

Page 1
Quick Reference Guide
Page 2
BOB™ LED QRG EN
About This
The BOB™ LED Quick Reference Guide (QRG) has basic product
Download the User Manual
from www.chauvetlighting.com for more deta i ls.
The information and specifications contained in this QRG are subject to
change without notice.
These Safety Notes include important information about installation, use,
and maintenance.
• The voltage of the outlet t o w hich you are connecting this product must
unplugging it.
Contact
Outside the U.S., United Kingdom, Ireland, Mexico, or Benelux contact
Visit
www.chauvetlighting.com for contact information.
What Is
Guide
information such as operation and mounting.
Disclaimer
Safety Notes
• This product is not intended for permanent installation.
• ONLY connect this product t o a grounded and prot ected circu it.
• Always disconnect from power before cleaning or replacing the f use.
• DO NOT look at the light source when the product is on.
• Make sure the power cord is not crimped or dama ged.
• Never disconnect this product from power by pulling on the cord.
• When mounting this product overhead, use a safet y cable.
• DO NOT allow flammable materials close to the unit while operating.
• DO NOT touch thi s product when it is operating because it may be hot.
be within the range stated on the decal or rear panel of the product.
• This product is for indoor use on ly! (IP20) To prevent ri sk of fire or
shock, do not expose this product to rain or moisture.
• Always mount this product in a l ocation with adequate ve ntil ation , a t
least 20 in (50 cm) from adjacent surfaces.
• Be sure that no ventilation slots on the unit’s housing are blocked.
• Never connect this prod uct to a dimmer or rheos tat.
• Replace the fuse with the same type and rating.
• ONLY use the hangi ng/mounti ng bra cket or t he handles to carry this
product.
• The maximum ambient temperature is 104 °F (40 °C ) . D o not operate
this product at higher tem p eratures.
• In the event of a serious operating problem, stop using immediately.
• DO NOT open this product. It conta ins no u ser-service able parts.
• To elim inat e unnecessary wear a nd improve it s l ifes pan, du r ing pe r iods
of non-use completely disconnect the product via breaker or by
your distributor to request support or return a product.
• BOB™ LED
Included
• H angi ng Chains
• Table /Floor Mounting Legs with
Connecting Hardware
2
• Warranty Card
• Quick Reference Guide
Page 3
BOB™ LED QRG EN
To Begin
Unpack your BOB™ LED and make sure you have received all parts in
the box or contents appear damaged, notify the carrier
immedia te ly, not Chauvet.
Product
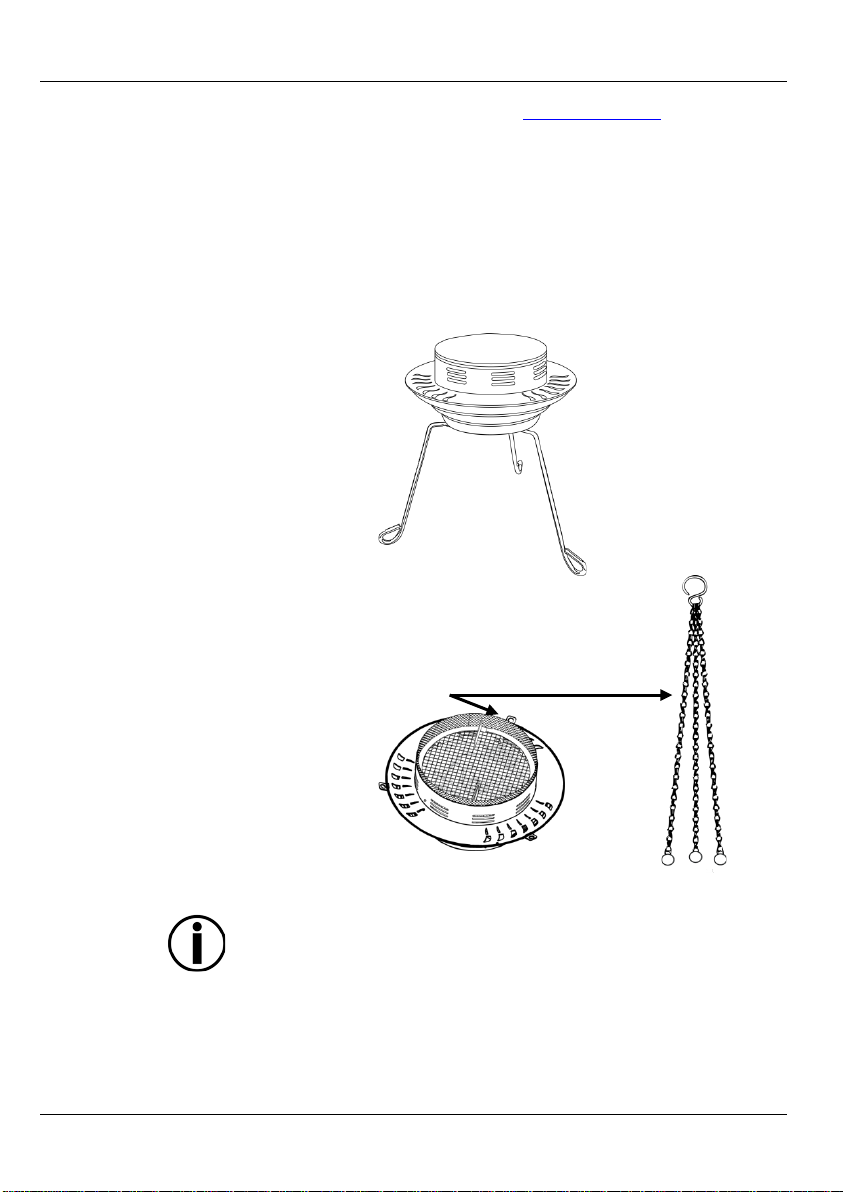
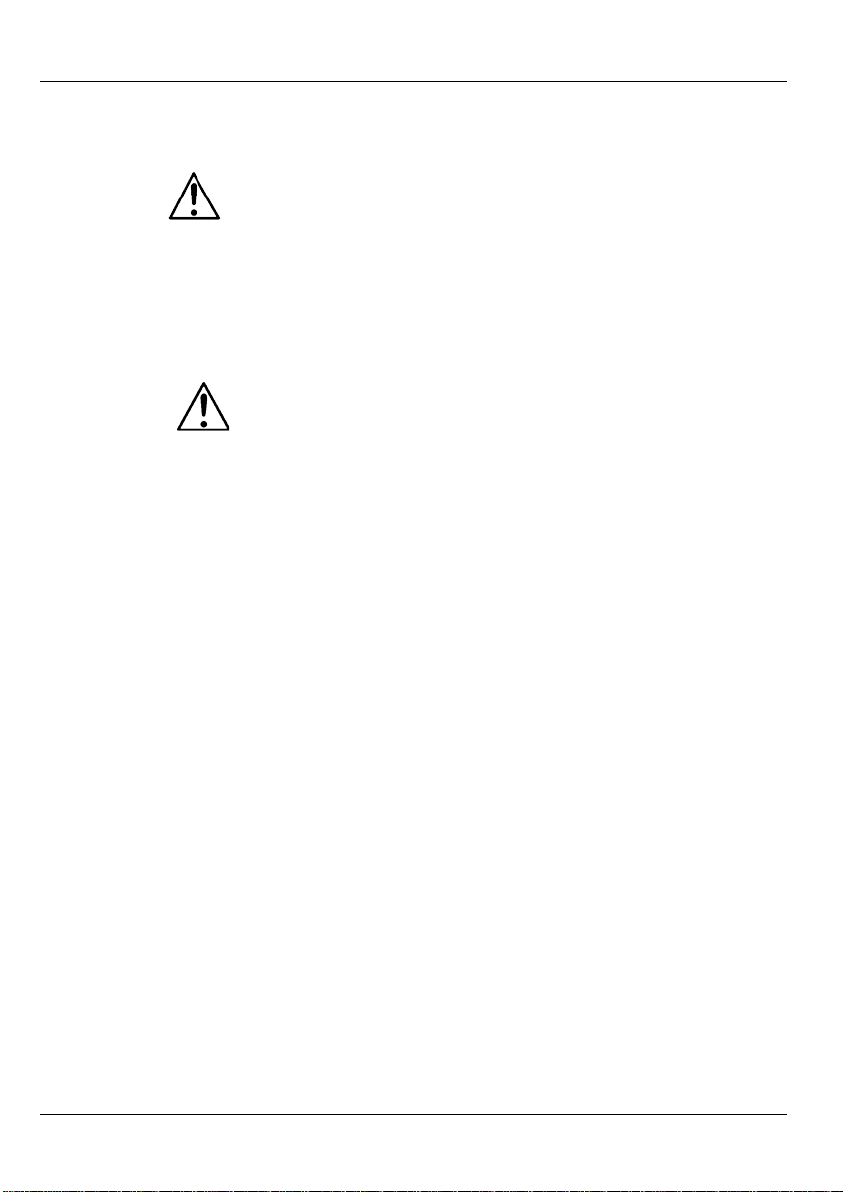
The BOB™ LED is a low-profile simulated flame effect light, but
cycle free fixture perfectly
ing cauldron. BOB™ LED can either stand on included
legs or ha ng from the included chains.
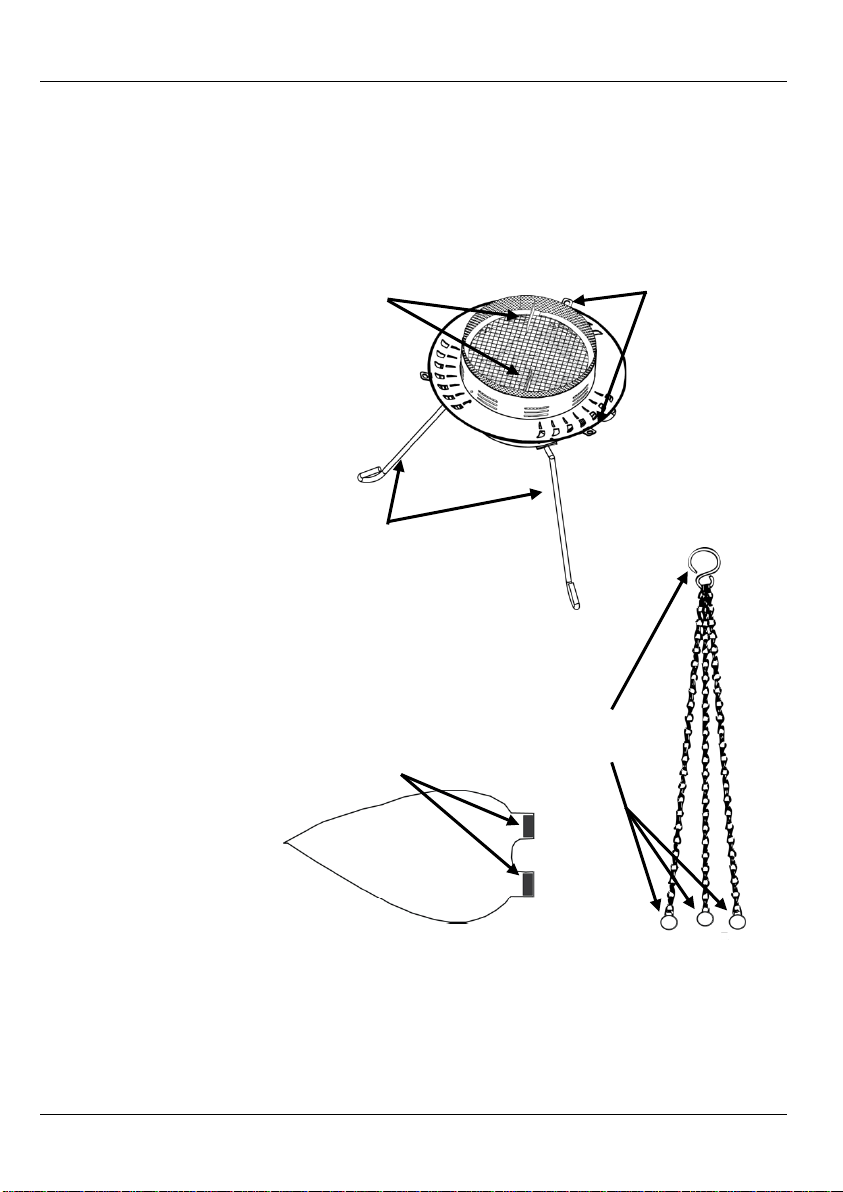
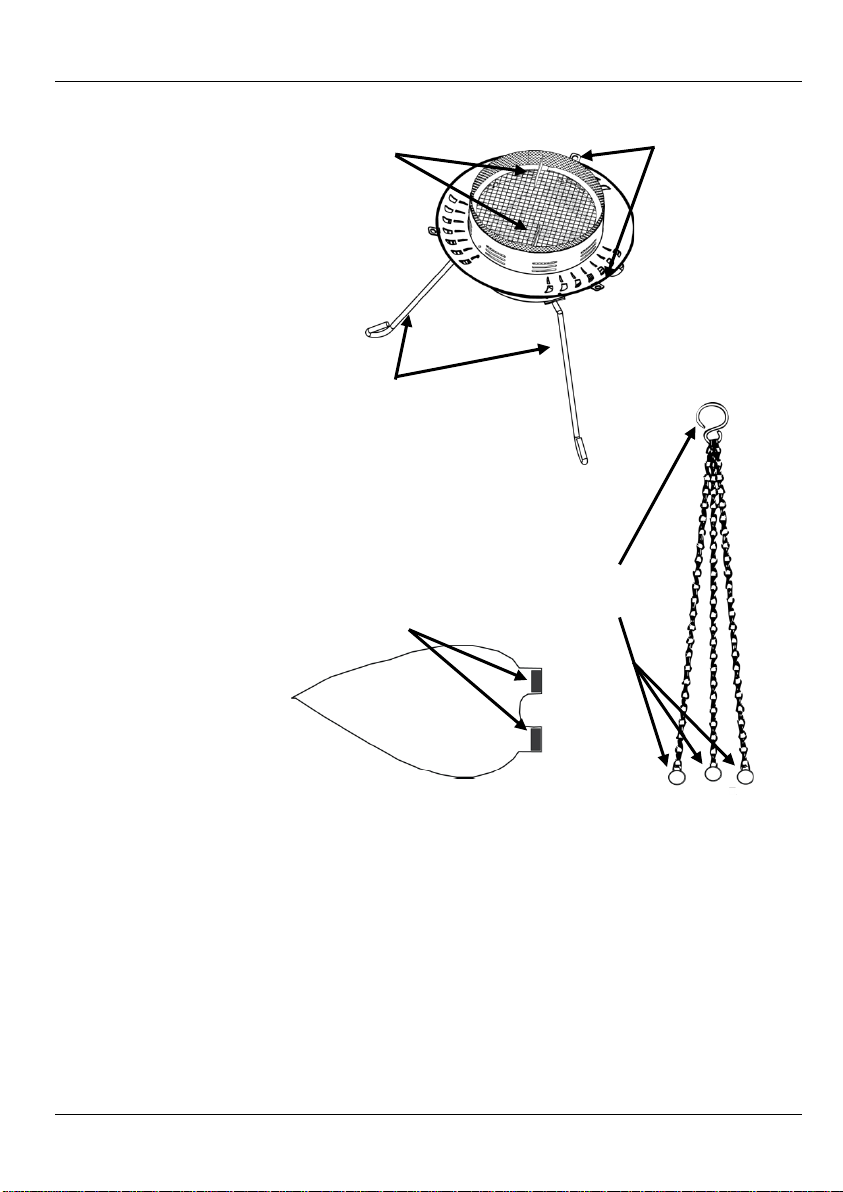
Silk Flame
Attachment
Flame Base
Hanging Chains
Magnetic
Strips
Chain
Holes x 3
Silk Flame
Plates x 2
Mounting
Legs x 3
Attachment
Loops
good condition. If
Description
Overview
generates no heat. This LED-powered, dutysimulates a flicker
Attachment
Attachment
3
Page 4
BOB™ LED QRG EN
AC Power
The BOB™ LED has a fixed power supply and it can work with an input
volt age of 120 VAC, 60 Hz or 230 VAC, 50Hz.
Fuse Replacement
Disconnect the product from power. 1.
Screw the fuse holder cap back in place and reconnect power. 5.
Operation
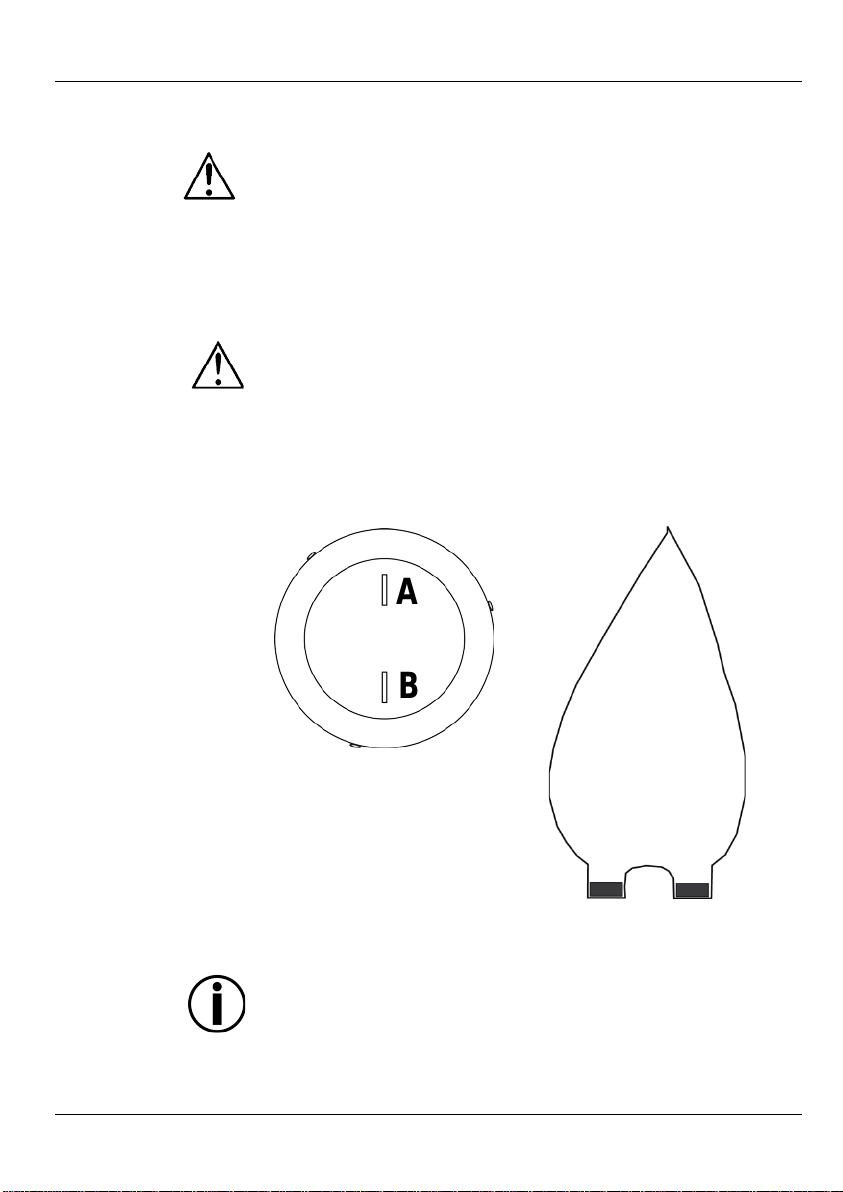
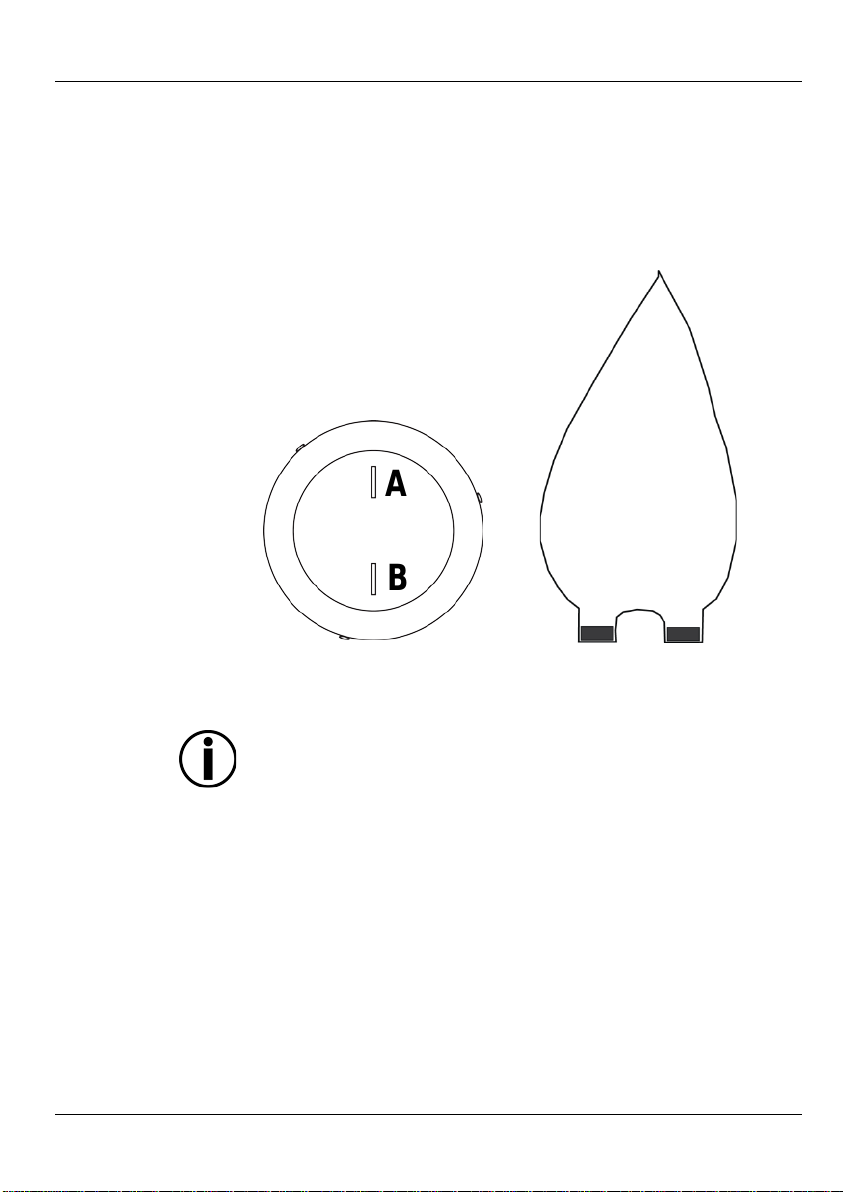
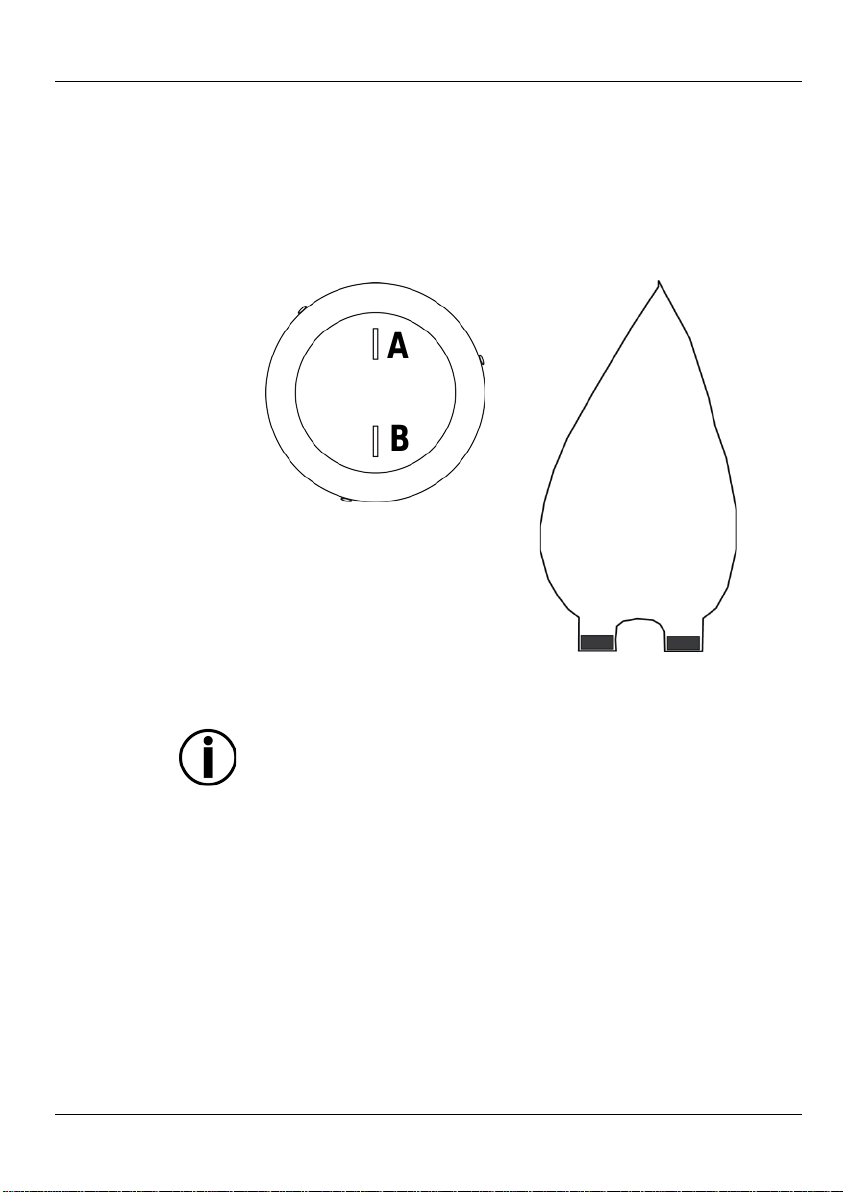
Silk Flame
etic strip on the simulated silk flame to a silk attachment
Be sure the silk is free from the air vents on the base, before powering
A A B
B
To eliminate un nec essary wear and impr ove its li f espan, duri ng peri ods
of non-use completely disconnect the product via breaker or by
unplugging it.
With a Phillip's head screwdriver, unscrew the fuse holder cap from 2.
the housing.
Remove the blown f use. 3.
Replace with a fuse of the same type and rating. 4.
Disconnect the product from the power outlet before replacing the fuse.
This product will stay on as long as it is plugged in. To use this product,
1. Attach the silk simulated flame attachment piece to the flame base.
2. Connect the product to a suitable power outlet.
Attach each magn
Attachment
plate on the base. Be careful not to damage the silk.
on or walking away.
4
Page 5

BOB™ LED QRG EN
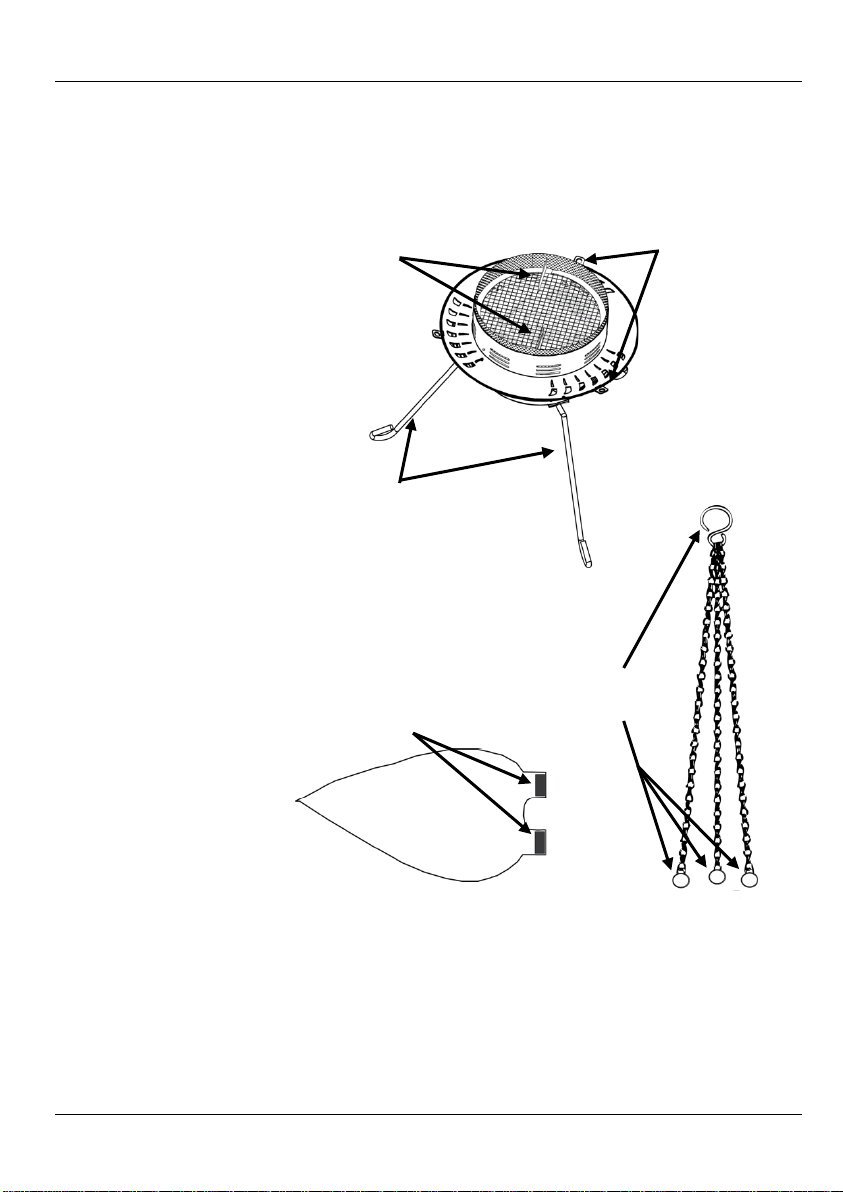
Mounting
Before mou nti ng this product, read the Safety Notes. The BOB™ LED may
that are provided with the fixture. Make sure there is adequate room for
ventilation w hen moun ting this product.
Rigging
Make sure that the structure onto which you are mounting the product
Diagram
Floor/Table
chain sections
be used with the chain sus pe nsi ons or wit h t he 3 table/floor mounting legs
•
can support the product’s weight. See the product 's U ser Manual for
weight information.
• Attach legs with included hardware, using a Phillip's screwdriver.
Attach legs one at a time.
Mounting
Mounting
Hanging
Mounting
Attach all 3
to holes on
base
3
Attach all 3
legs with
included
1
3
2
1
2
hardware
1
Be sur e the sil k flame is clear of t he chain whi le hangin g and durin g
operation.
2
3
5
Page 6
BOB™ LED GRR ES
Acerca de esta
La guía de referencia rápida (GRR) del BOB™ LED contiene información
para una información más
detallada.
Exención de
responsabilidad
La información y especificaciones contenidas en esta GRR están sujetas a
Notas de
seguridad
Estas notas de seguridad incluyen información impo rtante sobre el montaje,
Desconecte siempre de la alimentación antes de la limpieza o sustitución
NO toque este producto cuando esté en funcionamiento, pues podría estar
• La tensión del enchufe al que conecte este producto ha de estar en el
Monte siempre este producto en una ubicación con ventilación adecuada,
durante period os en que no se use.
guía
básica sobre el producto, como funci onamient o y montaje. Descargue el
manual de usuario de www.chauvetlighting.com
cambio sin pre vio aviso.
uso y mantenimiento.
• Este producto no está concebido para una instalación permanente.
• Conect e este producto S O LO a un cir cuito con toma de ti e rra y pr ot egid o.
•
del fusible.
• NO mire a la fuente de luz cuando el producto esté encendido.
• Asegúrese de que el cable de alimentaci ón no está retorcido ni
estropeado.
• Nunca desconecte este producto de la alimentación tirando del cable.
• Cuando mont e este producto en alto, use un cable de seguridad.
• NO permita la presencia de materiales inflamables cerca de la unidad
cuando esté en funcionamiento.
•
caliente.
rango est able cido en el graba do o en el p anel p osterior del producto.
• ¡Este producto es pa r a u so en interiores solamen te! (IP20) Par a evitar
rie sgos de ince ndio o descarga, n o exponga este produ cto a la ll uvia o la
humedad.
•
al menos a 20 in (50 cm) de superfic ie s adyacentes.
• Asegúrese de que ninguna ranura de ventilación en la carcasa de la
unidad queda bloqueada.
• Nunca conect e este producto a u n a tenuador o reost ato.
• Su s tituya el fusib le con u n o del mismo tipo y categoría.
• Use SO LAM ENTE los sop ortes de colga r/montar o las asas para mover
este producto.
• La temp eratura ambient e m áxima es de 10 4 ° F (40 °C). No haga
funcionar este producto a temperaturas más altas.
• En cas o de un pr oblema gr ave de funci onamiento, deje de usar lo
inmediatamente.
• NO abra e s te prod ucto. No contien e piezas repar ables por el usuario.
• Para evitar un desgaste innecesario y alargar su vida útil, desconecte
completament e el prod ucto media nte el interrupt or o desenchuf ándol o
6
Page 7

BOB™ LED GRR ES
Contacto
Fuera de EE. UU., Reino Un ido, Irl anda, Mé xico o Bene lux pónga se en
contacto con su distribuidor para solicitar asistencia o devolver un
producto. Visite www.chauvetlighting.com para información de contacto.
Qué va
Patas para montaje en mes a/ suelo
Para
Desembale su BOB™ LED y asegúrese de que ha recibido todas las partes
añados,
notifíqueselo inmediatamente al transportista, no a Chauvet.
Descripción
El BOB™ LED es un efecto de luz de perfil bajo que simula una llama,
pero no produce calor. Este dispositivo LED sin ciclo de trabajo emula a la
aldera llameante. El BOB™ LED se puede poner de pie
sobr e sus pies o colgarse con la cadena que va i n cluida .
incluido
empezar
del producto
• BOB™ LED
• Cadenas para col gar
•
con material
en buen estado. Si la caja o los componentes parecen d
perfección una c
• Tarjeta de garant ía
• Guía de referencia rápida
7
Page 8
BOB™ LED GRR ES
Accesorio de llama
de seda
Base de llama
Cadena para colgar
Bandas
magnéticas
Agujeros para
x 3
Placas de
x 2
Patas de
montaje x 3
Anillas de
acoplamiento
accesorio de
Vista general
llama de seda
fijar la cadena
8
Page 9
BOB™ LED GRR ES
Corriente
ja que puede funcionar
Sustitución del
Descon ecte el producto de la alimen tació n. 1.
nuevo la alimentación.
El BOB™ LED tiene una fuente de alimentación fi
alterna
con una tensión de entrada de 120 VCA, 60 Hz o 230 VCA, 50Hz.
Para evitar un desgaste innecesario y alargar su vida útil, desconecte
complet amente el pr oducto mediant e el interru ptor o desenc hufándolo
durante periodos en que no se use.
fusible
Con un destornillador de estrella, desatornille la tapa del portafusibles 2.
de la carcas a.
Quite el fusible fundido. 3.
Sus t i túyal o con un f usib le del m i smo tipo y cate goría. 4.
Vuelva a atornillar la tapa del portafusibles en su sitio y conecte de 5.
Descone cte el pr oducto del enchufe de aliment ación ante s de sustit uir el
fusible.
9
Page 10
BOB™ LED GRR ES
Funciona-
este
Accesor i o de llama
Acople cada banda magnética de la llama simulada de seda a una placa de
A
A B B
Este pr odu cto per mane cerá en cendid o mie ntra s e sté en chu fad o. Par a us ar
miento
producto:
1. Acople el accesorio de llama simulada de seda a la base de llama.
2. Conecte el producto a una toma de corriente adecuada.
de seda
acoplamiento de seda en la base. Tenga cuidado para no estropear la seda.
Asegúre se de que la sed a no o bstruye los c onduct os de ventilaci ón de la
base antes de encenderlo o de marcharse.
10
Page 11
BOB™ LED GRR ES
Montaje
Antes de montar este producto, lea las Notas de segu ri dad. El BOB™ LE D
mesa/suelo que vienen con el aparato. Asegúrese de que hay espacio
suficiente para la ventilación cuando monte el producto.
Instalación de
arejos
de montaje
Asegúrese de que la seda no obstruye los conductos de ventilación de la
Montaje en
mesa/suelo
para colgar
Acople las 3
se puede usar con las cadenas de su spensión o con las 3 pa tas d e mon taj e en
• Asegúrese de que estruc t ura en la que es tá mo ntando el pro ducto
ap
puede soportar su peso. Consulte el manual de usuario para ver
información sobre el peso.
• Acople las patas con el material incluido utilizando un destornillador
de estrella. Acople las patas de un a en una.
Diagrama
Montaje
1
secciones de
cadena a los
agujeros de la
base
3
2
1
Acople todas
las patas con
el material
3
2
incluido
1
3
2
base antes de encenderlo o de marcharse.
11
Page 12
BOB™ LED MR FR
A propos de ce
Le manuel de référence (MR) du BOB™ LED reprend des informations de
base sur cet appareil notamment en matière de fonctionnement et de
montage. Veuillez télécharger le manuel d'utilisation à partir du site
internet www.chauvetlighting.com pou r plus de dét ails.
Clause de non
Responsabilité
Les informations et caractéristiques contenues dans ce MR sont sujettes à
Consignes de
en
NE PAS laisser de produit inflammable à proximité de l'appareil lorsque
• La tension de la source d'énergie à laquelle est connecté cet appareil doit
! (IP20) Afin d'éviter
soulever cet appareil.
manuel
modification sans préavis.
Ces consignes de sécurité contiennent des informations importantes
Sécurité
matière d' in stalla tion, d 'utili s ation e t d'en tretien.
• Cet appareil n'est pas adapté pour une installation permanente.
• Cet appareil D O IT être re lié à un cir cuit mis à la terre et pr otégé.
• Toujou rs dé bran cher l'appareil de la source d'a limentation avant de le
nettoyer ou de re m place r son fus ible.
• NE PAS exposer directement les yeux à la source de lumière lorsque le
produit est allumé.
• Veillez à ce que le cordon d'alimentation ne soit jamais pincé ou
endommagé.
• Ne débranchez jamais cet appareil en tirant sur le cordon d'alimentation.
• En cas de montage de l'appareil en hauteur, veillez à toujours utiliser un
câbl e de sécurité.
•
celui-ci fon ctionne.
• NE PAS toucher au boîtier de l'appareil lorsqu'il est en fonctionnement,
celui-ci pouvant être très chaud.
être dans la plage indiquée sur l'étiq uet te ou sur le pann eau arrière de
l'appareil.
• Cet appareil doit uniquement êt re utilisé en int érieur
tout risque d' inc endie ou de décha rge électrique, veillez à n'exposer cet
appareil ni à la pluie ni à l'humidité.
• Insta llez touj ours cet appareil dans un endroi t bien ve ntilé à au moi ns
50 cm (20 po) des surfaces adjacentes.
• Assurez-vous qu'aucune fente de ventilation de l'appareil n'est obstruée.
• Ne connectez jamais cet appareil à un variateur ou un rhéostat.
• Lors du remplace me nt du fusible, utilis ez le même type et le même
ampérage.
• Ut ilisez EXCLUSIVEMENT le support de suspension/fixation pour
12
Page 13
BOB™ LED MR FR
La température ambiante maximale est de 40 °C (104 °F). Ne faites pas
débranchant ou en coupant le disjoncteur.
Nous
En dehors des États-Unis, du Royaume-Uni, de l'Irlande, du Mexique ou du
Benelux, contactez votre fournisseur si vous avez besoin d'assistance ou
le site internet
pour obtenir des informations pour nous
contacter.
Contenu
Préalable
Déballez votre BOB™ LED et assurez-vous qu e vous avez r eçu t outes les
contactez immédiatement le transporteur, et non pas Chauvet.
•
fonctionner cet appareil à des températures plus élevées.
• En cas de sérieux problèmes de fonctionnement, arrêtez l'appareil
immédiatement.
• NE P AS ou vrir cet appar eil. Il ne contient a ucune pi èce réparabl e pa r
l'utilisateur.
• Durant les périodes de non-utilisation, pour éviter tout usure inutile et
pour prolonger la durée de vie, éteignez complètement l'appareil en le
contacter
pour retourner un appareil. Veuillez consulter
www.chauvetlighting.com
• BOB™ LED
• Chaînes de suspension
• Pieds de montage sur table/sol
avec matériel de montage
pièces en bon état. Si la boîte et/ou son cont enu semble endommagés,
• Fiche de garantie
• Manuel de référenc e
13
Page 14
BOB™ LED MR FR
Description
Le BOB™ LED est une lumière compacte à effet simulant une flamme et
ne générant aucune chaleur. Cet accessoire à LED ne nécessite pas de
cycle de service et permet de simuler parfaitement un chaudron scintillant.
ieds ou suspendu avec la chaine
fournie.
Attache de la
flamme en soie
Porte-flamme
suspension
Bandes
magnétiques
Trous de
chaîne x 3
Plaques de
Pieds de
montag e x 3
Boucles
d'attache
de l'appareil
Le BOB™ LED peut être posé sur ses p
fixation de la
Vue d'ensemble
flamme en
soie x 2
fixation de la
Chaîne de
14
Page 15
BOB™ LED MR FR
Alimentation
Le BOB™ LED dispose d'une alimentation à tension fixe qui peut
Hz ou 230 VCA,
50Hz.
utilisation, pour éviter tout usure inutile et
Remplacement des
Débranchez l'appareil. 1.
rebranchez.
fonctionner avec une tension d'entrée de 120 VCA, 60
CA
Durant les péri odes de nonpour prol onger la durée de vie, éteigne z complètement l'appareil en le
débranchant ou en coupant le disjoncteur.
fusibles
Avec un tournevis cruciforme, dévissez le capuchon du porte-fusible 2.
du boîtier.
Retirez le fusible grillé. 3.
Remplacez-le par un fusible de même type. 4.
Reme ttez en place et visse z le capuch on du porte-fusible, puis 5.
Débranchez l'appareil de la prise de courant avant de changer le fusible.
15
Page 16
BOB™ LED MR FR
Utilisation
Fixations de la
A
A
B
B
Ce produit reste allumé du moment qu'il est branché. Pour utiliser cet appareil,
procédez comme suit :
1. Fixez la pièce accessoire de simulation de flamme en soie sur le porte-
flamme.
2. Branchez l'appareil sur une prise de courant appropriée.
Fixez chaque ban de magnétique de la fa usse flam me en soie sur une plaque de
flamme en soie
fixation de soie située sur la base. Faites attention à ne pas endommager la soie.
Assurez-vous que la soie ne gène pas les é ve nt s situ é s sur la b as e avant de
brancher l'appareil ou de vous éloigner.
16
Page 17

BOB™ LED MR FR
Montage
Avant de monter cet appareil, veuillez lire les consignes de sécurit é. Le
l'appare il , as surez-vous de laisser suffisamment de place pour l'aération.
Montage
nstallez l'appare il pe ut
Schéma de mo n
au sol / su r
table
suspension
BOB™ LED peut être ut ilisé avec l es chaî nes de sus pen sion ou a vec l es 3
pie ds de su pport au sol fourni s avec l e proj ecte ur. Lor s de l 'inst allat ion de
• Assurez-vous que la structure sur laquelle vous i
supporter le poids de l'appareil. Consultez le manu el de l'utilisateur de
l'appareil pour plus d'informations.
• Fixez les pieds avec le matériel fournis en utilisant un tournevis
tage
cruciforme. Fixer les pieds un par un.
Montage
Fixation
par
1
Fixez les 3
sections de
chaînes aux
trous situés
sur la base
3
Fixez les 3
pieds avec le
matériel
3
2
1
2
fournis
1
2
3
Assurez-vous que la soie ne gène pas les évents situés sur la base avant de
brancher l'appareil ou de vous éloigner.
17
Page 18

BOB™ LED SAL DE
Über diese
In der Schnellanleitung des BOB™ LED finden Sie die wesentlichen
Produktinformationen, wie etwa über den Betrieb und die Montage des
Geräts. Laden Sie für weiterführende Informationen unter
www.chauvetlighting.com das Benutzerhandbuch herunter.
Haftungs-
ausschluss
Die in dieser Anleitung aufgeführten Informationen und Spezifikationen
Diese Sicherheitshinweise enthalten wichtige Informationen über die
Montage, Verwendung und Wartung des Geräts.
NIEMALS in die Lichtquelle schauen, während das Gerät eingeschaltet
KEINE entflammbaren Materialien während des Betriebs in der Nähe des
heiß wird.
Hinweisschild oder dem rückwärtigen Bedienfeld des Geräts angegeben
Dieses Gerät darf nur im Innenbereich verwendet werden. (IP20) Um das
Installieren Sie das Gerät an einem Ort mit ausreichender Belüftung und
Die maximal zulässige Umgebungstemperatur beträgt 40 °C. Nehmen Sie
das Gerät nicht bei höheren Temperaturen in Betrieb.
Schnell-
anleitung
können ohne vorherige Ankündigung geändert werden.
Sicherheitshinweise
• Dieses Produkt eignet sich nicht für eine permanente Installation.
• S chli eßen Si e dies e s Produkt NU R an eine n mi t der E r de ver bundenen
und geschützten Stromkreis an.
• Tren nen Sie das Gerät von d er Stromquelle, bevor Si e es reinigen oder
die Si cherung auswechseln.
•
ist.
• Stellen Sie sicher, dass das N etzkabel nicht gequetscht oder beschäd igt
ist.
• Ziehe n Sie be im Trennen des Gerä ts von de r Str om vers orgun g nie am
Kabel.
• Bei Montage über Kopf immer ein Sicherungsseil verwenden.
•
Geräts lagern.
• NIEMALS während des Betriebs das Gehäuse berühren, da dies sehr
• Die Spannung der Schukosteckdose, an die Sie das Gerät anschließen,
muss sich innerhalb des Spannungsbereiches befinden, der auf dem
ist.
•
Risiko von B rän den oder elektris chen Schl ägen zu ve rmeid en, dürf en Sie
das Gerät nicht Regen oder Feuchtigkeit aussetzen.
•
mit einem Abstand von 50 cm zu den angrenzenden Flächen.
• Stellen Sie sicher, dass die Lüftungsöffnungen im Gehäuse des Geräts
nicht ver schlossen s ind.
• Schließen Sie dieses Gerät niemals an einen Dimmer oder
Regelwiderstand an.
• Achten Sie beim Auswechseln der Sicherung darauf, den gleichen Typ
mit den gleichen Werten zu verwenden.
• Das Ger ät NUR an den Hänge-/Befestigungsbügeln oder Griffen tragen.
•
18
Page 19

BOB™ LED SAL DE
Dieses Gerät NICHT öffnen. Die eingebauten Komponenten sind für den
Um unnötigen Verschleiß zu vermeiden und die Lebensdauer des Geräts
oder durch Herausziehen des Steckers aus der Steckdose.
Kontakt
Kunden außerhalb der USA, GB, Irland, Mexiko oder der Benelux-Staaten
wenden sich an ihren Lieferanten, um den Kundensupport in Anspruch zu
Sie u nter www.chauvetlighting.com.
Packungs-
• BOB™ LED
• Garantiekarte
Start
Packen Sie Ihren BOB™ LED aus und überprüfen Sie, ob Sie alle Teile
unbeschädigt erhalten haben. Wenn die Verpackung beschädigt ist,
benachrichtigen Sie umgehend das Transportunternehmen, nicht jedoch
Chauvet.
Produktbe-
Der BOB™ LED ist ein simulierter Flammeneffekt ohne
Wärmeentwicklung und in flacher Bauform. Dieses per LED betriebenes
Gerät kann im Dauerbetrieb betrieben werden uns simuliert eine
Beinen stehend oder an einer Kette hängend betrieben werden.
• Bei ernsth aften B etriebsproblemen stoppen Sie um gehend die
Verwendung des Geräts.
•
Kunden wartungsfrei.
•
zu verlängern, trennen Sie während längerer Perioden des
Nichtgebrauchs das Gerät vom Stromnetz – entweder per Trennschalter
nehmen oder ein Produkt zurückzuschicken. Kont aktinfor mati onen fi nden
inhalt
schreibung
• Ketten für eine hängende Montage
• Beine und Befestigungsmitt el für e ine
Aufstellung auf dem Ti sch/Boden
flackernde Feuerschale. Der BOB™ LED kann mit den beiliegenden
• Schnellanleitung
19
Page 20

BOB™ LED SAL DE
Seidenstoff
Flammenbasis
Magnetstreifen
3 x Bohrungen für
2 x Befestigungs-
3 Montagebeine
Befestigungsösen
Übersicht
platten für
flammenartig
gemusterten
Seidenstoff
Befestigung fü r
flammenartig
gemusterten
Kettenbefestigung
Kette für eine
hängende Montage
20
Page 21

BOB™ LED SAL DE
Wechselstrom
Der BOB™ LED verfügt über ein Netzteil für eine Eingangsspannung von
120 VAC, 60 Hz oder 230 VAC, 50 Hz .
zu verlängern, trennen Sie während längerer Perioden des
entweder per Tren nsch alter
Auswechseln der
Sicherung
Tre nnen Si e das Gerät vom Stromnet z. 1.
Schrauben Sie die Abdeckung der Sicherung wieder ein, und schließen
Sie d as Gerät w ieder an das Stromnet z an.
Um unnöt igen Ve r s chleiß zu v ermeiden und di e Lebens dauer des Geräts
Nichtgeb r au c hs das Ger ät vom Stromnetz –
oder durc h Her auszie hen des Steckers aus de r St e ckdose.
Mit einem Kreuzschlitzschraubendreher schrauben Sie die Abdeckung 2.
der Sicherung heraus .
Entfernen Sie die durchgebrannte Sicherung. 3.
Achten Sie beim Auswechseln der Sicherung darauf, den gleichen Typ 4.
mit den gleichen Werten zu verwenden.
5.
Trennen Sie das Gerät von der Stromquelle, bevor Sie die Sicherung
auswechseln.
21
Page 22

BOB™ LED SAL DE
Betrieb
Verwendung
Befestigen Sie die Befestigung für den flammenartig gemusterten
Befestigung für
flammenartig
gemusterten
Befestigen Sie jeden der Magnetstreifen am flammenartig gemusterten
Darauf
Sie sich vor dem Einschalten oder bevor Sie sich entfernen,
A
A B B
Dieses Gerät bleibt solan ge eingeschaltet, wie es an gesteckt ist.
dieses Geräts:
1.
Seidenstoff an der Flammenbasis.
2. Schließen Sie das Gerät an eine passende Wandsteckdose an.
Seidenstoff an einer Seidenstoff-Befestigungsplatte an der Basis.
achten, nicht den Seitenstof f zu bes chädigen.
Seidenstoff
Vergewissern
dass der Sei denstoff ni cht v or den Luftöffnungen an der Basis hängt.
22
Page 23

BOB™ LED SAL DE
Montage
Lesen Sie vor der Montage dieses Geräts in jedem Fall die
OB™ LED kann mit der Kette für eine
hängende Montage oder mit den 3 Beinen für das Aufstellen auf einem
Tisch/dem Boden verwendet werden; beide Befestigungselemente liegen
und
Entlüftung de s Raum e s gewäh rleis tet ist .
Hängende Montage
Montageansicht
Hängende
Befestigen Si e all e 3
Kettensegmente an
Sicherheitshinweise. Der B
bei. Vergewissern Sie sic h, dass bei der Mo n t age eine ausreichende B e-
• Stellen Si e sich e r, dass die Konstruktion, auf der S i e das Gerät
montieren, dessen Gewicht tragen kann. Informationen zum Gewicht
finden Si e in der B edien ungsanleitung.
• Befestigen Sie die Bein e mit den beiliegenden Befestigungsmitteln
und einem Schraubenz ie her. Befestigen Sie ein Bein nach dem
1
den Bohrungen an
der Basis
3
Befestigen Si e alle 3
Beine mit den
3
2
1
2
beiliegenden
Befestigungsmitteln.
1
anderen.
Aufstellung
auf dem
Boden/auf
einem Tisch
Montage
3
2
Vergewisser n Sie sich vor dem Einsch alten oder bevor Sie sich entf ernen,
dass der Seidenstoff ni cht v or de n Luftöffnungen an der Basi s hä ngt.
23
Page 24

BOB™ LED GRR PT
Sobre este
O Guia de Referência Rápida (GRR) do BOB™ LED possui informações
para obter
mais informa ções.
Exclusão de
As informações e especificações contidas neste GRR estão sujeitas a
Instruções de
segurança
Estas Instruções de Segurança incluem informações importantes sobre a
poderá estar quente.
produto em ambi entes c om temperaturas superiores.
guia
responsabilidade
básicas sobre os produtos, tal como o funcionamento e a montagem.
Transfira o Manual de Utilizador de www.chauvetlighting.com
alteração sem aviso prévio.
instalação, utilização e manutenção.
• Este produto não s e destina à instalação permanente .
• Li gue es te pr oduto APE N AS a um circui to protegi do e ligado à te r ra.
• Desligue-o sempre da aliment a ção antes da limpeza ou subs tituição do
fusível.
• NÃO olhe para a fonte de lu z quando o prod uto está liga do.
• Certifique-se de que o cabo de alime ntaç ão não está desgast ado nem
danificado.
• Nunca desligue este produto da alimentação ao puxar o cabo de
alimentação.
• Numa instalação suspensa deste produto, utilize sempre um cabo de
segurança.
• NÃO permita a presença de materiais inflamáveis junto da unidade
durante o seu funcionamento.
• NÃO toque neste produto aquando do funcionamento do mesmo, pois
• A tensão da tomada à qual irá ligar este produto deve estar no intervalo
indicad o no aut ocolan te ou pa inel p osterior d o produ to.
• Este produto destina -se apenas a ser utilizado no interior! (IP20) Para
evitar o ri sco de incên dio ou choque e léctrico, não exponha este produto
à chu va nem hu m idad e.
• Instale sempre este produto num local com ventilação adequada, a pelo
menos 50 cm (20 pol.) das superfícies adjacentes.
• Certifique-se de que não est ão obst ruídas quaisqu er ranhuras de
ventilação do corpo da unid ade.
• Nunca ligue este produto a um regulador da intensidade da luz nem a um
reóstato.
• Substitua o fusível por um do mesmo tipo e classificação.
• Trans porte este p roduto APENAS com as pegas ou suportes de
montagem/suspensão.
• A temperatura máxima ambiente é 40 °C (104 °F). Não utilize este
24
Page 25

BOB™ LED GRR PT
Contacto
Fora dos E.U.A., Reino Unido, Irlanda, México ou Benelux, entre em
ou de volver u m
para obter informações de
contacto.
Conteúdo
Para
Desembale o BOB™ LED e certi fique-se de que recebeu todas as peças
em boas condições. Se a caixa ou conteúdos aparentarem estar
dan ifica dos, notifique i m e diata m ente a trans portadora e não a Cha uvet.
Descrição do
O BOB™ LED é uma luz com efeitos de chama simulada de baixo perfil,
mas não produz calor. Este equipamento LED sem ciclo de funcionamento
simula de forma perfeita um conjunto de cintilações. O BOB™ LED pode
funcionar de forma autónoma em pernas incluídas ou suspenso de uma
corrente incluí da.
• Em caso de u m proble ma de funcionamento grave, pare a utilização
imediatamente.
• NÃ O abra e s te prod uto. Não contém quaisquer pe ças pas síve i s de
manutenção.
• Para eliminar desgaste desnecessário e aumentar a respectiva vida útil,
durante os períodos de não ut i liza ç ão deve desligar totalm ente o p rodut o
através de um disjuntor ou desconectando-o.
contacto com o seu distribuidor para solicitar assistência
produto. Aceda a www.chauvetlighting.com
começar
produto
• BOB™ LED
• Correntes de susp ens ão
• Pernas de montagem para
mesa /solo com eq uipam ento
• Cartão de garantia
• Guia de referência rápida
25
Page 26

BOB™ LED GRR PT
Alimentação
CA
O BOB™ LED possui uma fonte de alimentação fixa que pode funcionar
Base de chama
Corrente de
suspensão
Barras
magnéticas
Orifícios para
correntes x 3
Placas de
seda x 2
Pernas de
montagem x 3
Anéis de
fixação
fixação da
Descrição geral
Fixação de seda
fixação de
com uma tensão de entrada de 120 VCA, 60 Hz ou 230 VCA, 50Hz.
Para eliminar desgaste desnecessário e aumentar a respecti va vida úti l,
durant e os perí od os de não util izaçã o de ve deslig ar t otalment e o produ to
atra vé s de um disjuntor ou desconectando-o.
26
Page 27

BOB™ LED GRR PT
Substituição do
Des ligue o produ to da alimentação. 1.
alimentação.
ão antes de substituir o
Funcionamento
Para utilizar
Fixação de seda
Insta l e a bar r a mag n ét ic a na s ed a na b ase d e ch am a em sed a à p lac a d e fix a ção
A A B
B
fusível
Com uma chave de estrela Phillips, desaperte a tampa do suporte do 2.
fusível da estrutura.
Retire o fusível queimado. 3.
Substitua o fusível por um do mesmo tipo e classificação. 4.
Apar afus e a tampa do suporte do fusível no s ítio e volte a ligar a 5.
Desligue o produto da tomada de alimentaç
fusível.
Este produto permanece ligado sempre que está ligado à corrente.
este produto,
1. Instale a peça de fixação tipo seda à base de chama.
2. Ligue o produto a uma tomada de alimentação adequada.
de seda na base. Certifique-se de que não danifica a seda.
Certifique-se de que a seda não está próxima das ventilações na base
antes de desligar a alimentação ou se afastar.
27
Page 28

BOB™ LED GRR PT
Instalação
Antes de instalar este produto, leia as Instruções de segurança. O BOB™
se d e
compartimento possui uma ventilação adequada ao montar este
produto.
Suspensão
ale as pernas com o equipamento incluído utilizando uma chave de
Diagrama de
e
pernas com o
equipamento
Suporte de
montagem
Suporte de
/suspensão
LED pod e s er ut ili zad o com as sus pe nsõ es de corr ent e ou com a s 3 per nas
de montagem na mesa/piso fornecidas com o equipamento. Certifiqueque o
• Certifique-se de que a est r utur a na qual vai montar o pr oduto s uporta o
peso do mes m o. Consulte o Manual do Ut i l izad or do pr oduto para
obter mais informações sobre o pe so.
• Inst
fendas Phillips. Instale uma pe rna de cad a vez.
para a
mesa/solo
instalação
montagem
corrente nos
orifícios na base
1
Instale as 2
secções de
3
3
2
1
2
Instale as 3
incluído
1
3
2
Certifique-se de que a seda não est á próxima das ventilações na bas
antes de desligar a alimentação ou se afastar.
28
Page 29

BOB™ LED GR IT
Informazioni
sulla Guida
La Guida Rapida di BOB™ LED contiene informazioni di base sul
dettagli, scaricare il Manuale Utente dal sito www.chauvetlighting.com
Esclusione di
Le informazioni e le specifiche contenute in questa guida possono essere
Note di
Sicurezza
azioni importanti circa il montaggio,
Collegare questa unità SOLTANTO ad un circuito dotato di messa a terra
molto calda.
trovarsi entro il campo specificato sull'etichetta o sul pannello posteriore.
e ammessa: 40 °C (104 °F). Non utilizzare
In caso di gravi problemi di funzionamento sospendere immediatamente
dall'alimentazione con l'interruttore o scollegando il cavo.
prodotto quali montaggio, opzioni menù e valori DMX. Per maggiori
responsabilità
modificate senza preavviso.
Le Note di Sicurezza includono inform
l'uso e la manutenzione.
• Questa apparecchiatura non è progettata per installazione permanente.
•
e protetto.
• Prima di effet t uare l a pu l izia o s ostituir e il fu s ib ile, scolle ga r e se mpr e
l'un it à d all' a limentazione elettrica.
• NON guardare la sorgente luminosa quando l'unità è in funzione.
• Assicurar si che il cavo d i alim entazione non sia pi egat o o danneggia to.
• Non scoll egare m ai questa apparecchiatur a dall'alimentazione elettrica
tir ando il cavo.
• P er il m ontaggi o in alto dell'unità ut ilizz are SEMPRE un cavo di
sicurezza.
• NON collocare materiale infiammabile vicino all'unità mentre è in
funzione.
• NON toccare l'unità durante il funzionamento perché potrebbe essere
• La tensione della presa a muro cui si collega l'apparecchiatura deve
• Qu esta a pparecch iat ura deve essere utilizzat a soltanto in interni ( IP20) !
Per evitare il rischio d i i ncendio o di folgora z ione non es porr e
l'apparecchiatura alla pioggia o all'umidità.
• Montare sempre l'unità in posizione ben ventilata, ad almeno 50 cm.
(20") da qualsiasi superficie.
• Assicurarsi che nessuna apertura di ventilazione dell'unità sia ostruita.
• Non collegare mai ad un di m m er o ad un reostato
• Sostituir e il fu s ib ile con un altro dello stesso tipo e cla sse.
• Prendere e trasportare l'unità SOLTANTO dalla staffa per il montaggio
sospeso o dalle m aniglie.
• Massima temper atu ra ambient
l'un it à a te mper a ture su p eriori.
•
l'utilizzo.
• NON aprire l'unità. Non contiene parti riparabili dall'utente.
• Per evitare un consumo inutile ed aumentare la durata, durante i periodi
di non utilizzo disconnettere completamente il prodotto
29
Page 30

BOB™ LED GR IT
Contatti
Per richiedere assistenza o restituire l'apparecchiatura, al di fuori di Stati
locale. Per informazioni sui contatti, visitare il sito Web
www.chauvetlighting.com.
Che cosa è
• BOB™ LED
• Scheda di garanzia
Per iniziare
Disimballare BOB™ LED ed accertarsi di aver ricevuto tutti i componenti
tra spor tatore e non a Chauvet.
Descrizione
BOB™ LED è un effetto luce di basso profilo, che simula la fiamma e che
non genera calore. Questa unità a LED, che può funzionare
ininterrottamente, simula perfettamente un braciere. BOB™ LED può
con la catena anch'essa fornita .
Uniti, R egno Unito, Irlanda , Messico o B enelu x contatt are il dist ributor e
incluso
del prodotto
• Catene p e r montaggio s ospeso
• Gam be per m ontaggio a
pavimen to o su tavolo con
relativa ferramenta
integri. Se l'imballo appare danneggiato, farlo immediatamente presente al
esse re posi zionat o sul s upport o a gambe f ornit o oppure montat o sospes o
• Guida Rapida
30
Page 31

BOB™ LED GR IT
Base fiamma
Nastri
magnetici
Fori di
cate n a x 3
Silk Fiamma
Pia str e x 2
Gambe per montaggio a
pavimento o su tavola x 3
Anelli di
fissaggio
Vista d'ins ieme
Allegato
Pezza in seta
fissaggio
Catena per
montaggio sospeso
31
Page 32

BOB™ LED GR IT
Alimentazione
so che può funzionare
con una tensione d'ingresso di 120 V CA / 60 Hz oppure 230 V CA / 50Hz.
Per evitarne l'eccessiva usura e migliorarne la durata nel tempo,
scollegare l'unità dalla presa elettrica o disattivare l'alimentazione
Sostituzione
Scollegare l'alim e ntazione e lettric a d all' u n ità. 1.
Riavvitare il capp ellotto del po rtafusibil e e ricollegare l'alim e ntazione
elettrica.
Prima di sostituire il fusibile, scollegare l'unità dalla presa di
Questa apparecchiatura è dotata di alimentatore fis
CA
tramite l'apposito interruttore, se inutilizzata per lunghi periodi.
fusibile
Con un cacciavite Phillips, svitare il cappellotto del portafusibile 2.
dall'alloggiamento.
Rimuovere il fusibile bruciato e 3.
sostituirlo con un altro dello stesso tipo e amperaggio. 4.
5.
alimentazione.
32
Page 33

BOB™ LED GR IT
Funzionamento
Per
Pezza in seta
na collocata alla
Prima di collegare l'unità alla presa di alimentazione, o di allontanarsi,
A A B
B
L'unità rimane accesa finché collegata alla presa di alimentazione.
utilizzarla:
1. fissare la pezza di seta che simula lafiamma alla base dell'unità.
2. Collegare l'unità ad una presa di corrente adeguata.
Fissare ogni nastro magne tico sulla pezza in seta alla piastri
base dell'unità. Fare attenzione a non danneggiare la seta.
assicurarsi che la pezza in seta non rimanga incastrata nelle prese d'aria.
33
Page 34

BOB™ LED GR IT
Montaggio
Prima di montare l'unità, leggere le Note di Si curezza . È possibile utilizzare
si
che vi sia sufficiente spazio per la ventilazione.
Traliccio
Prima di collegare l'unità alla presa di alimentazione, o di allontanarsi,
Montaggio
il BOB™ LED s ospes o con la ca tena o con le 3 gamb e per montaggio a
pavimen to o su tavol o, forni te con l'un ita. Durant e il monta ggio, assicurar
• Assi curarsi che l a st rutt ura sull a quale viene m on t ata l'unità sia in
grado di s opport arne il peso. Per maggiori inf ormazioni ve dere i l
Manuale utente dell'unità.
• Fiss are le ga m b e con la fe rramenta for n ita, utilizzan do un giravite
Phillip. Fissare una gamba alla volta.
Montaggio a
pavimento/su
tavolo
Schema
di montaggio
sospeso
Fissare le tre
sezioni di catena
ai fori sulla base
1
3
Fissare tutte le tre
gambe con la
ferramenta fornita
3
2
1
2
1
2
3
assicurarsi che la pezza in seta non rimanga incastrata nelle prese d'aria
34
Page 35

BOB™ LED QRG PL
Informacje
dotyczące
instrukcji
Instrukcja obsługi (QRG) dotycząca urządzenia BOB™ LED zawiera
gi na stronie
www.chauvetlighting.com.
Informacje i specyfikacje zawarte w niniejszym dokumencie (QRG)
podlegają zmianie bez powiadomienia.
Wskazówki
dotyczące
• Napięcie, do jakiego podłączane jest urządzenie musi odpowiadać temu,
wszystkie istotne informacje, m.in. instrukcję montażu. Szczegółowe
informacje znajdują się w instrukcji obsłu
Oświadczenie
Informacje dotyczące bezpieczeństwa zawierają ważne informacje
bezpieczeństwa
związane z instalacją, użytkowaniem oraz konserwacją.
• Produkt nie jest przeznaczony do instalowania na stałe.
• Produkt można podłączyć TYLKO do uziemionego oraz
zabezpieczonego źródła prądu.
• Zawsze należy odłączyć zasilanie przed przystąpieniem do czyszczenia
lub wymiany bezpiecznika.
• NIE należy patrzeć na źródło światła, gdy produkt jest włączony.
• Należy upewnić się, czy kabel zasilający nie jest zagięty lub uszkodzony.
• Nigdy nie można wyłączać urządzenia poprzez wyciągnięcie przewodu z
gniazdka.
• Należy użyć kabla bezpieczeństwa przy montażu produktu na górze.
• NIE należy pozostawiać materiału łatwopalnego w pobliżu urządzenia
podczas gdy jest włączone.
• NIE należy dotykać urządzenia w czasie jego pracy, ponieważ może być
gorące.
które zostało określone na naklejce lub tylnej części produktu.
• Produkt może być używany jedynie w pomieszczeniach! (IP20) Aby
uniknąć ryzyka wystąpienia pożaru lub zwarcia, urządzenia nie należy
wystawiać na działanie deszczu lub wilgoci.
• Produkt należy zawsze instalować w miejscu z odpowiednią wentylacją
przynajmniej 50 cm od przyległych do niego powierzchni.
• Należy upewnić się, że kratki wentylacyjne na obudowie urządzenia nie
są zablokowane.
• Nigdy nie należy podłączać urządzenia do ściemniacza lub
potencjometru.
• Bezpiecznik, który jest wymieniany musi być takiego samego typu oraz
wartości.
• Do przenoszenia produktu należy użyć JEDYNIE uchwytu montażowego
lub uchwytów do jego przenoszenia.
• Maksymalna temperatura otoczenia to 40° C. Nie należy używać
produktu w wyższych temperaturach.
35
Page 36

BOB™ LED QRG PL
uktu. Urządzenie nie zawiera części, które mogą
urządzenia.
Kontakt
Poza Stanami Zjednoczonymi, Zjednoczonym Królestwem, Irlandią,
Meksykiem oraz krajami Beneluksu w celu uzyskania pomocy lub zwrotu
ju.
www.chauvetlighting.com.
Co wchodzi
w skład
Przed
Należy rozpakować urządzenie BOB™ LED oraz upewnić się, że
Chauvet.
Opis
BOB™ LED jest niskoprofilowym urządzeniem symulującym efekt
podwieszonej zwisając na dołączonym do zestawu łańcuchu.
• W przypadku poważnych problemów z obsługą należy natychmiast
zaprzestać jego dalszego użytkowania.
• NIE należy otwierać prod
być serwisowane przez użytkownika.
• Podczas, kiedy urządzenie jest nieużywane należy odłączyć je od źródła
zasilania poprzez wyłączenie bezpiecznika lub wyciągnięcia wtyczki z
gniazda, co wyeliminuje niepotrzebne zużycie i przedłuży żywotność
produktu należy skontaktować się z dystrybutorem na terenie danego kra
W celu uzyskania informacji proszę odwiedzić naszą stronę internetową
zestawu
montażem
produktu
• BOB™ LED
• Łańcuchy do podwieszania
• Nogi do ustawianie na
stole/podłożu wraz z osprzętem.
wszystkie znajdujące się w opakowaniu części są w dobrym stanie. W
przypadku, gdy opakowanie lub jego zawartość noszą ślady uszkodzenia,
należy natychmiast poinformować o tym fakcie dostawcę, a nie firmę
płomienia bez emisji ciepła. Urządzenie wyposażone jest w diody LED i
idealnie symuluje efekt palącego się znicza oraz nie posiada ograniczenia
cykli pracy. BOB™ LED może pracować stojąc na nóżkach lub w pozycji
• Karta gwarancyjna
• Instrukcja obsługi
36
Page 37

BOB™ LED QRG PL
Zasilanie
Urządzenie BOB™ LED posiada transformator i może pracować przy
napięciu wejściowym wynoszącym 120 V, 60 Hz lub 230 V, 50Hz.
cia wtyczki z
Materiał imitujący
płomień
Podstawa
Łańcuch do
podwieszania
Paski
magnetyczne
Otwory do
łańcucha x 3
Płytki do
Nóżki
x 3
Zaczepy do
montażu
montażu
Opis produktu
jedwabnego
materiału
imitującego efekt
płomienia x 2
montażowe
zaczepienia
Podczas kiedy urządzenie jest nieużywane należy odłączyć je od źródła
zasilania poprzez wyłączenie bezpiecznika lub wyciągnię
gniazda, co wyeliminuje niepotrzebne zużycie i przedłuży żywotność
urządzenia.
37
Page 38

BOB™ LED QRG PL
Wymiana
Odłączyć produkt od zasilania. 1.
Bezpiecznik, który jest wymieniany musi być takiego samego typu oraz
Ponownie przykręcić pokrywę bezpiecznika oraz podłączyć zasilanie. 5.
Praca
Materiał imitujący
Należy upewnić się, że materiał nie znajduje się na wylotach powietrza
A A B
B
bezpiecznika
urządzenia
płomień
Przy pomocy wkrętaka krzyżakowego należy odkręcić pokrywę 2.
bezpiecznika znajdującą się na obudowie.
Usunąć przepalony bezpiecznik. 3.
4.
wartości.
Przed przystąpieniem do wymiany bezpiecznika należy odłączyć
urządzenie od zasilania.
Urządzenie pozostaje włączone tak długo, jak długo jest podłączone do sieci.
W celu użycia urządzenia należy:
1. Przymocować materiał imitujący płomień do podstawy.
2. Podłączyć urządzenie do odpowiedniego napięcia.
Każdy z pasków magnetycznych znajdujących się na materiale musi zostać
przyczepiony do płytki znajdującej się w podstawie. Należy uważać, żeby nie
uszkodzi ć materiału.
znajdujących się na podstawie przed włączeniem urządzenia lub
pozostawieniem go w trybie pracy.
38
Page 39

BOB™ LED QRG PL
Montaż
Przed zamontowaniem produktu należy zapoznać się ze Wskazówkami
zy
miejsca, aby zapewnić odpowiednią wentylację.
Montaż
Przy pomocy wkrętaka krzyżakowego należy przykręcić dołączone do
montażowy
Podwieszanie
łańcucha należy umieścić
w otworach znajdujących
Bezpieczeństwa. Urządzenie BOB™ LED może zostać podwieszone pr
użyciu łańcucha lub ustawione na trzech nóżkach, które stanowią część
zestawu. Należy upewnić się, że w pomieszczeniu jest wystarczająco dużo
• Należy upewnić się, że miejsce, w którym zamierzamy zamontować
urządzenie wytrzyma jego wagę. W celu uzyskania szczegółowych
informacji dotyczą cych wagi, proszę zapoznać się z instrukcją obsługi
konkretnego urządzenia.
•
urządzenia nóżki montażowe. Nóżki należy przykręcać po kolei.
Montaż na
stole/podłożu
Rysunek
Wszystkie 3 końcówki
się w podstawie
1
3
3
2
1
2
Wszystkie 3
nóżki należy
przykręcić
używając
dołączonych
elementów
montażowych
1
3
2
Należy upewnić się, że materiał nie znajduje się na wylotach powietrza
znajdujących się na podstawie przed włączeniem urządzenia lub
pozostawieniem go w try bie pracy.
39
Page 40

BOB™ LED BH NL
Over deze
De beknopte handleiding (BH) van BOB™ LED bevat basisinformatie
gebruikershandleiding op www.chauvetlighting.com voor meer informatie.
De informatie en specificaties in deze BH kunnen zonder voorafgaande
ken nisge ving worde n gewijz igd.
Deze veiligheidsinstructies bevatten belangrijke informatie over de
insta llatie, het gebruik en het onde rhoud.
heet zi jn.
Vervang de zekering met een van hetzelfde type en met dezelfde waarde.
De maximale omgevingstemperatuur bedraagt 40 °C. Gebruik dit product
niet bij hogere temp eraturen.
handleiding
Disclaimer
Veiligheidsinstructies
over het product, zoals verbinding en montage. Download de
• Di t p roduct is niet bedoe ld voor permanente install at ie.
• S luit dit product U ITSLUITEND op een geaard en bevei ligd
stroomcircuit.
• Haal voor het verva ngen van de ze keri ng alti jd de stekker van he t product
uit het stopcontact.
• K IJK NIET in de lichtbron wanneer het apparaat is ingeschakeld.
• Zorg ervoor dat het stroomsnoe r nie t knikt of bes chadi gd.
• Koppel dit product nooit los van het stopc ontact door aan het snoer te
trekken.
• Gebruik een veiligheidskabel wanneer het product boven lichaamshoogte
word t gemon teerd.
• GEEN brandbare materialen in de buurt van de unit tijdens gebruik.
• RAAK het product NIET AAN wanneer het in werking omdat het dan
• De spanning van het stopcontact waarop u dit product aansluit moet
binnen het vermelde b e reik op de sticker of acht erkant van he t produ ct
zijn.
• Het product is alleen voor gebruik binnenshuis! (IP20) Om risico op
brand of el ektrisch e schok ken te voorkome n, mag dit product niet a an
regen of voch t worden blootgest eld.
• Monteer dit product altijd op een ple k met voldoe n d e ventilatie, minsten s
20 inch (50 cm) van de aangrenzende oppervlakken.
• Zorg ervoor dat er geen ventilatie-openingen van de behuizing van het
product worden geblokkeerd.
• S luit dit product nooit aan op ee n dimmer of een re gelweerstand.
•
• Gebruik UITSLUITEND de ophang-/montagebeugel of de hendels om
dit product te dragen.
•
40
Page 41

BOB™ LED BH NL
Contact
Van buiten de VS, Verenigd Koninkrijk, Ierland, Mexico of Benelux kunt u
ondersteuning vragen dan wel
voor
contactinformatie.
Wat is
Om te
Pak uw BOB™ LED ui t en zorg ervoor dat u alle onderdelen in goede
staat hebt ontvangen. Als de doos of inhoud beschadigd lijkt, stel dan de
vervoerder on m iddellijk op de hoogte, niet C hauve t.
Product-
De BOB™ LED is een lage effectlamp met het effect van een
gevoede
onderhoudsvrije armatuur simuleert een perfecte flikkerende ketel. De
ngen aan een
meegelev erde ketting .
• S top in het geva l van er nstige oper ation ele proble m en onmi ddellijk met
het gebr uik.
• Open het prod uct NIET. Het bevat geen te on der houden onderdele n.
• Om onnodige slijtage te elimineren en zijn levensduur te verlengen,
gedurende perioden wanneer het product niet wordt gebruikt, moet u het
product afsluiten door een aardlekschakelaar om te zetten of door het te
ontkoppelen
conta ct opn emen met de distr ibut eur of om
het product retourneren. Ga naar www.chauvetlighting.com
inbegrepen
beginnen
beschrijving
• BOB™ LED
• Hangketens
• P oten die met middel en aan de
tafel/vloer te bevestigen zijn
gesimuleerde vlam, maar genereert geen warmte. Deze LED-
BOB™ LED kan staan om de meegeleverde poten of ha
• Garantiekaart
• Beknopte handleiding
41
Page 42

BOB™ LED BH NL
Bevestiging van d e
zijden vlam
Vlamonderstel
Hangketting
Magnetische
stroken
Bevestigingsga
Bevestigingspl
zijden vlam x 2
Montagepoten x 3
Bevestiging
slussen
aten van de
Overzicht
ten van de
ketting x 3
42
Page 43

BOB™ LED BH NL
AC-stroom
De BOB™ LED heeft een voeding met vaste spanning en kan werken met
een ingangsspanning van 120 V wisselstroom, 50/60 Hz of 230 V
wisselstroom, 50 Hz.
het product afsluit en door een aardlekschakelaar om te zett en of door
Vervangen van de
Ontkoppel het appara at van de stroom. 1.
Schroef de kap van de zekeringhouder terug en steek de stekker er weer
in.
Om onnodige slijtage te elimineren en zijn levensduur te verlengen,
gedurende perioden wanneer het pr oduct niet wordt gebrui kt, moet u
het te ontkoppelen.
zekering
Gebruik een kruiskopschroevendraaier en schroef de kap van de 2.
zekeringshouder los van de behuizing.
Ver w i jder d e doorgebra nde zekering. 3.
Vervangen met een zekering van hetzelfde type en met dezelfde 4.
waarde.
5.
Ontkoppel het product van het stopcontact voordat u de zekering
vervangt.
43
Page 44

BOB™ LED BH NL
Werking
Bevestiging van de
Bevestig elke magnetische strook op de gesimuleerde zijden vlam aan een
A
A
B
B
Dit pr oduct blij ft net zol ang a an al s het i s a angesl oten. Voor gebruik va n dit
product;
1. Bevesti g de zijden gesi muleerde vlambe ve st iging aan het vlamond ers t el .
2. Sluit het product aan op een geschikt stopcontact.
zijden vlam
zijden beves t igingspla at op het onderstel. Wees voorzichtig op de zijdestof niet
te beschadigen.
Contr oleer of de zijde vrij is van de venti latie gaten op het on derstel , nog
voordat u het inschakelt of wegloopt.
44
Page 45

BOB™ LED BH NL
Montage
Lees voor montage va n dit prod uct d e Veiligheidsvoorschriften. De BOB™
LED kan worden gebruikt met de ophangkettingen of met de 3
bij monta ge van di t produc t vold oende ruimt e is voor vent i latie.
Opbouw
gewicht van het product kan dragen. Zie de gebruikershandleiding van
Bevestig de poten met de meegeleverde middelen door middel van een
Montagediagram
Bevestig alle 3
meegeleverde
Hangende
kettingdelen aan
taf el/vloer steunvoe tjes di e bij de ar matuur zij n geleve rd. Contr oleer of e r
• Controleer of de constructie waar u het product op monteert het
het produc t voor infor m atie over he t gewicht.
•
kruiskopschroevendraaier. Be vestig de pot en een vo or een.
Plaatsing
op de
vloer/tafel
montage
1
2
Bevestig alle 3
de gaten op het
onderstel
1
2
3
poten met de
middelen.
1
2 3 3
Contr oleer of de zijde vrij is van de vent il atieg aten op het onderst el, nog
voordat u het inschakelt of wegloopt.
45
Page 46

BOB™ LED QRG RU
О данном
Краткое руководство (QRG) по BOB™ LED содержит базовую
www.chauvetlighting.com.
Правовая
оговорка
Замечания по
безопасности
• Это устройство не предназначено для стационарного монтажа.
• Напряжение розетки, к которой подключается это устройство,
руководстве
информацию об устройстве, включая вопросы эксплуатации и
монтажа. Загрузите Руководство пользователя на сайте
Информация и спецификации, приведенные в этом руководстве, могут
меняться без уведомления.
Настоящие Замечания по безопасности содержат важную
информацию о монтаже, эксплуатации и техническом обслуживании.
• Подключать это устройство можно ТОЛЬКО к заземленному и
защищенному контуру.
• Всегда отключайте устройство от питания перед очисткой или
заменой предохранителя.
• НЕ смотрите на источник света, когда устройство включено.
• Убедитесь, что провод электропитания не перегнут и не поврежден.
• Не отключайте это изделие от питания за шнур питания.
• При монтаже этого устройства сверху пользуйтесь
предохранительным тросом.
• НЕ допускайте размещения рядом с устройством
воспламеняющихся материалов.
• НЕ прикасайтесь к корпусу устройства во время его работы,
поскольку он нагревается.
должно находиться в диапазоне, указанном на наклейке на задней
панели устройства.
• Данное устройство предназначено только для использования в
помещениях (IP 20)! Чтобы уменьшить риск возгорания и
поражения электрическим током, не подвергайте устройство
воздействию дождя или влаги.
• Монтаж устройства должен выполняться только при наличии
достаточной вентиляции на расстоянии не менее 20 дюймов (50 см)
от соседних поверхностей.
• Убедитесь, что на корпусе устройства нет заблокированных
отверстий.
• Никогда не подключайте это устройство к регулятору яркости или
реостату.
• Заменяйте предохранитель на устройство того же типа и номинала.
• Для перемещения этого устройства пользуйтесь ТОЛЬКО
подвесным/монтажным кронштейном или ручками.
• Максимальная температура окружающей среды составляет 104° F
(40° C). Не допускайте работы этого устройства при высокой
температуре.
46
Page 47

BOB™ LED QRG RU
Контакт
За пределами США, Великобритании, Ирландии, Мексики и стран
приведена на сайте www.chauvetlighting.com.
Комплект
Начало
Распакуйте устройство BOB™ LED и проверьте исправное
этом не Chauvet, а перевозчику.
Описание
BOB™ LED – это низкопрофильный спецэффект пламени, не
комплект поставки цепи.
• В случае серьезного нарушения в работе устройства немедленно
прекратите его использование.
• НЕ открывайте это устройство. Оно не содержит деталей,
обслуживаемых пользователем.
• Во избежание ненужного износа и для продления срока службы,
неиспользуемое устройство следует полностью отключить с
помощью выключателя или путем извлечения вилки из розетки.
Бенилюкса по вопросам поддержки или возврата устройства
обращайтесь к своему дистрибьютору. Контактная информация
поставки
работы
устройства
• BOB™ LED
• Подвесная цепь
• Ножки для монтажа на
столе/пол у с крепежом
состояние всех полученных деталей. Если коробка или ее
содержимое имеют признаки повреждения, немедленно сообщите об
выделяющий тепла. Это светодиодное устройство без нагрузочного
цикла идеально создает эффект мерцающей факельной чаши.
Устройство BOB™ LED может либо устанавливаться на включенные
в комплект поставки ножки, либо подвешиваться с включенной в
• Гарантийная карта
• Краткое руководство
47
Page 48

BOB™ LED QRG RU
Крепеж шелкового
пламени
Магнитные
карты
Отверстия
цепи x 3
Пластины
пламени x 2
Монтажные
ножки x 3
Крепежные
петли
Обзор
крепления
шелкового
для
крепления
Основание
спецэффекта
пламени
Подвесная цепь
48
Page 49

BOB™ LED QRG RU
Питание
переменного
Устройство BOB™ LED имеет фиксированное напряжение питания и
может работать с входным напряжением 120 В пер. т, 60 Гц или 230 В
Замена
Отключите устройство от питания. 1.
Ввинтите держатель предохранителя и снова подключите питание 5.
Работа
тока
пер. т, 50 Гц.
Во избежание ненужного износа и для продления срока службы
неиспользуемое устройство следует полностью отключить с
помощью выключателя или путем извлечения вилки из розетки.
предохранителя
С помощью крестовой отвертки Phillips выверните крышку 2.
держателя предохранителя из корпуса.
Снимите перегоревший предохранитель. 3.
Замените его на предохранитель того же типа и номинала. 4.
Перед заменой предохранителя отключите устройство от питания.
Это устройство останется включенным до тех пор, пока оно будет
подключено. Для использования этого устройства:
1. Подсоедините крепежный элемент шелкового пламени к основанию
спецэффекта.
2. Подключите устройство к подходящей розетке питания.
49
Page 50

BOB™ LED QRG RU
Крепеж
шелкового
A A B
B
Присоедините каждую магнитную ленту на шелковом пламени к
крепежной пластине на основании. Соблюдайте осторожность, чтобы не
пламени
повредить шелк.
Перед включением питания или оставлением устройства убедитесь,
что шелковая ткань не имеет отверстий для воздуха в основании.
50
Page 51

BOB™ LED QRG RU
Монтаж
Перед монтажом этого устройства прочитайте Замечания по
наличии достаточного пространства для вентиляции.
Крепление
бедитесь,
Присоедините
полу/столу
Подвесной
безопасности. BOB™ LED может использоваться вместе с цепными
подвесками или 3 ножками для монтажа к столу/полу, поставляемыми
вместе с устройством. При монтаже этого устройства убедитесь в
• Убедитесь, что конструкция, на которую устанавливается
устройство, может выдерживать его массу. См. информацию о
массе в руководстве пользователя устройства.
• Присоедините ножки с помощью включенного в комплект
поставки крепежа и крестовой отвертки Phillips. Присоединяйте
ножки по очереди, одну за другой.
Крепеж к
Схема монтажа
устройства
монтаж
1
Прикрепите
все 3 секции
цепи в
отверстиях
основания
3
все 3 ножки с
помощью
прилагаемого
3
2
1
2
крепежа
1
2
3
Перед включением питания или оставлением устройства у
что шелковая ткань не имеет отверстий для воздуха в основании.
51
Page 52

BOB™ LED QRG Multi-Language
Contact
WORLD HEADQUARTERS - Chauvet
General Inform at ion
Technical Support
www.chauvetlighting.com
UNITE D KINGD OM AND IREL AN D - C hauvet Europe Ltd.
General Inform at ion
Fax: +44 (0)1773 5 11110
Technical Support
MEXICO - Chauvet Mexic o
General Inform at ion
Voice: +52 (728) 285 -5000
Technical Support
CHAUVET EUROPE - Chauvet Europe BVBA
General Inform at ion
Voice: +32 9 388 93 97
Technical Support
www.chauvetlighting.eu
Outsid e th e U.S., U ni ted K ing dom, Ir eland , Mexico, or Benelux, contact the dealer
our website for contact details.
Us
Address:520 0 NW 108th Av en ue
Sunrise, FL 33351
Voice: (954) 577-4455
Fax: (954) 929-5560
Toll free:(8 00) 762-1084
Voice: (954) 577-4455 (Press 4)
Fax: (954) 756-8015
Email: tech@chauvetlighting.com
World Wide Web
Address:Unit 1C
Brookhill Road Industrial Estate
Pinxton, Nottingham, UK
NG16 6NT
Voice: +44 (0)1773 5 11115
Address:Av. S anta Ana 30
Parque Indu st rial Lerma
Lerma, Mexico C.P. 520 00
Address: S t okst raat 18
9770 Kruishoutem
Belgium
Email: uktech@chauvetlighting.com
World Wide Web
www.chauvetlighting.co.uk
Email: servicio@chauvet.com.mx
World Wide Web www.chauvet.com.mx
Email: Eutech@chauvetlighting.eu
World Wide Web
of r ec ord . Follow their ins tructions to requ est supp ort or to r eturn a pr oduct. Vis it
BOB™ LED QRG Rev. 1 ML9
© Copyright 2015 Chauvet
All rights reserved.
Printed in the P. R. C.
52
 Loading...