

Chauvet Geyser P7 Quick Reference Manual

Quick Reference Guide
1
EN
QUICK REFERENCE GUIDE
Geyser P7 QRG Rev. 1
About This Guide
The Geyser P7 Quick Reference Guide (QRG) has basic product information such as menu options. Download the User
Manual from
www.chauvetdj.com for more details.
Disclaimer
The information and specifications contained in this QRG are subject to change without notice.
Safety Notes
These Safety Notes include important information about installation, use, and maintenance.
Contact
Outside the U.S., United Kingdom, Ireland, Mexico, or Benelux, contact your distributor to request support or return a
product. Visit www.chauvetdj.com for contact information.
What is Included
• Geyser P7
• Power Cord
• Geyser Wireless Remote Control and Receiver
• Warranty Card
• Quick Reference Guide
To Begin
Unpack your Geyser P7 and make sure you have received all parts in good condition. If the box or contents appear
damaged, notify the carrier immediately, not Chauvet.
• This product is not intended for permanent installation.
• ONLY connect this product to a grounded and protected circuit.
• Always disconnect from power before cleaning or replacing the fuse.
• Make sure the power cord is not crimped or damaged.
• Never disconnect this product from power by pulling on the cord.
• When mounting this product overhead, ALWAYS use a safety cable.
• DO NOT touch this product when it is operating because it may be hot.
• Do not set this product on a flammable surface (linoleum, carpet, wood, paper, carton, plastic, etc.).
• Do not touch the output nozzle on this product. It is very hot during operation and it may remain
hot for several hours after turning the unit off.
• Depending on the amount of fog generated, all fog machines may set off smoke detectors.
• The voltage of the outlet to which you are connecting this product must be within the range stated
on the decal or rear panel of the product.
• This product is for indoor use only! (IP20) To prevent risk of fire or shock, do not expose this
product to rain or moisture.
• Always mount this product in a location with adequate ventilation, at least 20 in (50 cm) from
adjacent surfaces.
• Be sure that no ventilation slots on the unit’s housing are blocked.
• Never connect this product to a dimmer or rheostat.
• Replace the fuse with one of the same type and rating.
• ONLY use the carry handle to carry this product.
• The maximum ambient temperature is 104 °F (40 °C). Do not operate this product at higher
temperatures.
• In the event of a serious operating problem, stop using immediately.
• DO NOT open this product. It contains no user-serviceable parts.
• Do not use for space heating purposes.
• Use only CHAUVET water-based fog fluid.
• Drain the tank before transporting or storing the product.
• To eliminate unnecessary wear and improve its lifespan, during periods of non-use completely
disconnect the product from power via the breaker or by unplugging it.

EN
2
Geyser P7 QRG Rev. 1
QUICK REFERENCE GUIDE
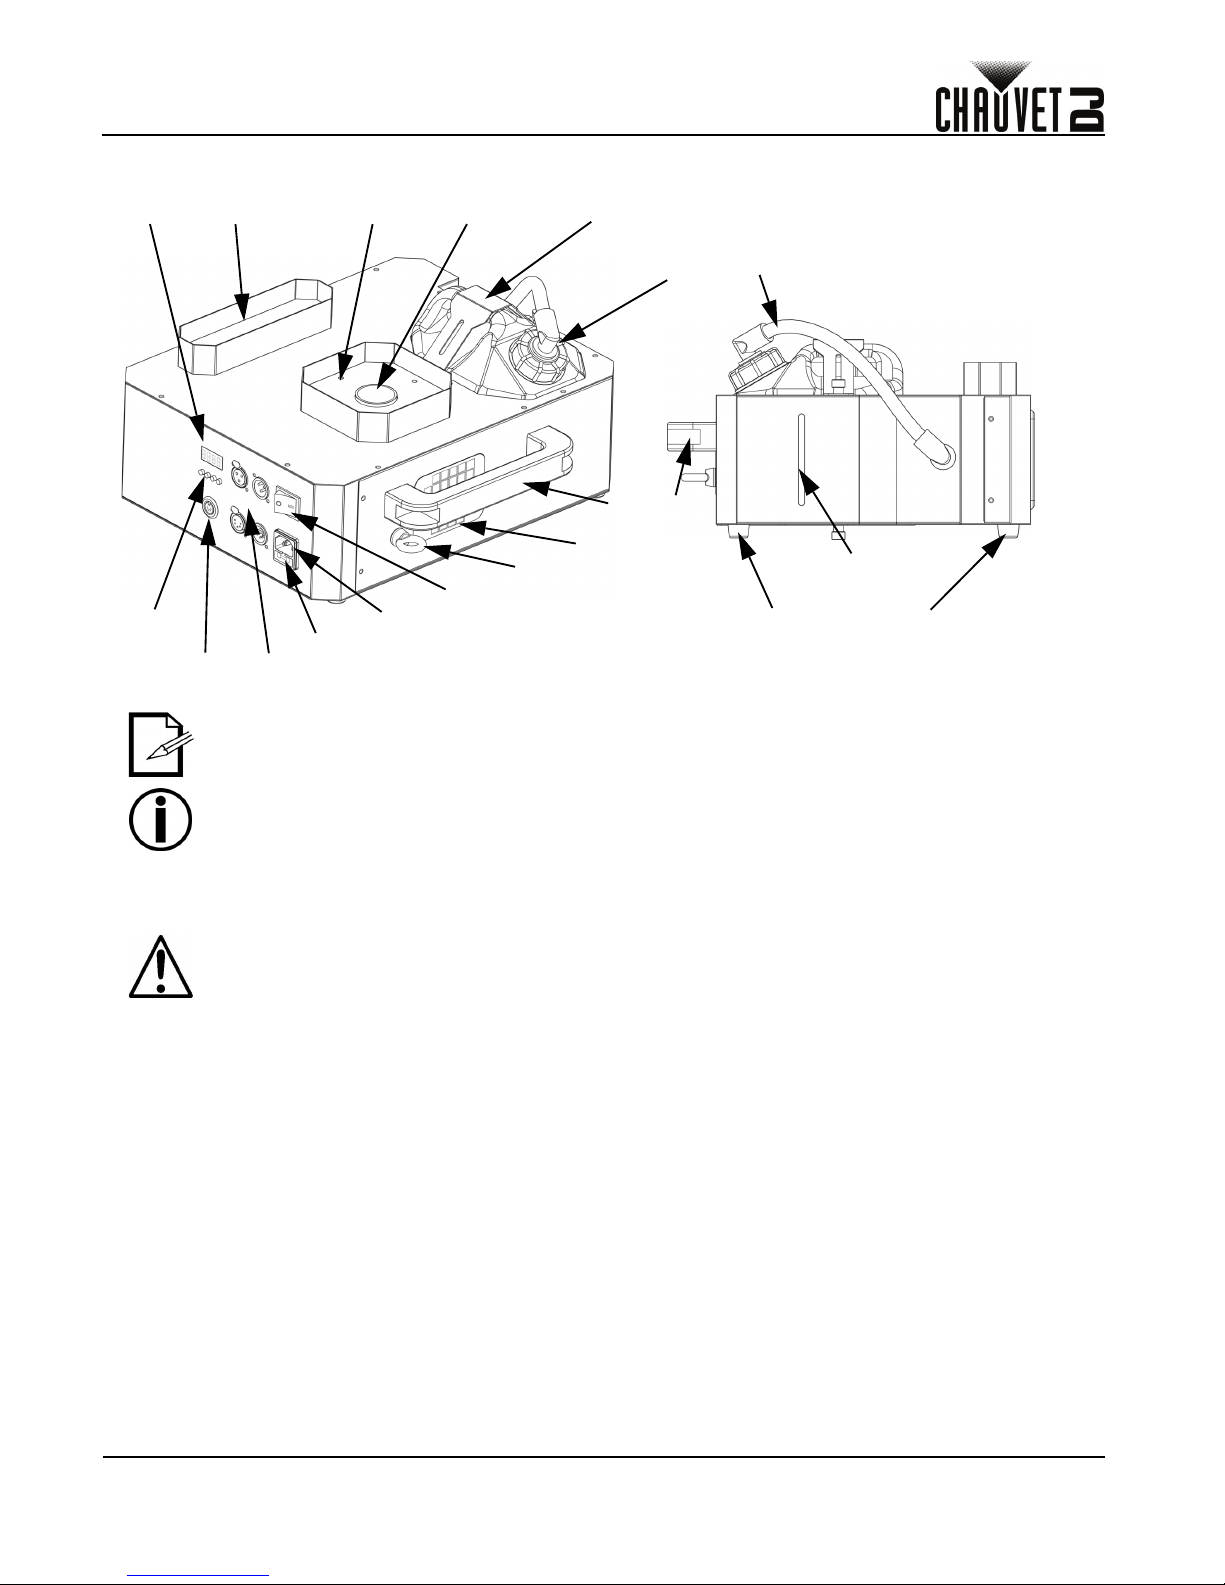
Product Overview
AC Power
This product has a fixed voltage power supply and it can work with an input voltage of either 120 VAC, 60 Hz or 230 VAC,
50 Hz, depending on the specific model.
Fuse Replacement
1. Disconnect the product from power.
2. Wedge the tip of a flat-head screwdriver into the slot of the fuse holder.
3. Pry the safety cap out of the housing.
4. Remove the blown fuse from the clip on the front of the safety cap and replace with a fuse of the exact same
type and rating.
5. Re-insert the fuse holder and reconnect power.
FCQ (Fog Cleaner Quart) was specifically developed by Chauvet to clean your Geyser P7. Make
sure you use FCQ regularly, no longer than 90 days between cleanings, to increase the life of
your product.
While operating the Geyser P7, make sure there is adequate fog fluid in the machine to prevent
pump and heater damage. When the fog fluid level becomes low, simply add more fog fluid to
continue using the Geyser P7.
To eliminate wear and improve its lifespan, during periods of non-use completely disconnect the
product from power via breaker or by unplugging it.
Power
In
Fuse
Holder
LED
Display
Penta-color LEDs
Fan
Controller
In
Carry
Handle
Fluid Tank
Fluid
Level
Indicator
Menu
Buttons
Nozzle
Rubber Feet for
Surface Mounting
(x4)
Power
Switch
Safety
Loop
DMX In/Out
(3- and 5-pin)
Zone 1Zone 2 Removable Shield
3
EN
QUICK REFERENCE GUIDE
Geyser P7 QRG Rev. 1
Mounting
Before mounting this product, read the Safety Notes. Use at least 2 mounting points per product.
Inverting the Tank
To prevent leaking or spilling, always position the fluid tank with its cap in the uppermost position, above the fog fluid line.
When mounting the Geyser P7 overhead, invert the fluid tank by doing the following:
1. Detach the removable shield by removing the thumb-screw.
2. Pull the fluid tank out and set it on a flat surface.
3. Detach the fluid tank plate by removing 4 screws.
4. Secure the fluid tank plate to the opposite side with the 4 screws.
5. Insert the fluid tank.
6. Secure the removable shield by inserting the end without the thumbscrew into the slot, and screwing in the
thumbscrew.
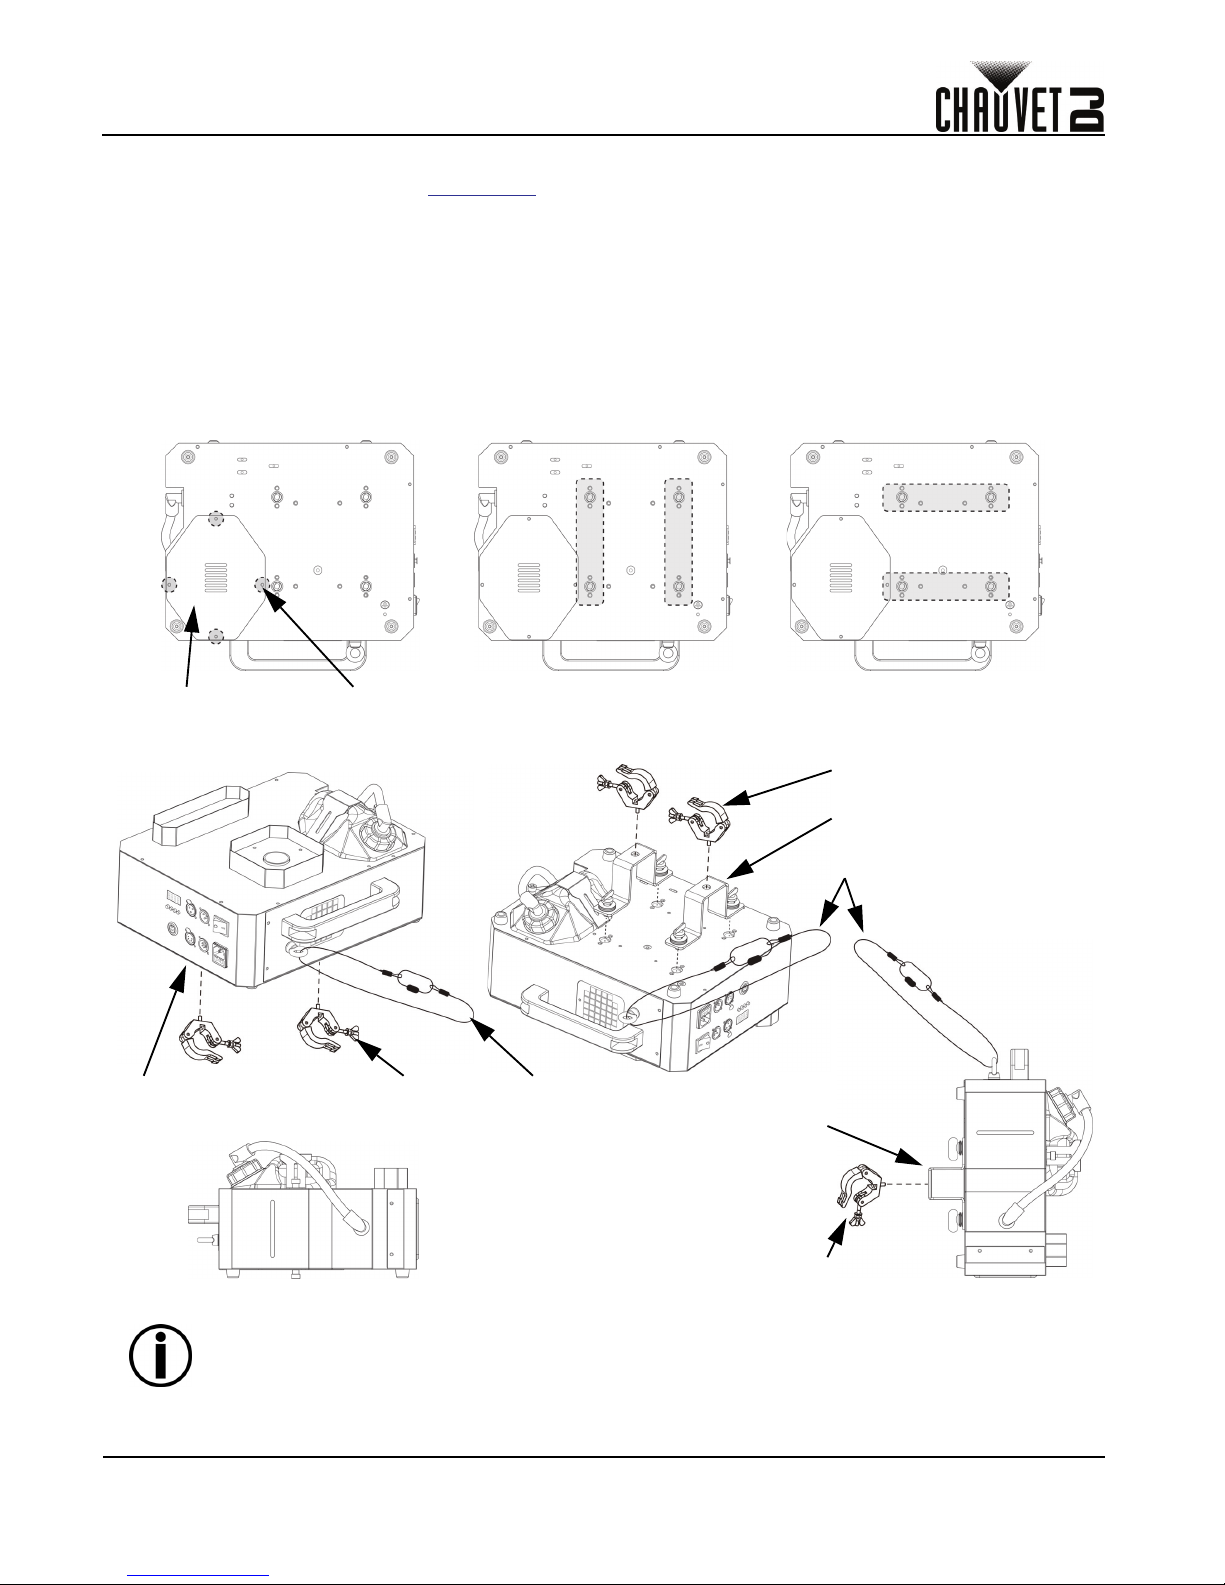
Mounting Diagram
To prevent leaking or spilling, always position the fluid tank with its cap in the uppermost
position, above the fog fluid line.
Fluid Tank Plate Screws (x4)
Omega Bracket Placement Options
Omega Bracket (x2) Safety Cable
Safety Cable
Mounting Clamp (x2)
Upwards Fog Output Downwards Fog Output
Horizontal Fog Output
Omega Bracket (x2)
Omega Bracket (x2)
Mounting Clamp (x2)
Mounting Clamp (x2)
Surface Mounting
EN
4
Geyser P7 QRG Rev. 1
QUICK REFERENCE GUIDE
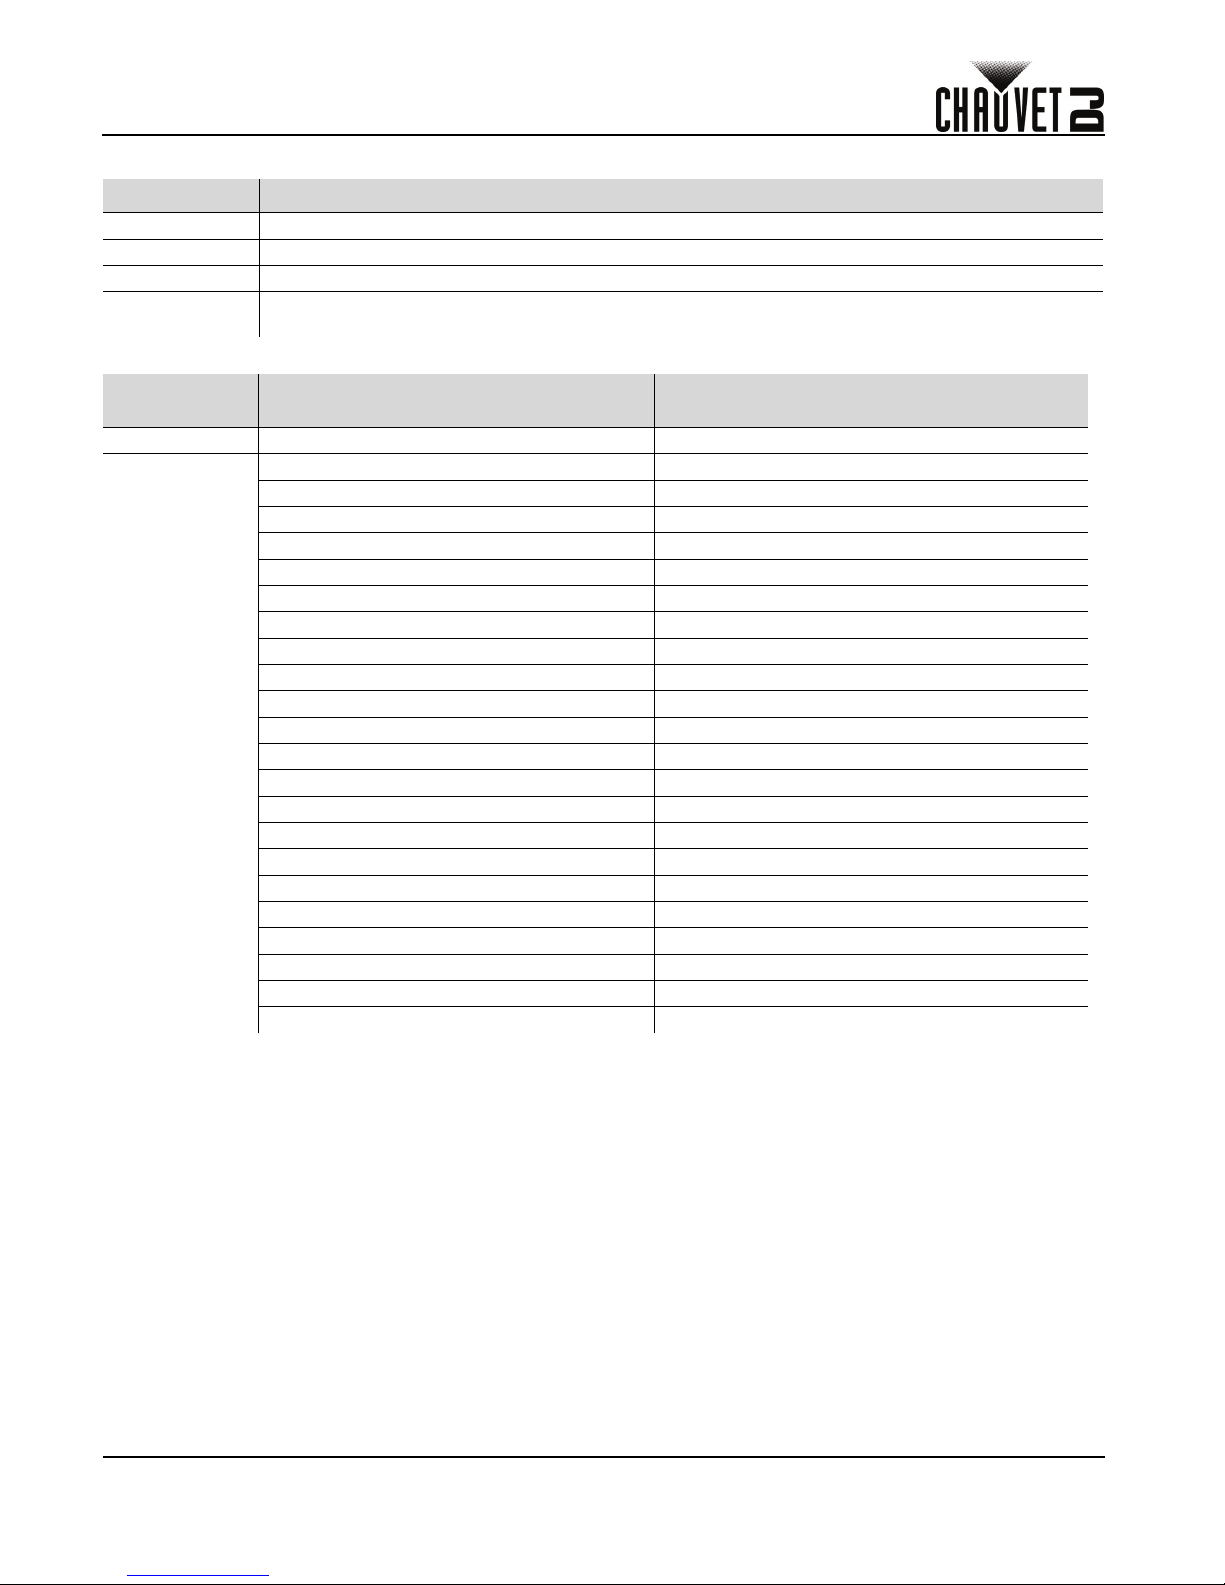
Control Panel Description
Menu Map
Wireless Remote Control
To trigger fog output and activate the color program using the wireless remote control, do the following:
1. Plug the wireless receiver into the Controller In port on the side of the Geyser P7.
2. Program the color choice for each button on the remote (<1>–<4>), using the CH-1–4 menu options on the
Geyser P7.
3. On the wireless transmitter, press the button assigned to the desired color program (<1>–<4>). The Geyser P7
emits fog and outputs color for as long as the button is held down.
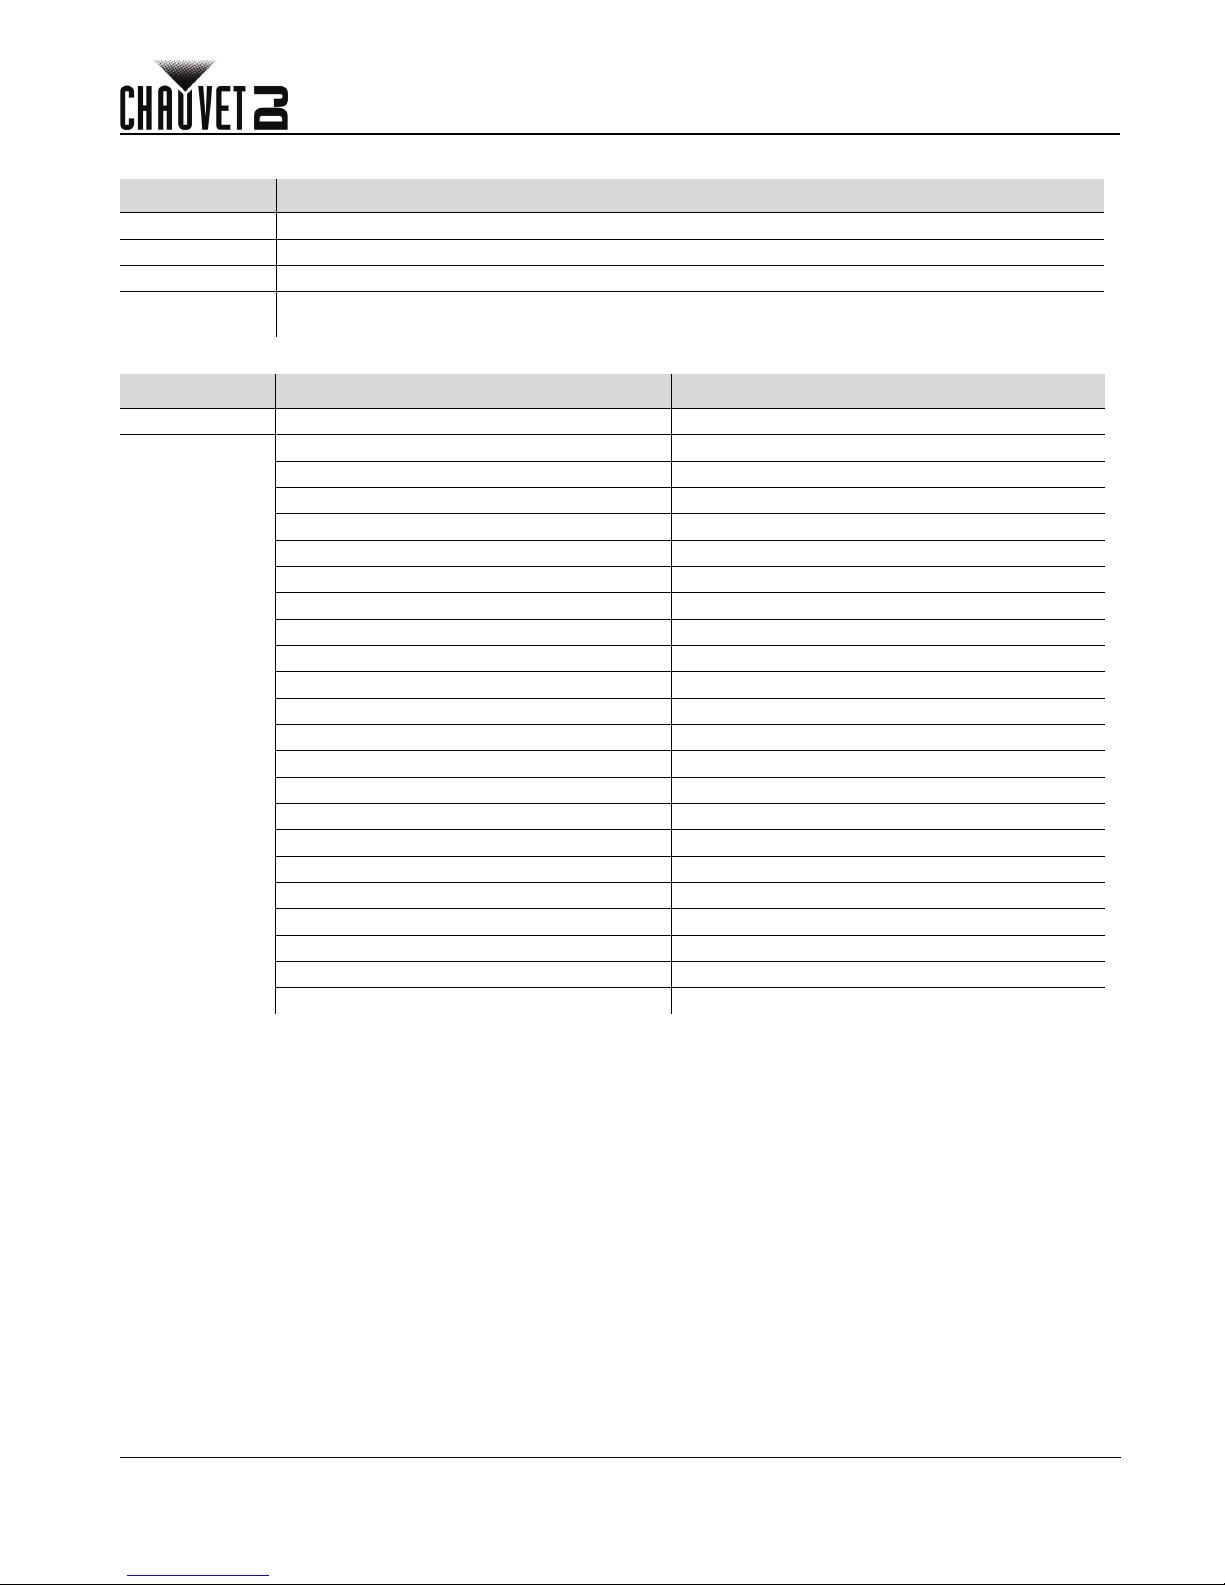
BUTTON FUNCTION
<MENU> Exits from the current menu or function
<UP> Navigates upwards through the menu list and increases the numeric value when in a function
<DOWN> Navigates downwards through the menu list and decreases the numeric value when in a function
<ENTER>
Enables the currently displayed menu or sets the currently selected value into the selected
function
MAIN LEVEL PROGRAMMING LEVELS DESCRIPTION
Addr 1–512 Sets the DMX starting address
CH-1–4
oFF No color output
Co 1 Red
Co 2 Green
Co 3 Blue
Co 4 Amber
Co 5 Ultraviolet
Co 6 Hot pink
Co 7 Magenta
Co 8 Yellow
Co 9 Cyan
Co10 White
Co11 Zone 1 green, zone 2 red
Co12 Zone 1 blue, zone 2 red
Co13 Zone 1 red, zone 2 green
Co14 Zone 1 blue, zone 2 green
Co15 Zone 1 red, zone 2 blue
Co16 Zone 1 green, zone 2 blue
Co17 Zone 1 amber, zone 2 magenta
Co18 Zone 1 blue, zone 2 magenta
Co19 Zone 1 magenta, zone 2 amber
Co20 Zone 1 hot pink, zone 2 blue
rand Random color output
5
EN
QUICK REFERENCE GUIDE
Geyser P7 QRG Rev. 1
DMX Linking
The Geyser P7 can work with a DMX controller. Instructions for connecting and configuring this product for DMX
operation are in the User Manual. If you are not familiar with DMX, download the DMX Primer from
www.chauvetdj.com.
Starting Address
To ensure full access to all channels available in each DMX mode, the highest recommended DMX address is 498.
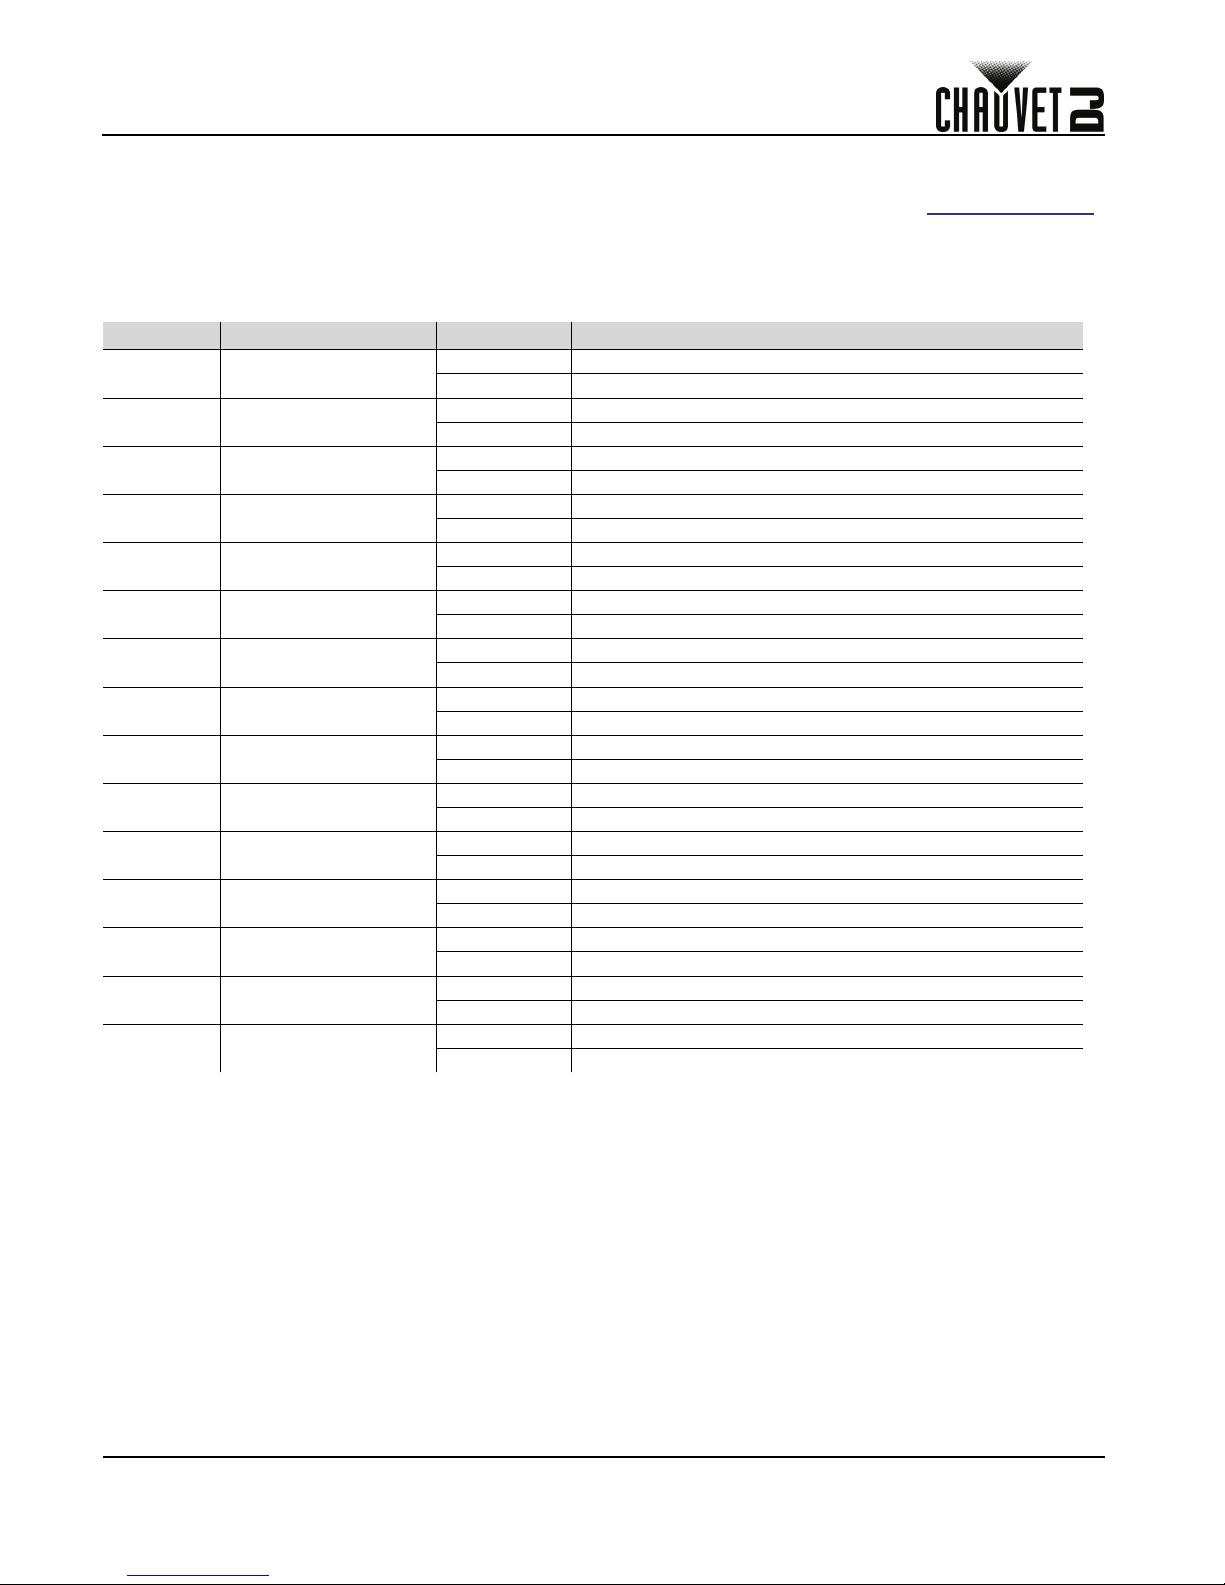
DMX Values
15Ch
CHANNEL FUNCTION VALUE PERCENT/SETTING
1 Fog
000 009 No function
010 255 Output fog
2 Zone 1 Red
000 014 No function
015
255 0–100%
3 Zone 1 Green
000
014 No function
015 255 0–100%
4 Zone 1 Blue
000 014 No function
015 255 0–100%
5 Zone 1 Amber
000 014 No function
015 255 0–100%
6 Zone 1 Ultraviolet
000 014 No function
015 255 0–100%
7 Zone 2 Red
000 014 No function
015 255 0–100%
8 Zone 2 Green
000 014 No function
015 255 0–100%
9 Zone 2 Blue
000 014 No function
015 255 0–100%
10 Zone 2 Amber
000 014 No function
015 255 0–100%
11 Zone 2 Ultraviolet
000 014 No function
015 255 0–100%
12 Color Macro
000 009 No function
010 255 Color macros
13 Color Macro Speed
000 009 No function
010 255 Color macro speed, slow to fast
14 Strobe
000 009 No function
010 255 Strobe, slow to fast
15 Dimmer
000 014 No function
015 255 0–100%
ES
6
Geyser P7 GRR Rev. 1
GUÍA DE REFERENCIA RÁPIDA
Acerca de esta guía
La guía de referencia rápida (GRR) del Geyser P7 contiene información básica sobre el producto, como montaje y
opciones de menú. Descargue el manual de usuario de www.chauvetdj.com para una información más detallada.
Exención de responsabilidad
La información y especificaciones contenidas en esta GRR están sujetas a cambio sin previo aviso.
Notas de seguridad
Estas notas de seguridad incluyen información importante sobre el montaje, uso y mantenimiento.
Contacto
Fuera de EE. UU., Reino Unido, Irlanda, México o Benelux póngase en contacto con su distribuidor para solicitar
asistencia o devolver un producto. Visite www.chauvetdj.com para información de contacto.
Qué va incluido
• Geyser P7
• Cable de alimentación
• Receptor y control remoto inalámbrico Geyser
• Tarjeta de garantía
• Guía de referencia rápida
Para empezar
Desembale su Geyser P7 y asegúrese de que ha recibido todas las partes en buen estado. Si la caja o los componentes
parecen dañados, notifíqueselo inmediatamente al transportista, no a Chauvet.
• Este producto no está concebido para una instalación permanente.
• Conecte este producto SOLO a un circuito con toma de tierra y protegido.
• Desconecte siempre de la alimentación antes de la limpieza o sustitución del fusible.
• Asegúrese de que el cable de alimentación no está retorcido ni estropeado.
• Nunca desconecte este producto de la alimentación tirando del cable.
• Cuando monte este producto en alto, use SIEMPRE un cable de seguridad.
• NO toque este producto cuando esté en funcionamiento, pues podría estar caliente.
• No coloque este producto sobre una superficie inflamable (linóleo, alfombra, madera, papel,
cartón, plástico, etc.).
• NO toque la boquilla de salida de este producto. Se calienta mucho durante el funcionamiento, y
puede permanecer caliente durante varias horas después de apagar la unidad.
• Dependiendo de la cantidad de niebla generada, todas las máquinas de niebla pueden disparar
los detectores de humo.
• La tensión del enchufe al que conecte este producto ha de estar en el rango establecido en el
grabado o en el panel posterior del producto.
• ¡Este producto es para uso en interiores solamente! (IP20) Para evitar riesgos de incendio o
descarga, no exponga este producto a la lluvia o la humedad.
• Monte siempre este producto en una ubicación con ventilación adecuada, al menos a 20 in (50
cm) de superficies adyacentes.
• Asegúrese de que ninguna ranura de ventilación en la carcasa de la unidad queda bloqueada.
• Nunca conecte este producto a un atenuador o reostato.
• Sustituya el fusible con otro del mismo tipo y categoría.
• Use SOLAMENTE el asa de transporte para mover este producto.
• La temperatura ambiente máxima es de 104 °F (40 °C). No haga funcionar este producto a
temperaturas más altas.
• En caso de un problema grave de funcionamiento, deje de usarlo inmediatamente.
• NO abra este producto. No contiene ninguna pieza reparable por el usuario.
• No utilizar para calentar espacios.
• Use solo fluido de niebla a base de agua CHAUVET.
• Vacíe el depósito antes de transportar o almacenar el producto.
• Para evitar un desgaste innecesario y alargar su vida útil, desconecte completamente el producto
de la alimentación mediante el interruptor o desenchufándolo durante periodos en que no se use.
7
ES
GUÍA DE REFERENCIA RÁPIDA
Geyser P7 GRR Rev. 1
Visión general del producto
Corriente alterna
El producto tiene una fuente de alimentación fija y puede funcionar con una tensión de entrada de 120 VCA 60 Hz o 230
VCA 50 Hz, dependiendo del modelo en concreto.
Sustitución del fusible
1. Desconecte el producto de la alimentación.
2. Haga cuña con la punta de un destornillador plano en la ranura del portafusibles.
3. Saque la tapa de seguridad de la carcasa.
4. Quite el fusible fundido de la sujeción en la parte frontal de la tapa de seguridad y sustituya el fusible con otro
del mismo tipo y categoría.
5. Vuelva a insertar el portafusibles y conecte de nuevo la alimentación.
El FCQ (cuarto de galón de limpiador de niebla) ha sido especialmente desarrollado por Chauvet
para limpiar su Geyser P7. Asegúrese de usar FCQ regularmente, no más de 90 días entre
limpiezas, para incrementar la vida de su producto.
Cuando ponga en marcha el Geyser P7, cerciórese de que hay fluido de niebla adecuado en la
máquina, para evitar que se estropeen la bomba y el calentador. Cuando el nivel de fluido esté
bajo, no tiene más que añadir fluido para seguir usando el Geyser P7.
Para evitar un desgaste innecesario y alargar su vida útil, desconecte completamente el producto
de la alimentación mediante el interruptor o desenchufándolo durante periodos en que no se use.
Entrada de alimentación
Portafusibles
Pantalla
LED
LED de cinco colores
Ventilador
Entrada de
controlador
Asa de
transporte
Depósito de líquido
Indicador de
nivel de fluido
Botones
de menú
Boquilla
Pies de goma para
montaje en superficie (x4)
Interruptor de alimentación
Lazo de seguridad
Entrada/Salida DMX
(3 y 5 pines)
Zona 1Zona 2 Pantalla desmontable

ES
8
Geyser P7 GRR Rev. 1
GUÍA DE REFERENCIA RÁPIDA
Montaje
Antes de montar este producto, lea las Notas de seguridad. Utilice al menos 2 puntos de montaje por producto.
Inversión del depósito
Para evitar fugas o vertidos, coloque siempre el depósito de fluido con la tapa del depósito en la posición más alta sobre
la línea de fluido de niebla del depósito. Cuando monte el Geyser P7 en altura, invierta el depósito de fluido haciendo lo
siguiente:
1. Desmonte la protección desmontable quitando el tornillo manual.
2. Tire del depósito de fluido y colóquelo sobre una superficie plana.
3. Desacople la placa del depósito de fluido quitando los 4 tornillos.
4. Fije la placa del depósito de fluido al lado contrario con los 4 tornillos.
5. Introduzca el depósito de fluido.
6. Fije la protección desmontable insertando el extremo sin tornillo en la ranura y atornillando luego el tornillo
manual.
Diagrama de montaje
Para evitar fugas o vertidos, coloque siempre el depósito de fluido con la tapa del depósito en la
posición más alta sobre la línea de fluido de niebla del depósito.
Placa del
depósito de fluido
Tornillos (x4)
Opciones de colocación del soporte omega
Soporte omega (x2) Cable de
seguridad
Cable de seguridad
Abrazadera de montaje (x2)
Salida de niebla hacia arriba Salida de niebla hacia abajo
Salida de niebla horizontal
Soporte omega (x2)
Soporte omega (x2)
Abrazadera de
montaje (x2)
Abrazadera de montaje (x2)
Montaje en superficie
9
ES
GUÍA DE REFERENCIA RÁPIDA
Geyser P7 GRR Rev. 1
Descripción del panel de control
Mapa de menú
Mando a distancia inalámbrico
Para lanzar la salida de niebla y activar el programa de color usando el mando a distancia inalámbrico, haga lo siguiente:
1. Conecte el receptor inalámbrico al puerto de entrada del controlador situado en el lateral del Geyser P7.
2. Programe la elección de color para cada botón en el mando a distancia (<1>–<4>), usando las opciones de
menú CH-1–4 del Geyser P7.
3. En el transmisor inalámbrico, pulse el botón asignado al programa de color deseado (<1>–<4>). El Geyser P7
emite niebla y color mientras se mantenga pulsado el botón.
BOTÓN FUNCIÓN
<MENU> Sale del menú o función actual
<UP> Navega hacia arriba por la lista de menú y aumenta el valor numérico cuando está en una función
<DOWN> Navega hacia abajo por la lista de menú y disminuye el valor numérico cuando está en una función
<ENTER>
Habilita el menú actualmente en pantalla o configura el valor seleccionado actualmente dentro de la
función seleccionada
NIVEL
PRINCIPAL
NIVELES DE PROGRAMACIÓN DESCRIPCIÓN
Addr 1–512 Configura la dirección inicial DMX
CH-1–4
oFF Sin emisión de color
Co 1 Rojo
Co 2 Verde
Co 3 Azul
Co 4 Ámbar
Co 5 Ultravioleta
Co 6 Rosa cálido
Co 7 Magenta
Co 8 Amarillo
Co 9 Cian
Co10 Blanco
Co11 Verde zona 1, rojo zona 2
Co12 Azul zona 1, rojo zona 2
Co13 Rojo zona 1, verde zona 2
Co14 Azul zona 1, verde zona 2
Co15 Rojo zona 1, azul zona 2
Co16 Verde zona 1, azul zona 2
Co17 Ámbar zona 1, magenta zona 2
Co18 Azul zona 1, magenta zona 2
Co19 Magenta zona 1, Ámbar zona 2
Co20 Rosa cálido zona 1, azul zona 2
rand Emisión de color aleatorio
 Loading...