

Page 1
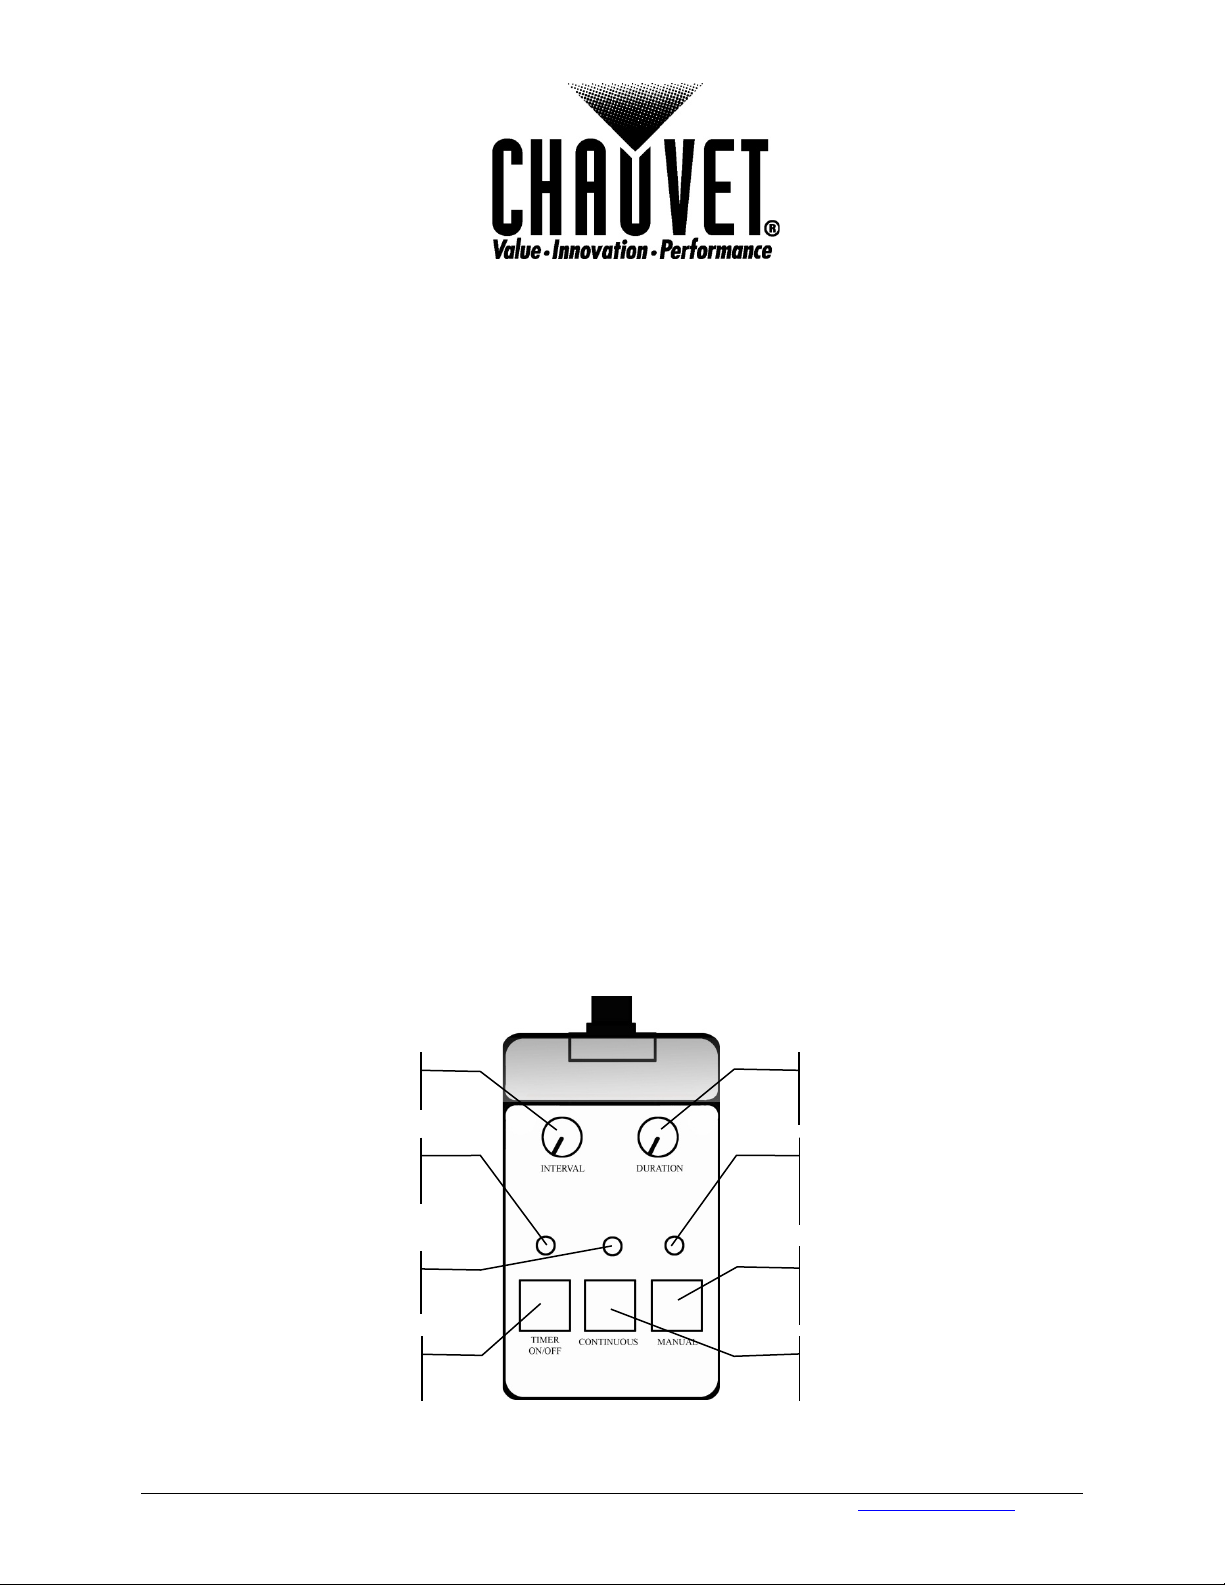
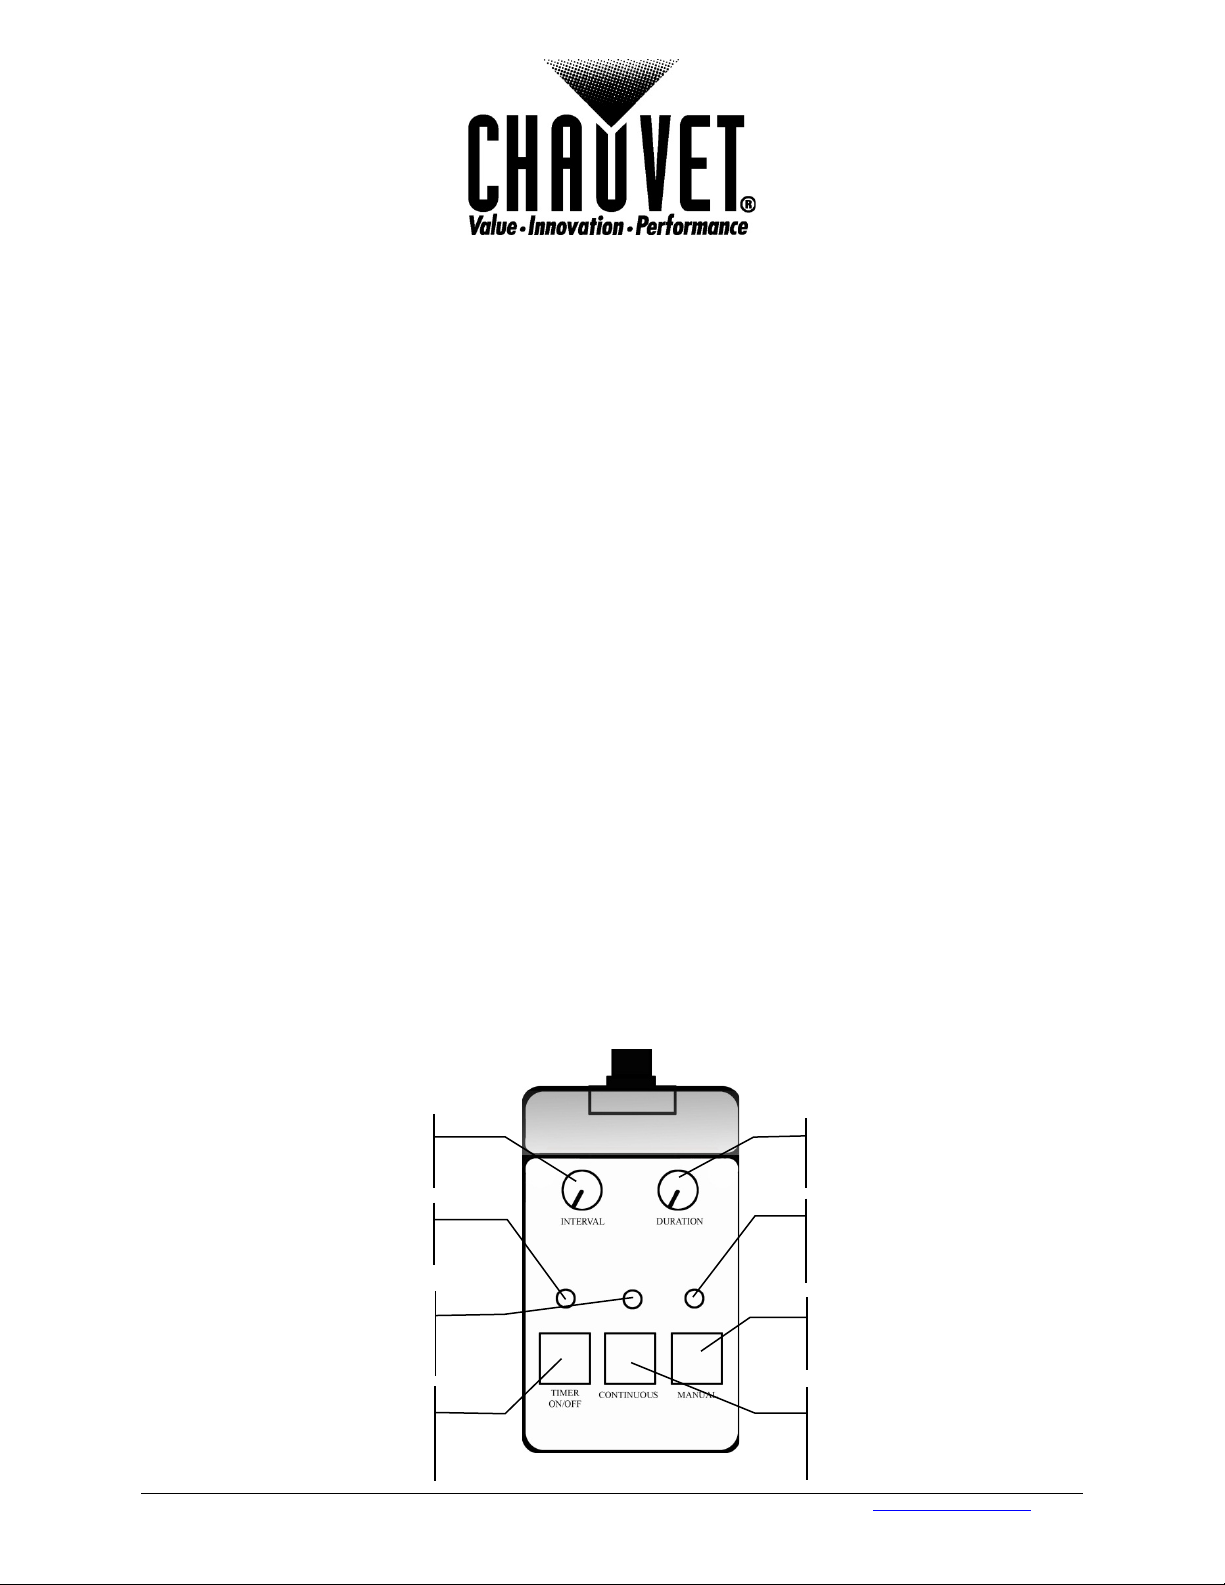
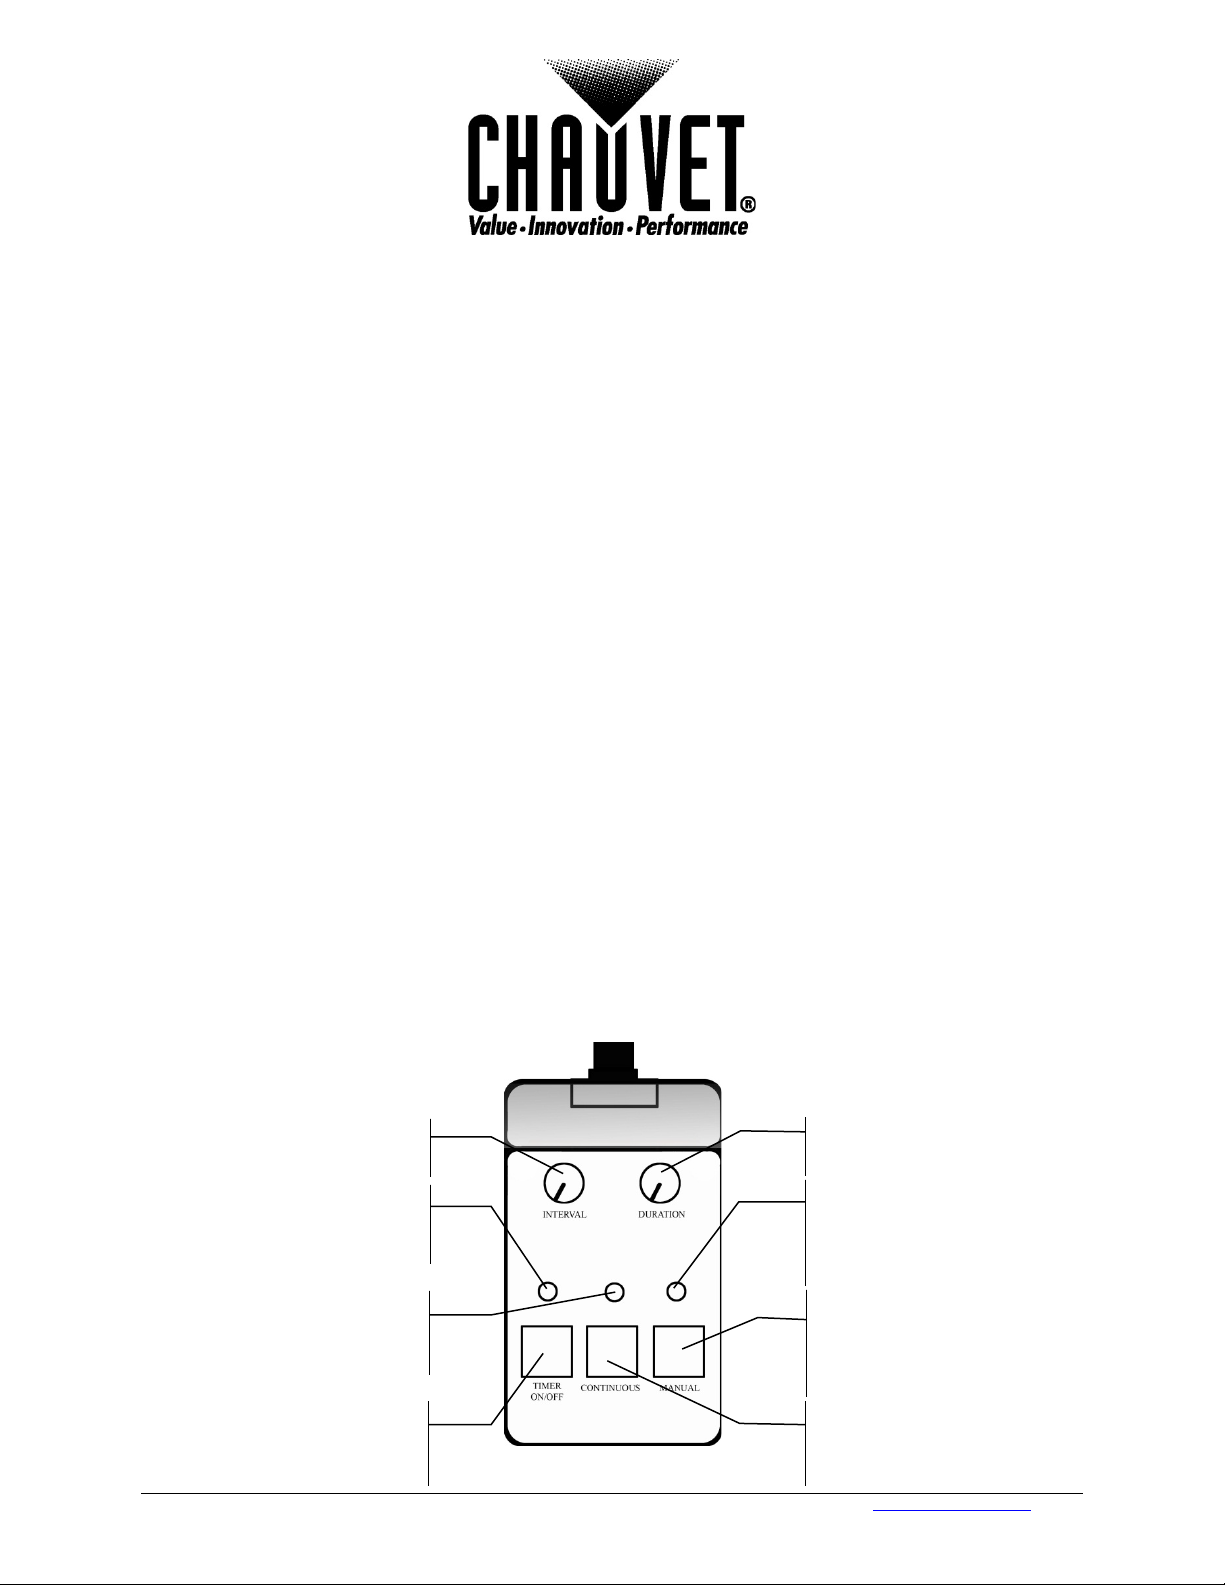
Duration
Interval
Adjustment
Timer LED
Manual
LED
Manual/Power LED
Indicator
Manual Control
Continuous
Timer On/Off
Wired Timer Controller (FC-T)
The FC-T wired timer controller allows you to automatically trigger fog output by setting interval and
duration times. LED indicator lights display the machine and controller’s current state. Rotary knobs
set interval and duration times, while manual and continuous buttons allow overriding control.
1. Plug in the fog machine to power and turn the power switch to the product on.
2. Plug in the timer controller to the Manual Controller socket on the back of the fog machine.
3. Press the <TIMER ON/OFF> latching button on the timer controller. The Timer LED Indicator
above the button will light up. The <TIMER ON/OFF> latching button will remain on until it is
pressed again.
4. Set the INTERVAL and DURATION adjustment knobs to the desired positions.
• INTERVAL knob sets the amount of time in between bursts of fog
• DURATION knob sets the length of time that the fog machine will run during the burst
5. Press the <CONTINUOUS> latching button and the fog machine outputs fog until the button is
pressed again. The Manual/Power LED Indicator above the button will light up dur ing conti nuo us
operation.
Note: The duration of continuous fog output is based on the capability of the fog machine.
6. Press the <MANUAL> button to momentarily output fog. The fog machine will output fog for as
long as you hold down the button. During manual operation the Manual Momentary LED Indicator
above the button will light up.
Note: The duration of manual fog output is based on the capability of the fog machine.
Adjustment
Indicator
Momentary
Momentary Button
Latching Button
5200 N.W. 108th Ave., Sunrise, FL 33351 U.S.A. (800) 762-1084 – (954) 577-4455 FAX (954) 929-5560 www.chauvetlighting.com
Latching Button
Page 2
Ajuste de
Ajuste de
Indicador LED de
temporizador
LED
Manual
Indicador LED de
Botón Control Manual
Botón de
Botón de conmutación
Controlador de Temporización con cable (FC-T)
El controlador de temporización
intervalos y tiempos de duración. Las luces del indicador LED muestran el estado actual de la
máquina y del controlador. Los mandos giratorios ajustan los tiempos de intervalo y duración,
mientras que los botones Manual y Continuo permiten tomar control directo.
1. Enchufe la máquina de humo y mueva el interruptor de encendido del aparato a "On".
2. Conecte el controlador del temporizador al conector del Controlador Manual de la parte posterior
de la máquina de humo.
3. Pulse el botón de conmutación <TIMER ON/OFF> (temporizador on/off) del controlador de
temporización. El indicador LED de Temporizador sobre el botón se encen derá. El botón de
conmutación <TIMER ON/OFF> (temporizador on/off) se quedará en "On" hasta que se pulse de
nuevo.
con cable le permite lanzar humo automáticamente ajustando los
4. Coloque los mandos de ajuste de INTERVAL (intervalo) y DURATION (duración) en las
posiciones deseadas.
• El mando de INTERVAL (interval) configura la cantidad de tiempo entre emisiones de humo.
• El mando DURATION (duración) configura la cantidad de tiempo que la máquina de humo
funcionará durante la emis ión.
5. Pulse el botón de conmutación <CONTINUOUS> (continuo) y la máquina de humo lanzará humo
hasta que pulse el botón de nuevo. El indicador LED Manual/Encendido sobre el botón se
encenderá durante el funcionamiento continuo.
Nota: La duración del humo continuo depe n d e de la capacidad de la máquina de humo.
6. Pulse el botón <MANUAL> (manual) para lanzar humo momentáneamente. La máquina de
humo emitirá humo mientras mantenga presionado el botón. Durante el funcionamiento manual,
el indicador LED de Manual Momentáneo se encenderá.
Nota: La duración del humo manual depende d e la capacidad de la máquina de humo.
intervalo
duración
Momentáneo/
Manual/Encendido
ON/Off del
Temporizador
5200 N.W. 108th Ave. Sunrise, FL 33351 U.S .A. +1 800-762-1084 – +1 954-577-4455 FAX +1 954-929-5560 www.chauvetlighting.com
Momentáneo
conmutación
Continuo
Page 3
Ajuster la
durée
Ajuster les
intervalles
Voyant LED
Voyant LED
momentanée
Voyant LED de
continues
Bouton de
momentanée
Bouton
continu
Bouton
minuterie
Commande câblée à minuterie (FC-T)
La commande câblée à minuterie FC-T vous permet de déclencher automatiquement des jets de
brouillard par programmation d'intervalles et de durées. Les voyants LED affichent le statut actuel de
la commande et de la machine. Les molettes permettent de définir des intervalles et des durées,
tandis que les boutons, manuels et statiques, permettent de reprendre le contrôle.
1. Branchez la machine à brouillard et mettez-la sous tension.
2. Branchez la commande à minuterie dans la prise de la commande manuelle à l'arrière de la
machine à brouillard.
3. Appuyez sur le bouton d'arm em ent <TIMER ON/OFF> (minuterie) sur la commande à minuterie.
Le voyant LED de la minuterie au-dessus de ce bouton s'allumera. Le bouton d'armement
<TIMER ON/OFF> restera allumé jusqu'à nouvelle pression sur celui-ci.
4. Définissez l'intervalle et la durée en posit ion ant les m olet tes INT ERV AL (intervalle) et DURATION
(durée) comme désiré.
• La molette INTERVAL définit le temps écoulé entre deux projections de fumée
• La molette DURATION définit la durée pendant laquelle la machine projetera un jet de fumée
5. Appuyez sur le bouton d'arm em ent <CONTINUOUS> (continu) et la machine à brouillard
projettera des jets de fumée jusqu'à nouvelle pression sur ce même bouton. Le vo yant LED
Manual/Power au-dessus du bouton s'allumera lors des projections continues.
Remarque : La durée des jets de brouillard continu est établie selon les capacités de la
machine à brouillard.
6. Appuyez sur le bouton <MANUAL> (manuelle) pour des projections de brouillard momentanées.
La machine à brouillard projettera du brouillard tant que le bouton est pressé. En opération
manuelle, le voyant LED Manual Momentary au-dessus du bouton s'allumera.
Remarque : La durée des jets de brouillard manuel est établie selon les capacités de la
machine à brouillard.
de la
de commande
manuelle
projections
d'armement de la
5200 N.W. 108th Ave. Sunrise, FL 33351 U.S .A. +1 800-762-1084 – +1 954-577-4455 FAX +1 954-929-5560 www.chauvetlighting.com
commande
manuelle
d'armement
Page 4

Einstellung
der Dauer
Einstellung
des Intervalls
Timer-LED
LED f.
Konstanter Ausstoß,
LED
Manuelle
Echtzeit-Taste
Einrasttaste
Einrasttaste Timer
Kabelgebundene Timer-Fernbedienung (FC-T)
Mit der kabelgebundenen Timer-Fernbedienung FC-T lässt sich der Nebelausstoß automatisch über
die Einstellung des Intervalls und der Dauer auslösen. Die LED-Anzeigelämpchen zeigen dem
Bediener den aktuellen Zustand der Nebelmaschine und der Steuerung an. Intervalle und Dauer
werden über Drehknöpfe eingestellt, während mit den Vorrangtasten "MANUAL" (manuell) und
"CONTINUOUS" (konstant) die Einstellungen der Steuerung überschrieben werden.
1. Schließen Sie die Nebelmaschine an die Stromversorgung an, und schalten Sie den
Geräteschalter an.
2. Stecken Sie die kabelgebundene Timer-Fernbedienung (FC-T) in die Buchse "Manual Controller"
auf der Rückseite der Nebelmaschine.
3. Betätigen Sie die Einrasttas te <TIMER ON/OFF> (Timer EIN/AUS) auf der Timer-Fernbedienung.
Die LED-Anzeige über dem Taster leuchtet auf. Die Einrasttaste <TIMER ON/OFF> bleibt
eingeschaltet, bis sie erneut gedrückt wird.
4. Drehen Sie die Drehknöpfe INTERVA L (Int erva ll) und DU RAT IO N (Dauer ) in die ge wüns cht en
Positionen.
• Mit dem Intervallknopf stell en Sie den Zeit absc hn itt ei n, der zwischen den einzelnen
Nebelausstößen liegt.
• Mit dem Dauerknopf stellen Sie die Zeitdauer des Nebelaustoßes der Nebelmaschine ein.
5. Durch Betätigen der Einrasttaste <CONTINUOUS> stößt die Nebelmaschine solange Nebel aus,
bis Sie diese Taste erneut betätigen. Die LED-Anzeige über der Taste MANUAL leuchtet
während des konstanten Betriebs.
Hinweis: Die Dauer des konstanten Nebelausstoßes hängt vom Fassungsvermögen und
vom Füllstand der Nebelmaschine ab.
6. Für einen Echtzeit-Nebelausstoß betätigen Sie die Taste <MANUAL>. Die Nebelmaschine stößt
solange Nebel aus, wie Sie die Taste gedrückt halten. Während des manuellen Betriebs leuchtet
die LED-Anzeige für den manuellen Echtzeit-Ausstoß über der Taste MANUAL.
Hinweis: Die Dauer des manuell ausgelösten Echtzeit-Nebelausstoßes hängt vom
Fassungsvermögen und vom Füllstand der Nebelmaschine ab.
Echtzeit,
manuell
-Anzeige
Steuerung,
Ein/Aus
5200 N.W. 108th Ave. Sunrise, FL 33351 U.S .A. +1 800-762-1084 – +1 954-577-4455 FAX +1 954-929-5560 www.chauvetlighting.com
konstanter Betrieb
Page 5

Ajuste da
duração
Ajuste do
intervalo
LED do
Indicador
LED
manual
LED
manual/alimentação
Botão momentâneo
de controlo manual
Botão de
contínuo
Botão
ligado/desligado
Controlador temporizador com fios (FC-T)
O controlador temporizador com fios FC-T permite-lhe accionar automaticamente o débito de fumo definindo
intervalos e a duração. As luzes indicadoras LED exibem o estado actual da máquina e do controlador. Os
botões rotativos definem o intervalo e duração, enquanto os botões manuais e contínuos permitem substituir o
controlo.
1. Ligue a máquina de fumo à alimentação e ligue o interruptor de alimentação para ligar o equipamento.
2. Ligue o controlador temporizador à tomada do controlador manual na parte poster ior da máqu ina de fumo .
3. Prima o botão <TIMER ON/OFF> (TEMPORIZADOR LIGADO/DESLIGADO) no controlador temporizador.
O indicador LED do temporizador sobre o botão acende-se. O botão <TIMER ON/OFF> (TEMPORIZADOR
LIGADO/DESLIGADO) permanece aceso até ser pressionado novamente.
4. Coloque os botões de ajuste INTERVAL (INTERVALO) e DURATION (DURAÇÃO) nas posições
pretendidas.
• O botão INTERVAL (INTERVALO) ajusta a quantidade de tempo entre as sequências de fumo
• O botão DURATION (DURAÇÃO) ajusta o período de tempo durante o qual a máquina de fumo
funcionará durante a sequência
5. Prima o botão <CONTINUOUS> (CONTÍNUO) e a máquina de fumo debita fumo até o botão ser
pressionado novamente. O indicador LED manual/alimentação sobre o botão acender-se-á durante o
funcionamento contínuo.
Nota: A duração do débito contínuo de fumo tem por base a capacidade da máquina de fumo.
6. Prima o botão <MANUAL> para debitar momentaneamente fumo. A máquina de fumo debitará fumo
enquanto mantiver premido o botão. Durante a operação manual, o indicador LED acende-se
momentaneamente sobre o botão.
Nota: A duração do débito manual de fumo tem por base a capacidade da máquina de fumo.
temporizador
momentâneo
temporizador
funcionamento
5200 N.W. 108th Ave. Sunrise, FL 33351 U.S .A. +1 800-762-1084 – +1 954-577-4455 FAX +1 954-929-5560 www.chauvetlighting.com
Page 6

Durata
Regolazione
dell’intervallo
Spia LED del
LED manuale
Spia LED
Pulsante comando
Pulsante
Pulsante
Controller con temporizzatore cablato (FC-T)
Il controller con temporizzatore cablato FC-T consente di azionare automaticamente l'emissione di
nebbia impostando i tempi di intervallo e durata. Gli indicatori a LED visualizzano lo stato corrente
della macchina e del controller. Con le manopole è possibile impostare i tempi di intervallo e durata
mentre con i pulsanti Manual e Continuous è possibile escludere il controllo.
1. Collegare la macchina per la nebbia all'alimentazione elettrica e portare l'interruttore su On.
2. Collegare il controller con temporizzatore alla presa Manual Controller posizionata sulla parte
posteriore della macchina per la nebbia.
3. Premere il pulsante <TIMER ON/OFF> sul controller con temporizzatore. L'indicatore a LED del
temporizzatore, posizionato sopra il pulsante, si illumina. Il pulsante <TIMER ON/OFF> rimane
illuminato fino a quando non venga premuto nuovamente.
4. Portare le manopole di regolazione INTERVAL (intervallo) e DURATION (durata) nella posizi one
desiderata.
• La manopola INTERVAL imposta l'intervallo di tempo tra un'emissione di nebbia e l'altra.
• La manopola DURATION imposta il tempo di durata dell'emissione.
5. Premendo il pulsante <CONTINUOUS> (continuo) la macchina emetterà nebbia fino a quando
non venga premuto il pulsante nuovamente. L'indicatore a LED Manual/Power posizionato sopra
il pulsante si illumina durante il funzionamento continuo.
Nota: la durata di emissione continua dipende dalla capacità della macchina per la nebbia.
6. Premendo il pulsante <MANUAL> (manuale) la macchina emetterà nebbia per breve tempo. La
macchina emetterà nebbia per tutto il tempo in cui si terrà premuto il pulsante. Durante il
funzionamento manuale l'indicatore a LED Manual Momentary posizionato sopra il pulsante si
illumina.
Nota: la durata di emissione manuale dipende dalla capacità della macchina per la nebbia.
dell’intervallo
temporizzatore
temporaneo
Manuale/Alimentazion
temporizzatore
On/Off
5200 N.W. 108th Ave. Sunrise, FL 33351 U.S .A. +1 800-762-1084 – +1 954-577-4455 FAX +1 954-929-5560 www.chauvetlighting.com
manuale temporaneo
funzionamento
continuo
Page 7

Ustawienie
pracy
Ustawienie
interwałów
Kontrolka
Kontrolka
ręcznego/chw
Kontrolka LED
Kontrolka
Przycisk ręcznego
Przycisk aktywowania
trybu ciągłego
Przycisk właczający i
wyłączający timer
Przewodow y kontroler ti mera (FC-T)
Przewodowy kontroler timera (FC-T) pozwala na automatyczne uruchomienie wytwarzania mgły
poprzez ustawienie interwałów oraz czasu trwania działania urządzenia. Wskaźniki LED pokazują
aktualny stan urządzenia oraz kontrolera. Za pomocą gałek można ustawić interwały oraz czas
trwania, a przyciski trybu sterowania ręcznego i ciągłego pozwalają na natychmaistowe przejęcie
kontroli nad urzadzeniem.
1. Podłączyć urządzenie do wytwarzania mgły do zasilania, a następnie włączyć urządzenie
włącznikiem.
2. Podłaczyć kontroler timera do gniazda sterowania ręcznego znajdującego się w tylnej części
urządzenia do wytwarzania mgły.
3. Przycisnąć przycisk <TIMER ON/OFF> na kontrolerze timera. Kontrolka LED znajdująca się nad
przyciskiem zaświeci się. Przycisk <TIMER ON/OFF> pozostanie aktywny do momentu, aż
zostanie przyciśnięty ponownie.
4. Ustawić pokrętła INTERVAL (interwał) oraz DURATION (czas trwania)
• Pokrętło INTERVAL (interwał) służy do ustawienia czasu pomiędzy momentami, w których
wytwarzana jest mgła.
• Pokrętło DURATION (czas trwania) służy do ustawienia czasu pracy urządzenia podczas
pojedynczego wytwarzania mgły.
5. Przycisnąć przycisk <CONTINUOUS> (ciągłym) w celu uruchomienia wytwarzania mgły. Po jego
ponownym przyciśnięciu wytwarzanie mgły zostanie przerwane. Kontrolka LED Manual/Power
(tryb ręczny/zasilanie) nad przyciskiem będzie się świecić podczas pracy w trybie ciągłym.
UWAGI: Czas trwania pracy w trybie ciągłym zależy od możliwości urządzenia do
wytwarzania mgły.
6. Przycisnąć przycisk <MANUAL> (tryb ręczny) w celu chwilowego wytworzenia mgły. Urządzenie
rozpocznie wytwarzanie mgły przez cały czas, kiedy przycisk pozostanie wciśnięty. Kontrolka
LED Manual/Power (tryb ręczny/zasilanie) nad przyciskiem będzie się świecić podczas pracy w
trybie ręcznym.
UWAGI: Czas trwania pracy w trybie ręcznym zależy od możliwości urządzenia do
wytwarzania mgły.
czasu trwania
LED timera
LED trybu
trybu
ręcznego/zasilania
5200 N.W. 108th Ave. Sunrise, FL 33351 U.S .A. +1 800-762-1084 – +1 954-577-4455 FAX +1 954-929-5560 www.chauvetlighting.com
sterowania
Page 8

Регулировка
Регулировка
Светодиодный
таймера
Светодиод
Светодиод. инд-р
Кнопка мгновенного
создания дыма в ручн. реж.
Кнопка с защелкой для
Кнопка с защелкой
таймера
Проводной таймерный контроллер (FC-T)
Проводной таймерный контроллер FC-T позволяет автоматически создавать дым с заранее
определенной длительностью через заданные временные интервалы. Светодиодные индикаторы
показывают текущее состояние дымогенератора и контроллера. Поворотные ручки позволяют задавать
длительность и периодичность создания дыма, а кнопки ручной и непрерывной работы позволяют
отменять автоматическое управление.
1. Подключите дымогенератор к питанию и включите питание.
2. Вставьте таймерный контроллер в гнездо ручного контроллера с задней стороны дымогенератора.
3. Нажмите кнопку с защелкой <TIMER ON/OFF> (ВКЛ/ВЫКЛ ТАЙМЕРА) на таймерном контроллере.
Светодиодный индикатор таймера над кнопкой загорится. Кнопка с защелкой <TIMER ON/OFF>
(ВКЛ/ВЫКЛ ТАЙМЕРА) остается включенной, пока она не будет нажата снова.
4. Установите ручки регулировки INTERVAL (ПЕРИОДИЧНОСТЬ) и DURATION
(ПРОДОЛЖИТЕЛЬНОСТЬ) в нужные положения.
• Ручка INTERVAL (ИНТЕРВАЛ) задает промежуток времени между выбросами дыма.
• Ручка DURATION (ПРОДОЛЖИТЕЛЬНОСТЬ) задает время, в течение которого дымогенератор
будет создавать дым.
5. Нажмите кнопку с защелкой <CONTINUOUS> (НЕПРЕРЫВНЫЙ РЕЖИМ) – дымогенератор будет
создавать дым до тех пор, пока кнопка не будет нажата. Светодиодный индикатор ручного
режима/питания над кнопкой во время непрерывной работы будет гореть.
Примечание: Длительность непрерывного создания дыма определяется мощностью
дымогенератора.
6. Нажмите кнопку <MANUAL> (РУЧНОЙ РЕЖИМ) для мгновенного создания дыма. Дымогенератор
будет создавать дым до тех пор, пока кнопка удерживается. Во время ручной работы светодиодный
индикатор мгновенного создания дыма в ручном режиме над кнопкой будет гореть.
Примечание: Длительность ручного создания дыма определяется мощностью
дымогенератора.
периодичности
длительности
индикатор
мгновенного создания
дыма в ручн. реж.
ручн. реж./питания
5200 N.W. 108th Ave. Sunrise, FL 33351 U.S .A. +1 800-762-1084 – +1 954-577-4455 FAX +1 954-929-5560 www.chauvetlighting.com
для вкл/выкл
непрерывного режима
 Loading...