

Page 1

User Manual
Page 2

Edition Notes
Edition Notes
Trademarks
Copyright Notice
Manual Usage
Document Printing
Intended Audience
CHAUVET®
Document
Product at
x
x
x
P
x
P
P
x
x
x
The Legend 300E Spot User Manual Rev. 01g covers the description, safety
precautions, installation, programming, operation, and maintenance of the Legend
300E Spot. CHAUVET® rel eased this editi on of th e Legen d 300E Spot Us er Manual
Rev. 01g in December 2010.
CHAUVET® is a registered trademar k of CHAUVET & S ons Inc. (d/b/a CHAUVET ® or
Chauvet). The CHAUVE T® logo in i ts entirety including th e Chauvet n ame and the
dotted triangle, and all other trademarks on this manual pertaining to services,
products, or marketing statements (example: It’s Green Thinking™) are owned or
licens ed by CHAUV ET®. Any ot her produc t names, l ogos, brands , compan y names,
and other t rademarks featur ed or ref erred to wit hin this d ocument are the pr operty of
thei r respective trademark holders.
CHAUVET® owns the content of this user manual in its entirety, including but not
limited to pictures, logos, trademarks, and resources.
© Copyright 2010 CHAUVET®
All rights reserved
Elec tronically publi s hed by CHAUV ET® in the Un it ed S t at es of Am erica
CHAUVET® authorizes its customers to download and print this manual for
professional information purposes only. CHAUVET® expressly prohibits the usage,
copy, st orag e, dist rib ut ion, modification, or pr inti ng of this manu al or it s cont ent f or any
other pur p os e wi th ou t its written consent.
For bett er results , print t his docu ment in c olor, on letter siz e paper (8.5 x 11 i nches),
doubl e sided. If us ing A4 p aper (210 x 297 mm), c onfigure your printer t o scale t he
content of th is doc u m ent to A4 paper.
Disclaimer
Publications Hot
Line
Revision
a Glance
Any person in ch arg e of instal ling, op er ating , and/or maint ai ning the Legend 300E Sp ot
should read the guide that shipped with it and this manual in their entirety before
install in g, operati ng, or maint ai ni ng this product.
CHAUVET® believes that the information cont ained in this manual is accurate in all
respects. However, CHAUVET® assumes no r esponsibilit y for any error or omissi ons
in this d ocum ent. CHAU VET® r eserves the ri ght to r evise th is doc ument and to m ake
chang es f rom time to ti me in the c ontent hereof without obli gation of CH AUVET® to
not if y any p ers on or comp any of suc h revisi on or ch anges. T his does n ot const itut e in
any w ay a c o m mi t m en t b y C H AU VET® to make s uc h c h anges. CHAUVET ® m ay iss ue
a revisi on of this manual or a new edition of it to incorpor ate such changes.
If you have an y comment s ab out the acc urac y of this doc um ent or gen er al sugg esti ons
regard ing how w e can impr ove it, pleas e call us at (800) 762-1084 (US callers) or +1954-929-1115 (international callers). You can download the latest versions of all
CHAUVET® products’ manuals from www.chauvetlighting.com.
The Legend 300E Spot User Manual Rev. 01g su persed es all pr evious vers ions of this
manual. Please disc ard any older vers ions of this manu al you may have, whether in
printed or el ect ronic for m at, an d r epl ace them with t his v ers ion.
Author Editor Manager PD Manager
O. Desmonteix D. Couppe M. Graham F. Sellers
Use on Dimmer
Outdoor Use
Sound Activated
Auto Programs
Auto-ranging Power Supply
Replaceable Fuse
DMX
Master/Slave
Legend 300E Spot User Manual Rev. 01g
User Serviceable
Duty Cycle
Page 3

Table of Contents
Table of Contents
1. Before You Begin ............................................................................................................1
What is Included ............................................................................................................................. 1
Unpacking Instruc tions ................................................................................................................... 1
Typographic Conv entions ............................................................................................................... 1
Icon Meaning .................................................................................................................................. 1
Safety Notes ................................................................................................................................... 2
2. Introduction .....................................................................................................................3
Product Description ........................................................................................................................ 3
Features ......................................................................................................................................... 3
Additional Features .................................................................................................................................... 3
Options ...................................................................................................................................................... 3
DMX Channel Summary ................................................................................................................. 4
Mode 1 ...................................................................................................................................................... 4
Mode 2 ...................................................................................................................................................... 4
Product Overview ........................................................................................................................... 5
3. Setup ................................................................................................................................6
AC Power ....................................................................................................................................... 6
AC Plug ..................................................................................................................................................... 6
Fuse Replacement ..................................................................................................................................... 6
DMX Linking ................................................................................................................................... 6
DMX Modes ............................................................................................................................................... 6
Gobo Wheels.................................................................................................................................. 7
Extra Gobos ................................................................................................................................... 7
Color Wheel ................................................................................................................................... 7
Gobo Replacement ......................................................................................................................... 8
Lamp Replacement ........................................................................................................................ 9
Increasing the Lamp’s Life .......................................................................................................................... 9
Mounting ...................................................................................................................................... 10
Orientation ............................................................................................................................................... 10
Rigging .................................................................................................................................................... 10
4. Operation .......................................................................................................................11
Control Panel Description ............................................................................................................. 11
LCD Display ................................................................................................................................. 11
Control Options ............................................................................................................................ 11
Programming ................................................................................................................................ 11
Navigation Buttons ................................................................................................................................... 11
DMX Functions ........................................................................................................................................ 12
Fixture Settings ........................................................................................................................................ 13
Lamp Settings .......................................................................................................................................... 14
Display Settings ....................................................................................................................................... 15
Fixture Tests ............................................................................................................................................ 15
Fixture Information ................................................................................................................................... 16
Reset Functions ....................................................................................................................................... 16
Special Functions..................................................................................................................................... 17
Offset Mode .................................................................................................................................. 17
Entering Offset Mode ............................................................................................................................... 17
Menu Map .................................................................................................................................... 19
DMX Values ................................................................................................................................. 20
Mode 1 .................................................................................................................................................... 20
Mode 2 .................................................................................................................................................... 22
5. Technical Information ...................................................................................................25
General Maintenance ................................................................................................................... 25
Legend 300E Spot User Manual Rev. 01g -a-
Page 4

Table of Contents
Photometrics................................................................................................................................. 25
Error Messages ............................................................................................................................ 26
Troubleshooti ng Guide .................................................................................................................. 27
Returns Procedure ........................................................................................................................ 28
Claims .......................................................................................................................................... 28
Contact Us .................................................................................................................................... 28
Technical Specifications................................................................................................................ 29
-b- Legend 300E Spot User M anual Rev. 01g
Page 5

1. Before You Begin
MENU > Settings
This icon indicates critical ins tallation, config uration or op eration
equipment, or c ause harm to the user.
Before You Begi n
What is
Included
Unpacking
Instructions
Typographic
Conventions
• One Legend 300E Spot
• Two omega clamps
• Three additional g obos
• One Warranty Card
• One Quick Reference Guide
Immedi ately u pon rec eiving t his pr oduct, careful ly unp ack it an d chec k the cont ain er in
which you rec eived it. Make sure that you h ave received all th e parts indicated above
and that th ey ar e all in good c ondit ion. If the mat erial ins ide the c ont ainer (this produc t
and any other access ory included with it) appears damaged from shipping, or if the
contain er sh ows s igns of mis han dlin g, not if y the shi pp er im medi atel y. In addi tion, r et ain
the cont ain er an d all the packin g m at er i al for inspecti on.
See the Claims section in t h e Tec h nical Infor m at ion chapter.
Convention Meaning
1~512 A range of values in the text
50/60 A set of mutually exclusive values in the text
[10] A DIP switch to be configured
Claims
“COLORado™ UM” The name of an other publication or m anual
<SET> A button on the fixture’s control panel
Settings A fixtur e func tion or a menu option
1~10 A range of m enu val u es from which to ch oose in a menu
Yes/No A set of two mutu ally excl us i ve m enu opti ons i n a men u
ON A uniqu e val u e to entered or s el ect in a men u
A new term, or a section or chapter of this document
A sequence of menu opt i ons
Icon Meaning
The term “ DMX” used throu ghout this docum ent refers to the USIT T DMX512-A
transmission protocol.
Icon Meaning
information. Failure to comply with this information may render
the fixture partially or completely inoperative , damage third-party
This icon indicates important installation or configuration
information. Failure to comply with this information may preven t
the fixture from functioning correctly.
This icon indicates useful, although n on-c ritical inf orm at i on .
Legend 300E Spot User Manual Rev. 01g -1-
Page 6
Before You Begi n
carefully because they include important safety
Safety Notes
Personal Safety
Mounting and Rigging
Power and Wiring
Please read the following notes
inform at i on ab ou t th e inst allation, usage and m ai nt enance of this pr o duc t.
It is important to read all these notes before starting to work with this product.
There are no user serviceable parts inside this product. Any reference to
servicing it you may find from now on in this User Manual will only apply to
properly CHAUVET® certif ied technicians. Do not open the ho using or attempt
any repairs unless you are one of them.
Please refer to all applicable local codes and regulations for the proper
installation of this prod uct .
• Avoid direct eye exposure to the light source while th e fixture is on.
• Always disconnect this product from its power source before servicing.
• Always connect this product to a ground ed circuit to avoi d th e ris k of el ectrocution.
• Lamp explosion hazard! Do not open the lamp cover within five minutes of having
turned off the fixture.
• The bulb remains hot for a long time after turn off. Never touch the bulb
barehan ded and alw ays handle it by its metallic conta cts.
• Do not touc h this product’s housing when operatin g b ec ause it may be ver y hot.
• This product is for indoor use only! To prevent risk of fire or shock, do not expose
this produc t t o r ain or m oistur e.
• Make sure there are no flammable materials close to this product while operating.
• When hanging this product, al ways s ec ure it to a fasteni ng devi ce using a safety
chain/cable (not provided).
• Do not carry this fixture from the head; use the handles instead.
• Always m ak e sure that you are connecting this product to the proper voltage, as
per the spec ifications in th is man u al or on th e product’s stic k er .
• Connect this fixture ONLY to a grounded and protected circuit.
• Never connect this prod uc t to a dimmer pack.
• Make sure the fixture’s power cable is not cr imped or dam aged.
• Never disconnect this product by pulling or tugging on the power cable.
Operation
• Do not operate this fixture if you see damage on the housing, lenses, ultraviolet
filter, or c ables; hav e the damaged part s rep laced by an aut h or iz ed tec hnician at
once.
• Do not aim this fixture toward any surface closer than 16 feet (5 m). Otherwise, you
may damage or overh eat th e il lu mi n ated surface.
• Do not cover the ventilation slots when the fixture is operating to avoid internal
overheating.
• Do not aim this fixture toward the Sun. Otherwise, the lenses could concentrate the
solar energy and c aus e int er n al ov erheating .
• The maximum ambient temperature (Ta) is 104° F (40° C). Do not operate this
product at a higher temperatur e.
• In case of a serious operating problem, stop using this product immediately!
In the unlikely event that your Legend 300E Spot may require service, please
contact CHAUVET® Technical Support.
-2- Legend 300E Spot User Manual Rev. 01g
Page 7

2. Introduction
Introduction
Product
Description
Features
The Legend 30 0E Spot is a c ompact, electron ic m ovi n g yok e spot fi xt ure equi pped wi th
a 300-watt HID lamp. It includ es a color wheel with ei ght s lots plus w hit e. I t also com es
with tw o gobo wh eels, one with seven rotating slot-n-lock gobos plus open, and the
other with eight fixed gob os plus open . It als o includ es rem ote focu s and a rot ating 3facet prism.
• 21 or 29-channel compact, fully electronic, 300-watt moving yoke spot
• Pan: 540⁰
• Tilt: 270⁰
• Color wh eel: 7 colors + white
Split/linear colors
Color wheel spins at variable speed
• Gobo wheel 1: Indexed, rotating gobo wheel with gobo shake
7 metal, slot-n-lock gobos + open
Gobo wheel spins at variable speed
16-bit gobo rotation
• Gobo wheel 2: Indexed gobo wheel
8 metal gobos + open
Gobo wheel spins at variable speed
• Static frost
• CTC filters (5,600 K and 3,2 00 K )
• CMY color mi xi ng s ys t em w ith vec tor speed adj us tments
• 3-facet rotating prism
• Variable shutter
• Variable iris
• Variable focus
• Variable 16-bit dimming (0~100%)
• Linear zoom (16~35⁰)
• Individual reset of pan/tilt, color, gobo, shutter, prism, focus
• Move-in-black for pan/tilt, color, gobo
• Remote fixture reset, lamp on/off, and vector control speed adjustments
• Built-in m ov em ent macros wit h r an g e adj ustments
• Built-in color macros
• Battery powered display
Additional Features
Options
Legend 300E Spot User Manual Rev. 01g -3-
• 3-pin and 5-pin DMX connections
• Three additional free gobos
• User-configurable lamp ignition delay
• User-c onf igurable mainten ance remind er
• Electronic ballast with power factor correction
• Electronic power supply
• Automatic pan & tilt correction
• Pan & tilt locks
• Lamp & fixture use timers
• Power saver mode
• W-DMX (wireless DMX) receiver
• W-DMX (wireless DMX) transmitter
Page 8
Introduction
DMX Channel
Function
DMX Channel
Function
1
Pan 1 Pan 2 Pan Fine
2
Pan Fine
3
Tilt 3 Tilt
4
Tilt Fine
4
Tilt Fine
5
Pan/Tilt Speed
5
Pan/Tilt Speed
6
Dimmer
6
Dimmer
7
Shutter
7
Dimmer Fine
8
Color
8
Shutter
9
Cyan
9
Color
10
Magenta
10
Cyan
11
Yellow
11
Magenta
12
Gobo 1
12
Yellow
13
R-Gobo 1
13
CMY Speed
14
Gobo 2
14
Gobo 1
15
Focus
15
R-Gobo 1
16
Zoom
16
R-Gobo 1 Fine
17
Prism
17
Gobo 2
18
R-Prism
18
Focus
19
Iris
19
Zoom
20
Frost
20
Prism
21
Function
21
R-Prism
22
R-Prism Fine
23
Iris
24
Frost
25
Pan/Tilt Macro
26
P/T Macro Speed
27
Preset Color
28
Color Macro
29
Function
DMX Channel Summary
Mode 1
Mode 2
-4- Legend 300E Spot User Manual Rev. 01g
Page 9
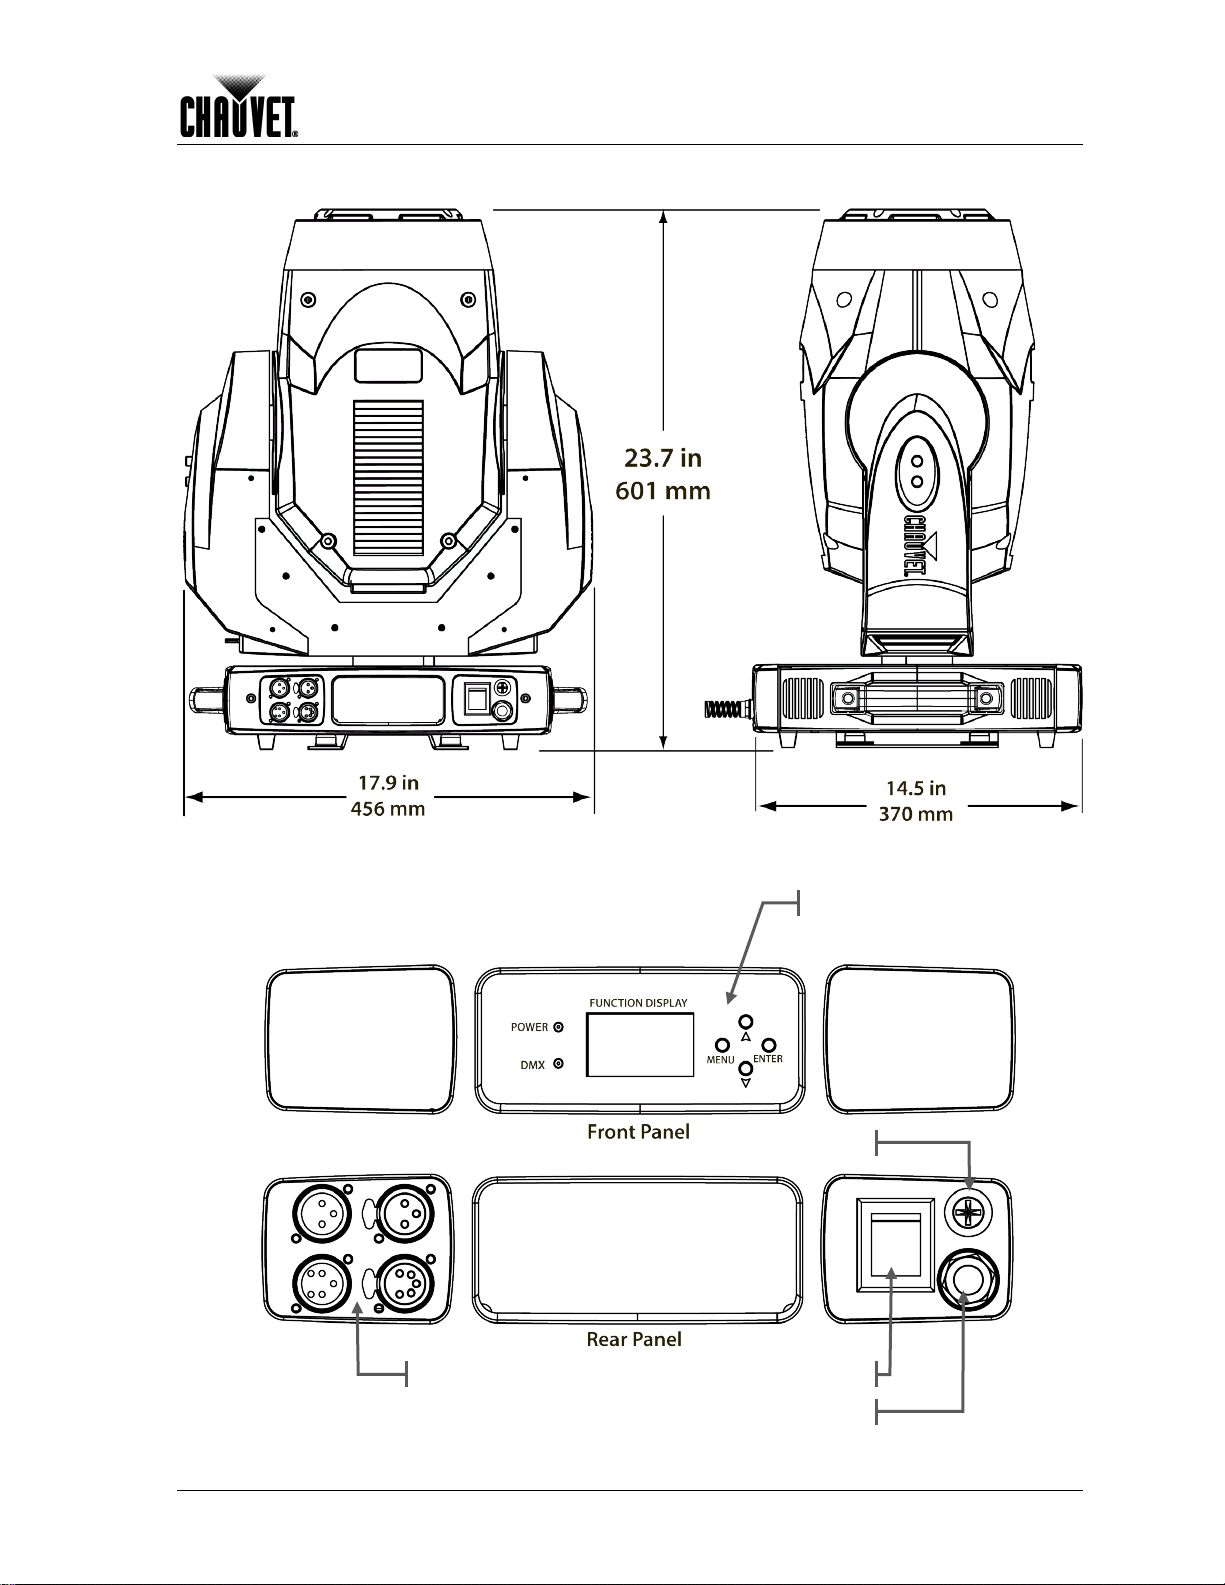
Product Overview
Control P a ne l
Power On/Off
Power Cord
Fuse Holder
DMX In/Out
Introduction
Legend 300E Spot User Manual Rev. 01g -5-
Page 10
Setup
see the label affixed to
specifications
3. Setup
AC Power
The Leg end 300E Spot has an auto-r anging p ower suppl y that can w ork with an in put
voltage range of 100~240 VAC, 50/60 Hz.
Make sure that you are connecting this product to the proper voltage, as per the
specifications in this guide, the product’s user manual, or on the product’s sticker.
Always co nnect th e Legend 300E Spot to a protected circ uit with an appro priate
electrical ground to avoid the risk of electrocution or fire.
To det er m in e t he pow er requir em en ts for th e L egen d 300E Spot
the sid e of th e fixtur e. Alter nativel y, you m ay refer to the corresponding
chart in the Technical Informat io n chapter of this m anual.
The list ed curren t rating i ndicates t he maxim um curr ent draw dur ing norm al operat ion.
Please ref er to the Sizing the Circu it Break ers section in the Appendix ch apter of this
manual.
Never c onnect th e Legend 300E Spot t o a rhe ostat (var iable r esistor ) or dimm er
circuit, even if the rheostat or dimmer channel serves only as a 0 to 100% switch.
AC Plug
Fuse Replacement
DMX Linking
DMX Modes
The Leg end 300 E Spot c omes with a bar e ended power in put cord. The fixture sid e of
this p ow er cord ent er s t h e f i xture through a s train r eli ev er (rubber boot) an d it cannot b e
disconnected from the fixture. Use the table below to wire the plug to the power cord.
Connection Wire (US) Wire (Europe) Screw Color
AC Live Black Brown Y el l ow or B r ass
AC Neutral White Blue Silver
AC Ground Green/Yellow Green/Yellow Green
Make sure t o discon nect the fi xture’s po wer cord b efore repl acing a blo wn fuse,
and always replace it with a fuse of the same type and rating.
1) With a Philips screwdriver, uns c r ew th e fuse holder out of its housi ng and remove
the blown fuse from its holder.
2) Replace the blown fus e wit h a fuse of the exact s am e typ e and r ati ng.
3) Reverse step 1 and reconnect power.
You may link the Leg end 300E Spot to a DMX c ontroller using a st andard DM X serial
connection. If using other DMX compatible fixtures with the Legend 300E Spot, it is
possible to control them individually with a single DMX control ler.
If you are not f amiliar with the D MX standard, you may download the “DMX Pr imer”
document from the CHAUVET® Web site.
The Leg end 300E Spot uses th e standard DM X data connection for its DM X Mod es
(Mode 1 and Mode 2). You will find information about these DMX modes in the
Introduction chapter (brief description), the Operation Instructions chapter (configuration
deta ils), and the DMX Values section (individual channel values)
-6- Legend 300E Spot User Manual Rev. 01g
Page 11

Setup
1 7 8
15
Gobo Wh eel s
Extra Gobos
The Leg end 3 00E Spot c om es wi th t w o g ob o w h eels . Gobo wheel #1 h as s even r otating
gobos, while gobo wheel #2 has eight fixed gobos, as i ndicated bel ow. The diagr am
shows th e firs t an d last gobo on eac h wh eel , as per the DMX Values tables.
Rotating Gobos Fixed Gobos
Color Wheel
Legend 300E Spot User Manual Rev. 01g -7-
Page 12

Setup
Replacement
Gobo
Procedure
Gobo Replacement
Diagram
The gob os in t he Legend 3 00E Spot’s gobo wheel ar e r em o vab l e f r om their gobo plates.
This op eration is qui te simple, although it req uires the tec hnician to b e careful and to
follow th e rec om m ended proc edure.
• Make sure to disconnect the fixture’s power cord before replacing a gobo
• Always replace a gobo with a gobo of the same dimensions.
• When insert ing a glass g obo, always m ake sure that the shinny sid e of the
gobo (glass ba se) faces th e lamp. T his provide s a layer of pr otection against
the high temperature from the lamp.
1) Turn the fixture off and disconnect it from the power outlet.
2) Open the head cover by loosening the four fastening screws at the side s of the top
cover.
3) Separate the gobo plate away from the gobo wheel by pushing it toward the front of
the moving head (dir ect ion 1 in the diagram). Be careful not to push the gobo out of
the gobo plate.
4) Extract the gobo plate by pulling it outward (direction 2 in the diagram).
5) On a flat surface, remove the expansion ring that holds the gobo in place an d
remove the gobo fr om th e g ob o pl at e.
6) Insert a new gobo and hold it in plac e wit h t h e exp ans i on ring.
7) Slide the tip of the gobo plate un d er th e pr ess ure plate near the center of the gobo
wheel.
8) Push the gobo plate inwards. DO NOT force the gobo plate into the gobo wheel slot.
If co rrectly installed, the gobo plate sho uld accommodate itself in the gobo wheel
slot.
-8- Legend 300E Spot User Manual Rev. 01g
Page 13

Setup
Replacement
Lamp
Procedure
Lamp Replacement
Diagram
The Legend 300E Spot is equipped with a Philips MSR Gold 300/2 lamp. This lamp
uses a sock et called F astFit, wh ich allows for fast an d eas y l amp c hanges. Foll ow th e
procedure below to safely change t he Legend 300E Spot’s lamp.
1) Turn the fixture off and disconnect it from the power outlet.
2) Wait at least 15 minutes for the lamp to cool down.
3) Loosen the two screws on the lamp cover (marked “A” in the diagram).
4) Lift and rotate the lamp cover as per the diagram to expose the base of the lamp.
5) Rotate the ceramic base of the lamp 90º counterclockwise.
6) Pull the lamp out by holding it from its base only.
7) Insert the new lamp and turn it 90º clockwise.
8) Reverse steps 3 and 4.
9) Use the adjustment screws (marked “B” in the diagram) to position the lamp in the
center of the reflector to obtain the best output.
Increasing the
Lamp’s Life
• ALWAYS turn the lamp off by using the DMX controller or the fixture’s control panel.
Then wait at least five minutes before switching off the fixture. This will keep the
fans running to extract any remaining heat from the fixture’s head.
• DO NOT power cycle the fixture unless it is necessary.
• DO NOT t ouch the l amp wit h out wearing gloves to avoi d l eavi n g grease on the bulb
or on the contacts that could reduce the lamp’s life.
• ALWAYS change the lamp when it has reached its recommended lifespan to avoid
the risk of lamp explosion.
Legend 300E Spot User Manual Rev. 01g -9-
Page 14

Setup
Mounting
Orientation
Befor e m ounting this f ixture, read an d follow the s afety recommen dations in dicated in
the Safety Notes (pag e 2 of this manual).
Always m ount th is fixtur e in an y saf e position while m aking s ure that there is adequate
room around it for vent il ation.
Make sur e to mou nt this f ixture aw ay from any fl ammable m aterial as indicat ed in th e
Safety Notes (page 2 of this manual).
Rigging
CHAUVET® recommends f ollowing the general guidelines below when mounting the
Legend 3 00E Spot.
• When sel ect in g an install at i on l oc ation, consi d er ease of access to the f i xture for
operation, progr am m in g adjustm ents , and routine maintenance.
• Never mount the fixture in places where rain, high humidity, extreme temperature
changes, or restricted ventilation may affect it.
• If hanging this fixture, make sure that the location where you are mounting the
fixture can support its weight. Please see the Technical Specifications section of this
manual for the weight requirement of this fixture.
Procedure
The Leg end 300E Spot c omes with an alr eady instal led mounti ng bracket to whic h you
will be able to attach the two included omega clamps. B e aware that you will have to use
two mounting points per fixture. In addition, you will have to us e a s afet y cab le (n ot
included) to link the fixture to the structure.
Product Mounting
Diagram
-10- Legend 300E Spot User Manual Rev. 01g
Page 15

4. Operation
reversible. This allows reading it normally whether the fixture is on the floor or hanging
any button for 30 seconds.
Control Panel
Description
Operation
Button Function
<MENU> Exits from the current menu or function
<ENTER>
<UP>
<DOWN>
Enables the currently displayed menu or sets the currently selected
value in to the current function
Navigates upwards through the menu list and increases the numeric
value when in a function
Navigates downw ards t hr ough the menu list and decreases the
numeric val u e wh en in a function
LCD Display
Control Options
Programming
The Legend 300E Spot features a backlit liquid crystal display (LCD) that provides
plenty of inf ormati on r egardin g th e fixtur e’s s ettings and status . In additi on, t he LCD is
from a truss.
Upon pow er up, the LCD will show t he Legend logo and the f ixture identificati on, as
shown on th e left f igur e above. Af ter c ompletin g the p ower up t ests, t he LCD will s how
the DMX addr ess, t he DMX m ode, and th e temp eratur e, al ong wi th the warning sign if
the tests h av e detected an error.
Press <ENTER> t o read th e corre spondi ng error messa ge (se e Er ror M essa ge s in
the Technic al Infor ma tion section).
Press <ENTER> while looking at the error messages to clear them.
You can s et the Legend 300E Spot start address in the 001~512 DMX range. This
allows f or th e contr ol of u p to 17 fixtures in the 29-channel Mode 2. Th e Legen d 300E
Spot works with any compatible DMX controller using standard DMX cables or the
optional W-DMX receiver.
Carry out all th e pr ogr ammin g pr oced ur es ind ic ated bel ow f rom th e cont rol p anel . R ef er
to the Menu Map page to learn how the menu options relate to each other
Navigation Buttons
To enter pr ogrammin g m od e, pr es s <MENU> until you see th e M ain M enu.
To highli ght a menu opti on or to ch an g e a setting, pr ess <UP> or <DOWN>.
To change menu levels as shown in the Menu M ap, press <ENTER> or <MENU>. This
is equivalent to moving right an d l ef t of the Menu Map, respectively.
To accept the current or n ew v al u e, pr es s <ENTER>.
To return t o the previous m en u wi thout maki ng ch anges, press <MENU>.
To exit programmin g m ode, press <MENU> until you s ee t h e M ain M en u or do n ot pr es s
Legend 300E Spot User Manual Rev. 01g -11-
Page 16

Operation
DMX Functions
DMX Address
DMX Mode
View DMX Values
W-DMX Settings
From the Main M en u, highl ig ht DMX Fun ctio ns and pr es s <ENTER> (a new menu wit h
the DMX functions will open).
1) Highlight DMX Address (the current address will show).
2) Press <MENU> to exit or c ontinue bel ow.
3) To change the current address, press <ENTER> (a pop up win d ow w ill op en).
a) Change the starting address (001~512).
b) Accept the new value.
1) Highlight DMX Channel Mode (the current mode will show).
2) Press <MENU> to exit or c ontinue bel ow.
3) To change the current mode, press <ENTER> (a p op up w in d ow wil l op en).
a) Select a DMX mode (Mode 1/Mode 2).
b) Accept the selected option.
1) Highlight View DMX Value.
2) Press <MENU> to exit or c ontinue bel ow.
3) Press <ENTER> (the val u e for each of th e attr i but es of th e current DM X mode will
show).
a) Scroll along the list to see the values of all the current attributes.
b) Return to the previous m en u.
The list will show either 17 or 25 attributes, depending on the current DMX mode.
1) Highlight WDMX Setting
2) Press <MENU> to exit or c ontinue bel ow.
3) To see the WDMX settings, press <ENTER> (a sub-m en u w ill op en) .
4) Press <MENU> to exit or c ontinue bel ow.
5) To activate or deactivat e W-DMX, highlight Active (the current setting will show)
and press <ENTER> (a pop up wi nd ow w il l op en) .
a) Select YES to activate W-DM X o r NO to deactivate W-DMX.
b) Accept the selected option.
6) To enable or dis able retransmissi on, highligh t Retransmit (the current setting will
show) an d pr ess <ENTER> (a pop up window will open).
a) Select YES to en abl e r etransmis s i on or NO to deactivate retransmission.
b) Accept the selected option.
7) To reset the memory, highlight Reset Memory an d press <ENTER> (a pop up
window will open).
a) Select YES to reset the mem ory or NO to exit wit h out r es etti ng.
b) Accept the selected option.
8) Return to the previous m en u.
The W-DM X funct ionali ty requ ires th e W-DM X t ransc eiv er i nstal led on th e Legend
300E Spot fixture.
-12- Legend 300E Spot User Manual Rev. 01g
Page 17

Operation
Fixture Settings
Reverse Pan Direction
Reverse Tilt Direction
Head Motion Black Out
Color Change Black Out
Gobo Change Black Out
From the M ain Menu, h ighlight Fi xtur e Settings and pr ess <ENTER> (a new menu with
the fixture settings will open).
1) Highlight Pan Inverse (the current setting will show).
2) To reverse th e p an direction, press <ENTER> (a p op up w in d ow will open).
a) Select YES to reverse the pan direction or NO to use the normal pan direction.
b) Accept the selec t ed opt ion.
1) Highlight Tilt Inverse (the current setting will show).
2) To reverse the tilt direction, press <ENTER> ( a p op up w in d ow wil l o p en) .
a) Select YES to reverse the t ilt direction or NO to use the normal tilt direction.
b) Accept the selected option.
1) Highlight Bl.o P/T Moving (the current setting will show).
2) To black out th e out p ut w h en th e head moves , press <ENTER> (a pop up wi ndow
will open) .
a) Select YES to black out the out p ut w h en th e head tilts or p ans , or NO t o keep
the output on while th e head m ov es.
b) Accept the selected option.
1) Highlight Bl.o Color Change (the current setting will show).
2) To black out the output when the color wheel ch anges, press <ENTER> (a pop up
window will open).
a) Select YES to bl ac k out the output dur ing a color chan g e or NO to k eep t h e
output on to see the color changing.
b) Accept the selected option.
1) Highlight Bl.o Gobo Change (the current setting will show).
2) To black out th e out p ut w h en th e gobo wheel ch ang es , press <ENTER> (a pop up
window will open).
a) Select YES to bl ac k out the output dur ing a gobo chan g e or NO to k eep the
output on to see the gobo changing.
b) Accept the selected option.
Legend 300E Spot User Manual Rev. 01g -13-
Page 18

Operation
Lamp Status During
Lamp Settings
Lamp On / Off
Power On
Remote Turn Off
Lamp On if DMX Present
Lamp Off if DMX Absent
Fan Speed
Lamp Strike Delay
From the Main Menu, highlight Fixture Settings and pr ess <ENTER>.
The lamp will not ignite if the ambient temperature is 104º F (45º C) or higher.
1) Highlight On/Off (the current setting will show).
2) To turn the lam p on or off, press <ENTER> ( a p op up window will op en) .
a) Select ON to tur n th e lam p on or OFF to turn the lamp off.
b) Accept the selected option.
1) Highlight State/Power On (the current setting will show).
2) To change the lamp status during power on, press <ENTER> ( a pop up w in d ow wi ll
open).
a) Select ON to turn on the fixture and the lamp simultaneously or OFF to turn on
the fixture without turning on the lamp.
b) Accept the selected option.
1) Highlight Off Via DMX (the current setting will show).
2) To enable/disabl e remote turn off , pr ess <ENTER> (a pop up wind ow will open).
a) Select YES to en abl e f i xture turn off fr om eit h er a DMX c ontroller or it s pow er
switch, or NO to turn the fixture off only from its power switch.
b) Accept the selected option.
1) Highlight On if DMX On (the current setting will show).
2) To turn the lamp on when DMX is present, press <ENTER> (a pop up window will
open).
a) Select YES to turn the lamp on if DMX signal is present, or NO to turn the lamp
on only from the control panel.
b) Accept the selected option.
1) Highlight Off if DMX Off (the current setting will show).
2) To turn the lam p off wh en D M X is absent, press <ENTER> ( a pop up wind ow wi ll
open).
a) Select YES to turn the lamp off if DMX signal is absent, or NO to turn the lamp
off only from the control panel.
b) Accept the selected option.
1) Highlight Cooling Mode (the current setting will show).
2) To change the fan speed setting, press <ENTER> (a pop up wi nd ow wi ll op en) .
a) Select AUTO to allow the fixture’s controller to set the fan speed, or HIGH to set
the fan speed to high mode.
b) Accept the new selection.
1) Highlight Ignition Delay (the current setting will show).
2) To set the lamp strike delay, press <ENTER> (a pop up window will open).
a) Select the delay before the lamp strikes after power up in seconds (0~255).
b) Accept the new value.
Fixture Shut Off Delay
1) Highlight Low Power Delay (the current setting will show).
2) To set the lamp shut off delay, press <ENTER> (a pop up wind ow will open).
a) Select the delay before the fixture powers off after lamp off in seconds (0~255).
b) Accept the new value.
-14- Legend 300E Spot User Manual Rev. 01g
Page 19

Operation
(a new menu
Temperature Unit
(a new menu
) (the fixture will assume the new attribute value
(the values of all tested channels
Display Settings
Overturn Display
LCD Backlight Off
Backlight Brightness
From the Main Menu, highlight Display Settings an d pres s <ENTER>
with the DMX functions will open).
1) Highlight Display Inverse (the current setting will show).
2) To overturn the display, press <ENTER> (a pop up wi nd ow will open) .
a) Select YES to turn the LCD around (fixture hanging from a truss) or NO to keep
the normal LCD view (fixture standin g on a sur face).
b) Accept the selected option.
1) Highlight Backlight Auto Off (the current setting will show).
2) To configure the LCD back li ght, press <ENTER>.
a) Select YES to aut om aticall y tur n th e LC D bac k li ght off or NO to keep the LCD
backli gh t al w ays on.
b) Accept the selected option.
1) Highlight Backlight Intensity (the current setting will show).
2) To set the backlight brightness, press <ENTER> ( a pop up window w ill op en ) .
a) Select the backlight brightness (1~10), being “1” the darkest and “10” the
brightest settings.
b) Accept the new value.
1) Highlight Temperature Unit (the current setting will show).
2) To select the tem peratur e uni t, pr ess <ENTER> ( a pop up wind ow wi l l op en) .
a) Select ºC to show the temperature in the Celsius scale or ºF to show the
temperature in the Fahrenheit scale.
b) Accept the selected option.
Fixture Tests
Automatic Fixture Test
From the Main Menu, highlight Display Settings an d pres s <ENTER>
with the test functions will open).
1) Highlight Auto Test.
2) To start the built-i n t est s eq uence, press <ENTER>.
The automatic fixture test runs only once after activation.
Manual Fixture Test
1) Highlight Manual Test and press <ENTER> (a sub-men u will op en ).
2) Highlight the desired attribute (the current setting will show).
3) To change th e valu e of th e s el ected attrib ut e, pr ess <ENTER> ( a p op up window
4) Repeat steps 2 and 3 for the other attrib utes.
5) When done wit h th e t es t, exi t t o th e pr e vi ous m enu
a) The fixture will start the test sequence (pan, tilt, color, CMY, gobo selection,
gobo rotation, shutter , di m m er , prism acti vat i on, prism rotati on, frost, z oom , an d
lamp on/ off).
b) You can stop the test by pressing <MENU>.
c) Return t o the previous m en u.
will open) .
a) Set the attribute valu e (000~255
as you change it, as if you w ere w orking with a DMX c ontroller).
b) Accept the new value.
will go back to zero).
Legend 300E Spot User Manual Rev. 01g -15-
Page 20

Operation
(a new menu
Fixture Information
Fixture Operation Timer
Lamp Operation Timer
Firmware Version
Reset Functions
Pan/Tilt Reset
From th e Mai n Menu, hig hlig ht F ixture Inform ation and pr ess <ENTER>
with the fi xture infor m ati on w il l open).
1) Highlight Fixture Use Time (the accumulated fixture’s operation time will s how).
You cannot modify or reset the fixture operation timer.
1) Highlight Lamp On Time (t he accumul at ed lam p’s operati on ti m e wil l sh ow).
2) To reset the lamp op er ati on ti m er, press <ENTER> (a p op up w in d ow will open).
a) Select Reset Time to reset the timer or Exit t o exit without r es etti ng.
b) Accept the selected option.
1) Highlight Firmware Ver sion.
2) To see the firmware versions installed, press <ENTER> (a sub-menu will open)
a) The display will show the current firmware version for each of the four CPU
boards (A through D) in the fixture.
b) Return to the previous m en u.
From the Main Menu, highlight Reset and press <ENTER> (a new menu with the
resettable attributes will open).
You can leave this sub-menu at any time by pressing <MENU>.
1) Highlight Pan/Tilt and press <ENTER> (a pop up w in d ow wi ll op en ) .
a) Select YES to reset the pan and tilt movements to their home positions.
b) Accept the selected option.
Color/CMY Reset
Gobo Reset
Shutter/Dimmer Reset
Focus/Zoom/Prism/Frost
1) Highlight Color/CMY and press <ENTER> (a p op up w in d ow wi ll op e n) .
1) Highlight Gobo and press <ENTER> (a pop up win dow will open).
1) Highlight Shutter/Dimmer and press <ENTER> (a pop up wind ow wi ll op en).
1) Highlight Focus/Zoom/Prism/Frost and press <ENTER> (a pop up window will
Reset
Iris/Flatb
Reset All
1) Highlight Iris//Flatb and press <ENTER> ( a p op up w in dow will open ) .
1) Highlight All and press <ENTER> ( a pop up wi nd ow w ill op en) .
a) Select YES to reset the color wheel and the CMY filters to their home positions.
b) Accept the selected option.
a) Select YES to reset the gobo wheel to its home position.
b) Accept the selected option.
a) Select YES to reset the shutter and di mmer to their home p ositions.
b) Accept the selected option.
open).
a) Select YES to reset the focus, the zoom, the prism, and the frost to their home
positions.
b) Accept the selected option.
a) Select YES to reset the iris and flatb to their home positions.
b) Accept the selected option.
a) Select YES to reset all movi ng opti cal parts and th e m ovi ng head to their home
positions.
b) Accept the selected option.
-16- Legend 300E Spot User Manual Rev. 01g
Page 21

Operation
Special Functions
Fixture Maintenance
Timers
Fixture Defaulting
Offset Mode
Entering Offset
Mode
From the M ain Menu, highlig ht Special Fun ctions and pr ess <ENTER> (a new menu
with the special functions will open).
1) Highlight Fixture Maintenance and pr ess <ENTER> (the current maintenance
interval and remaining time will show).
2) To change the maintenance interval timer, highlight Interval and press <ENTER> (a
pop up window will open).
a) Select the new interval (in hours ).
b) Accept the new value.
3) To reset the remaining time counter, highlight Remain Time and press <ENTER> (a
pop up window will open).
a) Select Reset Time to reset the timer or Exit to exit without resetting it.
b) Accept the selected option.
It is a good idea to u se t he F i xtu r e Maint ena nce Time as a r em i nd er to ch ang e the
lamp.
1) Highlight Fact or y Set t in g and press <ENTER> (a pop up window will op en) .
a) Select YES to default the fixture to factory settings, or NO to exit with out
resetting.
b) Accept the selected option and wait for the fixture to reset.
c) Return t o the previous m en u.
The Of f s et Mod e provides fine adj us t m en ts for the h om e position of all th e moving p art s
in the optic al path as well as th e pan and tilt movem ents . T his way, when in th eir h ome
position, the moving par ts d o not sh ow any border or r educe the light out pu t .
1) Press <MENU> to enter the regular Menu Mode.
2) Press <ENTER> for more than three seconds to enter the Offse t Mode (the Offset
Mode menu will show).
Pan
1) Select Pan and press <ENTER> ( a pop up w in dow will open).
a) Select the new value (-128~127).
b) Accept the new value.
Tilt
1) Select Tilt an d press <ENTER> (a pop up window will open).
a) Select the new value (-128~127).
b) Accept the new value.
Shutter
1) Select Shutter and press <ENTER> (a pop up window will op en) .
a) Select the new value (0~255).
b) Accept the new value.
Dimmer
1) Select Dimmer and pr ess <ENTER> (a pop up wind ow will open).
a) Select the new value (0~255).
b) Accept the new value.
Color
1) Select Color and press <ENTER> (a pop up window will open).
a) Select the new value (-128~127).
b) Accept the new value.
Cyan
1) Select Cyan and press <ENTER> (a pop up wi ndow will open ) .
a) Select the new value (0~255).
b) Accept the new value.
Magenta
1) Select Magenta and press <ENTER> (a p op up window will op en).
a) Select the new value (0~255).
b) Accept the new value.
Legend 300E Spot User Manual Rev. 01g -17-
Continues on the ne xt page
Page 22

Operation
Continued from the previous page
Yellow
1) Select Yellow and press <ENTER> (a pop up window wi ll op en) .
a) Select the new value (0~255).
b) Accept the new value.
Gobo 1
1) Select Gobo 1 and press <ENTER> (a pop u p wi nd ow will open).
a) Select the new value (-128~127).
b) Accept the new value.
R-Gobo 1
1) Select R-Gobo 1 and press <ENTER>.
a) Select the new value (-128~127).
b) Accept the new value.
Gobo 2
1) Select Gobo 2 and press <ENTER> (a pop u p wi nd ow will open).
a) Select the new value (-128~127).
b) Accept the new value.
Iris
1) Select Iris an d press <ENTER> (a pop up window will open).
2) Select the new value (0~255) and press <ENTER>.
3) Return to the Of fset Mode men u.
Prism
1) Select Prism and press <ENTER> (a pop up wi nd ow will open).
2) Select the new value (0~255) and press <ENTER>.
3) Return to the Of fset Mode men u.
R-Prism
1) Select R-Prism and press <ENTER> (a pop u p wi nd ow w ill op en) .
a) Select the new value (-128~127).
b) Accept the new value.
Frost
Flab
Focus
Zoom
1) Select Frost an d press <ENTER> (a p op up w in d ow wil l op en ).
1) Select Flatb and press <ENTER> ( a pop up window will op en) .
1) Select Focus and press <ENTER> ( a pop up w in d ow wil l op en).
1) Select Zoom and press <ENTER> (a pop up wi nd ow will open).
a) Select the new value (0~255).
b) Accept the new value.
a) S elect the new value (0~255).
b) Accept the new value.
a) Select the new value (0~255).
b) Accept the new value.
a) Select the new value (0~255).
b) Accept the new value.
-18- Legend 300E Spot User Manual Rev. 01g
Page 23

Menu Map
Main Level
2nd Level
3rd Level
4th Level
DMX Address
001~512
N/A
Mode 1 (21-channel)
N/A
Mode 2 (29-channel)
N/A
View DMX Value
N/A
N/A
Active
Retransmit
Reset Memory
Pan Inver se
Tilt Inverse
Bl. o P/T Moving
Bl. O Color Change
Bl. O Gobo Change
On/Off
State/Power On
Off Via DMX
On if DMX On
Off if DMX Off
Cooling Mode
Auto/High
Ignition Delay
0~255 s
Low Power Delay
0~255 s
Display Inverse
Backlight Auto Off
Backlight Int ens ity
1~10
Temperature Unit
ºC/ºF
Auto Test
Manual Test
Fixture Use Time
N/A
Lamp On Time
Exit/Rest Time
Firmwar e Version
N/A
Pan/Tilt
Color/CMY
Gobo
Shutter/Dimmer
Focus/Zoom/Prism/Frost
Iris/Flatb
All
Fixture Maintenance
Interval/Remain Time
Factory Settin g
No/Yes
DMX Functions
DMX Channel Mode
WDMX Setting
(Requir es opti onal
WDMX card)
Operation
No/Yes
Fixture Setting
Lamp Setting
Displa y Set ting
Fixture Te st
Fixture Inform atio n
No/Yes N/A
On/Off
No/Yes
No/Yes
N/A N/A
N/A
N/A
N/A
Reset Functions
Special Functions
Legend 300E Spot User Manual Rev. 01g -19-
No/Yes N/A
N/A
Page 24

Operation
1
Pan
000 ó 255
0~540º
2
Pan Fine
000 ó 255
0~100%
3
Tilt
000 ó 255
0~270º
4
Tilt Fine
000 ó 255
0~100%
5
Pan/Tilt Speed
000 ó 255
Fast~Slow
6
Dimmer
248 ó 255
Open
000 ó 007
194 ó 255
White
Slow~Fast CCW rotation
9
Cyan
000 ó 255
0~100%
10
Magenta
11
Yellow
194 ó 255
Slow~Fast CCW rotation
000 ó 127
194 ó 255
Index
Slow~Fast CCW rotation
DMX Values
Mode 1
Channel Function Value Percent/Setting
7 Shutter
8 Color
12 Gobo 1
000 ó 255 0~100%
000 ó 007
008 ó 015
016 ó 131
132 ó 167
168 ó 203
204 ó 239
240 ó 247
008 ó 015
016 ó 023
024 ó 031
032 ó 039
040 ó 047
048 ó 055
056 ó 063
064 ó 127
128 ó 189
190 ó 193
000 ó 255 0~100%
000 ó 255 0~100%
000 ó 007
008 ó 014
015 ó 021
022 ó 028
029 ó 035
036 ó 042
043 ó 049
050 ó 057
058 ó 067
068 ó 077
078 ó 087
088 ó 097
098 ó 107
108 ó 117
118 ó 127
128 ó 189
190 ó 193
Black out
Open
Slow~Fast
Slow open/Fast close
Fast open/ S low close
Slow open/Slow close
Random strobe
Red
Orange
3,200 K
5,600 K
Pink
Green
Dark Blue
Color Mix
Fast~Slow CW rotation
Stop
Open
Gobo 1
Gobo 2
Gobo 3
Gobo 4
Gobo 5
Gobo 6
Gobo 7
Gobo 1 Shaking
Gobo 2 Shaking
Gobo 3 Shaking
Gobo 4 Shaking
Gobo 5 Shaking
Gobo 6 Shaking
Gobo 7 Shaking
Fast~Slow CW rotation
Stop
-20- Legend 300E Spot User Manual Rev. 01g
13 R-Gobo 1
128 ó 189
190 ó 193
Continues on the ne xt pag e
Fast~Slow CW rotation
Stop
Page 25

Operation
Mode 1
000 ó 005
194 ó 255
Open
Slow~Fast CCW rotation
15
Focus
000 ó 255
Near~Far
16
Zoom
000 ó 255
0~100%
000 ó 008
009 ó 255
Normal
Prism effect
194 ó 255
Slow~Fast CCW rotation
19
Iris
000 ó 255
0~100%
20
Frost
000 ó 255
0~100%
250 ó 255
Disable flatb
(Cont.)
Continued from the previous page
Channel Function Value Percent/Setting
14 Gobo 2
006 ó 010
011 ó 015
016 ó 020
021 ó 026
027 ó 031
032 ó 036
037 ó 041
042 ó 047
048 ó 057
058 ó 067
068 ó 077
078 ó 087
088 ó 097
098 ó 107
108 ó 117
118 ó 127
128 ó 189
190 ó 193
Gobo 8
Gobo 9
Gobo 10
Gobo 11
Gobo 12
Gobo 13
Gobo 14
Gobo 15
Gobo 8 Shaking
Gobo 9 Shaking
Gobo 10 Shaking
Gobo 11 Shaking
Gobo 12 Shaking
Gobo 13 Shaking
Gobo 14 Shaking
Gobo 15 Shaking
Fast~Slow CW rotation
Stop
17 Prism
18 R-Prism
000 ó 127
128 ó 189
190 ó 193
Index
Fast~Slow CW rotation
Stop
21 Function
000 ó 069
070 ó 079
080 ó 089
090 ó 099
100 ó 109
110 ó 119
120 ó 129
130 ó 139
140 ó 149
150 ó 159
160 ó 169
170 ó 179
180 ó 189
190 ó 199
200 ó 209
210 ó 229
230 ó 239
240 ó 249
No function
Enable BO d ur i ng Pan or Tilt
Disable BO during Pan or Tilt
Enable BO during color change
Disable BO during color c hange
Enable BO during gobo change
Disable BO during gobo change
Lamp on
Pan / Tilt reset
Color / CMY reset
Gobo 1 / Gobo 2 reset
Shutter reset
Focus / zoom. / prism / frost reset
Iris / flatb reset
Reset a ll
No function
Lamp off
Enable flatb
Legend 300E Spot User Manual Rev. 01g -21-
Page 26

Operation
1
Pan
000 ó 255
0~540º
2
Pan Fine
000 ó 255
0~100%
3
Tilt
000 ó 255
0~270º
4
Tilt Fine
000 ó 255
0~100%
5
Pan/Tilt Speed
000 ó 255
Fast~Slow
6
Dimmer
000 ó 255
0~100%
7
Dimmer Fine
000 ó 255
0~100%
248 ó 255
Open
000 ó 007
194 ó 255
White
Slow~Fast CCW rotation
10
Cyan
000 ó 255
0~100%
11
Magenta
000 ó 255
0~100%
12
Yellow
000 ó 255
0~100%
13
CMY Speed
000 ó 255
Fast~Slow
194 ó 255
Slow~Fast CCW rotation
000 ó 127
194 ó 255
Index
Slow~Fast CCW rotation
16
R-Gobo 1 Fine
000 ó 255
0~100%
Mode 2
Channel Function Value Percent/Setting
8 Shutter
9 Color
14 Gobo 1
000 ó 007
008 ó 015
016 ó 131
132 ó 167
168 ó 203
204 ó 239
240 ó 247
008 ó 015
016 ó 023
024 ó 031
032 ó 039
040 ó 047
048 ó 055
056 ó 063
064 ó 127
128 ó 189
190 ó 193
000 ó 007
008 ó 014
015 ó 021
022 ó 028
029 ó 035
036 ó 042
043 ó 049
050 ó 057
058 ó 067
068 ó 077
078 ó 087
088 ó 097
098 ó 107
108 ó 117
118 ó 127
128 ó 189
190 ó 193
Black out
Open
Slow~Fast
Slow open / fast close
Fast open / slow close
Slow open / slow close
Random strobe
Red
Orange
3,200 K
5,600 K
Pink
Green
Dark Blue
Color Mix
Fast~Slow CW rotation
Stop
Open
Gobo 1
Gobo 2
Gobo 3
Gobo 4
Gobo 5
Gobo 6
Gobo 7
Gobo 1 Shaking
Gobo 2 Shaking
Gobo 3 Shaking
Gobo 4 Shaking
Gobo 5 Shaking
Gobo 6 Shaking
Gobo 7 Shaking
Fast~Slow CW rotation
Stop
-22- Legend 300E Spot User Manual Rev. 01g
15 R-Gobo 1
Continues on the ne xt pag e
128 ó 189
190 ó 193
Fast~Slow CW rotation
Stop
Page 27

Operation
Mode 2
000 ó 005
Open
18
Focus
19
Zoom
000 ó 255
0~100%
000 ó 008
009 ó 255
Normal
Prism effect
000 ó 127
Index
22
R-Prism Fine
000 ó 255
0~100%
23
Iris
000 ó 255
100~0%
000 ó 007
248 ó 255
Off
Macro 31
Continued from the previous page
Channel Function Value Percent/Setting
(Cont.)
17 Gobo 2
20 Prism
21 R-Prism
24 Frost
006 ó 010
011 ó 015
016 ó 020
021 ó 026
027 ó 031
032 ó 036
037 ó 041
042 ó 047
048 ó 057
058 ó 067
068 ó 077
078 ó 087
088 ó 097
098 ó 107
108 ó 117
118 ó 127
128 ó 189
190 ó 193
194 ó 255
000 ó 255 Near~Far
128 ó 189
190 ó 193
194 ó 255
000 ó 007
008 ó 255
Gobo 8
Gobo 9
Gobo 10
Gobo 11
Gobo 12
Gobo 13
Gobo 14
Gobo 15
Gobo 8 Shaking
Gobo 9 Shaking
Gobo 10 Shaking
Gobo 11 Shaking
Gobo 12 Shaking
Gobo 13 Shaking
Gobo 14 Shaking
Gobo 15 Shaking
Fast~Slow CW rotation
Stop
Slow~Fast CCW rotation
Fast~Slow CW rotation
Stop
Slow~Fast CCW rotation
Normal
Frost
25 Pan/Tilt Macro
008 ó 015
016 ó 023
024 ó 031
032 ó 039
040 ó 047
048 ó 055
056 ó 063
064 ó 071
072 ó 079
080 ó 087
088 ó 095
096 ó 103
104 ó 111
112 ó 119
120 ó 127
128 ó 135
136 ó 143
144 ó 151
152 ó 159
160 ó 167
169 ó 175
176 ó 183
184 ó 191
192 ó 199
200 ó 207
208 ó 215
216 ó 223
224 ó 231
232 ó 239
240 ó 247
Macro 1
Macro 2
Macro 3
Macro 4
Macro 5
Macro 6
Macro 7
Macro 8
Macro 9
Macro 10
Macro 11
Macro 12
Macro 13
Macro 14
Macro 15
Macro 16
Macro 17
Macro 18
Macro 19
Macro 20
Macro 21
Macro 22
Macro 23
Macro 24
Macro 25
Macro 26
Macro 27
Macro 28
Macro 29
Macro 30
Continues on the ne xt pag e
Legend 300E Spot User Manual Rev. 01g -23-
Page 28

Operation
Mode 2
26
P/T Macro Speed
000 ó 255
Fast~Slow
234 ó 255
Color 11
236 ó 255
Macro 12
000 ó 069
No function
(Cont.)
Continued from the previous page
Channel Function Value Percent/Setting
27 Preset Color
28 Color Macro
29 Function
000 ó 021
022 ó 042
043 ó 063
064 ó 085
086 ó 106
107 ó 127
128 ó 148
149 ó 170
171 ó 191
192 ó 212
213 ó 233
000 ó 007
008 ó 028
029 ó 049
050 ó 069
070 ó 090
091 ó 110
111 ó 131
132 ó 152
153 ó 173
174 ó 194
195 ó 215
216 ó 235
070 ó 079
080 ó 089
090 ó 099
100 ó 109
110 ó 119
120 ó 129
130 ó 139
140 ó 149
150 ó 159
160 ó 169
170 ó 179
180 ó 189
190 ó 199
200 ó 209
210 ó 229
230 ó 239
240 ó 249
250 ó 255
White
Color 1
Color 2
Color 3
Color 4
Color 5
Color 6
Color 7
Color 8
Color 9
Color 10
Open
Macro 1
Macro 2
Macro 3
Macro 4
Macro 5
Macro 6
Macro 7
Macro 8
Macro 9
Macro 10
Macro 11
Enable BO d ur i ng Pan or Tilt
Disable BO during Pan or Tilt
Enable BO during color change
Disable BO during color c hange
Enable BO during gobo change
Disable BO during gobo change
Lamp on
Pan / Tilt reset
Color / CMY reset
Gobo 1 / Gobo 2 reset
Shutter reset
Focus / zoom / prism / frost reset
Iris / flatb reset
Reset a ll
No function
Lamp off
Enable Flatb
Disable Flatb
-24- Legend 300E Spot User Manual Rev. 01g
Page 29

5. Technical Information
Photometrics
General
Maintenance
To maintai n optimum per formanc e and minimi ze wear , th e user sh ould c lean t he light
fixtures fr equentl y. Us age and envir onm ent are c ontr ibutin g f actors in det erminin g th e
cleani ng f requenc y. A s a rule, the user sh oul d c lean the fixtures at l e ast twice a m ont h.
Dust buil d up red uces ligh t output perform ance and c an caus e overheati ng. This can
lead to reduced light s ource life and inc reased m ec h anical wear .
CHAUVET® rec ommends cleaning t he fixtur e’s exter nal optic s with a s oft cloth usi ng
normal glass cleaning fluid.
To clean a fixture, follow the recom m end at i ons b el ow :
• Unplug the fixture from power.
• Wait until the fixture is cold.
• Use a vacuu m (or dr y c ompress ed air) an d a s oft brus h to remove du s t coll ec t ed
on the external vents and r eac h abl e internal c omp on en ts .
• Clean all external optics and gl ass surfaces with a mild solut ion of glas s clean er or
isopropyl alcohol, and a soft, lint free cotton cloth or a lens cleaning tissue.
• Apply the solution directly to the cloth or tissue and drag any dirt and grime to the
outsid e of the lens.
• Gently polish t h e external glass s ur f ac es unt i l th ey are free of haz e a nd lint.
• When clean i ng unit s with a movabl e mirror, you s h oul d k eep the contact wit h the
mirror surface to a minimum to avoid scratching or damaging it.
Technical Information
Always dry the external optics and glass surfaces carefully after cleaning them.
If the fixture ha s on e or m or e f an s, refr ain fr o m s pin nin g the m using co mpressed
air.
Legend 300E Spot User Manual Rev. 01g -25-
Page 30

Technical Information
Lamp Startup Fail
The lamp has not started after being struck
Check ballast and igniter
Lamp too Hot Low
Ambient temperature higher than 105º C;
Clean v ents
Lamp Too Hot Power Off
Ambient temperature higher than 110º C;
Check fans
Maintenance Fixture
Proc eed w it h m aintenanc e an d r es et ti m er
Lamp On Over 700 Hour
Change lamp
Memory Initial Fail
Change main board
No communication with auxiliary CPU
Frost Reset Fail
Error Messages
Message Cause(s) Action(s)
• Check lamp
• Check lamp socket and wiring
•
Temperature Sense
Error
Power
CPU-B Error
CPU-C Error
CPU-D Error
Pan Reset Error
Pan Encode Error
Tilt Reset Error
Tilt Encode Error
Shutter Reset Fail
Dimmer Reset Fail
Color Reset Fail
Cyan Reset Fail
Magenta Reset Fa il
Yellow Reset Fail
Gobo Reset Fail
R-Gobo Reset Fail
Effect Reset Fail
R-Effect Reset Fail
No communication with temperature
sensor
lamp in low power for safety
lamp off for safety
Fixture M aintenance timer exp ired
Lamp ch ang e is over due
Memory chip error
Moving head failed going to home position
after power up or fixture reset
Indicated moving part failed going to home
positi on after power up or fi xtu re reset
• Check sensor wiring
• Check sensor integrity
• Check control board
• Check fans
• Check fan wiring
•
•
• Check fan wiring
• Clean v ents
•
•
•
• Check sensors wiring and position
• Check stepper motor, belt, and driver board
• Check control boards
• Check moving head’s free movement
• Ch eck s ens ors ’ w iring and posi ti on
• Check stepper motor, belt, and driver board
• Check the corresponding control board
• Check main control board
• Check part’s free movement and integrity
• Check sensors’ w iri ng and positi on
• Check stepper motor, belt, and driver board
• Check the corresponding control board
• Check main control board
-26- Legend 300E Spot User Manual Rev. 01g
Page 31

Troubl es h oo ti n g Guide
Symptom Cause(s) Action(s)
• No power on ou t l et • Repair outl et problem or us e another out l et
• Replace blown fuse with same type and rating
fuse
• Change p ar am et er to Y ES
• Wait for lamp to come up with full output
temperature
• Install an optically coupled DMX splitter right after
the fixture with the strong signal
• Install an optically c ou pl ed D M X spl it t er aft er uni t
#32 or before
• Keep DMX cables separated from power cables or
fluorescent/black li ghts
Fixture does not pow er up
Fixture powers up but
lamp does not ignit e
Lamp ignited but has low
intensity/color
temperature
Lamp flic k ers or tur ns off
by itself
Circuit breaker/fuse keeps
tripping/blowing
Fixture does not respond
to DMX when n earby
fixtures on the same
universe do
DMX signal problems
(see Appendix > DMX
Primer)
• Blown fuse
• Bad power cord/plug • Repair or replace power cord/plug
• Bad power switch • Replace power switch
• Bad power supply • Replace power supply
• Bad main controller • Replace main controller
• State/Power On parameter set to
NO
• Lamp temperature problems • Check err or m essages and follow inst ruc tions
• Lamp problems • Check err or m essages and follow ins truc tions
• Dimmer not at full output • Adju s t dimmer v alue
• Lamp still cold
• CTC or CMY filter interfering • Set color wheel or filter to home position
• Defec ti v e o r old lamp • Replace lamp
• Misaligned lamp • Realign lamp
• Defec ti v e lam p wires or socket • Repair/change w iring or sock et
• Defec ti v e bal las t • Replace balla s t
• Defect i ve or ol d lam p • Replace lamp
• Temper at ur e problems • Check error messages and follow instructions
• Defec ti v e lam p wires or socket • Repair/change w iring or sock et
• Defec ti v e bal las t • Replace balla s t
• Excessive circuit load • Check total load placed on the electrical circuit
• Short circuit along the power wires • Check for a short in the electrical wiring
• Wrong DMX addressing • Check DMX mod e and startin g DM X ad dress
• Damaged DMX cables • Check DMX cables
• Wrong polarity on th e c ontroller • Check polarity switch settings on the controller
• Loose DMX cables • Check ca ble connections
• Faulty DMX interface • Replace the Main board
• Faulty Display/Main board • Replace the Main board
• Non DMX cables • Use only DMX compatible cables
• Bouncing signals • Ins tall termi n at or as su gg es t ed
• Long cable / low level signal
• Too many fixtures
• Interference from AC wires
Technical Information
If you still experience technical problems after trying the above solutions, contact
CHAUVET® Technical Support.
Legend 300E Spot User Manual Rev. 01g -27-
Page 32

Technical Information
with its original
Returns
Procedure
Claims
The us er must s end the mer chandis e prepaid, in the orig inal box, and
packi ng a nd ac cess ori es. CHA UVE T® will not issue call tags.
Call CHAUVET® and request a Return Merchandise Authorization Number (RMA #)
before s hipping th e fixture. B e prepared t o provide t he model nu mber, seri al number,
and a brief description of the cause for the return.
The user must clearly label the package with a Return Merchandise Authorization
Number (RMA #). CHAUVET® will refuse any product returned without an RMA #.
DO NOT write t he R MA # directly on the box. In ste ad, wr ite it on a pro per ly a ffix ed
label.
Once you receive the RMA #, please include the following information on a piece of
paper inside the box:
• Your name
• Your addr es s
• Your phone number
• The RMA #
• A brief description of the problem
Be sure to p ack th e fixture prop erly. Any shipping damag e resul ting from inad equate
packaging will be the c us t omer’s r es p ons ib il ity. As a sugges ti on, pro p er U PS p ac ki ng or
double-boxing is always a safe method to use.
CHAUVET® reserves the right to use its own discretion to repair or replace
returned product(s).
The carrier is responsibl e for any damage inc urred during s hipping. T herefore, if the
received merchandise app ears t o have damages c aus ed during shi ppi ng, t he c ust omer
must su bm it t he damage r eport and any relat ed c l ai ms w it h the carri er, n ot CH AU VET®.
The customer must submit the report upon reception of the damaged merchandise.
Failure to do so in a timely manner may invalidate the customer’s claim with the carrier.
For other iss ues s uch as mis sing c om pon ents or p arts , dam age n ot r elat ed to s hipp in g,
or conc eal ed d amag e, t he c ust omer must make clai ms t o CH AUVE T ® within s even (7)
days of rec ei vi ng t h e m erc handis e.
Contact Us
World Headquarters
General Inform ation
CHAUVET®
5200 NW 108th Avenue
Sunrise, FL 33351
Voice: (954) 929-1115
Fax: (954) 929-5560
Toll free: (800) 762-1084
Technical Supp or t
Voice: (954) 929-1115 (Press 4)
Fax: (954) 756-8015
World Wide Web
www.chauvetlighting.com
-28- Legend 300E Spot User Manual Rev. 01g
Page 33

Technical Specifications
Weight & dimensions
Length .................................................................................................................................... 14.5 in (370 mm)
Width ...................................................................................................................................... 17.9 in (456 m m)
Height ..................................................................................................................................... 23.7 in (601 mm)
Weight .................................................................................................................................. 47.5 lbs (21.55 kg)
Power
Auto-ranging ....................................................................................................................100~240 V, 50/60 Hz
Operating current @ 120 V, 60 Hz.......................................................................................................... 4.12 A
Operating current @ 230 V, 50 Hz............................................................................................................ 3.1 A
Inrush current @ 120 V, 60 Hz ................................................................................................................. 3.1 A
Inrush current @ 230 V, 50 Hz ................................................................................................................. 1.6 A
Power consumption @ 120 V, 60 Hz ...................................................................................................... 477 W
Power consumption @ 230 V, 50 Hz ...................................................................................................... 468 W
Power factor @ 120 V, 60 Hz..................................................................................................................... 0.99
Power factor @ 230 V, 50 Hz..................................................................................................................... 0.95
Fuse ................................................................................................... Glass, 20 mm, T 10 A, 250 V (external)
Light source
Type ....................................................................................................................................... 300 W, HID lamp
Approved lamp ............................................................................... Philips MSR Gold 300/2, 8,400 K, 750 hrs
Socket ........................................................................................................................................... MiniFastFit™
Head Motion Range
Pan .............................................................................................................................................................. 540º
Tilt ............................................................................................................................................................... 270º
Thermal
Maximum ambient temperature ................................................................................................. 104° F (40° C)
Maximum surface temperature .................................................................................................. 135° F (57° C)
Photo Optic
Illuminance at 5 m (16º zoom ) ........................................................................................................ 12,200 lux
Illumin ance at 5 m (35º z oom ) .......................................................................................................... 2,800 lux
Gobo Wheel 1
Outer diameter ................................................................................................................................... 26.83 mm
Image diameter ................................................................................................................................. 23.29 mm
Thickness ................................
Material ...................................................................................................................................................... glass
Gobo Wheel 2
Outer diameter ................................................................................................................................... 31.42 mm
Image diameter ................................................................................................................................. 23.04 mm
Thickness ............................................................................................................................................. 0.80 mm
Material ....................................................................................................................................................... steel
Control & Programming
Data input ............................................................................................... locking 3 and 5-pi n XLR m al e s ock et
Data out put ......................................................................................... locking 3 and 5-pin XLR female socket
Data pin configuration....................................................................................... pin 1 shield, pin 2 (-), pin 3 (+)
Protocols ................................................................................................................................. DMX-512 USITT
DMX Cha nnels ................................................................................................................................... 21 and 29
Ordering Information
Legend 3 00E Spot .............................................................................................................. LEGEND300SPOT
Two Legend 300E Spot units in a single road case ..................................................... LEGEND300SPOTX2
Warranty Information
Warr ant y durat ion ......................................................................................................... 2-year limited warranty
Technical Information
............................................................................................................. 4.32 m m
Legend 300E Spot User Manual Rev. 01g -29-
Page 34

CHAUVET®
5200 NW 108th Ave,
Sunrise, FL 33351, U.S.A.
(800) 762-1084 – ( 95 4) 92 9-1115
FAX (954) 929-5560
www.chauvetlighting.com
Legend 300E Spot User M anual Rev. 01g
December 2010
 Loading...