

Page 1

User Manual
Page 2
Edition Notes
Edition Notes
covers the description, safety
Trademarks
Copyright Notice
Manual Usage
Document Printing
Intended Audience
CHAUVET®
Document
Product at
The Q-Spot™ 160-LED User Manual Rev. 01b
precautions, installation, programming, operation, and maintenance of the Q-Spot™
160-LED product. CHAUVET® released this edition of the Q-Spot™ 160-LED User
Manual Rev. 01b in September 2010.
CHAUVET® is a regist ered tr adem ark of CHAUVET & Sons Inc. (d/b/a CHAUVET ® or
Chauvet). The CHAUVET® logo in its entirety including the Chauvet name and the
dotted triang le, and all other tradem ar ks on this manual p ert ainin g t o servic es, pr oducts
or marketing statements (example: It’s Green Thinking™) are owned or licensed by
CHAUVET®. Any other product names, logos, brands, company names, and other
trademarks featured or referred to within this document are the property of their
respective trademark holders.
CHAUVET® owns th e c ont ent of th is us er man u al in it s ent irety, inclu di n g bu t not li mi t ed
to p i ctur es, log os, trademarks, and resources.
© Copyright 2010 CHAUVET®. All righ ts reserved
Elec tronically publi s hed by CHAUV ET® in the Un it ed S t at es of Am erica
CHAUVET® authorizes its customers to download and print this manual for professional
inform ation pur poses only. CHAUVET® expressly prohi bits the usage, c opy, stor age,
distribution, modification, or print ing of t his man ual or its content for an y oth er purp ose
without its written consent.
For bett er r esults, pri nt this docum ent in c olor, on letter s ize p aper (8.5 x 1 1 inches),
doubl e sided. If using A4 paper (210 x 29 7 mm), configure your printer to scale the
content of th is doc u m ent to A4 paper.
Disclaimer
Publications Hot
Line
Revision
a Glance
Any pers on in ch arg e of inst alli ng, oper atin g, and/or m ai ntaining the Q-Sp ot™ 16 0-LED
should read the Guide that shipped with it as w e ll as this m anual in their entiret y b ef ore
install in g, operati ng, or maint ai ni ng this product.
CHAUVET® believes that the information contained in this manual is accurate in all
respects. However, CHAUVET® ass u m es n o responsibi li ty for any err or or om is s i ons
in this document. CHAUVET® reserves the right to revise this document and to make
changes from time to time in the content hereof without obligation of CHAUVET® to
notify any person or company of such revision or changes. This does not constitute in
any way a com mi tm en t b y CHAU VE T ® to make such changes. CHAUVET® may issue
a revisi on of this manual or a new edition of it to incorpor ate such changes.
If you hav e an y com ments ab out th e accur ac y of th is d ocum ent or gen eral sug gest ions
regard ing h ow we c an impr ove it, pleas e call us at ( 800) 76 2-1084 (US callers) or +1954-929-1115 (international callers). You can download the latest versions of all
CHAUVET® products’ manuals from www.chauvetlighting.com.
The Q-Spot™ 160-LED U s er Man u al Rev. 01b sup ersed es all previ ous vers ions of this
manual. Please disc ard any older vers ions of this manu al you may have, whether in
printed or el ect ronic for m at, and replac e th em wit h this v er s i on.
Author Editor Manager PD Manager
O. Desmonteix D. Couppe M. Graham F. Sellers
Use on Dimmer
Outdoor Use
Auto Programs
Auto-ranging Power Supply
Sound Activated
DMX
Master/Slave
Q-Spot™ 160-LED User Manual Rev. 01b
Replaceable Fuse
User Serviceable
Duty Cycle
Page 3

Table of Contents
Table of Contents
1. Before You Begin ............................................................................................................1
What is Included ............................................................................................................................. 1
Unpacking Instruc tions ................................................................................................................... 1
Typographic Conv entions ............................................................................................................... 1
Icon Meaning .................................................................................................................................. 1
Safety Notes ................................................................................................................................... 2
Expected LED Lifespan .................................................................................................................. 2
2. Introduction .....................................................................................................................3
Product Description ........................................................................................................................ 3
Features ......................................................................................................................................... 3
Additional Features .................................................................................................................................... 3
DMX Channel Summary ................................................................................................................. 3
Product Overview ........................................................................................................................... 4
3. Setup ................................................................................................................................5
AC Power ....................................................................................................................................... 5
AC Plug ..................................................................................................................................................... 5
Fuse Replacement ..................................................................................................................................... 5
DMX Linking ................................................................................................................................... 6
DMX Modes ............................................................................................................................................... 6
Master/Slave Connectivity .......................................................................................................................... 6
Color Wheel ................................................................................................................................... 6
Gobo Wheel ................................................................................................................................... 7
Gobo Replacement ......................................................................................................................... 7
Mounting ........................................................................................................................................ 8
Orientation ................................................................................................................................................. 8
Rigging ...................................................................................................................................................... 8
4. Operation .........................................................................................................................9
Control Panel Description ............................................................................................................... 9
Control Options .............................................................................................................................. 9
Programming .................................................................................................................................. 9
DMX Operation .......................................................................................................................................... 9
Auto Programs ........................................................................................................................................... 9
Sound Programs ........................................................................................................................................ 9
Custom Program ........................................................................................................................................ 9
Master/Slave............................................................................................................................................ 10
Display Backlight...................................................................................................................................... 10
System Info ............................................................................................................................................. 10
Fixture Reset ........................................................................................................................................... 10
Reset Control ........................................................................................................................................... 10
Move-in-Black .......................................................................................................................................... 10
Movement Ranges ................................................................................................................................... 11
Movement Modifications ........................................................................................................................... 11
Edit Custom ............................................................................................................................................. 12
Menu Map .................................................................................................................................... 13
DMX Values ................................................................................................................................. 14
Basic Mode .............................................................................................................................................. 14
Advanced Mode ....................................................................................................................................... 15
5. Technical Information ...................................................................................................16
General Maintenance ................................................................................................................... 16
Photometrics ................................................................................................................................ 16
Troubleshooti ng Guide ................................................................................................................. 17
Returns Procedure ....................................................................................................................... 18
Q-Spot™ 160-LED User Manual Rev. 01b -a-
Page 4

Table of Contents
Claims .......................................................................................................................................... 18
Contact Us .................................................................................................................................... 18
Technical Specifications................................................................................................................ 19
-b- Q-Spot™ 160-LED User Manual Rev. 01b
Page 5
1. Before You Begin
MENU > Settings
ON
This icon indicates critical ins tallation, configuration, or oper ation
equipment, or c ause harm to the user.
Before You Begi n
What is
Included
Unpacking
Instructions
Typographic
Conventions
Icon Meaning
• One Q-Sp ot™ 16 0-LED
• Two mounting brackets
• One power cord
• Three extra gobos
• Warr ant y Card
• Quick Start Guide
Immedi ately up on recei ving t his prod uct, carefully unpack it and check th e contain er in
which you r eceived it . Make s ure that you have recei ved all t he parts ind icated above
and that they are all in g ood con dition. I f the mat erial ins ide th e cont ainer (thi s prod uct
and any other accessory included with it) appears damaged from shipping, or if the
container shows s ig ns of mis h an dl ing, noti fy the shipper immedi at ely. In ad dition, retain
the container and all the p acki n g m at er i al f or ins p ec tion.
See the Claims section in t h e Tec h nical Infor m at ion chapter.
Convention Meaning
1~512 A range of val u es in the text
50/60 A set of mutually exclusive values in the text
[10] A DIP switch to be configured
Claims
“COLORado™ UM” The name of another publication or manual
<SET> A button on the fixture ’s contro l panel
Settings A fixtur e f unc ti on or a menu opti on
1~10 A range of m enu val u es from which to choose in a menu
Yes/No A set of two mutual l y exc l us ive menu opti ons in a menu
Icon Meaning
A new term, or a section or chapter in this document
A sequence of menu opt i ons
A unique value to entered or select in a menu
The term “ DMX” used throughout th is document refer s to the USITT DM X512-A
transmission protocol.
Q-Spot™ 160-LED User Manual Rev. 01b -1-
information. Failure to comply with this information may render
the fixture partially or completely inoperative , damage third-party
This icon indicates important installation or configuration
information. Failure to comply with this information may pr ev en t
the fixture from functioning correctly.
This icon indicates useful, although n on-c ritical inf orm at i on .
Page 6
Before You Begi n
carefully because they include important safety
Safety Notes
Personal Safety
Mounting and Rigging
Please read the following notes
inform at i on ab ou t th e inst allation, usage, and maintenance of this product.
It is important to read all these notes before starting to work with this product.
There are no user serviceable parts inside this product. Any reference to
servicing it you may find from now on in this User Manual will only apply to
properly CHAUVET® certif ied technicians. Do not open the ho using or attempt
any repairs unless you are one of them.
Please refer to all applicable local codes and regulations for the proper
installation of this prod uct .
Keep th is manual for future c on sultation. If y o u s el l this product to ano ther user,
make sure that they also receive this manual.
• Avoid direct eye exposure to the light source while th e fixture is on.
• Always disconnect this product from its power source before servicing.
• Always connect this product to a ground ed circuit to avoi d th e ris k of el ectrocution.
• Do not touc h this product’s housing when operatin g b ec ause it could be hot.
• This product is for indoor use only! To prevent risk of fire or shock, do not expose
this produc t t o r ain or m oistur e.
• This product is for outdoor use (IP66). However, do not submerge it.
• This product is for outdoor use and it can be submerged (IP67). However, do not
submer g e it deeper than 1 m.
• This product weighs XX lbs (XX kg). Alw ays as k f or h elp when mount ing t his
product to avoid personal injuries or damage to the unit.
• Make sure there are no flammable materials close to this product while operating.
• When hanging this product, al w ays s ec ur e it t o a fast ening device using a saf et y
cable (not provided).
• Do not carry this fixture from the head; carry it from the base instead.
Power and Wiring
Operation
Expected LED
Lifespan
• Always m ak e sure that you are connecting this product to the proper voltage, as
per the spec ifications in th is man u al or on th e product’s stic k er .
• Never connect this prod uc t to a dimmer pack or rheost at.
• Make sure the product’s housing or power cable are not cracked, crimped, or
damaged.
• Never disconnect this product by pulling or tugging on the power cable.
• Do not operate this fixture if you see damage on the housing, lenses, ultraviolet
filter, or c ab les; have th e dam aged parts r ep l ac ed by an authoriz ed technic i an at
once.
• Do not cover the ventilation slots when the fixture is operating to avoid internal
overheating.
• The maximum ambient temperature (Ta) is 104° F (40° C). Do not operate this
product at a higher temperatur e.
• In case of a serious operating problem, stop using this product imm e di ately!
In the un likely event that your CHAUVET® product may requir e servic e, plea se
contact CHAUVET® Technical Support.
LEDs gr adually d ecline in bri ghtness over time, mostly bec ause of h eat. Pack aged in
clust ers, LEDs exh ibit hig her op eratin g temper atures than in ideal or sing ular opt imum
conditi ons. For this r eason, using all color LEDs at th eir fullest int ensity signific antly
reduc es the LEDs’ lif espan. U nder n ormal con ditions , this lif espan c an be of 40,000 t o
50,000 hours. If extending this lifespan expectancy is vital, lower the operational
temper ature by imp roving fi xture ven til ation an d r educing the extern al temp eratu re. I n
additi on, limiting the overall projecti on intensit y ma y also help to ext end the LEDs life.
-2- Q-Spot™ 160-LED User Manual Rev. 01b
Page 7

2. Introduction
Description
Summary
2
2
3
3
4
4
Introduction
Product
Features
Additional Features
Th e Q-Spot™ 160 LED is a hard edge 9- or 12-channel DMX yok e with a nine-step
color wh eel pl us wh it e. I t f eat ur es a 7-position rotating slot-and-lock gobo wheel with an
easy-to-open cover and a three-facet prism.
• 9 or 12-chan nel DMX LED moving yoke
• Pan: 540º
• Tilt: 270º
• Color Wheel
Nine colors + white
Rainbow color spins at variable speeds
• Gobo wheel with gobo shake
Seven interchangeable, slot-n-lock, rotating gobos + open
• One high-powered, 20 W (1,000 mA) LED
• One 3-fac et pri sm
• Variable elec tronic strobe
• Variable elec tronic dimm er (0~100%)
• Remote fixture reset & vector speed channel
• Up to 255 user-programmable steps without DMX controller
• Move-in-black for pan/tilt
• Built-in automated programs
• Built-in sound activated programs
• Three extra gobos
• User-selectable pan/til t ranges
• Automatic pan/tilt correction
• Reset to factory settings option
• User-s el ec table basic or advanced op erat i n g m od es
Gobo wheel sp ins at var i able speeds
DMX Channel
Th e Q-Spot™ 160 LED has t wo DMX modes, B asic (9 channel s) and Advanc ed (12
channels). The table below shows the functions assigned to each channel in these
DMX modes.
Basic Mode Advanced Mode
DMX Channel Function DMX Channel Function
1 Pan 1 Pan
Tilt
Color
Gobo
5 Gobo Rotation 5 Pan/tilt speed
6 Prism 6 Color
7 Dimmer 7 Gobo
8 Strobe 8 Gobo Rotation
9 Control 9 Prism
10 Dimmer
11 Strobe
12 Control
Pan fine
Tilt
Tilt fine
Q-Spot™ 160-LED User Manual Rev. 01b -3-
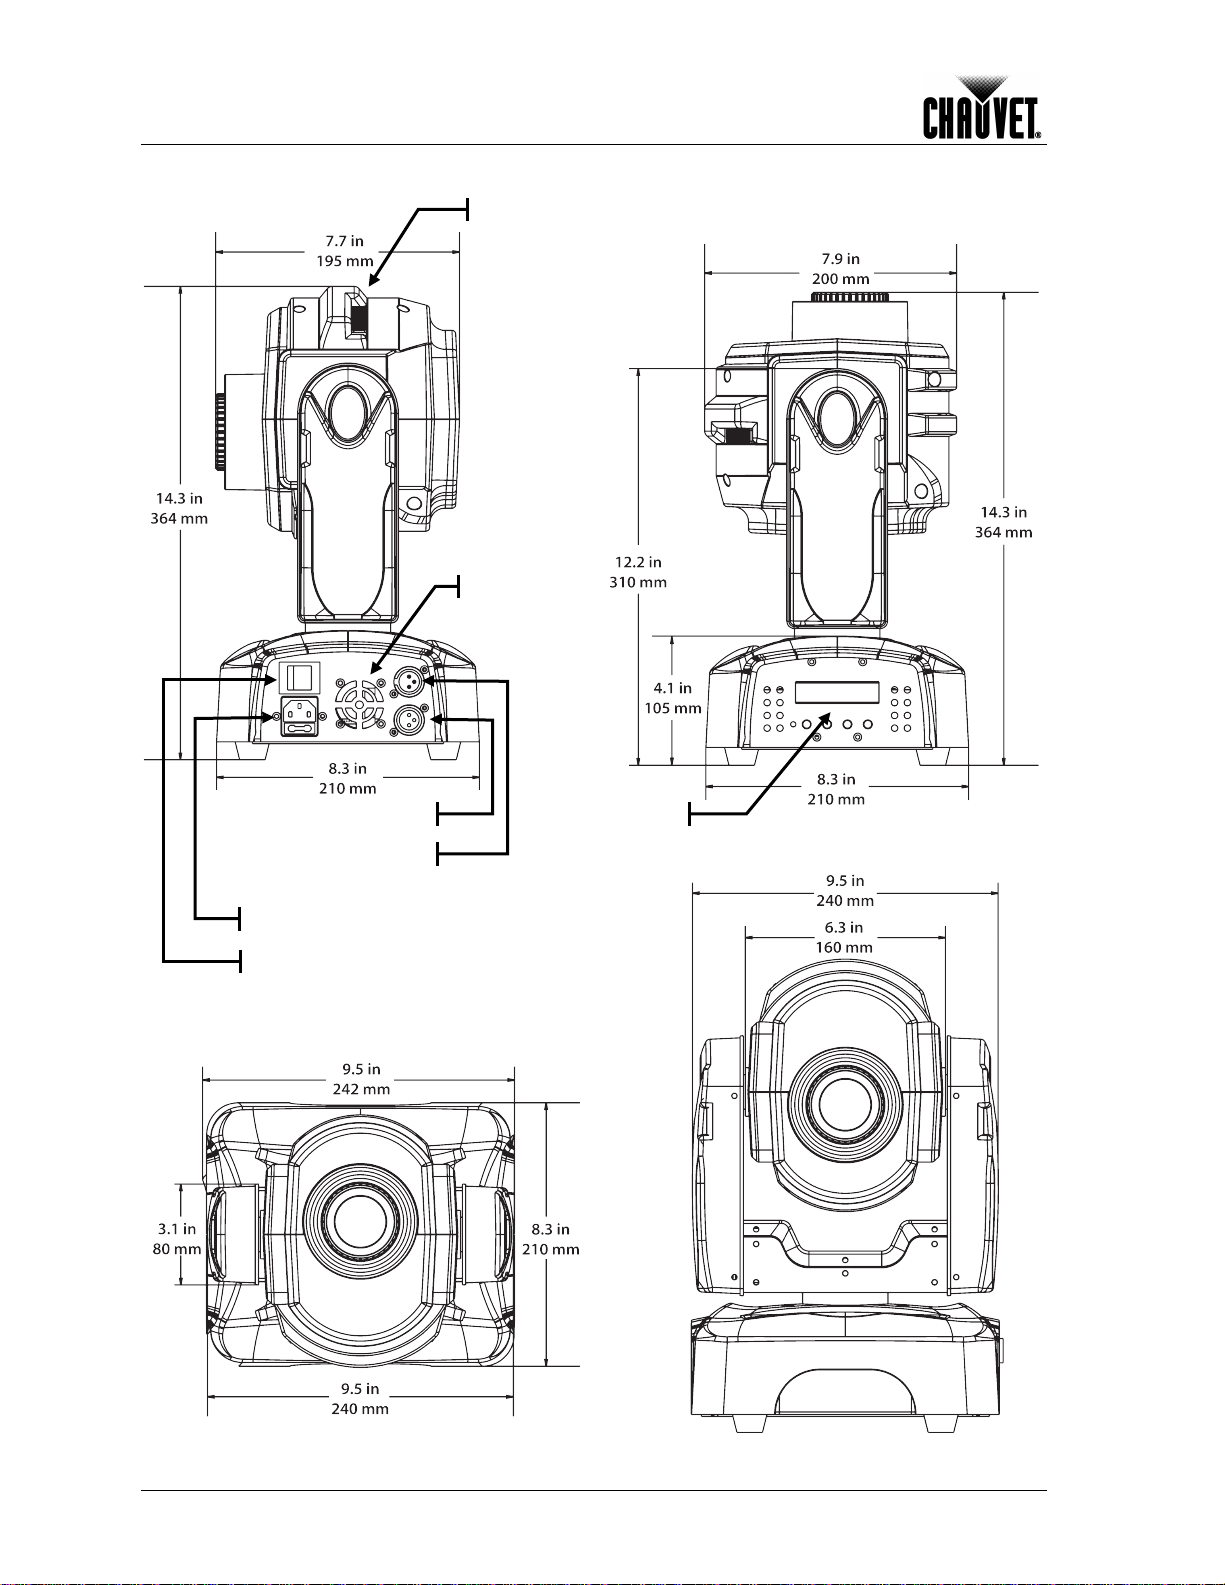
Page 8
Introduction
DMX Out
Power Input/Fuse holder
DMX In
On/Off Switch
Fan
Control Panel
Gobo cover
NOTE: Dimension in inches rounded to the nearest decimal digit
Product Overview
-4- Q-Spot™ 160-LED User Manual Rev. 01b
Page 9

3. Setup
see the label affixed to
specifications
Power Input
On/Off Switch
AC Power
This product has an auto-ranging power supply that can work with an input voltage
range of 100~240 VAC, 50/60 Hz.
Make sur e th at you ar e con necti ng th e Q-Spot™ 160-LED to th e pr oper volt age, as per
the specifications in this guide, the product’s manual or on the product’s sticker.
Always c onnect t he Q-Spot™ 160-LED to a prote cted circuit with an appro priate
electrical ground to avoid the risk of electrocution or fire.
To determi n e the power requ ir ements for th e Q-Sp ot™ 16 0-LED
the sid e of th e fixtur e. Alter nativel y, you m ay refer to the corresponding
chart in the Technical Informat io n chapter of this manual .
The list ed curren t rating i ndicates t he maxim um curr ent draw dur ing norm al operat ion.
For more information, you may download the “Sizing the Circuit Breakers” document
from the CHAUVET® Web site.
Never co nnect the Q-Spot™ 160-LED to a r heostat (v ariable resi stor) or dim mer
circuit, even if the rheostat or dimmer channel serves only as a 0 to 100% switch.
Setup
AC Plug
Fuse Replacement
The Q-Spot™ 16 0-LED comes wit h a power input cor d terminated wi th an Edison plug
(US mark et). If the pow er cord th at came with your fixtur e has no plug or you need to
change the Edison plug, use the table below to wire the new plug.
Connection Wire (US) Wire (Europe) Screw Color
AC Live Black Brown Y el l ow or B r ass
AC Neutral White Blue Silver
AC Ground Green/Yellow Green/Yellow Green
Make sure t o discon nect the fi xture’s po wer cord b efore repl acing a blo wn fuse,
and always replace it with a fuse of the same type and rating.
1) With a flat head screwdriver, wedge the fuse holder out of its housing and remove
the blown fuse from its holder.
2) Replace the bl ow n fuse with a fuse of the exact s am e t yp e and rat i ng .
3) Insert the fuse holder back in its place, and reconnect power.
The fuse is located
inside this compartment.
Remove it as instructed
above.
Q-Spot™ 160-LED User Manual Rev. 01b -5-
Page 10

Setup
DMX Linking
DMX Modes
Master/Slave
Connectivity
You may link any Q-Spot™ 160-LED f ixtur e to a D M X c ontr oller us i ng a s tan d ard D MX
serial connection. If using other DMX compatible fixtures with a Q-Spot™ 160-LED
fixture, it is possible to control them individually with a single DMX controller.
If yo u ar e n ot fa mi l i ar w i th t h e D M X s t an d ard, or if you need inf orm ati on abou t th e DMX
cables needed to link the Q-Spot™ 160-LED fixture to a DMX controller, you may
download the “DMX Primer” document from the CHAUVET® Web site.
The Q-S pot™ 160-LED u s es t h e standard D MX d at a conn ect ion f or its **DM X mod e(s),
<li st of mo d es >**. You wi ll find inf orm ation ab out th ese DMX modes in the Introduction
chapter (brief description), the Operation Ins truc tio ns chapt er (configuration d et ails ) , an d
the DMX Values section (individual channel values).
The Master /Slave mode all ows a Q-Spot™ 16 0-LED fixtur e to control on e or more QSpot™ 16 0-LED fi xtures wit hout a DMX c ontroller . The contr olling fi xture bec omes the
“master” when running an Auto program (AUTO 1 or 2), a sound activated program
(SOUND 1 or 2), or the custom program (CU STOM). Th e cont rolled fixtures are the
“slaves” and you mus t set them to “Slave” mode from t heir respec tive contr ol panels.
During the Master/Slave operation, the slave fixtures will operate in unison with the
master fixture.
The master and slave fixtures link to each other using the standard DMX serial
connection. I f you are not familiar with the Mast er/Sla ve con nec ti v i ty, you may d ownload
the “DMX Primer” document from the CHAUVET® Web site.
DO NOT con ne ct a DMX controller to the fixtures o per ating in M ast er/Sl av e mo de .
Otherwise, the signals from the DMX controller may interfere with the signals from
the master unit.
The Operation chapter of th is manual provides detailed instructions on how to
configure the Master and Slave units.
Color Wheel
Color Wheel Diagram
The Q-Spot™ 160-LED c omes equip ped with a Color wheel feat uri ng ni ne c olors and a
white (open).
-6- Q-Spot™ 160-LED User Manual Rev. 01b
Page 11

Setup
lock system) gobos. The gobo wheel has an eighth position with no
Gobo
Sliding knob
Gobo cover
Gobo Wh eel
Gobo Wheel Diagram
Gobo
Replacement
Procedure
The Q-Sp ot™ 1 60 -LED com es equi pp ed with a gobo wh eel featur in g seven r otat ing and
replaceable (slot-ngobo (op en) .
The Q-Spot™ 160-LED f eatures a gob o whe el th at holds sev en int erch ang eabl e, slot-nlock gobos. These gobos can rotate at various speeds and in both directions.
Follow th e pr oc edure bel ow to ch ange any of the gobos on the g obo wheel
Always disconnect the fixture from the AC power before opening it.
1) Remove the gobo cover.
2) Remove the slot-n-lock gobo from the gobo wheel.
3) Using a small tool, pry the tension ring from the gobo holder.
4) Remove the old gob o.
5) Insert the new gobo, and replace in the reverse steps of removal.
If using coat ed gla ss gobo s, mak e sure that th e more r efl ective si de of t he go bo
(glass base) faces the light source. This way, the glass base of the gobo will
provide extra isolation to its coating from the heat of the light source, thus
minimizing the risk of damaging the gobo’s coating.
Gobo Replacement
Diagram
Q-Spot™ 160-LED User Manual Rev. 01b -7-
Page 12

Setup
sure that they are capable of supporting the weight of this fixture. You
C clamp
(not provided)
Safety cable
(not provided)
Mounting
brackets
(included)
Mounting
Orientation
Rigging
Befor e m ounting this f ixture, read an d follow the saf ety recommen dations in dicated in
the Safety Notes section (page 2 of this manual).
Always m ount th is fixtur e in an y saf e position while m aking s ure that there is adequ ate
room around it for vent il ation, configuration, and maintenance.
CHAUVET® recommends following the general guidelines below when mounting the QSpot™ 16 0-LED.
• When sel ect in g an install at i on l oc ation, consi d er ease of access to the f i xture for
operation, progr am m in g adjustm ents , and routine maintenance.
• Make sure to mount this fixture away from any flammable material as indicated in
the Safety Notes section.
• Never mount the fixture in places where rain, high humidity, extreme temperature
changes, or restricted ventilation may affect it.
• If hanging this fixture, make sure that the location where you are mounting the
fixture can support its weight. Please see the Technical Specifications section of this
manual for the weight requirement of this fixture.
Procedure
You c an mount t he Q-Spot ™ 160-LE D on a f lat, rigi d surf ace or han g it fr om a trus s.
This f ixtur e includes t wo mountin g brackets f or overhead mounting . You can att ach a
rigging c lamp to . Y ou must supp ly your own “C ” or “O” c lamps as w ell as you r saf ety
cable, making
need to us e tw o cl amps p er f i xture.
Product Mounting
Diagram
-8- Q-Spot™ 160-LED User Manual Rev. 01b
Page 13

4. Operation
function
function
numeric val u e wh en in a function
numeric val u e wh en in a function
Control Panel
Description
Button Function
<MENU>
<ENTER>
Exits fr om th e current menu or
Enables the currently displayed
menu or sets the currently
selected value in to the current
Operation
Control Options
Programming
DMX Operation
<DOWN>
<UP>
You can set the Q-Spot™ 160-LED start address in the 001~512 DMX range. This
allows for the control of up to 42 fixtures in the 12-channel A d vanced DM X mod e.
Carry out all th e pr ogr ammin g pr oced ur es ind ic ated bel ow f rom th e cont rol p anel . R ef er
to the Menu Map on page 13 to learn how th e m enu op t i ons relate to each ot h er.
To go to an option, press <MENU> r ep e atedly until the option sh ow s on the displa y.
To select an opti on value, pr ess <UP> or <DOWN> unt il you see the desi red valu e and
press <ENTER> to accept it.
To exit to the previous m en u lev el, press <MENU>.
1) Go to Intro > Run.
a) Select DMX-512.
b) Activate the DMX operation mode or return to the previous level.
2) Go to Intro > Address.
a) Select the starting address (001~512).
b) Activate the new DMX address or return to the previous level.
3) Go to Intro > Channels.
a) Select e i th er Advanced (12 channels) or Basic (9 channels).
b) Activate the selected DMX mode or return to the previous level.
Navigates downw ards t hr ough
the menu lis t an d decreas es th e
Navigates upwards through the
menu list and inc reases th e
When select ing the Advanced mode, you can accomm odate up to 42 Q-Spot™
160-LED fixtures o n the same DMX univ erse.
Auto Programs
Sound Programs
Custom Program
Q-Spot™ 160-LED User Manual Rev. 01b -9-
1) Go to Intro > Run.
2) Select Auto 1 or Auto 2.
3) Activate the selected AUTO program or return to the previous level.
1) Go to Intro > Run.
2) Select Sound 1 or Sound 2.
3) Activate the selected SOUND program or return to the previous level.
1) Go to Intro > Run.
2) Select Custom.
3) Activate the CUSTOM program or return to the previous level.
See Edit Custom to learn how to configure the 255 steps of the CUSTOM program.
Continues on the ne xt pag e
Page 14

Operation
Fixture Reset
Master/Slave
Display Backlight
System Info
Reset Control
Continued from previous page
1) On the master unit, go to Intro > Operation.
a) Select any suitable Auto or Sound program.
b) Activate the selected AUTO or SOUND program.
2) On eac h of th e slave units, go to Intro > Operation.
a) Select Slave.
b) Ac ti vat e t h e SLA VE m od e or return to the previous level.
1) Go to Intro > Display.
2) Select
60 Close (the b acklight will turn off aft er 60 s ec onds of c ontrol panel i n act i vi t y) or
Bright (the backlight will stay on permanently).
3) Activate the selected backlight operation or return to the previous level.
1) Go to Intro > Info.
2) Select Edition (t h e f irm w ar e ver s i on w il l sh ow on th e dis play).
3) Acc ept or ret u rn to the previ ous l evel .
1) Go to Intro > Reset.
2) Select
Yes (all cus t om m odificati ons wi ll b e lost) or
No (all custom modifications will remain).
3) Ac c ept or ret u rn to the previ ous l evel .
1) Go to Special > Reset.
2) Select
DMX (the fixture will accept reset commands from the DMX controller) or
System (th e fi xture will onl y res et from the control panel).
3) Ac c ept or ret u rn to the previ ous l evel .
Move-in-Black
1) Go to Special > Black.
2) Select
No (move-in-bl ac k wil l st ay ac ti ve f or as l ong as the Control c h ann el remains
between 020~039) or
Yes (move-in-blac k w il l act ivate per m an ent l y if the Control channel remains
between 020~039 for 3 seconds.
3) Ac c ept or ret u rn to the previ ous l evel .
Once Move-in-Blac k is per ma nently a ctive, it w ill deact iv ate if the Control channe l
remains between 040~059 for 3 seconds.
-10- Q-Spot™ 160-LED User Manual Rev. 01b
Continues on the ne xt pag e
Page 15

Operation
Movement Ranges
Continued from previous page
1) Go to Range.
2) Set the start point of the PAN movement.
a) Select P/Start.
b) Select a val u e (000~255).
c) Activate the new value.
3) S et th e end of t h e PAN m ov em en t .
a) Select P/Finish.
b) Select a valu e (000~255).
c) Acti vat e t h e new value.
4) Set the start point of the TILT movement.
a) Select T/Start.
b) Select a valu e (000~255).
c) Acti vat e t h e new value.
5) S et th e end of the TILT movement.
a) Select T/Finish.
b) Select a valu e (000~255).
c) Acti vat e t h e new value.
6) Activate/disable the movement ranges.
a) Select Use.
b) Select
No (f ull r ang e m ov em en t) or
Yes (limited range movements).
c) Activate the new setting.
Movement
Modifications
Q-Spot™ 160-LED User Manual Rev. 01b -11-
1) Go to Invert.
2) Reverse the direction of the PAN movement (540º~0).
a) Select Pan.
b) Select No (0 ~5 40º) or Yes (540~0º).
c) Activate the new setting.
3) Reverse the direction of the TILT movement (270º~0).
a) Select Tilt.
b) Select
No (0~270 º) or
Yes (270~0º).
c) Activate the new setting.
4) Change the way the COLOR wheel rotates.
a) Select Color.
b) Select
Step (the color wheel jumps from one color to the next) or
Linear (the color wheel rotates smoothly from one color to the next to allow for
rainbow effects).
c) Activate the new setting.
5) Ac tivate/disable the m ov em en t modific ations.
a) Select Use.
b) Select
No (use normal settings) or
Yes (use modified settings)
c) Press <ENTER> to act i vate the new setting.
Continues on the ne xt pag e
Page 16

Operation
Step 255 Time = 0 Use = No
Continued from previous page
Edit Custom
1) Go to Edit.
2) Select Step.
a) Select a step number (000~255).
b) Activat e t h e new val u e.
3) Select Pan.
a) Select a pan position (000~255).
b) Activate the n ew val u e.
4) Select Tilt.
a) Select a tilt position (000~255).
b) Activat e t h e new val u e.
5) Select Speed.
a) Select a movement (pan & tilt) speed (000~255).
b) Activat e t h e new val u e.
6) Select Color.
a) Select a color from the color wheel (000~255).
b) Activat e t h e new val u e.
7) Select Gobo.
a) Selec t a gobo from the gobo wheel (000~255).
b) Activat e t h e new val u e.
8) Select Gobo.rot.
a) Selec t a rotation mode for the selected gobo (000~255).
b) Activat e t h e new val u e.
9) Select Prism.
a) Selec t a prism operation mode (000~255).
b) Activat e t h e new val u e.
10) Select Dimmer.
a) Selec t a dimmer value (000~255).
b) Activat e t h e new val u e.
11) Select Strobe.
a) Selec t a strobe mode (000~255).
b) Activat e t h e new val u e.
12) Select Time.
a) Select th e dur at i on of this step (000~255).
b) Activat e t h e new val u e.
13) Select Use.
a) Enable this step (Yes/No).
b) Activat e t h e new val u e.
14) Repeat for the other steps.
-12- Q-Spot™ 160-LED User Manual Rev. 01b
For smoother o per ation of the CUST OM program, disabl e al l the step s that are no t
part of the program (Use = No ).
The fixture will execute all the steps in the CUSTOM program and it will stop.
To make the fixture to start over add a last step whose duration is 0 seconds.
Example:
Step 1: Time = 5 Use = Yes
Step 2: Time = 4 Use = Yes
Step 3: Time = 6 Use = Yes
Step 4: Time = 0 Use = Yes (This step creates a loop)
Step 5: Time = 0 Use = No
(Unused steps)
Page 17

Menu Map
Address
001~512
Sets the DMX starting address
Reset
Yes/No
Resets the fixture to the “home” position
DMX-512
Sets the fixture to DMX mode
Auto 1
Starts the hanging auto mode (pointing down)
Auto 2
Starts th e fl oor st an ding auto mod e (for placin g on s p eak er )
Sound 1
Starts the hanging sound mode (pointing down)
Sound 2
Starts the floor standing sound mode (for placing on speaker)
Custom
Test
Runs a standard test program
Slave
Advanced
16-bit pan/tilt operation
Basic
8-bit pan/t ilt operati on
60 close
Turns the dis play back li gh t of f after 60 seconds of being idle
Bright
Sets the display backlight to remain on indefinitely
Info
Edition
Shows th e s oft w ar e vers i on
Normal
Sets the Pan operation: 0~540º
Reverse
Reverses the Pan operation: 540~0º
Normal
Reverse
Reverses the Pan operation: 270~0º
Step
Linear
Allows split color operation on the color wheel channel
Use
No/Yes
Enables / dis ables all Invert functions
P/start
000~255
Sets the Pan starting range
P/Finish
000~255
Sets the Pan end range
T/start
000~255
Sets the Tilt starting range
T/Finish
000~255
Sets the Tilt end range
Use
No/Yes
Enables / disables all Range functions
No
Control
020~039
Move-in-black activates permanently if Control channel = 020~039
for 3 seconds. (requires Control channel = 040~059 to deactivate it)
DMX
Allows the reception of a DMX remote reset command
System
Disables the reception of a DMX remote reset command
Step
000~255
Selects wh ic h st ep to edit
Pan
Tilt
X/Y_Speed
Color
Gobo
Gobo_Rot
Prism
Dimmer
Strobe
Time
000~255
Selects the duration of the step
Use
No/Yes
6-Default
Default
No/Yes
Defaults the fixture and erases the custom programs
st
Level 2nd Level 3rd Level Description
1
Operation
Run
1-Intro
2-Invert
3-Range
4-Special
Channels
Display
Pan
Tilt
Color
Black
Yes
Runs the user’s program
The fixture responds to a mast er un it
Sets the Pan operation: 0~270º
Sets the color wheel channel to locking colors
Move-in-black is active only when
ch ann el =
Reset
5-Edit
Q-Spot™ 160-LED User Manual Rev. 01b -13-
000~255
Use the nine differen t att r ibutes of the f i xture to creat e a custom step
(repeat for the other steps)
Enables / disables the program step
Page 18

Operation
1
Pan
000 255
0~540°
2
Tilt
000 255
0~270°
000 014
150 255
W h i te ( o pen)
Rainbow and linear effect (slow~fast)
000 009
220 255
No gobo (open)
Gobo scroll (slow~fast)
137 255
Counter-clockwise (slow~fast)
128 255
3-facet prism
7
Dimmer
000 255
Closed Open
000 031
224 255
Closed
Open
s to trigger
DMX Values
Basic Mode
Channel Function Value Percent/Setting
3 Color
4 Gobo
5 Gobo Rotation
015 029
030 044
045 059
060 074
075 089
090 104
105 119
120 134
135 149
010 019
020 029
030 039
040 049
050 059
060 069
070 079
080 099
100 119
120 139
140 159
160 179
180 199
200 219
000 002
003 006
007 128
129 132
133 136
Red
Yellow
Green
Pink
Blue
Orange
Magenta
Light blue
Light green
Gobo 1
Gobo 2
Gobo 3
Gobo 4
Gobo 5
Gobo 6
Gobo 7
Gobo shake 7
Gobo shake 6
Gobo shake 5
Gobo shake 4
Gobo sh ak e 3
Gobo shake 2
Gobo shake 1
No function
Clockwise (slowest)
Clockwise (slow~fast)
No function
Counter-clockwise (slowest)
6 Prism
8 Strobe
Control (hold
each of these
9
for 3
function)
-14- Q-Spot™ 160-LED User Manual Rev. 01b
000 127
032 063
064 095
096 127
128 159
160 191
192 223
000 019
020 039
040 059
060 079
080 099
100 119
120 139
140 159
160 179
180 199
200 219
220 255
No function
Open
Strob e (sl ow ~fast)
Open
Pulse Strobe (slow~fast)
Open
Random Strobe (slow~fast)
No function
Pan/tilt move-in-black (activate)
Pan/tilt move-in-black (deactivate)
Auto 1
Auto 2
Sound 1
Sound 2
Custom
Test
No function
Reset
No function
Page 19

1
Pan
000 255
0~540°
2
Pan fine
000 255
Fine pan adj us tment
3
Tilt
000 255
0~270°
4
Tilt fine
000 255
Fine tilt adjustment
5
Pan/tilt speed
000 255
Normal~slow
150 255
Rainbow and linear effect (slow~fast)
220 255
Fl o w ef fect
137 255
Counter-clockwise (slow~fast)
128 255
3-facet prism
10
Dimmer
000 255
0~100% (c l os ed~open)
000 031
Closed
220 255
No function
Advanced Mode
Operation
Channel Function Value Percent/Setting
6 Color
7 Gobo
8 Gobo Rotation
000 014
015 029
030 044
045 059
060 074
075 089
090 104
105 119
120 134
135 149
000 009
010 019
020 029
030 039
040 049
050 059
060 069
070 079
080 099
100 119
120 139
140 159
160 179
180 199
200 219
000 002
003 006
007 128
129 132
133 136
White ( op en)
Red
Yellow
Green
Pink
Blue
Orange
Magenta
Light blue
Light green
No gobo (open)
Gobo 1
Gobo 2
Gobo 3
Gobo 4
Gobo 5
Gobo 6
Gobo 7
Gobo shake 7
Gobo shake 6
Gobo shake 5
Gobo shake 4
Gobo shake 3
Gobo shake 2
Gobo shake 1
No function
Clockwise (slowest)
Clockwise (slow~fast)
No function
Counter-clockwise (slowest)
Q-Spot™ 160-LED User Manual Rev. 01b -15-
9 Prism
11 Strobe
Control
(Hold each of
12
these for 3 s to
trigger function)
000 127
032 063
064 095
096 127
128 159
160 191
192 223
224 255
000 019
020 039
040 059
060 079
080 099
100 119
120 139
140 159
160 179
180 199
200 219
No function
Open
Strob e (sl ow ~fast)
Open
Pulse Strobe (slow~fast)
Open
Random Strobe (slow~fast)
Open
No function
Pan/tilt move-in-black activation
Pan/tilt move-in-black deactivation
Auto 1
Auto 2
Sound 1
Sound 2
Custom
Test
No function
Reset
Page 20

Technical Information
Photometrics
5. Technical Information
General
Maintenance
To maintai n optimum per formanc e and minimi ze wear, the us er should cl ean the light
fixtures fr equentl y. Us age and envir onm ent are c ontr ibutin g f actors in determining the
cleani ng f requenc y. A s a rule, the user sh oul d c lean the fixtures at l e ast twice a m ont h.
Dust buil d up red uces ligh t output perform ance and c an cause overheati ng. This can
lead to reduced light s ource life and inc reased m ec h anical wear .
CHAUVET® rec ommends cleaning t he fixtur e’s extern al optic s with a sof t cloth usi ng
normal glass cleaning fluid.
To clean a fixture, follow the recommendations below:
• Unplug the fixture from power.
• Wait until the fixture is cold.
• Use a vacuu m (or dr y c ompress ed air ) an d a s of t brus h to remove du s t coll ec t ed
on the external vents and r eac h abl e internal c omp on en ts .
• Clean all external optics and gl ass surfaces with a mild solut i on of gl a s s clean er or
isopropyl alcohol, and a soft, lint free cotton cloth or a lens cleaning tissue.
• Apply the solution directly to the cloth or tissue and drag any dirt and grime to the
outside of the lens.
• Gentl y polish the exter n al gl ass s ur f ac es unt i l th ey are free of haz e a nd li nt .
• When clean i ng unit s with a movabl e mirror, you s h oul d k eep the contact wit h the
mirror surface to a minimum to avoid scratching or damaging it.
Always dry the external optics and glass surfaces carefully after cleaning them.
If the fixture ha s on e or m or e f an s, refr ain fr o m s pin nin g the m using co mpressed
air.
-16- Q-Spot™ 160-LED User Manual Rev. 01b
Page 21

Troubl es h oo ti n g Guide
Symptom Cause(s) Action(s)
• Dirty optic s • Clean opti c p ath
• Dimmer active • Check dimmer setting from control panel
Low LE D output
No LED output
Jumpy or no head
movement
Fixture d oes not power up
Circuit breaker/fuse keeps
tripping/blowing
Fixture does not respond
to DMX
DMX signal problems
• Faulty LED • Replace LED board
• Faulty LED driver boar d • Replace LED driver board
• Faulty main board • Replace main board
• Dimmer set to 0% • Check dimmer setting from control panel
• Faulty LED • Replace LED board
• Faulty LED driver boar d • Replace LED driver board
• Faulty main board • Replace main board
• Faulty sensor • Replace sensor
• Faulty wiring • Check and r ep air w iring
• Faulty synch belt • Replace synch belt
• Faulty X/Y control board • Repl ace X /Y control board
• Faulty main board • Replace main b oard
• Faulty stepper motor • Replace stepp er m otor
• No power • Check for power on power outlet
• Loose or damaged power cord • Check power cord
• Blown fuse • Replace fuse
• Faulty internal power supply • Replace internal pow er supply
• Excessive circuit load • Check total load placed on the electrical circuit
• Short circuit along the power wires • Chec k for a short in the electrical wiring
• Wrong DMX addressing • Check Control Panel and unit addressing
• Damaged DMX cables • Check DMX cables
• Wrong polarity on th e c ontroller • Check polarity switch settings on the controller
• Loose DMX cables • Check cable connections
• Faulty display board • Replace display board
• Faulty main board • Replace mai n board
• Non DMX cables • Use only DMX compatible cables
• Bouncing signals • I ns t all terminator as sugges ted
• Long cable / low level signal • Install an optically coupled DMX splitter right
after the fixture with the strong signal
• Too many fixtures • Install an optically coupled DMX splitter after
unit #32 or before
• Interference from AC wires • Keep DMX cables separated from power
ca b les or fluorescent/black lights
Technical Information
If you still experience technical problems after trying the above solutions, contact
CHAUVET® Technical Support.
Q-Spot™ 160-LED User Manual Rev. 01b -17-
Page 22

Technical Information
with its original
to have
manner may
Returns
Procedure
Claims
Th e user must send t he merc handis e prepaid, in the origin al box, and
packi ng a nd ac cess ori es. CHA UVE T® will not issue call tags.
Call CHAUVET® and request a Return Merchandise Authorization Number (RMA #)
before s hipping th e fixture. B e prepared t o provide t he model nu mber, seri al number,
and a brief description of the cause for the return.
The user must clearly label the package with a Return Merchandise Authorization
Number (RMA #). CHAUVET® will refuse any product returned without an RMA #.
DO NOT write t he R MA # directly on the box. In ste ad, wr ite it on a pro per ly a ffix ed
label.
Once you receive the RMA #, please include the following information on a piec e of
paper inside the box:
• Your name
• Your addr es s
• Your phone number
• The RMA #
• A brief description of the problem
Be sure to p ack th e fixture prop erly. Any shipping damag e resul ting from inad equate
packaging will be the c us t omer’s r es p ons ib il ity. As a sugges ti on, pro p er U PS p ac ki ng or
double-boxing is always a safe method to use.
CHAUVET® reserves the right to use its own discretion to repair or replace
returned product(s).
The carrier is r esp onsibl e for any damag e incurred du r i ng s hi pping t o t his pr oduct or any
part that shipped with it. Therefore, if the received merchandise appears
damages caus ed durin g s hi pp ing, the cus tomer mus t s ubmit the d am age report an d any
related c laims with th e carri er, not C HAUVET ®. The cus tomer must s ubmit th e report
upon rec eption of th e dam aged m erchan dise. Failur e to d o so in a timel y
invalidate the customer’s claim with the carrier.
For other iss ues s uch as mis sing c om pon ents or p arts , dam age n ot r elat ed to s hipp in g,
or conc eal ed d amag e, t he c ust omer must make clai ms t o CH AUVE T ® within s even (7)
days of rec ei vi ng t h e m erc handise.
Contact Us
-18- Q-Spot™ 160-LED User Manual Rev. 01b
World Headquarters
General Inform ation
CHAUVET®
5200 NW 108th Avenue
Sunrise, FL 33351
Voice: (954) 929-1115
Fax: (954) 929-5560
Toll free: (800) 762-1084
Technical Supp or t
Voice: (954) 929-1115 (Press 4)
Fax: (954) 756-8015
World Wide Web
www.chauvetlighting.com
Page 23

Technical Specifications
Dimensions and Weight
Length
Width
Height
Weight
Note: Dimensions in inches rounded to the nearest decimal digit.
Power
Power Supply Type
Range
Voltage Selection
Switching (internal)
100~240 V, 50/60 Hz
Auto-ranging
Parameter
120 V, 60 Hz
230 V, 50 Hz
Consumption
50 W (0.8 A)
50 W (0.4 A)
Power I / O
Input
Output
Cord plu g
Edison
N/A
Light Source
Type
Power
Lifespan
LED
20 W
50,000 h ours
Color
Quantity
Current
White
1
1,000 mA
Photo Opt ic
Parameter
Standard Optics
Illuminance @ 1 m
7,64 1 lx
Head Movement
Pan Range
Tilt Range
Fine Adjustm ent Option
0~540º
0~270º
Yes (Advanced Mode)
Gobos
Externa l Diameter
Image Diameter
Thickness
25.8 mm
18.2mm
1.2 mm max.
Thermal
Operating Temperature
Max. Operating Temp.
Cooling Syste m
DMX
I/O Connectors
Connector Type
Channel Range
3-pin XLR
Sockets
9 and 12
Ordering
Q-Spot™ 160-LED
9.5 in (242 mm) 9.5 in (240 mm) 14.3 in (364 mm) 14.35 lbs (6.5 kg)
Inrush current 0.3 A 0.4 A
Connectors IEC N/A
Technical Information
Beam angle 16º
104° F (40° C) Fan
QSPOT160LED
Q-Spot™ 160-LED User Manual Rev. 01b -19-
Page 24

CHAUVET®
5200 NW 108th Avenue
Sunrise, FL 33351 (USA)
(800) 762-1084 – ( 95 4) 92 9-1115
FAX (954) 929-5560
www.chauvetlighting.com
Q-Spot™ 16 0-LED User Manual Rev. 01b
September 2010
 Loading...