

Page 1
ChatterBox USA Page 20 of 20
Page 2

ChatterBox USA Page 2 of 20
Table of Contents
1. GETTING STARTED................................................................................................................3
WHAT’S NEW?................................................................................................................................................3
UNPACKING AND INSPECTION ...........................................................................................................................4
BATTERY .......................................................................................................................................................4
INSTALLATION OF HEADSET, MAIN UNIT, AND WIRED PTTB (PUSH TO TALK BUTTON)...............................................5
2. GETTING TO KNOW YOUR X1SLIM...................................................................................... 7
BUTTONS AND INPUTS .....................................................................................................................................7
LCD DISPLAY ................................................................................................................................................8
MODE BUTTON ...............................................................................................................................................8
MULTIPLE DEVICE MODES ................................................................................................................................9
3. BIKE TO BIKE COMMUNICATION .......................................................................................10
POWER ON/OFF:..........................................................................................................................................10
SET VOLUME LEVEL ......................................................................................................................................10
CHOOSE A CHANNEL FOR THE GROUP .............................................................................................................10
SIDE TONE................................................................................................................................................... 11
USING THE VOICE ACTIVATION FEATURE ..........................................................................................................11
TOT FUNCTION ............................................................................................................................................11
4. RIDER TO PASSENGER COMMUNICATION ......................................................................11
LISTENING TO BIKE TO BIKE COMMUNICATION ...................................................................................................11
WAYS TO TALK TO YOUR GROUP..................................................................................................................... 11
RIDER AND PASSENGER ONLY COMMUNICATION............................................................................................... 12
OTHER FEATURES PASSENGER CAN USE......................................................................................................... 12
5. BLUETOOTH FEATURE WITH AUDIO CONTROL .............................................................12
BLUETOOTH FEATURE ...................................................................................................................................12
PAIRING ...................................................................................................................................................... 12
PAIRING MULTIPLE DEVICES ...........................................................................................................................13
USING SMARTPHONE TO GET MUSIC, PHONE, AND NAVIGATION.......................................................................... 14
REMOTE CONTROL........................................................................................................................................14
6. FM RADIO..............................................................................................................................14
TURN ON/OFF THE FM RADIO ........................................................................................................................14
CHANGE VOLUME .........................................................................................................................................15
SEARCH FM RADIO STATIONS ........................................................................................................................15
HOW TO ACCESS AND PRESET RADIO STATIONS................................................................................................15
7. PUTTING IT ALL TOGETHER ..............................................................................................15
TYPICAL SETTING..........................................................................................................................................15
PRIORITY.....................................................................................................................................................15
SUMMARY OF BUTTON FUNCTIONS ..................................................................................................................15
8. OTHER FEATURES...............................................................................................................16
ChatterBox USA Page 19 of 20
US Motorcycle Laws by States
Certain states and localities may prohibit the use of two earpieces or two-piece headsets while operating a
vehicle. Please check and follow all applicable federal, state, and local laws and regulations regarding the
use of electronics, earpieces and headsets before operating your vehicle.
This link shown below is provided for informational purpose only. We do not guarantee the accuracy of the
information. Please verify the accuracy of the information before use.
http://www.americanmotorcyclist.com/asp/legisltn/laws.asp
Technical Specification
GENERAL
Frequency range From 462.550 MHz to 467.7125 MHz
Modulation type 8KOF3E (FM)
Channel capacity 22 Channels
Channel spacing 25KHz
Power supply pack DC 3.7 V; Li-ion rechargeable
Current drain transmitter (1W); <1000mA
Battery life 8 hours talk time, 20 hours of stand by time
Operating temperature -20C + 60C
Dimensions 55(H) x 100 (W) x 21 (D) mm
Weight 3 oz. (with battery)
TRANSMITTER
Power output 1W
Frequency stability Better than +/- 5ppm within
Hum & Noise -40dBc (with 300Hz to 3KHz audio filter)
Spurious & Harmonics -60dBc
Audio distortion less than 5% (1KHz tone 60% modulation)
RECEIVER
Sensitivity (12dB SINAD) 0.2uV (-119dBm SINAD)
Selectivity -60dB
Inter-Modulation -60dB
Spurious and image -60dB rejection
Maximum audio output more than 100mW
Audio distortion less than 5%
Hum & Noise -40dBc (with 300Hz to 3KHz audio filter)
Page 3
ChatterBox USA Page 18 of 20
9. Trouble shooting
Questions Answers
While using voice activation the
transmission is being cut out
while trying to communicate to
other riders
Position the microphones directly kissing your lips and speak
without pausing. The closer the microphones is to your lips, the
clearer you can transmit.
I don’t hear group
communication
Adjust the microphones sensitivity to a lower setting (counter
clockwise)
Transmission range is a lot
shorter than it is claimed.
Make sure you're clear of power lines. Foliage, hills, and buildings.
Those obstacles will reduce the maximum transmission range. Even
weather makes a difference.
I can hear too much surrounding
noise while hearing the
transmission from other group
members
Add foam or cotton directly to the tip of the microphones and place
the wind sock over it.
I can not listen to music from my
Bluetooth enabled MP3 player
after I paired it with X1slim
Allow up to 30 seconds for the devices to pair and the music should
automatically start playing through the headset. If this does not
occur after 30 seconds, turn off the unit and follow the steps again
from the beginning.
10. Important information
Chatterbox USA Limited Warranty
Chatterbox USA guarantees that each new Chatterbox will be free from defective materials and workmanship
for a period of one (1) year from the date of original purchase. Chatterbox will remedy any such defect by
repair or replacement (at our discretion) of the products, provided they are delivered to the address listed
below, intact for examination, with all transportation charges prepaid and accompanied by a copy of the
original retail sales receipt. The provisions of this warranty shall not apply to any unit which has been subject
to misuse, neglect, incorrect installation, unauthorized modification, accident, or has been repaired or altered
outside of our factory. The express warranty contained herein is in lieu of all other warranties, expressed,
implied or statutory, including without limitation any warranty of merchantability or fitness for a particular use.
In no event will Chatterbox be liable to the buyer for any damages, including special, incidental, indirect, or
consequential.
FCC License
Your Chatterbox product operates on communications frequencies which are subject to FCC (Federal
Communications Commission) rules and regulations. FCC rules require that all operators using GMRS
(General Mobile Radio Service) frequencies obtain a radio license before operating their equipment.
Information on license application can be found at http://www.fcc.gov.formpage.html or by calling
1-888-CALL-FCC (1-888-225-5322)
THIS DEVICE COMPLIES WITH PART 15 OF THE FCC RULES.
OPERATION IS SUBJECT TO THE FOLLOWING TWO CONDITIONS.
(1) THIS DEVICE MAY NOT CAUSE HARMFUL INTERFERENCE AND
(2) THIS DEVICE MUST ACCEPT ANY INTERFERENCE RECEIVED
INCLUDING INTERFERENCE THAT MAY CAUSE UNDESIRED OPERATION
ChatterBox USA Page 3 of 20
AUX (AUXILIARY) INPUT................................................................................................................................16
WIRELESS PTT BUTTON................................................................................................................................16
ACCESSORIES:.............................................................................................................................................17
9. TROUBLE SHOOTING ..........................................................................................................18
10. IMPORTANT INFORMATION.............................................................................................. 18
CHATTERBOX USA LIMITED WARRANTY .........................................................................................................18
FCC LICENSE ..............................................................................................................................................18
US MOTORCYCLE LAWS BY STATES............................................................................................................... 19
TECHNICAL SPECIFICATION............................................................................................................................ 19
1. Getting started
What’s new?
Thank you for your recent purchase of the Chatterbox X1slim®. The X1slim® is the replacement model for
our current flagship X1BT®. The X1BT® has always been favored by riders for all of its advanced features.
Per your request the X1slim is now smaller and lighter with even more features. The following is a detailed
comparison chart that shows the new features of the X1slim.
Features X1Slim X1BT
Bike to Bike two way communication among unlimited riders Yes Yes
22 Channel with 38 talk groups for each channel Yes Yes
Maximum range of 5 miles Yes Yes
Hands free voice activation or push to talk capability Yes Yes
Rider to passenger communication capability Yes Yes
Share music and two way communication with passenger Yes Yes
Page 4
ChatterBox USA Page 4 of 20
Answer phone calls and listen to music wirelessly Yes Yes
True Hi-Fi stereo speakers and noise suppression microphones Yes Yes
8 hours of talk time and 20 hours of standby Yes Yes
FM Radio with preset channels Yes
Headset with microphones for open and full face helmets including modular Yes
Optional wireless PTTB (Push To Talk Button) Yes
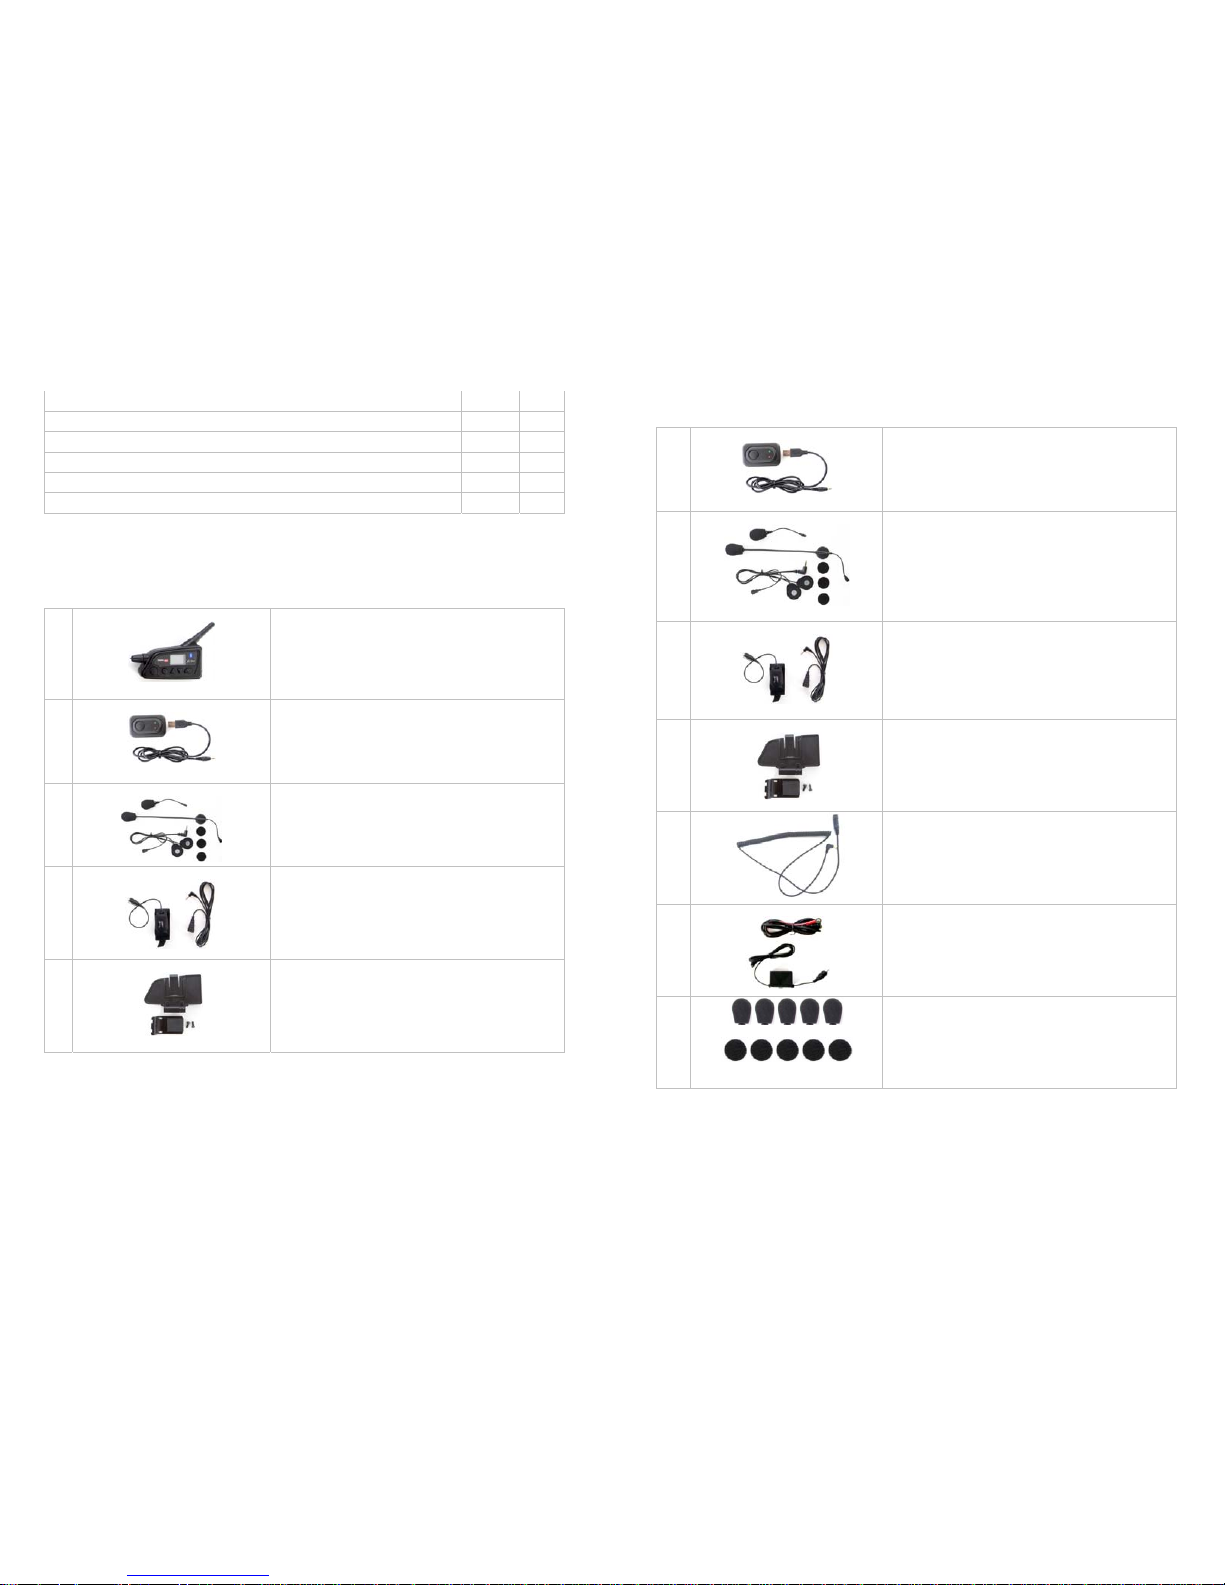
Unpacking and inspection
Please check and make sure that you have everything listed below inside the box. If you find any parts
missing or that have been damaged, please contact our customer service immediately.
1
X1slim Unit with Battery pre-installed
2 USB charging cable and AC adaptor
3
Multi microphone Headset which includes microphones
for open and full face helmets, two Velcro speaker disks,
two foam microphone covers, and microphone Velcro
4
Handle bar mount push to talk button and extension cord
5
Helmet mounting bracket with Cradle, two screws and
Allen wrench.
Battery
The X1slim comes with a rechargeable Li-ion battery pre-installed inside of the unit. Please do not attempt to
open the case to replace the battery.
We recommend that the battery be pre-conditioned to restore to the original state.
ChatterBox USA Page 17 of 20
Accessories:
1
Replacement USB charging cable and AC adaptor
2
Replacement Headset with microphones for open and full
face helmet , two Velcro disks, sponge, wooden wire tuck
stick, and Velcro set for microphones
3
PTTB and extension cord
4 Mounting bracket with Cradle, two crews, Allen ranch
5
Headset Extension cord
6
Power filter cord
7
Sponge and Velcro Kit (5 pieces of microphone sponge, 5
pairs of speaker Velcro, and 5 pairs of microphone Velcro
for full face helmet)
Page 5

ChatterBox USA Page 16 of 20
Rider
communication
(Default setting)
Rider to
Passenger
communication
(private)
Bluetooth
feature
FM Radio
To Activate Turn knob on Long press
INTERCOM
Long Press UP
button
Long Press
DOWN button
To deactivate Turn Knob off Long press
INTERCOM
Long press
INTERCOM
Long press
INTERCOM
a. Deactivation leads directly to the default setting of
group communication device mode.
b. Group communication device mode is always
available except Rider to Passenger device mode.
Volume up Short press UP Short press UP Short press UP Short press UP
Volume down Short press DOWN Short press
DOWN
Short press
DOWN
Short press
DOWN
To talk Press and hold
PTT or Use voice
activation
To Answer phone
call
Long press MODE Short press
MODE
Short press
MODE
To skip music track
or radio station
Long press UP Long press UP
To reverse music
track or radio station
Long press
DOWN
Long press
DOWN
To pause and play Short press
INTERCOM
To preset radio
station
Short press
INTERCOM
To select preset
radio station
Long press
MODE
8. Other Features
AUX (Auxiliary) Input: If your Audio device is not Bluetooth enabled, you can still connect it to the AUX
input with an extension cord.
Wireless PTT button: The X1 slim is compatible with an optional wireless Push to Talk button. Please
refer to the wireless PTT manual upon purchasing.
ChatterBox USA Page 5 of 20
1) Discharge the battery completely by leaving the unit on and setting the MICROPHONE SENSITIVITY
sensitivity to the highest next to a TV or radio or in noisy room until the battery is completely drained.
2) Charge the battery completely using the charger supplied with the kit. It should take about 5 hours to fully
charge the battery.
If you are planning to store the unit for a long period of time, store it after fully charging the battery. Upon
using it again, please follow the pre-conditioning process described above.
To reduce the risk of damage to the battery, do not use any other charger except the one supplied with the kit.
Make sure the battery is always stored at room temperature.
Battery indicator in the LCD display means as followed:
Indicator Means
3 Bars Fully charged
2 Bars Half charged
1 Bar Low charged
When the battery indicator shows 1 bar, you need to charge the battery. Or you can hear a chime sound
when it is time to charge the battery.
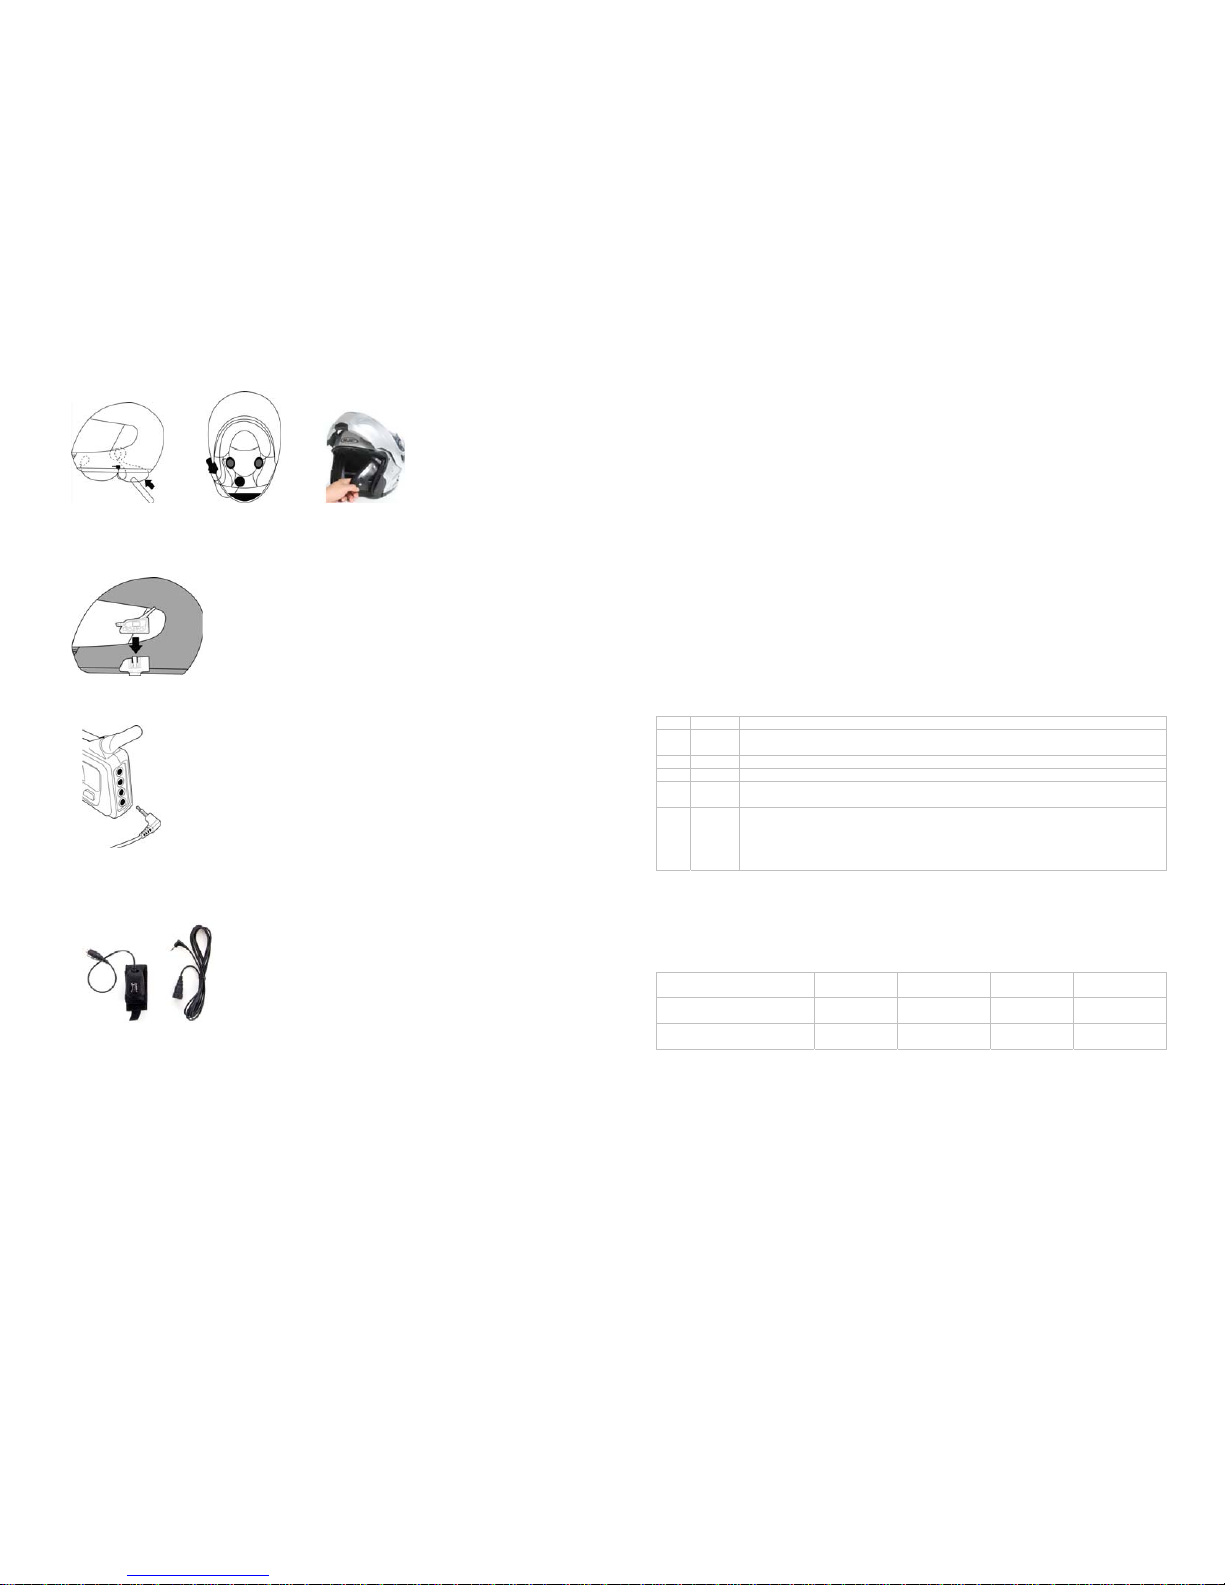
Installation of headset, main unit, and wired PTTB (Push to talk button)
The Multi Headset comes with both open and full face microphones. Choose the one that you intend to use
and plug it into the connector on the headset. Please keep the microphone that you are not using in a safe
place for future use. All microphones come with foam cover. For full face helmet, attach soft Velcro disk to
the helmet chin bar and hard Velcro disk to the microphones. Use the wooden wire tuck stick to gently tuck
the microphones wire between the headliner and the shell of your helmet.
The headset speakers should already have Velcro on the back casing. Simply apply the soft Velcro disks
on the liner of your helmet. Mount them in the indentation of the helmet padding where your ears would line
up. Please keep in mind that you need to mount the speakers in a location that is directly next to your ears.
Attach the right speaker (with the longer wire) to the corresponding Velcro disk that you applied on the
helmet liner. Attach the left speaker (with the shorter wire) to the other Velcro disk. For helmets with
speaker pockets, simply insert the speakers in each corresponding pocket. Use the wooden wire tuck stick
to gently tuck all wires between the headliner and the shell of the helmet as shown below. If you helmet has
washable lining that pops out, you can tuck the wires behind that.
Page 6
ChatterBox USA Page 6 of 20
Fasten the mounting bracket snugly to the bottom left side of the helmet with two bolts supplied. Align the
back side of the X1slim unit to the grooves on the mounting bracket. Slide the X1 slim unit down on the
mounting bracket until it latches firmly into place.
Insert the 3.5mm plug of the headset into the Rider’s headset jack on the back of the main unit.
If you decide to use the handle bar mount PTT button, place the wired PTT button on the left side handle bar
grip (closest to where your thumb would be) of the motorcycle using the integrated Velcro strip. And insert
the 2.5mm plug into the PTT input in the back of the main unit.
ChatterBox USA Page 15 of 20
Change volume: while listening to the radio, short press the UP or DOWN button to adjust the volume.
Search FM radio stations: while listening to the radio, Long press the UP button to search forward and
long press the DOWN button to search backward. Please not that each time you search forward or
backward the radio will automatically stop at the next available station.
How to access and preset radio stations: If you want to preset the station, simply short press the
Intercom button when on that station. You can preset up to 10 radio stations. To access the preset stations,
long press the MODE button. Each time you long press the MODE button it will go to the next preset
station.
7. Putting it all together
Typical setting: The most typical setting for X1slim is listening to your music, hearing voice prompted
direction from your navigation system, and answering incoming calls while you communicate with your fellow
riders and/or passenger.
1 Turn on X1slim
2 Choose and set the channel and talk group. Test with PTT button or Voice activation
to see if everyone can hear each other.
3 Pair your Smartphone with Navigation app to the X1 slim.
4 Set the Bluetooth device mode by long pressing UP button
5 Access navigation system in your Smartphone and initiate the navigation by inputting
destination. Afterwards start your mp3 player
6 Now you should hear your music and hear the turn by turn direction from your
navigation system occasionally. You are also ready to answer your phone calls by
short pressing the MODE button. Lastly you can communicate with your fellow riders
who are on the same channel.
Priority: Table shown below summarizes the priority among different devices. When you are in the
Bluetooth device mode, the navigation direction and phone calls get priority over the music. This means that
when a phone call is answered the music will be paused. As soon as the call ends, the music will play again.
Same thing applies with fellow rider communication. When you hear communication the music will pause.
After the communication is finished the music will automatically come back.
Priority
1 2 3 4
Bluetooth Cell phone Rider
communication
Navigation MP3
FM Radio Cell phone Rider
communication
FM Radio
Summary of button functions: The table below will summarize the button functions that have been
explained in this manual
Page 7
ChatterBox USA Page 14 of 20
Way to pair three devices
4
Yes Yes *Yes *Navigation systems that
supports pairing with
phone: TomTom rider2,
Zumo550
Smart way to get music, navigation, and phone simultaneously by pairing one device
5
Yes Yes* Yes *You need to buy GPS
apps for your
Smartphone that
supports In-App Music
player (Gokivo,
TomTom)
Using Smartphone to get music, phone, and navigation; Once you have paired your
Smartphone with X1slim, you may listen to your music from your Smartphone using your own playlist. When
there’s an incoming phone call, you will hear your music faded away and get paused and start hearing
engine revving sound. You simply short press Mode button on X1slim to answ er. If you want to end the call,
just short press mode button again. As soon as you end the call, the music will play back automatically.
If you want to use navigation system, you need to buy one of the navigation apps offered for your
Smartphone. Please make sure you get the In-App music player for more streamlined operation. Unlike the
navigation systems that rely on network to get the maps and information, there are systems that you still can
use even during the absence of network by accessing the maps and information already downloaded in your
Smartphone. If you phone has enough disk space, this option is the most suitable for the moto rcycle riders.
*For longer ride, you need to have charger for your Smart phones if you want to use navigation system.
Remote control: The X1 slim Bluetooth feature can also remotely control the devices so that you don’t
have to reach for your device in your pocket dangerously while you are riding. The Table below will show you
the remote control functions available. (Does not apply to all devices)
Music GPS Cell
phone
Buttons to use (You must be in Bluetooth mode
by pressing UP button for 3 seconds)
Pause and Play Yes
Short Press Intercom button
Skip track Yes
Long press UP button
Reverse track Yes
Long press DOWN button
Volume UP & DOWN Yes Yes Yes
Short press UP&DOWN button
Answer incoming call Yes
Short press Mode button
End incoming call Yes
Short press Mode button
Redial last number
called
Yes
Short press Mode button
(*Long press: Hold the button for 3 seconds, Short press: hold the button for half second)
6. FM Radio
The X1 slim has a built in FM radio player. The following will explain how to use the FM radio feature.
Turn on/off the FM Radio: After the X1 slim is on, long press the DOWN button to turn the FM Radio on.
Long press Intercom button to turn the FM Radio off.
ChatterBox USA Page 7 of 20
2. Getting to know your X1slim
Buttons and inputs
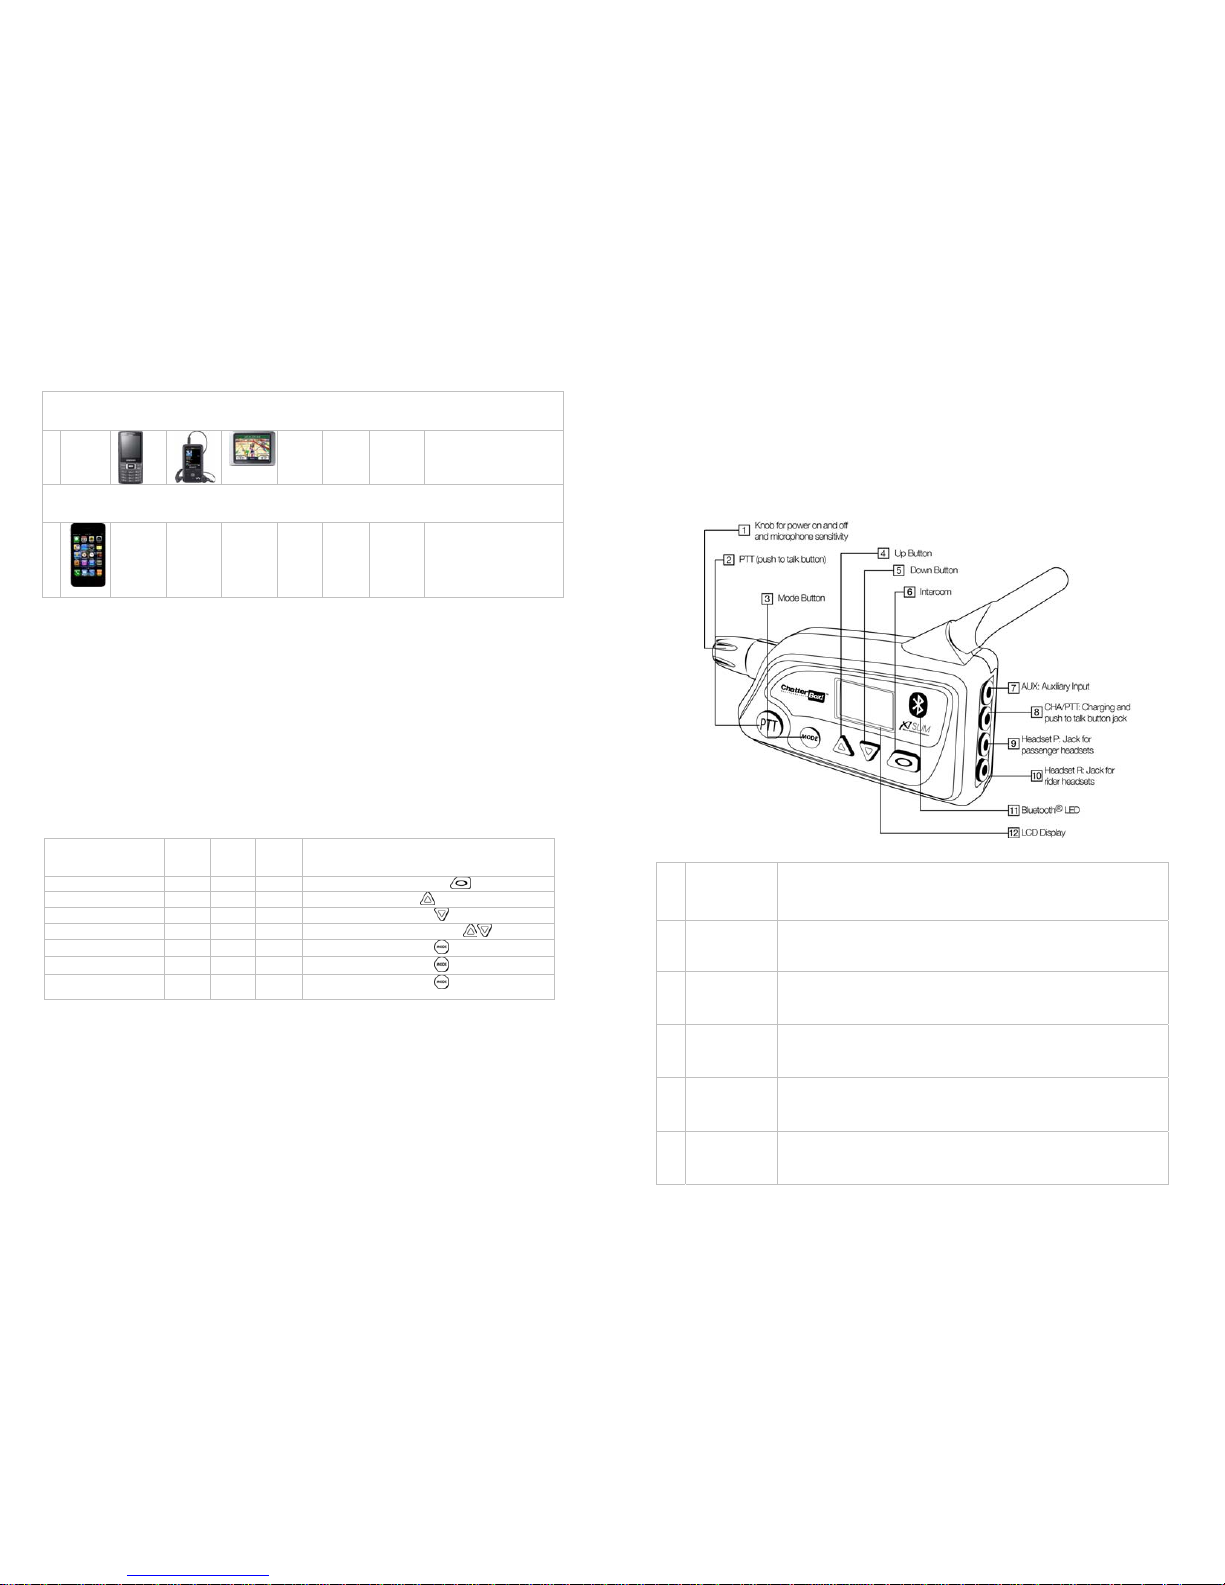
The X1slim is packed with many features in a light compact casing. Please refer to the picture below which
will show each button and its description.
Buttons &
Inputs
Description
These are brief descriptions of the buttons and inputs. Detailed descriptions and specific
instructions will be provided later in the manual
1 Knob for Power
& microphone
sensitivity
Turn the X1slim on and off
Increase or decrease microphones sensitivity for voice activation
2 PTT (push to
talk )
Transmit to other riders or your passenger.
Pair an optional wireless PTT
Select the settings in each mode
3 Mode
Access the different mode functions.
Answer and end the phone calls
Choose the preset FM radio stations.
4 Up
Increase Volume, main Channel, Talk group, and FM radio channel.
Skip music tracks. (When listening to music via Bluetooth)
Activate the Bluetooth mode on.
5 Down
Decrease Volume, main Channel, Talk group, and FM radio channel.
Reverse music tracks. (When listening to music via Blueto oth)
Activate the FM Radio mode.
Page 8
ChatterBox USA Page 8 of 20
6 Intercom
Activate/deactivate the rider to passenger private conversation mode.
End Bluetooth and FM radio mode
Pair Bluetooth devices
7 AUX
Connect a wired audio device
8 CHA/PTT
Wall charger input
Power filter cord input
Wired push to talk button input
9 Headset P
Input for Passenger Headset
10 Headset R
Input for Rider headset
Multi-function buttons: Each button handles more than one function. The following are two ways of
pressing the buttons in order to control the different functions of the X1slim.
Long press Press the button and hold it for 3 seconds
Short Press Press the button for half second
LCD Display
The X1slim is equipped with an LCD display that shows the status of the X1slim. The table below shows the
icons and what they mean.
Mode button
The MODE button is used to choose the desired function setting. The table below shows the different
settings that you can use along with a brief description.
Press
Mode
button
Setting
control
for:
LCD
Display
Description of mode
1 time Channel
Press Up or Down button to set desired main channel from
1 to 22. Press PTT button to set.
2 times Talk
Group
Press Up or Down button to set desired talk group from 00
to 38. Press PTT button to set.
Description Appears when;
M
Mode You press mode button
INT
Intercom You long press INTERCOM button
SCN
Scan You let X1slim to scan open channels
VOX
VOX You press and hold PTT button
Battery meter (Shows status of battery power)
Sound You turn the sound on
Lock You turn the lock on
Talk group (Shows talking group number)
Channel (Shows Channel number)
ChatterBox USA Page 13 of 20
5 Press and hold the UP button for 3 seconds until the LCD display shows “Bt on”. You will notice
that the X1 slim will now connect with your device.
6 To reconnect to the device, simply press and hold the UP button for 3 seconds until the LCD
display shows “Bt on”.
Pairing multiple devices: you can pair any Bluetooth enabled MP3 player, Mobile phone, and
Navigation system with X1slim. However, only two devices can be paired with X1slim simultaneously. Table
shown below summarizes the way you can pair multiple devices simultaneo usly.
There are two ways you can get all three, music, navigation, and phone simultaneously.
The first way is by using a navigation system that supports pairing with mobile phone. This does NOT mean
that any navigation system with Bluetooth will work. These types of Navigation systems are usually the
motorcycle specific models. (Garmin Zumo and Tom Tom Rider models) In this case, you need to pair your
mobile phone to the Navigation system first then pair the navigation system and MP3 player to the X1slim.
The second way is to buy one of the navigation apps for you Smartphone that supports In-app music player.
With this route you can do the following all from your Smartphone; hear your voice prompted directions,
answer/make phone calls, and listen to music from the Mp3 player. We highly recommend this setting.
Bluetooth enabled devices
Music Navig
ation
phone
Smart
phone
Mobile
phone
MP3
player
Navigat
ion
Ways to pair two devices
1
Yes Yes
2
Yes Yes
3 Yes Yes
Page 9

ChatterBox USA Page 12 of 20
Rider and Passenger only communication: This feature allows both you and your passenger to
communicate in private. In order to activate this feature simply push and hold the INTERCOM button down
for 3 seconds. You will hear the unit beep and will see the “INT” icon displayed on the LCD. In order to
deactivate this mode simply push and hold the INTERCOM button again for 3 seconds. The unit will beep
and the “INT” icon will be disappeared in LCD screen.
Other features Passenger can use: Your passenger can also share many other features the rider is
using. Table shown below summarizes the features available in the X1slim. (Please note that your passenger
is not capable of hearing a cell phone conversation)
Rider Passenger
Music from Bluetooth source Yes Yes
GPS Direction Yes Yes
Cell Phone Yes No
FM Radio Yes Yes
5. Bluetooth feature with audio control
The X1slim is equipped with Bluetooth transmitter that allows you to pair up to 2 Bluetooth devices
simultaneously. It must be understood that NOT just ANY 2 Bluetooth devices will always work. When
pairing two devices, Bluetooth only permits 1 hands free device and 1 audio device. You cannot pair 2
audio devices and you cannot pair 2 hands free devices. It will only allow 1 of each kind. An example of a
hands free device is a cell phone. An example of an audio device is an iPOD/MP3 player with a Bluetooth
adapter. Please note some Smart phone’s (iPHONE/Android phones) take up BOTH devices when paired
to the X1slim. This is why you will be able to listen to music and answer the phone from a smart phone.
These phones do not have an option to disable this. Some motorcycle specific GPS devices also take up
both devices when paired. This is why you can listen to music, hear your voice prompted directions, and
answer your phone through them.
* You will find a chart below that explains the different combinations of accessories and what will work.
Bluetooth feature: The Bluetooth feature will allow you to listen to the music, GPS direction, and/or
answer phone calls wirelessly.
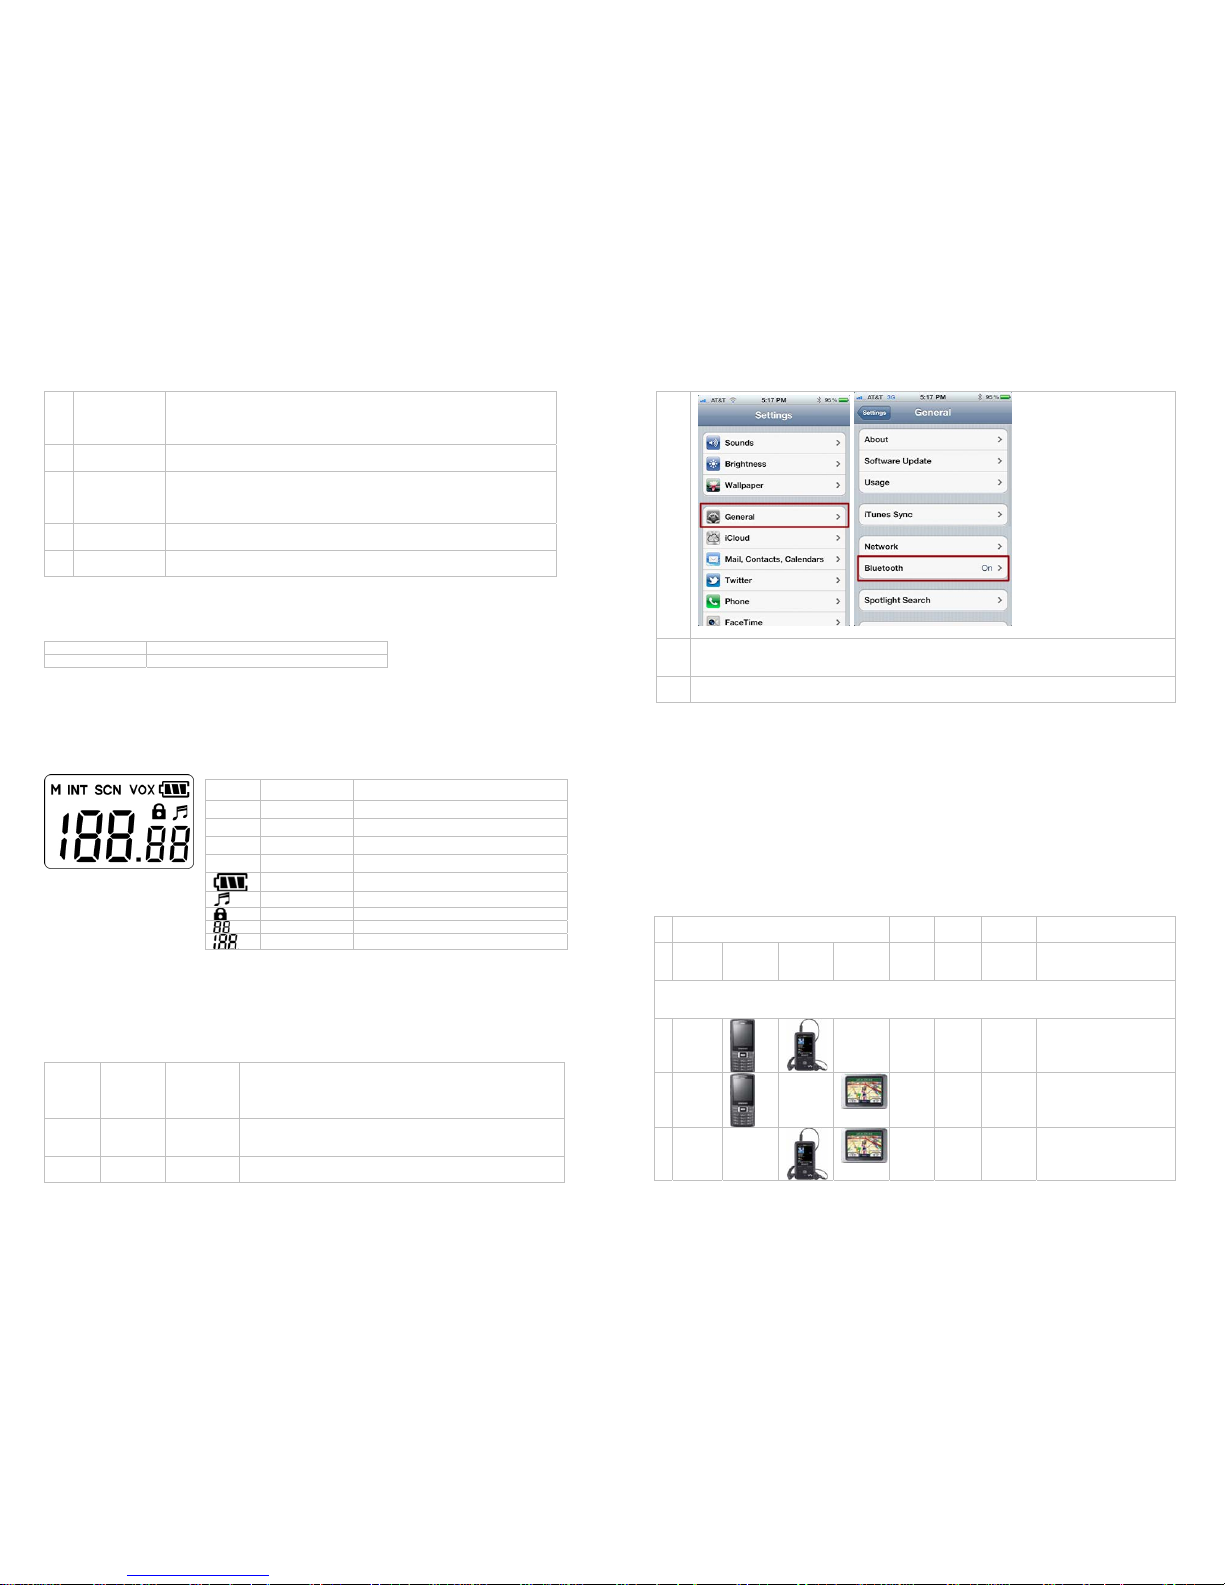
Pairing: In order to pair the X1 slim to a Bluetooth device you must follow the directions below. Please
make sure that the device you are trying to pair is Bluetooth capable.
1 Make sure the X1 slim is in the OFF position and the device you want to pair is near. Please
note that you must make sure any other Bluetooth devices in the area are turned off.
2
Press and hold the Intercom button
and slowly turn the Power knob on. You will see “Bt rd”
letter in LCD display.
3
Continue to hold the Intercom button until you see the Bluetooth LED
rapidly blinking.
Release the Intercom button at this time.
4 Follow the “pairing” instructions for your Bluetooth device. Please allow about 30 seconds for
your device to search X1slim. If done correctly, you will notice the name “X1SLIM” on your
devices Bluetooth list.
The following is an example of how to pair an iphone with the X1slim. Go to Bluetooth settings
as pictured below. Once the iphone finds the X1slim as a Bluetooth device, you will see “X1slim
Not Paired”. You simply touch that device then it will automatically pair.
ChatterBox USA Page 9 of 20
3 times Sound
(beep)
bp On/OF
Press Up or Down button to choose On or Off. Press PTT
button to set.
A musical note in the LCD display says this mode is on.
Set this mode On if you want to hear the system tones
when pushing any buttons.
4 times Lock Lc On/OF
Press Up or Down button to choose On or Off, Then press
PTT button to set.
A padlock icon in the LCD display says this mode is on.
Set this mode On if you want to prevent mode settings
changed accidentally. You must set this mode off first to
change any settings.
5 times Scan
Channel
SC On/OF
Press Up or Down button to choose On or Off Press PTT
button to set.
SCN in LCD display says this mode is on.
Upon scanning for an available channel press the PTT
button to stay on the channel of your choice.
6 times Power
Save
P 00
Press Up or Down button to choose your setting
Setting 00 is power save off.
Setting 01 is basic power save
Setting 02 is extended power save
Multiple device modes
The X1slim can operate on four different device modes. The table shown below will briefly explain those
device modes.
Device modes
Description
A Bike to Bike Group
Communicator
Bike to bike communication is the primary device mode for the X1slim
user. It is also the default device mode when you turn the unit on.
Unlimited number of riders can communicate as long as you are all on
the same channel and talk group. With 22 channels and 38 talk groups
for each channel, users can have 836 different possibilities of having
their own communication path.
B Rider to passenger
communicator
Rider to passenger communication is also possible by sharing the
X1slim with a passenger headset. (Passenger headset and extension
cord sold separately) When in Intercom mode the communication with
your passenger is private. When NOT in intercom mode both you and
your passenger can communicate with other bikes that are on the
same channel. Your passenger can also listen to the same audio
device and/or music.
C Bluetooth transmitter
with remote control
The X1 slim built in Bluetooth will allow you to wirelessly connect your
Bluetooth Smartphone, MP3 player (w/ BTA/BTD Bluetooth adapter),
Bluetooth ready GPS system, or Bluetooth cell phone.
* Depending on your device you can also remotely control your
Bluetooth ready devices with the X1slim.
D FM Radio FM Radio setting allows you to listen to local radio stations. You can
preset up to ten FM radio stations.
Page 10

ChatterBox USA Page 10 of 20
3. Bike to bike communication
The X1slim can communicate with an unlimited number of riders. Before riding everyone must turn their units
on and make sure they are on the same main channel and talk group. In order to transmit to other riders
you must use the voice activation, handle bar mount PTT button, or the PTT on the unit. Once you talk,
everyone on your channel will hear. However, only one person at a time can talk. It is a good idea to use
the word “over” when done talking. This way others will know that they can now say something back. It is
strongly suggested that you practice talking back and forth in your house before actually using on a ride.
This way you can get a feel of what to expect.
Power On/Off: Turn the power knob clockwise until you hear and feel it click on. Once the unit turns on,
do not turn the knob any further. You will notice that the LCD display will turn on. Keep in mind that the
power knob is also the voice activation sensitivity control. You must keep it at the lowest setting until you
decide to tune your sensitivity setting. To power the unit off, turn the knob counterclockwise until you hear the
clicking sound and see the display turns off.
Set Volume level: There are two types of volume level control shown below:
Headset speaker volume: set the desired volume level by pressing UP or DOWN button shortly.
Microphones volume: There is no volume control for microphones. System has a default volume level.
Choose a channel for the group: Press mode button one time, and choose the desired channel by
pressing UP or DOWN button. Press the PTT button to set. If all channels are busy, press mode button two
times and choose the desired talk group by pressing UP or DOWN button. Press the PTT button to set. Make
sure everyone in your group has set up same channel and talk group. Then you are ready to communicate.
Please keep in mind that main channels 8-15 are GMRS frequency as shown on the table below. If you want
to have a maximum range of 5 miles you need to choose one of these. Main Channels 1-7 and 16-22
operate on FRS (2 Mile) frequencies. Use these channels if you want to communicate to FRS type radios.
Channel Frequency Maximum
Range
Channel Frequency Maximum
Range
1 FRS 2 miles 12 GMRS 5 miles
2 FRS 2 miles 13 GMRS 5 miles
3 FRS 2 miles 14 GMRS 5 miles
4 FRS 2 miles 15 GMRS 5 miles
5 FRS 2 miles 16 FRS 2 miles
6 FRS 2 miles 17 FRS 2 miles
7 FRS 2 miles 18 FRS 2 miles
8 GMRS 5 miles 19 FRS 2 miles
9 GMRS 5 miles 20 FRS 2 miles
10 GMRS 5 miles 21 FRS 2 miles
11 GMRS 5 miles 22 FRS 2 miles
(* While you are in one of the GMRS channels, Please make sure you are in high power mode by short
pressing Intercom button to get the maximum range)
Press Mode
button
MODE
selected:
Description of mode
1 time Main Channel Press Up and Down button to go the desired channel from 1 to 22.
Press PTT button to set.
2 times Talk Group Press Up and Down button to go the desired talk group from 00 to
38. Press PTT button to set
ChatterBox USA Page 11 of 20
Channel 10 is an Emergency Channel. Use the emergency channel only for the purpose of soliciting or
rendering assistance to a traveler. This channel is also used by certain organizations during emergency
situations and may not necessarily be monitored.
Side tone: When transmitting by using PTT or voice activation you will hear yourself in your own speakers.
This is called side tone. Side tone is what tells you that your microphone is working.
Using the voice activation feature: The voice activation feature is what allows you to communicate
to other riders hands free (without using the PTT). This feature can work very well but does need patience
and understanding. It is critical that you set the microphone sensitivity knob to the correct setting depending
on your particular scenario. Failure to do so will either cause the microphone to never activate automatically
or activate and stay on for extended periods. Start with the microphone sensitivity knob at the lowest setting.
Make sure your microphone is directly in front and as close to your lips as possible. Turn the knob to 10:30
as if it were a clock. Begin to say the words “CHECK CHECK ONE TWO” in a semi loud raised voice.
While you say this, listen to see if you hear the side tone coming through the speakers. If you do NOT hear
yourself in the speakers you are either not talking loud enough or the microphone sensitivity is set too low.
Keep In mind that you are riding a motorcycle and the background noise will be loud. The key is to set the
microphone sensitivity knob to as low of a setting as possible to where only your loud voice can activate it.
Turn the microphone sensitivity knob a little bit higher each time until you can hear yourself say “CHECK
CHECK ONE TWO ONE TWO” consistently as a side tone. Once you achieve this you have found your
“sweet spot”. You are now ready to ride. Keep in mind that throughout your ride you may need to slightly
adjust the sensitivity depending on your surroundings. If you set it too sensitive your microphone will be
activated by the wind keeping it keyed and preventing anyone else from talking. It is suggested to practice
using this feature back and forth in the house before actually using while riding. This way you can
familiarize yourself with back and forth communication.
* If you decide not to use the voice activation feature simply turn the knob all the way down and use
one of the PTT button options.
TOT function: When you unintentionally set the voice activation level too high, the surrounding noise may
activate the microphones. You may not know that your microphone is keyed the entire time. When that
happens, no one in your group can talk. The new TOT function will notify you that your microphone is still
keyed on. After ten seconds you will hear a short beeping sound. After 5 more seconds it will beep
continuously for another 5 seconds. If this happens make sure to immediately turn the microphone
sensitivity knob down until your microphone deactivates. Carefully set your sensitivity again making sure
you have it set at a lower setting.
4. Rider to Passenger Communication
The X1slim does not require a separate unit for a passenger to communicate with the rider and others. In
order to connect a passenger you must purchase an additional headset and extension cord. Please contact
a dealer near you or call customer service.
Listening to bike to bike communication; When connected, Passenger can communicate with
the driver and other riders who are on the same channel.
Ways to talk to your group: With a passenger connected, there are different ways to set up your
communication. The table below will show your options as to how rider and passenger can share talking.
Rider Passenger
A PTT button on Unit Wired PTT button
B Voice activation Wired PTT Button
C Voice activation Voice activation
D Optional (available soon) Wireless PTT Wired PTT
E Optional (available soon) Voice activation Wireless PTT
 Loading...