

Chattanooga DHT FLU110D, DHT FLU110DE, DHT FLU115D, DHT FLU115DE, DHT FLU210D User manual
...Page 1
Moving
Rehabilitation
Forward™
Dry Heat Therapy Units
User Manual
Models:
FLU110D
FLU110DE
FLU115D
FLU115DE
FLU210D
ISO 13485 CERTIFIED
FLU210DE
Page 2

TABLE OF CONTENTS
Fluidotherapy®- Dry Heat Therapy
Foreword....................................................................................1
Dry Heat Therapy...............................................................2-4
Precautionary Instructions..............................2-3
Indications & Contraindications........................4
Nomenclature......................................................................5-8
FLU110D & FLU110DE...........................................5
FLU115D & FLU115DE...........................................6
FLU210D & FLU210DE...........................................7
Control Panel............................................................8
Specifications.....................................................................9-11
FLU110D & FLU110DE............................................9
FLU115D & FLU115DE..........................................10
FLU210D & FLU210DE..........................................11
Setup.....................................................................................12-20
Treatment Mode Parameters.......................12-14
Time Controlled Parameters...............................15
Preheat Standby Setup...................................10-11
Preference Mode Default Parameters........16-20
© 2007 Encore Medical, L.P. and its affiliates, Austin, Texas, USA. Any use of editorial, pictorial or layout composition of
this publication without express written consent from Chattanooga Group of Encore Medical, L.P. is strictly prohibited.
This publication was written, illustrated and prepared for print by Chattanooga Group of Encore Medical, L.P.
Operation......................................................................21
Patient Preparation....................................21
Starting Treatment.....................................21
Stopping Treatment...................................21
Required Maintenance......................................22-29
Daily Maintenance.......................................22
Weekly Maintenance.............................23-26
ADDITIONAL FLUIDOTHERAPY PREVENTIVE
MAINTENANCE REQUIREMENTS
Quarterly..........................................................27
Bi-Annual.........................................................27
Annual..............................................................27
Fluidotherapy Maintenance Record......28
Factory Service..............................................29
Accessories......................................................................30
Warranty ..........................................................................31
ISO 13485 CERTIFIED
Page 3

FOREWORD
Thank you for purchasing the Chattanooga Group, Fluidotherapy Dry Heat Therapy Unit.
This manual contains general safety, operating, maintenance and care instructions for the owners and operators of the
Fluidotherapy Dry Heat Therapy Units.
At the time of publication the information contained herein was current and up to date. However, due to continual
technological improvements and increased clinical knowledge in the field of Dry Heat Therapy, as well as Chattanooga
Group’s policy of continual improvement, Chattanooga Group reserves the right to make periodic changes and
improvements to our equipment and documentation without any obligation on the part of Chattanooga Group.
Read, understand and follow the information contained in this manual.
Stay current with the latest clinical developments in the field of Dry Heat Therapy and observe all applicable
precautionary measures for treatment.
Keep informed on appropriate indications and contraindications for the use of Dry Heat Therapy.
This equipment is to be used only under the prescription and supervision of a licensed practitioner.
Fluidotherapy®- Dry Heat Therapy
1
Page 4
DRY HEAT THERAPY
Precautionary Instructions
The precautionary instructions found in this section and throughout
this manual are indicated by specific symbols. Understand these
symbols and their definitions before operating this equipment. The
definition of these symbols are as follows;
=CAUTION- Text with a “CAUTION” indicator will explain
possible Safety infractions that could have the
potential to cause minor to moderate injury or
damage to equipment.
=WARNING- Text with a “WARNING” indicator will explain
possible Safety infractions that will potentially
cause serious injury and equipment damage.
=DANGER- Text with a “DANGER” indicator will explain
possible Safety infractions that are imminently
hazardous situations that would result in death
or serious injury.
=EXPLOSION HAZARD-
Text with an “Explosion Hazard” indicator will explain
possible safety infractions if this equipment is used in the
presence of flammable anesthetics.
NOTE: Helpful information marked as “NOTE” may be found
throughout this manual. Each “NOTE” is beneficial in the aid of a
particular area or function being described for this product.
Fluidotherapy®- Dry Heat Therapy
CAUTION
• Read, understand and practice the precautionary and operating
instructions found in this manual. Know the limitations and hazards
associated with using any electrical device. Observe the precautionary
and operational decals placed on the unit.
• DO NOT operate the unit when connected to any unit other than
Chattanooga Group devices.
• Refill unit daily to proper fill level with Chattanooga Group Cellex® Dry Heat
Medium.
• Change Cellex Dry Heat Medium every six (6) months.
• Use only Cellex Dry Heat Medium in the Fluidotherapy units.
• Clean Inlet Filter(s) daily before unit startup.
• Use only fingers to operate button controls on the control panel(s). Use of
sharp objects such as pencils or pens will result in damage to the unit.
• Turn unit OFF before positioning a patient or removing a patient from the
unit.
• Secure all entry ports before turning the unit ON.
• Check unit temperature before treating patient to ensure correct
temperature.
• Place the patient in a comfortable position allowing for correct placement
of the limb being treated.
• Proper storage and transport temperature for the Fluidotherapy units are
-40°F - 158°F (-40°C - 70°C). Relative Humidity 10% - 100%.
2
Page 5
DRY HEAT THERAPY
Precautionary Instructions
Fluidotherapy®- Dry Heat Therapy
WARNING
• Federal law restricts this device to sale by, or on the order of, a physician
or licensed practitioner. This device should be used only under the
continued supervision of a physician or licensed practitioner.
• For continued protection against fire hazard, replace fuses only with
ones of the same type and rating.
•
Make certain the unit is electrically grounded by connecting only to a
grounded electrical service receptacle conforming to
national and local electrical codes.
• This device should be kept away from children.
• Care must be taken when operating this equipment around other
equipment. Potential electromagnetic or other interference could
occur to this or to the other equipment. Tr y to minimize this interference
by not using other equipment in conjunction with it.
•
Before administering any treatment to a patient you should become
acquainted
available, as well as the indications, contraindications, warnings
and precautions. Consult other
regarding the application of Dry Heat Therapy.
• To prevent electrical shock, disconnect the unit from the power source
before attempting any maintenance procedures.
• Use only processed dry heat medium in the unit such as Cellex® to
prevent excessive dusting.
with the operating procedures for each mode of treatment
resources for additional information
the applicable
DANGER
• Explosion hazard if used in the presence of flammable
anesthetics.
• Perform all Required Maintenance as described in this manual.
Strict adherence to the Required Maintenance for the Fluidotherapy
units is mandatory. Failure to perform the Required Maintenance
could result in the Cellex® medium entering the heat chamber of
the unit(s) and cause severe injury to patients as well as smoke
damage to the facility and the Fluidotherapy unit(s).
3
Page 6

DRY HEAT THERAPY
Indications, Contraindications & Adverse Effects
Indications
• Relief of local pain
• Treatment of local blood flow insufficiency
• Treatment in range of motion when combined with exercise
• Treatment for symptoms of non-rheumatoid arthritis
Fluidotherapy®- Dry Heat Therapy
WARNING
• Adequate precautions should be taken when treating
individuals with suspected or diagnosed medical conditions or
diseases such as heart problems, epilepsy, diabetes, etc.
Contraindications
• This device should not be used for symptomatic pain relief unless
etiology is established or unless a pain syndrome has been
diagnosed.
• This device should not be used when cancerous lesions or open
wounds are present in the treatment area.
• Other counterindications are patients suspected of carrying
serious infectious disease and or disease where it is advisable, for
general medical purposes, to suppress heat or fevers.
• Prior to treatment, consult a medical professional familiar with
the precautionary measures to be taken for patients that may
experience allergic reactions to dust and pollen.
4
Page 7
NOMENCLATURE
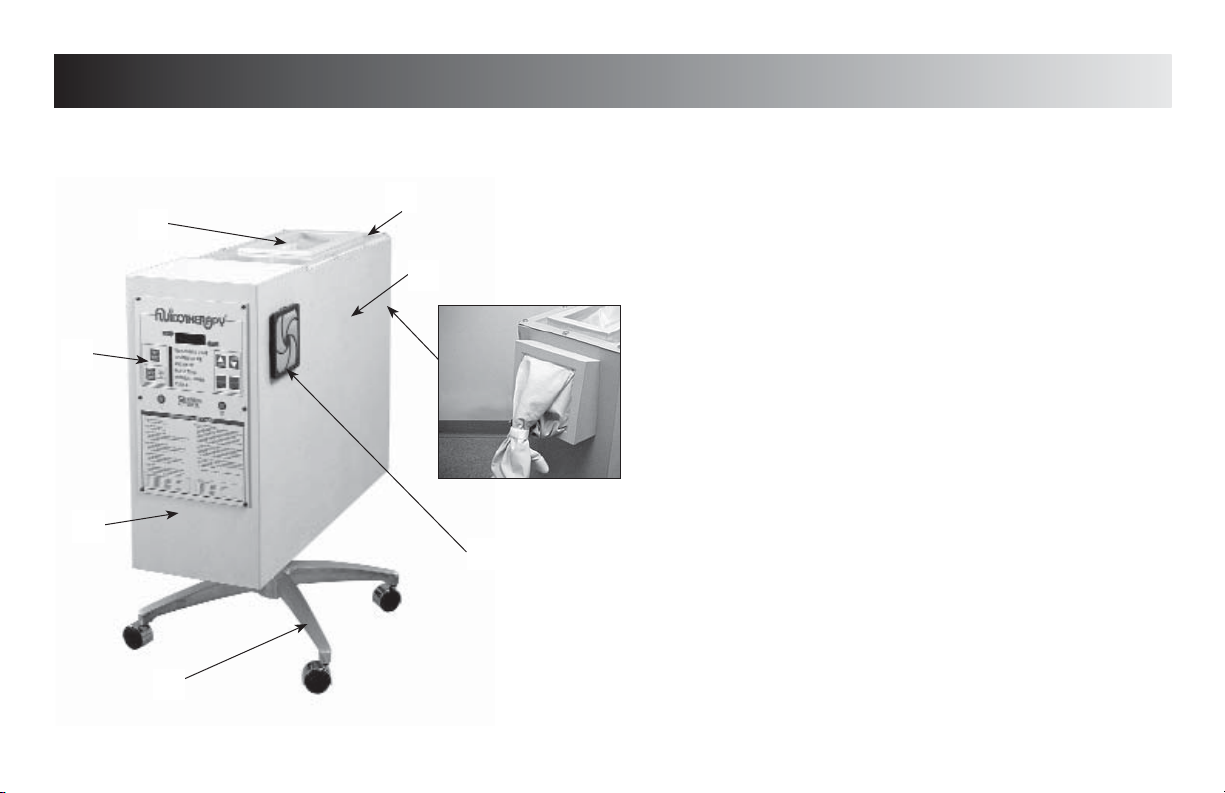
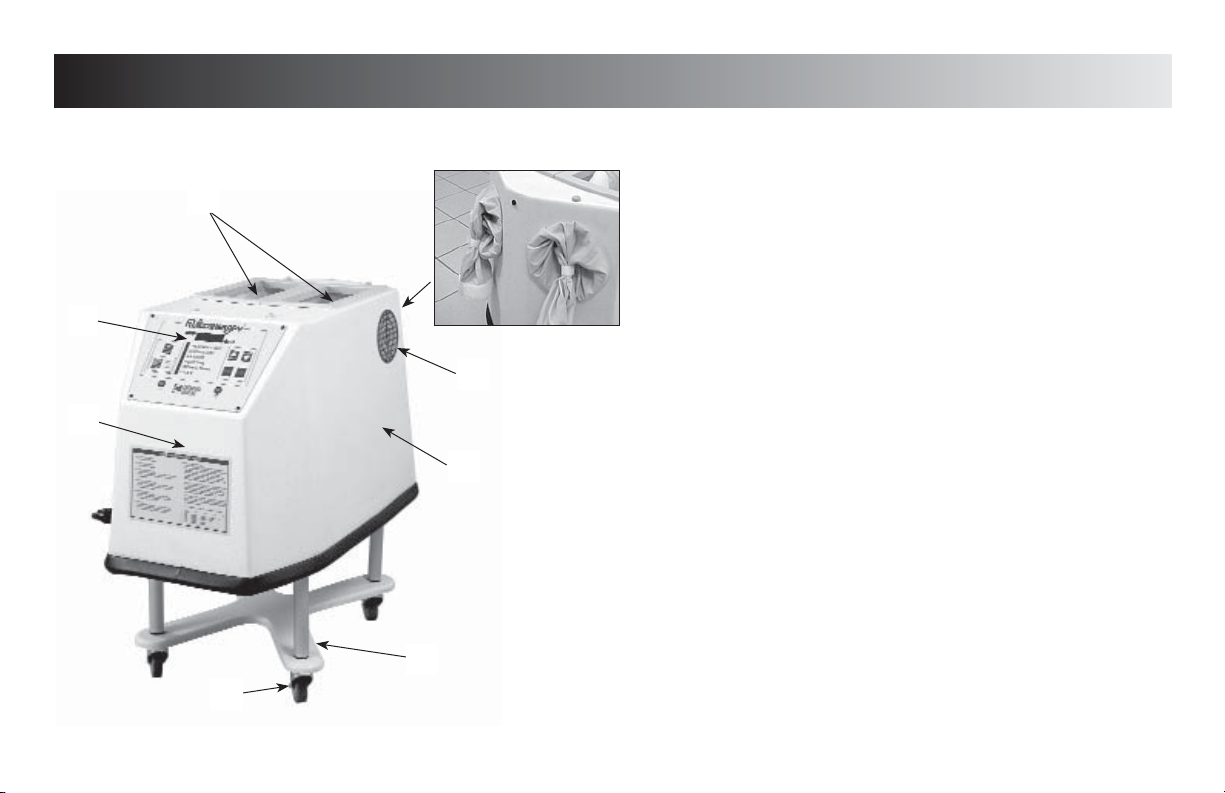
FLU110D & FLU110DE Unit Familiarization
1
8
2
Fluidotherapy®- Dry Heat Therapy
1. RESERVOIR LID & TREATMENT VIEWING WINDOW
Access to add/change medium, view patient treatment and
clinician access to patient treatment area.
2. MEDIUM/TREATMENT RESERVOIR
Treatment access and medium reservoir
3
3. HAND/ARM ACCESS PORT
Treatment port for Hand/Arm Treatment (end of unit)
7
4. REPLACEABLE INLET FILTERS
Filters room air entering the Fluidotherapy unit (1 each side)
5. FOUR POINT BASE
Casters included to convert to a Mobile Base
6. BLOWER HOUSING
6
4
Houses Blower & Heater
7. CONTROL PANEL
See page 8 for detailed description of controls
8. ELBOW/FOOT TREATMENT ACCESS PORT
Treatment port for Elbow and Foot
5
5
Page 8
NOMENCLATURE
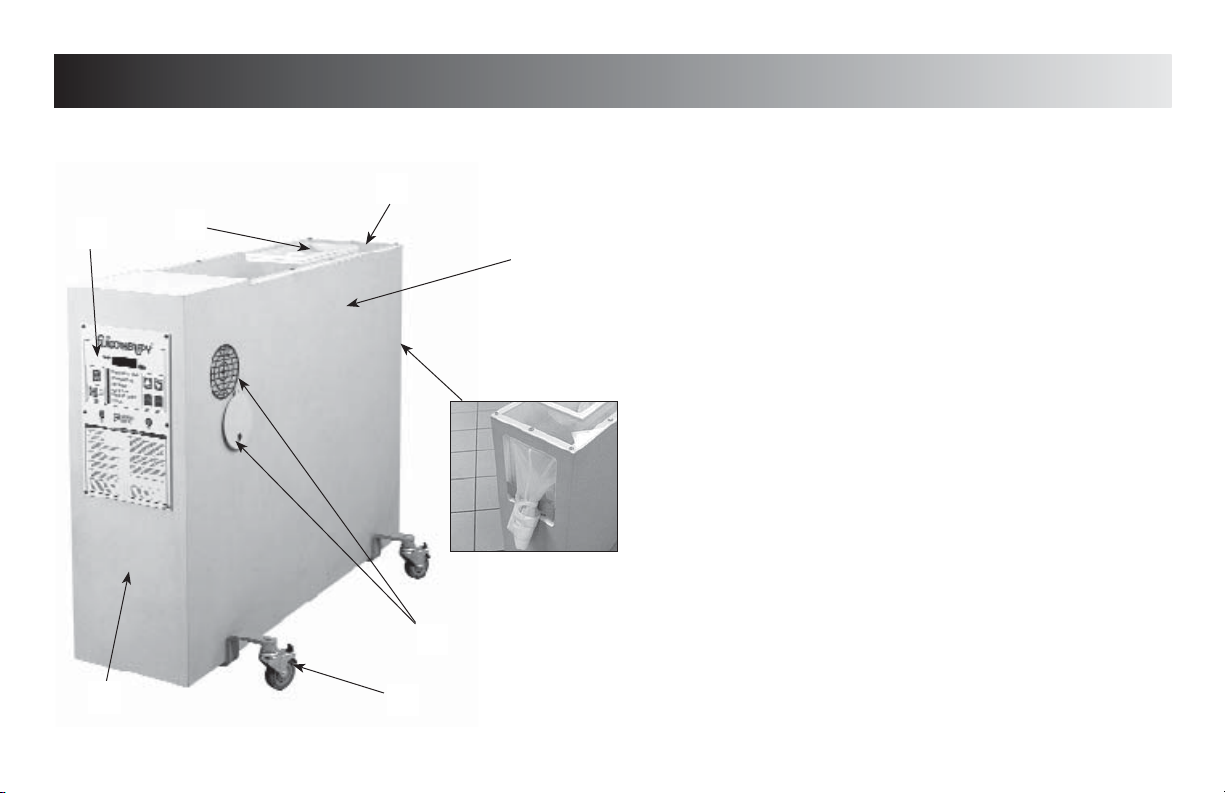
FLU115D & 115DE Unit Familiarization
1
2
Fluidotherapy®- Dry Heat Therapy
1. ELBOW/FOOT ACCESS PORT
Treatment port for Elbow and Foot Treatment. Access to add/
change medium. Clinician access to patient treatment area.
2. HAND/ARM ACCESS PORTS
Treatment ports for Hand/Arm Treatment (end of unit)
8
3
7
4
3. INLET FILTERS
Filters room air entering the Fluidotherapy unit (1 each side)
4. MEDIUM/TREATMENT TUB
Treatment access and medium reservoir
5. MOBILE BASE
6. LOCKING CASTERS
7. BLOWER HOUSING
Houses Blower & Heater
8. CONTROL PANEL
See page 8 for detailed description of controls
5
6
6
Page 9
NOMENCLATURE
FLU210D & FLU210DE Unit Familiarization
1
7
8
2
3
4
Fluidotherapy®- Dry Heat Therapy
1. RESERVOIR LID & TREATMENT VIEWING WINDOW
Access to add/change medium, view patient treatment and
clinician access to patient treatment area.
2. MEDIUM/TREATMENT RESERVOIR
Treatment access and medium reservoir
3. HAND/ARM/LEG ACCESS PORT
Treatment port for Hand/Arm/Leg Treatment (end of unit)
4. INLET FILTERS WITH HEAT FLAPS
Filters room air entering the Fluidotherapy unit (1 each side)
Heat Flaps aid in shortening the Pre-Heat time
5. MOBILE BASE w/LOCKING CASTERS
6. BLOWER HOUSING
Houses Blower & Heater
7. CONTROL PANEL
See page 8 for detailed description of controls
8. ELBOW/FOOT TREATMENT ACCESS PORT
Treatment port for Elbow and Foot
6
5
7
Page 10
NOMENCLATURE
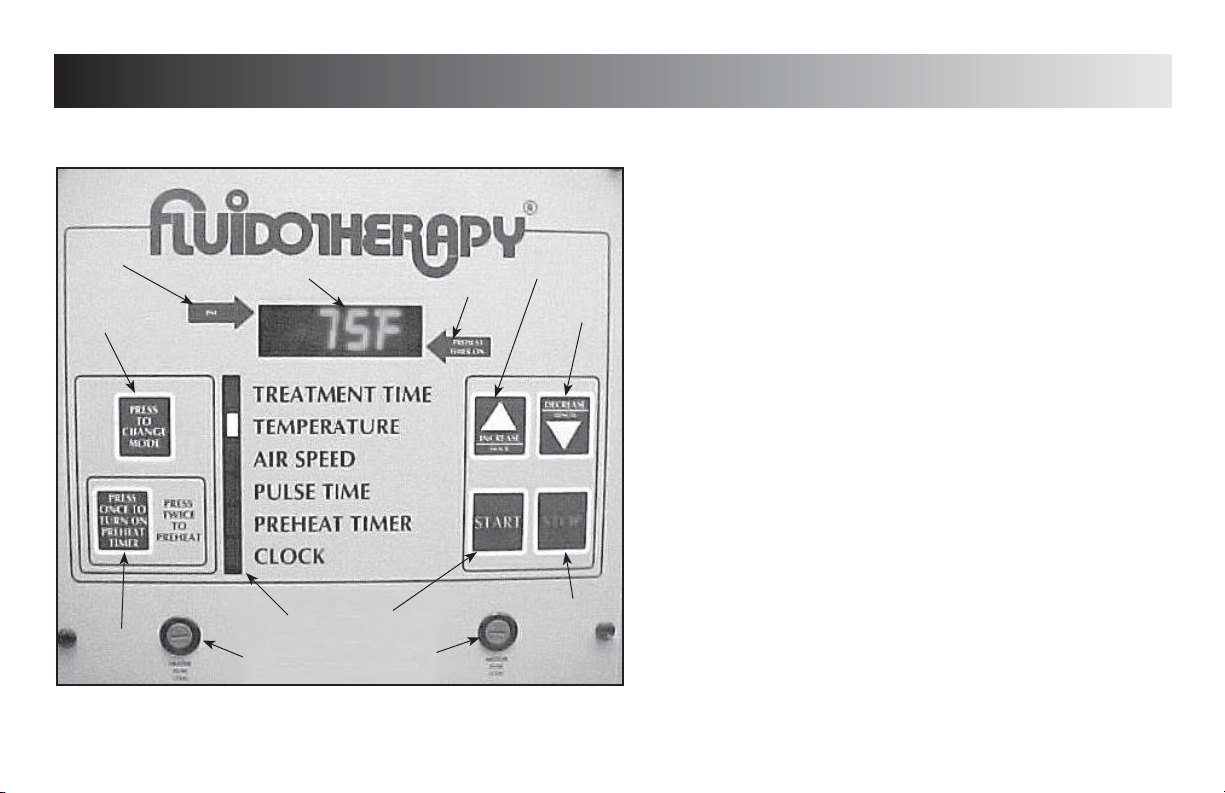
Operating Controls (All Units)
12
1
11
78
10
9
Fluidotherapy®- Dry Heat Therapy
1. DISPLAY
Displays Treatment Time, Temperature, Airspeed, Pulse Time,
Preheat Timer and Clock when the respective Mode is indicated.
2. PREHEAT TIMER ON
2
3
4
5
6
Indicator light for Preheat Timer
3. INCREASE/HOUR
Use to increase Mode parameters and use to set the Hour when
setting Clock
4. DECREASE/MINUTE
Use to decrease Mode parameters and use to set the Minutes
when setting Clock
5. STOP
Use to stop treatment and Preheat Timer
6. MOTOR FUSE
7. START
Use to start treatment
8. INDICATOR BAR
Indicates Mode as they are chosen
9. HEATER FUSE
10. PREHEAT TIMER BUTTON
Press once to turn Preheat Timer On. Press twice to start
Preheat function
11. MODE SELECT
Use to select desired Mode
12. PM
PM indicator for Clock
8
Page 11
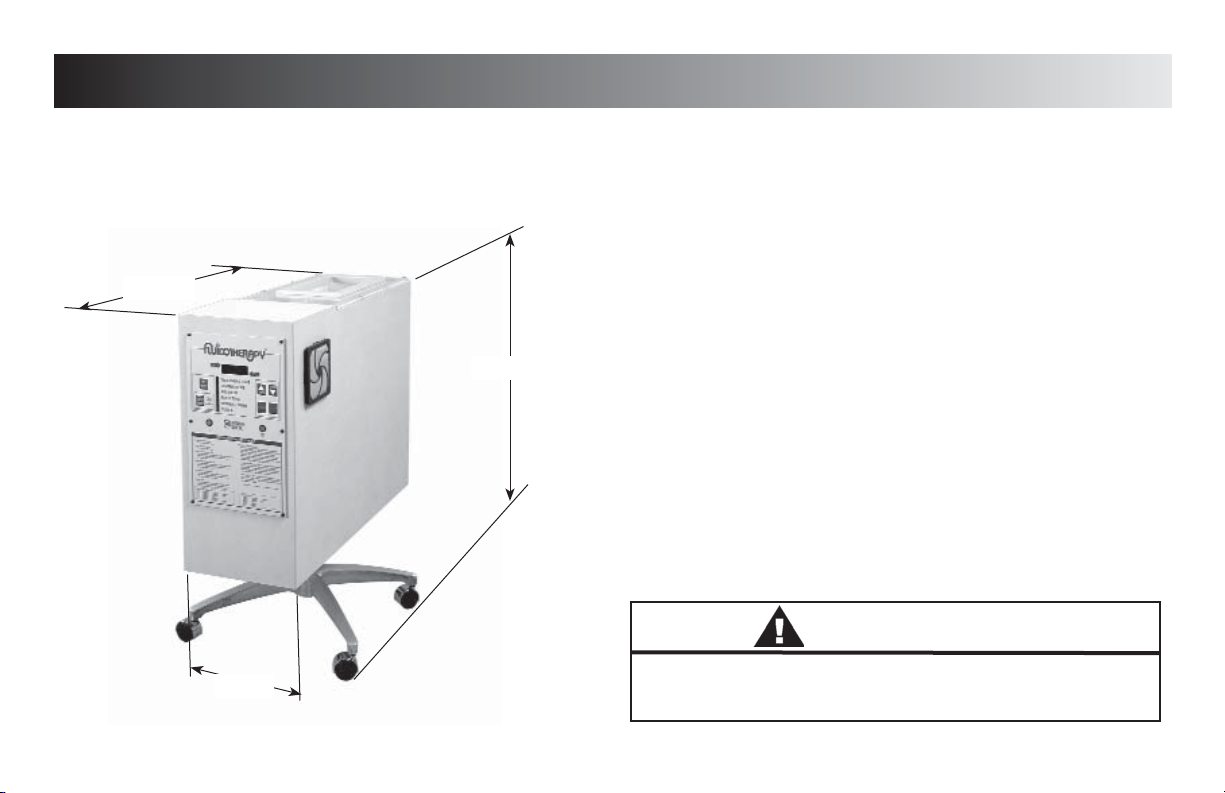
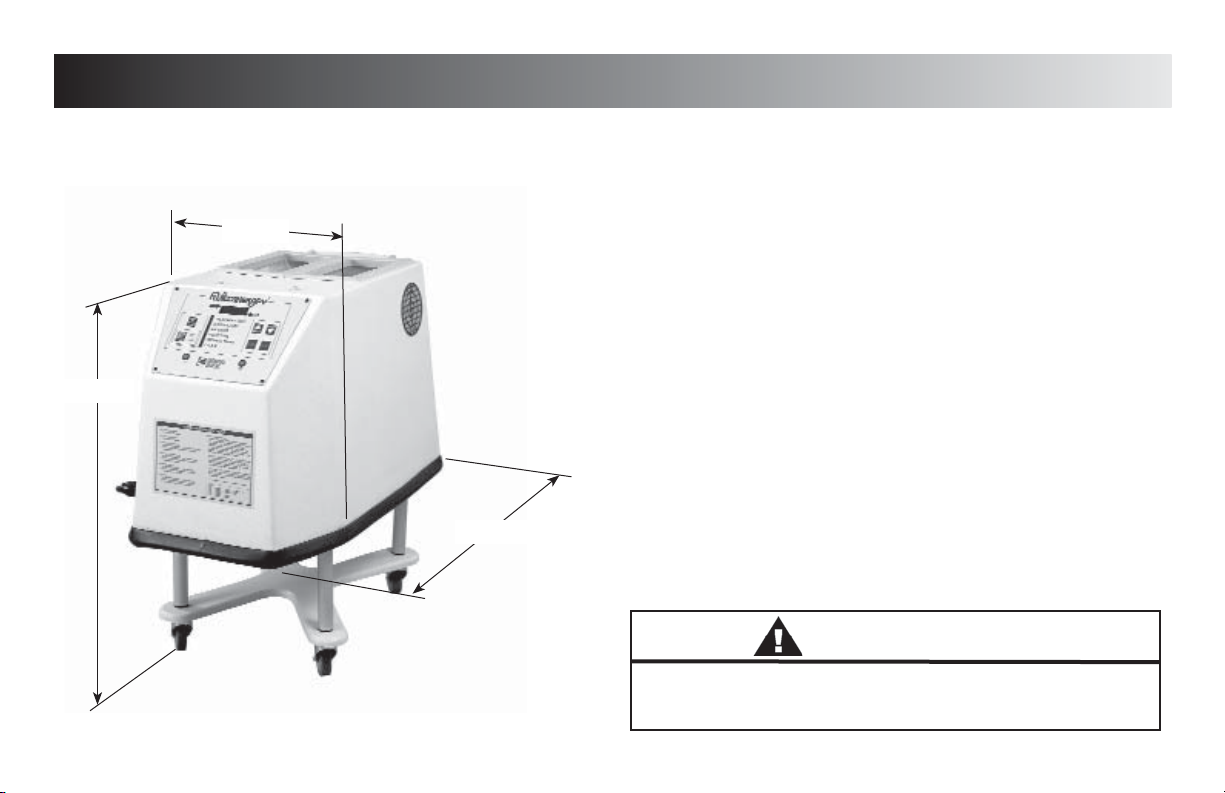
SPECIFICATIONS
FLU110D & FLU110DE
Length
Width
Height
Fluidotherapy®- Dry Heat Therapy
Modes of Operation
Continuous (Default)
Variable Adjustments for Time, Temp and Air Speed
Pulse Mode...............................................OFF to 6 Sec ON/OFF
TREATMENT TIME.................................................1 to 99 minutes
OPERATING TEMPERATURE.............110 °F (43.3 °C) to 125 °F (51.6 °C)
AIR SPEED.......................................0% to 100% (5% increments)
PREHEAT TIMER....................115 °F (46.1 °C) with 50% Air Flow
MEDIUM CAPACITY.........................Approximately 30 lb (13.6 kg)
Input Power (FLU110D)........................105-120Vac, 50/60 Hz, 13A
Input Power (FLU110DE)........................210-250Vac, 50/60 Hz, 8A
Physical Dimensions
Cabinet Length....................................................34.0” (86.4 cm)
Cabinet Width......................................................11.5” (29.2 cm)
Height..................................................................33.0” (83.8 cm)
Weight..........................................70 lbs (31.7 kg) Less Medium
Shipping Weight................................................100 lbs (45.4 kg)
WARNING
•
Make certain the unit is electrically grounded by connecting only
to a grounded electrical service receptacle conforming to
applicable national and local electrical codes.
the
9
Page 12
SPECIFICATIONS
FLU115D & FLU115DE
Width
Height
Length
Fluidotherapy®- Dry Heat Therapy
Modes of Operation
Continuous (Default)
Variable Adjustments for Time, Temp and Air Speed
Pulse Mode...............................................OFF to 6 Sec ON/OFF
TREATMENT TIME.................................................1 to 99 minutes
OPERATING TEMPERATURE.............110 °F (43.3 °C) to 125 °F (51.6 °C)
AIR SPEED.......................................0% to 100% (5% increments)
PREHEAT TIMER....................115 °F (46.1 °C) with 50% Air Flow
MEDIUM CAPACITY.......................Approximately 40 lbs (18.1 kg)
Input Power (FLU115D)........................105-120Vac, 50/60 Hz, 13A
Input Power (FLU115DE).......................210-250Vac, 50/60 Hz, 8A
Physical Dimensions
Cabinet Length....................................................34.0” (86.4 cm)
Cabinet Width......................................................18.5” (47.0 cm)
Height..................................................................33.0” (83.8 cm)
Weight...........................................60 lbs (27.2kg) Less Medium
Shipping Weight................................................100 lbs (45.4 kg)
WARNING
•
Make certain the unit is electrically grounded by connecting only
to a grounded electrical service receptacle conforming to
applicable national and local electrical codes.
10
the
Page 13

SPECIFICATIONS
FLU210D & FLU210DE
Length
Width
Height
Fluidotherapy®- Dry Heat Therapy
Modes of Operation
Continuous (Default)
Variable Adjustments for Time, Temp and Air Speed
Pulse Mode.....................................OFF to 6 Sec ON/OFF
TREATMENT TIME.....................................1 to 99 minutes
OPERATING TEMPERATURE...110 °F (43.3 °C) to 125 °F (51.6 °C)
AIR SPEED............................0% to 100% (5% increments)
PREHEAT TIMER..........115 °F (46.1 °C) with 50% Air Flow
MEDIUM CAPACITY.............Approximately 60 lbs (27.2 kg)
Input Power (FLU210D).............105-120Vac, 50/60 Hz, 13A
Physical Dimensions
Cabinet Length........................................44.0” (111.8 cm)
Cabinet Width...........................................12.5” (31.1 cm)
Height......................................................35.75” (90.8 cm)
Weight..............................140 lbs (63.5kg) Less Medium
Shipping Weight..................................... 200 lbs (90.7 kg)
WARNING
•
Make certain the unit is electrically grounded by connecting only
to a grounded electrical service receptacle conforming to
applicable national and local electrical codes.
11
the
Page 14

SETUP
TREATMENT MODE PARAMETERS
Use the following Instructions to set the various Mode Parameters to
the desired settings.
TREATMENT TIME
Press the “PRESS TO CHANGE MODE”
button until the indicator light is beside
“TREATMENT TIME”.
NOTE:
The default time of “20:00” will be
displayed.
Fluidotherapy®- Dry Heat Therapy
TREATMENT TEMPERATURE
Press the “PRESS TO CHANGE MODE”
button until the indicator light is beside
“TEMPERATURE”.
NOTE:
The default temperature of “115°F (46.1°C)
will be displayed when unit is first plugged
into wall outlet.
The “F” or “C” and “ TEMPERATURE” indicator
will flash while the programmed Treatment
Temperature is being displayed.
When the Bed Temperature is displayed, the
“F” or “C” and the “TEMPERATURE” indicator
will burn steadily.
Press the “INCREASE” or “DECREASE”
buttons until desired Treatment Time is
displayed.
NOTE:
The “TREATMENT TIME” can be adjusted in
one minute increments from 1 to 99.
12
Press the “INCREASE” or “DECREASE”
buttons until desired Treatment Temperature
is displayed.
NOTE:
°F can be changed to °C and vice versa as
desired. See page 17 for instructions.
Treatment Temperature can be adjusted in
1° increments from 88 °F to 130 °F
54°C).
(31.1 °C to
Page 15
SETUP
TREATMENT MODE PARAMETERS (Continued)
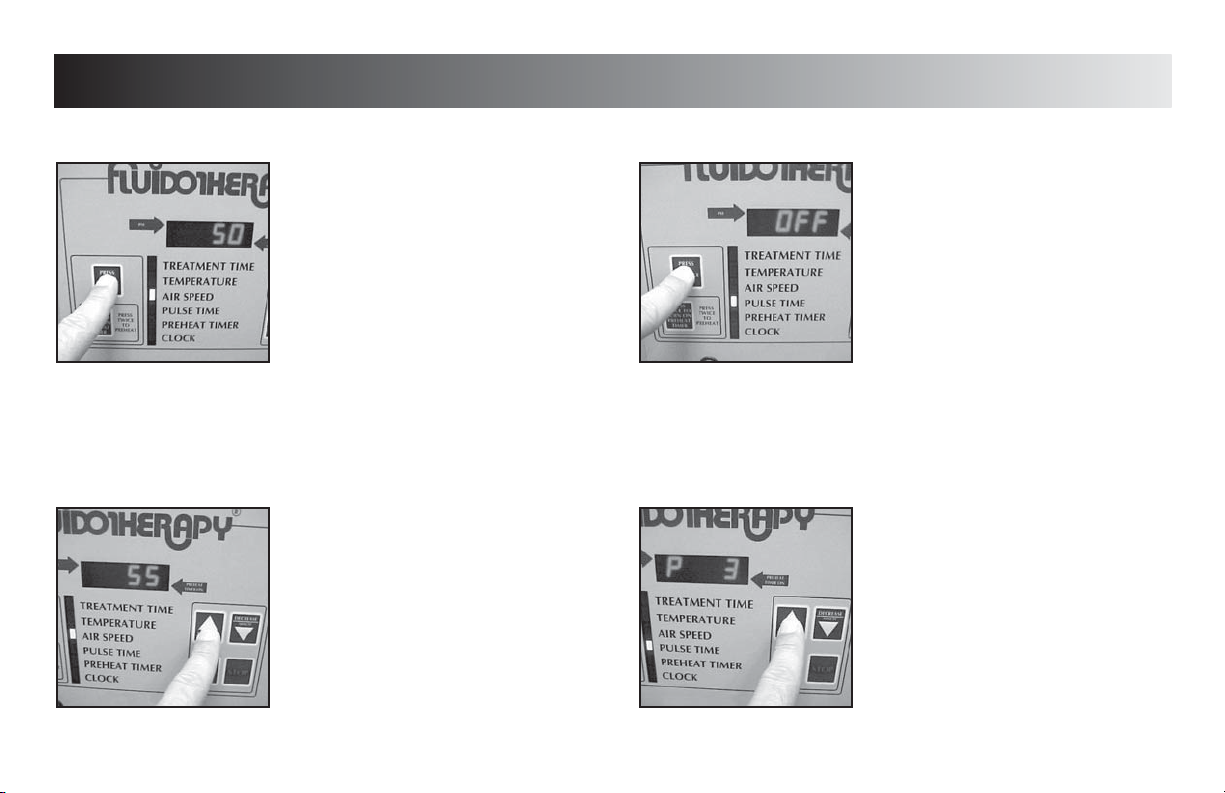
AIR SPEED
Fluidotherapy®- Dry Heat Therapy
PULSE TIME
Press the “PRESS TO CHANGE MODE”
button until the indicator light is beside
“AIR SPEED”.
NOTE:
The default speed of “50” will be displayed.
Press the “INCREASE” or “DECREASE”
buttons until desired Air Speed is
displayed.
NOTE:
The “AIR SPEED” is adjusted in increments
of 5 from 0 to 100.
Press the “PRESS TO CHANGE MODE”
button until the indicator light is beside
“PULSE TIME”.
NOTE:
The “PULSE TIME” allows the unit to
operate by pulsing the medium during
treatment. If selected and set, the medium
will pulse on and off in equal increments.
The Factory Default is “OFF”.
EXAMPLE: “PULSE TIME” is set at “5”.
The unit will pulse the medium during
treatment, five seconds on and five
seconds off.
Press the “INCREASE” or “DECREASE”
buttons until desired Pulse Time is
displayed.
NOTE:
“PULSE TIME” is adjusted in one second
increments from “OFF” to 6 seconds.
13
Page 16
SETUP
TREATMENT MODE PARAMETERS (Continued)
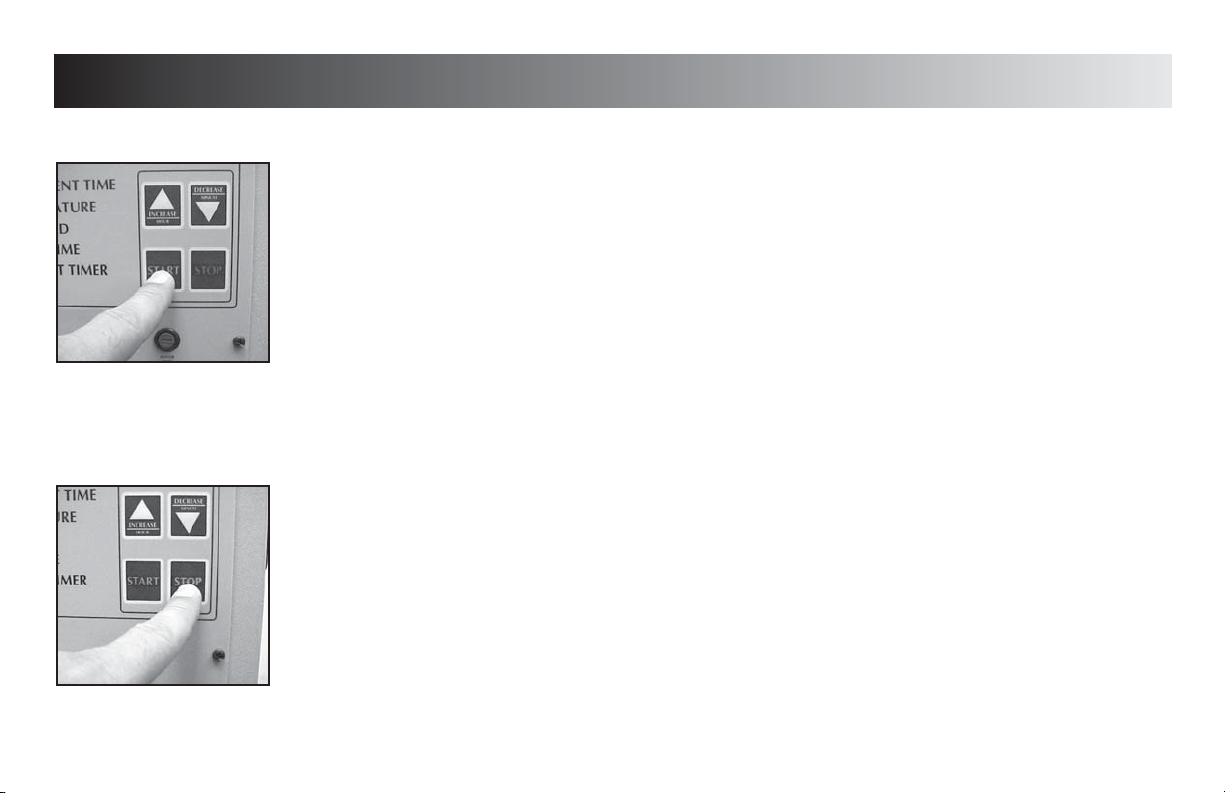
START TREATMENT
Press the “START” button.
STOP TREATMENT
Press the “STOP” button.
Fluidotherapy®- Dry Heat Therapy
14
Page 17
SETUP
TIME CONTROLLED PARAMETERS
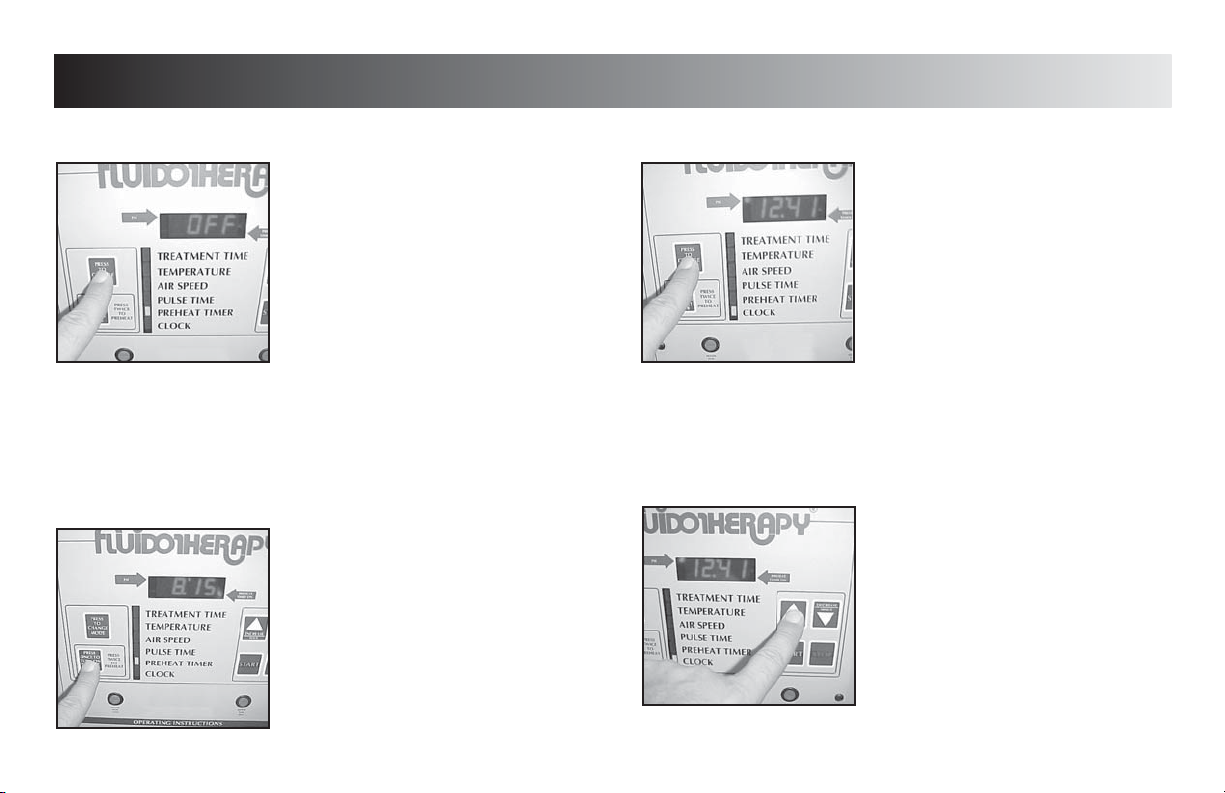
PREHEAT TIMER
Press the “PRESS TO CHANGE MODE”
button until the indicator light is beside
“PREHEAT TIMER”.
NOTE:
The “PREHEAT TIMER” allows the unit to
preheat the medium. The unit will run at 50%
Air Speed until the unit reaches the default
preheat temperature or 90 minutes whichever
comes first. The “PREHEAT TIMER” will operate
Monday through Friday only and can be set
to automatically start at a predetermined time
and heat the medium to a predetermined
temperature. See page 18 for setting the default
parameters of the “PREHEAT TIMER.
Fluidotherapy®- Dry Heat Therapy
CLOCK
Press the “PRESS TO CHANGE MODE” button
until the indicator light is beside “CLOCK”.
NOTE:
The “PREHEAT TIMER” will not function until
the Clock is set.
Press the “PRESS ONCE TO TURN ON
PREHEAT TIMER” button to illuminate the
“PREHEAT TIMER ON” indicator light. Press again
to start the “PREHEAT TIMER”.
NOTE:
The “PREHEAT TIMER” indicator light must be
set at the end of each day in order for it to
automatically come on the next day.
The “STOP” button is used to turn off the
Preheat if desired.
Press the “INCREASE” button to set hours.
Press the “DECREASE” button to set minutes.
NOTE:
The “PM” indicator light will illuminate when
PM hours are reached.
15
Page 18
SETUP
PREFERENCE MODE DEFAULT PARAMETERS
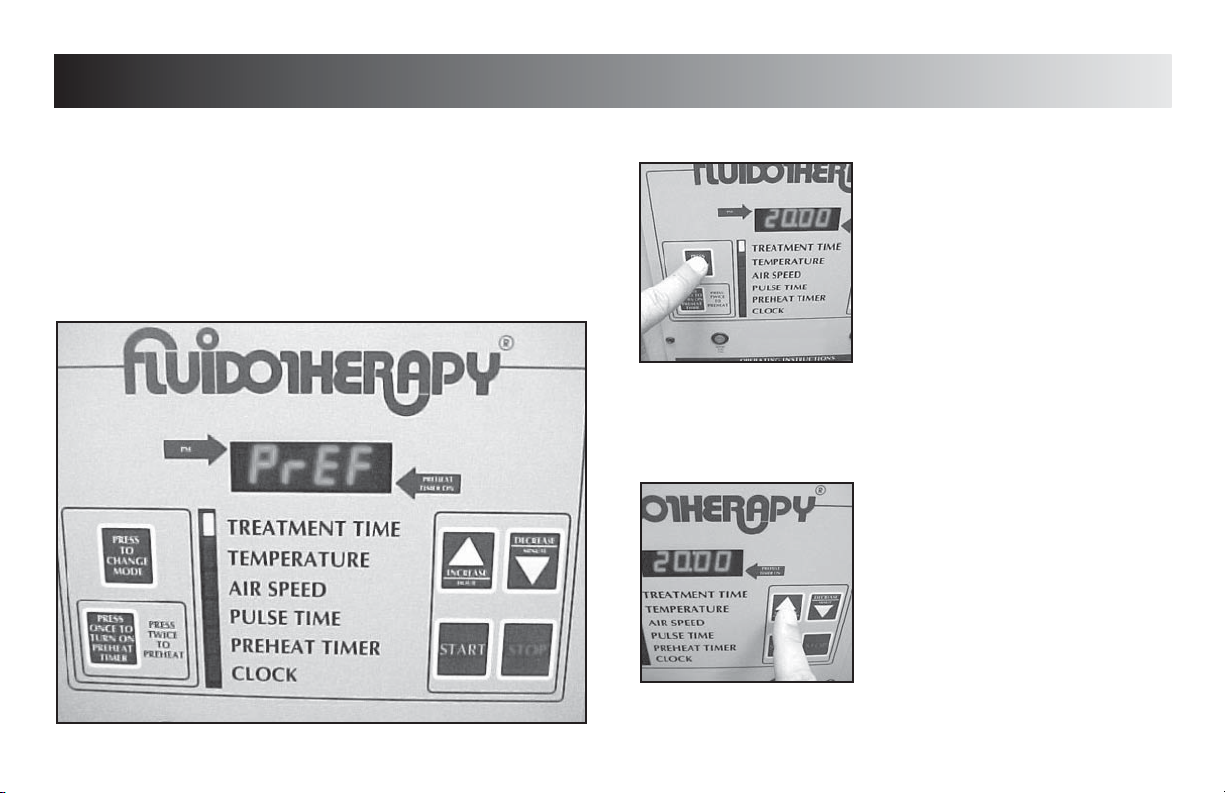
ENTERING “PrEF” MODE (PREFERENCE MODE)
Fluidotherapy®- Dry Heat Therapy
TREATMENT TIME DEFAULT
Simultaneously press the “PRESS TO CHANGE MODE”, “INCREASE” and
“DECREASE” buttons. “PrEF” will be displayed.
NOTE:
The “PrEF” mode allows the user to change the unit default settings.
Press the “PRESS TO CHANGE MODE” button
until the indicator light is flashing beside
“TREATMENT TIME”.
Press the “INCREASE” and “DECREASE”
buttons to set unit to the desired default
treatment time.
Press the “PRESS TO CHANGE MODE” button
to save the new setting.
NOTE:
The factory default setting is 20:00 minutes.
16
Page 19
SETUP
PREFERENCE MODE DEFAULT PARAMETERS (Continued)
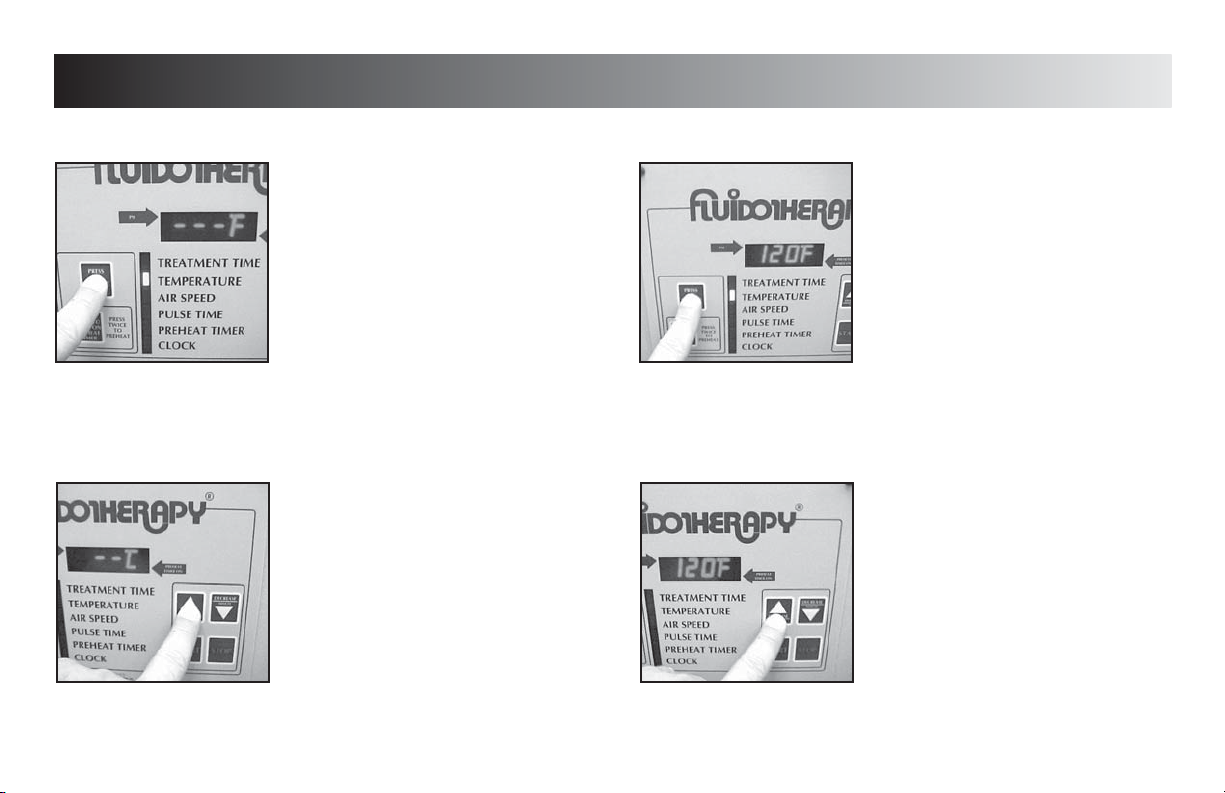
TEMPERATURE READING DEFAULT
Fluidotherapy®- Dry Heat Therapy
TREATMENT TEMPERATURE DEFAULT
Press the “PRESS TO CHANGE MODE”
button until the indicator light is flashing
beside “TEMPERATURE”.
Press the “INCREASE” button to set unit
to display °F or °C as desired for the
default setting.
Press the “PRESS TO CHANGE MODE”
button to save the new setting.
NOTE:
The factory default setting is °F.
Press the “PRESS TO CHANGE MODE”
button until the indicator light is flashing
beside “TEMPERATURE” and the existing
default temperature is displayed.
Press the “INCREASE” and “DECREASE”
buttons to set unit to the desired default
treatment temperature.
Operating Temperature Range is:
110 °F - 125 °F (43.3 °C - 51.6 °C)
Press the “PRESS TO CHANGE MODE”
button to save the new setting.
17
Page 20
SETUP
PREFERENCE MODE DEFAULT PARAMETERS (Continued)
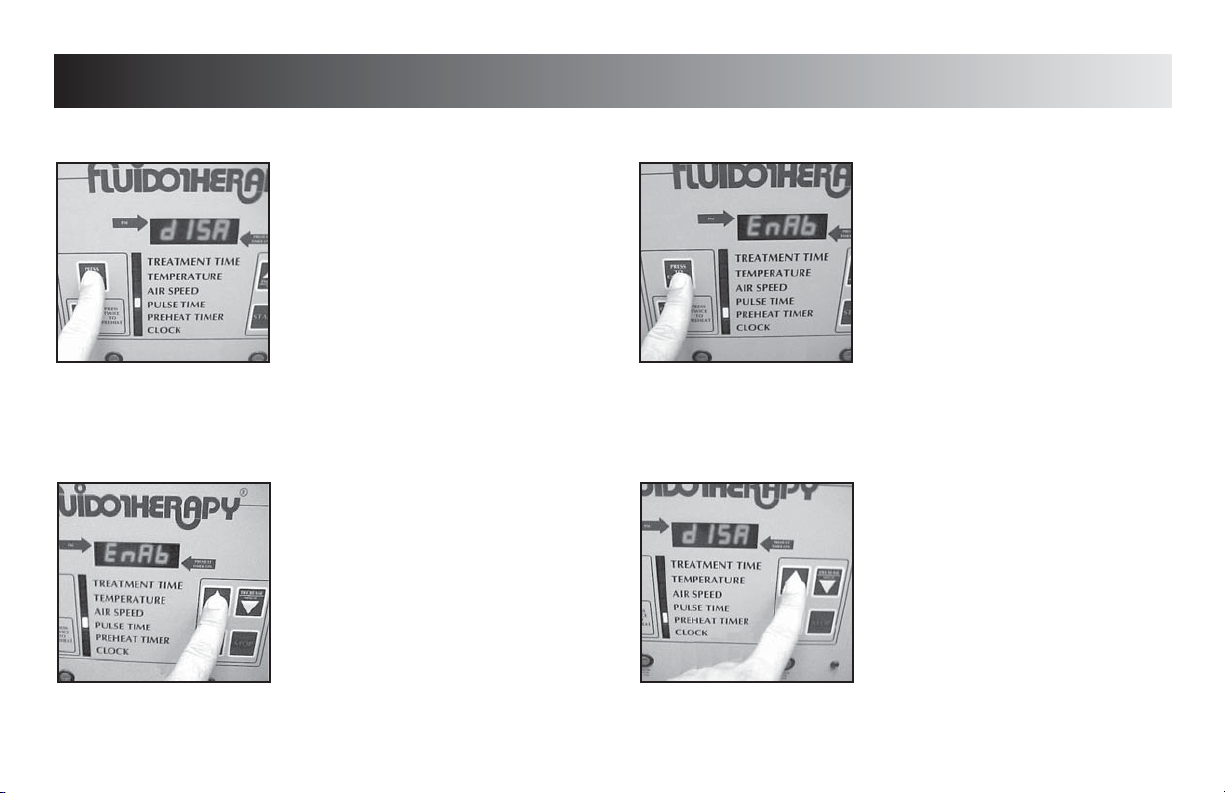
PULSE MODE (Enable/Disable)
Fluidotherapy®- Dry Heat Therapy
PREHEAT TIMER MODE (Enable/Disable)
Press the “PRESS TO CHANGE MODE”
button until the indicator light is flashing
beside “PULSE TIME”.
“EnAb” (enable) or “dISA” (disable)
will display.
Press the “INCREASE” button to set unit to
display “EnAb” or “dISA” as desired.
Press the “PRESS TO CHANGE MODE”
button to save the new setting.
Press the “PRESS TO CHANGE MODE”
button until the indicator light is flashing
beside “PREHEAT TIMER”.
“EnAb” (enable) or “dISA” (disable)
will display.
Press the “INCREASE” button to set unit to
display “EnAb” or “dISA” as desired.
Press the “PRESS TO CHANGE MODE”
button to save the new setting.
NOTE:
If Clock is disabled, the “PREHEAT TIMER”
will automatically be disabled.
18
Page 21

SETUP
PREFERENCE MODE DEFAULT PARAMETERS (Continued)
CLOCK (Enable/Disable)
Fluidotherapy®- Dry Heat Therapy
SETTING DAY OF WEEK
Press the “PRESS TO CHANGE MODE”
button until the indicator light is flashing
beside “CLOCK”.
“EnAb” (enable) or “dISA” (disable)
will display.
Press the “INCREASE” button to set unit to
display “EnAb” or “dISA” as desired.
Press the “PRESS TO CHANGE MODE”
button to save the new setting.
NOTE:
If Clock is disabled, the “PREHEAT TIMER”
will automatically be disabled.
Press the “PRESS TO CHANGE MODE”
button until “dAy__” (__= day code) is
displayed.
DAY CODE CHART
WEEKDAY DAY CODE
Sunday dAyu
Monday dAyn
Tuesday dAyE
Wednesday dAyd
Thursday dAyr
Friday dAyF
Saturday dAyA
Press the “INCREASE” or “DECREASE” button
to set unit to display the desired day code.
Press the “PRESS TO CHANGE MODE”
button to save the new setting.
19
Page 22

SETUP
PREFERENCE MODE DEFAULT PARAMETERS (Continued)
EXITING “PrEF” MODE
Press the “PRESS TO CHANGE MODE” buttons until “PrEF” is displayed.
Simultaneously press the “INCREASE”, “DECREASE” and “STOP” buttons.
The default treatment time will display and the indicator will be beside
“TREATMENT TIME”.
Fluidotherapy®- Dry Heat Therapy
20
Page 23

OPERATION
Fluidotherapy®- Dry Heat Therapy
PATIENT PREPARATION
DANGER
CLEAN THE PATIENT TREATMENT AREA THOROUGHLY WITH AN
ANTIMICROBIAL SOAP AND CLEAN WATER AS PER INDUSTRY/ FACILITY/
REGULATORY STANDARDS, AND UNIVERSAL SKIN WASHING PROCEDURES.
FOLLOWING THE SKIN WASHING PROCEDURE, APPLY A HOSPITAL GRADE
ANTISEPTIC SKIN CLEANSER, PER THE CLEANSER MANUFACTURER'S
RECOMMENDED INSTRUCTIONS FOR USE.
REFERENCE THE MAINTENANCE SCHEDULE AND MAKE CERTAIN THE
REQUIRED MAINTENANCE HAS BEEN PERFORMED PRIOR TO STARTING THE
UNIT.
STARTING TREATMENT
STARTING
Make certain all control panel settings have
been made, unit is preheated and patient
is in proper position with sleeve(s) secure
prior to starting the treatment. Refer to
pages 13 - 15 for setup of the unit.
Press “START” button to begin treatment.
STOP TREATMENT
STOPPING
Treatment will automatically stop when the
treatment time reaches zero.
Should it be desired to stop treatment
before the timer reaches zeros, push the
“STOP” button.
NOTE:
Should the treatment be stopped before
the timer reaches zero, it will be necessary
to re-set the “TREATMENT TIME” in order to
complete the prescribed treatment.
21
Page 24

REQUIRED MAINTENANCE
Fluidotherapy®- Dry Heat Therapy
DAILY MAINTENANCE
WARNING
• Before any Maintenance is performed or attempted, unplug the unit from
the power source to prevent the possibility of electrical shock.
CLEAN INLET FILTERS
At the end of each work day, unplug the
unit and clean the Inlet Filters on the unit.
Carefully remove the filter retainer and
wash the filter and screen with a mild
antibacterial soap and water. Thoroughly
dry the filter and screen before placing
back on the unit.
NOTE:
Should your unit have the earlier style inlet
filters, gently clean the filter using a soft
bristle brush. Be careful not to puncture or
damage the filter.
Should the filter become damaged, torn or
punctured, call your dealer for replacement
of the filter before resuming operation.
REFILL WITH CELLEX® MEDIUM
Refill the unit with Cellex® Dry Heat Medium to
approximately one (1) inch above the bottom of
the arm treatment ports of the unit.
NOTE:
Use of other than Cellex Medium may cause
premature failure of the fluidotherapy unit(s).
INSPECT SLEEVE CONDITION
Inspect the port sleeves for tears, rips and weak seams. Replace all sleeves
that show signs of tears, rips, weak or loose seams or excessive wear.
Keeping the sleeves in excellent condition prevents excessive spillage
of the Cellex medium and prevents the medium from entering the heat
chamber of the unit.
ARM PREHEAT TIMER
Plug the unit back into an approved power
source. If the “Preheat Timer” is used, press
the “PREHEAT TIMER” button once, the
“PREHEAT TIMER ON” indicator will illuminate,.
in order for the Preheat Timer to automatically
come on at the default time
the next morning.
NOTE:
The Fluidotherapy Preheat Timer does not
operate on Saturday or Sunday. However,
for Monday morning preheat, set the unit as
described above on Friday evening.
22
Page 25
REQUIRED MAINTENANCE
Fluidotherapy®- Dry Heat Therapy
WEEKLY MAINTENANCE
Each week all sleeves of the Fluidotherapy unit should be laundered in a
mild antibacterial detergent. Allow the sleeves to air dry or dry on a low
temperature setting. Drying the sleeves in high temperatures could cause
the sleeves to shrink or become distorted resulting in the sleeve(s) not
properly fitting when placing them back onto the unit.
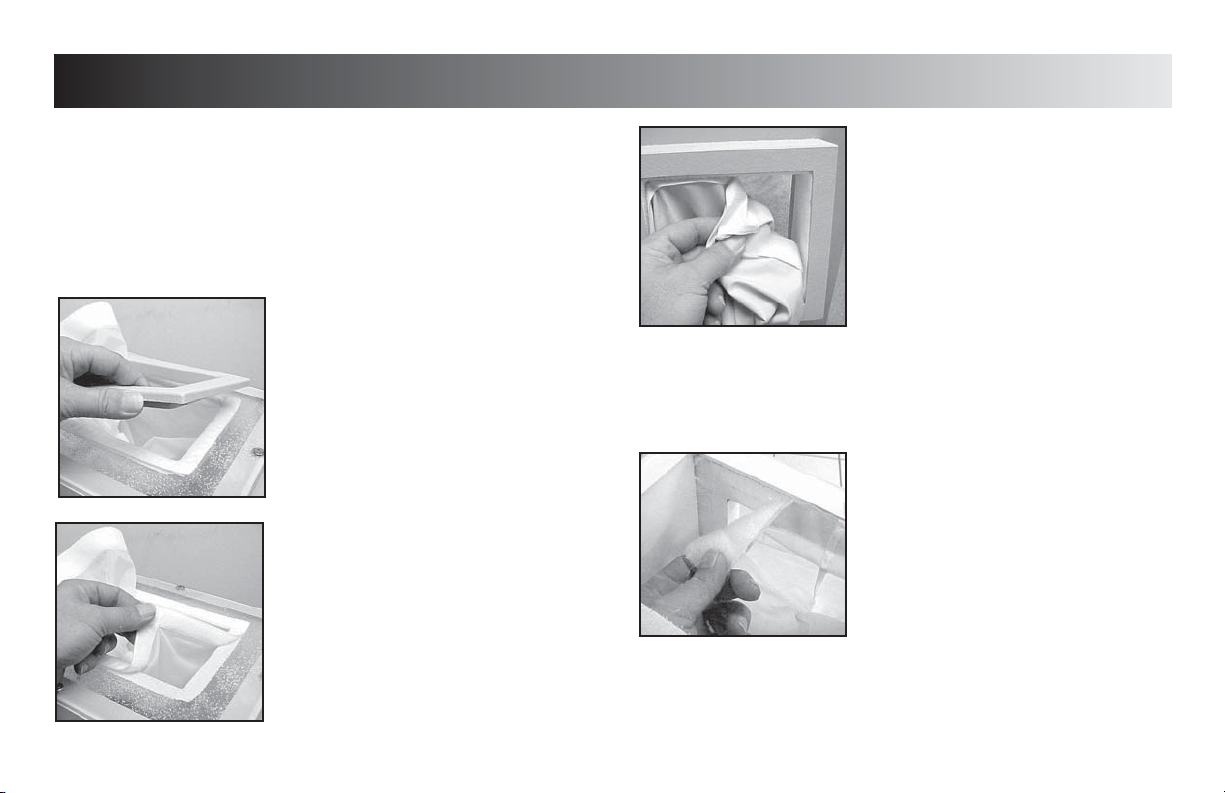
REMOVING TOP SLEEVES (All Models)
Unplug the unit from the power source.
Carefully remove the rectangular bezel(s)
from the top of the unit.
Carefully pull the hook and loop fasteners
apart to remove the sleeve from the unit.
Replace in reverse order making certain
the corners are well seated to form the seal
required to prevent excessive escape of
medium.
REMOVING END SLEEVE
(Model FLU110D & FLU110DE)
Carefully pull the hook and loop fastener on
the sleeve to remove sleeve from unit.
Replace in reverse order making certain
the corners are well seated to form the seal
required to prevent excessive escape of
medium.
REMOVING END SLEEVE
(Model FLU210D & FLU210DE)
With Top Sleeve removed, reach in through
the top port and carefully pull the hook
and loop fastener of the sleeve away from
the unit.
Replace in reverse order making certain
the corners are well seated to form the
seal required to prevent excessive escape
of medium.
23
Page 26

REQUIRED MAINTENANCE
Fluidotherapy®- Dry Heat Therapy
WEEKLY MAINTENANCE (Continued)
REMOVING END SLEEVES
(Model FLU115D & FLU115DE)
NOTE:
The sleeve in these photos has been
modified (cut away) for clarity.
Remove the top sleeves to gain access to
the inside of the unit. Refer to page 23.
Pull the medium back and away from the
arm ports.
It is extremely important to move the medium away from the ports to
prevent the medium entering the space between the inner and outer
walls of the unit when the sleeves are removed and replaced.
Dust away all Cellex® medium from inside
the sleeve.
Pull the retainer ring from the sleeve and
lay aside for re-installation.
Pull the sleeve away from the sleeve
extrusion in the inner housing of the unit.
NOTE:
There is a ring folded into the sleeve that
fits over the sleeve extrusion on the inside
of the unit.
From the outside of the unit, reach into the
sleeve and remove the other sleeve retainer
ring.
Carefully pull the sleeve and ring out of the
unit, avoiding Cellex medium from entering
the cavity between the two housings of the
unit.
Cellex medium entering the heat
chamber of the unit(s) can cause
severe injury to patients as well as
smoke damage to the facility and the
Fluidotherapy unit(s).
24
Page 27

REQUIRED MAINTENANCE
Fluidotherapy®- Dry Heat Therapy
WEEKLY MAINTENANCE (Continued)
Remove the ring from the folded end of the
sleeve.
Launder sleeves as described on page 23.
Vacuum out any of the Cellex® medium that
may have entered the cavity between the
inner and outer walls of the unit.
WARNING
Removal of all Cellex medium that has entered the cavity is essential to
maintain proper and safe operation of the unit. If the medium reaches
the heating chamber of the unit immediately call a certified technician for
removal of any suspected medium in the heat chamber. Do not place the
unit into service if medium is suspected to be in the heat chamber.
INSTALLING 115 Model SLEEVE
Fold the elastic end of the sleeve over
the ring.
Place sleeve through port hole.
Place the ring/sleeve assembly over the
sleeve extrusion on the inside of the unit.
NOTE:
Position the sleeve seam toward the top of
the unit and push the ring/sleeve assembly
completely onto the sleeve extrusion.
Install the inner sleeve retainer ring making
certain the ring split will be toward the top of
the unit.
Push the retainer ring over the ring/sleeve
assembly until it is completely seated.
NOTE:
The retainer ring should fit tightly over the
sleeve. If necessary, use a pair of pliers to
tighten the ring in the area where it slides over
the sleeve.
25
Page 28

REQUIRED MAINTENANCE
WEEKLY MAINTENANCE (Continued)
From the outside of the unit, reach in through
the sleeve and install the outer sleeve
retaining ring.
NOTE:
Start installation of the outer ring at the top
of the unit. As the ring is being seated pull
the area of the sleeve tight. This will aid in the
prevention of excessive medium spillage and
patient comfort.
Fluidotherapy®- Dry Heat Therapy
26
Page 29

REQUIRED MAINTENANCE
Fluidotherapy®- Dry Heat Therapy
ADDITIONAL FLUIDOTHERAPY PREVENTIVE MAINTENANCE REQUIREMENTS
The following additional preventive maintenance requirements must be scheduled and performed as described to ensure that the unit(s) are operating
efficiently, safely and functioning at their optimum. A blank Maintenance Record is provided, on page 28, to aid in the scheduling and Record Keeping of
this prescribed preventive maintenance program. The following preventive maintenance procedures must be performed by a Chattanooga Group certified,
trained service technician trained in the maintenance requirements of the Chattanooga Group. Fluidotherapy units.
QUARTERLY (Every 3 Months)
The following Preventive Maintenance must be performed on all
Fluidotherapy units quarterly by a certified service technician.
• INTERNAL CAVITY INSPECTION AND CLEANING
• INTAKE FILTER REPLACEMENT
• FULL FUNCTIONAL AND PERFORMANCE TESTS
• DISTRIBUTOR REPLACEMENT
Only if Performance Test results indicate replacement is necessary.
BI-ANNUAL (Every 6 Months)
The following Preventive Maintenance must be performed on all
Fluidotherapy units every six months in addition to the Quarterly
Maintenance requirements by a certified service technician.
• CHANGE Cellex® Medium
• BLOWER MOTOR(S) REPLACEMENT
• REPLACE DISTRIBUTOR
Required at the six month interval
ANNUAL (Once per Year)
The following Preventive Maintenance must be performed on all
Fluidotherapy units annually in addition to the Quarterly and Bi-Annual
Maintenance requirements by a certified service technician.
• CALIBRATION
DANGER
If the level of Cellex medium suddenly drops one inch or more
below the operating level of the unit, immediately pull the unit out
of service and contact a certified service technician.
A sudden level drop in the Cellex medium indicates that medium is
in the heating chamber of the unit and must be repaired before the
unit is placed back into service.
27
Page 30

REQUIRED MAINTENANCE
Fluidotherapy®- Dry Heat Therapy
FLUIDOTHERAPY MAINTENANCE RECORD
UNIT SERIAL NUMBER UNIT MODEL NUMBER DATE PLACED IN SERVICE
DEALER: PHONE: CONTACT
Completing this form:
“DATE”-Date Service is performed “MAINTENANCE PERFORMED”- Quarterly, Bi-Annual or Annual “TECH INITIALS”- Certified Tech’s Initials
28
Page 31

REQUIRED MAINTENANCE
SERVICE
When the Fluidotherapy Dry Heat Therapy unit requires service, or preventive
maintenance, contact the selling dealer or Chattanooga Group Service
Department.
All units returned to the factory for service must include the following:
WARRANTY REPAIR/OUT OF WARRANTY REPAIR
1. Written statement containing the following information;
·
2. Copy of original invoice issued at puchase of the unit.
3. Ship unit to Factory in the original container with all
accessories and information as required in item 1 above to:
Chattanooga Group
4717 Adams Road
Hixson, TN 37343
Phone: USA: (800)-592-7329
(423)-870-2281
FAX: (423) 875-5497
Web Address: chattgroup.com
Service to these units should be performed only by Service Technicians
Certified by Chattanooga Group.
RA Number- Obtain from Factory
·
Unit Model Number
·
Unit Serial Number
·
Contact person with Phone and Fax Numbers
·
Billing Address (for Out of Warranty Repair)
·
Shipping Address (Where to Ship Unit after Repair)
·
Detailed Description of Problem or Symptoms
Fluidotherapy®- Dry Heat Therapy
29
Page 32

ACCESSORIES
REPLACEMENT ACCESSORIES
When ordering additional accessories for the Chattanooga Group
Fluidotherapy units, use the following part numbers and descriptions.
HENLEY No. CGI No.
MODEL FLU110D & FLU110DE
TOP SLEEVE SLE0003 31775
TOP SLEEVE BEZEL FRA0003 31456
ARM SLEEVE SLE0002 31774
MODEL FLU115D & FLU115DE
TOP SLEEVE SLE0003 31775
TOP SLEEVE BEZEL FRA0003 31456
INNER SLEEVE RETAINER TRI0034 31883
SLEEVE RING PPL0013 31679
OUTER SLEEVE RETAINER TRI0035 31834
ARM SLEEVE SLE0001 31773
MODEL FLU210D & FLU210DE
TOP SLEEVE SLE0003 31775
TOP SLEEVE BEZEL FRA0003 31456
END SLEEVE SLE0004 31776
CELLEX® Dry Heat Medium 10 lbs (4.5 kg) MED0001
Fluidotherapy®- Dry Heat Therapy
MEDIUM
Use only Chattanooga Group’s Cellex Dry Heat Medium in the
Fluidotherapy unit. The Cellex medium is designed specifically for use
in the Chattanooga Group Fluidotherapy units to ensure optimal and
efficient operation of all the Fluidotherapy products.
30
Page 33

WARRANTY
Chattanooga Group, a division of Encore Medical, L.P. ("Company") warrants that the Fluidotherapy Dry Heat Therapy units ("Product") are free of defects in material and
workmanship. This warranty shall remain in effect for one year (12 months) from the date of original consumer purchase. If this Product fails to function during the one year
warranty period due to a defect in material or workmanship, at the Company's option, the Company or the selling dealer will repair or replace this Product without charge within
a period of thirty (30) days from the date on which the Product is returned to the Company or the dealer.
All repairs to the Product must be performed by a service center certified by the Company. Any modifications or repairs performed by unauthorized centers or groups will void
this warranty.
The warranty period for accessories are 90 days. Accessories consist of sleeves and use replaceable intake filter(s).
The warranty period for the motor(s) and distributor are 180 days.
To participate in warranty coverage, this Product's warranty registration card (included with Product) must be filled out and returned to the Company by the original owner
within ten (10) business days of purchase.
This Warranty Does Not Cover:
Replacement parts or labor furnished by anyone other than the Company, the selling dealer or a certified Company service technician.
Defects or damage caused by labor furnished by someone other than Company, the selling dealer or a certified Company service technician.
Any malfunction or failure in the Product caused by product misuse, including, but not limited to, the failure to provide reasonable and required maintenance or any use that is
inconsistent with the Product User's Manual.
COMPANY SHALL NOT BE LIABLE IN ANY EVENT FOR INCIDENTAL OR CONSEQUENTIAL DAMAGES.
Some states do not allow the exclusion or limitation of incidental or consequential damages, so the above limitation or exclusion may not apply to you.
To Obtain Service From Company or the selling dealer under this warranty:
1. A written claim must be made within the warranty period to the Company or the selling dealer. Written claims made to the Company should be sent to:
4717 Adams Road
P.O. Box 489
Hixson, TN 37343 USA
Telephone: 1-800-592-7329
Facsimile: (423) 875-5497
and
2. The Product must be returned to the Company or the selling dealer by the owner.
This warranty gives you specific legal rights and you may also have other rights which vary from state to state.
The Company does not authorize any person or representative to create for it any other obligation or liability in connection with the sale of the Product.
Any representation or agreement not contained in the warranty shall be void and of no effect.
THE FOREGOING WARRANTY IS IN LIEU OF ALL OTHER WARRANTIES, EXPRESSED OR IMPLIED,
INCLUDING ANY WARRANTY OR MERCHANTABILITY OR FITNESS FOR A PARTICULAR PURPOSE.
Fluidotherapy®- Dry Heat Therapy
31
Page 34

INDICE DE CONTENIDOS
Fluidotherapy®- Dry Heat Therapy
Introducción...................................................................................1
Terapia de Calor Seco.............................................................2-4
Instrucciones de Precaución.................................2-3
Indicaciones & Contraindicaciones........................4
Nomenclatura................................................................................5-8
FLU110D & FLU110DE.................................................5
FLU115D & FLU115DE.................................................6
FLU210D & FLU210DE.................................................7
Panel de Control............................................................8
Especificaciones.....................................................................9-11
FLU110D & FLU110DE.................................................9
FLU115D & FLU115DE...............................................10
FLU210D & FLU210DE...............................................11
Configuración........................................................................12-20
Parámetros del Modo de Tratamiento..........12-14
Parámetros Controladores del Tiempo...............15
Configuración de Espera de Precalentamiento.....10-11
Parámetros por Defecto de Modo Preferido............16-20
© 2007 Encore Medical. L.P. and its affiliates, Austin, Texas, USA. Any use of editorial, pictorial or layout composition of
this publication without express written consent from Chattanooga Group of Encore Medical, L.P. is strictly prohibited.
This publication was written, illustrated and prepared for print by Chattanooga Group of Encore Medical, L.P.
Funcionamiento.......................................................................21
Preparación del Paciente.......................................21
Inicio del Tratamiento.............................................21
Parada del Tratamiento...........................................21
Mantenimiento Requerido............................................22-29
Mantenimiento Diario..............................................22
Mantenimiento Semanal..................................23-26
REQUISITOS ADICIONALES DE MANTENIMIENTO
PREVENTIVO DE FLUIDOTERAPIA
Trimestral......................................................................27
Semestral......................................................................27
Anual...............................................................................27
Registro del Mantenimiento de Fluidoterapia......28
Servicio de Fábrica.....................................................29
Accesorios.....................................................................................30
Garantía ........................................................................................31
ISO 13485 CERTIFIED
Page 35

INTRODUCCION
Gracias por adquirir la Unidad de Terapia de Calor Seco del Grupo Chattanooga.
Este manual contiene las instrucciones generales de seguridad, funcionamiento, mantenimiento y cuidado para los
propietarios y usuarios de los Aparatos de Terapia de Calor Seco Fluidoterapia.
En el momento de su publicación la información aquí contenida estaba vigente y actualizada. Sin embargo, debido a
las continuas mejoras tecnológicas y a los crecientes conocimientos técnicos en el campo de la Terapia de Calor Seco,
así como a la política de mejora continua del Grupo Chattanooga, Chattanooga Group se reserva el derecho de hacer
cambios y mejoras en nuestro equipo y documentación sin ninguna obligación por parte de Chattanooga Group.
Lea, entienda y siga la información contenida en este manual.
Permanezca al corriente de los últimos desarrollos en el campo de la Terapia de Calor Seco y respete todas las medidas
de precaución para el tratamiento.
Mantengasé informado de las indicaciones y contraindicaciones apropiadas para el uso de Terapia de Calor Seco.
Este equipo es para utilizarse solo bajo la prescripción y supervisión de un profesional autorizado.
Fluidotherapy®- Dry Heat Therapy
1
Page 36

TERAPIA DE CALOR SECO
Instrucciones de Precaución
Las instrucciones de precaución que encontrará en esta sección y a lo
largo de este manual se indican con símbolos específicos. Debe entender
estos símbolos y sus definiciones antes de manejar este equipo. La
definición de estos símbolos es la siguiente:
=CUIDADO - El texto con el indicador "CUIDADO" explicará
posibles infracciones de Seguridad que podrían
causar un daño potencial menor o moderado o
dañar el equipo.
=ATENCION- El texto con un indicador "ATENCION" explicará
posibles infracciones de Seguridad que causarán
potencialmente daños serios y averías al equipo.
=PELIGRO- El texto con el indicador "PELIGRO" explicará
las posibles infracciones de Seguridad que son
situaciones inminentemente peligrosas que darían
como resultado la muerte o daños serios.
=PELIGRO DE EXPLOSION - El texto con un indicador
"Peligro de Explosión" explicará posibles
infracciones de Seguridad si se utiliza este equipo
en presencia de anestésicos inflamables.
NOTA: A lo largo de este manual se encontrará "NOTA". Estas Notas son
información útil para ayudar en un área particular o para la descripción de
una función.
Fluidotherapy®- Dry Heat Therapy
CUIDADO
• Lea, entienda y ponga en práctica las instrucciones de precaución y funcionamiento
que aparecen en este manual. Conozca las limitaciones y los peligros relacionados
con el uso de cualquier dispositivo eléctrico. Observe los rótulos de precaución y de
funcionamiento colocados en el aparato.
• NO haga funcionar el aparato conectado a otros dispositivos que no sean de
Chattanooga Group.
• Rellene el aparato a diario para tener un nivel apropiado de llenado con Chattanooga
Group Cellex® Medio de Calor Seco.
• Cambie el Medio de Calor Seco Cellex cada seis (6) meses.
• Use solo el Medio de Calor Seco Cellex en los aparatos de Fluidoterapia.
• Limpie el Filtro(s) Intel diariamente antes de poner en marcha el aparato.
• Use solo los dedos para funcionar los botones de control del panel(es) de control.
Utilizar objetos puntiagudos como bolígrafos o lapiceros dañaría al aparato.
• APAGUE el aparato antes de colocar a un paciente o quitar a un paciente de la
unidad.
• Fije todos los puertos de entrada antes de encender el aparato.
• Compruebe la temperatura del aparato antes de tratar al paciente para asegurarse de
que está a la temperatura correcta.
• Coloque al paciente en una posición cómoda teniendo en cuenta una colocación
correcta del miembro tratado.
• La temperatura apropiada de almacenamiento y transporte de los aparatos de
Fluidoterapia son -40° F - 158° F (- 40° C - 70° C). Humedad Relativa 10% - 100%.
2
Page 37

TERAPIA DE CALOR SECO
Instrucciones de Precaución
Fluidotherapy®- Dry Heat Therapy
ATENCION
• La ley federal restringe la venta de este dispositivo a, o bajo la orden de, un
medico o profesional autorizado. Este dispositivo se debe usar solo bajo la
supervisión continuada de, un médico o un profesional autorizado.
• Para una protección continua contra el riesgo de fuego, cambiar los fusibles
solo con otros del mismo tipo y potencia.
• Asegúrese de que el aparato está conectado a tierra enchufándolo solamente
a un enchufe de servicio eléctrico de tierra conforme con los códigos eléctricos
nacionales y locales aplicables.
• Este dispositivo se debe mantener lejos de los niños.
• Se debe tener cuidado cuando esté funcionando este equipo cerca de otros
equipos. Un potencial electromagnético u otra interferencia podrían ocurrir
a este o a otro equipo. Intente minimizar esta interferencia no usando otro
equipo conjuntamente con este.
• Antes de administrar cualquier tratamiento a un paciente debe estar
familiarizado con los procedimientos de funcionamiento de cada modo de
tratamiento disponible, así como de las indicaciones, contraindicaciones,
avisos y precauciones. Consulte otros recursos para información adicional con
respecto a la aplicación de Terapia de Calor Seco.
• Para prevenir una descarga eléctrica, desconectar el aparato de fuente de
energía antes de intentar cualquier procedimiento de mantenimiento.
• Use solamente medio de calor seco tratado en la unidad como Cellex® para
prevenir el polvo excesivo.
PELIGRO
• Hay peligro de explosión si se utiliza en presencia de anestésicos
inflamables. El símbolo de peligro para este riesgo se expone a la
vista en el rótulo del número de serie.
• Realice todos los Mantenimientos Necesarios que se describen en este
manual. Es obligatorio el seguimiento estricto de los Mantenimiento
Necesarios para las unidades de Fluidoterapia. Un fallo en la realización de
los Mantenimientos Necesarios podría dar como resultado que el medio
Cellex® entre en la cámara de calor de la unidad(es) y cause lesiones graves
al paciente, además el humo perjudica a la instalación y a la unidad(es) de
Fluidoterapia.
3
Page 38
TERAPIA DE CALOR SECO
Indicaciones, Contraindicaciones & Efectos Adversos
Indicaciones
• Alivio del dolor local.
• Tratamiento de la insuficiencia del flujo de sangre local.
• Tratamiento del campo de movimiento cuando se combina con
el ejercicio.
• Tratamiento de los síntomas de artritis no reumática.
Contraindicaciones
• Este dispositivo no se debería usar para aliviar un dolor
sintomático a menos que la etiología esté establecida o a
menos que se haya diagnosticado el síndrome del dolor.
• Este dispositivo no se debería usar cuando se presenten
lesiones cancerosas o heridas abiertas en la zona de tratamiento.
• Otras contraindicaciones son los pacientes que se sospecha que son
portadores de enfermedades infecciosas serias y/o enfermedades en
que es aconsejable, por fines generales médicos, suprimir el calor o
la fiebre.
• Se deben tomar precauciones adecuadas cuando se trate
a las personas con condiciones o enfermedades medicas
sospechadas o diagnosticadas como problemas cardiacos,
epilepsia, diabetes, etc.
• Antes del tratamiento, consultar a un profesional médico
familiarizado con las medidas de precaución que se deben
tomar para pacientes que pueden tener reacciones alérgicas al
polvo y al polen.
Fluidotherapy®- Dry Heat Therapy
ATENCION
4
Page 39

NOMENCLATURA
Familiarización con el Aparato FLU110D & FLU110DE
1. TAPA DEL DEPOSITO & VENTANA DE VISUALIZACION DEL
1
8
TRATAMIENTO
Acceso a añadir/cambiar medio, ver tratamiento del paciente y
acceso clínico a a zona de tratamiento del paciente
Fluidotherapy®- Dry Heat Therapy
2
3
7
6
4
5
2. DEPOSITO DEL MEDIO/TRATAMIENTO
Acceso al tratamiento y deposito del medio
3. PUERTO DE ACCESO A LA MANO/BRAZO
Puerto de tratamiento para el Tratamiento de Mano/Brazo (extremo
del aparato)
4. FILTROS DE ENTRADA REEMPLAZABLES
Filtros de la entrada de aire de la habitación en el aparato de
Fluidoterapia (1 a cada lado)
5. BASE DE CUATRO PUNTOS
Ruedecillas incluidas para convertirlo en una Base Móvil
6. ALOJAMIENTO DEL VENTILADOR
Alojamiento del Ventilador & Calentador
7. PANEL DE CONTROL
Ver página 8 para la descripción de los detalles de los controles
8. PUERTO DE ACCESO AL TRATAMIENTO DE CODO/PIE
Puerto del tratamiento para Codo y Pie
5
Page 40

NOMENCLATURA
Familiarización con el Aparato FLU115D & 115DE
1
2
8
3
7
4
5
1. PUERTO DE ACCESO A CODO/PIE
Puerto de tratamiento para el Tratamiento de Codo y Pie. Acceso a
2. PUERTOS DE ACCESO A MANO/BRAZO
Puerto de tratamiento para el Tratamiento de Mano/Brazo (extremo
3. FILTROS DE ENTRADA
Filtros de entrada del aire de la habitación al aparato de
4. MEDIO/CUBA DE TRATAMIENTO
Acceso al tratamiento y deposito del medio
5. BASE MOVIL
6. BLOQUEADOR DE LAS RUEDECILLAS
7. ALOJAMIENTO DEL VENTILADOR
Alojamiento del Ventilador & Calentador
8. PANEL DE CONTROL
Ver página 8 para la descripción de los detalles de los controles
Fluidotherapy®- Dry Heat Therapy
añadir/cambiar medio. Acceso clínico a la zona de tratamiento de
pacientes.
del aparato).
Fluidoterapia (1 a cada lado).
6
6
Page 41

NOMENCLATURA
Familiarización con el Aparato FLU210D & FLU210DE
1
7
8
2
1. TAPA DEL DEPOSITO & VENTANA DE VISUALIZACION DEL
TRATAMIENTO
Acceso a añadir/cambiar medio, ver tratamiento del paciente y
acceso clínico a la zona de tratamiento del paciente
2. DEPOSITO DEL MEDIO/TRATAMIENTO
Acceso al tratamiento y deposito del medio
3. PUERTO DE A ACCESO MANO/BRAZO/PIERNA
Puerto de tratamiento para el Tratamiento de Mano/Brazo/Pierna
(extremo del aparato)
Fluidotherapy®- Dry Heat Therapy
3
4
6
5
4. FILTROS DE ENTRADA CON SOLAPAS DE CALOR
Filtra el aire que entra de la habitación al aparato de Fluidoterapia
(1 a cada lado)
Las Solapas de Calor ayudan a la reducción del tiempo de
precalentamiento.
5. BASE MOVIL W/BLOQUEADOR DE LAS RUEDECILLAS
6. ALOJAMIENTO DEL VENTILADOR
Alojamiento del Ventilador & Calentador
7. PANEL DE CONTROL
Ver página 8 para la descripción de los detalles de los controles
8. PUERTO DE ACCESO AL TRATAMIENTO DE CODO/PIE
Puerto de tratamiento para el Codo y Pie
7
Page 42

NOMENCLATURA
Controles de Funcionamiento (Todos los Aparatos)
1. VISUALIZACION
Muestra el Tiempo, Temperatura, Velocidad de Aire, Tiempo del
Pulso, Cronómetro del Precalentador y Reloj del Tratamiento
cuando se indica el Modo respectivo
12
11
10
1
2
3
4
78
9
6
5
2. ENCENDIDO DEL CRONOMETRO DE PRECALENTAMIENTO
Indicador de luz para el Cronómetro de Precalentamiento
3. AUMENTO/HORA
Se utiliza para aumentar los parámetros Modo y para fijar la Hora
cuando se pone el Reloj
4. DISMINUCION/MINUTO
Se usa para disminuir los parámetros Modo y para fijar los
Minutos cuando se pone el Reloj
5. PARAR
Se usa para parar el tratamiento y el Cronómetro de Precalentamiento
6. FUSIBLE DEL MOTOR
7. INICIO
Se usa para empezar el tratamiento
8. BARRA INDICADORA
Indica los Modos según se eligen
9. FUSIBLE DEL CALENTADOR
10. BOTON DEL CRONOMETRO DE PRECALENTAMIENTO
Presionar una vez para Encender el Cronómetro de
Precalentamiento. Presionar dos veces para iniciar la función de
Precalentamiento
11. ELEGIR MODO
Se utiliza para elegir el Modo deseado
12. PM
Indicador PM para el Reloj
8
Fluidotherapy®- Dry Heat Therapy
Page 43

ESPECIFICACIONES
FLU110D & FLU110DE
Longitud
de la Caja
Físicas de la Longitud de la Caja
Altura
Fluidotherapy®- Dry Heat Therapy
Modos de Funcionamiento
Continuo (Por Defecto)
Ajuste de Variables para Tiempo, Temperatura y Velocidad del Aire
Modo Pulsación..................................................................OFF para 6 seg. ON/OFF
TIEMPO DE TRATAMIENTO..............................................................1 a 99 minutos
TEMPERATURA DE FUNCIONAMIENTO...............................110°F (43.3°C) 125°F(51.6°C)
VELOCIDAD DEL AIRE............................................0% a 100% (incrementos 5%)
CRONOMETRO DE PRECALENTAMIENTO.................................115 °F (46.1 °C)
con 50% Corriente de Aire
CAPACIDAD DEL MEDIO..............................Aproximadamente 30 lb (13.6 kg)
Energía Entrante (FLU110D)...................................105-120Vac, 50/60 Hz, 13A
Energía Entrante (FLU110DE)...................................210-250Vac, 50/60 Hz, 8A
Dimensiones
Longitud de la Caja.........................................................................34.0” (86.4 cm)
Físicas de la Longitud de la Caja..............................................11.5” (29.2 cm)
Altura.....................................................................................................33.0” (83.8 cm)
Peso..........................................................................70 lbs (31.7 kg) Menos Medio
Peso de Transporte .....................................................................100 lbs (45.4 kg)
ATENCION
•
Asegúrese de que el aparato está conectado a tierra enchufándolo
solamente a un enchufe de servicio eléctrico de tierra conforme con
los códigos eléctricos nacionales y locales aplicables.
9
Page 44

ESPECIFICACIONES
FLU115D & FLU115DE
Físicas de la Longitud de la Caja
Altura
Longitud de
la Caja
Fluidotherapy®- Dry Heat Therapy
Modos de Funcionamiento
Continuo (Por Defecto)
Ajuste de Variables para Tiempo, Temperatura y Velocidad del Aire
Modo Pulsación...................................................................OFF para 6 seg ON/OFF
TIEMPO DE TRATAMIENTO...............................................................1 a 99 minutos
TEMPERATURA DE FUNCIONAMIENTO.....................110 °F (43.3 °C) to 125 °F (51.6 °C)
VELOCIDAD DEL AIRE..........................................0% to 100% (incrementos 5%)
CRONOMETRO DE PRECALENTAMIENTO..............................115 °F (46.1 °C)
con 50% Corriente de Aire
CAPACIDAD DEL MEDIO..................................Aproximadamente 40 lbs (18.1 kg)
Energía Entrante (FLU115D)....................................105-120Vac, 50/60 Hz, 13A
Energía Entrante (FLU115DE)...................................210-250Vac, 50/60 Hz, 8A
Dimensiones
Físicas de la Longitud de la Caja............................................. 34.0” (86.4 cm)
Longitud de la Caja.........................................................................18.5” (47.0 cm)
Altura.....................................................................................................33.0” (83.8 cm)
Peso............................................................................60 lbs (27.2kg) Menos Medio
Peso de Transporte .....................................................................100 lbs (45.4 kg)
ATENCION
•
Asegúrese de que el aparato está conectado a tierra enchufándolo
solamente a un enchufe de servicio eléctrico de tierra conforme con los
códigos eléctricos nacionales y locales aplicables.
10
Page 45

ESPECIFICACIONES
FLU210D & FLU210DE
Longitud de
la Caja
Físicas de la Longitud de la Caja
Altura
Fluidotherapy®- Dry Heat Therapy
Modos de Funcionamiento
Continuo (Por Defecto)
Ajuste de Variables para Tiempo, Temperatura y Velocidad del Aire
Modo Pulsación...................................................................OFF para 6 seg ON/OFF
TIEMPO DE TRATAMIENTO..............................................................1 a 99 minutos
TEMPERATURA DE FUNCIONAMIENTO........................110 °F (43.3 °C) to 125 °F (51.6 °C)
VELOCIDAD DEL AIRE.............................................0% to 100% (5% increments)
CRONOMETRO DE PRECALENTAMIENTO.................................115 °F (46.1 °C)
con 50% Corriente de Aire
CAPACIDAD DEL MEDIO............................Aproximadamente 60 lbs (27.2 kg)
Energía Entrante (FLU210D)..................................105-120Vac, 50/60 Hz, 13A
Energía Entrante (FLU210DE)..................................210-250Vac, 50/60 Hz, 8A
Dimensiones
Longitud de la Caja......................................................................44.0” (111.8 cm)
Físicas de la Longitud de la Caja..............................................12.5” (31.1 cm)
Altura..................................................................................................35.75” (90.8 cm)
Peso.........................................................................140 lbs (63.5kg) Menos Medio
Peso de Transporte .....................................................................200 lbs (90.7 kg)
ATENCION
•
Asegúrese de que el aparato está conectado a tierra enchufándolo
solamente a un enchufe de servicio eléctrico de tierra conforme con los
códigos eléctricos nacionales y locales aplicables.
11
Page 46

CONFIGURACION
PARAMETROS DE MODO DE TRATAMIENTO
Utilizar las siguientes Instrucciones para fijar los distintos Parámetros
de Modo en la posición deseada.
TIEMPO DE TRATAMIENTO
Fluidotherapy®- Dry Heat Therapy
TEMPERATURA DE TRATAMIENTO
Presionar el botón "PRESIONAR PARA
CAMBIAR MODO" hasta que el indicador
luminoso esté al lado de "TEMPERATURA".
Presionar el botón "PRESIONAR PARA
CAMBIAR EL MODO" hasta que el
indicador luminoso esté al lado de
"TIEMPO DE TRATAMIENTO".
NOTA:
Se visualizará el tiempo por defecto de
"20:00".
Presionar los botones de "AUMENTO" o
"DISMINUCION" hasta que se visualice el
Tiempo de Tratamiento deseado.
NOTA:
El "TIEMPO DE TRATAMIENTO" se puede
ajustar en incrementos de un minuto
desde 1 a 99.
NOTA:
Se visualizará la temperatura por defecto
de 115º F (46.1° C) cuando se enchufe
por primera vez en la toma de corriente
de la pared. Los indicadores "F" o "C" y
"TEMPERATURA" destellarán mientras la
Temperatura de Tratamiento programada
se esté visualizando. Cuando se visualiza la
Temperatura de la Base, el indicador "F" o "C" y
"TEMPERATURA" funcionarán constantemente.
Presionar los botones de "AUMENTAR"
o "DISMINUIR" hasta que se visualice la
Temperatura de Tratamiento deseada.
NOTA:
Se puede cambiar °F por °C y vice
versa según se desee. Ver la página 17
para las instrucciones. La Temperatura
de Tratamiento se puede ajustar en
incrementos de 1º desde 88 °F a 130 °F (31.1
°C a 54° C).
12
Page 47

CONFIGURACION
PARAMETROS DE MODO DE TRATAMIENTO (CONTINUACION)
VELOCIDAD DEL AIRE
Presionar el botón "PRESIONAR PARA
CAMBIAR MODO" hasta que el indicador
luminoso esté al lado de "VELOCIDAD DEL
AIRE".
NOTA:
Se visualizará la velocidad por defecto de
"50".
Presionar los botones de "AUMENTAR"
o "DISMINUIR" hasta que se visualice la
Velocidad del Aire deseada.
NOTA:
La "VELOCIDAD DEL AIRE" se ajusta en
incrementos de 5 desde 0 a 100.
Fluidotherapy®- Dry Heat Therapy
TIEMPO DE PULSO
Presionar el botón de "PRESIONAR PARA
CAMBIAR MODO" hasta que el indicador
luminoso esté al lado de "TIEMPO DE
PULSO".
NOTA:
El "TIEMPO DE PULSO" permite al aparato
funcionar pulsando el medio durante
el tratamiento. Si se elige y fija, el
medio pulsará encendido y apagado en
incrementos iguales.
La elección de fábrica por defecto es
"APAGADO".
EJEMPLO: "TIEMPO DE PULSO" se fija en
"5". La unidad pulsará el medio durante el
tratamiento, cinco segundos encendido y
cinco segundos apagado.
Presionar los botones de "AUMENTAR"
O "DISMINUIR" hasta que se visualice el
Tiempo de Pulso deseado.
NOTA:
El "TIEMPO DE PULSO" se ajusta en
incrementos de un segundo desde
"APAGADO" hasta 6 segundo.
13
Page 48

CONFIGURACION
PARAMETROS DE MODO DE TRATAMIENTO (CONTINUACION)
INICIAR EL TRATAMIENTO
Presionar el botón "INICIAR".
PARAR EL TRATAMIENTO
Presionar el botón "PARAR".
Fluidotherapy®- Dry Heat Therapy
14
Page 49

CONFIGURACION
PARAMETROS CONTROLADORES DEL TIEMPO
CRONOMETRO DE PRECALENTAMIENTO
Presionar el botón de "PRESIONAR PARA CAMBIAR
MODO" hasta que el indicador luminoso esté al lado
de "CRONOMETRO DE PRECALENTAMIENTO".
NOTA:
El "CRONOMETRO DE PRECALENTAMIENTO"
permite que el aparato precaliente el medio. El
aparato funcionará a una Velocidad del Aire del
50% hasta que la unidad alcance la temperatura de
precalentamiento por defecto o 90 minutos, lo que
alcance antes.
El "CRONOMETRO DE PRECALENTAMIENTO"
funcionará solo de lunes a viernes y se puede
poner para que se inicie automáticamente a una
hora predeterminada y caliente el medio a una
temperatura predeterminada. Ver página 18 para fijar
los parámetros por defecto del "CRONOMETRO DE
PRECALENTAMIENTO".
Presionar el botón "PRESIONAR UNA VEZ
PARA ENCENDER EL CRONOMETRO DE
PRECALENTAMIENTO" para iluminar el
indicador luminoso de "CRONOMETRO DE
PRECALENTAMIENTO ENCENDIDO". Presionar
otra vez para empezar el "CRONOMETRO DE
PRECALENTAMIENTO".
NOTA:
El indicador luminoso de "CRONOMETRO DE
PRECALENTAMIENTO" se debe poner al final de cada
día para que se encienda automáticamente al día
siguiente. El botón "PARAR" se usa para apagar el
Precalentamiento si se desea.
Fluidotherapy®- Dry Heat Therapy
RELOJ
Presionar el botón "PRESIONAR PARA
CAMBIAR MODO" hasta que el indicador
luminoso esté al lado de "RELOJ".
NOTA:
El "CRONOMETRO DE PRECALENTAMIENTO"
no funcionará hasta que se ponga el reloj.
Presionar el botón "AUMENTAR" para poner
la hora.
Presionar el botón "DISMINUIR" para poner
los minutos.
NOTA:
El indicador luminoso "PM" se iluminará
cuando se alcance las horas PM.
15
Page 50

CONFIGURACION
MODO DE PREFERENCIA DE LOS PARAMETROS POR DEFECTO
INTRODUCIR MODO "PrEF" (MODO PREFERENCIA)
Presionar simultáneamente los botones "PRESIONAR PARA CAMBIAR
MODO", "AUMENTAR" y "DISMINUIR". Se visualizará "PrEF".
NOTA:
El modo "PrEF" permite al usuario cambiar la posición por defecto del
aparato.
Fluidotherapy®- Dry Heat Therapy
TIEMPO DE TRATAMIENTO POR DEFECTO
Presionar el botón "PRESIONAR PARA
CAMBIAR MODO" hasta que el indicador
luminoso esté intermitente al lado de
"TIEMPO DE TRATAMIENTO".
Presionar los botones de "AUMENTAR"
y "DISMINUIR" para poner en el aparato
el tiempo de tratamiento por defecto
deseado.
Presionar el botón "PRESIONAR PARA
CAMBIAR MODO" para guardar la nueva
posición.
NOTA:
La posición de fábrica por defecto es 20:00
minutos.
16
Page 51

CONFIGURACION
MODO DE PREFERENCIA DE LOS PARAMETROS POR DEFECTO (CONTINUACION)
INDICACION DE LA TEMPERATURA POR
DEFECTO
TEMPERATURA DE TRATAMIENTO POR
DEFECTO
Fluidotherapy®- Dry Heat Therapy
Presionar el botón "PRESIONAR PARA
CAMBIAR MODO" hasta que el indicador
luminoso esté intermitente al lado de
"TEMPERATURA".
Presionar el botón "AUMENTAR" para
establecer que se visualice en el aparato °F
o °C según se desee para la posición por
defecto.
Presionar el botón "PRESIONAR PARA
CAMBIAR MODO" para guardar la posición
nueva.
NOTA:
Al posición de fábrica por defecto es ºF.
Presionar el botón "PRESIONAR PARA
CAMBIAR MODO" hasta que el indicador
luminoso esté intermitente al lado
de "TEMPERATURA" y se visualice la
temperatura por defecto existente.
Presionar los botones de "AUMENTAR"
y "DISMINUIR" para fijar en el aparato la
temperatura de tratamiento por defecto
deseada.
El Rango de Temperaturas de Funcionamiento
es: 110 °F - 125 °F (43.3 °C - 51.6 °C).
Presionar el botón "PRESIONAR PARA
CAMBIAR MODO" para guardar la posición
nueva.
17
Page 52

CONFIGURACION
MODO DE PREFERENCIA DE LOS PARAMETROS POR DEFECTO (CONTINUACION)
MODO PULSO (Activado/Desactivado)
Presionar el botón "PRESIONAR PARA
CAMBIAR MODO" hasta que el indicador
luminoso esté intermitente al lado de
"TIEMPO DE PULSO".
Se visualizará "EnAb" (activado) o "dISA"
(desactivado).
Presionar el botón "AUMENTAR" para fijar
en el aparato la visualización de "EnAb" o
"dISA" deseada.
Presionar el botón "PRESIONAR PARA
CAMBIAR MODO" para guardar la posición
nueva.
MODO CRONOMETRO DE
PRECALENTAMIENTO (Activado/
Desactivado)
Presionar el botón "PRESIONAR PARA
CAMBIAR MODO" hasta que el indicador
luminoso esté intermitente al lado de
"CRONOMETRO DE PRECALENTAMIENTO".
Se visualizará "EnAb" (activado) o "dISA"
(desactivado).
Presionar el botón "AUMENTAR" para fijar
en el aparato la visualización de "EnAb" o
"dISA" deseada.
Presionar el botón "PRESIONAR PARA
CAMBIAR MODO" para guardar la posición
nueva.
NOTA:
Si el Reloj está desactivado, el
"CRONOMETRO DE PRECALENTAMIENTO"
se desactivará automáticamente.
Fluidotherapy®- Dry Heat Therapy
18
Page 53

CONFIGURACION
MODO DE PREFERENCIA DE LOS PARAMETROS POR DEFECTO (CONTINUACION)
RELOJ (Activado/Desactivado)
PONER EL DIA DE LA SEMANA
Fluidotherapy®- Dry Heat Therapy
Presionar el botón "PRESIONAR PARA
CAMBIAR MODO" hasta que el indicador
luminoso esté intermitente al lado de
"RELOJ".
Se visualizará "EnAb" (activado) o "dISA"
(desactivado).
Presionar el botón "AUMENTAR" para fijar
en el aparato la visualización de "EnAb" o
"dISA" deseada.
Presionar el botón "PRESIONAR PARA
CAMBIAR MODO" para guardar la posición
nueva.
NOTA:
Si el Reloj está desactivado, el
"CRONOMETRO DE PRECALENTAMIENTO"
se desactivará automáticamente.
Presionar el botón "PRESIONAR PARA
CAMBIAR MODO" hasta que se visualice
"dAy__" (__= código del día).
DAY CODE CHART
WEEKDAY DAY CODE
Sunday dAyu
Monday dAyn
Tuesday dAyE
Wednesday dAyd
Thursday dAyr
Friday dAyF
Saturday dAyA
Presionar el botón de "AUMENTAR" o
"DISMINUIR" para fijar en el aparato la
visualización del código del día deseado.
Presionar el botón "PRESIONAR PARA
CAMBIAR MODO" para guardar la posición
nueva.
19
Page 54

CONFIGURACION
Fluidotherapy®- Dry Heat Therapy
MODO DE PREFERENCIA DE LOS PARAMETROS POR DEFECTO (CONTINUACION)
SALIR DE MODO "PrEF"
Presionar el botón "PRESIONAR PARA CAMBIAR MODO" hasta que se visualice "PrEF".
Presionar simultáneamente los botones "AUMENTAR", "DISMINUIR" y "PARAR". Se visualizará el tiempo
de tratamiento por defecto y el indicador estará al lado de "TIEMPO DE TRATAMIENTO".
20
Page 55

CONFIGURACION
Fluidotherapy®- Dry Heat Therapy
PREPARACION DEL PACIENTE
PELIGRO
LIMPIAR A FONDO LA ZONA DE TRATAMIENTO DEL PACIENTE CON UN JABON
ANTIMICROBIANO Y AGUA LIMPIA SEGÚN LAS NORMAS DE INDUSTRIA/
FABRICA/REGULADORAS, Y LOS PROCEDIMIENTOS DE LAVADO DE PIEL
GENERALES.
SEGUIR EL PROCEDIMIENTO DE LAVADO DE PIEL, APLICAR UN LIMPIADOR DE
PIEL ANTISEPTICO DE TIPO HOSPITALARIO, SEGÚN LAS INSTRUCCIONES DE
USO DE LIMPIEZA RECOMENDADAS POR EL FABRICANTE.
CONSULTE EL PROGRAMA DE MANTENIMIENTO Y ASEGURESE DE QUE SE
HA REALIZADO EL MANTENIMIENTO NECESARIO ANTES DE ARRANCAR EL
APARATO.
EMPEZAR EL TRATAMIENTO
INICIAR
Aseguresé de que se han fijado todos
los paneles de control, el aparato está
precalentado y el paciente está en la
posición correcta con la(s) manga(s)
aseguradas antes de empezar el
tratamiento. Consultar las páginas 13 - 15
para configurar el aparato.
Presionar el botón de "INICIAR" para
empezar el tratamiento
PARAR EL TRATAMIENTO
PAR AR
El tratamiento se parará automáticamente
cuando el tiempo de tratamiento alcance
el cero. Si se desea parar el tratamiento
antes de que el cronómetro alcance el cero,
pulsar el botón de "PARAR".
NOTA:
Si el tratamiento se parara antes de que el
cronómetro alcance el cero, será necesario
reiniciar el "TIEMPO DE TRATAMIENTO" para
completar el tratamiento prescrito.
21
Page 56

MANTENIMIENTO REQUERIDO
Fluidotherapy®- Dry Heat Therapy
MANTENIMIENTO DIARIO
ATENCION
• Antes de realizar o intentar cualquier Mantenimiento, desenchufar el aparato de
la fuente de energía para evitar la posibilidad de una descarga eléctrica.
LIMPIEZA DE LOS FILTROS DE ENTRADA
Al final de cada día de trabajo, desenchufar
el aparato y limpiar los Filtros de Entrada del
aparato.
Quitar con cuidado el soporte del filtro y lavar
el filtro y la rejilla con un jabón antibacteriano
suave y agua. Secar completamente el filtro
y la rejilla antes de volverlo a colocar en el
aparato.
NOTA:
Si su aparato tiene el modelo antiguo de
filtros de entrada, limpiar suavemente el
filtro usando un cepillo de cerda blanda.
Cuidado con no perforar o dañar el filtro.
Si se llega a dañar, rasgar o perforar el filtro,
llame a su distribuidor para que sustituya el
filtro antes de reanudar el funcionamiento.
RELLENAR CON MEDIO CELLEX
Rellenar el aparato con Medio Cellex® Caliente
Seco hasta aproximadamente una (1) pulgada por
encima del fondo de los puertos de tratamiento
del brazo del aparato.
NOTA:
La utilización de otro que no sea Medio Cellex
puede causar un fallo prematuro en el aparato(s)
de fluidoterapia.
REVISION DEL ESTADO DE LA MANGA
Revisar los desgastes, rasgaduras y las junturas débiles de las mangas
del puerto. Cambiar todas las mangas que muestren signos de desgaste,
rasgaduras o junturas débiles o flojas o uso excesivo. Mantener las mangas
en estado excelente previene el derramamiento excesivo del medio Cellex
y previene el medio de la entrada en la cámara caliente del aparato.
CRONOMETRO DE PRECALENTAMIENTO DEL BRAZO
Enchufar el aparato en una fuente de energía
aprobada. Si el "Cronómetro de Precalentamiento"
se está usando, presionar el botón "CRONOMETRO
DE PRECALENTAMIENTO" una vez, se iluminará el
indicador "CRONOMETRO DE PRECALENTAMIENTO
ENCENDIDO", para que el Cronómetro de
Precalentamiento se encienda automáticamente a
la hora por defecto la mañana siguiente.
NOTA: El Cronómetro de Precalentamiento de Fluidoterapia no funciona en
sábado o domingo. No obstante, para el precalentamiento del lunes por la
mañana, poner el aparato según se describió antes el viernes por la tarde.
®
22
Page 57

MANTENIMIENTO REQUERIDO
Fluidotherapy®- Dry Heat Therapy
MANTENIMIENTO SEMANAL
Cada semana todas las mangas del aparato de Fluidoterapia se lavarán
con un detergente antibacteriano suave. Dejar que las mangas se
sequen al aire o en un sitio a baja temperatura. Secar las mangas a alta
temperatura podría hacer que las mangas encogieran o que llegaran a
deformarse haciendo que la(s) manga(s) no encajaran cuando se colocan
otra vez en el aparato.
CAMBIO DE LA TAPA DE LAS MANGAS
(Todos los Modelos)
Desenchufar el aparato de la fuente de
energía.
Quitar con cuidado el anillo(s) rectangular
de la tapa del aparato.
Separar con cuidado de los cierres de
gancho y trabilla para quitar la manga del
aparato.
Reponer en orden inverso asegurando que
las esquinas están bien colocadas para
formar la junta necesaria para evitar el
escape excesivo de medio.
QUITAR EL EXTREMO DE LA MANGA
(Modelos FLU110D & FLU110DE)
Tirar con cuidado de los cierres de gancho
y trabilla en la manga para quitar la manga
del aparato.
Reponer en orden inverso asegurando que
las esquinas están bien colocadas para
formar la junta necesaria para evitar el
escape excesivo de medio.
QUITAR EL EXTREMO DE LA MANGA
(Modelos FLU210D & FLU210DE)
Con la Tapa de la Manga quitada, entrar por
la tapa del puerto y retirar del aparato con
cuidado los cierres de gancho o trabilla de
la manga.
Reponer en orden inverso asegurando que
las esquinas están bien colocadas para
formar la junta necesaria para evitar el
escape excesivo de medio.
23
Page 58

MANTENIMIENTO REQUERIDO
Fluidotherapy®- Dry Heat Therapy
MANTENIMIENTO SEMANAL (CONTINUACION)
QUITAR EL EXTREMO DE LA MANGA
(Modelos FLU115D & FLU115DE)
NOTA:
La manga de estas fotos se ha modificado
(quitado) para mayor claridad.
Quitar la tapa de las mangas para mejorar
el acceso al interior del aparato. Consultar
la página 23.
Retroceder y sacar el medio de los puertos
del brazo.
Es extremadamente importante quitar el medio de los puertos para
evitar que entre el medio en el espacio entre las paredes interna y
externa del aparato cuando se quitan o sustituyen las mangas.
Desempolvar todos los medios Cellex® del
interior de la manga.
Sacar el anillo de retención de la manga y
dejar a un lado para reinstalarlo.
Sacar la manga de la extrusión de manga
en el alojamiento interno del aparato.
NOTA:
Hay un anillo doblado dentro de la manga
que encaja sobre la extrusión de la manga
en el interior del aparato.
Desde el exterior del aparato, llegar al
interior de la manga y quitar el otro anillo
de retención de la manga.
Sacar con cuidado la manga y el anillo del
aparato, evitando que el medio Cellex entre
en la cavidad entre los dos alojamientos del
aparato.
La entrada del medio Cellex en la cámara
caliente del aparato(s) puede causar daños
graves a los pacientes además del daño del
humo para la instalación y el aparato(s) de
Fluidoterapia.
24
Page 59

MANTENIMIENTO REQUERIDO
Fluidotherapy®- Dry Heat Therapy
MANTENIMIENTO SEMANAL (CONTINUACION)
Quitar el anillo del extremo doblado de la
manga.
Lavar las mangas según se describe en la
página 23.
Limpiar con aspiradora el medio Cellex®
que pueda haber entrado en la cavidad
entre las paredes interna y externa del
aparato.
ATENCION
Retirar todo el medio Cellex que ha entrado en la cavidad es esencial para
mantener un funcionamiento correcto y seguro del aparato. Si el medio
alcanza la cámara de calentamiento del aparato llamar inmediatamente a un
técnico certificado para que quite cualquier medio que se sospeche que está
en la cámara caliente.
INSTALACIÓN DE LA MANGA DEL Modelo 115
Doblar el extremo elástico de la manga sobre
el anillo.
Colocar la manga a través de agujero del
puerto.
Colocar la junta anillo/manga sobre la extrusión
de la manga en el interior del aparato.
NOTA:
Situar la costura de la manga hacia la parte de
arriba del aparato y empujar la junta anillo/
manga completamente sobre la extrusión de
la manga.
Instalar la manga interna del anillo de retención
asegurándose de que la raja del anillo está hacia la
parte de arriba del aparato.
Empujar el anillo de retención sobre la junta anillo/
manga hasta que asiente completamente.
NOTA:
El anillo de retención deberá encajar firmemente
en la manga. Si es necesario, usar un par de alicates
para encajar el anillo en la zona sobre la que se
desliza la manga.
25
Page 60

MANTENIMIENTO REQUERIDO
MANTENIMIENTO SEMANAL (CONTINUACION)
Desde el exterior del aparato, entrar a través de
la manga e instalar el anillo de retención de la
manga externa.
NOTA:
Comenzar la instalación del anillo externo en
la parte superior del aparato. Mientras se está
asentando el anillo sacar la superficie de la
manga apretada. Esto ayudará a prevenir el
derramamiento del medio y a la comodidad
del paciente.
Fluidotherapy®- Dry Heat Therapy
26
Page 61

MANTENIMIENTO REQUERIDO
Fluidotherapy®- Dry Heat Therapy
REQUISITOS ADICIONALES DE MANTENIMIENTO PREVENTIVO DE FLUIDOTERAPIA
Los siguientes requisitos de mantenimiento preventivo adicionales se deben programar y ejecutar según se describe para asegurar que el aparato(s) funciona con eficacia,
seguridad y con óptimo funcionamiento. El formulario de Registro de Mantenimiento está preparado, en la página 28, para ayudar a programar y Mantener el Registro de
este programa preventivo de mantenimiento prescrito. Los siguientes procedimientos de mantenimiento preventivo se deben ejecutar por un servicio técnico certificado,
especializado por el Grupo Chattanooga formado en los requisitos de mantenimiento de los aparatos de Fluidoterapia de Chattanooga Group.
TRIMESTRALMENTE (Cada 3 Meses)
El siguiente Mantenimiento Preventivo se debe realizar en todos los aparatos de
Fluidoterapia trimestralmente por un servicio técnico certificado.
• INSPECCION Y LIMPIEZA DE LA CAVIDAD INTERNA
• SUSTITUCION DEL FILTRO DE ENTRADA
• PRUEBAS DE PLENO FUNCIONAMIENTO Y RENDIMIENTO
• SUSTITUCION DEL DISTRIBUIDOR
Solo si los resultados de la Prueba de Rendimiento indican que es
necesaria la sustitución.
SEMESTRAL (Cada 6 Meses)
El siguiente Mantenimiento Preventivo lo debe realizar un servicio técnico
certificado en todos los aparatos de Fluidoterapia cada seis meses además de los
requisitos de Mantenimiento Trimestral.
• CAMBIO del Medio Cellex®
•SUSTITUCION DEL MOTOR(ES) DEL VENTILADOR
•SUSTITUCION DEL DISTRIBUIDOR
Necesaria en intervalos de seis meses.
ANUAL (Una vez al Año)
El siguiente Mantenimiento Preventivo lo debe realizar un servicio técnico
certificado en todos los aparatos de Fluidoterapia una vez al año además de los
requisitos de Mantenimiento Trimestral y Semestral.
• CALIBRACION
PELIGRO
Si el nivel de medio Cellex cae de repente una pulgada o más por debajo del
nivel de funcionamiento del aparato, inmediatamente retirar el aparato de
servicio y contactar con un servicio técnico certificado. Una repentina caída
de nivel en el medio Cellex indica que el medio está en la cámara caliente del
aparato y se debe reparar antes de volver a poner el aparato en servicio.
27
Page 62

MANTENIMIENTO REQUERIDO
Fluidotherapy®- Dry Heat Therapy
REGISTRO DE MANTENIMIENTO DE FLUIDOTERAPIA
NUMERO DE SERIE DEL APARATO NUMERO DE MODELO DEL APARATO FECHA DE PUESTA EN SERVICIO
DISTRIBUIDOR: TELEFONO: CONTACTO
Rellenar este impreso:
“FECHA”-Fecha en que se realiza el servicio “MANTENIMIENTO REALIZADO”- Trimestral, Semestral o Anual “INICIALES TECNICAS”- Iniciales del Certificado Técnico
28
Page 63

MANTENIMIENTO REQUERIDO
SERVICIO
Cuando el aparato de Terapia de Calor Seco Fluidoterapia necesite reparación, o mantenimiento
preventivo, contactar con el distribuidor de ventas o con el Departamento de Reparaciones de
Chattanooga Group.
Todos los aparatos devueltos a la fábrica para su reparación deben incluir lo siguiente:
GARANTIA EN LA REPARACION/FUERA DE LA GARANTIA DE REPARACION
1. Informe por escrito que contenga la información siguiente:
Número RA- Obtenido de la Fábrica
Número de Modelo de la Unidad
Número de Serie de la Unidad
Persona de contacto con Números de Teléfono y Fax
Dirección de Facturación (si está Fuera de la Garantía de Reparación)
Dirección de Envío (Donde Enviar la Unidad después de Repararla)
Descripción Detallada del Problema o Síntomas
2. Copia de la factura original emitida al adquirir la unidad.
3. Enviar la unidad a Fábrica en la caja original con todos los accesorios e
información según se requiere en el punto uno 1 anterior a:
Chattanooga Group
4717 Adams Road
Hixson, TN 37343
Teléfono: 1-800-592-7329
(423)-870-2281
FAX: (423) 875-5497
Dirección Web: chattgroup.com
La reparación de estas unidades solo se realizarán en los Servicios Técnicos Certificados por Chattanooga
Group.
Fluidotherapy®- Dry Heat Therapy
29
Page 64

ACCESORIOS
RECAMBIO DE ACCESORIOS
Cuando se pidan accesorios adicionales para los aparatos de Fluidoterapia del
Grupo Chattanooga, usar los siguientes números y descripciones de pieza.
HENLEY No. CGI No.
MODELO FLU110D & FLU110DE
SUPERFICIE DE LA MANGA BEZEL FRA0003 31456
MANGA DE BRAZO SLE0002 31774
MODELO FLU115D & FLU115DE
SUPERFICIE DE LA MANGA BEZEL FRA0003 31456
RETENCION DE MANGA INTERNA TRI0034 31883
ANILLO DE MANGA PPL0013 31679
RETENCION DE MANGA EXTERNA TRI0035 31834
MANGA DE BRAZO SLE0001 31773
MODELO FLU210D & FLU210DE
SUPERFICIE DE LA MANGA BEZEL FRA0003 31456
EXTREMO DE MANGA SLE0004 31776
CELLEX® Medio de Calor Seco 10 lbs (4.5 kg) MED0001
SUPERFICIE DE LA MANGA SLE0003 31775
SUPERFICIE DE LA MANGA SLE0003 31775
SUPERFICIE DE LA MANGA SLE0003 31775
Fluidotherapy®- Dry Heat Therapy
MEDIO
Usar solo el Medio Cellex de Calor Seco del Grupo Chattanooga en el
aparato de Fluidoterapia. El medio Cellex está diseñado específicamente
para los aparatos de Fluidoterapia del Grupo Chattanooga para asegurar un
funcionamiento óptimo y eficiente de todos los productos de Fluidoterapia.
30
Page 65

GARANTIA
Chattanooga Group, una división de la Encore Medical, L.P. ("Compañía") garantiza que las aparatos de Terapia de Calor Seco Fluidoterapia® ("Producto") no tiene defectos
materiales ni de ejecución. Esta garantía tendrá efecto durante un año (12 meses) desde la fecha de compra del cliente original. Si el Producto deja de funcionar durante el
periodo de garantía de un año debido a un defecto material o de ejecución, en la opción de la compañía, la Compañía o el distribuidor de venta reparará o reemplazará este
Producto dentro de un periodo de treinta (30) días desde la fecha en que se devuelva el Producto a la Compañía o al distribuidor.
Todas las reparaciones del Producto se deben realizar por un centro de reparación certificado por la Compañía. Cualquier modificación o reparación realizada por centros o
grupos no autorizados invalidará la garantía.
El periodo de garantía de los accesorios es de 90 días. Los accesorios lo componen las mangas y el filtro(s) que se utiliza de entrada reemplazable.
El periodo de garantía del motor(es) y distribuidor es de 180 días.
Para participar de la cobertura de la garantía, el propietario original debe rellenar y devolver a la Compañía la tarjeta de registro de la garantía del Producto (incluida con el
Producto) en los diez (10) días laborables siguiente a la fecha de la adquisición.
Esta Garantía No Cubre:
La sustitución de partes o mano de obra por cualquier persona ajena a la Compañía, el distribuidor de ventas o un servicio técnico certificado por la Compañía.
Defectos o daños causados por la mano de obra por cualquier persona ajena a la Compañía, el distribuidor de ventas o un servicio técnico certificado por la Compañía.
Cualquier avería o fallo en el Producto causado por el mal uso del producto, incluso, pero no limitado a, el fallo al proporcionar el mantenimiento razonable y necesario o
cualquier uso que es incoherente con el Manual de Usuario del Producto.
LA COMPAÑÍA NO SE RESPONSABILIZARA EN TODO CASO POR ACCIDENTE O EL DAÑO CONSIGUIENTE
Algunos estados no permiten la exclusión o limitación de daños por accidente o daños consiguientes, por lo tanto la limitación o exclusión anterior no será de aplicación.
Para Obtener Reparación De la Compañía o del distribuidor de ventas bajo esta garantía:
1. Se debe hacer una reclamación por escrito dentro del periodo de garantía a la Compañía o al distribuidor de ventas. Las reclamaciones escritas hechas a la
Compañía se deben enviar a:
4717 Adams Road
P.O. Box 489
Hixson, TN 37343 USA
Teléfono: 1-800-592-7329
Facsimile: (423) 875-5497
and
2. El propietario debe devolver el Producto a la Compañía o al distribuidor de ventas.
Esta garantía le da los derechos legales específicos y puede tener otros derechos que varían de unos estados a otros.
Fluidotherapy®- Dry Heat Therapy
LA COMPAÑÍA NO AUTORIZA A NINGUNA PERSONA O REPRESENTANTE A CREAR EL MISMO CUALQUIER OTRA OBLIGACIÓN O RESPONSABILIDAD CON RELACIÓN
A LA VENTA DEL PRODUCTO. CUALQUIER REPRESENTACIÓN O ACUERDO QUE NO ESTÉ CONTENIDO EN LA GARANTIZA NO TENDRÁ VALOR Y NO AFECTARÁ.
31
Page 66

Moving
Rehabilitation
Forward™
ISO 13485 CERTIFIED
4717 Adams Road
P.O. Box 489
Hixson, TN 37343 U.S.A.
1-800-592-7329
1-423-870-2281
1-423-875-5497 FAX
chattgroup.com
31247C
© 2007 Encore Medical, L.P.
 Loading...