

Page 1

English
Introduction 4
Getting started 4
1. Charging the battery ..................5
2. Pairing your Chatpen .................5
3. Setting up your Chatpen ............6
4. Activating the notepad...............7
Using your Chatpen 8
Turning your Chatpen on/off.........8
Writing and drawing ......................8
Marking a box................................9
Character fields..............................9
Using notepads and
the Chatpen memory ....................10
Using the phone book ..................10
Sending messages 11
Sending e-mail or fax messages .. 11
Sending text/graphical
messages (SMS) ..........................12
Sending a notepad........................14
Editing ticks and characters ......... 14
Maintenance 15
Charging the battery ....................15
Setting languages.........................15
Changing ink cartridges............... 16
Re-pairing your Chatpen .............16
Resetting your Chatpen ...............17
Master reset ................................. 17
Chatpen functions ........................18
Additional information 19
Chatpen status indication .............19
Troubleshooting ...........................19
Technical data..............................23
Safe and efficient use...................23
Limited warranty ......................... 25
Declaration of conformity ......... 164
t
o
N
o
f
r
C
m
m
o
e
s
U
l
a
i
c
r
e
Sony Ericsson Chatpen™ CHA-30
Second edition (Decem ber 2001)
This User ’s Guide is publ ished by
Sony Ericsson Mobile
Communications AB, without
any warran ty.
Improv ements and chan ges to
this User ’s Guide necessitated by
typographical errors, inaccuracies of
current i nform ation, or improvements
to programs and/or equipment, may
be made by
Communications AB
and without notice. Such changes
will, however, be incorporated into
new editions of this User’s Guide.
All rights reserved.
©Sony Ericsson Mobile
Communications AB
Publication number:
LZT 108 5067 R1A
Sony Ericsson Mobile
at any time
, 2001
English 3
Page 2
Note:
When writing in
character fields, the
Chatpen supports the
characters used in the
following languages:
• English
•Finnish
• French
•German
•Italian
• Spanish
•Swedish
For more information,
see “Character fields”
on page 9.
Introduction
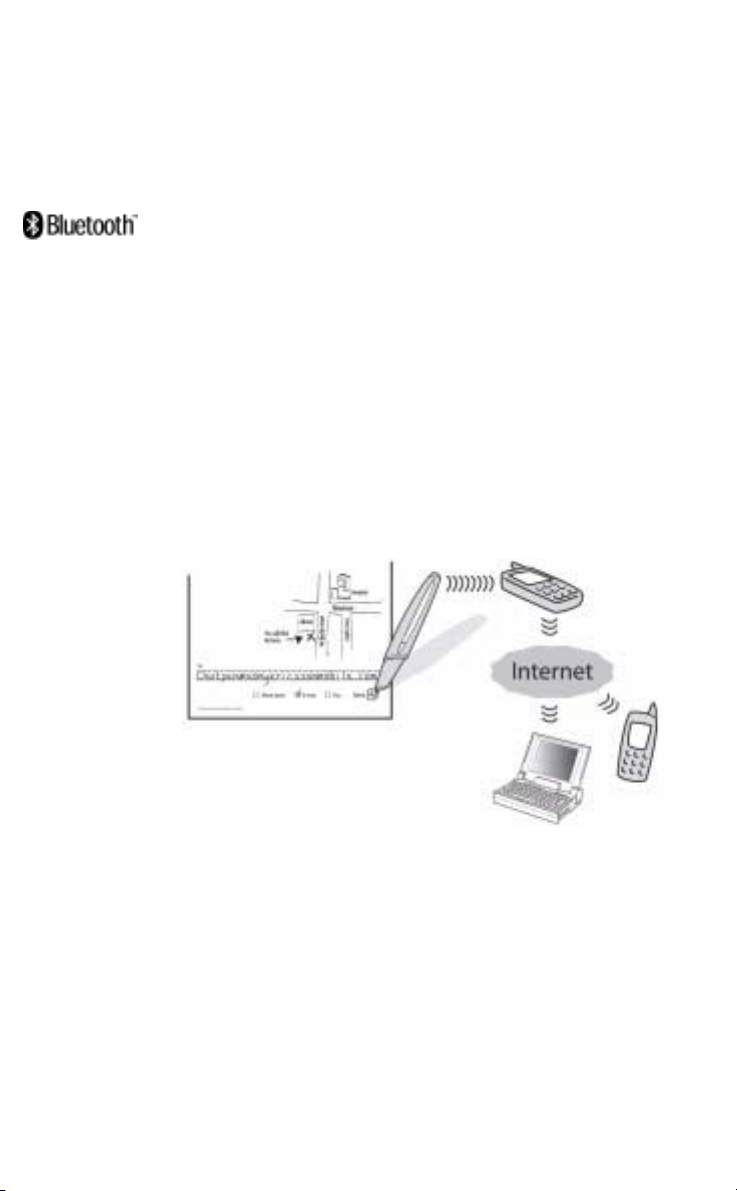
The Chatpen™ CHA-30 uses Bluetooth wireless technology to
communicate. Please read the “Safe and efficient use” and “Limited
warranty” chapters before using your Chatpen.
What is Bluetooth wireless technology?
U
e
s
The Bluetooth wireless technology makes it possible to connect any
compatible portable and stationary communications device without
using cables. The technology is based on a radio link that offers fast
and reliable transmission of voice and data information. It does not
require a line-of-sight connection in order to establish communication.
The Bluetooth wireless technology uses a globally available frequency
range intended to ensure communication compatibility worldwide.
The Chatpen concept
The Chatpen CHA-30 allows you to, via your mobile phone and the
Internet, send your notes and drawings to any computer or mobile
phone anywhere in the world.
e
l
a
i
c
r
m
m
o
C
r
o
t
o
f
Whatever you write or draw is saved in the Chatpen memory, which
can hold approximately 40 pages filled with writing. Nothing of what
you write or draw is ever saved in the phone (the phone is only a
carrier of data), and the phone display only reflects what is saved
in the Chatpen.
N
Additional Chatpen information
For more information about your Chatpen, visit
www.SonyEricssonMobile.com/.
4 Introduction
Page 3
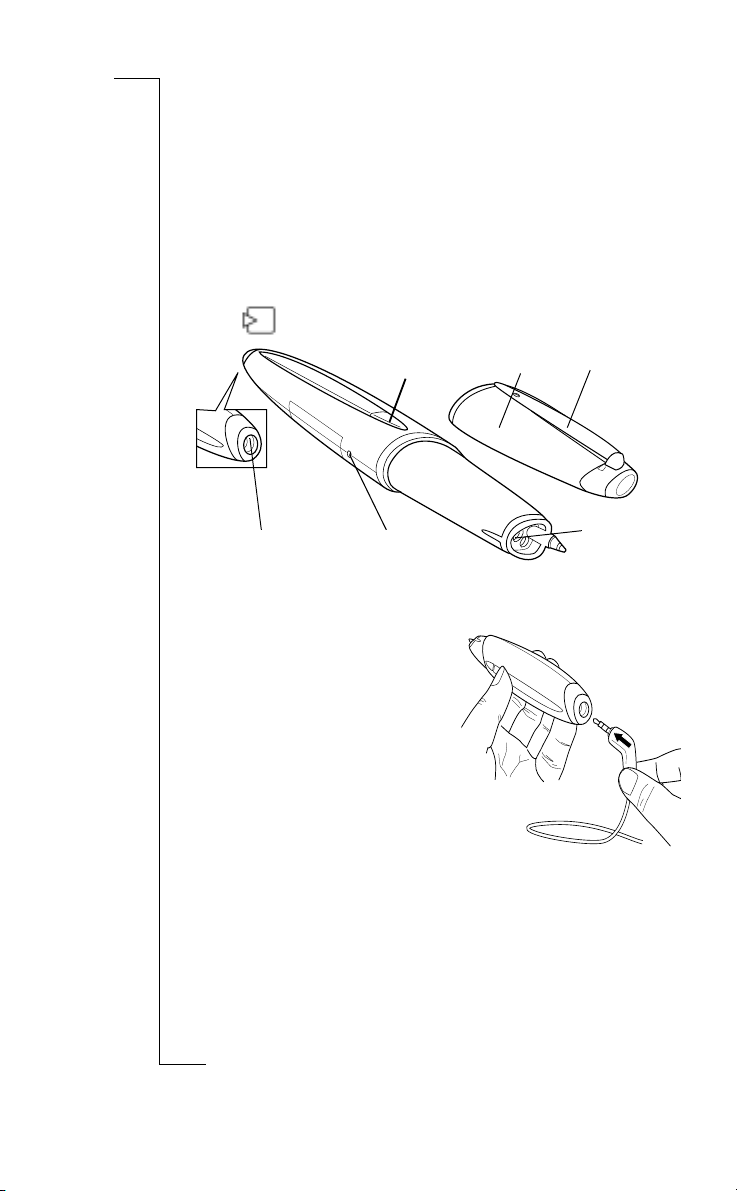
Getting started
Before you can start to use your Chatpen, you must:
1. Charge the Chatpen battery.
2. Pair a phone with the Chatpen.
3. Set up your Chatpen.
4. Tick to activate a notepad.
s
light
cap
l
U
a
i
c
charging connector
reset hole
r
e
e
clip
lens
1. Charging the battery
• Connect the charger to the mains
and to the charging connector on
the Chatpen.
When the charger is connected,
Note:
you do not have to wait for the battery
to be fully charged before you start
pairing the Chatpen with a phone.
2. Pairing your Chatpen
In order for your Chatpen to work,
it must be able to communicate with
a phone. When you pair your Chatpen with your phone, you make
this communication possible.
You pair your Chatpen once. The Chatpen remains paired when you
turn it off.
t
o
N
o
f
r
C
m
m
o
Getting started 5
Page 4

The Chatpen can be paired with one phone. If you want to
use another phone with your Chatpen, you must first re-pair it. See
“Re-pairing your Chatpen” on page 16.
Several Chatpens can be paired with the same phone.
To pair your Chatpen with a phone
1. Keep the charger attached to the Chatpen, and take off the cap.
The Chatpen is ready to pair when the light on the Chatpen starts
flashing red, green and yellow and when it vibrates at regular
intervals.
2. In the phone menu, scroll to Connect or Extras
YES, Paired devices, YES, Add device, YES, Phone initiates,
YES. A list of device types that can be paired with your phone
is shown.
Select All types,
3. The phone searches for Bluetooth devices. A list of available devices
appears in the display. Select CHA-30, which is the default name of
the Chatpen.
4. Enter the Bluetooth passkey (which you find in the Chatpen box),
press
YES. The phone starts the pairing procedure.
5. When pairing is completed, you can edit CHA-30 to a personal
name tag and press
6. Press
7. Continue with “3. Setting up your Chatpen” below.
3. Setting up your Chatpen
You must enter some service provider data to be able to send your
messages.
• See Alternative A below, if the Chatpen setup starts
• See Alternative B below, if you have received instructions to
• See Alternative C below, if you have received instructions to
• See Alternative D below, if you do not succeed with the setup
NO repeatedly to return to standby.
automatically.
set up your Chatpen on the Web.
f
t
set up your Chatpen by filling in a paper form.
o
in Alternative B or C.
r
o
YES.
C
a
i
c
r
e
YES.
m
m
o
*
e
, YES, Bluetooth,
s
U
l
N
*
Depending on what phone model you are using.
6 Getting started
Page 5

Alternative A: Automatic setup
1. The Chatpen automatically starts configuration to your service
provider when you have paired it.
2. To check that the Chatpen works, send an e-mail or text message
to yourself. See “Sending messages” on page 11.
Alternative B: Web setup
1. Go to the web address defined by your service provider, and
follow the setup instructions.
2. To check that the Chatpen works, send an e-mail or text message
to yourself. See “Sending messages” on page 11.
Alternative C: Paper setup
1. Follow the instructions on the setup paper from your service
provider.
2. To check that the Chatpen works, send an e-mail or text message
to yourself. See “Sending messages” on page 11.
Alternative D: Manual setup
For manual setup, you need to know the phone number of your
service provider, your own username and password, primary and
secondary DNS, APN, proxy, service provider ID and your own
e-mail address. The settings you enter for Standardized services are
the settings that will be used for all services described in this manual.
The settings you enter for Open services are the settings that will be
used for other services.
1. With your Chatpen, tick the Set service provider box on page 18.
2. Follow the instructions that appear, and enter the data.
3. When your e-mail address appears in the phone display, make
sure it is correct. If not, edit it on the phone. See “Editing ticks and
characters” on page 14.
4. To check that the Chatpen works, send an e-mail or text message
to yourself. See “Sending messages” on page 11.
t
o
f
4. Activating the notepad
In your notepad, tick to activate the notepad before you start
to write.
r
C
o
e
m
m
l
a
i
c
r
U
e
s
o
N
Getting started 7
Page 6
Using your Chatpen
Note: The paper you write on must be marked with “Digital paper enabling
Anoto functionality”.
Turning your Chatpen on/off
• Remove the cap to turn on the Chatpen.
Wait for the Chatpen to vibrate once and the light to turn green.
The Chatpen is now ready to use.
• Put the cap back on the Chatpen to turn it off. To save power
and to protect the lens from dirt, always keep the cap on when
not using the Chatpen.
l
U
e
s
a
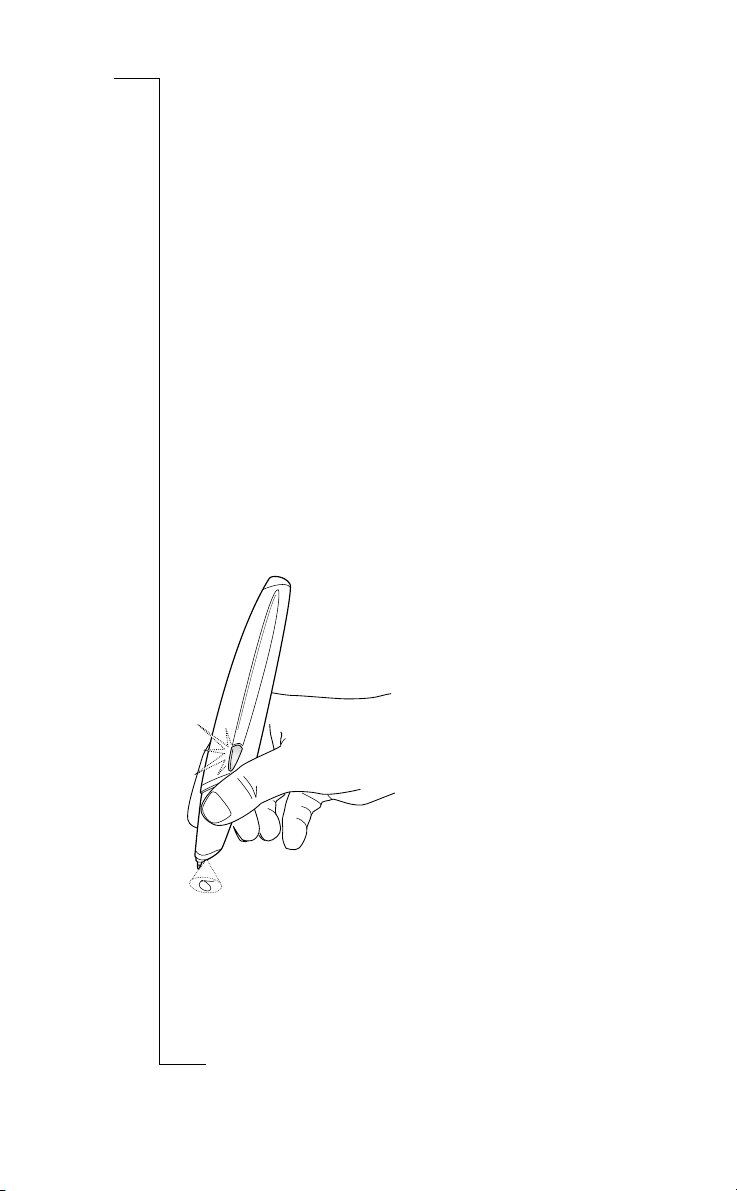
Writing and drawing
When writing, a steady green light on the Chatpen indicates that the
Chatpen is registering the strokes. Vibration when writing indicates
problems.
m
m
o
C
r
o
f
t
o
i
c
r
e
• Write and draw on the drawing
area of the paper, not too near
the edges.
• Hold the Chatpen with the lens
facing the paper.
• Do not block the lens when
writing.
You can interrupt your writing and
put on the cap (turn off the Chatpen)
to continue later. Whatever you
write or draw is saved in the
Chatpen until its memory is full.
See “Using notepads and the
Chatpen memory” on page 10.
N
8 Using your Chatpen
Page 7
Marking a box
To mark a box on the paper, you can tick it, put
a stroke in it or just tap it with your Chatpen.
The Chatpen will vibrate briefly to confirm the
selection.
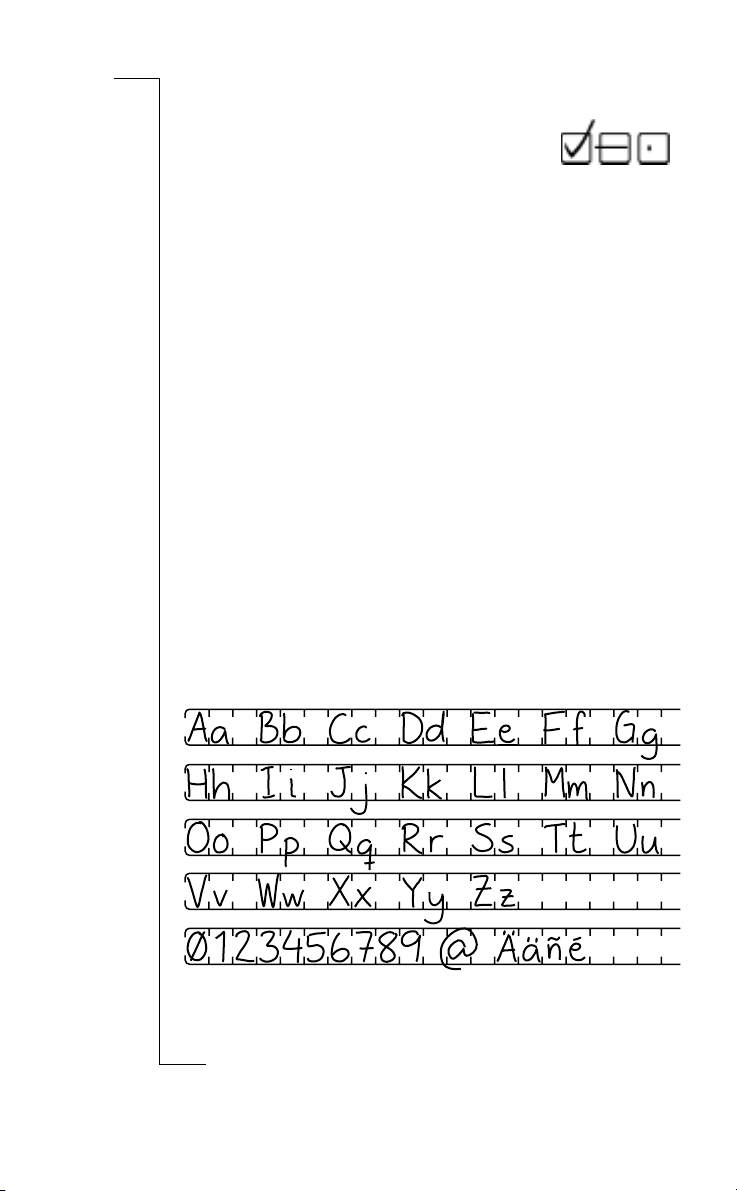
Character fields
It is important that you write well-formed characters in the character
fields (in contrast to when you write in the drawing area).
• Write on the baseline.
• Write one character per space. Do not change an already written
character, as this may cause problems in interpreting the character.
When writing in character fields, the Chatpen supports the characters
used in the following languages: English, Finnish, French, German,
Italian, Spanish, Swedish.
Type of entry Allowed character
e-mail address
phone number “0-9”, “ - + ”
Phone book search / text
message / subject
The Chatpen interprets what you write in the character fields. To
Note:
ensure that the interpretation is correct, always check the text that appears
in the phone display before sending it.
o
“A-Z”, “a-z”, “0-9”, “- @ . _ ”
The upper and lower case letters
used for the chosen language in
e
character fields and
% &
m
page 15.
m
l
a
i
c
r
”. See “Setting languages” on
U
s
e
“@ ! ? # + . : ;
o
N
t
o
f
r
C
Using your Chatpen 9
Page 8

Using notepads and the Chatpen memory
There are two different kinds of Chatpen notepads, and they are used
in two different ways.
Using a notepad with a on the first page
• Tick before you start to use the notepad the first time, to
make the Chatpen aware of the new notepad. To fill in the notepad
title is optional.
Warning! Do not touch with your Chatpen a second time.
If you do, you risk deleting all your notes in the notepad from the
Chatpen memory.
When you write in a notepad with a on the first page, all
that you write is saved in the Chatpen until the Chatpen memory
is full (approximately 40 pages filled with writing, or 80 half-pages).
When the Chatpen memory is full, the oldest page is deleted from
the memory.
• To be sure nothing is deleted by accident, always save your notes
by sending them to yourself.
Using several notepads
The Chatpen cannot differentiate between two identical notepads. If
you have used a notepad, and then change to a notepad that is identical,
there is a risk that the notes from the first notepad will be deleted
from the Chatpen memory. Therefore, use notepads that differ in
some way, for example, the colour of the cover, the brand or the size.
Using a notepad with a at the top of every page
• Tick before you write on the page, to make the Chatpen
aware of the new page.
You can only use one page in that notepad at a time.
What you have written on a page with a printed at the top is
deleted from the Chatpen memory once you send the page or tick
on another page.
o
t
f
If you do not send a page or tick on the new page you start
to write on, the new strokes will appear on top of the old ones.
r
C
o
e
m
m
l
a
i
c
r
U
e
s
o
Using the phone book
It will simplify sending messages if you use the phone book in your
N
phone. Instead of writing an e-mail address or a phone or fax number,
you can use the information in your phone book. This requires that
you have saved phone numbers and e-mail addresses in the phone
book, see your phone user’s guide for instructions.
10 Using your Chatpen
Page 9

Sending messages
The paper that you use with your Chatpen contains character fields and
check boxes. The most common functions are described below. Please
also refer to the instructions for the aper product that you are using.
When sending, keep your Chatpen within a range of a few metres
Note:
from the phone it is paired with, with no solid objects in between. You can use
your Chatpen for new notes, or put on the cap, while the phone is sending.
e
s
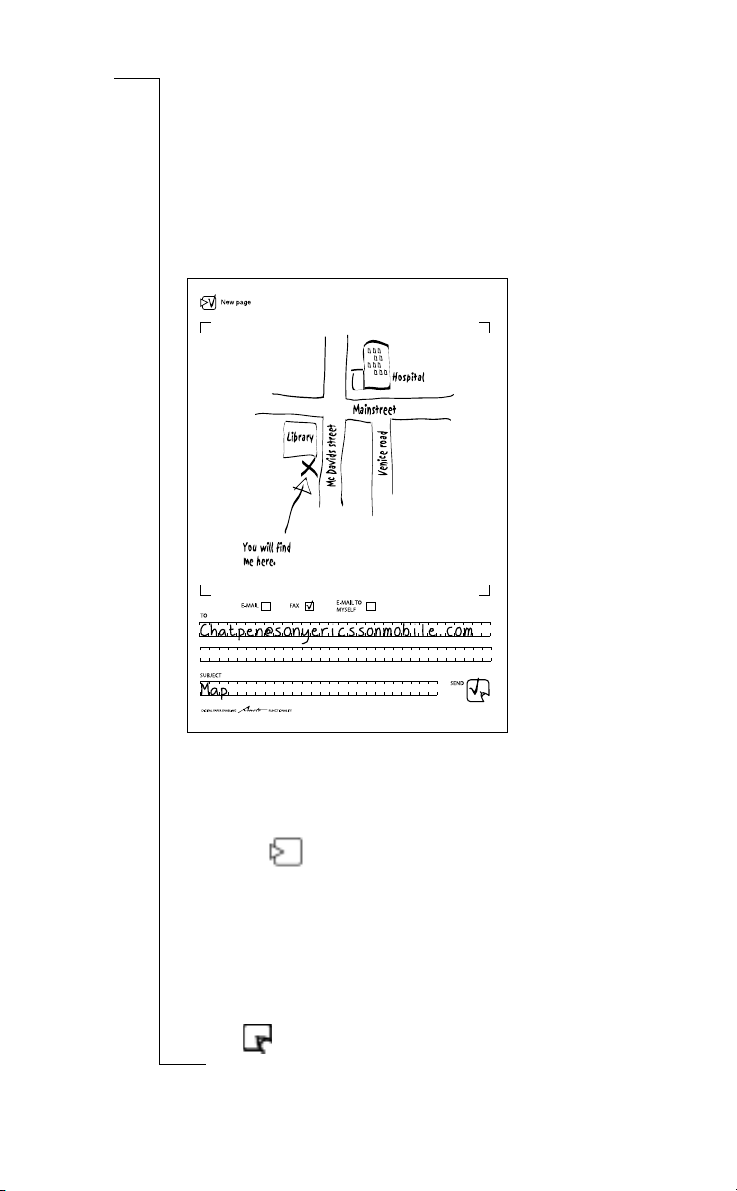
Sending e-mail or fax messages
1. If there is a at the top of the page, tick it.
If there is a on the first page only, tick it the first time you
use your notepad. If you tick it a second time, you will lose your
old notes.
2. Write or draw your message.
3. In the To field on the paper, do one of the following:
• Write the first characters of a contact from the phone book.
• Write the full e-mail address or fax number (including area
code). Both capitals and lower case letters can be used.
• Leave empty (if using E-mail to myself or if you want the
phone to show a list of addresses/ numbers last used).
4. Tick one of the boxes E-mail, Fax or E-mail to myself (the
Chatpen vibrates once).
5. Tick to send (the Chatpen vibrates twice).
6. Do one of the following depending on your choice in step 3:
• If you used your phone book, a list of suggested names appears
in the phone display (the first time, this may take several minutes).
Select the correct name. If none of the names is correct, select
Find contact, press
and characters” on page 14), press YES. Repeat this instruction
t
until you find the correct name.
o
• If you wrote the full address or number, make sure it appears
correctly in the phone display. If not, edit the characters (see
N
“Editing ticks and characters” on page 14).
o
f
r
C
m
m
o
YES. Edit the characters (see “Editing ticks
c
r
e
a
i
l
U
Sending messages 11
Page 10
• If you left the To field empty, the addresses or numbers last
used appear in the phone display. Select the correct address or
number. If none of the addresses or numbers is correct, press
NO and select Enter address or Enter number, press YES.
Enter the correct address or number.
7. Press
The light on the Chatpen flashes yellow while sending. A message
appears on the phone, confirming that your message has been sent.
YES.
e
s
U
l
a
i
c
r
e
m
m
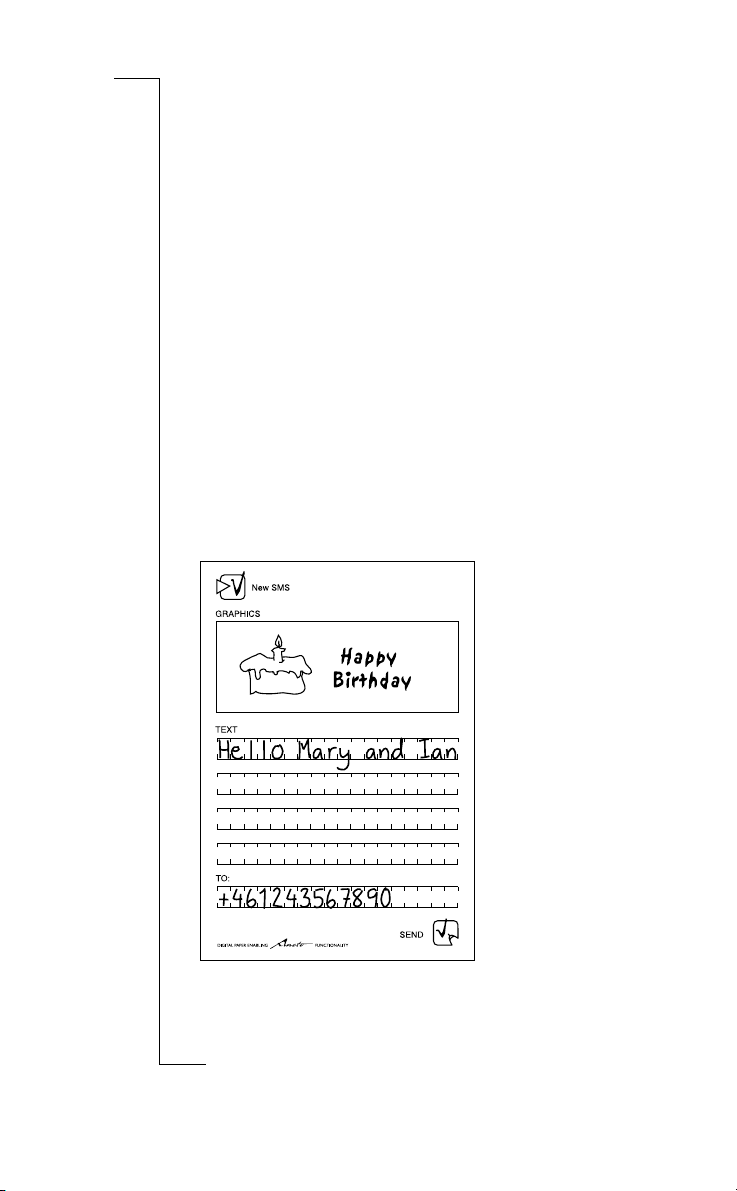
Sending text/graphical messages (SMS)
Note: To be able to receive graphical messages, the receiving mobile phone
has to support graphical messaging. Text messages are sent from the Chatpen
and are not saved in your phone.
1. Tick the box.
2. Draw your message in the graphics field and/or write your
3. In the To field, do one of the following:
N
4. Tick to send (the Chatpen vibrates twice).
12 Sending messages
f
t
o
message in the text field.
• Write the first characters of a contact from the phone book.
• Write the full phone number (including area code).
• Leave empty ( if you want the phone to show a list of numbers
last used).
r
o
C
o
Page 11
5. On the phone, check the text in the text message and edit if
necessary (see “Editing ticks and characters” on page 14).
Press
YES to confirm the text message.
6. Do one of the following depending on your choice in step 3.
• If you used your phone book, a list of suggested names appears
in the phone display (the first time, this may take several minutes).
Select the correct name. If none of the names is correct, select
Find contact, press
and characters” on page 14), press YES. Repeat this instruction
until you find the correct name.
• If you wrote the whole phone number, make sure it appears
correctly in the phone display. If not, edit the characters (see
“Editing ticks and characters” on page 14).
• If you left the To field empty, the numbers last used appear
in the phone display. Select the correct number. If none of the
numbers is correct, press
YES. Enter the correct number.
7. Press
The light on the Chatpen flashes yellow while sending. A message
appears on the phone, confirming that your message has been sent.
YES.
YES. Edit the characters (see “Editing ticks
e
s
U
l
NO and select Enter number, press
a
i
c
r
e
m
m
o
N
t
o
f
r
C
o
Sending messages 13
Page 12
Sending a notepad
• Tick the box Save notepad (the Chatpen vibrates twice). The light
on the Chatpen flashes yellow while sending. A message appears
on the phone, confirming that your message has been sent.
When you save a notepad, all that you have drawn and written in that
notepad since the last time you saved it is sent to your e-mail address.
(You can tick the box several times).
Editing ticks and characters
U
e
s
If sending fails
•Tick again.
If you tick the wrong service box (E-mail/Fax/E-mail to myself)
• Tick the correct service box. Then tick . The Chatpen reads
the service box last ticked.
If the subject or address is wrong
Tick and then edit the title or address on the phone as follows.
1. Use the joystick/arrow keys
character you want to edit.
2. Press (to delete the character).
3. Press the key for the appropriate character, see your phone user’s
guide for instructions.
Tip: On the phone, press 0 to find “@”, press 1 to find “.”.
*
to move to the position after the
e
m
l
a
i
c
r
m
f
t
o
N
* Depending on what phone model you are using.
14 Sending messages
r
o
C
o
Page 13

Maintenance
Charging the battery
The Chatpen has a built-in rechargeable battery. Use only the
Ericsson charger that comes with the Chatpen.
When the battery power in your Chatpen is low, the light on the
Chatpen flashes green when the Chatpen is idle (cap off, not writing).
You can charge the battery with the cap on or off. You can use the
Chatpen while charging.
Anything that you wrote or drew before the battery discharged is
saved in the Chatpen.
To charge the battery
• Connect the charger to the mains and to the charging connector
on the Chatpen.
It takes about 2 hours to fully charge the battery.
When the light is steady green, the battery is fully charged.
To disconnect the charger
• Remove the charger from the mains and pull out the charger plug
from the Chatpen. You can interrupt the charging at any time.
To check the battery status
•Tick the Battery status box on page 18 with your Chatpen.
The battery status appears in the phone display.
Setting languages
You can change the language for Chatpen information in the phone
display. You can also change the language for the interpretation of
the text in the character fields on the paper.
• With your Chatpen, tick the box for the appropriate language
on page 18.
A message confirming the change appears on the phone.
t
o
o
f
r
C
o
e
m
m
l
a
i
c
r
U
e
s
N
Maintenance 15
Page 14
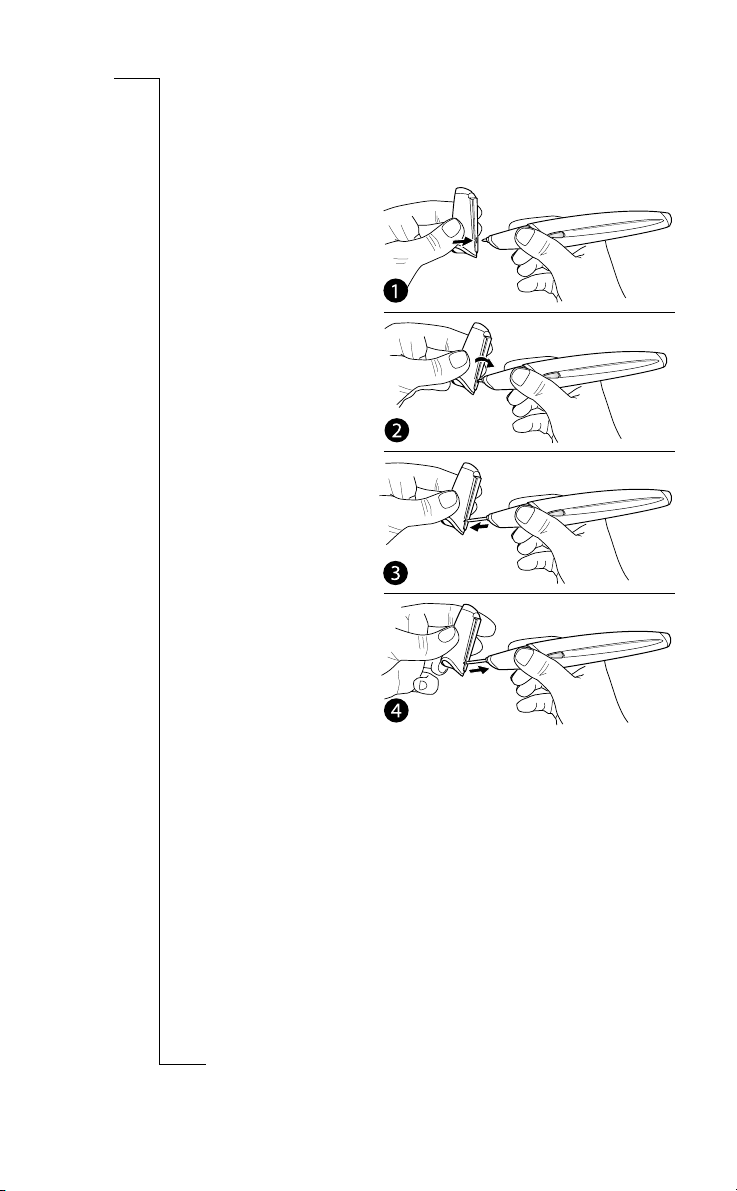
Changing ink cartridges
You change ink cartridges with the built-in tool in the clip on the cap.
Note:
The ink cartridge may be damaged when pulled out.
Place the Chatpen tip in
the hole on the clip.
Tilt the cap slightly.
e
s
U
l
a
Take out the ink
cartridge by pulling
the cap away. Dispose
the ink cartridge.
Gently slide a new ink
cartridge into the Chatpen
(with your hand or with
the built-in tool), until it
cannot be pressed any
further.
Warning! Make sure you slide the new ink cartridge into
the correct hole.
Re-pairing your Chatpen
The Chatpen can be paired with one phone at a time, but you can
change paired devices and re-pair the Chatpen with a new phone.
1. Tick the Re-pair the Chatpen box on page 18 with your Chatpen.
2. Wait for the light to start flashing red, green and yellow. The
3. Follow the instructions in “To pair your Chatpen with a phone”
t
o
To re-pair your Chatpen with a new phone
N
Chatpen is now ready to pair.
on page 6 (from step 2).
o
f
r
C
m
m
o
i
c
r
e
16 Maintenance
Page 15
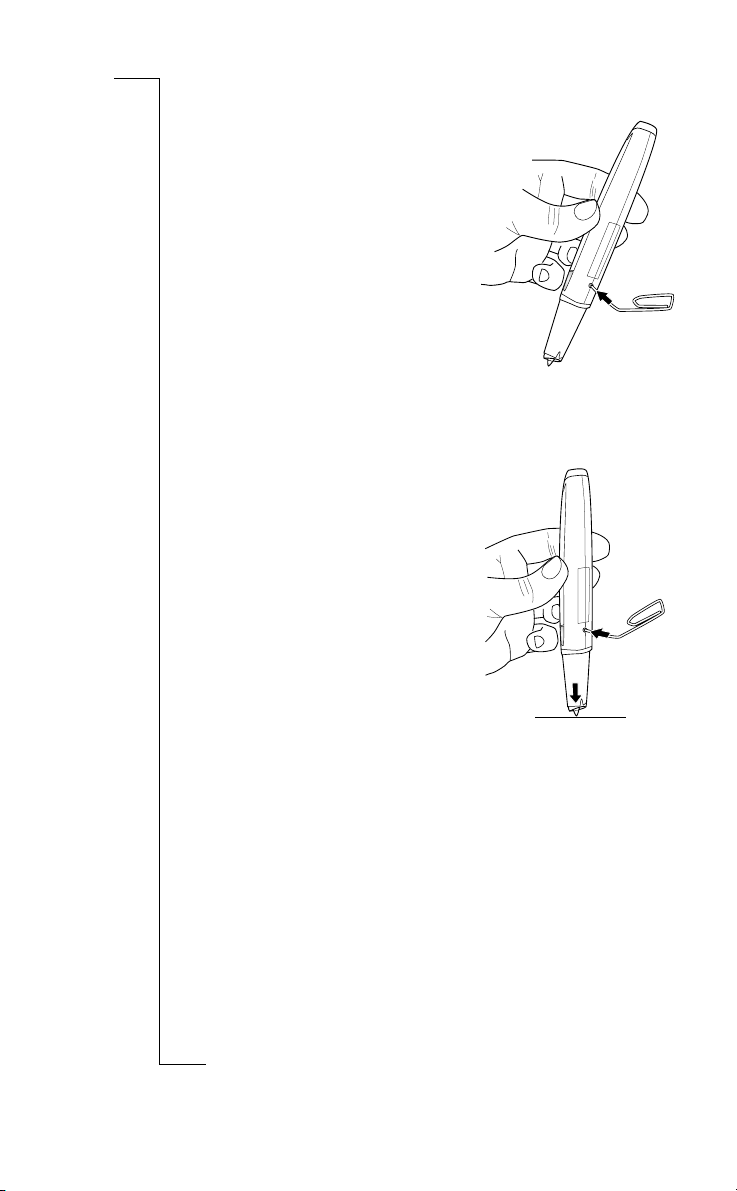
Resetting your Chatpen
You can reset your Chatpen if, for
example, it freezes. Everything that you
have written or drawn before the reset
will remain in the Chatpen.
Warning! Make sure the pen tip is not
pressed on a surface when resetting.
1. Take off the cap.
2. Push the reset hole on the Chatpen
with a paper clip or another pointed
object.
The light turns green (the Chatpen is
ready to use).
Master reset
You can reset the Chatpen to the factory
settings.
Warning! All data and everything you
have written or drawn will be deleted
from the Chatpen memory.
1. Take off the cap.
2. Press the pen tip on a surface at the
same time as you push the reset hole
on the Chatpen with a paper clip or
another pointed object.
3. Take out the paper clip and keep the
Chatpen pressed to the surface for
15 seconds (the light flashes red).
r
C
m
m
o
c
r
e
a
i
l
e
s
U
When the reset is completed, the Chatpen vibrates once and the
light flashes red, green and yellow (the Chatpen is ready to pair).
o
f
t
You can interrupt the master reset while the light is flashing red by
o
lifting the Chatpen from the surface (nothing has been deleted).
N
Maintenance 17
Page 16
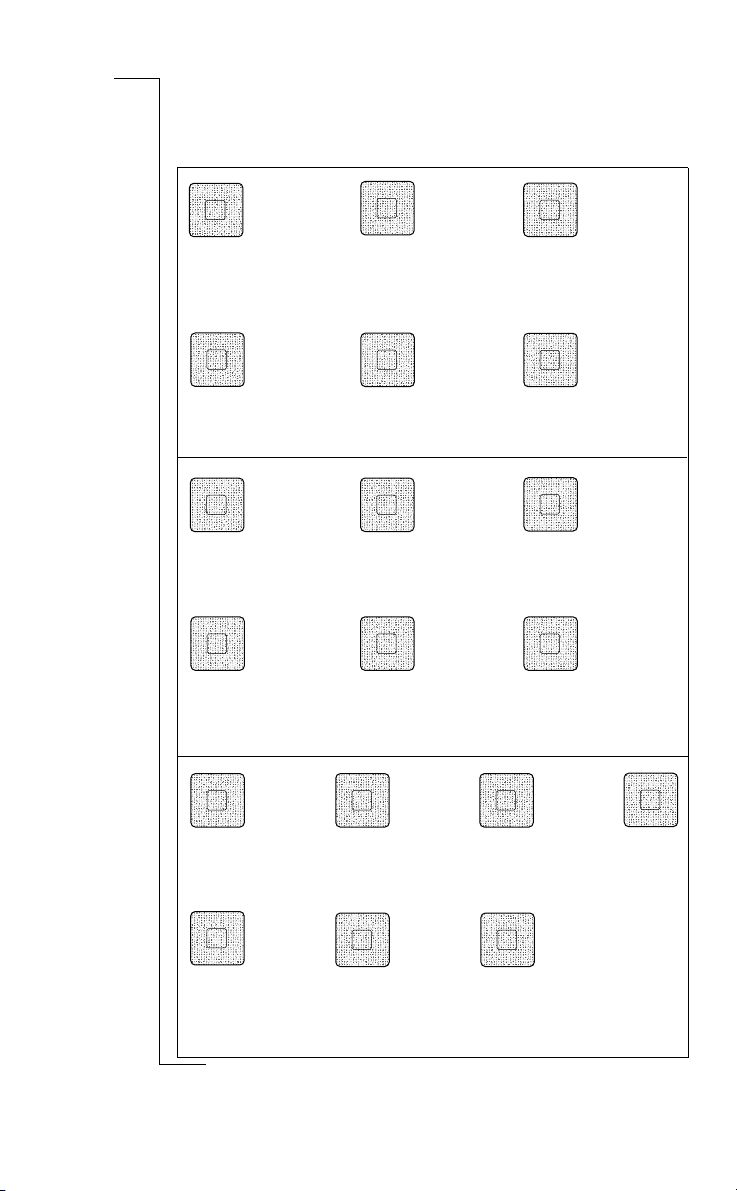
Chatpen functions
Tick the inner box with your Chatpen. You can use each of
• Tick a box with your Chatpen (information appears in the phone
the boxes several times.
display).
You can use each of the boxes several times.
Set service provider
To manually set the
Chatpen service provider
data.
Clear stroke memory
To clear the memory from
all written since start.
English
Italian
Set display language
To change language for the text in the phone display.
Re-pair the Chatpen Battery Status
To re-pair the Chatpen
with another phone.
Pen status For support
Various status
information.
French
Spanish Swedish
To show battery status
(%) on the phone.
German
English
French German Italian
Chatpen user's guide
use the page in the paper version of the
Printouts of this page cannot be used. Please
18 Maintenance
Finnish
Set paper language
To change language for pen interpretation of the text in the paper character fields.
Spanish Swedish
17
Page 17

Additional information
Chatpen status indication
The lights and vibration on the Chatpen indicate the Chatpen status
(the two lights show the same status indication).
Light Chatpen status
Off The Chatpen is turned off or the battery
is discharged.
Green – steady The Chatpen is ready to use or is registering
Green – flashing The battery is low and needs charging.
Yellow Wait. The Chatpen is powering up, connecting
Red Something is wrong (strokes not registered,
Red/green/yellow The Chatpen is ready to pair.
strokes.
l
to a Bluetooth device or sending.
unable to connect to the Bluetooth device,
hardware error).
a
i
c
r
e
U
e
s
m
Vibration Chatpen status
Short vibrations Action is performed or a service is selected.
Constant vibration Something is wrong.
t
r
o
f
Troubleshooting
The list below presents some problems that might arise when you are
using the Chatpen, and what to do in the different situations.
Pairing
• The light is green when connecting the charger, cap off (pairing
o
the first time)
The Chatpen is already paired with a device. Master reset your
N
Chatpen. See “Master reset” on page 17.
m
In combination with red/green/yellow flashing,
o
Chatpen is ready to pair.
C
Additional information 19
Page 18

• Phone finds no Chatpen (step 2)
The cause can be one of the following:
- Something is in the way of the Chatpen and the phone. Make
sure there is no solid object between the Chatpen and the phone.
Start pairing again.
- The Bluetooth function in your phone is set to off. See your
phone user’s guide for instructions how to activate Bluetooth.
- If nothing is in-between, and the Bluetooth function in your
phone is activated, restart the phone and the Chatpen (put on
the cap and take it off again), and start pairing again.
• Old software version in phone appears on the phone.
Contact your phone retailer for new software. Start pairing from
the beginning.
Pen setup
• An error message appears during setup.
Despite the error message, the setup might have been correctly
performed. Check this by sending an e-mail or text message to
yourself.
• Receives no text message after ticking on service provider’s
configuration paper (Setting up your Chatpen alt. C)
The cause can be one of the following:
- You have not waited long enough. It may take up to 10 minutes.
- Network signal for mobile telephony may be weak. Move to
another place and try to tick again.
- Service provider does not answer. Try configuration by
“Alternative D: Manual setup” on page 7.
Writing
• Chatpen vibrates and light is red when writing
The Chatpen is not registering your strokes. The cause can be
one of the following:
- Your paper does not have Anoto functionality. Make sure the
paper is marked “Digital paper enabling Anoto functionality”.
N
- You are writing outside the drawing area or too close to the
edges. Make sure you write on the drawing area, not too near
the edges.
- You are holding the Chatpen so that the lens does not face
the paper. See “Using your Chatpen” on page 8.
t
o
o
f
r
C
o
e
m
m
l
a
i
c
r
U
e
s
20 Additional information
Page 19
- The lens is blocked (for example by a finger). Make sure nothing
is blocking the lens.
- There is too much light (the camera in the Chatpen may have
problems interpreting the pattern in, for example, bright sunlight).
Try a shadier place.
- You are using an ink cartridge with unacceptable ink. See
“Technical data” on page 23.
- The printing quality is poor. Try another paper.
- There is dirt on the lens. Hold the pen with the lens facing upwards
under a strong lamp to clearly see the lens surface. Remove dust
and loose particles by blowing carefully at the lens, preferably
using a can of pressurised air duster. If the surface of the lens
is smeared with grease or other liquids, use a small cotton bud
moistened with alcohol to remove it. Note: Do not use acetone.
Sending
• An error message appears on the phone when trying to send
The cause can be one of the following:
- The service provider settings are wrong (only if an error message
appears the first time you try to send). Enter the settings again.
Tick again.
- Network problems. Turn off the phone, and turn it on again.
Tick again. If using GPRS (General Packet Radio Services),
check that the GPRS symbol shows in the display.
- The Internet connection is not working for the moment. Try to
tick at a later time.
- GPRS is not supported, if abroad for example. Contact your
service provider for instructions.
• This paper is not supported appears on the phone when trying
to send
The paper you used may be old, and the pen cannot interpret the
pattern. Use another notepad.
• No vibration or phone feedback when ticking
The pen did not interpret the tick. Tick again. If the problem
N
persists, reset the pen and tick again.
t
o
o
f
r
C
o
e
m
m
l
a
i
c
r
U
e
s
Additional information 21
Page 20

• Pen vibrates, light flashes red and nothing appears on the phone
The Chatpen cannot connect to the Bluetooth device. The cause
can be one of the following:
- The paired phone is not turned on. Turn it on and tick again.
- The Bluetooth function on the phone is not activated. Activate
the Bluetooth function (see your phone user’s guide for
instructions) and tick again.
- There is a problem with the connection. Switch the phone off/on,
reset the pen and tick again.
- You are too far from the Bluetooth device. Make sure you are
within a few metres, and tick again.
Miscellaneous
• Light not lit when cap is off
The battery is discharged. Charge the battery (see page 15). If you
have charged the battery for at least 15 minutes and the light is still
not lit, reset the Chatpen (see page 17).
• Light not lit when charger is attached
The charger is not properly attached. Make sure the charger
plug is fully inserted in the charging connector on the Chatpen,
and connected to the mains.
• Light flashes green
The Chatpen battery is low. Recharge the Chatpen.
• Chatpen vibrates and light is red when not writing
There is an error in the Chatpen. Restart the Chatpen (put on the
cap and take it off again). If this does not help, reset the Chatpen.
See “Resetting your Chatpen” on page 17. If none of this helps,
contact your retailer.
• The received message has words linked together with lines
The pressure sensor behind the ink cartridge has got stuck. Take
out the ink cartridge and replace it with a new one. See “Changing
ink cartridges” on page 16.
• The received message seems to be a fusion of several pages
You have not ticked before starting to write. See “Using
N
notepads and the Chatpen memory” on page 10.
t
o
o
f
r
C
o
e
m
m
l
a
i
c
r
U
e
s
22 Additional information
Page 21

Technical data
General
Left and right hand independent.
Battery
Battery standby time: 10 hours (cap off)
4 weeks (cap on)
Battery writing time: 2 hours (continuous writing)
Battery charging time: 2 hours
Dimensions
Size: 20 x 25 x 157 mm (cap off)
21 x 25 x 165 mm (cap on)
Weight: 50 g (with cap)
Ambient temperatures
Max: +55°C
Min: -10°C
Ink cartridge
Use the ink cartridges included in the box. To order more, see
information at www.SonyEricssonMobile.com/.
Memory
The Chatpen can store approximately 40 pages filled with writing (80
half-pages). When the memory is full, the oldest page is deleted.
Software
This product includes cryptographic software written by Eric Young
([email protected]). This product also includes software developed
by the OpenSSL Project for use in the OpenSSL Toolkit
(http://www.openssl.org/).
Safe and efficient use
Note: Read this information before using your Chatpen.
Please note only Sony Ericsson service partners sh ould remove or replace the battery.
Changes or modif ications to this Ch atpen not expressly approved b y Sony Erics son may void the user’s
authority to operate the equipmen t.
N
Please check f or any excepti ons, due to national requirem ents or limitations, in usage of Bluetooth
equipment bef ore using thi s product.
Never direct the in frared ray at any one’s eye and m ake sure that it does not disturb an y other
infrared uni ts.
t
o
o
f
r
C
o
e
m
m
l
a
i
c
r
U
e
s
Additional information 23
Page 22

Product care
• Do not expose your product to liquid or moi sture or to humidity.
• Do not expose your product to extreme high or l ow temperatures.
• Do not expose your product to lit candles, ci garettes, or cigars, or to open flames etc.
• Do not drop , throw or try to bend th e product as rough treatme nt coul d dam age it.
• Do not use any other accessories , e.g. chargers or batteries, than those deli vered with the product.
Use of other accessories may resul t in loss of performan ce, damage to the product, fire, electric
shock or injury. The warranty does not cover product failures which h ave been caused by use of
other accessories than the Sony Ericsson origi nal accessories i ntended for use with the product.
• Do not attempt to disassembl e your product. The product does not contain consumer servicea ble
or replaceable c omponents. Only Sony Ericsson s ervice partners shoul d perform service.
• To prevent demagnetis ing do not keep your product next to credit cards or other items equipped
with a magnetic stri p.
• If you will not be using the product for a while, store it in a place that is dry, free from damp,
dust and extreme temperatures.
• Always put on the cap when not using the Chatpen, to efficiently protect the lens from dirt.
Radio frequency exposure
Your Chatpen is a radio transmi tter and receiver. When in operation, it communi cates with a Bluetooth
equipped mobi le devi ce by receiving and transmitting radi o frequency (RF ) electromagnetic f ields
(microwaves) i n the frequency range 2400 to 2500 MHz. The output power of the radio transmi tter
is low, 0.001 Watt.
Your Chatpen is designed to operate in compliance with the RF exposure guidelines and limits set
by national authorities and internationa l health agenci es when used with any compatible Ericsson
or Sony Ericsson mobile phone.
Electronic equipment
Most modern electronic equi pment is shielde d from RF ene rgy. However, certain el ectronic equipmen t
is not, therefore:
Do not use your Chatpen near medical equi pment without requesting permi ssion. If you are usin g any
personal medi cal devi ces, e.g. a pacemaker or a hea ring aid, please read in your mobil e phone’s User’s
Guide for further information.
Aircraft
To prevent interference wi th communi cation systems, turn your Chatpen OFF before boarding
any aircraf t.
Blasting areas
Turn off all your electroni c devices when in a bl asting area or in areas posted “turn off two-way radio” to
avoi d interfe ring with blasti ng operation s. Constructi on crews ofte n use remote control RF devic es to set
off ex plos ive s.
Potentially explosive atmospheres
Turn off all y our electronic devi ces when in any area wi th a potentially explosive atmosphere. It is rare,
but your electronic dev ices could gen erate sparks. Sparks in such areas could cause an explosion or fi re
resulting in bodily injury or even death.
Areas with a potentiall y explosiv e atmosphere are often, but not always, clearly marked.
Power supply
Connect the AC power adapter only to designated power sources as marked on the product.
To reduce ris k of da mage to the ele ctric cord, rem ove i t from th e outlet by hol ding onto the AC ada pter
rather th an the cord.
Make sure the cord is positioned so that it will not be stepped on, tripped over or otherwise subjected to
damage or stress.
To reduce risk of electric shock, unpl ug the unit from any power source bef ore attempting to clean i t.
The AC power adapter must not be used outdoors or in damp areas.
DANGER – Never alter the AC cord or plug. If the plug will not fit into the outlet, have a proper outlet
install ed by a quali fied electrician. Improper connection can result in risk of electric sh ock.
Children
Do not allow chil dren to play wi th your Chatpen si nce it contains smal l parts that could become
detached and create a chokin g hazard.
N
Battery information
Please note that only Sony Ericsson s ervice partners should remove or replace the battery.
A rechargeable battery has a long serv ice lif e if treated properly. A new battery or one that has not been
used for a long period of time could hav e reduced capacity the first fe w times it is used.
Do not expose the battery to extreme temperatures, never above +55°C (+131°F). For maxim um battery
capacity, use the battery in room temperature. If the battery is used in l ow temperatures, the battery
capacity wil l be reduced.
The battery should only be charged in temperatures between +10°C (+50°F) an d +45°C (+113°F).
t
o
o
f
r
C
o
e
m
m
l
a
i
c
r
U
e
s
24 Additional information
Page 23

Recycling the battery
The battery in your Chatpen m ust be disposed of properly and should n ever be placed in municipal
waste. The Sony Ericsson service partner removing or replacing the battery will dispose of it according
to local regulati ons.
Limited warranty
Thank you for purchasing thi s product. To get maximum use of y our new Product, we recommend
that you follow a few sim ple steps:
Read the Safe and Effici ent Use chapter.
Read all the terms and conditi ons of your Sony Eri csson Warranty.
Save your original receipt. You will need it for warranty repair claims. Should your product need
warranty service, plea se return it to the dealer from whom it was purchased, or contact your local
Sony Ericsson Contact Center or visit www.SonyEricssonMobile.com/ to get further information.
Our warranty
Sony Ericsson Mobil e Communi cations AB, Nya Vattentornet, 221 88 Lund, Sweden, warrants this
Product to be free from defec ts in material and workmanship at the time of i ts original purcha se by
a consumer, and for a subsequent period of one (1) year.
What we will do
If, during the warranty period, this Product fail s to operate under normal use and service, due to
imp roper m aterials or workmans hip , Sony Ericsson servi ce partner s or auth orised distrib utors will ,
at their option, either repair or repl ace the Product in accordance wi th the terms and condi tions
stipulated herein.
Conditions
1. The warranty is val id only if the original receipt issued to the origi nal purchaser by the deal er,
specify ing the date of purch ase and serial number, is presented with the Product to be repaired or
replaced. Sony Ericsson reserves the right to refuse warranty service if this information has been
removed or changed af ter the original purchase of the Product from the deal er.
2. If Sony Ericsson repai rs or replaces the Product, the repaired or replace d Product shall be warranted
for the remai ning tim e of the origi nal warran ty period or for nin ety (9 0) day s from the date of repa ir/
replacement, whi chever is l onger. Repair or replacement may in volve the use of functionally
equivalen t reconditioned units. Replaced f aulty parts or components will become the property
of Sony Ericsson.
3. Thi s warranty does not cove r any f ailure of the Product d ue to normal wear and te ar, or due to mi suse,
including but not limited to use in other than the normal and customary manner, in accordance with
Sony Ericsson’s instructions for use and m aintenance of the Product. Nor does this warranty cover
any fai lure of the Product due to accident, modification or adjustmen t, acts of God, improper
ventilati on or damages resulti ng from l iquid.
4. This warranty does not cover Product failures due to improper repair installations, modifications
or service performed by a non-authorized service partner.
5. The warranty does not cover Product failures which have been caused by use of non-Ericsson or
Sony Ericsson origin al accessories i ntended for use with this product.
6. Since an independen t carrier provides the network system on which thi s product operates,
Sony Ericsson will not be responsible for the operation, availability, coverage, services or range
of that system.
7. Tampering with an y of the seals on the Product will v oid the warranty.
8. THERE ARE NO EXPRESS WARRANTIES, WHETHER WRITTEN OR ORAL, OTHER
THAN THIS PRINTED LIMITED WA RRANTY. ALL IMPLIED WARRANTIES, INCLUDING
WITHOUT LIMITATION THE IMPLIED WARRANTIES OF MERCHANTABILITY OR
FITNESS FOR A PARTICULAR PURPOSE, ARE LIMITED TO THE DURATION OF
THIS LIMITED WARRANTY. IN NO EVENT SHAL L SONY ERICSSON BE LIABLE FOR
INCIDENTAL OR CONSEQUENTIAL DAMAGES OF ANY NATURE WHATSOEVER,
INCLUDING BUT NOT LIMITED TO LOST PROFITS OR COMMERCIAL LOSS, TO THE
FULL EXTENT THOSE DAMAGES CAN B E DISCLAIMED BY LAW.
Some countries/states do not allow the exclusion or limitation of incidental or consequential damages,
or limitation of the duration of implied warranties, so the preceding limitations or exclusions may not
apply to you.
The warranty provided does n ot affect the consumer ’s statutory rights under national l egislation in
force, nor does it affect the consumer’s rights again st the dealer arising f rom their sales/purchase
N
contract.
t
o
o
f
r
C
o
e
m
m
l
a
i
c
r
U
e
s
Additional information 25
Page 24

t
o
o
f
r
C
m
o
e
m
r
i
c
l
a
U
e
s
N
26 Additional information
 Loading...