

Page 1

OPERATION MANUAL
CENTRAL COMMAND
ALARM CHRONOGRAPH
© Copyright 2006 CHASE-DURER LTD all rights reserved.© Copyright 2006 CHASE-DURER LTD all rights reserved.
Page 2

Table of Contents
®
Display and Screw Down Crown/Pushbuttons
® LCD Digital Displays
Setting Time and Date
®
® Setting Date/Time and Alarm
Setting Time Zones/Leap Year
®
Resetting Chronograph Hands to Zero
®
Timing Mode • Simple Chronograph Function
®
Timing Mode • Split-Time or Intermediate Times Function
®
® Timing Mode • Lap-Time Function
® E6B Flight Computer
E6B Flight Computer
®
® E6B Flight Computer
® E6B Flight Computer
® E6B Flight Computer (Conversion Table)
® Specifications
1
2
3
4
5
6
7
8
9
10
11
12
13
14
15
Page 3

DISPLAY and Screw Down Crown/Pushbuttons
E6B Flight Computer
Interior Rotating Dial
E6B Stationary Dial
Pushbutton D
E6B Interior Dial Setting Crown
1
Screwed
Down
2
Setting Positions
Screw Down Crown and Pushbuttons
Push
1 crown in and turn clockwise until tight
to lock down.
Turn crown counterclockwise until you no longer
feel the threads gripping; crown can now be pulled
out to positions 2 & 3.
2 .Date, Time Zone, and LCD adjustment, Chronograph hands reset position
3 Stops second hand, setting minute and hour hands position.
LCD digital display functions are explained in detail on the following pages.
*
WARNING: Crown must be locked down in position 1 at all times, use positions
2 & 3 for adjustments only. Do not operate pushbuttons under water!
NOTE - Failure to screw down Crown to resist moisture will void your warranty
3
*Left LCD
Pushbutton C
40
4
.
T
A
T
S
5
3
35
.
T
U
A
N
30
30
5
5
50
55
50
45
45
C H A S E - D U R E R
0
12
10
2
8 4
6
0
5
4
0
25
24
5
23
2
2
2
4
21
2
23
22
1
2
CHRONOGRAPH HANDS
60
65
70
MPH
7
30
2
0
60
10
0
2
30
1
6
17
1
8
0
2
19
1
7
1
8
0
2
1
9
1.
12 hour counter
60 second counter
30 minute counter
7
5
80
8
8
5
9
0
9
95
10
10
1
1
12
13
13
14
1
1
4
5
1
5
16
Pushbutton A
10
11
12
Setting Crown
*Right LCD
Date Indicator/
1/100 second counter
Pushbutton B
Minute hand
Second hand
Hour hand
WATCH HANDS
Page 4

LCD Digital Displays
Information Displayed on LCD Panels
2.
Left LCD
Time Setting
Time Mode
Month
Alarm Indicators
Alarm Hour
Setting
Alarm Mode
Alarm ON
Alarm OFF
Chronograph Indicators
Chronograph
Add Function
Split Time Function
Last Elapsed Time
Lap Time Function
Total Time
Right LCD
24 Hour Time
12 Hour Time
Date
Alarm Minutes
Setting
/ /
Date
Chronograph
1/100 second
0
6
6
5
55
MP
5
5
C H A S E - D U R E R
2
60
0
5
4
0
30
2
21
0
2
21
20
70
7
5
H
7
30
20
10
0
2
16
1
7
1
8
9
1
1
7
18
19
A
8
0
8
8
5
90
1
9
9
5
1
1
0
0
10
11
11
1
2
12
1
3
1
3
1
4
14
15
1
5
16
2
B
12/24 Hour Time
mode indicators
0
D
C
5
0
5
45
45
40
0
12
4
.
10
T
A
T
S
8 4
5
5
6
3
3
.
T
U
A
N
30
30
5
2
24
3
5
2
2
2
4
2
23
22
Note - When the displays are flashing while watch is in setting
mode, it indicates the watch is waiting for input.
Blinking or partial displays when watch is in normal operating
mode (not setting mode) indicates a low battery condition.
3
Page 5

Setting Time and Date
Note - It is very important that the following steps 1 - 6 are performed in sequence when
setting the Time and Date. Failure to do so can prevent accurate display of time
and correct Alarm function!
1. Pull setting crown out to position and preset the hour hand to the correct hour with the crown.
2. Pull setting crown out to position when the small second hand reaches “60” to stop the second
hand for exact time setting. The following steps 3 - 6 will be made with the crown in this position.
Setting AM/PM or 24 hour Time Mode
3. Make sure the setting crown is still in position
and press button to display
(time). If (date) appears, press
button once more. During the 2 seconds that
displays, press button
to change the right LCD between standard
A
+
D
AM/PM or 24 hour military time.
Your new Time Mode selection will appear for
2 seconds in the LCD’s, after which, it becomes
the default time mode with the hours and
minutes displayed as flashing numbers.
4. Set the hour in the left LCD to match the hour hand
setting in step 1 with button , set the minutes in the right LCD several minutes ahead of actual time
using button . Pressing or for longer than 1 second will advance the hours and minutes rapidly.
A
+
/ /
B B C
2
3
Set crown in position
adjust only the
3
0
6
65
+
/ /
D
5
3
0
C
55
0
5
0
5
5
4
45
40
0
12
4
.
10
T
A
T
S
8 4
5
6
3
.
T
U
A
N
30
3
5
2
4
2
23
2
25
24
3
2
2
2
M
55
C H A S E - D U R E R
2
60
50
40
30
2
21
0
2
1
2
20
7
0
75
PH
7
8
30
2
0
10
10
0
2
1
5
16
17
1
8
19
1
6
17
18
19
80
A
85
9
0
9
9
5
1
10
0
11
11
12
12
13
1
3
1
4
1
4
1
5
BC
and adjust both hour
2 to
hour hand
1
2
Set crown in
position 3
the Second Hand
and minute hands
3.
3
to Stop
Setting the Date
5. Make sure the setting crown is still in position and press button to display (date).
If appears, press button once more. After 2 seconds, the two displays will
+
/ /
3
A
show flashing numbers for the month in the left LCD, and the date in the right LCD.
A
+
(continued)
Page 6

Setting Date/Time and Alarm
4.
Set the date with button and the month with button . Pressing buttons or for longer than 1
B C B C
second will advance the date and month rapidly.
6. For the final time setting step, turn the crown and adjust the minute hand to MATCH the minutes
set in the right LCD with button in previous step 4. Set the current time by pushing in the crown to
position while using an accurate time signal. Screw down the setting crown to finish the setting
1
B
procedure.
Setting the Alarm
1. Make sure the setting crown is in position .
2. Press button momentarily and the left LCD will display for 2 seconds and then change to one
of the following: with the date in the right LCD, or hours and
minutes in both LCD’s. If are displayed in the left LCD, press
again to display hours and minutes currently set for the alarm time.
D
3. Press either button or ; the LCD’s will flash indicating you are in
D
/
/
B C
alarm setting mode. Set the minutes by pushing button , and
hours with button .
C
Note - While adjusting the left LCD (hour) setting, the right LCD
(minutes) will display if digital time is set to standard
time mode. If digital time is in 24 hour military time mode, the
/
right LCD will display minutes. Pressing buttons or for longer
than 1 second will advance the hours and minutes rapidly.
4. When finished setting hours and minutes, press button ; the left LCD will display for 2 seconds
followed by indicating the alarm’s mode and the right LCD will display the date.
or
5. To set alarm state, press and hold button until the left LCD changes from or
Note - To test the alarm, press and hold ; the alarm should produce a beeping tone. D
1
0
6
65
5
5
70
MPH
5
5
C H A S E - D U R E R
60
0
5
40
30
2
1
2
0
2
21
0
2
7
5
7
30
20
10
20
17
18
19
1
7
18
19
A
8
0
85
8
9
0
1
9
95
1
10
0
10
11
11
1
2
12
1
3
1
3
1
4
14
1
5
1
6
15
1
6
B
50
D
50
5
4
5
4
0
4
0
12
4
B
B C
.
10
2
T
A
T
S
8 4
5
6
3
35
.
T
U
A
N
0
3
0
3
25
24
3
5
2
2
2
4
2
23
C
22
D
C
to to
Page 7
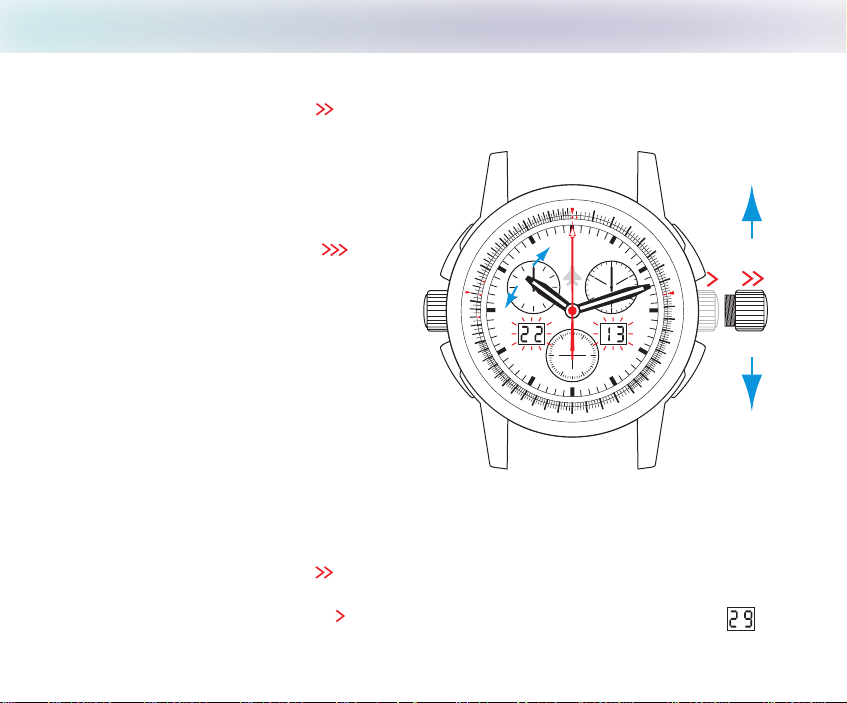
Setting Time Zones/Leap Year
Setting Time Zones
1. Pull setting crown out to position and turn to set the hour hand to another time zone when
traveling, or to adjust for Daylight Savings.
2
5.
Note - The hour displayed in the left LCD will also
change in synchronization with the hour hand!
If you wish to retain the original time zone,
pull setting crown to position and
press button to set LCD’s to time mode.
A
3
Reset the current hour on the left LCD
by pushing button until original time is
C
displayed.
Please note that the LCD time is used for the
Alarm function! If you wish to have the Alarm
synchronized to the hour hand, then the LCD
and hour hand must be set to the same time.
0
6
65
5
5
0
5
D
0
4
5
5
3
3
.
T
U
A
0
3
C
55
50
45
45
0
12
4
.
10
2
T
A
T
S
8 4
6
N
0
3
5
2
24
3
5
2
2
22
4
2
3
2
2
2
1
M
P
H
C H A S E - D U R E R
60
50
40
30
1
2
0
2
19
2
20
1
9
70
7
30
20
10
0
2
1
7
18
7
18
7
5
A
80
8
8
5
9
0
1
9
95
10
10
0
1
11
11
12
1
2
1
3
13
14
1
15
4
1
6
1
5
1
6
1
B
2
Set crown in
position 2 to
only the hour hand
adjust
Correcting for Leap Year
February 28 will normally change to March 1 and only needs to be adjusted on February 29 every four
years to accommodate leap years.
1. Pull setting crown out to position and turn the hour hand counterclockwise (backwards) 24 hours
or two revolutions.
2. Push setting crown back to position and the right LCD (date) will display the correct date
3. Screw down the setting crown to finish.
2
1
Page 8
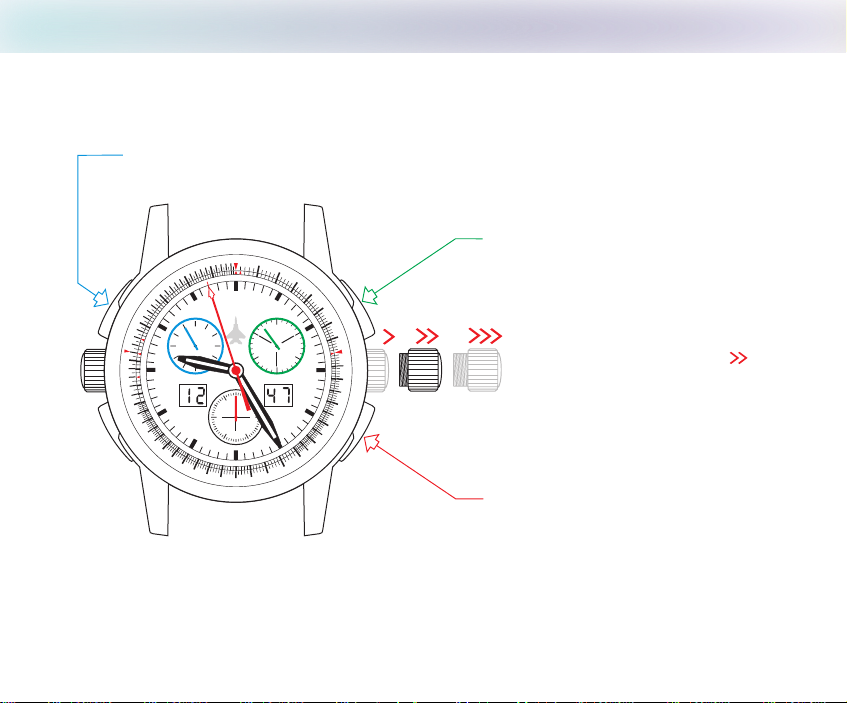
Resetting Chronograph Hands to Zero
The chronograph hands can be set at zero or another time zone.
Set the counter at 012 hour
6.
60
65
5
5
D
C
50
55
0
5
45
5
4
40
A
T
S
5
3
35
.
T
U
A
N
30
C H A S E - D U R E R
0
12
4
.
10
2
T
8 4
6
0
3
5
2
4
2
23
25
22
4
2
23
22
21
70
7
M
PH
7
30
20
1
60
1
0
0
5
4
0
20
30
5
1
6
17
21
18
0
2
19
16
17
1
8
0
2
1
9
5
0
1
A
8
0
8
8
5
90
1
9
9
5
1
10
0
1
11
1
1
2
1
2
1
3
13
14
1
4
15
2
B
Set the counter at 030 minute
3
Setting crown in position
for all adjustments
2
Set the counter at 060 second
Note: Pressing PUSHBUTTONS momentarily will advance hands one index mark at a time.
To advance hands rapidly, press PUSHBUTTONS longer than 1 second .
Page 9
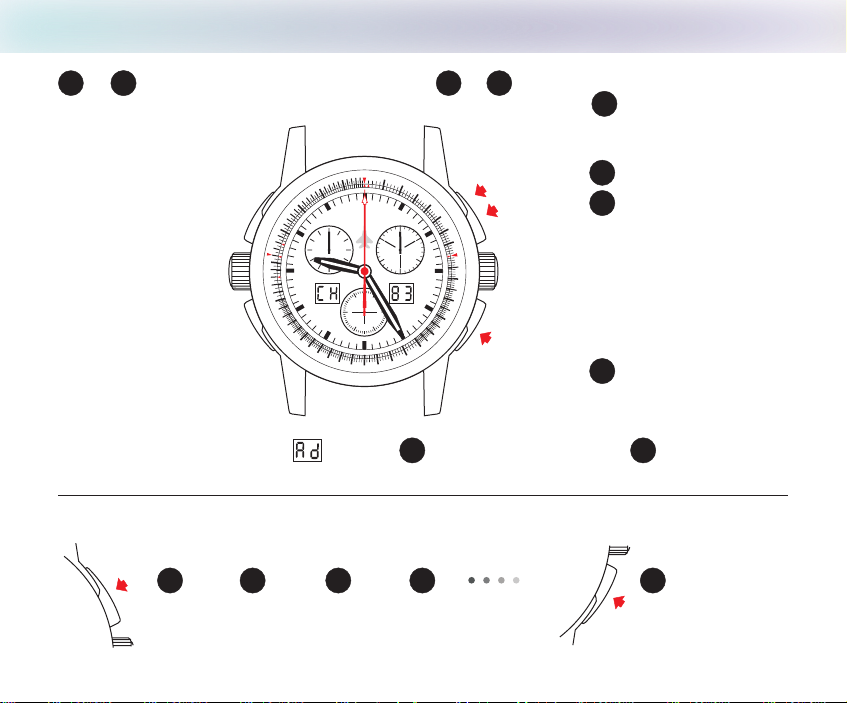
Timing Mode • Simple Chronograph Function
7.
to
order of functions
X
1
5
4
0
4
0
4
.
T
A
T
S
5
3
35
.
T
U
A
N
30
0
3
Note - The left LCD will display after step (STOP) until Reset to zero ( ) .
Note* Step (or ) may be repeated as many
as necessary; Step before is the final reading.
0
6
65
45
25
50
10
8 4
25
4
2
55
0
5
12
6
4
2
23
2
3
2
2
2
5
5
C H A S E - D U R E R
2
0
5
4
0
2
21
20
1
2
0
2
70
7
M
PH
5
7
8
0
8
9
30
2
0
0
1
60
1
0
3
14
20
30
15
16
15
1
7
18
19
1
6
17
1
8
19
3
2
X
START
A
8
5
9
0
1
0
11
12
1
1
3
1
4
STOP
95
10
1
1
1
2
Setting crown in
position 1
Reset to
Zero
B
1
2
X
2
X
The right LCD will display hundredths of a second until Reset to zero.
ADD FUNCTION:
Order in which pushbuttons should be pressed.
A
1
2
START STOP
Read
3
4
START STOP
Read
X
B
times
Reset to zero
Page 10
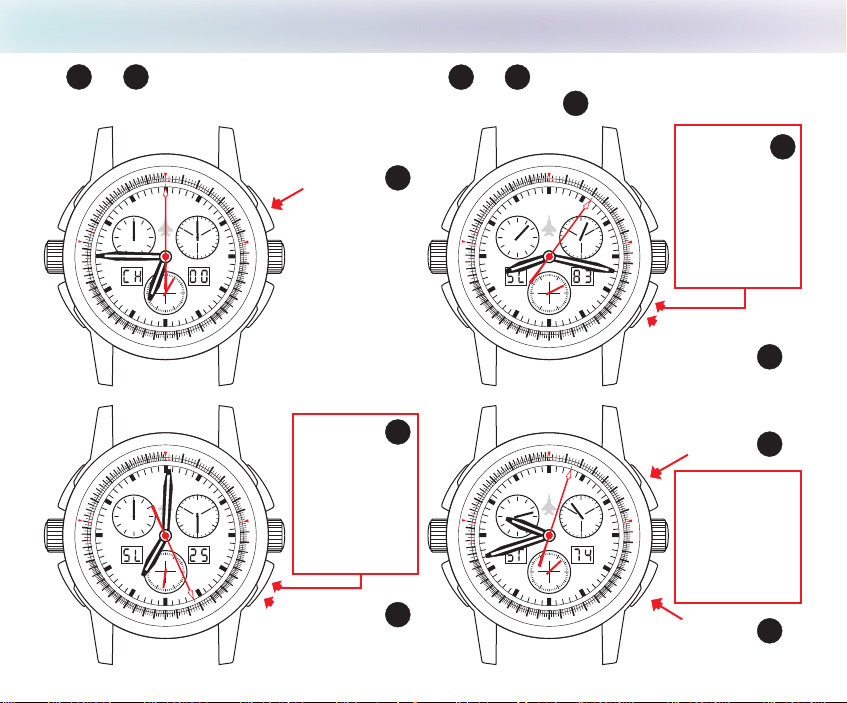
Timing Mode • Split-Time or Intermediate Times Function
8.
to
order of functions
7
1
Note* Step (or ) may be repeated as many
as necessary; Step is the final reading.
4
2
6
times
0
6
65
55
70
50
55
50
45
5
4
C H A S E - D U R E R
40
0
12
4
.
10
2
T
A
T
S
8 4
5
6
3
35
.
T
U
A
N
30
30
4
5
2
24
5
23
2
22
4
21
2
23
2
2
21
7
H
MP
20
60
10
0
5
0
0
2
30
18
0
2
19
18
20
1
9
A
5
7
80
8
8
5
90
9
95
30
1
1
0
0
10
1
1
12
12
1
3
1
3
1
4
14
15
16
15
17
16
1
7
1
1
START
Crown set
in position 1
1
5
4
40
0
4
.
T
A
T
S
5
3
35
.
T
U
A
N
30
0
3
4
25
5
5
4
50
50
12
10
8 4
2
24
2
23
6
3
2
2
2
2
55
55
C H A S E - D U R E R
2
50
4
0
2
21
21
0
6
65
7
0
7
5
H
MP
7
80
85
8
90
9
95
30
1
1
20
60
10
20
30
7
18
20
19
18
20
1
9
0
0
10
1
1
1
1
2
12
1
3
13
1
4
14
1
5
16
15
1
16
1
7
B
1
83/100 second
RESTART
Read
TIME 2
1 hour
32 minutes
06 seconds
SPLIT 2
4
5
(catching up)
1
1
25/100 second
RESTART
(catching up)
SPLIT 1
Read
TIME 1
0 hour
15 minutes
26 seconds
0
6
6
5
55
55
C H A S E - D U R E R
2
0
5
4
0
22
21
2
21
70
7
H
MP
5
7
80
8
8
5
90
9
95
30
1
1
20
60
10
0
2
30
18
0
2
19
18
20
1
9
0
0
0
1
1
1
1
2
12
1
3
1
3
1
4
14
15
16
15
17
1
6
17
B
0
5
50
45
5
4
40
0
12
4
.
10
T
A
T
S
8 4
5
6
3
35
.
T
U
A
N
30
30
5
2
24
23
25
24
23
2
2
5
4
40
0
4
.
T
A
T
S
5
3
35
.
T
U
A
N
30
0
3
3
4
25
5
50
50
12
10
8 4
25
24
24
23
6
3
2
2
2
55
55
C H A S E - D U R E R
2
50
4
0
22
21
21
0
6
6
5
7
0
A
75
H
MP
7
80
85
8
90
9
9
30
5
1
1
20
60
1
0
20
30
1
8
20
19
18
20
1
9
0
0
10
1
1
1
1
2
12
1
3
1
3
14
14
1
5
16
15
17
16
17
B
1
74/100 second
Reset to
STOP
Read
LAST TIME
57 minutes
03 seconds
6
2 hours
7
Zero
Page 11
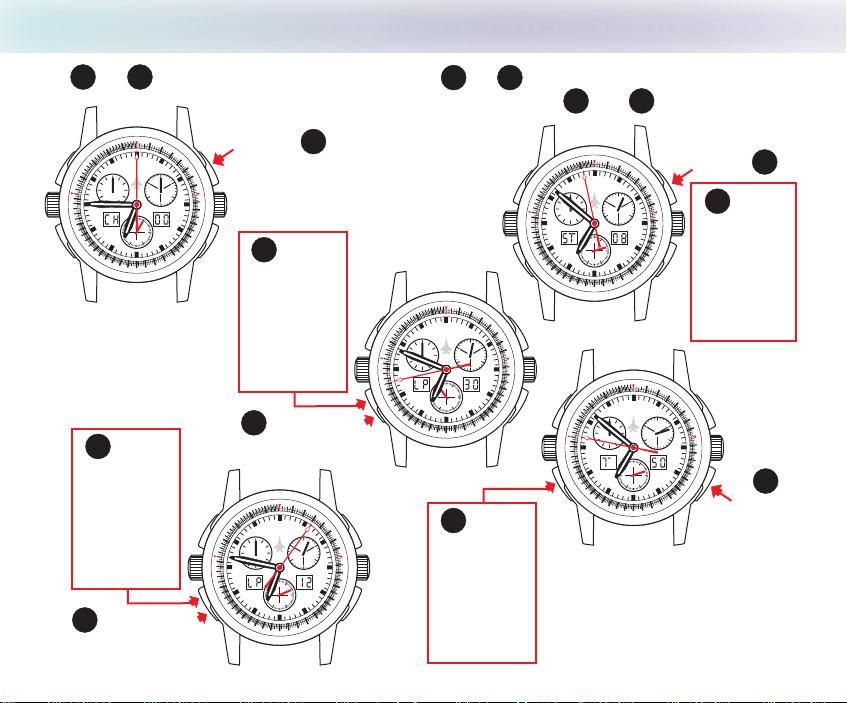
Timing Mode • Lap-Time Function
9.
to
9
1
0
6
55
0
5
M
P
H
55
0
5
45
45
C H A S E - D U R E R
0
4
0
12
4
.
10
2
T
A
T
S
8 4
5
6
3
35
.
T
U
A
N
60
30
30
50
40
30
25
4
2
23
25
22
21
20
9
1
24
23
2
2
21
20
19
LAP 1
2
Read
TIME 1
0 hour
2 minutes
06 seconds
12/100 second
RESTART
3
(catching up)
order of functions
6
5
A
70
7
5
7
8
30
20
0
1
1
0
0
2
15
1
6
1
7
18
1
6
1
7
18
START
80
85
90
9
9
5
10
1
0
1
11
1
Crown set in position 1
1
2
12
1
3
13
1
4
14
15
30/100 second
5
50
50
5
4
45
40
0
12
4
.
10
T
A
T
S
8 4
5
6
3
35
.
T
U
A
N
30
0
3
25
24
25
4
2
23
C
1
LAP 2
4
Read
TIME 2
0 hour
1 minute
43 seconds
RESTART
(catching up)
60
65
5
5
7
0
75
MPH
55
7
80
8
C H A S E - D U R E R
30
2
2
0
0
1
60
1
0
0
5
40
1
4
20
30
15
16
23
2
22
15
17
2
21
1
8
0
2
19
1
6
17
1
2
1
8
0
2
1
9
Note* Step (or ) may be repeated as many
as necessary; Steps and are final readings.
6
55
50
5
5
0
5
45
45
C H A S E - D U R E R
40
0
12
4
.
10
2
T
A
T
S
8 4
5
5
6
3
3
.
T
U
A
N
0
3
0
3
50
4
0
25
4
2
5
23
2
22
1
4
2
20
2
3
2
2
2
21
C
8
5
9
0
9
95
1
1
0
0
1
1
1
1
1
2
12
13
13
14
20
2
0
65
70
7
M
PH
7
30
2
0
10
60
1
0
20
30
15
16
1
7
18
9
1
1
6
1
7
18
19
Read
8
TOTAL
TIME
0 hours
6 minutes
4
7
50
0
5
5
4
45
40
0
12
4
.
10
T
A
T
S
8 4
5
5
6
3
3
.
T
U
A
N
30
30
5
2
4
2
3
5
2
2
24
23
22
5
80
85
8
9
0
9
95
10
1
0
11
11
1
2
12
13
13
14
14
15
40
35
0
3
C
5
5
5
5
C H A S E - D U R E R
2
0
5
4
0
22
1
2
1
2
0
4
0
4
.
T
A
T
S
5
3
.
T
U
A
N
30
8
60
65
A
70
75
MP
H
7
80
8
30
20
0
1
60
10
1
4
20
30
1
5
1
6
15
17
1
8
0
2
9
1
1
6
17
18
2
1
9
60
5
5
0
5
MPH
55
50
5
5
4
C H A S E - D U R E R
12
10
2
8 4
6
60
50
40
30
25
24
23
2
25
2
4
21
20
19
2
3
2
2
2
1
2
0
2
1
9
STOP
85
9
0
9
95
10
10
11
11
1
2
1
2
1
3
13
1
4
Read
7
FINAL
TIME
0 hours
2 minutes
58 seconds
08/100 second
65
7
0
7
5
7
80
8
8
5
9
0
9
95
30
1
1
0
20
0
0
1
1
1
1
1
1
2
12
1
0
13
13
14
20
14
1
5
16
15
17
18
1
6
17
1
8
B
Reset to
47 seconds
50/100 second
times
6
9
Zero
Page 12
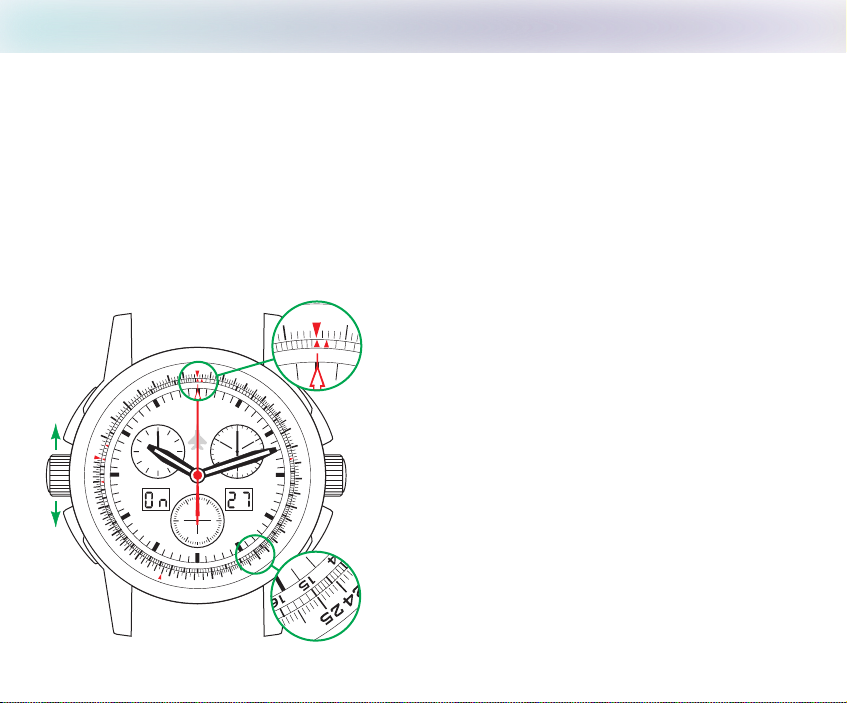
E6B Flight Computer
1
0
5
MP
H
The E6B Flight Computer is based on the principle of the slide rule. The unit of measurement is the base
10 logarithms (log10). These instructions cover only the basics of using the E6B Flight Computer
dial/slide rule. A more complete description may be found in your public library or on the internet.
How to read the scale
The most important technique to master is reading the scale. The numbered tick marks can represent a
range of values. For example, on the scale on the face of the watch, the numeral 30 to the left of the
letters “NAUT” can represent 30, or 300 or 3000 or 3.0. The nine tick marks between the 30 and 35 each
represent 1/10 of the distance between 30 and 35, or 300 and 350, or 3000 and 3500, or 3.0 and 3.5. So
for 3.0 and 3.5 each one of the tick marks represents .05; for 30 and 35, 0.5; for 300 and 350, 5; for
3000 and 3500, 50. You can see it is important that you keep track of the range that each interval
represents.
How to use the E6B Flight Computer dial
When doing calculations, the rotating dial will represent
the time and the face/dial the units (distance, pounds,
0
1
5
11
9
0
9
5
8
0
5
5
8
50
75
5
4
70
5
6
T
0
S
6
5
3
.
T
U
A
55
N
0
5
C H A S E - D U R E R
0
12
4
.
10
2
T
A
8 4
6
0
3
45
0
5
40
25
4
2
23
22
1
2
40
5
3
1
2
MPH
60
30
20
1
7
3
1
4
8
15
9
30
2
0
1
0
20
17
18
19
3
0
16
10
1
7
0
1
18
11
19
1
2
2
0
21
13
2
14
2
23
1
5
2
4
1
6
2
5
gallons, etc.)
¤ Let’s try an example:
You’re in your car on the freeway traveling at 60 milesper-hour. You’ve been traveling for 2.5 hours. How far
have you gone?
¤ Solution:
Turn the rotating dial so that the red numeral on the
dial (which represents 1 hour) is directly over the “60”
indicator triangle on the face at 12 o’clock (which
represents the 60 miles traveled in 1 hour). Directly
below the numeral 25 (2.5 hours) on the dial you should
see the numeral 15 on the face. The 15 represents the
significant digits of the answer and we must decide
whether there should be none, 1 or 2 zeros after the 15.
10.
10
Page 13
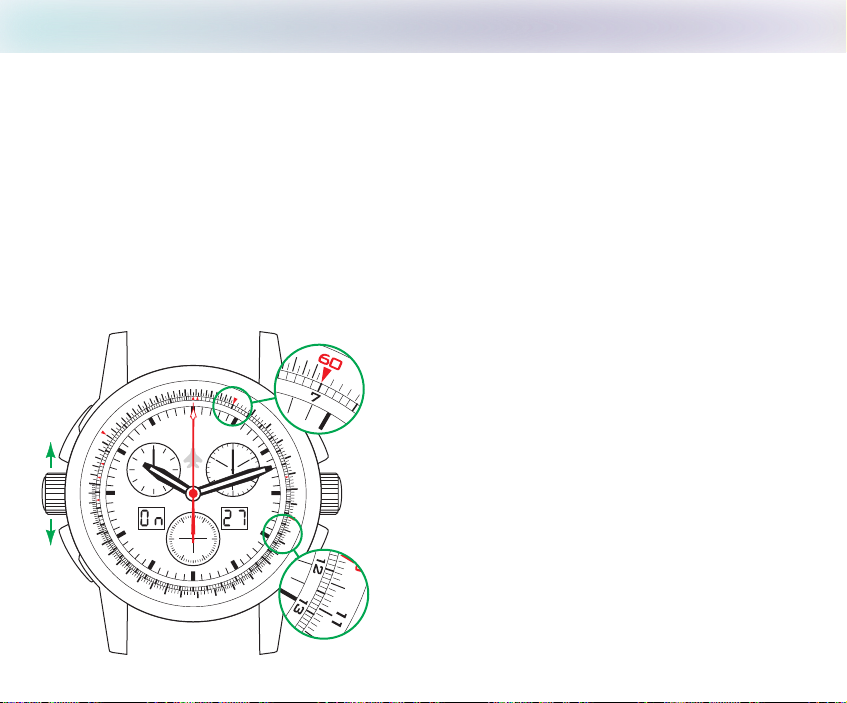
E6B Flight Computer
You can probably guess how many, because 15 miles in 2.5 hours is obviously too little and 1500 is
obviously too much. So the answer must be 150 miles.
¤ Let’s try another example:
Again, you’re going down the freeway at 70 miles-per-hour. You’ve been traveling at that speed for
110 minutes. How far have you traveled?
¤ Solution:
Turn the dial so that the numeral 60 (which represents 60 minutes) on the dial is right above the
number 7 (which represents 70 miles-per-sixty minutes). Now find the numeral 11 on the dial and
look directly below it on the face. You will note that the 11 is between the numerals 12 and 13 on the
face. We must now interpolate. First we must decide whether the numerals 12 and 13 on the face
represent 12 and 13, 120 and 130, 1200 and 1300, etc. It’s obvious that 12 is too little and 1200 is
too big, but sometimes it’s not so obvious. So here’s another method.
At 70 miles-per-hour (70 miles in 60 minutes), you would
55
50
5
4
55
40
50
5
4
35
S
0
5
3
3
.
T
U
A
N
5
2
4
2
C H A S E - D U R E R
0
12
4
.
10
2
T
A
T
8 4
6
30
25
23
4
2
2
2
23
22
21
0
2
19
6
0
MP
60
0
5
4
0
30
21
0
2
18
7
1
6
H
5
7
7
0
8
7
5
80
9
30
2
0
1
0
20
6
17
18
9
1
1
5
1
6
85
10
0
90
1
11
9
5
1
1
0
2
13
1
1
1
4
1
15
2
1
1
3
1
4
have to travel over 14 hours to go further than 1000 miles.
14 hours is 840 minutes. So the answer must have more
than 2 and less than 4 digits. In other words, it must
have 3 digits until you get above 14 hours or 840 minutes.
After using the Flight Computer for a while these
mental estimates will become second nature (i.e. intuitive).
Now that we’ve done the mental calculation, we know that
the answer must have 3 digits. Therefore 12 must
represent the number 120 and 13 must represent the
number 130. Since there are nine ticks between the 12 and
13, there are ten divisions between them. Since they
represent the difference between the numbers 120 and
130, which is 10, each tick must represent 1. Since the
numeral 11 on the dial is above the eighth tick after
11.
Page 14
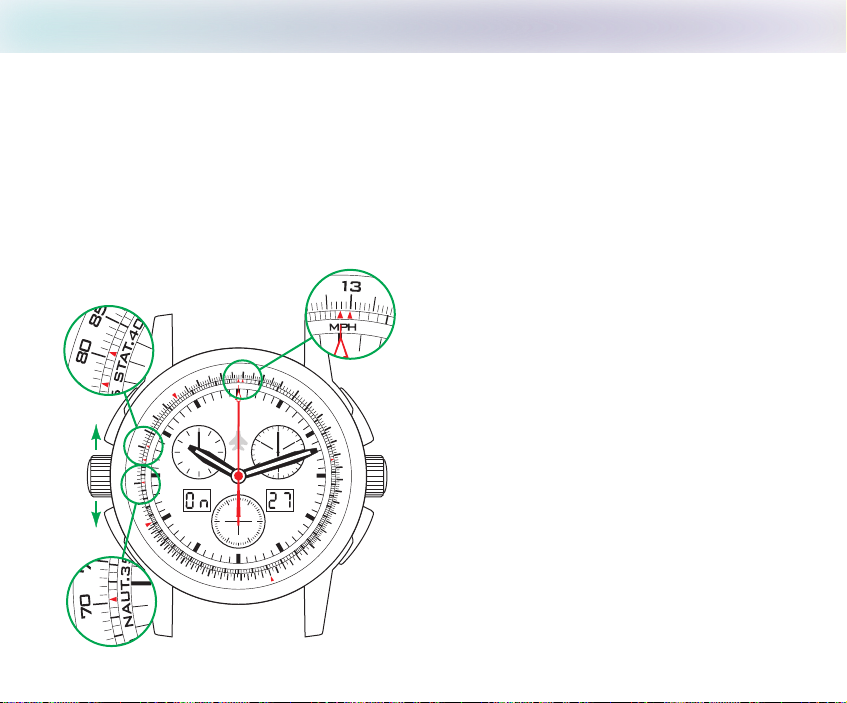
E6B Flight Computer
12.
the 12 on the face, it represents 8. Therefore the distance traveled in 110 minutes at 70 miles-perhour is 120 + 8 or 128 miles.
How to calculate distance and fuel usage
Now that you know a few of the basics, you can start using the Flight Computer to estimate your
distance or fuel usage in relation to time. Simply select the numeral on the dial that represents the
time interval and set the dial so that number is directly above the numeral on the face represents the
number of miles, kilometers, nautical miles or pounds of fuel traveled or used in that time period. Then,
as time passes, you locate the lapsed time on the dial and look directly below it for the approximate
distance traveled, fuel usage, etc.
How to convert basic units
The Flight Computer is provided with red arrows on
the face for converting to and from nautical miles,
statute miles and kilometers. The Red arrow above
the “A” in “STAT” on the face is for statute miles.
1
3
2
1
1
4
1
11
5
5
10
0
5
95
0
45
9
5
8
0
A
8
T
S
5
75
3
.
T
U
0
A
7
N
5
6
60
C H A S E - D U R E R
0
12
4
.
10
2
T
8 4
6
0
3
40
5
2
5
4
2
5
3
2
22
21
0
5
5
4
5
MPH
60
0
5
30
20
16
7
17
18
8
19
2
9
30
20
1
0
20
1
7
1
8
19
4
0
0
21
10
22
0
1
2
3
11
2
4
25
1
2
1
3
14
3
1
5
0
1
6
35
The red arrow above the “U” in“NAUT” on the face is
for nautical miles.
The red arrow above the “H” in MPH is for
kilometers.
To convert, for example, 13 KM. to statute and
nautical, move the dial so that the numeral 13 on
the dial is directly above the red arrow over the
“H” in “MPH” on the face. The statute miles in
13 KM. is found on the dial directly above the red
arrow above the “A” in “STAT” on the face, which is
the numeral 8.1.
Thus 8.1 statute miles equals 13 KM. If you look
directly above the red arrow above the “U” in “NAUT”
you will see the numeral 7.05. This is the number of
nautical miles in 8.1 statute miles and 13 KM.
Page 15
E6B Flight Computer
13.
Other conversions
You can also do other conversion calculations on the Flight Computer. You can, for example, convert
pounds of aviation gasoline, kerosene, or JP-4 to gallons. You can also convert from gallons to pounds.
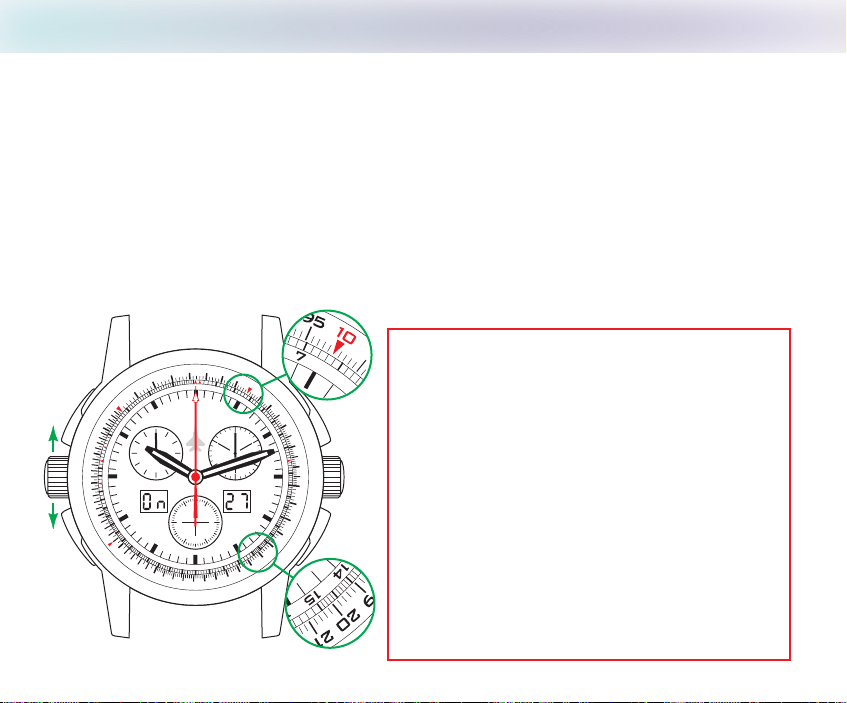
Simply move the dial so that the is over the numeral on the face that represents the number of 10
pounds in 1 gallon of that type of liquid (see the conversion table on next page), find the number of
gallons you’re converting on the dial and look directly below that at the corresponding number on the
face. That is the number of pounds!
The example below converts 20 gallons of oil (petroleum) to pounds. The Conversion Table shows
1 gallon = 7.35 pounds, so setting the on the dial over 7.35 and looking under 20 on the dial
10
shows 147 pounds on the watch face scale.
8
0
5
8
90
5
7
0
7
55
65
50
0
6
45
5
5
A
T
50
S
5
3
.
T
U
45
A
N
0
4
C H A S E - D U R E R
0
12
4
.
10
2
T
8 4
6
0
3
5
2
4
5
2
3
3
2
2
2
0
3
9
5
10
M
P
H
7
1
1
8
1
2
9
30
2
0
60
10
50
40
0
2
30
1
7
1
2
1
8
0
2
9
1
24
25
13
1
1
0
0
4
1
11
1
5
1
1
6
2
17
13
18
14
1
15
9
2
1
6
0
2
1
22
23
NOTE!
Use the Flight Computer only to
estimate fuel usage and travel distance.
Do not rely on it for navigation purposes.
Its purpose is to allow you to keep track
of approximate fuel usage or distance
traveled over time and to estimate
equivalent kilometers, statute and or
nautical miles. Any other use is outside
the design parameters of the Flight
Computer and is not recommended.
Page 16

E6B Flight Computer (Conversion Table)
Conversion Table
14.
1 GALLON
alcohol
aviation gasoline
garbage
gasoline (auto)
jet fuel (JP-4)
oil (lubricating)
oil (petroleum)
= POUNDS
6.55
6.00
4.01
6.14
6.50
6.67
7.59
7.35
1 BARREL = This Amount
(U.S. oil)
(U.S. oil)
5.62
42
cu.
U.S.
ft.
gal.
ONE (1) = This Amount
knot
knot
knot
knot
51.44
1.15
cm/sec
ft/sec
1.69
.514
m/sec
stat mi/hr
ONE (1) = This Amount
foot
foot
f oot
meter
meter
kilometer
kilometer
kilometer
kilometer
nautical mile
nautical mile
nautical mile
nautical mile
nautical mile
nautical mile
nautical mile
30.48
3280.84
1093.6
1012.7
6076.12
1852
cm
.167
fathoms
.305
meters
.54 7
fathoms
3.28
feet
ft.
.621
stat miles
.540
naut miles
yards
fathoms
feet
1.85
kilometers
meters
1.15
stat miles
1 minute of lat.
1 minute of Great Circle
Page 17

Specifications
CENTRAL COMMAND
Technical Specifications
®
SWISS Made, 23-jewel precision ETA 251.265 quartz movement.
® Chronograph: 1/100th second, 60 seconds, 30minutes & 12-hour elapsed
time, split time, and lap time.
® Interior rotating and stationary E6B navigational slide rule dials for
calculation of speed, distance, and fuel consumption.
® Digital power alarm.
® Twin LCD displays.
® Super-LumiNova advanced illumination system on hands & indexes.
Case and bracelet in combination of brushed/polished solid 316L
®
stainless steel
® Deployment buckle with double lock security clasp.
® Screw-locked crown and s .
® Water resistant to 100m/330 feet.
Domed
® scratch-resistant sapphire crystal.
iameter -
® D 45mm.
® Serial numbered.
® 2 year limited international warranty.
.
crew-in back
15.
Page 18
ETA Cal. 251.265
CHASE-DURER
9601 Wilshire Blvd. #1118
Beverly Hills, CA 90210 USA
Tel: 800.544.4365 / 310.550.7280
Fax: 310.550.0830
E-mail: [email protected]
www.chase-durer.com
 Loading...