

Chase Ingenico ICT220, Ingenico IWL250, Ingenico IWL220, Ingenico ICT250 Quick Reference Manual
Page 1
Ingenico ICT220, ICT250, IWL220 & IWL250
Retail & Restaurant POS
Terminal Guide
This Quick Reference Guide
will guide you through
understanding your
terminal’s functionality,
for both countertop
and wireless devices,
and will help you with
troubleshooting your
payment application.
Page 2
3
Contents
Key Functions ......................................................................................3
Navigating Your Terminal .................................................................4
Available Transaction Types ............................................................4
Integrated Contactless Technology ...............................................5
Clerk/Server Management .............................................................6
Gift Card Transaction Types (Optional) .......................................6
Available Reports .............................................................................8
Settling the Batch .............................................................................9
Adjusting Hardware Setting
(E.G. Screen Brightness & Key Beeps) .........................................10
Common Error Codes ......................................................................10
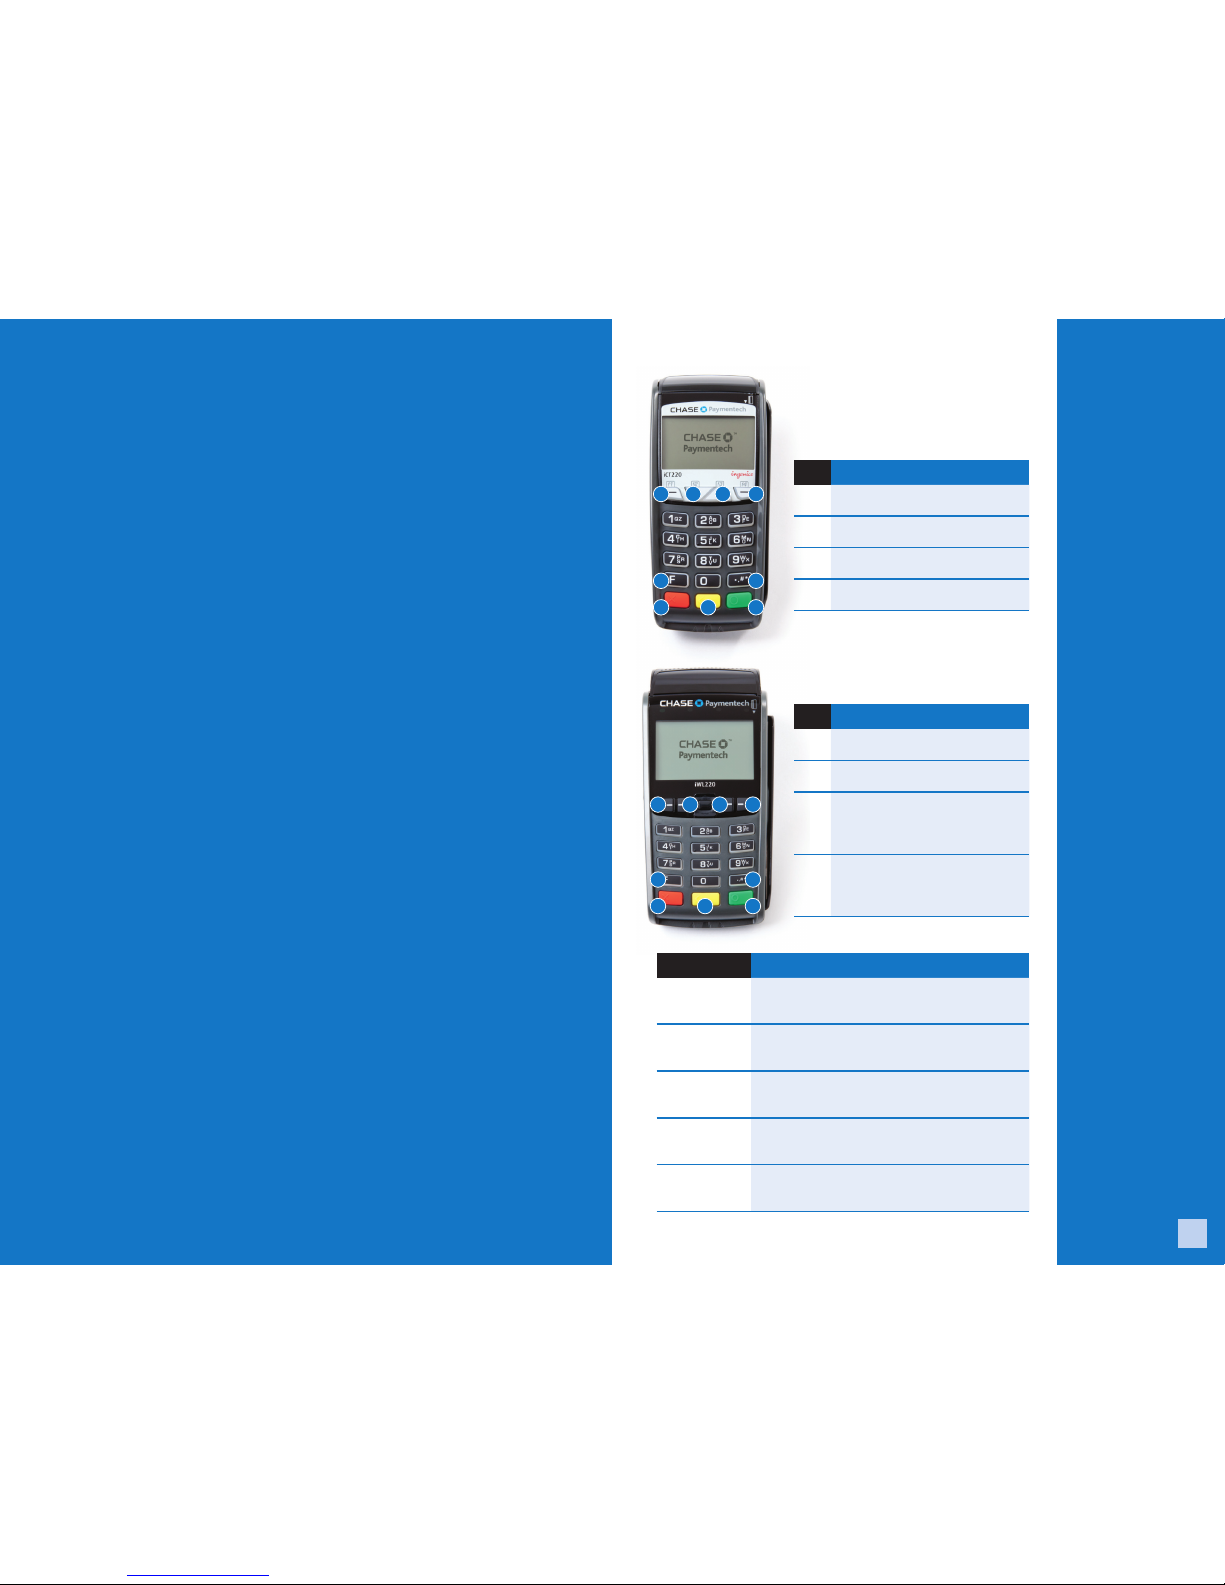
Key Functions
The following
charts details the
navigation from the
main menus for the
Ingenico ICT220,
ICT250, IWL220 and
IWL250 terminal.
KEY Function
5 - F Key Access the System Menu. When entering
text, press to specify letters and characters.
6 -# Key Access the Admin menu for
reports and management.
7 -Cancel
(Red Key)
Press to immediately stop the current
activity and return to the idle screen.
8 -Clear/Back
(Yellow Key)
Press to stop the current activity and restart the
current activity, such as entering a password.
9 -Enter
(Green Key)
Press to confirm and continue
with the activity in progress.
1
1
5
5
6
6
9
9
8
8
7
7
22334
4
ICT220 & ICT250 - NAVIGATION
KEY Function
1 F1 – this is a variable key.
2 F2 – press to scroll down.
3 F3 – press to scroll up.
4 F4 – this is a variable key.
IWL220 & IWL250 NAVIGATION
KEY Function
1 F1 – this is a variable key.
2 F2 – this is a variable key.
3 F3 – this is a variable key
used typically to scroll
through a menu.
4 F4 – this is a variable key
used typically to scroll
through a menu.
ICT220, ICT250, IWL220 & IWL250 NAVIGATION
Page 3

4 5
BEGIN A TRANSACTION
To begin a transaction, press [Enter] to access the main menu
and then select the transaction type you wish to perform.
Your terminal will guide you through the process.
For contactless payments, the customer should touch/tap their
card on or in close proximity to the terminal for a few seconds.
REPRINT A RECEIPT
To reprint a receipt, press [Enter] to access the main menu,
scroll down to Reprint and press [Enter] to select.
ACCESS CLERK/SERVER SETUP
Press [#] and then select Clerk/Server Menu.
TIP ADJUSTMENTS
Press [Enter] and select Tip Adjustment, if tip processing is enabled.
BATCH REVIEW / PRINT A REPORT
Press [Enter], scroll down and then select Reports.
Choose whether you would like a detail or summary
report, and then specify whether you would like the
report printed or simply displayed on the terminal.
Navigating
Your
Terminal
Refer to this section
to find and begin
the transaction or
terminal function
you wish to use.
Options may vary
depending on the
device you are using.
Available
Transaction
Types
Refer to this section
for information on
what transactions are
available, when
to use them, and
how to begin the
transaction.
*Purchase and
Commercial cards
are supported.
CONTACTLESS PAYMENTS
Your Ingenico terminal automatically accepts contactless
payments. During a sale transaction, the terminal will display the
“Tap/ Insert/Swipe” prompt and the contactless symbol. At this
time, customers with contactless-enabled cards should touch/
tap their card on or in close proximity to the top of the terminal
screen for a few seconds. Your terminal will process contactless
payment transactions as if a card were swiped or inserted. As an
added security measure, the terminal will prompt for a card insert
or swipe if the transaction amount is over a pre-set threshold.
Note: Tip functionality is not available for contactless transactions
- it requires the card to be inserted or swiped. Contactless option
can be disabled, please contact Help Desk at 1.800.265.5158.
Integrated
Contactless
Technology
Credit and Debit Transactions Instructions
SALE* A sale transaction
using a credit or debit card;
the card is present.
Press [Enter] and
[Enter] to select Sale.
RETURN* Perform a
return to refund money to a
cardholder’s account from a
credit or debit sale completed
in a closed batch (i.e., previous
day). May also be used to
adjust a previous transaction.
Press [Enter], scroll
to Return then press
[Enter] to select. Enter
Supervisor password
VOID* Perform a void to
reverse a credit or debit sale,
force, or return transaction
and prevent any funds from
transferring from the cardholder’s
account. Only available for
transactions in the current
batch (i.e., same day).
Press [Enter], scroll to Void
then press [Enter] to select.
Credit Only Transactions Instructions
FORCE* Perform a force sale
when the terminal cannot reach
the host (Chase Paymentech)
to authorize a transaction, or to
finalize a Pre-Auth transaction.
Contact your voice authorization
center for an authorization code,
and then force the transaction.
Press [Enter], scroll
to Force then press
[Enter] to select.
PREAUTH/PREAUTH
COMPLETION RETAIL ONLY*
A pre-auth transaction provides
an approval, but the consumer
is not charged until a pre-auth
completion is performed.
Press [Enter]. scroll to
Pre-Auth then press
[Enter] to select.
OPEN TAB RESTAURANT
ONLY A preauthorization
transaction for a specific,
pre-determined dollar amount.
Press [Enter], scroll to Tab
then press [Enter] to select.
Press [1] - Open
CLOSE TAB RESTAURANT
ONLY Perform to close the
opened tab and place it in the
settlement batch file.
Press [Enter], scroll to Tab
then press [Enter] to select.
Press [2] - Close
Page 4
6 7
Gift Card
Transaction
Types (Opt.)
If you are
participating in
Chase Paymentech’s
proprietary Gift
Card program, your
terminal supports
various stored value
card transactions.
Refer to this section
for information
on what gift card
transactions are
available and when
to use them.
To begin a Gift
Card transaction,
press [Enter] and
select Gift.
Gift Card Transactions Instructions
REDEMPTION Decreases
the value stored on the
consumer’s gift card account.
This transaction is performed
when a consumer uses the card
to purchase goods or services.
Select Redemption
then press [Enter].
FORCE REDEMPTION
FORCE ACTIVATION
Perform a force redemption,
activation or issuance.
Select Force
Redemption OR
Force Activation
then press [Enter].
ADD TIP A gift card redemption
transaction for the amount of the tip.
Press [3] – Add Tip
Gift Card Transactions Instructions
ISSUANCE/ADD VALUE Adds
value to the gift card account. This
transaction can be used to issue and
activate a new card, or to reload an
active card with incremental value.
Select Issuance/
Add Value then
press [Enter].
ACTIVATION
BLOCK ACTIVATION
Create a consumer’s gift card
account by assigning value to a
card. One or more gift cards can be
activated at one time. Activations
can only be performed on cards that
have not been previously activated.
Select Activation OR
Block Activation,
then press [Enter].
Clerk/Server
Management
Clerk/ Server
management allows
you to manage IDs and
passwords. Press [#] to
access the Admin menu
and [1] – Server Menu.
Available
Reports
A report is like a
snap shot in time of
business activities.
Use this data to help
you make crucial
business decisions.
Your menu options
may vary depending on
whether your terminal
is running the Retail or
Restaurant application:
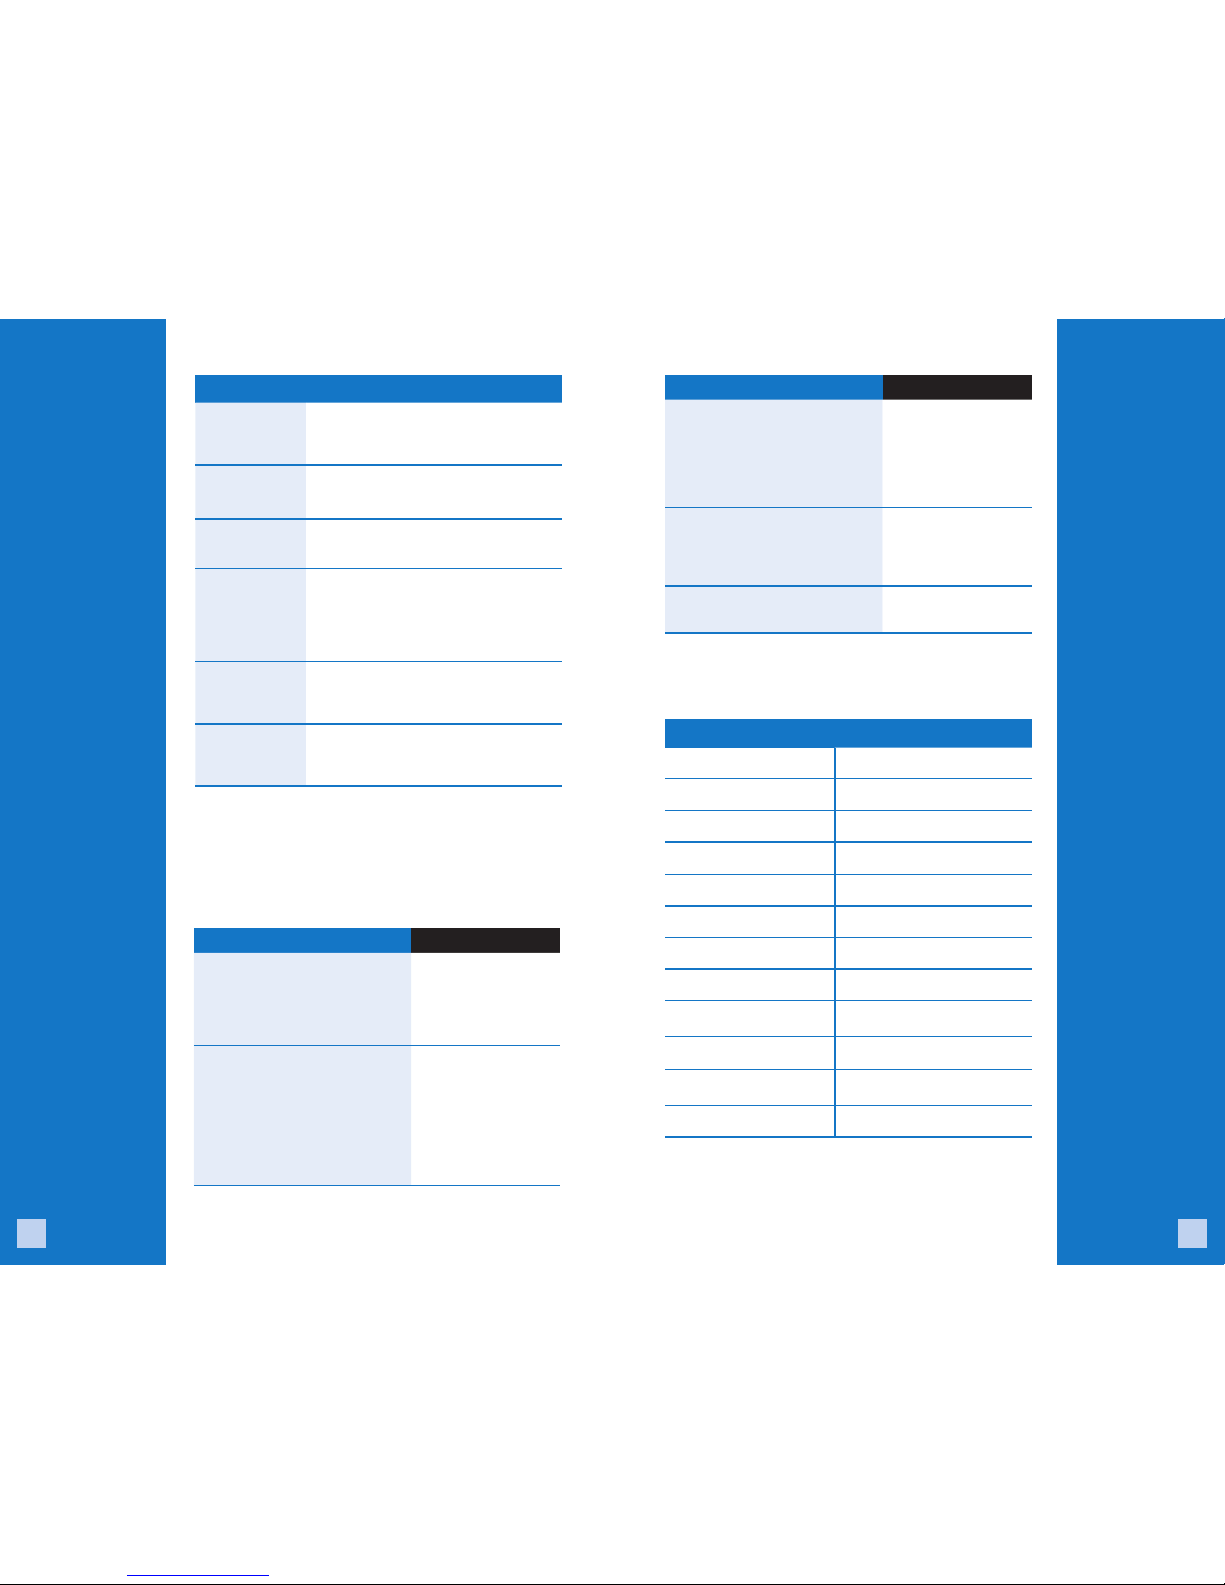
Clerk/Server Management
[1] ADD ID Adds new clerks or servers to your terminal.
You will be prompted to create an ID and
a password for each new clerk/server.
[3] DELETE IDs Removes a single clerk/server
from the terminal.
[4] PRINT
ID LIST
Prints a report of clerks/servers
currently signed on.
[5] AUTO ADD
CLERK/SERVER
This feature allows you to automatically
add new clerks/servers during a transaction.
If you toggle the feature off, then the
terminal will not allow a transaction
unless a valid clerk-server ID is entered.
[6] CLERK
PROMPT
Enable this feature to have the
terminal prompt for a clerk/server
ID during each transaction.
[7] CLERK
WORDING
This feature allows you to alternate
the terminal’s verbiage from
“clerk,” “server” or “cashier.”
Retail Main Menu Restaurant Main Menu
0 – Sale 0 – Sale
1 – Return 1 – Return
2 – Void 2 – Tab
3 – Force 3 – Void
4 – Gift 4 – Force
5 – Tip 5 – Gift
6 – TransAdjust 6 – Tip Adjustment
7 - PreAuth 7 – TransAdjust
8 – Settlement 8 – PreAuth
9 – Reprint 9 – Settlement
10 – Reports 10 – Reprint
11 – Reports
Page 5

8 9
Available
Reports
Press [Enter] to
access Main Menu,
scroll down to Reports
Menu then press
[Enter] to select.
SETTLEMENT
A Settlement operation is used to close the current batch
and open a new batch for logging and accumulating
transactions. Your Ingenico terminal uses a Terminal Capture
System (TCS), meaning it stores transactions throughout
the day and sends batch totals of sales and refunds to the
host (Chase Paymentech) after the close of business.
There are two settlement options:
1 MANUAL SETTLEMENT
Press [Enter] to access Main Menu, scroll down to Settlement
and press [Enter] to select. Then follow the prompts displayed.
2 AUTO SETTLEMENT
If your terminal is set to automatically settle, it will
automatically settle transactions in the current batch at
a specific, predetermined time, within a 24-hour period.
When configured, auto settlement begins any time after
the set time occurs if there are transactions in the batch.
For example, if auto settlement time is set to 22:30:00 (10:30
p.m.) then auto settlement occurs any time after 22:30:00. If the
terminal is turned off before the set time, and turned on again
(usually the next morning), auto settlement occurs at that time.
Settling
the Batch
Your transactions must
be “settled” daily. Read
this section to ensure
the settlement process
operates smoothly.
Gift Reports
[1] Gift Card
Detail Report
Prints detailed information for
each transaction and a summary
report of transaction types.
[2] Gift Card
Summary
Report
Prints totals by transaction type.
[3] Clerk/
Server Gift
Card Report
Prints a gift card detail report by clerk/
server that includes transaction
type, amount and total.
Reports: Reports Menu
Detail Report Prints detail information for each
transaction and a totals summary
for each card type and issuer.
Summary
Report
Prints totals by card type and card issuer.
Clerk/Server
Summary
Prints a summary report by
all or one clerk/server.
Open
Pre-Auth
Report
Prints a list of all open pre-auth
transactions stored in the terminal.
Unadjusted
Tip Report
Prints a list of unadjusted transactions
by clerk/server, if enabled.
OPEN TAB
Report
Prints a list of current open tabs
EMV Report Prints reports related to EMV
chip transactions, parameters,
statistics and key settings.
Recent Error
Report
Displays a log of recent terminal
and/or transaction errors.
Press [Enter]
to access Main
Menu, scroll down
to Gift Reports
menu then press
[Enter] to select.
Page 6
10 11
Adjusting
Hardware
Settings
(e.g. Screen
brightness &
key beeps)
To adjust the backlight
brightness on your
terminal, and key
beeps (the audio beeps
that will sound during
transaction errors),
please follow these
steps to adjust your
terminal hardware:
APPENDIX
Common
Error
Codes
Code Description Action
BATCH NEAR
MAX SETTLE
BATCH
The batch capacity
of the terminal
is nearly full.
Complete the
transaction and settle
as soon as possible.
CAN’T READ
CHIP SWIPE
ALLOWED
REMOVE
CARD
A chip card was
inserted in the
chip reader, but
could not be read.
The card can now be
swiped on the terminal.
Code Description Action
TAP FAILED
PLEASE
INSERT
OR SWIPE
CARD
A contactless chip
card was tapped
however the
amount is over
the contactless
transaction limit.
Insert the card.
PASSWORD
LOCKED OUT
PRESS ENTER
More than four
invalid attempts
have been made
to enter the admin
password.
The admin account
will be locked out
for 30 minutes
or another admin
account may reset
the locked account.
PIN TRIES
EXCEEDED
The chip card
has recorded too
many invalid PIN
entry attempts.
Request another
form of payment.
AMOUNT
EXCEEDS
CARD
BALANCE
LIMIT=$X.XX
Displayed if a
prepaid card is
used for Auth
Only, Pre-auth or
Open Tab, and is
partially approved
(or fully approved
but with $0
remaining balance
on the card), during
completion.
Process completion,
close tab or force sale
with the originally
approved amount on
the Auth Only, Preauth or Open Tab. A
new transaction can
be processed with
another card to satisfy
any balance owing.
EXCEEDS
AMOUNT
AUTHORIZED
LIMIT=$X.XX
Displayed if the
final amount
exceeds the
original amount
authorized on an
Open Tab or PreAuth transaction.
This message
may appear when
closing the Open
Tab or completing
the Pre-Auth
transaction.
Process completion
or close tab with the
originally approved
amount on the Preauth or Open Tab,
or void the original
transaction and
re-authorize for the
full amount owing.
INVALID
AMOUNT
An amount greater
than the cash
back limit, or the
ceiling limit for
sale or offline
transactions, will
generate this error.
Retry the transaction
with an amount
within the limit.
In the event that your
terminal displays
an error, refer to
these error codes to
troubleshoot your
terminal. If the code
you are experiencing
is not shown, retry
the transaction. To
reduce chargeback
risks and manage your
processing costs, avoid
keying transactions
when the card is
present. Instead, ask
for another method
of payment.
If the error persists,
contact your Help Desk
at 1.800.265.5158
for support.
1. Press the [#] - Admin Menu.
2. Press [3] - Setup Menu.
3. Enter your Manager Password as prompted then press [Enter].
4. Press [5] - Term Settings (Terminal Settings)
5. Scroll to TermHW (TerminalHardware) then press [Enter].
From there you can scroll and select to adjust the following:
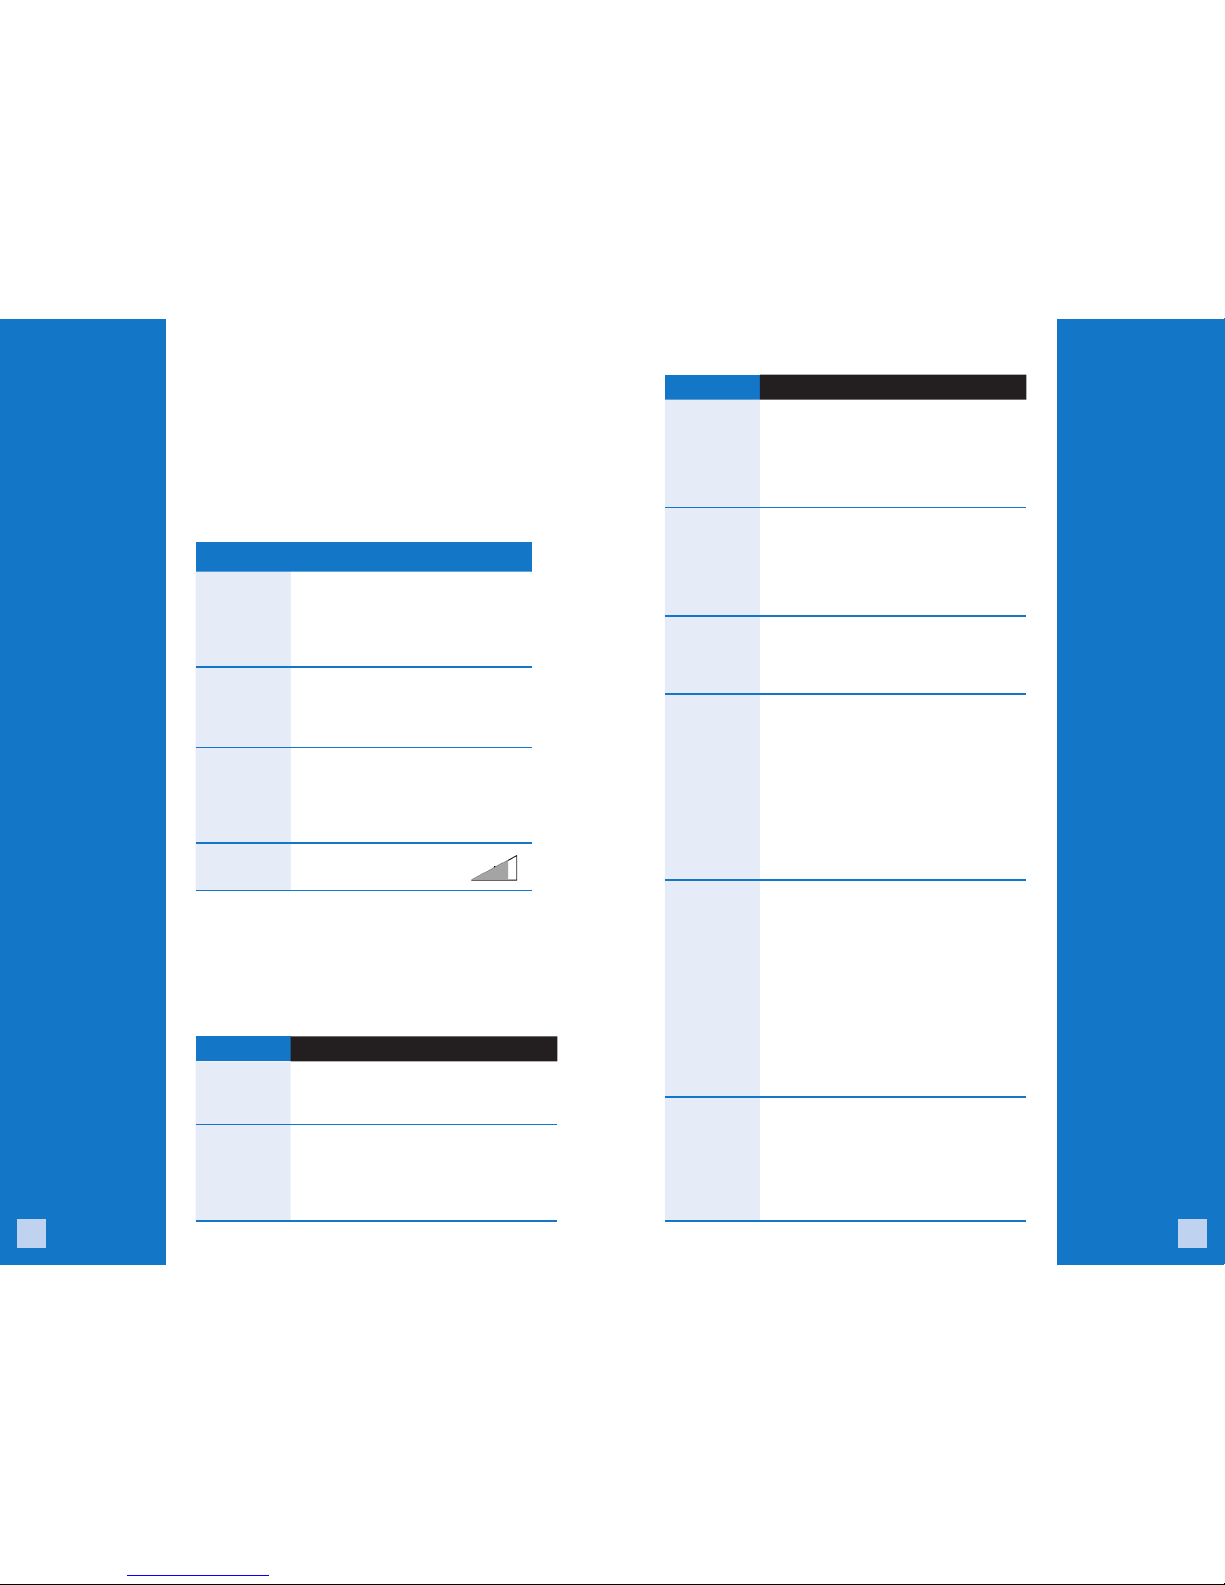
Hardware Settings
Key Beep Press [1] to disable all Key Beeps.
Press [2] to enable all Key Beeps.
Press [3] to enable Key Beeps
on invalid entry’s only.
Sleep Timer
(IWL220/
IWL250
only)
Sleep Timer is in seconds, key in a
value of 10 – 999 and press [Enter].
Backlight Press [1] to disable backlight.
Press [2] to enable backlight.
Press [3] to enable backlight for
60 seconds upon key press.
Brightness
Setting
Use Toggle Button to increase
or decrease brightness.
Page 7

WKCA-016-EN ING-Tel, RR 03/14
Merchant Support
1.800.265.5158
 Loading...