

Charnwood Island IIIb Owners Manual

C H A R N W O O D
I S L A N D
B O I L E R
O p e r a t i n g
a n d
I n s t a l l a t i o n
I I I
I n s t r u c t i o n s
f o r t h e
I s l a n d B o i l e r S t o v e
C H A R N W O O D B i s h o p s W a y , N e w p o r t , I s l e o f W i g h t P O 3 0 5 W S , U n i t e d K i n g d o m
T : + 4 4 ( 0 ) 1 9 8 3 5 3 7 7 7 7 F : + 4 4 ( 0 ) 1 9 8 3 5 3 7 7 8 8 c h a r n w o o d @ a j w e l l s . c o . u k w w w . c h a r n w o o d . c o m
A D i v i s i o n o f A . J . W e l l s & S o n s L i m i t e d R e g i s t e r e d i n E n g l a n d N o . 0 3 8 0 9 3 7 1
I I I
®

C H A R N W O O D
I S L A N D
O p e r a t i n g I n s t r u c t i o n s
Before lighting the stove check with the installer that the work and
checks described in the Installation Instructions have been carried out
correctly and that the chimney has been swept, is sound and free
from any obstructions. The stove is not suitable for use in a shared
flue system.
Your Island stove has been designed to work with the minimum
effort. If any operation - such as riddling the grate or opening and
closing the doors - begins to require extra force then the cause must
be investigated and corrected to prevent damage being caused to the
stove.
Remember that the stove will be hot and that it is made from hard
materials - ensure that you have a good balance before operating the
fire.
This stove is capable of intermittent or continuous operation.
F U E L
This stove is intended primarily for burning wood. Only dry well
seasoned wood should be burnt on this appliance as burning wet
unseasoned wood will give rise to heavy tar deposits in the stove, on
the glass and within the chimney. For the same reason hard woods
(such as Ash, Beech and Oak) are better than soft woods (such as
Pine and Spruce.) Burning wet unseasoned wood will also result in
considerably reduced outputs. The wood should be cut and split and
then left to season in a well ventilated dry place for at least one year
but preferably two years before use.
I I I B
1) In the open position the grate bars are vertical with gaps in
between allowing the primary combustion air to come up through
the grate and through the fuel bed.
2) In the closed position the grate bars are horizontal, allowing the
combustion air to come round the sides of the grate and over the top
of it. When in the closed position ash is able to build up on the grate
as is necessary for effective wood burning.
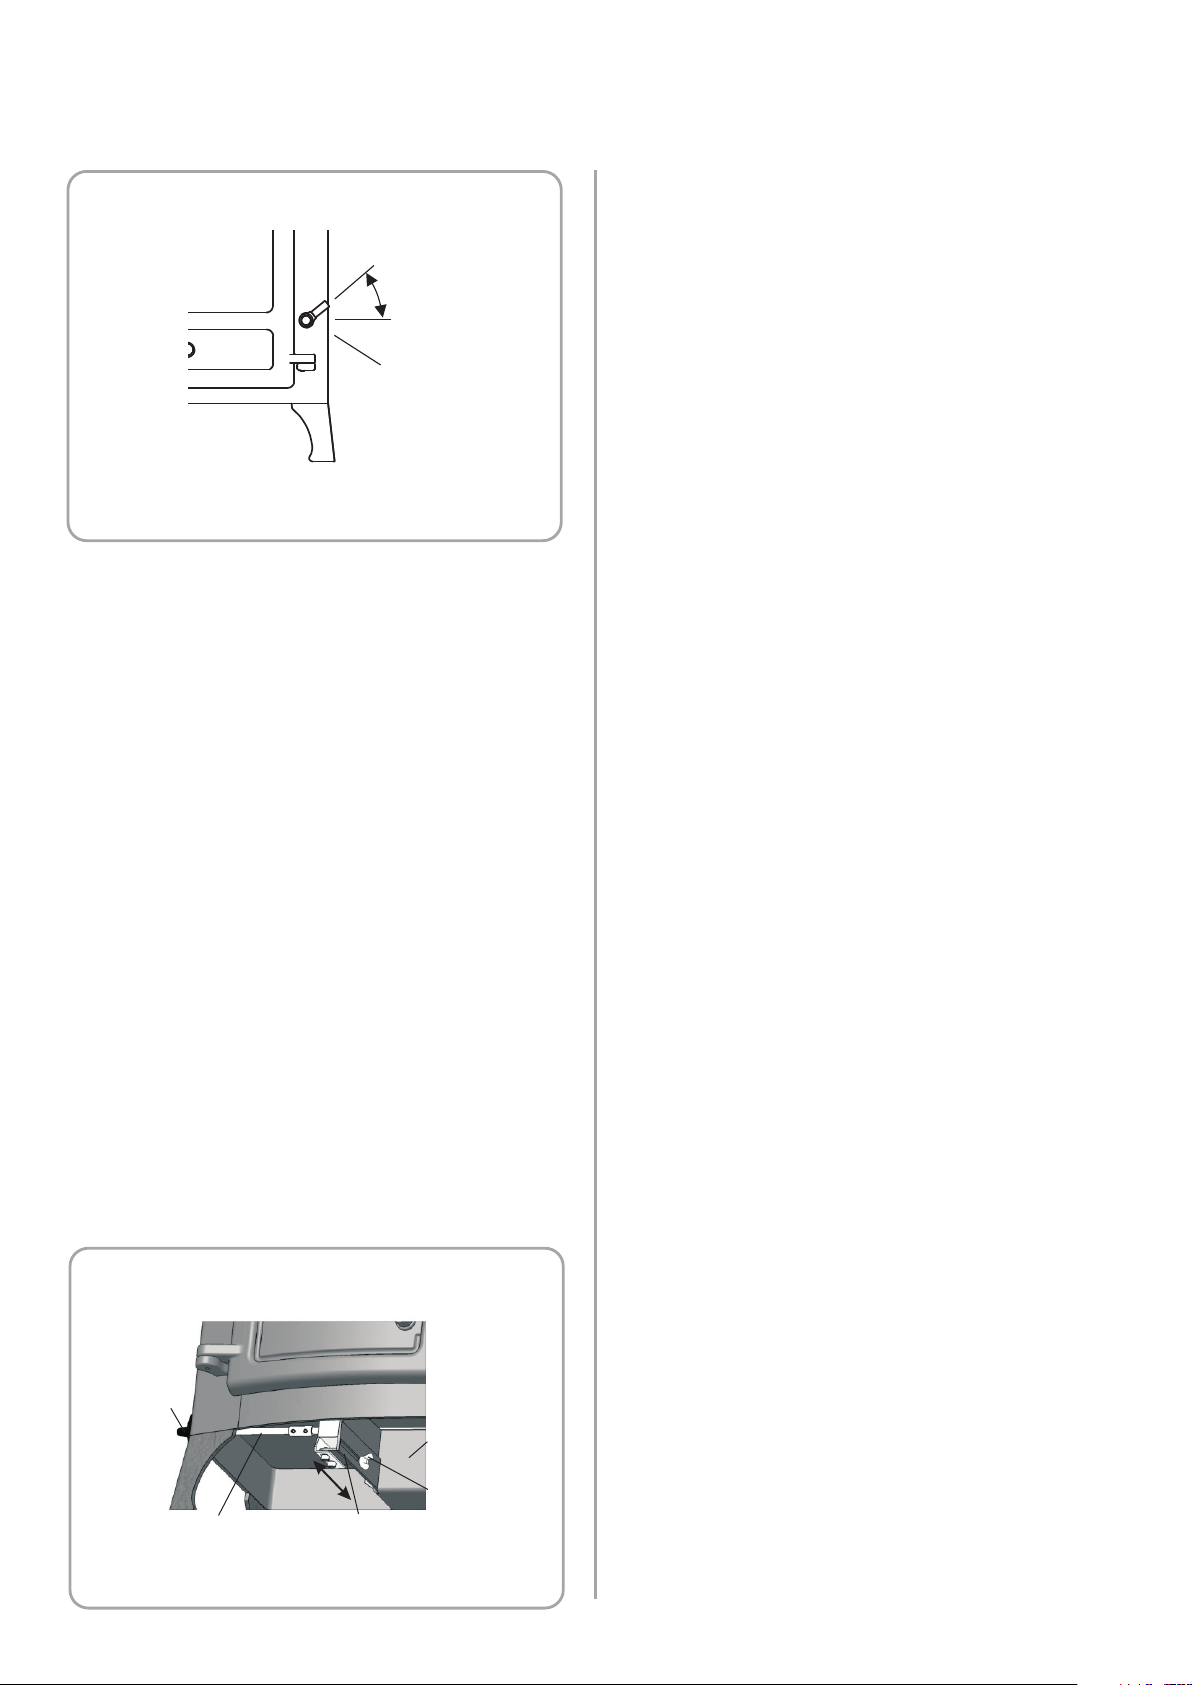
Movement of the grate from one position to the other is effected
using the tool supplied as shown in Fig. 2. The grate is put into the
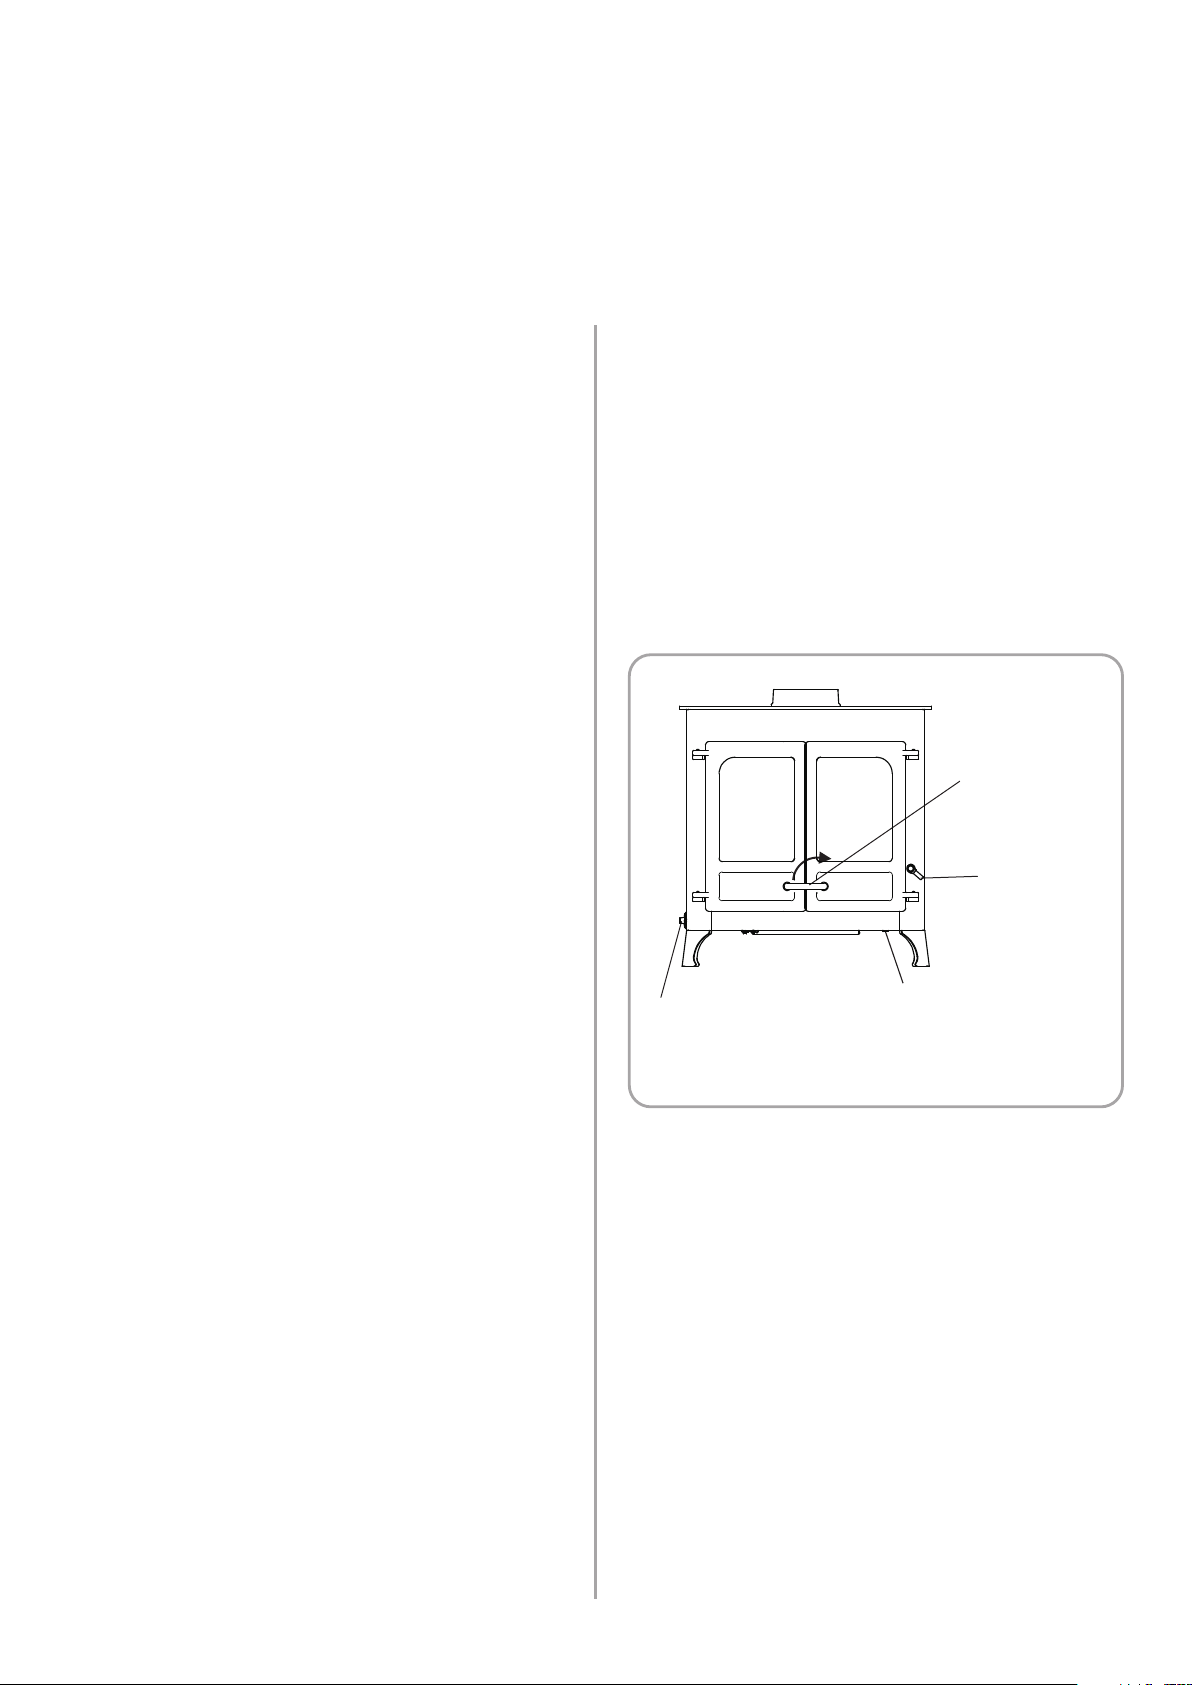
Door Handle,
Clockwise to Open
Grate Lever
Thermostat Control,
Clockwise to Increase
Fig. 1. Stove Controls
Identification Plate,
Pull Forward and Swing Down
PETROLEUM COKE IS NOT SUITABLE FOR USE ON THIS
APPLIANCE. ITS USE WILL INVALIDATE THE GUARANTEE.
For advice on other fuels please contact Charnwood.
D O O R O P E R A T I O N
The door handle has been carefully designed so that in normal use it
may be operated using bare hands. However, if you need to open the
doors when the fire is running at maximum then the use of a cloth or
glove may be required.
Take care not to touch the doors as they will be hot when the fire is
burning. Turn the door handle clockwise to open, and anti-clockwise
to close. The stove is normally run with the doors shut.
M U LT I G R A T E
Your Charnwood Island is fitted with a multi grate to enable wood to
be burned and ash to be cleared. The grate has two positions:-
Page 3
Island 3B 01.09
open position by moving the tool up until the handle is in the 1
o'clock position. The grate is put into the closed position by moving
the tool down until the handle is in the 5 o'clock position. To riddle
the appliance the tool should be moved between the 1 o'clock and 3
o'clock positions several times. When burning wood the ash should
be allowed to build up and riddling should only be carried out once
or twice a week.
L I G H T I N G
Light the Stove using dry kindling wood and paper or fire lighters. Set
the grate into either the closed position or the open position as
required. Place the paper, or fire lighters, and kindling on the grate
and cover with a few small dry logs. Open the thermostat control
fully (see Fig. 1.) Light the paper or fire lighters. Close the doors until
the fuel is well ignited then load with fuel. Once the fire is up to
temperature the airwash system will begin to work, so allow the fire
Open Position
Riddle
Closed Position
R I D D L I N G
When burning wood, ash should be allowed to build up and only
riddled when the ash begins to cover the slots in the rear fireplate.
The fire should be riddled with the doors shut (see Fig. 2.) Place the
tool onto the riddling lever and rotate between the 1 o'clock and 3
o'clock positions several times. Too much riddling can result in
emptying unburnt fuel into the ashpan and should therefore be
avoided. After riddling, the grate should be put back into the open
or closed position as required (the tool should be in the 1 o'clock
position for open grate or in the 5 o'clock position for closed grate).
Fig. 2. Multifuel Grate
to become hot before adjusting thethermostat to the required
setting.
On initial lighting, the stove may smoke and give off an odour as the
silicon paint with which the firebox is painted reacts to the heat. This
is normal and will cease after a short time, but meanwhile the room
should be kept well ventilated.
At first only light a small fire and burn it slowly for two hours to allow
any residual moisture in the bricks to evaporate.
When relighting the stove, riddle slightly and then empty the ashpan.
C O N T R O L L I N G T H E F I R E
The fire is controlled by the water temperature thermostat. The
water temperature is set by the control knob shown in Fig. 1. Turn
the knob clockwise to increase the water temperature or anti-
clockwise to decrease.
This thermostat controls both primary and secondary air, enabling
just one control to be used. The balance between primary and
secondary air for particular flue conditions is pre-set using the sliding
control mounted on the thermostat box beneath the stove. Once set
this should not need to be adjusted.
R E F U E L L I N G
Keep the firebox well filled but do not overfill to prevent fuel from
spilling over the top of the front fire bar. Logs should be evenly
distributed, filling the firebed to give the most pleasing flame pattern
Care should be taken especially when burning wood that fuel does
not project over the front fire bar or damage to the glass may be
caused when the doors are closed, it can also cause the glass to black
up . Maximium filling height is such that logs cannot fall from the fire
when the doors are opened. Liquid fuels are not to be used on this
appliance.
A S H C L E A R A N C E
The ashpan should be emptied regularly before it becomes too full.
Never allow the ash to accumulate in the ashpan so that it comes in
contact with the underside of the grate as this will seriously damage
the grate bars. The ashpan is handled using the tool provided. Care
should be taken to ensure that ash is cool before emptying it into
plastic liners or bins.
To make ash removal easier there is a special Charnwood ash carrier
available. This may be purchased from your supplier or, in case of
difficulty, from ourselves.
O V E R N I G H T B U R N I N G
Thermostat
Knob
Increase
Decrease
Thermostat rod
and connector
Secondary air pre-set slide
Fig. 3. Secondary air Adjustment
Thermostat Box
Wing nut
Page 4
Island 3B 01.09
For overnight burning the fire doors must be closed. Use large logs
rather than small ones.
If the fire is very low then it may be necessary to add a little fuel and
turn the thermostat control up to maximum for a brief period until
the fire is burning brightly before filling with fuel. When the new fuel
has ignited, the thermostat control should be turned down to the
required setting. If the central heating pump is off overnight then the
thermostat may be left at the same setting for both day and night
operation. If the central heating pump is on overnight then set the
thermostat control to give the required level of heating. Some
experimentation will be necessary to find the settings most suitable

for the particular fuel used and the draw on the chimney.
To revive the fire, add some small logs and open the thermostat
control to maximum. When the fire is burning well load on more fuel
as necessary and move the thermostat control to the desired setting.
D o o r Se al s
For the fire to operate correctly it is important that the door seals
are in good condition. Check that they do not become worn or
frayed and replace them when necessary.
S P E C I A L P O I N T S W H E N
B U R N I N G W O O D
The grate should be kept in the closed position and should not be
riddled until the ash becomes so deep that it begins to block the
passage of air into the firebox at the sides or back of the grate. When
this is the case do not remove all of the ash using the riddling
mechanism but keep a layer about half an inch thick as this enables
the wood to burn more effectively. When lighting the fire a few small
dry logs with a good amount of kindling will help to get the fire up to
temperature quickly.
M A I N T E N A N C E
C l e a ni ng
The stove is finished with a high temperature paint which will
withstand the temperatures encountered in normal use. This may be
cleaned with a damp lint-free cloth when the stove is cold. Should re-
painting become necessary then special high temperature paints are
available from your supplier or from Charnwood.
C l e a ni ng th e G la ss
The glass in the doors is a special ceramic glass which is able to
withstand high temperatures. Before cleaning the glass open the
doors and allow them to cool. Clean the glass using a damp cloth and
then wipe over with a dry cloth. Any stubborn deposits on the glass
may be removed with a proprietary stove glass cleaner or ceramic
hob cleaner. Some deposits on the glass may be burnt off simply by
running the fire at a fast rate for a few minutes. Do not use abrasive
cleaners or pads as these can scratch the surface which will weaken
the glass and cause premature failure. Aerosol spray cleaners should
not be used near the appliance whilst it is under fire.
W h e n No t in U s e
If the fire is going to be out of use for a long period (for instance in
the summer) then to prevent condensation, and hence corrosion, the
air control should be left fully open and the fire doors left ajar. It is
also advisable to sweep the chimney and clean out the fire. Spraying
the inside of the doors and firebox with a light oil, such as WD40,
will also help to keep all internal parts working well.
After long periods where the fire has been out of use, the chimney
and appliance flueways should be cleaned before lighting.
Page 5
Island 3B 01.09
S e r vici n g
It is recommended that the fire is serviced once a year to keep it in
first class working order. After cleaning out the firebox thoroughly,
check that all internal parts are in good working order, replacing any
parts that are beginning to show signs of wear. Check that the doors
seals are in good condition and that the doors seal correctly. A
servicing guide is available on request. Repairs or modifications may
only be carried out by the Manufacturer or their approved agents.
Use only genuine Charnwood replacement parts.
T H R O A T P L AT E A N D F L U E WAY
C L E A N I N G
It is important that the throat plate and all the stove flueways are kept
clean. They should be checked approximately once a week, by
looking up into the firebox for signs of soot or fly-ash on the throat
plate and at the sides of the firebox. If there are signs of a build up of
soot or fly-ash deposits then the fire must be let out in order to clean
the throat plate and flueways.
Before attempting to clean the throat plate and flueways ensure that
the fire is cold. Wear suitable gloves to prevent irritation from soot
deposits. To remove the throat plate lift the whole plate up until it
comes clear of the rear brackets, then swing the back edge forwards
and unhook(see Fig. 4.).
C H I M N E Y S W E E P I N G
The chimney should be swept at least once a year. Where a top
outlet is used it will generally be possible to sweep the chimney
through the appliance.
First remove the front firebar, side fire plates, and the throat plate.
Then sweep the chimney ensuring that soot is removed from all
horizontal surfaces after sweeping.
In situations where it is not possible to sweep through the appliance
the installer will have provided alternative means, such as a soot door.
After sweeping the chimney the appliance flue outlet and the flue
pipe connecting the stove to the chimney must be cleaned with a flue
brush.
After clearing any soot from within the stove, replace the throat plate
(see Fig. 4), the side fireplates, and front firebar .
Different types of sweep's brushes are available to suit different
flueways. For standard brick chimneys a wire centre sweep's brush
 Loading...