

Page 1
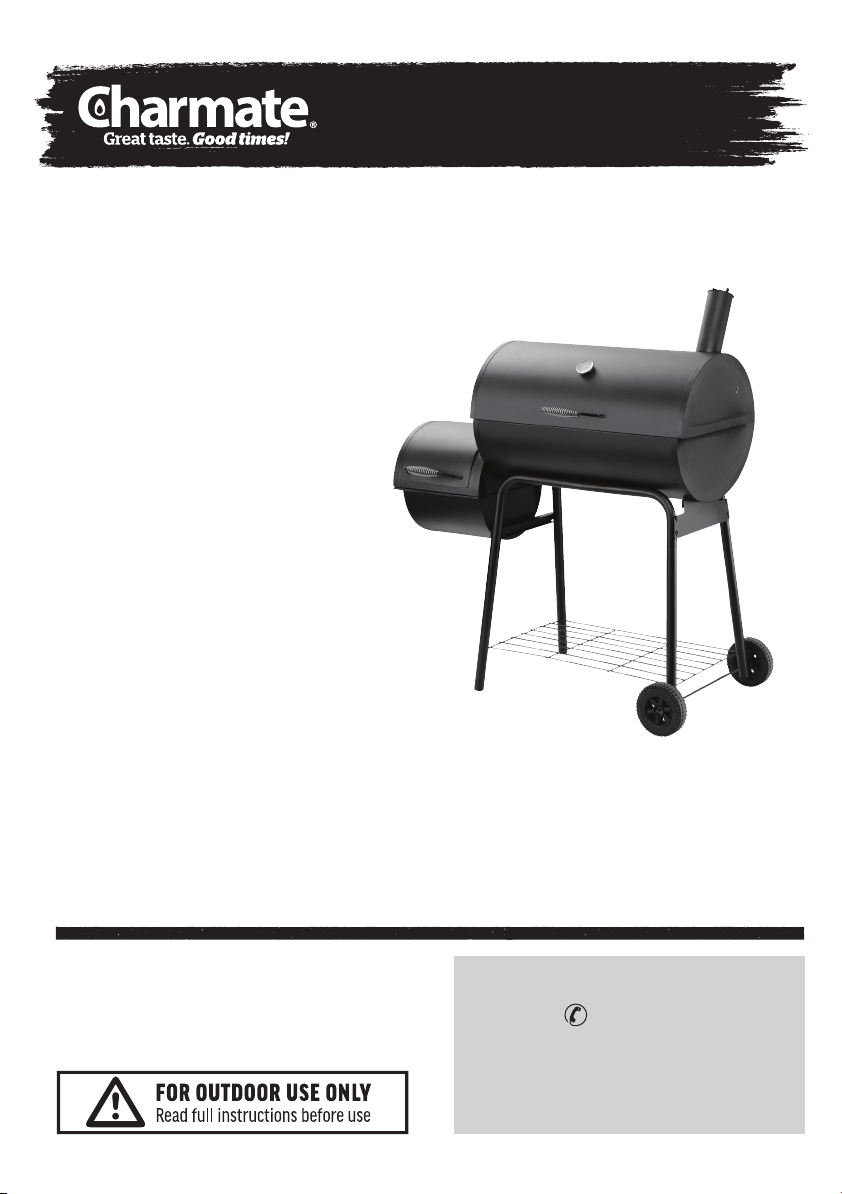
FEATURES
1070mm L x 1065mm H x 440mm W
Charcoal cooking surface 660mm x 420mm
Smoker cooking surface 320mm x 370mm
Includes o-set smoker
Enamel coated steel cooking grill
Temperature gauge
2 x Sturdy wheels for easy relocation
Lid and body made from powder coated steel
2 x Cool touch wire handle with spring
Wire rack storage shelf
For outdoor use only
Tex
Oset Smoker
Important: Retain these instructions for future use.
Charmate® is a registered trademark of
Sitro Group Australia Pty Ltd www.gasmate.com.au
Aber, N.Z. www.charmate.co.nz
03727 04/18
For any queries or assistance call Customer Service (Australia Only)
1300 174 876
Hours of operation: Monday to Friday 8am - 5pm EST
Do not return to place of purchase.
Keep your purchase receipt, this will be required to
make any claims under the 12 month warranty.
Page 2
IMPORTANT SAFETY WARNINGS
READ ALL SAFETY WARNINGS AND INSTRUCTIONS CAREFULLY BEFORE ASSEMBLING AND
OPERATING YOUR GRILL.
WARNING
• Only use this barbecue on a hard, level, noncombustible, stable surface (concrete, ground
etc.) capable of supporting the weight of the
barbecue. Never use on wooden or other surfaces
that could burn.
• DO NOT use barbecue without charcoal ash tray
in place. DO NOT attempt to remove charcoal ash
tray while barbecue contains hot coals.
• Proper clearance of 3m between the barbecue
and combustible material (bushes, trees, wooden
decks, fences, buildings, etc.) or construction
should be maintained at all times when barbecue
is in use. Do not place barbecue under a roof over
hang or other enclosed area. Not adhering to
these clearances will prevent proper ventilation
and may increase the risk of a re and/or property
damage, which could also result in personal
injury.
• For outdoor use only. Do not operate barbecue
indoors or in an enclosed area.
• For household use only. Do not use this barbecue
for other than its intended purpose.
• We recommend the use of a Charcoal Chimney
Starter to avoid the dangers associated with
charcoal lighting uid. If you choose to use
charcoal lighting uid, only use lighting uid
approved for lighting charcoal. Carefully read
manufacturer’s warnings and instructions on the
charcoal lighting uid and charcoal prior to the
use of their product. Store charcoal lighting uid
safely away from barbecue.
• When using charcoal lighting uid, allow charcoal
to burn for approximately 20 minutes. This will
allow charcoal lighting uid to burn o. Failure to
do this could trap fumes from charcoal lighting
uid in the barbecue and may result in a ash re
or explosion.
• Never use charcoal that has been pre treated with
lighter uid. Use only a high grade plain charcoal
or charcoal/wood mixture.
• Do not use gasoline, kerosene or alcohol for
lighting charcoal. Use of any of these or similar
products could cause an explosion possibly
leading to severe bodily injury.
• Never add charcoal lighting uid to hot or even
warm coals as ash back may occur causing
severe burns.
• Place barbecue in an area where children and
pets cannot come in to contact with unit. Close
supervision is necessary when barbecue is in use.
• Do not leave barbecue unattended when in use.
• Do not store or use barbecue near gasoline
or other ammable liquids, gases or where
ammable vapors may be present.
• Barbecue is hot when in use.
To Avoid Burns:
• DO NOT attempt to move the barbecue.
• Wear protective gloves or oven mitts.
• DO NOT touch any hot barbecue surfaces.
• DO NOT wear loose clothing or allow hair to come
in contact with barbecue.
• When grilling, grease from meat may drip on to
the charcoal and cause a grease re. Do not use
water to extinguish grease res.
• Use caution since ames can are up when fresh
air suddenly comes in contact with re.
• Use caution when assembling and operating your
barbecue to avoid scrapes or cuts from sharp
edges of metal parts. Use caution when reaching
in to or under barbecue.
• In windy weather, place barbecue in
an outdoor area that is protected
from the wind.
2 32 2
Page 3
• Never leave coals and ashes in barbecue
unattended. Before barbecue can be left
unattended, remaining coals and ashes must
be removed from barbecue. Use caution to
protect yourself and property. Carefully place
remaining coals and ashes in a non-combustible
metal container and saturate completely with
water. Allow coals and water to remain in metal
container 24 hours prior to disposing.
• Extinguished coals and ashes should be placed a
safe distance from all structures and combustible
materials.
• With a garden hose, completely wet the surface
beneath and around barbecue to extinguish any
coals or ashes which may have fallen during the
cooking or cleaning process.
• After each use, clean the barbecue thoroughly.
Cover the barbecue to protect it from excessive
rusting.
• Use caution when lifting or moving barbecue to
prevent strains and back injuries.
• We advise that a re extinguisher be
on hand. Refer to your local authority
to determine proper size and type
of re extinguisher.
• Store the barbecue out of reach of children and in
a dry location when not in use.
• Properly dispose of all packaging material.
CAUTION
USE CAUTION AND COMMON SENSE WHEN
OPERATING YOUR BARBECUE. FAILURE
TO ADHERE TO SAFETY WARNINGS AND
GUIDELINES IN THIS MANUAL COULD RESULT
IN BODILY INJURY OR PROPERTY DAMAGE.
SAVE THIS MANUAL FOR FUTURE REFERENCE.
CAUTION
• This grill is for use with charcoal only.
• Never attempt to attach this grill to the selfcontained system of a camper trailer, motor home or
house.
• Do not use gasoline, kerosene or alcohol for lighting.
This grill is not intended to be used in or installed on
recreation vehicles and/or boats.
• Do not attempt to move the grill while it is lit.
• Do not use the grill unless it is completely assembled
and all parts are securely fastened and tightened.
• Keep all combustible items and surfaces at least 36
inches (91.4cm) away from grill at all times.
• DO NOT use this grill or any gas product near
unprotected combustible constructions.
• Do not use in an explosive atmosphere.
Keep grill area clear and free from combustible
materials, gasoline and other ammable vapors and
liquids.
• Do not touch metal parts of grill until it has
completely cooled (about 45 minutes) to avoid burns,
unless you are wearing protective gear (BBQ mittens,
pot holders, etc.)
WARNING
• This grill is for outside use only, and should not be
used in a building, garage or any other enclosed area.
• The use of alcohol, prescription or non-prescription
drugs may impair the operator’s ability to properly
assemble or safely operate the grill.
• Always open grill lid slowly and carefully as heat and
steam trapped within the grill can burn you severely.
• Always place your grill on a hard, level surface far
away from combustibles. An asphalt or blacktop
surface may not be acceptable for this purpose.
• Do not leave a lit grill unattended. Keep children and
pets away from the grill at all times.
• Do not place this grill on any type of tabletop
surface.
• Do not use the grill in high winds.
Page 4

TABLE OF CONTENTS
Section Page
Important Safety Information 2
Preparing to use your grill 4
Grill Maintenance 5
Cooking Tips 5
Tool and Parts 8
Exploded View 9
Hardware List 8 - 9
Assembly Instructions 10
Grill Preparation 14
Warranty 15
TOOLS REQUIRED (NOT INCLUDED)
1 Adjustable spanner.
1 Phillips head screwdriver
Note: Before beginning assembly of product, make
sure all parts are present. Compare parts with
package content list and hardware contents. If
any part is missing or damaged do not attempt to
assemble the unit. Contact customer service for
further information.
PREPARING TO USE YOUR GRILL
Before cooking with your grill, the following steps
should be closely followed to both cure the nish
and season the interior steel. Failure to properly
follow these steps may damage the nish and/or
impart metallic avors to your rst foods.
1. Brush all interior surfaces including grills and
grates with vegetable cooking oil.
2. Build a small re on the charcoal pan, being sure
not to lay coals against the walls.
3. Close lid, position air vent knob at approximately
one quarter open. This burn should be sustained
for at least two hours. Begin increasing the
temperature by opening the air vent knob
halfway and adding more charcoal. Your grill is
now ready for use.
Rust can appear on the inside of your grill.
Maintaining a light coat of vegetable oil on the
interior surfaces will aid in the protection of
your grill. Exterior surfaces of the grill may need
occasional touch up. We recommend the use of
commercially available black high temperature
spray paint. NEVER PAINT THE INTERIOR OF THE
GRILL!
Please see information regarding uncoated cast iron
grates below.
First Time Use:
Before using a cast iron grate or other cast iron
cooking tool, wash it thoroughly with a mild
dishwashing liquid to remove the protective wax
coating applied for shipping. Rinse with hot water
and dry completely with a soft cloth or paper
towel. NEVER ALLOW TO DRAIN DRY OR WASH IN A
DISHWASHER. Now season the grates to prevent rust
and sticking.
Seasoning:
A solid vegetable shortening is recommended
for the initial seasoning. Spread a thin coating of
solid vegetable shortening over the entire surface,
including all corners, with a paper towel. Do not use
salted fats such as butter or margarine. Preheat grill
for 15 minutes; carefully place grates in the grill.
Allow the grill to heat grates for 1 to 1 ½ hours. Allow
the re to burn out on its own, and leave cooking
grates in grill until they are cool. Your cast iron
cooking grates are now ready to use.
To Prevent Rusting:
Re-season your grates frequently, particularly when
new. If rust occurs, it is an indication that the grates
have not been seasoned enough or the seasoning
has been burned o. Clean with a heavy brush
like Char-Broil’s Brush Hawg. Reapply vegetable
shortening and heat as indicated above to re-season
the grates.
4 54 4
Page 5

Maintenance:
Do not do a burn-o after you grill, but rather
leave the cooking residues on the grates to keep a
protective coating on the cast iron. Do a burn-o
just before you grill. The more you use your cast iron
grates, the easier the maintenance will be. Store in
a dry place. If you store your grates for an extended
period of time, grease very lightly with vegetable
shortening, then wipe dry with a paper towel.
Grilling:
Charcoal is recommended, however, wood or a
combination of both may be used as the fuel source
for grilling with the fuel source placed and ignited
on the charcoal pan. Do not build too large of a re.
We recommend starting a re with no more than 4
pounds of charcoal (approximately 60 briquettes)
and adding more as needed during cooking. After
allowing the re to burn down, place the cooking
grate on the unit. Failure to read and follow
instructions for lighting charcoal may result in
serious personal injury and/or property damage.
GRILL MAINTENANCE
Frequency of clean up is determined by how often
the grill is used. Make sure coals are completely
extinguished before cleaning inside of the unit.
Thoroughly rinse with water and allow to air dry
before using again. Wipe out the interior of the unit
with a cloth or paper towels.
When nished cooking, and the unit has adequately
cooled, clean out all remaining ashes. Ashes collect
moisture, which can lead to premature rusting and
decay. Periodically coating the interior surfaces with
vegetable oil will aid in the protection of your unit.
Also, occasional touch up of the exterior paint will
be required. Black, high-temperature spray paint is
recommended.
NEVER PAINT THE INTERIOR OF THE UNIT.
Cooking Surface:
If a bristle brush is used to clean any of the grill
cooking surfaces, ensure no loose bristles remain
on cooking surfaces prior to grilling. It is not
recommended to clean cooking surfaces while grill
is hot.
COOKING TIPS
Building Your Fire
1. Stack charcoal briquettes or wood into a
pyramid-shaped pile on top of the
charcoal grate. We recommend using 4
pounds (approximately 60 briquettes) to
start your re, adding more as needed.
2. If using lighter uid, saturate the charcoal
briquettes with lighter uid and let it soak
in for approximately 5 minutes. If using a
chimney starter, electric starter, or other
type of re starter, light your re according
to the manufacturer’s instructions.
3. After allowing the lighter uid to properly
soak in, light the pile of briquettes in
several locations to ensure an even
burn. Always light the re with the grill lid
open. Leave lid open until briquettes are
fully lit. Failure to do this could trap fumes
from charcoal lighter uid in grill and may
result in a ash re when lid is opened.
4. Never add charcoal lighter uid to hot or
warm coals as ashbacks may occur
causing injury.
5. You are ready to begin cooking when the
pile of briquettes ashes over and produces
a red glow (approximately 12 – 15
minutes).
6. Depending on your cooking method, either
leave the briquettes in a pile or spread
evenly across the charcoal grate using a
long-handled poker.
*ALWAYS USE CAUTION WHEN HANDLING HOT COALS
TO PREVENT INJURY.
Page 6

Know When Your Fire is Ready
Successful charcoal grilling depends on a good re.
The general rule for knowing when your coals are
ready for grilling is to make sure that 80 percent
or more of the coals are ashy gray. If you have less
than that, the coals are not ready, and if all of them
are glowing red hot, the re is probably too hot.
Here are a few steps you can take to adjust the
temperature of your re:
• If it is too hot, spread the coals out a bit
more, which makes the re less intense.
• Raise or lower the adjustable charcoal
grate.
• Partially close the vents in the grill, which
reduces the amount of oxygen that feeds
the re.
• Use the indirect grilling method, with coals
to either side of a drip pan
and the food over the pan rather than
directly over the coals.
• In the event of a severe are-up, spray
the ames with water from a squirt bottle.
Be careful, spraying with water tends to
blow ashes around and make a mess.
• Add briquettes 2 or 3 at a time to increase
the burn time. Allow 10 minutes for coals
to ash over before adding more.
DIRECT AND INDIRECT GRILLING
Direct Grilling:
For most grilling, the ignited coals are spread in
a single layer under the food. This is called direct
grilling and is appropriate for relatively quickcooking items such as hamburgers, steaks and
most seafood. The single layer of coals emits even,
steady heat, whether the grill lid is open or closed,
and represents the way most people grill. For more
control, pile some of the coals on one side of the grill
where they will emit intense heat. You can move the
food around on the grill, setting it over the very hot
coals when you want to sear it or when a thick piece
needs to cook a little more quickly. You can also use
the adjustable charcoal grate and air vent knob to
control the temperature in your grill.
Indirect Grilling:
For items that take longer to cook, you will want to
use indirect grilling. This method is for long, slow
cooking in a covered grill. For indirect cooking,
the coals are piled two or three coals deep on one
side of the grill, or divided and piled on two sides.
This leaves an empty space next to the coals or
between them. Food cooked over indirect heat is
often started over direct heat and then moved to
the cooler (empty) part of the grill for even, slow
cooking. To make the heat as even as possible,
construct two piles of coals. It is common to place
a metal drip pan in the empty space beside or
between the coals, which is lled with water, wine,
beer, broth, or a combination. Place the food directly
over the drip pan. This injects a little extra moisture
into the cooking environment and also catches
dripping juices, which makes cleanup a little easier
and reduces the possibility of are-ups. (Remember
to keep a spray bottle lled with water on hand to
extinguish any are-ups.) Once you get used to the
indirect method, you may prefer to use it for more
grilling tasks. Although it may take a little longer,
it is an excellent cooking method and a sure way to
prevent the food from burning and to promote even
cooking.
6 76 6
Page 7

Grilling with Wood Chips/Wood Chunks
For a more robust smoke avor while using charcoal
briquettes or lump charcoal, try adding wood chips
or several wood chunks to the re. Wood chunks
are available in a variety of natural avors, and
can be used alone or in addition to charcoal. As a
general rule, any hardwood that bears a fruit or nut
is suitable for cooking. However, dierent woods
have very dierent tastes. Experiment with dierent
woods to determine your personal favorite, and
always use well-seasoned wood. Green or fresh-cut
wood can turn food black, and tastes bitter.
OUR RECOMMENDATIONS:
Chicken - Alder, Apple, Hickory, Mesquite, Sassafras,
Grapevines
Beef - Hickory, Mesquite, Oak, Grapevines
Pork - Fruitwoods, Hickory, Oak, Sassafras
Lamb - Fruitwoods, Mesquite
Veal - Fruitwoods, Grapevines
Seafood - Alder, Mesquite, Sassafras, Grapevines
Vegetables - Mesquite
Page 8
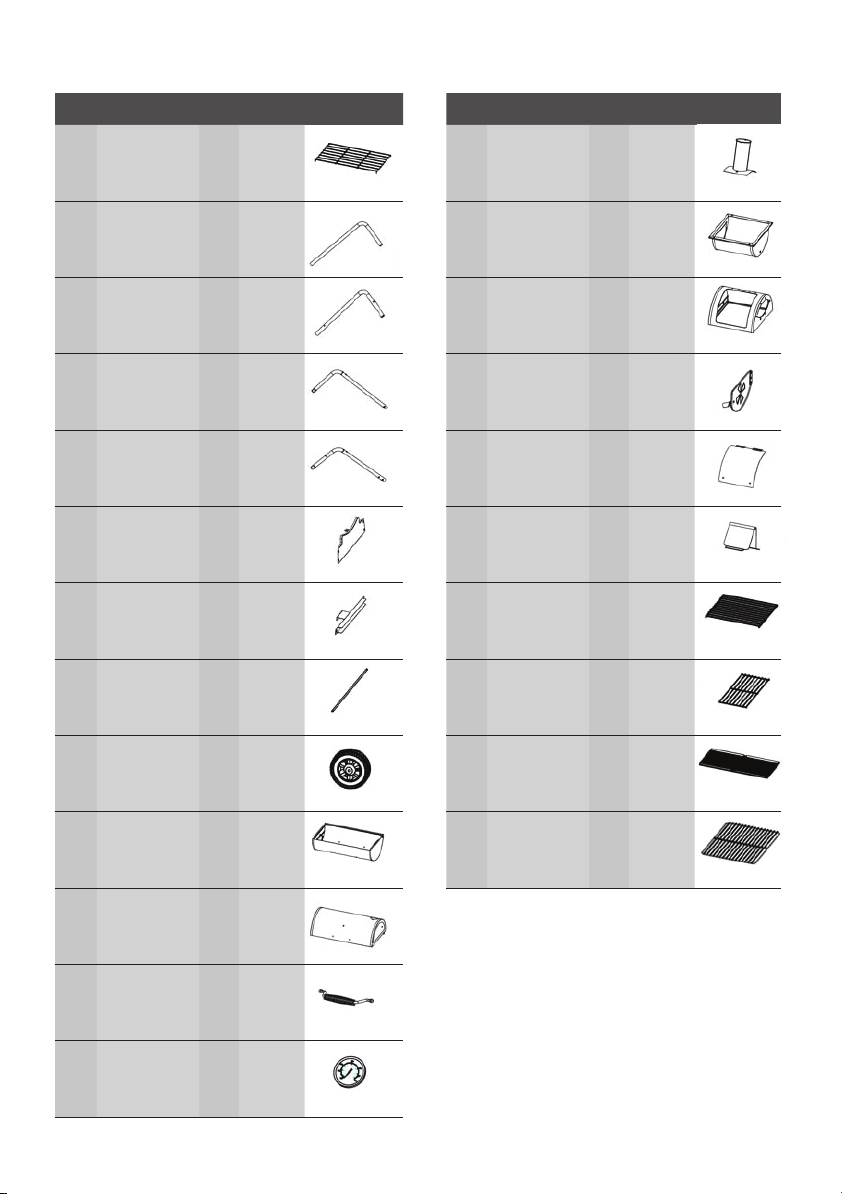
PARTS LIST
Part Description Qty Part No. Image
1 Bottom Shelf 1
2 Leg (LF) 1
3 Leg (LB) 1
4 Leg (RF) 1
5 Leg (RB) 1
Triangular
6
7
Connector
Triangular
Bracket
1
1
8 Axle 1
Part Description Qty Part No. Image
14 Smoke Stack 1
Firebox
15
Bottom
1
16 Firebox Lid 1
17 Air Vent 1
Firebox Lid
18
Cover
1
19 Limiting Film 1
20 Charcoal Grate 1
Cooking Grate
21
(Firebox)
2
9 Wheels 2
10 Body Bottom 1
11 Body Lid 1
12 Handles 3
13 Thermometer 1
22 Charcoal Pan 1
Cooking Grate
23
(Body)
8 98 8
2
Page 9
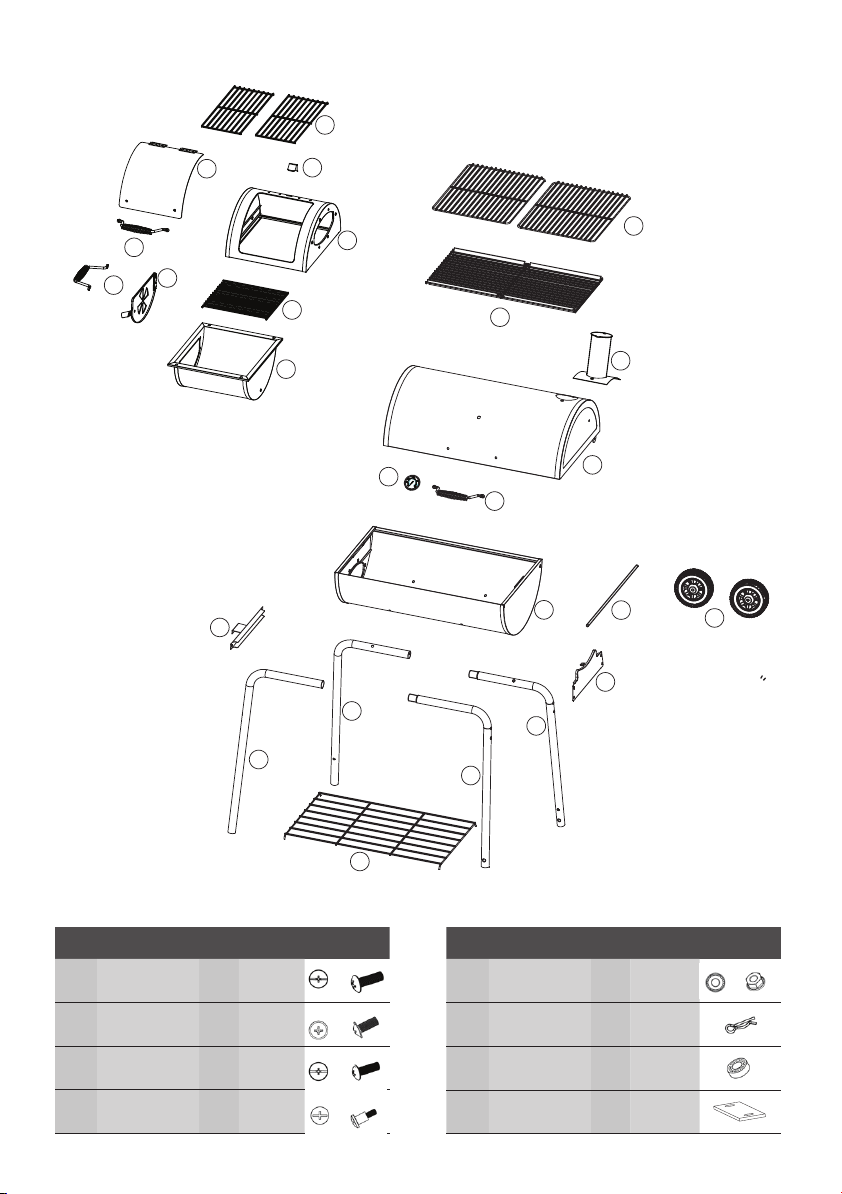
EXPLODED VIEW
21
18
12
17
12
7
19
16
20
15
13
3
2
22
12
10
5
4
23
14
11
8
6
9
HARDWARE
Part Description Qty Part No. Image
A BOLT M6 27
B BOLT M4 6
C BOLT M5 4
D BOLT M6 3
1
Part Description Qty Part No. Image
NUT M6 FLANGE
E
F
G
LOCK
COTTER PIN
Ø1.2 x 21
WHEEL PAD
Ø21 x 7
8
2
2
H SPACERS 2
Page 10
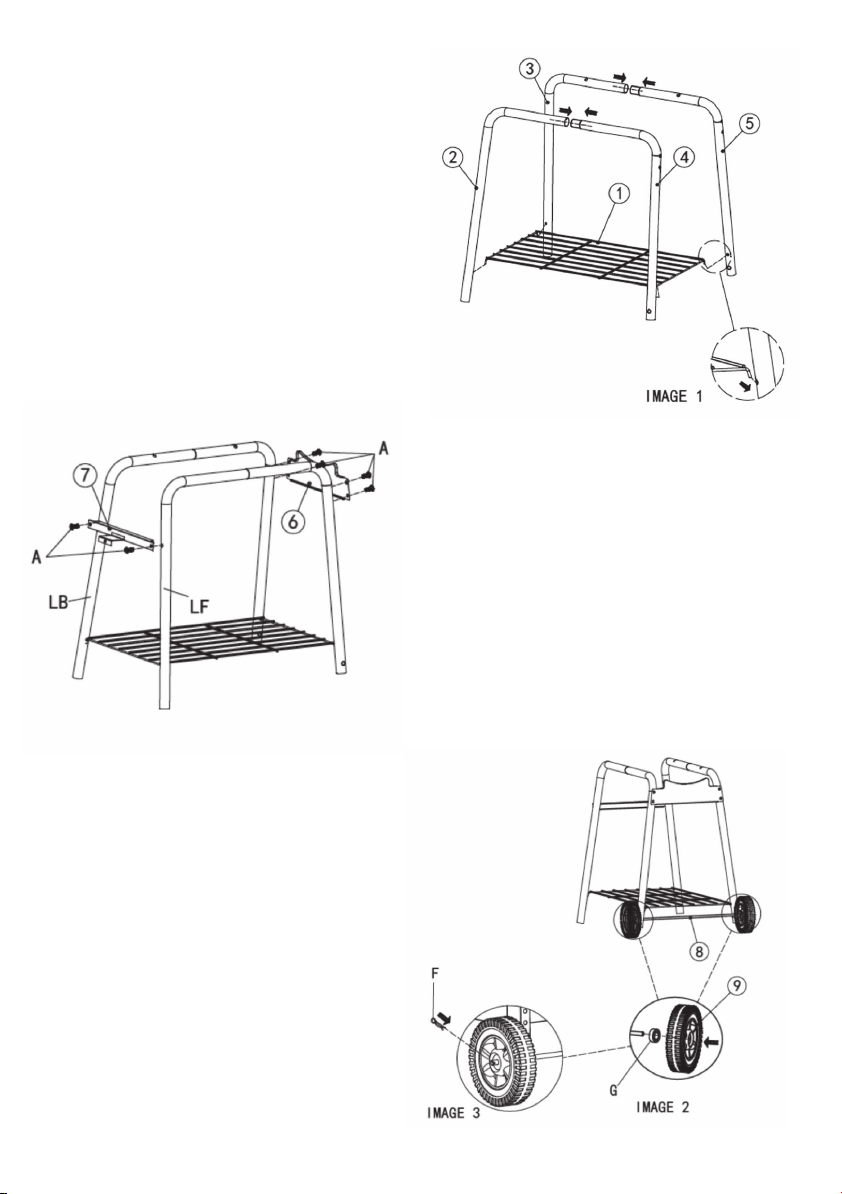
STEP 1
Assemble the bottom shelf (1) to the legs (2, 3, 4 &
5), then assemble each two legs together, as shown
in IMAGE 1.
STEP 2
Assemble the triangular bracket (7) to the left legs
(2, 3) using BOLT M6 (A) - 2pcs.
Assemble triangular connector (6) to the right legs
(4, 5) using BOLT M6 (A) - 4pcs.
Do not screw the Bolt too tightly.
STEP 3
Insert Wheel Axle (8) to the hole of two legs (4 & 5).
Insert Wheel Pad (G) - 2pcs and WHEEL (9) - 2pcs to
Axle as shown in IMAGE 2. Then attach them using
COTTER PINS (F) - 2pcs.
10 1110 10
Page 11
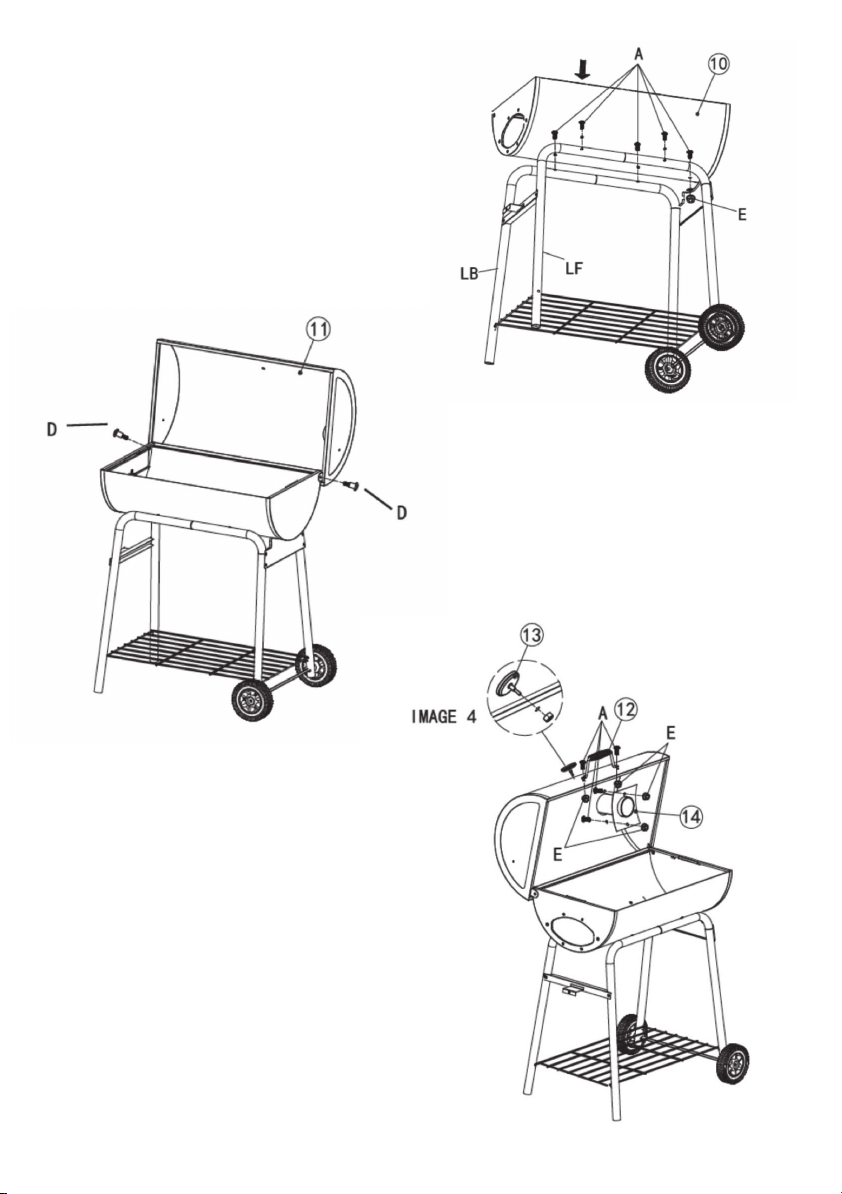
STEP 4
Assemble the bottom of the body bottom (10) to the
legs with Bolts M6 (A) - 4pcs.
Attach the body bottom to the triangular connector
(6) with Bolts M6 (A) -1pc and NUT M6 FLANGE LOCK
(E) - 1pc.
STEP 5
Assemble lid (11) to the body bottom with Bolts M6
(D) - 2pcs.
STEP 6
Assemble handle (12) - 1pc to the lid with Bolts M6
(A) - 2pcs and NUT M6 FLANGE
LOCK (E) - 2pcs.
Assemble smoke stack (14) with Bolts M6 (A) - 2pcs
and NUT M6 FLANGE LOCK
(E) -2 pcs. Remove the screws that were
preassembled on the thermometer (13), then attach
it on the lid.
Page 12
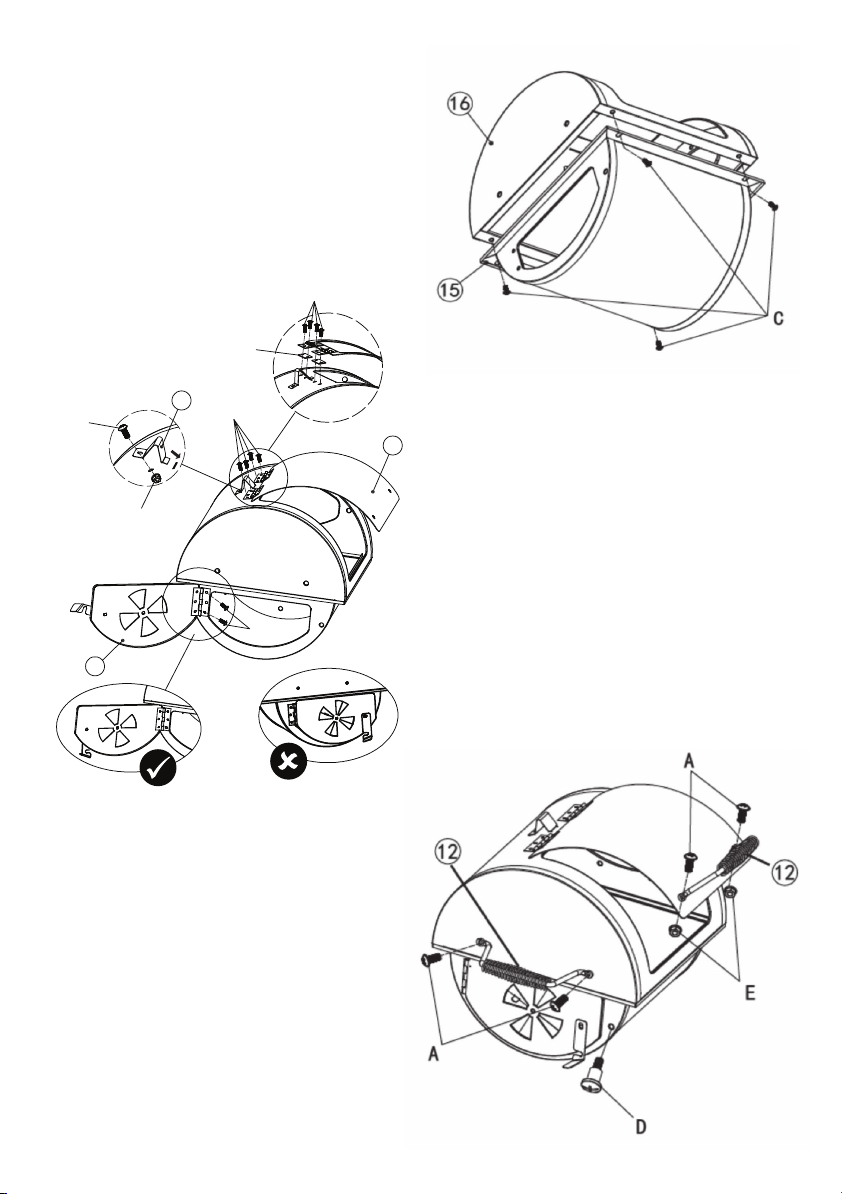
STEP 7
Assemble the rebox lid (16) and the rebox bottom
(15) together with Bolts M5*10 (C) - 4pcs.
B
H
IMAGE 5
A
17
19
B
E
B
STEP 9
Assemble the handle (12) to the rebox lid with Bolts
M6 (A) - 2pcs and NUT M6 FLANGE LOCK (E) -2pcs.
Attach the handle to the rebox lid left side with
Bolts M6 (A) -2pcs. Screw Bolt M6 (D) - 1pc to rebox
bottom on the left side.
18
STEP 8
Assemble the rebox lid cover (18) to the rebox lid
with Bolts M4 (B) - 4pcs and SPACERS (H) - 2pcs.
Attach the limiting lm (19) to the rebox lid with
Bolt M6 (A) - 1pc and NUT M6 FLANGE
LOCK (E) - 1pc.
Attach the air vent (17) with Bolts M4 (B) - 2pcs
(Ensure the hinge is attached to the inside of the air
vent door )
12 1312 12
Page 13
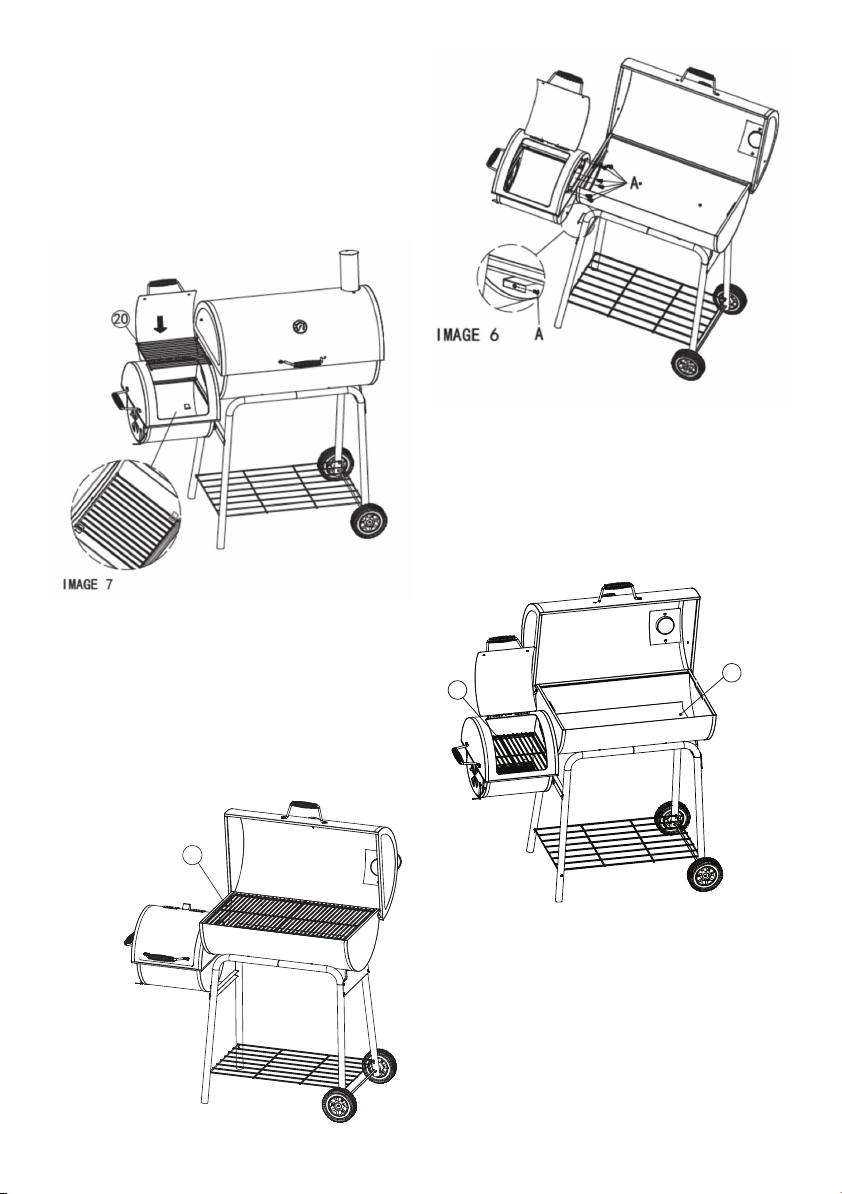
STEP 10
Attach the rebox to the body with Bolts M6 (A) 6pcs and attach to the triangular bracket (7) with
BOLTS M6 (A) - 1pc as shown in IMAGE 6. Then tighten
all screws.
STEP 11
Place Charcoal Grate (20) into the
Firebox Bottom (15).
STEP 12
Place the Cooking Grate x 2 (Firebox) (21) into
Firebox Bottom (15). Then place Charcoal Pan (22)
into Body Bottom (10)
23
21
22
STEP 13
Place the Cooking Grate x 2 (Body) (23) into Body
Bottom (10).
The Smoker is now fully assembled.
Page 14

GRILL PREPARATION AND OPERATING INSTRUCTIONS
Read all safety warnings and instructions carefully
before assembling and operating your grill.
1. CURE GRILL prior to your initial use to protect
the interior and exterior nish and to prevent
unnatural avors to your rst meals.
• Lightly coat ALL INTERIOR SURFACES
(including GRILLS, GRATES and INSIDE of
BARREL) with vegetable oil (spray
vegetable oil is easiest but do not use near
coals or re).
• Build a medium sized re on the charcoal
pan.
• After coals ash over, spread out coals,
replace cooking grates, close lid and
heat at approximately 250°F for two
hours. Re-coal GRATES and return to
GRILL at approximately 200°F for two
hours. You GRILL will then be ready for
use. NOTE: Grill will drip a lot of oil during
this process and for several uses but will
slow over time.
NEVER EXCEED 400°F BECAUSE THIS WILL DAMAGE
THE FINISH AND CONTRIBUTE TO RUST. PAINT IS NOT
WARRANTED AND WILL REQUIRE TOUCH-UP. THIS
UNIT IS NOT WARRANTED AGAINST RUST.
2. To START FIRE, stack 50-60 briquettes in
pyramid and saturate with lighter uid (DON’T
USE GASOLINE). Light coals in several places,
close lid after briquettes ash over or 1/2 gray,
spread them out and start cooking. If one end
burns faster, use tongs to move coals from one
end to the other for even heat.
3. Control heat with amount and type of FUEL,
DUAL DAMPERS and ADJUSTABLE FIRE GRATE.
Adjust GRATE one end at a time. Wood burns
hotter than coals. More airow is more heat.
4. For no are-ups, cook with lid in the down
position. Add water soaked hardwood chips for
a smoked avor.
5. Suggestion: Screw 3/4” cup hooks (not
furnished) on front of the wood shelf to hang
cooking utensils.
6. Burn out may be rust out. Ashes left in bottom
too long hold moisture and rust through any
thickness of steel. This grill is made of steel
and cast iron, which WILL RUST ESPECIALLY IF
NOT PROPERLY CARED FOR.
7. Do not use self-starting charcoal as it will give
unnatural avor. Burn lighter uid completely
before closing lid.
8. After using, coat vegetable oil on interior
grates and bare metal while warm to reduce
rust. On the EXTERIOR, remove rust with wire
brush and touch up with high heat paint,
available at most hardware/auto stores.
9. HINT: If cast iron grates get caked, put them in
self-cleaning oven. They come out like new, but
need re-seasoning.
10. You may place a coee can on bottom shelf
under the hole in the grill to catch drippings.
11. HEAT GAUGE may obtain moisture, which will
steam out during cooking. Gauge may be
calibrated in oven.
12. You may ll unwanted holes with Nuts & Bolts
(Not Provided).
ALWAYS FOLLOW CHARCOAL AND FLUID
MANUFACTURER’S INSTRUCTIONS AND WARNINGS.
USE OUTDOORS ONLY ON NONCOMBUSTIBLE
SURFACE. 15’ AWAY FROM WOOD AND COMBUSTIBLE
MATERIAL.
14 1514 14
Page 15

BBQ RANGE - LIMITED WARRANTY
SITRO GROUP AUSTRALIA (S.G.A.) warrants the purchaser of this Barbecue against defects in
workmanship and material, for a period of 12 months from the date of purchase. Barbecues are
warranted for 12 months for domestic use only. Commercial use will void warranty.
Warranty and purchase receipt of this product are to be retained as proof of purchase and must be
presented if making a claim under the terms of the S.G.A. warranty. Repairs under warranty are made
free of charge, provided the barbecue is delivered to our Service Department or Authorised Service
Agent and freight charges both ways are paid by the owner. No liability will be accepted
for any loss or damage in transit.
Note: In most cases the BBQ Body only will need to be returned.
S.G.A. Reserves the right to replace or repair the appliance within the warranty period.
Warranty does not apply to any defect, deterioration (including corrosion if located within 1km of the
sea), loss, injury or damage occasioned by or as a result of the misuse or abuse, negligent handling or
if the product has not been installed and used in accordance with the instructions.
The warranty is void if there is evidence of the product
being tampered with by unauthorised persons.
If the product includes one or a number of accessories, only the defective accessory or part will be
replaced i.e. Hose, Regulator, Rotisserie, Piezo lgnitor, Roast Hood, Side Burner and Rail Burners.
In the event of S.G.A. choosing to replace the appliance, the guarantee will
expire at the original date, i.e. 12 months from the original purchase date.
Where this product contains information from an overseas country, nothing in that information
is intended to limit any condition, guarantee, right or remedy which may be available
under the Consumer Guarantees Act 1993, except to the extent permitted by that Act.
Approved For Outdoor Use Only.
Fat res are not covered under warranty.
For warranty claims, service, spare parts or products information in Australia, please call
SITRO GROUP AUSTRALIA Pty Ltd on the Customer Service Line 1300 174 876.
Register your Warranty online at
www.gasmate.com.au
A receipt or proof of purchase is required and must be kept for your records.
Note: If you do not have internet access call our customer service team on 1300 174 876
Page 16

1616
 Loading...