

Page 1

Page 2

Page 3

Assembly Instruction Sheet
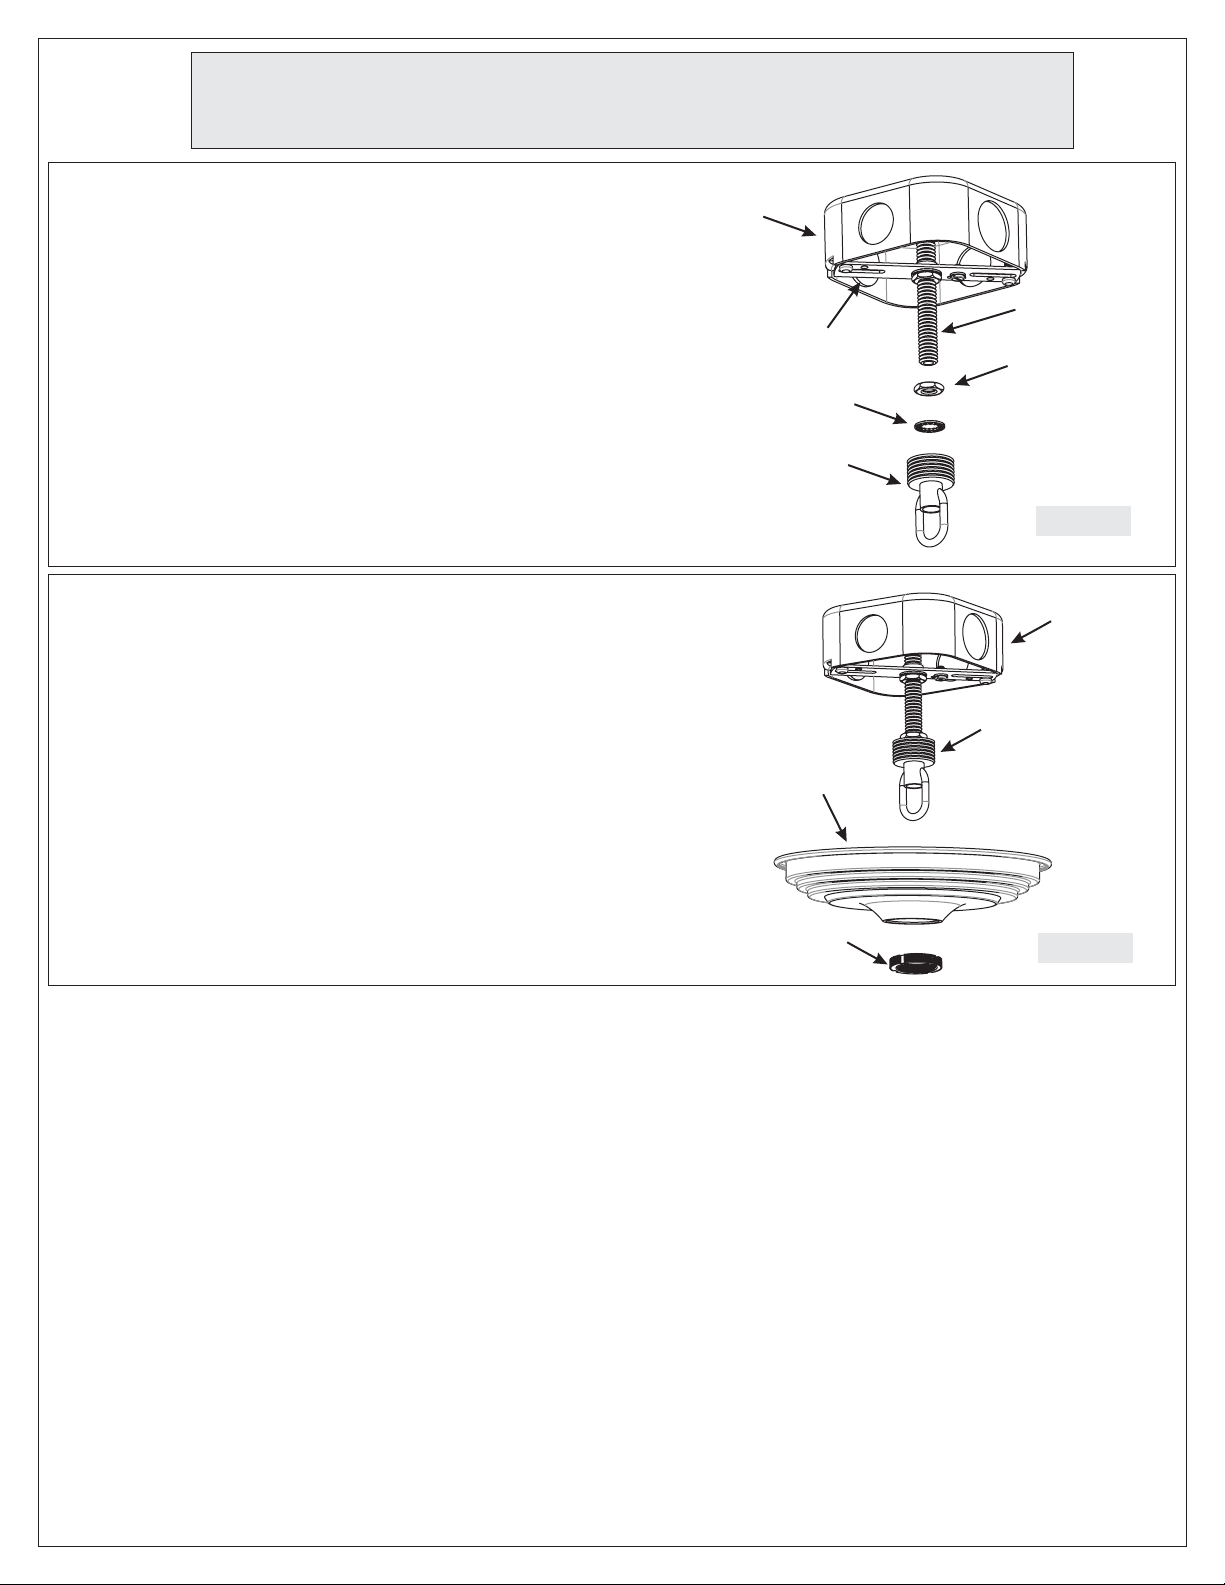
STEP 1 - Attach Waterproof Washer and
Fixture Loop to Fixture Body
A. Thread the Fixture Loop (I) onto the nipple
center of the Fixture Body ( )
J . Hand tighten until snug.
on the top
STEP 2 - Attach Crossbar to Outlet Box
A. Secure the Corssbar (A) to the outlet box with outlet
box screws (not supplied). Tighten until snug.
Figure 2
Fixture Loop
Fixture Body
Figure 1
Outlet Box
STEP 3 Attach Nipple to Crossbar-
A. Thread one Hex Nut (D) onto the top end of the Nipple
(B).
B. Place one Lock Washer (C) over the top end of the
Nipple (B) and then thread the Nipple (B) into the center
lock hole of the Crossbar (A).
C. Using pliers, thread the hex Nut (D) against the
Crossbar (A) and hand tighten until snug.
Mounting
Hole
Crossbar
Outlet Box
Screw (not
Supplied)
Crossbar
Lock Washer
Hex Nut
Socket
Figure 3
3of7
Page 4
Assembly Instruction Sheet
STEP 4 - Attach Canopy Chain Loop to Nipple
A. Thread another Hex Nut (D) onto the end of the Nipple
(B).
B. Place the Lock Washer (C) over the end of the Nipple
(B) and then thread the Canopy Chain Loop (E) onto the
end of the Nipple (B).
C. Using pliers, thread the Hex Nut (D) against the
Canopy Chain Loop (E) and hand tighten until snug.
STEP 5 Assemble Ceiling Canopy-
A. Push the Ceiling Canopy (H) upward over the Outlet
Box. Thread the Canopy Lock Ring (F) onto the Canopy
Chain Loop (E) and tighten until snug to secure the
Ceiling Canopy (H).
Outlet Box
Nipple
Crossbar
Hex Nut
Lock Washer
Canopy
Chain Loop
Figure 4
Outlet Box
Canopy Chian Loop
Ceiling Canopy
Canopy
Lock Ring
Figure 5
4of7
Page 5

Assembly Instruction Sheet
STEP 6 Attach Fixture Chain to Canopy
-
Chain Loop and Fixture Loop
A. Adjust the Fixture Chain (G) to your desired length by
removing the links if needed. You may need to use plier
to open the chain links. If so, put a cloth over the chain
to protect the finish from the pliers.
B. Attach one end of the Fixture Chain (G) onto the
Canopy Chain Loop (E) and then attach the other end of
the Fixture Chain (G) onto the Fixture Loop (I) on the
top of the fixture.
STEP 7 Pass Supply Wires through Fixture
-
Chain
A. Pull the Supply Wires and Ground Wire up through the
Fixture Chain (G) alternating links. Push the wires up
through the Canopy Chain Loop (E) into the outlet box.
Canopy Chain Loop
Fixture Chain
Fixture Loop
Supply Wire and
Ground Wire
Figure 6
Canopy Chain
Loop
Fixture Chain
5of7
Supply Wire
and Ground Wire
Figure 7
Page 6

Assembly Instruction Sheet
STEP 8 - Make Wire Connections
A. Un-thread the Canopy Lock Ring (F) and slide Canopy Lock
Ring (F) and Ceiling Canopy (H) down the Fixture Chain (G).
B. Push all slack fixture wire through Canopy Chain Loop (E)
into Outlet Box. Trim excess fixture wire leaving a minimum
of 6 inch. Hanging out of the Outlet Box.
C. Use standard wire connectors to make all wire connections.
(Connectors are not included with fixture.) Strip and prepare
wire ends according to instructions supplied with connectors.
D. Connect White Supply Wire from the Outlet Box to White
Wire from fixture.
E. Connect Black (or Red) Supply Wire from the Outlet Box to
Black Wire from fixture.
F. Connect Ground Wire from the Outlet Box to Ground Wire
from fixture.
G. Twist connectors until wires are tightly joined together.
H. Wrap each connection with approved electrical tape and
carefully stuff all the connected wires into the Outlet Box.
G. Re-attach the Ceiling Canopy (H) as shown in Step 5.
White wire from supply White wire from fixture
Black wire from supply
(or Red)
Black wire from fixture
Supply Wire and
Ground Wire from
Outlet Box
Supply Wire and
Ground Wire
Canopy Chain
Loop
Fixture Chain
Ceiling Canopy
Canopy Lock Ring
Figure 9
Ground wire from supply Ground wire from fixture
Figure 8
STEP 9 Attach Candle Cover to Socket
-
Assembly
A. Place the Candle Cover (K) over the Socket properly.
Candle
Cover
Socket
Figure 10
Figure 10
6of7
Page 7

STEP 10 - Install Bulb
Assembly Instruction Sheet
A. standard bulb with a candelabra screw
This fixture uses
base 0
. Maximum 6 watts.
B. Place the bulb from the bottom of the glass frame. Insert
bulb and screw snugly into place.
Your fixture is now assembled and ready to use.
Enjoy!
Bulb
Socket
Figure 11
7of7
 Loading...