


Char-griller 1224 User Manual

OWNER’S MANUAL
Smokin’ Pro™
Model # 1224
Keep your receipt with this manual for Warranty.
CUSTOMER SERVICE
1-912-638-4724
Service@CharGriller.com
Contents of this manual are Trademarked and Copyrighted by Char-Griller | A&J
Manufacturing. Using the information contained in this manual without consent of
Char-Griller and/or A&J Manufacturing is strictly prohibited.
OM1224B.4 ™ & © Char-Griller / A&J Mfg.

No Returns
on Used Grills
STOP! CALL FIRST! DO NOT RETURN PRODUCT TO STORE.
CALL (912) 638-4724 This product has been built to the highest quality standards.
Call us should you have any questions not addressed in these instructions, or for
service information.
Have your grill serial number (located on the back of the grill body or on the leg)
when calling.
Sold under license from W.C. Bradley Co.
OM1224B.5 ™ & © Char-Griller / A&J Mfg. 2

PARTS LIST AND TOOLS REQUIRED
(Tools Not Included)
Pliers and 7/16" nut driver
LINE ITEM QTY DESCRIPTION PART NO.
1 1 HOOD 20-0047
2 1 GRILL BODY 20.0049
3 1 HEAT GAUGE 55-0010
4 2 HOOD HANDLE 55-0014
5 1 WIRE SHELF 20-0050
6 2 LONG LEG 10-0055
7 2 SHORT LEG 10-0056
8 1 ASH PAN 20-0048
9 4 COOKING GRATE 10-0049
10 2 WHEEL 55-0003
11 2 LEG BRACE 10-0051
12 1 AXLE 10-0057
13 2 ASH PAN HANGERS 20-0024
14 3 UTENSIL HOOK 50-0003
15 1 DAMPER CIRCLE 10-0036
16 1 SIDE SHELF 30-0016
17 2 HUB CAP 55-0007
18 2 FRONT SHELF SLAT 10-0050
19 2 FRONT SHELF SUPPORTS 10-0053
20 2 FRONT SHELF BRACKETS 10-0052
21 1 SMOKESTACK 30-0015
22 2 SFB COOKING GRATES 10-0025
23 1 SFB DRAWER 20-0100
24 1 SFB DRAWER HANDLE 55-0015
25 1 SFB LARGE HANDLE 55-0016
26 1 FIRE GRATE 20-0028
27 1 SFB BODY 20-0101
28 2 LEG CAP 55-0013
OM1224B.4 ™ & © Char-Griller / A&J Mfg. 3

PAGE INTENTIONALLY LEFT BLANK FOR NOTES
OM1224B.5 ™ & © Char-Griller / A&J Mfg. 4

ASSEMBLY INSTRUCTIONS
Read all safety warnings and instructions carefully before
assembling and operating your grill.
IMPORTANT HINT: DO NOT TIGHTEN ANY NUTS AND BOLTS UNTIL
GRILL IS FULLY ASSEMBLED.
Step 1: Assemble Long Legs, Short Legs, and Leg Braces as show below then secure the Leg
Braces to one set of Long Leg and Short Leg with four 1 3/4” Hex Bolts and four Hex Nuts.
Hex Bolts
Hex Nuts
Step 2: Install Bottom Wire Shelf by placing the four corner hooks inside the hole on each leg
then rotate the leg assemblies up and secure the Leg Braces to the other side of the Long Leg
and Short Leg set.
Leg Braces
Hex Bolts
Hex Bolts
Short Legs
Leg Braces
Hex Bolts
Bottom Wire Shelf
OM1224B.4 ™ & © Char-Griller / A&J Mfg. 5
Hex Bolts

Step 3: Lay the cart assembly down with the Long Legs on the floor then install the Wheels and
Wheel Axle. On one end of the Axle insert the Cotter Pin into the hole on the Axle and snap in
the Hub Cap. Slide one Flat Washer and one Wheel onto the Axle then slide the Axle through
the holes on the Short Legs and Bottom Shelf. Complete the assembly by sliding the other
Wheel and Flat Washer onto Axle then insert the Cotter Pin and snap on the Hub Cap.
Hub Cap
Wheels
Wheel Axle
Cotter Pin
Hub Cap
Step 4: Attach the Grill Body to the previous assembly cart using four 1 3/4” Hex Bolts and four
Hex Nuts. The Bolts must go through the leg, Grill Body then tighten with the Hex Nuts inside
the Grill body.
Hex Nuts
Hex Bolts
Hub Cap
Wheel
Axle
Washer
Hex Bolts
NOTE: SFB
OPENING
SFB Opening
MUST BE ON
OPPOSITE
SIDE OF
WHEELS SIDE.
OM1224B.5 ™ & © Char-Griller / A&J Mfg. 6
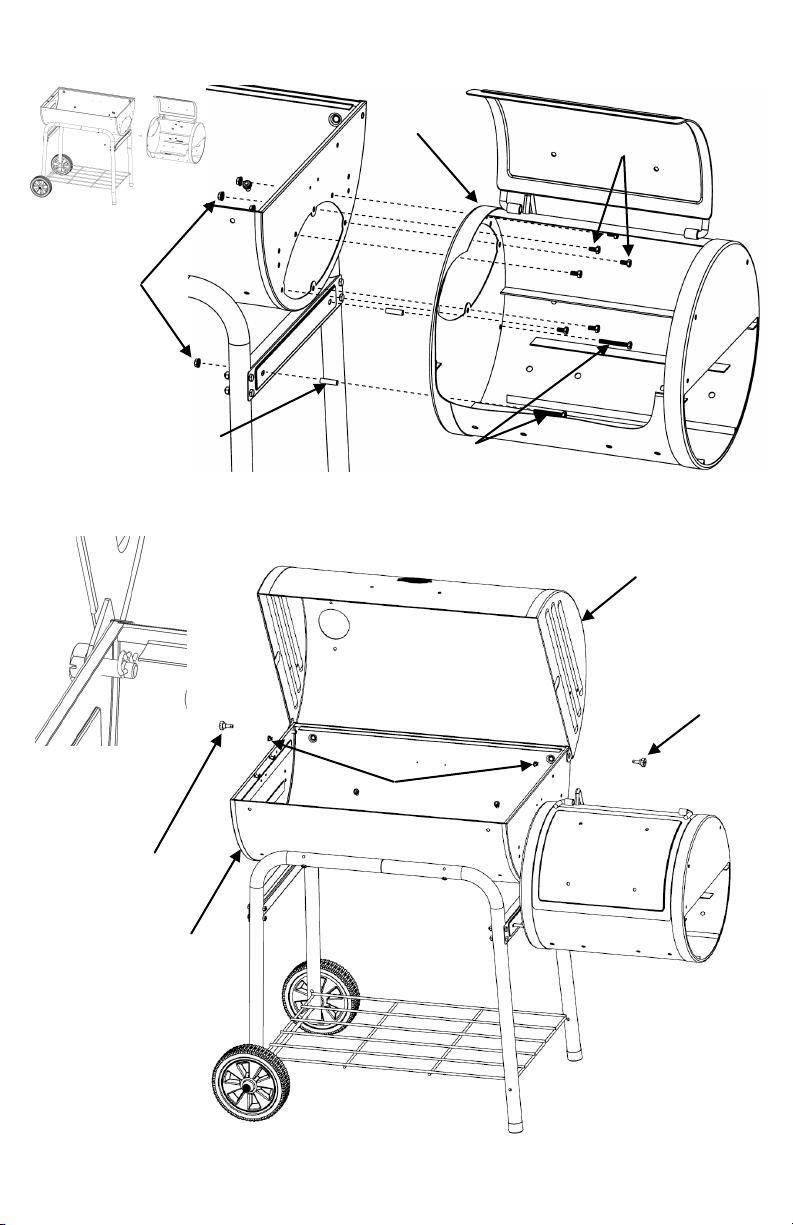
Step 5: Install SFB to the Grill Body using six 1/2” Hex Bolts, two 2” Hex Bolts, and eight Hex
Nuts. Bolts should go through the holes from the inside of the SFB Body.
SFB
1/2” Hex Bolts
Hex Nuts
Spacer
Tubes
Step 6: Attach the Grill Hood to the Grill Body using the two Hinge Pins and two Cotter Pins
provided.
2” Hex Bolts
Grill Hood
Hinge Pin
After Installation
Cotter Pins
Hinge Pin
Grill Body
OM1224B.4 ™ & © Char-Griller / A&J Mfg. 7
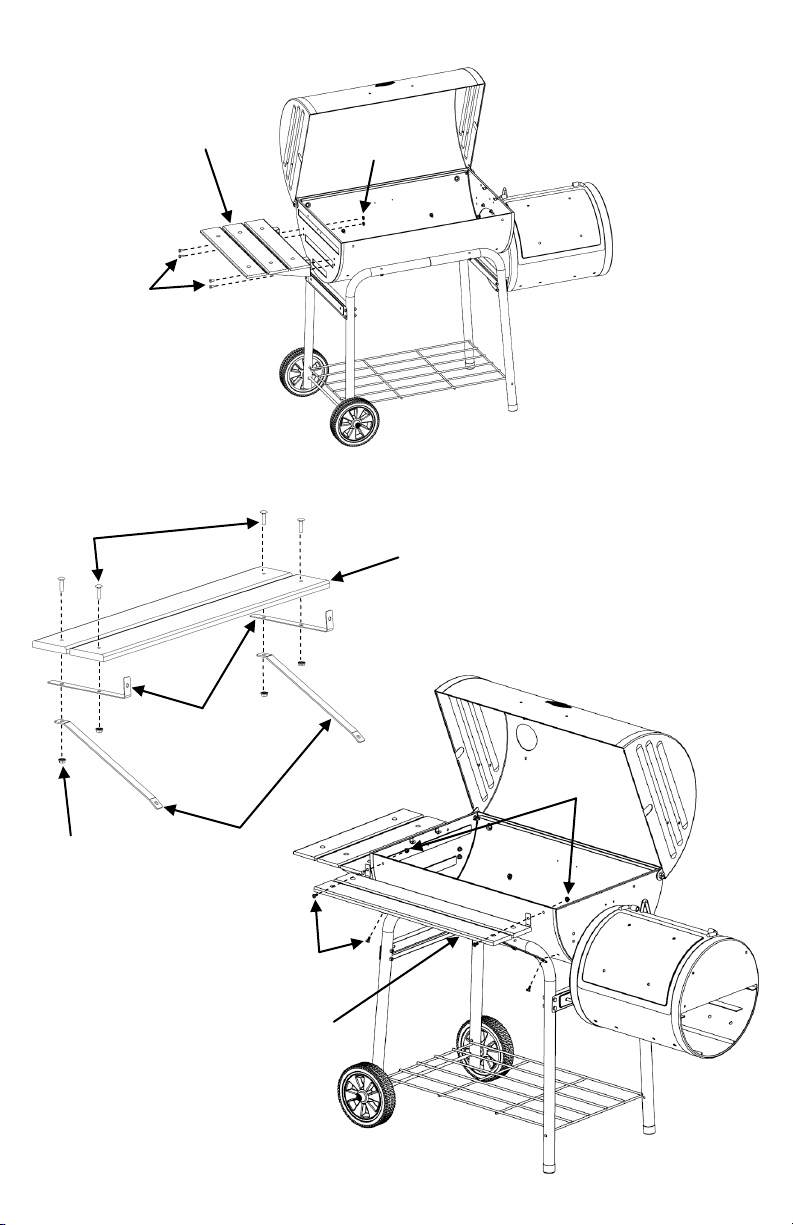
Step 7: Attach Side Shelf to Grill Body with four 1/2” Hex Bolts and four Hex Nuts.
Side Shelf
Hex Bolts
Step 8: Attach Front Shelf to Grill Body with four Hex Bolts and four Hex Nuts. First Assembly
the side shelf using four 1” Carriage Bolts and four Hex Nuts.
Carriage Bolt
Hex Nuts
Wood Slat
Front Shelf
Bracket
Hex Nut
Hex Nut
Front Shelf
Support Brace
Hex Bolt
Front Shelf
Assembly
OM1224B.5 ™ & © Char-Griller / A&J Mfg. 8