

Page 1
8 Bay Pin Code Video
Charging Locker
Installation Guide
(PPL8V)
4
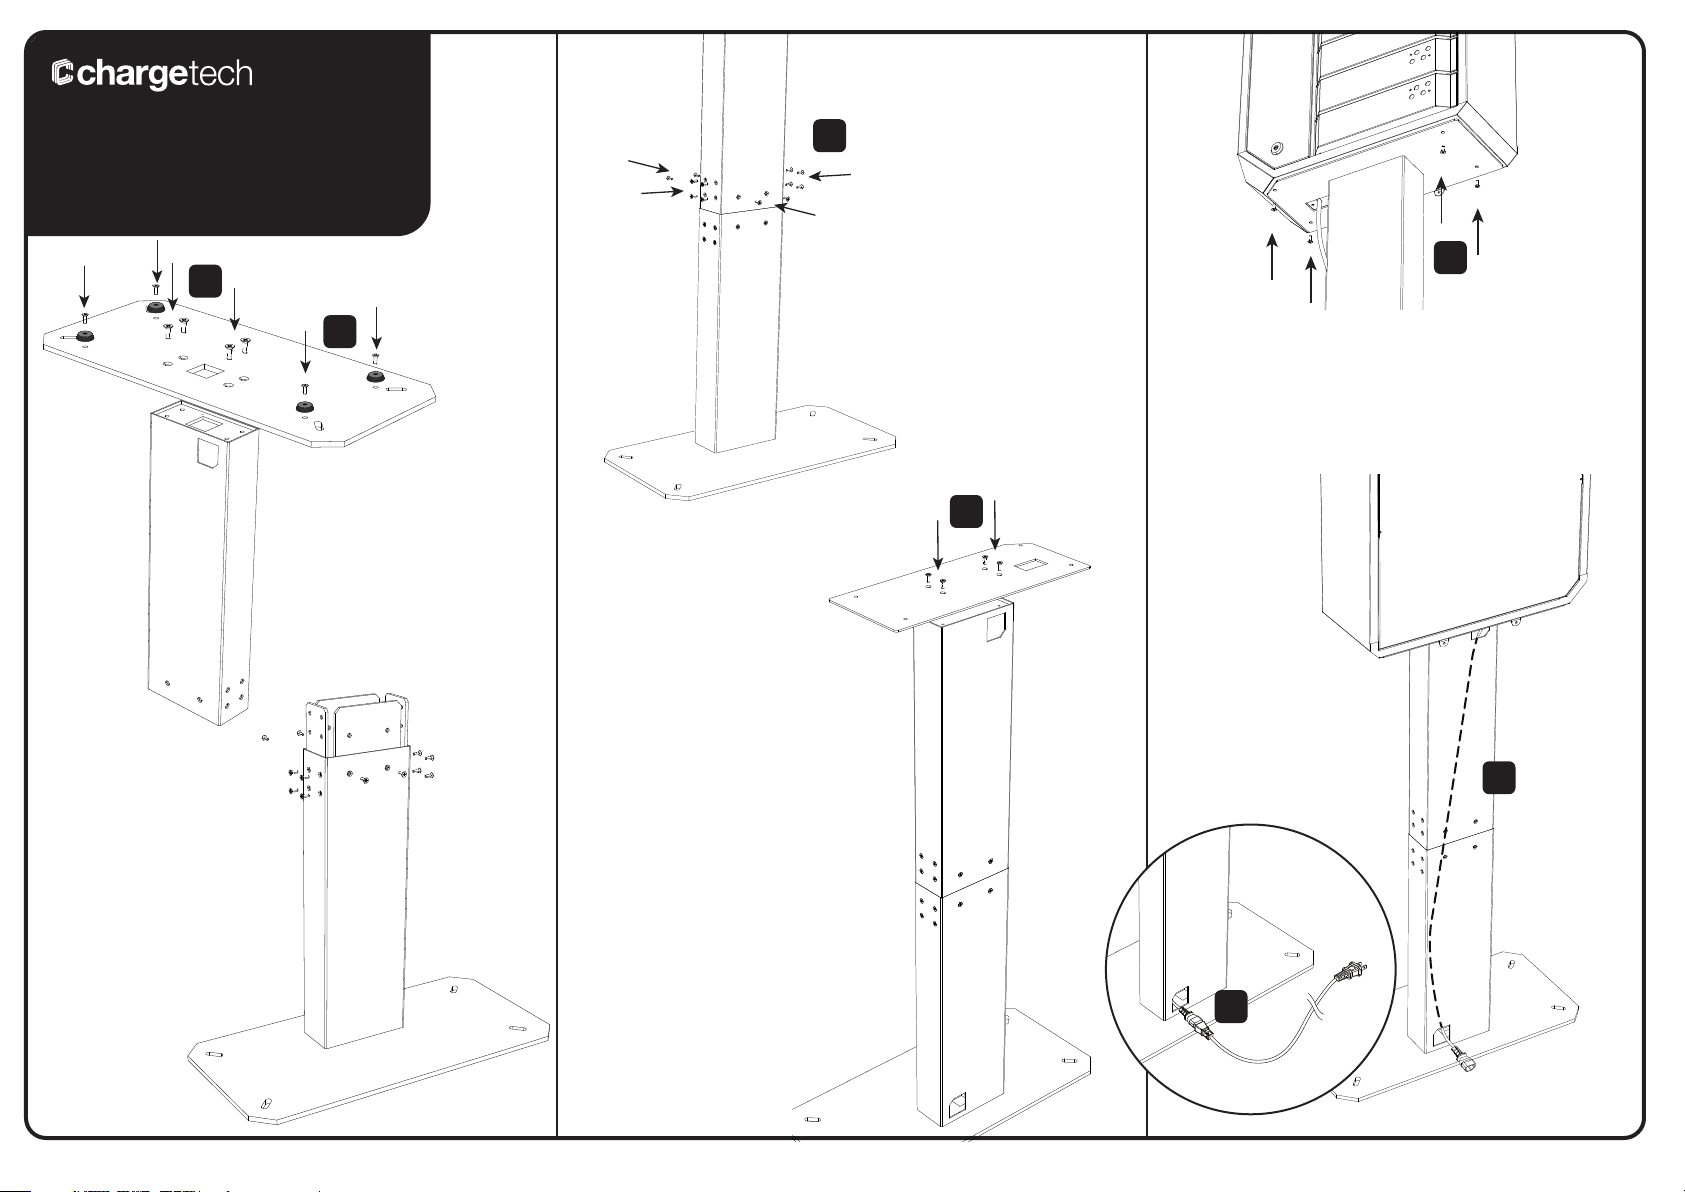
4. Fix rectangle pole B
1
on rectangle pole A
with 12 x M5 screws.
6
2
6. Fix PPLV8 on rectangle pole
with 4 x M5 Hex screws.
1. Fix rectangle pole
on base plate with 4 x
M8 screws.
2. Fix 4 x rubber foots
on base plate with 4 x
M5 screws.
5. Fix metal plate on rectangle
pole with 4 x M5 screws.
5
7. Put extension cord
through rectangle pole.
8. Connect power cord
with the extension cord.
7
3. Fix 4 metal pieces
in rectangle pole A
with 12 x M5 screws.
8
Page 2
Option A: Fix product by the wall Option B: Hang on wall
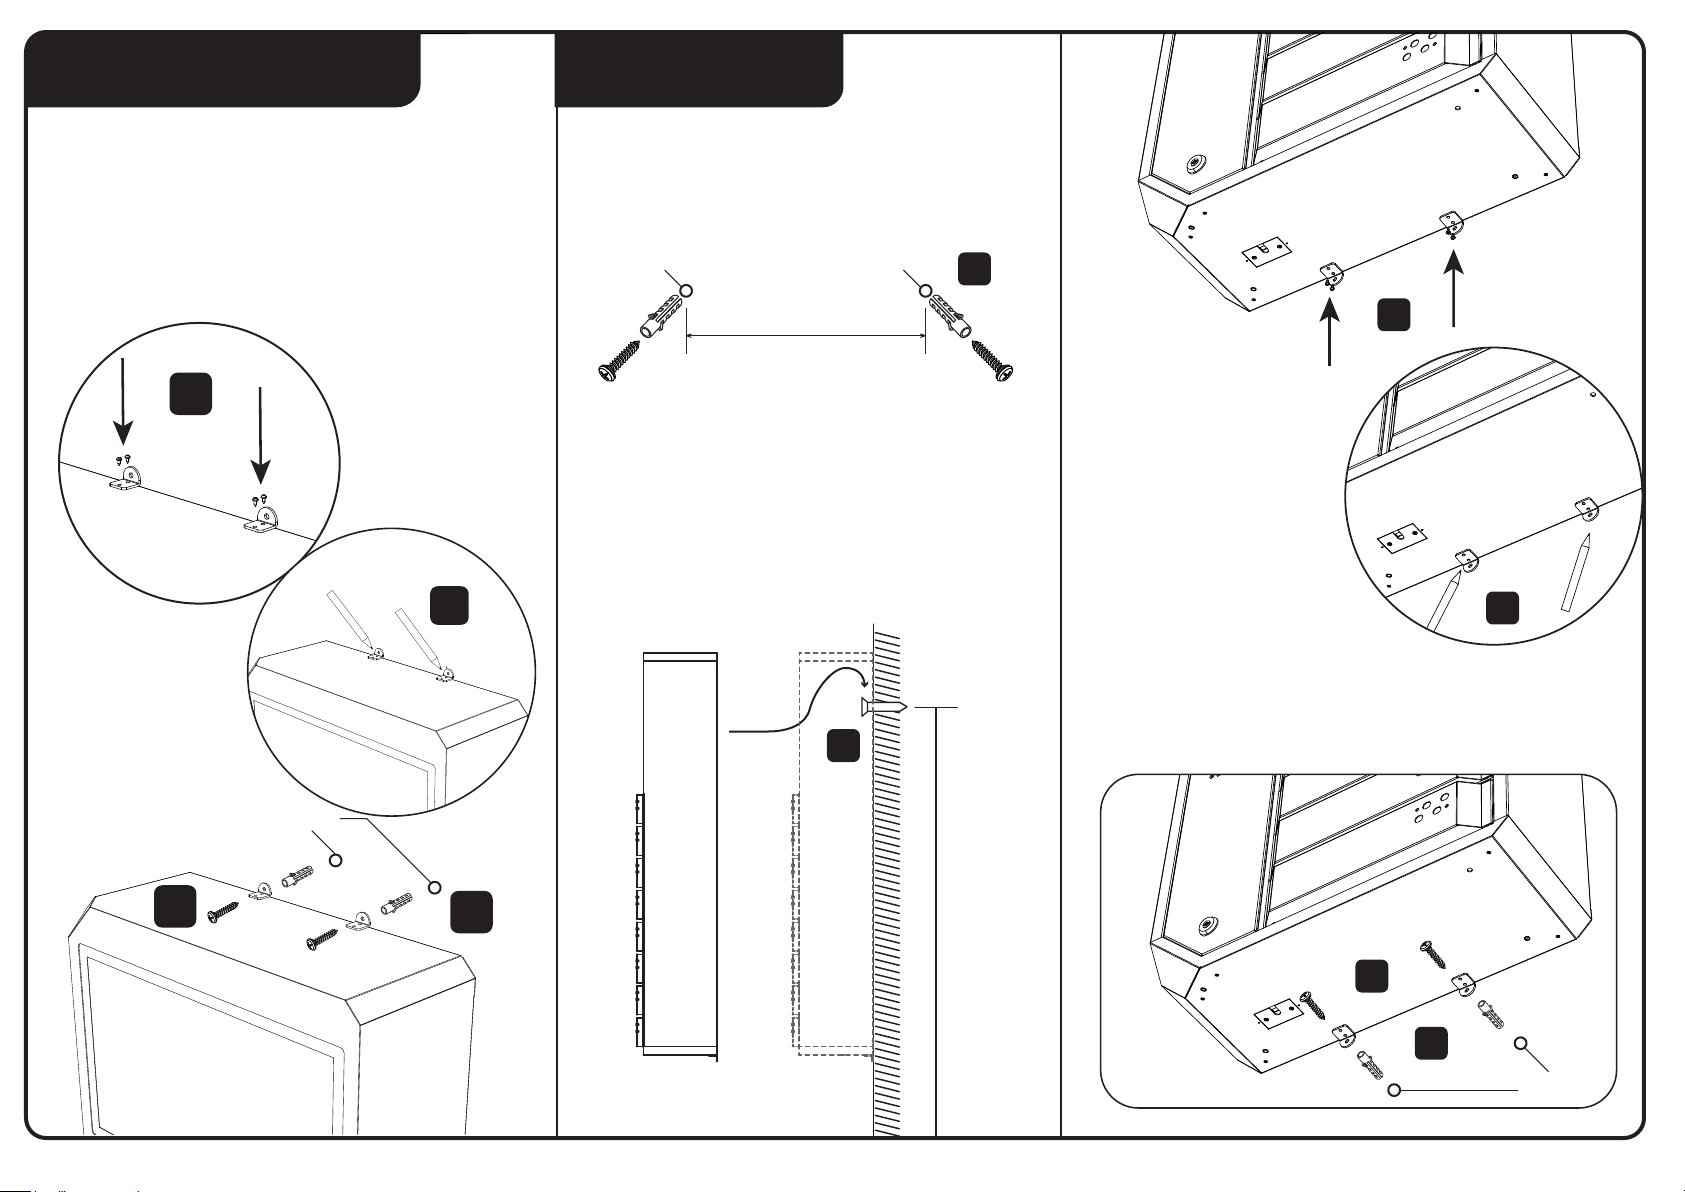
1. Fix 2 x L racks on the top of the product by
using 2 x M3 screws.
2. Mark the hole on wall. Drill 2 x Ø6mm holes on
wall according to the Mark.
3. Fix 2 x screw studs in hole.
4. Fix 2 x M4 screws to secure the unit in place.
Ø6mm Ø6mm
462 mm
1
3
4
1
Ø6mm
2
3
1. Drill 2 x Ø6mm holes (Suggest: 2m height)
on wall according to the drawing. Fix 2 x screw
studs and 2 x screws on wall(not included).
2. Lift 5mm space for hanging WM10 on wall.
2
200cm
3. Fix 2 x L racks on the
bottom of the product
by using 2 x M3 screws.
4. Mark the holes on
wall. Drill 2 x Ø6mm
holes on wall according
to the Mark.
5. Fix 2 x screw studs in holes.
6. Fix 2 x M4 screws to secure the unit in place.
4
6
5
Ø6mm
Page 3
Option C: Fix product on ground
B. Replace Cable
1
2
3
Ø12mm
1
2
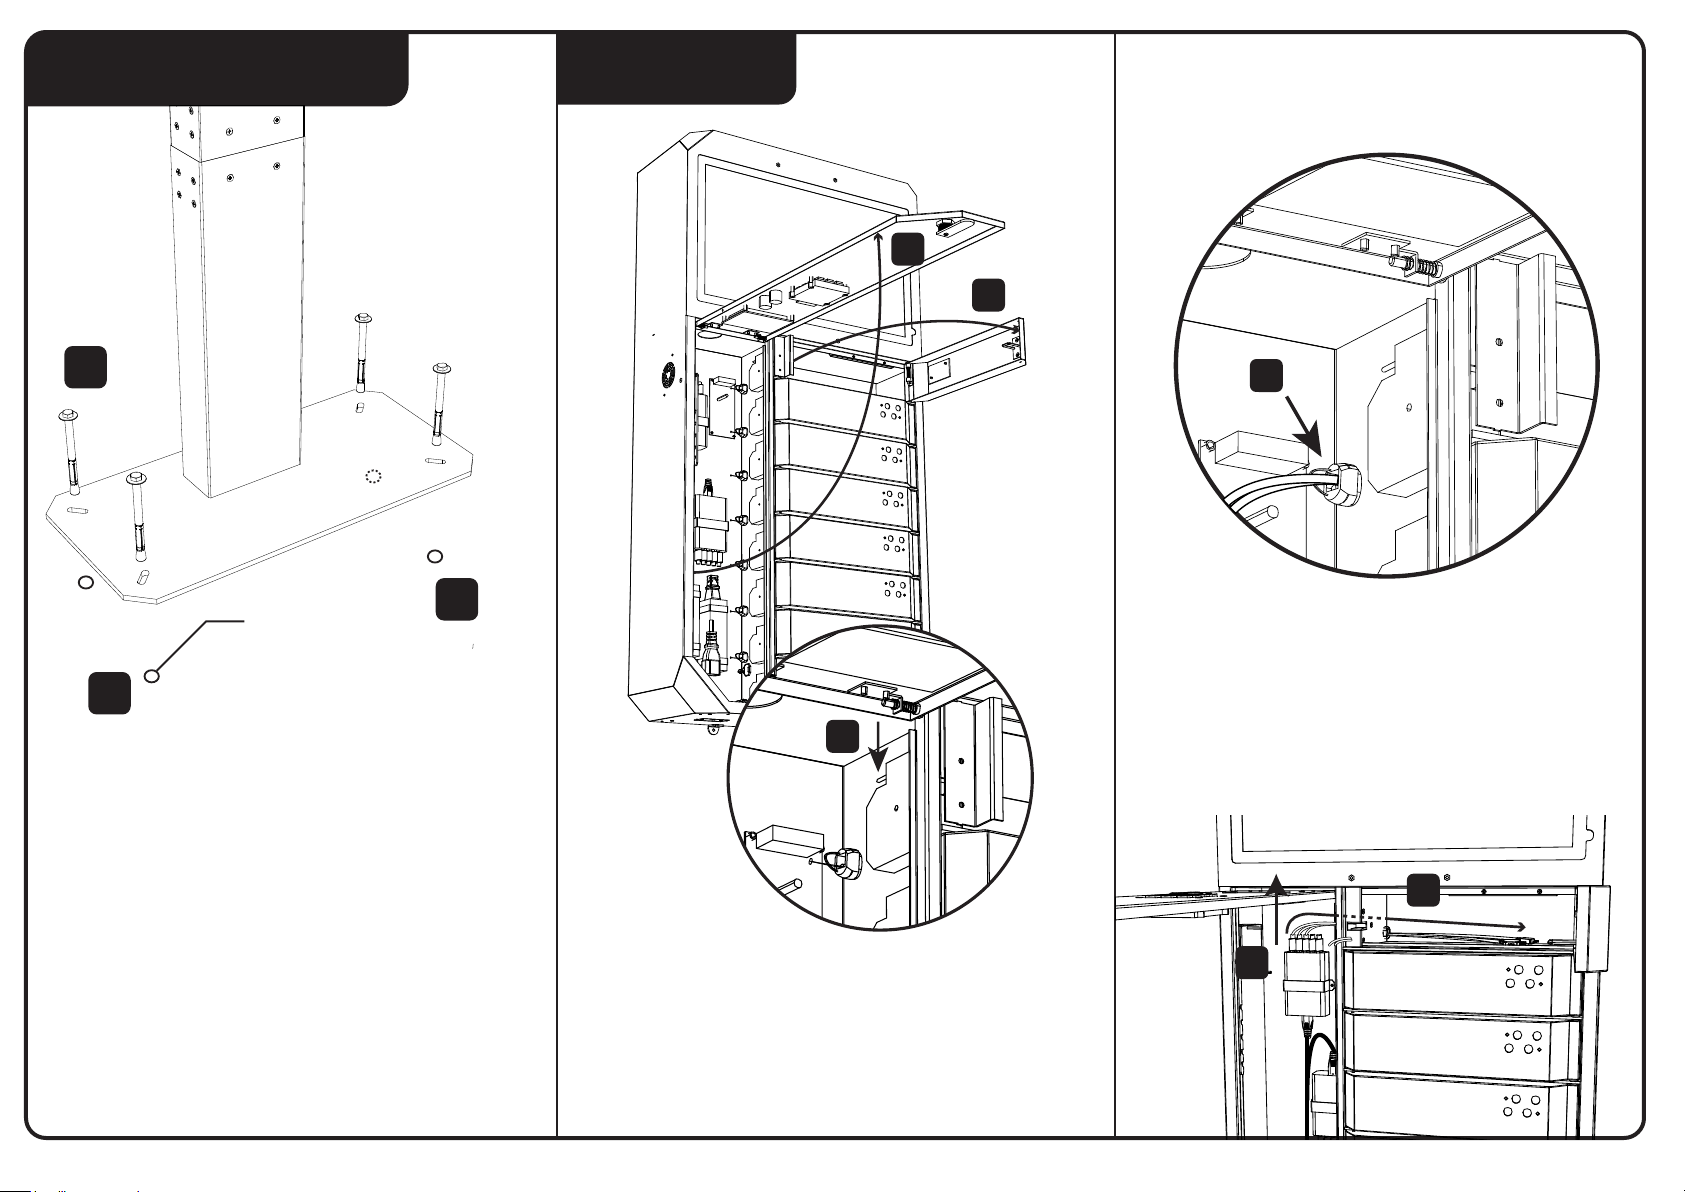
1. Mark the holes on floor.
2. Drill 4 x Ø12mm holes on floor
according to the Mark.
3. Bolt the base plate on the ground with
4 x expansion screws.
2
3
3. Open the cable clip.
4. Unplug USB Cable.
5. Take out the cable through the hole.
5
1. Open the control box door with key
provided.
2. Unlock the door by pressing the button
on the lock.
4
Page 4
C. Emergency
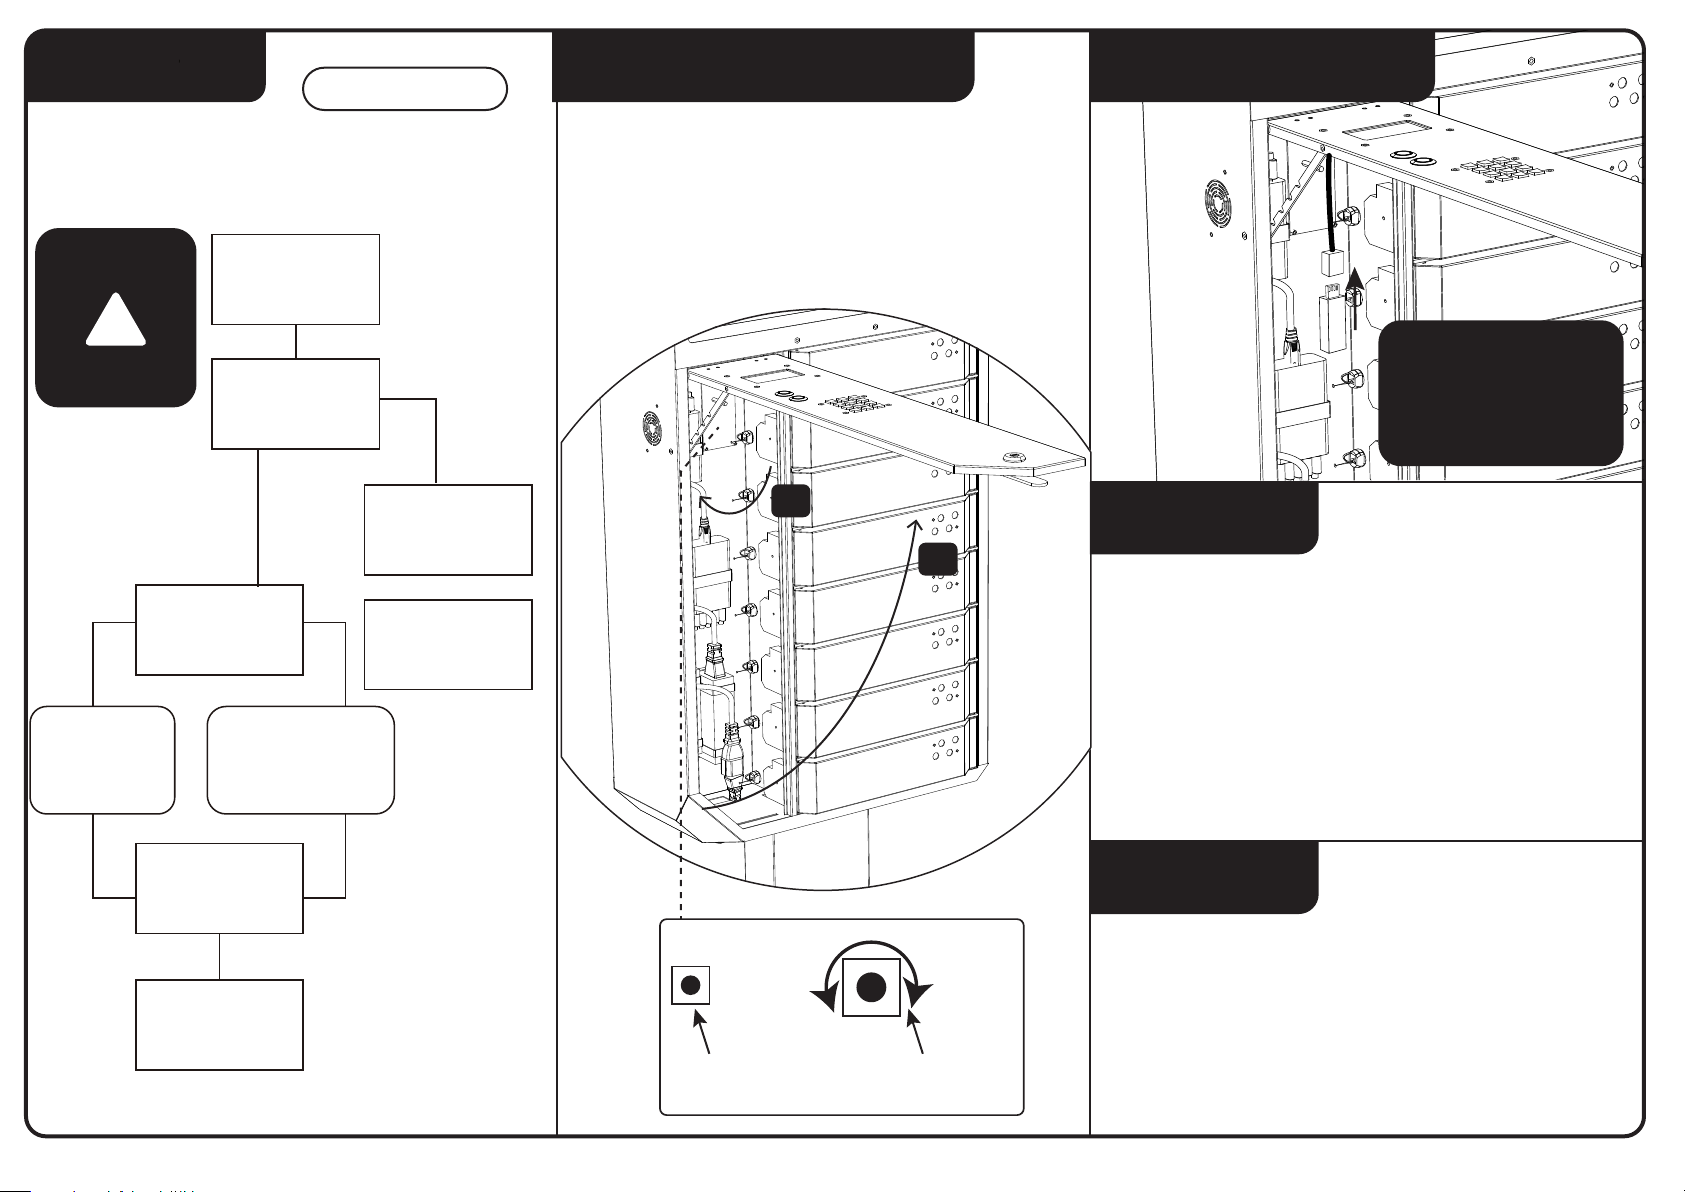
Administrative Mode
D. Reset to factory admin password
E. Advertising video content
Set up of Admin Password, Press “0” “#” “0” “#” “0” “#”
to enter Admin Mode.
LCD Displays:
Default Password:
88888888
Admin password:
* * * * * * * *
==>Press < # >
!
Please change it before
implementing the locker.
☐ 1 ☐ 3 ☐ 5 ☐ 7
☐ 2 ☐ 4 ☐ 6 ☐ 8
☐
==> Press < # >
Press button
“0”
Reset all boxs
==> Press < 1 >
Factory reset.
==> Press < 2 >
Modify Password.
Press
button “1”
0 Reset All
Press button
“1-8”
Reset corresponding
box
Press button “2”
Enter a new
8-digit password
==>Press < # >
The administramo
tor password is
modified success
fully.
10. Open the front door by using the key
provided.
11. Hold the angle of the front door by using
the metal stick.
11
10
Plug in your flash
memory stick with
your video content.
F. Specifications
- Model no.: PPLV8
- Input : AC 100 - 240V / 50~60Hz
- Output (per locker box) : 5V/2.4A Max
- Charging Cable (per locker box):
Micro USB Cable + Lightning Cable + Type C Cable
- Dimensions(PPLV8 only): 480 x 200 x 995 mm
- Dimensions(PPLV8 with Floor Stand): 590 x 280 x 1980mm
- Material (Housing) : Cold Rolled Steel
- Resolution: 1366 X 768 (pixel), support up to 1080p
- Support video format: MPEG-1, MPEG-2, MPEG-4, H.263, H.264,
VC1, RV etc.,
Ratio: 16:9
Resetting.....
Please wait a mo
ment.
Factory setting
reset completed.
Reset to factory
admin password
PCB
Specker volume
controller
G. Notes on use
- To Prevent fire on shock hazard, do not expose the device to rain or
moisture.
- To avoid electric shock, please do not disassemble the device.
- If trouble occurs, immediately disconnected the device from wall socket.
Maintenance
- Wipe the device with a soft dry cloth to prevent dust build up.
- keep the device away from strong volatile solvents or chemicals, such as
thinner, benzene, alcohol, pesticide, rubber or vinyl plastic etc, which may
lead to deterioration or damage to your devices.
 Loading...