

Page 1

THIS GRILL IS FOR
OUTDOOR USE ONLY
Failure to follow all manufacturer’s
instructions could result in serious
personal injury and/or property
damage.
WARNING
!
CAUTION
!
Some parts may contain sharp edges
– especially as noted in the manual!
Wear protective gloves if necessary.
CAUTION:
INSTALLER/ASSEMBLER:
CONSUMER:
Read and follow all safety
statements, assembly instructions,
and use and care directions before
attempting to assemble and cook.
Leave
these instructions with consumer.
Keep this manual for
future reference.
463731704
ASSEMBLY MANUAL
463731704 / 4165333 (11-26-03) - 1
Parts List - Model 463731704
Key Qty. Description Part #
A 1 Grease Cup .................4150349
C 1 Wire Shelf ..................4151033
D 1 Warming Rack ...............4152124
E 1 Cooking Grate ...............4152739
F 1 Side Shelf...................4154279
G 1 Handle .....................4154488
H 1 Sideburner Grate .............4156376
I 1 LPGasTank.................4158015
J 2 Wheel Assembly .............4310002
K 1 Sideburner Body .............4310004
L 1 V-Bar ......................4500290
M 1 Heat Shield .................4500305
N 1 Sideburner Frame ............4501705
O 2 Leg Assembly................4502378
P 1 Bottom Shelf ................4502379
Q 1 Front Panel .................4502383
R 4 #10x1/2”, T-20, Self-TapScrew . . 4080043
S 2 Valve Clip...................4151043
T 1 Burner/Collector Assembly......4505084
B 1 Tank Wire Support Bracket .....4151019
Key Qty. Description Part #
U 1 Control Panel Assembly........4530177
V 1 Sideburner Valve Cup .........4154476
W 1 Sideburner Ignitor Wire ........5156109
X 1 Grill Bottom .................4580538
Y 1 Grill Lid.....................4581022
Z 2 Control Knob ................4154470
AA 1 Sideburner Knob .............4154471
BB 2 Leg Extender ................4154577
CC 1 Logo Plate ..................4157147
DD 1 Sideburner Burner ............5068018
EE 1 Grease Clip .................5156607
- - 1 Hardware, Cart...............4254080
- - 1 Hardware, Shelf ..............4254005
- - 1 Hardware, Sideburner .........4254051
If you have any questions or need
assistance during assembly, please
call 1-800-241-7548.
Visit us on the web at:
www.charbroil.com
Optional Assembly Hardware
Optional hex nuts
We realize some customers prefer to use tools.
have been provided for you to use.
COLUMBUS, GA
A
B
C
D
E
F
G
H
I
J
K
L
M
N
O
P
Q
R
S
T
U
V
W
X
Y
Z
AA
BB
CC
DD
EE
O
R
R
R
U
Page 2
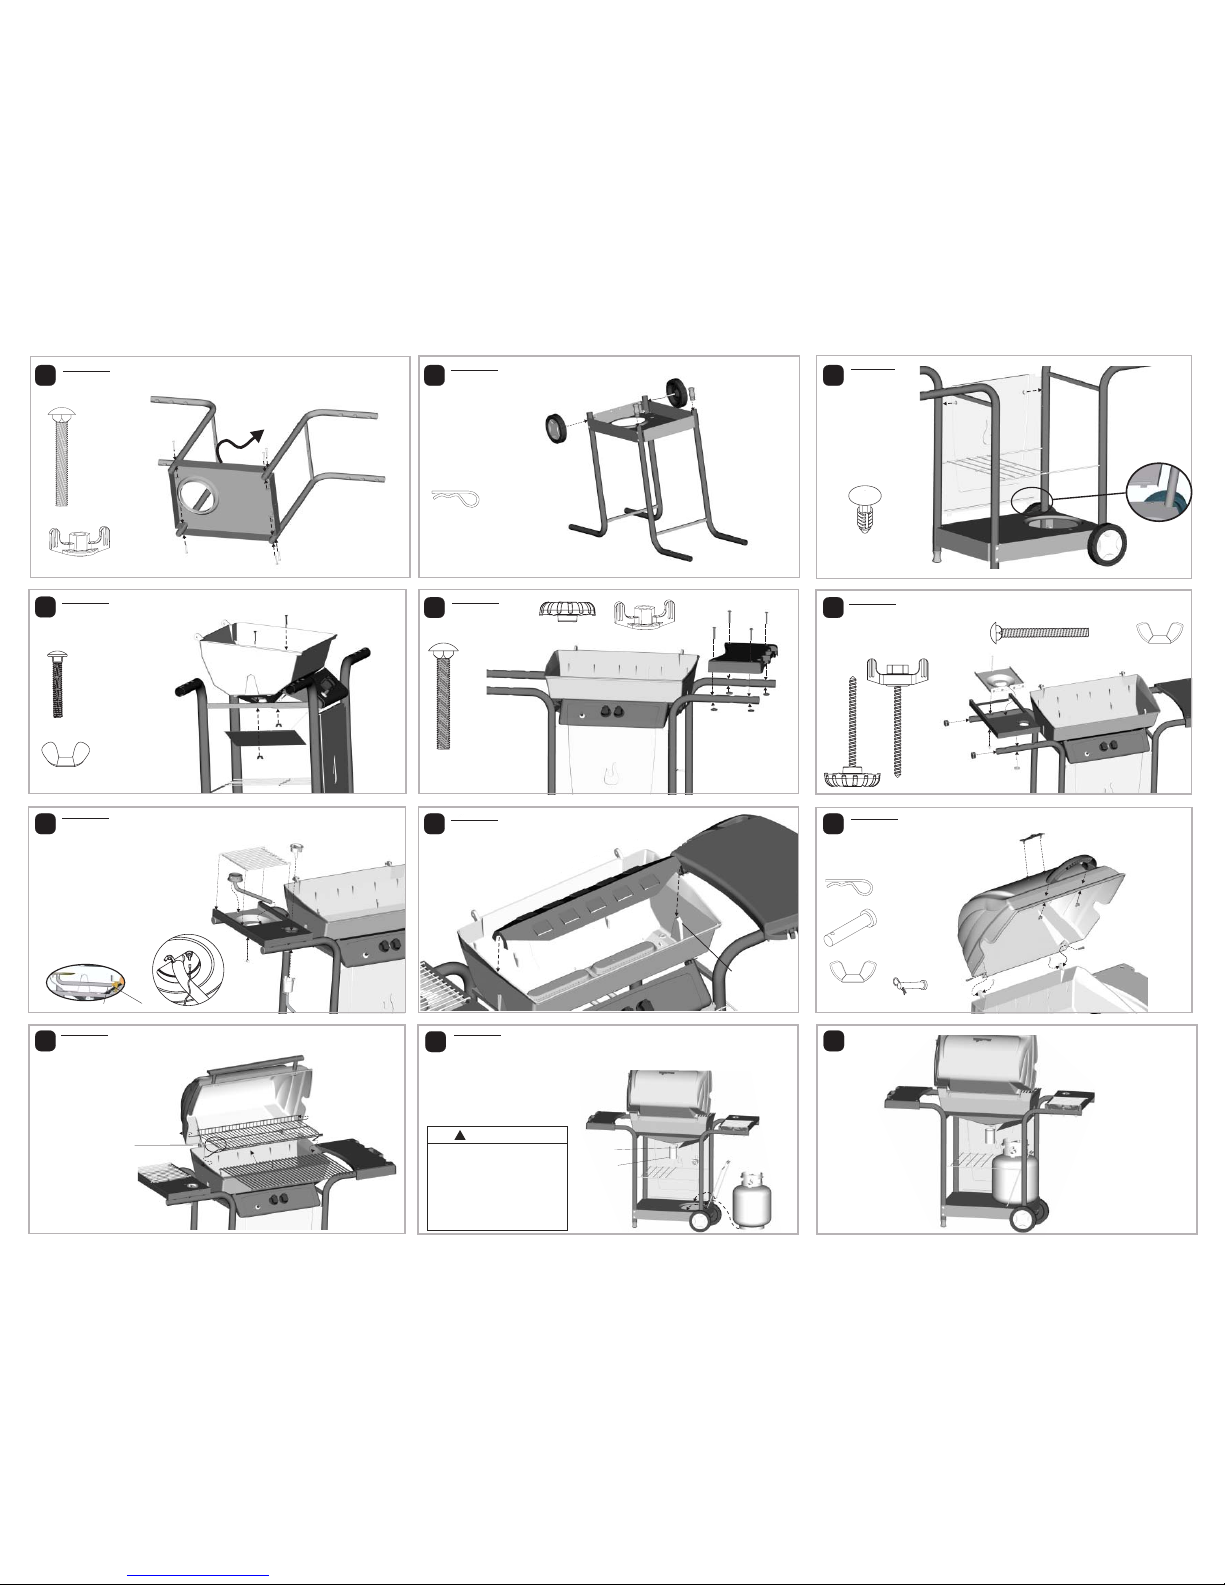
Items toAssemble:
1 V-Bar
Push V-Bardown onto
rest in Grill Bottom
Hinge Pin
and Hitch Pin
Qty: 2
Qty: 2
Qty:2
Items toAssemble:
1 Grill Lid
2 Hinge Pins
2 Hitch Pins
1 Handle
2 Wing Nuts
1 Logo Plate
Note: Grill lid
style may vary.
Back of GrillBack
of
Grill
Grease Clip
Grease Cup
See Use & Care Manual for “Match Lighting Instructions” and to
perform the Burner Flame Check” and important safety
instructions before using.
Items toAssemble:
1 Shelf
4 Crown Nuts or Wing Nuts
4 Carriage Bolts
Qty: 4
Qty: 4
463731704
Correct position of LP tank
and tank wire support
bracket after grill assembly
10
Items toAssemble:
1 Grease Clip
1 Grease Cup
1 TankWire Support Bracket
1 LP Tank
LP tank is shipped empty. Fill and leak check before
attaching to grill and regulator.
CAUTION
!
• Failureto install can in clip will cause hot grease
to drip from bottom of grill with risk of fire or
property damage.
• Tankcollar opening must face to front of cart
once tank is attached.
• Failureto install tank correctly may allow gas
hose to be damaged in operation, resulting in
the risk of fire.
Item toAssemble:
1 Wire Shelf
1 Panel
2 Push Pins
Qty: 2
ABPlace Wire Shelf in 3rd hole from top.
Assemble front panel first by
placing tabs into slots on Bottom Shelf.
Attach with push pins.
A
B
Items toAssemble:
1 Grill Bottom
1 Heat Shield
2 Carriage Bolts
2 Wing Nuts
2 Control Knobs
Qty. 2
Qty.2
Qty: 2
Items toAssemble:
2 WheelAssemblies
2 Hitch Pins
2 Leg Extenders
Items toAssemble:
2 LegAssemblies
1 Bottom Shelf
6 Carriage Bolts
6 Wing Nuts
Qty: 6
Qty: 6
Place Bottom Shelf and Legs as shown.
After assembling tighten all Wing Nuts.
Right Side:
Attach 2 Carriage Bolts and Wing Nuts in
front and back.
Left Side:
Place 1Carriage Bolt
and Wing Nut in upper hole only
Attach Wheels with Hitch Pins
6
5
4
9
3
8
2
7
1
Qty: 1
Qty: 1
A
Items toAssemble:
1 Sideburner
1 Wing Nut
1 Sideburner ValveCup
1 Sideburner Knob
1 Sideburner Grate
1 Sideburner Wire
A
B
C
Place Sideburner into hole.
Attach Sideburner ValveCup. Make sure
Sideburner Tubeis inside of valve. Tighten
with Wing Nut.
Place Sideburner Knob and Grate
Correctly assembled Sideburner Tubein Valve
B
C
Attach long wire from beneath console
to electrode beneath Sideburner.
D
D
Leg wires on Warming Rack
must run underneath surface.
A
B
Items toAssemble:
1 Warming Rack
1 Cooking Grate
ABInsert pivot wire of Warming Rack into Lid. Flex leg
wires to insert into Grill Bottom.
Place Cooking Grate into Grill Bottom.
11
Hang grease clip from center of grill bottom.
Use the grease cup to hang from grease clip.
Items toAssemble:
1 Sideburner Body
1 Sideburner Frame
1 Carriage Bolt
1 Wing Nut
1 Crown Screw or Wing Screw
Qty: 1
Qty: 1
or
Join Sideburner Body and Frame.Attach with Carriage Bolt and Wing Nut in back center hole.
In front use a Crown Screw or Wing Screw to attach Sideburner Body.
12
Qty: 4
 Loading...