

Char-Broil Perfomance 463227315, 463270615 Product Manual
Grilling's Juicy Little Secret TM
®
Serial number [ NOmero de serie
See rating Label on grill for serial number.
El nOmero de serie se encuentra en la etiqueta de
especificaciones de la parrilla.
Date purchased I Fecha de compra
If you have questions or need assistance
during assembly, please call 1-888-430-7870.
Si tiene alguna pregunta o si Necesita
ayuda durante el Ensamblado, 119menosAI
1-888-430-7870
Easily converts from (LP) [iquid
propane to (NG) naturat gas
Se convierte f_cltmente de propano
[iquido [LP} a gas natural [NG}
CONVERSIONKITI KITDECONVERSION
#4584609
11/14/14" G614-001-050801
ForYour Safety ................................. 2-4
Use and Care .................................. 4-11
Limited Warranty ................................. 12
Assembly .................................... 24-37
Troubleshooting ............................... 38-39
Parts Diagram ................................... 42
Parts List ....................................... 43
Hardware List ................................. 45-46
Registration Card................................. 47
SAFETY SYMBOLS
The symbols and boxes shown below explainwhat each
heading means. Read and follow all of the messages found
throughout the manual.
INSTALLER/ASSEMBLER:
Leave this manualwith consumer.
CONSUMER:
Keep this manual for future reference.
CAUTION
CAUTION:Indicates a potentially hazardous situation or
unsafe practice which, if notavoided, may result in minoror
moderate injury.
If you smell gas:
1.Shut off gas to the appliance
2. Extinguish any open flame.
. Open lid.
. If odor continues, keep away from the appliance and
immediately call your gas supplier or your fire
department.
1. Do not store or use gasoline or other flammable
liquids or vapors in the vicinity of this or any other
appliance.
2. An LP cylinder not connected for use shall not be
stored in the vicinity of this or any other appliance.
Do not attempt to repair or alter the
hose/valve/regulatorfor any "assumed" defect. Any
modification to this assembly will void your
warranty and create the risk of a gas leak and fire.
Use only authorized replacement parts supplied by
manufacturer.
WARNING: Indicates a potentially hazardous situation
which, if notavoided, could result in death or serious injury.
DANGER: Indicates an imminently hazardous situation
which, if not avoided, will result in death or serious injury.
CAUTION
For residential use only. Do not use for commercial cooking.
If during operation the flames go out (You smell gas or
cannot see the flame)
1. Turn the burner controls O OFF
2.Open lid.
3.Wait 5 minutes and repeat the lighting procedure.
If the burner goes out, gas will continue to flow out of the
burner and could accidently ignite with risk of injury.
Tools needed for assembly:
Adjustable wrench (not provided)
Screwdriver (not provided)
7/16"Combinationwrench (not provided)
Caster pin (provided)
CAUTION
Failuretofollowallmanufacturer'sinstructionscouldresultin
seriouspersonalinjuryand/orpropertydamage.
CAUTION
Read and follow all safety statements, assembly
instructions, and use and care directions before attempting
to assemble and cook.
/_ CAUTION
Some parts may contain sharp edges. Wear protective
gloves if necessary.
CAUTION /_
Grease Fires
• Putting out grease fires by closing the lid is not possible.
Grills are well ventilated for safety reasons.
• Do not use water on a grease fire. Personal injury may
result. If a grease fire develops, turn knobs and LP
tank off.
• If grill has not been regularly cleaned, a grease fire can
occur that may damage the product. Pay close attention
while preheating or burning off food residue to insure
that a grease fire does not develop.
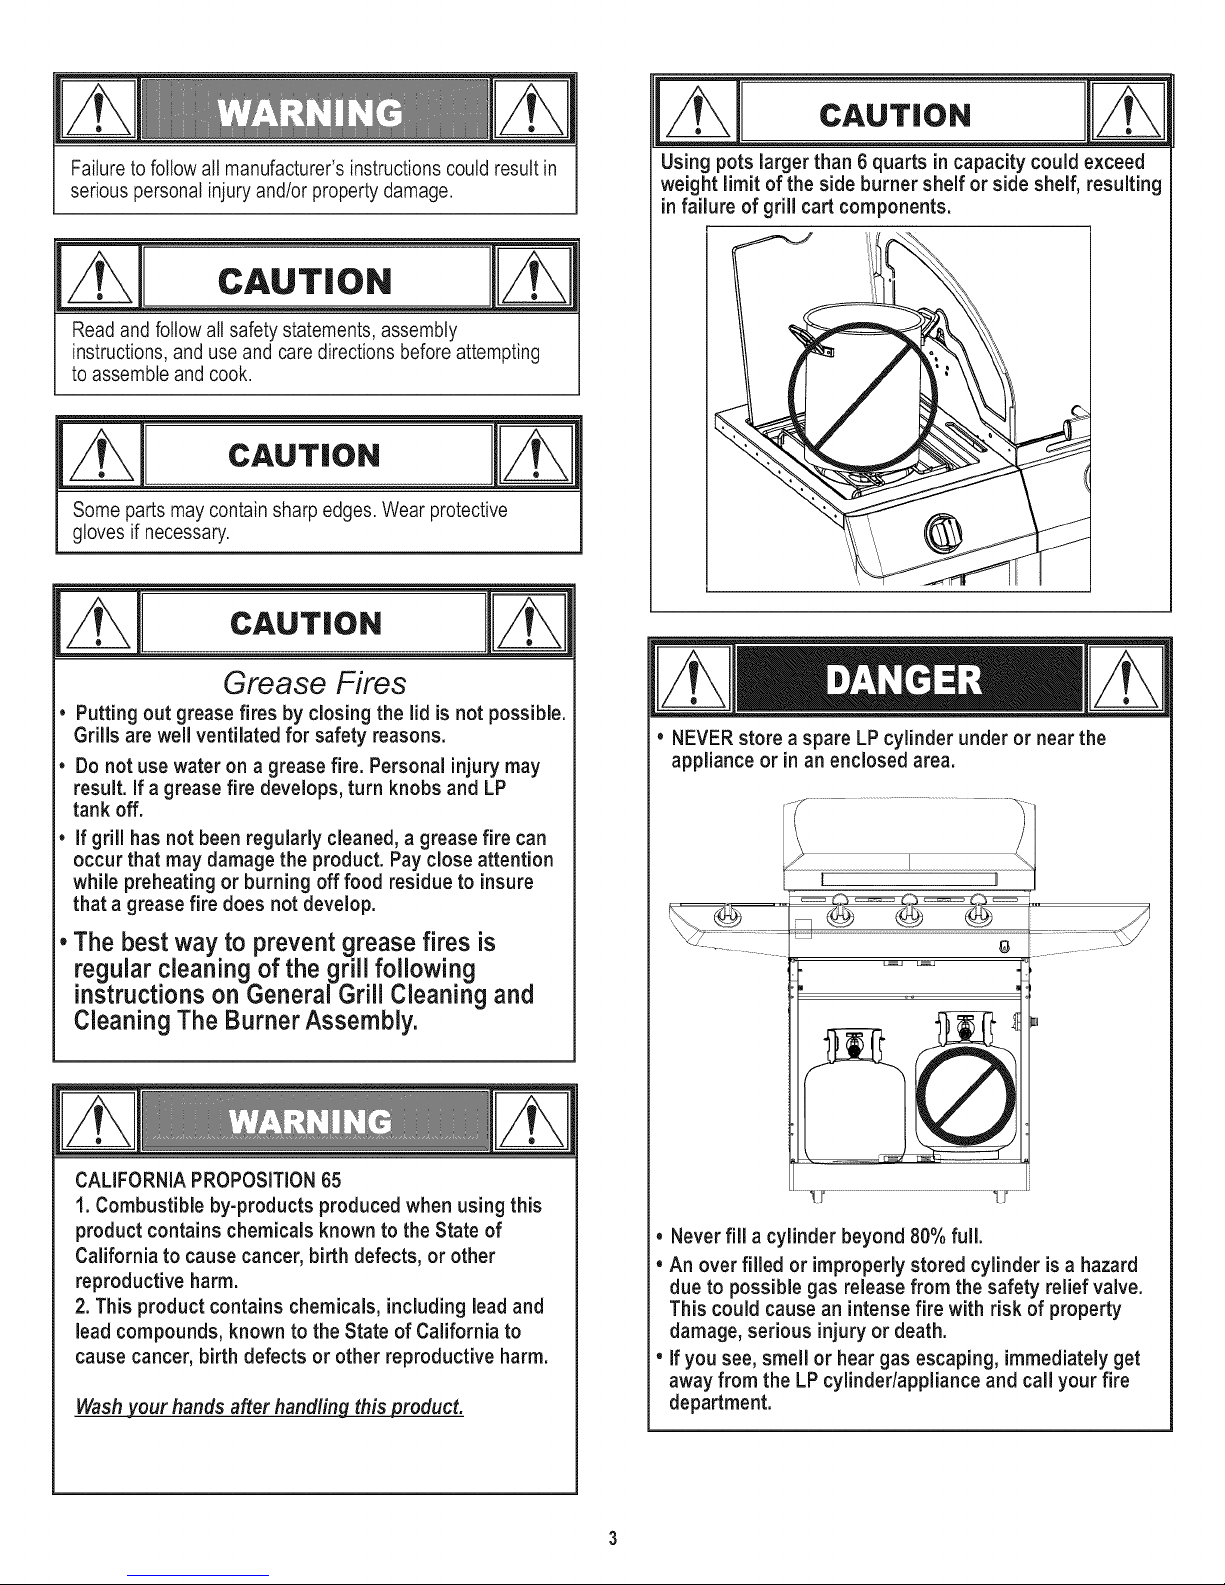
Using pots larger than 6 quarts in capacity could exceed
weight limit of the side burner shelf or side shelf, resulting
in failure of grill cart components.
,
,
• NEVERstore a spare LP cylinder under or near the
appliance or in an enclosed area.
, The best wayto preventgrease fires is
regular cleaning of the grill following
instructionson GeneralGrillCleaning and
Cleaning The Burner Assembly.
CALIFORNIA PROPOSITION 65
1. Combustible by-products produced when using this
product contains chemicals known to the State of
California to cause cancer, birth defects, or other
reproductive harm.
2. This product contains chemicals, including lead and
lead compounds, known to the State of California to
cause cancer, birth defects or other reproductive harm.
Wash your hands after handling this product.
• Never fill a cylinder beyond 80Yofull.
• An over filled or improperly stored cylinder is a hazard
due to possible gas release from the safety relief valve.
This could cause an intense fire with risk of property
damage, serious injury or death.
" If you see, smell or hear gas escaping, immediately get
away from the LP cylinder/appliance and call your fire
department.
InstallationSafetyPrecautions
,Use grill, as purchased,only with LP (propane) gas and the
regulator/valve assembly supplied. If your grill is Dual Fuel
ready,a conversion kit must be purchased for use with
naturalgas.
,Grill installation must conformwith local codes, or in their
absence of local codes, with either the National Fuel Gas
Code,ANSI Z223.f/ NFPA 54, NaturalGas and Propane
Installation Code, CSAB149,1, or Propane Storage and
Handling Code, B149.2.
,All electrical accessories (such as rotisserie) mustbe
electrically grounded in accordance with local codes, or
National Electrical Code,ANSI / NFPA 70 or Canadian
Electrical Code, CSAC22./. Keep any electrical cords
and/or fuel supply hoses away from any hot surfaces.
,This grill is safety certified for use in the United States
and/or Canada only. Do not modify for use in any other
location. Modification will result in a safety hazard.
LPCylinderRemoval, Transport and Storage
•Turn OFF all control knobs and LP cylinder valve. Turn coupling
nut counterclockwise by hand only - do not use tools to
disconnect. Loosen cylinder screw beneath bottom shelf or
disconnect other retention means, then lift LP cylinder up and
and out of cart. Install safety cap onto LP cylinder valve.
Always use cap and strap supplied with valve. Failure to use
safety cap as directed may result in serious personal
injury and/or property damage.
•Adisconnected LP cylinder in storage or being transported
must have a safety cap installed (asshown). Donot store an
LP cylinder in enclosed spaces such as a carport, garage,
porch, covered patio or other building. Never leave an LP
cylinder insidea vehicle which may become overheated by the
sun.
•Do notstore an LP cylinder in an area where children play.
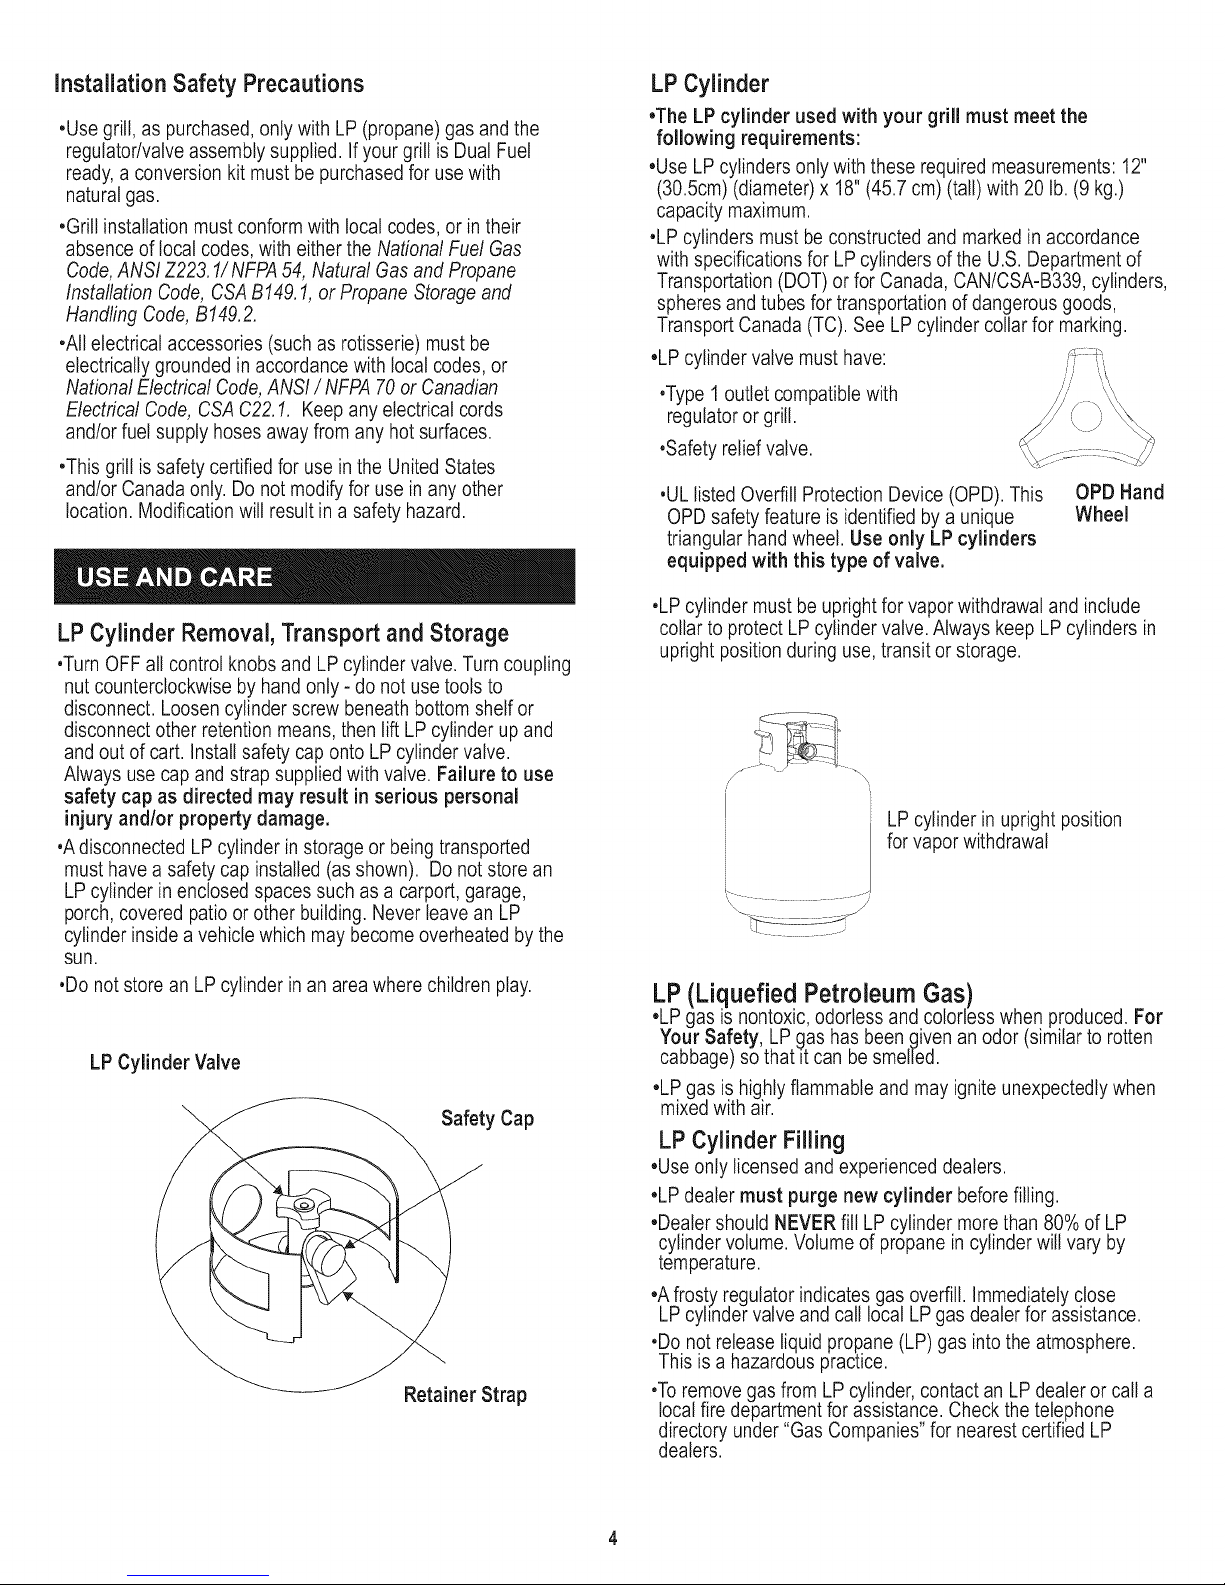
LP Cylinder Valve
Safety Cap
Retainer Strap
LPCylinder
•The LP cylinder used with your grill must meet the
following requirements:
•UseLP cylinders only with these required measurements: 12"
(30.5cm) (diameter) x 18"(45.7 cm) (tall)with 20 lb. (9 kg.)
capacity maximum.
•LPcylinders must be constructed and marked in accordance
with specifications for LP cylinders of the U.S. Department of
Transportation (DOT) or for Canada, CAN/CSA-B339, cylinders,
spheres and tubes for transportation of dangerous goods,
Transport Canada (TC). See LP cylinder collarfor marking.
•LPcylinder valve must have:
•Type 1 outlet compatible with
regulator or grill.
•Safety reliefvalve.
•ULlisted Overfill Protection Device (OPD). This
OPD safety feature is identified by a unique
triangular hand wheel. Use only LP cylinders
equipped with this type of valve.
•LPcylinder must be upright for vapor withdrawal and include
collar to protect LP cylinder valve. Always keep LP cylinders in
upright position during use, transit or storage.
i....... ii,_
LP cylinder in upright position
for vapor withdrawal
OPD Hand
Wheel
LP (Liquefied Petroleum Gas)
•LPgas is nontoxic,odorless and colorless when produced. For
Your Safety, LP gas has been given an odor (similar to rotten
cabbage)so that it can be smelled.
•LPgas is highly flammable and may ignite unexpectedly when
mixed with air.
LPCylinder Filling
•Useonly licensed and experienced dealers.
•LPdealer must purge new cylinder before filling.
•Dealershould NEVER fill LP cylinder more than 80% of LP
cylinder volume. Volume of propane in cylinder will vary by
temperature.
•Afrosty regulator indicates gas overfill. Immediately close
LP cylinder valve and call local LP gas dealer for assistance.
•Do notrelease liquid propane (LP) gas into the atmosphere.
This is a hazardous practice.
•Toremove gas from LP cylinder, contact an LP dealer or call a
local fire department for assistance. Check thetelephone
directory under "Gas Companies' for nearest certified LP
dealers.
LPCylinderExchange
•Manyretailers that sell grills offer you the optionof replacing
your empty LP cylinder through an exchange service. Use only
those reputable exchange companies that inspect, precision fill,
test and certify their cylinders. Exchange your cylinder only
for an OPD safety feature-equipped cylinder as described
in the "LP Cylinder" section of this manual.
•Always keep new and exchanged LP cylinders in upright
position during use, transit or storage.
•Leak test new and exchanged LP cylinders BEFORE
connecting to grill.
•Place safety capon cylinder valve outlet whenever the cylinder
is notin use. Only install the type of safety cap on the cylinder
valve outlet that is provided with the cylinder valve. Other types
of caps or plugs may result in leakage of propane.
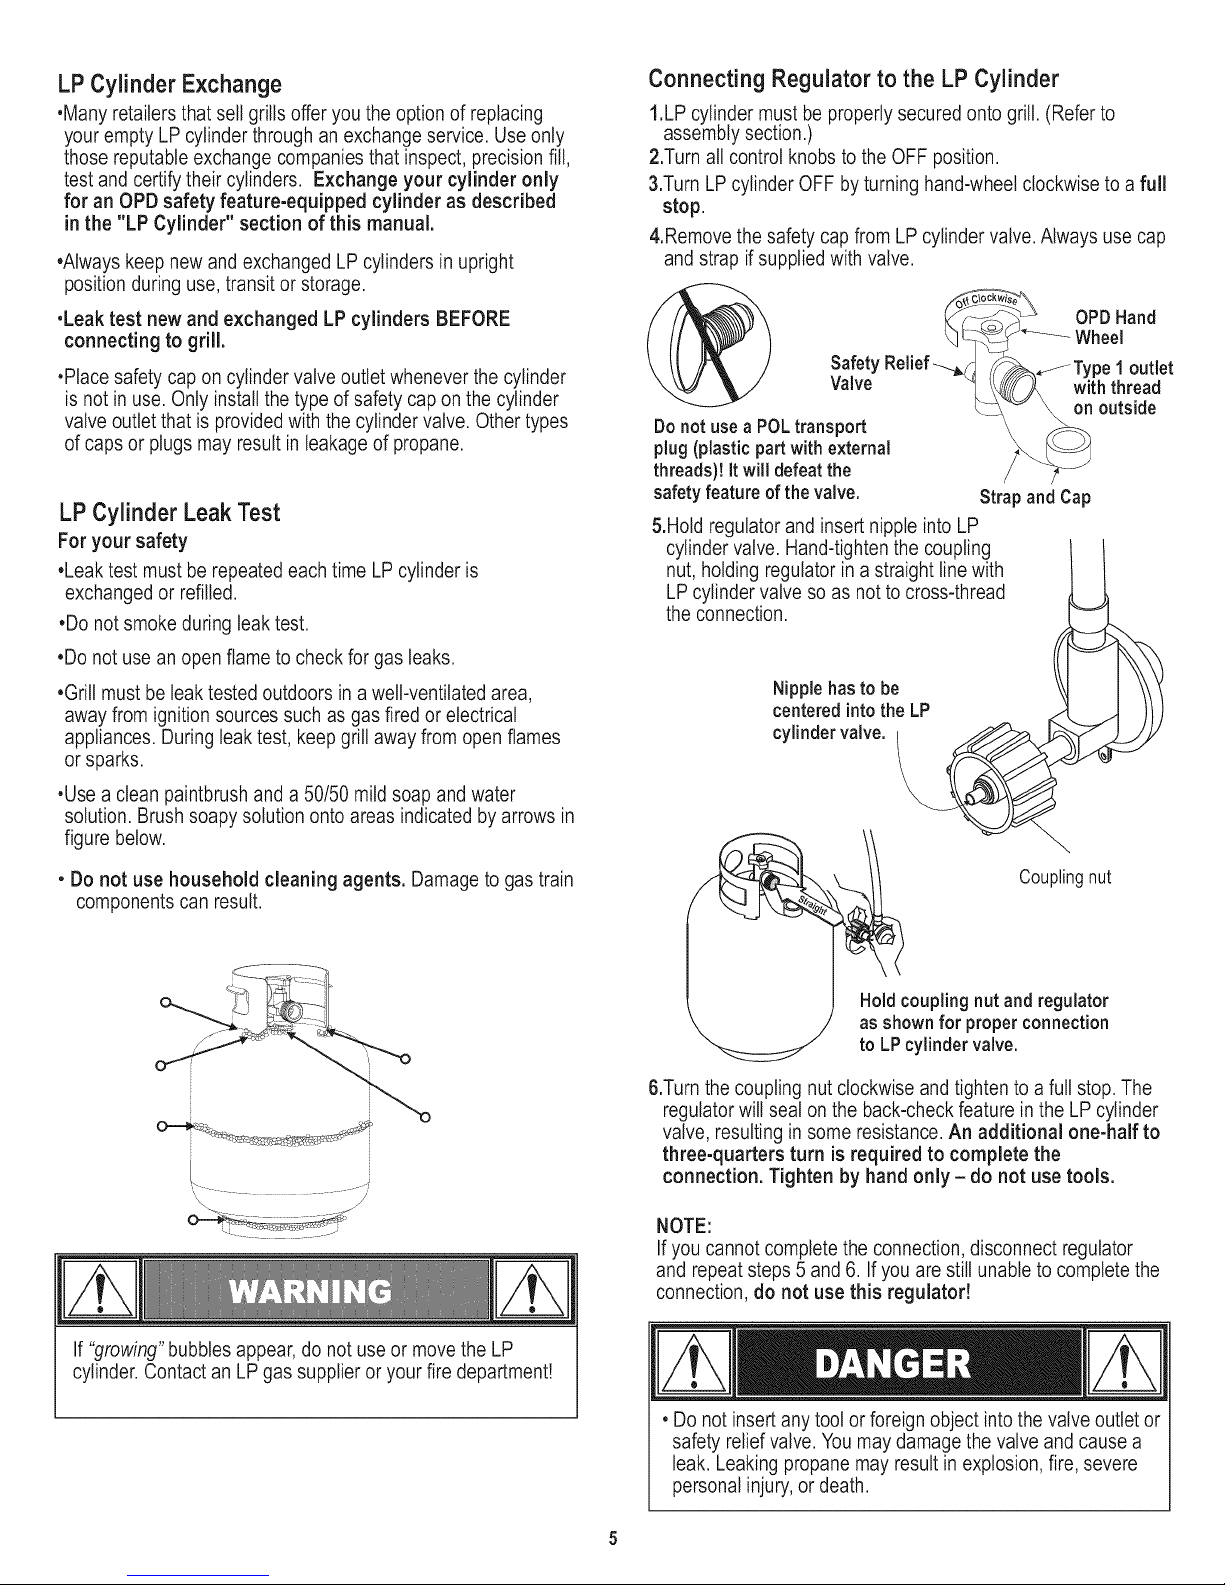
LPCylinder LeakTest
For your safety
•Leak test must be repeated each time LP cylinder is
exchanged or refilled.
•Do notsmoke during leak test.
•Do not use an open flame to check for gas leaks.
•Grill mustbe leak tested outdoors in a well-ventilated area,
away from ignition sources such as gas fired or electrical
appliances. Duringleak test, keep grill away from open flames
or sparks.
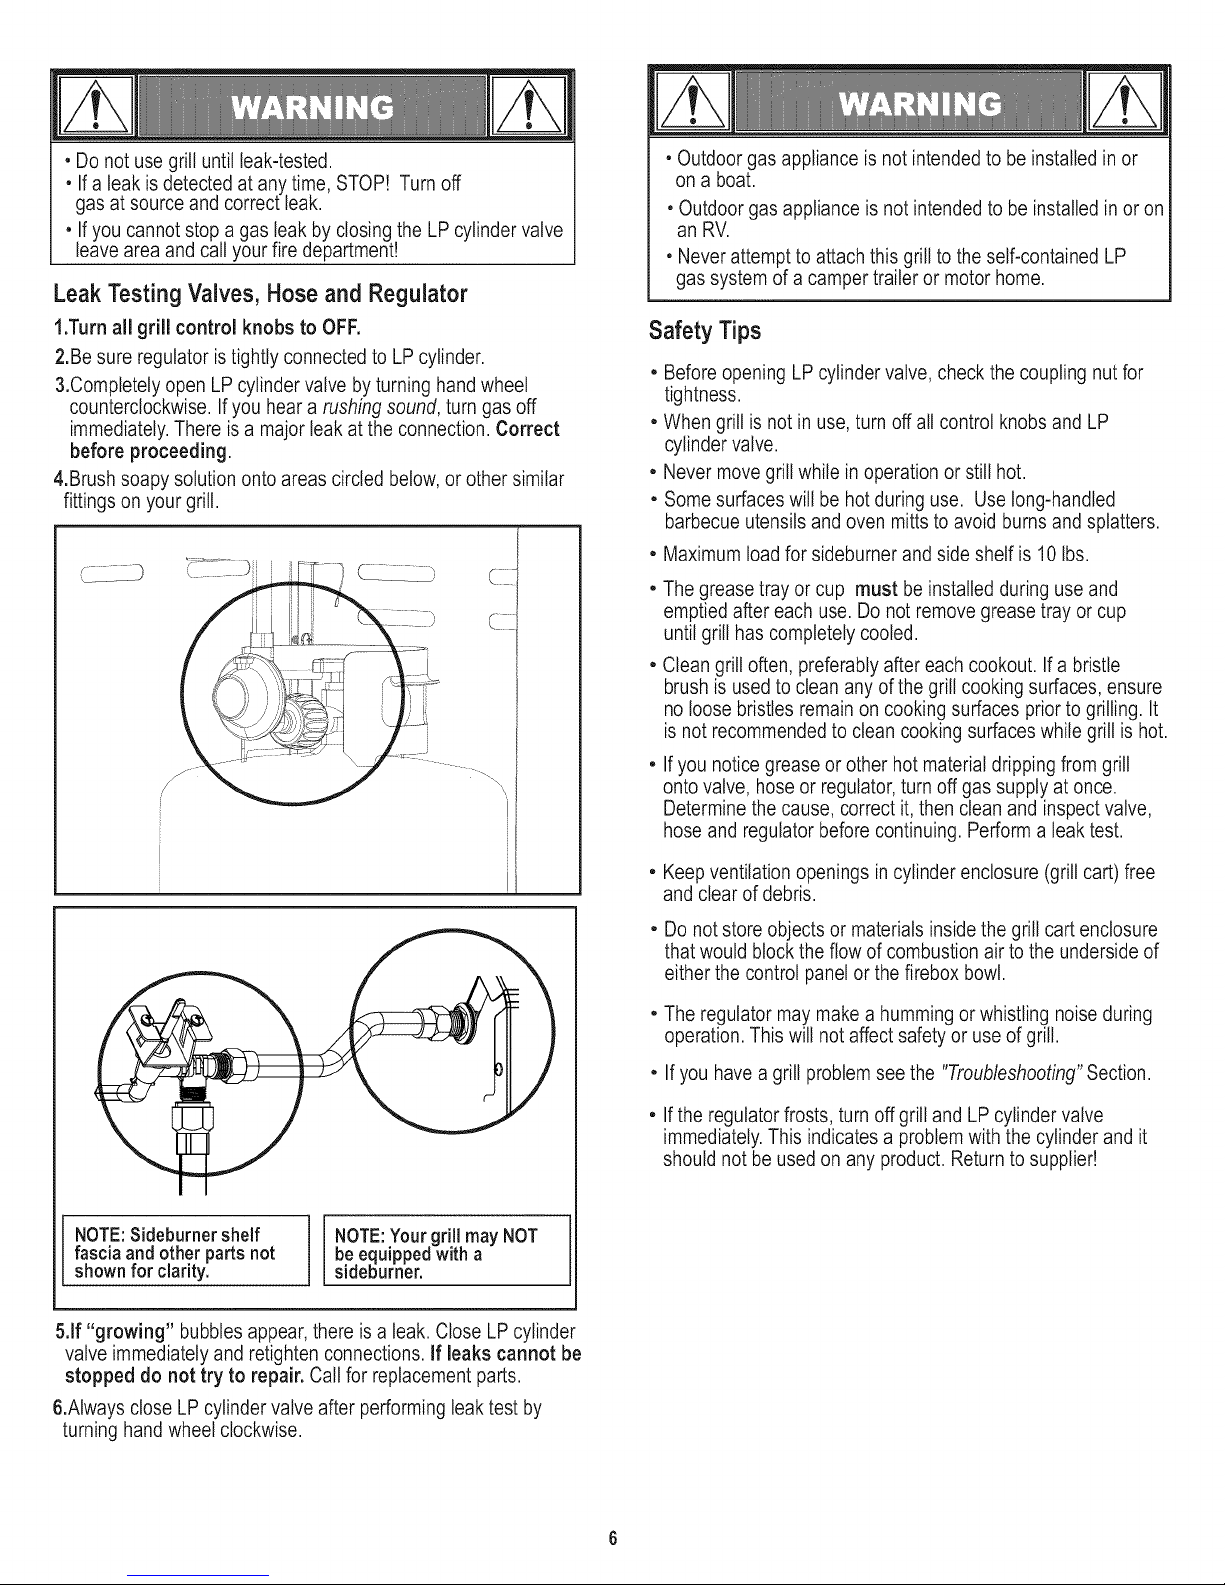
Connecting Regulator to the LPCylinder
I.LP cylinder must be properly secured onto grill. (Refer to
assembly section.)
2.Turn all control knobs to the OFF position.
3.TurnLP cylinder OFF by turning hand-wheel clockwise to a full
stop.
4.Remove the safety cap from LP cylinder valve.Always use cap
and strap if supplied with valve.
OPDHand
Wheel
Valve
Safety Relief-_._(
Donot use a POLtransport
plug (plastic partwith external
threads}! it willdefeatthe
safety feature of thevalve. Strapand Cap
5.Hold regulator and insert nipple into LP
cylinder valve. Hand-tighten the coupling
nut, holding regulator in a straight line with
LP cylinder valve so as not to cross-thread
the connection.
Nipplehasto be
centeredintothe LP
cylinder valve.
Type1 outlet
withthread
outside
•Usea clean paintbrush and a 50/50 mild soap and water
solution. Brushsoapy solution onto areas indicated by arrows in
figure below.
, Do not use household cleaning agents. Damage to gas train
components can result.
\ /
If "growing" bubbles appear,do not use or move the LP
cylinder. Contact an LP gas supplier or your fire department!
Couplingnut
Holdcoupling nutand regulator
as shownfor properconnection
to LPcylinder valve.
6.Turn the coupling nut clockwise and tighten to a full stop. The
regulator will seal on the back-check feature in the LP cylinder
valve, resulting in some resistance. An additional one-half to
three-quarters turn is required to complete the
connection. Tighten by hand only - do not use tools.
NOTE:
If you cannot complete the connection,disconnect regulator
and repeat steps 5 and 6. If you are still unable to complete the
connection, do not use this regulator!
•Do not insert any tool or foreign object into the valve outlet or
safety reliefvalve. You may damage the valve and cause a
leak. Leakingpropane may result in explosion, fire, severe
personal injury,or death.
°Donotusegrilluntilleak-tested.
°Ifaleakisdetectedatanytime,STOP!Turnoff
gasatsourceandcorrectleak.
°IfyoucannotstopagasleakbyclosingtheLP cylinder valve
leavearea and call your fire department!
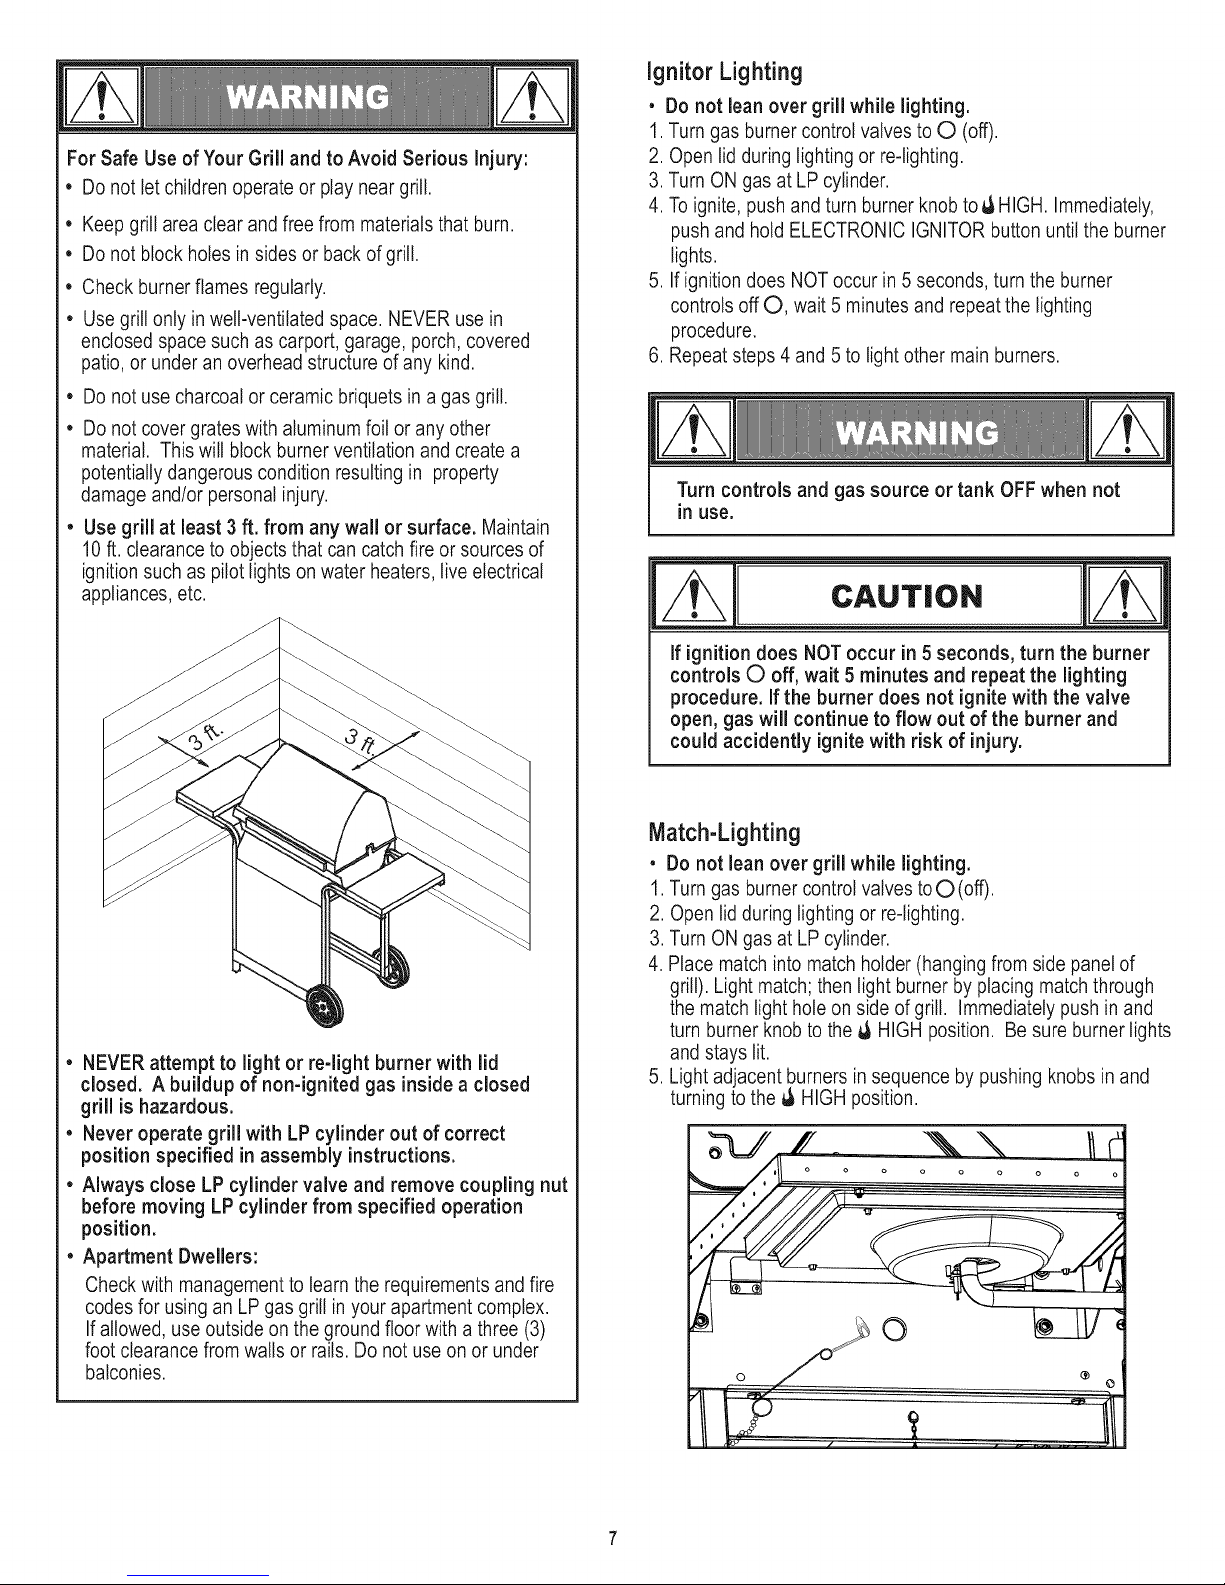
LeakTestingValves, Hose and Regulator
1.Turn all grill control knobs to OFF.
2.Be sure regulator is tightly connected to LP cylinder.
3.Completely open LP cylinder valve byturning hand wheel
counterclockwise. If you hear a rushing sound, turn gas off
immediately.There is a major leakat the connection. Correct
before proceeding.
4.Brush soapy solution onto areas circled below, or other similar
fittings on your grill.
(
• Outdoor gas appliance is not intendedto be installed in or
on a boat.
• Outdoor gas appliance is not intended to be installed in or or
an RV.
• Never attempt to attach this grill to the self-contained LP
gas system of a camper trailer or motor home.
SafetyTips
, Beforeopening LP cylinder valve, check the coupling nutfor
tightness.
, When grill is not in use, turn off all control knobs and LP
cylinder valve.
, Never move grill while in operation or still hot.
, Somesurfaces will be hot during use. Use long-handled
barbecue utensils and oven mitts to avoid burns and splatters.
, Maximum load for sideburner and side shelf is 10 Ibs.
, The grease tray or cup must beinstalled during use and
emptied after each use. Do not remove grease tray or cup
until grill has completely cooled.
, Clean grill often, preferably after each cookout. If a bristle
brushis used to clean any of the grill cooking surfaces, ensure
no loose bristles remain on cooking surfaces prior to grilling. It
is not recommended to clean cooking surfaces while grill is hot.
, If you notice grease or other hot material dripping from grill
onto valve, hoseor regulator, turn offgas supply at once.
Determine the cause, correct it, then clean and inspect valve,
hose and regulator before continuing. Perform a leak test.
NOTE:Sideburnershelf
fasciaand other partsnot
shown for clarity.
5.If "growing" bubblesappear, there is a leak. Close LP cylinder
valve immediately and retighten connections. If leaks cannot be
stopped do not try to repair. Call for replacement parts.
6.Always close LP cylinder valve after performing leak test by
turning hand wheel clockwise.
NOTE:Yourgrill may NOT
be equippedwith a
sideburner.
, Keep ventilation openings in cylinder enclosure (grill cart) free
and clear of debris.
, Do notstore objects or materials inside the grill cart enclosure
that would block the flow of combustion air to the underside of
either the control panel or the firebox bowl.
, The regulator may make a humming or whistling noise during
operation. This will not affect safety or useof grill.
, If you have a grill problemsee the "Troubleshooting" Section.
, If the regulator frosts, turn off grill and LP cylinder valve
immediately.This indicates a problemwith the cylinder and it
should not be used on any product. Return to supplier!
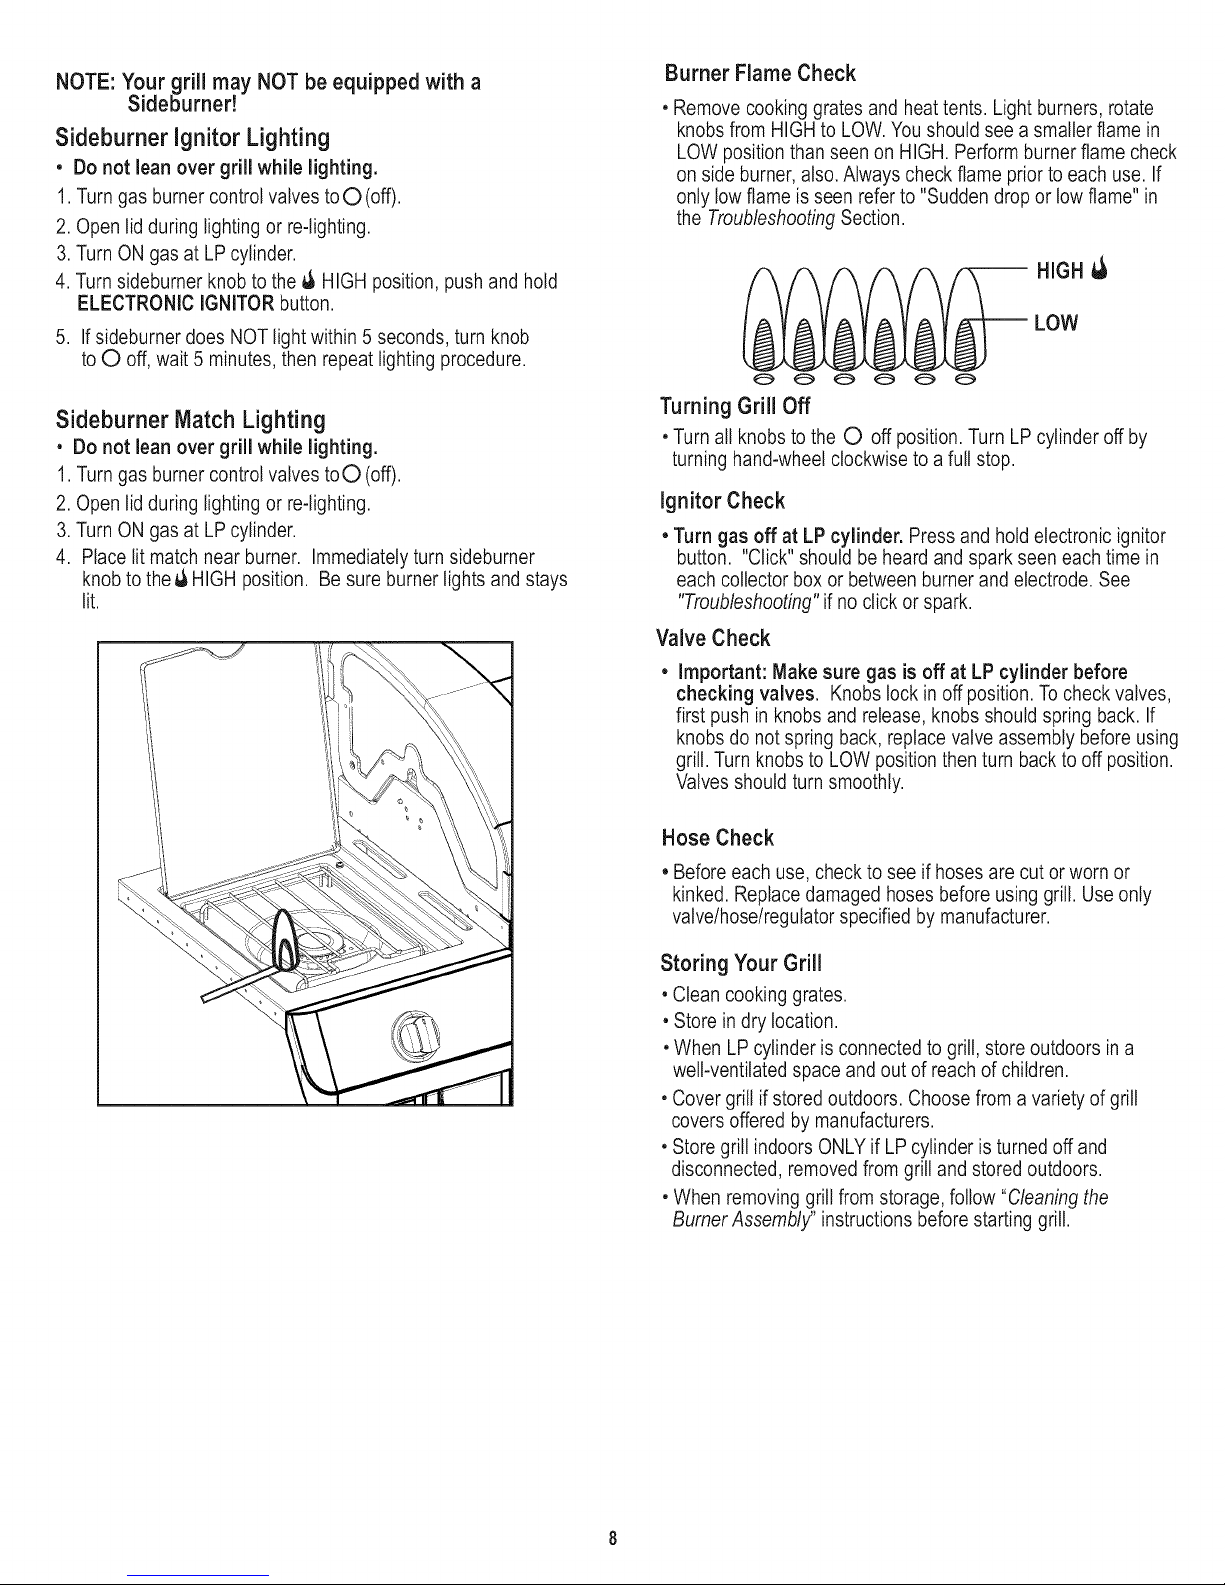
ForSafeUseof Your Grill and to Avoid Serious injury:
, Do not let children operate or play near grill.
, Keep grill area clearand free from materials that burn.
• Do not block holes in sides or back ofgrill.
• Check burner flames regularly.
• Use grill only in well-ventilated space. NEVER use in
enclosed space such as carport, garage, porch, covered
patio, or under an overhead structure of any kind.
• Do notuse charcoal or ceramic briquets in a gas grill.
• Donot cover grates with aluminum foil or any other
material. This will block burner ventilation and create a
potentiallydangerous condition resulting in property
damage and/or personal injury.
• Use grill at least 3 ft. from any wall or surface. Maintain
10 ft. clearance to objects that can catch fire or sources of
ignitionsuch as pilot lights on water heaters, live electrical
appliances, etc.
Ignitor Lighting
• Do not lean over grill while lighting.
1. Turn gas burner control valves to O (off).
2. Open lid during lighting or re-lighting.
3. Turn ON gas at LP cylinder.
4. To ignite, push and turn burner knob to&HIGH. Immediately,
push and hold ELECTRONIC IGNITOR button until the burner
lights.
5. If ignitiondoes NOT occur in 5 seconds, turn the burner
controls off O, wait 5 minutesand repeat the lighting
procedure.
6. Repeat steps 4 and 5 to light other main burners.
Turn controls and gas source or tank OFF when not
in use.
CAUTION
If ignition does NOT occur in 5 seconds, turn the burner
controls O off, wait 5 minutes and repeat the lighting
procedure. If the burner does not ignite with the valve
open, gas will continue to flow out of the burner and
could accidently ignite with risk of injury.
Y
• NEVERattempt to light or re-light burner with lid
closed, A buildup of non-ignited gas inside a closed
grill is hazardous.
• Never operate grill with LP cylinder out of correct
position specified in assembly instructions.
• Always close LP cylinder valve and remove coupling nut
before moving LP cylinder from specified operation
position.
• Apartment Dwellers:
Check with management to learn the requirements and fire
codes for using an LP gas grill in your apartment complex.
If allowed, use outside on the ground floor with a three (3)
foot clearance from walls or rails. Do not use on or under
balconies.
Match-Lighting
• Do not lean over grill while lighting,
1.Turn gas burner control valves to0 (off).
2. Open lid during lighting or re-lighting.
3. Turn ON gas at LP cylinder.
4. Place match into match holder (hanging from side panel of
grill). Light match; then light burner by placing match through
the match light hole onside ofgrill. Immediatelypush in and
turn burner knob to the _ HIGH position. Be sure burner lights
and stays lit.
5. Light adjacent burners in sequence by pushing knobs in and
turning to the & HIGH position.
NOTE:Yourgrill may NOT be equipped with a
Sidebumer!
Sideburner Ignitor Lighting
, Do not lean over grill while lighting,
I. Turn gas burner control valves to 0 (off).
2. Open lid during lighting or re-lighting.
3. Turn ON gas at LP cylinder.
4. Turn sidebumer knob to the _ HIGH position, push and hold
ELECTRONIC IGNITORbutton.
5. Ifsideburner does NOT light within 5 seconds, turn knob
to O off, wait 5 minutes, then repeat lighting procedure.
Burner Flame Check
•Remove cooking grates and heat tents. Light burners, rotate
knobs from HIGH to LOW. Youshould see a smaller flame in
LOW position than seen on HIGH. Perform burner flame check
on side burner, also. Always check flame prior to each use. If
only low flame is seen refer to "Sudden drop or lowflame" in
the TroubleshootingSection.
-- LOW
Sideburner Match Lighting
• Do not lean over grill while lighting,
1.Turn gas burner control valves toO (off).
2. Open lid during lighting or re-lighting.
3. Turn ON gas at LP cylinder.
4. Place lit match near burner. Immediately turn sideburner
knob to the _ HIGH position. Be sure burner lights and stays
lit.
Turning Grill Off
•Turn all knobs to the O off position. Turn LP cylinder off by
turning hand-wheel clockwise to a full stop.
Ignitor Check
• Turn gas off at LP cylinder. Press and hold electronic ignitor
button. "Click" should be heard and spark seen each time in
each collector box or between burner and electrode. See
"Troubleshooting"if no clickor spark.
Valve Check
• Important: Make sure gas is off at LP cylinder before
checking valves. Knobs lock in off position. Tocheck valves,
first push in knobs and release, knobs should spring back. If
knobs do not spring back, replace valve assembly before using
grill. Turn knobs to LOW position then turn back to off position.
Valves should turn smoothly.
Hose Check
• Before each use, check to see if hoses are cut or worn or
kinked. Replace damaged hoses before using grill. Use only
valve/hose/regulator specified by manufacturer.
Storing Your Grill
• Clean cooking grates.
•Store in dry location.
•When LP cylinder is connected to grill, store outdoors in a
well-ventilated space and out of reach of children.
• Cover grill if stored outdoors. Choose from a variety of grill
covers offered by manufacturers.
• Store grill indoors ONLY if LP cylinder is turned off and
disconnected, removed from grill and stored outdoors.
•When removing grill from storage, follow "Cleaning the
Burner Assembly" instructions before starting grill.
CAUTION
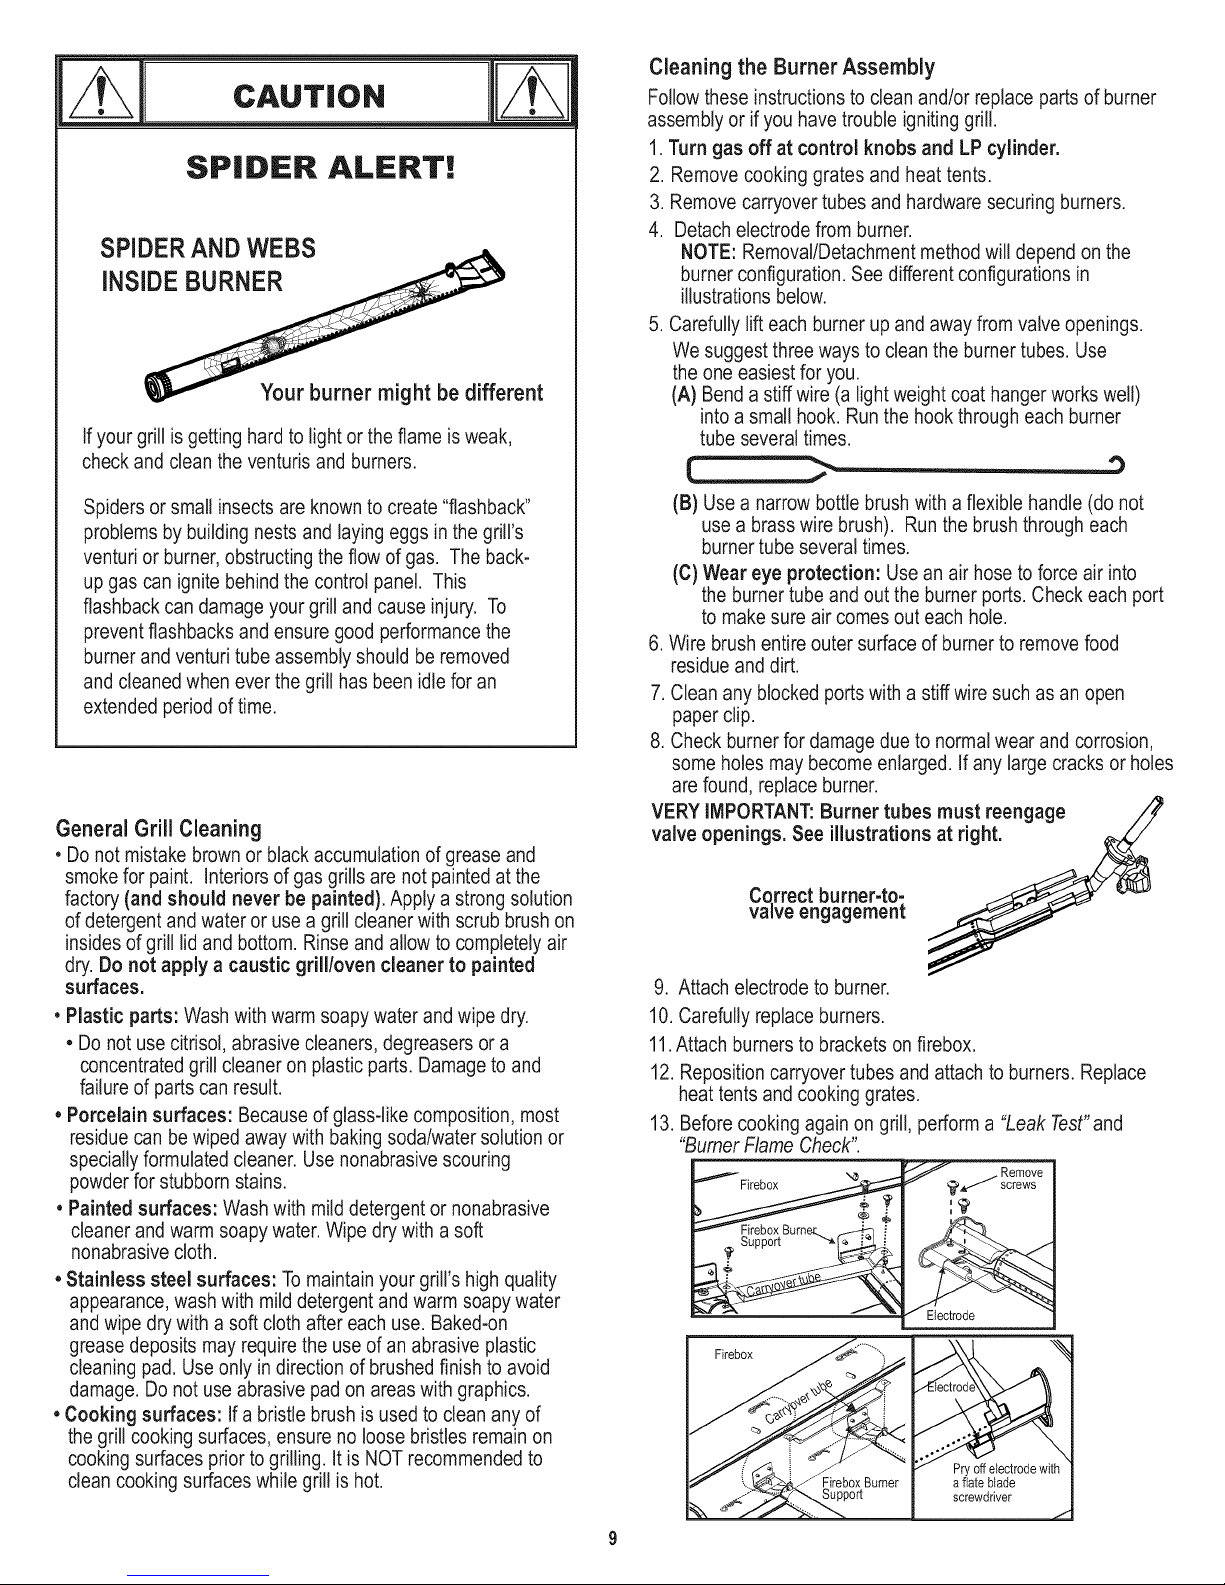
SPIDER ALERT!
SPIDERAND WEBS
INSI
Your burner might be different
If your grill is getting hard to light or the flame is weak,
checkand clean the venturis and burners.
Spidersor small insects are known to create "flashback"
problems by building nests and laying eggs in the grill's
venturi or burner, obstructing the flow of gas. The back-
up gas can ignite behind the control panel. This
flashback can damage your grill and cause injury. To
prevent flashbacks and ensure good performancethe
burner and venturi tube assembly should be removed
and cleaned when ever the grill has been idle for an
extended period of time.
General Grill Cleaning
. Do not mistake brownor black accumulation of grease and
smoke for paint. Interiorsof gas grills are not painted at the
factory (and should never be painted). Apply a strong solution
of detergent and water or usea grill cleaner with scrub brush on
insides of grill lid and bottom. Rinse and allow to completely air
dry. Do not apply a caustic grill/oven cleaner to painted
surfaces.
. Plastic parts: Wash with warm soapy water and wipe dry.
,,Do not use citrisol, abrasive cleaners, degreasers or a
concentrated grill cleaner on plastic parts. Damage to and
failure of parts can result.
. Porcelain surfaces: Because of glass-like composition, most
residuecan be wiped away with baking soda/water solution or
specially formulated cleaner. Use nonabrasive scouring
powderfor stubborn stains.
, Painted surfaces: Wash with mild detergent or nonabrasive
cleaner and warm soapy water. Wipe drywith a soft
nonabrasive cloth.
. Stainless steel surfaces: To maintain your grill's high quality
appearance, wash with mild detergent and warm soapy water
and wipe dry with a soft cloth after each use. Baked-on
grease deposits may require the use of an abrasive plastic
cleaning pad. Use only in direction of brushed finish to avoid
damage. Do not use abrasive pad on areas with graphics.
. Cooking surfaces: If a bristle brush is used to clean any of
thegrill cooking surfaces, ensure no loose bristles remain on
cooking surfaces prior to grilling. It is NOT recommended to
clean cooking surfaceswhile grill is hot.
Cleaning the Burner Assembly
Follow these instructions to clean and/or replace parts of burner
assembly or if you have trouble ignitinggrill.
1. Turn gas off at control knobs and LP cylinder,
2. Remove cooking grates and heat tents.
3. Removecarryover tubes and hardware securing burners.
4. Detach electrode from burner.
NOTE: Removal/Detachment method will depend on the
burner configuration. See differentconfigurations in
illustrations below.
5. Carefully lift each burner up and away from valve openings.
We suggest three ways to clean the burner tubes. Use
the one easiest for you.
(A) Bend a stiff wire (a light weight coat hanger works well)
intoa small hook. Runthe hook through each burner
tube several times.
,,)
(B) Use a narrow bottle brushwith a flexible handle (do not
use a brass wire brush). Run the brush through each
burner tube several times.
(C) Wear eye protection: Use an air hose to force air into
the burner tube and out the burner ports. Check each port
to make sure air comes out each hole.
6. Wire brush entire outer surface of burner to remove food
residue and dirt.
7. Clean any blocked ports with a stiff wire such as an open
paper clip.
8. Check burner for damage due to normal wear and corrosion,
some holes may become enlarged. If any large cracks or holes
are found, replace burner.
VERY IMPORTANT:Burner tubes must reengage //_
valve openings, See illustrations at right, /_
9. Attach electrode to burner.
10. Carefully replace burners.
11.Attach burners to brackets on firebox.
12. Reposition carryover tubes and attach to burners. Replace
heat tents and cooking grates.
13. Before cooking again on grill, perform a "Leak Test"and
"BurnerFlame Check".
Electrode
Firebox ..
_ c_+ '
_...._¢_ FireboxBurner
aflate blade
screwdriver
,,..-

rii| a|o en Light
LIGHT OPERATION iNSTRUCTiONS
1. Make sure grill has been turn off and cool and the light switch on
the control panel is in the "OFF" position,
2. Connect light plug to an extension cord, then put the extension
cord plug into the outlet onthe wall.
3. Turn the light switch to "ON".
. Keep any electricalsupply cord away from any
heated surface.
• Use the shortest length extension cord required.
Do not connect 2 or more extension cords together.
Bulb Replacement
A Make sure light switch on the control panel is inthe "OFF" position and adapter plug is disconnected from outlet.
1. 2. 3.
Li
for outdoor use
cord,
Release the screw securing the light
socket,
I li cAuT,o.
Pull out the bulb and replace
with a new bulb.
Take care not to touch the bulb with your bare fingers.
Touching bulb with your skin can leave a film on the
bulb that causes it to burn out quickly.
Take out the socket and remove the lens.
Reverse instructions from step 3
through step 1 to re-install socket.
10
Loosen the two screws which are
locking the bulb.
Remark:skip step 3 if there is no screw
locking the bulb.
Bulb Specification
Bulb Type:Halogen
Wattage: 10W per bulb
Voltage: 12V
Continued on next page
Cleaning the Lens
1. Prior to cleaning, make sure grill hasbeenturn off andcool andthe lightswitchis inthe "OFF" position and the
lightplug isdisconnected from the power supply.
2. Do not clean the glass lens when warm. Allow to cool before cleaning. Sudden change in
temperature may cause cracking of the glass lens.
3. Use a damp towel to clean the surface of the glass lens.
4. Allow the lens to dry before reconnecting the light plug to the power supply and turning the
lightswitchto the "ON" position.
• Since 1971 the National Electric Code (NEC) has required Ground Fault Interrupter devices on all outdoor
circuits,
• If your residence was built before 1971, check with a qualified electrician to determine if a Ground Fault
interrupterprotector exists.
• Do not use this appliance if the circuit does not have GFI protection.
• Do not plug this appliance into an indoor circuit.
1. To protect against electric shock, do not immerse cord or plugs in water or other liquid.
2. Unplug from the outlet when not in use and before cleaning. Allow to cool before putting on or taking off parts.
3. Do not operate grill with a damaged cord, plug, or after the appliance malfunctions or has been damaged in any
manner.
4. Do not let the cord hang over the edge of a table or touch hot surfaces.
5. Do not use an outdoor cooking gas appliance for purposes other than intended.
6. When connecting, first connect plug to the outdoor cooking gas appliance then plug appliance into the outlet.
7. Use only a Ground Fault Interrupter(GFI) protected circuit with this outdoor cooking gas appliance.
8. Never remove the grounding plug or use with an adapter of 2 prongs.
9. Use only extension cords with a 3 prong grounding plug, rated for the power of the equipment, and approved for
outdoor use with a W-A marking.
11
This warranty only applies to units purchased from an authorized retailer. ManuPacturer warrants to the mziginal consumer-purchaser only that this
product shall be free from defects in workmanship and materials after correct assembly and under nolTnal and reasonable home use for the periods
indicated below beginning on the date of purchase*. The manut:acturer reserves the right to require that defective parts be returned, postage and or
fieight pre-paid by the consumer for review and examination.
SCOPE OF COVERAGE PERIOD OF COVERAGE TYPE OF FAILURE COVERAGE
Stainless Burner
Firebox and Lid
All Other Parts
*Note: A dated sales receipt WILL be required for wananty service.
The original consumer-purchaser will be responsible for all shipping charges for parts replaced under the terms of this limited warranty.
Limited Lifetime
2 years fiom date of purchase*
l year fiom date of purchase*
PERFORATION, MANUFACTURING,
AND MATERIAL DEFECTS ONLY
This limited warranty is applicable in the United States and Canada only, is only available to the original owner of the product and is not transferable.
Manufacturer requires proof of your date of purchase. Therefore, you should retain your sales slip or invoice. Registering your product is not a
substitute for proof of purchase and the manut:acturer is not responsible for or required to retain proof of purchase records.
This limited warranty applies to the functionality of the product ONLY and does not cover cosmetic issues such as scratches, dents, corrosions or
discoloring by heat, abrasive and chemical cleaners or any tools used in the assembly or installation of the appliance, surl_ace rust, or the
discoloration of stainless steel surPaces. Paint is not warranted and will require touch up. RUST is not considered a manufacturing or materials defect.
3'his limited warranty will not reimburse you for the cost of any inconvenience, food, personal injury or property damage.
ITEMS MANUFACTURER WILL NOT PAY FOR:
1. Shipping cost, standard or expedited, for warranty and replacement parts
2. Service calls to your home.
3. Repairs when your product is used tbr other than normal, single-family household or residential use.
4. Damage, t:aitures, or operating difficulties resulting from accident, alteration, careless handling, misuse, abuse, fire, flood,
acts of God, improper installation or maintenance, installation not in accordance with electrical or plumbing codes, or use
of products not approved by the manul:acturer.
5. Any food loss due to product failures or operating difl_culties.
6. Replacement parts or repair labor costs for units operated outside the United States or Canada.
7. Pickup and delivery of your product.
8. Repairs to parts or systems resulting t?om unauthorized modifications made to the product.
9. The removal and/or reinstallation of your product.
DISCLAIMER OF IMPLIED WARRANTIES and LIMITATION OF REMEDIES
Repair or replacement of defective parts is your exclusive remedy under the terms of this limited warranty. In the event of parts availability issues,
the manufacturer reserves the right to substitute like or similar parts that are equally functional.
Manufacturer will not be responsible for any consequential or incidental damages arising from the breach of either this limited warranty or any
applicable implied warranty, or for failure or damage resulting from acts of God, flnproper care and maintenance, grease fire, accident, alteration,
replacement of parts by anyone other than Manufacturer, misuse, transportation, commercial use, abuse, hostile environments (inclement weather,
acts of nature, animal tampering), improper installation or installation not in accordance with local codes or printed manufacturer instructions.
THIS LIMITED WARRANTY IS THE SOLE EXPRESS WARRANTY GIVEN BY THE MANUFACTURER. NO PRODUCT PERFORMANCE
SPECIFICATION OR DESCRIPTION WHEREVER APPEARING IS WARRANTED BY MANUFACTURER EXCEPT TO THE EXTENT SET
FORTH IN THIS LIMITED WARRANTYI ANY IMPLIED WARRANTY PROTECTION ARISING UNDER THE LAWS OF ANY STATE,
INCLUDING IMPLIED WARRANTY OF MERCHAN'IABILITY OR FITNESS FOR A PARTICULAR PURPOSE OR USE, IS HEREBY
LIMITED IN DURATION TO THE DURATION OF THIS LIMITED WARRANTYI
Neither dealers nor the retail establishment selling this product has any authority to make any additional warranties or to promise remedies
in addition to or inconsistent with those stated above. Manufacturer's maximunl liability, in any event, shall not exceed the purchase price of the
product paid by the original consumer.
NOTE: Some states do not allow an exclusion or limitation of incidental or consequential damages, so some of the above limitations or exclusions
may not apply to you. This limited warranty gives you specific legal rights as set foth herein. You may also have other rights which vary from state
to state. In the state of California only, if refinishing or replacement of the product is not commercially practicable, the retailer selling this product or
the Manufacturer will refund the purchase price paid for the product, less the amount directly attributable to use by the original consumer-purchaser
prior to discovery of the nonconformity. In addition, in the state of California only, you may take the product to the retail establishment selling this
product in order to obtain performance under this limited warranty.
If you wish to obtain performance of any obligation under this limited warranty, you should
Columbus, GA 31902-1240
Consumer returns will not be accepted unless a valid Return Authorization is first acquired. Authorized returns are clearly marked on the outside of
the package with an RA number and the package is shipped freight/postage pre-paid. Consumer returns that do not meet these standards will be
refused.
write to:
Consumer Relations
P. O. Box 1240
12
Por su propia seguridad......................... 13-15
Uso y mantenimiento........................... 15-22
Garantia limitada................................. 23
Armado ..................................... 24-37
Resoluci6n de problemas ....................... 40-41
Vista esquematica de las piezas..................... 42
Lista de piezas .................................. 44
Lista de herrajes .............................. 45-46
Tarjeta de inscripci6n ............................. 47
Simbolos de seguridad
Lossimbolos y las casillas ilustradas mas adelante explican Io
que significa cada encabezado. Lea y cumpla Io indicado en
los mensajesque se encuentran en todo e/manual.
Si siente olor a gas:
1. Cierre el paso de gas al aparato.
2. Apague toda llama al descubierto.
3. Abra la tapa.
4. Si el olor continua, guarde lejos de la aplicaci6n y
Ilame inmediatamente su surtidor del gas o su
cuerpo de bomberos.
1. No guarde ni use gasolina ni otros gases o liquidos
inflamables cerca de este ni de cualquier otto aparato.
2. No guarde un tanque de gaspropano, que no este
conectado, cerca de este ni de cualquier otro aparato.
A LA PERSONA QUE INSTALE O
ENSAMBLE ESTA PARR|LLA:
Dejeeste manual al cliente.
AL CONSUM|DOR:
Conserve este manual para que Io
3ueda consultar enel futuro.
ADVERTENClA: Indica una situaci6n potencialmente
peligrosa o una practica insegura que, de no evitarse, podria
causar lesiones leves o menores.
ADVERTENCIA: Indica una situaci6n potencialmente
_eeligrosaque, de no evitarse, podria causar la muerte o
siones graves.
PELIGRO: Indica una situaci6n peligrosa inminente que, de
no evitarse, ocasionara la muerte olesiones graves.
S61o para uso particular. No Io use para fines comerciales.
No intentereparar ni modificar la unidad de la
manguera/la v_lvula/el regulador debido a un
"supuesto" defecto. Toda modificaci6n a esta unidad
anulara la garantia y creara el riesgo de una fuga de
gas e incendio. Use _nicamente repuestos
autodzados, suministrados pot el fabdcante.
Si durante el funcionamiento las llamas se apagan
(Huele a gas o no se ve la llama)
1. Gire los controles del quemador a O APAGADO.
2. Abra la tapa.
3. Espere 5 minutos y repita el procedimiento de
encendido.
Si el quemador se apaga, el gas continuara escapando
del quemador y puede accidentalmente encenderse con
riesgo de lesiones.
Herramientas necesarias para el montaje:
Llave ajustabte (no incluido)
Destornillador (no incluido)
7/ 16"Combinaci6nIlave (noincluido)
Clavija para la rueda (incluido)
13
ADVERTENC|A //_
El no cumplir con todas instrucciones del fabdcante
puede ocasionar graves y/o daSos materials.
ADVERTENC|A Z_
Antes de empezar a ensamblar la parrilla y cocinar, lea y siga
todas las indicaciones de seguridad, las instrucciones de
ensamblado y las instrucciones de uso y de cuidado
ADVERTENC|A
Ciertas pueden tenet bordes cortantes. Si es necesario, use
guantes protectores.
Fuego de Grasa
• No es posible apagar los fuegos provocados pot la
grasa cerrando la tapa. Pot razones de seguridad, las
parriilas tienen aberturas de ventilaci6n.
• No use agua para apagar los fuegos provocados pot
la grasa.Esto puede ocasionar lesiones. Si surge un
fuego provocado pot la grasa, cierre ias perillas y el
tanque de gas.
• Si el asador no se ha iimpiado regularmente, podda
ocurrir fuego causado pot ia grasa que podria dafiar el
producto. Preste mucha atenci6n mientras precaiienta
o quema los residuos de comida para asegurar que no
se cause fuego debido a ia grasa.
, La mejor forma de prevenir el incendio de
grasas es limpiar frecuentemente la parrilla
siguiendo las instruccionesde Limpieza
general de la parrillay Limpiezadei
conjunto quemador.
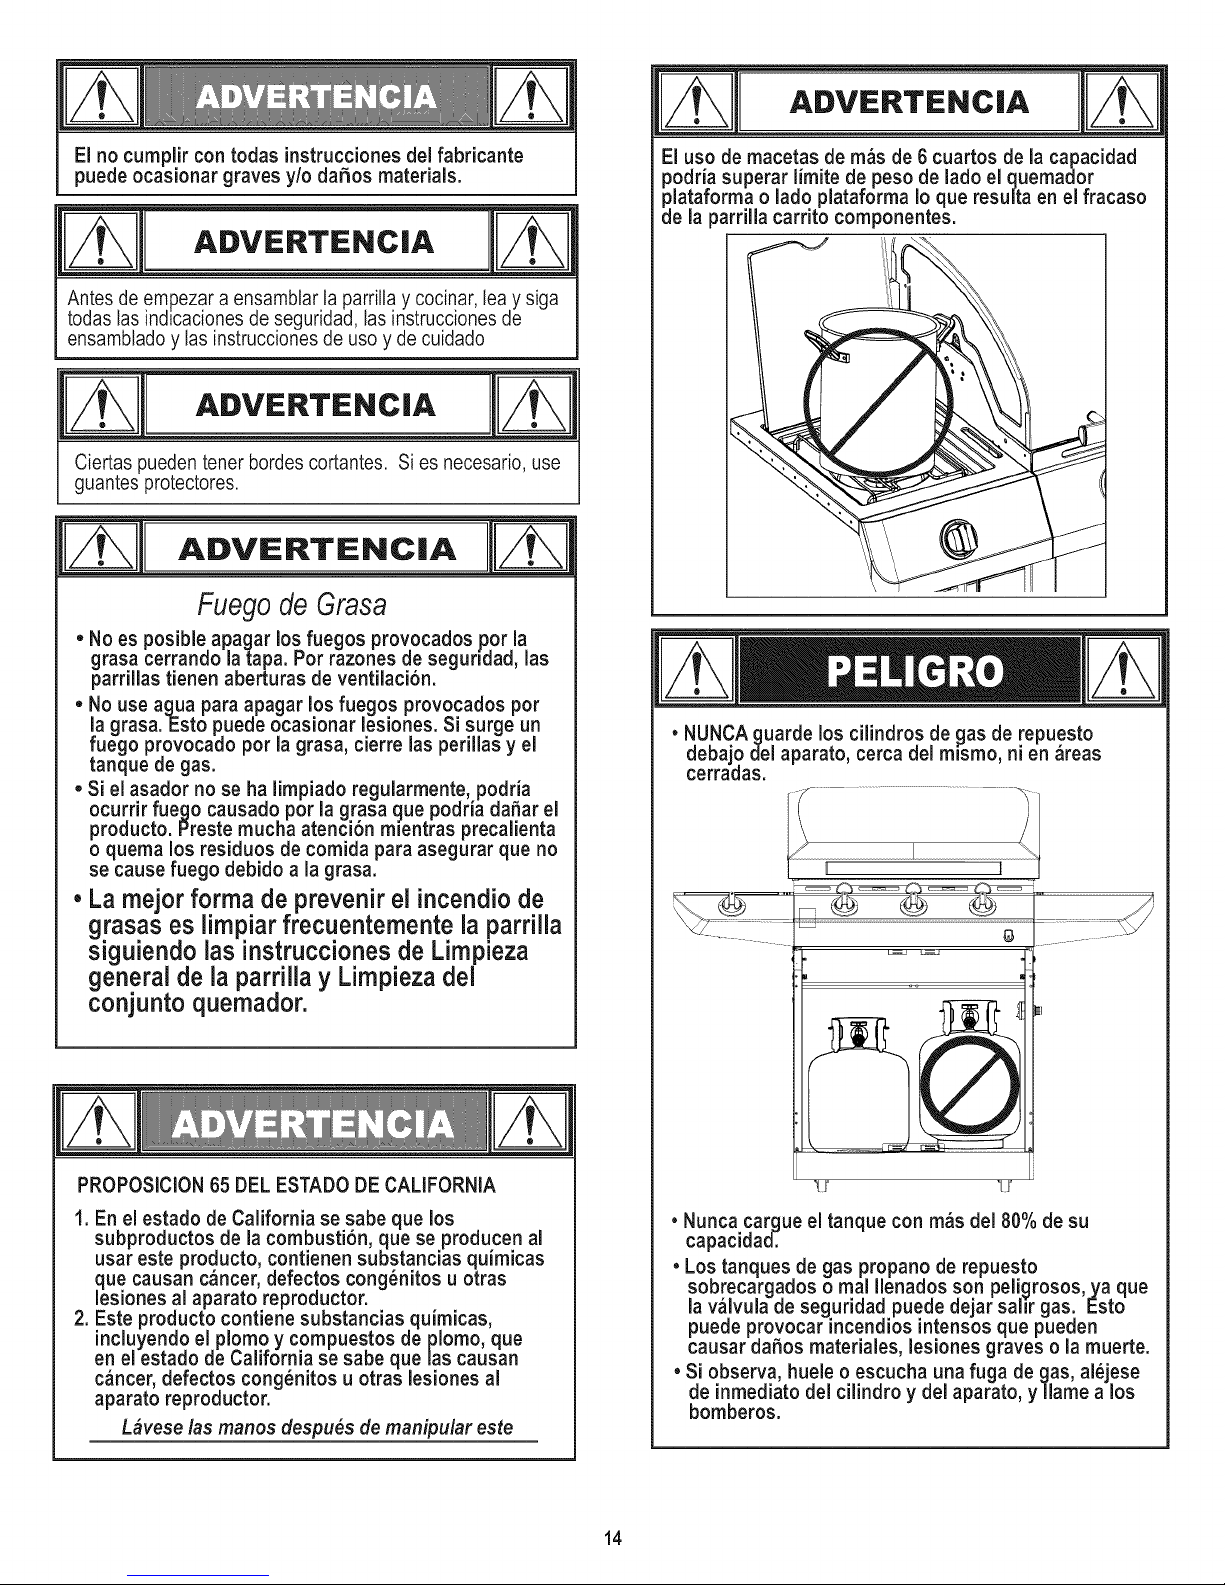
El uso de macetas de mas de 6 cuartos de ia capacidad
_odria superar limite de peso de iado el quemador
31ataformao lado plataforma Io que resulta en el fracaso
Je ia parriila carrito componentes.
• NUNCA guarde los cilindros de gas de repuesto
debajo del aparato, cerca del mismo, ni en areas
cerradas.
h_2
0
PROPOSiCiON 65 DEL ESTADO DE CALiFORNiA
1. En el estado de California se sabe que los
subproductos de la combusti6n, que se producen al
usar este producto, contienen substancias quimicas
que causan c_ncer, defectos cong_nitos u otras
lesiones al aparato reproductor.
2. Este _roducto contiene substancias quimicas,
inclu rendo el piomo y compuestos de piomo, que
en elestado de California se sabe que las causan
cancer, defectos cong_nitos u otras lesiones al
aparato reproductor.
Lavese /asmanos despu_s de manipuiar este
• Nunca cargue el tanque con mas del 80% de su
capacidad_
• Los tanques de gas propano de repuesto
sobrecargados o real Ilenados son peiigrosos,ya que
la valvula de seguridad puede dejar sahr gas. Esto
puede provocar incendios intensos que pueden
causar dafios materiales, lesiones graves o la muerte.
• Si observa, huele o escucha una fuga de gas, alejese
de inmediato del cilindro y del aparato, y/lame a los
bomberos.
14
Medidas de seguridad para la instalacion
• Utilice la parrilla, tal como se compr6, s61ocon LP
(propano), el gas y el regulador / valvula de montaje
suministrado. Si su parrilla es de doble combustible listo, un
kit de conversi6n debe ser adquirido para su uso con gas
natural.
• La instalaci6n de la parrilla debe cumplir con las
disposiciones de los c6digos locales,o, en su defecto, con el
National Fuel Gas Code (o C6digo nacional sobre gases
combustibles),y las normas NFPA54/ANSI Z223.1y
Natural Gas andPropane Installation Code(C6digo de la
instalaci6n del gas natural y del propano), CSA B149.1.
• Todoslos accesorios electricos (tal como el asador) deben
estar conectados a tierra de conformidad con los c6digos
locales,o con el National Electrical Code (C6digo nacional
sobre electricidad), ANSI / NFPA70. Mantenga todo cable
electrico o tuberia de suministro de combustible alejados de
lassuperficies calientes.
° Esta parrilla Qnicamentecuenta con la certificaci6n de
seguridad para ser usada en los Estados Unidos. No la
modifique para usarla en ningQnotro lugar. Cualquier
modificacio'npuede poner en peligro su seguridad.
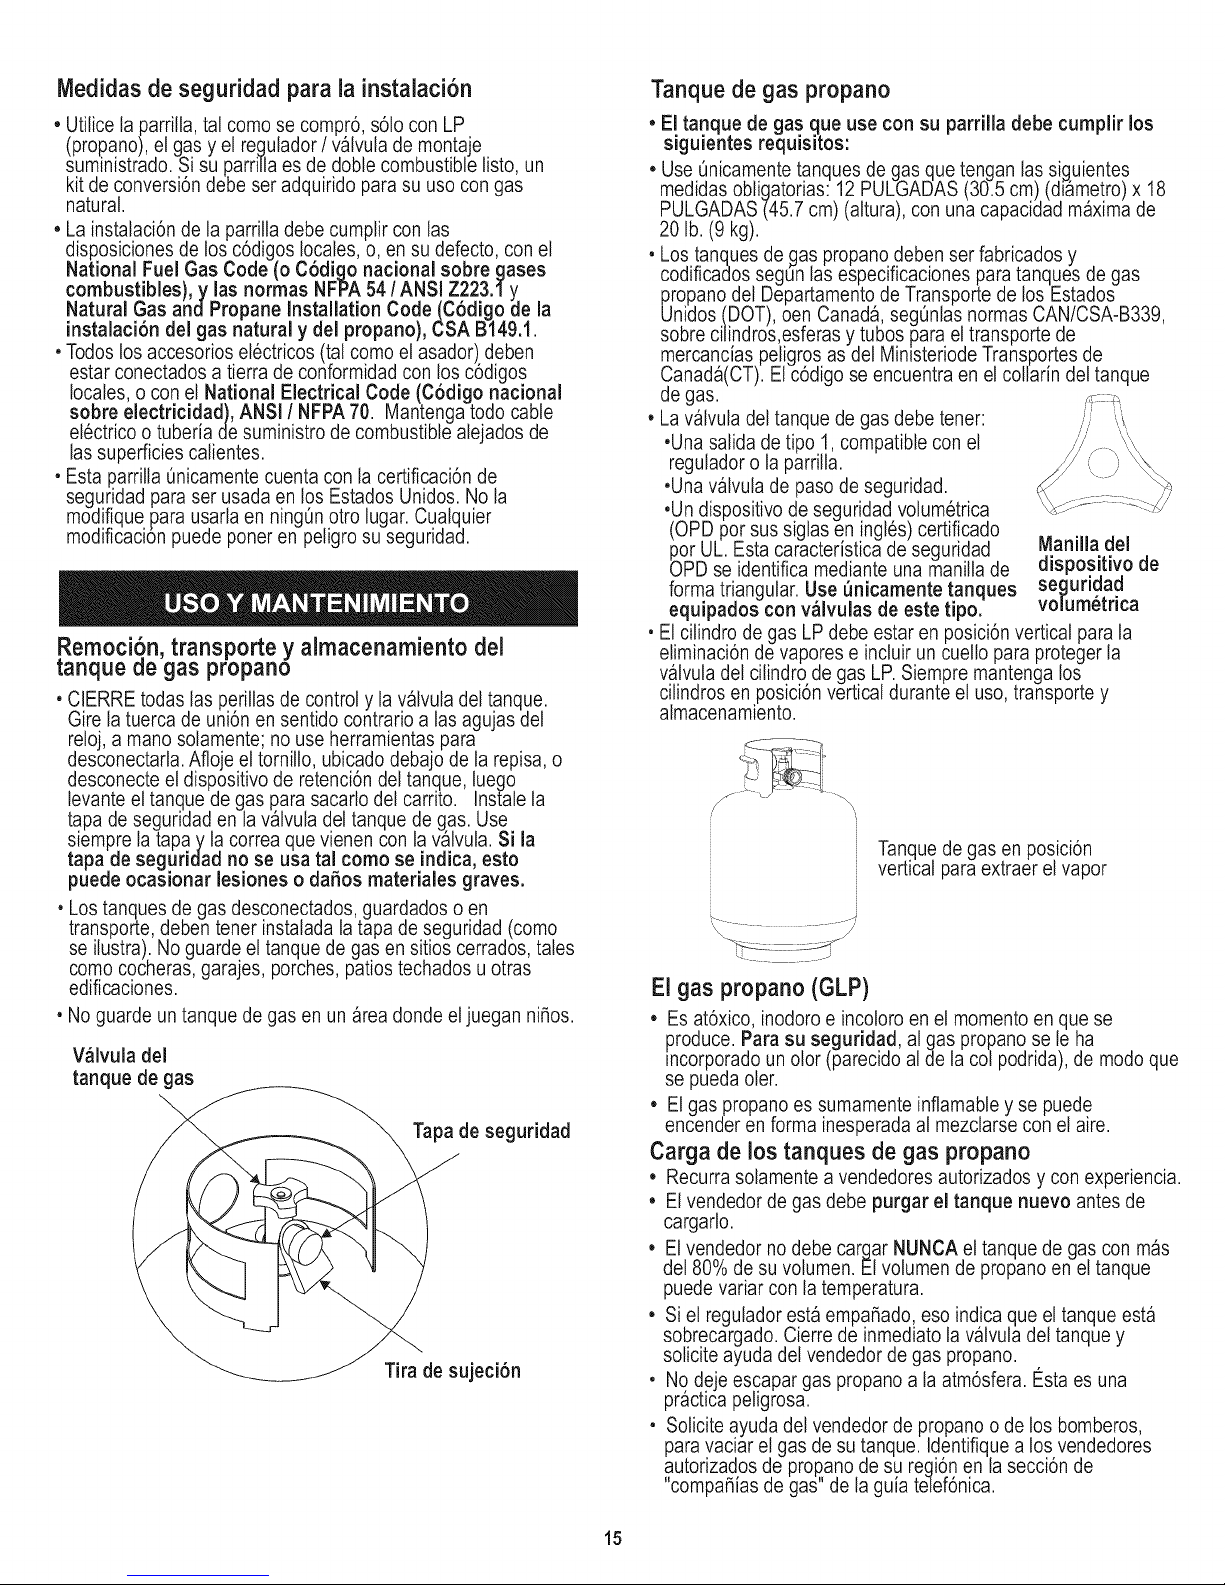
Remoci6.n,transporte y almacenamiento del
nqueae gas propano
• CIERRE todas las perillas de control y la valvula del tanque.
Gire la tuerca de uni6n en sentido contrario alas agujas del
reloj,a mano solamente; no use herramientas para
desconectarla. Afloje el tornillo, ubicadodebajo de la repisa, o
desconecte el dispositivo de retenci6n del tanque, luego
levante el tanque de gas para sacarlo del carrito. Ins[ale la
tapa de seguridad en la valvula dettanque de gas. Use
siempre la tapay la correa que vienen con la v_lvula. Si la
tapa de seguridad no se usa tal como se indica, esto
puede ocasionar lesiones o da_os materiales graves.
•Los tanques de gas desconectados, guardados o en
transporte, deben tener instalada la tapa de seguridad (como
se ilustra). No guarde el tanque de gas en sitios cerrados, tales
como cocheras, garajes, porches, patios techados u otras
edificaciones.
• No guarde un tanque de gas en un area donde el juegan nifios.
Valvula del
tanque de gas
Tapa de seguddad
Tira de sujeci6n
Tanquede gas propano
• El tanque de gas que use con su pardlla debe cumplir los
siguientes requisitos:
• Use _nicamente tanques de gas cluetengan lassifluientes
medidas obligatorias: 12 PULGADAS (30.5 cm)(dr_metro) x 18
PULGADAS(45.7 cm) (altura), con una capacidad maximade
20 lb. (9 kg).
• Los tanques de gas propano deben ser fabricados y
codificados segLinlas especificaciones para tanques de gas
propano del Departamento de Transporte de los Estados
Unidos (DOT), oen Canada, segQnlasnormas CAN/CSA-B339,
sobre ci/indros,esferas y tubos para el transporte de
mercancias peligros as del MintsteriodeTransportes de
Canada(CT). El c6digo se encuentra en el collarin del tanque
de gas. _-: -._
• La valvula del tanque de gas debe tener:
•Una salida de tipo 1, compatible con el
regulador o la parrilla.
•Una valvula de paso de seguridad.
•Un dispositivo de seguridad volumetrica
(OPD por sus siglas en ingles) certificado
por UL. Esta caracteristica de seguridad Manilla del
OPD se identifica mediante una manillade dispositivo de
forma triangular, Use _nicamente tanques seguridad
equipados con valvulas de este tipo. volumetrica
• El cilindro de gas LP debe estar en posici6n vertical para la
eliminaci6n de vapores e incluirun cuello para proteger la
valvula del cilindro de gas LP. Siempre mantenga los
cilindros en posici6n vertical durante el uso, transporte y
almacenamiento.
Tanquede gas en posici6n
vertical para extraer el vapor
/
i
El gas propano (GLP)
• Es at6xico, inodoro e incoloro en el momento en que se
produce. Para su seguridad, al gas propano se le ha
incorporado un olor (parecido al de la col podrida), de modo que
se pueda oler.
• Elgas propano es sumamente inflamable y se puede
encender en forma inesperada al mezclarse con el aire.
Carga de los tanques de gas propano
• Recurra solamente a vendedores autorizados y con experiencia.
• El vendedor de gas debe purgar el tanque nuevo antes de
cargarlo.
• Elvendedor no debe cargar NUNCA el tanque de gas con mas
• Siel regulador esta empafiado, eso indica que el tanque esta
• Nodeje escapar gas propano a la atm6sfera. Esta es una
• Solicite ayuda del vendedor de propano o de los bomberos,
o
de180Yode su volumen. El volumen de propano en el tanque
puede variar con la temperatura.
sobrecargado. Cierre de inmediato la valvula del tanque y
solicite ayuda del vendedor de gas propano.
practica petigrosa.
para vaciar el gas de su tanque. Identifiquea los vendedores
autorizados de propano de su regi6n en la secci6n de
"compa_ias de gas" de la guia te]ef6nica.
15
 Loading...