

Page 1
I
AChilr:'Brnil^
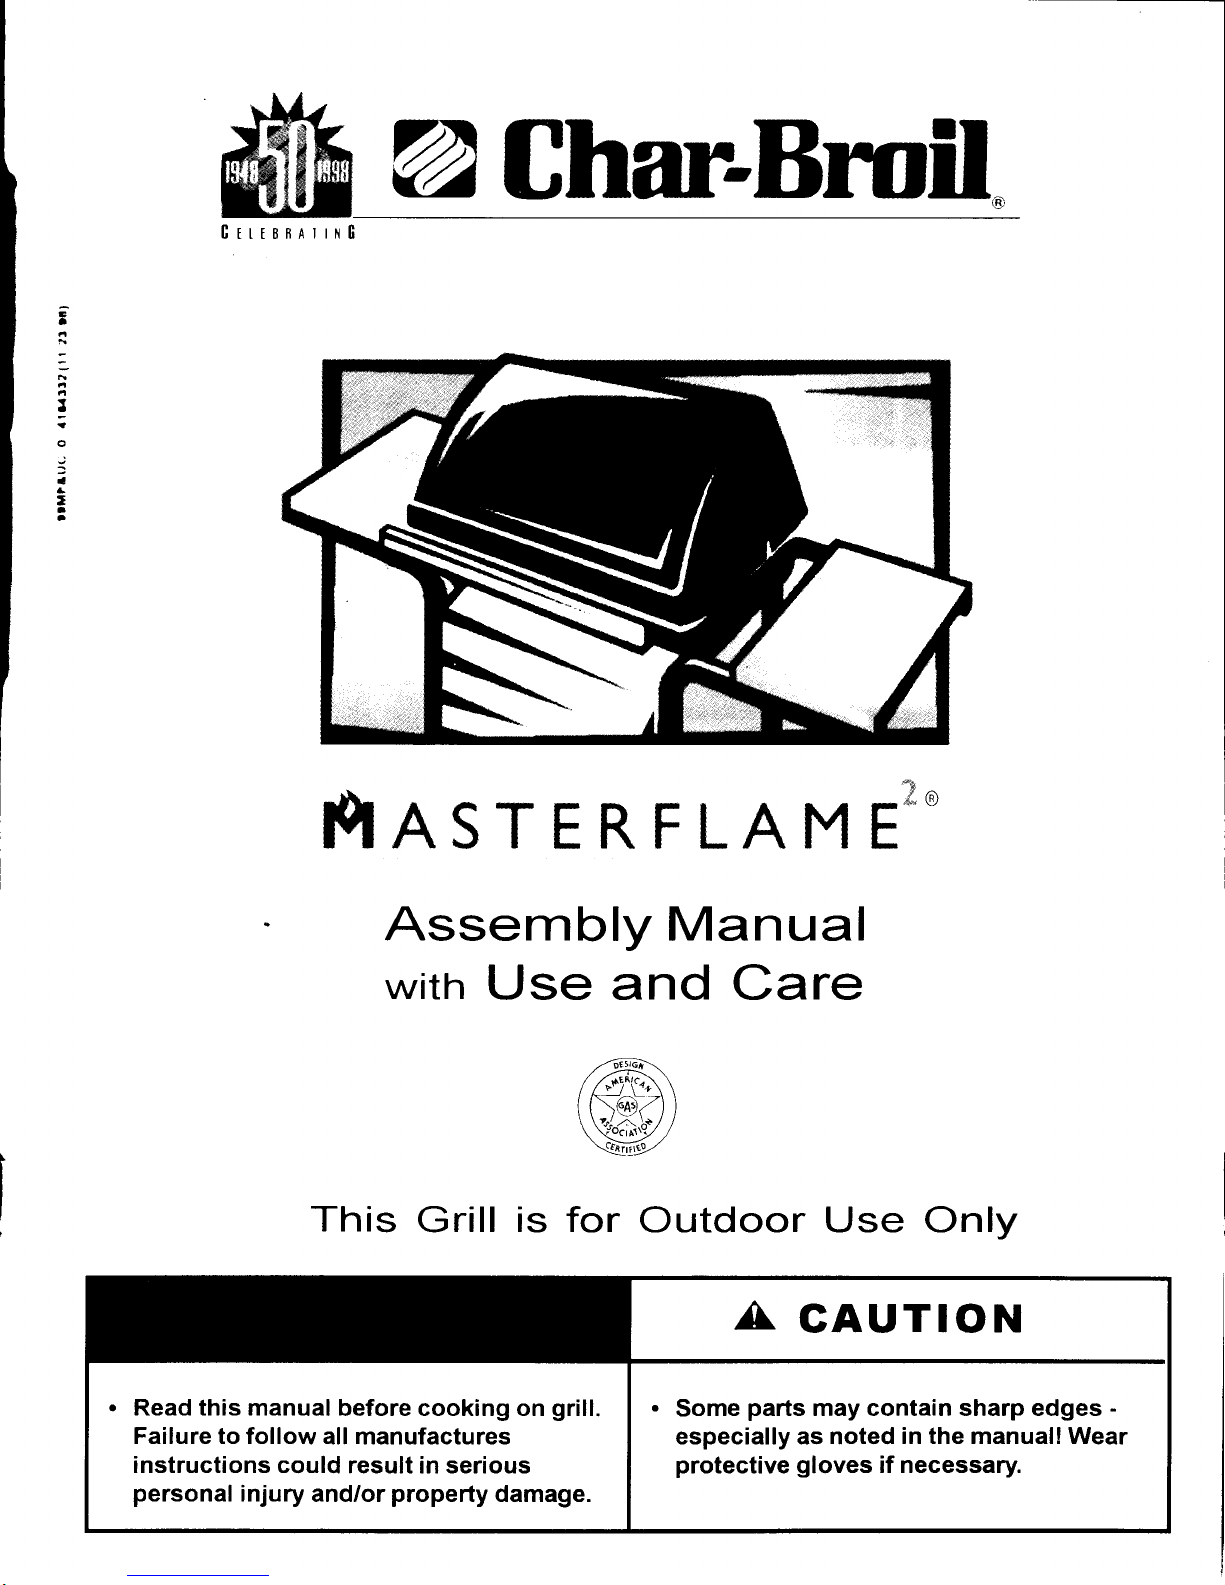
fiASTERFLAME*'
Assembly
Manual
with
Use and Care
/ffi\
{\-@Z))
w
This
Grill
is for
Outdoor Use Only
.
Read this manual
before cooking on
grill.
Failure to follow
all manufactures
instructions could
result in serious
personal
injury
and/or
property
damage.
.
Some
parts
may contain sharp edges
-
especially as noted
in the manual! Wear
protective
gloves
if necessary.
Page 2
FOR
YOUR
SAFETY
1. Do not store
or use
gasoline
or other
flammable vapors
and liquids
in the
vicinity of this
or any other
appliance.
2. An
LP Tank not connected
for use
shall
not
be stored in the vicinity
of this
or any
other
appliance.
FOR YOUR
SAFETY
lf
you
smell
gas:
1.
Shut
off
gas
to the appliance.
2. Extinguish any
open flame.
3.
Open
lid.
4.
lf odor continues,
immediately
call
your
gas
supplier or
your
fire department.
Installation
Safety
Precautions
.
This
grill
is designec
for
r,:.- ,vith an
LP
(propaner
!as:t-.
using the regulatorlva ve es:r.rrtr v ,sr00 led
Do not
us: ,,, :'
any other fuel source inc:-,:
''l',=
r,.ir
lnropane or
ral-.a
gas)
systems
.
Gt-ill rnstallatron
must conforr v!
i-
- -: ,
.:
"
::
absence
with
National Fuel
Gas Code NFPA 51 ANSI
22231 or CAN/CGA-8149.2 Propane Installatron
Code
Handlrng an'i storage of LP cylindels
''-
-.:'
, -
'
', '-
- -
r
Gas Code NFPA/ANSI 58. Grill s
r.1
':'
..=
'
.
,'
recreational
vehicles and/or boats
.
All electrical accessories
(srii.
.:r',r:::
:
electr
'caliy
g
o.-ded
in
acco'rr
:
National Electrical Code, ANSI / NFPA 70
.
Electrical Code. CSA C221.
(eec
:" , = i,'
or fuel supp y hoses awarl
fr
ol anv
|^::
:.."a
:.
Assembler
or Consumer
.
Assembler,
Leave this manual
wlth the
glll
for
consumter
.
Consumer Retain this manual
for future reference
Call Grill Service
Center
for
Help
and
Pafts
.
lf
you
need help or warranty
parts
call 81-800-241-7548
or
send a FAX to 1 706-576
6355
Business hours
Open 24 hours
-
Seven days a
week
.
To order
non-warranty replacement
parts
or buy
accessorres
(grill
cover cleaners,
parnil
call1 800 993
2677
or
send a FAX
to 1-706 565 2121
.
Please know
your
Model number
Date of Purchase and
Carton
Label
number
prior
to calling
ldentifying
Grill
Model
.Fourth
digitof model number found
on iabel outsrde
of
grill
box
or on
yellow
reference sheet rnside
the box Example
463(7)985 representing
a 7000 model
grill
Safety Symbols
.
The
sylrbois J,-.1 roxes sn:,\'- c: ,',
headrng means ReaC alo
fr
o,^,
:
throughout the manual
.
WARNING: Be
alert to the
possibility
of serious bodrly
inlury
if
the
instrLrctions
are
not followed. Be
sure to
read
and carefully
follow
all of the
messages
A
GAUTION
CAUTI0N:
Indicates
a
potent
a v
r?ZOr'ior,s
9tu3t,
which, if not
avoided
nray
:es.:
'
-
".' :'-c,fer*
iniurv.
DANGER: Indicates
ar
nrli.r nently
haza'l:-s
s:-:...^'
which if
not
avoided
ur resrr
t
lr
Cea:" :'
se-:-s
Injury
Warranty Information
SerialNumber
Model
Number
Date
Purchased
Carton Label#
GG
'.J;:1eri.r-
e
Page 3
Warning
.......,...2
lntroduction
and Safety
...........2
Contents
....
. .3
3
Assembly
4-25
UseandCare.......
....26-31
Troubleshooting..........
.........32
Grilling Chart
33
Food
Safety
34
Recipes
34-37
Warranty
38
.
You mav wish to fili the
LP
Tank
prior
to beginning
assembly
.
l lecessary tools
for
assembly
of
your grill
include
screwdrivers
(fiathead
and Phillips@)
hammer
pliers
and
adlustable
wrench a 3/B and 7/16' nLrt
driver would be ideal
Hardware
is shown actual size with a key
number to identify il
ll/hen assembly is
completed
you
may have
extra hardware
ihts
is lorn:l as
hardware
bags
are used on more
then one
()t
S zl ard type of hardware
used in assembly
may vary
nrt w
iri,t
afiect
grril
nlegrrty
performance
or assembly
Perform
only the
Step
Nurnbers
shown on
the
chart to complete
assembly
of
your
grill,
7
WHY?,.. This
manual rs
generic
illustrating
the
assembly
process
for
all
features included in
our
orill
line.
i) Char-Brnil
Reference
Sheet /
Model 1231234
rarlar
I af ! lfr :llrp frmhcr: s\r.wf
rf
ih
.,
:
rr.trl
Page 4
..\
t
:]
I
I
'
:
I
1
I
,
,
?_
.:
a
a
a
_.-)
-
-
-
-
-
-
652
ffi
\#,
208
:1
:-2
377
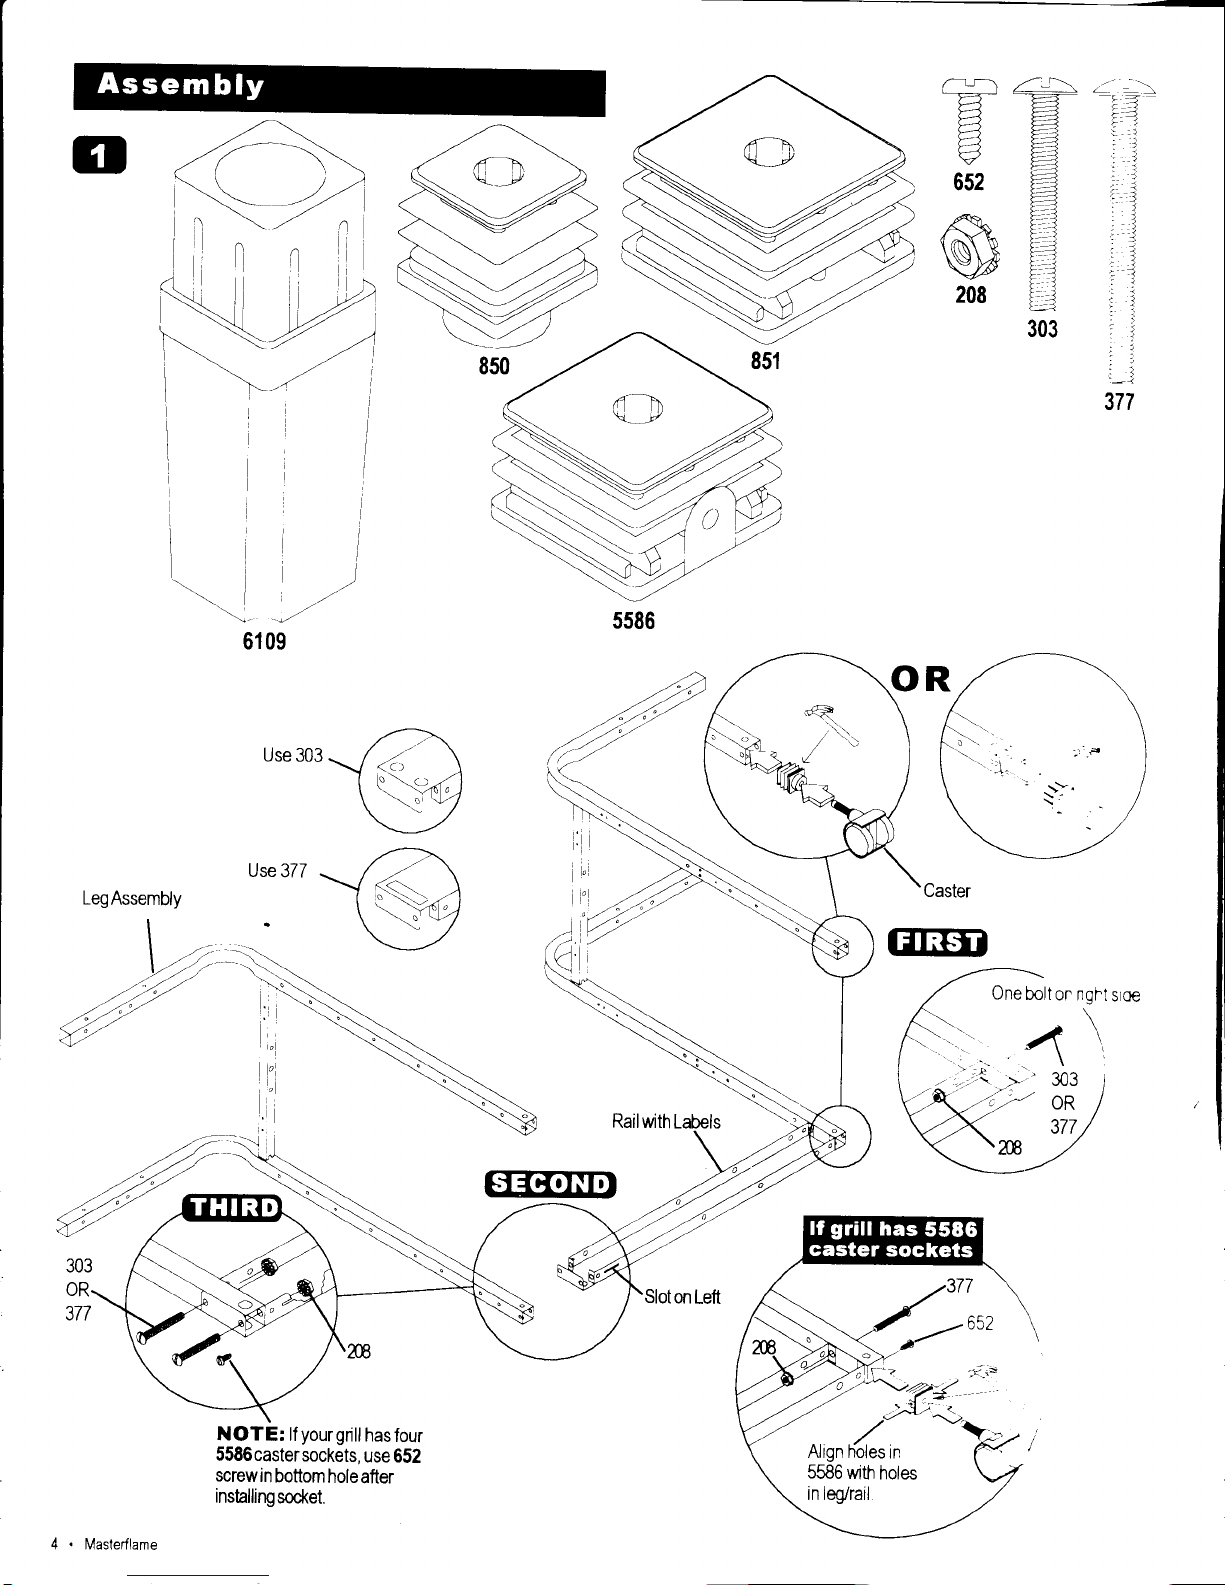
61 09
Use3o3v.<-a-
\'"\9
\,_--
Use377-/z\
\
'-"4)
\_:_,
NOTE:
lf
your
grill
has
four
5586 caster
sockets,
use 652
screw
in
bottom
hole
after
installing
socket.
303
s586
One
bolt
on ngi.ts
oe
:!
./c
2
^
RailwithLabels
*\
,E
4 . Masterflame
Sloton
Left
Page 5
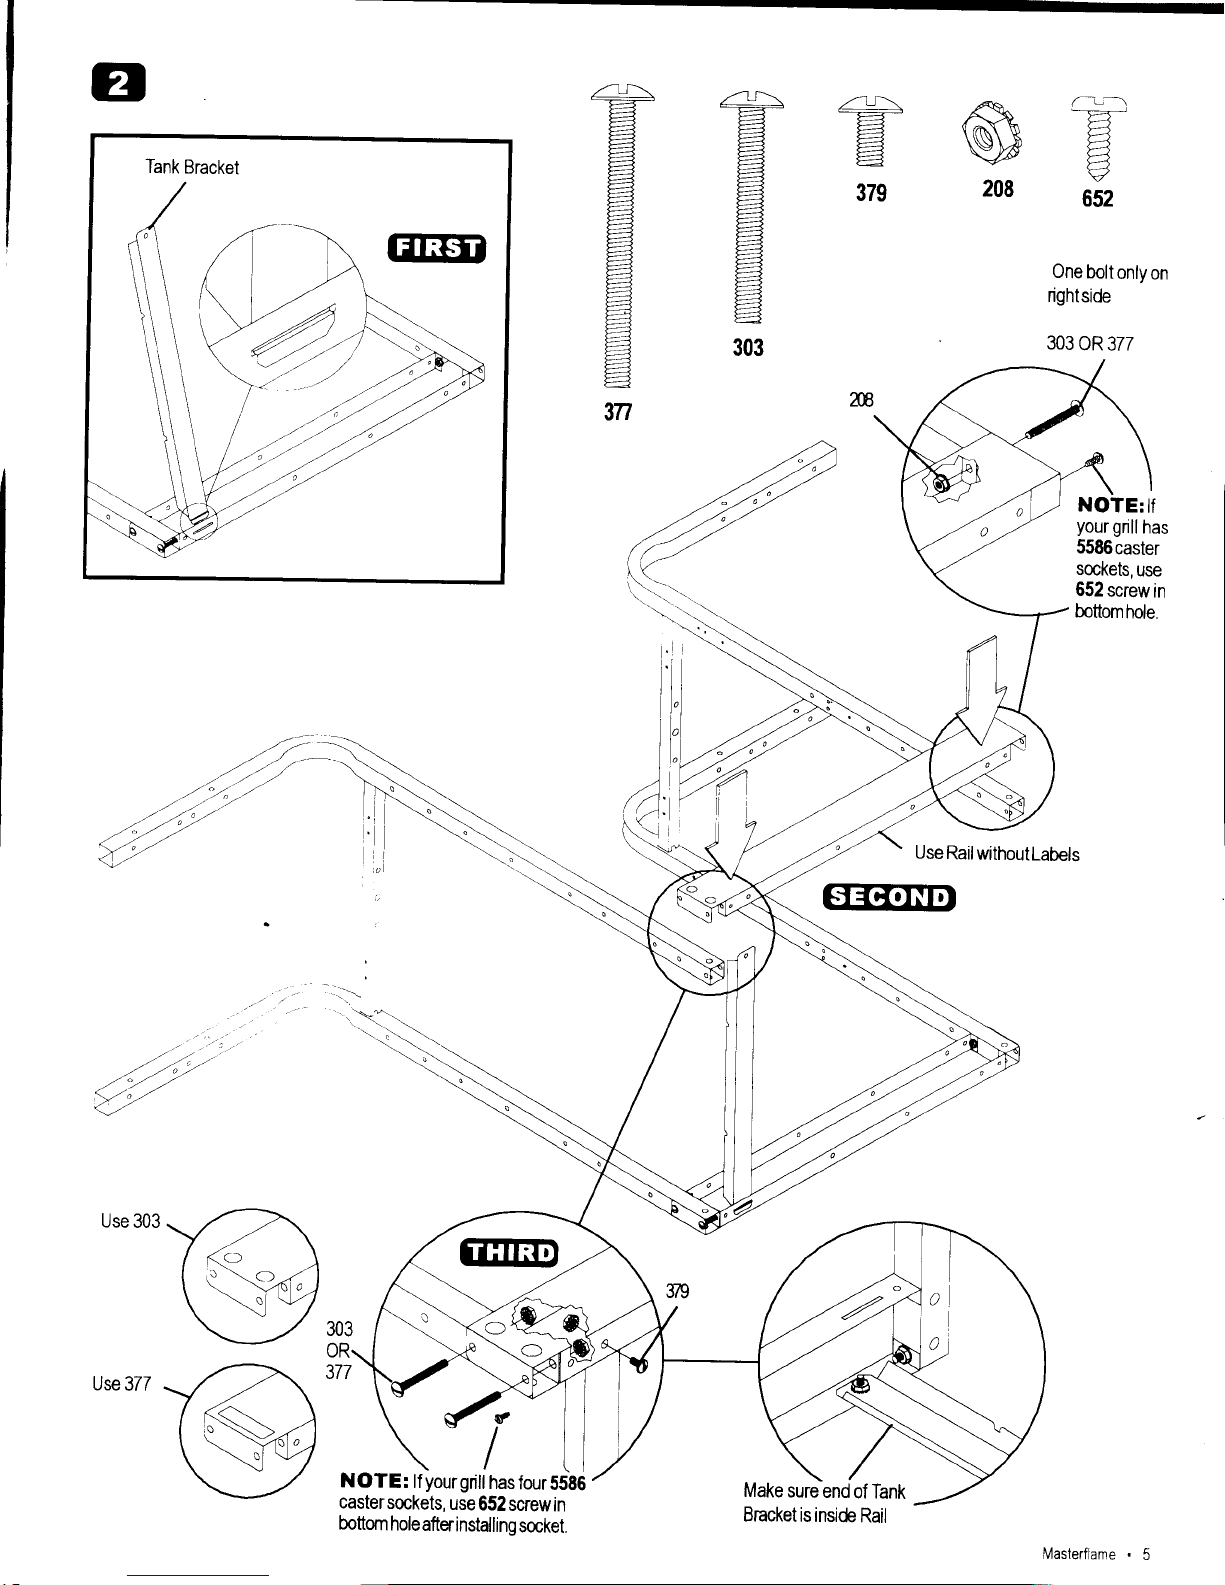
ffTilsf
One
bolt
only
on
rightside
303
0R
377
-
-
-
-
-
652
.=
:
379
/4f\
:
X:=
F=
-:=
l.=
t=:=
t'1
E:=
:
l:=
r----1
t-
?1
303
@
208
at
Use
303
303
oR.
377
\"t
ti
NOTE:
lf
your
grill
has
four
5586
caster
sockets,
use
652
screw
in
bottom
hole
afterinstalling
socket.
Use
RailwithoutLabels
Use
377
Masterflame
.
5
Page 6

re
6515
642 0R 643
(ilfeatured)
NOTE: lf
yourgdll
has4casters,
install
642
or 643 only.
WmdPanelSlats
WoodPanel
Channels
Page 7
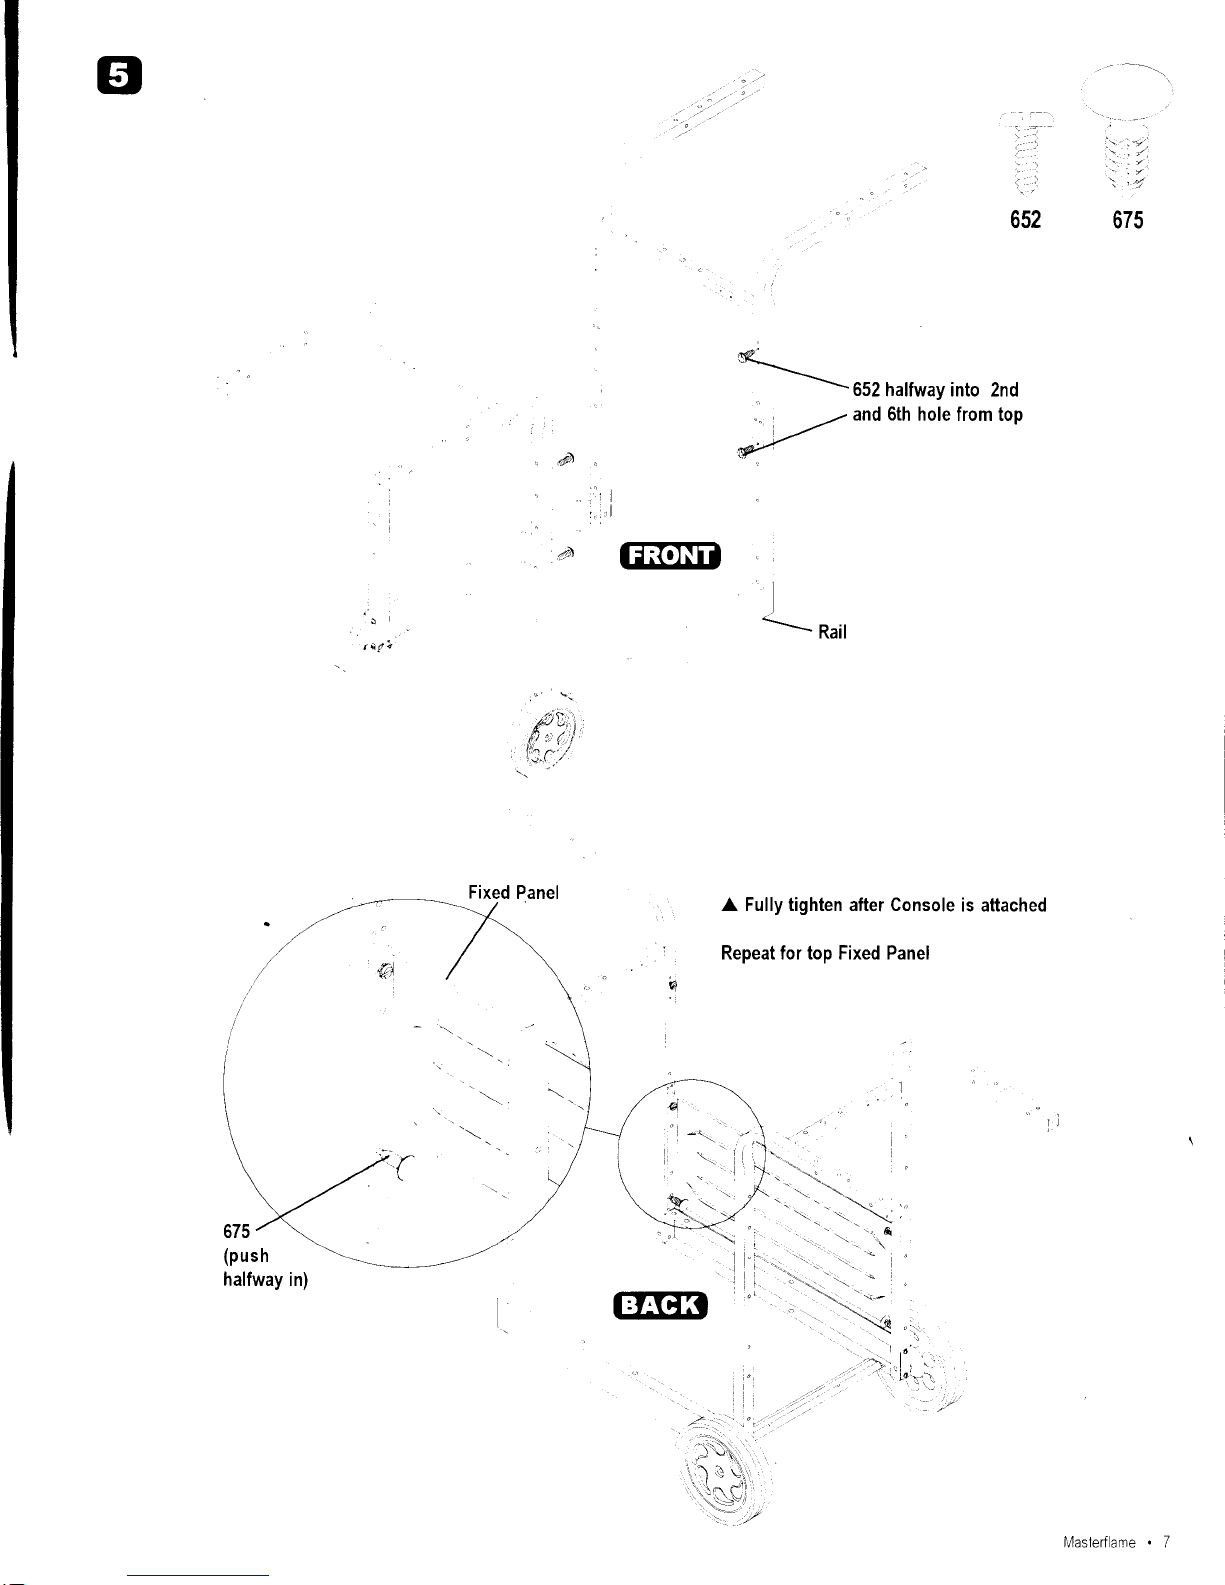
e
'l
',-/,
.'..'t
':
'4
675
s
---552 halfway
into 2nd
_//-
and 6th hole
from toP
#f
.
5r)
.o)
'lrl
,1,,1
CFf.rIfl
r*t1
L*,,,
?f,,
,
fr:
( |
lth r',i
Fixed
Panel
A Fully tighten after Console
is attached
Repeat for top Fixed Panel
/
;-:..
:
,
i
.\
r,,,1
I
t\,i,
',1
F'
'
.-'"/
I
K
halfway in)
Masterf
ame . 7
Page 8
=-:'.ii-
^......
'i
..-,:'iri,'--
'1.
.''
""'
- t
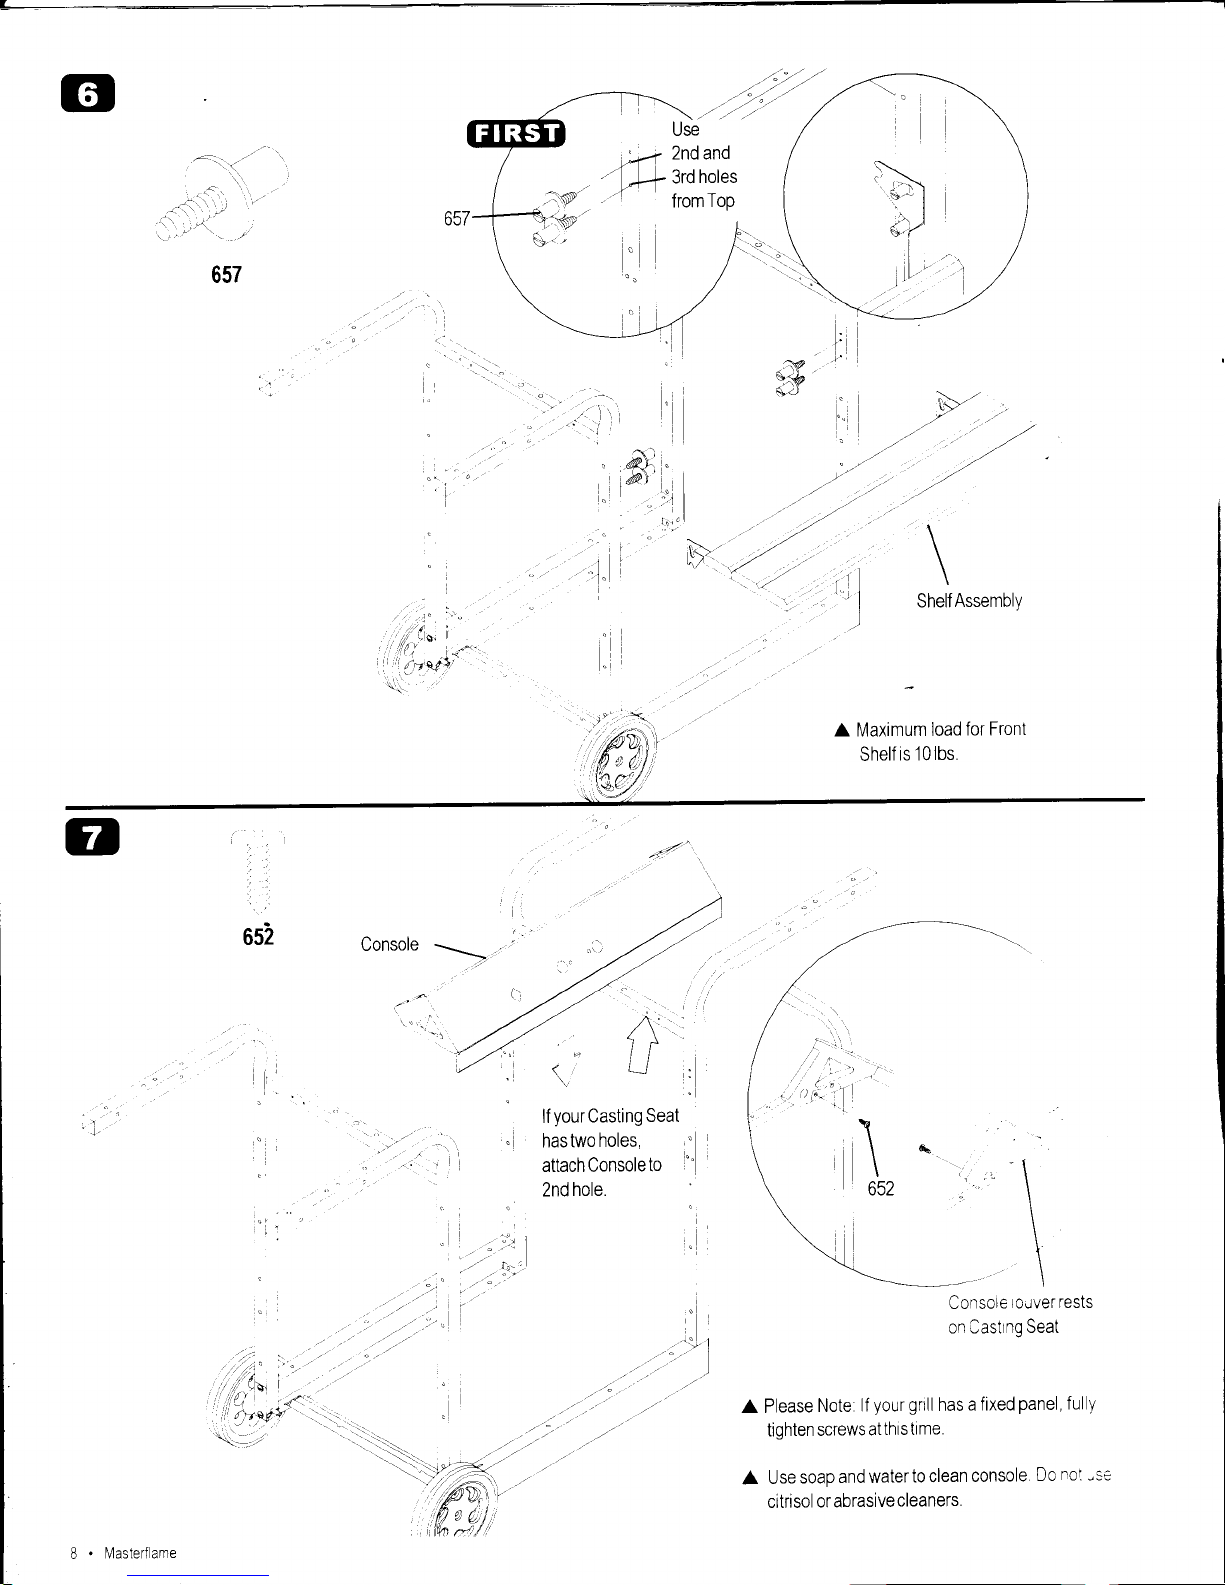
657
at'
\
\
\
Shelf
Assembly
Maximum
load
for Front
Shelf
rs 10lbs
..1.o,
i)
P-
t.
'.
t
Consote
ro!ver rests
nn e:ci nn Ro:t
A Please
Note
lf
your
grill
has
a fixed
panel,
ful
y
tighten
screws
atthts
ttme.
A
Use
soap
and water
to clean
console
Do
nol
-se
citrisol
or abrasive
cleaners.
652
lf
yourCasting
Seat
has two
holes,
attach Console
to
2nd
hole.
\q
652
,
,'a
'\
,\
\
\
\
.
'/:.:.
"
,:.
"..
-
.
{br i
li
:a-
lvay?
\--,,,
""
B
.
Masterf ame
Page 9
-:'
i
:
:l
:r
li
:-r1
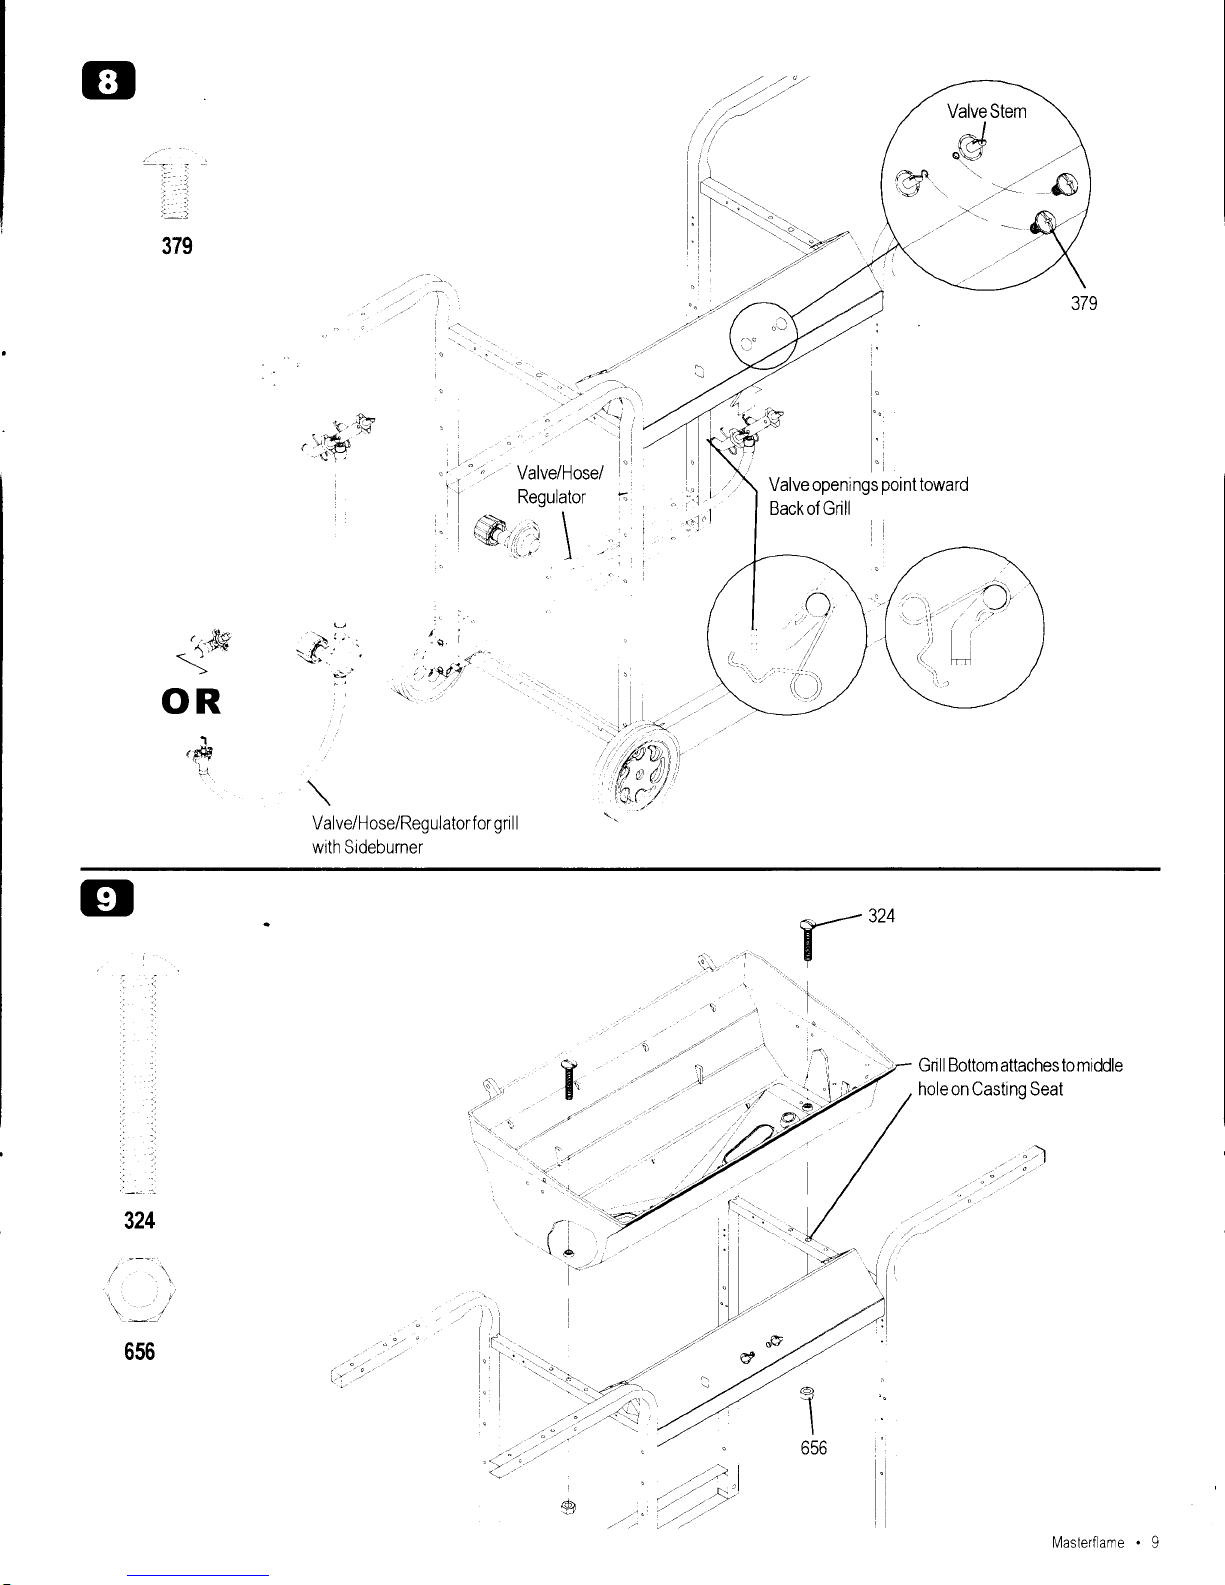
379
.
,-,1_,
Valveopeni
Backof Grill
'{'&
a
OR
.*
o\f
,
\
('r
'q.
'
I
ay't
.
..,,
.,:..
Valve/Hose/Regulatorfor
gril
I
with Sideburner
t
l"
-.<
AD^
fr,
/'t
(3r,.t
n--
324
.'F
,-'
tt'
,
't'a.l..
'\
-
'1
o'"t"'
t,
,,,.a
""
"
:;
"-
ri
rrr.
iri
656
')-
Gnll Bottom attachestomiddle
hole on Casting Seat
")
'''il,.,..""
.f
.
Masterf ame . 9
Page 10
7Ft
t-;,
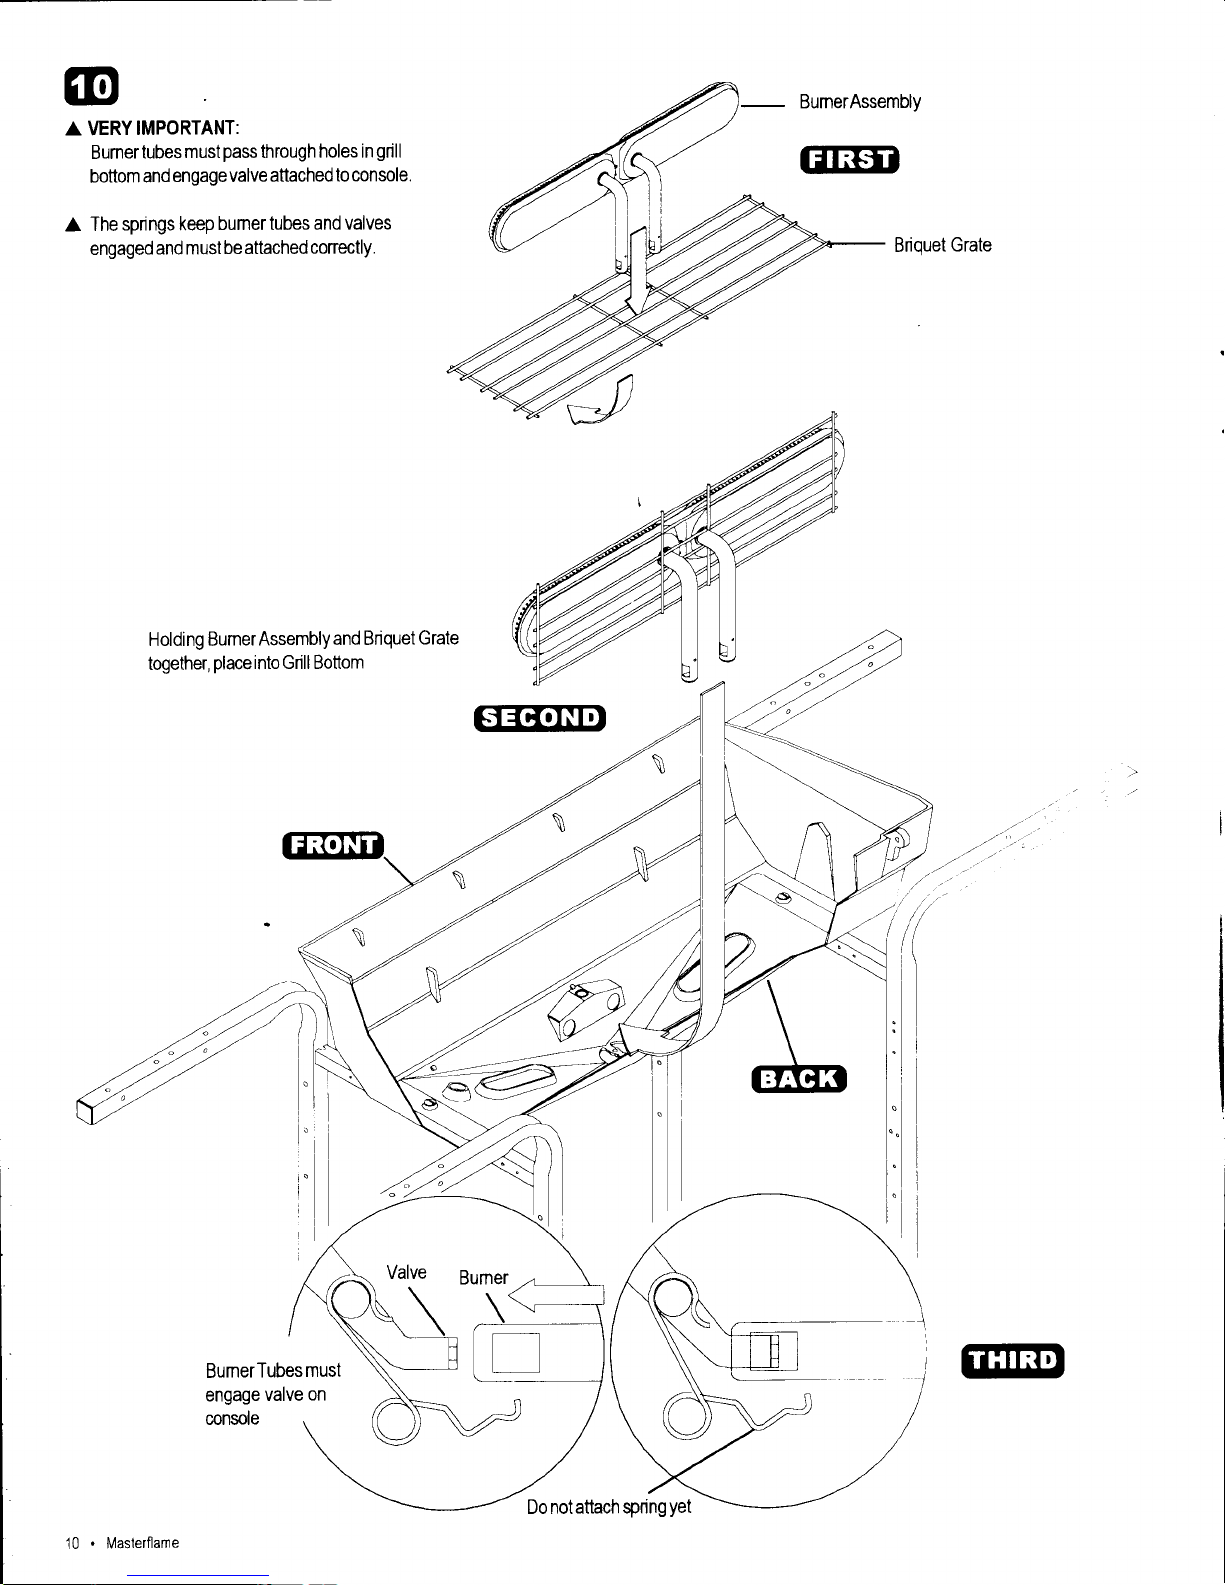
A VERY
IMPORTANT:
Bumertubes
must
pass
through
holes in
grill
bottom
and
engagevalve
attachedto
console
A
The
spnngs keep
bumer tubes
and valves
engaged
and mustbe
attached
conectly.
BumerAssembly
ftT|FST
Bnquet
Grate
Holding BumerAssemblyand
Bnquet
Grate
together,
place
into Grill Bottom
\
./t -r"r /-'-"
f
\eS
re
*€4ry
Do notattach
spring
yet
10.
Masterflame
Page 11
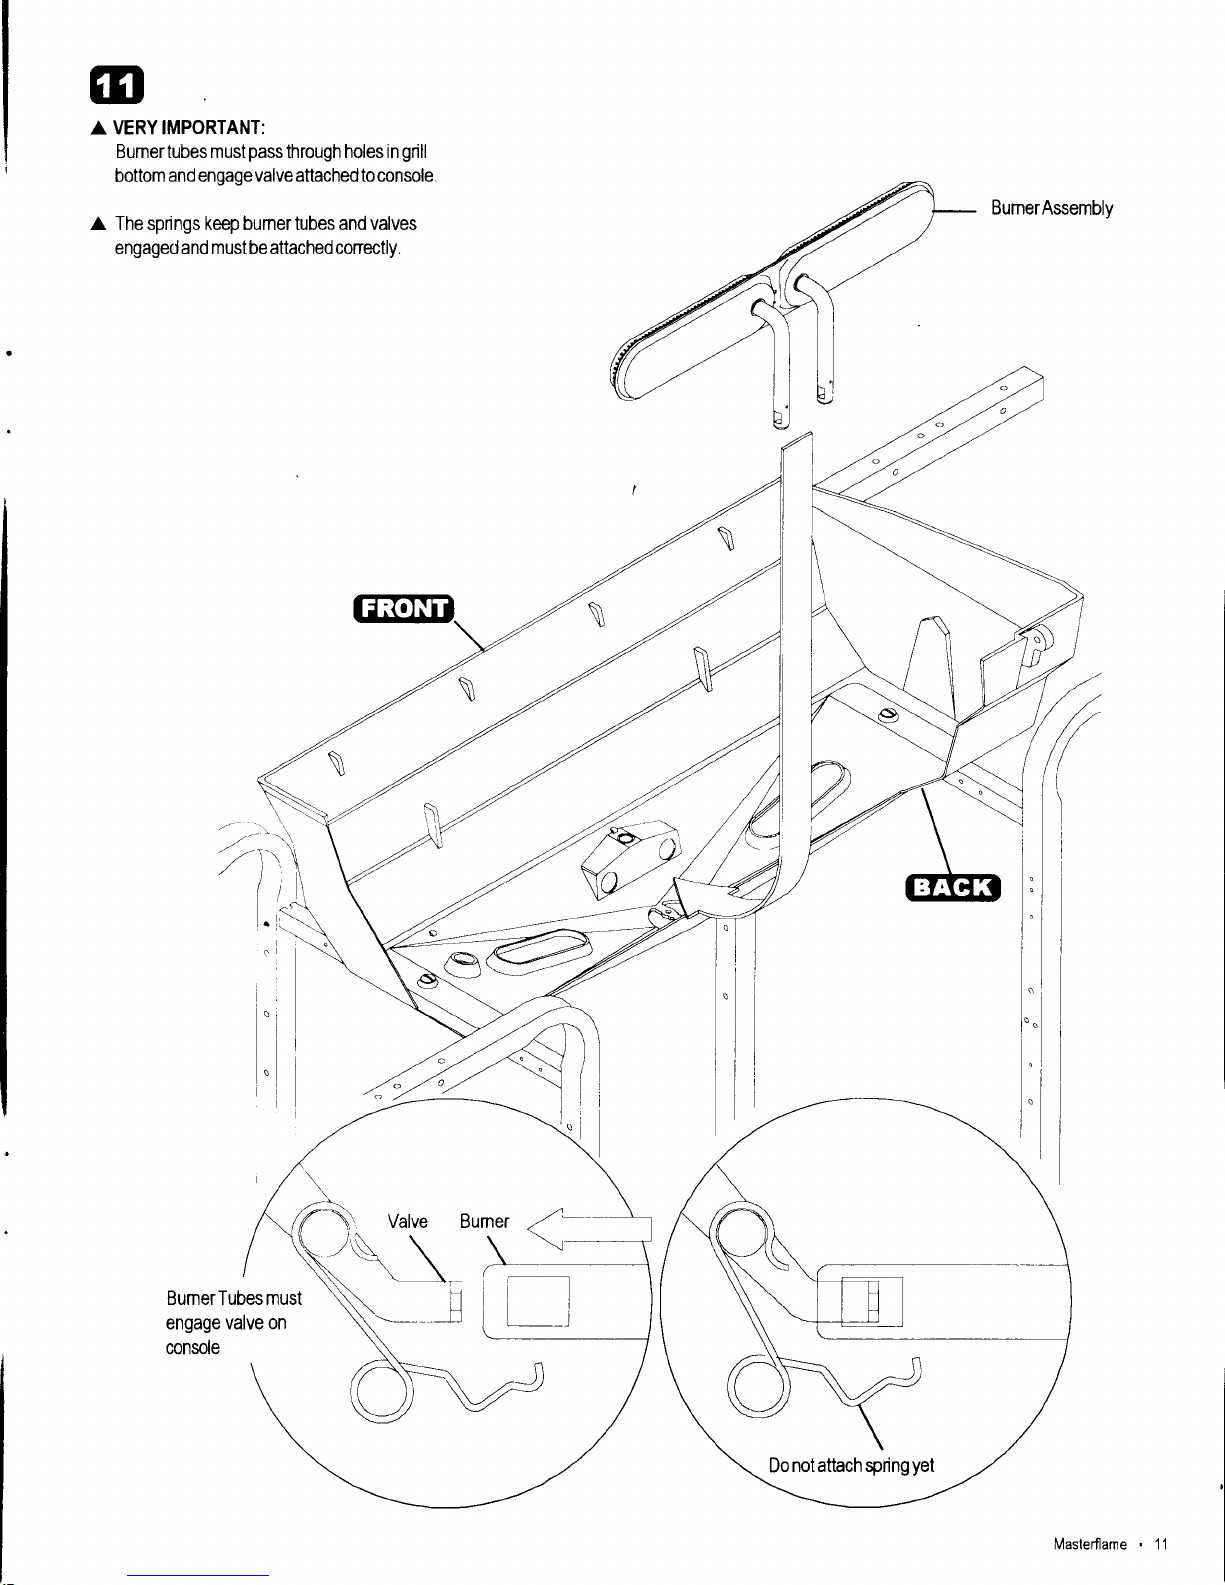
VERY IMPORTANT:
Bumertubes must
pass
through holes in
grill
bottom
and engagevalve attachedto console
A The spnngs keep bumer tubes and valves
engaged and must be attached conectly.
BumerAssembly
Do
notattach spring
yet
Maslerflame . 11
Page 12
/-
lJ
-\
-
Y-
-
652
€
264
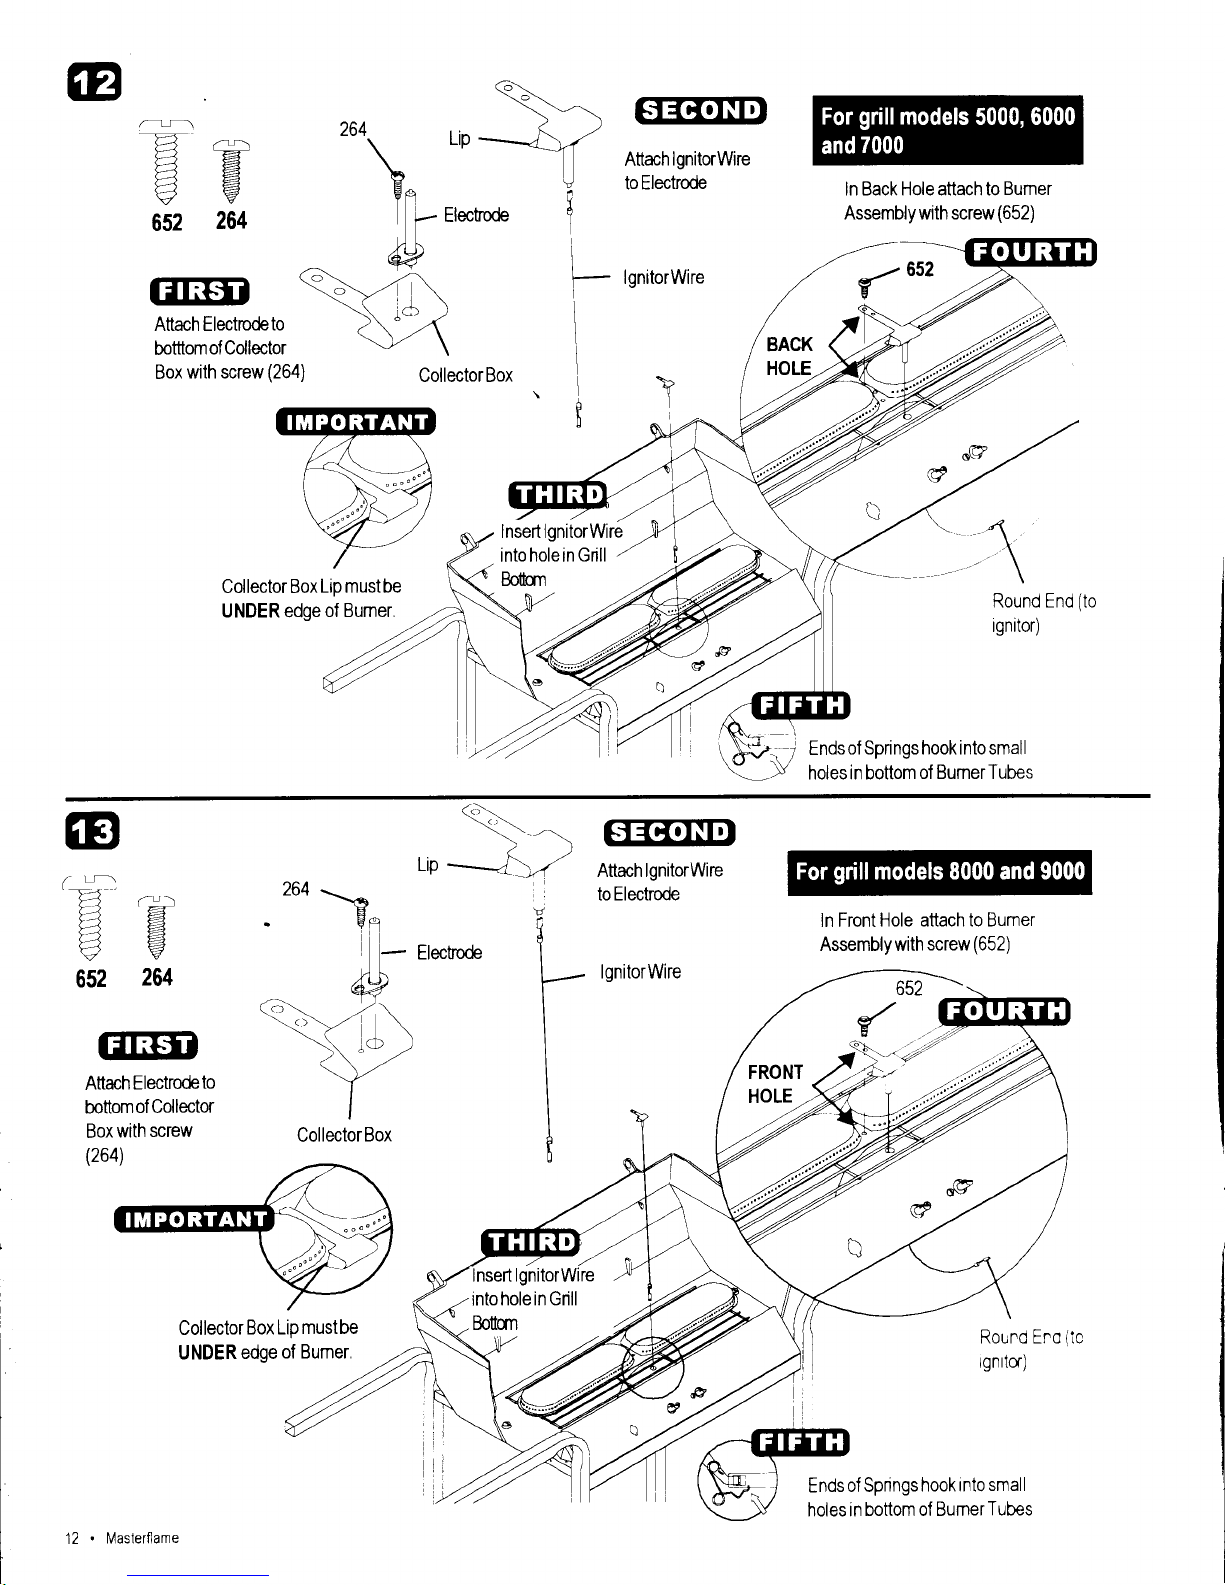
Attach Electrodeto
botttomof
Collector
Box
with screw
(264)
GETEEEI
Attach
lgnitorWire
to Electrode
lgnitorWire
ln Back Hole attach to
Bumer
Assembly with screw
(652)
{
652
Endsof
Spnngs hook into small
holes in bottom
of BumerTubes
CollectorBox
Collector Box
Lto must be
UNDER edge
of Bumer,
z
g
r_!|
]
a
v
652
'€
264
(<\
FCITNr'r
f;^ N ./
ttlt
--=-t
_.2
Attach lgnitorWire
acA
zoa
1_
:
toElectrOde
g
vgfi
J
-
Electode
i
W f-
lonitorwire
Y
ln Front
Hole attach to Bumer
Assembly with
screw
(652)
Ends
of Spnngs
hook into
small
holes in
bottom of BumerTubes
q\
7>'
- 4;-/
Attach Electrodeto
bottomof
Collector
Box with
screw
(264)
CollectorBox
Collector
Box Lip
mustbe
UNDER
edge
o{ Bumer,
FRONT
HOLE
12.
Maslerflame
Page 13

Drip VapoRlSER
\
\
\
;"
3n
t.-, t.t..-......
l.
386
1
\,
'l'-
,
-\\
.
\
rl )
.),'
,
,/.'.
208
tr
il
wtJ
HF
t] tE
fl
H
t,
t.1
fr
FJ
ti
r\
37
\
208
I
I
I
I
I
I
l
.:.
>
.L
?
.|?l
al
208
€r
,p*j
l
rrroR 386
Shelf Slat
g
t
I'
t
I
'\
.i,
Shelf Slat
/'/
')
i.
-.'""
-'t
,
*
\
t
',dP
$0.
-
.
Top
Two
OuterHoles
A Repeat rf
Left Leg has
Shelf Slats
A Maximum load for
Side Shelf is 15lbs
Masterf
ame
.
13
Page 14

OR
756 0R
757
lf
grill
has a sideburner
attach
shelf on
rtght stde
Maximum loadforside
shelf rs 15lbs
Use soap
and water
to
clean
plastic
shelves.
Do
not use citrisol
or
abrasive cleaners.
,J,
756
757
g
T
g
I
T
g
H
.H,
?
E
E
g
\21'
1'-l
\_-/
E
E
E
E
E
rI-
T
fl
B
:'
T
E
E
c
i5a
la
-57
lsthole
-e
r^..-z3rd
hote
\-i
,uu-E'
g
'14
.
\,4asterf ame
Page 15

ED
i
3096
'tx'/
_.&
/-"
I nnn Plrto
I
df€z
...
\ ,.-/
Wing
Nut
Logo Plate
I
I
--t
.*4'I
..f
@'
I
.u,
..*'
P'f'
\
4
i!
\
I
\
\
I
Wing
Nut
\
\
\
3096
Heat
lndicator
En
A Repeat
if Left Side has a Side Handle
/
\
.r,'-
\
j".rl
-.
,/.i;
208
'.''11
l
208
\
\
..t
.
's
A Do not overtjghten
nutorbend
Brackel
\
I
I
Side
Handle
,)
,/'
eraclr{
q
\
208
r5>5tt
302
\ _{,-:-_
-
.....
Page 16

'::::::l
,,
-:
._ a
a'.
a.l
iii;
208
rr\l
,,:].
v.
l.-
*,
.Ar-
418
.;/"
+-
208
208
A
GAUTION
t
.
High
glass
temperatures
for an
extended
perlod
of
time
weakens lhe
g
ass and
can
cause it to shatter
unexpectedlv
V--.-
-4,.
Preventgrease
fires by
cleaning
grill
of
accumulated
grease
after each
rse
When operating
grill
on high
watch carefully
for
grease
fire lf fire
occurs trrn off
grill.
Clean
grease
from
grill
after fire
has burned
out and
grill
is
cool
lmportant: Use
and Care
of Glass
.
lf the
glass
becomes
scratched
or
chiooed
it creates
a weakness
in the
glass
which
can cause
breakage
when
heated.
Clean
glass
with a mild
soap solution
or
professional
grill
window
cleaner
and a
soft scrub
pad.
DO
NOT use blades
or
abrasives.
Do not
clean
glass
when
HOT.
Do
not operate
grill
in the rain,
near
a
pool
or
whenever
hot
glass
can be
splashed
with water
or liquid
lf
grillhas
Heat Indicator
place
on
Upper
Right
cornerof Glass
Shott
A Short
Tabs
fit dow^
^s,oe
:^e
edgesof windowooen
-t
-se
slight
pressure
to f u
ly
seat :-e
Brackets
Tabs on
W ndow BracKets
ce'c
nnmnlotolv 2rn nri nnar on-
- -
^{
UU
Prgtgly
olvu u
|
'L
uuutr> .,
rrrinr]nrrr nnonrnn
rY,, ,uv vv
vyv ,
Y
(-
Sl.ort
-
fi"Jrrrffn
J6
.
Maslerflame
\
Page 17

A
SwingAways will keep food warm,
while keeping it
wayfrom
flames.
Do not use SwingAwayforcooking
meats or heavyfood rtems.
A
Pivot
and
leg
wires must
run
underneath
SwingAway surface.
A Grill liddesign mayvaryfrom modelto model, but
SwingAways will assemble the same way on each
desrgn.
SwingAway
Legs snap into loops on
Bottom
SwingAway
.:i
tt''
Pivot
and Leg Wires
./
and Leg
Wires
Pivot
A SwingAway's will keep food warm, while keeping it way from
{lames. Do
not use SwingAway for cooking meats or heavy food items.
A Pivot and leg wires must run underneath SwingAway surface.
A
Grillliddesign mayvaryfrom modelto model, but SwingAwayswill
assemble
the same wav on each desion.
,1'
Top
SwingAway
r ."'.
\
,,r:'
-,
,
il.,,l:tt:
.,,'.
,-'
"''
.
;i-,'"...,..,.',."-'
.
'
-':'"' '
r\:i
SwingAway
\
PrvotWire
\,
I
I
Leg
.,
,
it
Wires that form legs on both
Topand Bottom
SwingAways must run
underneath warming rack
surfaces
'1
t"
.
/t
3ottom
Maslerflame
.
17
Page 18

OR
.-4..
379
,iit,,"-
\
')\'
i
:\
/.
'
208
662
664
663
208
I
Itr,
,&./f
t
?70
.:.2''
"'"
s,
S deburner
./ aoay
a\
&t\
\
\
662
0R
663
664
\
l'e
,)
Towel Bar
/
OR
Condiment
Basket
(if
featured)
':r
:, :r
"
Rurinn Grrrl
\ Sideh rrner R.: - r ot
\
'*"""
Tn0unts
rr.ls
oe
S:ec,'-e.3cov
208
652
rT*TI
(@.,
€
'
.+f.
olt'"
"
utl
-
".r,t
"
.
"i{j'''
ii''1
'
I
I
652
trq
i;Tlf'r
i
I
I
A
Do not tiqhten
208 attn s :
-e
Page 19

gI
A Valve
opening must engage Burner Tube before
Sideburner Grate
EIEEI
'
tightening 361.
Tighten 208 on threaded stud of Burner,
Knob
locks
in off
position
Checkvalvefunction by
pushing
knob inward You should feel a spdng
tension againstthe knob lf knobdoes notspring back
to original
position
when released, replace valve. Call
1
-800 -241 -7
548 f or assi stance
Maximum load for Sideburner is 10 lbs.
Use soap and water to clean Sideburner. Do not use
citrisol orabrasive cleaners.
Burner Tube on
Srdeburner Burner
361
Basket
0R
-/
TowelBar
/
(if
featured)
Knob
Cjr{rfi{ril
\
A
A
Valve Opening
\
|?EFrI]l
sideburner Varve
OR
OR
386
303 0R 377
'\\
,
'/:"'
208
s^ll
/'
il
WoodSlat
208
\-,
Condiment
CondimentBas *"t
/
OR
Towel Bar
(if
featured)
386 0R
714
19
A Note
proper
valve opening-to-burner tube
Masterf
ame
Page 20

E..--
303 oR
377
c{tTt?T[r,r
E
-/
Sideburner Frame
/
Sideburner
X
Body
)'
Tool Holder
-
Brackets
(rf
featured)
361
i,iORi
756
757
t\
.l
I
211
i.
'*
/)
r-,
208
I
3n
303
211
,1
',.t
I
VJ.
1.
I
L
756
i1-
oR
STIIk-fit
g
ts7
361
696
'
208
Burner Tube
on
Sideburner
Burner
,q)
it
g
I
t
+
\
q.dtg
,'"...-
Attach
SideburnerValve
and
"'
Bracket
with
screw 696
I
GnfllTlt
\
ur,u.
\l
\
,;F*!
Thread 361
halfway
into Sideburner
Valve,
place
in
slot on right
rt== -=-= =
^^^-^^---a
!J-g : I
20
.
Maslerflame
361
Bracket
Page 21

I
I
-/
Sideburner
Grate
;'
1-
rgnrror
Knob
I
I
I
5r/\
lu.
.Jt
tK'-_
"r'
'/
t1
--Z:Z
':7)
TI'
A
When installing
lgnitor
do not
push
on
button This
may
cause
a
minor shock,
A Sideburner
electrode
wire must
be
connected
to lgnitor
for
grrll
and Sideburner
to ignite
A ignitor
Wire(s)
must-not come
into
contact
with
grill
bottom
A
Knobs lock
in off
position.
Check
valve
function
by
pushing
knobs inward
You
should feel
a
spring tension
against
knobs
lf
knobs
do not spring
back
to original
position
when
released,
replace
valve
Call Grill
Service
Center at
1-800-241-1549
t
vou
reoutre
assrstance.
>rc( |
,t.
I
lnsert
Tank
Wire into Left
Legs and
rotate rnward
1
2
3
\
gnitorWire
.9
Long
Sideburner I
gnitor
Wire
(may
have
Flat or Round
connector)
r''.
':'q./?'
J--
"
oR
I
{'
,/?/
1".
G-.
;;:,{.,
N/as1erflame.21
Page 22

A
LP
gas
tank
should
be
filled
at this time
to
a maximum
of
B0%
fill
level
with LP
gas
before
attaching
to cart.
A
Curved
portion
of tank
wire should
be to inside
of
tank
collar
REIVEMBER.
Tank
collar
opening
must
face
to front
of cart
once
tank
is
attached
\ ,
/7\
"tl
LP Gas
Tank
//
'
\
/\
\/
\
---,,,
\
Location
of bottom
ring
on LP
Gas
Tank
l':ti..:...
i,i'..,\
\
\
Remove
Packing
from
around
tank
Notches
22.lvlasterflare
Page 23

qn
Conne
cting
the
Regulator
to the
Lp
Tank
1 Turn
all
control
knobs
includinq
sideburner
in
the
OFF
position
2. Turn
LP
tank
hand
wheel
(Figure
A)
clockwise
to
a full
stop
3.
Remove
the
protective
cap from
the
Lp
tank valve.
Always
use cap
and
strap
supp[ed
with
valve.
Do not
use
(Figure
D) POL
transport ptug
(plastic part
with
external
threads).
4
Hold
regulator,
insert
nipple (Figure
B)
into
Lp tank
valve.
rVipp/e
must he
centered
in
Lp tank
vatve.
Hand
tighten
coupling
nut,
hotding
regulator
in
a
straight
line
(Figure
C)
with
Lp tank
yalye
so as
not
to
cross
thread
the
connection.
5
Turn
the coupling
nut
clockwise
to
tighten
to
a full solid
stop
The
regulatorwill
seal
on
the
back-check
feature
in
Lp tank
valve,
resulting
in
some resistance.
An
additional
one-
half
to three
quarters
turn
is required
to complete
connection.
Tighten
by hand
only
-
do
not use
tools.
NOTE:
lf
you
cannot
complete
connection,
disconnect
regulator
and repeat
steps
4 and
5. lf
you
are still
unable
to
complete
the
connection,
do
not
use
this
regulator!
6 Follow
'Leak
Test"
instructions
Cf
uloCKWlSe
---OPD
Hand
Wheel
,.>
Type
1 ouilet
with
thread
on
outside
Safety
Relief
Valve
Nipple
has
to be
,^r'/
Strap
and
,-:-i
.t'
"r:rr*,
-:,,
/
''
\-
\
Coupli
centered
into
the
-
LP tank
valve
-\\\
Hold
coupling
nut
and regulator
as
shown
for
proper
connection
to
LP
tank valve
,
-:----------Kegutator
Do
not
usethis
POL
transport plug
.
Do not
insert
any foreign
objects
into
the
valve
ouilet.
you
mav
damage
the
valve
and cause
a leak.
Leaking
propane
may result
in
explosion,
fire,
sever
personal
injury,
or death.
.
Never
attempt
to attach
this
gnll
to
the self-contained
Lp
gas
system
of
a camper
trailer
or
motor home.
lVasterf
ame
.
23
ng
Nut
Page 24

Leak
Test
For
your
safety
.
Leak
test
must
be
repeated
each
time LP
tank
is connected
or
reconnected
During
leak
test
keep
grill
away
from
open
flames
or sparks
.
Do
not
smoke
during
leak test.
Do
not
use an
open
flame
to
check
for
gas
leaks
Grill must
be leak
checked
outdoors
in
well-ventilated
area,
Away
from
ignitron
sources
such
as
gas
fired
or
active
electrical
appliances.
Never
remove
opening
at end
of valve
(A)
To
leak
test
your
grill:
Use
a
clean
paint
brush
and
50/50
soap
and
water
solutton.
Use
mild
soap
and
water.
A
Do not
use
household
cleaning
agents.
Damage
to
gas
tratn
components
can
result,
1.
Turn
control
knobs
to
OFF.
2.
Be
sure
regulator
is tightly
connected
to
LP
tank
3. Completely
open
LP
tank
valve
by
turning
hand
wheel
counter
clockwise
lf
you
hear
a rushtng
sound,
turn
gas
off
immediately
There
is
a maior
leak at
the
connection
Correct
before
Preceding
4.
Brush
soapy
solution
onto
following
connecttons:
.
LP
tank
valve
(1)
including
threaded
portion
into
LP
tank
'
.
Regulator
fitting,
face
at crimps
and
vent
hole
(2)
.
Hose
(3)
and
all connections
.
All LP
tank
welds
(A)
(LP
tank
collar,
middle,
and
bottom)
.
Valve
(5)
behind
Console
.
Valve
on
Sideburner
AssemblY
(6)
(if
featured)
5.
"lf growing" bubbles
appear,
there
is
a
leak
Close
LP
tank
valve
immediately
Retighten
connections
and
repeat
leak
.test
procedures lf
leaks
cannot
be
stopped
replace
parts
Order
new
parts
by
giving
the
serial
model
number
and
name
of
items
needed
to
the
Grill
Service
Center
at 81-800-241-7548.
6.
Always
close
LP
tank
valve
after
performing
leak
test
by
turning
hand
wheel
clockwise
o.
-o
o
o
o
LF Tank
and.Regulator
w!tl1
Sidebumer
connecti6n
'
:i
'
. "''
:
":'
'.
Regu'lator
Withotl
.Sidebu
rner
con
nectibn
.
Do
not
use
grill
until
leak
checked.
.
lf leak
is
detected
at
any
time,
STOP
and
correct
before
using
grill
further.
.
ff
you
cannot
stop
a
gas
leak,
immediately
close
LP
tank
valve
and
call
LP
gas
supplier
or
your fire
department!
Opening
at
end
24.
Masterflarn-e
Page 25

@
Do not layer
GI
Perform
the
"Burner
Flame
Check" in
the Use
and Care section,
A Let
grill
cool
before
placing
briquets or
lava rock,
or stack lava rock...just enough
to cover
f ire
grate
surface
Place 16 briquets Do
not layer or
stack
justenough
to cover fire
grate
surface.
A Do not let briquets cover burner
port
holes
Fire Grate Rest
Fire Grate
Place the Cooking
Grate that came
with
your grill
on the Grate Rests
Grate Rest
\
\
\ '.r'
\ I.
-\
'\
I
.l'
r.
4
GO
Use an empty soup can to hang from
the Grease Clip.
NOTE Viewfrom back of
grill
,4./
Grease Clip
Masterflame.25
Page 26

.
NEVER
attempt
to light
burner
with lid
closed.
A
buildup
of non-ignited
gas
inside
of closed
grill
is
hazardous.
.
Never
operate
grill
with
LP
tank out of
correct
position
specified
in Assembly
Instructions.
.
Always
close LP
tank valve
and remove
coupling
nut
before moving
LP tank
from specified
operating
position.
Safety
Tips
lf
you
have
a
grill problem
see the
Troubleshooting
sectton.
Before
opening
LP tank
valve, check
the
coupling
nut for
tightness.
When
grill
is not
in use,
turn off
all control
knobs and LP
tank
valve,
A Never
move
grill
while
in operation
or still
hot
Use
long-handled
barbecue
utensils
to avoid burns
and
splatters
lVaximum
load
for sideburner
and
front shelf
is 10 lb
A
Maximum
load
for
side shelf
is 15
lb
l,
A soup
can must
be attached
to
grease
cllp and emptied
after
each
use, Do
not
remove
soup can
until
grill
has
completely
cooled
A
lf
you
notice
grease
or
other
hot material
dripping
from
grill
onto
valve,
hose
or regulator
turn
off
gas
supply
at once
Determine
the cause,
correct,
and
clean valve,
n0se and
regulator
before
continuing
Perform
a leak
test
A
The regulator
may make
a humming
or whistling
notse
during operation
This
will not affect
safety
or use of
grill
Before
Your
First Cookout
.
Light
burners,
check
to
make sure
they are
lit close the
lid
and warm
up
grill
on
HIGH for
15 minutes
Curing
of
paint
and
parts
will
produce
an
odor only
on first lighting.
lgnitor
Lighting
For Mastertlame,
FLAVORMASTER
and
Lava
Rock Grills
Do not
lean
over
grill
while
lighting
1. Open
lid.
Turn on
gas
at LP
tank
2.
Turn one
knob to
{
IGNITE
3 Push
lGNlT0R
button
rapidlv
lo
l.l 3e sure
burner lights
and stays
lit
4 Turn
other
knob
to
X lGllrE tc
rgntother stde.
5
lf IGNITOR
does
not
work
fo
icw match lighting
instructions
After Lighting
Turn
knobs
to HIGH
for warm-up,
For safe
use of
your
grill:
.
Do not
let children
operate or
play
near
grill
.
Keep
grill
area
clear and
free from
materials
that burn.
.
Do
not block
holes in bottom
or back
of
grill.
.
Check burner
flames
regularly
.
Use
grill
only in well-ventilated
space
NEVER
use in
enclosed
space
such as carport,
garage.
porch,
covered
patio,
or under
a surface
that can catch
fire
.
Use
grill
at
least3 ft.
from any wall
or surface,
Maintain
'10
ft
clearance
to oblects
that can
catch fire or
sources
of
ignition
such as
pilot
lights
live electrical
appltances
etc
.
Do not
use charcoal
in a
gas grill
,t%
"'--'$"
ACAUTION
.
Grill is
for residential
use
only. Do
not use
for
commercial
cooking.
A
CAUTION
.
Putting
out
grease
fires
by closing
the
lid is not
possible.
Grills
are well
ventilated
for
safety reasons.
.
Do
not
use water
on
a
grease
fire. Personal
injury
may
result.
lf
a
grease
fire
develops
turn knobs
and LP
tank off.
.
Do not
leave
grill
unattended
while
preheating
or
burning
off on
high. lf
grill
has
not been
regularly
cleaned
a
grease
fire
can occur
that
may damage
the
product.
26
.
Masterf ane
Page 27

Match
Lighting
A
Do not lean
over
grill
while lighting.
'1
Open lid.
Turn on
gas
at LP
tank
2.
Place lit
match into match
lighting
hole from outside
grill
bottom
(as
shown)
3 Push
in and turn
RIGHT knob to{
tCNttf.
Be sure
burner
lights
and stays
lit
4 Light
left burner by
pushing
LEFT
knob in and
turning to
Y
TGNITE
6000,
7000, 8000 and
9000 Model
grills
have
match lighting
hole in bottom
5000
Model
grills
have match lighting
hole on RIGHT
side of
grill
bottom
lgnitor Lighting
The Sideburner
1 Turn
gas
on at LP tank
2.
Push in and
turn knob to HIGH
3 Push IGNITOR
button
rapidly to light
Be sure burner
lights
and
stays lit
Match Lighting
1 Turn
gas
on at LP tank
2 To light
use any
hole on sideburner
Push in and
turn knob to HIGH
Be
sure burner
ltghts and stays
lit.
Burner
Flame Check
.
Light burner,
rotate knobs
from HIGH
to LOW. You
should see
a smaller flame
in LOW
position
than seen
on HIGH Always
check
flame
prior
to each
use Perform
flame check
for
sideburner
(if
equipped)
lf only low
flame is seen
refer
to
"Sudden
drop
or
low flame"
in the
Troubleshooting
section
Turning Grill
Off
.
Turn
all knobs
to OFF
position.
Turn LP
tank hand wheel
clockwise
to
a full stop.
lgnitor Gheck
.
Turn
gas
off
at LP
tank. Press
ignitor
button rapidly
Click'
should
be heard
and spark
seen each
time between
collector
box
or burner
and electrode
See
Troubleshooting
if no click
or spark.
Valve Check
.
lmportant:
Make
sure
gas
is OFF at LP
tank before
checking
valves
Knobs lock
in OFF
position
To check
valves, first
push
in knobs
and release,
knobs should spring
back. lf
knobs do
not spring
back, replace
valve assembly
before
using
grill.
Turn
knobs to LOW
position
then turn back
to 0FF
position
Valves
should
turn smoothly
HoseCheck
.
Before each
use,
check to see
if hoses are
cut or worn,
Replace damaged
hoses
before
using
grill.
Use
only valve/
hosehegulator
specified
by
manufacturer
LP
Tank Filling
.
Use
only licensed
and
experienced
dealers
LP
tank must
be
purged
before filling
to maintain
gas
odor
Dealer should
NEVER
fill LP tank
more than 80%
of LP tank
volume,
Weight
of
propane
in tank will
vary by temperature
A
frosty regulator
indicates
gas
overfill.
lmmediately
close LP
tank valve
and call
local LP
qas
dealer for
assistance,
Do not
release liquid
propane
(LP) gas
into the
atmosphere,
This
is a hazardous
practice
To remove
gas
from LP tank
contact
an LP dealer or
call a
local
fire department
for
assistance
Check the telephone
directory
under
"Gas
companies"
for nearest certified LP
0eaters,
LP
tank Exchange:
You
may choose
to replace
your
empty LP
tank
through an
exchange
service, Use
only those reputable
exchange
companies
that inspect,
precision
fill test and
certify their
cylinders
Exchange
for OPD safety
feature
equipped
tank
as described
in LP Tank
Always
keep LP tank
in upright
position
during
use, transit or
storage,
.
lf burner
does not
light turn knob(s)
to OFF,
wait 5
minutes,
try again.
Nlasterfiame.2T
Page 28

.
NEVER
store a spare LP
tank
under or near
grill
or in
enclosed areas.
.
An
overfilled spare LP tank is hazardous due to
possible gas
released
from the
safe$ relief valve.
The
safety relief valve on a LP tank
could
activate
releasing
gas
and causing a fire.
.
lf
you
see, smell or hear
the sound of escaping
gas,
immediately
get
away
from the
LP
tank/grill and call
your
fire department.
.
All spare LP
tanks must have safety caps installed on
the LP
tank outlet.
LP Tank
Removal, Transport
And
Storage
.
Turn
OFF all control knobs
and LP tank valve Turn coupling
nut counter
clockwise by hand
only
-
do not use tools to
drsconnect.
Lift LP
tank wire upward off of LP tank collar lift
LP tank
up and off of support bracket. Install
safety cap onto
LP tank valve
Always use cap
and strap supplied with valve.
Failure
to use
safety cap as directed may result in
serious
personal
injury
and/or
property
damage.
LP
Te
Valve
Retainer
Strap
A
disconnected
LP tank
in storage or being
transported must
have
a safety cap
installed
(as
shown) An LP tank must not
be
stored
in a building,
garage
or any other enclosed
area. Never
leave
a LP
tank inside
a vehicle which may become
over-
heated
by
the sun.
.
Do
not store LP
tank in
an arca where children
play
LP
Tank
(LP
Gas
Supply Cylinder)
.
The LP
tank used with
your grill
must meet the
following
requirements.
.
Purchase
LP tanks
only with these required measurements:
'12"(30Scm)
(diameter)x'18"(457
cm)
(tall)with
20lb,
(9
kg.) capacity
maximum,
28
.
Masterflame
Be
conskucted and marked in accordance
with
specifications for LP tank of the U,S Department
of
Transportation
(DOT)
or for Canada,
Transport Canada
(TC)
See
LP
tank collar for marking
LP tank valve must
have:
.
Type 1 outlet compatible with regulator or
grill
.
Safety
relief valve.
a-)
.
ULlistedOverfillProtectionDevice(OPD)
This
/ --.. \
OPDsafetyfeatureisidentifiedbyaunique
,-Z
(
Cl
, \
tnangular hand wheel.
Use
only
tanks
\,
\--'l
)
equipped witr
this
gpe
of valve.
)ff"rY..,
Supply system must be arranged for vapor withdrawal and
include collar to orotect LP tank valve.
LP
(Liquefied
Petroleum
Gas)
.
ls
nontoxic, odorless and colorless when
produced
For
Your
Safe$, LP
gas
has been
given
an odor
(similar
to rotten
cabbage)
so that it can be smelled.
.
LP
gas
is very explosive when mixed with correct amounts of
dil.
General GrillCleaning
.
Do
not mistake brown and
black accumulation of
grease
and
smoke for
paint
Interiors of
gas grills
are not
painted
at the
factory
(and
should never be
painted).
Apply a
strong
solution
of
detergent
and water
or
use
a
grill
cleaner with
scrub brush
to
insides of
grill
lid and bottom.
Rinse
and
allow to
completely
air dry Do
not apply a caustic
grill/oven
cleaner to
painted
surfaces.
Plated
wire
grate(s):
wash
grate(s)
and drip vaporiser bar
with concentrated
grill
cleaner or use
soap and water
solution.
Dry thoroughly
and store indoors between cookouts.
Plastic
side shelf: wash
with warm soapy water and wipe
dry, A
Do not use
citrisol, abrasive
cleaners, degreasers or
a
concentrated
grill
cleaner
on
plasttc
side
shelf.
Damage
to
and failure
of shelf can
result.
Porcelain
grate(s):
because
of
glass-like
composition, most
residue can be
wiped away with
baking soda/water solution
or specially
formulated
cleaner. Use
nonabrasive scouring
powder
for
stubborn
stains
Briquet
and Fire
grates:
will
eventually decompose and
weaken
with use.
Remove
grate
from
grill
and tap to loosen
any
scaling. Brush
grate
vigorously
with a wire brush to
remove
any additional
scaling,
rust or restdue.
Page 29

1
2
3
A
a
5
6
Cleani n g Masterflame
0r
FLAVORMASTER
Burner
Assembly
Tum
gas
off
at control
knobs
and
LP tank.
Remove
cooking
grate
and
drip vaporiser
bar,
Discard briquets
before removing
burner and
briquet
grate.
Remove
can from
grease
clip
Beneath
console disconnect
short ignitor
wire
from ignitor
(A)
Remove
screw holding
collector
box
(B)
Note
wlrich
hole on
collector
box used
for attaching
to burner,
Remove
collector
box, clean
ceramic
portron
of electrode
with rubbinq
alcohol
and
cloth
Under console
disengage
burner
springs from
burner
tubes
(C)
Do not remove
springs
from valve.
Remove
burner holding
briquet
grate
and burner
together,
slide backwards
lift
up and out
of
grill
(D)
Separate
burner
and
briquet
grate
Remove scale
from briquet
grate,
replace
if necessary.
Clean outside of
burner wth
soao and
water r
clogged holes
with a thin
wire Shake
out excess
\
\
-
.
water
and examine holes.
Due to
normal wear
\ \-r-
and corrosion
some holes
may become
enlarged
\\
\1,,
lf any
large cracks or
holes are
found replace
burner,
\
ti
lf
grill
is to be stored
coat burner
lightly
with
cooking oil
Wrap in
protective
cover
to
keep
_aa
11.
insects
out lf not storing
grrll,
hold
briquet
grate
and burner
together, angle
into
grill
bottom
(D)
Valve openings
must
fit inside burner
tubes.
After cleaning,
insert wire and
electrode
into hole
in
grill
bottom
(A)i
Reattach collector
box to
burner
wth screw
(B).
Be sure
to use
conect hole.
Place ends
of springs into
holes on
undersides
of
burner tubes
as before
(C)
to secure
burner,
VERY IMPORTANT:
Bumer tubes
must
engage
valve openings
as shown
(E).
Note non-engagement
(F).
13
Reattach round connector
of ignitor
wire to
ignitor
14
Do not use
more than 16 new
briquets on
briquet
grate
around
burner.
Do
not
let briquets cover
burner holes,
15
Reposition
drip vaporiser bar
and cooking
grate(s)
Reattach
clean can to
grease
clip
16
Before cooking again on
grill,
follow
Burner Flame
Check.
I IITffi
Lay burner upside
down on flatsurface
rnsert
I
"]Iffi
\
garden
hose to
force water
through
tubes Make
\
(
_.. -
_
sure water
comes out of
all burner
holes
Open
\
/\
Vpa
Screw
Briquet
Grate
-
v
\=1
n
Collector
Box
Electrode
Burner
Burner
attached
to
Valve
-?
Round
end to
ign itor
10
4a
tL.
Spring
,h.
Masterflame
.
29
Page 30

Cleaning
Lava Rock BurnerAssembly
1. Turn
gas
off at control knob(s) and LP
tank.
2. Remove
cooking
grate.
Discard
used lava rock, remove fire
?
4
5
grate.
Remove
scale fiom
fire
grate,
replace
grate
if
necessary,
Remove
can from
grease
clip.
Beneath
console
disconnect short ignitor wre
from ignitor
(A).
Remove screw
holding collector box
(B).
Note
which
hole on
collector box used
for attachinq to burner. Remove
collector
box,
clean ceramic
portion
of electrode wth
rubbing
alcohol and
cloth.
Under
console
disengage burner springs from
burner
tubes
(C).
Do not remove springs
from valve.
Slide burner
backwards, lift
up
and
out of
grill
(D).
Clean outside
of burner wth soap
and
water. Lay
burner upside down
on flat
surface,
insert
garden
hose to force water
through
tubes. Make
sure water comes out
of all burner
holes. Open
clogged holes
with
a thin wire Shake
out excess water
and
examine holes.
Due to normal wear
Collector Box
oT
Burner attached
to
Valve
\_l
Burner
Spring
Spring
Round end
to ignitor
and
corrosion
some holes may
become enlarged
lf any large
cracks or holes
are found replace burner
lf
grill
is to be stored,
coat burner lightly with
cooking
oil. Wrap in
protective
cover to keep
insects
out. lf not
storing
grill,
angle
burner
tubes
back into
grill
boftom
(D).
Valve
openings
must fit inside
burner tubes
After
cleaning,
insert wre and
eleckode into hole
in
grill
bottom
(A)
Reattach collector
box to burner
with
screw
(B).
Be sure
to use correct hole.
Place
ends of
springs into holes
on undersides
of burner
tubes
as before
(C)
to secure burner.
VERY
IMPORTANT:
Bumer tubes
must
engage
valve
openings
as shown
(E).
Note
non-engagement
(F).
Reattach
round
end of ignitor wire
to ignitor
a,
a,
10
11
tt Reposition
fire
grate
Place
lava rock onto fire
grate
(do
not
layer
or stack lava
rock - use
just
enough to
cover fire
grate
surface).
13
Reposition
cooking
grates
and reattach
clean can to
grease
clip
14
Before
cooking
again
on
grill
follow Burner
Flame Check.
30
.
Maslerflame
Page 31

A
CAUTION
Clean
burner twice
a month when in
regular use,
Clean
burner
prior
to use after
storage, Spiders
and insects
like to
build nests in
burner tubes
(especially
during
colder
months)
These nests
can cause
flashback
(fire
in burner
tubes)
Typical
spider
webs inside
burner
*
*
Seasoning And
Using Cast lron
Cooking
Grates
Before
usrng cast
iron grates
wash
with dish washing
liquid
to
remove
a waxed
coatrng
used for
protection
in shipping
Rinse
with hot
water and
dry completely
Never allow
to drain
dry, or
wash in
a dishwasher.
Thts can cause
rusl and
cause food
to
have
a metalltc
lasle or discolor
foods After
drying
grates
coat
entire
surfaces with
a thin coat
of solid vegetable
shortening
Do
not
use salted fat
such as margarine
or
butter.
Place
grates
into
grill
grill
on HIGH
for 10 minutes.
Turn
control knobs
to medium,
close lid and
season for t
hour Turn
off all
control knobs.
Leave
grates
in
grill
to cool,
Your cast
iron
grates
are ready
to use.
You
may also
season cast iron
grates
in the
oven Follow
rnstructions
above to wash,
dry and
coatentire surface
with solid
vegetable
shortening
Put
grates
on top rack
of a clean
oven.
Place
aluminum foil on lower
oven rack
to catch
any drippings
Bake
in a 300 degree
oven for t
hours Turn
oven off, leave
grate(s)
in oven to cool
to room temperature.
lf ovenis
1o be
used
immediately
after seasonlng
use heat
resislanl barbecue
nrtts
or
pads
to remove
grates
from
oven while
HOT Place
qrates
on a
heat
resistant
surface
and allow
to cool to room
temperature,
Always
clean
grates
immediately
after each
use. Rinse
and
dry thoroughly.
lf there is
a lot of food
sticking to the
grates
clean
wrth
a steel wool
scouring
pad
Rinse well
with hotwater
and re-
season
in
grill
or oven
per
instructions
Prior
to storing
grease
very
lightly with
a solid vegetable
shortening
or
a vegetable cooking
spray
wipe dry with
a
paper
icwel
Store in a dry
place.
Cast iron
grates
will turn
black with
use. The
pores
of the iron
,l
be sealed
providing
a durable
coating
that helps to
prevent
':ods
from
sticking Grates
will further
season with
use Regular
appl cations
of a thin
coat of solid
vegetable shortenrng
or
,egetable
cooking spray
will improve
its resistance to
rust,
Cast iron
holds
heatwell
you
will not
need to use extremely
high cooking
temperatures when
grilling
A Do not drop
cast
iron
grates,
they will break
Repainting Your
Grill
.
After extended use and
exposure to weather,
paint
on
grill
may deteriorate or become
spotted Although
this detracts
from
grills
appearance,
it will not impair
its
performance,
.
To refinish
your grill
brush
outside of
grill
lid
and bottom
with
wire
brush and lightly sand with frne
grit
sandpaper
Sanding
allows new
paint
to adhere more
easily. Wash
grill
lid and
bottom
with soap and water
to remove dust and
grease
Do
not
use a
grill
cleaner on outside
of
grill.
Wipe
with vinegar
Refinish outsrde
with heat-resistant
paint,
Do not
paint
inside
of
grill
.CareOf
Wood
.
Wood items can be
sanded lightly with
fine
grit
sandpaper
Refinish
with stain,
paint
or water
sealant,
Storing
Your
Grill
.
Clean cooking
grate(s)
and discard
old briquets
or lava rock
.
Store in
dry
location.
.
When
LP tank is connected
to
grill
store
outdoors in
well-
ventilated snacc and
oUt
of reach of
Children.
.
Cover
grill
if
stored outdoors, Choose
from a variety
of
grill
covers
offered by Char-Broil
.
Store
grill
indoors 0NtY
if LP tank rs disconnected,
removed
from
grill
and
stored outdoors.
.
When removing
grill
from storage
follow Cleaning
Burner
Assembly
instructions before
starting
grill
Maslerfane
.
ll
Page 32

Problem
Burner
will not
light using
ignitor.
Possible Cause
Wire(s) and/or
electrode covered
with
cooking
residue.
Electrode(s)
and burner
are wet.
Electrode(s)
cracked or
broken
"sparks
at
crack"
Wire(s)
is loose ordisconnected.
Wire rs shorting
(sparktng)between
ignitor
and electrode.
Bad electrode.
Prevention/Cure
Clean wire(s)
and/or
electrode with
rubbing
alcohol and clean
swab.
Wipe
drywith cloth
Replace
electrode(s)
Reconnect
wires or
replace electrode/wire
assembly..
Replace ignitorwire/electrode
assembly
Qonleno olontrnr{o
Burner(s)
will not match
light.
No
gas
f low.
Coupling
nut and
regulator not f ully
connected.
Obstruction of
gas
f low
Disengagement
of burner
to valve
ls
grill
assembled correctly?
Check
to see if
LPtank is empty
lf LPtank
is notempty,
referto
"Sudden
drop in
gas
flow"
Turn the
coupling nut
about one-half
to three
quarters
additional
turn
until solid stop.
Tighten
by hand only-do
not use tools
Clear
burner tubes.
Reengage
burner
and valve
Check
steps
n assembly
instructions.
Sudden
drop in
gas
flow
or
lowflame.
Out
of
gas
Excess
flow valve tripped
Check
for
gas
in LP tank
Turn off knobs
and LP tank
valve Wait 30
seconds and
light
grill
lf f lames are still
low turn
off knobs and
LP tank valve Disconnecl
regulator
Reconnect
regulator
and leak check.
Turn on LP tank
valve, wait
30 seconds
and then
llght
grill
Flames
blow out.
High orgusting
winds
Low on LP
gas.
Excess
f low valve
tripped.
Turn f ront
of
grill
to
face wind or
increase f
lame height
Ref ill LP
tank
Refer to
"Sudden
drop
in
gas
flow"
above
Flare-up.
Grease buildup.
Excessivefatin
meat.
Excessive
cooking temperatut
e
Clean
grill
Trim
fat from meat
before
grilling
Adjust
(lower)
temperature
accordt
ngly
Persistent
grease
fire.
Grease trapped
by food
buildup around
0urner
syslem.
Turn knobs
to OFF
Turn
gas
off at LP
tank Open lid
carefully
and let fire
burn oul. After
qrill
cools
remove
and clean all
parts.
Flashback...
({ire
rn burner
tube(s)
Burner
and/or burner
tubes are blocked.
Clean burner
and/or burner
tubes
Unable
to fill LP tank
Some dealers
have olderfill nozzles
with
worn threads
The worn
nozzles
don't have
enough
"bite"
to engage
the valve.
Try a
second LP
dealer
Page 33

r::"._c
times
and
temperatures
may
vary
according
to
specific
recipes
cooking
conditions
or
barbecue
equipment
used
Take
.-=s:
ractors into
consideration
to
insure
best
resurts
riyou
use
the
iniirect
cooking
method
(indirectcooking
is
lighting
only
one
:-.^erandplacingfoodonoppositesideofcookinggrate)a||owmoregri||time
Please
note:
High
=
650
F0 /
Medium
=
450
F0 I
Low
=
300
F0
Food
Setting
Cooking
Time
Food
Setting
Cooking
Time
Seafood:
Steaks
1"
thick
Medium-Hot
Well
done:
10-15
min
Fillets
6-8
oz
Medium-Hot
B-'12
min
Shrimp
large
or
Low-Medium
B-12
min
jumbo
Medium
Medium-Hot
Med:
7-10
min.
Well
done:
'10-15
min
Rare:
3-6
min
Med:
6-9
min.
Well
done,
9-12
min
Rare.
18-22
min
Per
10,
I'Aed.
22-28
min,
Per
lb
Well
done:
28-32
min
per
lD
Venison
Steak
'1"
thick
Medrum
Rare
8-1U
mtn
Med:
'10-12
min
Burgers
1/2
Medium
il,ii,'
li_if
il,;
Roast
3-4
lbs.
Low
Medrum
Rare:
20-22
min
Per
lb
Med:
22-25
min
per
lD.
Pork
Chops
1/2'
Ribs
5-6
lbs
Roast
3-5
lbs
Medium
Well
done:
15-20
min
.
Low-Medium
Well
done:
45
90
min
Low-Medium
Well
done:
1B-23
min'
Per
lb
Ham
Steak
1/2
Medium-Hot
12'15
min
Ham
5 lb.
fully
Low-Medium
20
mtn
per
lb
cooked
Vegetables:
Wrap
vegetables
in
foil
Baking
potato,
whole
Onions,
whole
Tomatoes
half
Corn,
whole
Mushrooms
55-60
min
45
min.
30-40
min
35'45
mtn.
15-20
min
L amb
-'rnnq
1/2,,
Medium
6-1
2
min
Low
t
hr
15
min
to
t
hr
30
min
Low
40-60
min
Low-Med
18-20
min
Per
lb
Page 34

'
Fnnd cefotrr ic a rro;y
ir1'1pe;[ant
part
of enjoying
the outdoor
cooking experience,
To keep food
safe from harmful
bacteria,
follow
these four
basic
steps:
-
Wash hands,
utensils, and
surfaces
with hot soapy
water
before and after
handling raw meat
and
poultry
-
Separate
raw meats
and
poultry
from ready-to-eatfoods
to
avoid cross contamination.
Use
a clean
platter
and utensils
when
removing
cooked foods
-
Cook
meat and
poultry
thoroughly
to
kill bacteria.
Use a thermometer
to ensure
proper
internal food
temperatures
-
Refrigerate
prepared
foods
and leftovers
promptly.
For
more information
call:
USDA
Meat and Poultry
Hotline
at 1-800-535-4555
In Washington,
DC
(202)
720-3333, 10:00
am-4:00
pm
EST
How
to
Tell if Meat
is
Grilled Thoroughly
'
Meat and
poultry
cooked
on a
grill
often browns
very faston
the
outside. Use a
meat thermometer
to be sure food
has reacned
a
safe internal
temperature,
and
cut into food
to check
for visual
signs of doneness,
'
Whole
poultry
should reach
1800 F;
breasts 170a
F. Juices
should run
clear and flesh
should notbe
pink
'
Hamburgers
made
of any
ground
meat
or
poultry
should reach
1600 F
and be brown in the
middle with
no
pink
juices.
Beef,
veal
and lamb
steaks roasts
and chops
can be
cooked
to 1450 F
All cuts of
pork
should reach 1600
F
'
NEVER
partially
grill
meat or
poultry
and
finish cooking
later.
Cook food completely
to destroy
harmful bacteria
'
When reheating
takeoutfoods
or fully
cooked meats
like hot
dogs,
grillto
1650
F or until
steaming hot
Italian
Burgers
Yield,
B Servings
.
Cooking
Time:
20 Minutes
.
Method,
Medium
Combine
spaghetti sauce
mix, tomato
paste,
and 1l4cup
of the
water. Add half of this
mixture to meatand
mix well.
Shape into
8
(1/2inch)
patties
Addremainingl12cup
of thewatertosauceandheatongrill,stirringuntil
thickened
Grill burgersovermedium
fire for 10-15
minutes. Turn
and
grill
until
nearly ready
Top
wrth cheese and
cook until cheese
starts to melt
Top with tomato
and
sprinkle
with
garlic
salt. serve
meat on French
bread
topped with
hot spaghetti sauce.
Savory Sirloin
Steak
Yield'
4-G Servings
.
Cooking Time,
15-25
Minutes
.
Method: lVledium-Hot
1
(1.5
oz.)
pkg
spaghetti
sauce mix
'1
(6
oz.) can tomato
paste
314 cup water
divided
2 lbs
lean
ground
beef
B thin
slices mozzarellatheese
114 cup Worcestershire
sauce
1
tbs minced
onion
2 tbs lemon
juice
2
tbs oil
1 tsp salt
1/2
tsp instant
minced
garlic
2 large tomatoes,
sliced
Garlic
salt
B slices French
bread
sliced,
buttered
and toasted
1
(3
lb ) sirloin
steak
2 tbs
steak sauce
2 tbs. butter
melted
1 tbs chopped
parsley
1 tsp
Worcestershire
Combine first 6 ingredients,
Pour
into
a heavy
plastic
bag and
add steak Marinate in
refrigerator 4 hours or
overnight, turning
occasionally
Remove
steaks from
marinade about
t hour
before
grilling.
Drain Place on
grill
over
hotfire Grill aboutB
to 12
minutes on each
side or to
desired degree
of doneness
Combine
remaining ingredients and spoon
over steak
before serving
Slice steak in
thin diagonal
slices
34. Maslerflame
Page 35

Use
a
Wire Grill
Basket
to
grill
difficult
chicken,
fish, burgers,
steaks
and
shrimp
Cook
many
different
ttems
at the
same
ttme and
sa-e
rate by
flipping
them
all at
once, safely,
surely
Fish and
chicken
won
t
fall apart
while
turning.
To keep
food
from sticking
to the
,',
'e
coat
the basket
with
oil before
use,
Grilled
Fresh
vegetable
:resh
vegetables
can
be cooked
on
the
grill
Brush
the
prepared
vegetables
with
cooking
oil or
a bottled
vinaigrette
dressing
r
ace them
direcily
on
the cooking
grate
beside
the
meat.
Turn vegetables
once and
before
long
they will
be crisp
and
ready
to eat.
TeriyakiSteak
"
eld
6-8
Servings
'
Cooking
Time:
30 Minutes
'
Method:
Medium-Hot
'
2 lb
flank steak
112 cuP
soy sauce
'
clove
garlic,
minced
1/4
cuP water
'/3
cup
grated
onion
2 tsp
meat
tenderizer
'
tsp
ginger
1 tsP Liquid
Smoke
2
tbs sugar
Score
steak
in diamond
pattern
on both
sides.
Place
steak in
heavy
plastic
bag
Combine
marinade
ingredients
and
pour
over
steaks,
Marinate
at
room
temperature
2 to
3 hours
or
in refrigerator
overnight,
turning
occastonally
Allow
steak
to come
to room
remperature
before
grilling.
Reserve
marinade
Place
on
grill
over
medium-hotfire
and
grill
with
lid down
for 15
minutes,
basting
cften
Turn
and
grill
another
15 minutes
or
until done
to
your
liking
Continue
basting.
Eye of
Round
Yield: 6 Servings
.
Cooking
Time:About
1-114 Hours
'
Method:
Low-Medium
1
(3
lb ) eye
of round
1/3 cup
wine
vinegar
2/3 cup
Worcestershire
sauce
213
cup salad
oil
1/3
cup
soy
sauce
Marinate
roast
overnight
in above
mixture.
Cook
over
low fire
until
done
Check
after
t hour
for
medium
rare. Slice
very
thin and
serve with
Horseradish
Sauce.
Horseradish
Sauce
Yields:
1-112
cups
Combine
all
ingredients
in blender.
1
(3
oz
)
pkg
cream
cheese
2 tbs
horseradish
1
cup sour
cream
'1l4
tsp
each
: sugar,
salt
and
pepper
'1
tsp
grated
onion
Lemon
Herb Chicken
Y
eld: 6 Servings
.
Cooking
Time: 45
Minutes
'
Method:
Low
^
12
cup fresh
lemon
juice
Grated
rind of
I lemon
' '
2 lsp crushed
sweet
basil
1/2 tsp
crushed
thyme
2 ,:.es
garlic
crushed
2tsP.
salt
'
:st
:;t.
r
a
1 cup
oil
' '
2
lsp onron
powder
l cut
up frying
chicken
Combine
all
ingredients
and
pour
into
plastic
bag
Add
chicken
and
marinate
for
6 to
8 hours
in
refrigerator
turning
occasionally
Remove
from
refrigerator
'1
hour before
grilling.
Place
chicken
on
grill,
skin-side
up
Cook
for
20 to
25 minutes
basting
often with
marinade,
Turn
cook
for 20
minutes
longer
Serve
immediately
Masle(lame
.
35
Page 36

Polynesian Chicken
Yield: 4Servings-.
Cooking
Time . 1 to 1-112Hours . Method:
Low
2
(ztb.)
split broilers
2
tsp. salt
1/2 cup
oil
1/2
tsp
pepper
Brush
chicken with oil
and season with salt and
pepper
Place on
grill
with bone
side down
Grill slowly.
Turn afler 20 lo 25
minutes and cook
about 20 minutes longer
Meanwhile make the below
listed
glaze
Pineapple
Glaze
1
cup
crushed
pineapple
2
tbs
prepared
mustard
drained and reserve
'1l4
cup syrup
1/2 tsp salt
2
tbs. lemon
luice
1
cup
brown sugar
Combine
ingredients brush both
sides of chicken with
glaze
and
broil about
10 minutes
more or until
tender Turn and baste
with
glaze,
Serve extra
glaze
with chicken.
Indirect Cooking:
You
can
bake or slowly roast
many foods on a covered
grill
by
cooking indirectly.
Simply light
the
gas
on
one side of the
grill
and
place
the
food on the other side CIose
the lid and
your
grill
will bake
or roast like
a conventional
oven
Chicken Shish
Kabobs
Yield:
4 Servings . Cooking Time:
12-16 Minutes . Method: Medium
4 chicken breast
halves boned
1 cup soy sauce
and cut inlo 1-112
inch
pieces
1/2 lb mushrooms
1
green pepper
cut
in 1 inch
pieces
1 small can
pineapple
chunks,
1 zucchini squash sliced
and
parboiled
juice
reserved
Combine all but
pineapple
chunks
(include
the
pineapple
luice)
Marinate
for B
to 12 hours
in refrigerator Thread
chicken
pineapple
mushrooms and
bell
pepper
alternately on
skewers Grill over
medium fire for
6 to B minutes
on each side
or until done
Corn 0n
The
Grill
Yield: 6 Servings
.
Cooking
Time: 15 Minutes . Method:
Medium
6
ears unhusked corn
1/4 cup salt
Place unhusked
corn in sink
and cover with water. Add salt.
Soak 2 hours
Place unhusked
corn on
grill
Cook and
turn until entire
outside husk
is black Remove
from
qrill
and husk
corn Serve with Herb
Butter
Herb Butter
'1
stick
butter softened
1 small clove
garlic
pressed
1 tbs lemon
juice
2 tsp finely chopped chives
2
tsp finely chopped
parsley
2 tsp finely chopped
tarragon
Add herbs and
luice
to softened butter
and cream all together
Cover and
store in refrigerator
for seasonings
to blend
Good on
veoetables
bread fish
or steaks,
36. Nlaslerflame
Page 37

L a,a
Char.BroilTurkey
'
. )
'4
to
16
generous
servings or'1 lb.
per person
l::,
,ro
trme 25
minutes
per pound
.
Method: Grill on low
'
2'.:
'
4lb
turkey thawed
a^^l^ ^' '^rt^r^i
j
)v
dvvtv. gudr rur('u
"
2
strcks butter
-
r'ange,
quartered
'
:-on thinly slices or
4
:-:esecloth
(optional)
completely
vegetable oil
1
quart
water
2 stalks celery, cut
in
2"
pieces
onions, cut in large cubes
^^t+ ^h/.,/
Jdrr dr ru
PUPPcI
tbs. lemon 21uice
-eat
grill
to medium. Wash
and rinse turkey, removing
giblets.
Dry with absorbent
paper.
Bend wings
back behind turkey. Season
-sde
of
turkey with
saltand
pepper
Rub outside of bird with oil Stuff with
onions celery,orange
and apple Completely fillcavity
'-
c nivoq mnictrrro ln thg
{x1(gy), Cover openings of turkey with excess
skin. Melt butter
in a large aluminum foil
pan.
Add turkey,
,., ater and lemon
juice
Place
on
grill
and
turn heat to low Baste with butter, cover
top with cheesecloth and
baste again. Baste every
'
2
hour
until done Serve with Giblet Gravy
3011
giblets
until
tender, reserving broth. Chop
giblets
and set aside. Remove
grilled
turkey from
baking
pan
and
place
on hot
: atter, Pour all
pan
juices
into large measuring cup Skim off fat, reserving
3 to 4 tbs Place reserved
fat into a deep saucepan,
-::f
nn nvcr mndor:tp
heat, Stir in flour, whisking wellwith wire whisk, Cook
over low heat until bubbly
then remove from heat. Add
'^'
{'^^ ^^^;";^^^ /^'r'r
milk
and
giblet
broth to
juices
to make2 full cups). Blend
wellwith wire whisk.
Season with salt,
pepper,
:::ent,
thyme and Kitchen Bouquet whisking
continuously, Return mixture to heat and
continue stirring for 3 to 4
minutes Add
,^cpped eggs.
Giblet Gravy
-
'
- ? ''
rL nv nni ^hinL
an
nihlotc
Z
.L J lur ^Uy dl lU Ul llt AUl I
Vlulvto
: I tbs turkey or chicken fat
'
j
cup flour
-
.
^^ {^r {.^^ ^^^ ;,,;^"
.
--ps
rar-rree
pan
lurces
.
'ard
boiled eggs finely chopped
-
r ol hrnth if noodod
Smoked
Turkey
greast
,::k
ng
time, 25
minutes Per Pound
.
'
:-rkey breast, fresh or thawed
'
;. ro nlrctrn rnectinn I
,---.,,,, D?9
:^:cs
(1
to 1-112'thick)
-
r.\/
nn\A/dor /nntinnel\
noney
salt and
pepper
to
taste
1/4 tsp. Accent
dash of thyme
1/8 tsp Kitchen Bouquet
milk if needed
Method: Grill lndirect Heat
1 large bottle ltalian
dressing
1 small bottle soy sauce
o +l-^ ^^,, ^^,,^^
z LUD, buy JdUU('
1/2 tsp
ground ginger
l la +^^ ^^.li^ ^^lr
r/z r5P, gdr ilu bdil.
^^'r ^^" ^ruce,
Place turkey breast
in bag and
pour
mixture over turkey
breast, Marinate in refrigerator
overnight Light
.
'
_r ussr{lg dr ru 5uy J6
'
-:
: do nf nrill rrvilh col{ipg
e1-1 low, Remove turkey
from marinade and reserve liquid
Put meat thermometer
in turkey breast being
,='::
r
notto
touch bone Place turkey
on the
grill
away from direct heat Grill
over low fire, basting
and rotating often. Remove when
-
::i i^e
'rnofTreter
reqisters 180'F
Honey
Chops
'
= :
-1
Serv ngs . Cooking Time: 30-40 Minutes
.
Method: Medium-Low
'.t
'
roney
soy sauce and curry
powder,
rf desired Sprinkle
pork
chops
with
ginger
and
garlic
salt,
-:^:r
znd soy sauce mrxture,
Pierce chops with fork to be sure flavor
penetrates,
Turn several
times
=- - -:h to cook
pork
thoroughly but avoid charring
Chops should be cooked
in about 30 minutes
marinate chops
overnight in
The fire needs to be hot
lVasterf ame . 37
Page 38

CHAR.B
ROI L LI MITED WARRAN
TY
Gas, Electric, Cast Charcoal,
Hooded Charcoal
Grills
CHAR-BROIL
warrants to the
originalconsumer-purchaserthat this
product
shall be freefrom
defects
in
workmanship
and
materials under
normal and
reasonable use and correct assembly
(if
assembled by consumer-purchaser),
as
follows.
(1)
Thealuminumtopandbottomcastingsforthelifeoforiginalpurchaser,excludrngthepaintfinish(gas,electric,castcharcoalgrills);
(2)
The hood and fire box sheet
steel for a
period
of five
(5) years
from the date of
purchase (hooded
charcoal
grills);
(3)
The burner/burner assembly for a
period
of three
(3) years
from the date
of
purchase (gas
grills);
and
(4)
Allotherpartsforaperiodofone(1)yearfromthedateofpurchase(allgrills).CHAR-BROlLwill
atitsoption,refinishorreplaceany
product
or
part
found to be defective during the warranty
period
CHAR BROIL will
require
you
to
return the
part(s)
claimed
to be
defective,
for its inspection, f reight or
postage prepaid.
lf
you
wish to obtarn
performance
of
any obligation under this limited warranty,
you
should
write to:
cHAR-BROtLo
Consumer Warranty / P.
O. Box 1240
Columbus, GA 31
902-1 240
CHAR-BROIL may
require reasonable
proof
of
purchase
and we
suggest
you
keep
your
invoice.
In the state of California
only, if refrnishing or replacement
of
the
product
is not commercially
practtcable,
the retailer selling this
product
or CHAR-
BROIL will ref und the
purchase price paid
for the
product,
less the amount directly attributable
to use by the
ortginal consumer-purchaser
prior
to
discoveryofthenonconformity.
lnaddition inthestateofCaliforniaonly,youmaytaketheproducttotheretailestablishmentfromwhichitwas
purchased
or to any retail establishment selling
this
product
in order to obtain
performance
under
this warranty
This wananty does not
include the cost on any inconvenience or
property
damage due
to failure of the
product
and does
not cover damage due
tomisuse,abuse,
accident,damagearisingoutoftransportationoftheproduct,ordamageincurredthroughcommercial
useoftheproduct ALL
IMPLIED WARRANTIES INCLUDING
THE IMPLIED WARRANTIES OF MERCHANTABILITY
AND FITNESS
FOR A PARTICULAR
PURPOSE
ARE LIMITED IN DURATION
TO THE EXPRESS WARRANTY PERIODS
SPECIFIED
ABOVE FOR
THE PARTS DESCRIBED
THEREIN Somestatesdonotallowlimitationsonhowlonganimpliedwarrantylasts,sotheabovelimitationmaynotapplytoyou
Neither
CHAR-BROIL
dealers nor the retail
establishment selling this
product
has any
authority to make
any warranties or to
promise
remedies in addition
to orinconsistentwith those
stated above.
CHAR-BROIL'S
maximum liability
in
any
event, shall not exceed the
purchase price
of the
product paid
by the original
consumer-purchaser.
Some states do
not allow the exclusion or limitation
of incidental or consequential damages,
so the above
limitations or exclusions
may not apply to
you.
The warranty
giveslou
specific legal rrghts
and may also have other rights
which varyfrom
state to state.
38. Masterflame
Page 39

:HAR-BRotL@
FLAVoRMASTERo
MASTERFLAME2@
Heatwave@
cookingZone
1000@,
Saber@
Patiocaddie@
sierra@
Signatureseries@
SwingAway@
N2oSmoker@.andpatroKrtchen@areregisteredtrademarksof
wc.Bradleyco.
PrecisionFlamerM.sureFireTM.stackRackrM
FaststartrM
TiltrankrM
WideBodyTM'
andpatioBistrorM
aretrademarksof
wc
Bradleyco
Grillsprotectedforwc
Bradleyco
underoneormoreoftheseus.Patents:
4989579:
4955358
5220764
5421
31g 5.441
226 5566.606:
D291
768: D341
2g2
AssemblylnstructionsolggsWC
Bradleyco
All
RightsReserved
l',/asterf
arne
'
39
Page 40

enlglr-Broil'
A Division of W.C. Bradley
Co.
P O Box
1240
Columbus, GA 3'1902-1240
J}
rt
 Loading...