

Page 1
PRODUCT GUIDE
MODEL 463226513
Grilling's Juicy Little Secret TM
b®
Classic C-69G3
IMPORTANT:Fill out the product record information below.
Serial Number
Seeratinglabelongrillfor serial number.
Date Purchased
Forsupportandto registeryour
grill,pleasevisitusat
www.charbroil.com
Ifyouhavequestionsor need
assistanceduringassembly,
pleasecall1-800-241-7548.
© 2013 Char-Broil,LLC Columbus,GA 31902 PrintedinChina Assemblyinstructions© 2013 08/01/12. G651-001-210801
Page 2
ill,,
ForYourSafety.................................... 2-3
GrillingGuide...................................... 4-7
UseandCare .................................... 8-14
LimitedWarranty.................................... 15
PartsList.......................................... 16
PartsDiagram...................................... 17
Assembly....................................... 18-27
Troubleshooting.................................. 28-30
RegistrationCard................................... 31
Safety Symbols
The symbols and boxesshown below explain what each heading
means. Read and follow all of the messages found throughout
the manual.
If you smell gas:
1. Shut off gas to the appliance.
2. Extinguish any open flame.
3. Open lid.
4. If odor continues, keep away from the
appliance and immediately call your gas
supplier or your fire department.
1. Do not store or use gasoline or other
flammable liquids orvapors in the vicinity of
this or any other appliance.
2. An LP cylinder not connected for use shall not
be stored in the vicinity of this or any other
appliance.
WARNING: Indicatesa potentially hazardous situation
which, if notavoided, could result indeath or serious injury.
CAUTION
CAUTION: Indicatesa potentiallyhazardoussituationor
unsafe practicewhich, if notavoided, may result inminor
or moderate injury.
DANGER: Indicatesan imminentlyhazardous situation
which, if notavoided,will result indeath orserious injury.
INSTALLER/ASSEMBLER:
Leavethis manual with consumer.
CONSUMER=
Keepthis manualfor future reference.
Failureto follow all manufacturer's instructionscould
result in seriouspersonal injury and/or propertydamage.
CAUTION
Forresidential use only. Do not usefor commercial
cooking.
CAUTION
Readand follow all safety statements,assembly
instructions,and use and care directions before
attemptingto assembleand cook.
CAUTIO.
Some parts may contain sharp edges.
Wearprotective gloves if necessary.
Page 3

CAUTION
CALIFORNIAPROPOSITION65
1.Combustibleby-productsproducedwhenusing
thisproductcontainschemicalsknowntotheState
ofCaliforniatocausecancer,birthdefects,or
otherreproductiveharm.
2.This product containschemicals, includinglead
and lead compounds, known to the State of
California to cause cancer, birth defects or
other reproductive harm.
Washyour hands after handling this product.
Installation Safety Precautions
• Use grill, as purchased, only with LP (propane) gas and the
regulator/valve assembly supplied. If your grill is Dual Fuel ready,
a conversion kit mustbe purchased for usewith natural gas.
• Grill installation must conform with local codes, or in their
absence of local codes, with either the National Fuel Gas
Code,ANSI Z223.1/NFPA 54, Natural Gas and Propane
Installation Code, CSAB149.1, or Propane Storage and
Handling Code, B149.2.
• All electrical accessories (such as rotisserie) must be
electrically grounded in accordance with local codes, or
National Electrical Code,ANSI / NFPA70 or Canadian
Electrical Code, CSA C22.1. Keep any electrical cords and/or
fuel supply hoses away from any hotsurfaces.
• This grill is safety certified for use in the United States and/or
Canada only. Do not modify for use inany other location.
Modification will result in a safety hazard.
Do not attempt to repair or alter the
hose/valve/regulator for any "assumed" defect. Any
modification to this assembly will void your warranty
and create the risk of a gas leak and fire. Use only
authorized replacement parts supplied by
manufacturer.
Using pots larger than 6 quarts in capacity could
exceed weight limit of the
or side shelf,
resulting in failure
CAUTION
GreaseFires
• Putting out grease fires by closing the lid is not
possible. Grills are well ventilated for safety reasons.
• Do not use water on a grease fire. Personal injury may
result. If a grease fire develops, turn knobs and LP tank
off.
• if grill has not been regularly cleaned, a grease fire can
occur that may damage the product. Pay close attention
while preheating or burning offfood residue to insure
that a grease fire does not develop. Follow instructions
on General Grill Cleaning and Cleaning The Burner
Assembly to prevent grease fires.
• The best way to prevent grease fires is regular cleaning
ofthe grill.
NOTE: DONOT over tightenscrews andwashers that
come intocontact with porcelain coated surfaces. Over
tightening may cause the porcelain coatingto crack and
break, resultingin exposed metal that will be proneto rust.
Page 4
First Time Use
Read yourAssembly Manual and ensure the grill is puttogether
properly. Remove all Point-of-Purchase advertising material from
all grill surfaces before first use. We recommend operating your
grill on its highest setting for 15-20 minutes prior to your first use.
This aids in removing the oils used during manufacturing.
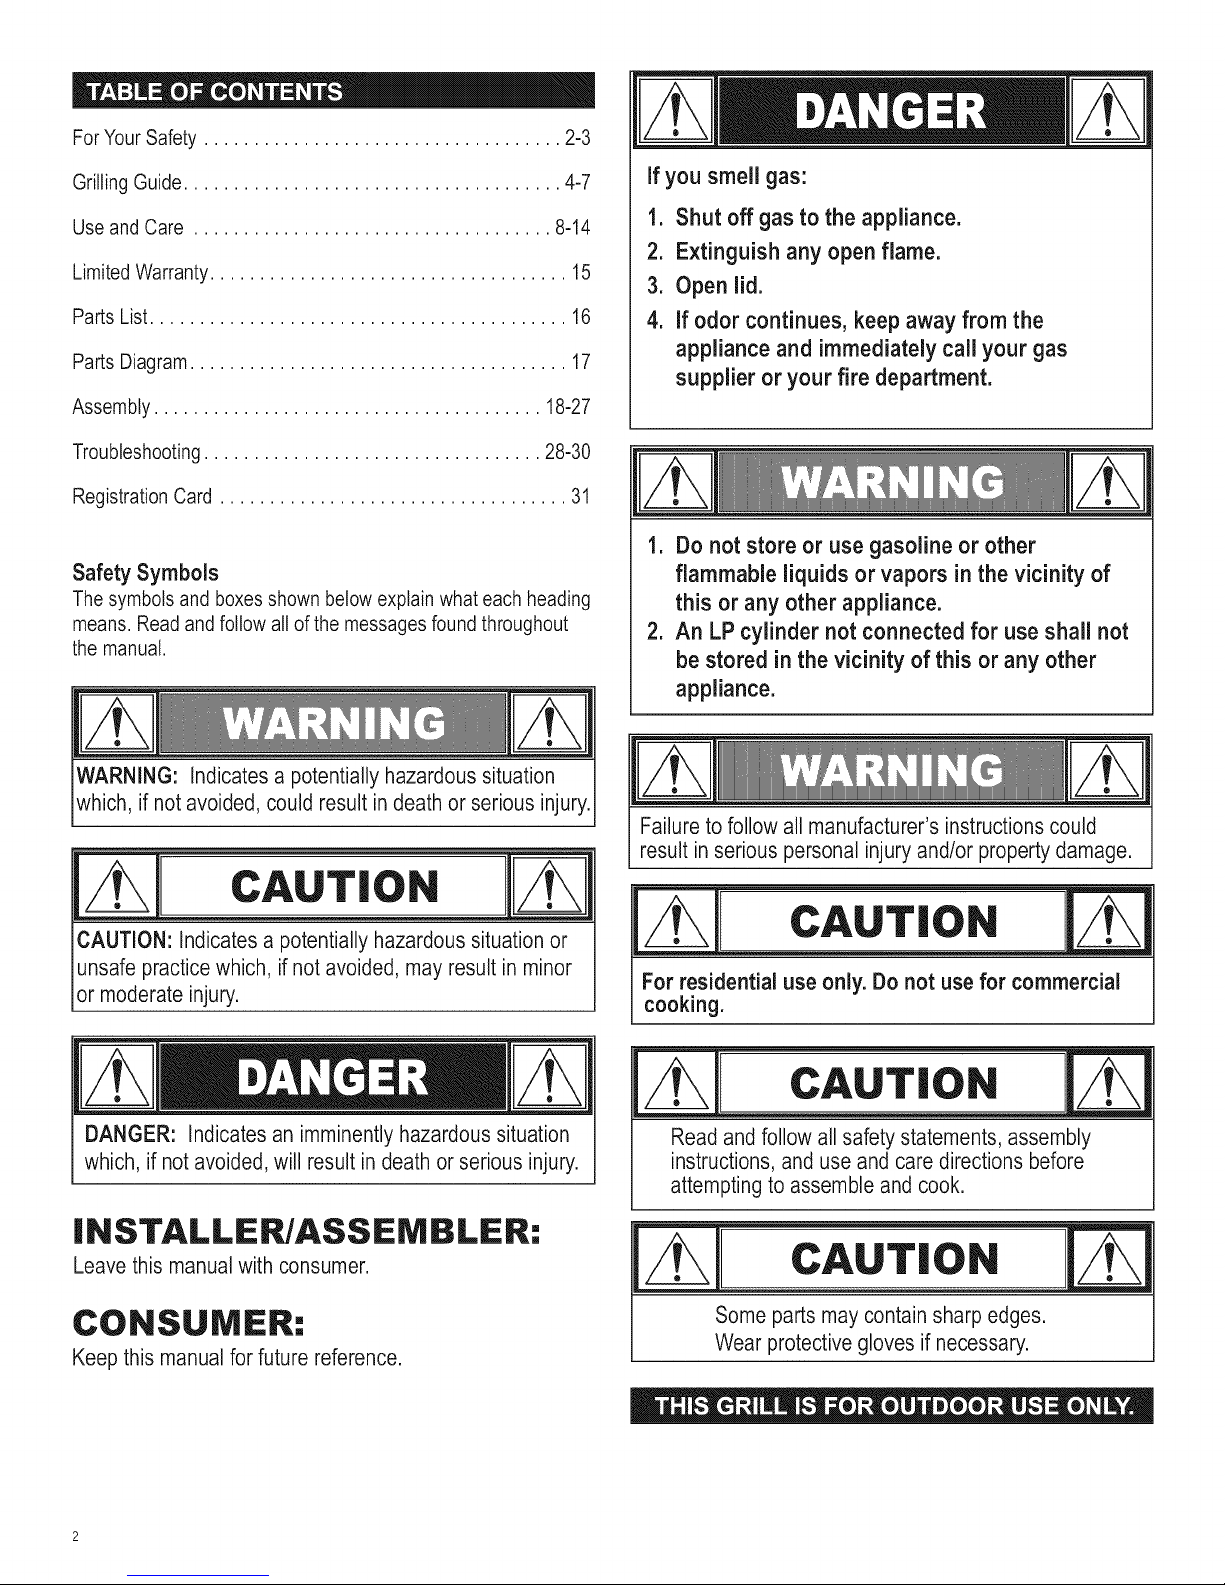
Lava Rock / Briquettes
This gas grill has been designed, engineered, and tested to be
used with flame tamers or heat distribution platesto provide
more even heating, improve the cleaning process, and reduce
flare-ups. The addition of after market lava rocks, charcoal, or
briquettes of any type will cause poor combustionand increase
the likelihood of a grease fire, and is not recommended. Using
briquettes, lava rock, or charcoal in this grillwill void your
warranty. For extra smoke flavor,we recommend using a
smoker box with wood chips.
Temperature - Convective Grills ONLY.
The temperature gauge in the hood of your new grill measures
air temperature. The air temperature inside your grill will never
be as hot as the temperature at the cooking surface.
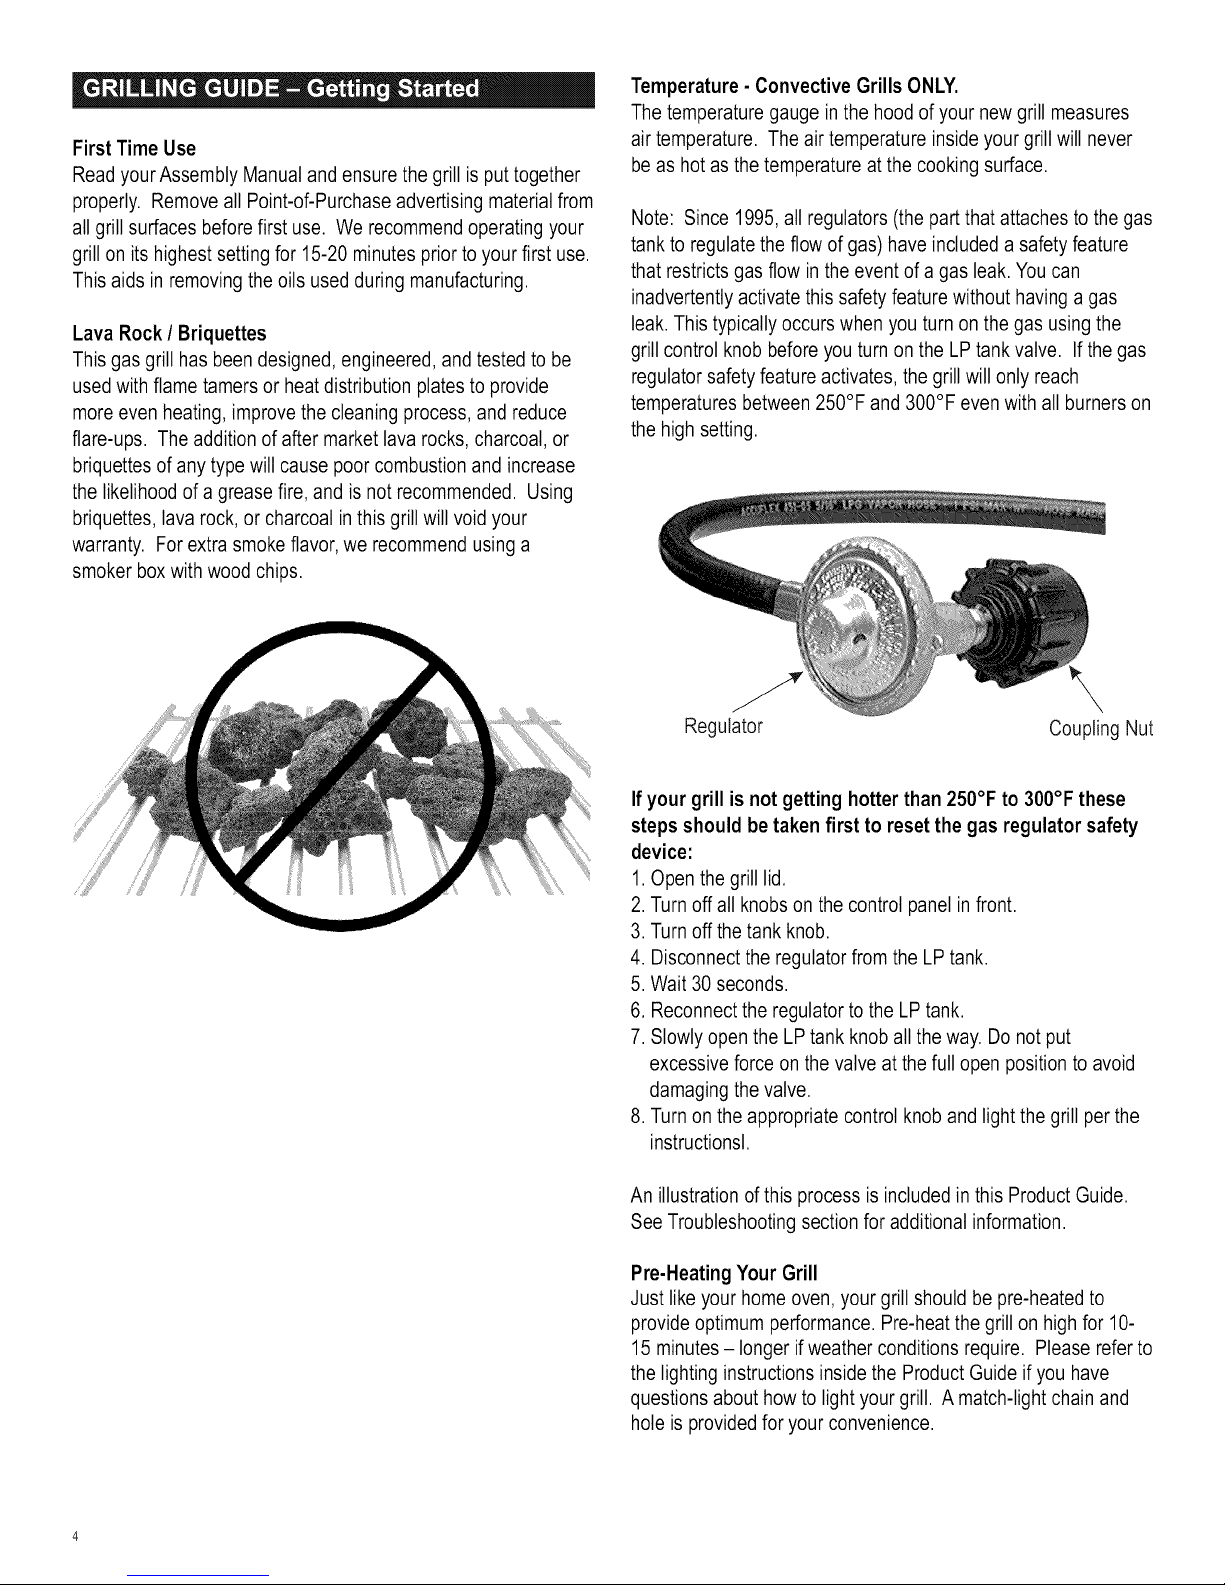
Note: Since 1995,all regulators (the part that attaches to the gas
tank to regulate the flow of gas) have included a safetyfeature
that restricts gas flow in the event of a gas leak. You can
inadvertently activate this safety feature without having a gas
leak. This typically occurs when you turn on the gas using the
grill control knob before you turn on the LP tank valve. If the gas
regulator safety feature activates, the grill will only reach
temperatures between 250°F and 300°F evenwith all burners on
the high setting.
Regulator
Coupling Nut
If your grill is not getting hotterthan 250°F to 300°F these
steps should be taken first to reset the gas regulator safety
device:
1.Open the grill lid.
2. Turnoff all knobs on the control panel in front.
3. Turnoff the tank knob.
4. Disconnect the regulator from the LP tank.
5. Wait 30 seconds.
6. Reconnect the regulator to the LP tank.
7. Slowly open the LP tank knob all the way. Do not put
excessive force on the valve at the full open position to avoid
damaging the valve.
8. Turnon the appropriate control knob and lightthe grill per the
instructionsl.
An illustration of this process is includedin this Product Guide.
See Troubleshooting section for additional information.
Pre-HeatingYour Grill
Just like your home oven, your grill should be pre-heated to
provide optimum performance. Pre-heat the grill on highfor 10-
15 minutes- longer ifweather conditions require. Please refer to
the lighting instructions inside the Product Guide if you have
questions about how to light your grill. A match-lightchain and
hole is provided for your convenience.
Page 5
Outdoorgrillingisreallyquitesimple.You'llsucceedwith
burgers,dogs,orsteaksusuallyonyourveryfirsttry.With
experience,youwilllearnhowtoworkwithyourgrill,creating
moreimaginativemealsallthetime.Thisknowledgemakesup
theartofgrilling.Beforeyoustartgrilling,organizeyourfood
accordingtocookingtechniqueandrequiredcookingtime,and
optimizetheuseofyourgrillingarea.
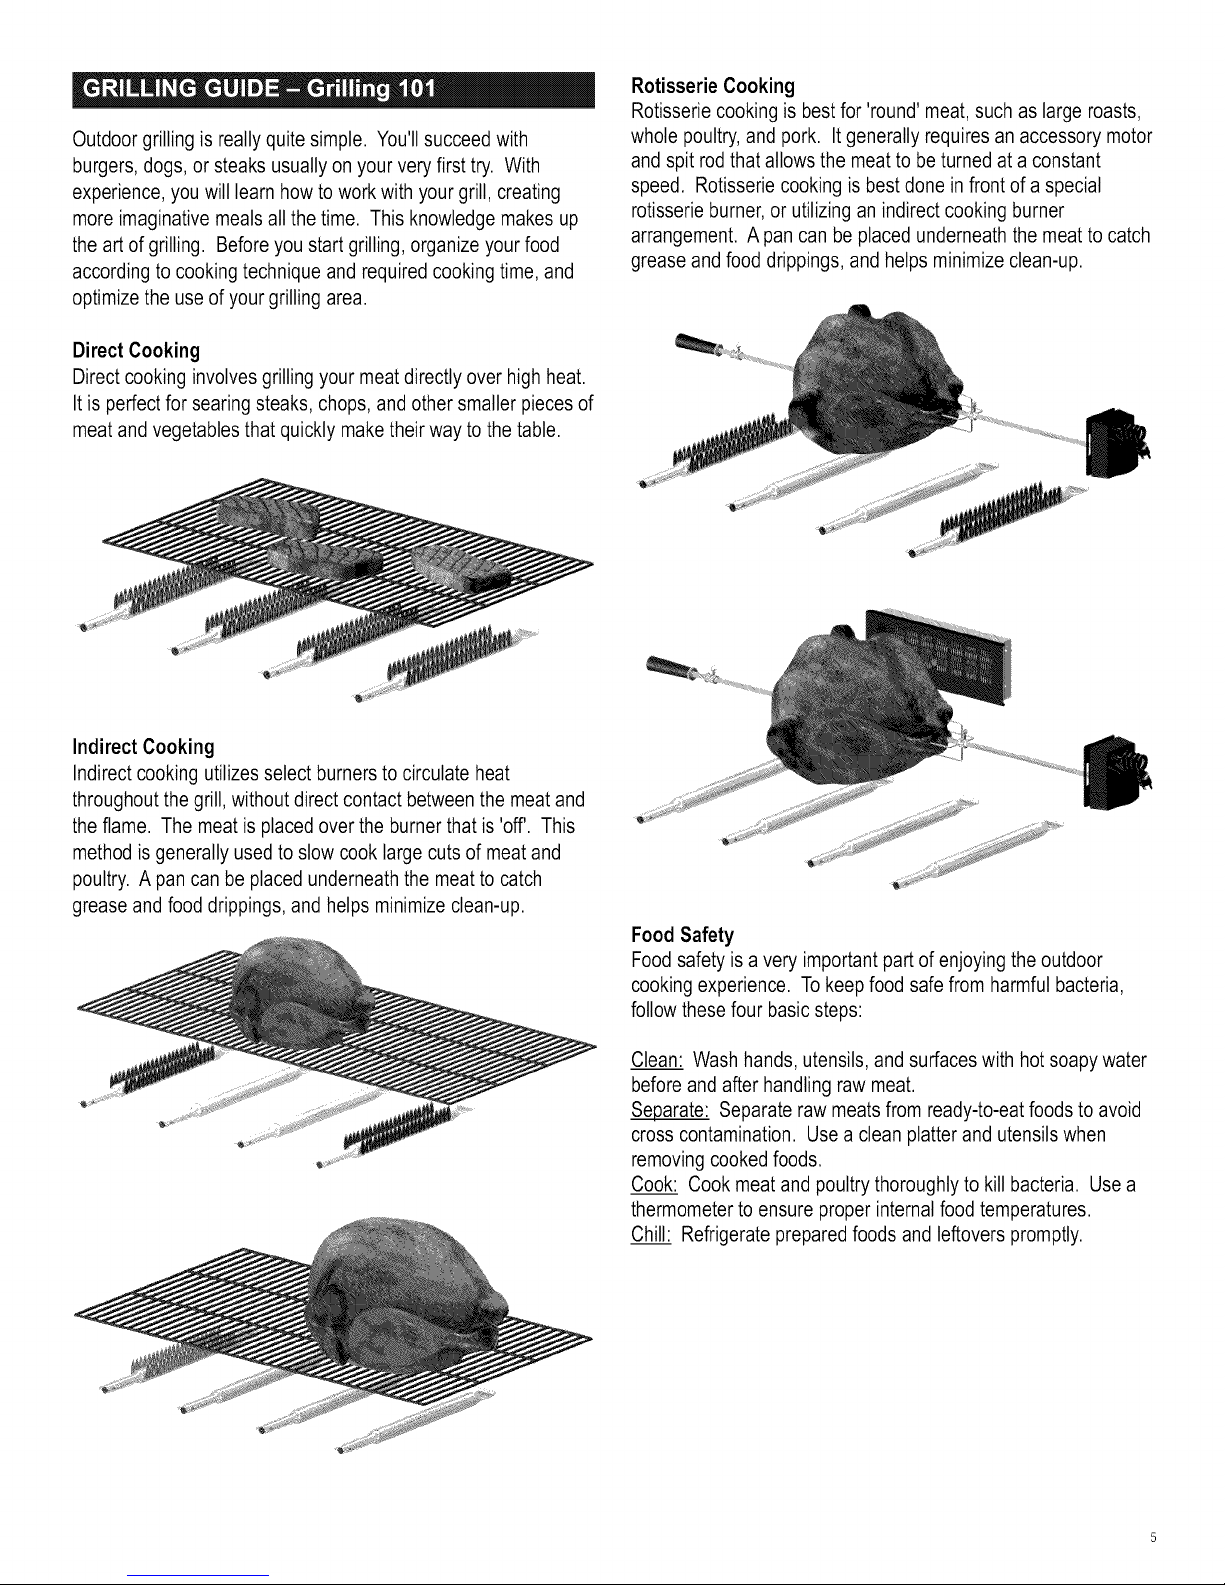
DirectCooking
Directcookinginvolvesgrillingyourmeatdirectlyoverhighheat.
Itisperfectforsearingsteaks,chops,andothersmallerpiecesof
meatandvegetablesthatquicklymaketheirwaytothetable.
RotisserieCooking
Rotisseriecookingisbestfor'round'meat,suchaslargeroasts,
wholepoultry,andpork.Itgenerallyrequiresanaccessorymotor
andspitrodthatallowsthemeattobeturnedataconstant
speed.Rotisseriecookingisbestdoneinfrontofaspecial
rotisserieburner,orutilizinganindirectcookingburner
arrangement.Apancanbeplacedunderneaththemeattocatch
greaseandfooddrippings,andhelpsminimizeclean-up.
IndirectCooking
Indirectcookingutilizesselectburnerstocirculateheat
throughoutthegrill,withoutdirectcontactbetweenthemeatand
theflame.Themeatisplacedovertheburnerthatis'off'.This
methodisgenerallyusedtoslowcooklargecutsofmeatand
poultry.Apancanbeplacedunderneaththemeattocatch
greaseandfooddrippings,andhelpsminimizeclean-up.
FoodSafety
Foodsafetyisaveryimportantpartofenjoyingtheoutdoor
cookingexperience.Tokeepfoodsafefromharmfulbacteria,
followthesefourbasicsteps:
Clean: Wash hands, utensils, and surfaces with hot soapy water
before and after handling raw meat.
Separate: Separate raw meats from ready-to-eat foods to avoid
cross contamination. Usea clean platterand utensils when
removing cooked foods.
Cook: Cookmeat andpoultry thoroughlyto kill bacteria. Use a
thermometer to ensure proper internalfood temperatures.
Chill: Refrigerate prepared foods and leftovers promptly.
Page 6
Cookingonyournewgrillisahands-onexperience,anditis
recommendedtoremainoutsidewithyourgrillwhilecooking.
Grillingcanbeaffectedbymanyexternalconditions.Incold
weather,youwillneedmoreheattoreachanidealcooking
temperature,andgrillingmaytakelonger.Themeat'sinternal
temperatureandthicknesscanalsoaffectcookingtimes.Cold
andthickermeatswilltakelongertocook.
InternalMeatTemperatures
Meatcookedonagrilloftenbrownsveryfastontheoutside.
Therefore,useameatthermometertoensureithasreached
safeinternaltemperatures.
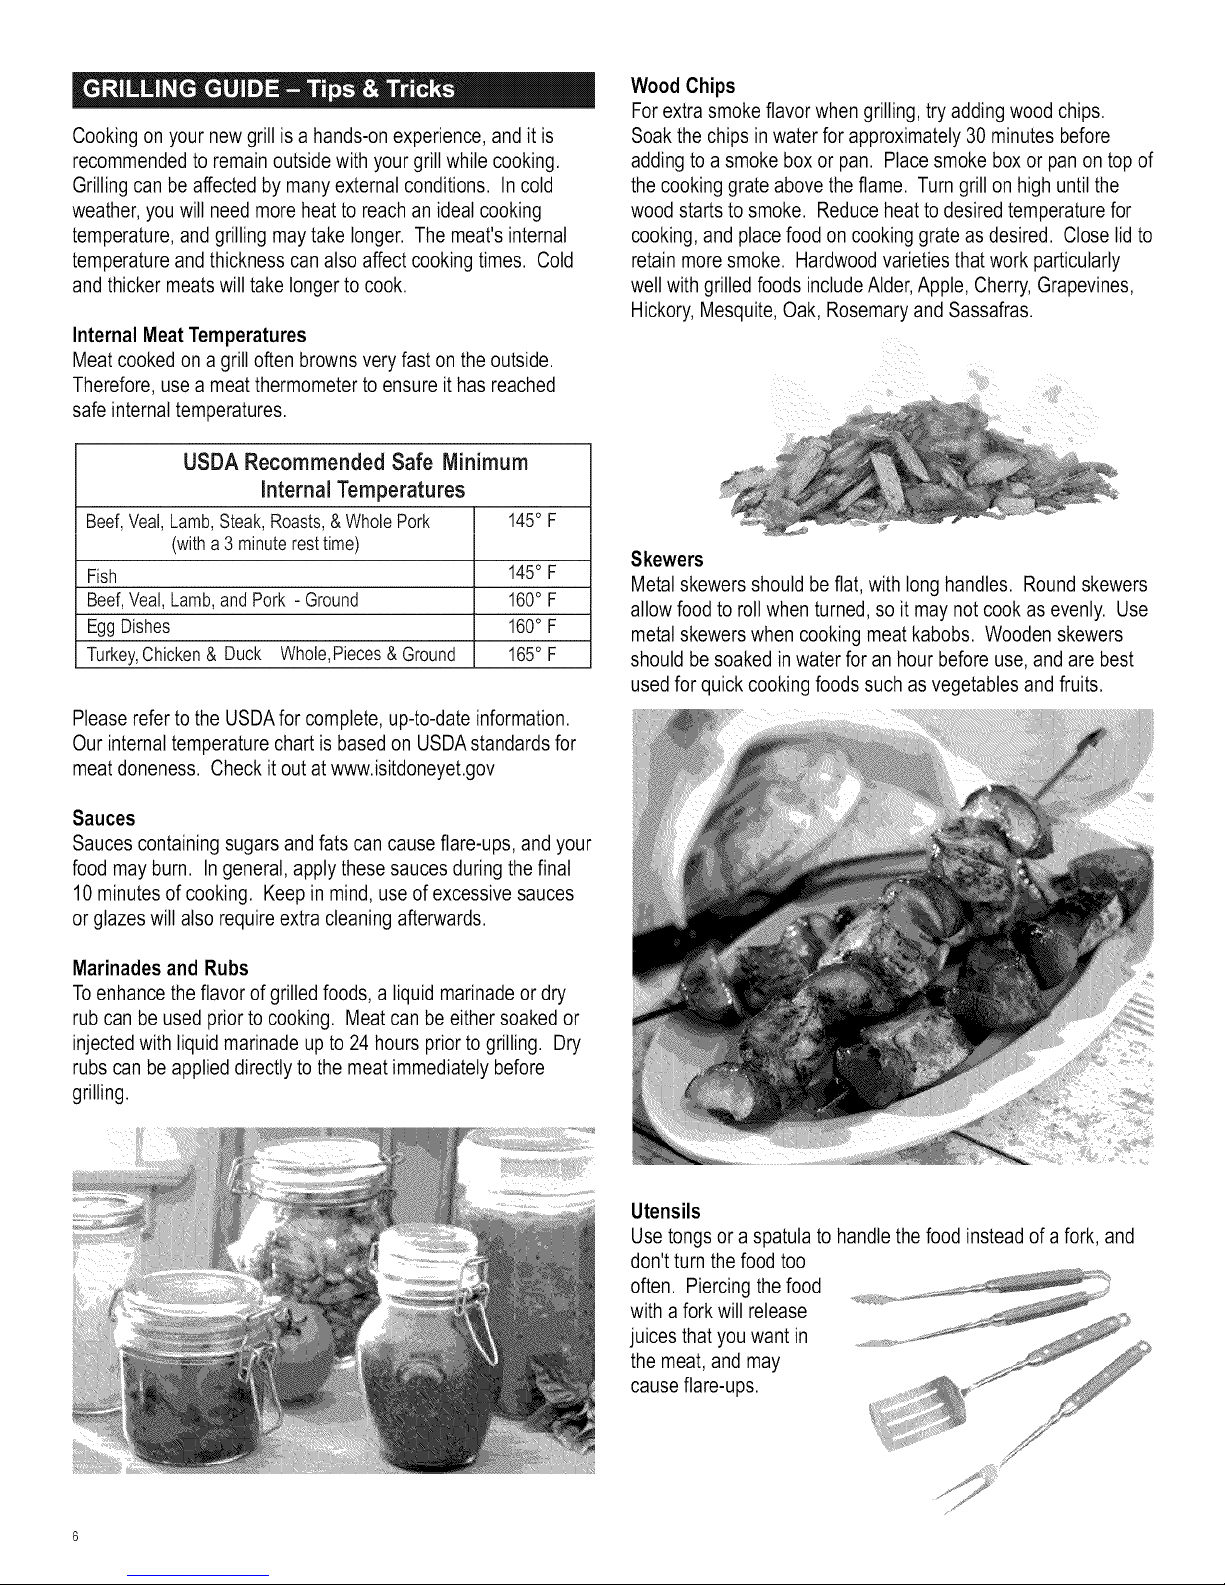
USDA Recommended Safe Minimum
internal Temperatures
Beef,Veal,Lamb,Steak,Roasts,&WholePork 145° F
(witha 3 minuteresttime)
Fish 145° F
Beef,Veal,Lamb,andPork - Ground 160° F
EggDishes 160° F
Turkey,Chicken& Duck Whole,Pieces& Ground 165° F
Please refer to the USDAfor complete, up-to-date information.
Our internal temperature chart is based on USDAstandards for
meat doneness. Check it out at www.isitdoneyet.gov
Wood Chips
For extra smoke flavor when grilling, try addingwood chips.
Soak the chips in water for approximately 30 minutes before
adding to a smoke box or pan. Placesmoke boxor panon top of
the cooking grate above the flame. Turn grill on high untilthe
wood starts to smoke. Reduce heat to desired temperature for
cooking, and place food on cooking grate as desired. Close lidto
retain more smoke. Hardwood varieties that work particularly
well with grilled foods include Alder, Apple, Cherry, Grapevines,
Hickory, Mesquite, Oak, Rosemary and Sassafras.
Skewers
Metal skewers should be flat, with long handles. Round skewers
allow food to roll when turned, so it may not cookas evenly. Use
metal skewers when cooking meat kabobs. Wooden skewers
should be soaked in water for an hour before use, and are best
usedfor quickcooking foods such as vegetables and fruits.
Sauces
Sauces containing sugars and fats can cause flare-ups, andyour
food may burn. Ingeneral, apply these sauces duringthe final
10 minutes of cooking. Keep inmind, use of excessive sauces
or glazes will also require extra cleaning afterwards.
Marinades and Rubs
Toenhance the flavor of grilled foods, a liquid marinadeor dry
rub can be used prior to cooking. Meat can be either soaked or
injected with liquid marinade up to 24 hours prior to grilling. Dry
rubs can be applied directly to the meat immediately before
grilling.
Utensils
Use tongs or a spatula to handle the food instead of a fork, and
don'tturn the food too
often. Piercing thefood
with a fork will release
juices that you want in
the meat, and may
cause flare-ups.
Page 7
WhyClean?
We'veallheardthesaying'Anounceofpreventioniswortha
poundofcure'.Thisisgreatadvicewhenitcomestokeeping
yourgrillclean.
Cooking surfaces: If a bristle brush is used to cleanany of the
grill cooking surfaces, ensure no loose bristles remain on cooking
surfaces prior to grilling. It is not recommended to clean cooking
surfaces while grill is hot.
RoutineCare
Periodiccleaningofthisgrillisnecessary,
asgrillfirescanoccurwhengreaseand
fooddebriscollectinthebottomofthegrill.
Aftereachuse,removeanyremaining
foodparticlesfromthecookinggrateand
insideofthegrillusingagrillbrush.Do
thisafterthegrillhascooleddown,yetis
stillwarm.Itismucheasiertocleanfood
particleswhilewarmthisstillpresent,than
afterthefoodparticleshavecompletely
cooledandhardened.Thisgrillisnot
designedtobe'burnedoff'byclosingthe
lidandturningtheburnersonHighforan
extendedtime.Theexcessiveheat
generatedcancauseleftovergreaseto
catchfire,andcancausepermanent
damagetoyourgrill.
GeneralCleaning
Plastic parts: Wash with warm soapy water and wipe dry. Do not
use abrasive cleaners, degreasers or a concentrated grill cleaner
on plastic parts. Damage to and failure of parts can result.
Storing Your Grill
• Clean cooking grates.
• Store grill in dry location.
• When LP cylinder is connected to grill, store outdoors in a well
ventilated space and out of reachof children.
• Cover grill if stored outdoors. Choosefrom avariety of grill
covers offered by manufacturer.
• Store grill indoors ONLYif LPcylinder is turned off,
disconnected, and removed from grill. Never store LP cylinder
indoors.
• When removing grill from storage, follow the 'Cleaning the
BurnerAssembly' instructions in the Use and Care section of
the Product Guide.
Critters
Spiders like to make their homes in the venturi tubes of grills.
These must be inspected and cleaned regularly to ensure there
are no blockages. Refer to the Use and Care portion of this
Product Guide for complete information.
Porcelain surfaces: Because of glass-like composition, most
residue can be wiped away with baking soda/watersolution or
glass cleaner. Use non-abrasive scouring powderfor stubborn
stains.
Painted surfaces: Wash with mild detergent or non-abrasive
cleaner and warm water. Wipe drywith a soft non-abrasive cloth.
Stainless steel surfaces: Stainless steel can rust under certain
conditions. This can be caused byenvironmental conditions
such as chlorine or salt water, or improper
cleaning tools such as wire or steel
wool. It can also discolor dueto heat,
chemicals, or grease build-up. To
maintain your grill's high quality
appearance, wash with mild detergent
and warm water,or use a stainless
steel grill cleaner. Baked-on grease
deposits may require the use of an
abrasive plastic cleaning pad. Use only
in direction of brushed finish to avoid
damage. Do not use abrasive pad on
areaswith graphics.
The Char-Broil®grill is equippedwith GearTraxTM, which
allow forthe easy mounting of our unique line of GearTrax
accessories. Pleasevisit charbroil.comfor a complete list
of Gear Trax accessories, *Availableon most models,
%
ViSiT CHARBRO|L,COM FOR
ALL YOUR GRiLLiNG NEEDS!
Page 8
• NEVERstore a spare LP cylinder under or near
the appliance or inan enclosed area.
LP Cylinder
•The LP cylinder used with your grill must meet the
following requirements:
•Use LP cylinders only with these required measurements: 12"
(30.5cm) (diameter) x 18" (45.7 cm) (tall) with 20 lb. (9 kg.)
capacity maximum.
•LPcylinders must be constructed and marked in accordance
with specifications for LP cylinders of the U.S. Departmentof
Transportation (DOT) or for Canada, CAN/CSA-B339,
cylinders, spheres and tubes for transportation of dangerous
goods. Transport Canada (TC). See LP cylinder collar for
marking.
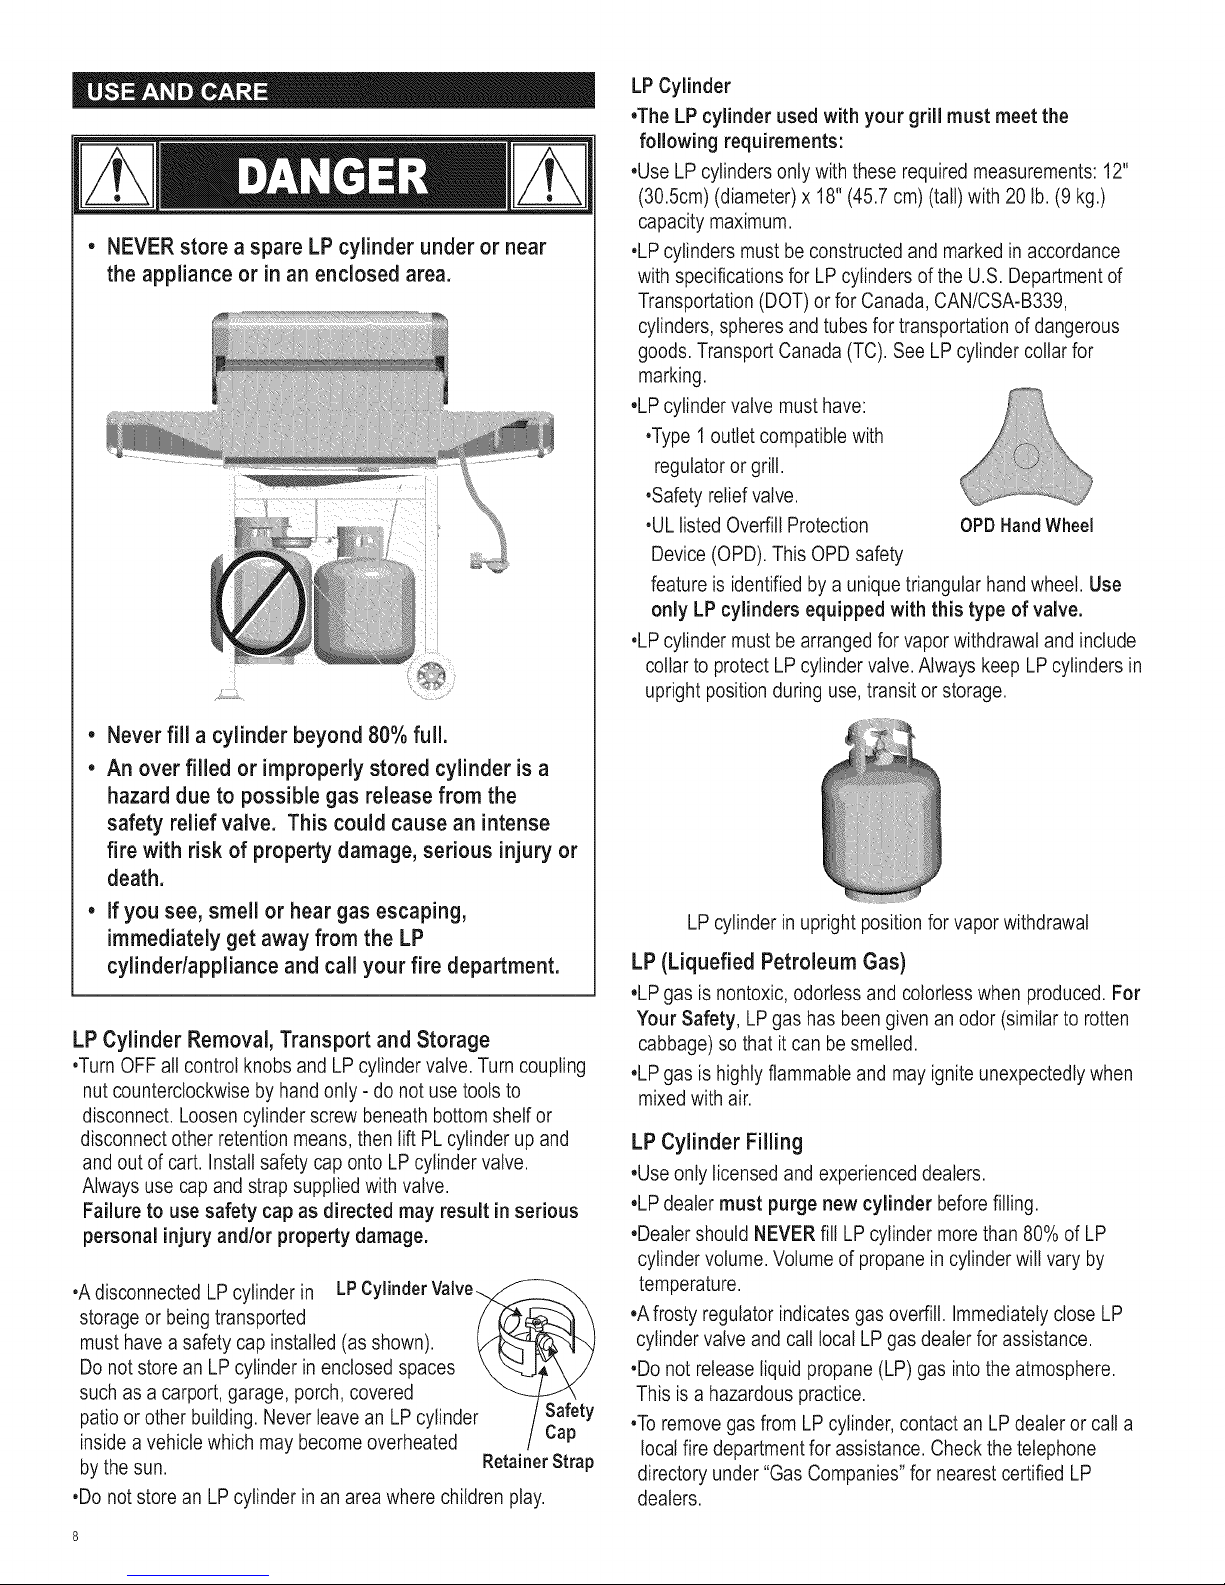
•LPcylinder valve must have:
•Type 1 outlet compatible with
regulatoror grill.
•Safety reliefvalve.
•ULlisted Overfill Protection OPDHandWheel
Device (OPD). This OPD safety
feature is identified by a uniquetriangular hand wheel. Use
only LP cylinders equipped with this type of valve.
•LPcylinder must be arranged for vapor withdrawal and include
collar to protect LP cylinder valve.Always keep LP cylinders in
upright position during use, transit or storage.
• Never fill a cylinderbeyond 80%full.
• An over filled or improperlystored cylinder is a
hazard due to possible gas release from the
safety relief valve. This could cause an intense
fire with risk of property damage, serious injury or
death.
If you see, smell or hear gas escaping,
immediatelyget away from the LP
cylinder/appliance and call your fire department.
LP Cylinder Removal, Transport and Storage
•Turn OFFall controlknobs and LP cylinder valve. Turn coupling
nut counterclockwise by hand only -do not use toolsto
disconnect. Loosencylinder screw beneath bottom shelf or
disconnect other retention means, then lift PL cylinder upand
and out of cart. Install safety cap onto LP cylindervalve.
Always use cap and strap supplied with valve.
Failure to use safety cap as directed may result in serious
personal injury and/or property damage.
•Adisconnected LP cylinder in LPCylinder
storage or being transported
must have a safety cap installed (as shown).
Do notstore an LP cylinder in enclosed spaces
such as a carport, garage, porch, covered
patioor other building. Never leave an LP cylinder Safety
inside a vehicle which may become overheated Cap
bythe sun. RetainerStrap
•Do notstore an LP cylinder in an area where children play.
LP cylinder in upright position for vapor withdrawal
LP (Liquefied Petroleum Gas)
•LPgas is nontoxic, odorless and colorless when produced. For
Your Safety, LPgas has been given an odor (similar to rotten
cabbage) so that it can be smelled.
•LPgas is highly flammable and mayignite unexpectedly when
mixed with air.
LP Cylinder Filling
•Useonly licensed and experienced dealers.
•LPdealer must purge new cylinder before filling.
•Dealer should NEVERfill LP cylinder more than 80% of LP
cylinder volume. Volume of propane in cylinder will vary by
temperature.
•Afrosty regulator indicates gas overfill. Immediatelyclose LP
cylinder valve and call local LP gas dealer for assistance.
•Do not releaseliquid propane (LP) gas into the atmosphere.
This is a hazardous practice.
•Toremove gas from LP cylinder,contact an LP dealeror call a
local fire department for assistance. Check the telephone
directory under "Gas Companies" for nearest certified LP
dealers.
Page 9
LP Cylinder Exchange Connecting Regulator to the LP Cylinder
•Many retailers that sell grills offer you the option of replacing
your empty LP cylinder through an exchange service. Use only
those reputable exchange companies that inspect, precision fill,
test and certify their cylinders. Exchange your cylinder only
for an OPD safety feature-equipped cylinder as described
in the "LP Cylinder" section of this manual.
•Always keep newand exchanged LP cylinders in upright
position during use, transit or storage.
•Leak test new and exchanged LP cylinders BEFORE
connecting to grill.
•Place dust cap on cylinder valve outlet whenever the cylinder is
notin use. Only installthe type ofdust cap on the cylinder valve
outlet that is providedwith the cylinder valve. Other types of caps
or plugs may result in leakage of propane.
LP Cylinder Leak Test
For your safety
•Leak test must be repeated each time LP cylinder isexchanged
or refilled.
•Do notsmoke during leak test.
•Do notuse an open flame to check for gas leaks.
•Grill must be leak tested outdoors in a well-ventilated area,
away from ignitionsources such as gas fired or electrical
appliances. During leak test, keep grill away from open flames
or sparks.
•Usea clean paintbrushand a 50/50 mild soap and water
solution. Brushsoapy solution onto areas indicated byarrows
in figure below.
A Do not use household cleaning agents. Damage to gas
train components can result.
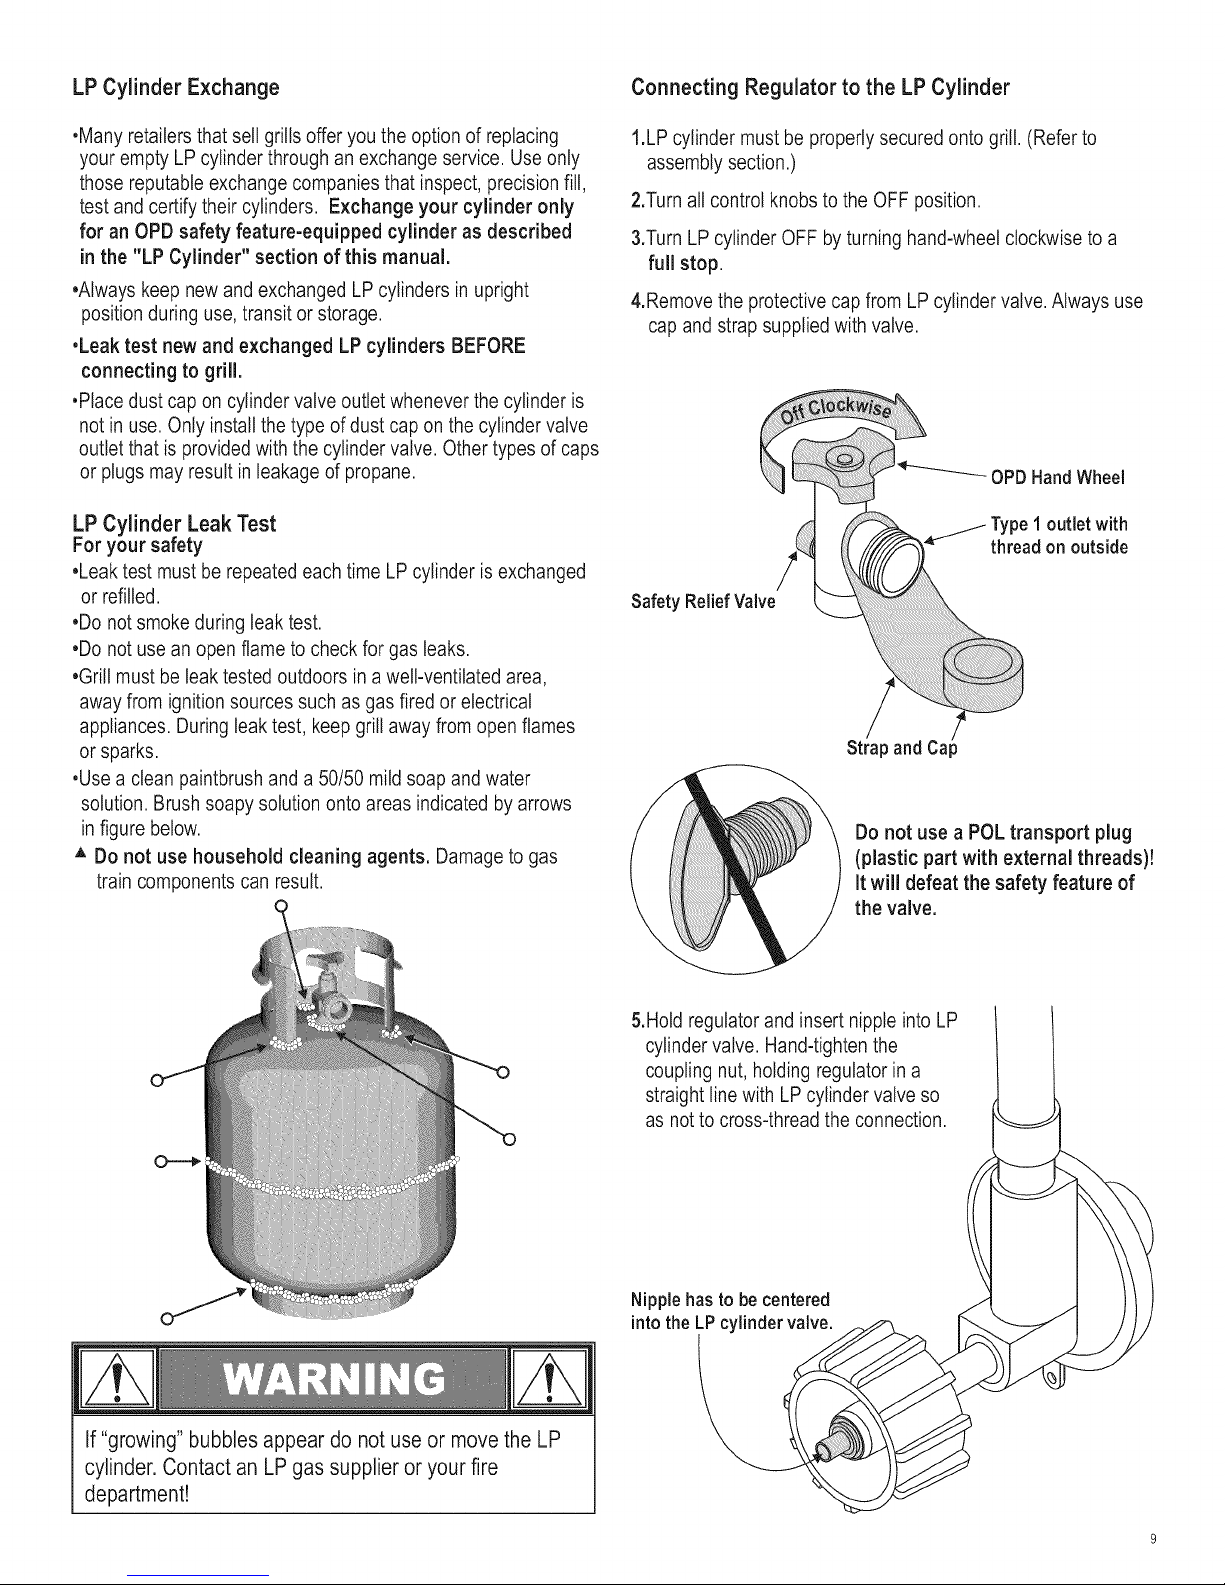
I.LP cylinder mustbe properly secured onto grill. (Referto
assembly section.)
2.Turn all control knobs to the OFF position.
3.Turn LP cylinder OFF by turning hand-wheel clockwise to a
full stop.
4.Remove the protective cap from LP cylinder valve.Always use
cap and strap suppliedwith valve.
OPDHandWheel
/ Type1outlet with
threadon outside
SafetyReliefValve
•
Strapand Cal_
Do not use a POLtransport plug
(plastic part with external threads)!
It will defeat the safety feature of
the valve.
If"growing" bubblesappear do not useor move the LP
cylinder.Contact an LPgas supplier oryour fire
department!
5.Hold regulator and insert nipple into LP
cylinder valve. Hand-tighten the
coupling nut, holding regulator in a
straight line with LP cylinder valve so
as notto cross-thread the connection.
Nipplehas to be centered
intothe LP cylinder valve.
Page 10
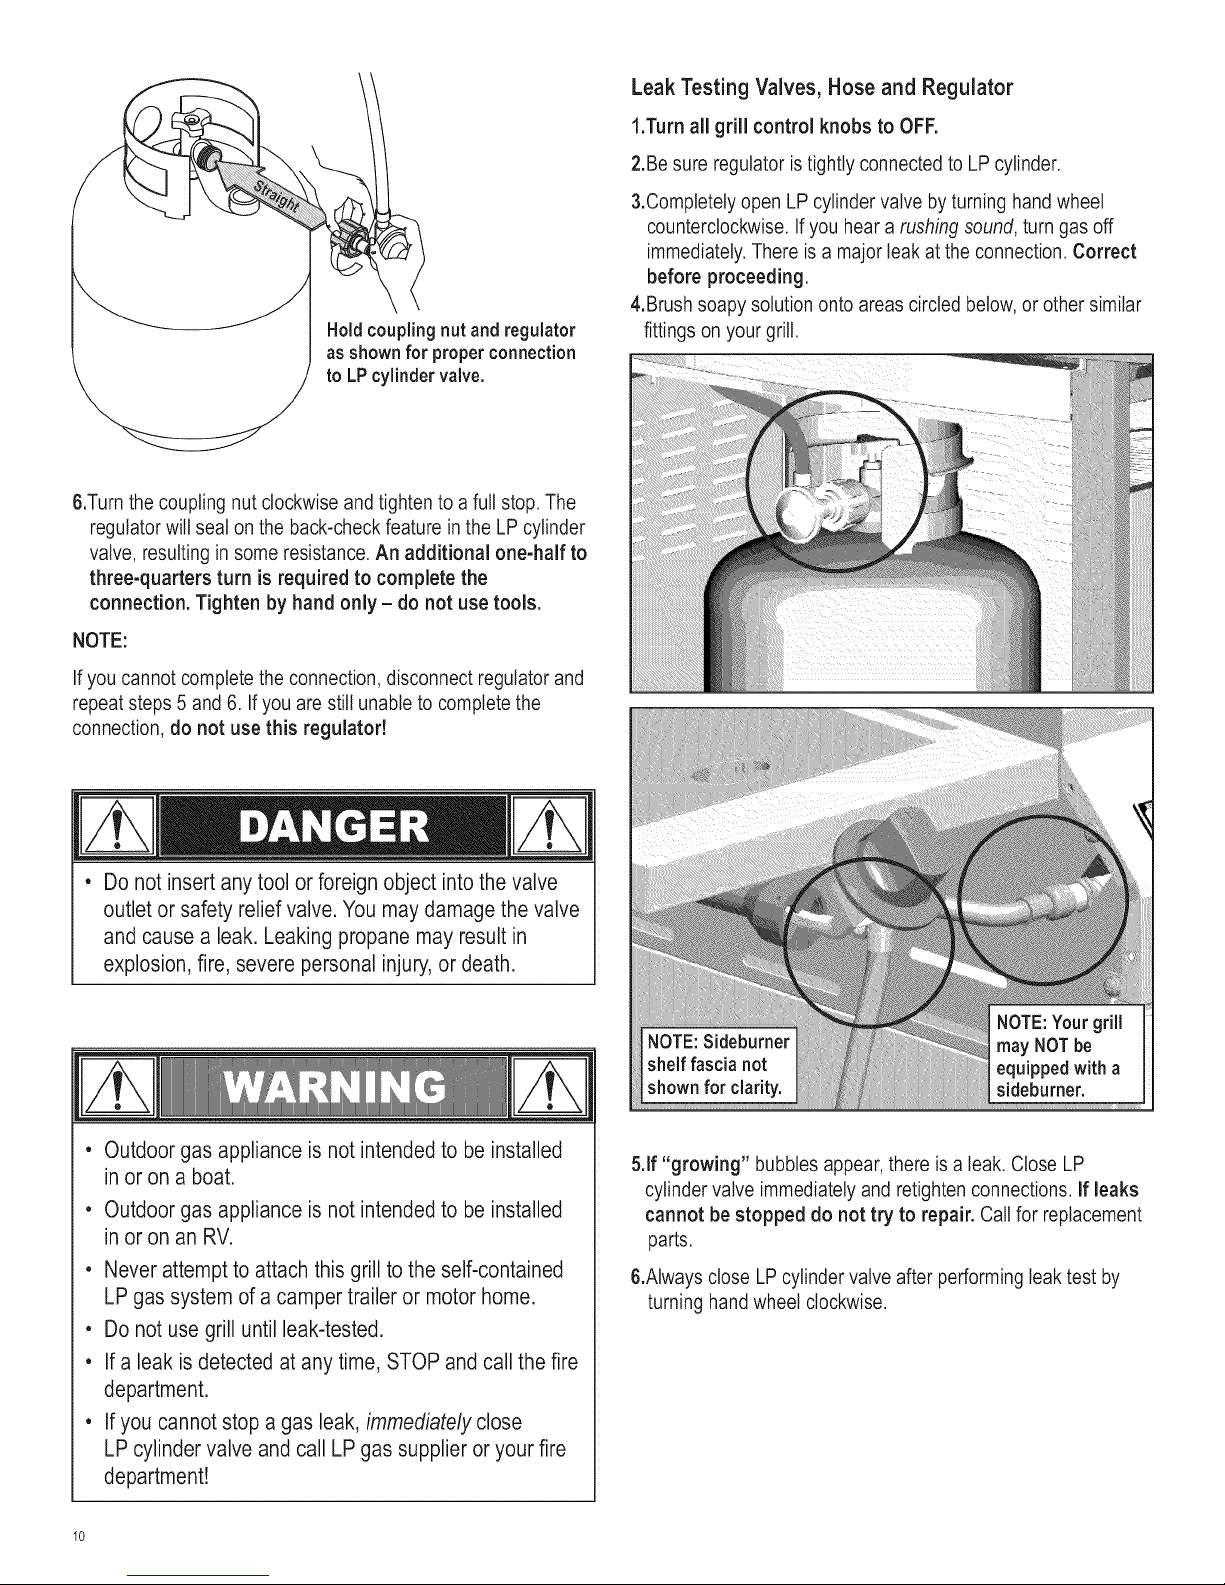
Holdcoupling nutand regulator
asshown for properconnection
to LP cylinder valve.
6.Turn the coupling nut clockwise and tighten to a full stop. The
regulatorwill seal onthe back-check feature inthe LP cylinder
valve, resulting in some resistance. An additional one-half to
three-quarters turn isrequired to complete the
connection. Tighten by hand only- do not use tools.
NOTE:
Leak Testing Valves, Hose and Regulator
1.Turn all grill control knobs to OFF.
2.Be sure regulator istightly connected to LP cylinder.
3.Completelyopen LPcylinder valve by turning hand wheel
counterclockwise. If you hear a rushing sound, turn gas off
immediately.There is a major leak at the connection. Correct
before proceeding.
4.Brush soapy solution onto areas circled below, or other similar
fittings on your grill.
If you cannot complete the connection, disconnect regulatorand
repeat steps 5 and 6. If you arestill unableto completethe
connection, do not use this regulator!
Do not insertany tool or foreignobject into thevalve
outlet or safetyrelief valve. Youmay damagethe valve
and cause a leak. Leaking propane may result in
explosion,fire, severe _ersonal injury,or death.
Outdoorgas applianceis notintendedto beinstalled
in oron a boat.
Outdoorgas applianceis notintendedto beinstalled
in oron an RV.
• Never attemptto attach this grill to theself-contained
LPgas systemof acamper trailer or motorhome.
• Do not use grill until leak-tested.
• If a leak is detected at any time, STOPand call the fire
department.
• If you cannot stopa gas leak,immediately close
LPcylinder valve and call LPgas supplier or your fire
department!
5.If "growing" bubbles appear, there is a leak. Close LP
cylinder valve immediately and retighten connections. If leaks
cannot be stopped do not try to repair. Callfor replacement
parts.
6.Always close LPcylinder valveafter performing leak test by
turning hand wheel clockwise.
Page 11

For Safe Use of YourGrill and to Avoid Serious
Injury:
• Do not letchildren operateor play near grill.
• Keepgrill area clearand free from materials that burn.
• Do not blockholes in sidesor backof grill.
• Check burnerflames regularly.
• Use grill only inwell-ventilated space. NEVER usein
enclosedspace such as carport,garage, porch,
covered patio,or underan overhead structureof any
kind.
• Do not use charcoalor ceramic briquetsin a gasgrill.
(Unlessbriquets are supplied with your grill.)
• Donot cover grates with aluminumfoil or anyother
material. This will blockburner ventilation andcreate
a potentiallydangerous condition resultingin
propertydamage and/or personalinjury.
• Use grill at least 3 ft. from any wall or surface.
Maintain 10ft. clearanceto objectsthat can catchfire
or sources of ignition such aspilot lightson water
heaters,live electrical appliances,etc.
Safety Tips
A Beforeopening LP cylinder valve, check the coupling nutfor
tightness.
A When grill is not in use, turn off all control knobs and LP
cylinder valve.
A Never move grill while in operation or still hot.
A Use long-handled barbecue utensils and oven mitts to avoid
burnsand splatters.
A Maximum load for sideburner and side shelf is 10 Ibs.
A The grease trayor cup must be installed during use and
emptied after each use. Do not remove grease tray orcup
until grill has completely cooled.
A Clean grill often, preferably after each cookout. Ifa bristle
brush is used to clean any of the grill cookingsurfaces,
ensure no loose bristles remain oncooking surfaces prior to
grilling. Itis not recommendedto clean cooking surfaces
while grill is hot.
A If you notice grease or other hot material dripping from grill
onto valve, hoseor regulator, turn off gas supply at once.
Determinethe cause, correct it, then clean and inspect valve,
hoseand regulator before continuing. Perform aleak test.
A Keep ventilation openings in cylinder enclosure (grill cart) free
and clear of debris.
A Donot store objects or materials inside the grillcart
enclosure that would block the flow of combustion air to the
undersideof either the control panel orthe firebox bowl.
A The regulator maymake a humming or whistling noise during
operation. This will notaffect safety or use of grill.
A If you have a grill problem see the "Troubleshooting Section".
A If the regulator frosts, turn off grill and LP cylindervalve
immediately.This indicates a problemwith the cylinder and it
should notbe used on any product. Returnto supplier!
• Apartment Dwellers:
Checkwith managementto learnthe requirements
and firecodes for using an LPgas grill in your
apartmentcomplex. If allowed, useoutside on the
ground floorwith a three (3)foot clearance from walls
or rails. Do not use onor under balconies.
• NEVERattempt to light burner with lid closed. A
buildup of non-ignited gas inside a closed grill is
hazardous.
• Never operate grill with LP cylinder out of correct
position specified in assembly instructions.
• Always close LP cylinder valve and remove
coupling nut before moving LP cylinder from
specified operation position.
Page 12

ignitor Lighting
A Do not lean over grill while lighting.
1. Turn O OFF gas burner control valves.
2. Turn ON gas at LP cylinder.
3. Open lid during lighting.
4. To ignite, push and turn IGNITION BURNER knobto _.
5. Pushand hold ELECTRONIC IGNITION buttonuntil the burner
lights.
6. If ignition does NOT occur in 5 seconds, turn the burner
controlsO OFF, wait 5minutes and repeat the lighting
procedure.
7.To ignite remaining burners, turn knob to the _ position
starting with the burners closest to IGNITION BURNERfirst.
If ignitor does not work, follow match lighting instructions.
8. For grills equipped with ELECTRONIC iGNiTiON at
each burner:
Repeat steps 4 through 6 to light each burner.
9. Onceeach burner has ignited, turn knobs to desired setting.
Turncontrolsand gas source or tank OFFwhen not
in use.
SEAR Burner ignitor Lighting
A Do not lean over grill while lighting.
1. TurnO OFF gas burner control valves.
2. Turn ON gas at LP cylinder.
3. Open lid during lighting.
4. Toignite, push and turn SEAR burner knob to _.
5. Pushand hold ELECTRONIC IGNITION button until the
burner lights.
6. If ignition does NOToccur in 5 seconds, turn the burner
controls O OFF, wait 5 minutes and repeat the lighting
procedure.
SEAR Burner Match-Lighting
A Do not lean over grill while lighting.
1. Open lid. Turn ON gas at LP cylinder.
2. Place match into match holder (hangingfrom right side
panel of grill). Light match; then light burner by placing
match through the match light hole on right side of grill.
3. Push in and turn SEAR burner knobto the _ position.
Be sure burner lights and stays lit.
/L cAuTioN/L
if ignition does NOToccur in5 seconds, turn the
burner controls O OFF,wait 5 minutes and repeat the
lighting procedure. If the burner does not ignite with
the valve open, gas will continue to flow out of the
burner and could accidently ignite with risk of injury.
Match-Lighting
A Do not lean over grill while lighting.
1. Open lid. Turn ON gas at LP cylinder.
2. Place match into match holder (hangingfrom leftside panel of
grill). Light match; then light burnerby placing match through
the match light hole on left side of grill.
3. Push in and turnfar left burner knob to the _ position.
Be sure burner lights and stays lit.
4. Lightadjacent burners in sequenceby pushing knobs inand
turning to the _ position.
A Do not lean over grill while lighting.
1. Open sideburner lid. Turn ON gas at LPcylinder.
2. Turn sideburner knob to the _ position, push and hold
ELECTRONIC IGNITOR button.
3. Ifsideburner does NOT light within 5 seconds, turn knob to
O OFF, wait5 minutes,then
repeat lighting procedure.
Sideburner Match Lighting
1. Open sideburner lid. Turn ON
gas at LP cylinder.
2. Placelit match near burner.
3. Turn sideburner knob to the
position.
Be sure burner lights and
stays lit.
12
Page 13

Burner Flame Check
• Remove cooking grates and flame tamers. Light burners, rotate
knobs from HIGH to LOW. You should see a smaller flame in
LOW position than seen on HIGH. Perform burner flamecheck
on sideburner, also.Always check flame priorto each use. If
only low flame is seen refer to "Sudden drop or low flame" in
the TroubleshootingSection.
General Grill Cleaning
• Do not mistake brown or black accumulation of grease and
smoke for paint. Interiors of gas grills are not painted at the
factory (and should never be painted). Apply a strong solution
of detergent and water or use a grill cleaner with scrub brush
on insides of grill lid and bottom. Rinse andallow to completely
air dry. Do not apply a caustic grill/oven cleaner to painted
surfaces.
Plastic parts: Wash with warm soapy water and wipe dry.
s Do not use citrisol, abrasivecleaners, degreasers ora
concentrated grill cleaner on plastic parts. Damage to and
failure of parts can result.
Turning Grill Off
• Turnall knobsto the 0 OFF position.Turn LP cylinder
OFF by turning hand-wheel clockwise to a full stop.
ignitor Check
• Turn gas off at LP cylinder. Press and hold electronic ignitor
button. "Click"should be heardand sparkseen each time
between each collector box or burner and electrode. See
"Troubleshooting" if no click or spark.
Valve Check
• important: Make sure gas is off at LP cylinder before
checking valves. Knobs lock in OFF position.To check
valves, first push in knobs and release, knobs should spring
back. If knobs do not spring back, replace valve assembly
before using grill. Turn knobs to LOW positionthen turn back to
OFF position. Valves should turn smoothly.
Hose Check
• Before each use, check to see if hoses are cut or worn or kinked.
Replace damaged hoses before usinggrill. Use only
valve/hose/regulator specified by manufacturer.
Porcelain surfaces: Because of glass-like composition, most
residue can be wiped away with baking soda/watersolution or
specially formulated cleaner. Use nonabrasive scouring powder
for stubborn stains.
Painted surfaces: Wash with mild detergent or nonabrasive
cleaner and warm soapy water. Wipe dry with a soft
nonabrasive cloth.
Stainless steel surfaces: To maintain your grill's high quality
appearance, wash with mild detergent and warm soapy water
and wipe dry with a soft cloth after each use. Baked-ongrease
deposits may require the use of an abrasiveplastic cleaning
pad. Use only in direction of brushed finishto avoid damage.
Do not use abrasive pad on areaswith graphics.
Cooking surfaces: If a bristle brush is used to cleanany of
the grill cooking surfaces, ensure no loose bristles remain on
cooking surfaces prior to grilling. It is not recommendedto
clean cooking surfaces while grill is hot.
Page 14

II l cAuTioN
r
SPIDER ALERT!
SPIDERAND WEBS
iNSiDE BURNER
If your barbeque is getting hard to light or
the flame is weak, check and clean the
venturis and burners.
Spiders or small insects are known to create
"flashback" problems by building nests and
laying eggs in the barbeque's venturi or
burner obstructing the flow of gas. The
backed-up gas can ignite behind the control
panel. This flashback can damage your
barbeque and cause injury. To prevent
flashbacks and ensure good performance,
the burner and ventud tube assembly should
be removed and cleaned whenever the
barbeque has been idle for an extended
period of time.
3. Remove carryover tubes and burners.
4. Detach electrode from burner.
NOTE: Removal/Detachment method will depend on the
burner configuration. See different configurations in
illustrations below.
5. Carefully lift each burner up and away from valve openings.
We suggest three ways to clean the burner tubes. Usethe one
easiest for you.
(A) Bend a stiff wire (alight weight coat hanger works welt)
into a small hook. Run the hook through each burner
tube several times.
(B) Use a narrow bottle brushwith a flexible handle (do not
use a brass wire brush), runthe brush through each
burner tube several times.
(C) Wear eye protection: Usean airhose to force airinto
the burner tube and out the burner ports. Check each
port to make sure air comes out each hole.
6. Wire brush entire outer surface of burner to remove food
residue and dirt.
7. Clean any blocked ports with a stiff wire such as an open
paper clip.
8. Check burner for damage, due to normal wear and corrosion
some holes may become enlarged. Ifany large cracksor
holes are found replace burner.
VERY iMPORTANT'.Burner tubes must reengage valve
openings. See illustrations at right,
9. Attach electrode to burner. Correct
10. Carefully replace burners, engagement
11. Attach burners to brackets on firebox.
12. Reposition carryover tubes and attach
to burners. Replace flame tamers and
cooking grates.
burner-to-valve
Storing Your Grill
, Cleancooking grates.
* Store in dry location.
* When LP cylinder is connected to grill, store outdoors in a well-
ventilated space and out of reachof children.
* Cover grill ifstored outdoors. Choose from a variety of grill
covers offered by manufacturers.
* Store grill indoors ONLY if LPcylinder isturned off and
disconnected, removed from grill and stored outdoors.
* When removing grill from storage, follow "Cleaning the Burner
Assembly' instructions before starting grill.
Cleaning the Burner Assembly
Follow these instructionsto clean and/or replace partsof burner
assembly or if you have trouble ignitinggrill.
1. Turn gas OFF at control knobs and LP cylinder.
2. Remove cooking grates and flame tamers.
Firebox
burner
bracket
Electrode
;off
electrode with
a flat blade
screwdriver
Page 15

This warranty only applies to units purchased from an authorized retailer. Manufacturer warrants to the m_jnal consumer-purchaser only that this
product shall be fiee from defects in workmanship and materials after correct assembly and under normal and reasonable home use for the periods
indicated below beginning on the date of purchase*. The manufacturer reserves the right to require that defective parts be returned, postage and or
freight pre-paid by the consumer for review and examination.
SCOPE OF COVERAGE PERIOD OF COVERAGE TYPE OF FAILURE COVERAGE
Stainless Burner
Firebox and Lid
All Other Parts
*Note: A dated sales receipt WILL be required for warranty service.
The original consumer-pro'chaser will be responsible for all shipping charges for parts replaced under the terms of this limited warranD_.
This limited warranty is applicable in the United States and Canada only, is only available to the original owner of the product and is not transferable.
Manufacturer requires proof of your date of pro'chase. Therefore, you should retain yore" sales slip or invoice. Registering your product is not a
substitute for proof of purchase and the manufacturer is not responsible for or required to retain proof of purchase records.
5 years from date of purchase*
2 years from date of purchase*
1 year from date of purchase*
PERFORATION, MANUFACTURING,
AND MATERIAL DEFECTS ONLY
This limited warranty applies to the functionality of the product ONLY and does not cover cosmetic issues such as scratches, dents, corrosions or
discoloring by heat, abrasive and chemical cleaners or any tools used in the assembly or installation of the appliance, surface rust, or the
discoloration of stainless steel surfaces. RUST is not considered a manufactm'ing m" materials defect.
This limited warranty will not reimbm'se you for the cost of any inconvenience, food, personal injm'y m" properD_ damage.
ITEMS MANUFACTURER WILL NOT PAY FOR:
1. Shipping cost, standard or expedited, for warranty and replacement parts
2. Service calls to your home.
3. Repairs when your product is used for other than normal, single-family household or residential use.
4. Damage, failures, or operating difficulties resulting from accident, alteration, careless handling, misuse, abuse, fire, flood,
acts of God, improper installation or maintenance, installation not in accordance with electrical or plumbing codes, or use
of products not approved by the manufacturer.
5. Any food loss due to product failures or operating difficulties.
6. Replacement parts or repair labor costs for units operated outside the United States or Canada.
7. Pickup and delivery of your product.
8. Repairs to parts or systems resulting from unauthorized modifications made to the product.
9. The removal and/or reinstallation of your product.
DISCLAIMER OF IMPLIED WARRANTIES and LIMITATION OF REMEDIES
Repair or replacement of detective parts is your exclusive remedy under the terms of this limited warranty. In the event of parts availability issues,
the manufacturer resmwes the right to substitute like or similar parts that are equally functional.
Manufacturer will not be responsible for any consequential or incidental damages arising from the breach of either this limited warranty or any
applicable implied warranty, or for failure or damage resulting from acts of God, improper care and maintenance, grease fire, accident, alteration,
replacement of parts by anyone other than Manufacturer, misuse, transportation, commercial use, abuse, hostile environments (inclement weather,
acts of nature, animal tampering), improper installation or installation not in accordance with local codes or printed manufacturer instructions.
THIS LIMITED WARRANTY IS THE SOLE EXPRESS WARRANTY GIVEN BY THE MANUFACTURER. NO PRODUCT PEREORMANCE
SPECIFICATION OR DESCRIPTION WHEREVER APPEARING IS WARRANTED BY MANUFACTURER EXCEPT TO THE EXTENT SET
FORTH IN THIS LIMITED WARRANT"L ANY IMPLIED WARRANTY PROTECTION ARISING UNDER THE LAWS OF ANY STATE,
INCLUDING IMPLIED WARRANTY OF MERCHANTABILITY OR FITNESS FOR A PARTICULAR PURPOSE OR USE, IS HEREBY
LIMITED IN DURATION TO THE DURATION OF THIS LIMITED WARRANTY.
Neither dealers am" the retail establishment selling this product has any authori_ to make any additional warranties m"to promise remedies
in addition to or inconsistent with those stated above. Manufacturer's maximum liabilRx, in any event, shall not exceed the purchase price of the
product paid by the original consumer.
NOTE: Some states do not allow an exclusion or limitation of incidental or consequential damages, so some of the above limitations or exclusions
may not apply to you. This limited warranty gives you specific legal rights as set foth herein. You may also have other rights which vary from state
to state. In the state of California only, if refinishing or replacement of the product is not commercially practicable, the retailer selling this product or
the Manufacturer will refund the purchase price paid for the product, less the amount directly attributable to use by the original consumer-purchaser
prior to discovery of the nonconformity. In addition, in the state of California only, you may take the product to the retail establishment selling this
product in order to obtain performance under this limited warranty.
If you wish to obtain performance of any obligation under this limited warran_, you should
write to:
Consumer Relations
P. O. Box 1240
Columbus, GA 31902-1240
Consumer returns will not be accepted unless a valid Return Authorization is first acquired. Authorized returns are clearly marked on the outside of
the package with an RAnumber and the package is shipped freight/postage pre-paid. Consumer returns that do not meet these standards will be
refused.
15
Page 16

A 1 FIREBOX
B 5 MAIN BURNER-TUBE BURNER
C 1 MAIN BURNER-BAR BURNER
D 1 ELECTRODE, F/TUBE BURNER
E 1 ELECTRODE, F/BAR BURNER
F 4 CARRY OVER TUBE
G 1 CONTROL PANEL, MAIN
H 1 ELECTRONIC IGNITION MODULE
I 1 BUTTON, F/IGNITION MODULE
J 1 SHIELD,F/ELECTRONIC IGNITION MODULE
K 1 HOSE VALVE REGULATOR ASSEMBLY
L 7 BEZEL F/CONTROL KNOB
M 7 CONTROL KNOB
N I TOP LID
O 1 LOGO PLATE F/LID
P 1 TEMPERATURE GAUGE
Q 1 BEZEL, F/TEMPERATURE GAUGE
R 2 LID BUMPER, RECTANGLE
S 2 LID BUMPER, ROUND
T 1 TOP LID HARDWARE
U 1 HANDLE, F/LID
V 5 HEATTENT
W 4 COOKING GRATE
X 1 WARMING RACK
Y 1 LEFT SIDE SHELF F/SB
Z 1 DRIP PAN, F/SB
AA 1 SIDEBURNER GRATE
BB 1 ELECTRODE, F/SB
CC 1 ELECTRODE WIRE, F/SlDEBURNER
DD 1 SIDEBURNER LID
EE 1 SIDEBURNER
FF 1 SIDEBURNER VALVE CLIP
GG 1 CONTROL PANEL, F/SB
HH 1 RIGHT SIDE SHELF
II 1 FASCIA, F/RIGHT SHELF
JJ 1 RIGHT SIDE CART PANEL
KK 1 LEFT SIDE CART PANEL
LL 1 BOTTOM SHELF
MM 1 FRONT DOOR BRACE
NN 1 LEFT DOOR
OO 1 RIGHT DOOR
PP 2 HANDLE, F/DOOR
QQ 1 BACK BRACE
RR 2 TANK EXCLUSION WIRE
SS 1 GREASE TRAY
TT 1 GREASE PAN
UU 4 CASTER SOCKET
W 2 CASTER, LOCKING
WW 2 CASTER, FIXED
XX 2 MATCH HOLDER
YY 1 TANK RETAINER SCREW
ZZ 2 MAGNET ASSEMBLY
AAA 1 SHIELD, F/TANK
BBB 2 DOOR PIN, FIXED
CCC 1 WEIGHT BLOCK
DDD 2 DOOR PIN, SPRING
EEE 1 HEAT TENT, F/BAR BURNER
NOT Pictured
... 1 CASTER PIN
... 1 PRODUCT MANUAL, ENGLISH
... 1 PRODUCT MANUAL, SPANISH
... 1 HARDWARE PACK
r
16
Page 17

X
)! _i,
....jw / w !w ,_w
N
EEE
!JBB
E__i_ ,zFF
,B /C i.@ 710
.... .... '_ ' ...... ' :_ S U
ZF /F iF /F \D _ /
\L XL \L \L \L \L
k_..../ /,
R
ST
/I
, iJ
_G
\M \M \M \M \M \M
\L \M
/
YY
/PP
iPP
\
DDD
ZZ D_DD
/LL
ZZ
Page 18

fortheLPcylindershouldbeon theleftside.
" Attachbottomshelftoleftandrightlegassemblieswith 1/4-20×2-3/8"machine screws and1/4-20flange nuts. Thecut outhole
ForFrontDoor
Y
RightSidePanel
/
LeftSidePanel
/
1/4-20×2-3/8"
MachineScrew
Qty:6
1/4-20
FlangeNut
BottomShelf
Qty: 6
" Placebackbracebetweensidepanelsasshown.Attachto leftandrightsidepanelswith1/4-20x2-3/8"machinescrews.
1/4-20x2-3/8"
MachineScrew
Qty:4
LeftSidePanel
1/4-20
FlangeNut
Qty:4
MagnetAssembly
Page 19

D " Hangtankexclusionwireontothe holesonbackbrace,attachotherendsto bottomshelfwith#8x3/8"sheet metalscrews.
BackBrace
#8x3/8"
SheetMetalScrews
Qty.2
flange nuts.
" Placefrontdoorbraceasshown.Attachto leftandrightlegassemblieswith 1/4-20×2-3/8"machinescrews and1/4-20
1/4-20×2-3/8"
MachineScrew
Qty:4
1/4-20
FlangeNut
\
FrontDoorBrace
Qty: 4
Page 20

Caster Pin
Caster
" Turnassemblyupsidedown.
" InsertCasterPinintothecastermountingplatetolockitinplace,shownA.Spinthecasterclockwiseintothethreadsonthebottom
shelfuntilsecure.RemovetheCasterPinandrepeatforremainingcasters.Makesurethetwolockingcastersaresecuredatthe
rearandthenon-lockingcastersaresecuredatthefront(B).Afterall4castersaresecureremovetheCasterPinandsavefor
futuremaintenance.
" Standcartupright.
" Attachweightblocktobottomshelfwith(2)1/4-20x2"machinescrewsand1/4-20flangenuts(C).
FixedCaster
FixedCaster LockingCaster
/ LockingCaster X
Q
1/4-20×2"
MachineScrew
Qty:2
1/4-20
FlangeNut
Qty: 2
2O
Page 21

D " Thisstep requirestwo peopleto liftand positiongrillheadontocart.
__ screws.
" Cardullylowerthegrill headontothecart.Makesure the regulatorhoseis hangingoutsidethecart.Attachwith 1/4=20x1/2"
GrillHead
1/4-20×1/2"Screw
Qty: 4
21
Page 22

" Hooktherightsideshelfto fireboxbythe pre-assembledscrews(A).
" Insidefirebox,insert7ramfiber washer and1/4-20x1/2"screw as shown(B).
" Attachshelfwith 1/4-20x1/2"screwand 1/4-20flangenuts, and fastenthe two pre-assembledscrews (C).
Right Side Shelf
/
1/4-20x1/2" 1/4-20
Screw FlangeNut
Qty.2 Qty: 1
7ram
FiberWasher
Qty.1
From
FiberWasher
" Attachfasciatofireboxwith#8x3/8" sheet metalscrews.
Fascia,
RightSideShelf
#8×3/8"
SheetMetalScrews
Qty.2
22
Page 23

• Hooktheleftsideshelftofireboxbythepre-assembledscrews(A).
" Insidefirebox,insert7ramfiber washer and1/4-20x1/2"screw as shown(B).
" Attachshelfwith 1/4-20x1/2"screwand 1/4-20flangenuts, and fastenthe two pre-assembledscrews (C).
LeftSideShelf
\
1/4-20×1/2"
MachineScrew
Qty.2
From
FiberWasher
1/4-20
FlangeNut
Qty: 1
7ram
FiberWasher
Qty.1
" Attachfasciatofireboxwith#8x3/8" sheet metalscrews.
sheetmetal screws
LeftSideShelf
T _ascia,
#8x3/8"
Qty.2
23
Page 24

" Attachsideburnerbezelandvalvewith#8x3/8"SSscrews. (A).
" Placesideburnerintoshelf. Makesure valveis insidesideburnertube.AttachsideburnerwithNo.8wing nut (B).
clip tosideburnertubeandaroundmanifold.Attachside burnerignitorwireto ignitorasshown(C).
" Presssideburnercontrolknobontovalvestem(D).
" Placegrateontoside burnershelf(E).
Sideburner_Bezel
Hookventuri
SideBurner
/
J Side BurnerTube
0
Sideburner Control Knob
Clip
0
\
#8X3/8 SSScrew
Qty.2
No.8WingNut
Qty.1
24
Sideburner Grate
Page 25

• Attachhandletodoorwith#10-24x1/2"machine screws,5ram fiat washersand5ramlock washers (A).
" Inserthingepinon bottomshelfinto holein door.Pressupperhingepininfrontdoorbrace,alignhingeholeon topofdoor,and
releasehingepininto door.
Him!ePin hole A HingePin hole
5ramLock Washer
MachineScrew
#10-24×1/2"
............. Qty:4
Left
Y
LeftDoor
\
5ramFlatWasher
Right Handle
5ramFlatWasher
Qty: 4
Right Door
5ramLock Washer
Qty: 4
25
Page 26

• Placeheattentsovertube burners andtheheattentforsearburneroversearburner byinsertingtabsintoslotsinfrontof firebox.
Oppositeendsof heattentsrestonpinsinbackoffirebox.
HeatTent,
F/SearBurner
StainlessSteel)
" Placecookinggratesonto graterests.
" InsertendsofWarmingRackpivotwireintoholesinsidesof gril lid.insertendsof WarmingRacklegwireintoholesinsidesof
firebox.
NOTE:Pivotandlegwires,runningside-to-side,shouldbeunderwiresrunningfront-to-back,tfpivotandlegwiresareontop,
WarmingRackisinstalledupside-down.
" UnscrewignitorcapandplaceAAbatteryintoignitorslotwith positiveend(+)facingoutward.Screwignitorcapontoignitor,
Warming Rack
LegWire
Cooking Grate
26
Page 27

" Attachtheheatshieldtogreasetraywith #8x3/8"sheet metal screws (A).
" Placegreasepanintogreasetray,thenplacethetray intothe cart(B).
S
GreaseTray
Greas(_Pan
#8x3/8"
SheetMetalScrews
Qty.4
O
HeatShield
GreaseTray
,/
I1 1T,O.
Failure to install grease tray and
grease pan will cause hot grease to
drip from bottom of grill with risk of
fire or property damage.
LPtankissoldseparately.Useonlywithan OPD(over-fillprotectiondevice)equippedLPtank.Fillandleak-checkbeforeattaching
togrillandregulator.SeeUseand Caresection to correctly LeakTestand performthe Burner FlameCheck.
PlaceLPtankinto holein bottomshelfwithtankcollaropeningfacingto the frontas shown.Fingertightentankthumbscrewto hold
LPtanksecurelyinplace.
Tlo./fl
Always keepLPcylinders in
upright positionduring use,
transport, and storage.
Failure to install tank correctly may
allow gas hoseto be damaged in
operation, resulting in the risk of fire.
LPTank
27
Page 28

DANGER; if a gas leak cannot be stopped, or a fire occurs due to gas leakage, call the fire department,
Gasleakingfrom
cracked/cut/burned
hose.
GasleakingfromLP
cylinder.
GasleakingfromLP
cylindervalve.
Gasleakingbetween
LPcylinderand
regulatorconnection.
Firecomingthrough
controlpanel.
Greasefireor
continuousexcessive
flamesabovecooking
surface.
Troubleshooting
Burner(s)willnot light
usingignitor.
(SeeElectronicIgnition
Troubleshootingalso)
Continuedonnext
page.
•Damagedhose.
•Mechanicalfailureduetorustingor
mishandling.
•Failureofcylindervalvefrom
mishandlingormechanicalfailure.
•Improperinstallation,connectionnot
tight,failureof rubberseal.
•Firein burnertubesectionofburnerdue
toblockage.
•Toomuchgreasebuildupin burnerarea.
GASISSUES:
•Tryingtolightwrongburner.
•Burnernotengagedwithcontrolvalve.
•Obstructioninburner.
•Nogasflow.
•TurnoffgasatLPcylinderoratsourceon naturalgassystems.If
anythingbutburned,replacevalve/hose/regulator.If burned,
discontinueuseofproductuntila plumberhasinvestigatedcause
andcorrectionsare made.
•ReplaceLPcylinder.
•Turnoff LPcylindervalve.ReturnLPcylindertogassupplier.
•Turnoff LPcylindervalve.Removeregulatorfromcylinderand
visuallyinspectrubbersealfor damage.SeeLPCylinderLeakTest
andConnectingRegulatortotheLP Cylinder.
•TurnoffcontrolknobsandLPcylindervalve.Leavelidopento
allowflamestodiedown.Afterfireisoutandgrill is cold,remove
burnerandinspectforspidernestsorrust.SeeNaturalHazard
andCleaningthe BurnerAssemblypages.
•TurnoffcontrolknobsandLPcylindervalve.Leavelidopento
allowflamestodiedown.Aftercooling,cleanfoodparticlesand
excessgreasefrominsidefireboxarea,greasetray,andother
surfaces.
•Seeinstructionsoncontrolpanelandin UseandCaresection.
•Makesurevalvesarepositionedinsideofburnertubes.
•Ensureburnertubesarenotobstructedwithspiderwebsor other
matter.Seecleaningsectionof UseandCare.
•MakesureLPcylinderisnotempty.If LPcylinderisnotempty,
referto "Suddendropin gasflow."
• Fora grillequippedwith theAUTO-CLEANTM feature,makesure
theAUTO-CLEANTM valveissetto"Grill"
•Vaporlockatcouplingnutto LPcylinder.
•CouplingnutandLPcylindervalvenot
fullyconnected.
ELECTRICALISSUES:
•Electrodecrackedorbroken;"sparksat
crack."
•Electrodetip notinproperposition.
•Wireand/orelectrodecoveredwith
cookingresidue.
•Wiresarelooseordisconnected.
•Wiresareshorting(sparking)between
ignitorandelectrode.
•Deadbattery.
28
•Turnoff knobsanddisconnectcouplingnutfromLPcylinder.
Reconnectandretry.
•Turnthe couplingnutapproximatelyone-halftothree-quarters
additionalturnuntilsolidstop.Tightenbyhandonly- do not use
tools.
•Replaceelectrode(s).
MainBurners:
•Tipofelectrodeshouldbepointingtowardgasportopeningon
burner.Thedistanceshouldbe 1/8"to 1/4".Adjustif necessary.
Sideburner:
•Tipofelectrodeshouldbepointingtowardgasportopeningon
burner,thedistanceshouldbe 1/8"to 3/16".Adjustif necessary.
•Cleanwireand/orelectrodewithrubbingalcoholandcleanswab.
•Reconnectwiresor replaceelectrode/wireassembly.
•Replaceignitorwire/electrodeassembly.
•Replacewitha newalkalinebattery.
Page 29

Troubleshooting(continued)
Burner(s)willnot light
usingignitor.
(SeeElectronicIgnition
Troubleshootingalso)
Burner(s)willnot
matchlight.
Suddendropin gas
floworlowflame.
Flamesblowout.
Flare-up.
ELECTRONICIGNITION:
•Nospark,noignitionnoise.
•Nospark,someignitionnoise.
•Sparks,butnotatelectrodeorat full
strength.
•See"GAS ISSUES:"onpreviouspage.
•Matchwillnot reach.
•Impropermethodof match-lighting.
•Outofgas.
•Excessflowvalvetripped.
•Vaporlockatcouplingnut/LPcylinder
connection.
•Highorgustingwinds.
•LowonLPgas.
•Excessflowvalvetripped.
•Greasebuildup.
•SeeSectionI ofElectronicIgnitionSystem.
•SeeSectionII ofElectronicIgnitionSystem.
•SeeSectionIIIof ElectronicIgnitionSystem.
•Uselong-stemmatch(fireplacematch).
•See"Match-Lighting"sectionof UseandCare.
•Checkforgasin LPcylinder.
•Turnoff knobs,wait30secondsandlightgrill.Ifflamesarestilllow,
turnoff knobsandLPcylindervalve.Disconnectregulator.
Reconnectregulatorandleak-test.Turnon LPcylindervalve,wait
30secondsandthenlightgrill.
•Turnoff knobsandLPcylindervalve.Disconnectcouplingnutfrom
cylinder.Reconnectandretry.
•Turnfrontofgrilltofacewindor increaseflameheight.
•RefillLPcylinder.
•Referto"Suddendropin gasflow"above.
•Cleanburnersandinsideofgrill/firebox.
Persistentgreasefire.
•Excessivefat in meat.
•Excessivecookingtemperature.
•Greasetrappedby foodbuilduparound
burnersystem.
•Trimfatfrommeatbeforegrilling.
•Adjust(lower)temperatureaccordingly.
•Turnknobsto OFF.Turngasoffat LPcylinder.Leavelidin position
andletfireburnout.Aftergrillcools,removeandcleanall parts.
Flashback... •Burnerand/orburnertubesareblocked. •Turnknobsto OFF.Cleanburnerand/orburnertubes.Seeburner
(firein burnertube(s)), cleaningsectionofUseandCare.
Unabletofill LP
cylinder.
Oneburnerdoesnot
lightfromother
•Somedealershaveolderfillnozzles •The wornnozzlesdon'thaveenough"bite"toengagethe valve.Try
withwornthreads, a secondLPdealer.
•Greasebuildupor foodparticlesin
•Cleancarry-overtube(s)withwirebrush.
end(s)ofcarryovertube(s).
burner(s).
Timerdoesnot work
(Greenlightdoesnot
flash)
, DeadBattery
, Batteriesinstalledincorrectly.
, KnobPositiondid notstarttheClean
Cycle
, Replacebatteries
, Installbatteriescorrectly.
, PushKnobin to startthecleancycle.(GreenLEDshouldbeginto
flash)
NoLED'swill illuminate , DeadBattery , Replacebatteries
, LowBatteryStrengthRedLED nextto battery
symbolis illuminated
, Preparetoreplacebatteries(NOTE:Cleancyclewilloperatewith
a weakbattery.
29
Page 30

Troubleshooting - Electronic ignition
pmm !
SECTIONI
Nosparksappearat
anyelectrodeswhen
ElectronicIgnitionButton
ispressed;nonoise can
be heardfromspark
module.
• Battery not installed
properly.
•Deadbattery.
•Checkbatteryorientation. • Installbattery(makesurethat "+"and"-"
connectorsareorientedcorrectly,with"+"endup
and"-" enddown.)
•Hasbatterybeenused
previously?
•Replacebatterywith newalkalinebattery.
SECTIONII
Nosparksappearat
anyelectrodeswhen
ElectronicIgnitionButton
ispressed;noisecan
beheardfromspark
module.
SECTIONIII
Sparksare present
butnot at all
electrodesand/ornot
atfullstrength
•Buttonassemblynot
installedproperly.
•Faultysparkmodule.
•Outputlead
connectionsnot
connected.
•Outputlead
connectionsnot
connected.
•Arcingto grillaway
fromburner(s).
Checkto insurethreadsare
properlyengaged.Button
shouldtravelupanddown
withoutbinding.
If nosparksaregenerated
withnewbatteryandgood
wireconnections,moduleis
faulty.
•Are outputconnectionson
andtight?
•Are outputconnectionson
andtight?
If possible,observegrillin
darklocation.Operate
ignitionsystemandlookfor
arcingbetweenoutputwires
andgrillframe.
•Unscrewbuttoncap assemblyandreinstall,making
surethreadsarealignedandengagedfully.
•Replacesparkmoduleassembly.
•Removeandreconnectall outputconnectionsat
moduleandelectrodes.
•Removeandreconnectall outputconnectionsat
moduleandelectrodes.
•If sparksareobservedotherthanfromburner(s),
wireinsulationmaybedamaged.Replacewires.
•Weakbattery.
•Electrodesarewet.
•Electrodescrackedor
broken"sparksat
crack".
3O
All sparkspresentbutweak
or at slowrate.
Hasmoistureaccumulated
on electrodeand/orin burner
ports?
Inspectelectrodesfor
cracks.
•Replacebatterywitha newalkalinebattery.
•Usepapertoweltoremovemoisture.
•Replacecrackedor brokenelectrodes.
Page 31

Please register your product online at:
Registre su producto en linea en"
Veuillez enregistrer votre produit a radresse:
_®
Grilling's Juicy Little Secret"
(ifyouregisteronline,youdo notneedtosendinthis registrationcard.)
(Siregistra en linea,noes necesafioenviaresta tarjetade registro.)
(Sivousenregistrezvotreproduiten ligne,il n'estpasn6cessaired'envoyer lacarte
d'enregistrement.)
PLEASEFILLOUTTHISCARDANDATTACHA COPYOF YOURSALESRECEIPT. RETURNITWlTHINIO DAYS OF PURCHASE.FOR WARRANTYSERVICEPROOFOF PURCHASE
WlLLBE REQUIRED.THISWARRANTYIS NON-TRANSFERABLE.
LLENE ESTA TARJETAY DEVUELVALADENTRODE LOS 10 DIASDE LA COMPRA.PARA ELSERVlCIODE GARANTIAES NECESARIOQUE PRESENTESU COMPROBANTEDE
COMPRA.CONSERVELA FACTURA.ESTAGARANTIAES INTRANSFERIBLE.
VEUILLEZCOM PLETE RCETTECARTE ETLA RETOU RN ERDANS LES 10 JOU RSSUIVANTL'ACHAT. POU RO BTENI RLESE RVlCESO USGARANTIE,UN EPREUVED'ACHAT DOlT
ETRE PRESENTEE.VEUILLEZCONSERVERVOTRE FACTURE.LA PRESENTEGARANTIEN'ESTPAS TRANSFERABLE.
*Required I Necesario I Exig_ ~ PLEASEPRINT~ IMPRIMAPOR FAVOR ~S'IL VOUSPLA'[TIMPRIMEI_
*O First Name I Nombre I Pr_nom
Address (number & street) I Direcci6n (n0mero y cane) I Adresse (num_ro et rue) Apt Number I N-°de aPart I N-°d'app t.
* O E-mail Address I Direccibn de correo electrbnico I Adresse _lectronique * O Phone Number I Nt_mero telef6nico I Num_ro de t_l_phone
Initial llnicialllnitiale Last Name I Apellido I Nom de Famillie
Zip Code I C6digo Zip I Code PostalCity I Cludad I Ville State I Estado I Province
ilc_;_ ¸ _ _'_ : I
Serial Number I N_mero de seriel Num_ro de s_rie
0
Date of Purchase I Fecha de compra I Date de I'achat
O Store Name I Nombre de la tienda I Nom du magasin
STICI(IION PRODUCT
$
0
Purchase Price I Precio de compra I Prix d'achat
@
Which product are you registering?
_.Qu_ producto est_i registrando?
Quel produit enregistrez-vous?
1. []Gas Grill I Parrilla a gas I Gril au gaz
2. [] Electric Grill I Parrilla el_ctrica I Gril _lectrique
3. []Smoker I Ahumador ] Fumoir
4. []Charcoal Grill I Parrilla a carb6n I Barbecue au charbon
S. [] Cooker/Fryer I Cocina/freidora I Cuiseur/Friteuse
6. []Otherl Otro I Autre
We respect your privacy. I Respetamos su privacidad. I Nous respectons votre vie priv_e.
• If you prefer not to receive special offers and promotions from Char-Broil, please check here: [ /
• Marque aquf si no desea recibir ofertas y promociones especiales de Char-Broil:
• Si vous pr_f_rez ne pas recevoir d'informations concernant des offres sp_ciales et des
promotions de Charbroil, veuiNez cocher ici:
O Your Gender I Sexo I Sexe:
[] Male I Masculino I Masculin
[]Femalel Femenino I F_minin
Mai! to: / Enviar a: / Envoyer _ :
Char-Broil Warranty Registration
P.O. Box 1240
Columbus, GA 31902-1240
I
* l_Attach copy ofyour
sales receipt here.
Adjunte aqui la copia
de su recibo de
compra
Veuillez attacher une
copie de votre regu
icL
:! 71
Thank you for completing this questionnaire. I Gracias por completer este cuestionario. I Merci d'avoir bien voulu remplir ce questionnaire.
31
Page 32

FO YOU
URCHASE
C
F
T
Grilling's Juicy Little Secret _°
C
G
• Valuable product information
• Inspiring grilling accessories
• Reliable customer support
• Delicious recipes and tips from chefs
• Exciting events and promotions
• And much more!
C
T
OU
OU
TT
F
ESE
TU
ITE
 Loading...