

Char-Broil 466242815 Product Manual
Commercial
Serial number | Numéro de série
See rating Label on grill for serial number.
Ce numéro se trouve sur l´étiquette signalétique sur
i´appareil.
Date purchased | Date d’chat
If you have questions or need assistance
during assembly, please call 1-888-430-7870.
Si vous avez des questions ou besoin d´aide
pendant l’assemblage, S’il vous plaît appelez
1-888-430-7870
466242815
4-Burner Gas Grill
10/21/14 • G533-001-030801
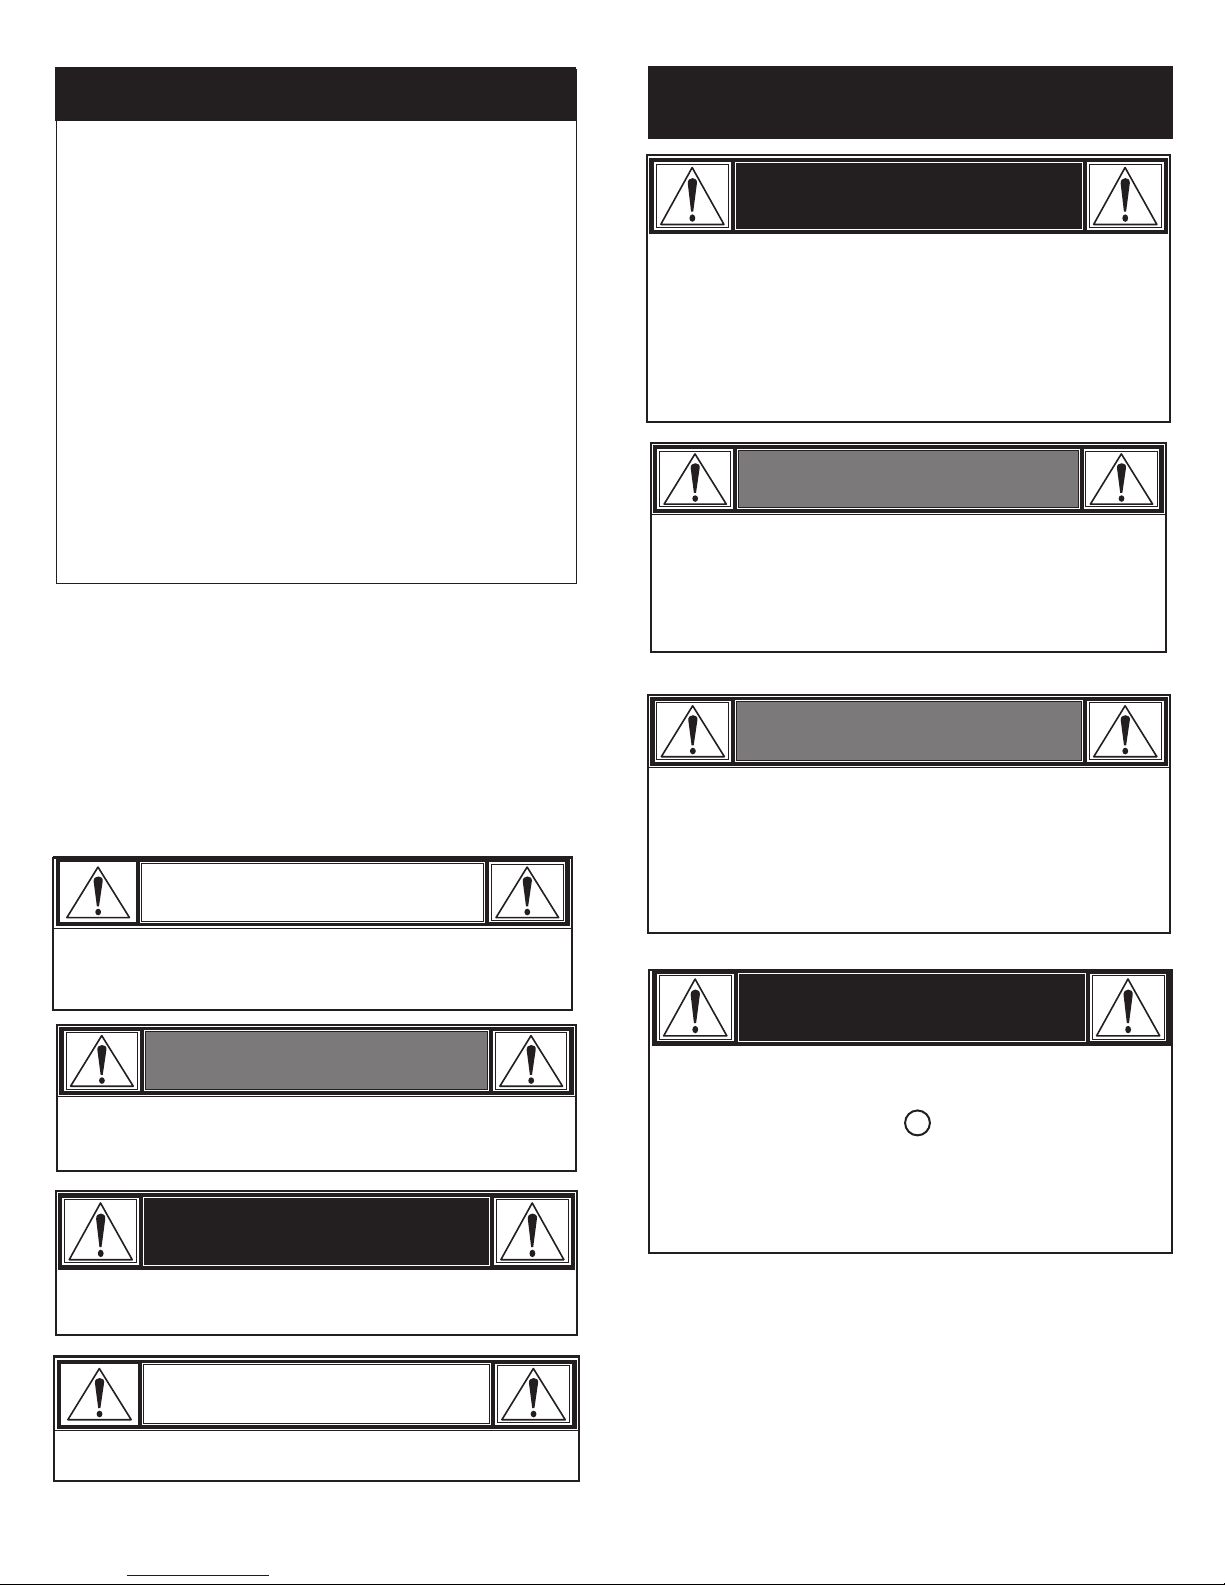
TABLE OF CONTENTS
For Your Safety . . . . . . . . . . . . . . . . . . . . . . . . . . . . . . . . . 2-4
THIS GRILL IS FOR OUTDOOR USE
ONLY.
Use and Care. . . . . . . . . . . . . . . . . . . . . . . . . . . . . . . . . . . 4-8
Limited Warranty . . . . . . . . . . . . . . . . . . . . . . . . . . . . . . . . . . 9
Assembly . . . . . . . . . . . . . . . . . . . . . . . . . . . . . . . . . . . . 18-33
Troubleshooting . . . . . . . . . . . . . . . . . . . . . . . . . . . . . . . 34-35
Parts Diagram . . . . . . . . . . . . . . . . . . . . . . . . . . . . . . . . . . . 38
Parts List . . . . . . . . . . . . . . . . . . . . . . . . . . . . . . . . . . . . . . . 39
Hardware List . . . . . . . . . . . . . . . . . . . . . . . . . . . . . . . . . . . 41
Registration Card. . . . . . . . . . . . . . . . . . . . . . . . . . . . . . . . . 43
SAFETY SYMBOLS
The symbols and boxes shown below explain what each
heading means. Read and follow all of the messages found
throughout the manual.
INSTALLER/ASSEMBLER:
Leave this manual with consumer.
CONSUMER:
Keep this manual for future reference.
CAUTION
DANGER
If you smell gas:
1. Shut off gas to the appliance
2. Extinguish any open flame.
3. Open lid.
4. If odor continues, keep away from the appliance and
immediately call your gas supplier or your fire
department.
WARNING
1. Do not store or use gasoline or other flammable
liquids or vapors in the vicinity of this or any other
appliance.
2. An LP cylinder not connected for use shall not be
stored in the vicinity of this or any other appliance.
WARNING
Do not attempt to repair or alter the hose/quick
disconnect for any “assumed” defect. Any
modification to this assembly will void your
warranty and create the risk of a gas leak and fire.
Use only authorized replacement parts supplied by
manufacturer.
CAUTION: Indicates a potentially hazardous situation or
unsafe practice which, if not avoided, may result in minor or
moderate injury.
WARNING
WARNING: Indicates a potentially hazardous situation
which, if not avoided, could result in death or serious injury.
DANGER
DANGER: Indicates an imminently hazardous situation
which, if not avoided, will result in death or serious injury.
CAUTION
For residential use only. Do not use for commercial cooking.
DANGER
If during operation the flames go out (You smell gas or
cannot see the flame)
1. Turn the burner controls OFF
2. Open lid.
3. Wait 5 minutes and repeat the lighting procedure.
If the burner goes out, gas will continue to flow out of the
burner and could accidently ignite with risk of injury.
Tools needed for assembly:
Tools needed for assembly:
Adjustable wrench (not provided)
Adjustable wrench (not provided)
Screwdriver (not provided)
Screwdriver (not provided)
7/16" Combination wrench (not provided)
7/16" Combination wrench (not provided)
2
WARNING
CAUTION
Failure to follow all manufacturer’s instructions could result in
serious personal injury and/or property damage.
CAUTION
Read and follow all safety statements, assembly
instructions, and use and care directions before attempting
to assemble and cook.
CAUTION
Some parts may contain sharp edges. Wear protective
gloves if necessary.
CAUTION
Grease Fires
• Putting out grease fires by closing the lid is not possible.
Grills are well ventilated for safety reasons.
• Do not use water on a grease fire. Personal injury may
result. If a grease fire develops, turn knobs to off
position and remove hose from quick disconnect
socket.
• If grill has not been regularly cleaned, a grease fire can
occur that may damage the product. Pay close attention
while preheating or burning off food residue to insure
that a grease fire does not develop.
Using pots larger than 6 quarts in capacity could exceed
weight limit of the side burner shelf or side shelf, resulting
in failure of grill cart components.
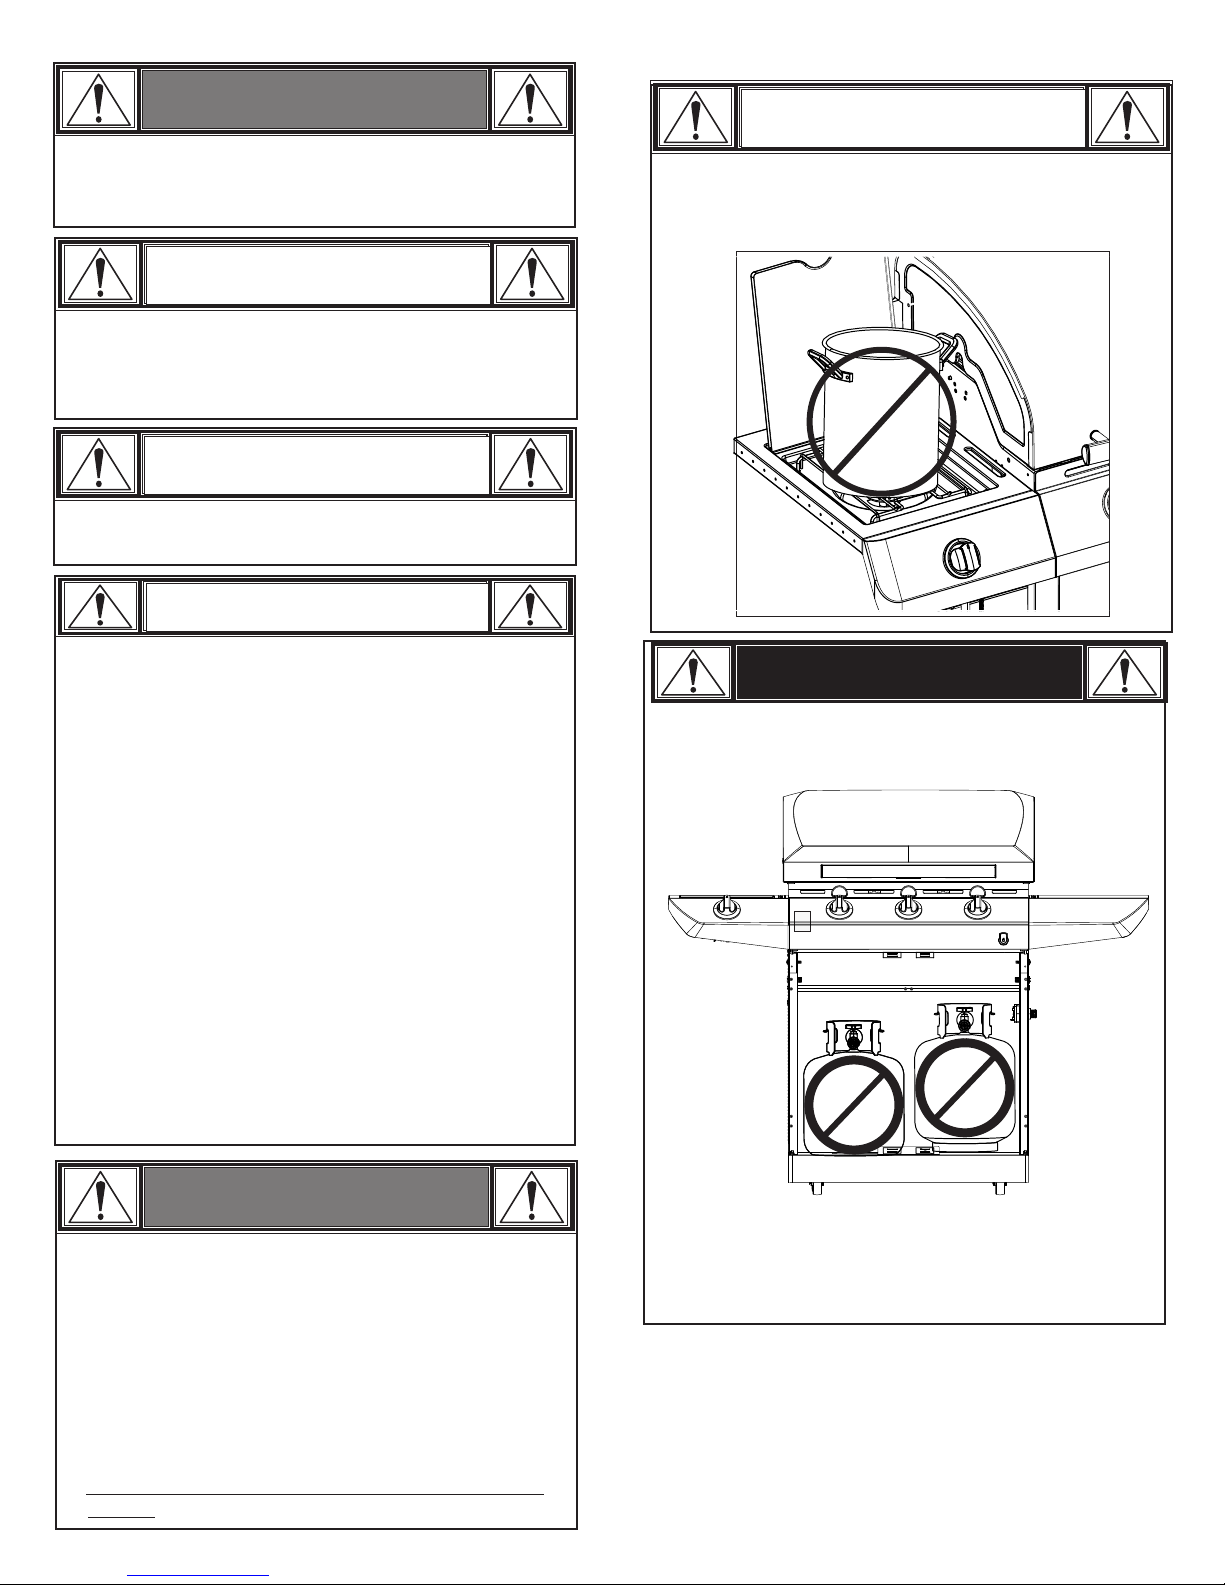
DANGER
•
NEVER store a spare LP cylinder under or near the
appliance or in an enclosed area.
• The best way to prevent grease fires is
regular cleaning of the grill following
instructions on General Grill Cleaning and
Cleaning The Burner Assembly.
WARNING
CALIFORNIA PROPOSITION 65
1. Combustible by-products produced when using this
product contains chemicals known to the State of
California to cause cancer, birth defects, or other
reproductive harm.
2. This product contains chemicals, including lead and
lead compounds, known to the State of California to
cause cancer, birth defects or other reproductive harm.
Wash your hands after handling this product.
•
If you see, smell or hear gas escaping, immediately get
away from the appliance and call your fire department.
3
Installation Safety Precautions
•Use grill, as purchased, only with natural gas and hose
supplied.
•Grill installation must conform with local codes, or in their
absence of local codes, with either the National Fuel Gas
Code, ANSI Z223.1/ NFPA 54, Natural Gas and Propane
Installation Code, CSA B149.1, or Propane Storage and
Handling Code, B149.2.
•All electrical accessories (such as rotisserie) must be
electrically grounded in accordance with local codes, or
National Electrical Code, ANSI / NFPA 70 or Canadian
Electrical Code, CSA C22.1. Keep any electrical cords
and/or fuel supply hoses away from any hot surfaces.
•Do not use grill indoors or on recreational vehicles or boats.
•This grill is safety certified for use in the United States
and/or Canada only. Do not modify for use in any other
location. Modification will result in a safety hazard.
•The hose assembly supplied must be used and
replacements must be those specified by appliance
manufacturer.
USE AND CARE
Connecting Your Grill to the Natural Gas Source.
A licensed gas fitter is required for connection to
the residential gas piping.
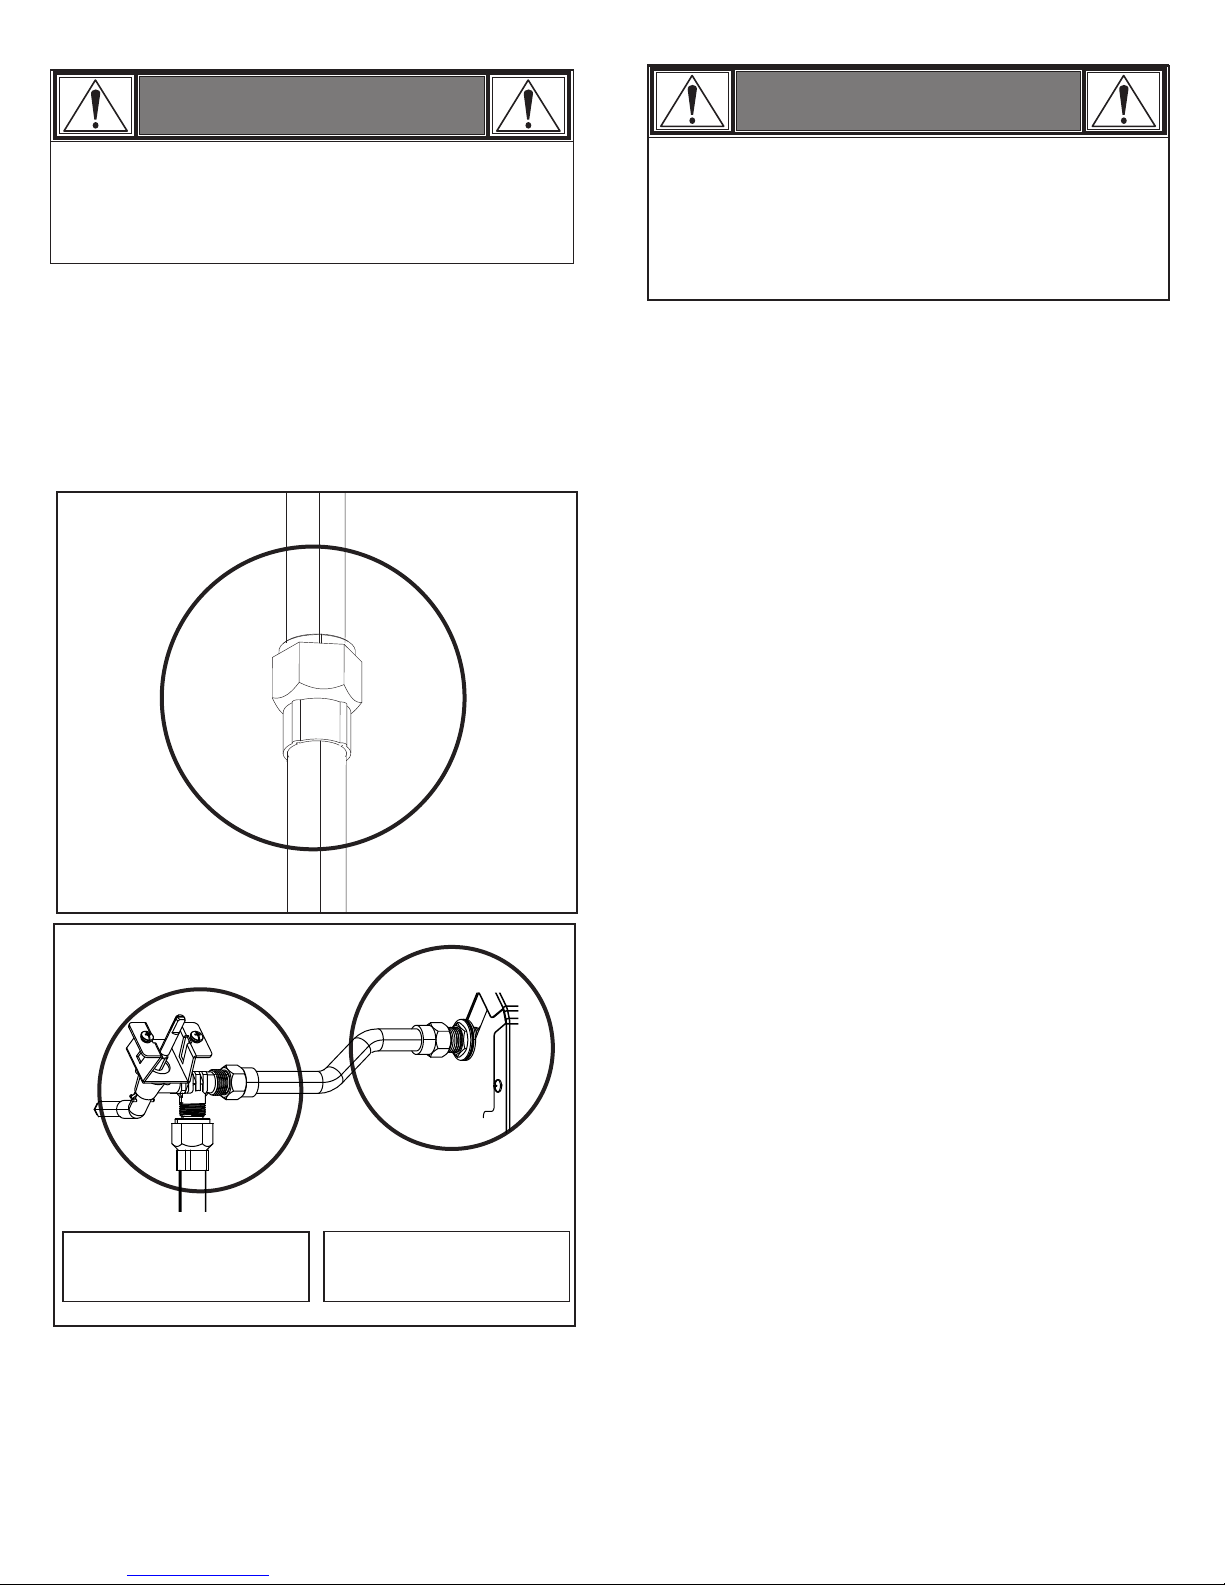
1. A professionally-installed shut-off valve between the supply
piping and the socket is recommended if not required by local
code. Socket connection must be made outdoors.
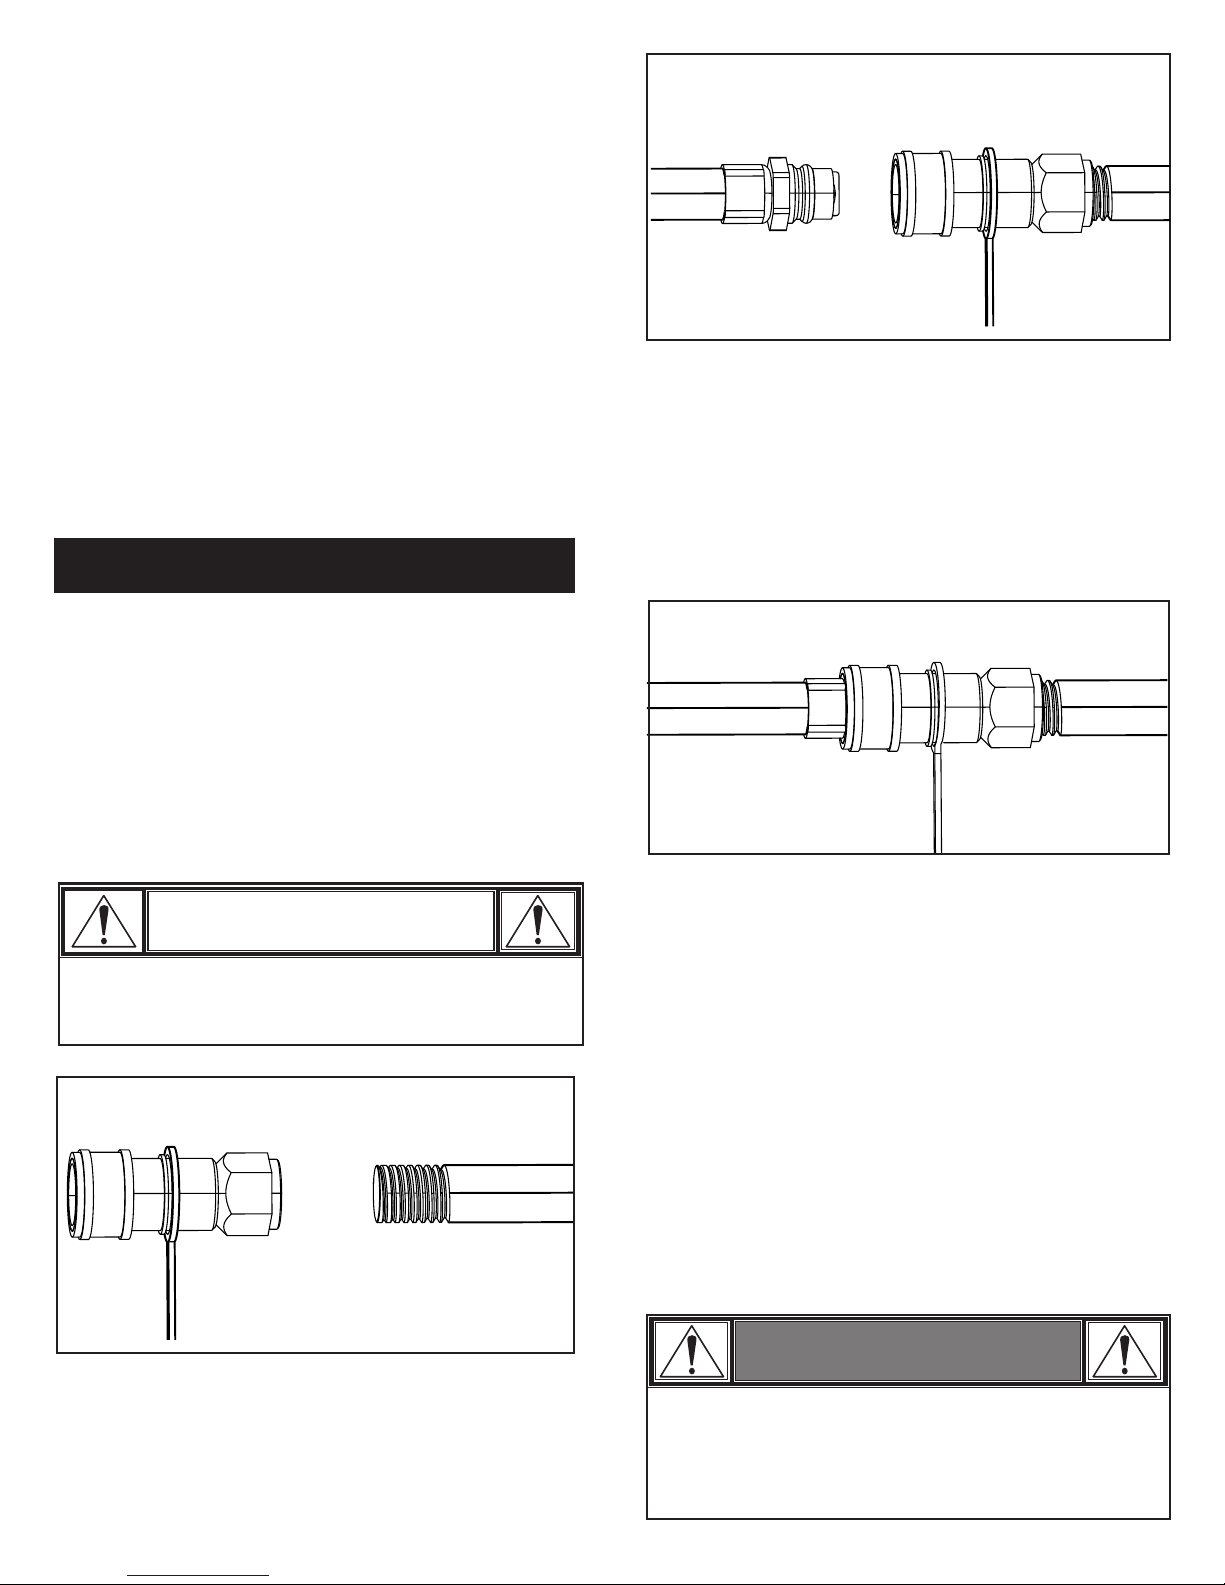
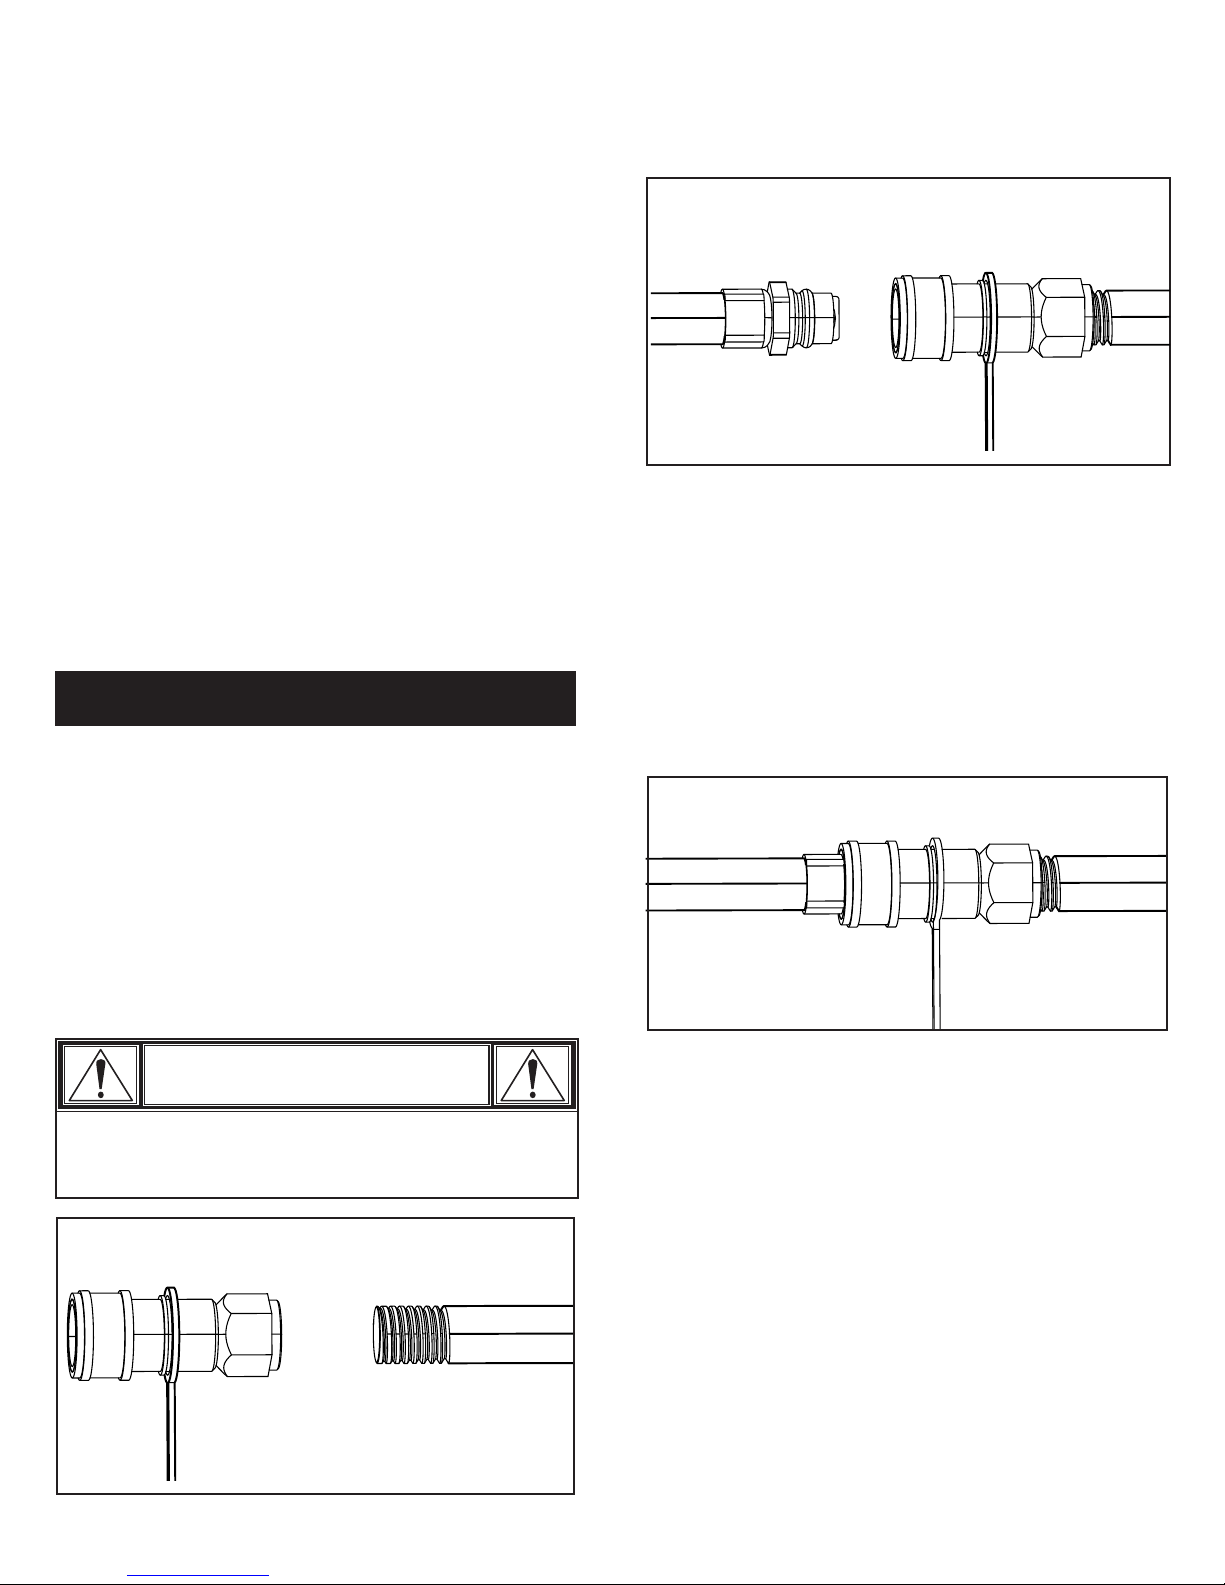
Gas hose
Quick Disconnect
Figure B
4. When the quick disconnect socket and the gas hose are
connected, a valve in the socket opens automatically to permit
full gas flow. When the gas hose is disconnected, the valve in
the socket instantly and positively shuts off the flow of gas.
Because the valve in the socket positively shuts off the flow of
gas, the grill can be disconnected from the gas source by
disconnecting the gas hose from the quick disconnect socket.
The socket should be left attached to the gas source (house
piping). Figure C, below, shows properly connected hose and
socket.
2. Coat the gas supply pipe nipple with gas resistant pipe dope
or approved teflon tape. Screw socket onto gas supply pipe
(house gas source) as shown in Figure A below, and wrenchtighten.
CAUTION
The quick disconnect socket should never be
connected to the grill. Direction of gas flow is indicated
on the socket.
Quick disconnect socket
3. Turn all grill valves to the off position. Pull back the sleeve on
the quick disconnect socket and insert the unattached end of
the gas hose into the socket. Release the sleeve and continue
pushing the hose into the socket until the sleeve snaps into
the locked position. See Figure B.
Gas pipe from residence
Figure A
Figure C
With proper assembly, the gas hose cannot be removed without
pushing the quick disconnect sleeve back. To disconnect, push
sleeve back and pull plug out of sleeve (this automatically shuts
off gas).
Please Note: Hose and assembly are C.S.A. listed for natural
gas, manufactured gas, mixed gas and for liquefied petroleum
and for LP Gas-Air mixtures on basis of 0.64 specific gravity for
1000 BTU’s per cubic foot of gas at 0.3 in. water column pressure
drop. Only ANSI Z21.54 approved hoses should be used with this
grill.
The appliance and its individual shut off valve must be
disconnected from the gas supply piping system during any
pressure testing on that system at test pressures in excess of 1/2
psig (3.5kPa).
The appliance must be isolated from the gas supply piping
system by closing its individual manual shutoff valve during any
pressure testing of the gas supply piping system at test
pressures equal to or less than 1/2 psi (3.5kPa).
WARNING
Do not use hard metal piping of any kind to connect this
type of grill to natural gas source. Use only hose
specified by manufacturer. Using hard metal piping or
convoluted metal tubing is an unsafe practice. Movement
of the grill can cause breakage of metal pipe.
4
WARNING
WARNING
• Do not use grill until leak-tested.
• If a leak is detected at any time, STOP! Turn off
gas at source and correct leak.
• If you cannot stop a gas leak leave area and call your fire
department!
Leak Testing
1.Turn all grill control knobs to OFF.
2.Be sure gas hose is tightly connected to gas source.
3.Completely open gas source. If you hear a rushing sound, turn
gas off immediately. There is a major leak at the connection.
Correct before proceeding.
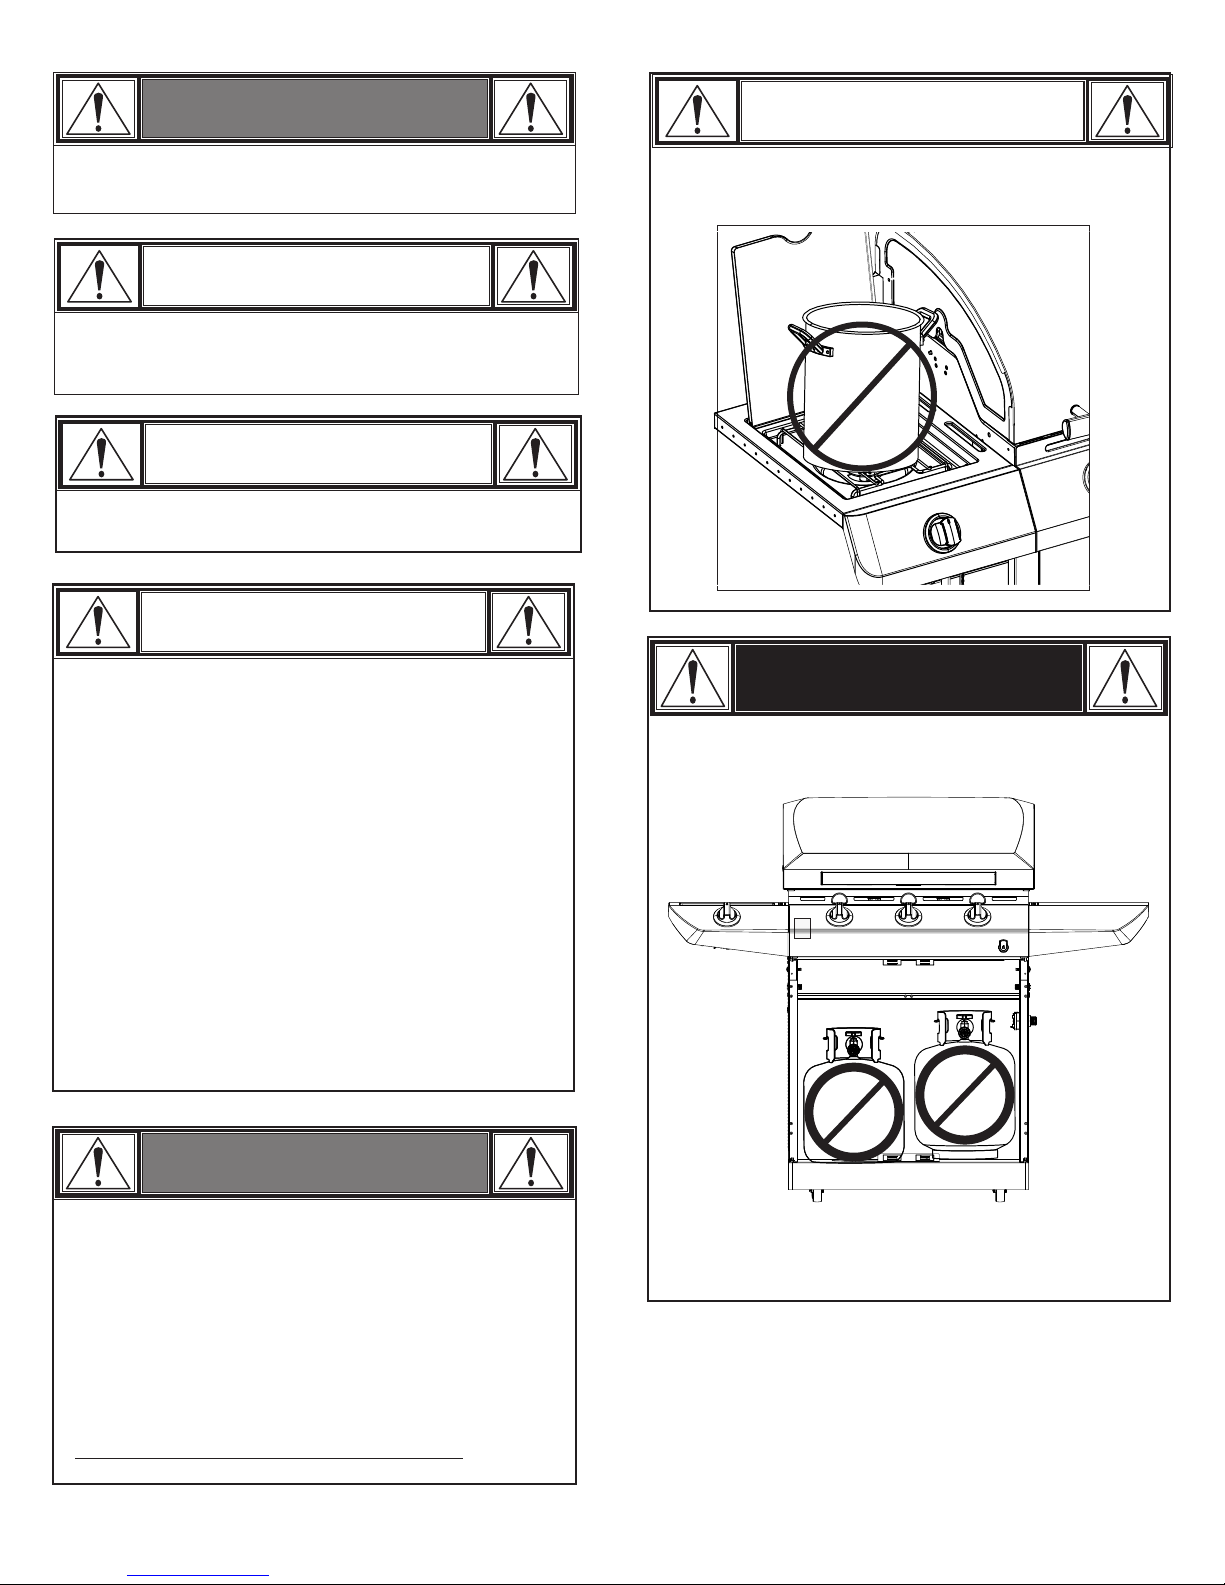
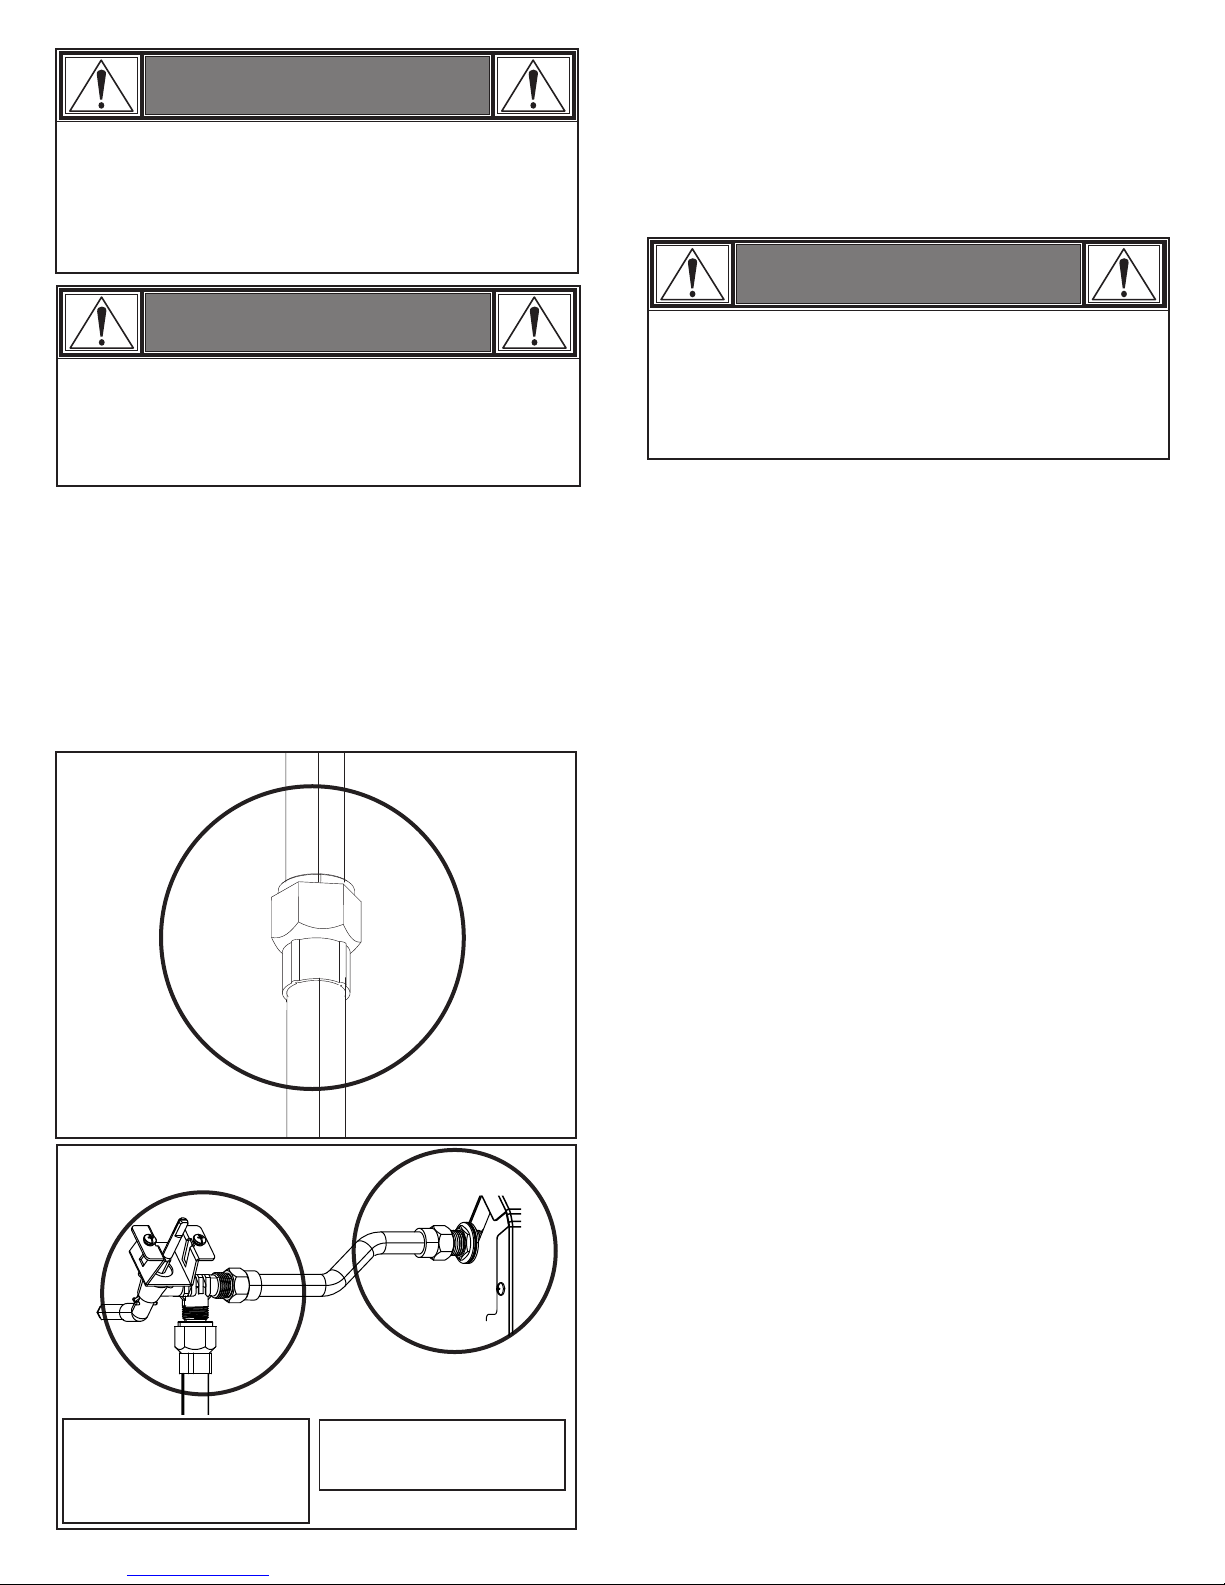
4.Brush soapy solution onto areas circled below, or other similar
fittings on your grill.
• Outdoor gas appliance is not intended to be installed in or
on a boat.
• Outdoor gas appliance is not intended to be installed in or on
an RV.
• Never attempt to attach this grill to the self-contained LP
gas system of a camper trailer or motor home.
Safety Tips
• When grill is not in use, turn off all control knobs and remove
gas hose from quick disconnect socket.
• Never move grill while in operation or still hot.
• Some surfaces will be hot during use. Use long-handled
barbecue utensils and oven mitts to avoid burns and splatters.
• Maximum load for sideburner and side shelf is 10 lbs.
• The grease tray or cup must be installed during use and
emptied after each use. Do not remove grease tray or cup
until grill has completely cooled.
• Clean grill often, preferably after each cookout. If a bristle
brush is used to clean any of the grill cooking surfaces, ensure
no loose bristles remain on cooking surfaces prior to grilling. It
is not recommended to clean cooking surfaces while grill is hot.
• If you notice grease or other hot material dripping from grill
onto hose, turn off gas supply at once. Determine the cause,
correct it, then clean and inspect hose before continuing.
Perform a leak test.
NOTE: Sideburner shelf
fascia and other parts not
shown for clarity.
5.If “growing” bubbles appear, there is a leak. Close gas source
immediately and tighten connections. If leaks cannot be
stopped do not try to repair. Call for replacement parts.
6.Always close gas source after performing leak test.
NOTE: Your grill may NOT
be equipped with a
sideburner.
• Keep ventilation openings in cylinder enclosure (grill cart) free
and clear of debris.
• Do not store objects or materials inside the grill cart enclosure
that would block the flow of combustion air to the underside of
either the control panel or the firebox bowl.
• If you have a grill problem see the "Troubleshooting” Section.
5
WARNING
For Safe Use of Your Grill and to Avoid Serious Injury:
• Do not let children operate or play near grill.
• Keep grill area clear and free from materials that burn.
• Do not block holes in sides or back of grill.
• Check burner flames regularly.
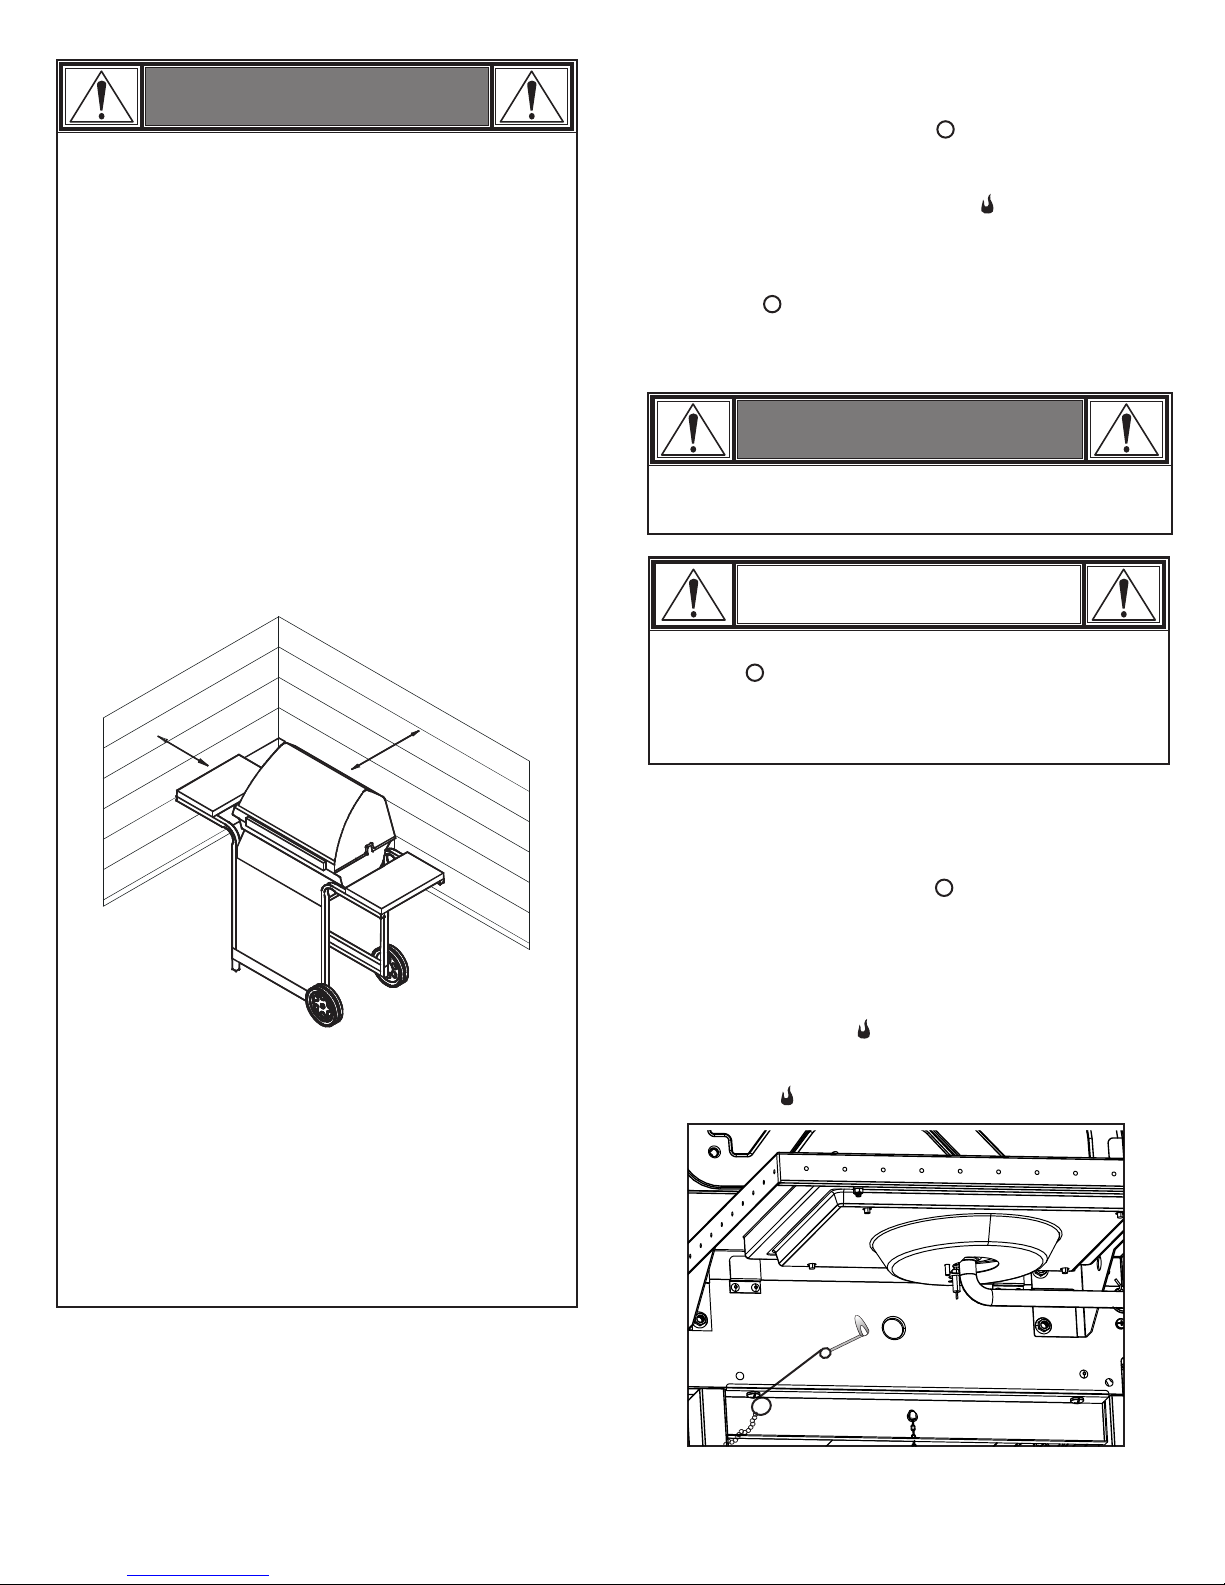
• Use grill only in well-ventilated space. NEVER use in
enclosed space such as carport, garage, porch, covered
patio, or under an overhead structure of any kind.
• Do not use charcoal or ceramic briquets in a gas grill.
• Do not cover grates with aluminum foil or any other
material. This will block burner ventilation and create a
potentially dangerous condition resulting in property
damage and/or personal injury.
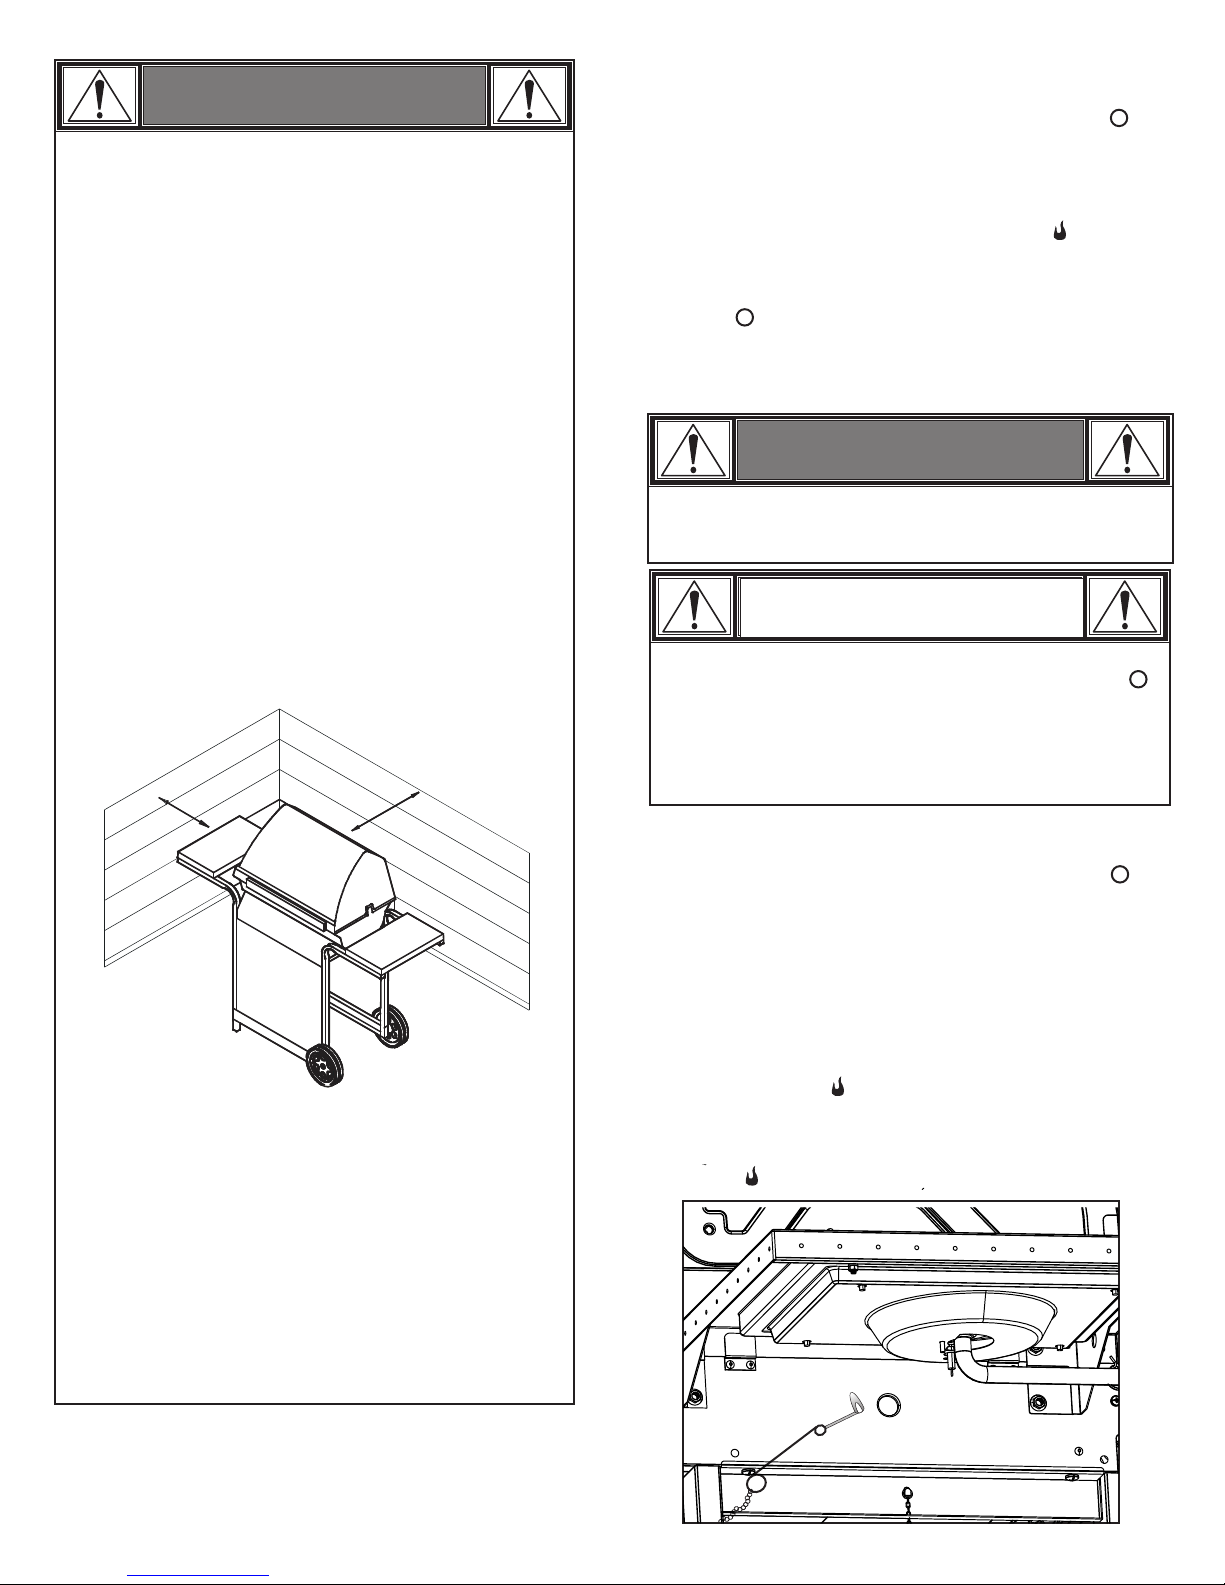
• Use grill at least 3 ft. from any wall or surface. Maintain
10 ft. clearance to objects that can catch fire or sources of
ignition such as pilot lights on water heaters, live electrical
appliances, etc.
3 ft.
3 ft.
Ignitor Lighting
• Do not lean over grill while lighting.
1. Turn gas burner control valves to (off).
2. Open lid during lighting or re-lighting.
3. Turn ON gas at source.
4. To ignite, push and turn burner knob to HIGH. Immediately,
push and hold ELECTRONIC IGNITOR button until the burner
lights.
5. If ignition does NOT occur in 5 seconds, turn the burner
controls off , wait 5 minutes and repeat the lighting
procedure.
6. Repeat steps 4 and 5 to light other main burners.
WARNING
Turn controls and gas source OFF when not in use.
CAUTION
If ignition does NOT occur in 5 seconds, turn the burner
controls off, wait 5 minutes and repeat the lighting
procedure. If the burner does not ignite with the valve
open, gas will continue to flow out of the burner and
could accidently ignite with risk of injury.
• NEVER attempt to light or re-light burner with lid
closed. A buildup of non-ignited gas inside a closed
grill is hazardous.
• Apartment Dwellers:
Check with management to learn the requirements and fire
codes for using a gas grill in your apartment complex. If
allowed, use outside on the ground floor with a three (3)
foot clearance from walls or rails. Do not use on or under
balconies.
Match-Lighting
• Do not lean over grill while lighting.
1. Turn gas burner control valves to (off).
2. Open lid during lighting or re-lighting.
3. Turn ON gas at source.
4. Place match into match holder (hanging from side panel of
grill). Light match; then light burner by placing match through
the match light hole on side of grill. Immediately push in and
turn burner knob to the HIGH position. Be sure burner lights
and stays lit.
5. Light adjacent burners in sequence by pushing knobs in and
turning to the HIGH position.
6
Sideburner Ignitor Lighting
• Do not lean over grill while lighting.
1. Turn gas burner control valves to (off).
2. Open lid during lighting or re-lighting.
3. Turn ON gas at source.
4. Turn sideburner knob to the HIGH position, push and hold
ELECTRONIC IGNITOR button.
5. If sideburner does NOT light within 5 seconds, turn knob
to off, wait 5 minutes, then repeat lighting procedure.
Sideburner Match Lighting
• Do not lean over grill while lighting.
1. Turn gas burner control valves to (off).
2. Open lid during lighting or re-lighting.
3. Turn ON gas at source.
4. Place lit match near burner. Immediately turn sideburner
knob to the HIGH position. Be sure burner lights and stays
lit.
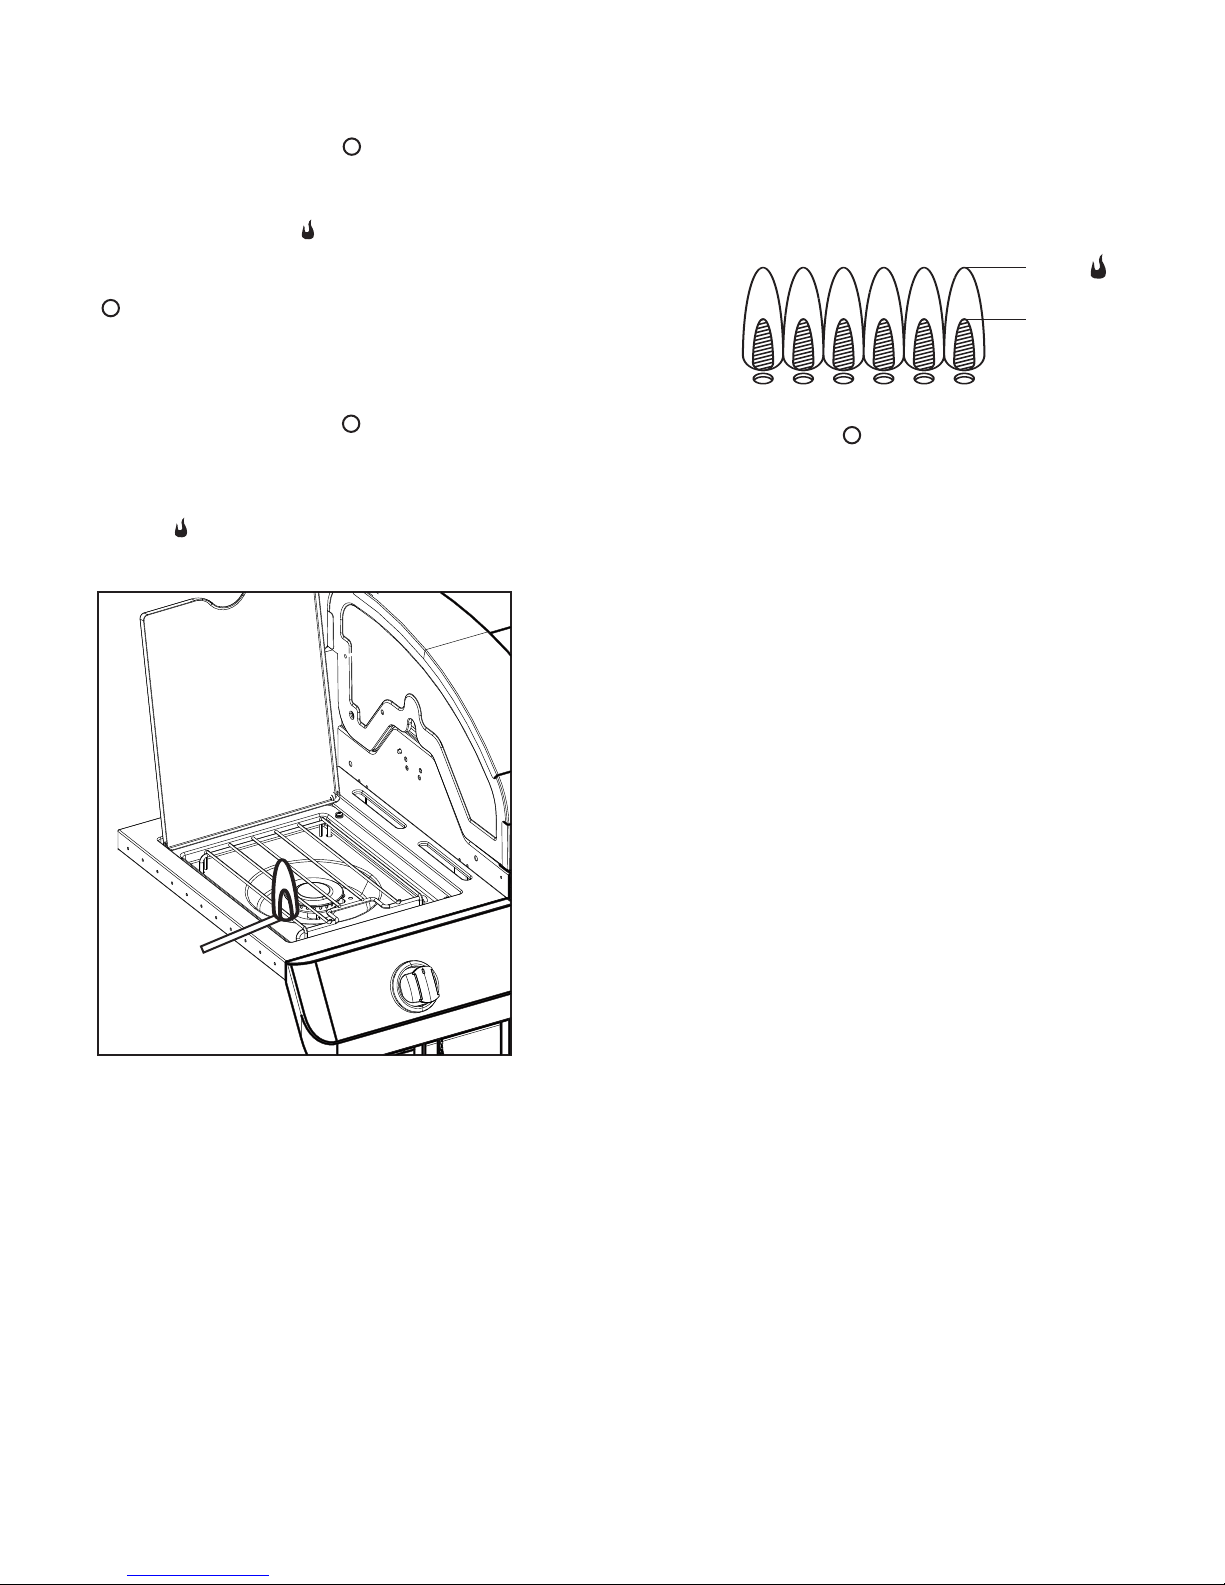
Burner Flame Check
• Remove cooking grates and heat tents. Light burners, rotate
knobs from HIGH to LOW. You should see a smaller flame in
LOW position than seen on HIGH. Perform burner flame check
on side burner, also. Always check flame prior to each use. If
no difference discontinue use of grill until a plumber or gas
technician has investigated and corrected the problem.
HIGH
LOW
Turning Grill Off
• Turn all knobs to the off position. Turn off NG source.
Ignitor Check
• Turn gas off at source. Press and hold electronic ignitor
button. "Click" should be heard and spark seen each time in
each collector box or between burner and electrode. See
"Troubleshooting" if no click or spark.
Valve Check
• Important: Make sure gas is off at source before checking
valves. Knobs lock in off position. To check valves, first push in
knobs and release, knobs should spring back. If knobs do not
spring back, replace valve assembly before using grill. Turn
knobs to LOW position then turn back to off position. Valves
should turn smoothly.
Hose Check
• Before each use, check to see if hoses are cut or worn or
kinked. Replace damaged hoses before using grill. Use only
hose specified by manufacturer.
Storing Your Grill
• Clean cooking grates.
• Store in dry location.
• Cover grill if stored outdoors. Choose from a variety of grill
covers offered by Char-Broil at charbroil.com.
• Store grill indoors ONLY if hose is disconnected from gas
source.
• When removing grill from storage, follow “Cleaning the
Burner Assembly” instructions before starting grill.
7
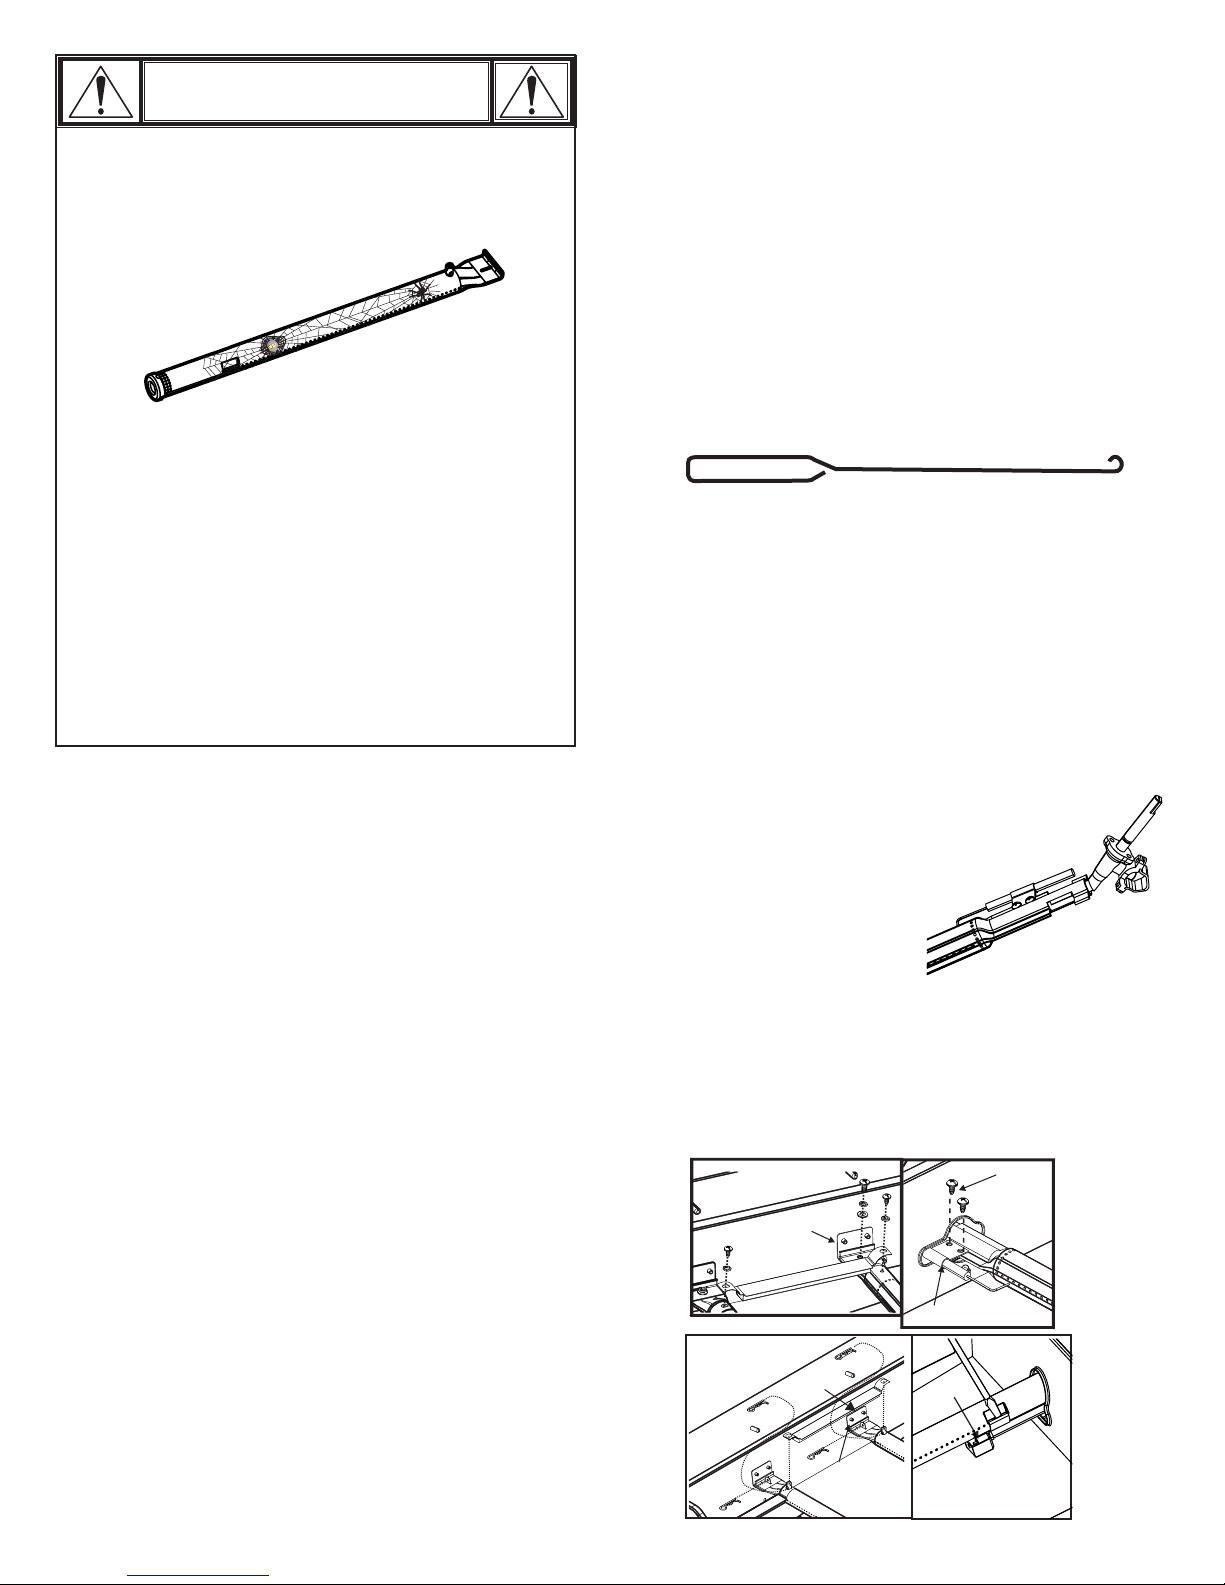
CAUTION
SPIDER ALERT!
SPIDER AND WEBS
INSIDE BURNER
Your burner might be different
If your grill is getting hard to light or the flame is weak,
check and clean the venturis and burners.
Cleaning the Burner Assembly
Follow these instructions to clean and/or replace parts of burner
assembly or if you have trouble igniting grill.
1. Turn gas off at control knobs and at gas source.
2. Remove cooking grates and heat tents.
3. Remove carryover tubes and hardware securing burners.
4. Detach electrode from burner.
NOTE: Removal/Detachment method will depend on the
burner configuration. See different configurations in
illustrations below.
5. Carefully lift each burner up and away from valve openings.
We suggest three ways to clean the burner tubes. Use
the one easiest for you.
(A) Bend a stiff wire (a light weight coat hanger works well)
into a small hook. Run the hook through each burner
tube several times.
Spiders or small insects are known to create “flashback”
problems by building nests and laying eggs in the grill’s
venturi or burner, obstructing the flow of gas. The backup gas can ignite behind the control panel. This
flashback can damage your grill and cause injury. To
prevent flashbacks and ensure good performance the
burner and venturi tube assembly should be removed
and cleaned when ever the grill has been idle for an
extended period of time.
General Grill Cleaning
• Do not mistake brown or black accumulation of grease and
smoke for paint. Interiors of gas grills are not painted at the
factory (and should never be painted). Apply a strong solution
of detergent and water or use a grill cleaner with scrub brush on
insides of grill lid and bottom. Rinse and allow to completely air
dry. Do not apply a caustic grill/oven cleaner to painted
surfaces.
• Plastic parts: Wash with warm soapy water and wipe dry.
• Do not use citrisol, abrasive cleaners, degreasers or a
concentrated grill cleaner on plastic parts. Damage to and
failure of parts can result.
• Porcelain surfaces: Because of glass-like composition, most
residue can be wiped away with baking soda/water solution or
specially formulated cleaner. Use nonabrasive scouring
powder for stubborn stains.
• Painted surfaces: Wash with mild detergent or nonabrasive
cleaner and warm soapy water. Wipe dry with a soft
nonabrasive cloth.
• Stainless steel surfaces: To maintain your grill’s high quality
appearance, wash with mild detergent and warm soapy water
and wipe dry with a soft cloth after each use. Baked-on
grease deposits may require the use of an abrasive plastic
cleaning pad. Use only in direction of brushed finish to avoid
damage. Do not use abrasive pad on areas with graphics.
• Cooking surfaces: If a bristle brush is used to clean any of
the grill cooking surfaces, ensure no loose bristles remain on
cooking surfaces prior to grilling. It is NOT recommended to
clean cooking surfaces while grill is hot.
(B) Use a narrow bottle brush with a flexible handle (do not
use a brass wire brush). Run the brush through each
burner tube several times.
(C) Wear eye protection: Use an air hose to force air into
the burner tube and out the burner ports. Check each port
to make sure air comes out each hole.
6. Wire brush entire outer surface of burner to remove food
residue and dirt.
7. Clean any blocked ports with a stiff wire such as an open
paper clip.
8. Check burner for damage due to normal wear and corrosion,
some holes may become enlarged. If any large cracks or holes
are found, replace burner.
VERY IMPORTANT: Burner tubes must reengage
valve openings. See illustrations at right.
Correct burner-tovalve engagement
9. Attach electrode to burner.
10. Carefully replace burners.
11. Attach burners to brackets on firebox.
12. Reposition carryover tubes and attach to burners. Replace
heat tents and cooking grates.
13. Before cooking again on grill, perform a “Leak Test” and
“Burner Flame Check”.
Remove
Firebox
Firebox Burner
Support
Carryover tube
Firebox
Carryover tube
Firebox Burner
Support
Electrode
Electrode
screws
Pry off electrode with
a flate blade
screwdriver
8

LIMITED WARRANTY
This warranty only applies to units purchased from an authorized retailer. Manufacturer warrants to the original consumer-purchaser only that this
product shall be free from defects in workmanship and materials after correct assembly and under normal and reasonable home use for the periods
indicated below beginning on the date of purchase*. The manufacturer reserves the right to require that defective parts be returned, postage and or
freight pre-paid by the consumer for review and examination.
SCOPE OF COVERAGE PERIOD OF COVERAGE TYPE OF FAILURE COVERAGE
Stainless Burner
Firebox, Lid, Cooking Grate and Emitters
All Other Parts
*Note: A dated sales receipt WILL be required for warranty service.
The original consumer-purchaser will be responsible for all shipping charges for parts replaced under the terms of this limited warranty.
This limited warranty is applicable in the United States and Canada only, is only available to the original owner of the product and is not transferable.
Manufacturer requires proof of your date of purchase. Therefore, you should retain your sales slip or invoice. Registering your product is not a
substitute for proof of purchase and the manufacturer is not responsible for or required to retain proof of purchase records.
This limited warranty applies to the functionality of the product ONLY and does not cover cosmetic issues such as scratches, dents, corrosions or
discoloring by heat, abrasive and chemical cleaners or any tools used in the assembly or installation of the appliance, surface rust, or the
discoloration of stainless steel surfaces. Paint is not warranted and will require touch up. RUST is not considered a manufacturing or materials defect.
This limited warranty will not reimburse you for the cost of any inconvenience, food, personal injury or property damage.
ITEMS MANUFACTURER WILL NOT PAY FOR:
1. Shipping cost, standard or expedited, for warranty and replacement parts
2. Service calls to your home.
3. Repairs when your product is used for other than normal, single-family household or residential use.
4. Damage, failures, or operating difficulties resulting from accident, alteration, careless handling, misuse, abuse, fire, flood,
acts of God, improper installation or maintenance, installation not in accordance with electrical or plumbing codes, or use
of products not approved by the manufacturer.
5. Any food loss due to product failures or operating difficulties.
6. Replacement parts or repair labor costs for units operated outside the United States or Canada.
7. Pickup and delivery of your product.
8. Repairs to parts or systems resulting from unauthorized modifications made to the product.
9. The removal and/or reinstallation of your product.
DISCLAIMER OF IMPLIED WARRANTIES and LIMITATION OF REMEDIES
Repair or replacement of defective parts is your exclusive remedy under the terms of this limited warranty. In the event of parts availability issues,
the manufacturer reserves the right to substitute like or similar parts that are equally functional.
Manufacturer will not be responsible for any consequential or incidental damages arising from the breach of either this limited warranty or any
applicable implied warranty, or for failure or damage resulting from acts of God, improper care and maintenance, grease fire, accident, alteration,
replacement of parts by anyone other than Manufacturer, misuse, transportation, commercial use, abuse, hostile environments (inclement weather,
acts of nature, animal tampering), improper installation or installation not in accordance with local codes or printed manufacturer instructions.
THIS LIMITED WARRANTY IS THE SOLE EXPRESS WARRANTY GIVEN BY THE MANUFACTURER. NO PRODUCT PERFORMANCE
SPECIFICATION OR DESCRIPTION WHEREVER APPEARING IS WARRANTED BY MANUFACTURER EXCEPT TO THE EXTENT SET
FORTH IN THIS LIMITED WARRANTY. ANY IMPLIED WARRANTY PROTECTION ARISING UNDER THE LAWS OF ANY STATE,
INCLUDING IMPLIED WARRANTY OF MERCHANTABILITY OR FITNESS FOR A PARTICULAR PURPOSE OR USE, IS HEREBY
LIMITED IN DURATION TO THE DURATION OF THIS LIMITED WARRANTY.
Neither dealers nor the retail establishment selling this product has any authority to make any additional warranties or to promise remedies
in addition to or inconsistent with those stated above. Manufacturer's maximum liability, in any event, shall not exceed the purchase price of the
product paid by the original consumer.
NOTE: Some states do not allow an exclusion or limitation of incidental or consequential damages, so some of the above limitations or exclusions
may not apply to you. This limited warranty gives you specific legal rights as set foth herein. You may also have other rights which vary from state
to state. In the state of California only, if refinishing or replacement of the product is not commercially practicable, the retailer selling this product or
the Manufacturer will refund the purchase price paid for the product, less the amount directly attributable to use by the original consumer-purchaser
prior to discovery of the nonconformity. In addition, in the state of California only, you may take the product to the retail establishment selling this
product in order to obtain performance under this limited warranty.
Limited Lifetime
3 years from date of purchase*
1 year from date of purchase*
PERFORATION, MANUFACTURING,
AND MATERIAL DEFECTS ONLY
If you wish to obtain performance of any obligation under this limited warranty, you should
Consumer returns will not be accepted unless a valid Return Authorization is first acquired. Authorized returns are clearly marked on the outside of
the package with an RA number and the package is shipped freight/postage pre-paid. Consumer returns that do not meet these standards will be
refused.
write to:
Consumer Relations
P. O. Box 1240
Columbus, GA 31902-1240
9
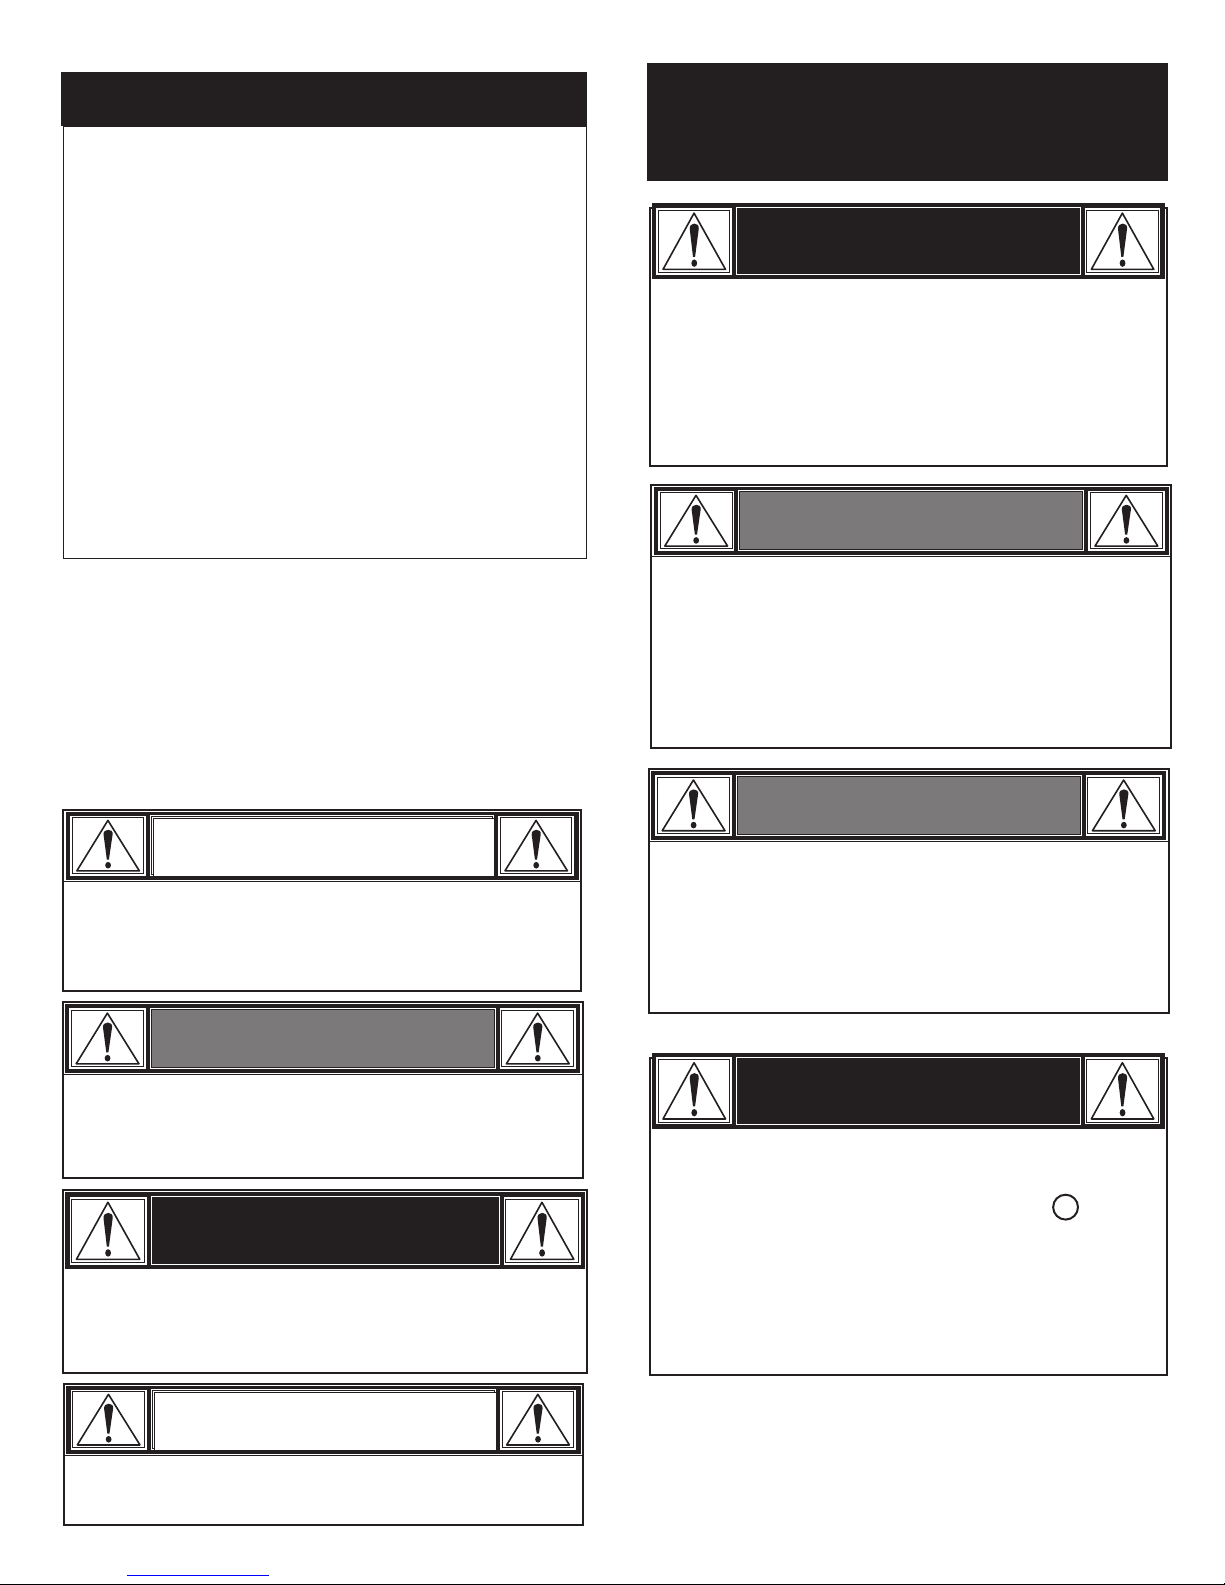
TABLE DES MATIÈRES
Pour votre sécurité . . . . . . . . . . . . . . . . . . . . . . . . . . . . . 10-12
Utilisation et entretien . . . . . . . . . . . . . . . . . . . . . . . . . . . 12-16
Garantie limitée . . . . . . . . . . . . . . . . . . . . . . . . . . . . . . . . . . 17
Assemblage . . . . . . . . . . . . . . . . . . . . . . . . . . . . . . . . . . 18-33
Dépannage . . . . . . . . . . . . . . . . . . . . . . . . . . . . . . . . . . . 36-37
Schéma des pièces . . . . . . . . . . . . . . . . . . . . . . . . . . . . . . . 38
Nomenclature des pièces . . . . . . . . . . . . . . . . . . . . . . . . . . 40
Liste des ferrures . . . . . . . . . . . . . . . . . . . . . . . . . . . . . . . . . 41
Fiche d'enregistrement. . . . . . . . . . . . . . . . . . . . . . . . . . . . . 43
CET APPAREIL EST CONÇU POUR
UN USAGE À L'EXTÉRIEUR
UNIQUEMENT
DANGER
S’il y a une odeur de gaz :
1. Coupez l'admission de gaz de l'appareil.
2. Éteindre toute flamme nue.
3. Ouvrir le couvercle.
4. Si l'odeur persiste, éloignez-vous de
l’appareil et appelez immédiatement le
fournisseur de gaz ou le service d'incendie.
AVERTISSEMENT
Symboles de sécurité
Vous trouverez ci-dessous une explication du sens de chaque
symbole. Lisez et respectez toutes les consignes qui
apparaissent partout dans ce guide.
INSTALLEUR / ASSEMBLEUR :
Vous devez laisser le présent manuel au client.
CLIENT :
Conservez ce manuel pour consultation future.
ATTENTION
ATTENTION : indique une situation potentiellement
dangereuse ou une pratique à risque qui, si elle n'est pas
évitée, pourrait entraîner des blessures mineures ou
modérément graves.
AVERTISSEMENT
AVERTISSEMENT : indique des conditions qui représentent
un risque d'accident; à défaut de prendre les mesures
correctives appropriées, la mort ou de graves blessures
s'ensuivront.
1. Ne pas entreposer ni utiliser de l'essence ni d'autres
vapeurs ou liquides inflammables dans le voisinage
de l'appareil, ni de tout autre appareil.
2. Une bouteille de propane qui n'est pas raccordée en
vue son utilisation, ne doit pas être entreposée dans
le voisinage de cet appareil ou de tout autre appareil.
AVERTISSEMENT
N'essayez pas de réparer ou de modifier le tuyau, le
système de valve ou le régulateur pour corriger un défaut
« présumé ». Toute modification à cet assemblage annule
votre garantie en plus de créer un risque de fuite de gaz et
d'incendie. N'utilisez que des pièces de rechange
approuvées, fournies par le fabricant.
DANGER
Si au cours de la procédure, les flammes s'éteignent
(vous sentez le gaz ou aucune flamme n'apparaît)
DANGER
DANGER : indique des conditions qui représentent un
danger imminent; à défaut de prendre les mesures
correctives appropriées, la mort ou de graves blessures
s'ensuivront.
ATTENTION
Pour utilisation domestique uniquement. Ne pas utiliser à
des fins commerciales.
1. Fermer le bouton de commande du brûleur
2. Ouvrir le couvercle.
3. Attendre cinq minutes et répéter l'opération.
Si le brûleur s'éteint, le gaz continuera de se répandre à
l'extérieur du brûleur et pourrait s'enflammer
accidentellement en engendrant un risque de blessure
pour la personne.
Outils requis pour l'assemblage :
Clé réglable (non comprise)
Tournevis (non comprise)
Clé mixte de 7/16 po (non comprise)
10
AVERTISSEMENT
ATTENTION
Ne pas suivre toutes les instructions du fabricant pourrait
causer des préjudices physiques graves et des dommages
matériels.
ATTENTION
Lire et respecter toutes les consignes de sécurité, les
instructions d'assemblage et les directives d'emploi et
d'entretien avant d'essayer d'assembler cet appareil ou de
l'utiliser pour la cuisson.
ATTENTION
Certaines pièces peuvent être munies de bords coupantsl.
Portez des gants de protection au besoin.
ATTENTION
Incendies de Graisse
Il n'est pas possible d'éteindre des incendies de
graisse en fermant le couvercle. Les grils sont bien
aérés pour des raisons de sécurité.
N'utilisez pas d'eau pour éteindre un incendie de
graisse. Cela pourrait causer des blessures. Si un
incendie de graisse se déclare, fermez les boutons
d'arrêt et retirez le tuyau de la prise de déconnexion
rapide.
Si le gril n’a pas été nettoyé régulièrement, un feu de
graisse pourrait s’ensuivre et endommager le produit.
Surveillez bien le gril durant le préchauffage ou
lorsque vous brûlez des résidus d’aliments au cas où
un feu de graisse se produirait.
• La meilleure façon d'empêcher les feux de
friture est de procéder à un nettoyage
régulier du gril en suivant les consignes
indiquées dans le guide sous les rubriques
Nettoyage général du gril et Nettoyer le
dispositif du brûleur.
Utiliser des pots de plus de 6 quarts de la capacité
pourrait dépasser le poids limite du plateau brûleur
latéral ou Côté plateauce qui entraîne la défaillance du
gril panier composants.
DANGER
N'entreposez JAMAIS un réservoir de gaz de
rechange sous un appareil au gaz, à proximité de
celui-ci ou dans un endroit fermé.
AVERTISSEMENT
CALIFORNIA PROPOSITION 65
1. Les sous-produits de combustion générés lors de
l'utilisation de ce produit contiennent des produits
chimiques qui, selon l'État de la Californie, causent le
cancer, des anomalies congénitales ou d'autres
dangers pour la reproduction.
2. Cet article contient des produits chimiques, y compris
du plomb et des composés de plomb, qui, selon l'État
de la Californie, causent le cancer, des anomalies
congénitales ou d'autres dangers pour la reproduction.
Veuillez vous laver les mains après avoir manipulé ce
produit.
Si vous voyez, sentez, ou entendez une fuite de gaz,
éloignez-vous immédiatement l'appareil et appelez
votre service d'incendie.
11
Mesures de sécurité pendant l'installation
• Utilisez seulement du gaz naturel avec le barbecue; utilisez
seulement le tuyau fournis avec le barbecue.
• L'installation du barbecue doit se conformer aux codes locaux,
ou en leur absence, au National Fuel Gas Code, ANSI Z223.1/
NFPA 54, Natural Gas and Propane Installation Code, CSA
B149.1, au Code sur le stockage et la manipulation du
propane B149.2, ou à la norme
• Tous les accessoires électriques (la rôtissoire, par exemple)
doivent être mis à la terre conformément aux codes locaux ou
au National Electrical Code, ANSI / NFPA 70 ou au Code
canadien de l'électricité CSA C22.1. Tenez les cordons
d'alimentation et les tuyaux d'alimentation en combustible loin
de toute surface chaude.
• N'utilisez pas le barbecue à l'intérieur ou sur le pont des
véhicules de plaisance ou des bateaux.
• Ce gril est homologué en matière de sécurité aux États-Unis
ou au Canada seulement. Ne le modifiez pas pour une
utilisation dans un autre endroit. Toute modification créera un
risque d'accident.
• N'utiliser que l'ensemble tuyau fourni; seules les pièces de
rechange spécifiées par le fabricant de l'appareil peuvent être
utilisées.
UTILISATION ET ENTRETIEN
Connexion du gril à la source d'alimentation en gaz naturel
Un monteur d'installations au gaz licence est nécessaire
pour la connexion à la tuyauterie de gaz résidentiel.
1. Si cela ne soit pas requis par le local code, nous vous
recommandons de faire installer par un professionnel un
robinet d'arrêt entre le tuyau d'alimentation et l'adaptateur, . Le
raccord de l'adaptateur doit être effectué à l'extérieur.
2. Enduisez le mamelon du tuyau d'alimentation en gaz d'une
pâte lubrifiante résistante au gaz ou recouvrez-le de ruban
teflon approuvé. Vissez l'adaptateur dans le tuyau
d'alimentation en gaz (source d'alimentation du logement) tel
qu'indiqué dans le schéma A ci-dessous; resserrez-le en vous
servant d'une clé.
3. Repoussez le manchon de l'adaptateur à débranchement
rapide et insérez le bout libre du tuyau de gaz dans
l'adaptateur. Relâchez le manchon et continuez de
pousser le tuyau dans l'adaptateur jusqu'à ce que le
manchon soit bien verrouillé. Voir le schéma B.
Tuyau de gaz
Manchon
Schéma B
4. Lorsque l'adaptateur à débranchement rapide est branché au
tuyau de gaz, une valve à l'intérieur de l'adaptateur s'ouvre
automatiquement afin de permettre le libre écoulement du
gaz. Quand le tuyau de gaz est débranché, la valve de
l'adaptateur se referme instantanément pour arrêter
complètement l'écoulement du gaz. Comme la valve de
l'adaptateur interrompt complètement l'alimentation en gaz, on
peut débrancher le gril de cette alimentation en détachant le
tuyau de gaz de l'adaptateur à débranchement rapide. Nous
vous recommandons de laisser l'adaptateur branché au tuyau
d'alimentation en gaz de la résidence en tout temps. Le
schéma C, ci-dessous, montre un branchement approprié du
tuyau et de l'adaptateur.
Schéma C
ATTENTION
L'adaptateur à débranchement rapide ne doit jamais être
branché à ce gril. La direction de l'écoulement du gaz est
indiquée sur l'adaptateur.
Adaptateur à
débranchement rapide
Tuyau de gaz provenant
de la résidence
Schéma A
Quand l'assemblage est fait correctement, le tuyau de gaz
ne peut pas être enlevé sans repousser vers l'arrière le
manchon de l'adaptateur à débranchement rapide. Pour le
débrancher, poussez le manchon vers l'arrière et retirez la prise
hors du manchon (cela arrêtera immédiatement l'alimentation en
gaz).
Remarque : Le tuyau et l'assemblage sont homologués CSA
pour le gaz naturel, le gaz manufacturé, le gaz mixte, le
pétrole liquéfié et les mélanges GPL/air, pour une densité de
0,64 sur 1 000 BTU par pied cube de gaz à une pression de
0,3 po. de colonne d'eau. Seuls les tuyaux homologués
ANSI Z21.54 sont approuvés pour être utilisés avec ce gril.
Cet appareil et son robinet d'arrêt doivent être débranchés
du système d'alimentation en gaz lors de tout essai de
pression sur ce système quand la pression manométrique
d'essai est supérieure à 1/2 lb/po² (3,5 kPa).
L'appareil doit être isolé du système d'alimentation en gaz
en refermant manuellement le robinet d'arrêt lors de tout
essai de pression sur ce système quand la pression
manométrique d'essai est égale ou inférieure à 1/2 lb/po² (3,5
kPa).
12
AVERTISSEMENT
N'utilisez pas de tuyau en métal dur pour brancher ce
type de gril à la source d'alimentation en gaz naturel.
N'utilisez que le tuyau fourni par le fabricant. L'utilisation
d'un tuyau en métal dur ou en métal vrillé est une
pratique non sécuritaire. Les mouvements du gril
pourraient briser le tuyau en métal.
5.Si des bulles « moussantes » apparaissent, c'est qu'il y a
une fuite. Fermez immédiatement la source d’alimentation
engaz natural et resserrez tous les raccords. Si vous
n'arrivez pas à arrêter les fuites, n'essayez pas de les
colmater vous-même.
6.Fermez toujours la source d'alimentation en gaz naturel après
chaque essai d'étanchéité.
AVERTISSEMENT
AVERTISSEMENT
• N'utilisez pas le gril avant d'en avoir vérifié l'étanchéité.
• Si une fuite est détectée, STOP! Fermer le gaz à la source
et remédier à la fuite.
• Si vous n'arrivez pas à arrêter une fuite de gaz quitter zone
et appelez le service d'incendie!
Essai d'étanchéité des valves
1.Tournez tous les boutons de réglage en position
d'arrêt (OFF).
2.Assurez-vous que le régulateur est attaché de façon étanche à
la valve du réservoir.
3.Tour sur la source de gaz. Si vous entendez un souffle ou un
sifflement, fermez immédiatement la valve du gaz. Cela
indique que le raccord comporte une fuite importante.
Corrigez le problème avant de poursuivre.
4.Badigeonnez les raccords suivants de solution savonneuse :
ou d'autres accessoires sur votre grille.
• L'appareil d'utilisation extérieure du gaz n'est pas conçu pour
être installé sur ou dans un bateau.
• L'appareil d'utilisation extérieure du gaz n'est pas conçu pour
être installé sur ou dans un VR.
• Ne tentez jamais de raccorder ce gril au système de GPL
autonome d'une tente-caravane ou d'une autocaravane.
Consignes de sécurité
• Lorsque vous n'utilisez pas le gril, mettez tous les boutons de
en position d'arrêt et retirez le tuyau de gaz de la prise de
déconnexion rapide.
• Ne déplacez jamais le gril lors de l'utilisation ou pendant
qu'il est encore chaud.
• Certaines surfaces seront chaudes pendnat l’utilisation de
l’appareil. Utilisez des ustensiles de cuisson à long manche
et des gants afin d'éviter les brûlures et les éclaboussures.
• Le brûleur latéral et la tablette latérale supportent une charge
maximale de 10 lb.
• Le plateau ou le réservoir d'écoulement de la graisse doit
être en place quand vous utilisez le gril et être vidé après
chaque utilisation. N'enlevez pas le plateau ou le réservoir
d'écoulement de la graisse avant que le gril ne soit
complètement refroidi.
• Si vous remarquez que de la graisse ou qu'une autre matière
chaude s'égoutte du gril sur le tuyau, coupez immédiatement
l'alimentation en gaz. Déterminez l'origine du problème,
corrigez-le, puis nettoyez et inspectez le tuyau avant de
continuer. Effectuez un essai d'étanchéité.
• Nettoyez souvent le gril, de préférence après chaque emploi.
Si une brosse avec soies est employée pour nettoyer les
surfaces de cuisson du gril, assurez-vous qu'aucune soie ne
reste sur les surfaces avant de procéder à la cuisson. Il est
déconseillé de nettoyer les surfaces de cuisson alors que le gril
est chaud.
• Gardez les orifices du cylindre (chariot du gril) dégagés et libres
de tout débris.
• Ne rangez pas d'objets ou de matériaux à l'intérieur du chariot
du gril et contribuant à bloquer la circulation d'air dans la partie
inférieure du tableau de commande ou de la cuvette du foyer.
• En cas de problème avec votre gril, consultez la section
«Dépannage».
REMARQUE: bordure de la
tablette du brûleur latéral et
d'autres parties non
représentées pour plus de
clarté.
REMARQUE : Votre gril peut
ne pas avoir un brûleur de
côté d'étagère.
13
AVERTISSEMENT
Pour utiliser votre gril en toute sécurité et pour
éviter des blessures graves :
• Ne laissez pas les enfants utiliser le gril ou jouer à proximité
de celui-ci.
• Gardez l'espace autour du gril propre et libre de tout matériel
inflammable.
• Ne bouchez pas les trous situés sur les côtés ou à l'arrière
du gril.
• Vérifiez périodiquement les flammes du brûleur.
• Ne vous servez du gril que dans un endroit bien aéré. Ne
l'utilisez JAMAIS dans un endroit fermé comme un abri
d'auto, un garage, un porche, un patio couvert ou sous toute
surface surplombante quelle qu'elle soit.
• N'utilisez pas de charbon ni de briquettes en céramique dans
un gril à gaz.
• Ne couvrez pas les grilles avec des feuilles d'aluminium ou
tout autre matériau. Cela empêchera la ventilation du brûleur
et sera à l'origine de conditions potentiellement dangereuses
pouvant entraîner des dommages matériels ou des blessures
graves.
• Gardez une distance d'au moins 1 m (3 pieds) entre le
gril et tout mur ou surface. Gardez une distance de 3 m
(10 pi) entre le gril et tout objet inflammable ou toute
source d'ignition telle que la veilleuse d'un chauffe-eau, un
appareil électroménager sous tension, etc.
1 m
• N'essayez JAMAIS d'allumer un brûleur lorsque le
couvercle du gril est fermé. Une accumulation de gaz
non brûlé à l'intérieur d'un gril fermé constitue un
danger.
1 m
Allumage
• Ne pas se pencher sur le gril au moment de l'allumage.
1. Tourner le bouton de commande du brûleur à gaz vers
(«arrêt »).
2. Ouvrir le couvercle avant de l'allumer l'appareil ou du
réallumer.
3. Allumez le gaz à la source.
4. Pour allumer, pousser et tourner le bouton vers HAUTE.
Pousser et tenir aussitôt le bouton d'ALLUMAGE
ÉLECTRONIQUE jusqu'à l'allumage du brûleur.
5. Si l'appareil ne s'allume pas en 5 secondes, fermez le
robinet du brûleur, attendez 5 minutes, et procédez de
nouveau à l'allumage.
6. Répéter les étapes de 4 à 5 pour allumer les autres
principaux brûleurs.
AVERTISSEMENT
Fermez les boutons de contrôle et le gaz de la source
d'alimentation quand l'appareil n'est pas utilisé.
ATTENTION
Si le brûleur ne s'allume PAS dans les 5 secondes, mettez
tous les boutons de contrôle des brûleurs en position
d'arrêt, attendez 5 minutes, puis répétez la procédure
d'allumage. Si le brûleur ne s'allume pas lorsque la valve
est ouverte, le gaz continuera de s'échapper du brûleur et
pourrait s'enflammer accidentellement et causer des
blessures.
Allumage avec une allumette
• Ne pas se pencher sur le gril au moment de l'allumage.
1. Tourner le bouton de commande du brûleur à gaz vers
(« arrêt »).
2. Ouvrir le couvercle avant de l'allumer l'appareil ou du
réallumer.
3. Allumez le gaz à la source.
4. Placez l'allumette dans le support d'allumette (pendant du
panneau latéral du gauche du gril). Allumez l'allumette ;
allumez alors le brûleur en plaçant l'allumette par le trou de
lumière d'allumette du gauche du gril. Pousser
immédiatement et tournez le bouton du brûleur à l'extrême
gauche en position maximale. Assurez-vous que le
brûleur s'est allumé et qu'il le reste.
5. Allumez les brûleurs adjacents un après l'autre en
enfonçant et en tournant les boutons correspondants sur la
position maximale.
• Résidents d'appartements :
Renseignez-vous auprès de l'administration pour
connaître quelles sont les exigences et les codes
d'incendie applicables à l'utilisation d'un gril à gaz dans
votre immeuble. Si l'utilisation du gril est permise, utilisezle à l'extérieur au rez-de-chaussée à une distance de 1 m
(3 pi) des murs ou des rampes. Ne l'utilisez pas sur un
balcon ou en dessous de celui-ci.
14
 Loading...