


SMARTenna
™
USER GUIDE
GUÍA PARA EL
USUARIO
CM3000HD
MODE
D’EMPLOI

This page intentionally left blank.

Table of Contents
Product Overview ........................................................................................2
Package Contents and Accessories ......................................3
Danger Information ....................................................................................4
CM3000HD Installation Instructions
Indoor Use, Table Top ........................................................................6
Outdoor Use, Wall Mounting ......................................................7
Outdoor Use, Mast Mounting ....................................................9
Operating Instructions ..........................................................................10
Features and Benefits ...........................................................................11
Customizing Your SMARTenna .....................................................11
Product Return Policy and Warranty ...................................12
Índice
Perspectiva general del producto ........................................14
Contenido del paquete y accesorios ...............................14
Información sobre peligros .............................................................15
Instrucciones de instalación de la CM3000HD
Interiores, sobremesa .......................................................................17
Uso en Exteriores, Montaje en Pared ............................18
Uso en Exteriores, Montaje en Mástil .............................20
Instrucciones de Operación ..........................................................22
Características y Beneficios ...........................................................22
Personalizar su SMARTenna ............................................................22
Garantía y póliza para la devolución
del producto ............................................................................................23
Index
Présentation du Produit ......................................................................25
Contenu et Accessoires de L'emballage .......................26
Conseils de Sécurité ...............................................................................26
Instructions D'installation CM3000HD a
Utilisation intérieure, Support ...................................................29
Utilisation à L'extérieur, Montage Mural .....................30
Utilisation à L'extérieur, Montage du Mât ................32
Mode d'emploi .............................................................................................33
Particularités et données techniques..................................34
Personnalisation de Votre SMARTenna .............................34
Politique de reprise de marchandise
et garantie ..................................................................................................35
1
CM3000HD Outdoor & Indoor 360° Signal
Reception Antenna
Antena de Recepción de señal a 360°,
para interiores y exteriores
Reception du signal d’antenne à 360 °
en Extérieur & en Intérieur
360˚
TV SIGNAL RECEPTION
RECEPCIÓN DE SEÑAL DE TV a 360°
RÉCEPTION DU SIGNAL TV à 360 ˚
CM-3000HD
Product Overview
The Channel Master CM3000HD is a unique new
digital HDTV antenna designed for indoor or outdoor
installations. It is engineered to be easy to install in
any location to meet your needs. Every antenna is
made of the finest components to exceed consumer
expectations. That means peace of mind for years to
come.
2
SMAR Ten n a
™

Product Features
• Designed for both indoor and outdoor installations
• Excellent for HDTV reception
• Easy installation indoors or outdoors
• Omni directional performance
• UV stabilized plastics and weather resistant design
• Can be painted to match the décor of your home
Package Contents and Accessories
1. Antenna Unit
2. Four Table top feet for indoor use
3. Four (10 mm) self-tapping screws for attaching the feet
to the antenna unit
4. Mast/Wall mount for outdoor use
5. Four (55 mm) self-tapping screws for wall mounting
6. Two U-bolts and four butterfly nuts for mast mounting
7. Two (15mm) self-tapping screws for attaching the
outdoor metal mount to the antenna unit.
8. Two (10mm) round head square neck screws for
outdoor metal mount
9. Connector weather boot
10. 90 degree F-type adapter
3
WATCH FOR WIRES!
You can be KILLED if
this antenna comes near
electric power lines!
READ INSTRUCTIONS
WARNING AND SAFETY
INFORMATION
Please read this user's manual before operating this
product. The information contained in this document
is subject to change without notice. Features or
specifications may be different depending on the type
of product model purchased.
4
SMAR Ten n a
™

Follow These Procedures for the
Safest Installation
1. Perform as much antenna assembly on the ground as
possible.
2. Watch out for overhead power lines. Check the
distance to the power lines before you start installing.
WE RECOMMEND YOU STAY A MINIMUM OF TWICE THE
MAXIMUM LENGTH OF THE ANTENNA ASSEMBLY AWAY
FROM ALL POWER LINES.
3. Do not use a metal ladder.
4. Remember, even the slightest touch of an antenna to
a power line can cause a fatal shock.
5. Do NOT try to do the job on a windy day.
6. Have a friend as a spotter when you’re on the roof.
They can see things you can’t.
7. If you start to drop an antenna, move away from it
and let it fall.
8. If any part of the antenna should come into contact
with a power line CALL YOUR LOCAL POWER
COMPANY! DO NOT TRY TO REMOVE IT YOURSELF! They
will remove it safely.
9. Mast, lead-in, and metal guy wires are excellent
conductors of electrical current - - keep them away
from power lines too.
10. Be sure your family and friends understand the danger
of touching an overhead power line. Tell them never
to try to remove any object in contact with a power
line (TV antenna, mast or anything else).
11. Make sure that the antenna mast assembly is properly
grounded.
For more information, visit www.channelmaster.com/
support.
5
CM-3000HD Installation Instructions:
Screws
Tornillos
Vis
Coaxial Cable
Cable coaxial
Câble coaxial
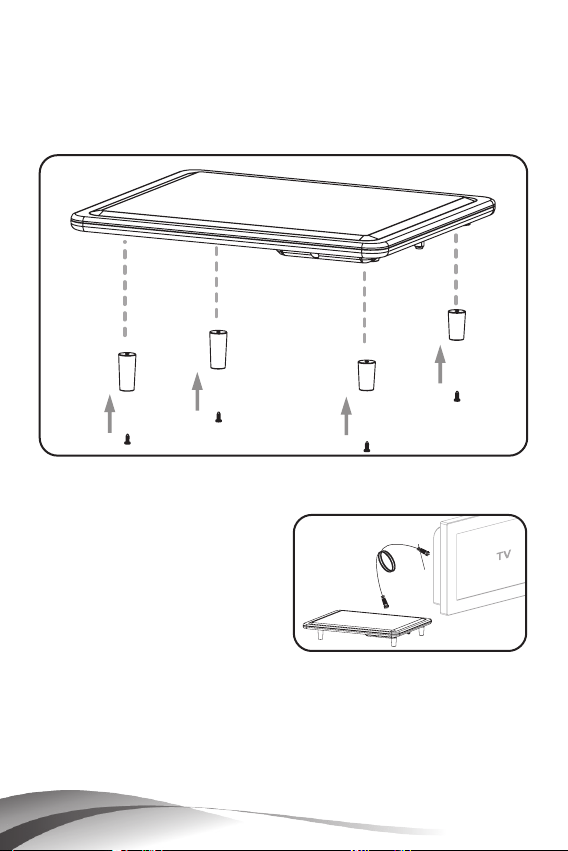
Indoor Use, Table Top:
1. Attach the plastic feet (Fig. 1) to the antenna unit
using the four (10 mm) screws provided.
Figure 1
2. Place the CM3000HD on a counter near the TV set.
3. Connect the F
connector from one
end of a coaxial jumper
to the F connector on
the antenna. Connect
the F connector from
the other end of a
coaxial jumper to the F
connector on the TV set or Set Top Box/DVR (Fig. 2).
4. Adjust the position of the antenna as necessary to get
the strongest signals (see Operating Instructions on
page 10).
5. Installation is now complete.
6
Figure 2
SMAR Ten n a
™
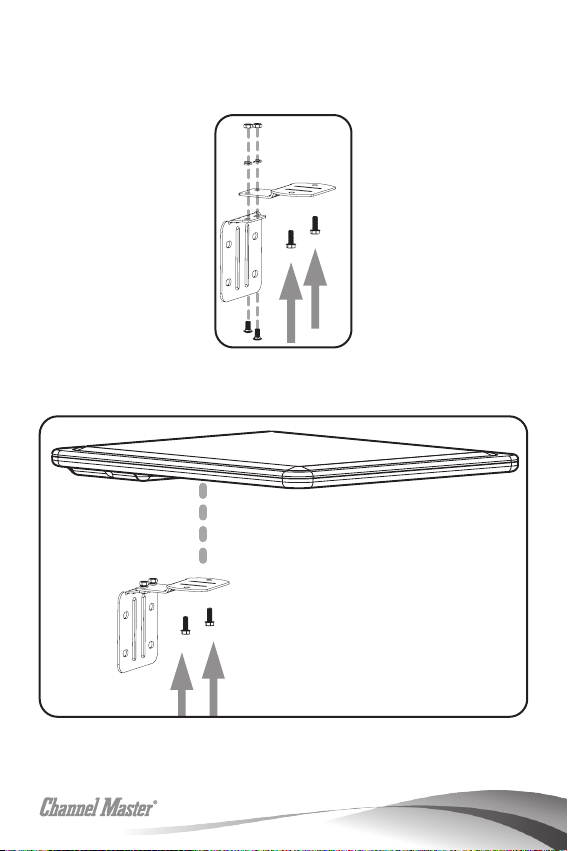
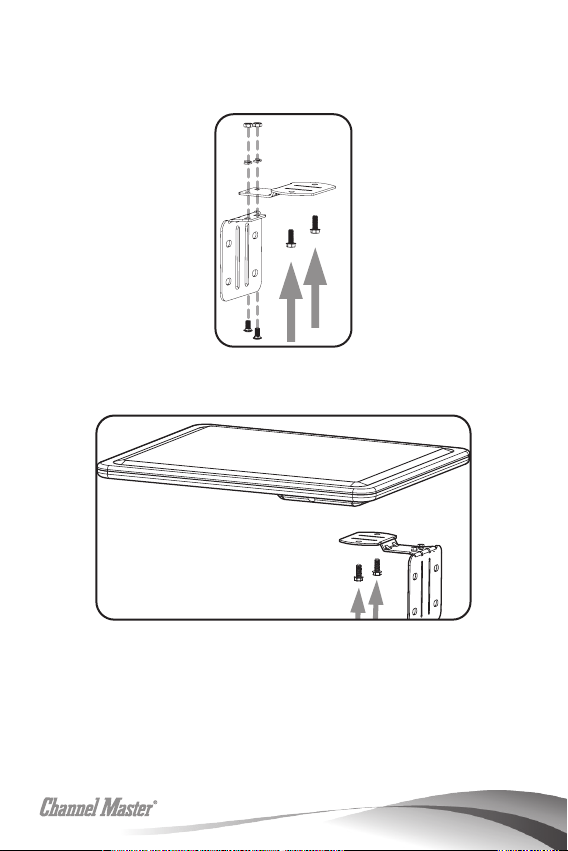
Outdoor Use, Wall Mounting:
1. Assemble the metal mount (Fig. a) using the two (10
mm) round head screws provided.
Figure a
2. Attach the metal mount (Fig. 3) to the antenna unit
using the two (15 mm) screws provided.
Figure 3
7
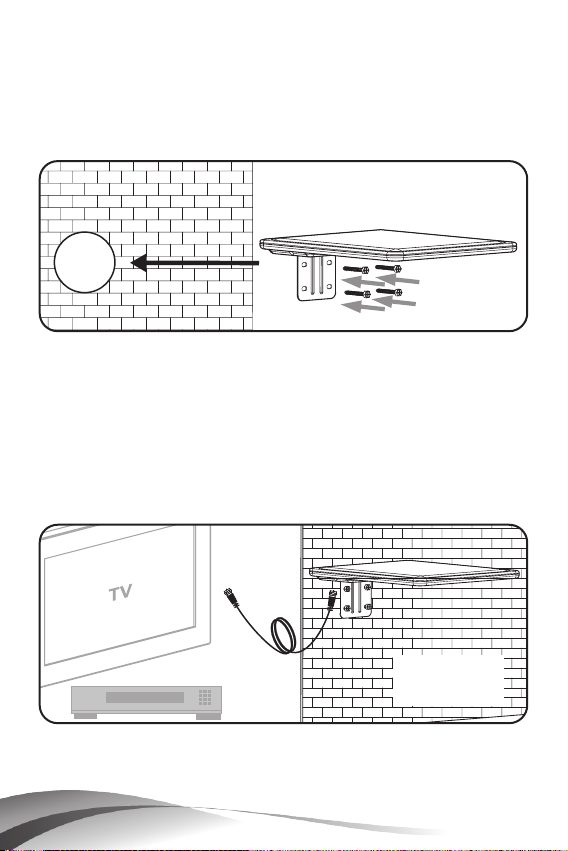
3. Determine the location on the wall where the antenna
is to be mounted, preferably on the side of the house
facing the TV station transmitters.
4. Attach the antenna to the house using the four (55
mm) self-tapping screws provided (Fig. 4).
Figure 4
5. Run coaxial cable between the TV set location and
the CM3000HD antenna and attach F connectors to
both ends of the cable.
6. Attach the connector on the antenna end of the
cable to the CM3000HD.
7. Attach the connector on the TV set end of the cable
to the TV set or Set Top Box/DVR. (Fig. 5)
8. See Operating Instructions on page 10.
9. Installation is now complete.
8
Figure 5
SMAR Ten n a
™
Outdoor Use, Mast Mounting:
1. Assemble the metal mount (Fig. a) using the two (10
mm) round head screws provided.
Figure a
2. Attach the metal mount to the antenna unit using the
two 0.6” (15 mm) screws provided (Fig. 6).
Figure 6
3. Using the instructions provided with the mast and/or
mast mount, install the mast on the house, preferably
on the side of the house facing the TV station
transmitters.
9
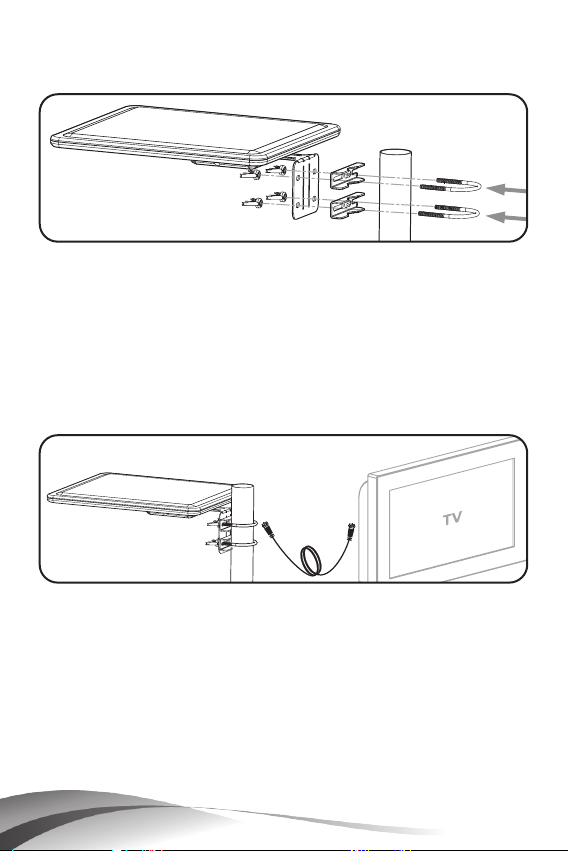
4. Attach the antenna to the mast using the two U-bolts
and four butterfly nuts provided (Fig. 7).
Figure 7
5. Run coaxial cable between the TV set location and
the CM3000HD antenna and attach F connectors to
both ends of the cable.
6. Attach the connector on the antenna end of the
cable to the CM3000HD.
7. Attach the connector on the TV set end of the cable
to the TV set or Set Top Box/DVR (Fig. 8).
Figure 8
8. Adjust the position of the antenna as necessary to get
the strongest signals (see Operating Instructions below).
9. Installation is now complete.
Operating Instructions:
For best reception, please consider the following
conditions:
10
SMAR Ten n a
™
 Loading...