

Changhong Electric LED40D1100ISX, LED50D3000ISX, LED55D3000ISX, UHD55C5500ISX, UHD42C5500ISX2 Operation Manual
TV
Operation Manual
Tel: 00 42 (0) 24 24088 49
Fax : 0042 (0 ) 22095 1190
Ser vice E- mail: i nfo@c hangh ongeu rope. cz
Web s ite: w ww.cha nghon geuro pe.co m
CH ANG HON G EUR OPE E LEC TRI C S.R .O
.
Argentinská 286/38, 170 00 Praha 7, Czech Republic
Model: LED40D1100ISX
40
Z
EN
SK
C
(
)


Contents
Warning…………………………………………………….…………………………1
Safety instructions………………………………………………………………….4
Main Unit Control………………………………………………………….............6
Getting Started………………………………………………………………………8
Connection and setup……………………………………………………………...9
Remote Control……………………………………………………………….........10
Basic Operation……………………………………………………………....……12
Menu Operation…………………………………………………………………….15
Teletext………………………………………………………………………………49
Troubleshooting Guide…………………………………………………………...50
E
nglish
Warning
1
E
ngli
sh
WARNING:
REGULATORY INFORMATION
This equipment generates uses and can radiate radio frequency energy and, if not
installed and used in accordance with the instructions, may cause harmful
interference to radio communication. However, there is no guarantee that
interference will not occur in a particular installation. If this equipment does cause
harmful interference to radio or television reception, which can be determined by
turning the equipment off and on, the user is encouraged to try to correct the
interference by one or more of the following measures:
CAUTION
RISK OF ELECTRIC SHOCK
DO NOT OPEN
TO REDUCE THE RISK OF ELECTRIC SHOCK DO NOT REMOVE
COVER (OR BACK). NO USER SERVICEABLE PARTS INSIDE. REFER
TO QUALIFIED SERVICE PERSONNEL.
The lightning flash with arrowhead symbol, within an equilateral triangle,
is intended to alert the user to the presence of uninsulated "dangerous
voltage" within the products enclosure that may be of sufficient
magnitude to constitute a risk of electric shock to persons.
The exclamation point within an equilateral triangle is intended to alert the
user to the presence of important operating and maintenance (servicing)
instructions in the literature accompanying the appliance.
-Relocate the receiving antenna.
-Increase the separation between the equipment and receiver.
-Connect the equipment into an outlet on a circuit different from that to which the
receiver is connected.
-Consult the dealer or experienced radio/TV technician for help.
Any changes or modifications not expressly approved by the party responsible
for compliance could void the user's authority to operate the equipment.
CAUTION
DO not attempt to modify this product in any way without written authorization from
supplier. Unauthorized modification could void the user's authority to operate this
product.
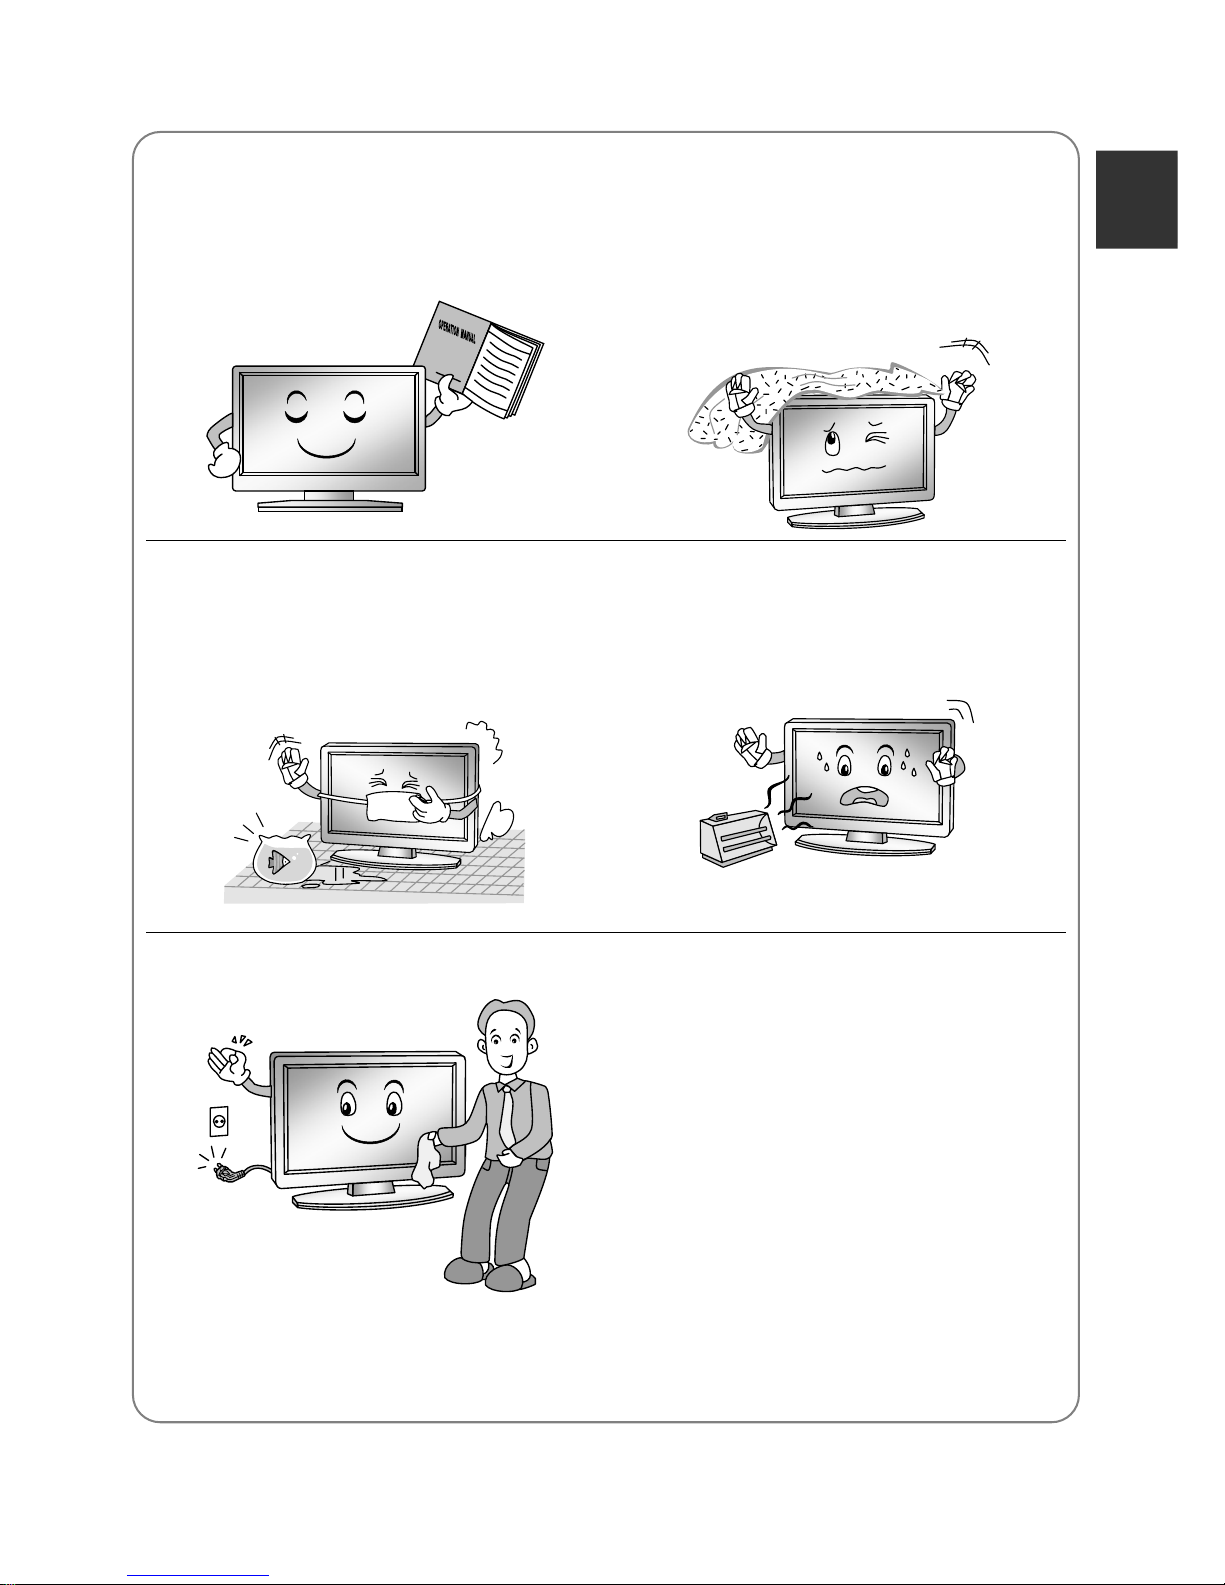
It is not recommended to keep a certain still image displayed on the screen for a
long time as well as displaying extremely bright images on screen.
Figures and illustrations in this User Manual are provided for reference only
and may differ from actual product appearance. Product design and
specifications may be changed without notice.
Warning
2
WARNING
To Reduce The Risk Of Fire Or Electric Shock, Do Not Expose This Apparatus To
Rain Or Moisture.
The ventilation should not be impeded by covering the ventilation openings with
items, such as newspapers, table-cloths, curtains, etc.
The Apparatus shall not be exposed to dripping or splashing and that no objects
filled with liquids, such as vases, shall be placed on the apparatus.
Attention should be drawn to the environmental aspects of battery disposal. Don’t
throw used batteries in dustbin. Please contact your retailer in order to protect the
environment.
When you install your TV, maintain a distance of at least 4 inches between the TV
and other objects (walls, cabinet sides, etc.) to ensure proper ventilation. Failing to
maintain proper ventilation may result in a fire or a problem with the product caused
by an increase in its internal temperature.
No naked flame sources, such as lighted candles, should be placed on the
apparatus.
To prevent the spread of fire, keep candles or other open flames away from this
product at all times.
The device may be malfunction when under electrostatic discharge. It can be
manually resumed by power off and power on again.
E
nglish
CAUTION connecting the Power Cord
Most appliances recommend they be placed upon a dedicated circuit; that is, a
single outlet circuit which powers only that appliance and has no additional outlets
or branch circuits.
Do not overload wall outlets. Overloaded wall outlets, loose or damaged wall
outlets, extension cords, frayed power cords, or damaged or cracked wire
insulation are dangerous. Any of these conditions could result in electric shock or
fire. Periodically examine the cord of your appliance, and if its appearance
indicates damage or deterioration, unplug it, discontinue use of the appliance, and
have the cord replaced with an exact replacement part by an authorized servicer.
Protect the power cord from physical or mechanical abuse, such as being twisted,
kinked, pinched, closed in a door, or walked upon. Pay particular attention to plugs,
wall outlets, and the point where the cord exits the appliance.
The MAINS plug is used as the disconnect device, and the disconnect device shall
remain readily operable.
Operating Temperature: 5°C to 35°C Operating Humidity: ≤80%
Storage Temperature: -15°C to 45°C Storage Humidity: ≤90%
This equipment is a Class Ⅱ or double insulated electrical appliance. It has
been designed in such a way that it does not require a safety connection to
electrical earth.
Warning
3
E
ngli
sh
is a trademark of SRS Labs, Inc. TruSurround HD technology is
incorporated under license from SRS Labs, Inc.
This DivX Certified® device has passed rigorous testing to ensure it plays DivX®
video.
To play purchased DivX movies, first register your device at vod.divx.com. Find
your registration code in the DivX VOD section of MENU-support.
For HD Test Kit 1080p v1.1 and later:
DivX Certified
®
DivX
used under license.
Covered by one or more of the following U.S. patents: 7,295,673; 7,460,668;
7,515,710; 7,519,274.
, DivX Certified® and associated logos are trademarks of DivX, LLC and are
®
to play DivX® video up to HD 1080p, including premium content.
Manufactured under license from Dolby Laboratories.
Dolby and the double-D symbol are trademarks of Dolby Laboratories.
Safety instructions
4
IMPORTANT SAFETY INSTRUCTIONS
E
nglish
1. Read these instructions.
2. Keep these instructions.
3. Heed all warnings.
4. Follow all instructions.
5. Do not use this apparatus near water.
7. Do not block any of the ventilation
openings. Install in accordance with
the manufacturer's instructions.
8. Do not install near any heat source
such as radiators, heat registers,
stoves, or other apparatus (including
amplifiers) that produce heat.
6. Clean only with a dry cloth.
9. Do not defeat the safety purpose of
the polarized or grounding type plug.
A polarized plug has two blades with
one wider than other. A grounding
type plug has two blades and a third
grounding prong. The wide blade or
the third prong is provided for your
safety. When the provided plug does
not fit into your outlet, consult an
electrician for replacement of the
obsolete outlet.
Safety instructions
5
E
ngli
sh
10. Protect the power cord from being
walked on or pinched particularly at
plugs, convenience receptacles,
and the point where they exit from
the apparatus.
11. Only use the attachments/
accessories specified by the
manufacturer.
12. Use only with a cart, stand, tripod,
bracket, or table specified by the
manufacturer, or sold with the
apparatus. When a cart is used, use
caution when moving the cart/
apparatus combination to avoid
injury from tip-over.
13. Unplug this apparatus during
lightning storms or when unused for
long periods of time.
14. Refer all servicing to qualified
service personnel. Servicing is
required when the apparatus has
been damaged in any way, such as
power supply cord or plug is
damaged, liquid has been spilled or
objects have fallen into the
apparatus, the apparatus has been
exposed to rain or moisture, does
not operate normally, or has been
dropped.
ON DISPOSAL
-The fluorescent lamp used in this product contains a small amount of mercury.
-Do not dispose of this product with general household waste.
-Disposal of this product must be carried out in accordance to the regulations of
your local authority.
NOTE
-If the TV feels cold to the touch, there may be a small "flicker" when it is turned on.
This is normal; there is nothing wrong with TV.
-Some minute dot defects may be visible on the screen, appearing as tiny red,
green, or blue spots. However there have no adverse effects on the monitor's
performance.
-Avoid touching the screen or holding your finger(s) against it for long periods of
time. Doing so may produce some temporary distortion effect on the screen.
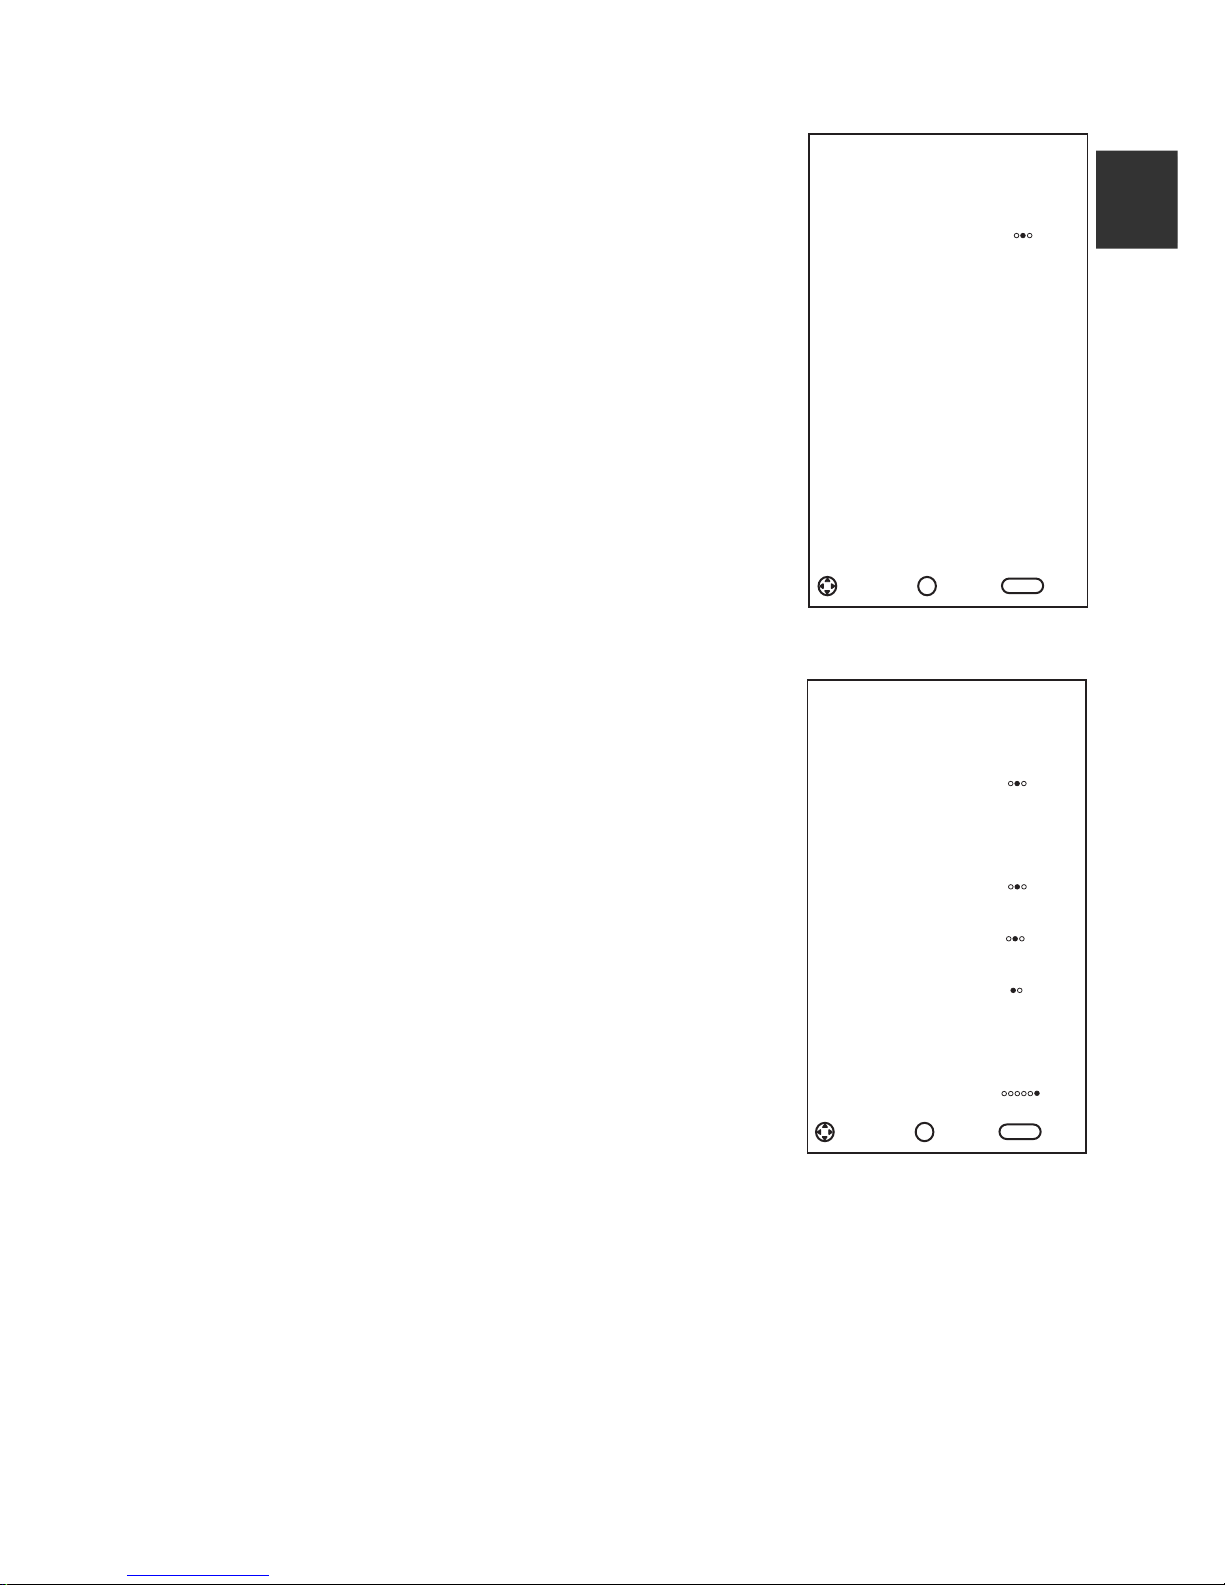
Main Unit Control
6
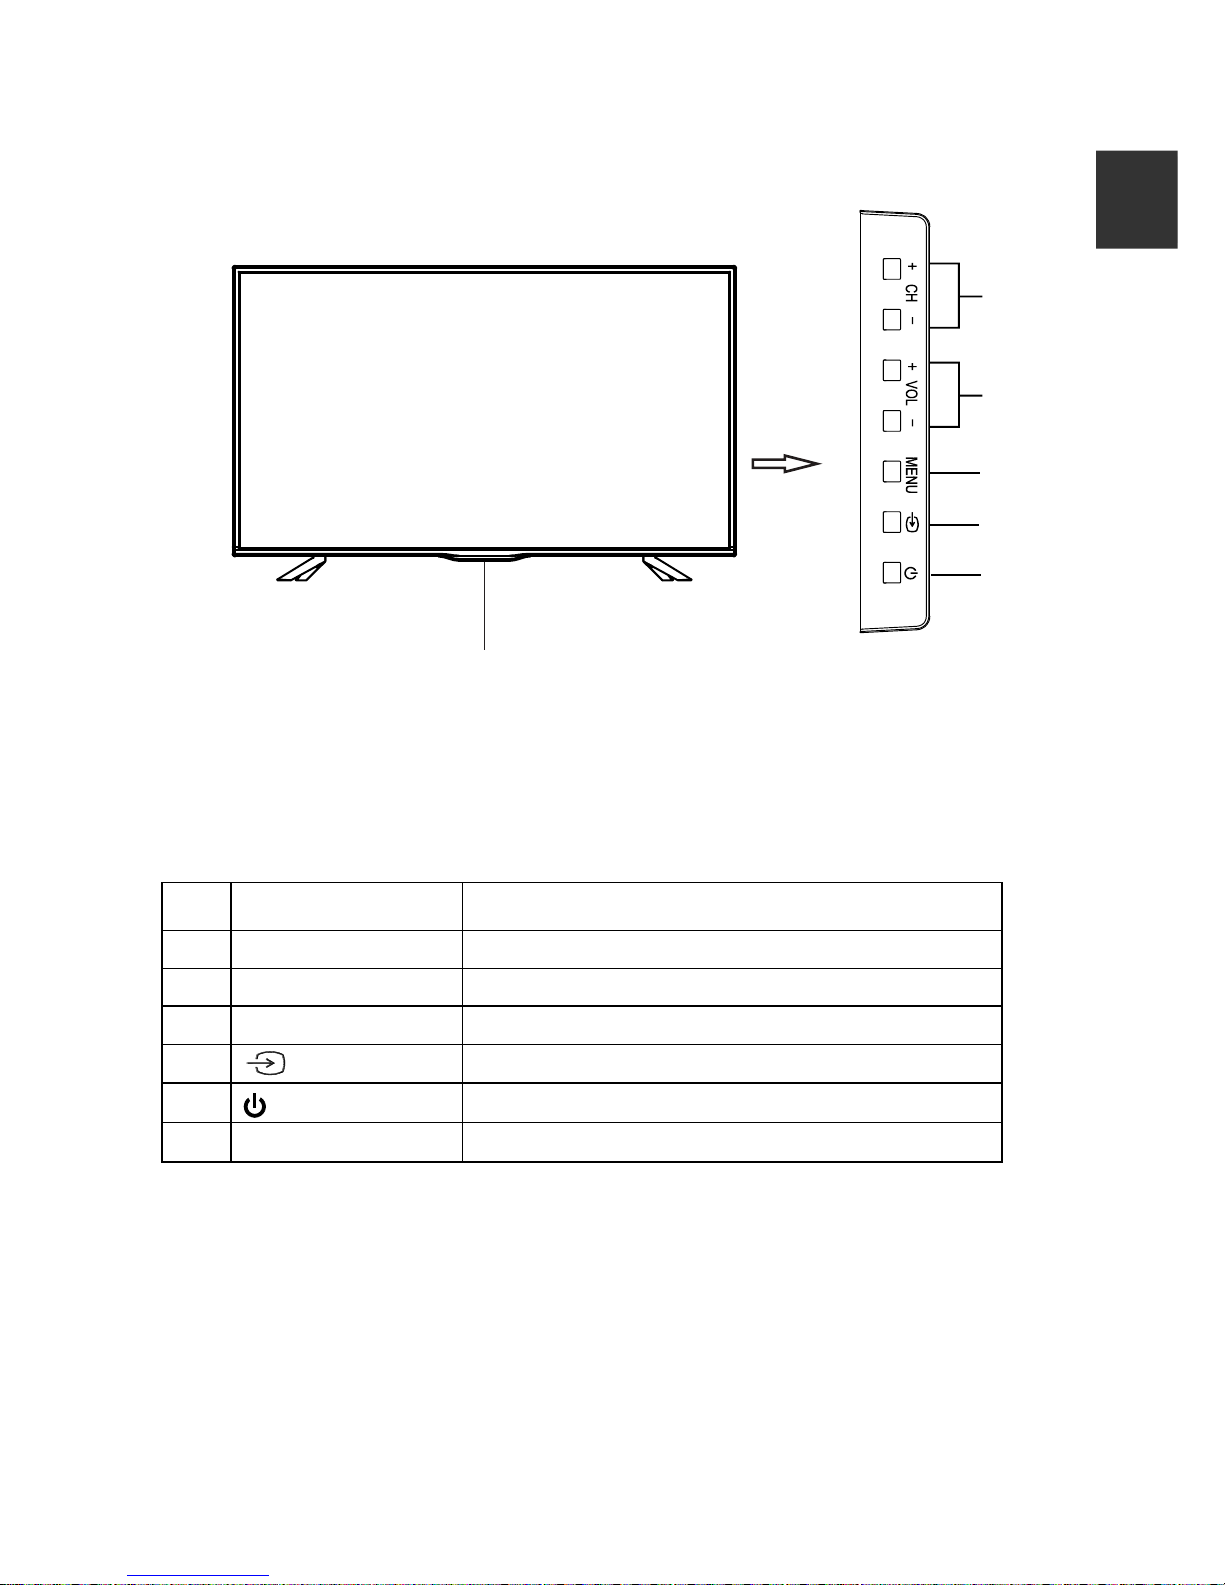
Front Panel
E
nglish
1
2
3
4
5
6
Name Description
No.
1 CH+/CH- Changes the channels.
2 VOL+/VOL- Adjust the volume.
3 MENU Open the menu.
4
5
6
Power & Sensor
To switch among the signal source.
Turns the unit on and off.
Power Indicator and Infrared sensor.
Main Unit Control
7
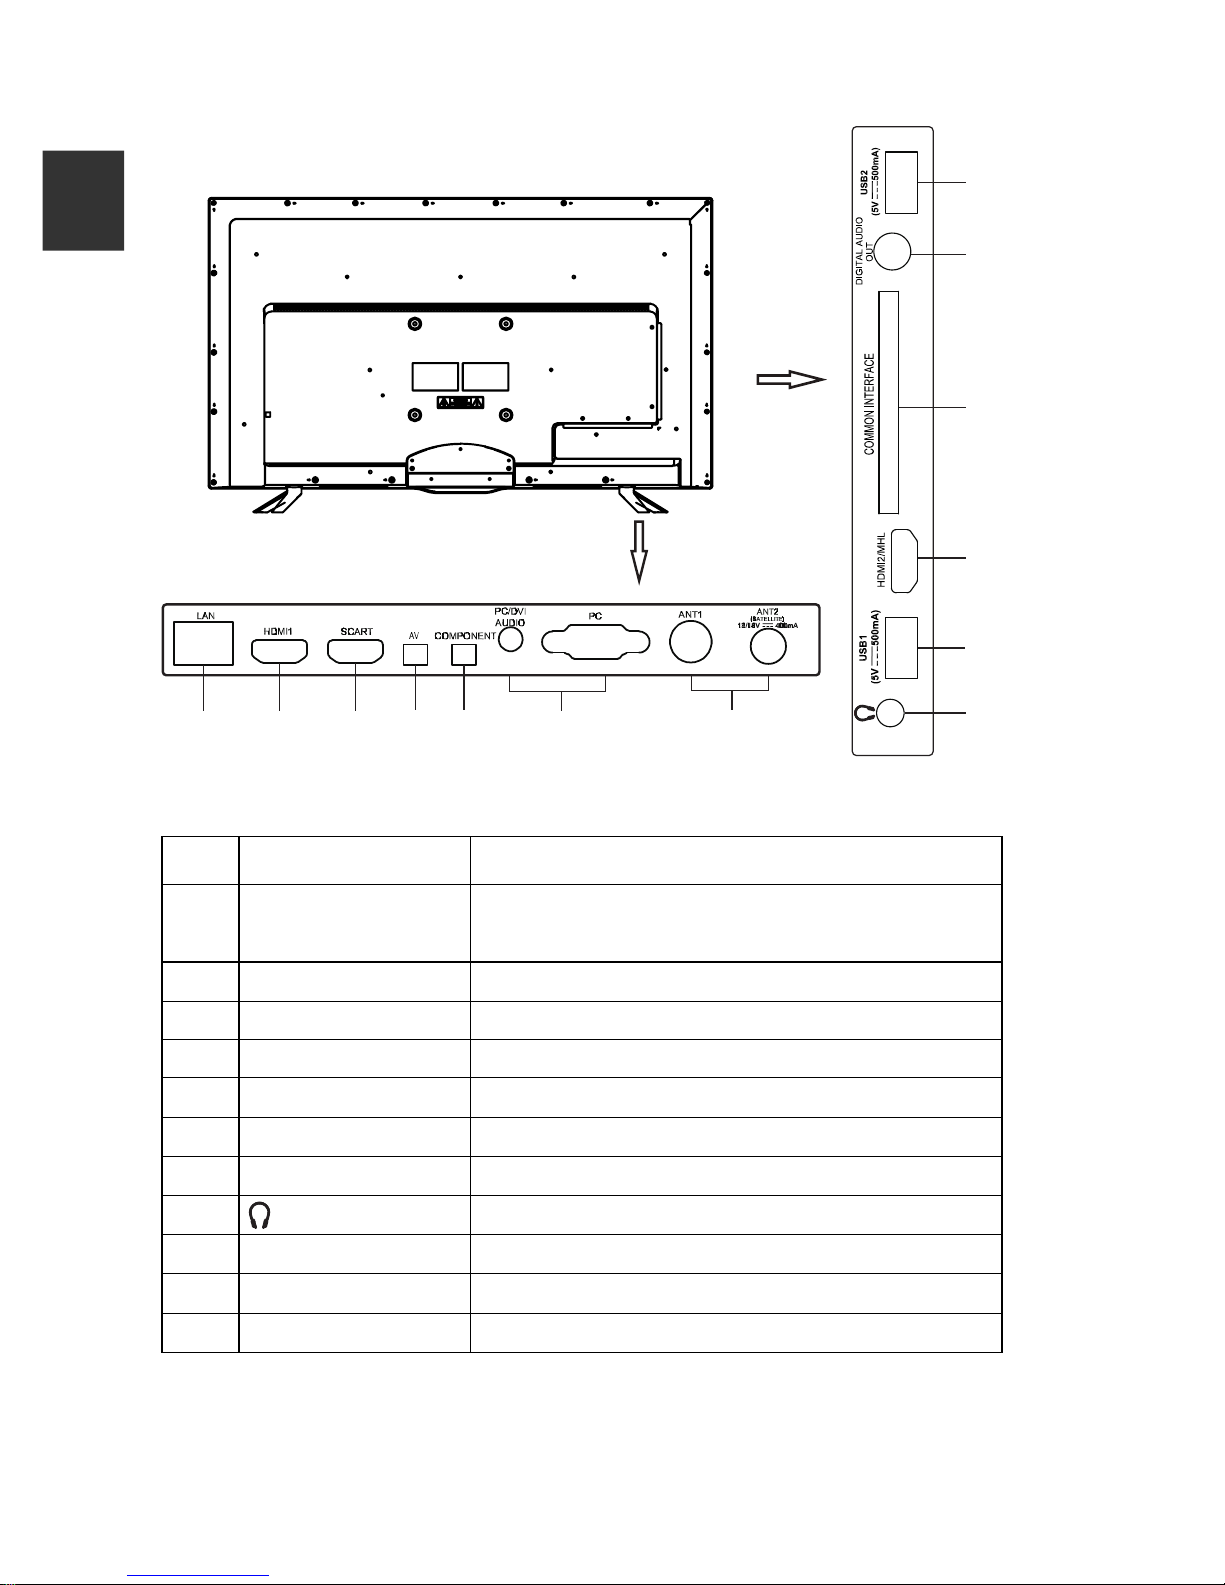
Rear & Sides Panel
E
ngli
sh
15
17
16
8
15
7
8 9 10 11 12 13
No.
Name Description
7 LAN Local area network (LAN) port. Connect a LAN cable
to this port to connect to the Network.
8
HDMI1/2
HDMI input. (HDMI2 and MHL share one port)
9 SCART SCART input/output.
10 AV AV audio/video signal input.
11 COMPONENT Component input.
12
13
14
15
PC/DVI AUDIO-PC
ANT1/2
USB1/2
PC input.
Antenna input.
Ear phone output.
Connector for USB Play.
14
16
17
COMMON INTERFACE
DIGITAL AUDIO OUT
Insert CI card.
Digital audio output.
Getting Started
8
Using the Remote Control
When using the remote control, aim it at remote sensor on the television. If there is an
object between the remote control and the remote sensor on the unit, the unit may not
operate.
• Point the remote control at the REMOTE SENSOR located on the television.
• When using this television in a very brightly lit area, the infrared REMOTE CONTROL
SENSOR may not work properly.
• The recommended effective distance for using the remote control is about 7 meters.
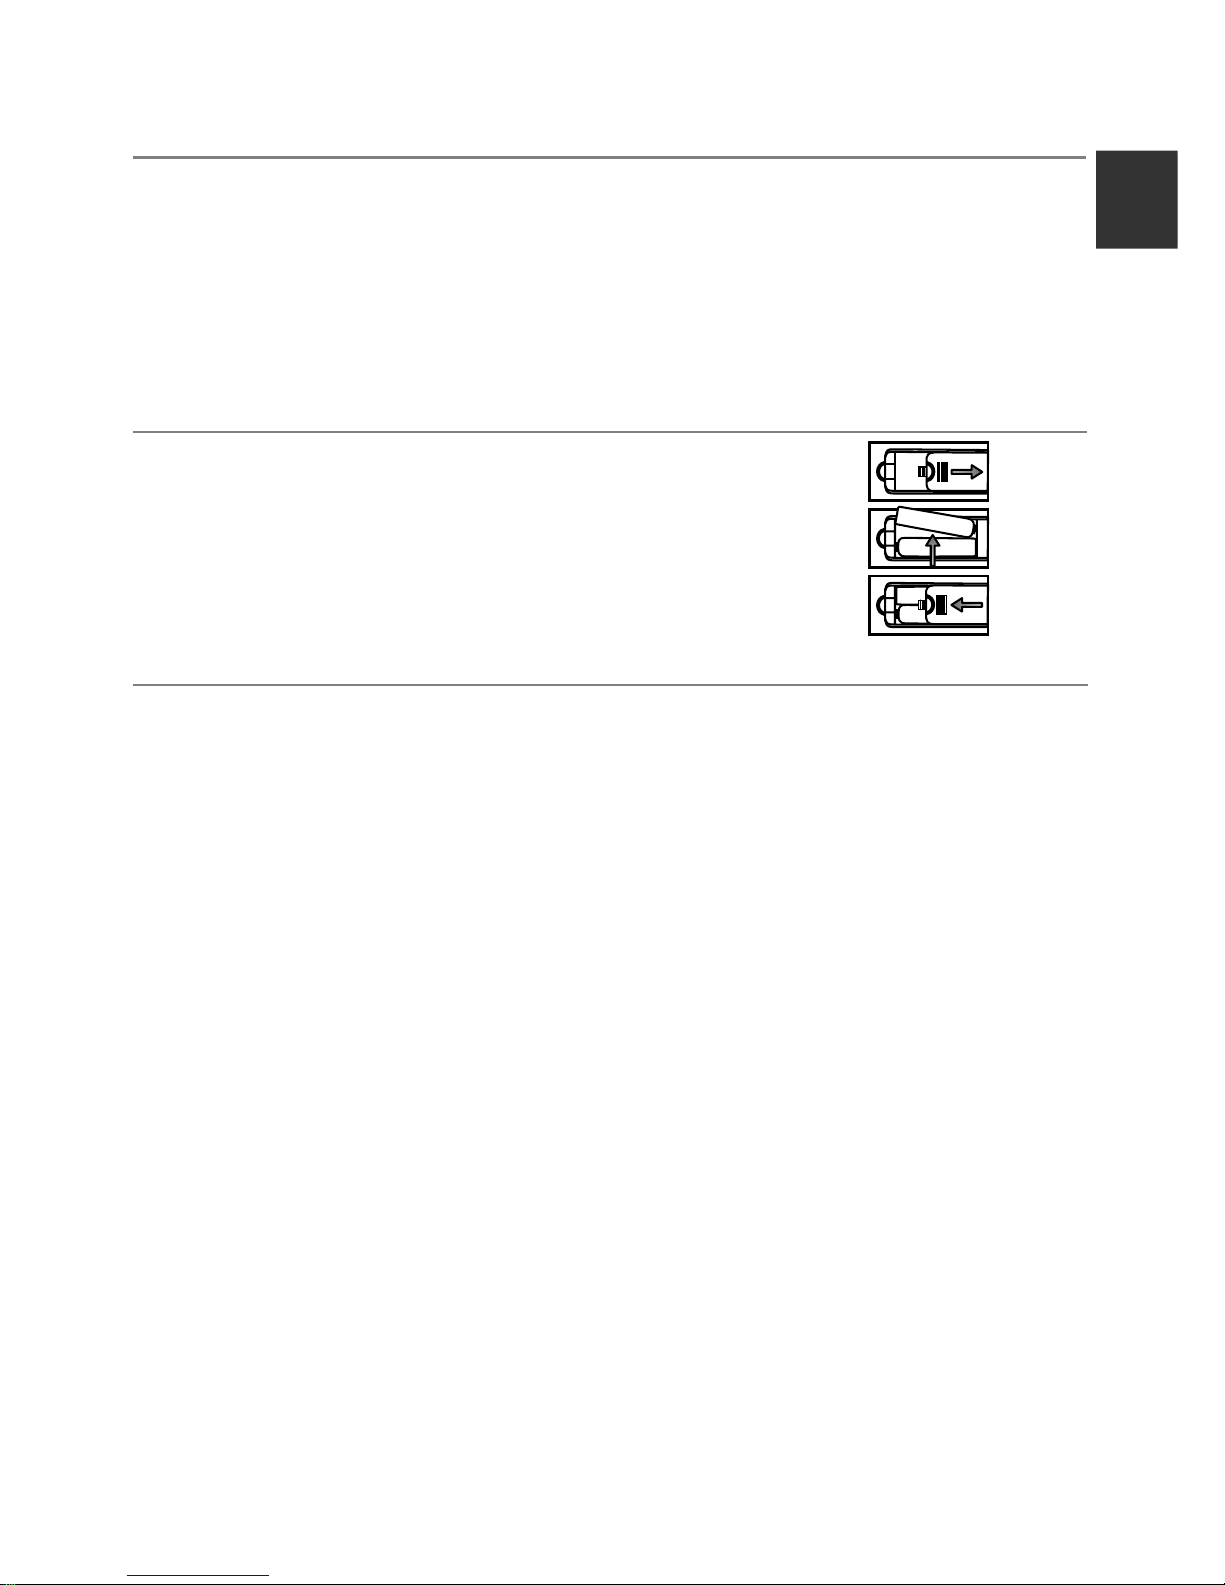
Installing Batteries in the Remote Control
1. Open the cover at the back of the remote control.
2. Install two AAA size batteries. Make sure to match
the “+” and “-” ends of the batteries with the
diagram inside the compartment.
3. Replace the cover.
Battery Replacement
You will need to install the batteries into the remote control to make it operate following
the instruction below.
When the batteries become weak, the operating distance of the remote control will be
greatly reduced and you will need to replace the batteries.
Notes on Using Batteries:
The use of the wrong type of batteries may cause chemical leakage and/or explosion.
Please note the following:
• Always ensure that the batteries are inserted with the + and - terminals in the correct
direction as shown in the battery compartment.
• Different types of batteries have different characteristics. Do not mix different types.
• Do not mix old and new batteries. Mixing old and new batteries will shorten battery life
and/or cause chemical leakage.
• Replace batteries as soon as they do not work.
• Chemicals which leak from batteries may cause skin irritation. If any chemical matter
seeps out of the batteries, wipe it up immediately with a dry cloth.
• The batteries may have a shorter life expectancy due to storage conditions. Remove
the batteries whenever you anticipate that the remote control will not be used for an
extended period.
• The batteries (battery pack or batteries installed) shall not be exposed to excessive
heat such as sunshine, fire or the like.
CAUTION:
• It may result in an explosion if batteries are replaced incorrectly.
• Only replace batteries with the same or equivalent type.
E
nglish

Connection and Setup
9
Cable Installation
E
ngli
Before the installation and use, please read carefully the relevant content in “Warning
and Safety instructions”.
sh
1. Take the TV from the wrapping package and put it in a drafty and flat place.
NOTE:
• When you plug or unplug the TV, computer or other equipment, you must make sure
that the power cable has been already shut down;
• When unplugging the power cable or signal cable, please hold the plug (the insulated
part); do not draw the body of the cable.
2. The RF output terminal can be connected with the RF input port of the TV.
3. The output AV terminal of DVD can be connected with the AV input port of the TV
through AV cable.
NOTE:
• COMPONENT (YPbPr) and AV cannot be used at same time for they share of one
audio channel.
If COMPONENT (YPbPr) and AV works as mini terminal, and shared same audio,
•
please choose to use a one-to-three audio&video cable.
4. The output COMPONENT (YPbPr) terminal of DVD can be connected with the
COMPONENT (YPbPr) input port of the TV through AV cable.
5. Connect one end of the VGA cable with the VGA port on computer, connect the other
end of the VGA cable with the VGA port on the TV, and tighten the bolts clockwise on
the each end of VGA cable.
NOTE:
• While connecting the 15-pin VGA, please do not insert the plug overexerted, for fear
the pin might be broken.
6. Connect one end of the HDMI cable with HDMI output port, connect the other end of
the HDMI cable with the HDMI port on the TV.
NOTE:
• While connecting the HDMI, please aim at carefully, do not insert overexerted, for fear
the pin might be broken.
7. Connect SCART socket input or output from an external device to these jacks
8. Sending the TV's audio signal to external audio equipment via the Digital Audio
Output port.
9. Check and make sure that all AV cables are connected with the corresponding ports
correctly.
10. Connect the power cable with 100-240V~ power supply.
NOTE:
• The range of power input for the TV is 100-240V~ 50/60Hz; do not connect the TV
power input port with the power cable out of the above range.
• Please hold the insulated part of the plug when you are unplugging the power cable,
do not touch directly the metallic part of the cable.
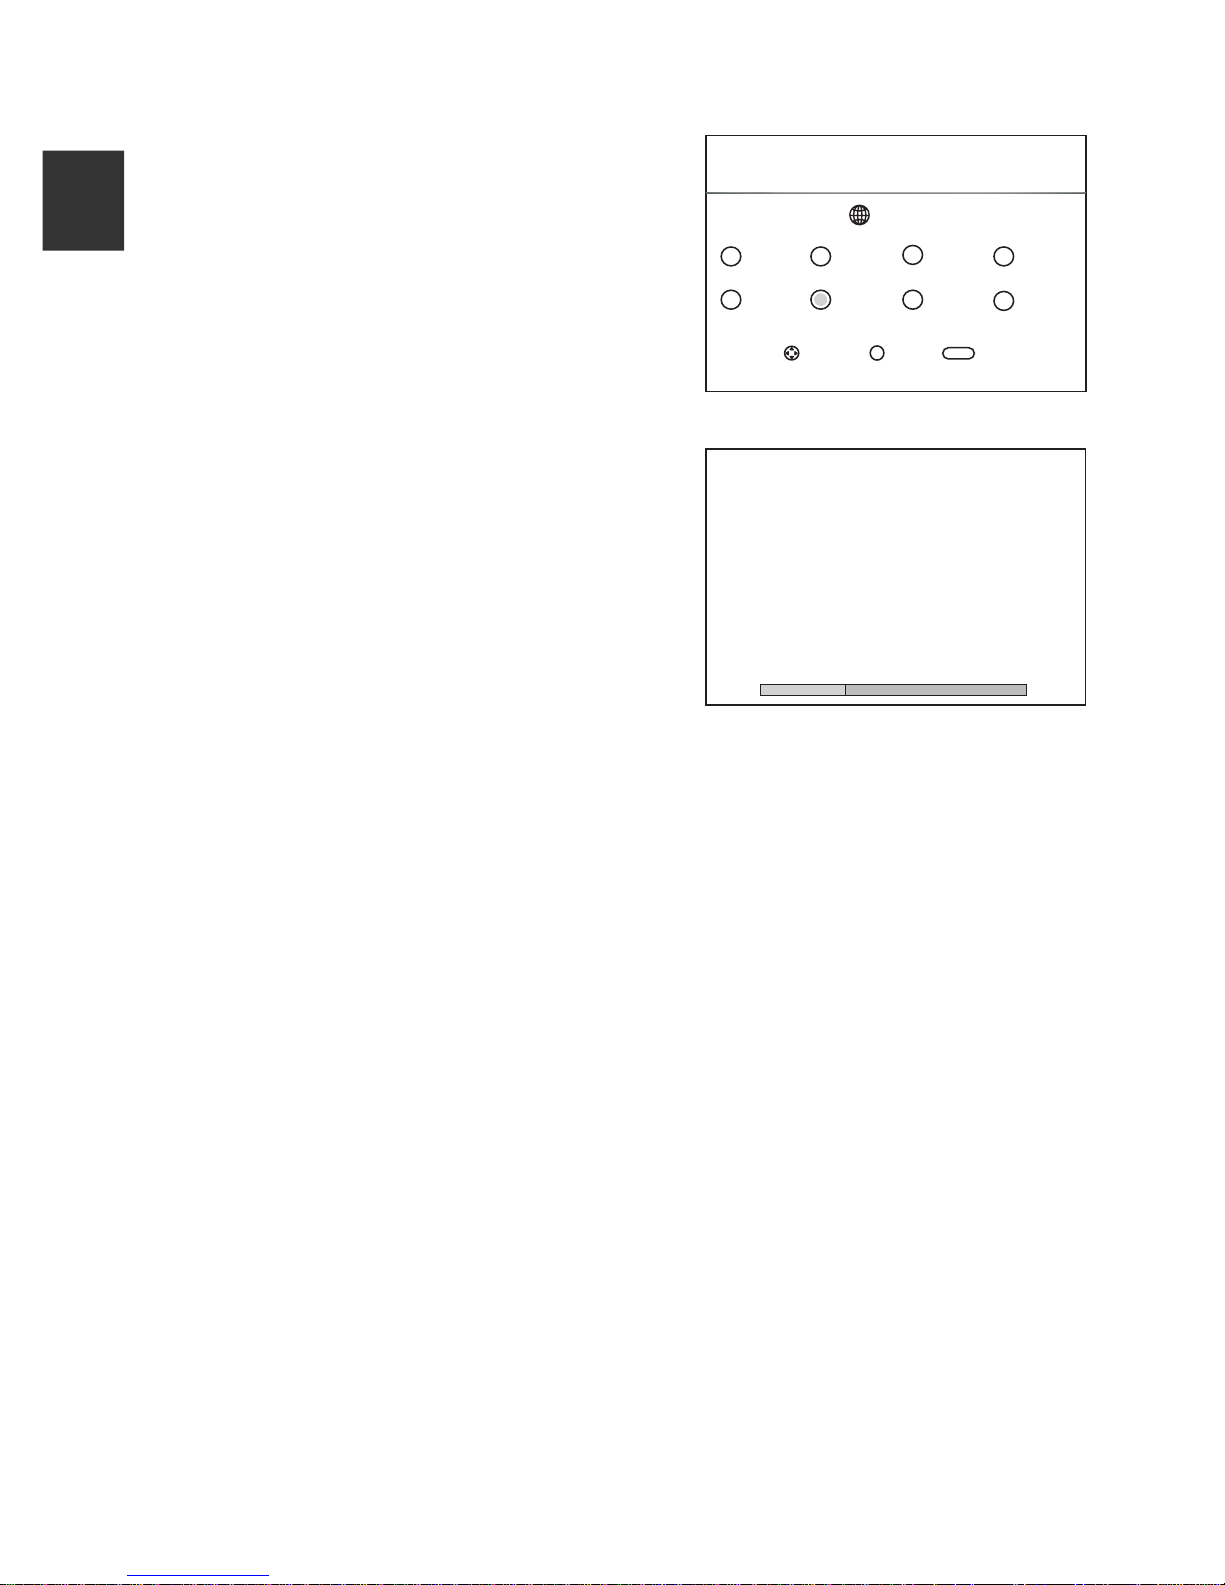
Remote Control
10
The buttons of the original remote control are as following:
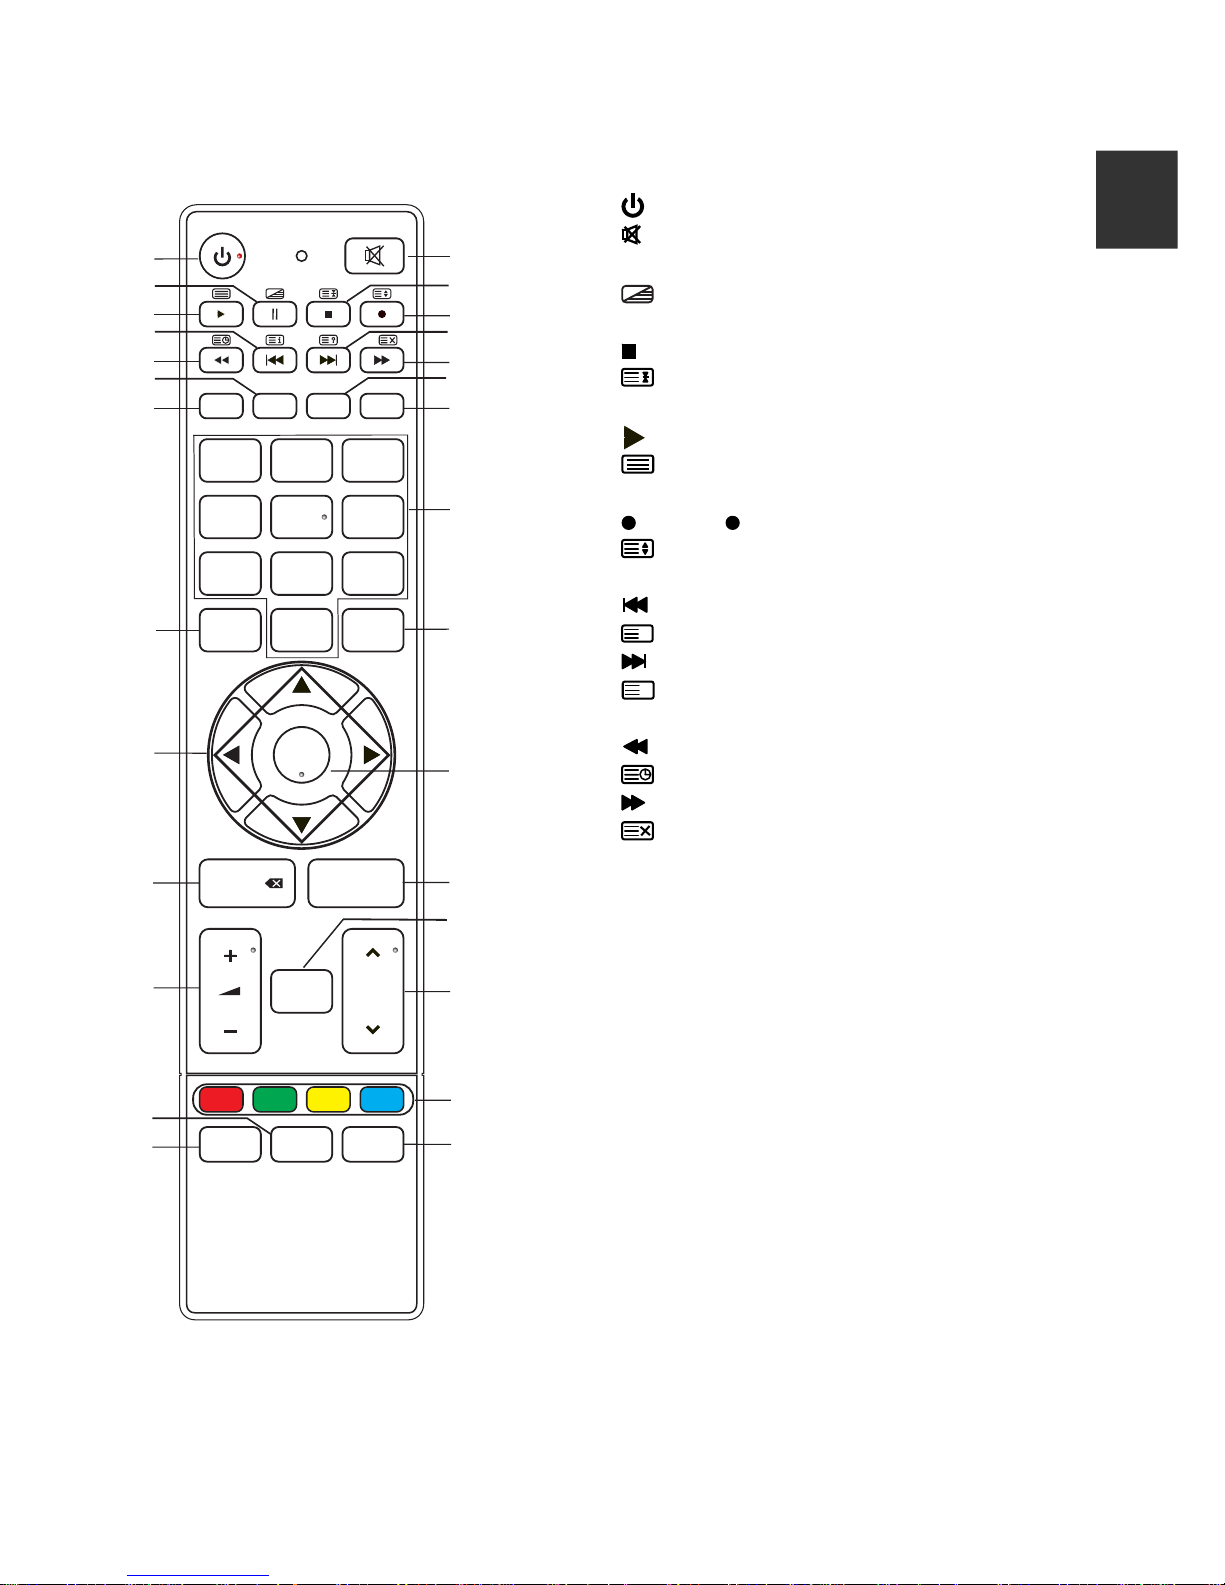
: Power, switch on or off TV set.
: Press to mute or restore sound.
: Press to enter the MIX mode in
the teletext.
: Stop (in USB/PVR mode).
: Hold the teletext page on display,
press again to release.
: Play (in USB/PVR mode).
: Enter the Teletext, and press this
button again to exit.
: Press button to start recording.
1
3
5
7
9
11
13
INFO EPG ANT
1 2
4
5
TOOLS
3
6
10
12
14
15
1.
2
4
6
8
2.
3. II: Pause (in USB/PVR mode).
4.
5.
6.
: Change size of teletext screen in
16
7 8 9
MENU
0
EXIT
17
display mode.
7.
8.
: Previous (in USB mode).
i
: Go to the index page.
: Next (in USB mode).
?
: Reveal the hidden information of
some teletext pages.
18
OK
19
9.
10.
: Fast reverse (in USB mode).
: Enter subtitle mode or subpage.
: Fast forward (in USB mode).
: Cancel the teletext but not to exit
20
BACK /
HOME/
SOURCE
21
23
teletext, press again to exit.
11. EPG: Electronic Programme Guide,
use in the DTV mode.
12. ANT: Press to select an antenna
22
APPS
P
24
source.
13. INFO: Press to display the current
program information on the screen.
14. TOOLS: Press to display the Tools
menu.
15. NUMBER BUTTONS: Choose
channels or password importation.
26
27
3D
LIST FAV
25
28
E
nglish
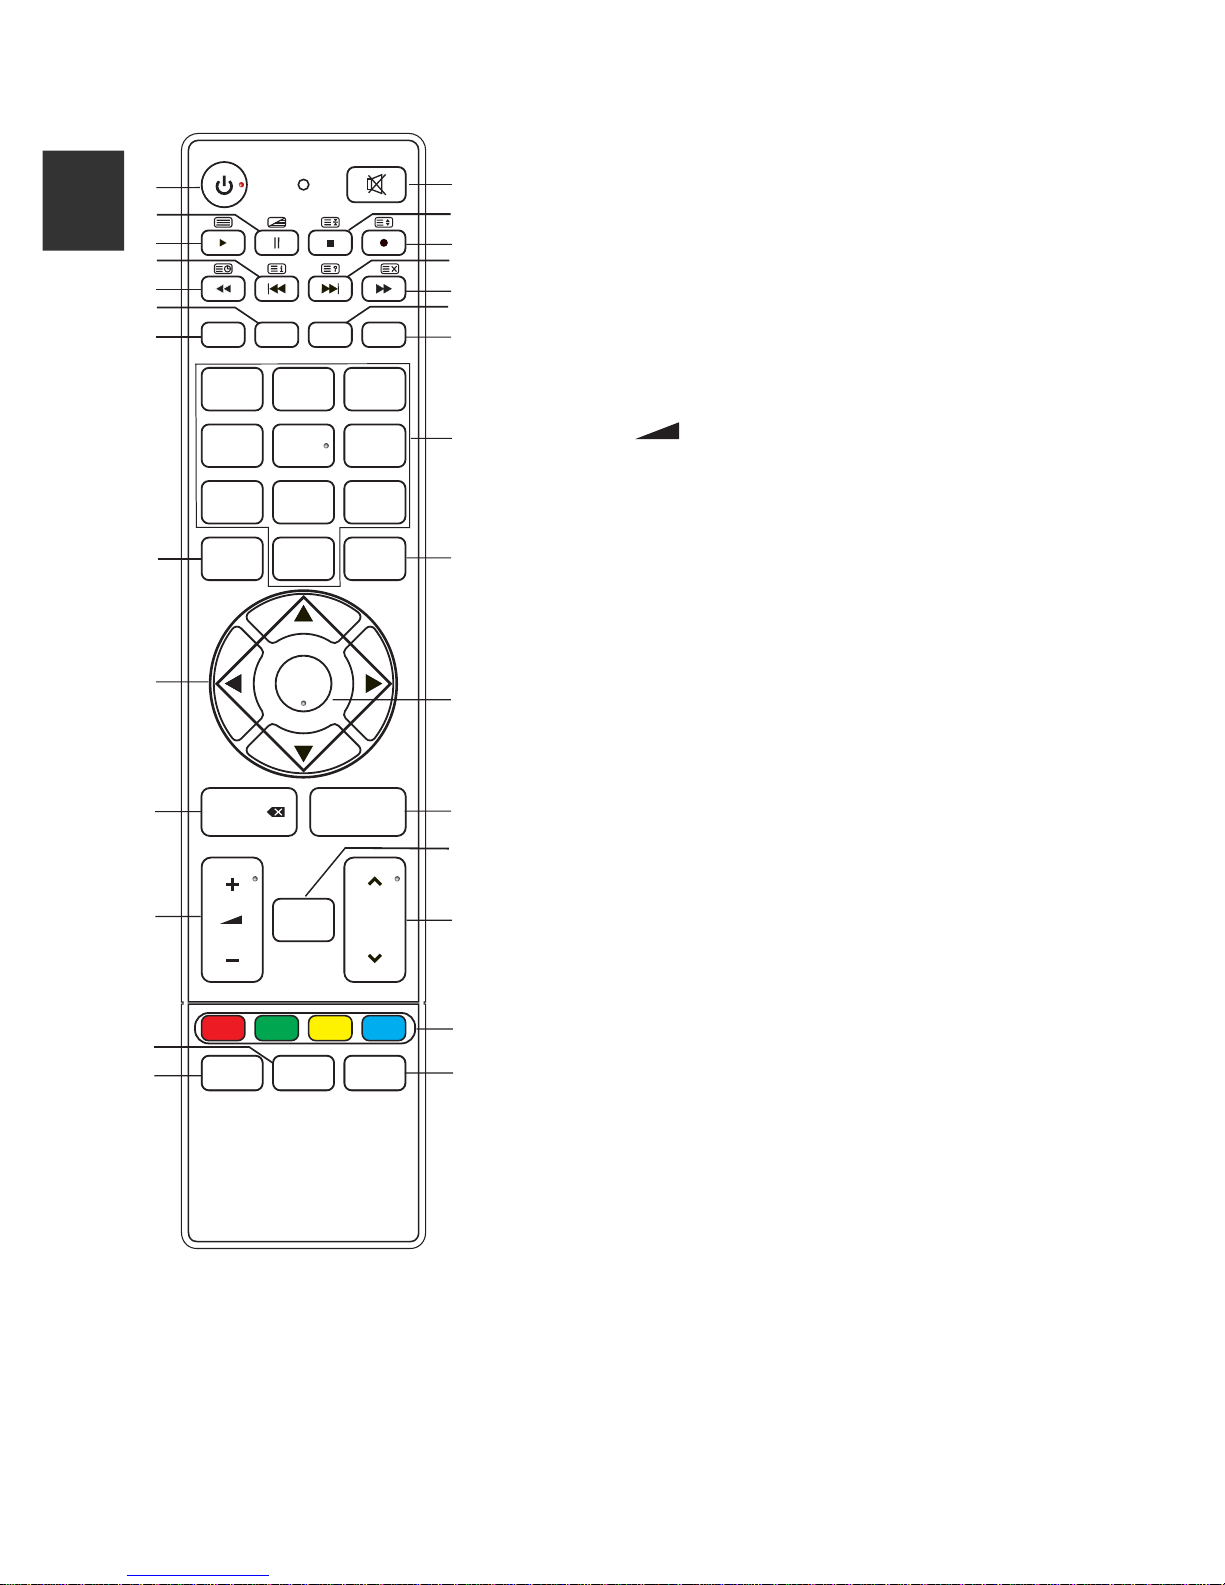
Remote Control
11
E
ngli
1
sh
3
5
7
9
11
13
INFO EPG ANT
1 2
4
5
7 8 9
16
18
MENU
0
OK
TOOLS
3
6
EXIT
17
19
6
10
12
14
15
16. MENU: Press to enter the menu screen for
2
4
various optional adjustable settings.
17. EXIT: Return the last layer OSD menu or
exit OSD Menu.
8
18. ▲/▼/◄/►: To select the direction.
19. OK: Press to execute the selected item in
the menu screen.
20. BACK: Return to last viewed program.
21. HOME/SOURCE: Select signal source,
and link to various internet services.
22. +
-: Press to adjust the volume level up
or down.
23. APPS: Press to enter APP Store function.
24. ∧P∨: Press to select channels in
ascending or descending order.
25. COLOR BUTTONS: Red/ green/ yellow/
blue key navigation link.
26. LIST: Press to call up the channel list.
Press again to exit it.
27. 3D: No function.
28. FAV: Switch on/off the favorite programs
list.
20
22
26
27
BACK /
3D
NOTE:
HOME/
SOURCE
APPS
LIST FAV
21
23
P
24
25
28
• All pictures in this manual are examples, only for reference, actual product may differ
from the pictures.
• The buttons not mentioned here are not used.
Basic Operation
12
QUICK START GUIDE
■ Initial Setup
1. The first time you power on the TV, the
"Installation Guide" will be shown on the TV
Installation Guide
screen. Please follow below procedures to do
first installation including channel searching.
Welcome to the installation guide!
Please press [OK] to start the guide!
Selecting a Language
2.
Press the ▲/▼/◄/► button to
select a
Language, and then press the OK button.
Installation Guide
Language
Česko
Italiano
Deutsch
Slovenčina
OK
Sel ect
Ack
English
BAC K
Français
Bac k
E
nglish
3. Selecting an Environment
Press the ▲/▼/◄/► button to
select an
Environment, and then press the OK button.
If you select the “Store”, it will be displayed the
“Yes/No” image.
4. Selecting an Antenna
Press the ▲/▼/◄/► button to select an
Antenna, and then press the OK button.
Installation Guide
Environment Select
Home
Sel ect
OK
Ack
Store
Bac k
BAC K
Installation Guide
Antenna Type
Air
Cable
OK
Sel ect
Ack
Satellite
Bac k
BAC K
13
Basic Operation
5. Selecting a Country
E
ngli
sh
Press the ▲/▼/◄/► button to
Country, and then press the OK button.
select a
Installation Guide
Country
Croatia Czech
Denmark
Finland
France
Germany
OK
Sel ect
Ack
Greece
BAC K
Hungary
Bac k
The TV starts Auto Tuning.
6.
Channel Tuning
NOTE:
• If the TV doesn't receive any channels, please check your aerial connection or the
country you selected, and then try an auto search again.
• If the TV just receives some of the channels, it means the aerial's reception isn't good
For this TV set works with Linux operating system, the TV may automatically restart or
•
the remote control does not respond when it is being used. If the remote control does
not respond, please turn off the power and restart the TV.
enough and an antenna service is recommended.
ATV
DTV
Radio
Data
10 %... UHF CH 26 DTV
:
:
:
:
0
0
0
0
Programme(s)
Programme(s)
Programme(s)
Programme(s)

Basic Operation
14
Turning on and off the TV
■ Turn on the TV
Connect the power cable, if TV has a power switch, turn it on firstly. Press the
button on remote control can turn on TV from standby mode.
■ Turn off the TV
Press the
Do not leave your set in standby mode for long periods of time. It is best to unplug the
set from the mains and aerial.
When there is an accident power off, it is recommended to unplug the power cable
from the power socket.
■ No signal
There is No Signal menu on screen when there is no input signal. In DTV/ATV mode,
if there is no signal in 5 minutes, the TV will turn off automatically. In PC-RGB
mode, the TV set will automatically turn off in 1 minute if no input signals. When VGA
cable is connected, the TV turns on automatically.
Programme Selection
■ Using the CH+/CH- on the panel of TV or ∧P∨ on the remote control.
Press CH+/∧ to increase channel number.
Press CH-/ ∨ to decrease channel number.
■ Using 0- 9 Digital Buttons.
You can select the channel number by pressing 0 to 9. (In DTV, ATV mode)
■ Example
To select - channel (e.g. Channel 5): Press 5.
To select -- channel (e.g. Channel 20): Press 2 and 0 in a short time.
button on the remote control to enter standby mode.
E
nglish
Volume Adjustment
■ Press the VOL+/VOL- on the panel of TV or +
volume.
■ If you want to switch the sound OFF, press the
■ You can release mute by pressing the
Changing the Input Source
1. You can select the input source by pressing the HOME/SOURCE button to open
Smart Home interface.
2. Press the ▲/▼ button to cycle through the input source, and press the OK button to
confirm your choice.
or increase the volume.
- on the remote control to adjust the
.
Menu Operation
15
How to Navigate Menus
E
ngli
Please before using the TV follow the steps below to learn how to navigate the menu in
order to select and adjust different functions. The access step may differ depending on
sh
the selected menu.
1. Press the MENU button to display the main menu.
Picture
Network
Sound
Time
Channel
Lock
Setting
Support
2. Press the ▲/▼/◄/► button to cycle through the main menu. Press the OK button to
access the submenu.
3. Press the ▲/▼ button to select the desired sub item, and then press the OK button.
4. Press the ▲/▼/◄/► button to select the desired value. The adjustment in the OSD
may differ depending on the selected menu.
5. Press the MENU button to return to the previous menu.
6. Press the EXIT button to exit from the menu.
NOTE:
• When an item in MENU is displayed gray, it means that the item is not available or
can not be adjusted.
• Buttons on the TV have the same function as corresponding buttons on the remote
control. If your remote control is lost or couldn’t work, you may use the buttons on the
TV to select menus. This manual focuses on operation of the remote control.
• Some items in the menus may be hidden depending on modes or signal sources
used.
Menu Operation
16
Configuring the Picture Menu
■ Picture Mode: You can select the type of picture which
best corresponds to your viewing requirements.
The manufacture's recommendation mode is Home.
■ User: Contrast, Brightness, Saturation, Sharpness and
Picture
Picture Mode
Hom e
< >
Backlight can be adjusted.
■ Color Temperature: Select the color temperature of the
User
>
picture.
■ Aspect Ratio: You can select the picture size which best
corresponds to your viewing requirements.
■ Screen (In PC mode):
Auto Adjust: Adjust the image automatically.
Color Temperature
Aspect Ratio
NR
16: 9
< >
< >
>
On
Horizontal Pos.: Centre the image by moving it left or
right.
Vertical Pos.: Centre the image by moving it up or down.
Phase: Adjust when characters have low contrast or
when the image flickers.
Size: Adjust the screen size.
■ PC Mode (In PC mode): Switch PC Mode function
Dynamic
Contrast
OverScan
Adj ust
OK
Ack Back
On
<
Sta ndard
< >
>
BACK
On or Off.
■ NR: Reduces screen noise without compromising video
quality.
■ Dynamic Contrast: Adjusts the contrast to the optimal
level according to the image's brightness.
■ OverScan (In DTV mode):
The picture reproduction rate is adjusted.
■ Motion Compensation:
Set the Motion Compensation Off, Low, Middle, and High.
Removes blurring and shudders from scenes with rapid movement.
■ Picture Reset: Reset all picture settings to the factory defaults.
E
nglish
Configuring the Sound Menu
■ Audio Type: You can select an audio type to suit your
personal preferences. Treble and Bass can be adjusted
when the audio type is set to User.
■ Balance: You can adjust the sound balance of the
speakers to preferred levels.
■ AVL (Auto Volume Level): AVL automatically remains
on the same level of volume if you change programmes.
Because each broadcasting station has its own signal
conditions, volume adjustment may be needed every
time when the channel is changed. This feature allows
users to enjoy stable volume levels by making automatic
adjustments for each program.
■ SRS:
SRS TruSurround HD
To switch the SRS function.
TM
creates an immersive,
feature-rich surround sound experience from two
speakers, complete with rich bass, high frequency detail
and clear dialog.
Sound
Audio Type
Balance
AVL
SRS
SPDIF Mode
AD Switch
AD Volume
Adj ust
OK
< >
< >
Ack Back
>
0
><
Off
><
Off
PCM
Off
><
30
BACK
Menu Operation
17
■ SPDIF Mode: You can select the SPDIF mode. SPDIF (Sony Philips Digital Interface)
E
ngli
provides digital audio output to speakers and various digital devices such as
A/V Receivers and Home Theaters which reduces interference and distortion.
sh
■ AD Switch (In DTV mode)
North America and Europe. This is an auxiliary audio function that provides an
additional audio track for visually challenged persons. This function handles the
Audio Stream for the AD (Audio Description), when it is sent along with the Main
audio from the broadcaster. Users can turn the Audio Description On or Off and
control the volume.
■ AD Volume:
When the AD Switch is set On, the AD Volume can be adjusted.
■ Audio Delay: Correct audio-video sync problems, when watching DTV and when
listening to digital audio output using an external device such as an audio receiver
(0ms~250ms).
■ Sound Reset: Reset all sound settings to the factory defaults.
*this is only available in some countries, mainly in
Configuring the Channel Menu
■ Antenna Type: Selecting an antenna source.
◆When TV signals is Air.
■ Auto tuning
Select the OK button to enter Auto Tuning menu.
Channel
Antenna Type
Air
<
>
– Tune Type: Press the ◄/► button to select tune type.
– Country: Press the ◄/► button to select country.
Satellite Settings
– Scan Mode: Select Free, All, or Encrypted channels to
store.
Auto Tuning
>
– Service Type: Select the channel type to memories.
– Search: Press the OK/► button to start the auto
DTV Manual Tuning
>
searching.
■ DTV Manual Tuning
Manual store for digital channels.
1. Press the ◄/► button to select channel.
2. Press the ▲/▼ button to select Search, and press
ATV Manual Tuning
Programme Edit
CI Information
Adj ust
OK
Ack Back
>
>
>
BAC K
the OK button to start channel tuning. When a channel is
found, the searching process will stop, the channel will be saved
with current channel number. Press the EXIT button to exit.
Menu Operation
18
◆When TV signals is Cable.
■ Auto tuning
Select the OK button to start Auto Tuning.
– Tune Type: Press the ◄/► button to select tune type.
– Country: Press the ◄/► button to select country.
– Scan Mode: Select Free, All, or Encrypted channels to
store.
– Service Type: Select the channel type to memories.
– Scan Type: Scans for all active broadcast station
channels and stores them in the TV.
If you select Full, the Auto Tuning will search through
all frequencies to find available channels.
If you select Network, the Auto Tuning will search
through appointed frequencies to find available
channels.
– Symbol: Displays available symbol rates.
(Symbol: Speed at which a device such as modem
sends symbols to a channel).
– Modulation: Displays available modulation values.
(Modulation: Loading of audio or video signals onto
carrier).
– Search: When you are satisfied with your setting,
press the OK/► button. The TV will begin memorizing
all of the available channels.
■ DTV Manual Tuning
Frequency, Symbol, Modulation, Scan Mode, and
Service Type are needed in order to add a programme
correctly in DVB cable mode. Please inquire of the cable
service provider about the correct values. When setting is
completed, select Search and press the OK button to
start channel tuning.
Channel
Antenna Type
Satellite Settings
Auto Tuning
DTV Manual Tuning
ATV Manual Tuning
Programme Edit
CI Information
Adj ust
OK
<
Ack Back
Auto Tuning
Tune Type
Country Germany
Scan Mode
Service Type
Scan Type
Symbol
Modulation
DTV +Radi o
< >
Cab le
>
>
>
>
>
>
BAC K
DTV
><
>
All
><
><
Ful l
Auto
><
Aut o
><
E
nglish
Adj ust
OK
Ack Back
BAC K
Menu Operation
19
E
◆ When TV signals is Satellite.
ngli
■ Satellite Settings
–Satellite/Transponder: Press the ▲/▼ button to
sh
select the Satellite/Transponder, then press the
OK button. Press the ▲/▼ button to select the
satellite/transponder from the list.
Delete: Press the red button to delete the current
satellite/transponder.
Edit: Press the green button to edit the current
satellite/transponder.
Add: Press the yellow button to add a new
satellite/transponder.
– LNB Power: Select the power supply type for the LBN.
–
LNB Type: Select the LBN type.
Press the OK button access the submenu. Items can be
adjusted when the LNB Type is set to User Mode.
– 22kHz Tone: 22KHz SWITCH. Select the 22KHz
depending on the LNB type.
– Toneburst: You can choose one of two satellites.
Used to choose proper device.
– DiSEqC1.0: You can choose one of four satellites.
Used to choose proper device.
– DiSEqC1.1: You can choose one of sixteen satellites.
Used to choose proper device.
– Motor: Sets the positioned type between DiSEqC1.2
and USALS.
When motor is set to DiSEqC1.2 or USALS:
Set Limit: Press the green button to set Limits to the
scope of satellite Antenna rotation.
Move Continue: Rotates the antenna until the rotation
has been completed or Stopped manually.
Move Step: Rotates the antenna in accordance with the
step value. Enables the antenna make a fine
adjustment.
Set West Limit: Set the West limit value.
Set East Limit: Set the East limit value.
Goto Reference: Drive antenna to zero position.
Disable Limit: Delete Limit settings. Allows the antenna to rotate over the full arc.
Cancel east limit and west limit.
Set position: Press the red button to set position.
Move Auto: Rotates the antenna automatically.
Move Continue: Rotates the antenna until the rotation has been completed or
stopped manually.
Move Step: Rotates the antenna in accordance with the step value. Enables the
antenna make a finer adjustment.
Store Position: Store current position as the selected positioner limit.
Goto Position: Rotates the antenna to the stored satellite position.
Channel
Antenna Type
Satellite Settings
Auto Tuning
DTV Manual Tuning
ATV Manual Tuning
Program Edit
CI Information
Adj ust
OK
Ack Back
Sat ellit e
<
>
>
>
>
>
>
>
BAC K
Satellite Settings
Satellite
Transponder 10729 V 22000
LNB Power
LNB Type
22kHz Tone >
Toneburst
DiSEqC1.0
Qua lity
Str ength
Adj ust
OK
ASTR A
13/ 18V
<
Ack Back
>
>
><
Uni versa l
>
Aut o
Non e
><
Non e
><
0%
0%
BAC K
Menu Operation
20
Goto Reference: Drive antenna to zero position.
GotoX: Moves the antenna to the location specified by Set Location.
When Motor is set to USALS:
Set Location: Press the yellow button to set Location.
Location: Longitude Direction, Longitude Angle, Latitude Direction, Latitude Angle
can be adjusted When the Location is set to Manual.
Longitude Direction: Sets the Longitude direction for the location.
Longitude Angle: Sets the Longitude angle for the location.
Latitude Direction: Sets the Latitude direction for the location.
Latitude Angle: Sets the Latitude angle for the location.
– Go Search: When setting is completed, select Go Search and press the OK to
enter Auto Tuning menu.
– Reset: Satellite setup setting will be reset to the default values. After reset all, you
can reset the country while Auto Tuning.
• The satellite TV company may adjust the transponder during the operation period;
therefore, the program parameter may be partially changed. The users who use this
machine to receive the satellite programs should regularly refer to the related
detailed information in this website: http://www.lyngsat.com/, and please add the new
transponder parameter in the machine in time, otherwise, your program receiving
may be influenced.
■ Auto Tuning: Select the OK button to start Auto Tuning.
1. Select the county for channels.
2. Press the ▲/▼ button to select Search, press the ◄/► button to select Quick
Scan or Blind Scan, and then press the OK button to start channel tuning.
3. The TV will begin memorizing all of the available channels.
E
nglish
■ DTV Manual Tuning
Manual store for DVBS2 channels.
Press the ▲/▼ button to select the desired sub item.
Press the ◄/►button to select the desired value.
Press the ▲/▼ button to select Search, and press the
OK button to start channel tuning.
Press the EXIT button to exit.
DTV Manual Tuning
Satellite
Frequency
Symbol
Polarization
Scan Mode
Service Type
Search
Qua lity
Str ength
Adj ust
OK
ASTR A
<
<
DTV +Radi o
Ack Back
>
0
><
0
><
Vert ical
>
All
>
><
0%
0%
BAC K

Menu Operation
21
■ ATV Manual Tuning
E
ngli
Manual store for ATV channels.
Press the ▲/▼ button to select the desired sub item.
sh
Press the ◄/► button to select the desired value.
Press the ▲/▼ button to select Search, and press the ◄/► button to search the
signal upward or downward, the system will stop after one channel is searched.
Press the EXIT to exit.
Press the ▲/▼ button to select Save, and press the OK button to save it.
■ Programme Edit
1. Press the ▲/▼ button to select the items.
2. Delete: Press the red button to delete the channel.
Sort: Press the green button to sort the channel.
Move: Press the yellow button to move the channel.
Skip: Press the blue button to skip the channel.
Favorite: Press the FAV button to set the favorite channel.
■ CI Information (In DTV mode): This function enables you to watch some encrypted
services (pay services). Please insert CI card into the CI slot according to the arrow
on the CI card.
NOTE:
• The function can only be gotten when CI slot is available.
• This OSD is only for illustration and the menu options and screen format will vary
according to the Digital pay services provider.
• It is possible for you to change CI (Common Interface) menu screen and service by
consulting your dealer.
• Please do not insert or pull out the CI card when power on.
• Do not insert or pull out the CI card frequently so as to avoid any damages of the TV
and the CI card.
• During initialization of the CI card, please don't operate the TV.
■ Signal Information
Display the current Signal Information.
Menu Operation
22
Configuring the Setting Menu
■ Language: Select your preferred On Screen Display
language.
■ Audio Languages: Select your preferred audio
language. (Available for digital channels if multiple audio
Setting
Language English
languages are broadcasted.)
■ Subtitle Languages: Select your preferred subtitle
Audio Languages
language. (Available for digital channels if multiple
subtitle languages are broadcasted.)
■ Subtitle: Switch the Subtitle function On or Off.
■ Hearing Impaired: When the Subtitle is set On, the
Hearing Impaired can be adjusted. When hearing
Impaired is ON, the TV screen will give some information
to the people whose hearing are impaired. When Hearing
Subtitle Languages
Subtitle
Hearing
Impaired
Country
Off
Germany
Off
Impaired is Off, the information will be hidden.
■ Country: Display the current country.
PVR File System
■ HBBTV Enable: Switch the HBBTV Enable function On
or Off. (The first time this function may unavailable, the
Adj ust
OK
Ack Back
BAC K
second time can work.)
■ Environment Select: Select the Environment Select
Home or Store. Store mode is the optimal setting for store
environment.
■ Energy Saving: When the Environment Select is set
Setting
HBBTV Enable
On
Home, the Energy Saving can be adjusted. Switch the
Energy Saving function On or Off.
Environment
Select
Hom e
■ Health Remind: Switch the Health Remind function On or
Off. While Health Remind is set to On, a prompt picture
Energy Saving
On
will remind you to have a break at intervals of two hours.
■ HDMI_CEC:
Press the OK/► button to access the
submenu. The HDMI_CEC system can be used only with
Health Remind
HDMI_ CEC On
Off
devices that have the HDMI_CEC feature. You must
connect an HDMI_CEC device using an HDMI cable.
Some HDMI cables may not support HDMI_CEC
functions.
Power Indicator
Power On Logo
On
On
< >
–Device List: Display devices that are connected to TV.
–HDMI_CEC: Switch the HDMI_CEC function On or Off.
Adj ust
OK
Ack Back
BAC K
–Auto Standby: Switch the Auto Standby function On or
Off.
–ARC: Switch the ARC function On or Off.
■ Power Indicator: Switch the Power Indicator function On or Off.
■ Power On Logo: Switch the Power On Logo function On or Off.
■ Default: Restore the system settings to the factory default. When the restore is
complete, the TV will enter standby mode.
>
>
>
><
>
><
><
><
><
>
><
E
nglish
Menu Operation
23
PVR Function Operation Instruction
E
ngli
How to use PVR function?
Preparing
sh
1. Plug USB flash drive or USB hard disk into USB slot on the left hand side of the TV
set.
NOTE:
• USB disk needs should have capacity at least 512MB.
• USB device must support USB 2.0 high-speed specification.
2. Press the HOME/SOURCE button to display the Smart Home menu. Press the
▲/▼ button to select DTV source, the PVR function can only be used in DTV mode.
3. Then press the MENU button on the remote to bring the main menu up, press the
▲/▼/◄/► button to highlight Setting menu, and then press the OK button.
4. Press ▲/▼ button to highlight PVR File System (In DTV mode), then press the
OK button to go into submenu.
Setting
– Select Disk: Select a disk used for PVR.
NOTE:
• Some models have two USB input and several disk
can be used when two USB devices are plugged in.
– Time Shift Size: You can select the memory size for
Time Shift function.
– Format Start: Format USB disk.
NOTE:
• Before formatting, please back up all important files.
• During the device formatting, do not disconnect the
device or turn off the power. If your USB device can't be
formatted or fail to be checked by the system, it means
the device isn't compatible with the TV or is damaged.
The larger USB device will take longer time to format
please be patient until the formatting finishes.
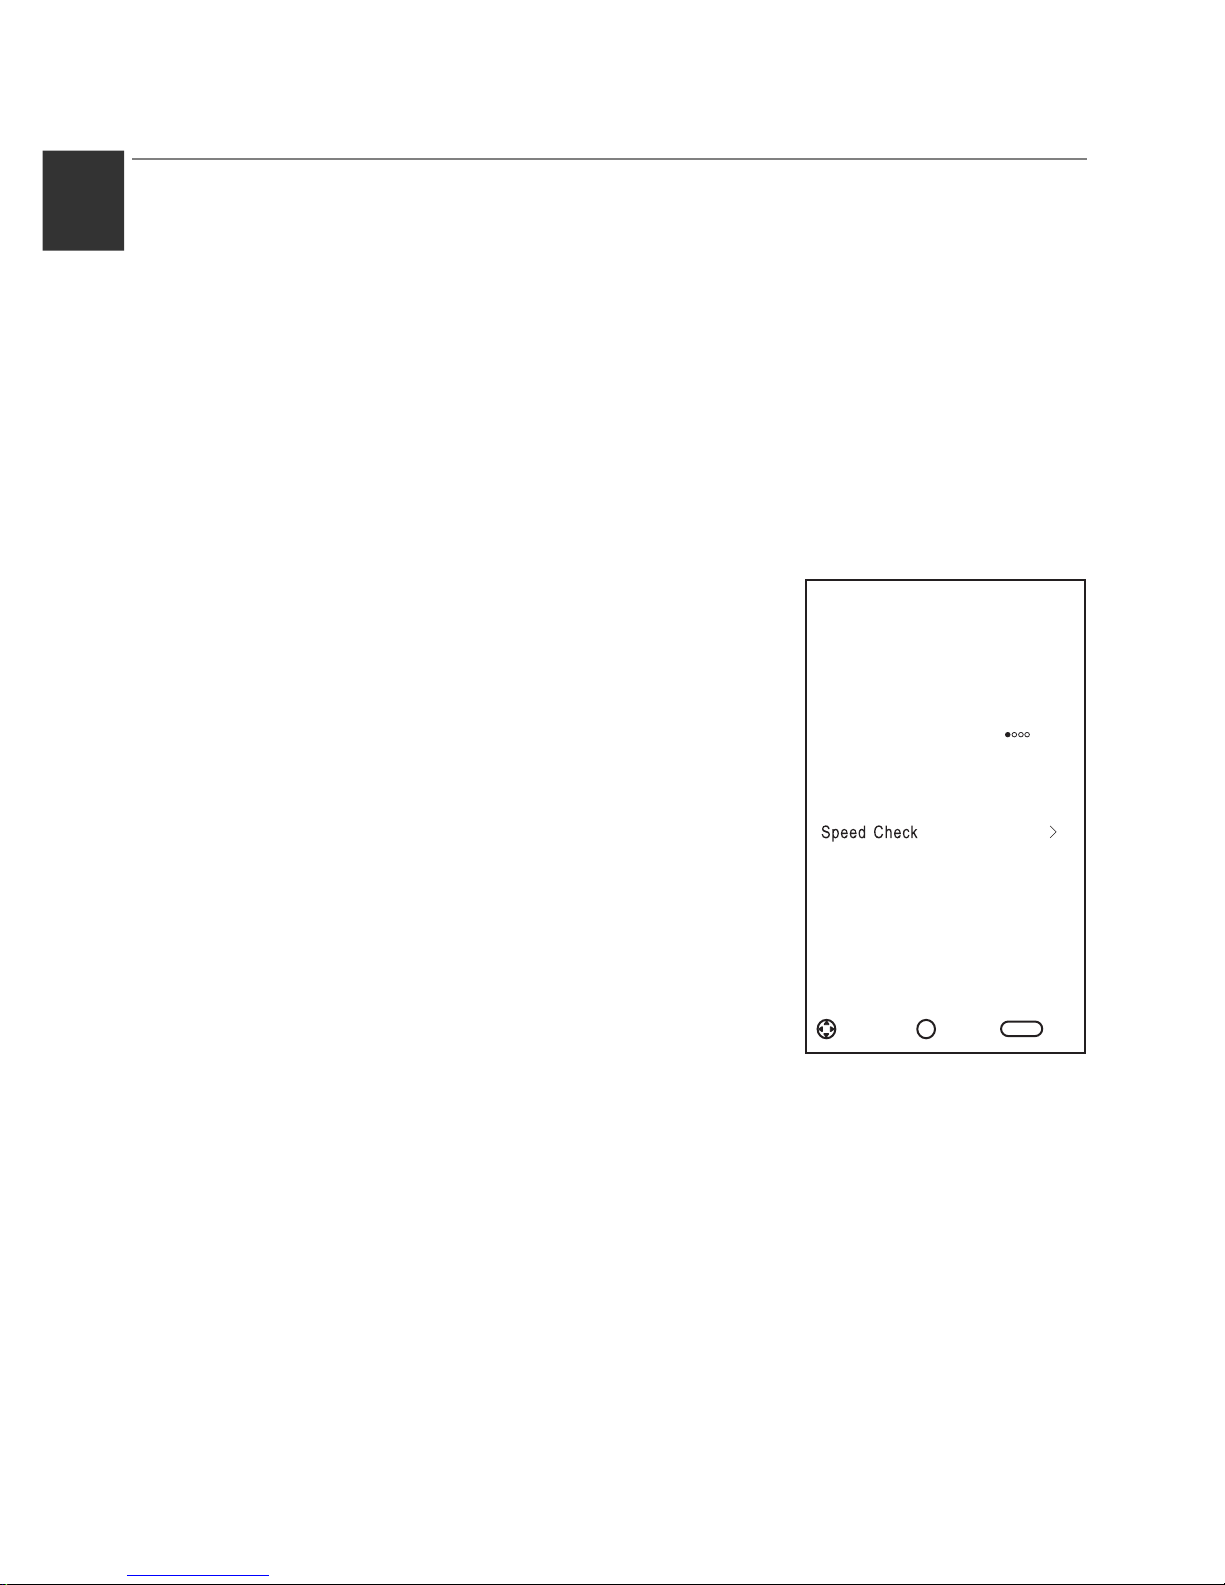
– Speed Check: Press the OK/► button to check the
speed of the storage device.
PVR File System
Select Disk
Time Shift Size
Format Start
Adj ust
OK
Ack Back
>
512 M
><
>
BAC K
Menu Operation
24
Recording
There are two types of recording: Instant Recording and Schedule Recording.
Instant Recording can record the current TV programmes, while Schedule Recording
can start at a specified time and record the TV programmes automatically on the day,
time and duration you choose.
– Instant Recording
1. Select the channel you want, then press
button to start recording. A menu will
come up on the screen when TV start recording.
2. Press
button to display/hide the recording menu. Press the ◄/► button to
select play, stop, pause, fast reverse, fast forward and set start time.
3. It will keep recording until
(stop) button is pressed or the memory is full.
>
00: 00
00: 08
CH 6 IT V2
00: 24
>
Dis k Space : 7%
E
nglish
– Schedule Recording
The unit is able to do schedule recording when TV is turned on or in standby mode.
1. Press EPG button to bring up EPG menu.
2. Then press red button will active timer recording submenu. You can set up time
or channel in the menu.
3. Press the ▲/▼ button to highlight different setting and press the ◄/► button to
change setting. After you have finished adjusting settings to desired options, and
press the OK button to save the scheduled recording.
NOTE:
• You can set up several schedule programmes to record. To do this you will need
to press the yellow button in the EPG mode which will show you the entire list.
Different schedules should not overlap and there must be at least a 1 minute time
gap to set up between two schedules.
• When recording starts in standby mode, the front indicators will change color and
there will be no picture or sound from the unit. You can press
button to turn on
the screen.

Menu Operation
25
Playing the Recorded Programmes
E
ngli
sh
Option1:
After recording has finished, press the TOOLS button on the remote control, and
then press the ▲/▼ button to select the Record list.
1. Press the ▲/▼ button to select the recorded file, and then press the OK button to
play the file.
2. Press the red button to delete the file you no longer require.
3. Press the yellow button to select the ascend or descend page.
4. Press the blue button to change the list by different types.
5. Press the EXIT button to quit the menu.
Option2:
Also you can play the recorded programmes in USB mode.
1. Press HOME/SOURCE button to enter the Smart Home interface.
2. Use the ◄/► button to select Movie, and then press OK.
3. Use the arrow buttons and OK button to enter the desired disk.
4. Use the arrow buttons and OK button to open the folder.
5. Press the MENU button to display the setting menu.
6. Press the
button to stop the playing file.
7. Press the EXIT button to return to the USB main menu screen.
Time Shift Function
This function allows the TV to automatically record live TV and make it available for
viewing at any time. With the Time shift turned on, you may rewind normal TV
viewing at any time without missing any of the live broadcasts.
Press the TOOLS button on the remote control, and then press the ▲/▼ button to
select Time Shift to activate Time Shift function.
point of view you want to record.
The TV stores the channel from the
>
00: 00
00: 08
CH 6 IT V2
00: 24
>
Dis k Space : 7%
If an USB device dedicated to recording is disconnected, Time Shift files that were
saved will automatically be deleted.

Menu Operation
26
HBBTV
You will be able to access services from entertainment providers, online providers and
CE manufactures through the HBBTV.
1. When the screen indicates (with the red button, etc.) that HBBTV is being accessed.
Press the red button to enter the HBBTV menu.
2. Operate the TV with the suggestive information.
NOTE:
• This service may be supported in other countries.
• Some broadcasting may not support the HBBTV.
•
An application on HBBTV may malfunction temporarily depending on the
circumstances of the broadcast station or application provider.
• An application is only available for use on HBBTV when the TV network is connected
to an external network. The application may malfunction depending on the network
conditions.
E
nglish
Menu Operation
27
Network Function Operation Instruction
E
ngli
You can set up your TV so that it can access the Internet through your local area
network (LAN) using a wired or wireless connection.
sh
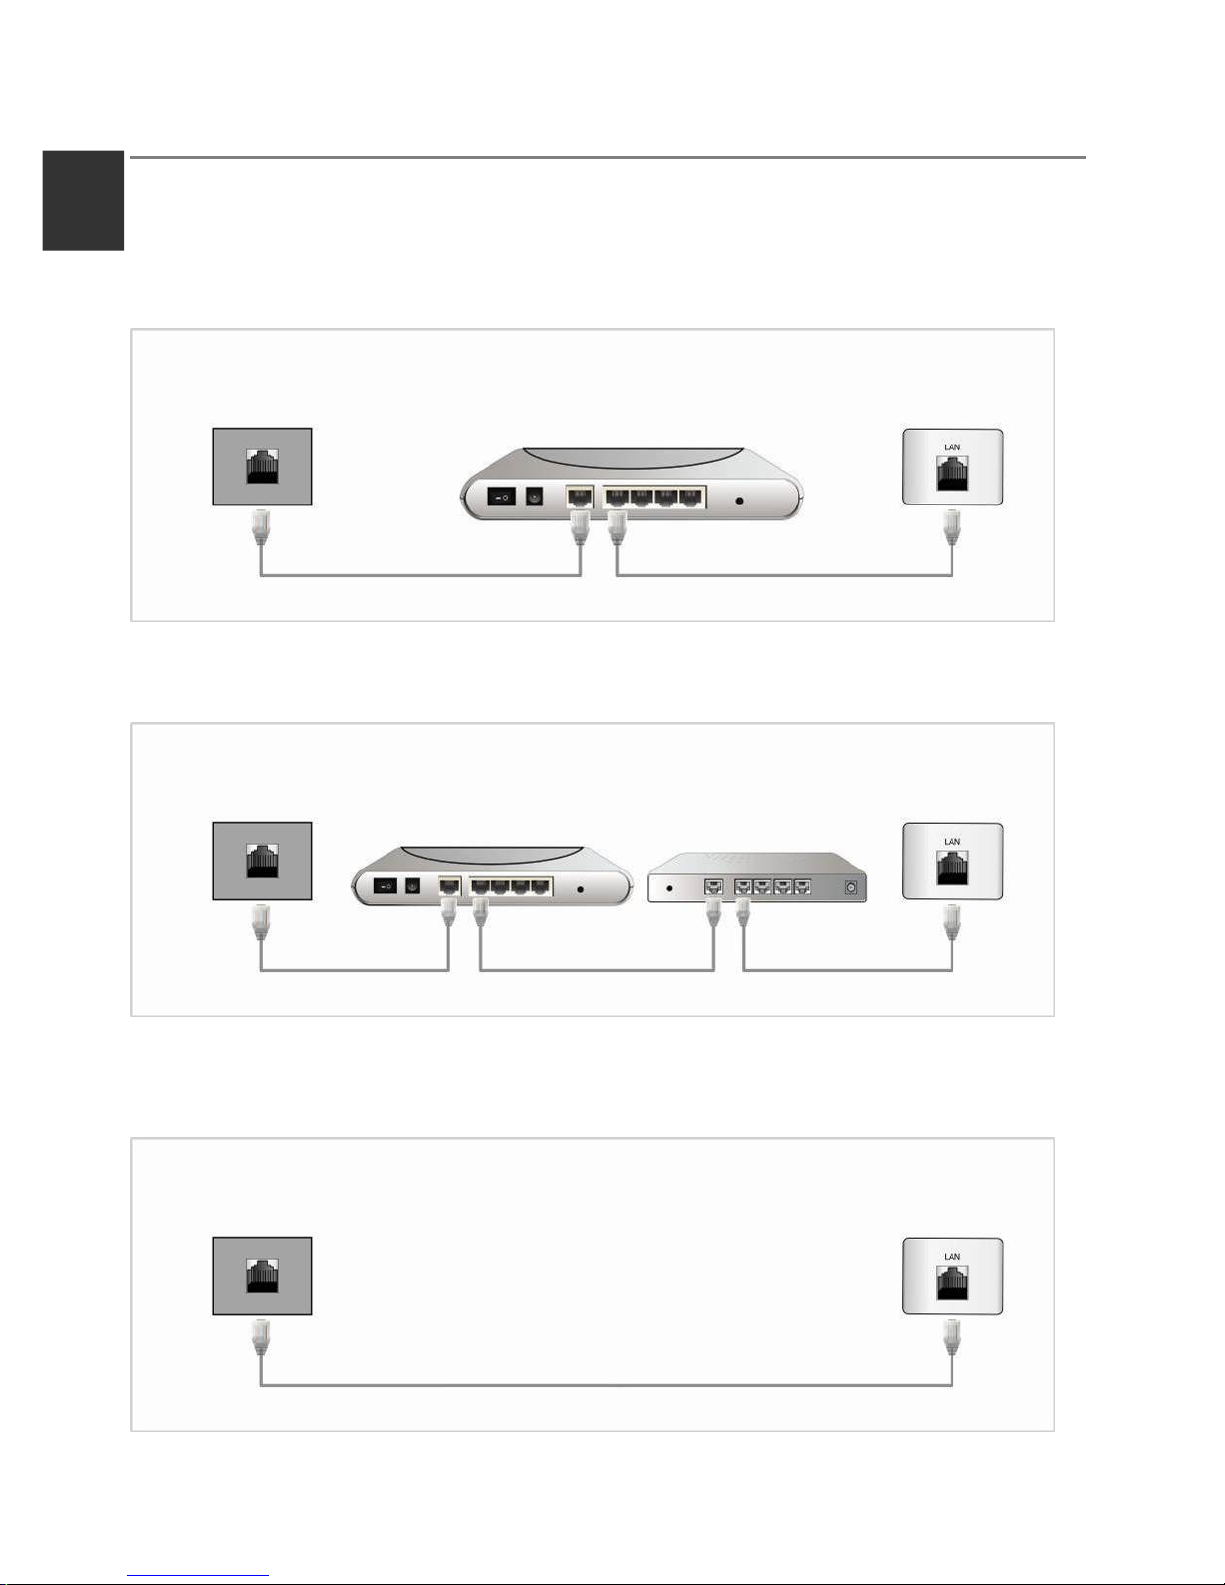
Connecting to a wired network
You can attach your TV to your LAN by connecting the LAN port on your TV to an
external modem using a LAN cable.
The Modem Port on the Wall
Modem Cable
External Modem
(ADSL/VDSL/Cable TV)
The LAN Port on the TV
LAN Cable
You can attach your TV to your LAN by connecting the LAN port on the back of your
TV to an IP Sharer which is connected to an external modem.
The Modem Port on the Wall
Modem Cable
External Modem
(ADSL/VDSL/Cable TV)
LAN Cable LAN Cable
IP Sharer
(having DHCP server)
The LAN Port on the TV
You may be able to attach your TV to your LAN by connecting the LAN port on your
TV directly to a network wall outlet using a LAN cable. Note that the wall outlet is
attached to a modem or router elsewhere in your house.
The LAN Port on the Wall
LAN Cable
The LAN Port on the TV
 Loading...