

Changhong Electric 3d60c4000i Operation Manual
3D60C4000i
签名 日期
设计
审核
电路会签
软件会签
工艺会签
结构会签
通知编号
图号
规格
封面纸张
内文纸张
机芯
A5
广制TZ0212
JUC0.018.00082926
157g铜版纸彩印
70g双胶纸黑白印刷
PS10
4
0
0
0

Table of Contents
Warning 1
Safety 3Instructions
Main Unit Control 5
F
Rear & Sides Panel
Remote Control
ront Panel 5
6
7
Important Unique Buttons
Favorite List
Teletext
Using the Teletext Feature
Troubleshooting Guide
Maintenance
Using USB Mode
Hotel Mode
Programme Guide
Channel List
Troubleshooting
4
QUICK START GUIDE
Configuring the Channel Menu
Configuring the Picture Menu
Configuring the Sound Menu
Configuring the Option Menu
Configuring the Lock Menu
Installing Batteries in the Remote Control
Connecting Antenna and Other Devices
n
Network Function Operation Instructio
Using the Remote Control 9
Battery Replacement
Getting Started 9
Connection and Setup 10
Connecting the Power Cord
Basic Operation 1
Volume Adjustment 1
123
Programme Selection 1
Changing the Input Source 1
Menu Operation 14
1
How to Navigate Menus 1
16
17
1
3
3
PVR Function Operation Instruction 3
3
4
4
4
Securing the TV to the Wall
4
English
9
9
2
Turning on and off the TV 1
3
3
3
4
4
5
2
7
4
10
0
10
4
4
4
4
2
Viewing TV using the 3D function
3
7
3
3
4
3
4
3
4
5
5
4
6
7
Warning
REGULATORY INFORMATION
This equipment generates uses and can radiate radio frequency energy and, if not
installed and used in accordance with the instructions, may cause harmful
interference to radio communication. However, there is no guarantee that
interference will not occur in a particular installation. If this equipment does cause
harmful interference to radio or television reception, which can be determined by
turning the equipment off and on, the user is encouraged to try to correct the
interference by one or more of the following measures:
-Relocate the receiving antenna.
-Increase the separation between the equipment and receiver.
-Connect the equipment into an outlet on a circuit different from that to which the
receiver is connected.
-Consult the dealer or experienced radio/TV technician for help.
Any changes or modifications not expressly approved by the party responsible for
compliance could void the user's authority to operate the equipment.
CAUTION
DO not attempt to modify this product in any way without written authorization from
supplier. Unauthorized modification could void the user's authority to operate this
product.
It is not recommended to keep a certain still image displayed on the screen for a long
time as well as displaying extremely bright images on screen.
Figures and illustrations in this User Manual are provided for reference only and
may differ from actual product appearance. Product design and specifications
may be changed without notice.
WARNING:
TO REDUCE THE RISK OF ELECTRIC SHOCK DO NOT REMOVE COVER
(OR BACK). NO USER SERVICEABLE PARTS INSIDE. REFER TO
QUALIFIED SERVICE PERSONNEL.
The lightning flash with arrowhead symbol, within an equilateral triangle,
is intended to alert the user to the presence of uninsulated "dangerous
voltage" within the products enclosure that may be of sufficient
magnitude to constitute a risk of electric shock to persons.
The exclamation point within an equilateral triangle is intended to alert the
user to the presence of important operating and maintenance (servicing)
instructions in the literature accompanying the appliance.
CAUTION
RISK OF ELECTRIC SHOCK
DO NOT OPEN
English1

Warning
WARNING
To Reduce The Risk Of Fire Or Electric Shock, Do Not Expose This Apparatus To
Rain Or Moisture.
The ventilation should not be impeded by covering the ventilation openings with
items, such as newspapers, table-cloths, curtains, etc.
The Apparatus shall not be exposed to dripping or splashing and that no objects
filled with liquids, such as vases, shall be placed on the apparatus.
Attention should be drawn to the environmental aspects of battery disposal. Don’t
throw used batteries in dustbin. Please contact your retailer in order to protect the
environment.
Keep minimum distances (5cm) around the apparatus for sufficient ventilation;
(Minimum distance around the apparatus for sufficient ventilation.)
No naked flame sources, such as lighted candles, should be placed on the
apparatus;
To prevent the spread of fire, keep candles or other open flames away from this
product at all times.
The device may be malfunction when under electrostatic discharge. It can be
manually resumed by power off and power on again.
CAUTION connecting the Power Cord
Most appliances recommend they be placed upon a dedicated circuit; that is, a
single outlet circuit which powers only that appliance and has no additional outlets or
branch circuits.
Do not overload wall outlets. Overloaded wall outlets, loose or damaged wall outlets,
extension cords, frayed power cords, or damaged or cracked wire insulation are
dangerous. Any of these conditions could result in electric shock or fire. Periodically
examine the cord of your appliance, and its if appearance indicates damage or
deterioration, unplug it, discontinue use of the appliance, and have the cord replaced
with an exact replacement part by an authorized servicer. Protect the power cord
from physical or mechanical abuse, such as being twisted, kinked, pinched, closed
in a door, or walked upon. Pay particular attention to plugs, wall outlets, and the
point where the cord exits the appliance.
The MAINS plug is used as the disconnect device, and the disconnect device shall
remain readily operable.
Whole product was place within the table surface in horizontal.
To avoid any injury caused by overturn of the product, please always ensure the
The apparatus shall be connected to a MAINS socket outlet with a protective
earthi ng conne ction.
English2
Safety instructions
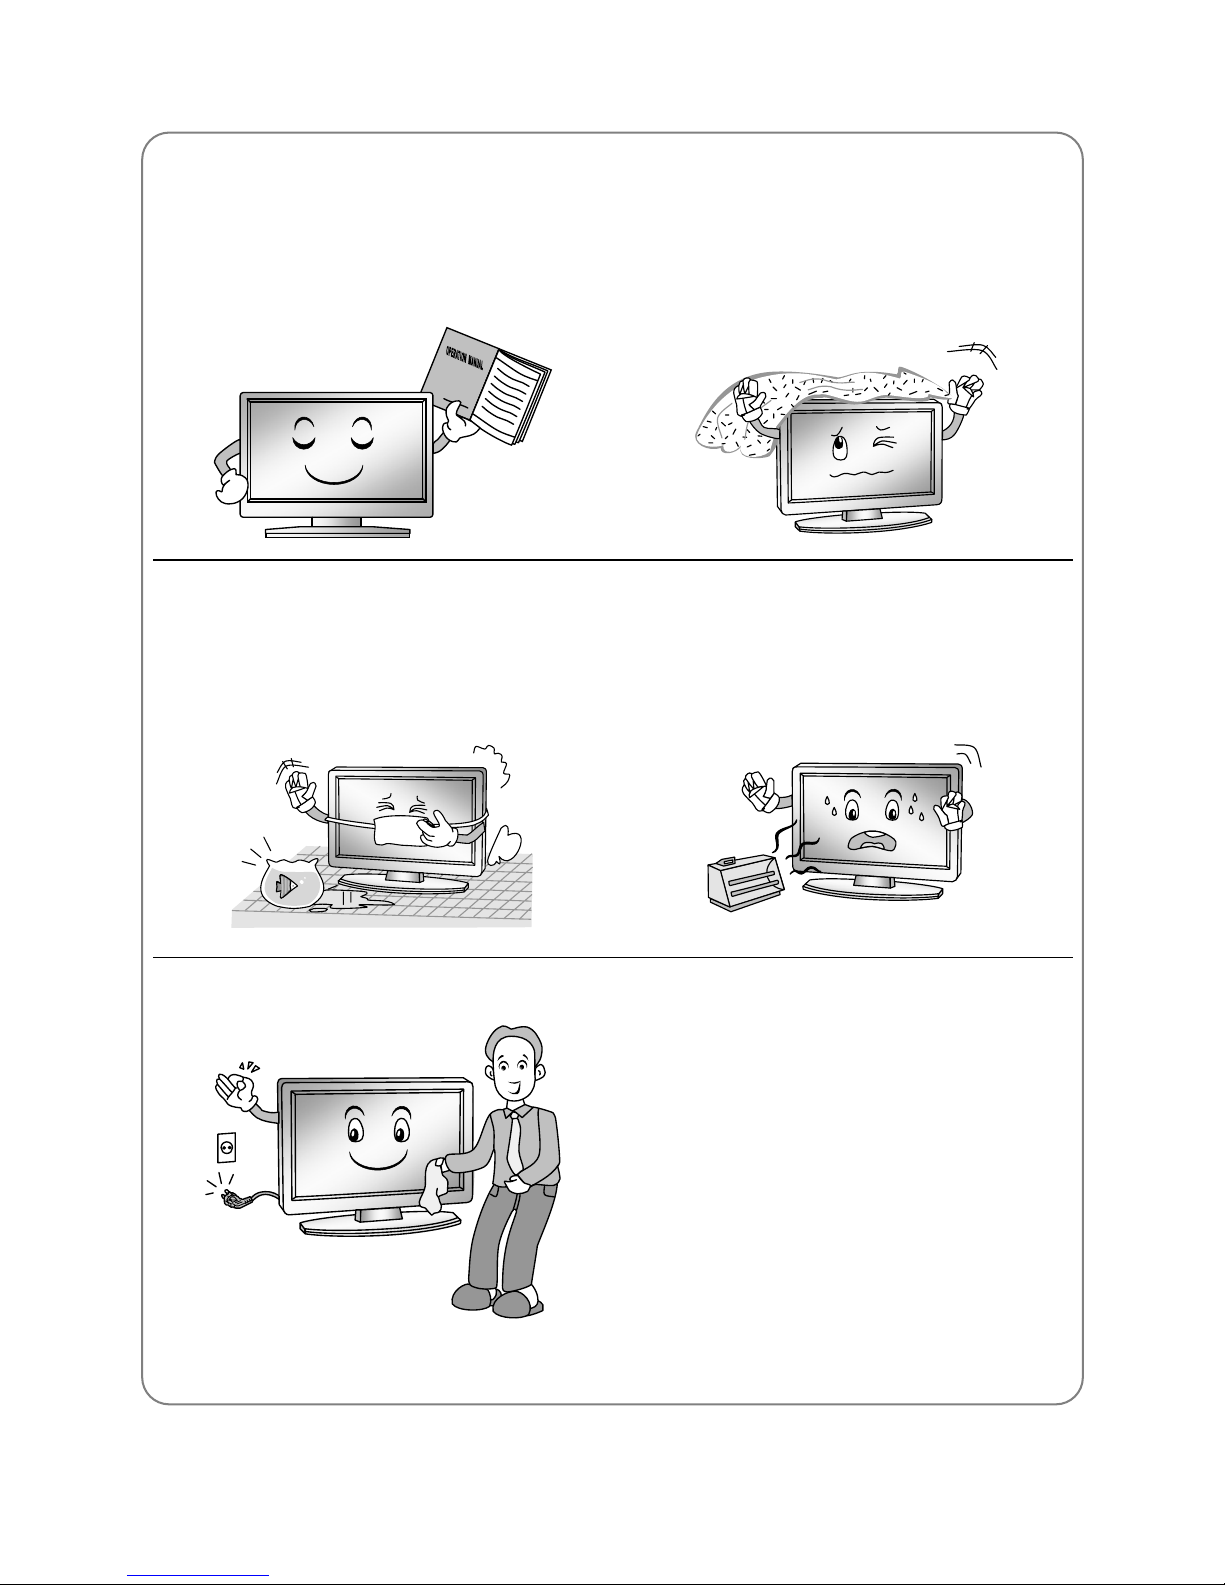
IMPORTANT SAFETY INSTRUCTIONS
1. Read these instructions.
2. Keep these instructions.
3. Heed all warnings.
4. Follow all instructions.
7. Do not block any of the ventilation
openings. Install in accordance with the
manufacturer's instructions.
5. Do not use this apparatus near water.
8. Do not install near any heat source such
as radiators, heat registers, stoves, or
other apparatus (including amplifiers)
that produce heat.
6. Clean only with a dry cloth.
9. Do not defeat the safety purpose of the
polarized or grounding type plug. A
polarized plug has two blades with one
wider than other. A grounding type plug
has two blades and a third grounding
prong. The wide blade or the third
prong is provided for your safety. When
the provided plug does not fit into your
outlet, consult an electrician for
replacement of the obsolete outlet.
English3
Safety instructions
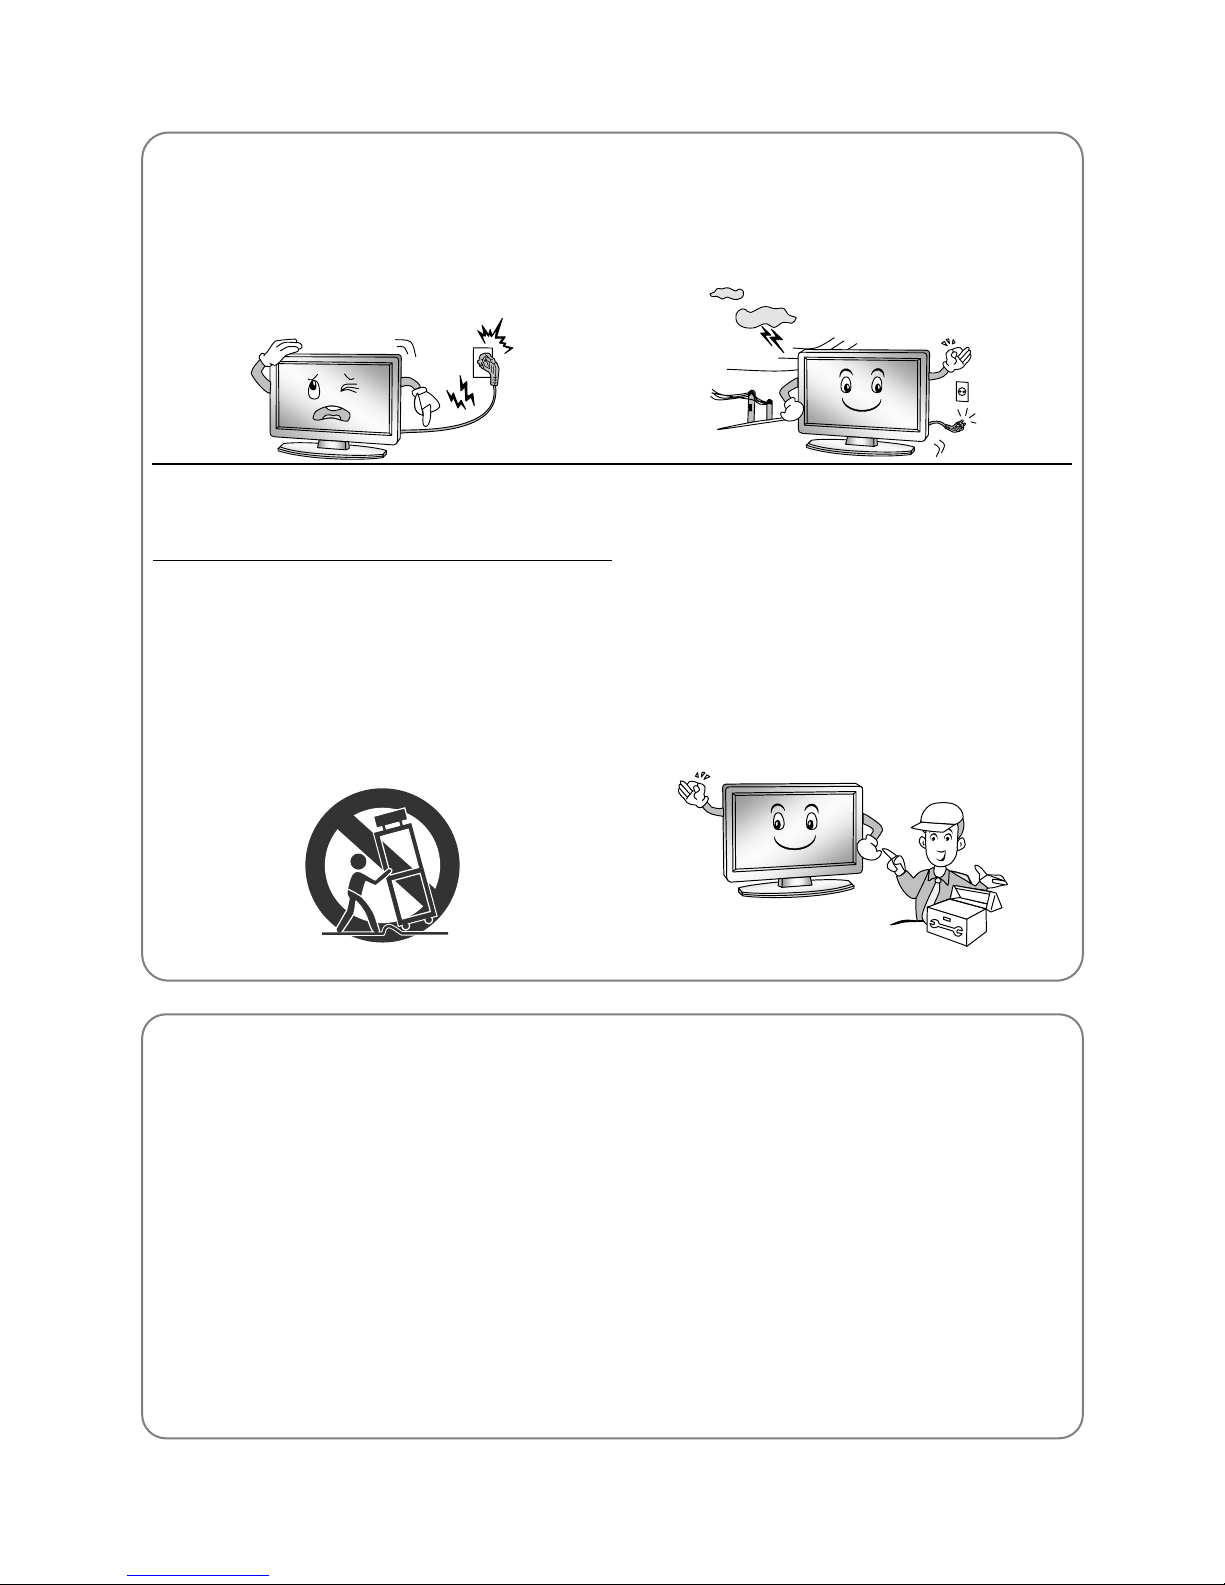
10. Protect the power cord from being
walked on or pinched particularly at
plugs, convenience receptacles, and
the point where they exit from the
apparatus.
13. Unplug this apparatus during
lightning storms or when unused for
long periods of time.
11. Only use the attachments/
accessories specified by the
manufacturer.
12. Use only with a cart, stand, tripod,
bracket, or table specified by the
manufacturer, or sold with the
apparatus. When a cart is used, use
caution when moving the cart/
apparatus combination to avoid
injury from tip-over.
14. Refer all servicing to qualified service
personnel. Servicing is required when
the apparatus has been damaged in
any way, such as power supply cord
or plug is damaged, liquid has been
spilled or objects have fallen into the
apparatus, the apparatus has been
exposed to rain or moisture, does not
operate normally, or has been
dropped.
ON DISPOSAL
-The fluorescent lamp used in this product contain a small amount of mercury.
-Do not dispose of this product with general household waste.
-Disposal of this product must be carried out in accordance to the regulations of your
local authority.
NOTE
-If the TV feel cold to the touch, there may be a small "flicker" when it is turned on.
This is normal, there is nothing wrong with TV.
-Some minute dot defects may be visible on the screen, appearing as tiny red,
green, or blue spots. However there have no adverse effect on the monitor's
performance.
-Avoid touching the screen or holding your finger(s) against it for long periods of time.
Doin
g so may produce some temporary distortion effect on the screen.
English4
Main Unit Control
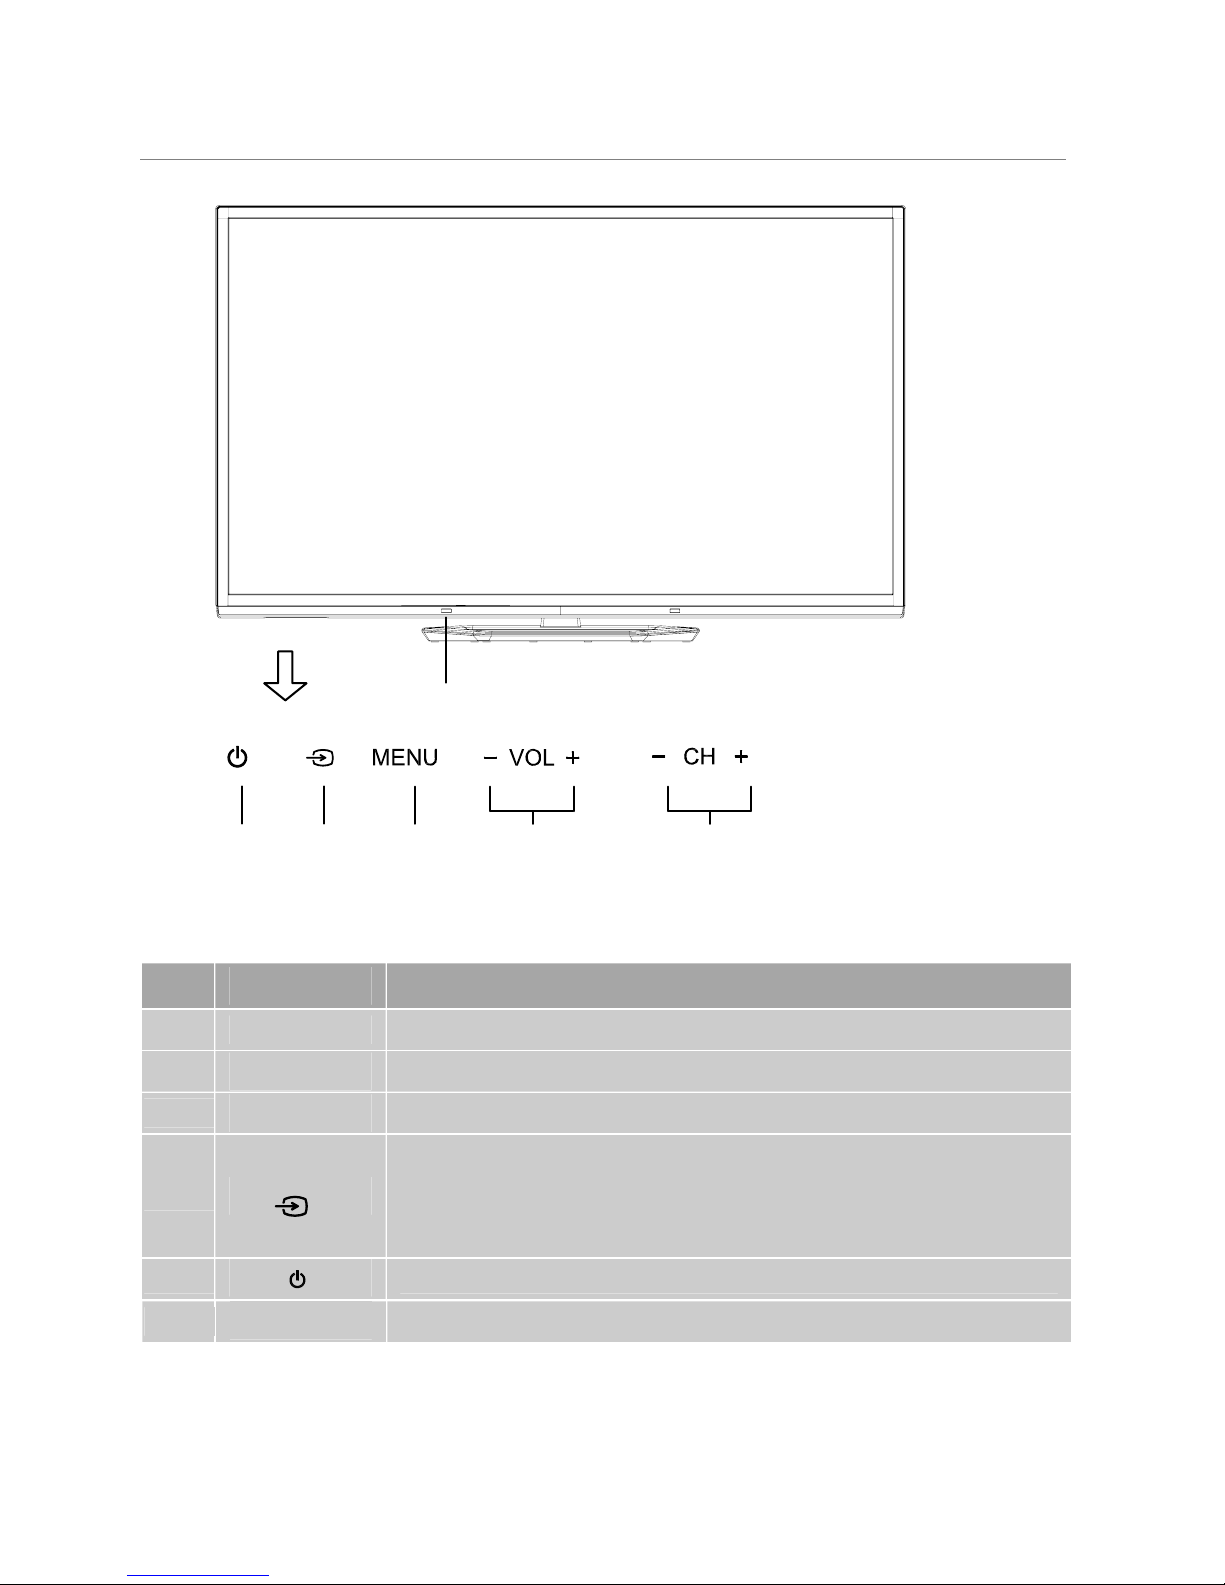
Front Panel Front Panel
No. Name Description
1
- CH + Changes the channels.
2
- VOL +
3
MENU Open the menu.
4
To switch the signal source. In the on-screen menu, use this
button as you would use the ENTER button on the remote
control.
5 Turns the unit on and off
6
6 Power Indicator and Infrared sensor
Power&Sensor
Adjusts the volume.
1
2
3
4
5
English5
Main Unit Control
No. Name Description
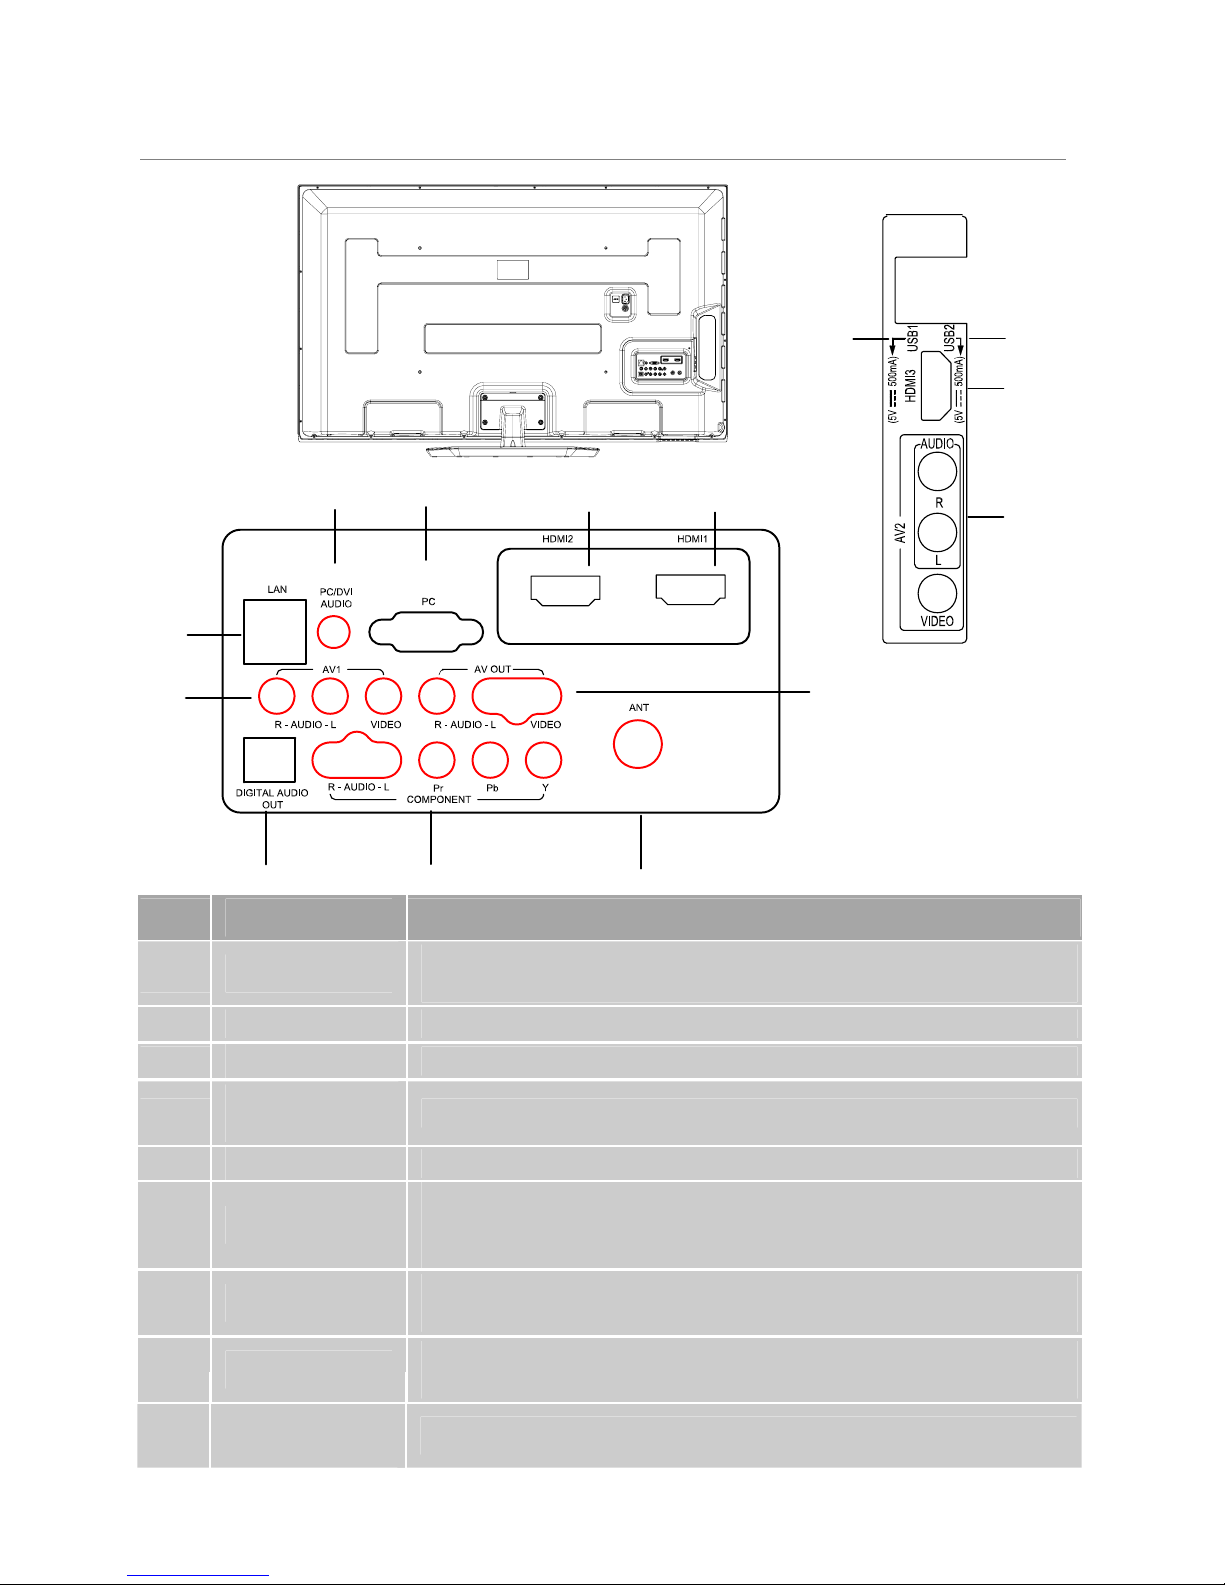
7 LAN
Local area network (LAN) port. Connect a LAN cable to this
port to connect to the Network.
8
HDMI HDMI input
PC input
ANT
Antenna input
USB
USB port. Connector for USB Play.
You can connect to network wirelessly using the Wireless LAN
Adapter.
COMPONENT
Component input. When connecting, use the appropriate
connector.
13
AV
AV audio/video signal input. When connecting, use the
appropriate connector.
AV OUT
AV audio/video signal output
DIGITAL AUDIO
OUT
SPDIF port
PC/DVI AUDIO/
PC
10
11
9
12
14
15
7
9
10
11
8
8
10
12
8
14
13
15
12
13
Rear & Sides Panel Rear & Sides Panel
English6
Remote Control
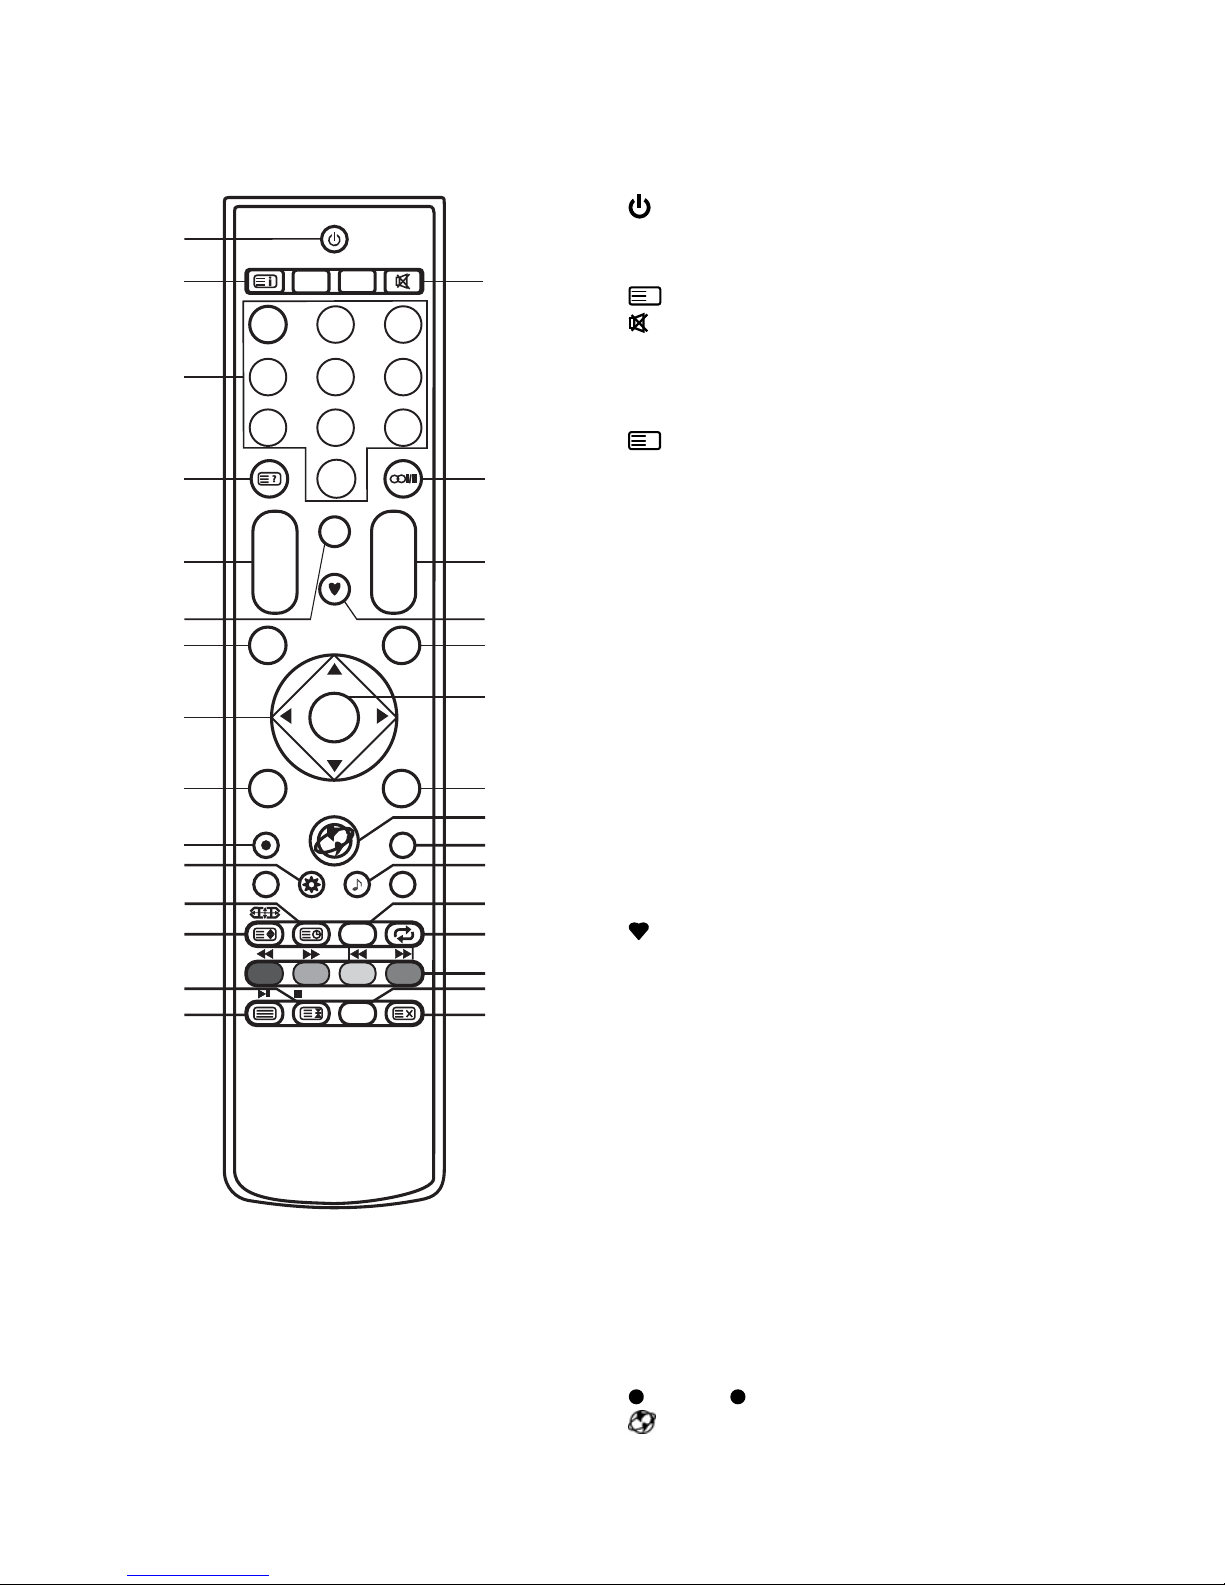
The buttons of the original remote control are as following: The buttons of the original remote control are as following:
1.
: Power, switch on or off TV set.
2. INFO: Press to display the current
programme information on the screen.
i
: Go to the index page.
3. : Press to mute or restore sound.
4. NUMBER BUTTONS: Choose channels
or password importation.
5. SOURCE: Press to select signal source.
?
: Reveal the hidden information of
some teletext pages.
6. AUDIO (∞I/II): The button can be used to
switch between NICAM DUALⅠ/ NICAM
DUALⅡ/ NICAM DUALⅠ+Ⅱ/MONO and
switch Audio language in DTV mode.
AUDIO:
Select the audio language if
available (in USB mode).
7. CH+/CH-: Press to select channels in
ascending or descending order. Moves to
the previous or next screen in some list.
8. VOL+/VOL-: Press to adjust the volume
level up or down.
9. INDEX: Press to enter the Recorded list.
(In PVR mode) Change the list by TIME or
CHANNEL (In PROGRAMME GUIDE
menu).
10.
: Switch on/off the favorite programs
list.
11. MENU: Press to enter the menu screen
for various optional adjustable settings.
12. EXIT: Return the last layer OSD Menu or
exit OSD Menu.
13. ▲/▼/◄/►: To select the direction.
14. ENTER: Press to execute the selected
item in the menu screen or enter the
desired value in any input mode.
15. LIST: Press to call up the channel list.
Press again to exit it.
REPEAT: Press to select the repeat play
mode (in USB mode).
16. EPG: Electronic Programme Guide, use in
the DTV mode.
17.
: Press button to start recording.
18. : Accesses the Home menu.
19. 3D: Opens 3D menu.
1
2 3
4
5
6
78
910
11
12
13
14
15
16
17
18
19
20
21
22
23
24
25
26
27
28
29
30
1 2
3
4
5
6
7
8 9
0
INFO
SOURCE
AUDIO
3D
INDEX
EPG
MENU
EXIT
CH+ VOL+
CH- VOL-
ENTER
REPEAT
LIST
P.M OD E
S.MODE
STILL
RADIO
SUBTITLE
T-Shift
English7
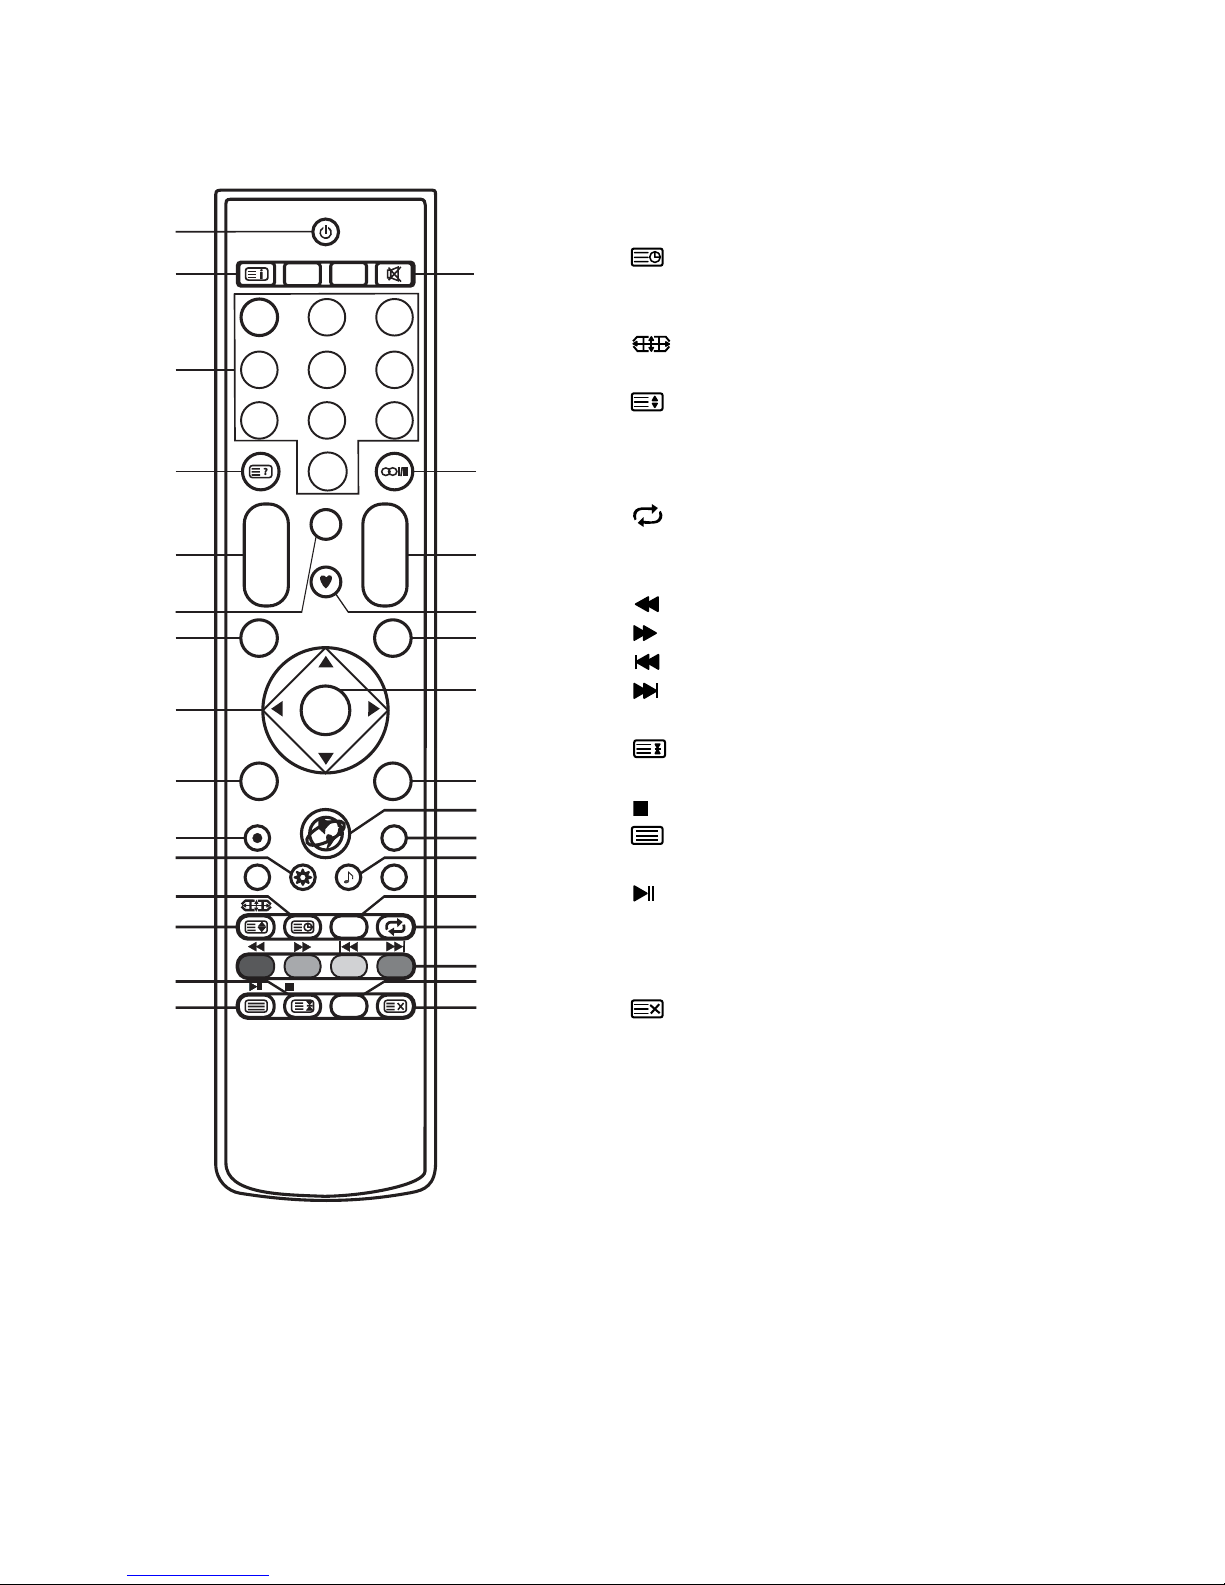
Remote Control
20. P.MODE: Changes the image mode.
21. S.MODE: Changes the sound mode.
22. : Enter subtitle mode or subpage.
SUBTITLE: Select the subtitle language if
available (in USB mode).
23.
: Press to select different images
sizes.
: Change size of teletext screen in
display mode.
24. T-Shift: Press T-Shift button to start time
shift function.
25.
: Return to last viewed program.
26. COLOR BUTTONS: Red/ green/ yellow/
blue key navigation link.
: Fast reverse (in USB mode).
: Fast forward (in USB mode).
: Previous (in USB mode).
: Next (in USB mode).
27. STILL: Press to hold the picture.
: Hold the teletext page on display,
press again to release.
: Stop (in USB/PVR mode).
28. : Enter the Teletext, press again for
MIX mode, press this button again to exit.
: Play / Pause (in USB/PVR mode).
29. RADIO: Press to interchange Radio and
DTV programs when there is Radio
program (In DTV mode).
30.
: Cancel the teletext but not to exit
teletext, press again to exit.
NOTE:
• All pictures in this manual are examples, only for reference, actual product may differ
from the pictures.
• The buttons not mentioned here are not used.
1
2 3
4
5
6
78
910
11
12
13
14
15
16
17
18
19
20
21
22
23
24
25
26
27
28
29
30
1 2
3
4
5
6
7
8 9
0
INFO
SOURCE
AUDIO
3D
INDEX
EPG
MENU
EXIT
CH+ VOL+
CH- VOL-
ENTER
REPEAT
LIST
P.M OD E
S.MODE
STILL
RADIO
SUBTITLE
T-Shift
English8
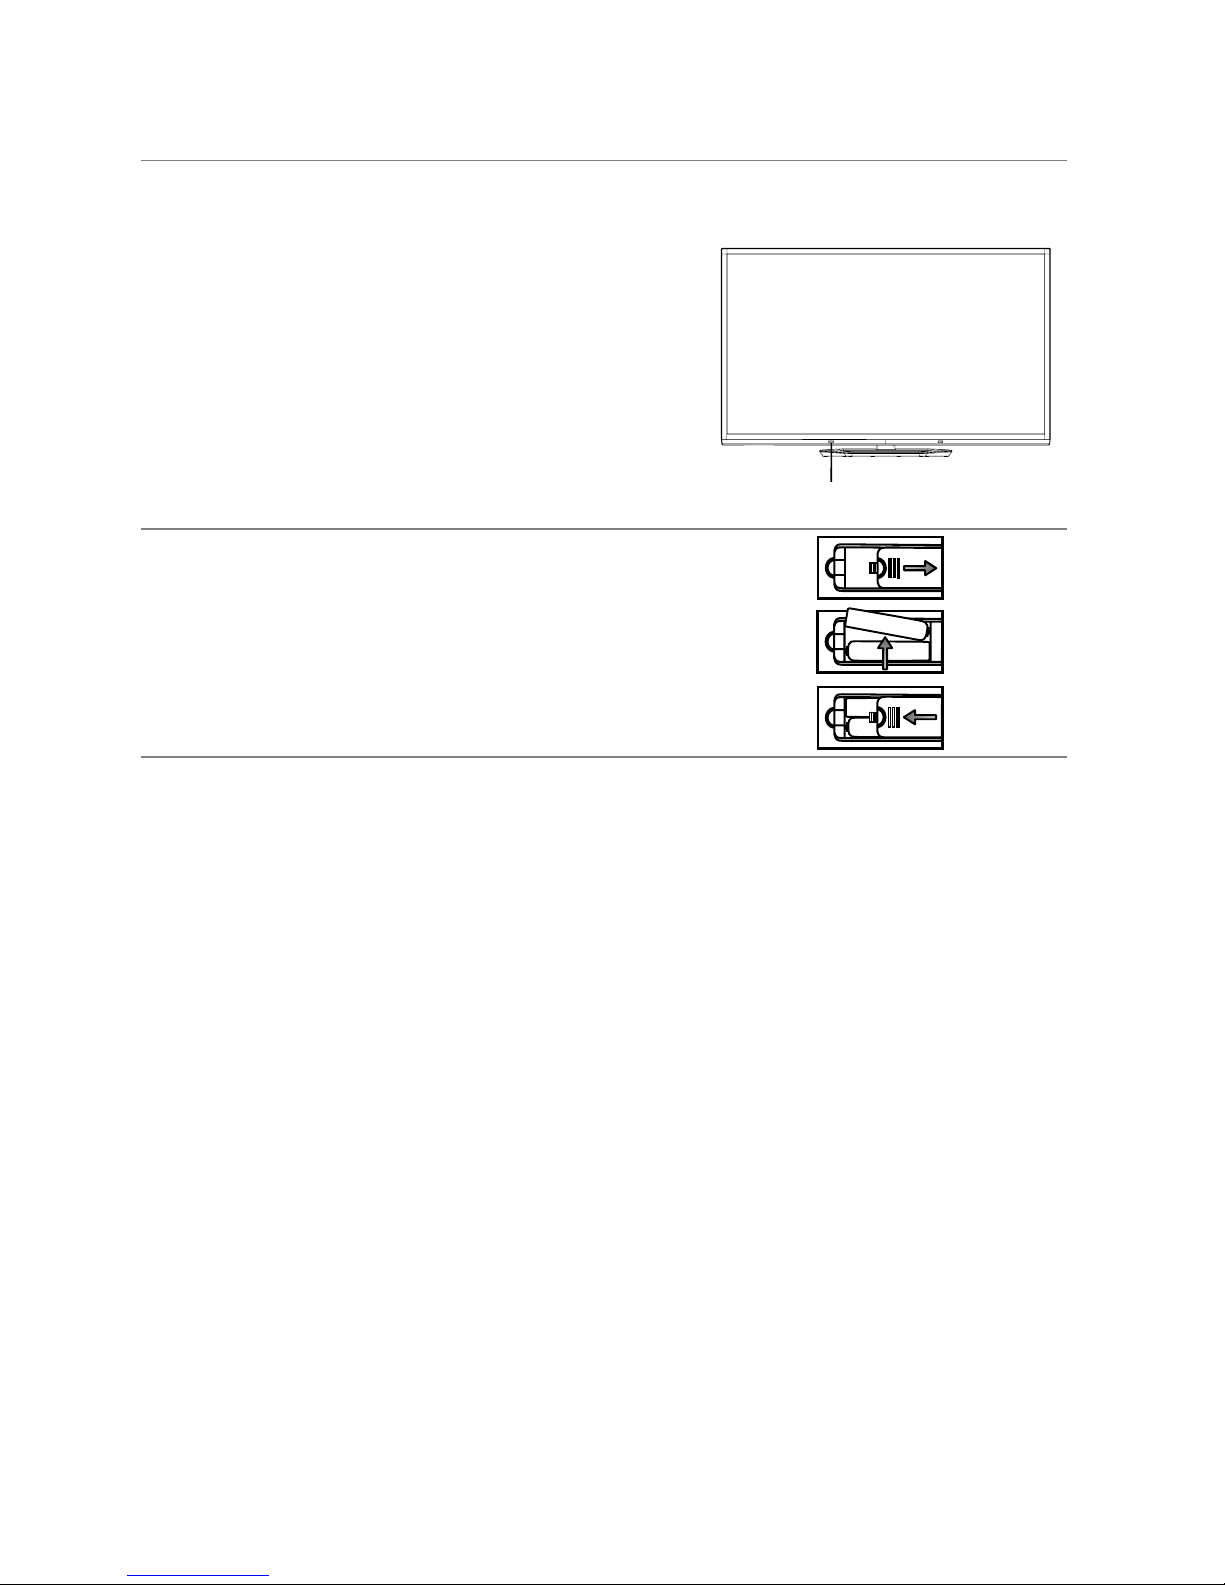
Getting Started
When using the remote control, aim it at remote sensor on the television. If there is an
operate.
Installing Batteries in the Remote Control
1. Open the cover at the back of the remote control.
2. Install two AAA size batteries. Make sure to match
the “+” and “-” ends of the batteries with the
diagram inside the compartment.
3. Replace the cover.
You will need to install the batteries into the remote control to make it operate following
the instruction below.
When the batteries become weak, the operating distance of the remote control will be
greatly reduced and you will need to replace the batteries.
Notes on Using Batteries:
The use of the wrong type of batteries may cause chemical leakage and/or explosion.
Please note the following:
• Always ensure that the batteries are inserted with the + and - terminals in the correct
direction as shown in the battery compartment.
• Different types of batteries have different characteristics. Do not mix different types.
• Do not mix old and new batteries. Mixing old and new batteries will shorten battery life
and/or cause chemical leakage.
• Replace batteries as soon as they do not work.
• Chemicals which leak from batteries may cause skin irritation. If any chemical matter
seeps out of the batteries, wipe it up immediately with a dry cloth.
• The batteries may have a shorter life expectancy due to storage conditions. Remove
the batteries whenever you anticipate that the remote control will not be used for an
extended period.
• The batteries (battery pack or batteries installed) shall not be exposed to excessive
heat such as sunshine, fire or the like.
CAUTION:
• It may result in an explosion if batteries are replaced incorrectly.
• Only replace batteries with the same or equivalent type.
Using the Remote Control
Battery Replacement
located on the television.
• The recommended effective distance for using the
remote control is about 7 metres.
• When using this television in a very brightly lit area,
the infrared REMOTE CONTROL SENSOR may not
work properly.
• Point the remote control at the REMOTE SENSOR
REMOTE SENSOR
object between the remote control and the remote sensor on the unit, the unit may not
English9
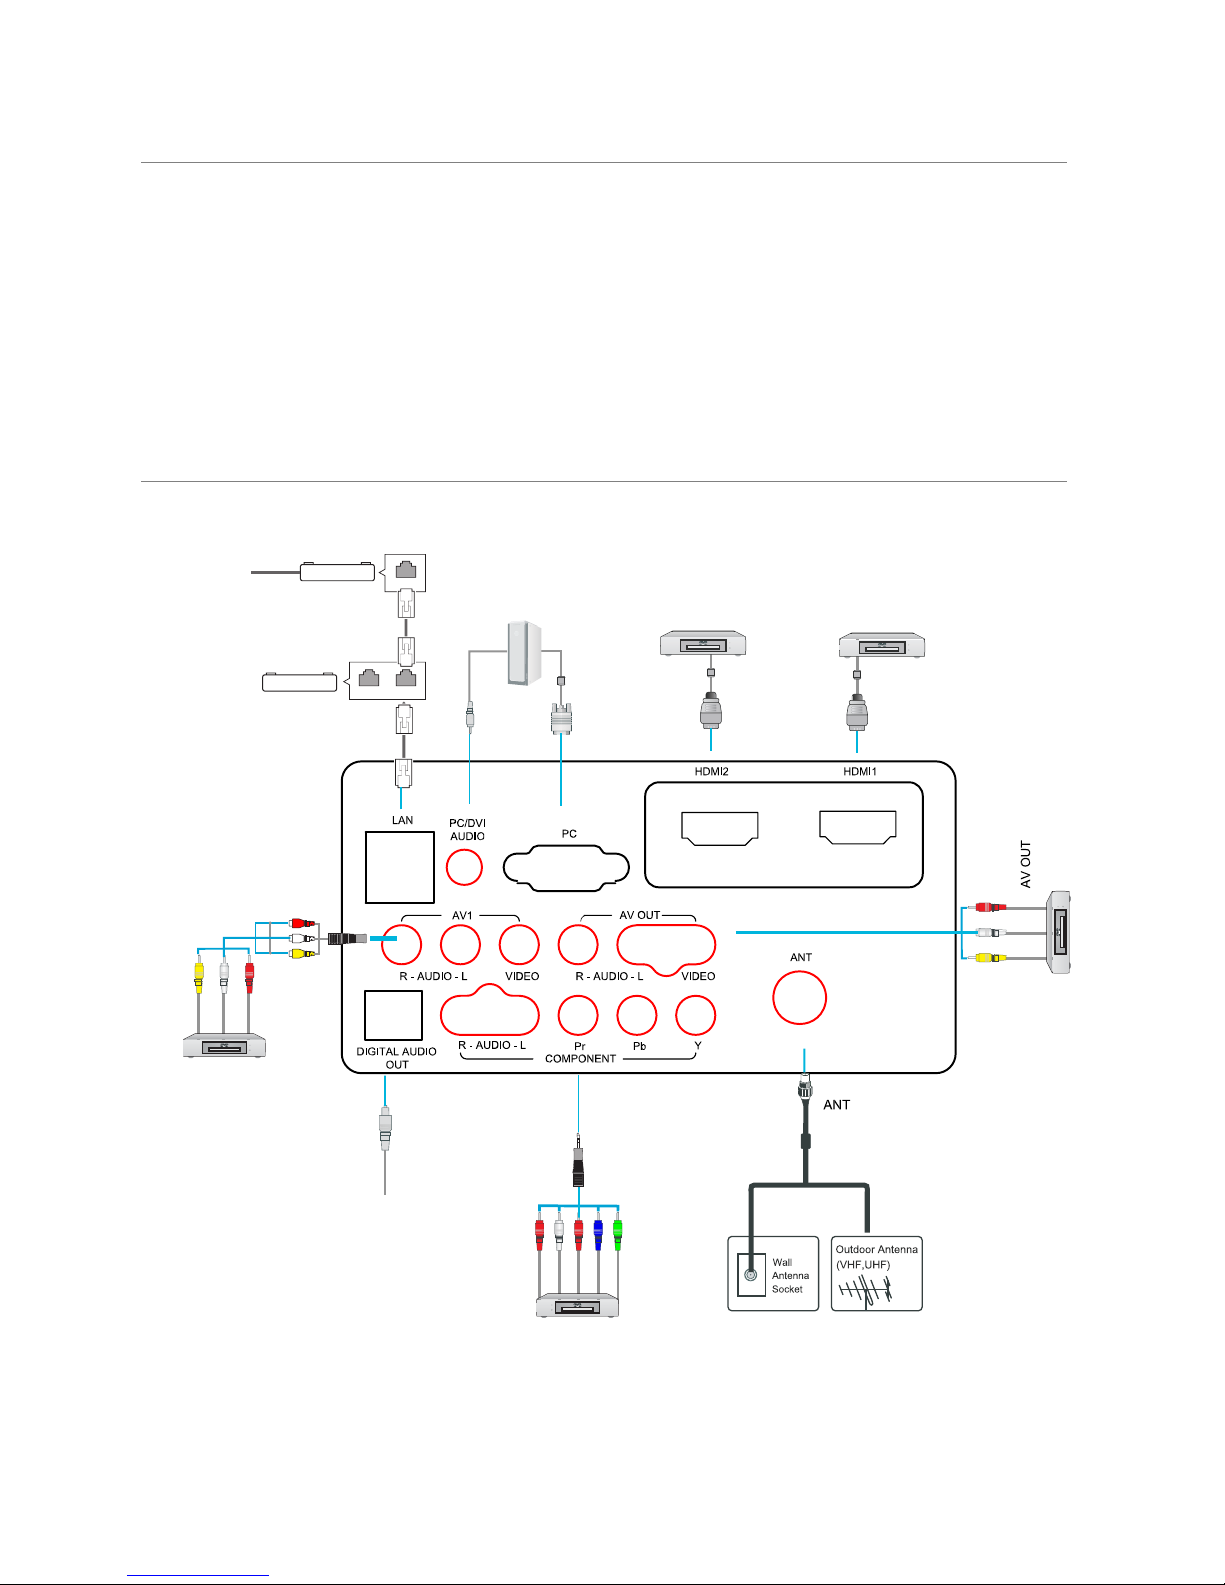
Connection and Setup
NOTE:
• The power input for the TV is 240V~ 50/60Hz.
• Be sure the power cord is disconnected and the TV is switched on before making
connections.
• To be completely disconnected from the supply mains, the mains plug of the television
should be disconnected from the mains socket outlet completely.
Connecting the Power Cord
Connecting Antenna and Other Devices
2.Turn on the power switch of the TV.
1.Connect the power cord with 240V power supply.
The equipment with
HDMI output function
The equipment with
HDMI output function
Computer
@
Internet
Cable modem
Router
ETHERNET
LAN WAN
The equipment with AV output
function (such as VCR, DVD,
set-top boxes, etc.).
Video
Audio L
Audio R
The equipment with
AV input function
Video
Audio L
Audio R
RF Coaxial
Wire(75 ohm)
SPDIF
The equipment with
Component output function
Audio L
Audio R
Pr/Cr
Pb/C
b
Y
English10
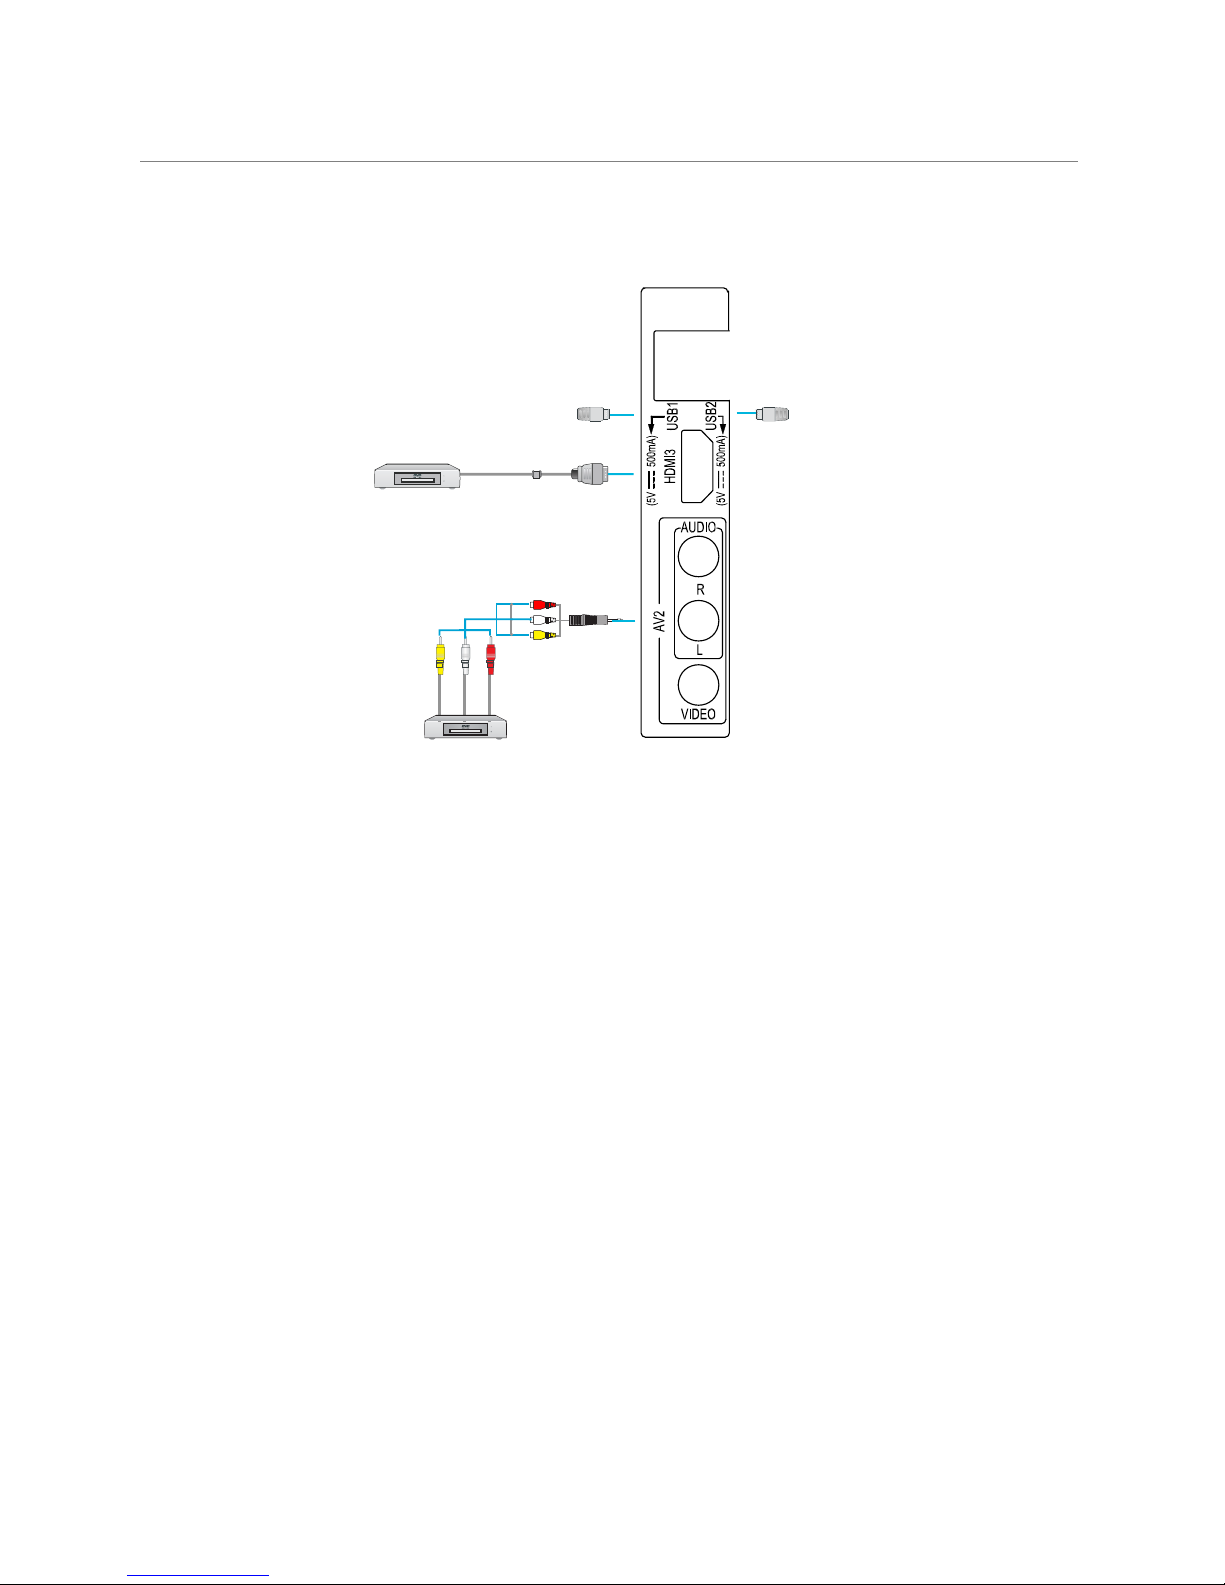
The equipment with
HDMI output function
USB Drive/
Wireless LAN Adapter
USB Drive/
Wireless LAN Adapter
The equipment with AV output
function (such as VCR, DVD,
set-top boxes, etc.).
Video
Audio L
Audio R
NOTE:
• When using digital audio optical output socket, please note the plug direction which
should be in accordance with the socket. Otherwise the socket would be easily
damaged for the improper operation.
• Make sure that all the components are connected correctly.
• For receiving free to air TV broadcasts, we recommend that you use an external fixed
antenna. Should you require the use of a temporary antenna, please ensure that you
purchase an antenna with sufficient ability to receive in weak signal areas. Only when
you are in close proximity to a transmitter will a temporary antenna reproduce a signal
as strongly as a fixed antenna. A digital antenna on the roof is recommended.
Connection and Setup
Connecting Antenna and Other Devices
English11
Basic Operation
QUICK START GUIDE
■ Connection
1.Connecting the mains and antenna.
■ Initial Setup
Press the
◄/►
button
to select Picture Mode
include Home,Vivid,Standard,Soft,
and User),
(
then press the
Channel .
1. Press ENTER button, you will see a list, Press the▲/▼to highlight
DTV
then
press ENTER.
2. Then press the MENU button to bring the TV menu up. Press the◄/►to highlight
CHANNEL on the very left, and press ENTER.
3. Press the▲/▼to highlight Auto Tuning, then press ENTER.
4. Press the▲/▼/◄/►button to select the country and tune type, then press the
ENTER button to start Auto Tuning.
5. After that, a Channel Tuning Frame will come up and it will take you about 5
minutes to get all the channels that will be saved in the TV system automatically.
NOTE:
•
country you selected, then try an auto search again.
•
enough and an antenna service is recommended.
•
If you need any help with the setting, please give us a call 1300796688.
2.If TV has a power switch, turn it on firstly.
English12
button to
start
If the TV just receives some of the channels, it means the aerial's reception isn't
good
If the TV doesn't receive any channels, please check your aerial connection or
the
The first time you power on the TV, the "Installation Guide" will be showen on the TV
screen. Please follow below procedures to do first installation including channel
seaching.
search
search as follows:
Channel
If you missed the setup, you need to do an auto
►

Turning on and off the TV
■ Turn on the TV
Then press the
■ Turn off the TV
Press the button on the remote control to enter standby mode.
Do not leave your set in standby mode for long periods of time. It is best to unplug
the set from the mains and aerial.
When there is an accident power off, it is recommended to unplug the power cable
from the power socket.
■ No signal
There is No Signal menu on screen when there is no input signal. In ATV mode, if
there is no signal in five minutes, the TV will turn off automatically. In PC-RGB mode,
the TV set will automatically turn off in 30 seconds if no input signal. When VGA cable
is connected, the TV turns on automatically.
Programme Selection
■ Using the CH+/CH- on the panel of TV or on the remote control.
Press CH+ to increase channel number.
Press CH - to decrease channel number.
■ Using 0- 9 Digital Buttons.
You can select the channel number by pressing 0 to 9. (In TV, DTV mode)
■ Example
To select - channel (e.g. Channel 5): Press 5.
To select -- channel (e.g. Channel 20): Press 2 and 0 in a short time.
Volume Adjustment
■ Press the VOL+/- button to adjust the volume.
■ If you want to switch the sound OFF, press the .
■ You can release mute by pressing the or increase the volume.
Changing the Input Source
1. You can select the input source by pressing the SOURCE
button on the remote control.
2. Press the▲/▼button to cycle through the input source, a
press the ENTER button to confirm your choice.
nd
SD
.
NOTE:
• The picture is just for reference. Please operate with the O
MENU of concrete TV and refer to the AV terminal board
Basic Operation
button on the remote to turn on the TV.
Connect the TV to your mains socket. If TV has a power switch,turn it on firstly.
English13
Menu Operation
How to Navigate Menus
Before using the TV follow the steps below to learn how to navigate the menu in order to
select and adjust different functions. The access step may differ depending on the
selected menu.
1. Press the MENU button to display the main menu.
2. Press the◄/►button to cycle through the main menu. Press the ENTER button to
access the submenu.
3. Press the▲/▼button to select the desired sub item, then press the ENTER button.
4. Press the ▲/▼/◄/► button to select the desired value. To save the setting, press
ENTER. The adjustment in the OSD may differ depending on the selected menu.
5. Press the MENU button to return to the previous menu.
6. Press the EXIT button exit from the menu.
NOTE:
• When an item in MENU is displayed gray, it means that the item is not available or
cannot be adjusted.
• Buttons on the TV have the same function as corresponding buttons on the remote
control. If your remote control is lost or couldn’t work, you may use the buttons on the
TV to select menus. This manual focuses on operation of the remote control.
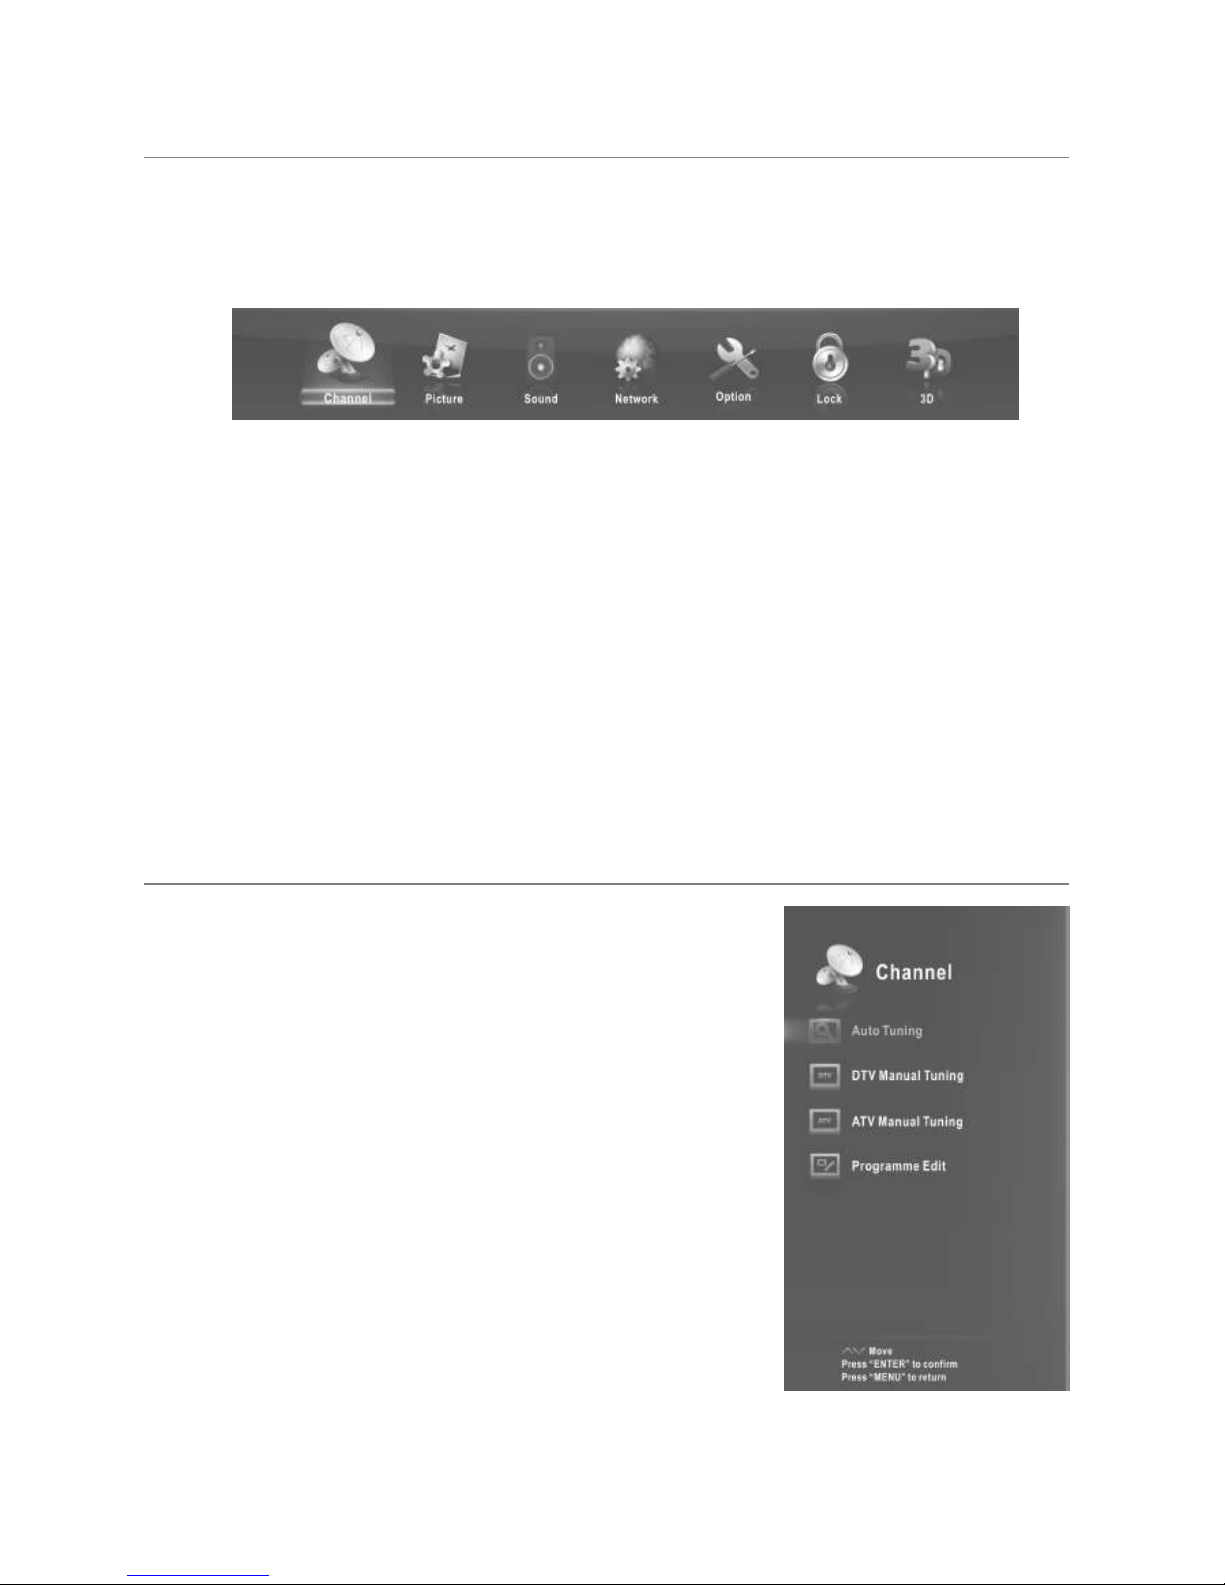
Configuring the Channel Menu
■ Auto Tuning:Select the ENTER button to start Auto
Tuning.
1. Select the tune type and country for channels.
2. The TV will begin memorizing all of the available
channels.
Once the progress bar is full, the found channels will
be stored and the unit will proceed to the search for
TV, DTV and Radio.
If you press the MENU button in TV searching, the
Channel Tuning will skip to DTV searching as the
suggestive picture shows.
■ DTV Manual Tuning: Manual store for digital
channels.
1. Press the ◄/►button to select channel.
2. Press the ENTER button to search.
When a channel is found, the searching process will
stop, the channel will be saved with current channel number.
English14
 Loading...