

Page 1

PETUNJUK PEMAKAIAN
TELEVISI LED
Model:LED19D1000
LED22D1000
LED22C1000
LED24D1000F
LED24B1000
LED24868
LED24D2200
Bacalah buku petunjuk pemakaian ini dengan teliti sebelum mengoperasikan TV.
Terdaftar No : P.32.CHANGHONG77.02601.0315
Page 2

DAFTAR ISI
Peringatan.......................…....................………………………………..…..……… 1
Petunjuk Keselamatan……….............………………………………....…………… 3
Memulai……………............……………...………………………..……..…………… 5
Menggunakan Remote Control……...........…………………………………..……. 5
Memasang Baterai pada Remote Control…....…….......………………...…… 5
Penggantian Baterai…......……………………………………………………..…… 5
Koneksi dan Pengaturan …………………..………………………………………… 6
Koneksi..........…………......…………………………………………………………. 6
Kabel Instalasi………………………………………………………………….....…. 7
Remote Control.…………………………..…………………………………………… 8
Pengoperasian Dasar…..…………………………………………………………... 9
Menyalakan dan mematikan TV………….....………………………………..……. 9
Pemilihan Program…………….….....………………………………………......… 9
Penyesuaian Suara…………………………………………………………….…… 9
Mengubah Sumber Input…..…….....………………………………………....…... 9
Menu Pengoperasian.…………..…………………………………………………. 10
Bagaimana Menjalankan Menu……..……………………………………………. 10
Konfigurasi Menu Saluran..........................…………………………………… 10
Konfiguarasi Menu Gambar..............….......………………...……………………1 1
Konfigurasi Menu Suara.....................………...…………………………..……… 11
Konfigurasi Menu Waktu.......................………………....…….....……………… 12
Konfigurasi Menu Fungsi.............…………….…………………………………… 13
Menggunakan Mode USB...…….………………………………………………… 14
Pedoman Pemecahan Masalah……..…………………………………………….. 16
Pemecahan Masalah……....……………………………………………………... 16
Perawatan……………………………………....…………………………………... 17
Page 3
Peringatan
1
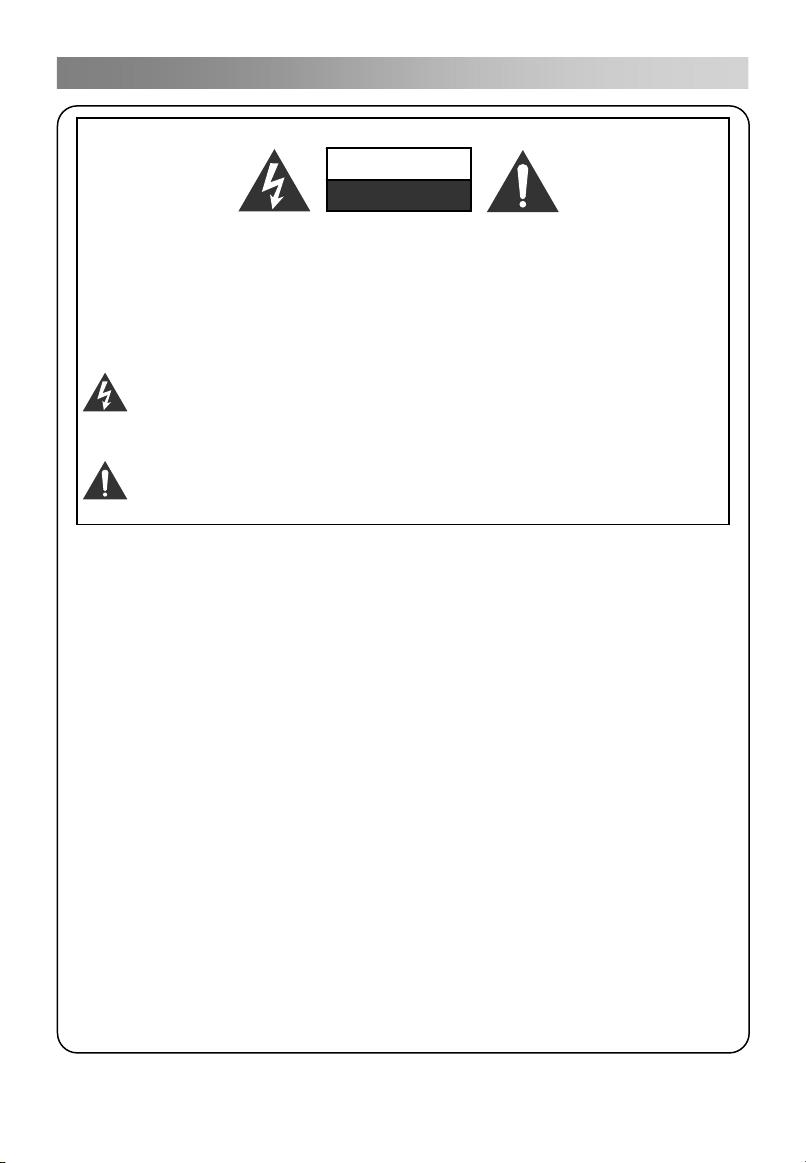
PERINGATAN:
UNTUK MENGURANGI RESIKO KEJUTAN LISTRIK, JANGAN
MEMBUKA TUTUP DEPAN (ATAU BELAKANG). TIDAK ADA BAGIAN
DALAM PART YANG DAPAT DIPERBAIKI OLEH PEMAKAI.
SERAHKAN PERBAIKAN PRODUK INI PADA TEKNISI YANG
BERKUALITAS.
Simbol petir dengan panah dalam segitiga sama sisi, dibuat untuk
memberitahukan kepada pemakai akan keberadaan “tegangan
berbahaya” yang tidak terisolasi pada produk yang mungkin
menimbulkan sengatan listrik yang cukup besar bagi manusia.
Simbol tanda seru dalam segitiga sama sisi dibuat untuk
memberitahukan kepada pemakai tentang pentingnya instruksi
pengoperasian dan pemeliharaan (servis) yang menyertai alat ini.
INFORMASI MENGENAI PERATURAN
Alat ini menggunakan dan memancarkan energi frekuensi radio sehingga jika
tidak dipasang dan digunakan sesuai dengan instruksi-instruksinya dapat
mengganggu komunikasi radio. Namun bagaimanapun juga, tidak ada garansi
bahwa interferensi tidak terjadi pada instalasi tertentu. Jika alat menyebabkan
interferensi berbahaya atas penerimaan radio atau televisi, yang mana dapat
ditentukan dengan memastikan alat mati dan menyala, pemakai dianjurkan untuk
memperbaiki interferensi dengan ukuran di bawah ini:
-Relokasi antenna penerima.
-Menambah jarak antara alat dan penerima.
-Hubungi alat pada stop kontak yang berbeda dengan stop kontak dimana
penerima terhubung.
-Konsultasi ke dealer atau teknisi radio/ TV yang berpengalaman untuk
bantuannya.
Perubahan atau modifikasi yang tidak disetujui oleh pihak yang bertanggung
jawab dapat membatalkan kewenangan pemakai untuk mengoperasikan alat
ini.
PERHATIAN
Jangan mengubah produk ini dengan cara apapun tanpa ijin tertulis dari pemasok.
Modifikasi yang tidak sah dapat membatalkan kewenangan pemakai untuk
mengoperasikan alat ini.
Tidak dianjurkan menyimpan gambar diam tertentu dalam jangka waktu yang
lama dan juga gambar yang sangat terang pada layar.
PERINGATAN
JANGAN DIBUKA
ADA ALIRAN LISTRIK
Page 4
Peringatan
2
PERINGATAN
Untuk mengurangi resiko kebakaran atau kejutan listrik, produk ini jangan terkena
hujan atau air.
Ventilasi sebaiknya tidak terhambat dengan tertutup oleh item seperti koran,
taplak meja, tirai dan lain-lain.
Produk ini tidak seharusnya terkena tetesan atau cipratan dan tidak ada benda
yang berisi cairan seperti vas bunga yang ditaruh di atas produk ini.
Harus diperhatikan aspek lingkungan untuk pembuangan baterai. Jangan
membuang baterai yang telah digunakan ke dalam tong sampah. Silakan
menghubungi penjual untuk melindungi lingkungan.
Ketika menginstal TV, menjaga jarak minimal 4 inci antara TV dan benda-benda
lainnya (dinding, sisi lemari, dll) untuk memastikan ventilasi yang tepat. Jika gagal
untuk mempertahankan ventilasi yang tepat dapat menyebabkan kebakaran atau
masalah dengan produk yang disebabkan oleh peningkatan suhu internal.
Tidak ada sumber api seperti lilin yang menyala yang ditempatkan pada produk;
Untuk menghindari penyebaran api, jauhkan lilin yang menyala atau sumber api
lainnya dari produk senantiasa.
Produk mungkin tidak berfungsi dengan baik ketika terjadi pengosongan
elektrostatik. Dapat secara manual dilanjutkan dengan menghidupkan power dan
mematikan power.
Untuk menghindari cidera yang disebabkan oleh penempatan produk yg tidak
benar,pastikan seluruh bagian produk sudah diletakkan pada permukaan yang
datar.
PERHATIAN menghubungkan kabel power
Kebanyakan peralatan dianjurkan untuk ditempatkan pada sirkuit tertentu yang
mana merupakan sirkuit tunggal ke peralatan tersebut dan tidak ada tambahan
outlet sirkuit maupun sirkuit cabang.
Jangan mengisi outlet dinding. Outlet dinding yang kelebihan beban, outlet
dinding rusak, perpanjangan kabel, kabel listrik usang atau isolasi kabel rusak
atau retak adalah berbahaya. Semua kondisi ini dapat menyebabkan kejutan
listrik atau kebakaran. Secara berkala periksa kabel dari peralatan Anda, dan jika
kelihatannya rusak atau tidak layak, cabut, dan jangan digunakan lagi, dan
gantikan kabel tersebut dengan pengganti yang sesuai dengan servis yang
berwenang. Lindungi kabel dari kerusakan fisik dan mekanis seperti menjadi
bengkok, tertekuk, terjepit, tertutup pintu atau berjalan di atasnya. Perhatikan
steker, colokan, dan titik keluarnya kabel dari produk tersebut. Steker utama
digunakan untuk memadamkan alat, dan melepaskan alat harus tetap siap
beroperasi.
Suhu Operasional: 5 ° C hingga 35 ° C Kelembaban Operasi: ≤ 80%
Suhu Penyimpanan: -15 ° C hingga 45 ° C Kelembaban Penyimpanan: ≤ 90%
Gambar dan ilustrasi pada buku petunjuk ini hanya sebagai referensi dan
mungkin berbeda dari tampilan produk sebenarnya. Desain dan spesifikasi
dari produk mungkin berubah tanpa pemberitahuan.
Page 5
Petunjuk Keselamatan
pengg
3
PETUNJUK PENTING KESELAMATAN
1. Baca petunjuk-petunjuk ini.
2. Simpan buku petunjuk ini.
3. Pahami semua peringatannya.
4. Ikuti semua petunjuknya.
7. Jangan menghalangi semua ventilasi
yang terbuka. Pasang sesuai
dengan instruksi dari pabrik.
5. Jangan menggunakan produk ini
dekat air.
6. Bersihkan hanya dengan kain kering.
8. Jangan memasang dekat dengan
sumber panas seperti radiator,
register panas, kompor atau alat lain
yang menghasilkan panas (termasuk
amplifier).
9. Jangan mengabaikan tujuan
keamanan dari steker tipe
terpolarisasi atau tipe landasan.
Steker terpolarisasi memiliki dua
bilah dengan satu lebar daripada
yang lainnya. Steker tipe landasan
memiliki dua bilah dan bilah ketiga
adalah landasan cabang. Bilah yang
lebar atau bilah ketiga disediakan
untuk keamanan Anda. Ketika steker
yang disediakan tidak sesuai dengan
stop kontak Anda, hubungi ahli listrik
untuk
antian steker tersebut.
Page 6

Petunjuk Keselamatan
y
4
10. Lindungi kabel power dari terinjak
atau terjepit terutama pada steker,
stop kontak dan pada titik di mana
kabel keluar dari produk.
11. Hanya pakai pelengkap/ aksesoris
yang ditentukan oleh pabrikan.
12. Gunakan kereta, tumpuan, tripod
atau meja yang ditentukan oleh
pabrikan, atau dijual beserta
produknya. Ketika kereta
digunakan, berhati-hatilah ketika
memindahan kereta/ kombinasi dari
produk untuk menghindari cedera
dari ujung atas.
13. Cabut kabel produk ini jika terjadi
kilat atau jika tidak digunakan pada
periode waktu yang panjang.
14. Semua perbaikan oleh personel
servis yang berkualifikasi. Servis
diperlukan apabila produk rusak
karena hal-hal berikut seperti kabel
listrik atau steker rusak, tertuang
cairan atau barang lain jatuh ke atas
produk, produk terkena hujan atau
cairan, tidak beroperasi dengan
normal, atau terjatuh.
TENTANG PEMBUANGAN
-Lampu neon yang digunakan pada produk ini mengandung sejumlah kecil
merkuri.
-Jangan membuang produk ini seperti kebanyakan peralatan rumah tangga biasa
lainnya.
-Pembuangan produk ini harus dilaksanakan sesuai dengan peraturan dari pihak
berwenang setempat.
CATATAN
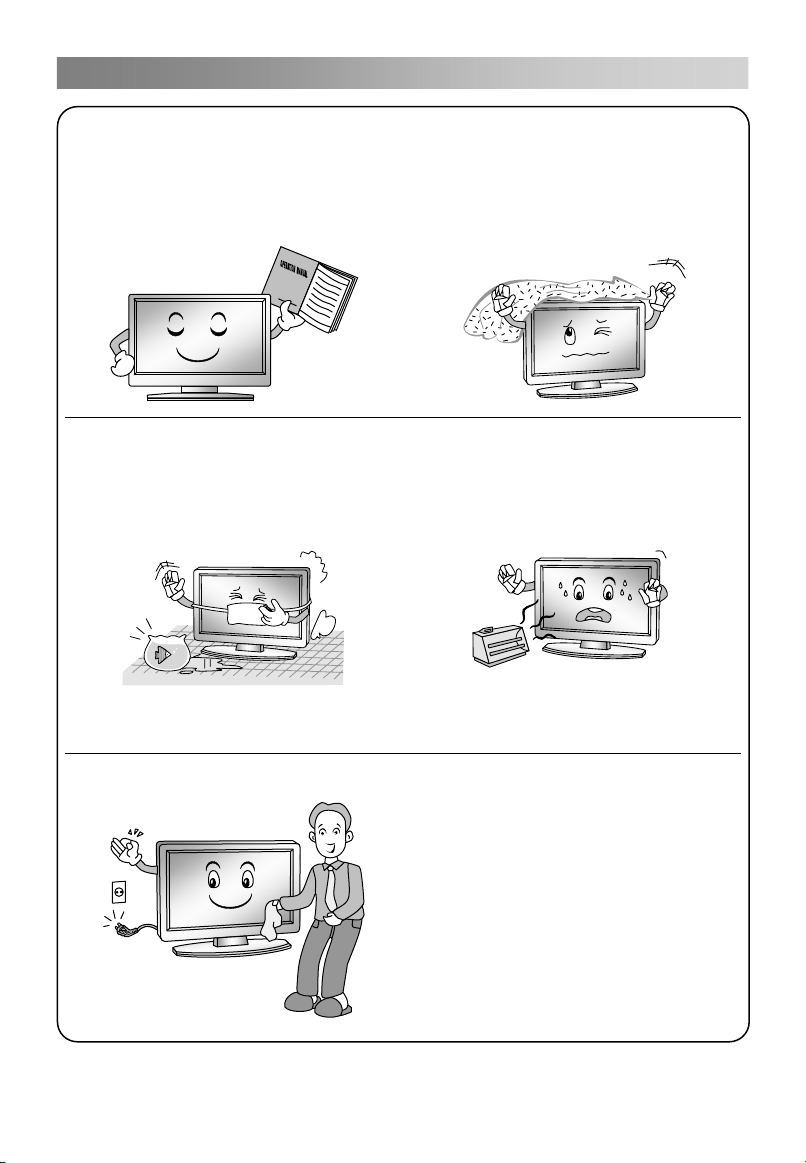
-Jika TV terasa dingin ketika disentuh, mungkin ada sedikit “kedipan” ketika
dinyalakan. Ini adalah normal, tidak ada yang tidak beres dengan TVnya.
-Beberapa menit dot mungkin terlihat pada layar, terlihat sebagai dot merah, hijau
atau biru kecil. Namun tidak efek negative pada kinerja layar.
-Hindari menyentuh layar atau memegangnya dengan jari padanya untuk periode
waktu yang lama. Hal ini dapat menyebabkan efek gangguan sementara pada
la
ar.
Page 7
Memulai
5
Menggunakan Remote Control
Ketika menggunakan remote kontrol, arahkan sensor remote pada televisi. Jika
terdapat benda yang menghalangi antara remote control dengan sensor maka unit
tidak dapat beroperasi.
Arahkan remote control ke REMOTE SENSOR yang terdapat pada televisi..
Ketika menggunakan televisi pada area yang sangat terang, infra merahnya
REMOTE CONTROL SENSOR mungkin tidak bekerja dengan baik.
Jarak efektif yang direkomendasi dalam penggunaan remote control adalah sekitar 7
meter.
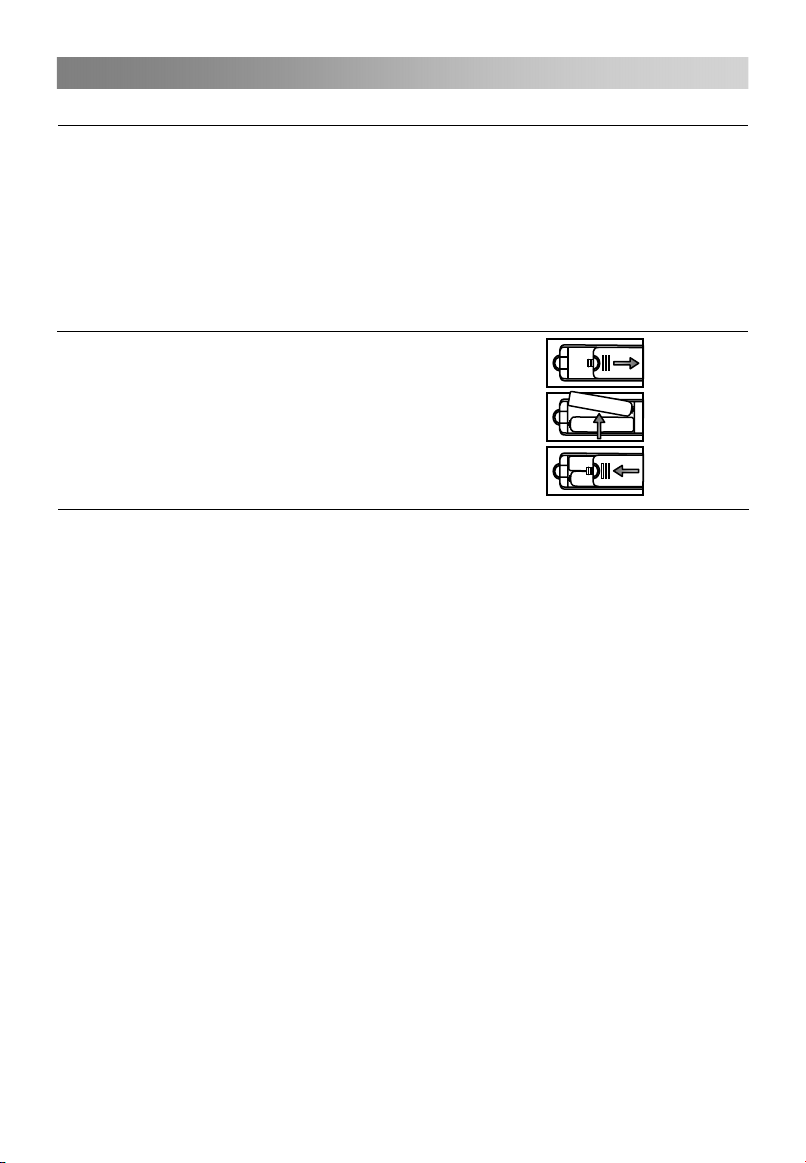
Memasang Baterai pada Remote Control
1. Buka tutup di belakang remote control.
2. Pasang 2 batu baterai ukuran AAA. Pastikan
sesuai dengan kutub “+” dan “-” dengan diagram
di dalamnya.
3. Tutup kembali.
Penggantian Baterai
Untuk memastikan remote control bekerja maka Anda harus memasang baterai sesuai
dengan instruksi di bawah.
Ketika baterai semakin lemah, maka jarak kerja untuk remote control akan sangat
berkurang dan Anda harus mengganti baterainya.
Catatan pada penggunaan baterai:
Penggunaan baterai yang tidak benar dapat menyebabkan keluarnya cairan racun
kimia dan atau ledakan. Pastikan mengikuti instruksi di bawah ini:
Selalu pastikan baterai telah terpasang pada kutub + dan – sesuai yang tercantum di
tempatnya..
Tiap jenis baterai memiliki karakteristik yang berbeda. Jangan mencampur tipe yang
berbeda.
Jangan mencampur penggunaan baterai lama dan baru. Menggabungkan keduanya
dapat mempercepat hidupnya baterai dan atau dapat menyebabkan keluarnya
cairan racun kimia.
Ganti dengan segera apabila baterai sudah tidak berfungsi lagi.
Kimia dari baterai yang bocor dapat menyebabkan iritasi kulit. Jika cairan kimia
keluar dari baterai, segera lap dengan kain kering.
Umur baterai mungkin bertambah pendek sesuai dengan kondisi penyimpanan.
Cabut baterai jika tidak digunakan untuk periode waktu tertentu.
Baterai (kemasan baterai atau baterai terpasang) tidak boleh terkena panas
berlebihan seperti sinar matahari, api atau sejenisnya.
PERHATIAN:
Jika baterai tidak ditempatkan dengan benar maka dapat menyebabkan ledakan.
Hanya ganti baterai dengan tipe yang sama atau sejenis.
Page 8
Koneksi dan Pengaturan
6
Koneksi
Matikan semua komponen ketika hendak memasang koneksi.
Jangan menyalakan TV sampai pengaturan koneksi selesai.
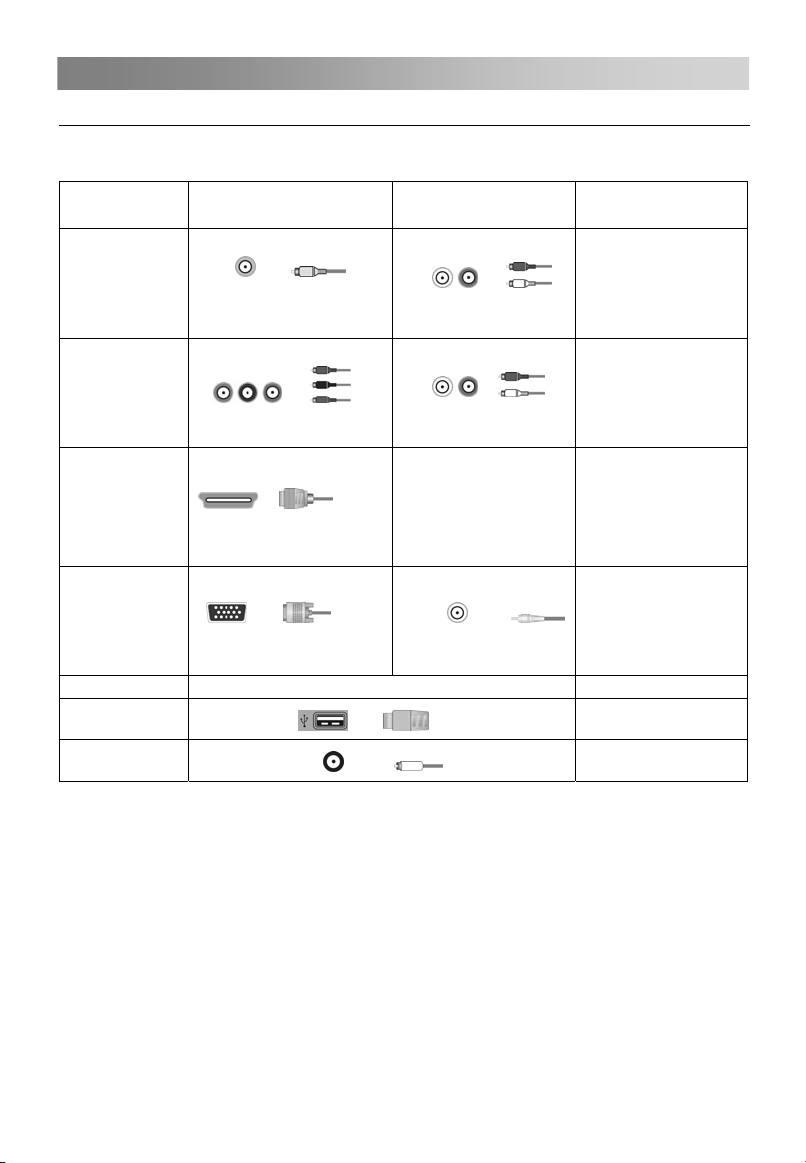
Konektor input Koneksi video Koneksi audio
AV
Component
HDMI
PC
Koneksi
USB
RF
Konektor Composite
video
Koneksi komponen
Koneksi HDMI
Koneksi PC
Koneksi USB
Koneksi RF
Kabel HDMI membawa
sinyal video dan audio.
Kabel audio terpisah tidak
diperlukan. (Ketika HDMI
dihubungkan ke DVI
dengan adaptor, L audio
terpisah / R diperlukan)
Audio L/R
Audio L/R
PC audio
Resolusi Tinggi atau
Standar
576i, 480i
(berisi SD)
1080p, 1080i, 720p,
576p, 576i, 480p, 480i
(Kompatibel dengan isi
HD atau SD)
1080p, 1080i, 720p,576p,
576i, 480p, 480i, PC
(Kompatibel dengan isi
HD atau SD)
1920×1080(60Hz)
USB2.0
75Ω
Page 9

Koneksi dan Pengaturan
7
Kabel Instalasi
Sebelum memasang dan menggunakan, silakan baca dengan seksama isi berikut
pada “Peringatan dan Instruksi Keselamatan”.
1. Ambil TV dari kemasannya dan tempatkan pada tempat yang datar dan berangin.
CATATAN:
¾ Ketika anda memasang atau melepaskan colokan TV, computer atau peralatan
lainnya, Anda harus memastikan AC power telah dipadamkan;
¾ Ketika melepaskan colokan kabel power atau kabel signal, pegang steker (bagian
terisolasi), jangan menarik dari badan kabel.
2. Terminal keluaran RF dapat disambungkan dengan terminal masukan RF pada TV.
3. Terminal keluaran AV dari DVD dapat dihubungkan dengan AV terminal masukan
pada TV melalui kabel AV.
CATATAN
¾ COMPONENT dan AV tidak dapat digunakan pada saat bersamaan karena
keduanya berbagi satu channel audio.
4. Terminal keluaran COMPONENT(YPbPr) pada DVD dapat dihubungkan dengan
terminal masukan COMPONENT(YPbPr) TV melalui kabel AV.
5. Hubungkan ujung kabel VGA yang satu dengan terminal VGA pada computer,
hubungkan ujung lain kabel VGA lainnya pada terminal VGA pada TV, dan
kencangkan bautnya searah jarum jam pada setiap ujung kabel VGA.
CATATAN:
¾ Ketika menghubungkan 15-pin VGA, jangan memasukkan colokan terlalu keras,
karena dikhawatirkan pin mungkin akan rusak.
6. Hubungkan ujung kabel HDMI dengan terminal keluar HDMI, hubungkan ujung
lainnya dengan terminal HDMI pada TV.
CATATAN:
¾ Ketika menghubungkan HDMI, pastikan dengan hati-hati, jangan terlalu keras
karena pin mungkin akan rusak karenanya.
7. Periksa dan pastikan semua kabel AV terhubung dengan terminal koresponden
dengan benar.
8. Hubungkan kabel AC power dengan listrik 100-240V~ .
CATATAN:
¾ Kisaran input daya untuk TV adalah 100-240V~ 50/60Hz, jangan menghubungkan
terminal daya masukan TV di luar dari kisaran daya di atas.
¾ Ketika melepaskan colokan kabel listrik pastikan memegang bagian yang terisolasi,
jangan memegang langsung bagian metal dari kabel.
:
Page 10
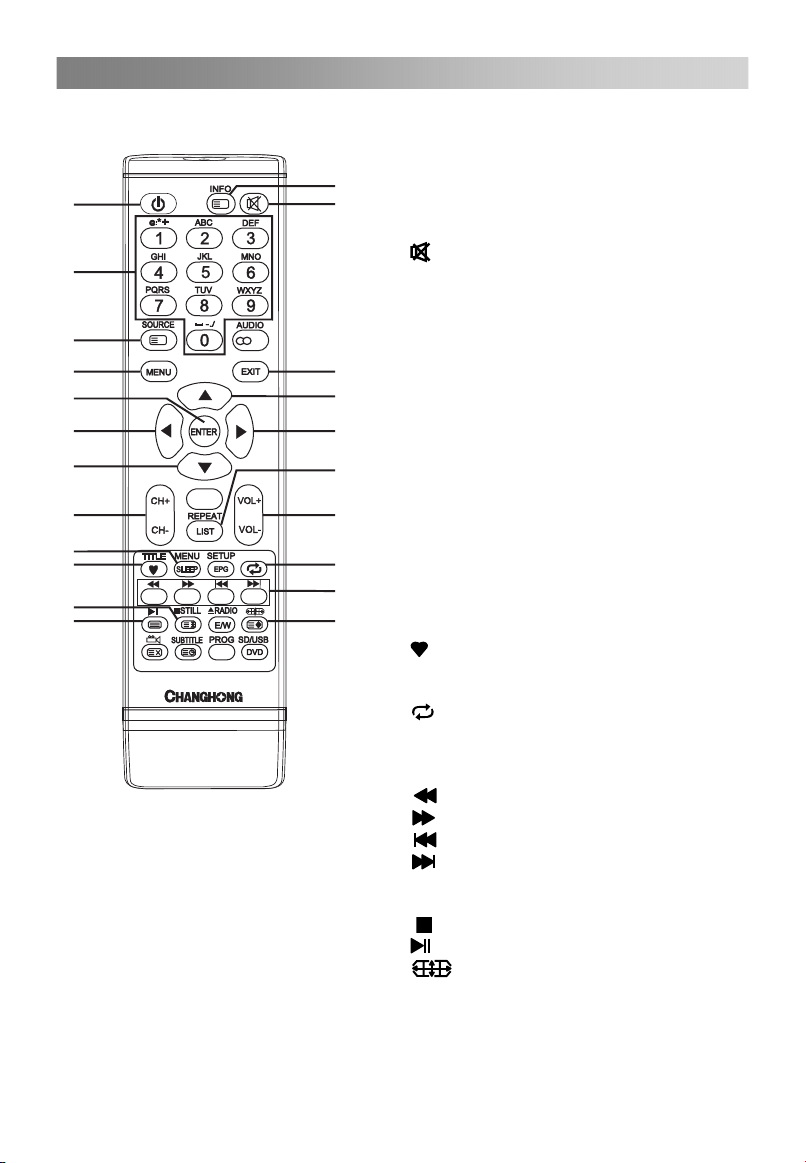
Remote Control
8
Tombol dari remote control yang asli adalah sebagai berikut:
Definisi dari tombol-tombol pada remote
control:
2
1
4
5
6
8
9 9
10
12
14
15
18
19
CATATAN:
?
i
I/II
GCBLT V21A -C60
Semua gambar pada buku petunjuk
ini adalah contoh, untuk referensi,
produk
sebenarnya mungkin
berbeda dari yang ada di gambar.
Tombol yang tidak disebutkan di
sini tidak dipakai.
1. POWER: Masuk atau keluar dari mode
3
siaga.
2. INFO: Memperlihatkan program saat ini.
3.
: Diam atau bersuara kembali.
4. NUMBER BUTTONS: Digunakan untuk
memilih saluran (pada mode TV).
5. SOURCE: Pilih sumbel signal.
6. MENU: Pilih untuk
7
10
menampilkan/menghilangkan menu pada
layar atau keluar dari beberapa operasi.
7. EXIT: Keluar dari tampilan sekarang.
8. ENTER: Pilih atau mengiyakan item
menu.
9. ◄/►: Pilih arah.
11
10. ▲/▼: Pilih arah .
11. REPEAT: Tekan untuk memilih mode
13
16
17
20
pengulangan. (pada mode USB)
12. CH+/CH-: Ganti ke channel
sesudahnya/sebelumnya.
13. VOL+/VOL-: Menambah. Mengurangi
volume suara.
14. SLEEP: Mengatur timer waktu.
15.
: Untuk menampilkan program favorit
pada TV mode (Mengatur channel favorite
pada Program Edit menu).
16.
: Kembali ke program terakhir/ sumber
signal yang dilihat.
17. COLOR BUTTONS:
Merah/hijau/kuning/biru kunci navigasi.
: Mundur cepat (pada mode USB)
: Maju cepat (pada mode USB)
: Sebelumnya (pada mode USB)
: Selanjutnya (pada mode USB)
18. STILL: Beku atau aktifkan gambar yang
sedang dilihat.
: Berhenti (pada mode USB)
: Main/ Pause (pada mode USB)
19.
20.
: Menyesuaikan aspek rasio yang
ditampilkan.
Page 11
Pengoperasian Dasar
9
Menyalakan dan mematikan TV
• Menyalakan TV
Sambungkan TV Anda dengan stop kontak.
Jika TV ada tombol power, tekan itu terlebih dahulu. Pada mode siaga, tekan tombol
Power pada remote control untuk menyalakan TVnya.
• Mematikan TV
Tekan tombol pada remote control untuk masuk dalam mode siaga.
Jangan biarkan TV Anda dalam mode siaga untuk periode waktu yang panjang.
Adalah lebih baik jika anda mencabut dari stop kontak.
CATATAN:
¾ Jika ada kecelakaan listrik padam, maka TV akan dalam mode siaga secara
otomatis ketika listrik menyala. Untuk memastikan pemakaian normal dari TV, sering
menyalakan dan mematikan adalah dilarang, lebih disarankan untuk mencabut kabel
listrik dari stop kontak.
• Tidak ada signal
Ketika TV bekerja pada mode penerimaan RF, TV akan masuk pada mode siaga
secara otomatis dalam 5 menit, jika tidak ada signal (seperti misalnya program
dihentikan dari stasiun TV). Dalam mode PC-RGB, TV akan secara otomatis mati
dalam 30 detik jika tidak ada signal. Ketika kabel VGA dihubungkan, TV akan
menyala secara otomatis.
Pemilihan Program
• Memakai CH+/CH- pada remote control atau panel pada TV.
Tekan CH+ untuk menambah angka channel.
Tekan CH – untuk mengurangi angka channel.
• Memakai tombol digital 0-9.
Anda dapat memilih angka channel dengan menekan angka 0 sampai dengan 9.
Sebagai tambahan, ketika TV berada pada beberapa mode, TV akan bekerja pada
mode TV dan memutarkan channel yang bersangkutan jika tombol ditekan.
• Contoh
Untuk memilih - channel (e.g. Channel 5): tekan 5.
Untuk memilih -- channel (e.g. Channel 20): tekan 2 dan 0 dengan jeda waktu yang
singkat.
Penyesuaian Suara
• Tekan tombol VOL+/- untuk menyesuaikan volume suara.
• Jika Anda ingin mematikan suara, tekan
• Anda dapat menyalakan kembali dengan menekan
suaranya.
Mengubah Sumber Input
Anda dapat memilih sumber input dengan menekan tombol SOURCE pada remote
control.
Tekan tombol ▲/▼untuk memilih sumber input dan tekan tombol ENTER untuk
memastikan pilihan Anda.
.
atau menambah volume
Page 12
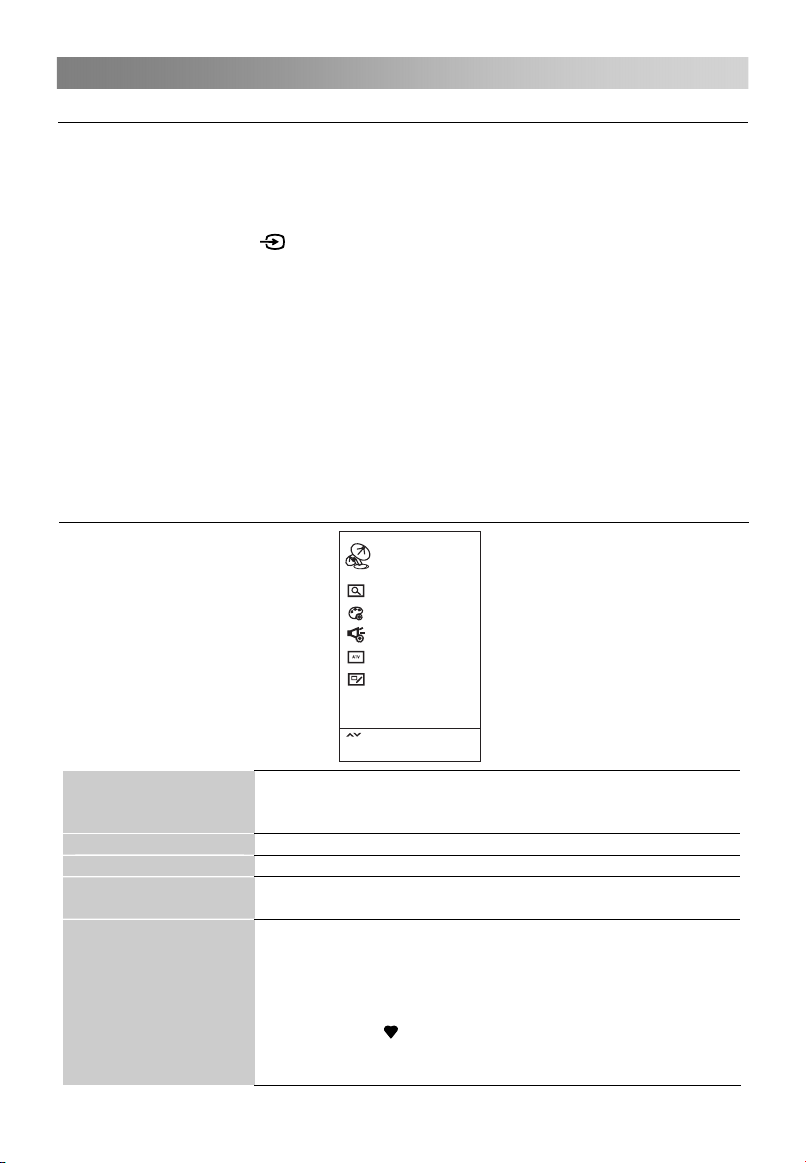
Menu Pengoperasian
10
Bagaimana Menjalankan Menu
Sebelum menyalakan TV, ikuti langkah-langkah di bawah ini untuk mempelajari
bagaimana menjalankan menu pilihan dan penyesuaian fungsi yang berbeda. Langkah
akses berbeda-beda tergantung pada menu yang dipilih.
1. Tekan tombol MENU untuk menampilkan menu utama.
2.
Tekan tombol ◄/► untuk siklus melalui menu utama, kemudian tekan tombol
ENTER atau TV/AV
( )
di panel untuk mengkonfirmasi.
3. Tekan tombol▲/▼untuk memilih sub item yang diinginkan.
4. Tekan tombol ENTER untuk mengakses sub menu.
5. Tekan tombol ▲/▼/◄/► untuk memilih nilai yang diinginkan. Penyesuaian dalam
OSD mungkin berbeda, tergantung pada menu yang dipilih.
6. Tekan tombol MENU untuk kembali ke menu sebelumnya.
7. Tekan tombol EXIT untuk keluar dari menu.
CATATAN:
tidak tersedia
¾ Jika item dalam MENU ditampilkan abu-abu, itu berarti item tersebut
atau tidak dapat disesuaikan.
¾ Tombol pada TV memiliki fungsi sama yang berhubungan dengan tombol pada
remote control. Jika remote control hilang atau tidak dapat berfungsi, anda dapat
menggunakan tombol pada TV untuk memilih menu. Manual ini berpusat pada
pengoperasian remote control.
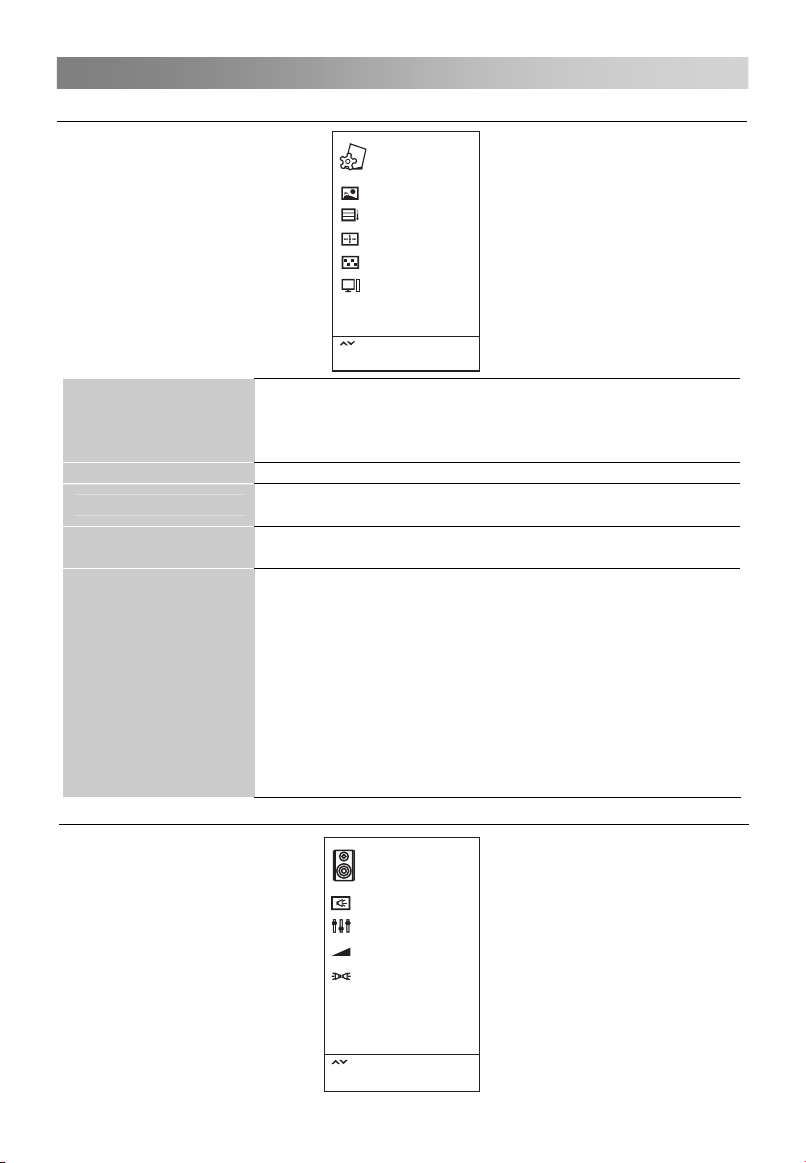
Konfigurasi Menu Saluran
Salu ran
Menc ari Oto matis
Sist em warn a
Sist em suar a
Penc arian s alura n ..
Peng ubaha n Progr. .
Auto
DK
Mencari Otomatis
Sistem warna
Sistem suara
Pencarian saluran
manual
Pengubahan Program
Pili h
Tekan " ENTER " untuk m emili h
Tekan " MENU" u ntuk ke mbali
Tekan tombol ENTER untuk memulai pencarian program
otomatis yang secara otomatis mencari dan menyimpan
semua program yang tersedia.
Untuk memilih Sistem Warna.
Untuk memilih Sistem Suara.
Pencarian manual mengizinkan anda mencari dan mengatur
sendiri stasiun berdasarkan susunan yang anda inginkan.
Tekan tombol ▲/▼ untuk memilih item.
Tekan tombol merah untuk menghapus channel.
Tekan tombol hijau untuk mengubah nama channel.
Tekan tombol kuning untuk menggeser channel.
Tekan tombol biru untuk melewati channel.
Tekan tombol
untuk menjadikan channel favorite.
Tombol CH+/CH- dapat digunakan untuk memilih halaman
berikut atau halaman sebelumnya.
Page 13
Menu Pengoperasian
11
Konfiguarasi Menu Gambar
Gam bar
Mode G ambar
Tempe ratur w arna
Aspe ct Rati o
DNR
Laya r
Pili h
Tekan " ENTER " untuk m emili h
Tekan " MENU" u ntuk ke mbali
Anda dapat memilih jenis gambar yang terbaik sesuai
Mode Gambar
dengan kebutuhan mata anda. Kontras, Kecerahan,
Saturasi, keseimbangan warna gambar dapat disesuaikan
ketika mode gambar(picture mode) dipilih oleh pengguna.
Temperatur warna
Aspect Ratio
DNR
Memilih temperature warna dari gambar.
Anda dapat memilih ukuran gambar yang terbaik sesuai
dengan kebutuhan mata anda.
Mengurangi gambar berbintik/bergaris pada saat signal
penyiaran lemah.
Jika TV digunakan sebagai terminal display, mode output
mode computer disarankan 1280 x1024(60Hz), Hal
tersebut dapat menampilkan performa terbaik dari TV.
Pengaturan otomatis: Mengatur image secara otomatis.
Layar
(In PC-RGB mode)
Posisi H: Atur gambar agar di tengah dengan
menggerakan ke kiri atau ke kanan.
Posisi V: Atur gambar agar di tengah dengan
menggerakan ke atas atau ke bawah.
Size: Mengatur besar layar.
Phase: Meningkatkan kualitas ketika karakter memiliki
kontras yang rendah atau gambar berkelip.
Konfigurasi Menu Suara
Tajam
Norm al
16:9
Seda ng
Sua ra
Mode S uara
Kese imban gan
AVL
Surr ound
Pili h
Tekan " ENTER " untuk m emili h
Tekan " MENU" u ntuk ke mbali
Thea ter
0
Hidu p
Mati
Page 14
Menu Pengoperasian
12
Mode Suara
Keseimbangan
Anda dapat memilih mode suara sesuai selera pribadi
Item dapat diseuaikan bila mode suara diatur ke User
anda.
Anda dapat mengatur keseimbangan suara speaker pada
level yang diinginkan.
AVL otomatis tetap sama pada level yang sama jika anda
merubah program. Karena setiap stasiun siaran memiliki
AVL
kondisi signal sendiri, pengaturan suara mungkin
diperlukan tiap kali channel dirubah. Fasilitas ini
mengizinkan pengguna menikmati level volume yang
stabil dengan pengaturan otomatis untuk tiap program.
Surround
Untuk menubah suara latar.
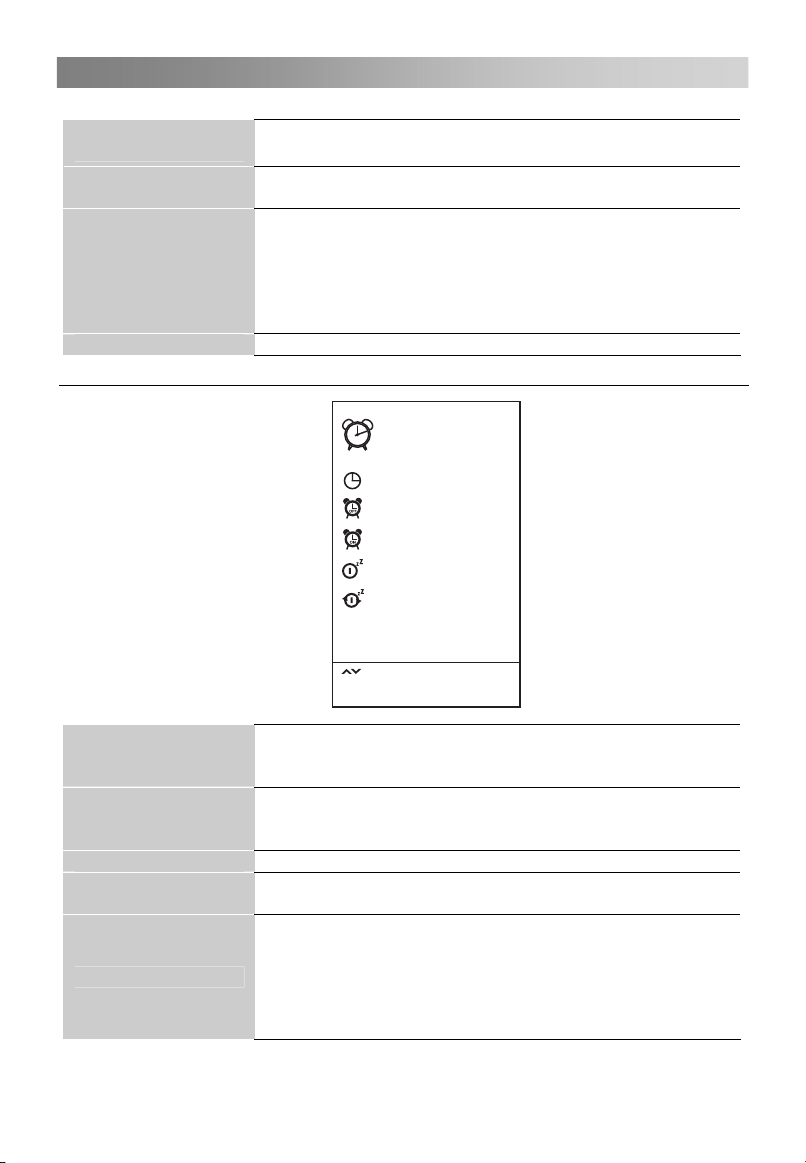
Konfigurasi Menu Waktu
Waktu
Jam
Wakt u mati
Wakt u hidup Mat i
Tidu r
Aut o Sleep
Pil ih
Tekan " ENTER " untuk m emili h
Tekan " MENU" u ntuk ke mbali
– – – –
Mat i
Mat i
4 Jam
Jam
Waktu mati
Waktu hidup
Tidur
Auto Sleep
Atur sistem waktu.
Anda dapat mengatur waktu yang tepat sebelum
menggunakan fungsi waktu on/off.
Atur waktu mematikan TV anda.
Waktu menyala dan waktu mati tidak dapat diatur sama,
dan tidak dapat bekerja pada menu operasi.
Atur waktu TV anda menyala.
Pilih waktu untuk mengubah TV anda ke mode stand by
secara otomatis.
Pilih waktu tidur otomatis yang anda inginkan.
Tidur otomatis mengubah TV ke mode stand by secara
otomatis setelah waktu pengaturan berlalu.(Waktu
pengaturan adalah 4 jam ketika meninggalkan pabrik).
Semua pilihan Menu Timer kecuali Clock dan Auto Sleep
tidak tersedia dalam Mode USB.
Page 15
Menu Pengoperasian
13
Konfigurasi Menu Fungsi
Bahasa
Transparan
Layar biru
Panel dikunci
Pengingat Kesehatan
Store Demo
Pilih bahasa yang anda inginkan.
Pilih menu transparan sesuai gambar latar yang berbeda.
Ketika tidak ada signal TV
Menyala Layar Biru Layar Biru
Mati
Ketika panel kunci(panel lock) diaktifkan, semua tombol
pada TV terkunci dan kehilangan fungsi mereka. Untuk
melepasakan panel lock, harap tekan tombol sembarang
pada TV selama 5 detik. Ketika anda memilih item ini tidak
aktif, tombol TV pada mode biasa.
Nyalakan atau matikan pengingat kesehatan(health
remind). Ketika pengingat kesehatan menyala, akan ada
gambar yang mengingatkan anda untuk beristirahat setelah
selang 2 jam.
Mengatur Store Demo ON atau OFF.
Store Demo adalah pengaturan optimal untuk lingkungan
pada
gambar
pengaturan gambar optimal setelah beberapa waktu.
Gambar berbintik-bintik
putih
Toko.Apabila ada pengguna yang mengatur kualitas
tidak optimal, mode Demo Store akan membalikan
Ketika tidak ada
signal yang lain
Layar Hitam
Page 16

Menu Pengoperasian
14
Mode Energi
Demonstrasi Energi
Kembali ke semula
Menggunakan Mode USB
• Untuk mengakses/ menghentikan mode USB
Tekan tombol SOURCE untuk memanggil menu sumber signal pilihan. Gunakan
▲/▼ untuk memilih USB, dan tombol ENTER untuk mengakses mode USB. Anda
boleh menggunakan menu sumber signal pilihan untuk keluar dari mode USB.
CATATAN:
¾ Tidak mendukung dengan baik perangkat USB khusus.
¾ USB Kapasitas Maksimum: DC 5V 500mA.
• Format yang mendukung
Fungsi USB dapat mendukung perangkat USB dengan memori USB.
Dapat memainkan PHOTO, MUSIK, FILM atau file TEXT.
Mendukung format Photo: JPEG, BMP, PNG.
Mendukung format Musik: WMA, MP3, M4A(AAC).
Mendukung format Film: MPG, RM.
Mendukung format Text: TXT.
CATATAN:
¾ USB tidak mendukung dokumen algoritma special.
USB mendukung format-format yang disebutkan diatas, jika format file tidak sesuai,
ubah menjadi format yang diberikan.
Video decoder mendukung H.264.
¾
• Penghubung Operasi Utama
Beralih Mode Energi "hidup" atau "mati"
Beralih Demonstrasi Energi "hidup" atau "mati"
Ketika Mode Energi dan Demonstrasi Energi diatur dalam
posisi "Hidup", "Konsumsi" akan muncul di layar TV.
Menyimpan pengaturan sistem sesuai sistem yang
ditentukan pabrik.
Page 17
Menu Pengoperasian
15
1. Gunakan tombol ◄/► untuk memilih PHOTO, MUSIK, FILM atau TEXT. Tekan
tombol
2. Gunakan tombol panah dan tombol ENTER untuk masuk pada disk yang
diinginkan. Tekan ENTER untuk membuka folder.
3. Gunakan tombol panah untuk memilih file. Gunakan tombol ENTER untuk
menandai atau meniadakan tanda pada file. Tekan tombol
file yang dipilih. Jika tidak ada file yang ditandai, semua files dalam folder akan
dimainkan secara berurut setelah anda menekan tombol .
4. Tekan tombol INFO untuk menampilkan menu yang sedang dimainkan.
5. Tekan
6. Tekan tombol EXIT untuk kembaili ke menu sebelumnya.
• Fungsi dasar
1. Play/ Pause
Mulai memainkan file yang dipilih dalam folder atau menghentikan sementara.
2. Stop
Menghentikan file dimainkan.
3. / Fast Reverse/Fast Forward
Anda dapat menekan / untuk melewati ke file sebelumnya atau setelahnya.
4. / Previous/Next
Anda dapat memilih file yang dikehendaki pada kondisi normal.
5. Red button
Pilih file yang ingin dihapus, tekan tombol merah untuk membuka menu bersangkutan,
kemudian tekan tombol ENTER untuk menghapusnya.
6. CH+/CH-
Ketika melihat file TEXT, tekan CH+/CH- untuk mengubah halaman atas dan bawah.
7. CH+/CH- on the TV
Pada mode USB, pakai tombol CH+/CH- pada TV seperti menggunakan tombol
ENTER pada remote kontrol.
Tekan tombol CH+/CH- pada TV selama lebih dari 3 detik untuk memulai memainkan
file yang dipilih.
8. VOL+/VOL- on the TV
Ketika memilih file, gunakan tombol VOL+ /VOL- pada TV seperti Anda menggunakan
tombol pada remote control. ◄/►
Ketika bermain file, gunakan tombol VOL+ /VOL- pada TV seperti Anda akan
menggunakan tombol VOL+ /VOL- pada remote control.
ENTER untuk masuk ke sub menu.
untuk memainkan
untuk menghentikan files dimainkan.
Page 18
Pedoman Pemecahan Masalah
16
Pemecahan Masalah
Ketika Anda menghadapi masalah-masalah umum seperti di bawah, Anda mungkin
mendiagnosa dan mendapatkan solusinya tanpa menghubungi teknisi.
Gejala Kemungkinan Alasan Solusi
Tidak ada gambar, tidak
ada suara, dan lampu
indikator tidak menyala
Gambar dan suara tidak
normal
Gambar ada bintik salju
Tidak ada gambar, tidak
ada suara dan lampu
indikator berwarna
hijau/biru
Layar biru, AV
ditayangkan
Gambar tidak jelas atau
goyang atau ada garis
horizontal hitam (pada
mode PC)
Gambar PC tidak di
tengah
Tidak ada suara
Gambar PC tertayang
dengan warna yang
tidak tepat
1.Kabel power tidak terpasang
2.Tidak ada sumber listrik padam
1.Kontras, ketajaman, dan warna
tidak diatur dengan benar
2.Sistem warna tidak diatur dengan
benar
3.Sistem suara tidak diatur dengan
benar
Sumber sinyalnya rendah
tingkatnya atau kabel sinyal rendah
kualitasnya
Volume suara dalam kondisi yang
paling kecil atau TV dalam mode
diam.
Kabel sinyal tidak terhubung
dengan benar.
Tidak ada masukan sinyal atau
kabel video tidak terhubung atau
terhubung dengan kurang baik
Gambar PC tidak diatur dengan
benar.
Tidak ada sinyal masukan audio
atau kabel audio tidak terhubung
dengan benar
color temp tidak tersesuaikan
dengan benar oleh pengguna
1.Colok kabel power
2.Nyalakan sumber
listriknya
1.Sesuaikan kekontrasan,
ketajaman dan warnanya
2.Atur sistem warna ke
standar penyiaran negara
setempat
3.Atur sistem suara ke
standar penyiaran Negara
setempat
Pakai kabel sinyal yang
berkualitas
Sesuaikan nilai dari volume
suara
Hubungi kabel sinyal
dengan benar
Hubungkan kabel video
dengan benar
Masuk ke menu Screen,
pilih Auto Adjust ke
perform automatic
calibration dan sesuaikan
Phase untuk menyelesaikan
masalah
Hubungi kabel audio
dengan benar
Sesuaikan kembali color
temp, atau pilih original
color setting
Page 19

Pedoman Pemecahan Masalah
17
Sumber HDMI,seluruh
layar penuh dengan titik
salju
Remote kontrol tidak
berfungsi
Sumber penghasil tidak standar
Baterai tidak terpasang dengan
benar atau sudah habis tenaganya
Perawatan
Kerusakan dini dapat dicegah. Bersihkan dengan hati-hati dan teratur dapat
memperpanjang waktu TV baru Anda. Pastikan untuk mematikan listrik dan cabut
kabel power sebelum Anda mulai membersihkan.
Bersihkan layar
1. Cara yang bagus untuk menjauhkan debu dari layar Anda. Basahi kain halus dalam
campuran air hangat dan pelembut pakaian atau deterjen pencuci piring. Peras kain
sampai hampir kering, kemudian gunakan untuk mengelap layar.
2. Pastikan kelebihan air tidak ada pada layar, dan biarkan kering sebelum Anda
menyalakan TV Anda.
Bersihkan kabinet
Untuk menghilangkan kotoran atau debu, bersihkan kabinet dengan kain halus, kering
dan bebas serta. Pastikan tidak menggunakan kain basah.
Tidak digunakan dalam waktu yang lama
Jika Anda akan meninggalkan TV Anda dalam waktu yang panjang (misalnya
liburan), adalah bagus untuk melepaskan kabel power untuk mencegah
kemungkinan rusak akibat kilat atau lonjakan kilat.
Colok kabel HDMI kembali
1. Pastikan kutub positif dan
negative sudah benar.
2.Periksa apakah kontaknya
longgar antar baterai dan
sumbernya
3.Ganti baterainya
Pembuangan alat rumah tangga yang lama
Petunjuk Eropa 2012/19/EU mengenai Limbah Elektrik dan Peralatan
Elektronik (WEEE), mensyaratkan untuk peralatan rumah tangga yang lama
tidak boleh dibuang di aliran limbah sortir kota. Peralatan yang lama harus
dikumpulkan secara terpisah untuk mengoptimalkan pemulihan dan pendaur
ulangan material yang terkandung, dan mengurangi dampak pada
kesehatan manusia dan lingkungan.
Simbol tong sampah yang disilang mengisyaratkan kewajiban Anda ketika
hendak membuang peralatan, harus secara terpisah pengumpulannya.
Konsumer harus menghubungi otoritas setempat atau pengecer untuk
informasi yang tepat dalam pembuangan peralatan rumah tangga mereka
yang lama.
Peralatan ini adalah Ⅱ Kelas atau alat listrik berisolasi ganda. Ini telah dirancang
sedemikian rupa sehingga tidak memerlukan koneksi aman ke bumi listrik.
Page 20

Spesifikasi CHANGHONG LED
18
SPESIFIKASI UMUM
Jenis layar
Ukuran (inci) layar
LED19D1000 LED22D1000
19
SISTEM PENYIARAN
Analog Ya
Digital
T idak
T idak
GAMBAR
Resolus i
BLU jenis (lampu latar)
Rasio kontras dinamis
ResponseTime(MPRT)
Full HD
136 6 x 768
LED
600:1
5ms
T idak
1920 x 1080
LED
600:1
5ms
VIDEO
PictureStatusMode
4 mode (Standar, Lembut, Pemakai, Tajam)
AUDIO
Audio Outpu t
Speaker System
SoundMode 5 mode(
Mono/Stereo/Dual
Theater/Musik/Sports/Pemakai/Standar
2w+2w
2 speaker
T idak
FITUR
USB 2.0
Smart penghematan ener g i
PHOTO/MUSIK/FILM/TEXT
T idak
LED24D1000F
22 24
Ya
Ya
T idak
1920 x 1080
LED
1000:1
5ms
Ya Ya
)
ANTARMUKA
Set Side ==========
USB 2.0
AV In
Komponen (Y Pb, Pr)
1
1
1
Set Bottom ==========
RF In 1
Input HDMI/HDCP
PC Audio Input
RGB In (Dsub 15pin)
1
1
1
Page 21

POWER KONSUMSI
19
Tegangan, Frekwensi
Konsumsi daya
Siaga (Off mod us)
DIMENSI
Berat (Kg)
SET(w/o stand)
Posisi berdiri
WxHxD (mm)
SET
Posisi berdiri
25W
↓
1W
==========
2.6
3 .5
==========
439 x281x49.5
1 0 0 - 240V~ 50/60Hz
30W
↓
1W
==========
2.85
3.45
==========
5 05.5x310.3x49
5 05.5x363x140
439x321x139
30W
↓
1W
==========
3.1
3.9
==========
564.5x340x44.4
5 64.5x387.5x178
Page 22

Spesifikasi CHANGHONG LED
20
SPESIFIKASI UMUM
Jenis layar
LED24B1000
Ukuran (inci) layar
SISTEM PENYIARAN
Analog
Digital
Ya
T idak
GAMBAR
Resolus i
BLU jenis (lampu latar)
Rasio kontras dinamis
ResponseTime(MPRT)
HDReady
1366 x 768
LED
2000:1
8.5ms
Y a
VIDEO
PictureStatusMode
4 mode (Standar, Lembut, Pemakai, Tajam)
AUDIO
Audio Outpu t
Speaker System
SoundMode 5 mode(
Mono/Stereo/Dual
Theater/Musik/Sports/Pemakai/Standar
2w+2w
2 speaker
T idak
FITUR
USB 2.0
Smart penghematan ener g i
PHOTO/MUSIK/FILM/TEXT
T idak
24
)
ANTARMUKA
Set Side ==========
USB 2.0
AV In
Komponen (Y Pb, Pr)
1
1
1
Set Bottom ==========
RF In
Input HDMI/HDCP
PC Audio Input
RGB In (Dsub 15pin)
1
1
1
1
Page 23

POWER KONSUMSI
21
Tegangan, Frekwensi 100 -240V~ 50/60Hz
Konsumsi daya
Siaga (Off mod us)
30 W
↓
1W
DIMENSI
Berat (Kg)
SET(w/o stand)
Posisi berdiri
WxHxD (mm)
SET
Posisi berdiri
==========
3.1
3 .9
==========
552.5 x346x50.5
552.5x388x178
Page 24

Spesifikasi CHANGHONG LED
22
SPESIFIKASI UMUM
Jenis layar
LED24868
Ukuran (inci) layar
SISTEM PENYIARAN
Analog
Digital
Ya
T idak
GAMBAR
Resolus i
BLU jenis (lampu latar)
Rasio kontras dinamis
ResponseTime(MPRT)
HDReady
1366 x 768
LED
1000:1
8.5ms
Y a
VIDEO
PictureStatusMode
4 mode (Standar, Lembut, Pemakai, Tajam)
AUDIO
Audio Outpu t
Speaker System
SoundMode 5 mode(
Mono/Stereo/Dual
Theater/Musik/Sports/Pemakai/Standar
2w+2w
2 speaker
T idak
FITUR
USB 2.0
Smart penghematan ener g i
PHOTO/MUSIK/FILM/TEXT
T idak
24
)
ANTARMUKA
Set Side ==========
USB 2.0
RF In
1
1
1
Set Bottom ==========
AV In
Input HDMI/HDCP
PC Audio Input
RGB In (Dsub 15pin)
1
1
1
1
miniKomponen (Y Pb, Pr)
Page 25

POWER KONSUMSI
23
Tegangan, Frekwensi 100 -240V~ 50/60Hz
Konsumsi daya
Siaga (Off mod us)
35W
↓
1W
DIMENSI
Berat (Kg)
SET(w/o stand)
Posisi berdiri
WxHxD (mm)
SET
Posisi berdiri
==========
3.95
4 .2
==========
576 x366x41
576x413x178
Page 26

Spesifikasi CHANGHONG LED
24
SPESIFIKASI UMUM
Jenis layar
LED22C1000
Ukuran (inci) layar
SISTEM PENYIARAN
Analog
Digital
Ya
T idak
GAMBAR
Resolus i
BLU jenis (lampu latar)
Rasio kontras dinamis
ResponseTime(MPRT)
HDReady
1366 x 768
LED
600:1
5ms
Y a
VIDEO
PictureStatusMode
4 mode (Standar, Lembut, Pemakai, Tajam)
AUDIO
Audio Outpu t
Speaker System
SoundMode 5 mode(
Mono/Stereo/Dual
Theater/Musik/Sports/Pemakai/Standar
2w+2w
2 speaker
T idak
FITUR
USB 2.0
Smart penghematan ener g i
PHOTO/MUSIK/FILM/TEXT
T idak
22
)
ANTARMUKA
Set Side ==========
USB 2.0
RF In
1
1
1
Set Bottom ==========
AV In
Input HDMI/HDCP
PC Audio Input
RGB In (Dsub 15pin)
1
1
1
1
Komponen (Y, Pb, Pr)
Page 27

POWER KONSUMSI
25
Tegangan, Frekwensi 100 -240V~ 50/60Hz
Konsumsi daya
Siaga (Off mod us)
30W
↓
1W
DIMENSI
Berat (Kg)
SET(w/o stand)
Posisi berdiri
WxHxD (mm)
SET
Posisi berdiri
==========
3.29
3 .76
==========
527.5 x340x46
527.5x369.8x186.9
Page 28

Spesifikasi CHANGHONG LED
24
SPESIFIKASI UMUM
Jenis layar
LED24D2200
Ukuran (inci) layar
SISTEM PENYIARAN
Analog
Digital
Ya
T idak
GAMBAR
Resolus i
BLU jenis (lampu latar)
Rasio kontras dinamis
ResponseTime(MPRT)
HDReady
1920 x 1080
LED
3000:1
5ms
Y a
VIDEO
PictureStatusMode
4 mode (Standar, Lembut, Pemakai, Tajam)
AUDIO
Audio Outpu t
Speaker System
SoundMode 5 mode(
Mono/Stereo/Dual
Theater/Musik/Sports/Pemakai/Standar
2w+2w
2 speaker
T idak
FITUR
USB 2.0
Smart penghematan ener g i
PHOTO/MUSIK/FILM/TEXT
T idak
24
)
ANTARMUKA
Set Side ==========
Komponen (Y, Pb, Pr)
Set Bottom ==========
DCIN
USB
HDMI
PC
1
1
1
1
1
1
VIDEO
R- Audio -L
PC/DVI AUDIO
ANT
headphone
1
1
1
1
Page 29

POWER KONSUMSI
25
Tegangan, Frekwensi 100 -240V~ 50/60Hz
Konsumsi daya
Siaga (Off mod us)
35W
↓
1W
DIMENSI
Berat (Kg)
SET(w/o stand)
Posisi berdiri
WxHxD (mm)
SET
Posisi berdiri
==========
3.85
4 .95
==========
552 .6 x332x50.8
552.6x365x153.1
Page 30

Page 31

Operation Manual
LED TV
Model:LED19D1000
LED22D1000
LED22C1000
LED24D1000F
LED24B1000
LED24868
LED24D2200
Please read this manual carefully before operating your TV.
No.Registered: P.32.CHANGHONG77.02601.0315
Page 32

Contents
Warning…………........….........................………………………………..…..……… 1
Safety instructions……….........…......………………………………....…………… 3
Getting Started…………………………...………………………..……..…………… 5
Using the Remote Control………………...…………………………………..……. 5
Battery Replacement…....……………………………………………………...…… 5
Connection and Setup…………………...…………………………………………… 6
Connection..........……………………………………………………………………. 6
Cable Installation……………………………………………………………………. 7
Remote Control…………………………..………………………………………….… 8
Basic Operation…………………………………………………………………….... 9
Turning on and off the TV……………………………………………………..……. 9
Programme Selection…………….…………………………………………...…… 9
Volume Adjustment……….......………………………………………………..…… 9
Changing the Input Source…..……………………………………………..……... 9
Menu Operation ………………..…………………………………………………. 10
How to Navigate Menus……......…………………………………………………. 10
Configuring the Channel Menu.................…………………………………… 10
Configuring the Picture Menu..............…...……………………………………… 11
Configuring the Sound Menu.............………...…………………………..……… 11
Configuring the Timer Menu.................………………....…….....……………… 12
Configuring the Option Menu......…………….…………………………………… 13
Using USB mode...………………………………………………………………… 14
Troubleshooting Guide…………………………………………………………….. 16
Troubleshooting…………….……………………………………………………... 16
Maintenance………………………………………………………………………... 17
Installing Batteries in the Remote Control……………...………………...…… 5
Page 33

Warning
1
WARNING:
TO REDUCE THE RISK OF ELECTRIC SHOCK DO NOT REMOVE
COVER (OR BACK). NO USER SERVICEABLE PARTS INSIDE.
REFER TO QUALIFIED SERVICE PERSONNEL.
The lightning flash with arrowhead symbol, within an equilateral
triangle, is intended to alert the user to the presence of uninsulated
"dangerous voltage" within the products enclosure that may be of
sufficient magnitude to constitute a risk of electric shock to persons.
The exclamation point within an equilateral triangle is intended to alert
the user to the presence of important operating and maintenance
(servicing) instructions in the literature accompanying the appliance.
REGULATORY INFORMATION
This equipment generates uses and can radiate radio frequency energy and, if not
installed and used in accordance with the instructions, may cause harmful
interference to radio communication. However, there is no guarantee that
interference will not occur in a particular installation. If this equipment does cause
harmful interference to radio or television reception, which can be determined by
turning the equipment off and on, the user is encouraged to try to correct the
interference by one or more of the following measures:
-Relocate the receiving antenna.
-Increase the separation between the equipment and receiver.
-Connect the equipment into an outlet on a circuit different from that to which the
receiver is connected.
-Consult the dealer or experienced radio/TV technician for help.
Any changes or modifications not expressly approved by the party responsible
for compliance could void the user's authority to operate the equipment.
CAUTION
DO not attempt to modify this product in any way without written authorization
from supplier. Unauthorized modification could void the user's authority to operate
this product.
It is not recommended to keep a certain still image displayed on the screen for a
long time as well as displaying extremely bright images on screen.
CAUTION
RISK OF ELECTRIC SHOCK
DO NOT OPEN
Page 34

Warning
2
WARNING
To Reduce The Risk Of Fire Or Electric Shock, Do Not Expose This Apparatus To
Rain Or Moisture.
The ventilation should not be impeded by covering the ventilation openings with
items, such as newspapers, table-cloths, curtains, etc.
The Apparatus shall not be exposed to dripping or splashing and that no objects
filled with liquids, such as vases, shall be placed on the apparatus.
Attention should be drawn to the environmental aspects of battery disposal. Don’t
throw used batteries in dustbin. Please contact your retailer in order to protect the
environment.
When you install your TV, maintain a distance of at least 4 inches between the TV
and other objects (walls, cabinet sides, etc.) to ensure proper ventilation. Failing
to maintain proper ventilation may result in a fire or a problem with the product
caused by an increase in its internal temperature.
No naked flame sources, such as lighted candles, should be placed on the
apparatus.
To prevent the spread of fire, keep candles or other open flames away from this
product at all times.
The device may be malfunction when under electrostatic discharge. It can be
manually resumed by power off and power on again.
Warning: To avoid any injury caused by overturn of the product, please always
ensure the whole product was placed within the table surface in horizontal.
CAUTION connecting the Power Cord
Most appliances recommend they be placed upon a dedicated circuit; that is, a
single outlet circuit which powers only that appliance and has no additional outlets
or branch circuits.
Do not overload wall outlets. Overloaded wall outlets, loose or damaged wall
outlets, extension cords, frayed power cords, or damaged or cracked wire
insulation are dangerous. Any of these conditions could result in electric shock or
fire. Periodically examine the cord of your appliance, and its if appearance
indicates damage or deterioration, unplug it, discontinue use of the appliance, and
have the cord replaced with an exact replacement part by an authorized servicer.
Protect the power cord from physical or mechanical abuse, such as being twisted,
kinked, pinched, closed in a door, or walked upon. Pay particular attention to
plugs, wall outlets, and the point where the cord exits the appliance.
The MAINS plug is used as the disconnect device, and the disconnect device shall
remain readily operable.
Operating Temperature:
Operating Humidity: ≤80%
Figures and illustrations in this User Manual are provided for reference only
and may differ from actual product appearance. Product design and
specifications may be changed without notice.
5°C to 35°C
Storage Temper
Storage Humidity: ≤90%
ature: -15°C to 45°C
Page 35

Safety instructions
3
IMPORTANT SAFETY INSTRUCTIONS
1. Read these instructions.
2. Keep these instructions.
3. Heed all warnings.
4. Follow all instructions.
7. Do not block any of the ventilation
openings. Install in accordance with
the manufacturer's instructions.
5. Do not use this apparatus near water.
6. Clean only with a dry cloth.
8. Do not install near any heat source
such as radiators, heat registers,
stoves, or other apparatus (including
amplifiers) that produce heat.
9. Do not defeat the safety purpose of
the polarized or grounding type plug.
A polarized plug has two blades with
one wider than other. A grounding
type plug has two blades and a third
grounding prong. The wide blade or
the third prong is provided for your
safety. When the provided plug does
not fit into your outlet, consult an
electrician for replacement of the
obsolete outlet.
Page 36

Safety instructions
4
10. Protect the power cord from being
walked on or pinched particularly at
plugs, convenience receptacles,
and the point where they exit from
the apparatus.
11. Only use the attachments/
accessories specified by the
manufacturer.
12. Use only with a cart, stand, tripod,
bracket, or table specified by the
manufacturer, or sold with the
apparatus. When a cart is used, use
caution when moving the cart/
apparatus combination to avoid
injury from tip-over.
13. Unplug this apparatus during
lightning storms or when unused for
long periods of time.
14. Refer all servicing to qualified
service personnel. Servicing is
required when the apparatus has
been damaged in any way, such as
power supply cord or plug is
damaged, liquid has been spilled or
objects have fallen into the
apparatus, the apparatus has been
exposed to rain or moisture, does not
operate normally, or has been
dropped.
ON DISPOSAL
-The fluorescent lamp used in this product contain a small amount of mercury.
-Do not dispose of this product with general household waste.
-Disposal of this product must be carried out in accordance to the regulations of
your local authority.
NOTE
-If the TV feel cold to the touch, there may be a small "flicker" when it is turned on.
This is normal, there is nothing wrong with TV.
-Some minute dot defects may be visible on the screen, appearing as tiny red,
green, or blue spots. However there have no adverse effect on the monitor's
performance.
-Avoid touching the screen or holding your finger(s) against it for long periods of
time. Doing so may produce some temporary distortion effect on the screen.
Page 37

Getting Started
5
Using the Remote Control
When using the remote control, aim it at remote sensor on the television. If there is an
object between the remote control and the remote sensor on the unit, the unit may not
operate.
Point the remote control at the REMOTE SENSOR located on the television.
When using this television in a very brightly lit area, the infrared REMOTE CONTROL
SENSOR may not work properly.
The recommended effective distance for using the remote control is about 7 metres.
Installing Batteries in the Remote Control
1. Open the cover at the back of the remote control.
2. Install two AAA size batteries. Make sure to match
the “+” and “-” ends of the batteries with the
diagram inside the compartment.
3. Replace the cover.
Battery Replacement
You will need to install the batteries into the remote control to make it operate following
the instruction below.
When the batteries become weak, the operating distance of the remote control will be
greatly reduced and you will need to replace the batteries.
Notes on Using Batteries:
The use of the wrong type of batteries may cause chemical leakage and/or explosion.
Please note the following:
Always ensure that the batteries are inserted with the + and - terminals in the correct
direction as shown in the battery compartment.
Different types of batteries have different characteristics. Do not mix different types.
Do not mix old and new batteries. Mixing old and new batteries will shorten battery
life and/or cause chemical leakage.
Replace batteries as soon as they do not work.
Chemicals which leak from batteries may cause skin irritation. If any chemical matter
seeps out of the batteries, wipe it up immediately with a dry cloth.
The batteries may have a shorter life expectancy due to storage conditions. Remove
the batteries whenever you anticipate that the remote control will not be used for an
extended period.
The batteries (battery pack or batteries installed) shall not be exposed to excessive
heat such as sunshine, fire or the like.
CAUTION:
It may result in an explosion if batteries are replaced incorrectly.
Only replace batteries with the same or equivalent type.
Page 38

Connection and Setup
6
Connection
Turn off and unplug all components before making connections.
Do not turn on the TV until connection setup is completed.
Input Connector Video Connection Audio Connection
High or Standard
Definition Quality
AV
Component
HDMI
PC
Connection
USB
RF
Composite video
connector
Component connection
HDMI connection
PC connection
USB connection
RF connection
Audio L/R
Audio L/R
HDMI cable carries both
video and audio signals.
Separate audio cable is
not needed. (When
HDMI is connected to
DVI with an adapter, a
separate audio L/R is
necessary)
PC audio
576i, 480i
(SD content)
1080p, 1080i, 720p,
576p, 576i, 480p, 480i
(Compatible with HD
or SD content)
1080p, 1080i, 720p,576p,
576i, 480p, 480i, PC
(Compatible with HD
or SD content)
1920×1080(60Hz)
USB2.0
75Ω
Page 39

Connection and Setup
7
Cable Installation
Before the installation and use, please read carefully the relevant content in “Warning
and Safety instructions”.
1. Take out the TV from the wrapping package and put it in a drafty and flat place.
NOTE:
¾ When you plug or unplug the TV, computer or other equipments, you must make
sure that the AC power has been already shut down;
¾ When unplugging the power cable or signal cable, please hold the plug (the insulated
part), do not draw the body of the cable.
2. The RF output terminal can be connected with the RF input port of the TV.
3. The output AV terminal of DVD can be connected with the AV input port of the TV
through AV cable.
NOTE:
¾ COMPONENT and AV can not be used at same time for they share of one audio
channel.
4. The output COMPONENT(YPbPr) terminal of DVD can be connected with the
COMPONENT(YPbPr) input port of the TV through AV cable.
5. Connect one end of the VGA cable with the VGA port on computer, connect the other
end of the VGA cable with the VGA port on the TV, and tighten the bolts clockwise on
the each end of VGA cable.
NOTE:
¾ While connecting the 15-pin VGA, please do not insert the plug overexertedly, for
fear the pin might be broken.
6. Connect one end of the HDMI cable with HDMI output port, connect the other end of
the HDMI cable with the HDMI port on the TV.
NOTE:
¾ While connecting the HDMI, please aim at carefully, do not insert overexertedly, for
fear the pin might be broken.
7. Check and make sure that all AV cables are connected with the corresponding ports
correctly.
8. Connect the AC power cable with 100-240V~ power supply.
NOTE:
¾ The range of power input for the TV is 100-240V~ 50/60Hz, do not connect the TV
power input port with the AC power out of the above range.
¾ Please hold the insulated part of the plug when you are unplugging the power cable,
do not touch directly the metallic part of the cable.
Page 40

Remote Control
8
The buttons of the original remote control are as following:
Definition of the buttons on remote control:
1. POWER: Enter or quit the standby mode.
2
1
4
5
6
8
9 9
10
12
14
15
18
19
?
i
I/II
GCBLT V21A -C60
NOTE:
All pictures in this manual are examples, only for reference, actual product may differ
from the pictures.
The buttons not mentioned here are not used.
2. INFO: Show info of current program.
3
3. : Mute or restore sound.
4. NUMBER BUTTONS: Use to choose
channels. (in TV mode)
5. SOURCE: Select signal source.
6. MENU: Press to display/disappear the on
screen menus or to quit some operations.
7. EXIT: Quit the current interface.
7
8. ENTER: Select or confirm menu item.
10
9. ◄/►: Select direction.
10. ▲/▼: Select direction.
11. REPEAT: Press to select the repeat play
11
mode. (in USB mode)
12. CH+/CH-: Scroll to next/previous channel.
13. VOL+/VOL-: Increase/Decrease audio
13
volume.
14. SLEEP: Set the sleep timer.
16
17
20
: Press to display the Favourites
15.
program in TV mode.(You should setup
your favourite channels in Program Edit
menu)
16.
: Return to last viewed program/signal
source.
17. COLOR BUTTONS:
Red/green/yellow/blue key navigation link.
: Fast reverse (in USB mode)
: Fast forward (in USB mode)
: Previous (in USB mode)
: Next (in USB mode)
18. STILL: Freeze or activate the current
picture.
: Stop (in USB mode)
: Play / Pause (in USB mode)
19.
20.
: Adjust displayable aspect ratio.
Page 41

Basic Operation
9
Turning on and off the TV
• Turn on the TV
Connect the TV to your mains socket.
If TV has a power switch, turn it on firstly. In standby mode, press Power button
on the remote to turn on the TV.
• Turn off the TV
Press the button on the remote control to enter standby mode.
Do not leave your TV in standby mode for long periods of time. It is best to unplug the
power cord.
NOTE:
¾ If there is an accident power off, the TV will be in standby mode automatically after
re-supply the power. To ensure the normal use of the TV, the frequent turning on and
off is forbidden, when there is an accident power off, it is recommended to unplug the
power cable from the power socket.
• No signal
When the TV is working in RF receiving mode, the TV will enter standby mode
automatically 5 minutes after there is no any signal (such as the programs are
stopped by TV station). In PC-RGB mode, the TV set will automatically turn off in 30
seconds if no signal. When VGA cable is connected, the TV turns on automatically.
Programme Selection
• Using the CH+/CH- on the panel of TV or on the remote control.
Press CH+ to increase channel number.
Press CH - to decrease channel number.
• Using 0-9 digital buttons.
You can select the channel number by pressing 0 to 9.
Additionally, when TV is in some mode, the TV will work in TV mode and play the
corresponding channel if any number button is pressed.
• Example
To select - channel (e.g. Channel 5): Press 5.
To select -- channel (e.g. Channel 20): Press 2 and 0 in a short time.
Volume Adjustment
• Press the VOL+/- button to adjust the volume.
• If you want to switch the sound OFF, press the .
• You can release mute by pressing the
Changing the Input Source
You can select the input source by pressing the SOURCE button on the remote control.
Press the▲/▼button to cycle through the input source, and press the ENTER button to
confirm your choice.
or increase the volume.
Page 42

Menu Operation
10
How to Navigate Menus
Before using the TV follow the steps below to learn how to navigate the menu in order
to select and adjust different functions. The access step may differ depending on the
selected menu.
1. Press the MENU button to display the main menu.
2. Press the ◄/► button to cycle through the main menu, then press ENTER button
or TV/AV ( ) button on the panel to confirm.
3. Press the ▲/▼ button to select the desired sub item.
4. Press the ENTER button to access the submenu.
5. Press the ▲/▼/◄/► button to select the desired value. The adjustment in the
OSD may differ depending on the selected menu.
6. Press the MENU button to return to the previous menu.
7. Press the EXIT button exit from the menu.
NOTE:
¾ When an item in MENU is displayed gray, it means that the item is not available or
cannot be adjusted.
¾ Buttons on the TV have the same function as corresponding buttons on the remote
control. If your remote control is lost or couldn’t work, you may use the buttons on the
TV to select menus. This manual focuses on operation of the remote control.
Configuring the Channel Menu
Auto Tuning
Color System
Sound System
Manual Tuning
Programme Edit
Press the ENTER button to start Auto tuning which
automatically scan and store all available programmes.
To select the Color System.
To select the Sound System.
Manual Tuning lets you manually tune and arrange the
stations in whatever order you desire.
Press ▲/▼ button select items.
Press red button to delete the channel.
Press green button to rename the channel.
Press yellow button to move the channel.
Press blue button to skip the channel.
Press
The CH+/CH- button can be used to select the following or
preceding page.
button to set the favorite channel.
Page 43

Menu Operation
11
Configuring the Picture Menu
You can select the type of picture which best corresponds to
Picture Mode
Color Temp Select the color temperature of the picture.
Aspect Ratio
DNR
Screen
(In PC-RGB mode)
Configuring the Sound Menu
your viewing requirements. Contrast, Brightness,
Saturation, Sharpness and Tint (NTSC) can be adjusted
when the Picture Mode is set to User.
You can select the picture size which best corresponds to
your viewing requirements.
Reduce the picture noise (snowy picture) in a weak
broadcast signal.
If the TV is used as the display terminal, the output mode
of computer 1280 x1024(60Hz) is recommended, thus allow
you to have the best performance of the TV.
Auto Adjust: Adjust the image automatically.
H Position: Centre the image by moving it left or right.
V Position: Centre the image by moving it up or down.
Size: Adjust the screen size.
Phase: Adjust when characters have low contrast or when
the ima
ge flickers.
Page 44

Menu Operation
12
You can select a sound mode to suit your personal
Sound Mode
Balance
AVL
Surround
Configuring the Timer Menu
Clock
Off Time
On Time
Sleep
Auto Sleep
preferences. Items can be adjusted when the sound mode
is set to User.
You can adjust the sound balance of the speakers to
preferred levels.
AVL automatically remains on the same level of volume if
you change programmes. Because each broadcasting
station has its own signal conditions, volume adjustment
may be needed every time when the channel is changed.
This feature allows users to enjoy stable volume levels by
making automatic adjustments for each program.
To switch the surround sound.
Set the System Time.
You must set the time correctly before using on/off timer
function.
Set the time for the TV to switch off.
On time and Off time can not be set to the same time, and
they do not work in operating menu.
Set the time for your TV to turn on.
Select the time to turn the TV to standby mode
automatically.
Select the Auto Sleep time you want.
The Auto Sleep switches the TV to standby automatically
after the preset time has elapsed. (the preset time is 4
hours when leave the factory).
All the Timer Menu options but Clock and Auto Sleep are
not available in USB mode.
Page 45

Menu Operation
13
Configuring the Option Menu
Language
Transparency
Blue Screen
Panel Lock
Health Remind
Store Demo
Select your preferred On Screen Display language.
Select menu transparency according to different
background pictures.
When there is no TV signal
On Blue Screen Blue Screen
Off Picture is spotted with snowflake Black Screen
When the Panel Lock is set as On, all of the buttons on the
TV are locked and lose their function. To release Panel
Lock, please press any button on the TV for more than 5
seconds. When you select this item as Off, the buttons on
the TV are in normal mode.
Switch the Health Remind on or off. While Health Remind
is set to On, a prompt picture will remind you to have a
break at intervals of two hours.
Switch the Store Demo on or off.
Store Demo mode is the optimal setting for store
environments. If a user modifies image quality data Store
Demo mode initializes the product to the image quality set
by us after a certain period of time.
When there is no other
signals
Page 46
Menu Operation
14
Energy mode
Switch the Energy mode on or off.
Switch the Energy Demo on or off.
Energy Demo
Reset
Using USB mode
While both Energy mode and Energy Demo are set to "On",
the "Consumption" dial will appear on the TV screen.
by us after a certain period of time.
Restore the system settings to the factory default.
• To Access/Quit USB mode
Press the SOURCE button to call up the signal source selection menu. Use the ▲/▼
to highlight USB, and the ENTER button to access the USB mode. You may also use
the signal source selection menu to exit from the USB mode.
NOTE:
¾
Special USB device may be not or well supported.
¾
USB max. Load: DC5V 500mA.
• The formats supported
The USB function can support the USB device with USB memory.
It can play PHOTO, MUSIC, MOVIE or TEXT files.
Photo Format Support: JPEG, BMP, PNG.
Music Format Support: WMA, MP3, M4A(AAC).
Movie Format Support: MPG, RM.
Text Format Support: TXT.
NOTE:
Special algorithm documents may not be or well be supported by the USB.
¾
The USB supports the format mentioned above, if the file format is not supported,
change it to the given format.
¾
Video decoder supports H.264.
• Main Operating Interface
Page 47

Menu Operation
15
1. Use the ◄/► button to select PHOTO, MUSIC, MOVIE or TEXT. Press ENTER
button enter into sub-menu.
2. Use the arrow buttons and ENTER button to enter the desired disk. Press ENTER
to open the folder.
3. Use the arrow buttons to highlight the file. Use the ENTER button to mark or
unmark a file. Press
files in the folder will be played in sequence after you press
4. Press the INFO button to display the menu screen in playing.
5. Press the
6. Press the EXIT button to return to the previous menu screen.
• Basic operation
1. Play/ Pause
Start playing the selected file of a folder or pause.
2. Stop
Stop the playing files.
3. / Fast Reverse/Fast Forward
You can press / to skip fast reverse or forward.
4. / Previous/Next
You can select the desired files manually in normal condition.
5. Red button
Select a file you want to delete,press the red button to open corresponding menu,
then press ENTER button to delete it.
6. CH+/CH-
When view the TEXT files, press CH+/CH- to change pages up and down.
7. CH+/CH- on the TV
In the USB mode, use the CH+/CH- button on the TV as you would use the ENTER
button on the remote control.
Press the CH+/CH- button on the TV for more than 3 seconds to start playing the
selected file.
8. VOL+/VOL- on the TV
When selecting files, use the VOL+/VOL- button on the TV as you would use the ◄/►
button on the remote control.
When playing files, use the VOL+/VOL- button on the TV as you would use the
VOL+/VOL- button on the remote control.
to stop the playing files.
button to play the selected files. If no file is marked, all the
button.
Page 48

Troubleshooting Guide
16
Troubleshooting
When you meet the following common problems, you might diagnose and get the
solutions without contacting with the technicians.
Symptoms Possible Reason Solutions
No picture, no sound,
and no indicator light on
Picture and sound with
abnormity
Picture is spotted or with
snow
No picture, no sound
and indicator light is
green/blue
Blue screen, AV is
displayed
Picture is unclear or
shaking or with black
horizontal strips (in PC
mode)
PC picture is not
centered
No sound
PC picture display with
improper color
HDMI source, with snow
pixel of full screen
1.The power cord is not plugged in
2.The power is off
1.Contrast, sharpness, and color
are set improperly
2.Color system is set improperly
3.Sound system is set improperly
Signal source is low-grade or the
signal cord is in a lower quality
Volume is in the minimum value or
TV is in mute mode.
The signal cable is not correctly
connected.
There is no signal input or the video
cable is not connected or
incorrectly connected
PC picture is not correctly adjusted.
There is no audio signal input or
audio cable is not connected
correctly
The color temp is adjusted
incorrectly by user
The source generate is not
standard
1.Plug the power cord in
2.Turn the power on
1.Adjust the value of
Contrast, sharpness, and
color
2.Set the Color system to
the country broadcasting
standard
3.Set the Sound system to
the country broadcasting
standard
Use the qualified signal cord
Adjust the value of volume
Connect the signal cable
correctly
Connect the video cable
correctly
Enter into Screen menu,
select Auto Adjust item to
perform automatic
calibration and adjust Phase
to solve the problem
Connect the audio cable
correctly
Readjust the color temp, or
select the original color
setting
Plug the HDMI cable again
Page 49

Troubleshooting Guide
17
1. Make sure the positive
and the negative
The remote control does
not work
Batteries are improperly installed or
exhausted
Maintenance
Early malfunctions can be prevented. Careful and regular cleaning can extend the life
of your new TV. Be sure to turn the power off and unplug the power cord before you
begin any cleaning.
Cleaning the screen
1. Here’s a great way to keep the dust off your screen for a while. Wet a soft cloth in a
mixture of lukewarm water and a little fabric softener or dish washing detergent. Wring
the cloth until it’s almost dry, and then used it to wipe the screen.
2. Make sure the excess water is off the screen, and then let it air-dry before you turn
on your TV.
Cleaning the cabinet
To remove dirt or dust, wipe the cabinet with a soft, dry, lint-free cloth. Please be sure
not to use a wet cloth.
Extended Absence
If you expect to leave your TV dormant for a long time (such as a vacation), it’s a
good idea to unplug the power cord to protect against possible damage from
lightning or power surges.
polarities are correct.
2.Check if there is a loose
contact between the
batteries and the springs
3.Replace the batteries
Disposal of old electrical appliances
The European directive 2012/19/EU on Waste Electrical and Electronic
Equipment (WEEE), requires that old household electrical appliances must
not be disposed of in the normal unsorted municipal waste stream. Old
appliances must be collected separately in order to optimize the recovery
and recycling of the materials they contain, and reduce the impact on human
health and the environment.
The crossed out “wheeled bin” symbol on the product reminds you of your
obligation, that when you dispose of the appliance, it must be separately
collected.
Consumers should contact their local authority or retailer for information
concerning the correct disposal of their old appliance.
This equipment is a Class or double insulated electrical appliance. It has
been designed in such a way that it does not require a safety connection to electrical
earth.
Ⅱ
Page 50

18
CHANGHONG LED Expand all Specs
COMMON SPEC
Display Type
Screen Size ( Inch ) 19
BROADCASTING SYSTEM
Analog Yes
Digital
PICTURE
Resolution
BLU Type (Backlight )
Dynamic Contrast Ratio 600:1
ResponseTime(MPRT) 5ms
Full HD
VIDEO
PictureStatusMode 4 Modes (User, Vivid, Standard, Soft)
AUDIO
Audio Output 2 W+2W
Speaker System 2 Speakers
SoundMode 5 Modes (Standard/Theater/Music/Sports/User)
Mono/Stereo/Dual
FEATURE
USB 2.0
Smart Energy Saving Plus
LED19D1000 LED22D1000
22
Yes
No
1366 x 768
LED
No
PHOTO/MUSIC/FILM/TEXT
No
1920 x 1080
LED
600:1
5ms
Yes
No
No
LED24D1000F
24
Yes
No
1920 x 1080
LED
1000:1
5ms
Yes
INTERFACE
Set Side
USB 2.0
AV In
Component in (Y,Pb,Pr)
Set Bottom
RF In
HDMI/HDCP Input
PC Audio Input
RGB In (Dsub 15pin)
==========
1
1
1
==========
1
1
1
1
Page 51

POWER
19
Voltage, Hz 1 0 0 - 240V~ 50/60Hz
Consumption 25W
Standby (Off mode) 1W
↓
30W
↓
1W
DIMENSION
Weight (Kg) ==========
SET(w/o stand)
Included stand
2.6
3 .5
WxHxD (mm) ==========
SET 439 x281x49.5
Included stand 439x321x139
==========
2.85
3.45
==========
5 05.5x310.3x49
5 05.5x363x140
30W
↓
1W
==========
3.1
3.9
==========
564.5x340x44.4
5 64.5x387.5x178
Page 52

20
CHANGHONG LED Expand all Specs
COMMON SPEC
Display Type
Screen Size ( Inch )
BROADCASTING SYSTEM
Analog Yes
Digital
PICTURE
Resolution
BLU Type (Backlight )
Dynamic Contrast Ratio
ResponseTime(MPRT)
HDReady
VIDEO
PictureStatusMode 4 Modes (User, Vivid, Standard, Soft)
AUDIO
Audio Output 2 W+2W
Speaker System 2 Speakers
SoundMode 5 Modes (Standard/Theater/Music/Sports/User)
Mono/Stereo/Dual
FEATURE
USB 2.0
Smart Energy Saving Plus
LED24B1000
24
No
1366 x 768
LED
2000:1
8.5ms
Ye s
No
PHOTO/MUSIC/FILM/TEXT
No
INTERFACE
Set Side
USB 2.0
AV In
Component in (Y,Pb,Pr)
Set Bottom
RF In
HDMI/HDCP Input
PC Audio Input
RGB In (Dsub 15pin)
==========
1
1
1
==========
1
1
1
1
Page 53

POWER
21
Voltage, Hz 1 0 0 - 240V~ 50/60Hz
Consumption
Standby (Off mode) 1W
30W
↓
DIMENSION
Weight (Kg) ==========
SET(w/o stand)
Included stand
3.1
3 .9
WxHxD (mm) ==========
SET
Included stand
552.5 x346x50.5
552.5x388x178
Page 54

22
CHANGHONG LED Expand all Specs
COMMON SPEC
Display Type
Screen Size ( Inch )
BROADCASTING SYSTEM
Analog
Digital
PICTURE
Resolution
BLU Type (Backlight )
Dynamic Contrast Ratio
ResponseTime(MPRT)
HDReady
VIDEO
PictureStatusMode 4 Modes (User, Vivid, Standard, Soft)
AUDIO
Audio Output 2 W+2W
Speaker System 2 Speakers
SoundMode 5 Modes (Standard/Theater/Music/Sports/User)
Mono/Stereo/Dual
FEATURE
USB 2.0
Smart Energy Saving Plus
PHOTO/MUSIC/FILM/TEXT
LED24868
24
Yes
No
1366 x 768
LED
1000:1
8.5ms
Ye s
No
No
INTERFACE
Set Side
USB 2.0
RF In
Set Bottom
AV In
HDMI/HDCP Input
PC Audio Input
RGB In (Dsub 15pin)
mini Component in (Y,Pb,Pr)
==========
1
1
1
==========
1
1
1
1
Page 55

POWER
23
Voltage, Hz 1 0 0 - 240V~ 50/60Hz
Consumption
Standby (Off mode) 1W
35W
↓
DIMENSION
Weight (Kg) ==========
SET(w/o stand)
Included stand
3.95
4 .2
WxHxD (mm) ==========
SET
Included stand
576 x366x41
576x413x178
Page 56

24
CHANGHONG LED Expand all Specs
COMMON SPEC
Display Type
Screen Size ( Inch )
BROADCASTING SYSTEM
Analog
Digital
PICTURE
Resolution
BLU Type (Backlight )
Dynamic Contrast Ratio
ResponseTime(MPRT)
HDReady
VIDEO
PictureStatusMode 4 Modes (User, Vivid, Standard, Soft)
AUDIO
Audio Output 2 W+2W
Speaker System 2 Speakers
SoundMode 5 Modes (Standard/Theater/Music/Sports/User)
Mono/Stereo/Dual
FEATURE
USB 2.0
Smart Energy Saving Plus
PHOTO/MUSIC/FILM/TEXT
LED22C1000
22
Yes
No
1366 x 768
LED
600:1
5ms
Ye s
No
No
INTERFACE
Set Side
USB 2.0
RF In
Set Bottom
AV In
HDMI/HDCP Input
PC Audio Input
RGB In (Dsub 15pin)
Component in (Y,Pb,Pr)
==========
1
1
1
==========
1
1
1
1
Page 57

POWER
25
Voltage, Hz 1 0 0 - 240V~ 50/60Hz
Consumption
Standby (Off mode) 1W
30W
↓
DIMENSION
Weight (Kg) ==========
SET(w/o stand)
Included stand
3.29
3 .76
WxHxD (mm) ==========
SET
527.5 x340x46
Included stand 527.5x369.8x186.9
Page 58

24
CHANGHONG LED Expand all Specs
COMMON SPEC
Display Type
Screen Size ( Inch )
BROADCASTING SYSTEM
Analog
Digital
PICTURE
Resolution
BLU Type (Backlight )
Dynamic Contrast Ratio
ResponseTime(MPRT)
HDReady
VIDEO
PictureStatusMode 4 Modes (User, Vivid, Standard, Soft)
AUDIO
Audio Output 2 W+2W
Speaker System 2 Speakers
SoundMode 5 Modes (Standard/Theater/Music/Sports/User)
Mono/Stereo/Dual
FEATURE
USB 2.0
Smart Energy Saving Plus
PHOTO/MUSIC/FILM/TEXT
LED24D2200
24
Yes
No
1920 x 1080
LED
3000:1
5ms
Ye s
No
No
INTERFACE
Set Side
Komponen (Y, Pb, Pr)
Set Bottom
DCIN
USB
HDMI
PC
VIDEO
R- Audio -L
PC/DVI AUDIO
ANT
headphone
==========
1
==========
1
1
1
1
1
1
1
1
1
Page 59

POWER
25
Voltage, Hz 1 0 0 - 240V~ 50/60Hz
Consumption
Standby (Off mode) 1W
35W
↓
DIMENSION
Weight (Kg) ==========
SET(w/o stand)
Included stand
3.85
4 .95
WxHxD (mm) ==========
SET
Included stand
552 x3.6
32x50.8
552.6x365x153.1
Page 60

Jl. Mangga Dua Raya
Komp. Agung Sedayu Blok J : 39-40
Jakarta 10730 – Indonesia
Telp : (021) 6126288 ( Hunting )
Service E-mail: service@changhong.co.id
Fax :(021) 6126208
SMS Service Centre: 0815-9990111
Web site: www.changhong.co.id
call centre: 1500 866
 Loading...