

Page 1

图号:JUG0.018.61388
规格:A5大小
封面封底:150g铜版纸彩印
内文:70g双胶纸
机芯:LS13+CI(306)
Operation Manual
Model : EF24E868
CH ANG HON G E UR O PE E L ECT RIC S .R. O
Jank ov co va 1037/4 9, 17 0 00 Prah a 7, Cz ec h Repub li c
Tel: 004 2 (0 ) 24 24088 49
Fax: 0 04 2 (0 ) 220951190
Serv ic e E- ma il: inf o@ ch anghong eu ro pe.cz
Web s ite: ww w.c ha nghonge ur op e.com
24
TV
UK
CZ
SK
ES
PL
Page 2

Page 3

Contents
Warning……………………………………………………………………..…..……… 1
Safety instructions……………………………………………………....…………… 3
Getting Started…………………………...………………………..……..…………… 5
Using the remote control…………………………………………………….……… 5
Installing Batteries in the Remote Control……………………………..…………. 5
Battery replacement……………………………..……………………….………… 5
Connection and setup…………………...…………………………………………… 6
Cable Installation……………………………………………………………………. 6
Remote Control…………………………..…………………………………………… 7
Basic Operation……………………………………………………………………... 9
QUICK START GUIDE……………….………………………………………….….. 9
Turning on and off the TV…………………………………………………………. 10
Programme Selection…………….……………………………………………… 10
Volume adjustment………………………………………………………………… 10
Changing the Input Source…..…………………………………………………... 10
Menu Operation……………………………………………………………………… 11
How to Navigate Menus…………………………………………………………... 11
Channel Menu……………………………………………………………………… 11
Picture Menu……………………………………………………………………….. 13
Sound Menu………………………………………………………………………... 13
Timer Menu…………………………………………………………………………. 14
Option Menu………………………………………………………………………... 14
Lock Menu………………………………………………………………………….. 16
Using DMP mode…………………………………………………………………. 17
MHEG5……………………………………………………………………………… 19
Important Unique Buttons.................................................................................20
PROGRAMME GUIDE………………………………….………………………… 20
Channel List………………………………………………………………………… 20
Favorite List………………………………………………………………………… 20
Teletext………………………………………………………………………………... 21
Using the teletext feature…………………....................................................... 21
Troubleshooting Guide…………………………………………………………….. 22
Troubleshooting…………….……………………………………………………... 22
Maintenance………………………………………………………………………... 23
UK
Page 4
Warning
1
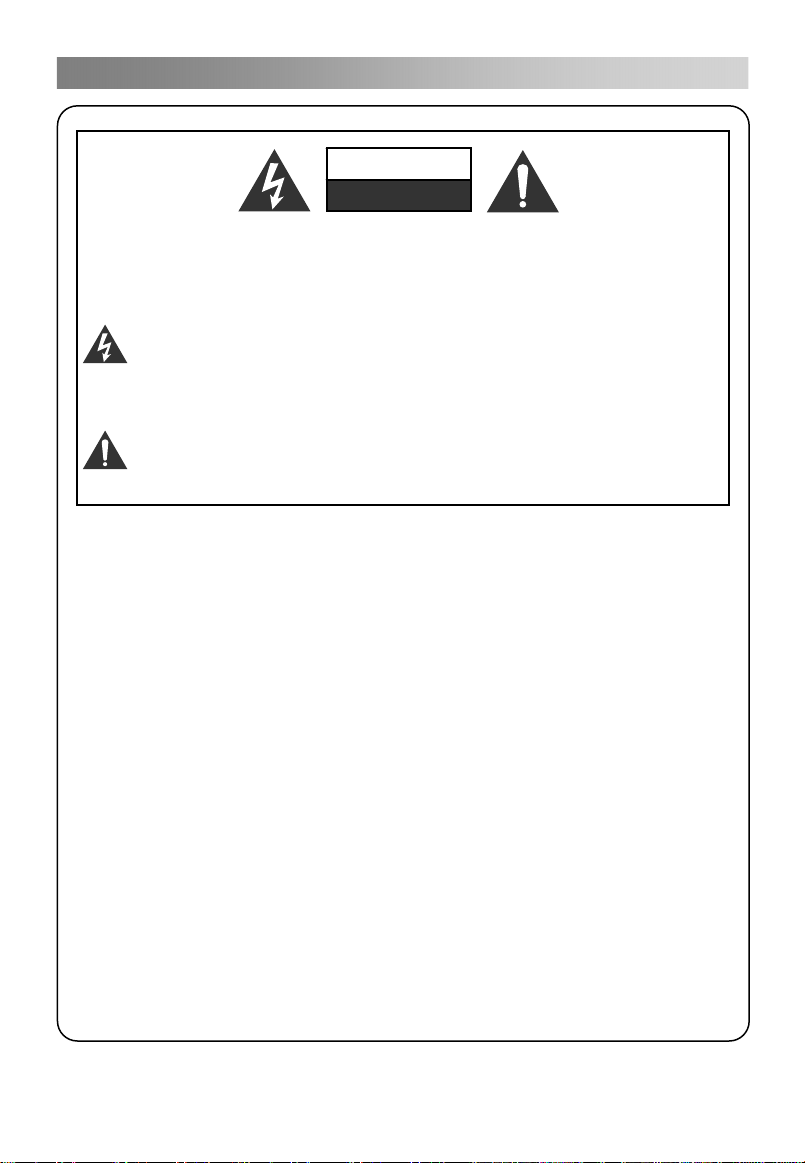
WARNING:
TO REDUCE THE RISK OF ELECTRIC SHOCK DO NOT REMOVE
COVER (OR BACK). NO USER SERVICEABLE PARTS INSIDE.
REFER TO QUALIFIED SERVICE PERSONNEL.
The lightning flash with arrowhead symbol, within an equilateral
triangle, is intended to alert the user to the presence of uninsulated
"dangerous voltage" within the products enclosure that may be of
sufficient magnitude to constitute a risk of electric shock to persons.
The exclamation point within an equilateral triangle is intended to alert
the user to the presence of important operating and maintenance
(servicing) instructions in the literature accompanying the appliance.
REGULATORY INFORMATION
This equipment generates uses and can radiate radio frequency energy and, if not
installed and used in accordance with the instructions, may cause harmful
interference to radio communication. However, there is no guarantee that
interference will not occur in a particular installation. If this equipment does cause
harmful interference to radio or television reception, which can be determined by
turning the equipment off and on, the user is encouraged to try to correct the
interference by one or more of the following measures:
-Relocate the receiving antenna.
-Increase the separation between the equipment and receiver.
-Connect the equipment into an outlet on a circuit different from that to which the
receiver is connected.
-Consult the dealer or experienced radio/TV technician for help.
Any changes or modifications not expressly approved by the party responsible
for compliance could void the user's authority to operate the equipment.
CAUTION
DO not attempt to modify this product in any way without written authorization
from supplier. Unauthorized modification could void the user's authority to operate
this product.
It is not recommended to keep a certain still image displayed on the screen for a
long time as well as displaying extremely bright images on screen.
CAUTION
RISK OF ELECTRIC SHOCK
DO NOT OPEN
Page 5

Warning
2
WARNING
To Reduce The Risk Of Fire Or Electric Shock, Do Not Expose This Apparatus To
Rain Or Moisture.
The ventilation should not be impeded by covering the ventilation openings with
items, such as newspapers, table-cloths, curtains, etc.
The Apparatus shall not be exposed to dripping or splashing and that no objects
filled with liquids, such as vases, shall be placed on the apparatus.
Attention should be drawn to the environmental aspects of battery disposal. Don’t
throw used batteries in dustbin. Please contact your retailer in order to protect the
environment.
Keep minimum distances (5cm) around the apparatus for sufficient ventilation;
(Minimum distance around the apparatus for sufficient ventilation.)
No naked flame sources, such as lighted candles, should be placed on the
apparatus;
To prevent the spread of fire, keep candles or other open flames away from this
product at all times.
The device may be malfunction when under electrostatic discharge. It can be
manually resumed by power off and power on again.
CAUTION connecting the Power Cord
Most appliances recommend they be placed upon a dedicated circuit; that is, a
single outlet circuit which powers only that appliance and has no additional outlets
or branch circuits.
Do not overload wall outlets. Overloaded wall outlets, loose or damaged wall
outlets, extension cords, frayed power cords, or damaged or cracked wire
insulation are dangerous. Any of these conditions could result in electric shock or
fire. Periodically examine the cord of your appliance, and its if appearance
indicates damage or deterioration, unplug it, discontinue use of the appliance, and
have the cord replaced with an exact replacement part by an authorized servicer.
Protect the power cord from physical or mechanical abuse, such as being twisted,
kinked, pinched, closed in a door, or walked upon. Pay particular attention to
plugs, wall outlets, and the point where the cord exits the appliance.
The MAINS plug is used as the disconnect device, and the disconnect device shall
remain readily operable.
Figures and illustrations in this User Manual are provided for reference only and
may differ from actual product appearance. Product design and specifications may
be changed without notice.
Page 6
Safety instructions
3
IMPORTANT SAFETY INSTRUCTIONS
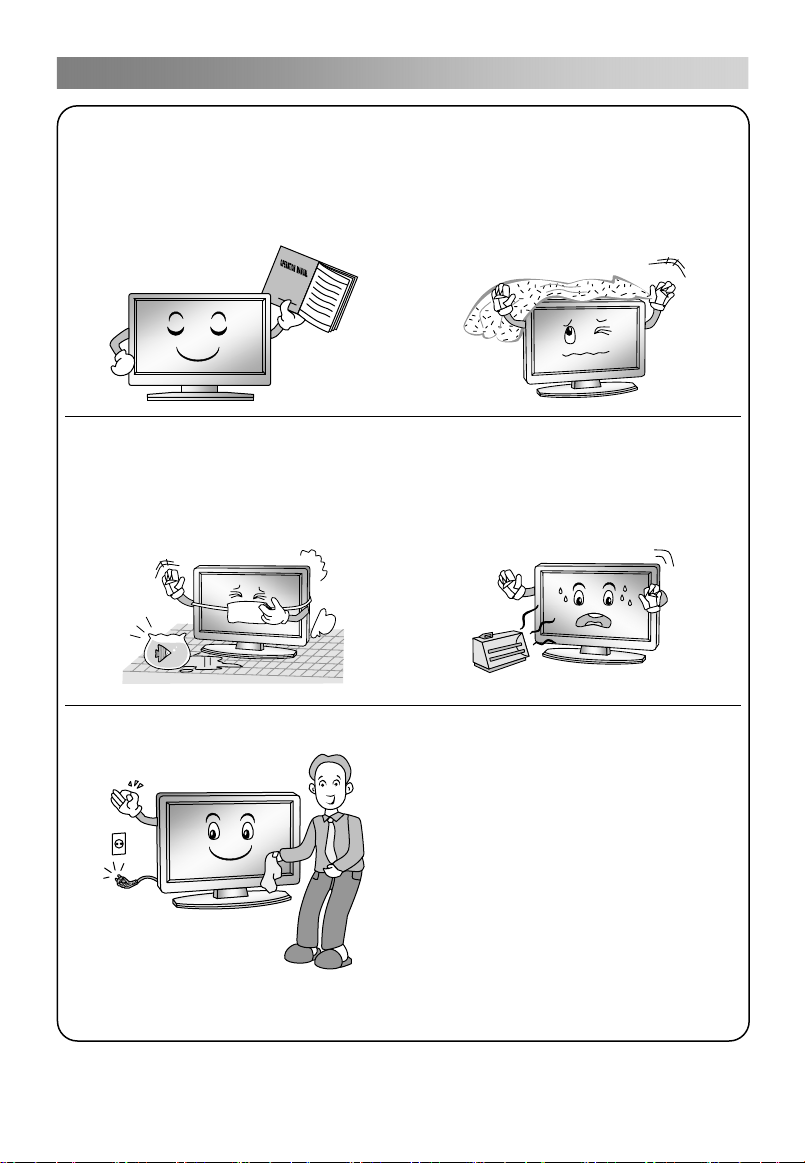
1. Read these instructions.
2. Keep these instructions.
3. Heed all warnings.
4. Follow all instructions.
7. Do not block any of the ventilation
openings. Install in accordance with
the manufacturer's instructions.
5. Do not use this apparatus near water.
6. Clean only with a dry cloth.
8. Do not install near any heat source
such as radiators, heat registers,
stoves, or other apparatus (including
amplifiers) that produce heat.
9. Do not defeat the safety purpose of
the polarized or grounding type plug.
A polarized plug has two blades with
one wider than other. A grounding
type plug has two blades and a third
grounding prong. The wide blade or
the third prong is provided for your
safety. When the provided plug does
not fit into your outlet, consult an
electrician for replacement of the
obsolete outlet.
Page 7
Safety instructions
4
10. Protect the power cord from being
walked on or pinched particularly at
plugs, convenience receptacles,
and the point where they exit from
the apparatus.
11. Only use the attachments/
accessories specified by the
manufacturer.
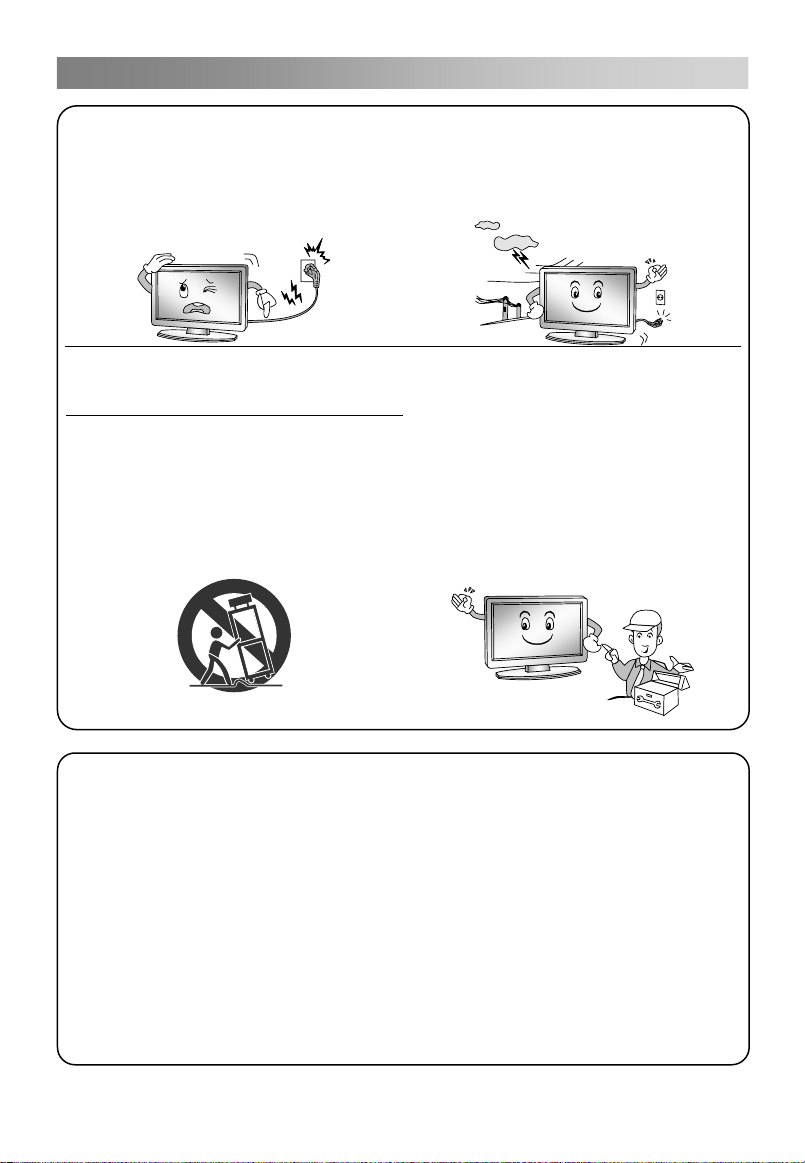
12. Use only with a cart, stand, tripod,
bracket, or table specified by the
manufacturer, or sold with the
apparatus. When a cart is used, use
caution when moving the cart/
apparatus combination to avoid
injury from tip-over.
13. Unplug this apparatus during
lightning storms or when unused for
long periods of time.
14. Refer all servicing to qualified
service personnel. Servicing is
required when the apparatus has
been damaged in any way, such as
power supply cord or plug is
damaged, liquid has been spilled or
objects have fallen into the
apparatus, the apparatus has been
exposed to rain or moisture, does not
operate normally, or has been
dropped.
ON DISPOSAL
-The fluorescent lamp used in this product contain a small amount of mercury.
-Do not dispose of this product with general household waste.
-Disposal of this product must be carried out in accordance to the regulations of
your local authority.
NOTE
-If the TV feel cold to the touch, there may be a small "flicker" when it is turned on.
This is normal, there is nothing wrong with TV.
-Some minute dot defects may be visible on the screen, appearing as tiny red,
green, or blue spots. However there have no adverse effect on the monitor's
performance.
-Avoid touching the screen or holding your finger(s) against it for long periods of
time. Doing so may produce some temporary distortion effect on the screen.
Page 8
Getting Started
5
Using the remote control
When using the remote control, aim it at remote sensor on the television. If there is an
object between the remote control and the remote sensor on the unit, the unit may no
operate.
Point the remote control at the REMOTE SENSOR located on the television.
When using this television in a very brightly lit area, the infrared REMOTE CONTROL
SENSOR may not work properly.
The recommended effective distance for using the remote control is about 7 metres.
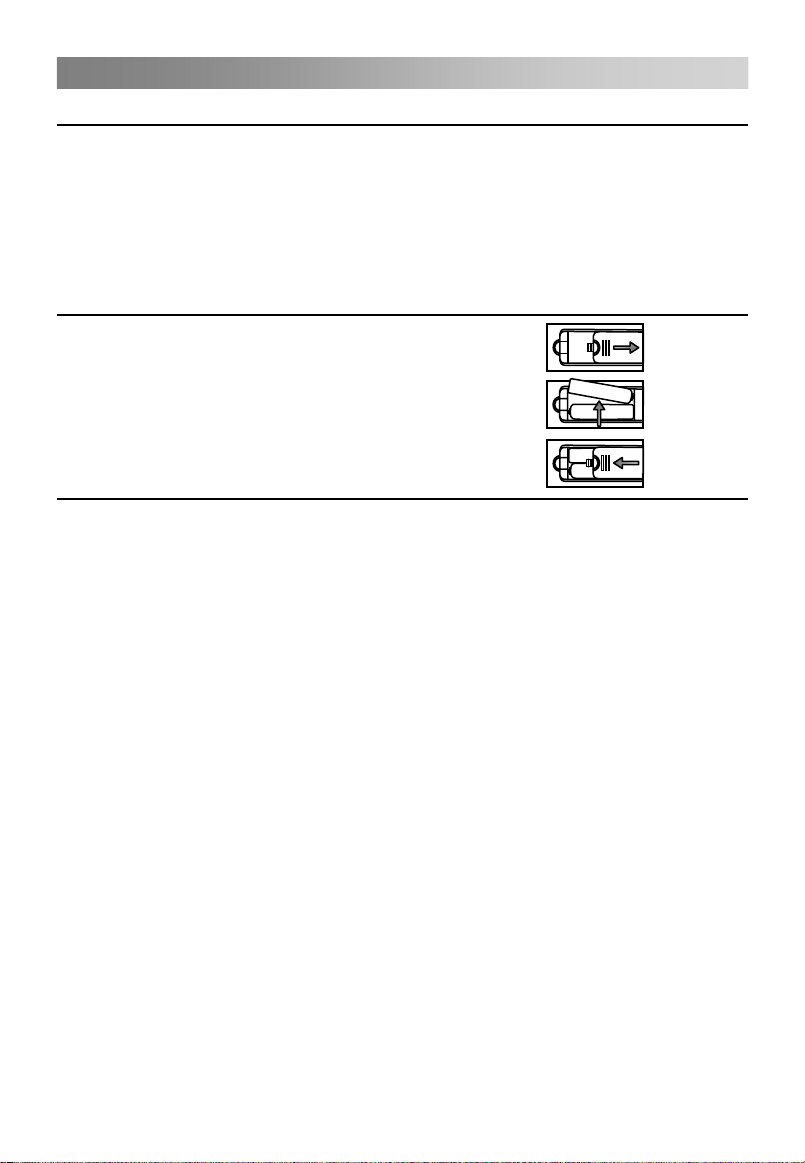
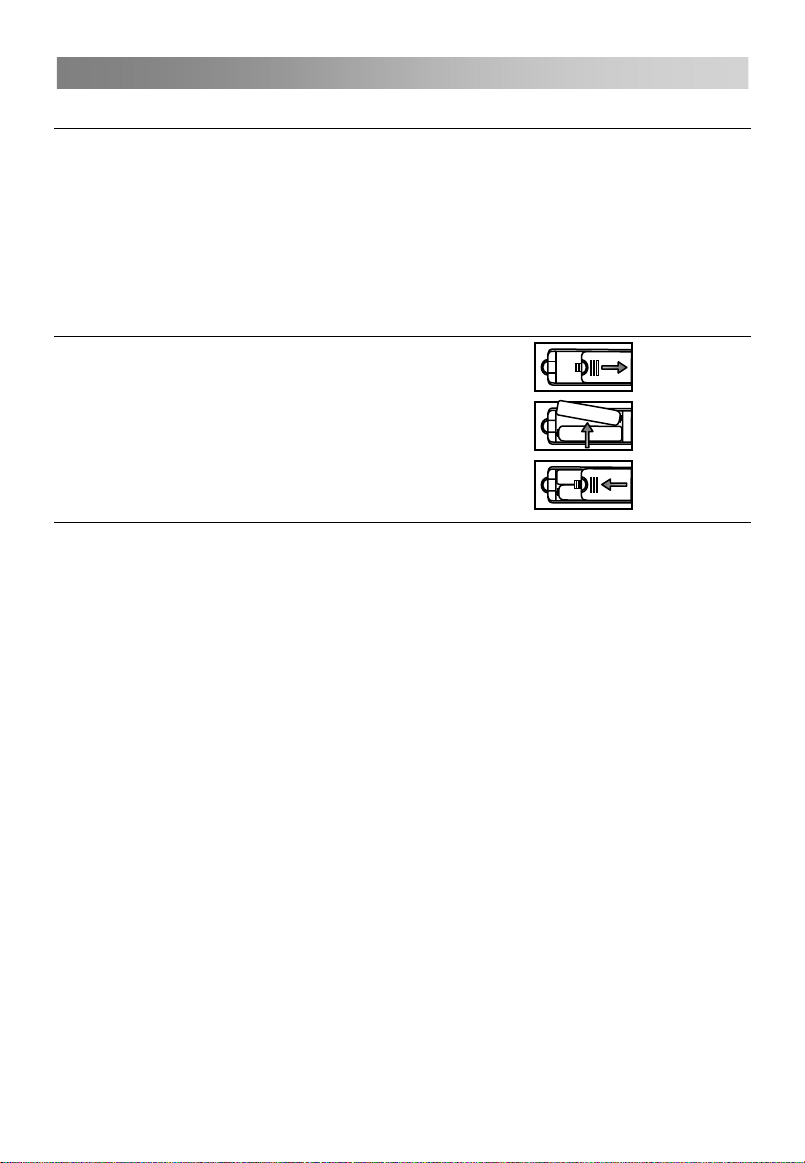
Installing Batteries in the Remote Control
1. Open the cover at the back of the remote control.
2. Install two AAA size batteries. Make sure to match
the “+” and “-” ends of the batteries with the
diagram inside the compartment.
3. Replace the cover.
Battery replacement
You will need to install the supplied batteries into the remote control to make it operate
following the instruction below.
When the batteries become weak, the operating distance of the remote control will be
greatly reduced and you will need to replace the batteries.
Notes on Using Batteries:
The use of the wrong type of batteries may cause chemical leakage and/or explosion.
Please note the following:
Always ensure that the batteries are inserted with the + and - terminals in the correct
direction as shown in the battery compartment.
Different types of batteries have different characteristics. Do not mix different types.
Do not mix old and new batteries. Mixing old and new batteries will shorten battery
life and/or cause chemical leakage.
Replace batteries as soon as they do not work.
Chemicals which leak from batteries may cause skin irritation. If any chemical matter
seeps out of the batteries, wipe it up immediately with a dry cloth.
The batteries supplied with the product may have a shorter life expectancy due to
storage conditions. Remove the batteries whenever you anticipate that the remote
control will not be used for an extended period.
The batteries (battery pack or batteries installed) shall not be exposed to excessive
heat such as sunshine, fire or the like.
CAUTION:
It may result in an explosion if batteries are replaced incorrectly.
Only replace batteries with the same or equivalent type.
Page 9

Connection and setup
6
Cable Installation
Please read the relevant content in "Notice for Maintenance and Safety" carefully
before the installation and use.
1. Take out the TV from the package and put it in a drafty and flat place.
NOTE:
When you plug or unplug the TV, computer or other equipments, you must make
sure that the AC power has been already shut down; when unplugging the power
cable or signal cable, please hold the plug (the insulated part), do not draw the body
of the cable.
2. The RF output terminal can be connected with the RF input port of the TV.
3. The output AV terminal of DVD can be connected with the AV input port of the TV
through AV cable.
4. Connect one end of the VGA cable with the VGA port on computer, connect the other
end of the VGA cable with the VGA port on the TV, and tighten the bolts clockwise on
the each end of VGA cable.
NOTE:
While connecting the 15-pin VGA, please do not insert the plug overexertedly, for
fear the pin might be broken.
5. Connect one end of the HDMI cable with HDMI output port, connect the other end of
the HDMI cable with the HDMI port on the TV.
NOTE:
While connecting the HDMI, please aim at carefully, do not insert overexertedly,
for fear the pin might be broken.
6. Check and make sure that all AV cables are connected with the corresponding ports
correctly.
7. Connect SCART socket input or output from an external device to these jacks.
Connect the AC power cable with 100-240V~ power supply.
8.
NOTE:
The range of power input for the TV is 100-240V~ 50/60Hz, do not connect the TV
power input port with the AC power out of the above range.
Please hold the insulated part of the plug when you are unplugging the power
cable, do not touch directly the metallic part of the cable.
Page 10
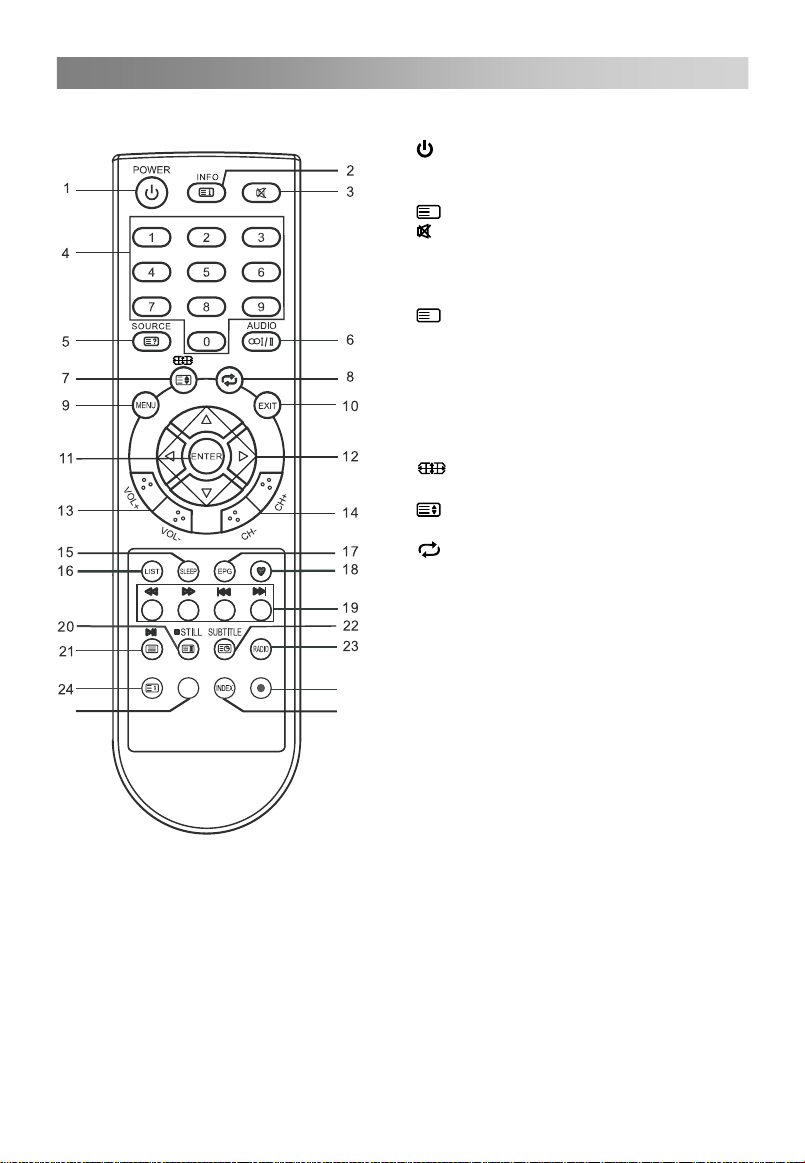
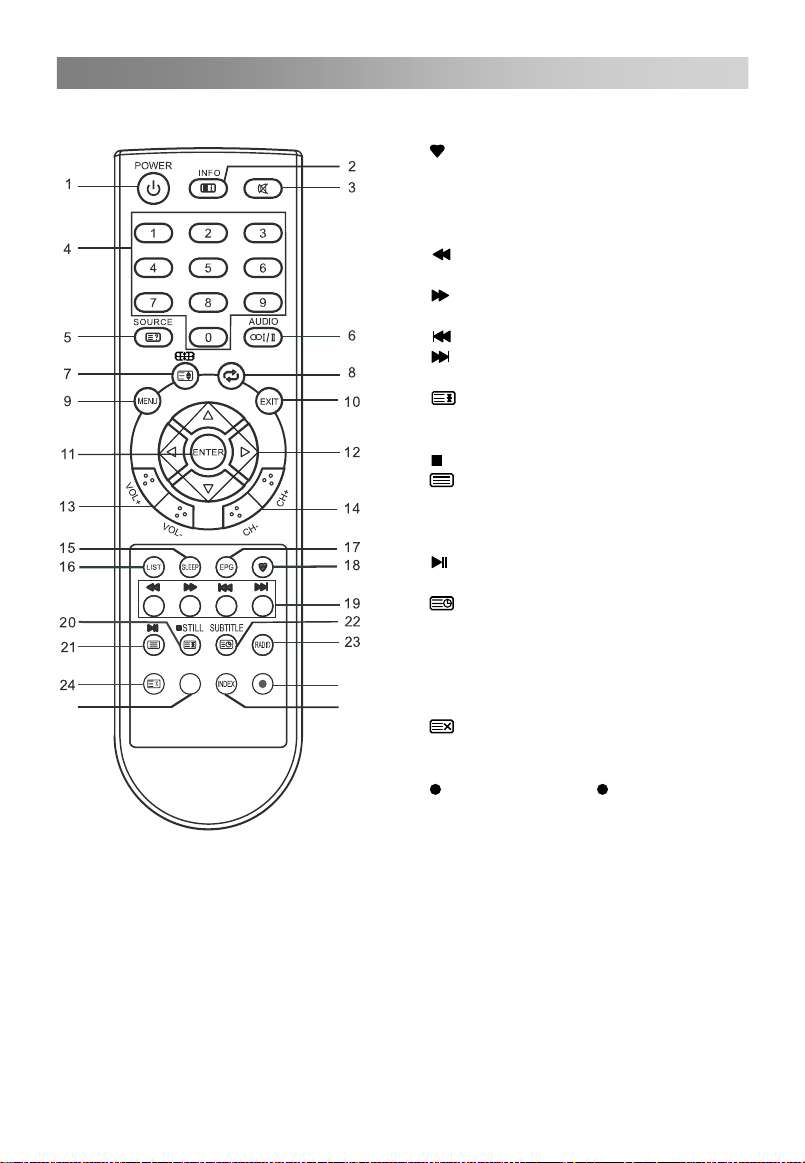
Remote Control
r
7
The buttons of the original remote control are as following:
: Power, switch on or off TV set.
1.
2. INFO: Press to display the current
program information on the screen.
i
: Go to the index page.
3.
: Press to mute or restore sound.
4. NUMBER BUTTONS: Choose channels
or password importation.
5. SOURCE: Press to select signal source.
?
: Reveal the hidden information of
some teletext pages.
6. AUDIO (∞I/II): The button can be used
to switch between NICAM DUALⅠ/
NICAM DUALⅡ/ NICAM DUALⅠ+Ⅱ
/MONO and switch Audio language in
DTV mode.
2777
DMP
7.
8.
9. MENU: Press to enter the menu screen
10. EXIT: Return the last layer OSD Menu o
11. ENTER: Press to execute the selected
25
26
12. ▲/▼/◄/►: To select the direction.
13. VOL+/VOL-: Press to adjust the volume
14. CH+/CH-: Press to select channels in
15. SLEEP: Press to set the sleep timer.
16. LIST: Press to call up the channel list.
17. EPG: Electronic Program Guide, use in
: Press to select different images
sizes.
: Change size of teletext screen in
display mode.
: Return to last viewed program.
for various optional adjustable settings.
exit OSD Menu.
item in the menu screen or enter the
desired value in any input mode.
level up or down.
ascending or descending order.
When the preset length of time has
passed, the TV set enters standby
mode.
Press again to exit it.
the DTV mode.
Page 11
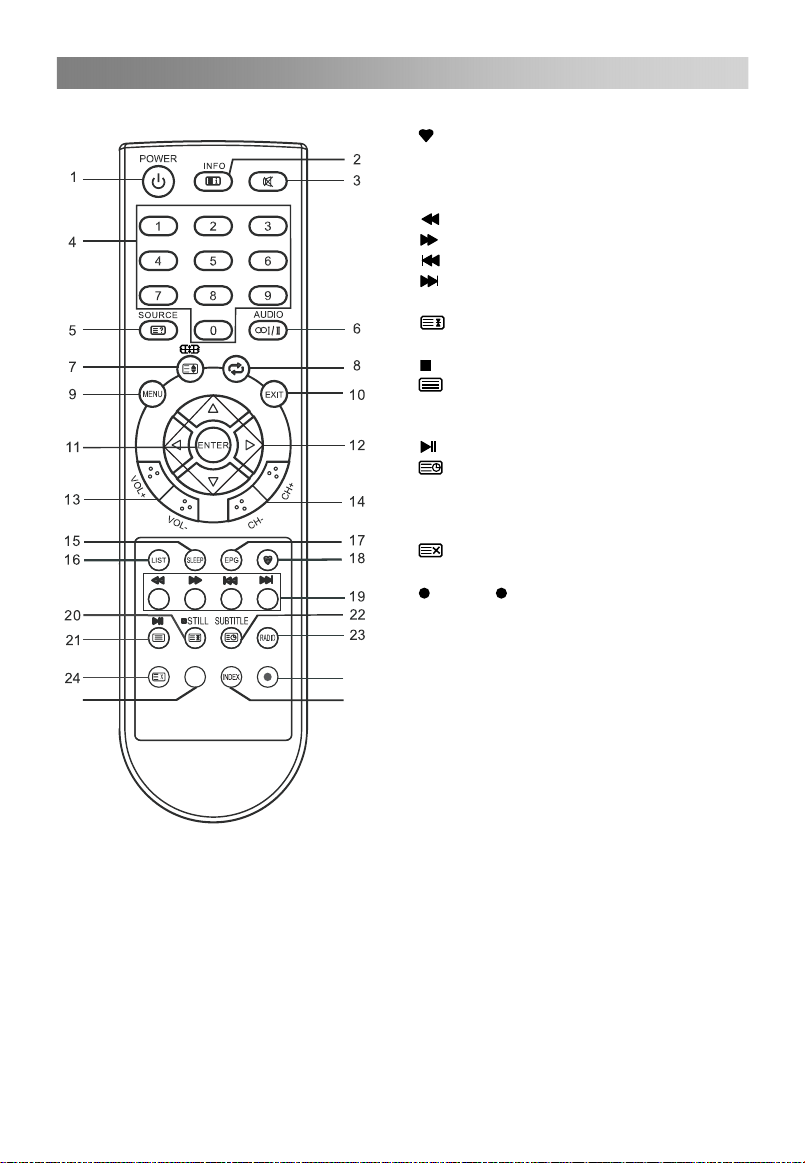
Remote Control
8
DMP
2777
: Switch on/off the favorite programs
18.
list.
19. COLOR BUTTONS: Red/ green/ yellow/
blue key navigation link.
: Fast reverse (in DMP mode).
: Fast forward (in DMP mode).
: Previous (in DMP mode).
: Next (in DMP mode).
20. STILL: Press to hold the picture.
: Hold the teletext page on display,
press again to release.
: Stop (in DMP/PVR mode).
21.
: Enter the Teletext, press again for
MIX mode, press this button again to
exit.
: Play / Pause (in DMP/PVR mode).
22.
: Enter subtitle mode or subpage.
23. RADIO: Press to interchange Radio and
DTV programs when there is Radio
program (In DTV mode).
24.
: Cancel the teletext but not to exit
teletext, press again to exit.
25.
: Press button to start recording.
Recording in use.
(In PVR mode).
26. INDEX: Press to enter the Recorded list.
(In PVR mode) Change the list by
25
26
TIMER or CHANNEL. (In PROGRAMME
GUIDE menu)
27. DMP: Press to switch to the DMP source.
NOTE:
All pictures in this manual are examples, only for reference, actual product may differ
from the pictures.
The buttons not mentioned here are not used.
Page 12
Basic Operation
9
QUICK START GUIDE
• Connection
1. Connecting the mains and antenna.
2. If TV has a power switch, turn it on firstly. Then press Power button on the
remote to turn on the TV.
• Initial Setup
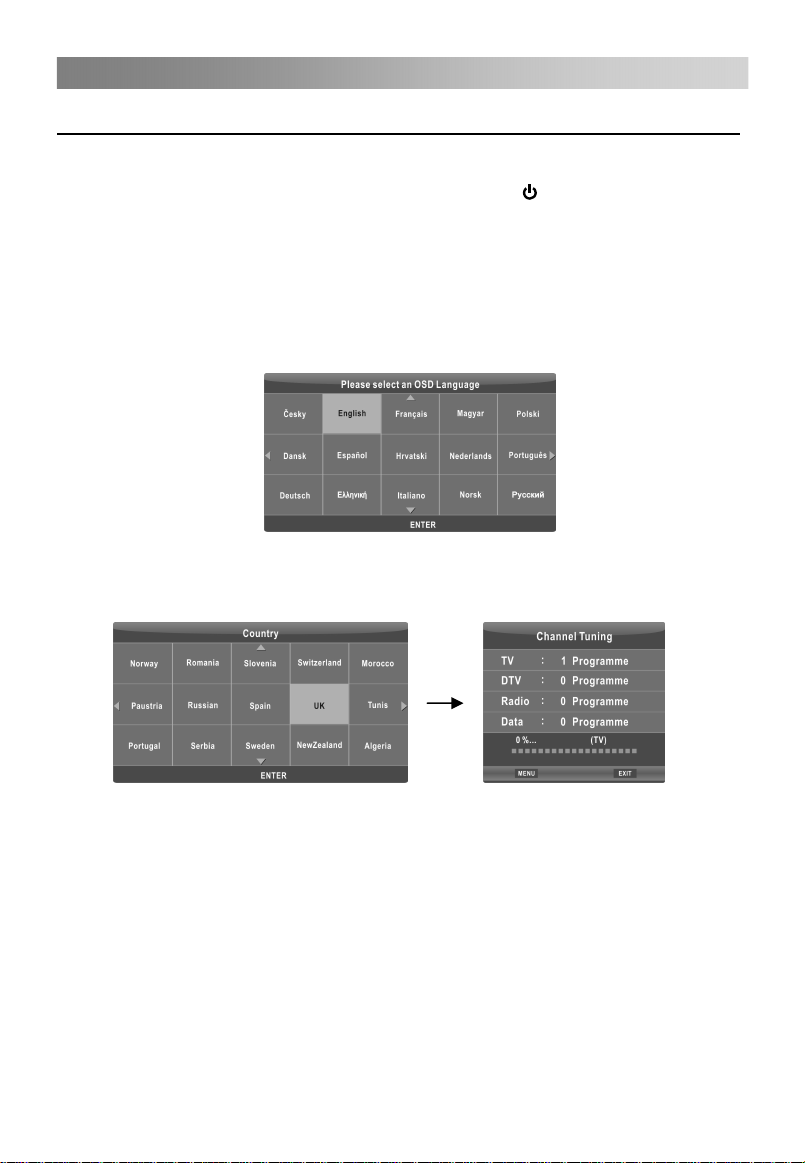
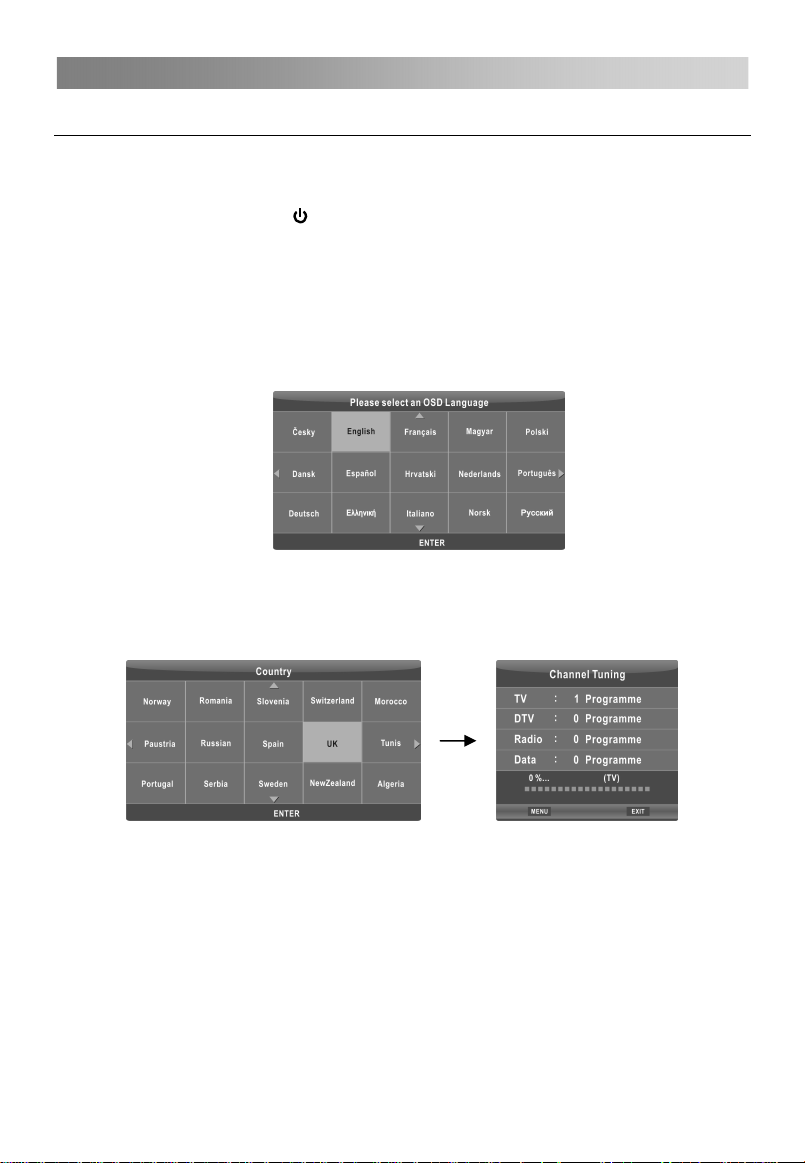
When the TV is initially powered on (Or no preset channels), a sequence of on-screen
prompts will assist in configuring basic settings.
1. Select the desired OSD (On Screen Display) language.
Press the▲/▼/◄/►button, then press the ENTER button.
2. Select the appropriate country.
Press the▲/▼/◄/►button to select the country, then press the ENTER button to
start Auto tuning.
Page 13
Basic Operation
10
Turning on and off the TV
• Turn on the TV
Connect the AC input cable, at this time the TV will enter standby mode.
Press the
• Turn off the TV
Press the button on the remote control to enter standby mode.
Do not leave your set in standby mode for long periods of time. It is best to unplug the
set from the mains and aerial.
• No signal
There is No Signal menu on screen when there is no input signal. In TV/DTV mode, if
there is no signal in five minutes, the TV will turn off automatically. In PC-RGB mode,
the TV set will automatically turn off in 16 seconds if no input signal. When VGA cable
is connected, the TV turns on automatically.
Programme Selection
• Using the CH+/CH- on the panel of TV or on the remote control.
Press CH+ to increase channel number.
Press CH - to decrease channel number.
• Using 0- 9 digital buttons.
You can select the channel number by pressing 0 to 9. (In TV, DTV mode)
• Example
To select - channel (e.g. Channel 5): Press 5.
To select -- channel (e.g. Channel 20): Press 2 and 0 in a short time.
Volume adjustment
• Press the VOL+/- button to adjust the volume.
• If you want to switch the sound OFF, press the
• You can release mute by pressing the
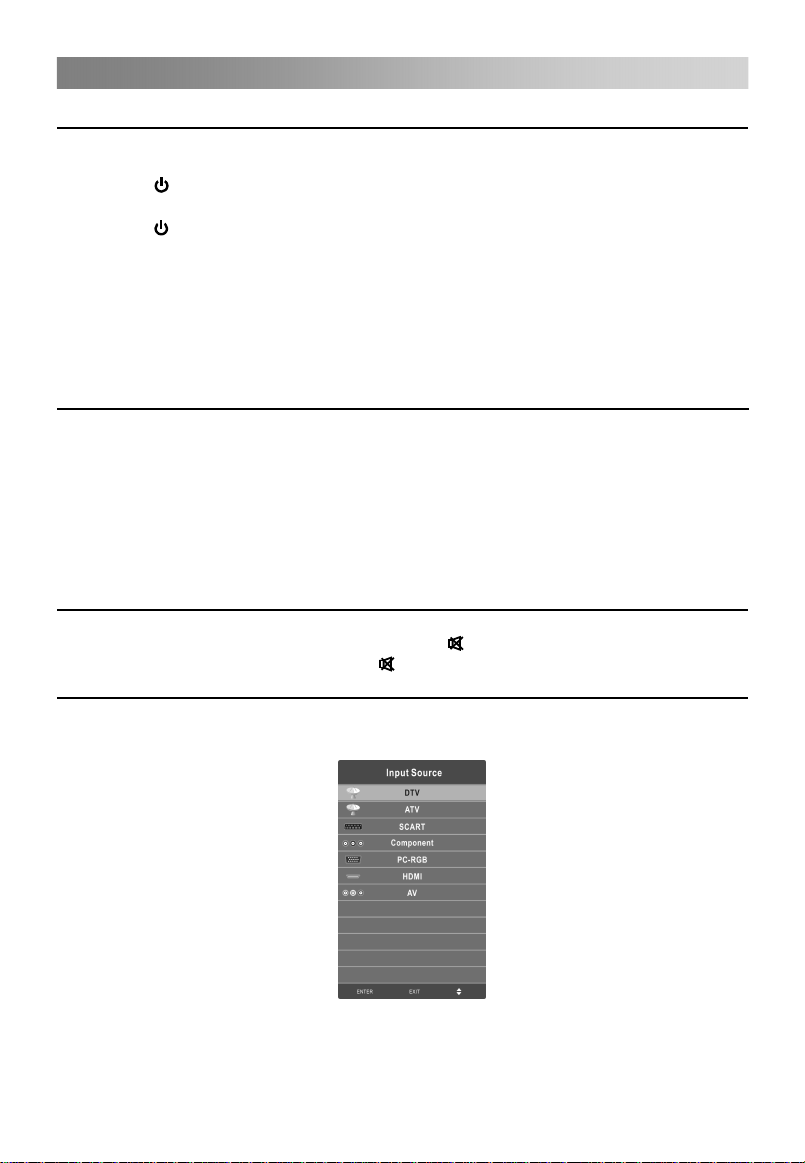
Changing the Input Source
You can select the input source by pressing the SOURCE button on the remote control.
Press the▲/▼button to cycle through the input source, and press the ENTER button to
confirm your choice.
button on remote control can turn on TV
.
or increase/decrease the volume.
from standby mode.
NOTE:
The picture is just for reference. Please operate with the OSD MENU of concrete TV
and refer to the AV terminal board.
Page 14

Menu Operation
11
How to Navigate Menus
Before using the TV follow the steps below to learn how to navigate the menu in order
to select and adjust different functions. The access step may differ depending on the
selected menu.
1. Press the MENU button to display the main menu.
2. Press the◄/►button to cycle through the main menu.
3. Press the▲/▼button to select the desired sub item.
4. Press the ENTER button to access the submenu.
5. Press the ▲/▼/◄/► button to select the desired value. The adjustment in the
OSD may differ depending on the selected menu.
6. Press the MENU button to return to the previous menu.
7. Press the EXIT button exit from the menu.
NOTE:
When an item in MENU is displayed gray, it means that the item is not available or
cannot be adjusted.
Buttons on the TV have the same function as corresponding buttons on the remote
control. If your remote control is lost or couldn’t work, you may use the buttons on the
TV to select menus. This manual focuses on operation of the remote control.
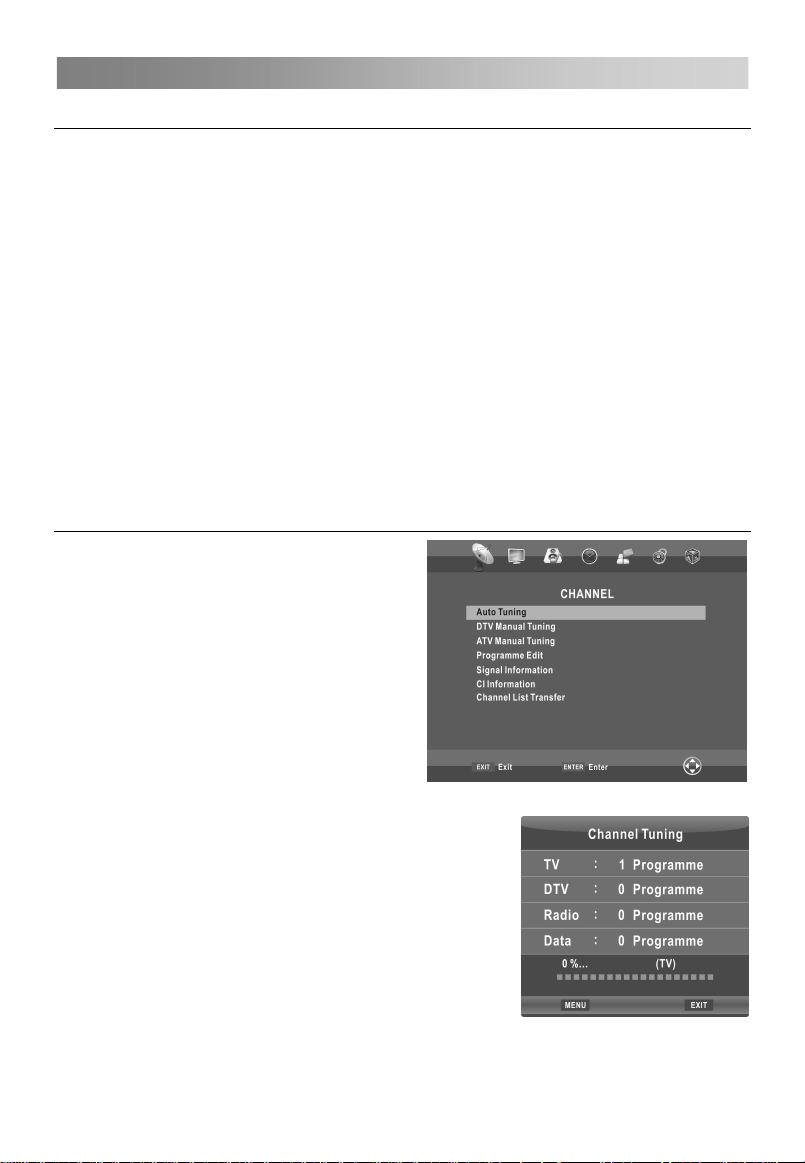
Configuring the Channel Menu
• Auto Tuning
Select the ENTER button to start Auto
Tuning.
1. Select the country and tune type for
channels.
2. The TV will begin memorizing all of the
available channels.
Once the progress bar is full, the found channels will
be stored and the unit will proceed to the search for
TV, DTV, Radio and Data.
If you press the MENU button in TV searching, the
Auto tuning will skip to DTV searching as the
suggestive picture shows.
Page 15
Menu Operation
12
•
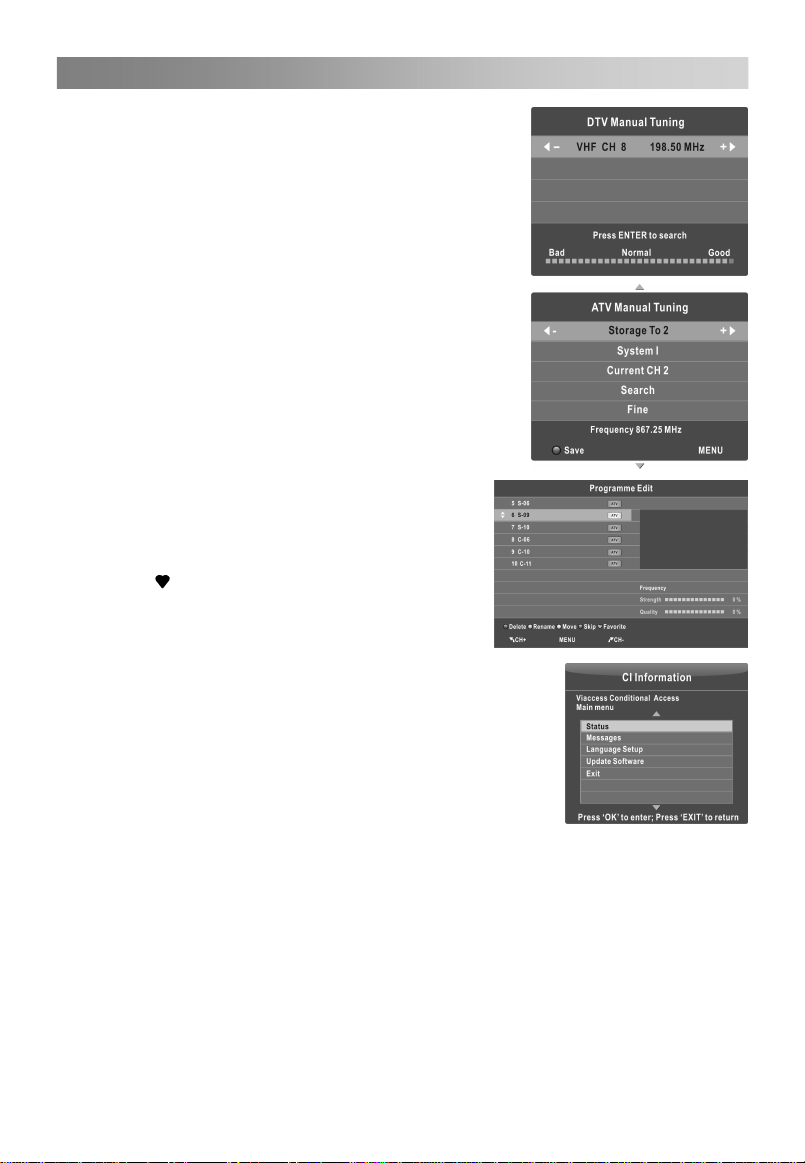
DTV Manual Tuning
Manual store for digital channels.
Press the ◄/►button to select channel.
Press the ENTER button to search.
When a channel is found, the searching process will
stop, the channel will be saved with current channel
number.
If the program is not your expected one, please press
the ◄/►button to continue the searching.
Press the EXIT button to exit.
ATV Manual Tuning
•
Manual store for ATV channels.
Press the▲/▼ button to select items.
Press the ◄/► button to adjust it.
Press the red button to save it.
Press the EXIT to exit.
• Programme Edit
Press the▲/▼ button select items.
Press the red button to delete the channel.
Press the green button to rename the channel.
(In TV mode)
Press the yellow button to move the channel.
(Except DTV channels with LCN)
Press the blue button to skip the channel.
Press the
The CH+/CH- button can be used to select the
following or preceding page.
• Signal Information (In DTV mode)
Display the current Signal Information.
• CI Information (In DTV mode)
This function enables you to watch some encrypted services
(pay services).
Please insert CI card into the PCMCIA slot according to the
arrow on the CI card.
NOTE:
The function can only be gotten when CI slot is available.
This OSD is only for illustration and the menu options and
screen format will vary according to the Digital pay services provider.
It is possible for you to change CI (Common Interface) menu screen and service by
consulting your dealer.
Please do not insert or pull out the CI card when power on.
Do not insert or pull out the CI card frequently so as to avoid any damages of the TV
and the CI card.
During initialization of the CI card, please don't operate the TV.
• Channel List Transfer
You can export all current channel information (including channel number, channel
name, frequency, etc.) into the U disk, as the channel information backup for this unit.
The system will automatically create a data file to store the channel information has
been exported.
If you can not restore the initial channel information after SORT, MOVE, DEL, SKIP,
LOCK, etc. operations, you can import the channel information from the USB.
button to set the favorite channel.
Page 16

Menu Operation
13
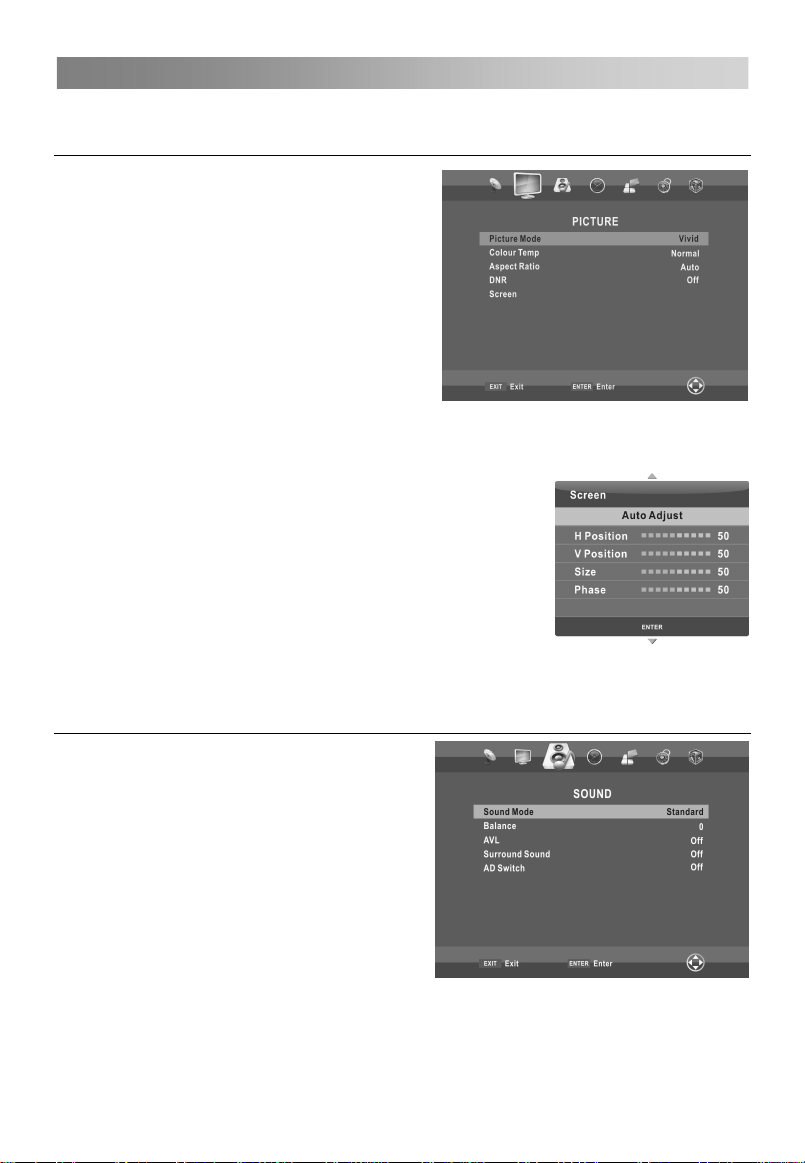
Configuring the Picture Menu
Picture mode
•
You can select the type of pict
best corresponds to your viewing
requirements. C
Saturation, Sharpness and Tint (NTSC) can
be adjusted wh
User.
anufacture's recommendation mode The m
is VIVID.
• Colour Temp
Select the colour of the picture.
Aspect Ratio
•
You can select the picture size which best corresponds to yo
DNR
•
Reduce
•
Screen (In PC-RGB mode)
Auto Adjust: Adjust the image automatically.
H Position:
V Position:
Size: Adjust the screen size.
Phase: Adjust when characters have low co
the image flickers.
C ring the Sound Menu
onfigu
• Sound mo
You can select a sound mode to suit your
personal preferences. Treble and B
be adjusted when the sound
User.
Balance
•
You can adjust the sound balance of the
speakers to preferred levels.
AVL (Auto Volume Level)
•
AVL automatically remains on the same level
of volume if you change programmes.
Because each broadcasting stat
own signal conditio
may be needed every time when the channel
is changed. This feature allo
stable volume levels by making automatic
adjustments for each program.
•
Surround Sound
You can select a
s screen noise without compromising video quality.
ontrast, Brightness,
en the picture mode is set to
temperature
Centre the image by moving it left or
Centre the image by moving it up or down.
de
ns, volume adjustment
desired Surround Sound mode.
ure which
ur viewing requirements.
right.
ntrast or when
ass can
mode is set to
ion has its
ws users to enjoy
Page 17

Menu Operation
14
• AD Switch (In DTV mode)
an auxiliary audio function that provid
This is es an additional audio track for visually
challenged persons. This function hand
Description), when it is sent along with the
e Audio Description On or Off and control the vocan turn th
Configuring the Timer Menu
• Clock
You can display either the DTV Sign
Stream Time or set the System Time.
Off Time
•
Set the t
•
On Time
Set the time for your T
The TV must
On Time to work.
•
Sleep
Select the time to turn the TV to standby
mode autom
•
Auto Sleep
Select the Auto Sleep time you want.
The TV will
set time (the
•
Time Zone
Select your
Configuring the Option Menu
•
Language
Select your preferred On Screen Dis
language.
•
Audio Language
Select your preferred audio language
(Available for digital channels if multiple
audio language
• Subtitle Language
Select your preferred subtitle language or
turn off subtitle. (Available for digital
channels
broadcast
Hearing Impaired
•
When hearing Impaired is ON, the
whose hearing are impaired when Hearing Im
hidden.
Country
•
Display the current country.
ime for the TV to switch off.
V to turn on.
be in standby mode for the
atically.
enter into standby mode automatically when there is no any operation in
set time is 4 hours when leave t
time zone.
s are broadcasted.)
if multiple subtitle languages are
ed.)
les the Audio Stream for the AD (Audio
Main audio from the broadcaster. Users
lume.
al
he factory).
play
.
TV screen will give some information to the people
paired is Off, the information will be
Page 18

Menu Operation
15
• PVR File System (In DTV mode)
Select Disk: Select the disk used for PVR.
Check PVR File System: Check the disk and
the speed of the system.
USB Disk: USB activated or
Format: Format USB disk.
Speed: Display speed of the storage device.
Free Record Limit: Select the recording duration.
Digital program recordin
Insert an U disk, the s
create a fol er (_MSTPVR) to store the files has been recorded.
Carve-rec
button presse
in/out the record menu.
Playback function
Press the
in/out the Playback menu. You can operate refer to the Playback menu.
Record list
Press the INDEX button to
Press th
Press the red button to delete the programme.
Press the green button to display the programme information.
Press the INDEX button to sort programmes.
P
ress EXIT button to exit.
N
OTE:
USB disk at least the capacity with 512MB.
Please format the inserted USB disk when it could not be recorded to.
n
During the Device formatting, do not disconnect the device while formatting is i
progress. If you format the device, all files will be deleted. Before formatting your
device to the TV, please back up your files to prevent them from
data. If USB disk in some virus meeting formats turn failur
If the u
System the menu win election to choose PVR to
If PVR recordin
USB memory must support USB
Some of nonstandard USB device may not be supported.
• Default
Restore the system settings to the factory de
OSD Animation
•
Select style of displaying menus.
• E-POP
Switch the Store Demo on or off.
Store Demo mode is the optimal setting for store environments. If a user modifies
image quality d
us after a certai
• Health Remind
Switch the Health Remind on or off.
While Break Time is set to On, a prompt picture will remind you to have a break
at intervals of two hours.
d
ording begins when button pressed, and it records all the time u
d or the memory is full. During the recording, press button to zoom
button to activate Playback while recording. Press
e ▲/▼ button to select items, then press ENTER button to play.
sage contains many ambulation hard drives that divide area, can at PVR File
g system is used all the time, it will exit PVR system automatically.
ata Store Demo mode initializes the product to the image quality set by
n period of time.
not.
e time to do Time Shift. Time Shift Size: Select th
g
ystem will automatically
display the Record list.
2.0 high-speed specification.
test
▲/▼
▲/▼
e.
in response to the disk sign.
fault.
ntill
button to zoom
damage or loss of
Page 19

Menu Operation
16
C onfiguring the Lock Menu
•
Lock System
The feature can prevent unauthorized
operating the TV set, unless entering 4-digit
password. When Lock System i
the system is locked, we must input the
system password at Auto Tuning, Manual
Tuning, Programme Edit or Default.
Press the right number buttons for the
password.
The default password is 0000.
NOTE:
After a password correction has been confirmed, please rem
into the Parent Guide menu, all functi
password is entered. If you forget, the super
• Set Password
You can set your private password. P
to set the new password. When the ne
finished successfully. The TV will
• Block Program (In TV/DTV mode)
ress the green button LOCK to lock
P
e available program you want.
th
Press the green button again t
unlock it.
Parent Lock (In DTV mode)
•
This feature can prevent children watching adult’s TV programmes, according to the
rating limit set. This function appearance according the information from broadcasting
station. Therefore if the signal has incorr
operate.
s on and
ember it for entering
ons can not be activated until the correct
password of 1225 still valid.
ress the number buttons on the remote control
w password has been input twice, the setting is
go back to previous menu.
o
ect information, this function does not
Page 20

Menu Operation
17
Usi ng DMP mode
•
To Access/Quit DMP mode
1
. Connect an USB device.
2. Press MENU button to display the main
menu. Press ◄/► button to select the
Applications menu.
3. Press the ENTER butto
DMP mode.
4. Press EXIT button to exit.
NOTE:
Special USB device may
USB max. Load: DC5V 500mA
The formats supported
•
T
he DMP function can support the USB device with USB memory.
It can play PHOTO, MUSIC,
Photo Format Support: JPEG, BMP, PNG.
Music Format Support: MP3, AAC.
Movie Format Support: AVI, VOB, DAT, MPG , TS/TP.
Text Format Support: TXT.
NOTE:
Special algorithm documents may not be or well be supported by the USB.
The USB supports the format mentioned above, if the file format is not supported,
change it to the given format.
n to enter the
be not or well supported.
MOVIE or TEXT files.
• Main Operating Interface
Page 21

Menu Operation
18
1. Use the ◄ ► button to select PHOTO, M
button enter into sub-menu.
2. Use the arrow b
to open the fold
3. Use the arrow buttons to highlight the file. Use the
unmark a file. Press
files in the
4. Press the INFO butt
5. Press the
6. Press the EX button to return to the previous menIT
•
Bas c peration i o
1. Play/ Pause
Start playing th
2. Stop
Stop the playing files.
3. / Fast
You can press / to skip fast
4. / Previous/Next
You can select the desired files manually in normal condition.
5. Red button
Select a file you want to delete,press the red button to open corresponding menu,
then press ENTER button to delete it.
6. CH+/CHPage up or page down the files.
/ USIC, MOVIE or TEXT. Press ENTER
uttons and ENTER button to enter the desired disk. Press ENTER
er.
ENTER button to mark or
button to play the selected files. If no file is marked, all the
folder will be played in sequence after you press
on to display the menu screen in playing.
to stop the playing files.
u screen.
e selected file of a folder or pause.
Reverse/Fast Forward
reverse or forward.
button.
Page 22

Menu Operation
19
MHEG5
MHEG5 (Multimedia and Hypermedia information coding Expert Group) is connecting
the operation and function as media player. If you want to enter the MHEG5, subtitle
must be set off.
Press red button or
the suggestive on. Press EXIT button or
Home Page:
After entering the selected item, you can view the main menu as:
Select the main item you want, you can see more particular details.
informati
button to enter the MHEG5 menu. You can operate the TV with
button to exit the MHEG5 menu.
Page 23

Important Unique Buttons
20
PROGRAMME GUIDE (In DTV mode)
Press EPG button to display the PROGRAMME GUIDE menu. This function let you
know the detailed information of the channel, indicating the time of the program playing.
From the PROGRAMME GUIDE it is possible to check the program information for the
next eight days (If the information is available from the broadcaster). Press EXIT button
to exit.
Record: Press red button to set the parameters
The unit is able to do schedule recording when TV is
turning on or in standby mode. You can set up several
schedule recording. Different schedules should not
overlap. When recording starts in
front indicators will change color and there will be no
picture or sound from the
button to light up the screen.
INFO: Press green button to see the detailed
information of the current channel.
Schedule: Press yellow button to display the
schedule list.
Remind: If you find the desired program which
will be shown in the future. Press the blue
button to book program.
INDEX: Change the list by TIMER or
CHANNEL.
ENTER: Press to change channel.
Channel List
Press LIST button to display the Channel
List.
Press ▲/▼ to select the items, and the
channels will be changed automatically.
Press CH+/CH- button to page up or down
the Channel list.
Press LIST button to exit.
Favorite List
Press
Press ▲/▼ to select the items, and the
channels will be changed automatically.
Press CH+/CH- button to page up or down
the Favorite list.
Press
button to display the favorite list.
button to exit.
unit. You can press
standby mode, the
for recording.
Page 24

Teletext
21
Using the teletext feature
• Display teletext
1. Select a TV station with a teletext signal.
2. Press the
3. Press the
button to enter teletext mode.
button 2nd to enter Mix mode, this function enables you to
superimpose the teletext page over the TV program.
4. Press the
button 3rd return or exit to the normal TV/DTV mode.
• Page selection
1. Enter the page number (three digits) using the number buttons. If you press a
wrong number during input, you must complete the three digit number and then
reenter the correct page number.
2. The CH-/CH+ button can be used to select the preceding or following page.
• Hold
You can press the
button to hold a page, and press it again to release the page.
• Index
Press the
i
button to enter the main index page directly.
• Enlarging Text
When a page is displayed, you can double the size of the text to make it easier to
read.
1. Press the
2. Press the
3. Press the
button to enlarge the top half of the page.
button again to enlarge the bottom half of the page.
button once more to return to the normal display.
• Reveal mode
You can display concealed teletext information (e.g. Answer to puzzles or riddles etc.)
by pressing
?
button. Press ? button again to remove the information from the
display.
• Subpage
Some teletext may contain several sub-pages which are automatically paged in a
certain cycle by the TV station.
1. Yon can enter into a certain sub page by pressing the button directly and
select the page number with number buttons. Enter the sub page number (e.g. 0003)
for the third sub page.
2. Press the button again to exit the sub page mode.
3. Press the button to return to the normal TV mode.
• Color buttons (Red, Green, Yellow and blue)
Press these buttons to access directly to the corresponding color pages displayed at
the lower part of the teletext screen.
Page 25

Troubleshooting Guide
22
Troubleshooting
Before contact the service technician, perform the following simple checks. If any
program still persists, unplug the TV and calling for serving.
PROBLEM POSSIBLE SOLUTION
- Check whether the main plug has been connected to
a wall let.
No sound and picture
Normal picture but no
sound
The remote control does
not work
Power is suddenly turned
off
Picture appears slowly
after switching on
No or poor color or poor
picture
Horizontal/vertical bars or
picture shaking
Poor reception on some
channels
Lines or streaks in
pictures
No output from one of the
speakers
- Check whether you have pressed the POWER
button on the front of TV set.
- Check the picture contrast and brightness settings.
- Check the volume.
- Sound muted? Press the MUTE button.
- Try another channel, the problem may be with the
broadcast.
- Are the audio cables installed properly?
- Check to see if there any object between the product
and remote control Causing obstruction.
- Are batteries installed with correct polarity (+ to +,
- to -)?
- Correct remote operating mode set: TV, VCR etc.?
- Install new batteries
- Is the sleep timer set?
- Check the power control settings. Power interrupted.
- No broadcast on station tuned with auto activated.
- This is normal, the image is muted during the
product startup process. Please contact your service
center, if the picture has not appeared after five
minutes.
- Adjust the color in menu option.
- Keep a sufficient distance between the product and
the VCR.
- Try another channel, the problem may be with the
broadcast.
- Are the VIDEO cables installed properly?
- Activate the any function to restore the brightness of
the picture.
- Check for local interference such as an electrical
appliance or power tool.
- Station or cable product experiencing problems.
Tune to another station.
- Station signal is weak, reorient antenna to receive
weaker station.
- Check for sources of possible interference.
- Check the antenna (Change the direction of the
antenna).
- Adjust balance in menu option.
Page 26

Troubleshooting Guide
23
NOTE:
Maintenance
Early malfunctions can be prevented. Careful and regular cleaning can extend the
amount of time you will have your new TV. Be sure to turn the power off and unplug the
power cord before you begin any cleaning.
Cleaning the screen
1. Here’s a great way to keep the dust off your screen for a while. Wet a soft cloth in a
mixture of lukewarm water and a little fabric softener or dish washing detergent. Wring
the cloth until it’s almost dry, and then used it to wipe the screen.
2. Make sure the excess water is off the screen, and then let it air-dry before you turn
on your TV.
Cleaning the cabinet
To remove dirt or dust, wipe the cabinet with a soft, dry, lint-free cloth. Please be sure
not to use a wet cloth.
Extended Absence
There is a problem in VGA mode (Only VGA mode applied).
PROBLEM POSSIBLE SOLUTION
- Adjust resolution, horizontal frequency, or vertical
frequency.
The signal is out of range.
Vertical bar or stripe on
back ground & Horizontal
Noise & Incorrect position.
Screen color is unstable or
single color.
If you expect to leave your TV dormant for a long time (such as a vacation), it’s a
good idea to unplug the power cord to protect against possible damage from
lightning or power surges.
- Check it whether the signal cable is connected or
loose.
- Check the input source.
- Work the auto configure or adjust clock, phase, or
H/V position.
- Check the signal cable.
- Reinstall the PC video card.
Disposal of old electrical appliances
The European directive 2002/96/EC on Waste Electrical and Electronic
Equipment (WEEE), requires that old household electrical appliances must
not be disposed of in the normal unsorted municipal waste stream. Old
appliances must be collected separately in order to optimize the recovery
and recycling of the materials they contain, and reduce the impact on human
health and the environment.
The crossed out “wheeled bin” symbol on the product reminds you of your
obligation, that when you dispose of the appliance, it must be separately
collected.
Consumers should contact their local authority or retailer for information
concerning the correct disposal of their old appliance.
Page 27

Obsah
Varování.................................................................................................... 1
Bezpečnostní pokyny .............................................................................. 3
Začínáme ..................................................................................................5
Používání dálkového ovladače............................................................... 5
Vkládání baterií do dálkového ovladače................................................. 5
Výměna baterií
Připojení a nastavení ............................................................................... 6
Instalace kabelů...................................................................................... 6
Dálkové ovládání...................................................................................... 7
Základní funkce........................................................................................ 9
STRUČNÝ NÁVOD K POUŽITÍ.............................................................. 9
Zapnutí a vypnutí televize..................................................................... 10
Výběr programu.................................................................................... 10
Nastavení hlasitosti ..............................................................................10
Změna zdroje vstupního signálu........................................................... 10
Funkce menu.......................................................................................... 11
Jak procházet menu ............................................................................. 11
Menu Kanál .......................................................................................... 11
Menu Obraz.......................................................................................... 13
Menu Zvuk............................................................................................ 13
ČAS
Menu
Menu VOLBY........................................................................................
Menu Zámek ........................................................................................16
Používání režimu DMP......................................................................... 17
MHEG5.................................................................................................19
Důležitá specifická tlačítka.................................................................... 20
PROGRAMME GUIDE
SEZN. KANÁLŮ
Seznamu oblíbených
Teletext ...................................................................................................21
Používání teletextu...............................................................................
Řešení problémů....................................................................................
Odstraňování problémů........................................................................ 22
Údržba.................................................................................................. 23
…………...........………..…………......................….…...5
............................................................................................
........................................................................
.....................................................................................
.............................................................................20
14
14
20
20
21
22
CZ
Page 28

Varování
1
UPOZORNĚNÍ:
CHCETE-LI SNÍŽIT RIZIKO ÚRAZU ELEKTRICKÝM PROUDEM,
NEOTVÍREJTE KRYT (NEBO ZADNÍ PANEL PŘÍSTROJE). UVNITŘ
NEJSOU ŽÁDNÉ KOMPONENTY, KTERÉ BY MOHL UŽIVATEL SÁM
OPRAVIT. VŽDY SE OBRAŤTE
SERVISU.
Symbol blesku se šipkou v rovnoramenném trojúhelníku má varovat
uživatele před neizolovaným “nebezpečným napětím” uvnitř přístroje,
které může být dostatečně vysoké, aby osobám způsobilo úraz
elektrickým proudem.
Vykřičník v rovnostranném trojúhelníku má informovat uživatele o tom,
že v literatuře přiložené k přístroji se nachází mnoho důležitých pokynů
pro jeho provoz a údržbu (případně servis).
DŮLEŽITÉ INFORMACE
Zařízení vytváří, používá a může vyzařovat vysokofrekvenční energii a, pokud
není instalováno a používáno podle pokynů, může být příčinou škodlivého rušení
radiokomunikace. Neexistuje však záruka, že se rušení v určité instalaci neobjeví.
Pokud zařízení způsobuje škodlivé rušení příjmu radiových a televizních signálů,
což se dá určit vypnutím a zapnutím přístroje, doporučuje se uživateli, aby se
pokusil odstranit rušení jedním nebo několika z těchto opatření:
- Přemístěním antény
- Zvětšením odstupu mezi zařízením a přijímačem
- Zapojením zařízení do zásuvky jiného obvodu, než je obvod, do kterého je
přijímač zapojen
- Obraťte se na prodejce nebo zkušeného radiotechnika nebo televizního technika
a požádejte ho o pomoc
Veškeré změny nebo modifikace, které strana odpovědná za shodu s předpisy
výslovně neschválila, mohou zrušit platnost oprávnění uživatele zařízení
provozovat.
UPOZORNĚNÍ
Nepokoušejte se žádným způsobem modifikovat tento výrobek bez písemného
oprávnění dodavatele. Neoprávněné modifikace mohou zrušit platnost oprávnění
uživatele provozovat tento výrobek.
Nedoporučuje se ponechávat na obrazovce zobrazený statický obraz příliš
dlouho. Totéž platí o zobrazování neobyčejně jasných obrazů na obrazovce.
POZOR
RIZIKO ÚRAZU ELEKTRICKÝM
PROUDEM NEOTVÍRAT
NA VYŠKOLENÉ ZAMĚSTNANCE
Page 29

Varování
V
2
AROVÁNÍ
Chcete-li snížit riziko požáru nebo úrazu elektrickým pouzdrem, nevystavujte
přístroj působení deště nebo vlhka.
Větrací otvory nesmějí být zakryty takovými předměty jako noviny, ubrusy,
záclony atd., protože tím se zabraňuje nezbytnému větrání.
Nenechte na přístroj kapat vodu, nedovolte, aby do něj natekla voda a nestavte na
něj žádné předměty naplněné tekutinou jako např. vázy s květinami.
Nezapomínejte na ekologickou likvidaci baterie. Nevyhazujte baterie do směsného
odpadu v popelnicích. V případě potřeby můžete kvůli ochraně životního prostředí
kontaktovat svého prodejce.
Ponechte okolo svého přístroje volný prostor (5 cm) umožňující dostatečné
větrání. (Minimální vzdálenost okolo přístroje umožňující dostatečné větrání.)
Nestavte na přístroj zdroje přímého plamene jako např. hořící svíčky.
Chcete-li zabránit rozšíření ohně, nikdy se k tomuto výrobku nepřibližujte se
svíčkami nebo jinými zdroji otevřeného plamene.
Elektrostatický výboj může způsobit poškození zařízení. Lze manuálně obnovit
vypnutím napájení a jeho opětovným zapnutím.
POZOR při zapojování napájecí sňůry
U většiny přístrojů se doporučuje, aby byly zapojeny do předem určeného obvodu,
tj. do obvodu s jedinou zásuvkou, který bude napájet pouze tento přístroj a
nebude mít žádné další vývody nebo větvení.
Zásuvky nepřetěžujte. Přetížené, uvolněné nebo poškozené zásuvky,
prodlužovací kabel nebo napájecí šňůry s roztřepeným opletením nebo
poškozenou či popraskanou izolací jsou nebezpečné. Libovolná výše uvedená
závada může být příčinou úrazu elektrickým proudem nebo může způsobit požár.
Pravidelně kontrolujte napájecí šňůru vašeho přístroje, a pokud jeho vzhled
ukazuje na poškození nebo degradaci materiálu, vytáhněte ji ze zásuvky,
přestaňte používat přístroj a nechte šňůru vyměnit za přesně stejnou novou šňůru
pověřeným pracovníkem servisu. Chraňte napájecí šňůru před fyzickým nebo
mechanickým poškozením. Jedná např. o její překroucení, zauzlení, smáčknutí,
přivření do dveří nebo chození po ní. Dávejte také velký pozor na zásuvky,
nástěnné vývody a místo, kde šňůra vstupuje do přístroje.
Zásuvka zapojená do SÍTĚ se používá k odpojení zařízení a zůstává připravena
k použití.
Obrázky a kresby v této uživatelské příručce jsou uvedeny pouze pro porovnání
a mohou se od aktuálního vzhledu výrobku lišit. Design a specifikace výrobku
mohou být změněny bez předchozího oznámení.
Page 30

Bezpečnostní pokyny
3
DŮLEŽITÉ BEZPEČNOSTNÍ POKYNY
1. Přečtěte si tyto pokyny.
2. Uložte si tyto pokyny.
3. Dbejte na všechna upozornění.
4. Dodržujte všechny pokyny.
7. Neblokujte žádný větrací otvor.
Nainstalujte podle pokynů výrobce.
5. Nepoužívejte tento přístroj blízko
vody.
6. Otírejte pouze suchým hadříkem.
8. Neinstalujte v blízkosti žádného
tepelného zdroje jako jsou radiátory,
topné registry, kamna nebo jiné
přístroje (včetně zesilovačů), které
produkují teplo.
9. Neobcházejte bezpečnostní funkce
polarizovaných nebo zemnících typů
zástrček. Polarizovaná zástrčka má
dva kolíky, přičemž je jeden širší než
druhý. Zemnící typ zásuvky má dva
kolíky a jeden zemnící kontakt. Širší
kolík nebo zemnící kontakt zajišťují
vaši bezpečnost. Pokud se poskytnutá
zástrčka nehodí do vaší zásuvky,
obraťte se na svého elektrikáře, aby
vám zastaralou zásuvku vyměnil.
Page 31

Bezpečnostní pokyny
4
10. Chraňte napájecí šňůru, nešlapejte
po ní, zabraňte jejímu smáčknutí, a
to zejména v blízkosti zástrček,
objímek a míst, kde vystupují z
přístroje.
11. Používejte pouze přídavná
zařízení/příslušenství označená
výrobcem.
12. Používejte pouze vozíky, stojany,
trojnožky, konzole nebo stolky
označené výrobcem nebo
prodávané s přístrojem. Pokud
používáte vozík, buďte při převážení
opatrní, aby nedošlo k převržení a
zranění.
13. Přístroj vypojte ze sítě za bouřky
nebo v případě, že ho nebudete
dlouhou dobu používat.
14. Veškeré údržbu nechte na
vyškolených pracovnících servisu.
Servis je nezbytný, pokud je přístroj
jakýmkoli způsobem poškozen, např.
když je poškozena napájecí šňůra
nebo zástrčka, do přístroje se dostala
tekutina nebo do něj spadl nějaký
předmět, přístroj byl vystaven dešti
nebo vlhku, nefunguje normálně
nebo spadl.
LIKVIDACE
- Fluorescenční lampa používaná v tomto výrobku obsahuje malé množství rtuti.
- Nevyhazujte tento výrobek do směsného domácího odpadu.
- Likvidace tohoto výrobku musí proběhnout podle předpisů vydaných vašimi
místními orgány.
POZNÁMKA
- Když je televize na dotyk studená, mohlo dojít při jejím zapnutí k drobnému
“mihotání” obrazovky. To je normální, s televizí nic není.
- Některé drobné vady bodů mohou být na obrazovce vidět. Vypadají jako červené,
zelené nebo modré skvrnky na obrazovce. Nebudou však mít žádný nepříznivý
vliv na výkon monitoru.
- Nedotýkejte se obrazovky, ani u ní nedržte delší dobu prst. Můžete tím způsobit
dočasné zkreslení obrazu na obrazovce.
Page 32
Začínáme
5
Používání dálkového ovladače
Při používání dálkového ovladače miřte na čidlo dálkového ovládání na televizi. Pokud
bude mezi dálkovým ovladačem a čidlem dálkového ovládání na přístroji nějaký
předmět, přístroj nemusí fungovat.
Zamiřte dálkový ovladač na ČIDLO DÁLKOVÉHO OVLÁDÁNÍ na televizi.
Pokud používáte tuto televizi ve velmi jasně osvětleném prostoru, infračervené
ČIDLO DÁLKOVÉHO OVLÁDÁNÍ nemusí řádně fungovat.
Doporučená účinná vzdálenost pro používání dálkového ovladače je asi max. 7
metrů.
Vkládání baterií do dálkového ovladače
1. Otevřete kryt na zadní straně dálkového ovladače.
2. Vložte dvě baterie AAA. Zkontrolujte, zda
označení “+” a “– ” na koncích baterie odpovídají
označení v prostoru pro baterie.
3. Vraťte kryt na místo.
Výměna baterií
Budete muset vložit přiložené baterie do dálkového ovladače, abyste ho podle níže
uvedených pokynů uvedli do provozu.
Když jsou baterie slabé, vzdálenost, na kterou dálkový ovladač funguje, je mnohem
menší, a bude třeba baterie vyměnit.
Poznámky k používání baterií:
Použití špatného typu baterií může způsobit unikání chemikálií a/nebo výbuch. Nikdy
nezapomeňte na následující pokyny a informace:
Vždy zkontrolujte, zda jsou baterie vloženy tak, aby označení “+” a “–” na koncích
baterie odpovídala označení v prostoru pro baterie.
Různé typy baterií mají různé charakteristické vlastnosti. Nelze je míchat dohromady.
Nemíchejte baterie dohromady. Míchání starých a nových baterií zkrátí životnost
baterie a/nebo způsobí unikání chemikálií.
Vyměňte baterie, jakmile přestanou fungovat.
Chemikálie, které unikají z baterií, mohou způsobovat podráždění kůže. Jestliže z
baterií uniká nějaká chemická látka, okamžitě ji otřete suchým
Baterie dodávané společně s výrobkem mohou mít kratší životnost kvůli podmínkám
skladování. Vyjměte baterie vždy, když předpokládáte, že dálkový ovladač nebudete
delší dobu používat.
Baterie (v obalu nebo již instalované) se nesmí vystavovat nadměrnému teplu
způsobenému např. slunečním svitem, ohněm apod.
POZOR:
Nesprávně vložené baterie mohou způsobit výbuch.
Nahrazujte vybité baterie pouze bateriemi stejného nebo rovnocenného typu.
hadříkem.
Page 33

Připojení a nastavení
6
Instalace kabelů
Před instalací a použitím si prosím pečlivě přečtěte příslušnou část v kapitole “Údržba a
bezpečnost”.
1. Vyjměte televizi z obalu a dejte ji na vzdušné rovné místo.
POZNÁMKA:
Při zapojování televize, počítače nebo jiných zařízení do sítě nebo při jejich
odpojování zkontrolujte, zda jste předtím vypnuli zdroj střídavého proudu. Při
odpojování napájecího kabelu nebo kabelu přivádějícím televizní signál držte
zástrčku (izolovanou část) a netahejte za samotný kabel.
2. Výstupní vývod RF může být zapojen do vstupního portu RF televize.
3. Výstupní vývod AV pro DVD může být zapojen do vstupního portu AV televize
pomocí kabelu AV.
4. Zapojte jeden konec kabelu VGA do portu VGA počítače a druhý konec kabelu VGA
do portu VGA televize a utáhněte šrouby ve směru hodinových ručiček na obou
koncích kabelu VGA.
POZNÁMKA:
Při zapojování VGA kabelu netlačte příliš na 15pinový konektor, aby nedošlo ke
zlomení pinů.
5. Zapojte jeden konec kabelu HDMI do výstupního portu HDMI a druhý konec kabelu
HDMI do HDMI portu televize.
POZNÁMKA:
Při zapojování HDMI se soustřeďte na to, abyste se strefili, a netlačte příliš na
konektor, aby nedošlo ke zlomení pinu.
6. Zkontrolujte a ujistěte se, že jsou všechny kabely správně zapojeny do
odpovídajících portů.
7. Připojte vstup nebo výstup konektoru SCART z externího zařízení k těmto jackům.
8.
Připojte napájecí kabel k zdroji střídavého napětí 100-240V~.
POZNÁMKA:
Napájecí napětí televize se pohybuje v rozsahu 100-240V~ 50/60Hz. nepřipojujte
televizi ke zdroji střídavého proudu mimo toto rozpětí.
Při odpojování napájecího kabelu držte izolovanou část zástrčky a přímo se
nedotýkejte kovové části kabelu.
Page 34

k
Dálkové ovládání
7
Tlačítka na originálním dálkovém ovladači:
1. : Power, tlačítko vypíná nebo zapíná
televizní přístroj.
2. INFO: Stisknutím zobrazíte na obrazovce
informace o aktuálně nastaveném
programu.
: Stisknutím vypnete nebo obnovíte zvuk.
3.
4. TLAČÍTKA S ČÍSLY: Pro výběr kanálů
nebo zadání vstupního hesla.
5. SOURCE: Stisknutím vyberete zdroj
signálu.
?
některých stránkách teletextu.
6. AUDIO (∞I/II): Tlačítko můžete použít jak k
přepínání mezi NICAM DUAL I, NICAM
DUAL II, NICAM DUAL I+II a MONO, tak i
přepínání AUDIO jazyka v režimu DTV.
7.
různou/dostupnou velikost obrazu.
: Změní velikost obrazovky teletextu v
zobrazovacím režimu.
: Návrat k posledně sledovanému
8.
programu.
9. MENU: Stisknutím otevřete na obrazovce
OSD menu, kde si můžete zvolit různá
volitelná nastavení.
DMP
2777
10. EXIT: Vrátíte se k předcházející úrovni
25
26
OSD menu nebo OSD menu zavřete.
11. ENTER: Stisknutím aktivujete vybranou
položku z menu na obrazovce nebo zadáte
požadovanou hodnotu v libovolném
vstupním režimu.
12. ▲/▼/◄/►: Výběr směru.
13. VOL+/VOL-: Stisknutím zesílíte nebo
zeslabíte zvuk.
14. CH+/CH-: Stisknutím přepínáte mezi
kanály ve vzestupném nebo sestupném
pořadí.
15. SLEEP: Stisknutím nastavíte přechod do
režimu spánku. Když vyprší nastavená
doba, televize přejde do pohotovostního
režimu.
16. LIST: Stisknutím otevřete seznam kanálů.
Dalším stisknutím ho zavřete.
17. EPG: Elektronický programový průvodce
používaný v režimu DTV.
i
: Přejdete do rejstříku.
: Zobrazí se informace skryté na
: Stisknutím vyberete
Page 35
Dálkové ovládání
8
18. : Zapíná/vypíná seznam oblíbených
programů.
19. BAREVNÁ TLAČÍTKA:
Červené/zelené/žluté/modré navigačn
tlačítko.
: Rychlé převinutí zpět (v režimu
DMP
).
: Rychlé převinutí dopředu (v
režimu DMP
: Předchozí (v režimu DMP).
: Následující (v režimu DMP).
20. STILL: Stisknutím zmrazíte obraz.
: Pozastavíte stránku teletextu na
obrazovce,dalším stisknutím ji
uvolníte.
: Stop (v režimu DMP/PVR).
21.
22.
23. RADIO: Stisknutím budete přepínat
DMP
2777
25
26
24.
25.
26. INDEX: Stisknutím otevřete seznam
: Otevřete teletext, dalším
stisknutím spustíte smíšený režim a
dalším stisknutím stejného tlačítka
režim ukončíte.
: Přehrávat/pozastavit (v režimu
DMP/PVR).
: Spustíte režim titulků nebo
otevřete podstránku.
mezi rozhlasovým a DTV programem,
pokud rozhlasový program existuje (v
režimu DTV).
: Zrušíte teletext, ale nezavřete ho.
Teletext zavřete dalším stisknutím
tlačítka.
: Stisknutím tlačítka zahájíte
nahrávání. Nahrává se.
nahrávek (v režimu PVR). Seznam
můžete změnit podle časovače TIMER
nebo kanálu CHANNEL (v nabídce
PRŮVODCE PROGRAMEM).
27. DMP: Stiskněte pro přepnutí do
zdrojového DMP.
POZNÁMKA:
Všechna zobrazení v tomto návodu jsou pouze ilustrativní, skutečný výrobek se
může lišit.
Tlačítka, o nichž se v návodu nezmiňujeme, se nepoužívají.
).
(v
režimu PVR).
í
Page 36
9
Základní funkce
STRUČNÝ NÁVOD K POUŽITÍ
• Připojení
1. Připojení do sítě a připojení antény.
2. Pokud má televizní přístroj spínač napájení, zapněte jej. Pak zapněte televizi
stisknutím tlačítka Power na dálkovém ovladači.
• První nastavení
Když je televize poprvé zapnuta (nebo nejsou předem nastavené kanály), objeví se na
obrazovce řada pokynů, které vám pomohou zkonfigurovat základní nastavení.
1.Si
vyberte požadovaný jazyk OSD
Stisknutím směrového tlačítka ▲/▼/◄/►,
2.Vyberte příslušnou zemi.
Stisknutím směrového tlačítka ▲/▼/◄/►vyberte zemi,
ENTER
spustíte automatické ladění.
menu(nabídka na obrazovce).
stiskněte tlačítko ENTER.
a pak
a pak stiskněte tlačítko
Page 37

Základní funkce
10
Zapnutí a vypnutí televize
• Zapnutí televize
Zapojte napájecí kabel střídavého napětí,
pohotovostního režimu. Stisknutím tlačítka na
• Vypnutí televize
Stisknutím tlačítka na dálkovém ovladači přejde televize do pohotovostního režimu.
Nenechávejte svůj přístroj v pohotovostním režimu příliš dlouhou dobu. Nejlepší je
vypojit přístroj ze sítě a odpojit anténu.
• Žádný signál
Když není zjištěn žádný vstupní signál, objeví se na obrazovce sdělení „Žádný signál“.
V režimu TV/DTV se televize automaticky vypne, pokud se vstupní signál neobjeví do
5 minut po zapnutí. V režimu PC-RGB se televize automaticky vypne po 16
sekundách. Když se zapojí kabel VGA, zapne se televize automaticky.
Výběr programu
• Používání CH+/CH- na ovládacím panelu televize nebo na dálkovém ovladači.
Stisknutím CH+ nastavíte kanál s vyšším číslem.
Stisknutím CH- nastavíte kanál s nižším číslem.
• Používání číselných tlačítek 0-9
Můžete vybrat číslo kanálu stisknutím 0 až 9 (v režimu TV nebo DTV).
• Příklad
Při zvolení kanálu - (např. kanál 5): Stiskněte 5.
Při zvolení kanálu -- (např. kanál 20): Stiskněte rychle po sobě 2 a 0.
Nastavení hlasitosti
• Stisknutím tlačítka VOL+/- nastavte hlasitost.
• Jestliže chcete zvuk vypnout, stiskněte
• Dalším stisknutím tlačítka nebo stisknutí tlačítka pro zesílení/zeslabení zvuku,
zvuk znovu zapnete.
Změna zdroje vstupního signálu
Stisknutím tlačítka SOURCE na dálkovém ovladači můžete vybrat zdroj vstupního
signálu. Stisknutím směrového tlačítka ▲/▼ procházejte vstupními zdroji a svůj výběr
potvrďte tlačítkem ENTER.
V té chvíli přejde televize do
dálkovém ovladači televizi zapnete.
.
POZNÁMKA:
Obrázek je pouze ilustrativní. Pracujte s MENU OSD konkrétní televize a ověřujte
správnost na terminálu AV.
Page 38
Funkce menu
11
Jak procházet menu
Před použitím televize proveďte následující kroky, abyste se naučili jak procházet
menu při výběru a úpravě různých funkcí. Přístup k vybranému menu se může lišit.
1. Stisknutím tlačítka MENU zobrazíte hlavní menu.
2. Stisknutím tlačítka ◄/► budete procházet hlavním menu.
3. Pomocí tlačítka ▲/▼ vyberete z menu požadovanou položku.
4. Stisknutím tlačítka ENTER se dostanete do podmenu.
5. Stisknutím tlačítka ▲/▼/◄/► vyberete požadovanou hodnotu. Nastavení v menu
na obrazovce se může lišit podle vybraného menu.
6. Stisknutím tlačítka MENU se vrátíte do předchozího menu.
7. Stisknutím tlačítka EXIT menu zavřete.
POZNÁMKA:
Když je položka v MENU zobrazena šedě, znamená to, že není k dispozici nebo
nemůže být nastavena.
Tlačítka na televizi mají stejnou funkci jako odpovídající tlačítka na dálkovém
ovladači. Pokud dálkový ovladač ztratíte nebo nefunguje, můžete vybrat menu
pomocí tlačítek na televizi. Tento návod se zabývá používáním dálkového ovladače.
Konfigurování menu Kanál
Automatické přizpůsobení
•
Stisknutím tlačítka ENTER spustíte
automatické ladění.
1. Vyberte zemi a typ ladění kanálů.
2. Televize začne ukládat do paměti
všechny dostupné kanály.
Jakmile je indikátor průběhu plný, nalezené kanály
budou uloženy a jednotka bude pokračovat ve
vyhledávání televizních, DTV, rozhlasových a
datových programů.
Jakmile stisknete při vyhledávání televizních
programů tlačítko MENU, automatické ladění přeskočí
na vyhledávání DTV jak ukazuje ilustrativní obrázek.
Page 39

Funkce menu
12
DTV Manual Tuning
•
Manuální ukládání digitálních kanálů.
Stisknutím tlačítka ◄/► vyberte kanál.
Stisknutím tlačítka ENTER zahájíte vyhledávání.
Když je kanál nalezen, vyhledávání se zastaví a kanál
se uloží pod aktuálním číslem kanálu.
Pokud se nejedná o program, který očekáváte,
stiskněte tlačítko ◄/► a vyhledávání bude
Stisknutím tlačítka EXIT vyhledávání ukončíte.
ATV Manual Tuning
•
Manuální ukládání kanálů ATV.
Stisknutím tlačítka ▲/▼ vyberte položku.
Stisknutím tlačítka ◄/► ji nastavte.
Stisknutím červeného tlačítka ji uložte.
Stisknutím tlačítka EXIT zavřete menu.
Programme Edit
•
Stisknutím tlačítka▲/▼ vyberete položky.
Stisknutím červeného tlačítka vymažete kanál.
Stisknutím zeleného tlačítka přejmenujete kanál (v
režimu TV).
Stisknutím žlutého tlačítka posunete kanál (s
výjimkou kanálů DTV s LCN).
Stisknutím modrého tlačítka přeskočíte kanál.
Stisknutím tlačítka
Tlačítko CH+/CH- můžete použít k výběru
následující nebo předchozí strany.
Signální informace
•
Zobrazí aktuální informace o vstupním signálu.
CI informace
•
Tato funkce vám umožňuje sledovat některé z
(placené) programy.
Vložte kartu CI do slotu PCMCIA podle šipky na kartě CI.
POZNÁMKA:
Funkci lze využívat pouze v případě, kdy je k dispozici
slot CI.
Toto OSD je pouze ilustrativní, a možnosti menu a jeho
formát na obrazovce se bude lišit podle poskytovatele
digitálních placených služeb.
Na základě konzultace se svým prodejcem bude možné, abyste změnili své CI
(přístupové rozhraní) menu ODS a služby.
Nevkládejte ani nevyndávejte kartu CI, pokud je televize zapnuta.
Nevkládejte ani nevyjímejte často kartu CI, aby nedošlo k poškození televize nebo
karty CI.
Během inicializace karty CI, neoperujte s televizi.
Channel List Transfer
•
Všechny aktuální informace o kanálech můžete vyexportovat (včetně čísla kanálu,
názvu kanálu,
pro toto zařízení.
vyexportovaných informací o kanálech. Původní informace o kanálech nemůžete
nastavíte oblíbený kanál.
(v režimu DTV)
(v režimu
frekvence, atd.) na disk U, jako zálohované informace o kanálech
DTV)
Systém automaticky vytvoří datový soubor pro uložení
pokračovat.
akódované
Page 40
Funkce menu
13
obnovit po akcích SORT, MOVE, DEL, SKIP, LOCK, atd.;
můžete importovat z USB.
Konfigurování menu Obraz
•
Režim obrázků
Můžete si vybrat styl obrazu, který nejlépe
odpovídá vašim požadavkům na sledování
televize. Uživatel může v režimu obrazu
nastavit kontrast, jas, sytost barev, ostrost a
odstín (u NTSC).
Režim doporučeného nastavení výrobce
naleznete pod názvem VIVID.
•
Tepl. barev
Vyberte barevnou teplotu obrazu.
• Poměr stran
Můžete si vybrat rozměry obrazu, který
nejlépe odpovídá vašim požadavkům na sledování televize.
• DNR
Snižuje šum obrazovky, aniž tím utrpěla kvalita obrazu.
• Obraz (v režimu PC-RGB)
Auto. upr.: Automaticky upraví obraz.
H pozice: Vycentruje obraz jeho posunutím
doleva nebo doprava.
V pozice: Vycentruje obraz jeho posunutím nahoru
nebo dolů.
Vel.: Upraví velikost obrazu na obrazovce.
Fáze: Dochází k úpravě při malém kontrastu, nebo když ob
bliká.
Konfigurování menu Zvuk
• Režim zvuku
Můžete si vybrat režim zvuku, který vám
osobněvyhovuje.V režimu„Uživatel“
můžete nastavit výšky a basy.
Stereo váha
•
Můžete upravit vyváženost hlasitosti L+R
reproduktorů tak, jak vám to vyhovuje.
• AVL (Automatická úroveň hlasitosti)
Při změně programů udržuje AVL
automaticky stejnou hlasitost. Protože kvalita
signálu se u jednotlivých stanic liší, může se
stát, že při každé změně kanálu bude nezbytná úprava hlasitosti. Tato funkce
umožňuje uživatelům těšit se ze stabilní hlasitosti díky automatické úpravě každého
programu.
• Prostorový zvuk
Můžete si vybrat požadovaný režim prostorového zvuku.
informace o kanálech
raz
Page 41

Funkce menu
14
AD změna
•
Jedná se o pomocnou audio funkci poskytující zrakově postiženým další zvukovou
stopu. Tato funkce ovládá zvukový tok audio popisu, pokud ho stanice vysílá společně
s hlavní zvukovou stopou. Uživatelé mohou audio popis zapnout nebo vypnout a
upravovat jeho hlasitost.
Konfigurování menu
• Hodiny
Můžete zobrazit buďto časový signál DTV
nebo nastavit systémový čas.
• Čas vypnutí
Nastavte čas vypnutí televize.
• Čas zapnutí
Nastavte čas zapnutí televize.
Tuto funkce se dá používat, pouze je-li
televize v pohotovostním režimu.
Vypínací časovač
•
Vyberte čas automatického přechodu
televize do pohotovostního režimu.
• Auto. us.
Vyberte libovolný čas automatického spánku.
Televize přejde automaticky do pohotovostního režimu, pokud není načasována
nějaká akce (standardní nastavená doba z výroby jsou 4 hodiny).
• Čas. pás.
Vyberte své časové pásmo.
Konfigurování menu VOLBY
• Jazyk
Vyberte si požadovaný jazyk OSD.
• Audio jazyk
Vyberte si požadovaný jazyk mluveného
slova. (K dispozici u digitálních kanálů,
pokud je vysílání v několika jazycích.)
• Jazyk titulů
Vyberte si požadovaný jazyk titulků nebo je
vypněte. (K dispozici u digitálních kanálů,
pokud jsou titulky vysílány v několika
jazycích.)
Pro špatně slyšící
•
Když je zapnuta funkce Sluchově postižení, na televizní obrazovce se objeví určité
informace pro sluchově postižené diváky. Když je funkce vypnuta, budou tyto
informace skryty.
•
Výběr země
Zobrazí aktuální zemi.
(v režimu DTV)
ČAS
Page 42

Funkce menu
15
• PVR Souborový systém (v režimu DTV)
Vybrat disk: Vyberte disk používaný pro PVR.
Kontrolovat souborový systém PVR
disk a otestuje rychlost systému.
USB Paměť
Formát: Zformátuje USB disk.
Velikost časového posuvu: Vyberte čas provedení
časového posunu.
Rychlost: Zobrazí rychlost paměťového zařízení.
Bez omezení záznamu
Digitálního nahrávání programu
Připojte USB-disk a systém automaticky vytvoří složku (_MSTPVR) pro ukládání
nahraných souborů. Nahrávání začne po stisknutí tlačítka a bude pokračovat až d
stisknutí tlačítka
nahrávání
Funkce přehrávání
Stlačením tlačítka
tlačítek ▲/▼
postupujte podle ponuky Playback.
Seznam nahrávek
Stisknutím tlačítka INDEX zobrazíte seznam nahrávek.
Stisknutím tlačítka ▲/▼ vyberete položky, a pak stisknutím tlačítka ENTER spustíte
přehrávání. Stisknutím červeného tlačítka vymažete program. Stisknutím
tlačítka zobrazíte informace o programu. Stisknutím tlačítka INDEX roztřídíte
programy. Stisknutím tlačítka EXIT zavřete toto menu.
POZNÁMKA:
USB disk s min. kapacitou 512 MB.
Když na vložený USB disk nelze nahrávat, naformátujte ho prosím.
Během formátování disk nevyjímejte. Při formátování disku budou všechny soubory
vymazány. Před formátováním svého disku si udělejte záložní kopie svých souborů,
abyste zabránili ztrátě nebo poškození dat. Jestliže je USB disk zavirován,
formátování se nezdaří.
Jestliže je pevný disk rozdělen na několik částí, lze vybrat podle času odezvy disku
jednu z nich k formátování nebo použít funkci PVR.
Jestliže je neustále používán nahrávací systém PVR, bude systém PVR
automaticky zavřen.
Paměť USB musí podporovat specifikaci vysoké rychlosti USB 2.0.
Některé nestandardní USB zařízení nemusí být podporovány.
• Stand. nast.
Obnovení standardních systémových nastavení z výroby.
• OSD animace
Vyberte styl zobrazení menu.
•
E-POP
Zapíná/vypíná funkci Uložení ukázky.
Režim uložení ukázky je optimální nastavení pro úložná prostředí. Jestliže uživatel
změní data kvality obrazu, režim uložení ukázky spustí po určité době produkt v námi
nastavené kvalitě obrazu.
Připomínka zdraví
•
Zapněte nebo vypněte zdravotní připomínku.
Je-li čas přestávky přepnutý na Zap, obrázek výzvy vám v intervalu dvou hodin
připomene, že si mate udělat přestávku.
: USB aktivováno nebo neaktivováno.
: Vyberte trvání nahrávání.
nebo do zaplnění paměti. Stisknutím tlačítka během
zvětšíte či zmenšíte menu nahrávání.
aktivujete režim přehrávaní v průběhu nahrávání.
zvětšíte/zmenšíte ponuku přehrávání (Playback).
: Zkontroluje
▲/▼
Stlačením
Při další činnosti
zeleného
o
Page 43

Funkce menu
16
Konfigurování menu Zámek
•
Zám. sys.
Funkce může zabránit neoprávněnému
používání televize, pokud nezadáte
4místné heslo. Když je blokovací systém
zapnut a systém je zablokován, musíme
zadat systémové heslo do funkcí
automatického ladění, manuálního ladění,
editace programu a
nastavení Heslo zadáte.
Stisknutím správných tlačítek s čísly.
Standardní heslo je 0000.
POZNÁMKA:
Po potvrzení změny hesla si ho prosím zapamatujte, protože ho musíte zadat při
otevření menu Rodičovský zámek. Žádnou funkci nelze spustit, dokud nezadáte
správné heslo. Pokud ho zapomenete, můžete stále ještě použít superheslo 1225,
které neztrácí platnost.
• Nast. heslo
Můžete nastavit své soukromé heslo. Stisknutím tlačítek s čísly na dálkovém ovladači
nastavíte nové heslo. Když se nové heslo zadá dvakrát po sobě, je nastavení
úspěšně dokončeno. Televize se pak vrátí k předchozímu menu.
• Blok. program (v režimu
TV/DTV)
Stisknutím zeleného tlačítka LOCK
zamknete libovolný dostupný program.
Dalším stisknutím zeleného tlačítka
program odemknete.
• Rodič. Zámek (v režimu DTV)
Tato funkce může zabránit dětem, aby sledovali v televizi programy pro dospělé, na
základě nastaveného omezení programů s určitou klasifikací. Tato funkce se aktivuje
podle informací z vysílací stanice. Pokud tedy nese signál nesprávnou informaci, tato
funkce zůstává nečinná.
standardního
Page 44

Funkce menu
17
Používání režimu DMP
• Vstup/výstup z režimu DMP
1. Připojte USB zařízení.
2. Stisknutím tlačítka MENU zobrazíte
hlavní menu. Stisknutím tlačítka ◄/►
vyberete menu Aplikace.
3. Stisknutím tlačítka ENTER se dostanete
do režimu DMP.
4. Stisknutím tlačítka EXIT ukončíte tento
režim.
POZNÁMKA:
Zvláštní USB zařízení nemusí být dobře nebo vůbec podporovány.
Max. zatížení USB: DC5 V 500 mA.
• Podporované formáty
Funkce DMP podporuje USB zařízení s USB pamětí.
Může přehrávat fotografické, hudební, filmové nebo textové soubory.
Podporované fotografické formáty: JPEG, BMP, PNG.
Podporované hudební formáty: MP3, AAC.
Podporované filmové formáty: AVI, VOB, DAT, MPG, TS/TP.
Podporovaný textový formát: TXT.
POZNÁMKA:
USB zařízení nemusí dobře nebo vůbec podporovat dokumenty se speciálními
algoritmy.
USB podporuje výše uvedený formát. Není-li formát souboru podporován,
změňte jej na daný formát.
• Hlavní provozní rozhraní
Page 45

Funkce menu
18
1. Pomocí tlačítka ◄/► vyberete FOTO, HUDBU, FILM nebo TEXT. Stisknutím
tlačítka ENTER vstoupíte do podmenu.
2. Pomocí směrových tlačítek a tlačítka ENTER se dostanete do požadovaného disku.
Stisknutím tlačítka ENTER otevřete složku.
3. Pomocí směrových tlačítek zvýrazníte soubor. Pomocí tlačítka ENTER označíte
nebo odstraníte označení souboru. Stisknutím tlačítka
vybraných souborů. Jestliže není označen žádný soubor, budou po stisknutí tlačítka
postupně přehrány všechny soubory ve složce.
4. Stisknutím tlačítka INFO zobrazíte na obrazovce přehrávané menu.
5. Stisknutím tlačítka zastavíte přehrávání souborů.
6. Stisknutím tlačítka EXIT se vrátíte do předchozího menu.
• Základní funkce
1. Přehrávat/pozastavit
Spustíte přehrávání souboru vybrané složky nebo přehrávání pozastavíte.
2. Zastavit
Zastavíte přehrávání souborů.
3. / Rychlé převíjení dozadu/Rychlé převíjení dopředu
Stisknutím / spustíte rychlé převíjení dozadu nebo dopředu.
4. / Předchozí/následující
Za normální situace si můžete vybrat požadované soubory manuálně.
5. Červené tlačítko
Vyberte soubor, který chcete vymazat, a stisknutím červeného tlačítka otevřete
příslušné menu, a pak stisknutím tlačítka ENTER soubor vymažete.
6. CH+/CH-
Page Up nebo Page Down soubory.
spustíte přehrávání
Page 46

Funkce menu
19
MHEG5
MHEG5 (Expertní skupina kódování multimediálních a hypermediálních informací
Multimedia and Hypermedia information coding Expert Group) souvisí s provozem a
funkcí multimediálního přehrávače. Jestliže chcete otevřít MHEG5, titulky musí být
vypnuty.
Stisknutím červeného tlačítka nebo tlačítka
obsluhovat televizi pomocí ilustrativních informací. Stisknutím tlačítka EXIT nebo
tlačítka
zavřete menu MHEG5. Domovská stránka:
otevřete menu MHEG5. Můžete
Po zadání vybrané položky můžete vidět hlavní menu takto:
Po vybrání libovolné hlavní položky uvidíte více detailních informací.
Page 47

Důležitá specifická tlačítka
20
PROGRAMME GUIDE
Stisknutím tlačítka EPG zobrazíte menu PROGRAMOVÝ PRŮVODCE. Tato funkce
vám umožní získat detailní informace o kanálu společně s informacemi o času
přehrávaného programu. V PROGRAMOVÉM PRŮVODCI naleznete informace o
programech na dalších osm dnů (pokud vysílací stanice tyto informace zveřejnila).
Stisknutím tlačítka EXIT ukončíte toto menu.
Record: Stisknutím červeného tlačítka nastavíte
parametry nahrávání.
rozvrh nahrávání, když je televizor zapnutí nebo v
pohotovostním
rozvrh nahrávání. Různé plány by se neměly
překrývat. Při nahrávání se spustí v pohotovostním
režimu, přední ukazatele změní barvu a nebude
obraz nebo
obrazovky můžete stisknout tlačítko .
INFO: Stisknutím zeleného tlačítka získáte detailní
informace o aktuálním kanálu.
Schedule: Stisknutím
Plán. sezn.
Remind: Jestliže naleznete program, který chcete
vidět a který se bude vysílat v nejbližších dnech,
stisknutím modrého tlačítka si nastavíte připomenutí
programu.
INDEX: Seznam změníte Časovačem nebo KANÁLEM.
ENTER: Stisknutím změníte kanál.
SEZN. KANÁLŮ
Stisknutím tlačítka LIST otevřete seznam
kanálů.
Stisknutím tlačítka ▲/▼ vyberte položky a
kanály se automaticky změní.
Stisknutím tlačítka CH+/CH- budete
procházet seznamem kanálů nahoru i
dolů.
Stisknutím tlačítka LIST zavřete toto
menu.
Seznamu oblíbených
Stisknutím tlačítka zobrazíte seznam
oblíbených programů.
Stisknutím tlačítka ▲/▼ vyberte položky a
kanály se automaticky změní.
Stisknutím tlačítka CH+/CH- budete
procházet seznamem oblíbených
programů nahoru nebo dolů.
Stisknutím tlačítka
zvuk z přístroje.
(v režimu DTV)
Jednotka je schopna udělat
režimu.Můžete nastavit několik
Pro rozsvícení
tlačítka
zavřete seznam.
žlutého
otevřete
Page 48
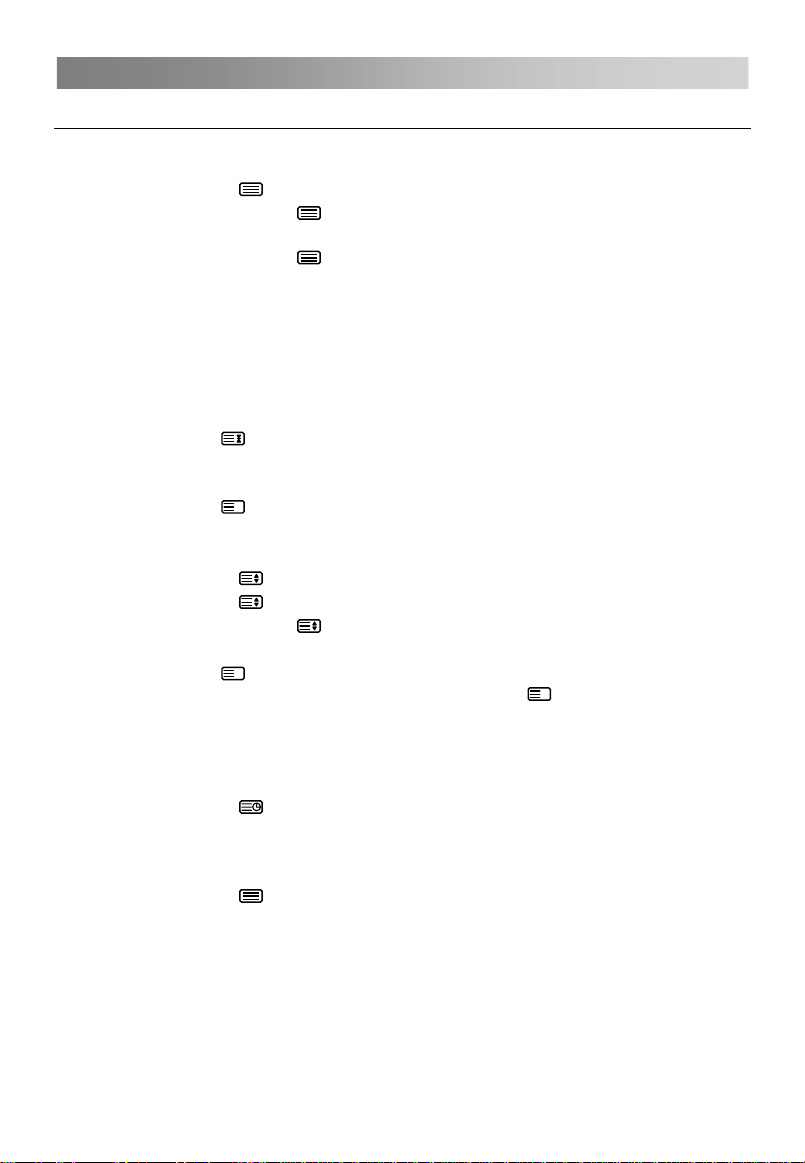
Teletext
21
Používání teletextu
• Zobrazení teletextu
1. Vyberte televizní stanici s teletextovým signálem.
2. Stisknutím tlačítka
3. Dalším stisknutím tlačítka otevřete smíšený režim. Tato funkce vám umožní
překrýt teletextem televizní program.
4. Dalším stisknutím tlačítka
ATV/DTV.
• Výběr stránky
1. Zadejte číslo stránky (tři čísla) pomocí tlačítek s čísly. Jestliže stisknete během
zadávání čísla špatné tlačítko, musíte dokončit celé trojčíslí a pak znovu zadat
správné číslo stránky.
2. Tlačítko CH+/CH- můžete použít k výběru předchozí nebo následující strany.
• Zmrazení stránky
Stisknutím tlačítka pozastavíte stránku teletextu, dalším stisknutím ji uvolníte a
můžete pokračovat v listování.
• Rejstřík
Stisknutím tlačítka
• Zvětšení písma textu
Když se zobrazí strana, můžete zdvojnásobit velikost písma, aby se dalo lépe přečíst.
1. Stisknutím tlačítka
2. Stisknutím tlačítka zvětšíte spodní polovinu stránky.
3. Dalším stisknutím tlačítka
• Režim zobrazení skrytých informací
Stisknutím tlačítka ? můžete zobrazit skryté informace na teletextu (např. odpovědi
na rébusy nebo hádanky atd.). Dalším stisknutím tlačítka
obrazovky.
• Podstránka
Některé teletexty mohou obsahovat několik podstránek, které televizní stanice určitým
způsobem automaticky stránkuje.
1. Stisknutím tlačítka
stránky pomocí tlačítek s čísly. Zadejte číslo podstránky (např. 0003) pro třetí
podstránku.
2. Dalším stisknutím tlačítka ukončíte režim podstránky.
3. Stisknutím tlačítka
• Barevná tlačítka (červené, zelené, žluté a modré)
Stisknutím těchto tlačítek otevřete přímo stránky odpovídající barvy zobrazené ve
spodní části obrazovky teletextu.
se dostanete do režimu teletextu.
se vrátíte nebo přejdete do normálního režimu
i
přímo zobrazíte hlavní stranu rejstříku.
zvětšíte horní polovinu stránky.
se vrátíte k normálnímu zobrazení.
?
odstraníte informace z
můžete přímo otevřít určitou podstránku a vybrat číslo
se vrátíte do normálního televizního režimu.
Page 49
Řešení problémů
22
Odstraňování problémů
Než se obrátíte na servisního technika, zkuste problém vyřešit pomocí jednoduchých
kroků. Pokud problém i nadále přetrvává, odpojte televizi a zavolejte servis.
PROBLÉM MOŽNÉ ŘEŠENÍ
- Zkontrolujte, zda je zástrčka napájecí šňůry zapojena
Nenaskočil zvuk ani
obraz
Obraz je v pořádku, ale
nenaskočil zvuk
Dálkový ovladač
nefunguje
Televize se znenadání
sama vypnula
Po zapnutí se obraz
objevuje pomalu
Žádné nebo špatné
barvy nebo špatný
obraz
Vodorovné/svislé čáry
nebo se obraz třese
Špatný příjem
některých kanálů
Čáry nebo šmouhy v
obraze
Jeden reproduktor je
bez výstupu
do zásuvky
- Zkontrolujte, zda jste stiskli tlačítko POWER televizního
přístroje
- Zkontrolujte nastavení kontrastu a jasu obrazu
- Zkontrolujte hlasitost
- Zmizel zvuk? Stiskněte tlačítko pro vypnutí zvuku.
- Zkuste jiný kanál, vysílač může mít problémy s
vysíláním.
- Jsou audio kabely řádně zapojeny?
- Zkontrolujte, zda mezi přístrojem a dálkovým
ovladačem není nějaký předmět bránící přenosu
- Jsou baterie správně nainstalovány (+ k + a – k –)?
- Správné nastavení režimu dálkového ovládání: TV,
VCR atd.?
- Vložte do ovladače nové baterie
- Je nastaveno načasování režimu spánku?
- Zkontrolujte napájení. Došlo k výpadku proudu.
- Nebylo naladěno vysílání stanice s automatickým
spuštěním.
- Je to normální, obraz je pozastaven během aktivace
přístroje Obraťte se na svůj servis, pokud se obraz
neobjeví po pěti minutách.
- Upravte barvy v menu Nastavení
- Udržujte dostatečnou vzdálenost mezi výrobkem a
VCR.
- Zkuste jiný kanál, může se jednat o problém s
vysíláním.
- Jsou VIDEO kabely řádně zapojeny?
- Aktivujte libovolnou funkci pro obnovení jasu obrazu.
- Zkontrolujte místní rušení způsobené elektrickým
spotřebičem nebo elektrickým nářadím.
- DVB-T nebo DVB-C vysílání má problémy Nalaďte na
jinou stanici.
- Vysílaný signál je slabý, přesměrujte anténu, abyste
zachytili slabší vysílání.
- Zkontrolujte zdroje možného rušení.
- Zkontrolujte anténu (přesměrujte anténu).
- Upravte vyvážení hlasitosti v menu Výběr
Page 50

Řešení problémů
23
POZNÁMKA: Problém v režimu VGA (týká se pouze režimu VGA).
PROBLÉM MOŽNÉ ŘEŠENÍ
Signál je mimo dosah.
Vertikální pruh nebo pás na
pozadí a horizontální
šum a nesprávná pozice
obrazu.
Barvy na obrazovce jsou
nestabilní nebo se jedná
pouze o jednu barvu.
Údržba
Pomůže předcházet selhání přístroje. Pečlivé a pravidelné čištění může prodloužit
životnost televize. Než začnete s čištěním, zkontrolujte, zda jste vypnuli televizi a
odpojili napájecí šňůru.
Čištění obrazovky
1. Existuje skvělý způsob, jak na chvíli zabránit usazování prachu na obrazovce.
Navlhčete měkký hadřík ve vlažné vodě s malým množstvím avivážního prostředku
nebo prostředku na mytí nádobí. Vyždímejte hadřík, až je skoro suchý a pak jím
otřete obrazovku.
2. Zkontrolujte, že jste setřeli z obrazovky přebytečnou vodu a pak ji nechte volně
uschnout. Teprve potom zapněte televizi.
Čištění krytu
Chcete-li odstranit špínu nebo prach z krytu televize, otřete jej měkkým suchým
hadříkem bez žmolků. Nikdy nepoužívejte vlhký hadřík.
Delší nepřítomnost
Pokud očekáváte, že svou televizi nebude delší dobu používat (např. po dobu
dovolené), bude vhodné odpojit napájecí šňůru, abyste televizi ochránili před
poškozením bleskem nebo přepětím.
Likvidace starých elektrických spotřebičů
Evropská směrnice 2002/96/ES o odpadních elektrických a elektronických
zařízeních (WEEE) požaduje, aby se staré elektrické spotřebiče používané v
domácnosti nevyhazovaly do normálního směsného komunálního odpadu.
Staré spotřebiče se musí sbírat odděleně, aby se optimalizovalo zužitkování
a recyklace materiálů, které obsahují, a snížil se dopad na lidské zdraví a
životní prostředí.
Přeškrtnutý symbol popelnice na výrobku vám připomíná vaši povinnost při likvidaci
spotřebiče v rámci odděleného sběru odpadu.
Spotřebitelé se musí obrátit na své místní orgány nebo na prodejce, kde získají
informace o správné likvidace jejich starého spotřebiče.
- Upravte rozlišení, horizontální nebo vertikální
kmitočet.
- Zkontrolujte, zda je signální kabel zapojen nebo
odpojen.
- Zkontrolujte zdroj vstupního signálu.
- Spusťte automatické konfigurování nebo nastavte
hodiny, fázi nebo H/V pozici.
- Zkontrolujte signální kabel.
- Přeinstalujte video kartu počítače
Page 51

Obsah
Výstraha..............................................................................................1
Bezpečnostné pokyny.......................................................................3
Stručný návod....................................................................................5
Používanie diaľkového ovládania.....................................................5
Inštalácia batérií do diaľkového ovládania........................................5
Výmena batérií.................................................................................5
Pripojenie a uvedenie do prevádzky................................................6
Inštalácia kábla...............................................................................6
Diaľkové ovládanie............................................................................7
Základná prevádzka...........................................................................9
STRUČNÝ NÁVOD..........................................................................9
Vypnúť a zapnúť televízor...............................................................10
Výber programu..............................................................................10
Prispôsobenie zvuku......................................................................10
Zmena vstupného zdroja................................................................10
Používanie ponuky..........................................................................11
Ako sa pohybovať v ponuke............................................................11
Ponuky kanál..................................................................................11
Ponuky Obraz................................................................................13
Ponuky Zvuk..................................................................................13
Ponuky .................................................................................14
Ponuky Zámok...............................................................................16
Používanie DMP režimu.................................................................17
MHEG5..........................................................................................19
Dôležité jedineč
Programový návod
Zoznam programov
Zoznamu obľúbených
Teletext.............................................................................................21
Používanie vlastnosti teletext.........................................................21
Sprievodca odstraňovaním problémov..........................................22
Odstraňovanie problémov...............................................................22
Údržba............................................................................................23
Voľby
né tlačidlá..............................................................20
........................................................................ 20
.......................................................................20
....................................................................20
SK
14 Ponuky Čas ...................................................................................
Page 52
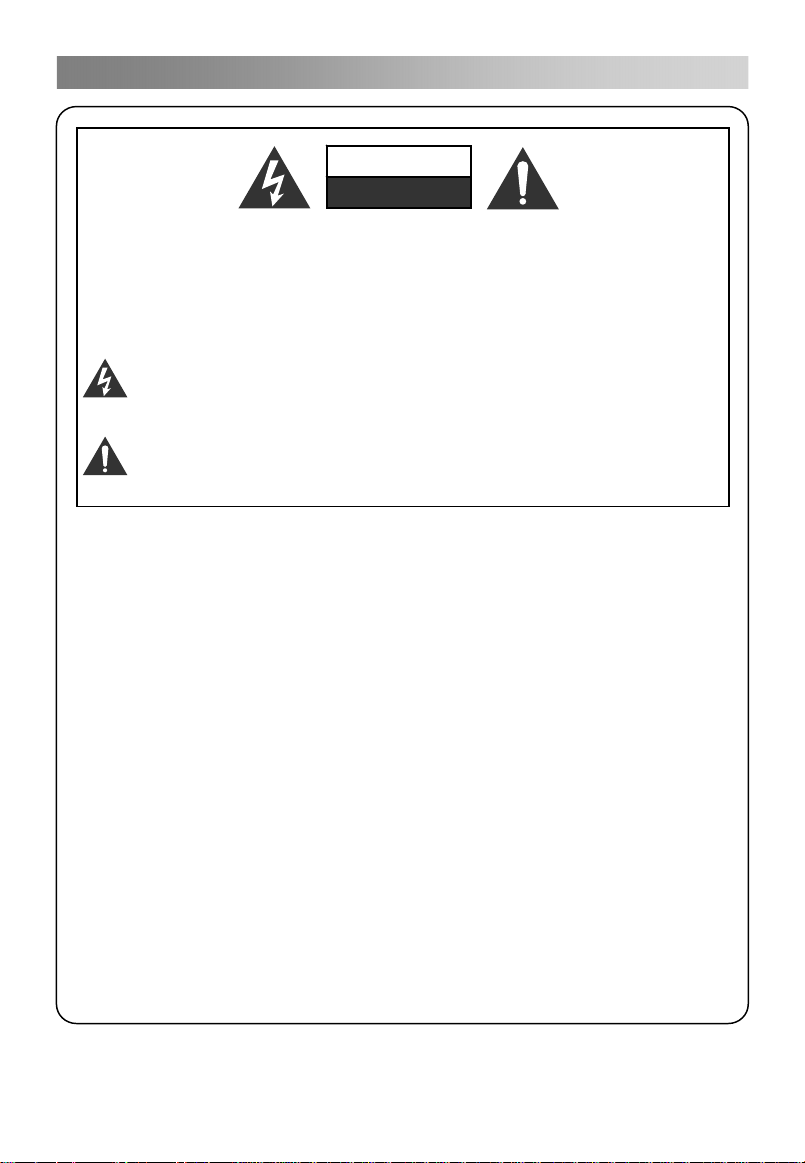
Výstraha
1
VAROVANIE:
NA ZNÍŽENIE RIZIKA ÚRAZU ELEKTRICKÝM PRÚDOV
NEODSTRAŇUJTE KRYT (ALEBO ZADNÚ ČASŤ). VNÚTRI NIE SÚ
ŽIADNE ČASTI, KTORÉ BY SI VYŽADOVALI SERVIS UŽÍVATEĽA.
OBRÁŤTE SA NA KVALIFIKOVANÝ SERVISNÝ PERSONÁL.
Symbol šípky v tvare blesku v rovnoramennom trojuholníku je určený na
to, aby užívateľa upozornil na prítomnosť neizolovaného “nebezpečného”
napätia vnútri krytu výrobku, ktoré môže mať dostatočnú intenzitu, aby
p
redstavovalo riziko úrazu elektrickým prúdom pre osoby.
Výkričník v rovnoramennom trojuholníku je určený na upozornenie užívateľa
na dôležité prevádzkové a servisné pokyny (pokyny údržby) v literatúre, ktorá
je priložená k prístroju.
INFORMÁCIE O PREDPISOCH
Toto zariadenie generuje a môže vyžaruje rádio frekvenčnú energiu a ak nie je
inštalované a používané v súlade s pokynmi, môže spôsobovať škodlivú
interferenciu rádiovej komunikáciu. Napriek tomu to nie je záruka, že sa
interferencia neobjaví pri konkrétnej inštalácii. Ak toto zariadenie spôsobuje
škodlivé interferencie pri príjme televízneho alebo rádiového signálu, je možné to
zistiť vypnutím a zapnutím zariadenia, užívateľovi sa odporúča, aby opravil
interferenciu pomocou jedného alebo viacerých opatrení:
- Premiestnite prijímaciu anténu.
- Zvýšte oddelenie medzi zariadením a prijímačom.
- Pripojte zariadenie na zásuvku v inom obvode ako je ten, na ktorý je pripojený
prijímač. Konzultujte predajcu alebo skúseného rádio/TV technika.
- Akékoľvek zmeny alebo modifikácie, ktoré nie sú výlučne schválené stranou,
zodpovednou za zhodnosť spôsobia zneplatnenie práva užívateľa na
prevádzkovanie zariadenia
UPOZORNENIE
Nepokúšajte sa upravovať tento výrobok žiadnym spôsobom bez písomného
povolenia od dodávateľa. Neoprávnené úpravy môžu zneplatniť užívateľovo
oprávnenie na prevádzkovanie tohto výrobku. Neodporúča sa nechať zobrazený
istý obraz na obrazovke počas dlhej doby, tak isto ako aj zobrazovanie
mimoriadne jasných obrázkov na obrazovke.
POZOR
RIZIKO ÚRAZU ELEKTRICKÝM
PRÚDOM, NEOTVÁRAJTE
Page 53

Výstraha
2
VAROVANIE
Zníženie rizika úrazu elektrickým prúdom alebo požiaru nevystavujte tento aparát
dažďu alebo vlhkosti.
Ventilácia by nemala byť obmedzená prekrývaním ventilačných otvorov rôznymi
vecami, ako sú napríklad noviny, dekoračné tkaniny, záclony a podobne.
Aparát by nemal byť vystavený kvapkajúcej alebo striekajúcej vode a na aparáte
by nemali byť umiestnené žiadne predmety naplnené tekutinou, ako napríklad
vázy.
Je potrebné venovať pozornosť environmentálnym aspektom likvidácie batérií.
Použité batérie nevyhadzujte do domového odpadu
prostredia kontaktujte vášho predajcu.
Udržiavajte minimálnu vzdialenosť (5cm) okolo aparátu pre dostatočnú ventiláciu;
(Minimálna vzdialenosť okolo aparátu pre dostatočnú ventiláciu.)
Na aparát by sa nemali klásť žiadne zdroje nekrytého plameňa, ako napríklad
zapálené sviečky.
Zariadenie môže mať poruchu pri elektrostatickom výboji. Je možné ho manuálne
pripojiť a odpojiť od siete.
UPOZORNENIE Pripájanie napájacieho kábla
Pri väčšine zariadení sa odporúča, aby boli vložené do vyhradeného obvodu, to
jest jednoduchého zásuvkového obvodu, ktorý napája iba toto zariadenie a nemá
žiadne ďalšie zásuvky ani vetvy.
Nepreťažujte stenové zásuvky. Preťažené stenové zásuvky, uvoľnené alebo
poškodené stenové zásuvky, predlžovacie káble, rozstrapkané káble alebo
poškodená alebo polámaná izolácia sú nebezpečné. Akýkoľvek z týchto stavov
môže spôsobiť úraz elektrickým prúdom alebo požiar. Pravidelne kontrolujte kábel
vášho zariadenie a pokiaľ jeho vzhľad indikuje poškodenie alebo opotrebovanie,
vytiahnite ho zo zásuvky, prerušte používanie prístroja a nechajte šnúru vymeniť
za presnú náhradnú súčiastku autorizovaným servisným technikom. Chráňte
napájací kábel pred mechanickým alebo fyzickým nesprávnym použitím, ako je
napríklad skrútenie, ohnutie, prepichnutie, privretie do dverí alebo chodenie po
kábli. Veľkú pozornosť venujte zástrčkám, zásuvkám a bodu, kde kábel opúšťa
zariadenie.
SIEŤOVÁ zástrčka sa používa na odpojenie zariadenia a odpájacie zariadenie by
malo zostať pripravené na prevádzku.
Obrázky a ilustrácie sú v tejto Príručke používateľa uvedené len pre orientáciu a
môžu sa líšiť od skutočného vzhľadu výrobku. Dizajn a špecifikácie výrobku sa
môžu zmeniť bez predchádzajúceho upozornenia.
.. Kvôli ochrane životného
Page 54
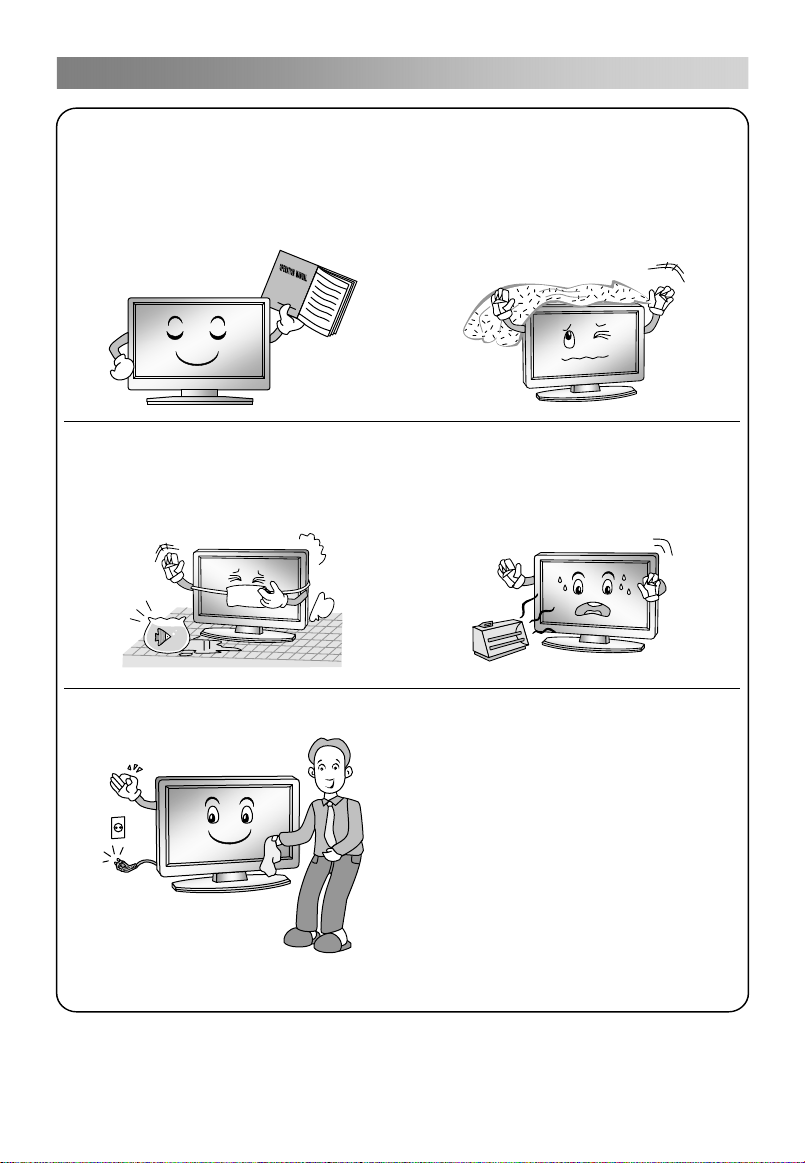
Bezpe
3
Dôležité BEZPEČNOSTNÉ POKYNY
1. Prečítajte si tieto pokyny.
2. Dodržiavajte tieto pokyny.
3. Dodržiavajte všetky výstrahy.
4. Postupujte podľa všetkých pokynov.
čnostné pokyny
7. Neblokujte žiadny z ventilačných
otvorov. Inštalujte v súlade s pokynmi
výrobcu
5. Nepoužívajte tento aparát v blízkosti
vody.
6. Čistite iba suchou látkou.
8. Neinštalujte v blízkosti akéhokoľvek
zdroja tepla, ako sú radiátory, registre,
pece alebo iné aparáty (vrátane
zosilňovačov), ktoré produkujú teplo.
9. Nerušte bezpečnostný účel
polarizovanej alebo uzemnenej
zástrčky. Polarizovaná zástrčka má
dva kolíky, pričom jeden je širší ako
druhu. Uzemňovacia zástrčka má dva
otvory a uzemňovací kolík. Široký
kolík alebo tretí kolík je tu pre vašu
bezpečnosť. Keď zástrčka nepasuje
do vašej zásuvky, zavolajte
elektromontéra, aby vymenil
zastaranú zásuvku.
Page 55
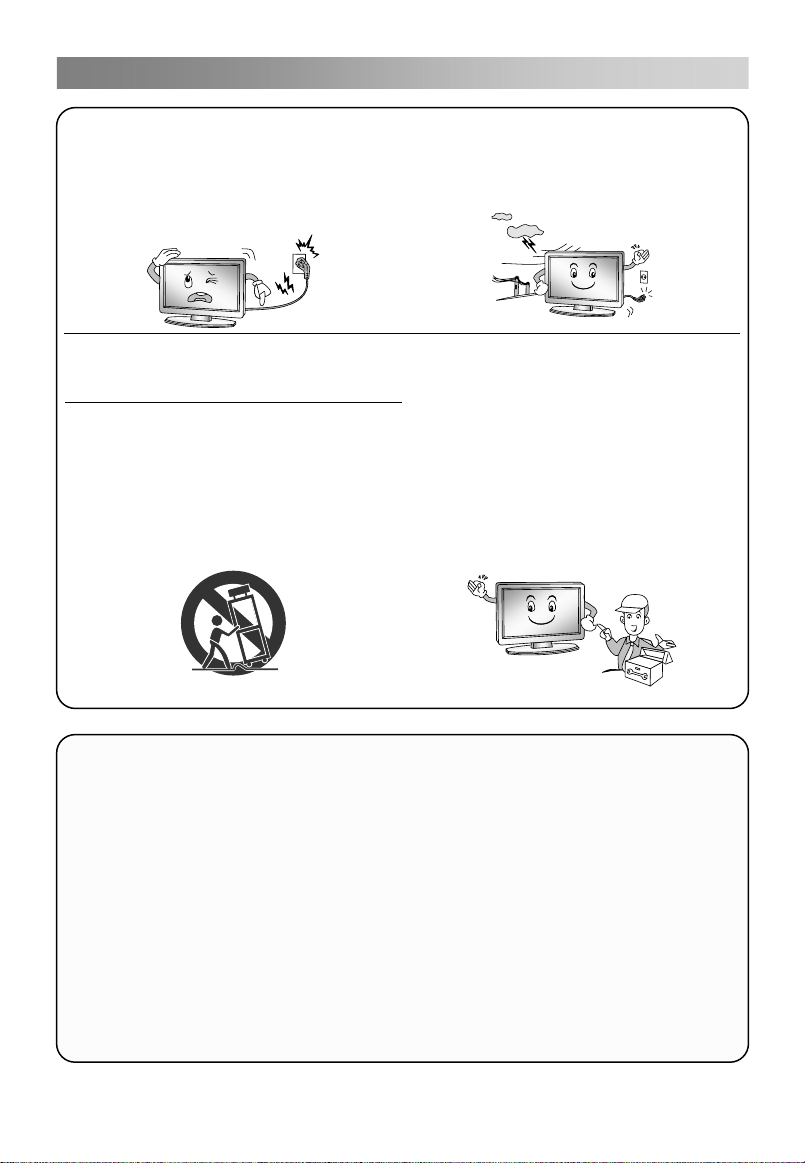
Bezpečnostné pokyny
4
10. Chráňte napájací kábel predtým,
aby sa po ňom chodilo, alebo aby
sa ohýbal, zvlášť pri zástrčkách,
zásuvkách a v bodoch, kde opúšťa
aparát.
11. Používajte iba
príslušenstvá/nástavce, ktoré sú
špecifikované výrobcom.
12. Používajte iba vozík, stojan,
trojnožku, konzolu alebo stôl, ktorý
je špecifikovaný výrobcom alebo sa
predáva spolu s aparátom. Keď sa
používa vozík, dávajte si pozor pri
presúvaní vozíka/aparátu, aby ste
sa vyhli úrazom pri prevrátení
13. Počas búrok s bleskami tento
aparát vytiahnite zo zástrčky, alebo
keď sa nemá používať dlhšiu dobu.
14. Všetku úpravu zverte
kvalifikovanému servisnému
personálu. Servis sa vyžaduje, keď
bol aparát poškodený akýmkoľvek
spôsobom, ako napríklad, keď je
poškodený napájací kábel alebo
zástrčka, rozliala sa na neho tekutina
alebo na aparát padli nejaké
predmety, aparát bol vystavený
dažďu alebo vlhkosti, nefunguje
normálne alebo spadol.
PRI LIKVIDÁCII
- Fluorescenčná elektrónka, použitá v tomto výrobku obsahuje malé množstvo
ortuti.
- Tento výrobok nelikvidujte spolu s domovým odpadom.
- Likvidácia tohto produktu sa musí vykonať v súlade s predpismi vašich
miestnych orgánov.
POZNÁMKA
- Ak bol televízor v chlade, môže sa pri zapnutí objaviť slabé "blikanie“. Toto je
normálne, televízor nie je pokazený.
- Niekoľko minút je možné na obrazovke vidieť bodkové chyby, ktoré sa objavia
ako drobné červené, zelené alebo modré body. Napriek tomu nemajú
nepriaznivý vplyv na výkonnosť monitora.
- Vyhýbajte sa dotýkaniu sa obrazovky alebo tomu, aby ste sa jej prstami dotýkali
počas dlhej doby.Ak tak urobíte, môže dôjsť k dočasnému poškodeniu
obrazovky.
Page 56

Stručný návod
5
Používanie diaľkového ovládania
Pri používaní diaľkového ovládania zamierte na diaľkový snímač na televízore. Pokiaľ
je medzi diaľkovým ovládaním a diaľkovým snímačom na jednotke nejaký predmet,
jednotka nemusí pracovať.
Zamierte diaľkové ovládanie na DIAĽKOVÝ SNÍMAČ, umiestnený na televízore.
Keď používate tento televízor vo veľmi jasne osvetlenom priestore, infračervený
SNÍMAČ DIAĽKOVÉHO OVLÁDANIA nemusí správne pracovať.
Odporúčaná účinná vzdialenosť na používanie diaľkového ovládania je okolo 7
metrov.
Inštalácia batérií do diaľkového ovládania
1. Otvorte kryt v zadnej časti diaľkového ovládania.
2. Nainštalujte dve batérie veľkosti AAA Skontrolujte,
či “+” a “-” póly na koncoch batérií súhlasia so
schémou vnútri oddelenia.
3. Vymeňte kryt.
Výmena batérií
Musíte nainštalovať do diaľkového ovládania priložené batérie, aby fungovalo podľa
pokynov, uvedených nižšie. Keď sa batérie vybijú, prevádzková vzdialenosť diaľkového
ovládania sa výrazne zníži a budete musieť vymeniť batérie.
Poznámky o používaní batérií:
Používanie nesprávneho typu batérií môže spôsobiť únik chemikálií a/alebo výbuch.
Všimnite si prosím nasledovné:
Vždy zaistite, aby boli batérie vkladané so správnym poradím + a – svoriek do
priestoru na batérie. .
Rôzne typy batérií majú rôzne charakteristiky. Nemiešajte rôzne typy batérií.
Nemiešajte staré a nové batérie. Miešanie starých a nových batérií môže spôsobiť
skrátenie ich životnosti a/alebo únik chemikálií.
Keď už batérie nepracujú, vymeňte ich.
Chemikálie, unikajúce z batérií môžu spôsobiť podráždenie pokožky. Pokiaľ
akákoľvek chemikália presiakne von z batérií, okamžite ju utrite suchou látkou.
Batérie, dodané s výrobkom môžu mať kratšiu životnosť z dôvodu skladovacích
podmienok. Vyberte batérie, kedykoľvek predpokladáte, že sa diaľkové ovládanie
nebude dlhšiu dobu používať.
Batéri (balíček batérií alebo inštalované batérie) by nemali byť vystavené
nadmernému teplu ako je napríklad slnečné svetlo, oheň alebo podobné.
UPOZORNENIE:
Pokiaľ sa batérie vymenia nesprávne, môže dôjsť k výbuchu.
Batérie vymieňajte iba za rovnaký typ.
Page 57

Pripojenie a uvedenie do prevádzky
6
Inštalácia kábla
Prečítajte si prosím starostlivo text v “Poznámke pre bezpečnosť a údržbu” pred
inštaláciou a údržbou.
1. Televízor vyberte z obalu a položte ho na širokú rovnú plochu.
POZNÁMKA:
Keď vyťahujete alebo zapínate televízor, počítač alebo iné zariadenie do zásuvky,
musíte si skontrolovať, že jednosmerné napájanie už bolo vypnuté, pri odpájaní
signálneho kábla alebo napájacieho kábla držte prosím za zástrčku (izolovaná časť),
nie za teleso kábla.
2. Výstupná RF svorka sad á pripojiť na RF vstupný port televízora.
3. Výstupná AV svorka DVD sad á pripojiť na AV vstupný port televízora cez AV kábel.
4. Pripojte koniec VGA kábla na VGA port na počítači, pripojte druhý koniec VGA kábla
na VGA port na televízore a dotiahnite skrutky v protismere hodinových ručičiek na
každom konci VGA kábla.
POZNÁMKA:
Pri pripájaní 15-pinového VGA zástrčku príliš nezatláčajte aby ste nepolámali
kolíky.
5. Pripojte jeden koniec HDMI kábla na HDMI výstupný port, pripojte druhý koniec
HDMI kábla na HDMI port na televízore.
POZNÁMKA:
Počas pripájania HDMI, prliš nezatláčajte aby ste nezlomili kolík.
6. Skontrolujte a zaistite, aby boli všetky AV káble pripojené na svoje príslušné porty.
Správne.
7. Pripojte SCART vstupnú alebo výstupnú zásuvku z externého zariadenia pomocou
týchto kolíkov.
Pripojte sieťový napájací kábel na 100-240V~ napájanie.
8.
POZNÁMKA:
Rozsah napájania pre televízor 100-240V~ 50/60Hz, nepripájajte napájací vstup
televízora na striedavý zdroj nad týmto rozsahom.
Pri odpájaní držte napájací kábel za izolovanú zástrčku, nedotýkajte sa priamo
kovového telesa kábla.
Page 58

Diaľkové ovládanie
7
Na diaľkovom ovládaní sa nachádzajú nasledovné tlačidlá:
1. : Napájanie na zapnutie alebo vypnutie
televízora.
2. INFO: Stlačte na zobrazenie informácií o
aktuálnom programe na obrazovke.
i
: Prejdite na stranu indexu.
3.
: Stlačte na stlmenie alebo obnovu zvuku.
4. TLAČIDLÁ S ČÍSLAMI: Vyberte kanál
alebo import hesla.
5. ZDROJ: Stlačte na výber zdroja signálu.
?
: Odhalí skryté informácie niektorých
teletextových stránok.
6. AUDIO (∞I/II): Tlačidlo sa dá použiť na
prepínanie medzi NICAM DUAL I/ NICAM
DUAL II/ NICAM DUAL I+II/MONO a
audio jazykom v DTV režime.
7.
8.
9. MENU: Stlačte na vstup do ponuky
10. EXIT Vráti sa do poslednej vrstvy OSD
11. ENTER: Stlačte na vykonanie vybranej
DMP
2777
25
26
12. ▲/▼/◄/►: Na výber smeru.
13. VOL+/VOL-: Stlačte na nastavenie
14. CH+/CH-: Stlačte na výber kanálu v
15. SLEEP: Stlačte na nastavenie časovača
16. LIST: Stlačte na vyvolanie zoznamu
17. EPG: Elektronický sprievodca programami,
: Stlačte na výber rôznych veľkostí
obrazu.
: Zmení veľkosť teletextovej obrazovky v
režime zobrazenia.
: Vráti sa k naposledy pozeranému
programu.
obrazovky na rôzne voliteľné nastaviteľné
nastavenia.
ponuky alebo opustí OSD Ponuku.
položky v ponuke na obrazovke alebo na
zadanie želanej hodnoty v akomkoľvek
vstupnom režime.
hlasistosti smerom hore alebo dole.
zostupnom alebo vzostupnom poradí.
spánku. Keď uplynie vopred nastavený čas,
televízor sa prepne do pohotovostného
režimu.
kanálov. Stlačte znovu na ukončenie.
používajte v režime DTV.
Page 59

Diaľkové ovládanie
8
DMP
2777
18. : Vypnite/zapnite zoznam obľúbených
programov.
19. FAREBNÉ TLAČIDLÁ: Červená/zelená/
žltá/ modrá klávesa navigačného
prepojenia.
: Rýchle prevíjanie (v režime
DMP ).
: Rýchlo vpred (v režime DMP).
: Predchádzajúca (v režime DMP).
: Ďalšia (v režime DMP).
20. STILL: Stlačte na podržanie obrazu.
21.
22.
23. RADIO: Stlačte na zámenu rozhlasových a
24.
25.
26. INDEX: Stlačte na vstup do
25
26
: Podržte teletextovú stránku v
zobrazení, stlačte znovu na ukončenie.
: Stop (v režime DMP/PVR).
: Stlačte Teletext, stlačte znovu pre
režim MIX, stlačte toto tlačidlo znovu na
ukončenie.
: Prehrávať/Pauza (v režime DMP/PVR).
: Zadajte režim titulkov alebo
podradenej strany.
DTV programov, keď tu rozhlasový
program existuje. (V režime DTV ).
: Zruší teletext ale na ukončenie
teletextu je potrebné ho stlačiť znova.
: Stlačte na štart záznamu.
Zaznamenáva sa.
Zaznamenaného zoznamu. (v režime
PVR ) Zmeňte zoznam pomocou TIMER
alebo CHANNEL. (V ponuke
SPRIEVODCA PROGRAMAMI)
27.
DMP: Stlačte pre prepnutie do
(V režime
PVR).
zdrojového DMP.
POZNÁMKA:
Všetky obrázky v tomto návode sú príklady, sú tu uvedené iba ako referencia,
skutočný výrobok sa môže od obrázkov líšiť.
Tlačidlá, ktoré tu nie sú uvedené, sa nepoužívajú.
Page 60

Základná prevádzka
9
STRUČNÝ NÁVOD
• Pripojenie
1. Pripojenie na sieť a anténu.
2. Ak má televízor vypínač, najprv ho zapnite. Potom stlačte tlačidlo na diaľkovom
ovládaní na zapnutie televízora.
• Začiatočné nastavenie
Keď sa televízor zapne (alebo nie sú nastavené kanály), objaví sa na obrazovke súbor
výziev na nastavenia.
1. Vyberte želaný jazyk OSD (Zobrazenie na
Stlačte tlačidlo ▲/▼/◄/►Potom stlačte
2. Výber príslušnej krajiny.
Stlačte tlačidlo▲/▼/◄/►
začatie Automatického ladenia.
výber krajiny,
tlačidlo ENTER.
potom stlačte tlačidlo ENTER na
obrazovke).
Page 61

Základná prevádzka
10
Vypnúť a zapnúť televízor
• Zapnutie televízora
Pripojte sieťový vstupný kábel, Teraz prejde televízor do pohotovstného režimu.
Stlačením tlačidla na diaľkovom ovládaní
• Vypnutie televízora
Stlačte tlačidlo na diaľkovom ovládaní, aby ste televízor prepli do pohotovostného
režimu. Váš televízor nenechávajte v pohotovostnom režime počas dlhšej doby. V
takom prípade je najlepšie televízor odpojiť zo siete a od antény.
• Žiadny signál
Na obrazovke sa objaví ponuka No Signal (Žiadny signál), keď nie je žiadny signál. V
režime TV/DTV, ak tu nie je do piatich minút žiadny signál, televízor sa automaticky
prepne do pohotovostného režimu. V režime PC-RGB sa televízor automaticky vypne
po 16 sekundách, pokiaľ nie je žiadny vstupný signál, Keď je pripojený VGA kábel
pripojený, televízor sa automaticky vypne.
Výber programu
• Použitím CH+/CH- na paneli televízora alebo v diaľkovom ovládaní.
Stlačte CH+ na zvýšenie čísla kanálu.
Stlačte CH – na zníženie čísla kanálu.
• Použitie číslicových tlačidiel 0- 9.
Môžete si vybrať číslo kanálu stlačením tlačidiel 0 až 9. (V režime TV, DTV)
• Príklad
Na výber - kanál (t.j. kanál 5): Stlačte 5.
Na výber -- kanál (t.j. kanál 20): Stlačte 2 a 0 v krátkom čase.
Prispôsobenie zvuku
• Stlačte tlačidlo VOL+/- na nastavenie hlasistosti.
• Ak chcete zvuk vypnúť, stlačte prosím
• Môžete uvoľniť stlmenie stlačením
Zmena vstupného zdroja
Môžete vybrať zdroj vstupného signálu stlačením tlačidla SOURCE na diaľkovom
ovládaní. Stlačte tlačidlo ▲/▼ na prechod cez vstupný zdroj a stlačte tlačidlo ENTER
na potvrdenie voľby.
prepne televízor z pohotovostného režimu.
.
alebo zvýšenie/zníženie hlasitosti.
POZNÁMKA:
Obrázok je iba informatívny. Pracujte prosím s OSD MENU konkrétneho televízora a
pozrite si AV svorkovnicu.
Page 62

Používanie ponuky
11
Ako sa pohybovať v ponuke
Pred používaním televízora postupujte podľa nižšiie uvedených krokov aby ste sa
naučili, ako sa pohybovať v ponuke a prispôsobiť rôzne funkcie. Prístup sa môže líšiť v
závislosti od vybranej ponuky.
1. Stlačte tlačidlo MENU na zobrazenie hlavnej ponuky.
2. Stlačte tlačidlo ◄/►na pohyb v hlavnej ponuke.
3. Stlačte tlačidlo ▲/▼na výber želanej podradenej položky.
4. Stlačte tlačidlo ENTER na vstup do podradenej ponuke.
5. Stlačte tlačidlo ▲/▼/◄/► na výber želanej hodnoty. Nastavenie v OSD sa môže
líšiť v závislosti od vybranej ponuky.
6. Stlačte tlačidlo MENU na návrat do predchádzajúcej ponuky.
7. Stlačte tlačidlo EXIT na odchod z ponuky.
POZNÁMKA:
Keď je položka v MENU zobrazená sivo, znamená to, že položka nie je prístupná,
alebo sa nedá nastaviť.
Tlačidlá na televízore majú tú istú funkciu ako tie na diaľkovom ovládaní. Ak ste
stratili vaše diaľkové ovládanie, alebo ak nepracuje, môžete použiť tlačidlá na
televízore na výber ponúk. Tento návod sa zameriava na prevádzku s pomocou
diaľkového ovládania.
Konfigurácia ponuky Kanál
•
Automatické prispôsobenie
Vyberte tlačidlo ENTER na začiatok
automatického ladenia.
1. Vyberte krajinu a typ ladenia pre kanály.
2. Televízor si začne ukladať do pamäte
všetky dostupné kanály.
Keď už je postupový stĺpec plný, nájdené kanály sa
uložia a jednotka bude pokračovať vo vyhľadávaní TV,
DTV, rádií a údajov.
Ak stlačíte tlačidlo MENU pri vyhľadávaní TV,
automatické ladenie preskočí DTV vyhľadávanie, tak
ako ukazuje sugestívny obrázok.
Page 63

Používanie ponuky
12
• DTV Manual Tuning
Manuálne ukladanie pre digitálne kanály.
Stlačte tlačidlo ◄/► na výber kanála.
Stlačte tlačidlo ENTER na vyhľadávanie.
Keď sa nájde kanál, proces vyhľadávania sa zastaví a
kanál sa uloží s aktuálnym číslom kanála.
Ak program nie je ten, ktorý ste hľadali, stlačte prosím
tlačidlo ◄/►na pokračovanie vo vyhľadávaní.
Stlačte tlačidlo EXIT na ukončenie.
• ATV Manual Tuning
Manuálne ukladanie ATV kanál
Stlačte tlačidlo▲/▼ na výber položiek.
Stlačte tlačidlo ◄/► na prispôsobenie.
Stlačte červené tlačidlo na uloženie
Stlačte tlačidlo EXIT na ukončenie.
• Programme Edit
Stlačte tlačidlo▲/▼ na výber položiek.
Stlačte červené tlačidlo na vymazanie kanála.
Stlačte zelené tlačidlo na premenovanie kanála.
(V TV režime)
Stlačte žlté tlačidlo na presun kanála. (S
výnimkou DTV kanálov s LCN)
Stlačte modré tlačidlo na preskočenie kanála.
Stlačte tlačidlo
Tlačidlo CH+/CH- sa dá použiť na výber
predchádzajúcej alebo nasledujúcej strany.
Signálne informácie
•
Zobrazte informáciu o aktuálnom signále.
Informácie o module rozhrania
•
Táto funkcia vám umožňuje sledovať niektoré zakódované
služby (platené služby).
Vložte prosím CI kartu do PCMCIA slotu v súlade so šípkou
na CI karte.
POZNÁMKA:
Táto funkcia môže fungovať iba ak je k dispozícii CI slot .
Toto OSD je iba pre ilustráciu a možnosti ponuky a formát
obrazovky sa budú meniť
digitálnych platených služieb.
Po konzultácii s vašim predajcom môžete zmeniť CI ponuku obrazovky a služby- CI
(Common Interface – Spoločné rozhranie).
Nevkladajte ani nevyberajte CI kartu, keď je napájanie zapnuté.
CI kartu často nevyberajte, aby ste predišli poškodeniu TV a CI karty.
Počas inicializácie CI karty televízor prosím nezapínajte.
•
Channel List Transfer
Všechny aktuální informace o kanálech můžete vyexportovat (včetně čísla kanálu,
názvu kanálu,
pro toto zařízení.
vyexportovaných informací o kanálech. Původní informace o kanálech nemůžete
obnovit po akcích SORT, MOVE, DEL, SKIP, LOCK, atd.;
můžete importovat z USB.
na výber obľúbeného kanála.
(V režime DTV)
(V režime DTV )
v závislosti od poskytovateľa
frekvence, atd.) na disk U, jako zálohované informace o kanálech
Systém automaticky vytvoří datový soubor pro uložení
informace o kanálech
Page 64

Používanie ponuky
13
Konfigurácia ponuky Obraz
• Režim Obrazu
Môžete vybrať typ obrazu, ktorý najlepšie
zodpovedá vašim požiadavkám na
prezeranie. Kontrast (Contrast), Jas
(Brightness), Saturácia (Saturation),
Ostrosť (Sharpness) a Odtieň (Tint) (NTSC)
sa dajú nastaviť vtedy, keď je režim obrazu
nastavený na Užívateľ.
Režim, odporúčaný výrobcom je VIVID.
• Tepl.barev
Vyberte teplotu farby obrazu.
•
Pomer strán
Vyberte si veľkosť obrazu, ktorý najlepšie zodpovedá vašim požiadavkám na
prezeranie.
• DNR
Znižuje hluk obrazovky bez zníženia kvality videa.
• Obraz (V režime PC-RGB )
Autonastavenie: Automaticky prispôsobí
H Pozícia
alebo doľava.
V pozícia: Vycentrujte obrázok pohybom nahor a
nadol.
Veľkosť : Upravte veľkosť obrazovky.
Fáza : Prispôsobte, keď majú znaky nízky kontrast, alebo keď obraz bliká.
Konfigurácia ponuky Zvuk
•
Mód Zvuku
Môžete vybrať režim zvuku, ktorý by mal
vyhovovať vašim osobným referenciám.
Výšky a bas sa dajú nastaviť, keď je režim
zvuku nastavený na Užívateľ.
• Vyváženie
Môžete nastaviť vyváženie zvuku
reproduktorov na želanú úroveň.
• AVL (Automatcká úroveň zvuku )
AVL zostane automaticky na tej istej úrovni
hlasitosti, ak zmeníte program. Pretože
každé vysielanie má svoje vlastné
podmienky signálu, nastavenie hlasitosti je potrebné vždy, keď sa zmení kanál. Táto
vlastnosť umožní užívateľom vychutnať si stabilnú úroveň hlasitosti tak, že urobí
automatické nastavenia pre každý program.
Priestorový zvuk
•
Môžete vybrať želaný režim Zvuku okolia.
: Vycentruje obrázok pohybom doprava
obrázok.
Page 65

Používanie ponuky
14
(V režime DTV)
•
AD zmena
Toto je pomocná audio funkcia, ktorá poskytuje dodatočnú audio stopu, pre vizuálne
postihnuté osoby. Táto funkcia manipuluje s Audio Streamom pre AD (Audio
Description – Audio popis), keď sa pošle do hlavnej Audio ponuky od vysielateľa.
Užívatlia môžu Audio popis vypnúť alebo zapnúť a regulovať hlasitosť.
Konfigurácia ponuky Čas
• Hodiny
Môžete zobraziť buď DTV Signal Stream
Time alebo nastaviť Systémový čas
(System Time).
• Čas vypnutia
Nastavte čas vypnutia pre televízor.
• Čas zapnutia
Nastavte čas zapnutia vášho televízora.
Televízor musí byť v pohotovostnom re
aby mohol Čas zapnutia fungovať.
•
Časovač spánku
Vyberte čas, kedy sa televízor automaticky
prepne do pohotovostného režimu.
Autovypnutie
•
Vyberte Automatický čas spánku.
Televízor automaticky vstúpi do pohotovostného režimu, keď tu nie je žiadna
nastavená operácia v nastavenom čase. (vo výrobe sa nastaví čas 4 hodiny).
•
Časová oblasť
Vyberte vašu časovú zónu.
Konfigurácia ponuky
• Jazyk
Vyberte váš preferovaný jazyk Zobrazenia
na obrazovke.
• Audio jazyk
Vyberte si váš preferovaný jazyk zvuku.
(Je k dispozícii pre digitálne kanály, ak sa
vysiela vo viacerých jazykoch.)
• Jazyk titulkov
Vyberte si váš preferovaný jazyk titulkov,
alebo titulky vypnite. (Dostupné pre digitálne
kanály, ak vysielajú s viacerými jazykmi
titulkov).
• Pre sluchovo postihnutých
Keď je zapnuté Pre sluchovo postihnutých, televíznu obrazovka bude poskytovať isté
informácie pre ľudí so sluchovým postihnutím. Keď je Pre sluchovo postihnutých
vypnuté, informácia sa skryje.
výber krajiny
•
Zobrazí aktuálnu krajinu.
Voľby
žime,
Page 66

Používanie ponuky
15
PVR súborový systém
•
Zvoliť Disk
Kontrolovať súborový systém PVR
a otestuje rýchlosť systému.
USB Pamäť
Formát : Formát USB disku.
Veľkosť časového posunu: V
posun.
Rýchlos
Bez obmedzenia záznamu
záznamu.
Záznam dig
Vložte U disk a systém automaticky
ktoré boli zaznamenané.
Záznam začína, keď sa stla
nestlačí tlačidlo , alebo keď už nie je dosť pamäti. Počas nahrávania stlačte tlač
▲/▼
Funkcia prehrávania
Stlačením tlačidla
tlačidiel ▲/▼
činnosti sa riaďte podľa ponuky
Zoznam Záznamov
Stlačte tlačidlo INDEX
Stlačte tlačidlo ▲/▼ na výber položiek, potom stlačte tlačidlo
Stlačte červené tlačidlo na vymazanie programu.
Stlačte tlačidlo na zobrazenie informácií o programe.
Stlačte tlačidlo INDEX na vytriedenie programov.
Stlačte tlačidlo EXIT na ukončenie.
POZNÁMKA:
USB disk by
Naformátujte prosím vložený USB disk, keď sa naň
Počas formátovania zariadenia neodpájajte zariadenie, kým prebieha fo
Ak formátujete zariadenie, všetky súbory sa vymažú. Pred formátovaním zariadenia
na televízore prosím zazálohujte prosím vaše súbory, aby ste predišli poškodeniu,
alebo strate údajov. Ak USB disk má nejaký vírus - formátovanie zlyhá. .
Ak zariadenie obsahuje mnohé prechodné pevné disky, ktoré rozdeľujú pr
iestor,
môže sa v Systéme súborov PVR získať prístup na výber PVR v reakcii na znak disku.
disku.
Ak sa stá
le používa nahrávací systém PVR, systém PVR sa automaticky vypne.
USB pamäť musí podporovať špecifikáciu USB2.0 pre vysoké rýchlosti.
Nemusia byť podporované niektoré neštandardné USB zariadenia.
povodné nastaveníe
•
Obnoví nastav
•
OSD animácie
Vyberte si systém
• E-POP
Vypnite alebo zapn
Režim Uložiť demo je optimálne nastav
údaje o kvalite obrazu, Ukladanie Dema inicializuje produkt na kvalitu obrazu, ktorú
sme na určitý čas nastavili.
: Vyberte disk, ktorý sa má použiť pre PVR.
: USB je aktivovan
ť : Zobrazí rýchlosť ukladacieho zariadenia.
itálneho programu
Na priblíženie /oddialenie ponuky Nahrávania.
zväčšujete/zmenšujete ponuku prehrávania (Playback). Pri ďalšej
zelené
mal mať kapacitu minimálne 512MB.
enia systému na nastavenia z výroby.
(V režime DTV)
: Skontrolujte disk
é alebo nie je aktivované.
yberte čas na Časový
: Vyberte trvanie
vytvorí adresár (_MSTPVR) na ukladanie súborov,
čí tlačidlo a zaznamenáva po celý čas, až kým sa
aktivujete režim prehrávania počas nahrávania. Stlačením
Playback.
na zobrazenie zoznamu záznamov.
ENTER na prehrávanie.
nedá nahrávať.
rmátovanie.
zobrazenia ponuky.
ite uloženie dema.
enei pre ukladanie prostredí. Ak užívateľ zmení
idlo
Page 67
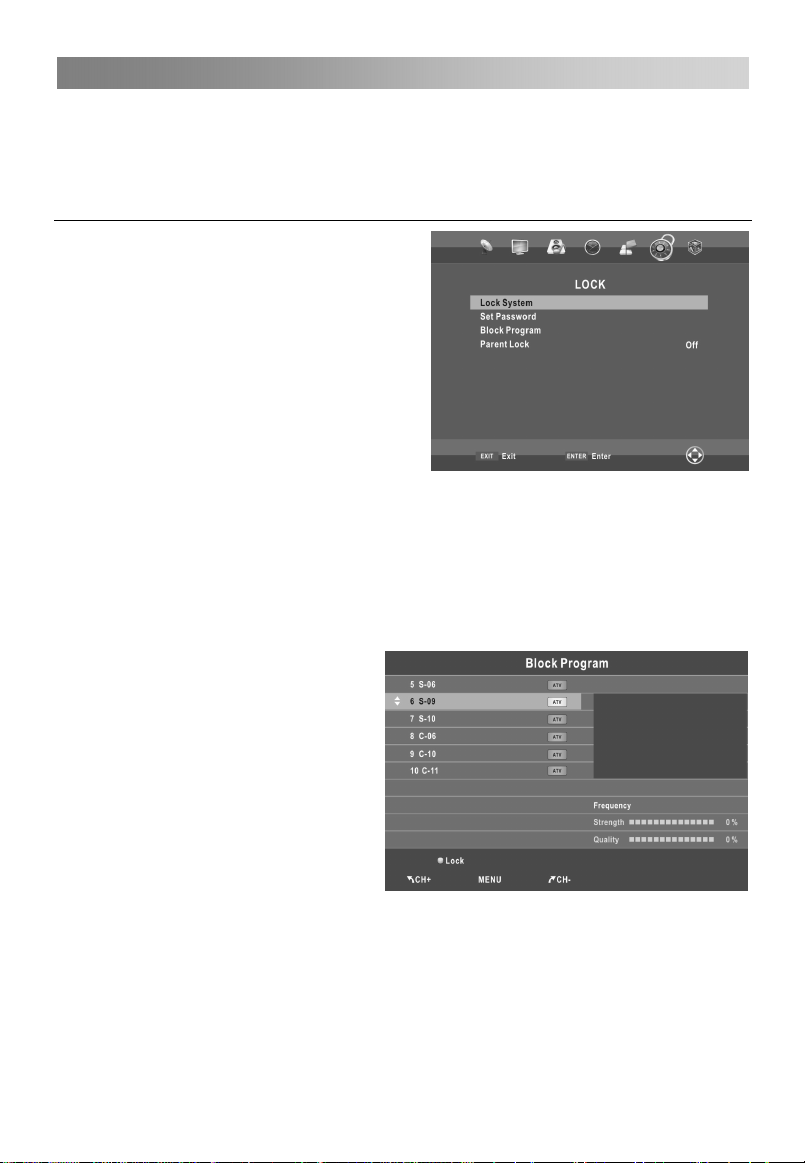
Používanie ponuky
16
Tipy pre zdravie
•
Zapne alebo vypne zdravotné upozornenie.
Ak je zdravotné upozornenie zapnuté, obrázok s upozornením vás vyzve na prestávku
v intervaloch 2
Konfigurácia ponuky Z mok
Zmaknúť systém
•
Vlastnosť dokáže zabrániť neoprávnenému
prevádzkovaniu televízora zadaním 4
číselného hesla. Keď je systém zapnutý,
musíme vložiť do systému heslo pri
Automatickom ladení, Manuálne ladení,
Editovanie programu
Stlačte správne číslicové
Predvolené heslo je 0000.
POZNÁMKA:
Keď bola potvrdená oprava hesla, nezabudnite ho zadať do Ponuky Sprievodcu
rodičov, aby sa dali všetky funkcie aktivovať iba po zadaní správneho hesla. Ak h
zabudnete, stále platí super heslo 1225.
• Nastavenie hesla
Môžete nastaviť vaše súkromné heslo. Stla
aby ste nastavili nové heslo. Keď sa nové heslo dva krát zadá, nastavenie sa úspešne
ukončilo. Televízor sa vráti do predchádzajúcej ponuky.
BLOKOVANÝ PROGRAM
•
(V režime
Stlačte zel
zablokovanie tých dostupných
programov, pri ktorých to chcete
Znovu stlačte zelené tlačidlo na ich
odblokovanie.
Rodičovský zámok
•
Táto vlastnosť dokáže zabrániť, aby de
dospelých podľa nastavení ratingu. Vzhľad tejto funkcie sa mení v závislosti od
ktorá vysiela. Takže, ak má program nesprávne informácie, táto funkcia nefunguje.
hodiny.
á
alebo Predvolené.
tlačidlá pre heslo.
TV/DTV )
ené tlačidlo LOCK na
žime DTV )
(V re
čte číselné tlačidlá na diaľkovom ovládaní,
.
ti pozerali na televízore programy pre
stanice,
o
Page 68
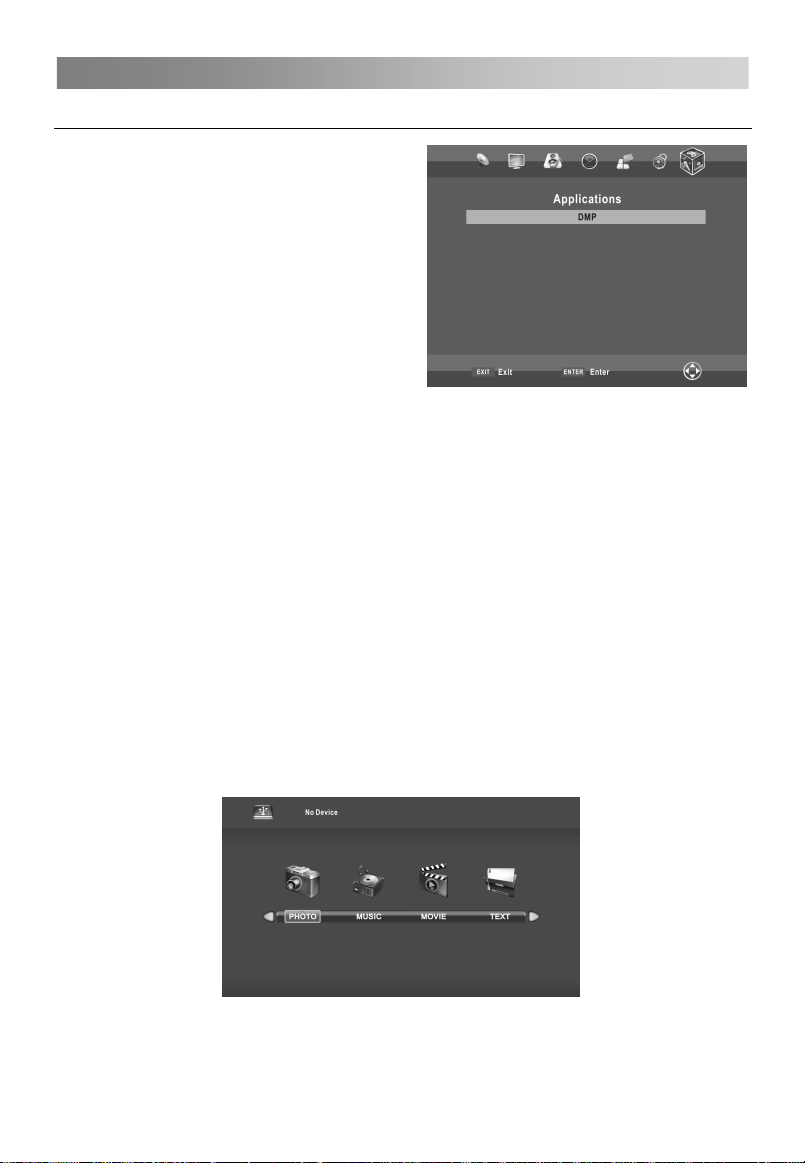
Používanie ponuky
17
Používanie DMP režimu
• Na vstup/ukončenie režimu DMP
1. Pripojte USB zariadenie USB.
2. Stlačte tlačidlo MENU na zobrazenie
hlavnej ponuky. Stlačte tlačidlo ◄/► na
výber ponuky Aplikácií.
3. Stlačte tlačidlo ENTER na vstup do
režimu DMP.
4. Stlačte tlačidlo EXIT na ukončenie.
POZNÁMKA:
Špeciálne USB zariadenia nemusia byť podporované dobre alebo nemusia byť
podporované vôbec.
Max. zaťaženie USB: DC 5 V, 500 mA
• Podporované formáty
Funkcia DMP môže podporovať USB s pamäťou USB.
Môže prehrávať súbory PHOTO, MUSIC, MOVIE alebo TEXT.
Podporované fotografické formáty: JPEG, BMP, PNG.
Podporované hudobné formáty: MP3, AAC.
Podporované formáty filmu: AVI, VOB, DAT, MPG, TS/TP.
Podporované textové formáty: TXT.
POZNÁMKA:
Špeciálne algoritmy dokumentov môžu byť podporované na USB zariadení
nedokonale alebo vôbec nie.
USB podporuje uvedených formáte, v prípade, že formát súboru nie je podporovaný,
zmeňte ju na určitom formáte.
• Hlavné operačné rozhranie
Page 69

Používanie ponuky
18
1. Použite tlačidlo ◄/► na výber PHOTO, MUSIC, MOVIE alebo TEXT. Stlačte tlačidlo
ENTER na vstup do podradenej ponuky.
2. Použite šípkové tlačidlá a tlačidlo ENTER na vstup do želaného disku. Stlačte
tlačidlo ENTER na otvorenie adresára.
3. Použite šípkové tlačidlá na zdôraznenie súboru. Použite tlačidlo ENTER na
vyznačenie alebo odznačenie súboru. Stlačte tlačidlo
súborov. Ak nie je vyznačený žiadny súbor, budú sa postupne prehrávať všetky
súbory v adresári, keď stlačíte tlačidlo .
4. Stlačte tlačidlo INFO na zobrazenie ponuky na obrazovke počas prehrávania.
5. Stlačte tlačidlo
6. Stlačte tlačidlo EXIT na návrat na predchádzajúcu ponuku obrazovky.
• Základná prevádzka
1. Prehrať/ Pauza
Začnite prehrávať vybraný súbor alebo adresár alebo urobte Prestávku.
2. Zastavenie
Skončite prehrávanie súborov.
3. / Rýchle prevíjanie dopredu/dozadu.
Môžete stlačiť / na preskakovanie pri rýchlom prevíjaní dopredu alebo dozadu.
4. / Predchádzajúca/Ďalšia
Za normálnych okolností môžete vybrať želané súbory manuálne.
5. Červené tlačidlo
Vyberte súbor, ktorý chcete vymazať, stlačte červené tlačidlo na otvorenie príslušnej
ponuky,potom stlačte tlačidlo ENTER na jeho vymazanie.
6. CH+/CH-
Page Up Page Down súbory alebo.
na zastavenie prehrávania súborov.
na prehranie vybraných
Page 70

Používanie ponuky
19
MHEG5
MHEG5 (Multimedia and Hypermedia information coding Expert Group) spája funkcie
prevádzky a funkcie ako prehrávača médií. Ak chcete vstúpiť do MHEG5, titulky sa
musia vypnúť.
Stlačte červené tlačidlo
informácií v návrhoch. Stlačte tlačidlo EXIT alebo tlačidlo na ukončenie ponuky
MHEG5. Domovská stránka:
na vstup MHEG5. Môžete prevádzkovať televízor pomocou
Po zadaní vybranej položky môžete vidieť hlavnú ponuku ako:
Vyberte hlavnú položku, ktorú chcete a môžete vidieť viac konkrétnych detailov.
Page 71
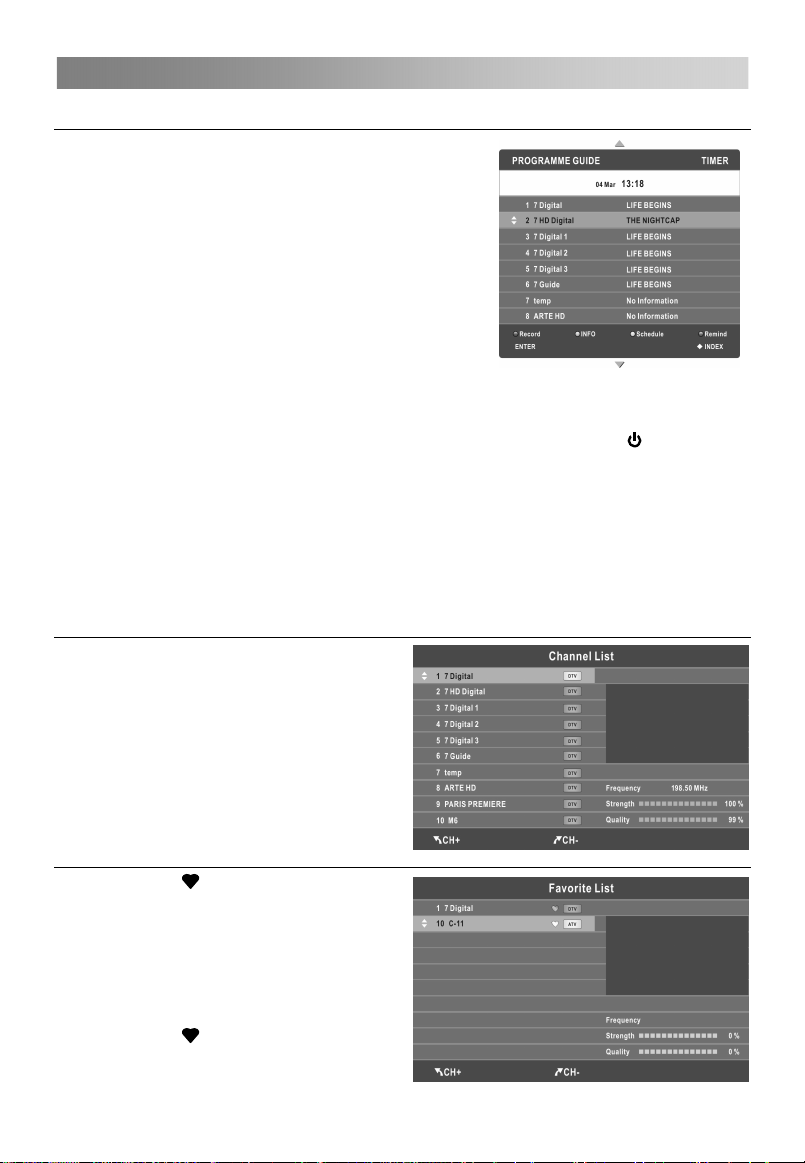
Dôležité jedinečné tlačidlá
20
Programový návod
Stlačte tlačidlo EPG na zobrazenie ponuky
PROGRAMME GUIDE. Táto funkcia vám umožní
prístup k detailným informáciám o kanále, pričom
uvedie čas, kedy sa program bude vysielať. Z ponuky
PROGRAMME GUIDE je možné skontrolovať
informácie o programe na najbližších osem dní. (Ak je
táto informácia k dispozícii (ak je táto informácia od
vysielateľa k dispozícii). Stlačte tlačidlo EXIT na
ukončenie.
Record : Stlačte červené tlačidlo na
nastavenie parametrov nahrávania.
schopná urobiť rozvrh nahrávania, keď je televízor zapnutie alebo v pohotovostnom
režimu.Můžete nastaviť niekoľko rozvrh nahrávania. Rôzne plány by sa nemali
prekrývať. Pri
zmení farbu a nebude obraz
obrazovku.
INFO: Stlačte zelené tlačidlo, aby ste si pozreli detailné informácie o aktuálnom kanáli.
Schedule :
Remind : Ak nájdete želaný program, ktorý sa bude vysielať v
budúcnosti. Stlačte modré tlačidlo na záznam programu.
INDEX: Zmeňte zoznam na ČASOVAČ alebo na KANÁL.
ENTER: stlačte na zmenu kanála.
Zoznam programov
Stlačte tlačidlo LIST na zobrazenie
Zoznam Kanálov.
Stlačte ▲/▼ na výber a kanály sa
automaticky zmenia.
Stlačte CH+/CH- tlačidlo na presun o
stranu vyššie alebo nižšie v Zozname
kanálov.
Stlačte tlačidlo LIST na ukončenie.
Zoznamu obľúbených
Stlačte tlačidlo na zobrazenie
zoznamu Obľúbených.
Stlačte tlačidlo ▲/▼ na výber položiek a
kanály sa zmenia automaticky.
Stlačte tlačidlo CH+/CH- na presun o
stranu vyššie alebo nižšie v Zozname
obľúbených.
Stlačte tlačidlo
Stlačte tlačidlo na zobrazenie
(V režime DTV)
Jednotka je
nahrávaní sa spustí v pohotovostnom režime, predné ukazovatele
na ukončenie.
alebo zvuk z prístroja.
žlté
Stlačením tlačidla rozsvietite
Plán. zoznam.
Page 72
Teletext
21
Používanie vlastnosti teletext
• Zobrazenie teletextu
1. Vyberte televíznu stanicu s teletextovým signálom.
2. Stlačte tlačidlo
3. Stlačte tlačidlo druhý krát na vstup do Zmiešaného režimu, táto funkcia vám
umožní umiestniť teletextovú stránku cez TV program.
4. Stlačte tlačidlo
• Výber stránky
1. Zadajte číslo strany (tri čísla) pomocou číslicových tlačidiel. Ak stlačíte chybné číslo,
musíte dokončiť trojmiestne číslo a potom znovu zadať správne číslo strany.
2. Tlačidlo CH-/CH+ sa dá použiť na výber predchádzajúcej alebo nasledujúcej strany.
• Podržať
Môžete stlačiť tlačidlo
• Index
Stlačte tlačidlo
• Rozšírenie textu
Keď sa zobrazí strana, môžete zdvojnásobiť veľkosť textu, aby sa ľahšie čítalo.
1. Stlačte tlačidlo
2. Stlačte tlačidlo znovu na rozšírenie spodnej polovice strany.
3. Stlačte tlačidlo
• Režim Odhalenia
Môžete zobraziť utajené informácie z teletextu (t.j. Odpovede na hádanky alebo
rozlúštenie puzzle a podobne.) stlačením tlačidla
odstránenie informácií z displeja.
• Podradená strana
Niektoré teletexty môžu obsahovať viaceré podradené strany, ktoré sú automaticky
stránkované v istom cykle na televíznej stanici.
1. Priamo stlačte tlačidlo
Zadajte číslo podradenej strany (t.j. 0003) pre tretiu podradenú stranu.
2. Stlačte znovu tlačidlo na ukončenie režimu podradenej strany.
3. Stlačte tlačidlo
• Farebné tlačidlá (Červené, zelené, žlté a modré)
Stlačte tieto tlačidlá na priamy prístup k príslušným farebným stranám, zobrazeným v
dolnej časti teletextovej obrazovky.
na vstup do režimu teletextu.
tretí krát na návrat alebo na ukončenie režimu TV/DTV.
na podržanie strany a znovu ho stlačte na uvoľnenie strany.
i
na priamy vstup do hlavnej indexovej strany.
na rozšírenie hornej polovice strany.
ešte raz na návrat k normálnemu zobrazeniu.
?
. Znova stlačte tlačidlo ? na
button a vyberte číslo strany pomocou číselných tlačidiel.
na návrat do normálneho televízneho režimu.
Page 73

Sprievodca odstraňovaním problémov
22
Odstraňovanie problémov
Pred kontaktovaním servisného technika vykonajte nasledujúce jednoduché kontroly.
Pokiaľ akákoľvek porucha stále pretrváva, vytiahnite televízor zo zásuvky a zavolajte
servis.
PROBLÉM MOŽNÉ RIEŠENIE
- Skontrolujte, či je hlavná zástrčka zasunutá v
Žiadny zvuk ani obraz
Normálny obraz ale
žiadny zvuk.
Diaľkové ovládanie
nefunguje
Napájanie sa náhle vyplo
Po zapnutí sa obraz
objavuje pomaly.
Obraz bez farby alebo
nízka kvalita farby
Horizontálne/vertikálne
pásy alebo trasenie
obrazu
Slabý príjem niektorých
kanálov
Čiary alebo striekance na
obraze.
Žiadny výstup z
reproduktorov
stenovej zásuvke.
- Skontrolujte, či ste stlačili tlačidlo NAPÁJANIE v
predu na televízore.
- Skontrolujte nastavenia jasnosti a kontrastu obrazu.
- Skontrolujte hlasitosť.
- Stlmený zvuk? Stlačte tlačidlo MUTE.
- Skúste iný kanál, môže byť problém s vysielaním.
- Sú audio káble vhodne nainštalované?
- Skontrolujte, či nie je žiadny predmet medzi
výrobkom a diaľkovým ovládaním, ktorý mu prekáža.
- Sú batérie vložené so správnou polaritou (+ na +, -
na -)?
- Je nastavený správny prevádzkový režim: TV, VCR
etc.?
- Vložte nové batérie
- Je nastavený časovač spánku?
- Skontrolujte nastavenia napájania. Výpadok prúdu.
- Na stanici, ktorá sa automatcky naladila nie je žiadne
vysielanie.
- Toto je normálne, obraz je stlmený počas fázy
štartovania výrobku. Kontaktujte prosím vaše
servisné centrum, ak sa obraz do piatich minút
neobjavil.
- Nastavte farbu v ponuke možností.
- Zaistite dostatočnú vzdialenosť medzi výrobkom a
VCR.
- Skúste iný kanál, problém môže byť so stanicou.
- Sú VIDEO káble správne nainštalované?
- Aktivujte akúkoľvek funkciu na obnovu jasnosti
- Skontrolujte, či nedochádza k lokálnej interferencii, s
elektrickým zariadením alebo so silným náradím.
- Stanica alebo produkt káblovej televízie majú
problémy. Nalaďte si inú stanicu.
- Signál stanice je slabý, preorientujte anténu tak, aby
prijímala signál slabej stanice.
- Skontrolujte, či nie sú v blízkosti zdroje interferencie.
- Skontrolujte anténu (Skontrolujte smer antény ).
- Nastavte vyváženie v ponuke možnosti
obrazu.
Page 74

Sprievodca odstraňovaním problémov
23
POZNÁMKA: je tu problém vo VGA režime (Platí iba pre VGA režim).
PROBLÉM MOŽNÉ RIEŠENIE
- Nastavte rozlíšenie, horizontálnu alebo vertikálnu
frekvenciu.
Signál je mimo rozsahu.
Vertikálny pás alebo čiara
na pozadí & horizontálnyl
hluk & Nesprávna poloha.
Farba obrazovky je
nestabilná alebo je iba
jedna farba.
Údržba
Mnohým poruchám sa dá predísť. Starostlivé a pravidelné čistenie môže predĺžiť
životnosť vášho nového televízora. Pred akýmkoľvek čistením skontrolujte, či ste
vytiahli napájací kábel.
Čistenie obrazovky
1. Tu je skvelý spôsob, ako udržať vašu obrazovku bez prachu. Namočte mäkkú handru
do zmesi vlažnej vody a trošky aviváže alebo prostriedku na umývanie riadu. Látku
vyžmýkajte, až kým nie je takmer suchá a potom ju použite na utretie obrazovky.
2. Skontrolujte, či ste pred zapnutím televízora utreli obrazovku do sucha.
Čistenie krytu
Na odstránenie nečistoty alebo prachu utrite kryt suchou, čistou handrou, ktorá nepúšťa
vlákna. Nepoužívajte prosím vlhkú handru.
Dlhšia neprítomnosť
Ak predpokladáte, že váš televízor nebudete počas dlhšej doby používať (ako
napríklad prázdniny), je dobrý náápad vytiahnuť ho zo zásuvky, aby ste ho
ochránili pred prípadným poškodením bleskom alebo prúdovým nárazom.
Likvidácia starého elektrického zariadenia
Smernica Európskej únie 2002/96/EK o odpade z elektrických
a elektronických zariadení (WEEE), vyžaduje, aby sa staré domáce
elektronické zariadenia nevyhadzovali do bežného netriedeného domáceho
odpadu, ale aby sa zbierali oddelene, aby sa optimalizovala ich obnova a
recyklácia materiálov, ktoré obsahujú a znížil sa tak dopad na životné
prostredie a ľudské zdravie.
Prekrížený symbol odpadového koša na kolieskach vám pripomína vašu povinnosť, že
keď likvidujete toto zariadenie, musí ísť do separovaného zberu.
Spotrebitelia by mali kontaktovať svoje miestne orgány alebo maloobchodného
predajcu ohľadom informácií o správnej likvidácii ich starého zariadenia.
- Skontrolujte, či je signálny káblel pripojený, alebo
je uvoľnený.
- Skontrolujte vstupný zdroj.
- Pracujte na automatickej konfigurácii, alebo
nastavte hodiny, fázu alebo H/V polohu.
- Skontrolujte signálny kábel.
- Znovu nainštalujte PC video kartu.
Page 75

Contenido
Advertencia............................................................................................................1
Instrucciones de Seguridad .................................................................................3
Iniciando.................................................................................................................5
Usando el mando a distancia .............................................................................. 5
Instalación de pilas en mando a distancia
Reemplazo de batería
Conexión y Configuración.................................................................................... 6
Instalación del cable...........................................................................................
Mando a Distancia.................................................................................................7
Operación Básica
GUÍA DE INICIO
Encender y apagar el televisor ...........................................................................10
Selección de Programas .....................................................................................10
Ajsute de Volumen ..............................................................................................10
Cambio de la fuente de entrada ......................................................................... 10
Operación de Menú ...............................................................................................
Cómo desplazarse por los menús
Menú Canal.........................................................................................................
Menú Imagen ......................................................................................................
Menú Sonido .......................................................................................................
Menu HORA........................................................................................................
OPCIÓN
Menú
Menú
BLOQUEAR
Usando Modo DMP.............................................................................................
MHEG5 ...............................................................................................................
Botones Unicos Importantes................................................................................20
GUÍA DE PROGRAMA
Lista de canales.................................................................................................. 20
Lista de Favoritos................................................................................................ 20
Teletexto................................................................................................................. 21
Usando la función de teletexto
Guía de Resolución de Problemas
Resolución de Problemas
Mantenimiento..................................................................................................... 23
........................................................................................5
.................................................................................................. 9
RÁPIDO
...................................................................................................
...................................................................................9
.......................................................................
..............................................................................................
.....................................................................................20
............................................................................
.......................................................................22
.................................................... .............................. 22
........................................................5
ES
6
11
11
11
13
13
14
14
16
17
19
21
Page 76

Advertencia
1
ADVERTENCIA:
PARA REDUCIR EL RIESGO DE DESCARGA ELÉCTRICA NO RETIRE
LA CUBIERTA.NO HAY PIEZAS QUE EL USUARIO PUEDA REPARAR.
CONSULTE A PERSONAL CUALIFICADO.
El símbolo del rayo con punta de flecha dentro de un triángulo
equilátero, tiene por finalidad alertar al usuario de la presencia de
"voltaje peligroso" dentro del recinto de productos que pueden ser de
magnitud suficiente para constituir un riesgo de descarga eléctrica
para las personas.
El signo de exclamación dentro de un triángulo equilátero pretende
alertar al usuario de la presencia de instrucciones de funcionamiento y
mantenimiento (servicio) en la literatura que acompaña al aparato.
INFORMACIÓN REGLAMENTARIA
Este equipo genera, utiliza y puede irradiar energía de radiofrecuencia y, si no se
instala y utiliza de acuerdo con las instrucciones, puede causar interferencias en
las comunicaciones de radio. Sin embargo, no hay garantía de que no se
produzcan interferencias en una instalación particular. Si este equipo causa
interferencia dañina a la recepción de radio o televisión, lo cual puede
determinarse apagando y encendiendo el equipo, se le recomienda intentar
corregir la interferencia por una o más de las siguientes medidas:
-Cambie de lugar la antena receptora.
-Aumentar la separación entre el equipo y el receptor.
-Conecte el equipo a un tomacorriente en un circuito diferente al que está
conectado el receptor.
-Consulte a su distribuidor o de radio y TV con experiencia para obtener ayuda.
Cualquier cambio o modificación no aprobados expresamente por la parte
responsable del cumplimiento podrían anular la autoridad del usuario para operar
el equipo.
PRECAUCION
No intente modificar este producto de ninguna manera sin la autorización por
escrito del proveedor. Las modificaciones no autorizadas pueden anular la
autorización del usuario para operar este producto.
No se recomienda para mantener una cierta imagen fija en la pantalla durante
mucho tiempo, así como la visualización de imágenes muy brillantes en la
pantalla.
PRECAUCION
RIESGO DE DESCARGA
ELÉCTRICA NO ABRIR
Page 77

Advertencia
2
ADVERTENCIA
Para reducir el riesgo de fuego o descarga eléctrica, no exponga este aparato a
lluvia o humedad.
La ventilación no debe impedirse al cubrir las aberturas de ventilación con objetos
como periódicos, manteles, cortinas, etc
El aparato no debe ser expuesto a goteos o salpicaduras, ni objetos que
contengan líquidos, como floreros, sobre el aparato.
Se debe prestar atención a los aspectos medioambientales de la eliminación de la
batería. No tire las pilas usadas en el cubo de basura. Póngase en contacto con
su distribuidor con el fin de proteger el medio ambiente.
Mantenga las distancias mínimas (5 cm) alrededor del aparato para la ventilación
suficiente; (Distancia mínima alrededor del aparato para la ventilación suficiente.)
No hay fuentes de llamas, como velas encendidas, se debe colocar sobre el
aparato;
Para evitar la propagación del fuego, mantenga velas u otras llamas alejadas de
este producto en todo momento.
El dispositivo puede funcionar mal si en virtud de las descargas electrostáticas.
Puede ser de forma manual se reanuda encendiendo y apagando de nuevo.
PRECAUCION al conectar el cable de alimentación
La mayoría de los aparatos recomiendan que se coloquen en un circuito
dedicado, es decir, un circuito de toma única sólo a ese aparato y sin salidas o
circuitos adicionales.
No sobrecargue los enchufes de pared. Conexiones saturadas, sueltas o
dañadas, cables de extensión, cables de alimentación deshilachados, o el
aislamiento de cables dañados o agrietados son peligrosos. Cualquiera de estas
condiciones podría provocar una descarga eléctrica o un incendio. Examine
periódicamente el cable de su aparato, y si su apariencia indica daño o deterioro,
desenchúfelo, deje de utilizar el aparato, y sustituya el cable por una pieza de
recambio exacta por un técnico autorizado. Proteja el cable de alimentación
contra abusos físicos o mecánicos, tales como ser retorcido, doblado, aplastado
con una puerta, o caminar sobre él. Preste especial atención a los enchufes,
tomas de corriente, y el punto donde el cable sale del aparato.
El enchufe principal se utiliza como dispositivo de desconexión, y el dispositivo de
desconexión debe ser accesible fácilmente.
Las figuras e ilustraciones de este manual se proporcionan sólo como referencia
y pueden diferir de su apariencia real. El diseño del producto y las
especificaciones pueden cambiar sin previo aviso.
Page 78

Instrucciones de Seguridad
3
INSTRUCCIONES IMPORTANTES DE SEGURIDAD
1.Lea las instrucciones.
2.Guarde estas instrucciones.
3.Preste atención a las advertencias.
4.Siga todas las instrucciones.
7.No bloquee ninguna de las aberturas
de ventilación. Instale de acuerdo con
las instrucciones del fabricante.
5.No utilice este aparato cerca del agua.
6.Limpie sólo con un paño seco.
8.No instale cerca de fuentes de calor
tales como radiadores, calefactores,
estufas u otros aparatos (incluyendo
amplificadores) que produzcan calor.
9.No anule el propósito de seguridad del
enchufe polarizado o con conexión a
tierra. Un enchufe polarizado tiene dos
clavijas, una más ancha que la otra. Un
enchufe de tierra tiene dos cuchillas y
una tercera a tierra. La hoja ancha o la
tercera clavija se proporciona para su
seguridad. Cuando el enchufe no
encaja en su tomacorriente, consulte a
un electricista para que cambie el
tomacorriente obsoleto.
Page 79

Instrucciones de Seguridad
4
10.Proteja el cable de alimentación de
ser pisado o aplastado, especialmente
en los enchufes, tomacorrientes y el
punto donde salen del aparato.
11.Utilice sólo los accesorios /
aditamentos especificados por el
fabricante.
12.Use only with a cart, stand, tripod,
bracket, or table specified by the
manufacturer, or sold with the
apparatus. When a cart is used, use
caution when moving the cart/
apparatus combination to avoid injury
from tip-over.
13.Desenchufe este aparato durante
tormentas eléctricas o cuando no se
use por largos períodos de tiempo.
14.Consulte todas las reparaciones al
personal de servicio calificado. Se
requiere servicio cuando el aparato
ha sido dañado de alguna manera, si
el cable de alimentación o el enchufe
está dañado, se ha derramado
líquido o han caído objetos dentro
del aparato, el aparato ha sido
expuesto a lluvia o humedad, no
funciona con normalidad, o se ha
caído.
SOBRE LA ELIMINACIÓN
-La lámpara fluorescente utilizada en este producto contiene una pequeña
cantidad de mercurio.
-No se deshaga de este producto con los desechos domésticos.
-La eliminación de este producto debe llevarse a cabo de acuerdo con las normas
de las autoridades locales.
NOTA
-Si la TV se siente fría al tacto, puede haber un pequeño “parpadeo” cuando se
enciende. Esto es normal, no hay nada malo en la TV.
-Algunos pocos defectos pueden ser visibles en la pantalla, aparecen como
pequeños puntos rojos, verdes o azules. Sin embargo, no ha habido efectos
adversos en el rendimiento del monitor.
-Evite tocar la pantalla o poner sus dedos contra esta por períodos largos, pues
puede producir distorsión temporal.
Page 80
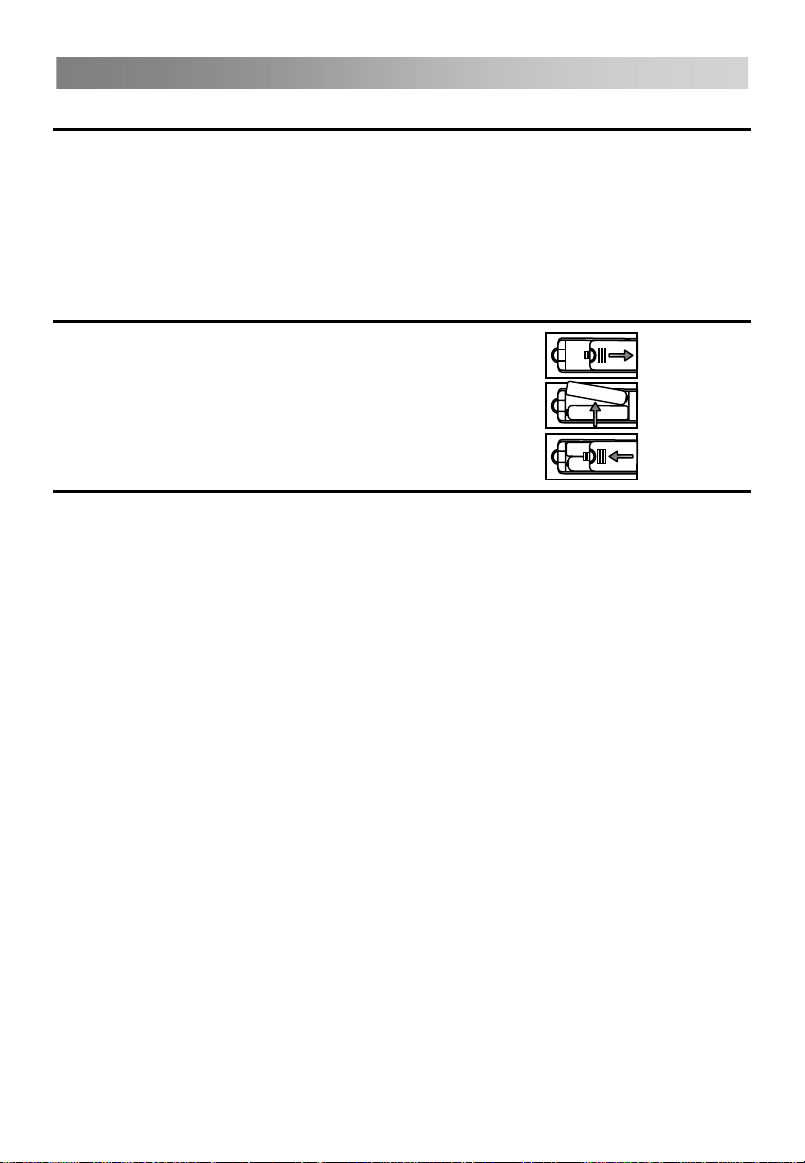
Iniciando
5
Usando el mando a distancia
Al utilizar el mando a distancia, apuntar hacia el sensor remoto del TV. Si hay un objeto
entre el mando a distancia y el sensor remoto de la unidad, la unidad puede no
funcionar.
Apunte el mando a distancia hacia el SENSOR REMOTO situado en el TV.
Cuando se utiliza esta televisión en una zona muy iluminada, el SENSOR DE
MANDO A DISTANCIA infrarrojo puede no funcionar correctamente.
La distancia recomendada para el uso eficaz del mando a distancia es de unos 7
metros.
Instalación de pilas en mando a distancia
1.Abra la tapa detrás del mando a distancia.
2.Instale dos pilas de tamaño AAA. Asegúrese de
coincidir el signo “+” y “-” de las pilas con el
diagrama en el compartimiento.
3.Vuelva a colocar la cubierta.
Reemplazo de batería
Usted tendrá que instalar las pilas suministradas en el mando a distancia para que
pueda operar siguiendo las instrucciones de abajo.
Cuando las pilas se debilitan, la distancia de funcionamiento del mando a distancia se
reducirá considerablemente y tendrá que reemplazar las pilas.
Notas sobre el uso de pilas:
El uso de un tipo incorrecto de las pilas puede causar fugas de químicos y / o explosión.
Tenga en cuenta lo siguiente:
Asegúrese siempre de que las pilas se insertan con las terminales + y - en la
dirección correcta, como se muestra en el compartimiento de la batería.
No mezcle pilas de diferentes características No mezcle pi.
No mezcle pilas nuevas y viejas. Mezclar pilas usadas con nuevas acortará la
vida de la batería y / o causará fugas de productos químicos.
Cambie las pilas tan pronto como no funcionen.
Productos químicos que se filtren de las pilas pueden causar irritación de la piel.
Si alguna materia química se filtra fuera de las pilas, limpie inmediatamente con
un paño seco.
Las pilas suministradas con el producto pueden tener una esperanza de vida más
corta debido a las condiciones de almacenamiento. Retire las pilas si usted
anticipa que e mando a distancia no se utilizará durante un período prolongado
Las pilas (la batería o pilas instaladas) no debe estar expuestas a un calor
excesivo como la luz solar, fuego o similares.
PRECAUCIÓN:
Puede provocar una explosión si las pilas se reemplazan incorrectamente.
Sólo reemplace las pilas con el mismo tipo o equivalente.
las nuevas con pilas usadas.
Page 81

Conexión y Configuraci nó
6
Instalación del cable
Por favor, lea el contenido relevante en el “Aviso de Mantenimiento y de Seguridad”
antes de la instalación y uso.
1.Saque el televisor del paquete y colóquelo en un lugar aireado y plano.
NOTA:
Cuando conecte o desconecte el televisor, computadora u otros equipos, debe
asegurarse de que la alimentación de CA ha sido ya cerrada, cuando desconecte
el cable de alimentación o cable de señal, por favor, sujete el enchufe (la parte
aislada), no tire del cuerpo del cable.
2. El terminal de salida de RF se puede conectar con el puerto de entrada de RF del
televisor.
3.TEl terminal de salida AV de DVD se puede conectar con el puerto de entrada AV de
la TV a través de cable AV.
4.Conecte un extremo del cable VGA al puerto VGA en la computadora, conecte el otro
extremo del cable VGA al puerto VGA de la TV, y apriete los tornillos en sentido
horarioj en el extremo de cada cable VGA.
NOTA:
Durante la conexión de VGA de 15 pines, por favor, no introduzca a la fuerza el
conector, pues la clavija puede romperse.
5.Conecte un extremo del cable HDMI con el puerto de salida HDMI, conecte el otro
extremo del cable HDMI con el puerto HDMI en el televisor.
NOTA:
WDurante la conexión del HDMI, por favor,apunte con cuidado, no introduzca a la
fuerza, pues la clavija puede rompers.
6.Compruebe y asegúrese de que todos los cables AV están conectados con los
puertos correspondientes correctamentel.
7.Conecte el conector SCART de entrada o salida dese un dispositivo externo a estas
tomas.
Conecte el cable de alimentación de CA con fuente de alimentación de 100-240V~.
8.
NOTA:
El rango de potencia de entrada para el televisor es de 100-240V~ 50/60Hz, no
conecte el puerto de entrada de alimentación de CA del televisor fuera del rango
anterior.
Sujete la parte aislada del enchufe cuando desconecte el cable de alimentación,
no toque directamente la parte metálica del cable.
Page 82
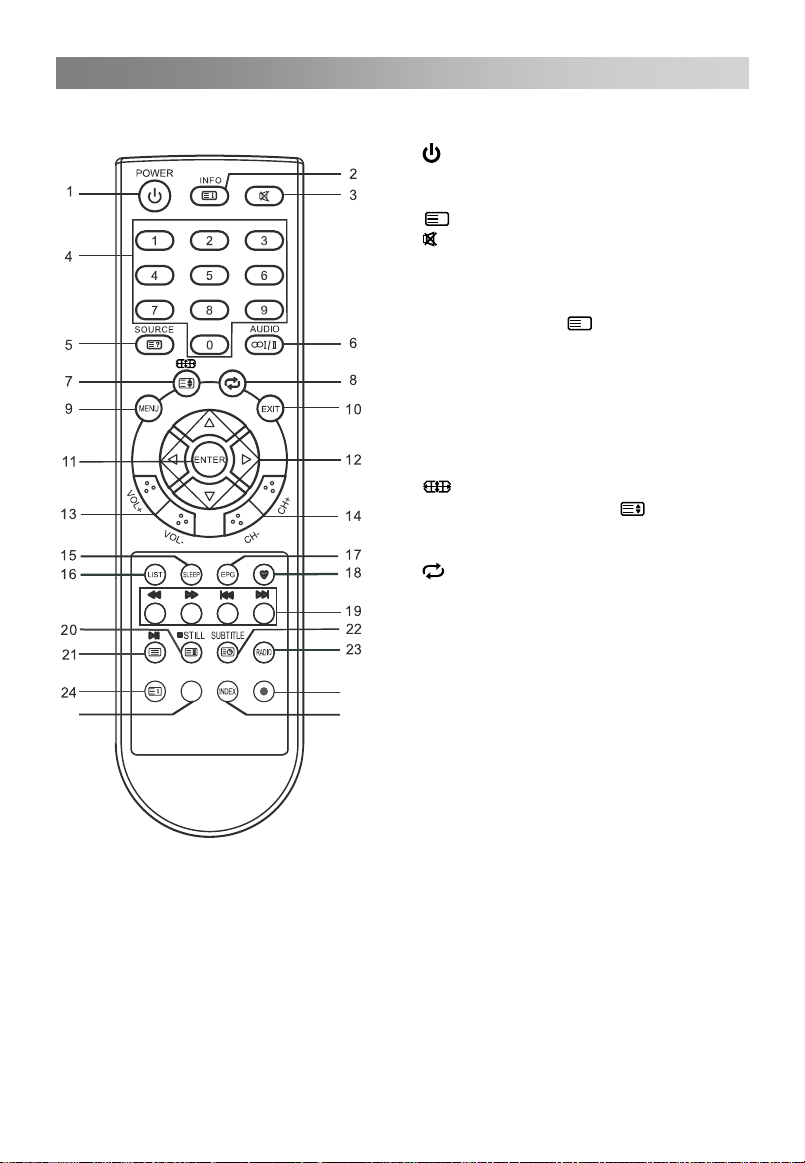
Mando a Distancia
7
Los botones del mando a distancia original son los siguientes:
DMP
2777
25
26
: Encendido, enciende o apaga el TV.
1.
2. INFO:Presione para mostrar
del programa actual en
: Va a la pagina indice.
i
3.
: Presione para quitar o poner sonido.
4. BOTONES DE NUMERO: Elija canals o
ingrese contraseña.
5. FUENTE: Presiones para selecciona
de señal.
fuente
información escondida de algunas
paginas de teletexto.
6. AUDIO (∞I/II): El boton puede se
usado para alternar entre NICAM DUA
I/ NICAM DUAL II/ NICAM DUA
I+II/MONO y poner idioma de audio en
modo DTV.
7.
: Presione para seleccionar distintos
tamaɦos de imagen.
tamaño de pantalla de teletexto en
modo pantalla.
8.
9.
: Vuelve al ultimo programa visto
MENU: Presione para ingresar la
pantalla de menu para varias
configuraciones ajustables.
EXIT: Vuelve a la anterior capa de menu
10.
OSD o sale del Menu OSD.
ENTER: Presione para ejecutar la
11.
seleccion en la pantalla de menu o
ingresar el valor deseado en modo
entrada.
▲/▼/◄/►:
12.
VOL+/VOL-: Presione para subir o bajar
13.
Para seleccionar la
el volumen.
14.
CH+/CH-: Presione para selecciona
canals en orden ascendente o
descendente.
SLEEP: Presione para fijar el tiempo de
15.
reposo. Cuando el tiempo prefijado ha
pasado, el TV entra en modo espera.
16.
LIST: Presione par aver la lista de
canales. Presione de Nuevo para salir.
EPG: Guia de Programa Electronico, se
17.
usaenmodoDTV.
pantalla.
?
: Revela
informacion
r
r
L
L
: Cambia
direccion.
r
Page 83

Mando a Distancia
8
DMP
2777
: Activa/desactiva lista de programas
18.
favoritos.
19. BOTONES DE COLOR: Teclas de
navegación Rojo/verde/ amarillo/azul.
: Retroceso rapido (en modo DMP).
: Avance rapido (en modo DMP).
: Anterior (en modo DMP).
: Siguiente (en modo DMP).
20. STILL: Presione para detener la
imagen.
: Pone en pantalla la pagina de
teletexto, presionar otra vez para
liberar.
: Detener (en modo DMP/PVR).
21.
: Ingresa el Teletexto, presione de
Nuevo para modo MIX presione de
nuevo para salir.
: Reproducir/ Pausa (en modo
DMP/PVR).
22.
: Ingresa modo o pagina de
subtitulos.
RADIO: Presione para
23.
intercambiarprogramas de Radio y DTV
cuando hay programa de Radio (En
modo DTV).
25
26
24.
: Cancela el teletexto pero no sale
del teletexto, presionar de nuevo para
salir.
25.
: Presionar boton para empezar a
grabar. Grabacion en uso.
(En modo PVR).
26.
INDEX: Presione para ingresar la lista
grabada. (En modo PVR) Cambie la
lista por TIMER o CHANNEL. (En el
menu GUIA DE PROGRAMA)
DMP: Presionar para cambiar a fuente
27.
DMP.
NOTA:
Todas las imágenes de este manual son ejemplos, sólo como referencia, el
producto real puede diferir de las imágenes.
Los botones no mencionados aquí no se utilizan.
Page 84

Operación Básica
9
GUÍA DE INICIO RÁPIDO
• Conexión
1. Conexión de la red eléctrica y la antena.
2. Si el TV tiene un interruptor de alimentación, enciéndalo primero. A continuación,
pulse el botón de encendido del mando a distancia para encender el televisor.
• Configuración Inicial
Cuando el televisor se enciende por primera vez (o sin canales preestablecidos), una
secuencia de instrucciones en pantalla le ayudará a configurar los ajustes básicos.
1. Seleccione el idioma OSD (On Screen Display) deseado.
Pulse el botón▲/▼/◄/►luego presione el
2. Seleccione el país apropiado.
Pulse ▲/▼/◄/►para seleccionar país, luego pulse el botón ENTER para
sintonización
automática
botón ENTER.
Page 85
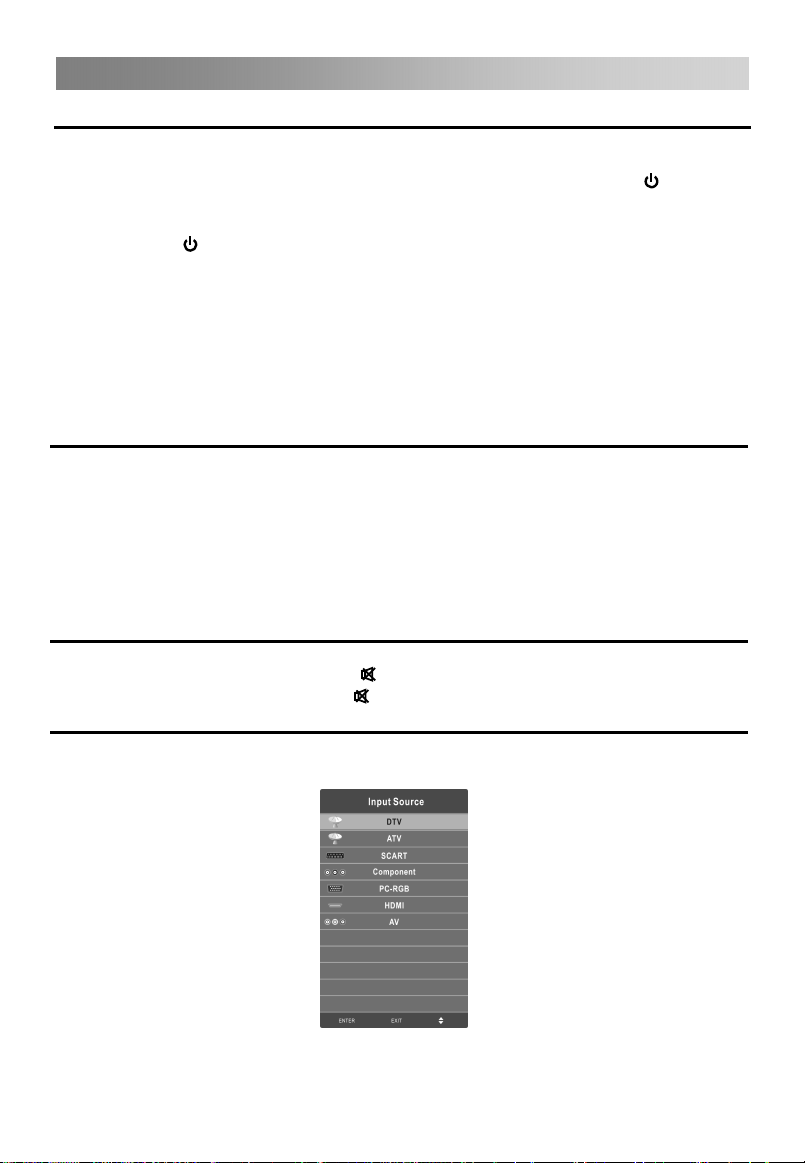
Operación Básica
10
Encender y apagar el televisor
• Encender el televisor
Conecte el cable de entrada de CA y encienda el interruptor de encendido del televisor.
En este momento el televisor entra en modo de espera. Pulsar el botón del mando
a distancia puede a su vez encender el TV desde el modo de espera.
• Apagar el televisor
Pulse el botón del mando a distancia para entrar en modo de espera.
No deje su equipo en modo de espera durante largos períodos de tiempo. Es mejor
desconectar el aparato de la electricidad y de la antena aérea.
• No hay señal
No hay un menú de señal en la pantalla cuando no hay señal de entrada. En el modo
TV / DTV, si no hay señal en cinco minutos, el televisor se apagará automáticamente.
En el modo PC-RGB, el televisor se apagará automáticamente en 16 segundos si no
hay señal de entrada. Cuando el cable VGA está conectado, el televisor se enciende
automáticamente.
Selección de Programas
• Uso de los botones CH + / CH- en el panel de la TV o del mando a distancia.
Presione CH + para aumentar el número de canal.
Presione CH - para disminuir el número de canal.
• Uso de botones digitales 0-9.
Puede seleccionar el número de canal presionando 0-9. (En el TV, el modo DTV)
• Ejemplo
Para seleccionar - canal (por ejemplo, Canal 5): Presione 5.
Para seleccionar -- canal (por ejemplo, Canal 20): Pulse 2 y 0 en poco tiempo.
Ajuste del volumen
• Pulse el botón VOL+/- para ajustar el volumen.
• Si desea apagar el sonido, presione
• Puede liberar el mudo presionando
Cambio de la fuente de entrada
Puede seleccionar la fuente de entrada pulsando SOURCE del mando a distancia.
Pulse ▲/▼para desplazarse por la fuente de entrada, y pulse ENTER para confirmar
su elección.
.
o aumente/disminuya el volumen.
NOTA:
• La foto es solo para referencia. Por favor, operar con el menú OSD de televisión
concreto y consulte la tarjeta de terminal AV.
Page 86
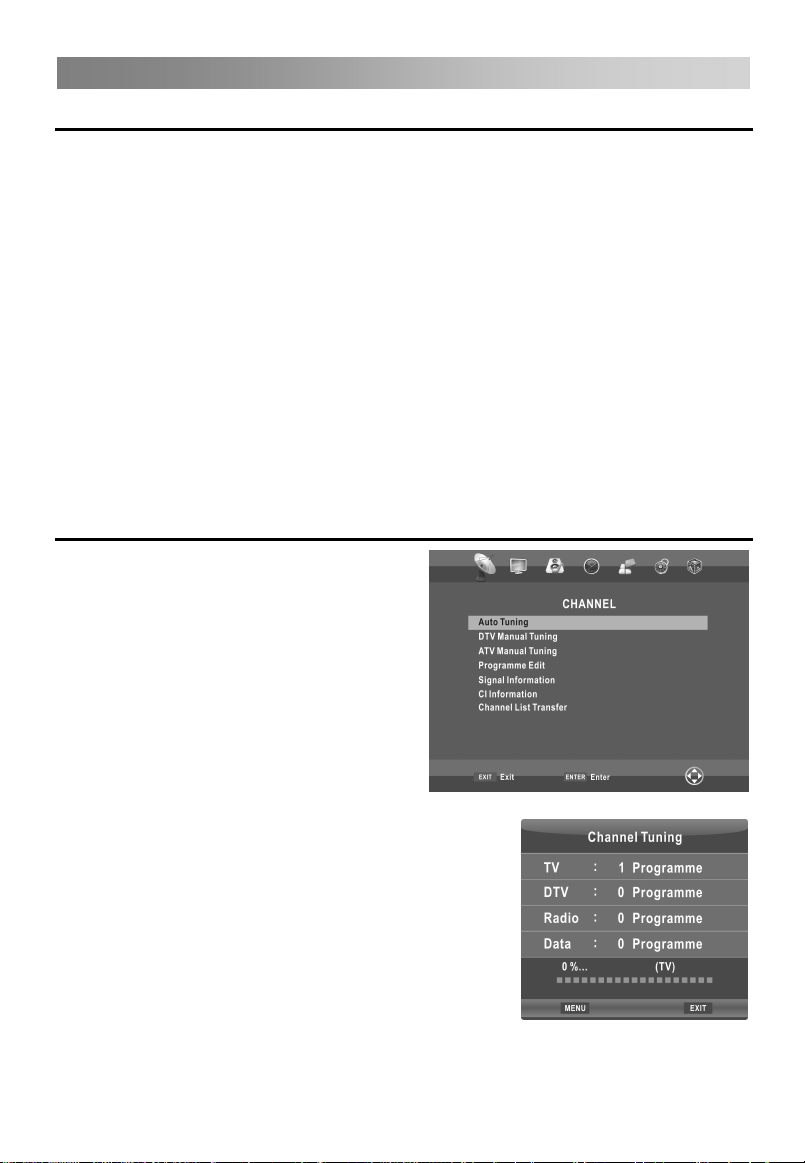
Operación de Menú
11
Cómo desplazarse por los menús
Antes de usar el televisor siga los siguientes pasos para aprender a navegar por el
menú con el fin de seleccionar y ajustar las diferentes funciones. El paso de acceso
puede variar según el menú seleccionado.
1. Pulse el botón MENU para visualizar el menú principal.
2. Pulse el botón ◄/►para desplazarse por el menú principal.
3. Pulse el botón ▲/▼para seleccionar el sub elemento deseado.
4. Pulse el botón ENTER para acceder al submenú..
5. Pulse el botón ▲/▼/◄/► para seleccionar el valor deseado. El ajuste en el OSD
puede variar según el menú seleccionado
6. Pulse el botón MENU para volver al menú anterior.
7. Pulse el botón EXIT para salir del menú.
NOTA:
Cuando un elemento de menú se muestra gris, significa que el elemento no está
disponible o no se puede ajustar.
Los botones del TV tienen la misma función que los botones correspondientes del
mando a distancia. Si el mando a distancia se pierde o no puede trabajar, puede
utilizar los botones del televisor para seleccionar los menús. Este manual se
centra en el funcionamiento del mando a distancia.
Configuración del menú Canal
• Sintonización Automática
Seleccione el botón ENTER para iniciar la
sintonización automática.
1. Seleccione el país y tipo de
sintonización de canales.
2. El televisor empezará a memorizar
todos los canales disponibles.
Una vez que la barra de progreso se llene, los canales
encontrados serán almacenados y la unidad procederá
a la búsqueda de TV, DTV, radio y datos.
Si pulsa el botón MENU en búsqueda de TV, la sintonía
automática saltará a la búsqueda de DTV como
muestra la imagen siguiente.
Page 87
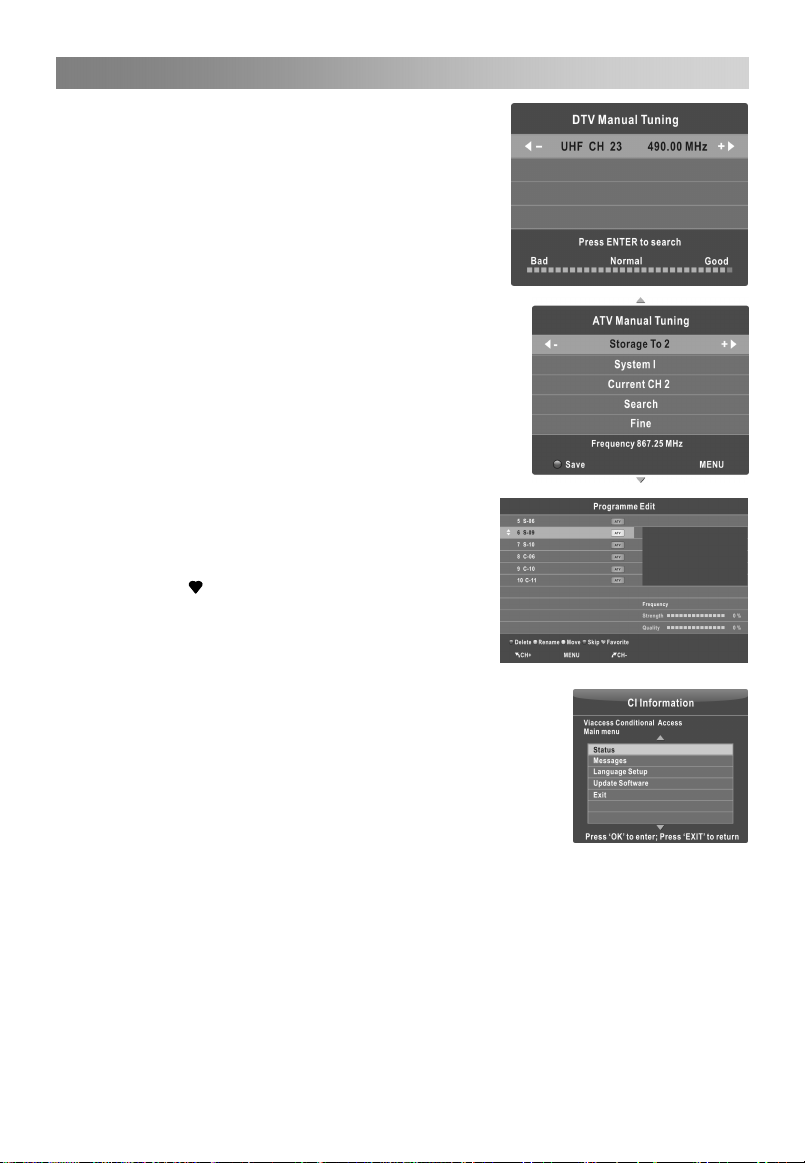
Operación de Menú
12
• Sintonización Manual TDT
Almacenamiento manual para canales digitales.
Pulse el botón ◄/►para seleccionar el canal.
Pulse el botón ENTER para búsqueda.
Cuando se encuentre un canal, el proceso de
búsqueda se detendrá, el canal será guardado con el
número de canal actual.
Si el programa no es el esperado, pulse el botón
◄/►para continuar la búsqueda.
Pulse el botón EXIT para salir.
•
Sintonizacion Manual Analógica
Almacenamiento manual para canales de ATV.
Pulse el botón ▲/▼ para seleccionar elementos.
Pulse el botón ◄/► para ajustarlo.
Pulse el botón rojo para guardarlo.
Pulse el botón EXIT para salir.
•
Edición de Programas
Pulse el botón ▲/▼ para seleccionar elementos .
Pulse el botón rojo para borrar el cana.
Pulse el botón verde para renombrar el canal (en
modo TV)
Pulse el botón amarillo para mover el canal
(Excepto canales DTV con LCN)
Pulse el botón azul para saltar el canal.
Pulse el botón
El botón CH+/CH- puede ser utilizado para
seleccionar la página siguiente o anterior.
• Información de Señal (En el modo DTV)
Muestra la información de señal actual.
• Información CI (en modo DTV)
Esta función te permitirá ver algunos servicios cifrados
(servicios de pago).
Por favor, introduzca la tarjeta CI en la ranura PCMCIA de
acuerdo con la flecha en la tarjeta CI.
NOTA:
La función sólo se puede conseguir cuando se dispone
de ranura de CI.
Este OSD es sólo para ilustración y las opciones de menú y formato de pantalla
puede variar según el proveedor de servicios de pago digital.
Es posible para usted cambiar pantalla de menú CI (Common Interface) y el
servicio consultando a su distribuidor.
Por favor no insertar o extraer la tarjeta CI cuando esté encendida.
No inserte ni extraiga la tarjeta CI con frecuencia a fin de evitar daños al TV y a la
tarjeta CI.
Durante la inicialización de la tarjeta CI, no opere el televisor.
•
Transferir lista de canales
Puede exportar toda la información actual sobre el canal (incluyendo el número de
canal, el nombre del canal, la frecuencia, etc) en el disco U, como copia de seguridad
de la información del canal para esta unidad.
El sistema creará de manera automática un archivo
para fijar el canal favorito.
de datos para guardar la
Page 88
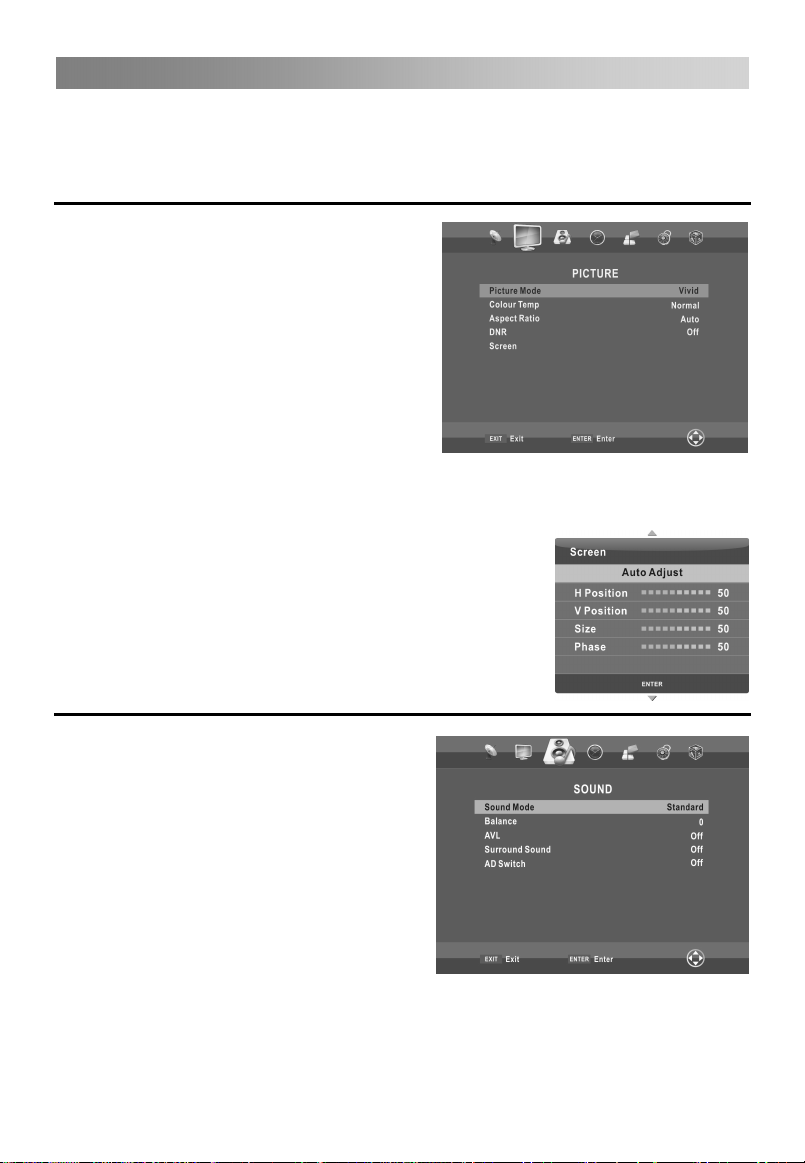
Operación de Menú
13
información de canal exportada.
Si no puede restaurar la información sobre el canal iniciar tras CLASIFICAR, MOVER,
BORRAR,
el USB.
Configuración del menú Imagen
• Modo Imagen
Puede seleccionar el tipo de imagen que
mejor cumpla sus requisitos de visualización.
Contraste, brillo, saturación, nitidez y tinte
(NTSC) se pueden ajustar cuando el modo
de imagen está ajustado a Usuario. El modo
recomendado por el fabricante es VIVID.
• Temp. de Color
Selecciona temperatura de color de imagen.
• Ratio de aspecto
Puede seleccionar el tamaño de la imagen
que mejor corresponde a sus requisitos de
visualización.
• DNR
Reduce el ruido de la pantalla sin comprometer la calidad de vídeo.
• Pantalla (En en modo PC- RGB)
Ajustar Auto: Ajusta la imagen automáticamente.
Posición H: Centra imagen moviendo a izquierda o derecha.
Posición V: Centra imagen moviendo arriba o abajo.
Tamaño: Ajusta el tamaño de la pantalla.
Fase: Ajusta cuando los caracteres tienen poco contraste o
cuando la imagen parpadea.
Configuración del menú de sonido
• Modo De So.
Puede seleccionar modo de sonido según
sus preferencias personales. Graves y
agudos se pueden ajustar cuando el modo
de sonido se establece en Usuario.
• Balance
Puede ajustar el balance de sonido de los
altavoces a los niveles de preferencia.
• AVL (nivel automático de volumen)
AVL automáticamente permanece en el
mismo nivel de volumen si cambia de
programas. Debido a que cada emisora tiene
sus propias condiciones de señal, el ajuste
de volumen puede ser necesario cada vez que se cambia de canal. Esta característica
permite a los usuarios disfrutar de niveles de volumen estables haciendo ajustes
automáticos para cada programa.
• Surround Sound
Usted puede seleccionar un modo de sonido envolvente deseado.
SALTAR, BLOQUEAR, etc, puede importar la
información del canal desde
Page 89
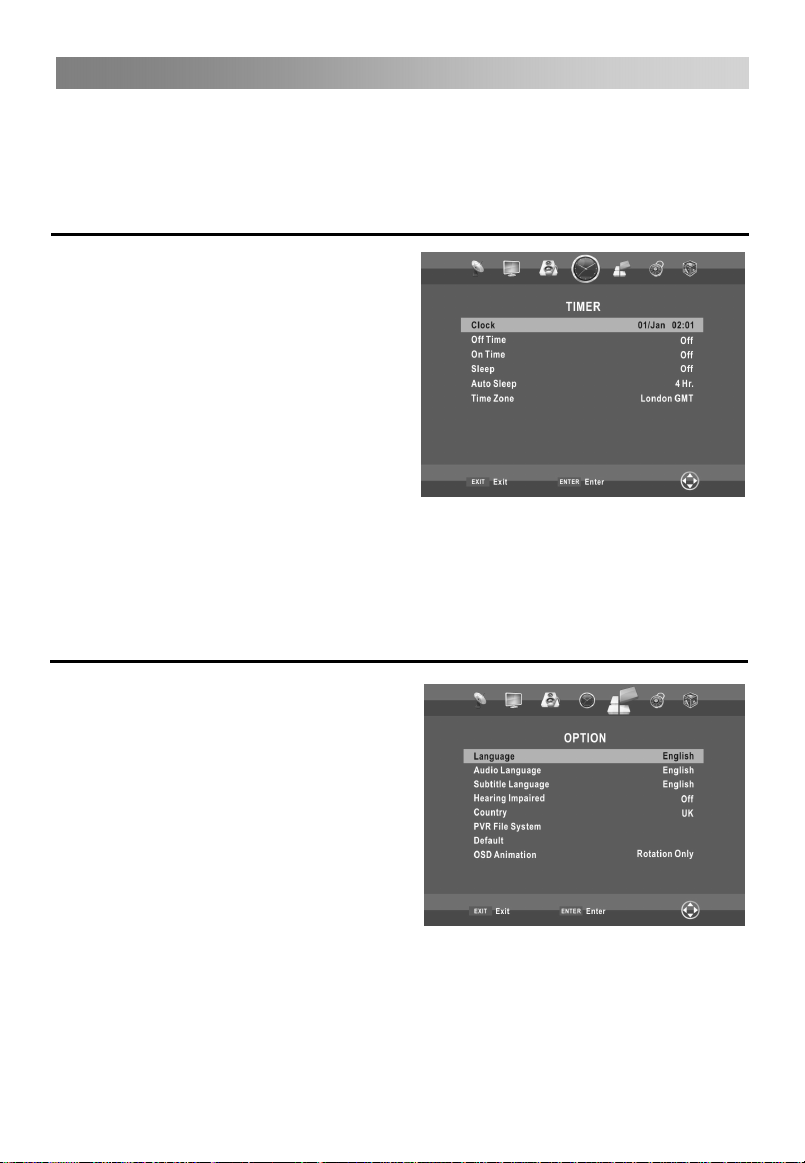
Operación de Menú
14
• AD Switch (En el modo DTV)
Esta es una función auxiliar de audio que proporciona una pista adicional de audio para
personas con problemas visuales. Esta función se encarga de la secuencia de audio
para el AD (Audiodescripción), se envía con el audio principal de la emisora. Los
usuarios pueden Activar o Desactivar audio descripción y controlar volumen.
Configuración del menú de HORA
• Reloj
Usted puede mostrar Hora de Señal DTV o
establecer la hora del sistema.
• Hora de Apagado
Fija la hora de apagado del televisor.
• Hora de Encendido
El televisor debe estar en modo de espera
para que funcione la hora de encendido.
• Temporizador
Fija la hora para poner el televisor en modo
de espera automáticamente.
• Reposo automático
Seleccione la hora de reposo automático
que desee.
El televisor entrará en modo de espera automáticamente cuando no hay ninguna
operación en el tiempo (el tiempo establecido es de 4 horas, de fábrica).
• Zona horaria
Seleccione su zona horaria.
Configuración del menú de OPCIÓN
• Idioma
Seleccione su idioma de pantalla preferido.
• Idioma de Audio
Seleccione idioma de audio preferido.
(Disponible para canales digitales, si se
transmiten múltiples idiomas de audio.)
• Idioma de subtítulo
Seleccione su idioma preferido para
subtítulos o desactive subtítulos. (Disponible
para canales digitales, si transmiten varios
idiomas de subtítulos.)
• Deficiencias Auditivas
Cuando la discapacidad auditiva está
activada, la pantalla del televisor le dará alguna información a las personas cuya
audición está deteriorada. Cuando Discapacidad Auditiva está desactivada, la
información se oculta.
• Selección de país
Muestra el país actual.
Page 90

15
Operación de Menú
• Sistema de archivos PRV(En el modo DTV)
Seleccionar Disco: Selecciona disco de PVR.
Comprueba disco y velocidad del sistema.
Disco USB: USB activado o no.
Formato: Formateo de disco USB.
Capacidad de Cambio de Tiempo: Seleccione la
hora para hacer Cambio de Tiempo.
Velocidad: Muestra velocidad del dispositivo de
almacenamiento.
Límite libre de grabación: Selecciona la duración
de la grabación.
Grabación de programas digitales
Inserte un disco U, el sistema creará automáticamente una carpeta (_MSTPVR) para
almacenar el archivo que ha sido grabado.
La grabación comienza cuando se pulsa el botón y graba todo el tiempo hasta que
el botón es presionado o la memoria está llena. Durante la grabación, pulse el botón
para acercar/alejar el menú de grabación.
▲/▼
Función de reproducción
Presione el botón
▲/▼ para
el menú Reproducción.
Lista de grabación
Pulse el botón INDEX para mostrar la lista de Grabación.
Pulse el botón ▲/▼ para seleccionar elementos, luego presione el botón ENTER para
reproducir.
Pulse el botón rojo para borrar el programa.
Pulse el botón verde para mostrar la información de programa.
Pulse el botón INDEX para ordenar programas.
Presione el botón EXIT para salir.
NOTA:
Disco USB con capacidad de al menos 512MB.
Formatee el disco USB insertado cuando no se pueda grabar.
Durante el formateo del Dispositivo, no lo desconecte mientras está formateando.
Si formatea el dispositivo, todos los archivos serán borrados. Antes de formatear
su dispositivo en el TV, respalde sus archivos para evitar daño o pérdida de datos.
Si el disco USB contiene algún virus el formato falla.
Si el uso contiene muchos discos duros que dividen el área, en el Sistema de
Archivos PVR el menú elegirá PVR en respuesta a la señal de disco.
Si el sistema de grabación PVR se usa todo el tiempo, saldrá del sistema PVR
automáticamente.
La memoria USB debe soportar la especificación USB2.0 de alta velocidad.
Ciertos dispositivos USB no estándares pueden no ser soportados.
• Predeterminados
Restaura las configuraciones del sistema a los valores de fábrica.
• OSD
Selecciona el estilo para mostrar menús.
• E-POP
Activa o desactiva el Demo de Tienda.
El modo Demo de Tienda es la configuración óptima para ambientes de tienda. Si un
usuario modifica los datos de calidad de imagen, el modo Demo de Tienda inicializa el
producto a la calidad de imagen fijada por nosotros luego de un cierto tiempo.
ampliar/alejar el menú de Reproducción. Encontrará
para activar la Reproducción
PVR: Comprobar Sistema de Archivo
mientras graba. Presione el botón
las funciones utilizando
Page 91
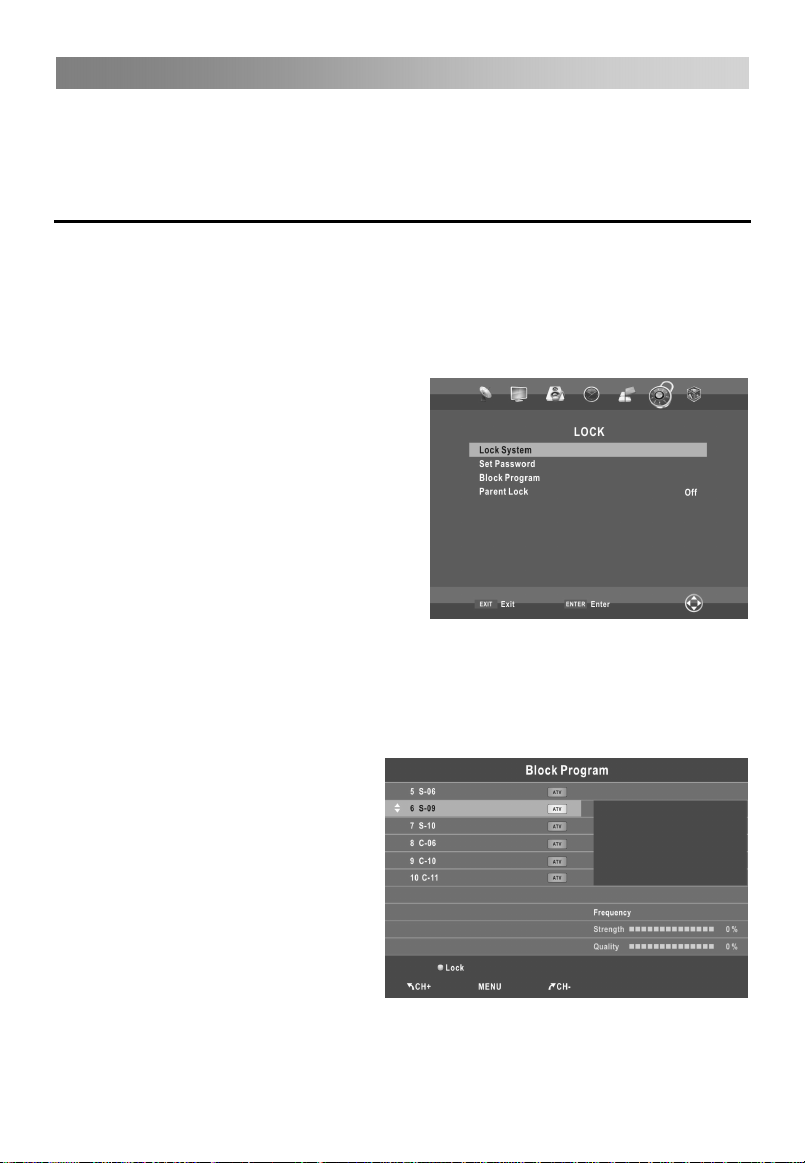
16
Operación de Menú
Consejos de salud
•
Enciende y apaga el Recordatorio para la Salud.
Cuando el Tiempo de Descanso está encendido, una imagen le recordará que se tome
un descanso cada dos horas.
Configurando el Menú BLOQUEAR
• Bloquear Sistema
La función puede evitar la operación no autorizada del televisor, a menos que
introduzca la contraseña de 4 dígitos. Cuando el bloqueo del sistema está encendido y
el sistema está bloqueado, se debe introducir la contraseña del sistema en
Sintonización Automática, Sintonización Manual, Edición de Programa o por
omisión. Pulse los botones de número adecuados para la contraseña.
La contraseña por omisión es 0000.
NOTA:
Luego que una contraseña ha sido
confirmada, recuerde ingresarla en el
menú Guía Paterna, las funciones no
pueden ser activadas hasta que se
ingrese la contraseña correcta. Si la
olvida, la supercontraseña 1225 es aún
válida.
● Establecer Contraseña
Puede fijar su contraseña privada. Pulse los
botones de número en el mando a distancia
para fijar la nueva contraseña. Cuando la nueva contraseña ha sido ingresada dos
veces, la configuración termina con éxito. El TV volverá al menú anterior.
● Bloquear Canal (En modo
TV/DTV)
Pulse el botón verde LOCK para
bloquear el programa disponible que
desee. Pulse el botón verde de nuevo
para desbloquearlo.
● Guía Paterna (En modo DTV)
Esta característica puede evitar que niños vean programas de TV para adultos, de
acuerdo con la clasificación. Esta función aparece de acuerdo con la información de la
emisora. Por lo tanto si la señal tiene información incorrecta, esta función no opera.
Page 92

Operación de Menú
17
Usando modo DMP
● Para entrar/salir de modo DMP
1. Conectar un dispositivo USB.
2. Presionar el botón MENU para
mostrar el menú principal. Presionar
el botón ◄/► para seleccionar el
menú de Aplicaciones.
3. Pulse el botón ENTER para entrar en
modo DMP.
4.Presione el botón EXIT para salir.
NOTA:
Dispositivos USB especiales pueden
no ser soportados.
Carga máx. USB: DC5V 500mA
• Formatos soportados
La función DMP puede soportar el dispositivo USB con memoria USB.
Puede reproducir archivos de IMAGEN, MÚSICA, PELÍCULA o TEXTO.
Soporta formatos de Imagen: JPEG, BMP, PNG.
Soporte formatos de Música: MP3, AAC.
Soporta formatos de Película: AVI, VOB, DAT, MPG, TS/TP
Soporta formato de texto: TXT.
NOTA:
Documentos con algoritmos especiales pueden no ser soportados por el USB.
soportado, cámbielo al formato dado.
El USB soporta el formato mencionado arriba. Si el formato de archivo no es
.
• Interfaz Operativa principal
Page 93

Operación de Menú
18
1. Use el botón ◄/► para seleccionar IMAGEN, MÚSICA, PELÍCULA o TEXTO.
Presione el botón ENTER para entrar en este sub-menú.
2. Use los botones de flecha y el botón ENTER para ingresar el disco deseado
Presione ENTER para abrir la carpeta.
3. Use los botones de flecha para resaltar el archivo. Use el botón ENTER para
marcar o desmarcar un archivo. Presione el botón
seleccionados. Si no se marca un archivo, todos los archivos en la carpeta serán
reproducidos en secuencia luego de presionar el botón .
4. Pulse el botón INFO para mostrar la pantalla de menú en reproducción.
5. Pulse el botón para detener la reproducción de archivos.
6. Pulse el botón EXIT para volver a la pantalla de menú anterior.
● Operación básica
1. Reproducción/ Pausa
Empieza a reproducir o pausar el archivo seleccionado de una carpeta.
2. Detener
Detiene la reproducción de archivos.
3. /
Retroceso Rápido/Avance Rápido
Puede presionar / para saltar en reversa o avance rápido.
4. /
Anterior/Siguiente
Puede seleccionar manualmente los archivos deseados en condición normal.
5.Botón rojo
Seleccione un archivo que desee borrar, presione el botón rojo para abrir el menú
correspondiente, luego presione el botón ENTER para borrarlo.
6.CH+/CHAvanza o retrocede páginas de archivos.
para reproducir los archivos
Page 94

Operación de Menú
19
MHEG5
MHEG 5 (MultiMedia y Hypermedia Información codificada por Grupo de Experto)
es conectado con la
en el MHEG5, subtítulo
Pulse el botón rojo o el botón de para entrar en el menú MHEG5.
utilizar el televisor con la información sugerente. Pulse el
para salir del menú MHEG5.
Página de inicio:
operación y función como un reproductor de media Si quiereentrar
debe ser objeto de
compensación.
botón EXIT o el botón de
Puede
Después de introducir el elemento seleccionado, puede ver el menú principal como:
Seleccione el elemento principal que desee, puede ver más detalles particulares.
Page 95

Botones Unicos Importantes
20
GUÍA DE PROGRAMA (En el modo DTV)
Pulse el botón EPG para mostrar el menú Guía de programas. Esta función le permite
conocer la información detallada del canal, lo que indica la hora del programa. De la
Guía del Programa, es posible comprobar la información del programa para los
próximos ocho días (Si la información está disponible en el organismo de radiodifusión).
Pulse el botón EXIT para salir.
Grabar: Presione el botón rojo para establecer
los parámetros para la grabación. La unidad es
capaz de hacer la programación de grabación
cuando el televisor está encendido o en modo de
espera. Puede configurar la programación de
varias grabaciones. Diferentes programaciones
no deben solaparse. Cuando se inicia la
grabación en modo de espera, los indicadores
frontales cambiarán de color y no habrá ninguna
imagen o sonido de la unidad. Puede apretar el
botón
INFO: Presione el botón verde para ver la
información detallada del canal actual.
Programación
Recordar: Si usted encuentra el programa deseado que se mostrará en el futuro.
Pulse el botón azul para programarlo.
INDEX: Cambio de la lista de TEMPORIZADOR o CANAL.
ENTER: Pulse para cambiar de canal.
LISTA DE CANALES
Presione LIST para visualizar la lista de
canales.
Presione ▲/▼ para seleccionar los
elementos, y los canales cambiarán
automáticamente.
Presione CH+/CH- para subir o bajaren la
lista de canales.
Presione LIST para salir.
Lista de Favoritos
Pulse para mostrar la lista de favoritos.
Presione ▲/▼ para seleccionar los
elementos, y los canales se cambiará
automáticamente.
Presione CH+/CH- para arriba o abajo en
la lista Favoritos.
Pulse
para iluminar la pantalla.
:
Presione amarillo para visualizar la
para salir.
LISTA DE CALENDARIO.
Page 96

Teletexto
21
Usando la función de teletexto
• Visualización del teletexto
1. Seleccione una estación de televisión con una señal de teletexto.
2. Pulse el botón
3. Pulse el botón
permite superponer la página de teletexto en el programa de televisión.
4. Pulse el botón por tercera vez para volver o salir a la TV normal / modo DTV.
• Selección de página
1. Introducir el número de página (tres dígitos) utilizando los botones numéricos. Si
pulsa un número equivocado durante la entrada, debe completar el número de
tres dígitos y, volver a introducir el número de página correcto.
2.El botón CH-/CH+ se puede utilizar para seleccionar la página anterior o
siguiente.
• Espera
Usted puede pulsar el botón
página.
la
• Índice
Pulse el botón
• Ampliación de Texto
Cuando una página se muestra, puede duplicar el tamaño del texto para hacerlo más
fácil de leer.
1. Pulse el botón
2. Pulse el botón
3. Pulse el botón
• Modo Revelar
Puede mostrar información de teletexto oculta (por ejemplo, Respuesta a crucigramas
o acertijos, etc.) pulsando el botón
información de la pantalla.
• Subpágina
Algunos teletextos pueden contener varias sub-páginas que están automáticamente
paginadas en un ciclo determinado por el canal de televisión.
1. Puede entrar en una sub página determinada pulsando el botón
seleccionando directamente el número de página con los botones numéricos.
Introduzca el número de sub-página (por ejemplo, 0003) para la tercera
sub-página.
2. Pulse el botón otra vez para salir del modo de sub-página.
3. Pulse el botón
• Para volver al modo normal de TV
Presione estos botones para acceder directamente a las páginas de color
correspondiente aparece en la parte inferior de la pantalla del teletexto.
para entrar en el modo de teletexto.
otra vez para entrar en el modo de mezcla, esta función le
congelar una página, y pulse de nuevo para liberar
i
para entrar en la página de índice principal directamente.
para ampliar la mitad superior de la página.
otra vez para ampliar la mitad inferior de la página.
una vez más para volver a la pantalla normal.
?
. Pulse el botón ? otra vez para quitar la
para volver al modo normal de TV.
y
Page 97

Guía de Resolución de Problemas
22
Resolución de Problemas
Antes de contactar al servicio técnico, realice las comprobaciones siguientes. Si algún
problema todavía persiste, desconecte el televisor y llame al servicio técnico.
PROBLEMA POSIBLE SOLUcION
-Compruebe si el enchufe está conectado a una toma de pared.
No hay sonido o
imagen
Imagen normal
pero sin sonido
El mando a
distancia no
funciona
Se apaga
repentinamente
La imagen tarda
en aparecer de inicio del producto. Póngase en contacto con su centro de
luego de
encender
Imagen sin color
o con color
pobre
Barras verticals
u horizontals o
imagen que
tiembla.
Mala recepción
en algunos
canales
Líneas o rayas
en la imagen
No hay salida en
uno de los
altavoces
-Compruebe si ha pulsado el botón POWER en el frente del
televisor.
-Compruebe el ajuste de contraste y brillo de la imagen.
-Compruebe el volumen.
-No hay sonido? Pulse el botón MUTE.
-Pruebe con otro canal, el problema puede estar en la emisión.
-Están los cables de audio instalados apropiadamente?
-Compruebe si hay algún objeto entre el producto y el control
remoto causando obstrucción.
-Están las baterías instaladas con la polaridad correcta?
-El modo de operación a distancia es correcto: TV, VCR, etc?
-Instale pilas nuevas
-Está el temporizador de reposo puesto?
-Compruebe los ajustes de control de potencia. Alimentación
interrumpida.
-No hay transmisión en la estación sintonizada con auto
activado.
-Esto es normal, la imagen está en silencio durante el proceso
servicio, si la imagen no ha aparecido después de cinco
minutos.
-Ajuste el color en el menú.
-Mantenga una distancia suficiente entre el producto y el VCR.
-Pruebe con otro canal, el problema puede estar en la emisión.
-Están los cables de vídeo instalados apropiadamente?
-Activar cualquier función para restaurar el brillo de la imagen.
-Verifique si hay interferencia local, como un electrodoméstico
o herramienta eléctrica.
-Estación o producto de de cable con problemas. Sintonice otra
estación.
-Señal de la estación es débil, reorientar la antena para recibir
la estación más débil.
-Compruebe si hay posibles fuentes de interferencia.
-Compruebe la antena (Cambiar la orientación de la antena).
-Ajuste el balance en la opción del menú.
Page 98
Guía de Resolución de Problemas
23
NOTA: Hay un problema en modo VGA (Sólo se aplica modo VGA).
PROBLEM POSSIBLE SOLUTION
-Ajuste resolución, frecuencia horizontal o frecuencia
La señal está fuera de
rango
Barra o banda vertical
en el fondo y ruido
horizontal y posición
incorrecta
Screen color is unstable
or single color.
Mantenimiento
Los fallos tempranos se pueden prevenir. Una limpieza cuidadosa y regular puede
aumentar la cantidad de tiempo que tendrá su nuevo televisor. Asegúrese de apagar el
monitor y desconectar el cable de alimentación antes de comenzar cualquier operación
de limpieza.
Limpieza de la pantalla
1. Aquí hay una gran manera de mantener el polvo fuera de la pantalla por un
tiempo. Moje un paño suave en una mezcla de agua tibia y un poco de suavizante
o detergente para lavar la vajilla. Exprima el paño hasta que esté casi seco, y
luego úselo para limpiar la pantalla.
2. Asegúrese de que el exceso de agua esté fuera de la pantalla, y luego dejar secar
al aire antes de encender el televisor.
Limpieza del gabinete
Para eliminar la suciedad o el polvo, limpiar el mueble con un paño suave, seco y sin
pelusa. Asegúrese de no utilizar un paño húmedo.
Ausencia prolongada
Si usted espera dejar el televisor inactivo durante mucho tiempo (como durante
las vacaciones), es una buena idea desenchufar el cable de alimentación para
proteger contra posibles daños causados por rayos o subidas de tensión.
Desecho de electrodomésticos
La directiva europea 2002/96/CE sobre Residuos de Aparatos Eléctricos y
Electrónicos (RAEE), requiere que electrodomésticos viejos no puedan ser
arrojados en el curso normal de los desechos sólidos urbanos. Estos aparatos
tienen que ser recogidos selectivamente para optimizar la recuperación y el
reciclado de los materiales que contienen, y reducir el impacto sobre la salud
humana y el medio ambiente.
El símbolo del "contenedor de basura" tachado en el producto le recuerda de
su obligación, que cuando se deshaga del aparato, debe ser recogido por
separado.
Los consumidores deben contactar con la autoridad local o minorista para
obtener información sobre la correcta eliminación de su electrodoméstico viejo.
vertical.
-Compruebe si el cable de señal está conectado o
suelto.
-Compruebe la fuente de entrada.
-Opere la autoconfiguración o ajuste reloj, fase o
posición H/V.
-Compruebe el cable de señal.
-Reinstale la tarjeta de video del PC.
Page 99

Spis treści
Ostrzeżenie ................................................................................................................ 1
Bezpieczeństwo......................................................................................................... 3
Pierwsze kroki ........................................................................................................... 5
Korzystanie z pilota ................................................................................................. 5
Wkładanie baterii do pilota ...................................................................................... 5
Wymiana baterii....................................................................................................... 5
Podłączenie i ustawienia ..........................................................................................6
Instalacja Kabla....................................................................................................... 6
Pilot............................................................................................................................. 7
Podstawowe cechy.................................................................................................... 9
SZYBKI START....................................................................................................... 9
Włączanie i wyłączanie TV.................................................................................... 10
Wybór programów................................................................................................. 10
Dostosowanie głośności........................................................................................ 10
Zmiana źródła wejściowego .................................................................................. 10
Menu......................................................................................................................... 11
Jak nawigować menu .............................................................................................11
OBRAZ ..................................................................................................................
.....................................................................................................................
GŁOS
CZAS.....................................................................................................................
OPCJA..................................................................................................................
BLOKADA.............................................................................................................
Używanie trybu DMP.............................................................................................
MHEG5 .................................................................................................................
Ważne przyciski.......................................................................................................
PILOT PROGRAMÓW
Lista Kanałów........................................................................................................
Lista ulubiona........................................................................................................
Teletekst................................................................................................................... 21
Korzystanie z funkcji teletekstu .............................................................................21
Rozwiązywanie problemów .................................................................................... 22
Rozwiązywanie problemów ................................................................................... 22
Konserwacja.......................................................................................................... 23
..........................................................................................
PL
11
13
13
14
14
16
17
19
20
20
20
20
Kanał.....................................................................................................................
Page 100

OSTRZEŻENIE
g
yją
1
OSTRZEŻENIE:
W CELU ZMINIMALIZOWANIA RYZYKA PORAŻENIA
ELEKTRYCZNEGO, NIE USUWAJ POKRYWY (LUB TYLNEJ
OSŁONY). NIE ZAWIERA WEWNĄTRZ CZĘŚCI ZDATNYCH DO
UŻYTKU UŻYTKOWNIKA.
ZWRÓĆ SIĘ DO WYKWALIFIKOWANEGO PERSONELU.
Symbol błyskawicy w trójkącie równobocznym ostrzega użytkownika o
obecności wewnątrz obudowy urządzenia "niebezpiecznych napięć",
które mogą spowodować porażenie elektryczne.
Znak wykrzyknika w trójkącie równobocznym informuje użytkownika o
istotnych uwagach i zaleceniach dotyczących obsługi i konserwacji
(obsługi technicznej) zamieszczonych w dokumentacji dostarczonej z
urządzeniem.
INFORMACJE PRAWNE
Niniejsze urządzenie może emitować energię fal radiowych i, jeśli nie jest
zainstalowane i używane zgodnie z instrukcjami, może wywoływać szkodliwe
zakłócenia w komunikacji radiowej. Jednakże, nie ma gwarancji, że zakłócenia nie
pojawią się w określonej instalacji. Jeśli niniejsze urządzenie powoduje szkodliwe
zakłócenia w odbiorze radiowym lub telewizyjnym, co można stwierdzić, włączając i
wyłączając sprzęt, użytkownik może spróbować poprawić zakłócenia na jeden z niżej
wymienionych sposobów:
-Zmienić umiejscowienie anteny odbiorczej.
-Zwiększyć przestrzeń pomiędzy sprzętem, a odbiornikiem.
-Podłączyć sprzęt do otworu w obwodzie innym niż ten, do którego podłączony jest
odbiornik.
-Skonsultować się ze sprzedawcą lub doświadczonym technikiem
radiowo-telewizyjnym w celu uzyskania pomocy.
Jakiekolwiek zmiany lub modyfikacje nie zatwierdzone przez firmę odpowiedzialną za
zgodność mogą unieważnić użytkownikowi pozwolenie na używanie tego urządzenia.
UWAGA
NIE próbuj modyfikować tego produktu w żaden sposób bez pisemnego zezwolenia
od dostawcy. Nieautoryzowane modyfikacje mogą unieważnić użytkownikowi
pozwolenie na używanie tego urządzenia.
Nie polecamy utrzymywać nieruchomego obrazu wyświetlanego na ekranie przez
i okres czasu, jak również wyświetlania w
dłu
UWAGA
NIEBEZPIECZEŃSTWO
PORAŻENIA ELEKTRYCZNEGO
NIE OTWIERAĆ
tkowo jasnych obrazów na ekranie.
 Loading...