

Page 1
Page 2
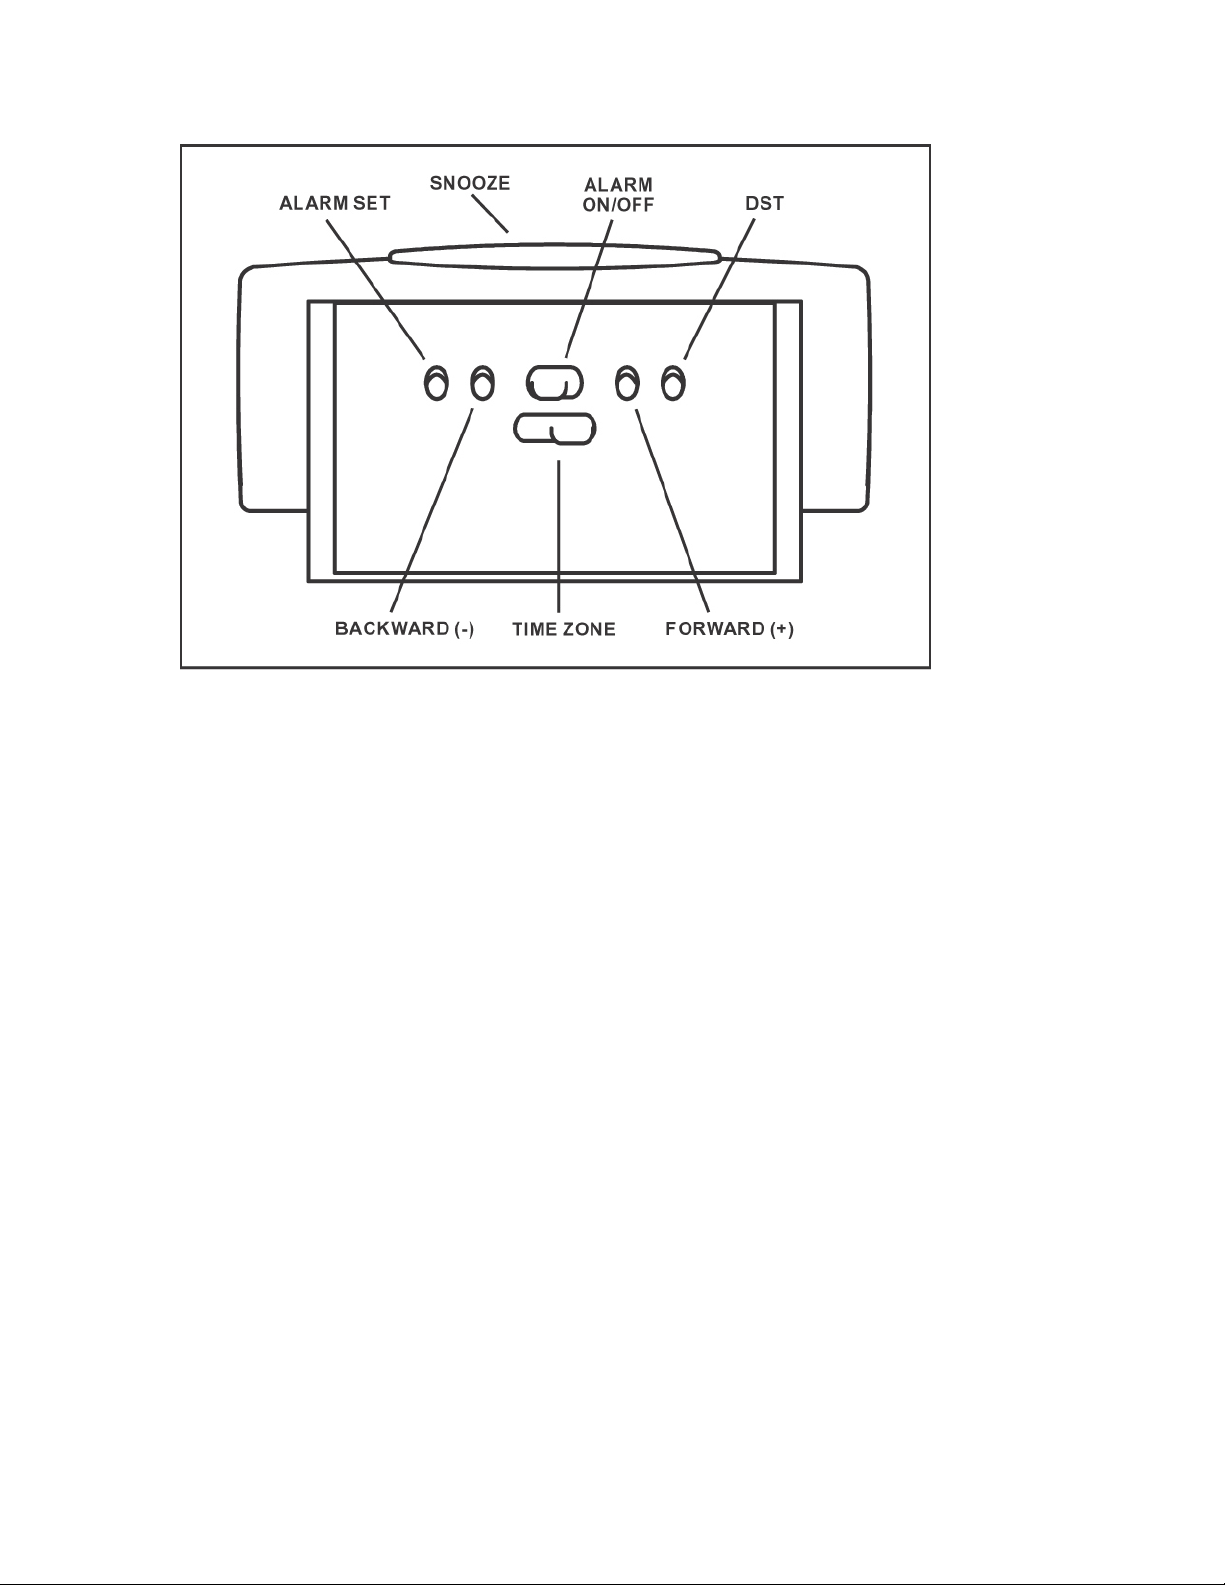
Features
Congratulations on your purchase of an Acu-Rite Set and Forget alarm clock, the first
alarm clock to automatically display the time as soon as it is plugged in. The clock will
show the correct time in the Eastern Time Zone (default). Simply slide the switch to your
time zone and the time will adjust to your correct local time.
To Set DST (Daylight Savings Time)
To set the DST (On/Off), press the DST button once, and then press the (+) or (-) button
to turn the DST function on or off, if the display shows (doN) it means DST is on and
(doF) means DST is off. After turning on the DST function the first time, DST will be
updated automatically. This allows people living in areas that do not observe DST to set
their clock to the correct time quickly & easily.
DST starts: First Sunday in April at 2am.
DST ends: Last Sunday in October at 2am.
To Set Time Zone
Slide the TIME ZONE switch located on the back of the clock to your local time zone.
To view the time zone status on the display press the DST button twice and a time zone
code number will be shown at the right side of the display. Code number key:
1 = East Standard Time (EST)
2 = Central Standard Time (CST)
3 = Mountain Standard Time (MST)
4 = Pacific Standard Time (PST)
Page 3

To Set the Alarm
To set the alarm time, press the ALARM SET button once. The hour digits will begin to
flash. Press the (+) or (-) button until the correct hour is displayed. Press the ALARM
SET button once again to set the minutes. The minutes digits will begin to flash. Press the
(+) or (-) button as above. Be sure to set the AM/PM time properly or the alarm will
sound at the wrong time.
Snooze
Press the SNOOZE bar and get an extra 10 minutes of sleep. This may be repeated up to
four times.
To Operate Alarm
Slide the ALARM ON/OFF switch located on the back of the clock to the ON position.,
the alarm will sound at the time it is set for. To reset the alarm for the next day,
momentarily press the ALARM SET button. To shut off the alarm completely, slide the
ALARM ON/OFF switch to the OFF position.
To Manually Reset the Time
Some people prefer to set their clock ahead of the correct time. The following will allow
you to do so, if you wish. Should the clock ever lose the correct time, the same procedure
can be followed to set it correctly.
To set the time, press and hold the DST button for 5 seconds. The hour digits will begin
to flash. Press the (+) or (-) button to set the hour. Press the DST button again. The
minutes digits will begin to flash. Press the (+) or (-) button to set the minute. Continue
these steps to set the date and year also.
Backup Battery Replacement
This clock has 4 AG13/LR44 backup batteries installed at the factory. We suggest that
you replace the backup batteries at least every five years. This will allow the correct time
to be kept forever. When the unit is not plugged in, the backup battery will keep the
correct time for 11/2 years without the display showing.
To Read the Date and Year
Press the (+) or (-) button to display time, date, and year alternately. Press the (+) or (-)
button once to show Month & Date, press the (+) or (-) button twice to show Year, for
example, the display reading (y03) means the year is 2003.
Page 4

Page 5

 Loading...