

Page 1
1
RF WIRELESS THERMOMETER INSTRUCTIONS
Congratulation’s on your purchase of the wireless thermometer & clock. Designed and engineered with
state-of-art technology and components, this instrument will provide accurate and reliable measurement
of inside and outside temperatures. Read these instructions carefully to full explore the features and
functions of the new product.
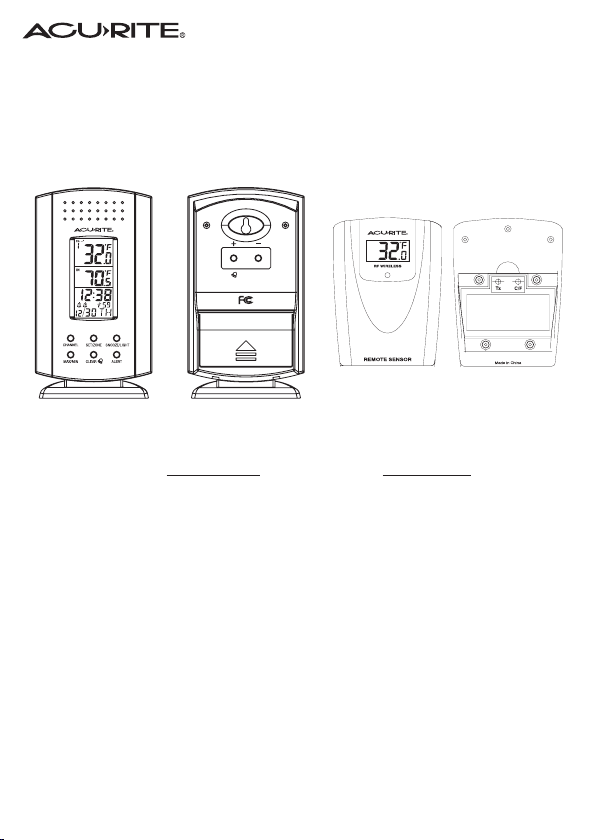
Name and Functions of Buttons:
Press Functions Hold 3 seconds
SET/ZONE Home Time/ World Time Enter clock & calendar settings
UP + 1 step forward Fast advance
Alarm 1& 2 on / off
DOWN - 1 step backward Fast backward
CLEAR/ Clear memory at Max/ Min display Alarm time setting
ALARM Read alarm time 5 sec at normal mode
MAX/ MIN Read maximum/ minimum record 5 sec
ALERT Temp alert on / off Enter temp alert setting
CHANNEL Select Channel 1, 2, 3, auto scroll Delete current channel
SNOOZE/ Trigger snooze alarm,
LIGHT
trigger extended green backlight
Page 2

2
SETTING UP YOUR WIRELESS THERMOMETER / CLOCK
• For the first installation, always insert batteries into the home unit first and then the remote
sensor. Your new RF Thermometer is build with random security code technology; the home unit
will learn the random code of the first remote sensor and log in as Channel 1. Channel 2 and
Channel 3 will be registered in the same way.
• Battery Installation
Home Receiver:
Lift off the battery cover at the back, install 2 AA batteries according to the polarity indicated and
close the battery cover.
Remote Sensor:
This remote comes with a bracket stand that clips onto the back of the unit. This needs to be
removed. Once the bracket stand is removed you will see a square-shaped panel with four
screws (one in each corner). Remove the 4 screws. Remove this cover and underneath is
the battery compartment and the TX and C/F (Celsius / Fahrenheit) setup buttons. Insert 2
AAA batteries according to the polarity indicated. To register the remote and to verify the RF
reception to the home unit press the “TX” button a hold for three seconds. To read the remote in
Fahrenheit press the “C/F” at this time. Replace the cover and tighten the four screws.
Note: The “TX” and the “C/F” are hidden inside the protective backing to ensure weather
resistance of this unit that is intended for the outdoors.
The remote sensors are not “waterproof” meaning able to submerse, but rather water
resistant or weather resistant.
Prolonged exposure to cold weather may cause damage to the LCD panel and in addition
can drain your batteries. Extreme heat can cause your batteries to drain and more
importantly, explode and corrode in the compartment. Battery corrosion will harm the unit.
Although these units are intended for outdoor use, placing them in a protected area will
preserve the life of the unit.
• A registered channel will not accept any new sensors. The registered channels will be erased
when the batteries of the remote sensor or the home unit are removed.
• When replacing batteries for the remote sensor, remember to clear the corresponding channel of
the home unit by removing the batteries or in this way: Select the respective channel by pressing
the CHANNEL button, hold the CHANNEL button 3 seconds to clear the registration.
• When replacing batteries for the home receiver, please remove batteries of all remote sensors
and re-install the batteries to the sensors according to the desired channel sequence. Press the
TX button on the back of remote sensor to verify the RF reception, hold the button 3 seconds to
reset. Replace the cover and tighten the 4 screws.
Page 3

3
C/ F SELECTION
Hold “SET” 3 seconds to enter into the setting mode to select C (Celsius) and F (Fahrenheit).
CLOCK & CALENDAR SETTING
Hold “SET “ button for 3 seconds to enter clock set. Using “ + , - “ (on the back of the home unit) to
adjust and “ SET ” to confirm, the following values can be set in sequence: 12/ 24 hr > C/F > Yr >
Month > Date > Language > Hour > Minutes > Time Zone Offset > Confirm & Exit.
LANGUAGE
GE = German
EN = English
FR = French
IT = Italian
SP = Spanish
ALARM SETTING
Hold “CLEAR/ ALARM“ for 3 seconds. Press “ +, - “ to select AL 1 or AL 2 and press “CLEAR/ ALARM”
to confirm. Press “ +, - “ to enter the desired Hr/ Min values and press “CLEAR/ ALARM“ to confirm
setting.
To view alarm time 1 and 2, repeat press “CLEAR/ ALARM” button at normal mode. Alarm time 1 or 2
will display for 10 seconds and resume to normal clock thereafter.
To turn Alarm 1, 2 on and off, repeat press “ + “ button at normal mode.
The unit will provide Daily Alarm which last for 1 minutes. At snooze mode, the alarm will repeat 10
minutes.
SNOOZE / LIGHT
Press SNOOZE to trigger snooze alarm. To stop alarm for one day, press any key on the unit.
Press to trigger an extended green backlight.
MAX/ MIN MEMORY
Press the ”MAX/ MIN“ to view the maximum values for 5 seconds, press again to view the minimum
memory. To clear the memory record, press “CLEAR/ALARM” while the respective values displaying
on screen.
Temperature Trend Indicator: The 3 icons will indicate Rising, Steady, Falling if the temperature
change is more than 1 degree in an hour.
TEMPERATURE ALERT
Press “ALERT“ to turn temperature alert on and off.
Hold “ALERT“ 3 seconds to enter the alert setting mode. The indoor channel and the Upper + Lower
pointers flash.
Press “ +, - “ to select the indoor or Ch1, 2, 3 and press “ALERT“ to confirm the channel. The Upper
pointer and temperature will flash, enter the desired upper limit with the “ +, - “ buttons, press “ALERT”
to confirm and go to the lower limit setting.
The Lower pointer and temperature will flash, enter the desired lower limit with “ +, -“ buttons, press
“ALERT” to confirm and exit.
Each setting cycle will allow setting one channel for the temperature alarm. This unit allows you to enter
a temperature alert for the indoor channel and all of the remote channel’s 1, 2 & 3.
When the temperature hits the limit of the preset alert, the Upper & Lower pointers and the temperature
of the respective channel will flash; Press any key to stop the alarm.
LOW BATTERY INDICATION
Low battery indication is available for the home unit itself and all of the 3 remote channels. Replace the
batteries and follow the setup procedure as mentioned earlier in this instruction manual.
Page 4

SPECIFICATIONS
Range of temperature measurement:
Indoor unit : 0 C to + 50 C (+32 F to +122 F)
Remote sensor : -20 C to +60 C (-4 F to +140 F)
Channel : max. 3 remote sensors
Transmission : max. 30M (100 ft.) open area, RF434 MHz
Resolution : 0.1 degree for temperature
Batteries : 2 AA’s for home unit and 2 AAA’s for remote sensor
LIMITED WARRANTY— INTERNATIONAL
Consumer may have more remedies at law than follows. Chaney Instrument Company warrants to
the owner, this product to be free from defect in material and workmanship for one year from date of
purchase. CHANEY INSTRUMENT SHALL NOT BE LIABLE FOR ANY INCIDENTAL, INDIRECT OR
CONSEQUENTIAL DAMAGES, WHETHER ARISING IN CONTRACT OR TORT. Chaney Instrument’s
obligation (at its option) is limited to repair or replace this product.
For in-warranty repair, send clock, accompanied by Guarantee, bearing Dealer’s name and date of
purchase, with $5.00 to cover handling and postage, to:
Chaney Instrument Company
965 Wells Street
Lake Geneva, Wisconsin 53147
4
 Loading...