

Page 1
Thank you for purchasing the Radio Controlled Projection Alarm Clock with Indoor
and Outdoor Thermometer.
Features:
Radio controlled timekeeping with manual setting option
Adjustable projector focus and reversible projection display
Indoor & outdoor temperature readings
Projector displays time, indoor & outdoor temperature
Selectable 12/24 hour time display
Green LED back light
Button for radio controlled time reception
Alarm with snooze
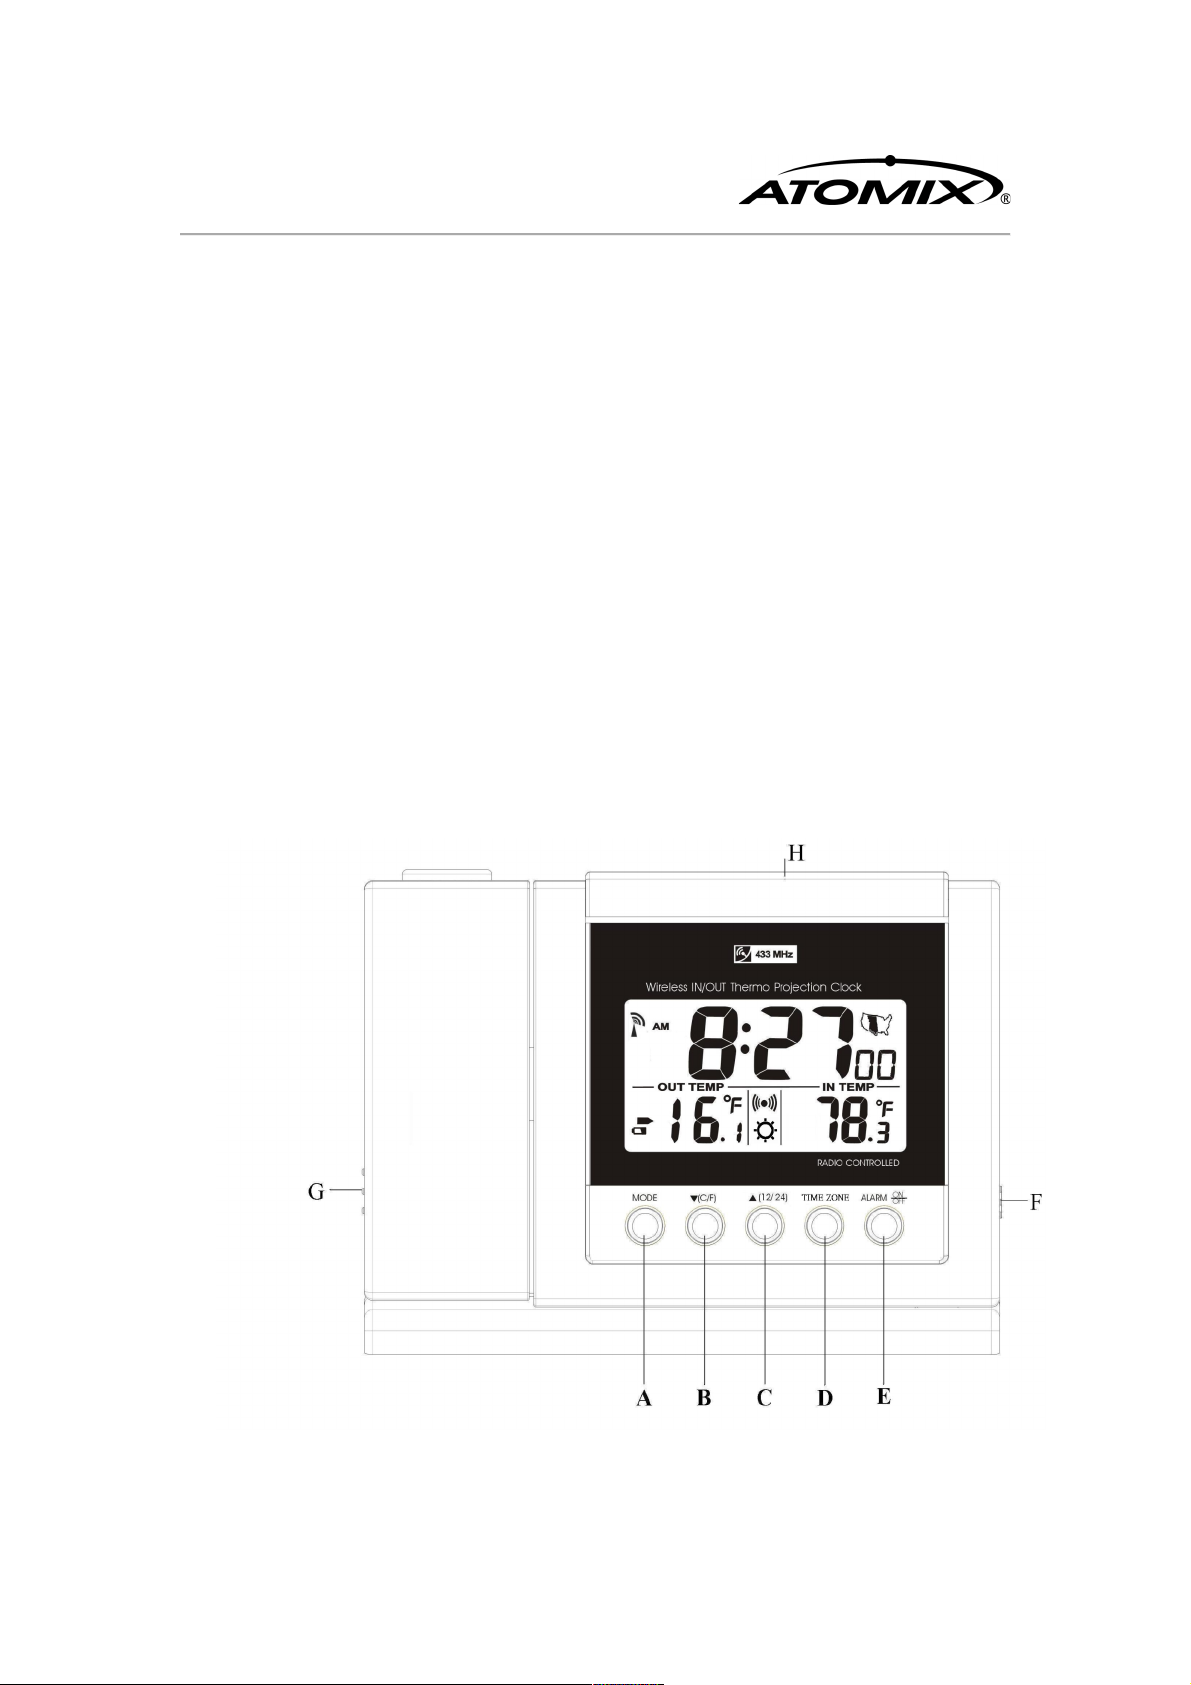
Main Unit
Front View.
A: “MODE” button E: “ALARM ON/OFF” button
B: “▼°C/°F” button F: Projection ON/OFF slide switch
C: “▲(12/24)” button G: Projection “ROTATE” slide switch
D: “TIME ZONE” button H: “SNOOZE/PROJECTION/LIGHT” button
Page 2
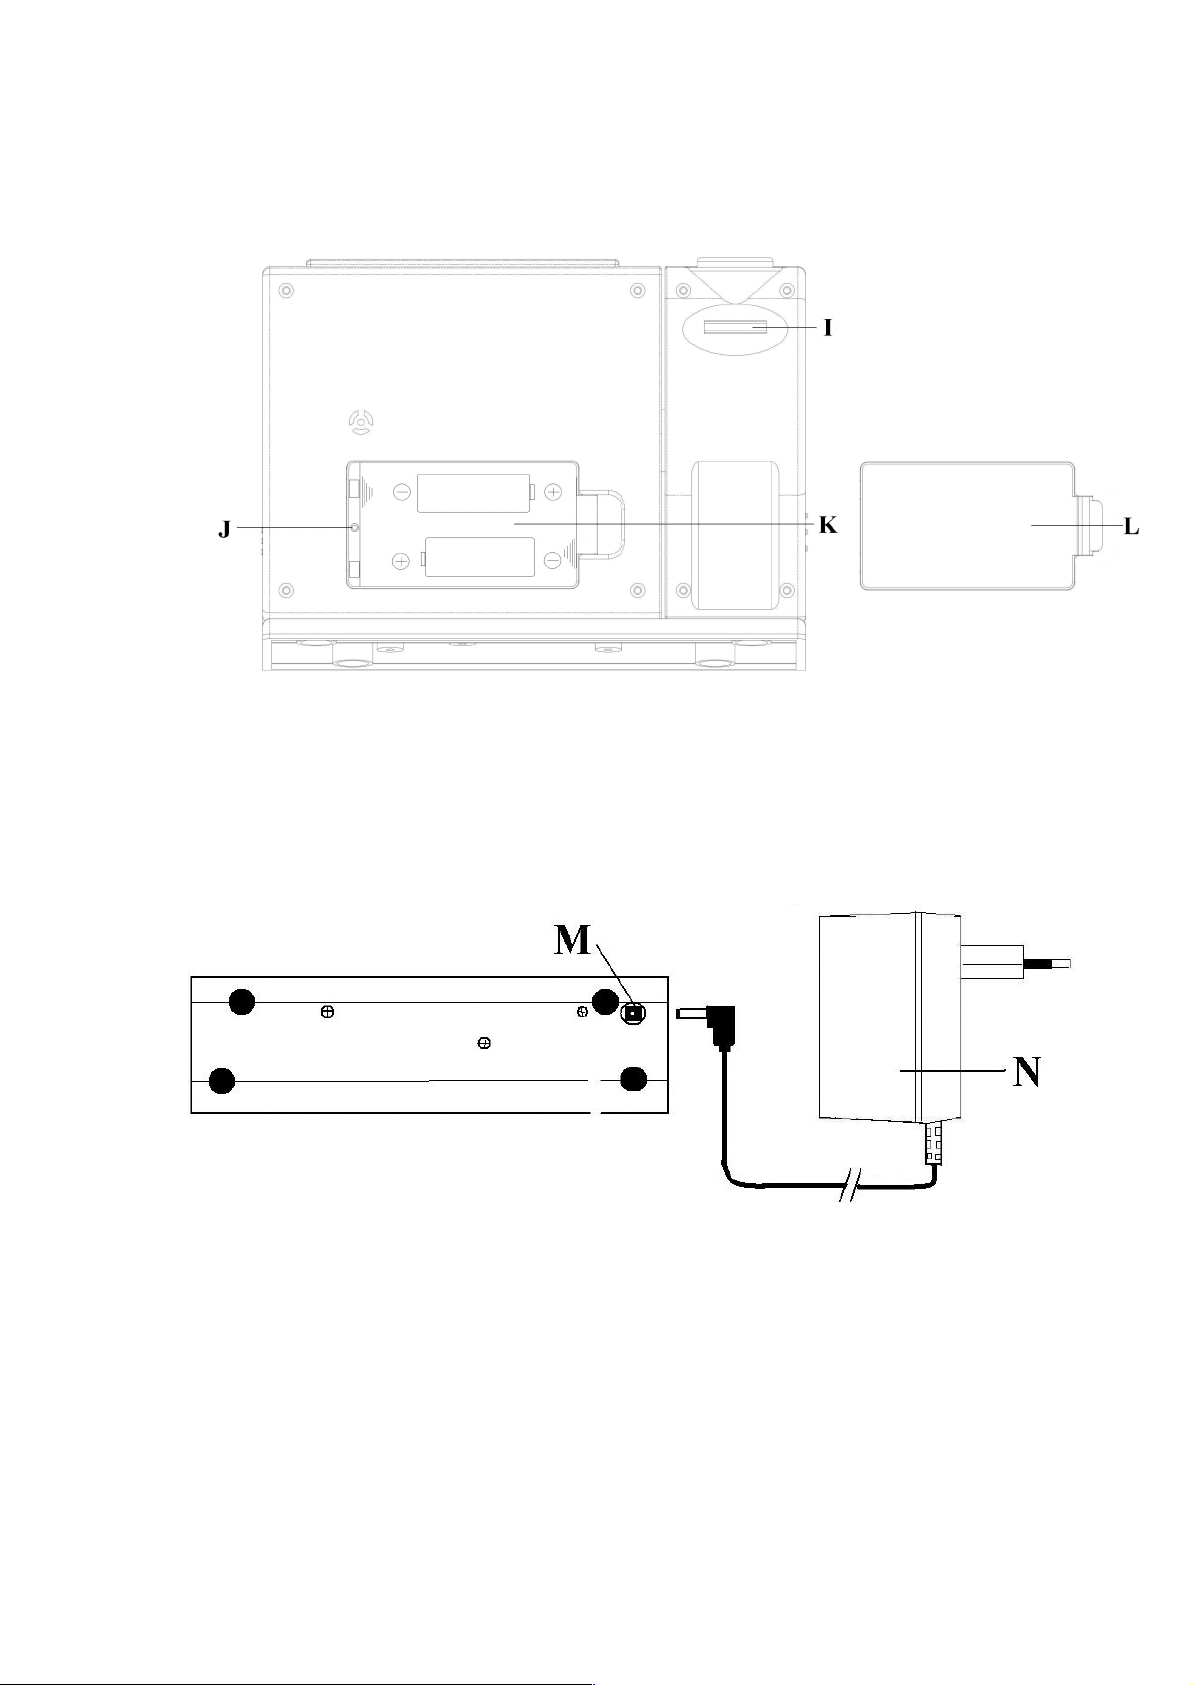
Back View
I: Projector Focus Wheel K: Battery Compartment
J: RESET button L: Battery Compartment Door
Bo tt om View
M: Adaptor Plug N: Adaptor
Page 3
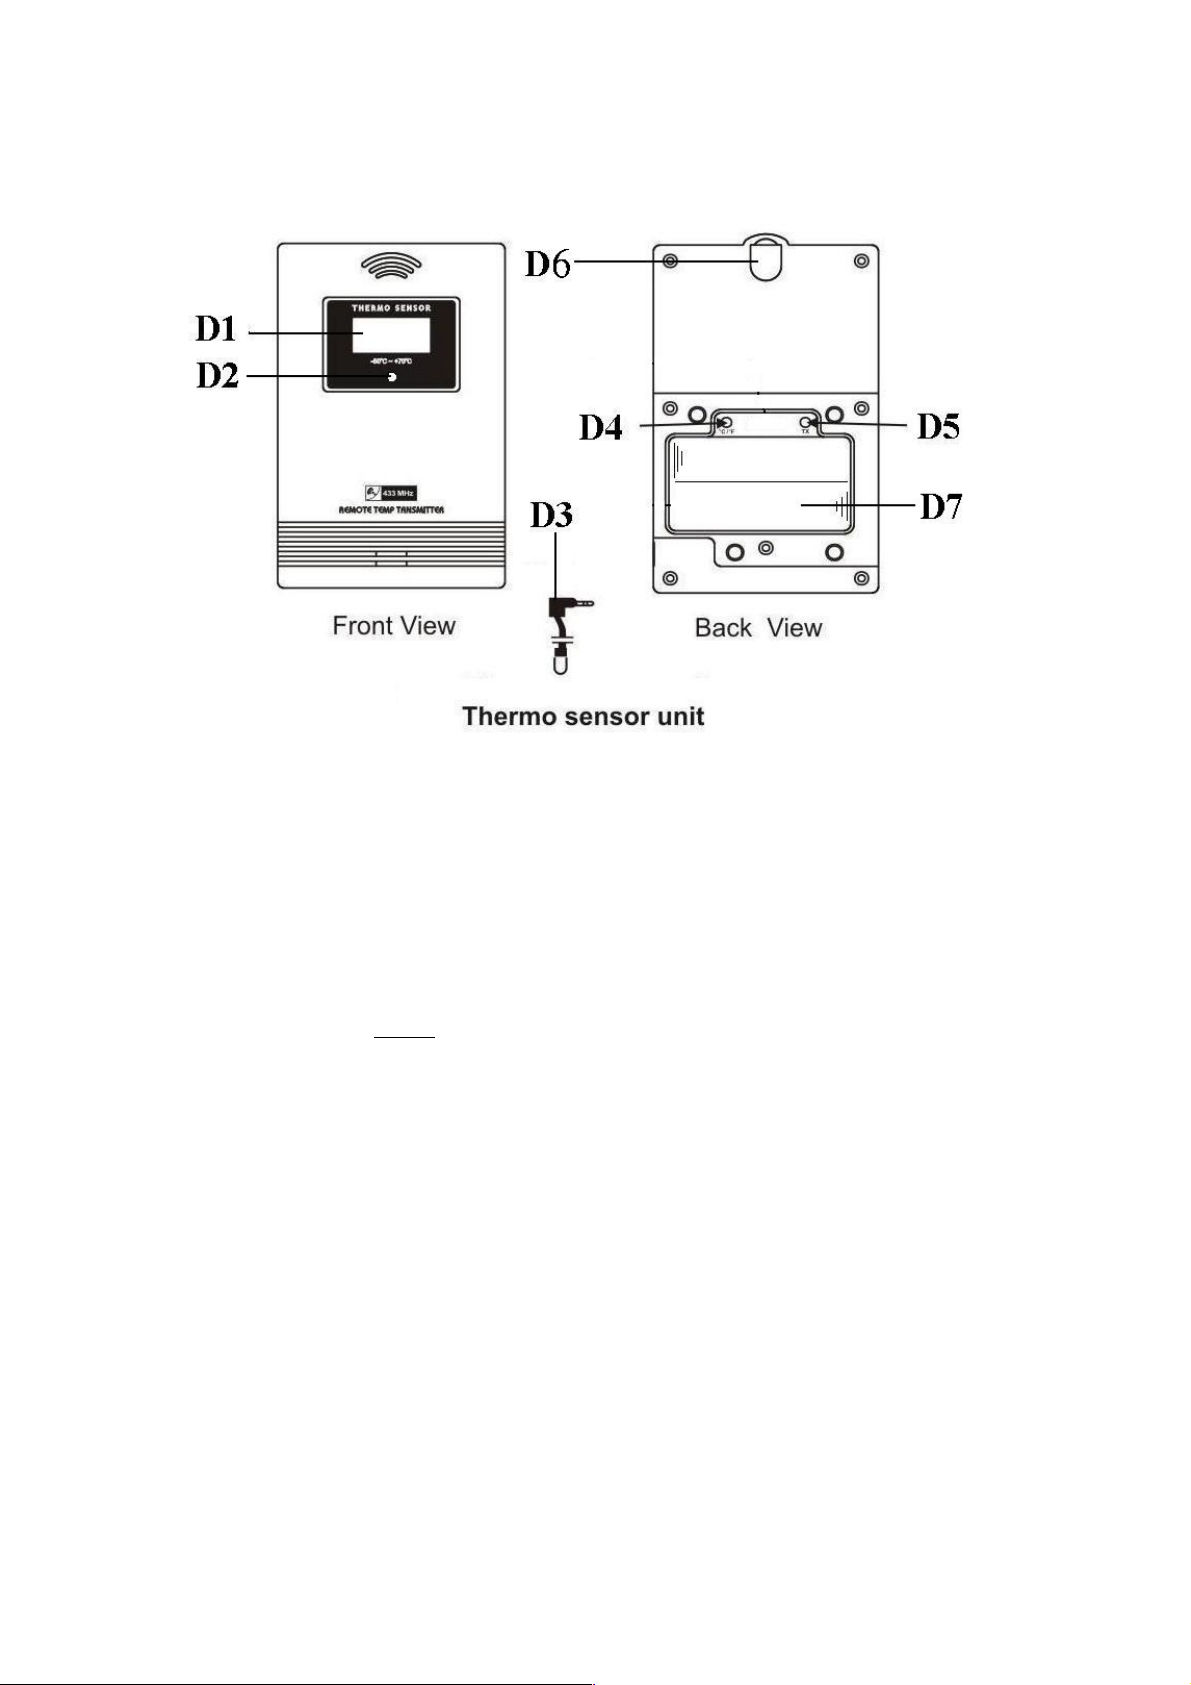
Thermometer Sensor Unit:
D1: Outdoor Temperature D5: “TX” button
D2: Transmission Indicator LED D6: Wall Mount Hole
D3: Temperature Probe D7: Battery Compartment
D4: “°C/°F” button
Step One: Getting Started
Insert 2 “AAA” batteries in the remote transmitter. Always insert batteries in to
the transmitter before inserting batteries in the main unit. At extremely low
temperatures, below 15F, battery voltage output decreases and may cause your
outdoor temperature reading to go blank. Using lithium batteries can increase the
effective temperature range as they function at lower temperatures than alkaline
batteries.
Your new clock and thermometer unit can be operated either with batteries or by
using the enclosed AC adapter. To use the adapter simply attach the adapter into
the base of the clock, and insert the plug into a wall outlet. To use batteries insert
2 “AA” batteries into the main unit. The set-up procedure is as follows.
Press the TX button on the back of the remote unit (D5) to transmit the
temperature data from the remote sensor to the main unit. The transmitter can be
placed up to 100’ (30M) away from the main unit. Walls, power lines, fences and
other structures can interfere with the remote signal so it is recommended the
remote be placed as close to the main unit as possible. Place the remote unit out
of direct sunlight, rain & snow.
If the main unit does not receive the temperature transmitted from the thermo
sensor, hold the “TIME ZONE ” button (D) for 3 seconds to cancel the channel
Page 4

manually. It will automatically register the thermometer sensor again when a
temperature signal is received.
If there is no temperature displayed in existing channel ( “ - - . –“ is displayed on
the LCD ), hold the “TIME ZONE” button (D) for 3 seconds to cancel that
channel and receive the signal again. A “Beep” sound will be heard.
Page 5

Step Two: Radio Controlled Time Set Up
Selecting the Ideal Location: Like a typical AM radio, the radio controlled time of
your Atomix Clock will not receive the WWVB signal in places surrounded by heavy
concrete or metal panels. For best reception, please install the home receiver near a
window. The time signal reception is also greatly affected by electrical or electronic
interference. If the home receiver location you selected does not work, change to a
location in another part of the room or building.
The clock automatically starts scanning for the WWVB Radio Controlled time
signal when batteries are inserted ( flashes on the LCD). Note: The clock
will not respond to any manual settings while attempting to receive the Radio
Control Time signal. This reception cycle lasts from 2 to 5 minutes. To turn the
reception off and to enable manual settings, press the TIME ZONE button.
The clock automatically scans for the time signal at 2:00a.m. every day to
maintain accurate timing. If the Radio Controlled time signal is not received,
scanning stops ( on LCD will not appear) and repeats again at 3:00a.m.,
4:00a.m., and 5:00a.m.
The clock can be made to manually scan for the Radio Controlled time signal by
holding the “▲” & “▼” buttons at the same time. If the Radio Controlled time
signal is not received, scanning stops ( on LCD will not appear) and repeats
again 4 times in the next 4 hours until the signal is received. (example: if a scan at
8:20 fails, it will scan again at 9:00; 10:00; 11:00 & 12:00)
Stop scanning by holding the “▲” & “▼” buttons at the same time.
* Icon flashes to indicate the unit is receiving the WWVB signal.
Icon turns on to indicate the WWVB signal has been received successfully.
Manual Time Setting:
To select your local time zone press “TIME ZONE” (D) button. A map appears on
the upper right hand corner of the screen that helps you choose a time zone.
When the Time or Calendar is displayed on LCD press and hold the “MODE” (A)
button to enter the setting mode. After the unit beeps the hour digit will flash. The
data will appear on the screen in this order:
Page 6

Time (hour, minutes) Year Month Date Day Daylight
Saving Time
Press the “▲” (C) & “▼” (B) buttons to adjust the Hour, Minutes, Year, Month,
Day and DST ON/OFF (“ ” is centered on the bottom half of the LCD).
Pressing the button once will change the setting by one unit. Holding the button
down will enter the fast setting mode.
Press “MODE” (A) button to confirm each setting
The clock will automatically exit the TIME SETTING mode if no adjustments are
made within 10 seconds.
Page 7

Use a pin or similar small object to press the “RESET” button located inside the
battery compartment of the receiver unit if the clock is not working properly. This
will reset the clock to the default settings. You can then start the setting procedure
again.
Step Three: Projector and Alarm Set Up
Projector Function:
To switch on the projector slide the projection ON/OFF Slide Switch (F) to “On.”
To project Time and Temperature press “SNOOZE/ PROJECTION/ LIGHT” (H)
on the top of the unit. The first press of H will project the time, the second press
will display the outdoor temperature and a third press will display the indoor
temperature.
To adjust the focus turn the “Focus” Wheel (I) right or left.
To reverse the projection content by 180° slide the Project “ROTATE” Slide
Switch (G).
Snooze Alarm Clock Function:
To switch the alarm on press the “ALARM ON/OFF” (E) button. When the alarm
is set “ ” appears on the LCD.
To change to the Alarm Time display press the “MODE” button twice. Hold the
“MODE” button for 2 seconds. The hour digit will blink. Adjust the setting to
your desired alarm time with the “▲” or “▼” buttons.
To change the alarm clock minute display, press the “Mode” button again. The
Minute digits will blink. Adjust the setting to your desired alarm time with the
“▲” or “▼” buttons.
To check the AM and PM icons, look to the left of the hour button when setting
the alarm to be sure the alarm is set for the proper time.
To return to the Time display press “Mode” again.
To use the Snooze feature, press “SNOOZE/ PROJECTION/LIGHT” button (H)
when alarm sounds. The alarm snoozes for 5 minutes and then sounds again.
To switch off the alarm press the “ALARM ON/OFF” (E) button (“ ” icon
will disappear).
Thermometer:
To select either Celsius or Fahrenheit thermometer readings press the “▲℃/℉”
button.
12/24 Hr:
Page 8

To select 12 or 24 hour time display format press the “12/24” button.
Back Light:
To illuminate the back light for 5 seconds press the “SNOOZE/ PROJECTION/
LIGHT” button.
Additional Information:
Insert the batteries in the remote temperature sensor before inserting batteries in
the main unit.
Avoid placing the clock near potential interference sources and metal objects such
as computer monitors or TV sets.
Placing the clock closer to a window & towards the general direction of the
remote transmitter increases its ability to read the remote temperature signal. The
signal will be weaker in a basement. The transmitter range is 100’ (30M) in a clear
setting.
Never use the clock in a bathroom or any other area with high humidity.
The normal operating temperature of the clock and the remote transmitter is 32 °F
- 140°F (0℃–60℃). The operating temperature of the remote sensor using the
wired probe is -58°F to 158°F (-50℃ to 70℃). The remote will usually function if
left outside in below freezing temperatures if the batteries are strong. Once the
temperature falls below 23°F the battery output will decrease and the transmitter
may fail to function. This failure is due to the inability of the batteries to supply
enough power to the transmitter. We recommend that for prolonged periods of
extreme cold that the transmitter be brought indoors. The outdoor temperature can
still be measured using the wired probe.
The clock loses all setting information when the battery is removed.
Use of 10 foot wired Temperature Probe:
Insert the probe plug on the right hand side of the Thermometer Sensor Unit.
Put the metal casing outside and leave the Thermometer Sensor Unit indoors to
avoid freezing the battery when the outdoor temperature is below 32 °F (0°C).
Always use the temperature probe to sense the temperature when the temperature
is between the following ranges: -58°F ~ 32°F (-50 °C ~ 0°C) and 122°F ~ 158°F
(+50°C ~ + 70°C)
Low Battery Indicator: The Low Battery icon “ ” appears on the outdoor
temperature display or thermometer sensor unit to indicate the external transmitter
needs to have the batteries replaced.
Page 9

LIMITED WARRANTY—INTERNATIONAL
Consumer may have more remedies at law than follows. Chaney Instrument Company
warrants to the owner, this product to be free from defect in material and
workmanship for one year from date of purchase. CHANEY INSTRUMENT SHALL
NOT BE LIABLE FOR ANY INCIDENTAL, INDIRECT OR CONSEQUENTIAL
DAMAGES, WHETHER ARISING IN CONTRACT OR TORT. Chaney
Instrument’s obligation (at its option) is limited to repair or replace this product.
For in-warranty repair, send clock, accompanied by Guarantee, bearing Dealer’s name
and date of purchase, with $5.00 to cover handling and postage, to:
Chaney Instrument Company
965 Wells Street
Lake Geneva, Wisconsin 53147
 Loading...