

Page 1
WIRELESS WEATHER STATION INSTRUCTION MANUA L
Thank y ou for pu rchasing t his Cha ney Instru ment el ectronic w eathe r station. D esign ed and
engin eered w ith the stat e-of-art t echnolog y and com ponents, t his ins trument pr ovide s accurate
and rel iable m easureme nts of ai r pressure , indoo r and outdoo r tempe rature and h umidi ty
toget her wit h an Atomix Ra dio-C ontrolle d perpe tual calen dar clo ck. Follow the st ep-by-st ep
instr uctio ns in this man ual car efully to se t the fol lowing fun ction s: setting u p the wir eless
therm omete r, synchr onizing the atomi c clock, and settin g the weather forec aster. Ot her
funct ions ex plained in t his man ual includ e utili zing the dua l alarm f eature as we ll as man ually
setti ng time , date and wea ther se ttings.
A
SNOOZE / LIGHT
H
W E A T H E R
TEMPERATURE HUMIDITY
Ch
TEMPERATURE HUMIDITY
IN
PM
DST
Z
Z
1
M
F
T
W
T
S
S
R
H
E
U
O
U
A
2
U
I
D
E
N
N
T
A
N M
I
M X
C
M
R
A
L
B
H
C
C
A
/
D
R
LEA
E
F
G
n BAROMETER n WIRELESS n DIGITAL n
RF WIRELESS
Ch
REMOTE SENSOR
FCC ID : L5C0964TX
This device complies with part 15 of the
FCC rules. Operation is subject to the
following two conditions; (1) this device
may not cause harmful interference and (2)
this device must accept any interference
received, including interference that may
cause undesired operation.
Made in China
Bracket Stand
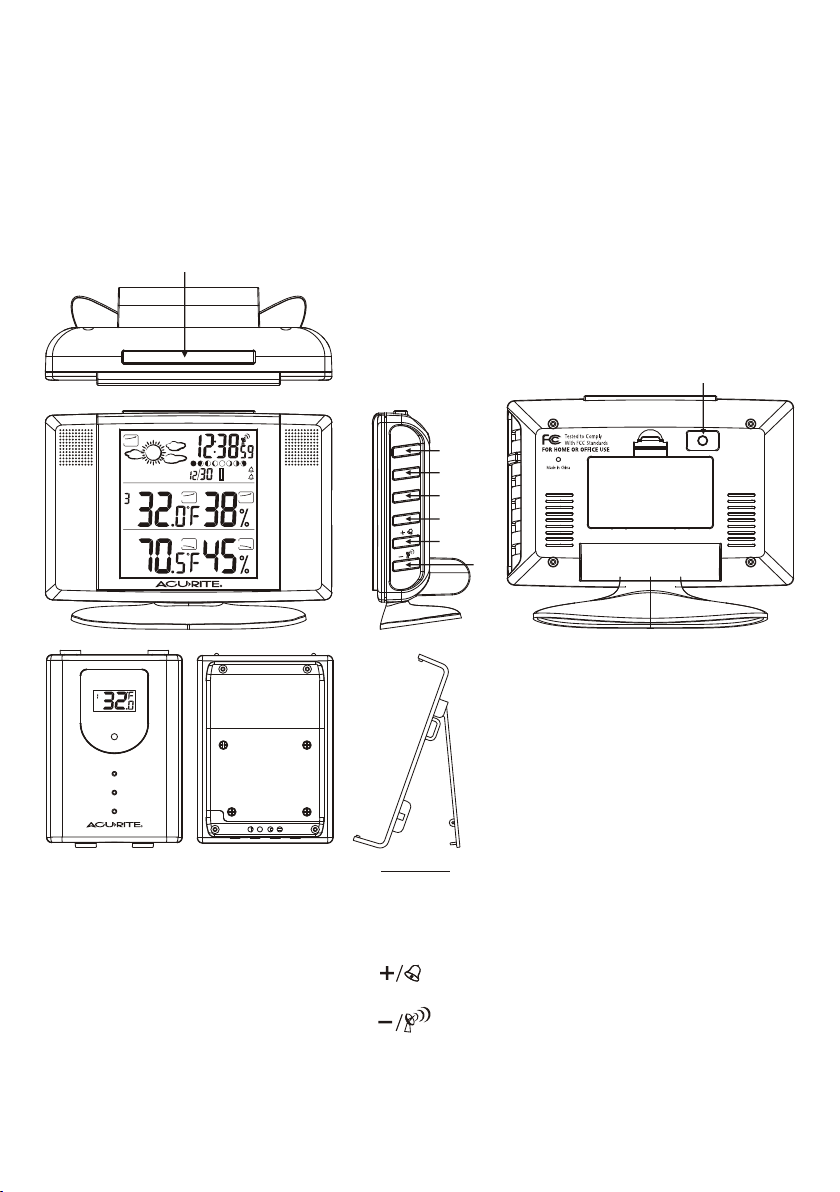
FUNCTION BUT TONS:
A =Sno oze/Light Button E =Clear Button
B =Alarm Button F =
SET
C =CH (Cha nnel) Button G =
D =Min/Max Button H =Set Button
1
Page 2

STEP ONE: SETTING UP THE WIRELESS THERMOMETER
Home Receiver Set Up:
For the init ial ins tallatio n, alwa ys insert ba tteri es to the home u nit fir st and then th e remot e
senso r. Remove the batt ery cover on the back a nd install 2 "AA alka line or lithium bat teries" (not
inclu ded) ac cording to t he pola rity indic ated. R eplace the b atter y cover. Th e home unit will star t
to sear ch for a se nsor trans mitti ng outdoor t emper ature & humi dity in formatio n durin g the first 5
minut es afte r entering t he exis ting weath er cond ition. To enter t he existing weath er conditions
selec t the cor rect weath er cond ition by pre ssing " MIN/MAX" a nd pres s "CLEAR" to e nter. The
home un it will t ry to seek for a r emote s ensor afte r the wea ther condi tions a re entered .
The out door te mperatur e and hum idity sect ion wil l flash duri ng chan nel regist ratio n. If you pres s
the CH ke y it will d isable the r egist ration mod e and go to r adio contr olled c lock recep tion mo de.
Remote Sensor Set Up:
Remov e the bra cket stand a nd remo ve the 4 screw s with a sm all Philip s head sc rewdrive r. Insert
2 "AAA" a lkali ne or lithiu m batte ries (not in clude d) accordi ng to the p olarity in dicat ed. Set
Chann el 1 for th e first remo te sens or. You mu st set to Ch 1 if on ly one se nsor is in use . One
senso r is incl uded with th e base un it. Additi onal se nsors may be p urcha sed separa tely. Set
chann el 2 if usi ng a second se nsor or c hannel 3 if us ing a thi rd sensor.
• To verify t ransmiss ion of a si gnal press t he TX but ton inside t he batt ery compar tment o f the
remot e senso r. The red LE D on the front of the rem ote sensor will fla sh when it successf ully
trans mits a si gnal. Temper ature and hu midit y of the remot e senso r will be upda ted and
displ ayed on t he remote se nsor.
• Selec t Celsi us or Fahrenhei t by pres sing the C/F b utton i nside the ba ttery c ompartme nt.
• Repla ce the co ver and tigh ten the 4 s crews.
• When re placi ng the batte ries in t he remote se nsor re member to cl ear the c orrespon ding
chann el on the home receiv er unit i n this way: Se lect the respecti ve chan nel by press ing the
CH butt on, hol d the CH butto n 3 secon ds to clear th e chann el.
Placement of Remote S ensor :
Place t he remo te sensor ou t of dire ct sunligh t and dir ect exposu re to rai n or snow. At ext remely
low tem perat ures, belo w 15F, battery volta ge output decreas es. The low tempera tures may
cause y our out door tempe ratur e reading to g o blank . Using lith ium bat teries can i ncrea se the
effec tive te mperatur e range a s they funct ion at lo wer temper ature s than alkal ine bat teries. For
prolo nged pe riods of ext reme co ld we recomm end the r emote sens or be bro ught indoo rs. Met al
struc tures , walls and el ectri cal interf erenc e can shorte n the tra nsmissio n range o f the remote
senso r. Please try seve ral locations to de termine the best re ception of the sign al by the home
unit.
STEP TWO: SETTING THE ATOMIC CLOC K
About The Atomic Clock:
The Nat ional I nstitute o f Stand ard and Techno logy (NIST ) in Fo rt Coll ins, Color ado bro adcasts
the tim e signa l (WWVB at 60k Hz AM rad io signal) w ith an ac curacy of on e secon d per every
3,000 y ears. T he signal co vers a di stance up to 2 ,000 mi les from the s ource .
Selecting the Ideal Locati on:
Like a ty pical A M radio, the A tomic C lock will no t recei ve the WWVB si gnal in p laces surr ounde d
by heav y concr ete or metal p anels . For b est recept ion, pl ease insta ll the ho me receive r near a
windo w. The time sig nal rec eption is al so grea tly affect ed by ele ctrical or e lectr onic inter feren ce.
If the ho me rece iver locat ion you s elected do es not wo rk, change t o a locat ion in anoth er part o f
the roo m or buil ding.
2
Page 3

Radio Controlled (R/C) Tim e Recep tion Se t Up:
The clo ck atte mpts to sync hroni ze with the At omic ti me signal AUTOM ATI CALLY right after the
first r emote s ensor is reg ister ed. The unit s tarts s ynchroni zing th e clock afte r regis tering the
remot e senso r thermome ter rea ding. The cl ock wil l not respon d to any ma nual setti ngs whi le
attem pting t o receive th e Radio C ontrol Time signal. Th is rece ption cycl e lasts f rom 2 to 5
minut es. The t ower icon in t he left h and corner o f the scr een appear s fixed w hen recept ion is
succe ssful . To turn th e recep tion off and to enabl e manual settings , press the " " button.
Entering the Time Zon e:
After e stabl ishing you r time si gnal, pres s SET/ ZO NE once to sel ect PST / MST/ CS T or EST ti me
zones . A small P, M, C, E icon will appea r to the le ft of the time d ispla y for the resp ectiv e time
zone.
P = Pacific Standa rd Time
M = Mountain Standa rd Time
C = Central Sta ndard Time
E = Ea stern S tandard Ti me
How to Manually Synchronize Your A tomic C lock:
Hold th e " " butto n for 3 second s to trig ger a manual s ynchr onizatio n. The to wer will fla sh
regul arly du ring synch roniz ation. Sig nal str ength leve l is indi cated in thi s way:
1. Ve ry We ak or no signa l ( )
2. Weak ( )
3. Good ( )
4. Icon a ppear s fixed (Rec eptio n successf ul)
5. Icon d oes not s how (No sign al rece ived & decod ed)
If sign al leve l is weak and ti me rece ption is not s ucces sful, move t he unit a way any sour ce of
possi ble int erferenc e and try a gain in anot her loc ation. The R /C cloc k will attem pt a dail y
synch roniz ation at 1:0 0 AM ever yday. If not succe ssful , the R/C cloc k will se arch for the t ime
signa l every h our. Each R/ C recep tion cycle l asts fr om 2 minutes t o 5 minut es. To avoid
inter feren ce, the unit w ill dis able the oth er butt on functio ns duri ng Radio Con troll ed Ti me
recep tion. T his is not a def ect. Si mply press " " b utton t o turn Radio C ontro lled Time
recep tion te mporaril y off.
Daylight Saving Tim e (DST) Feat ure:
The fea ture is e nabled whe n the bat teries are i nstal led. The DST i con app ears in the up per rig ht
hand co rner. For areas not usi ng DST in summer, se lect DST off m ode as de scribed un der
Manua lly Adj usting Clo ck & Cale ndar Setti ng.
STEP THREE: SETTING UP YOUR WEATHER FORECASTER
Enter Existing Weather Conditions:
To ensure a m ore accura te weat her foreca st base d on the altit ude of yo ur locatio n, ente r the
exist ing wea ther condi tions . The unit wil l relat e the existi ng weat her condit ions wi th the curre nt
air pre ssure l evel.
The hom e unit wi ll ask you to en ter the e xisting we ather c ondition s right a fter insta lling t he
batte ries. P lease sele ct the co rrect weat her con dition by pr essin g "MIN/MAX " and pre ss "CLEAR"
to ente r. The home u nit wil l try to seek fo r a remot e sensor after the we ather condition s are
enter ed.
3
Page 4

Resetting Weather Conditions: If the w eathe r forecast d eviat es from the ex istin g conditio ns
after t he init ial setup, y ou can ch ange the wea ther of fset in this m anner :
1. Hold t he "CLE AR" but ton for 3 seco nds to en ter the pres sure of fset mode. T he weat her icon
will fl ash.
2. Sele ct the existing wea ther co ndition by p ressi ng "MIN/MAX. "
3. Pres s "CLEA R" to con firm your se lecti on and exit th e setti ng mode.
Selecting Celsius/ Fahrenheit display on home unit:
Hold "M IN/MA X" button 3 se conds t o select C or F.
WEATHER FO RECAS T with St orm Ale rt:
The bui lt-in prec ision B arometri c press ure sensor w ill rea d the atmospheric p ressure and
calcu late th e weather co nditi ons for the ne xt 12 hou rs.
The Ico ns will s how:
Sunny Part ial Sunny Cl oudy Ra iny Stormy ( Flash ) Icy
Pressure, Temp eratu re, Hum idity Trend I ndica tors:
Small a rrow ic ons displa yed in bo xes will ind icate : Rising( ), S teady ( ), Fa lling( ).
Refre sh rate i s once every h our.
Moon Phase:
Moon Ph ase is sh own by the scr ollin g of the moon ic on from l eft to right . The ico n will stop at t he
exist ing moo n phase for 5 se conds a nd then resu me scro lling.
Manually Adjusting Clock & Calendar Setting:
Hold th e "SET" b utton for 3 se conds t o enter the cl ock set ting mode. U sing "+ " or "-" to adju st and
"SET" t o confi rm, the foll owing v alues can be s et in seq uence: 12/ 2 4 hr > Year > Month > Date
> Hour > Mi nutes > D ST on/ off. Turn ing DST off disable s the Daylight Savi ng Time sett ing.
ADDITIONAL FEAT URES
Using ALARM 1( ), ALARM 2( ):
1
2
This un it has tw o alarms tha t can be se t independ ently o f one anothe r. Select ALARM 1 or A LARM
2 by pres sing th e "ALARM" bu tton. H old the "ALA RM" but ton for 3 seco nds. Pr ess "+" or "-" t o
enter t he desi red alarm ti me and pr ess "ALARM " to conf irm the sett ing. Pl ease be sure t o note th e
PM indi cator t o ensure you h ave set t he alarm for t he prop er time.
To view ala rm time 1 and 2, s imply p ress the "AL ARM" bu tton to read A LARM 1 an d ALARM 2. The
alarm t ime wil l be display ed for 5 se conds and th en reve rt to the norm al cloc k display.
To turn AL 1, A L 2 on and off, press "+" butt on. When alarm one is s et a bell with a number o ne
will sh ow next t o the right of t he cale ndar. Whe n the second alarm is s et a bell with a number t wo
will ap pear to t he right of th e calen dar. If both a larms a re set, both b ells wi ll appear.
The uni t will so und a Cresce ndo Ala rm which wil l last fo r 2 minutes be fore tu rning itse lf off.
Press ing the " Snooze" bu tton wi ll repeat th e alarm a fter 5 minut es. Use t he "ALARM" b utton t o
turn th e alarm o ff complet ely.
Low Battery Indicator:
A low bat tery in dicator is s hown on t he main unit d ispla y panel for th e home un it itself an d all of
the rem ote cha nnels. Rep lace th e batterie s and fol low the setu p proce dure as ment ioned i n this
instr uctio n manual.
4
Page 5

SPECIFICATION S
Range o f tempe rature mea surem ent:
Indoo r unit : -5 C to 50 C (32F to 1 22F)
Remot e senso r : -2 0 C to 60 C (14 F to 158F)
Transmiss ion : 100 feet (30 M) in an open area, RF4 34 MHz
Resol ution : 0.1 degree
Clock : WW VB Radio Controll ed Atomic Clock
Batte ry Req. : 2 - "A A" for the main unit, 2 " AAA" for each remot e sensor
Batte ry life : 12 m onths ( alkaline b atter ies recomm ended , not includ ed)
Button Funct ions:
Side Bu ttons
CHANNEL Selec t Chann el 1, 2, or 3 Delet e Curre nt Channel R eadin g
+ Advan ce Sett ing Forward by 1 Un it Fast Forw ard Settin g
– Change Sett ing Backward by 1 Uni t Fast B ackward Se tting
MAX/ MIN View ma x & min mem ory for Hol d to select C/ F
CLEAR Clear t he Max/ M in memory Weather Of fset
AL Read Time Setting s for Ala rms 1 & 2 Set ti me for Al arms 1& 2
Back Bu tton
SET Sele ct Time Zone Enter c lock & ca lendar set ting
Top Butto n
SNOOZE/LIGHT Acti vate sn ooze alarm a nd gree n backligh t
Press Button Once Press and Hold for 3 seconds
For Viewin g
Turn A larm 1 and/o r Alarm 2 o n & off
Start o r Stop Ra dio Contro lled Time Signal Searc h
tempe ratur e & humidity
Alarm S top
PST/M ST/CST/EST
5
 Loading...