

Page 1

ATOMIC RADIO CONTROLLED
LCD DESK-TOP CLOCK
USER'S INSTRUCTION MANUAL
(USA VERSION)
1. What is Atomic Radio Control?
The most precise time keeping device on earth is the atomic clock. It keeps time to the accuracy of better
than 1 second for every million years. The atomic clock is a huge piece of scientific equipment and it is so
expensive that it is normally found in laboratories and standards institutions etc. Thanks to the latest
technology, the accuracy of the atomic clock is now brought to your home. The NIST* (National Institute
of Standards and Technology) is broadcasting electronically encoded time signals based on an atomic clock
from an antenna in Fort Collins, Colorado to cover the mainland of the United States. The signal is picked
up by the radio receiver circuit in your clock, and is then decoded to synchronize the time to within a split
of a second precision. The radio signal automatically sets the calendar and daylight savings or standard
time too.
Fig. 1 Atomic radio controlled time signal transmission and reception
* For more information on the NIST transmission and cesium atomic clock visit www.bldrdoc.gov/timefreq
Note: The clock is used in USA mainland only. In the states of Alaska and Hawaii, the radio signal may not
be strong enough for synchronization and the clock can only be used as a normal quartz clock that needs
manual setting.
2. About your Clock
Page 2
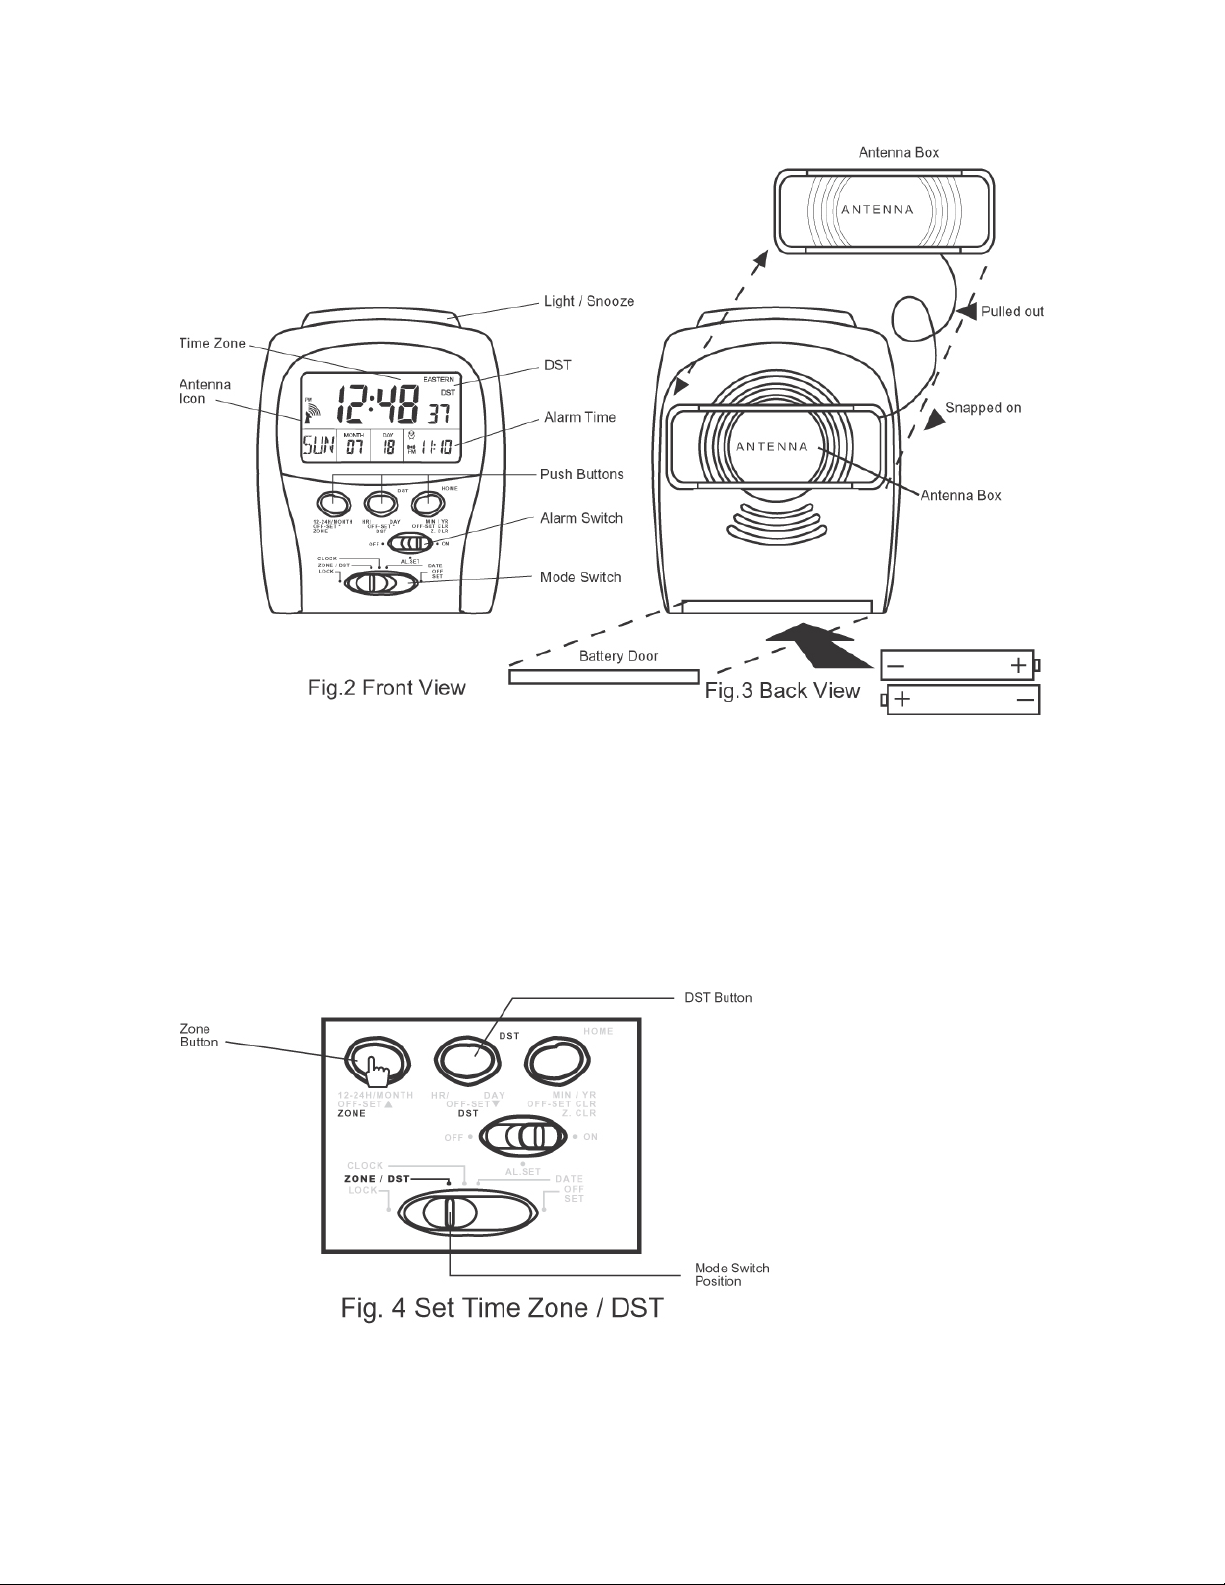
3. Battery Type
The clock uses 2 AA size batteries, alkaline type is recommended. Insert batteries observing the polarities
shown in battery compartment or remove insulating tag if the clock comes with batteries. (The clock is
designed to maximize battery life. The trade off for this is that with brand new batteries, some shadowy
effect appears on the LCD. This effect will last only for a few days.)
4. Auto-synchronization
After inserting batteries, set the clock to the correct time zone. This is done by sliding the Mode Switch to
ZONE / DST position as shown in Fig. 4 and then push the ZONE button to select the right time zone
(Pacific, Mount. - for Mountain, Central or Eastern) depending on where you are located.
Once batteries are installed, the receiver circuit is activated. This is symbolized by the blinking of the
Antenna icon (See Fig. 5a). The Bars facing the Antenna indicate the strength of the radio signal, no bar
means there is no or very weak signal received, one bar indicates a weak signal and 5 bars the strongest
Page 3
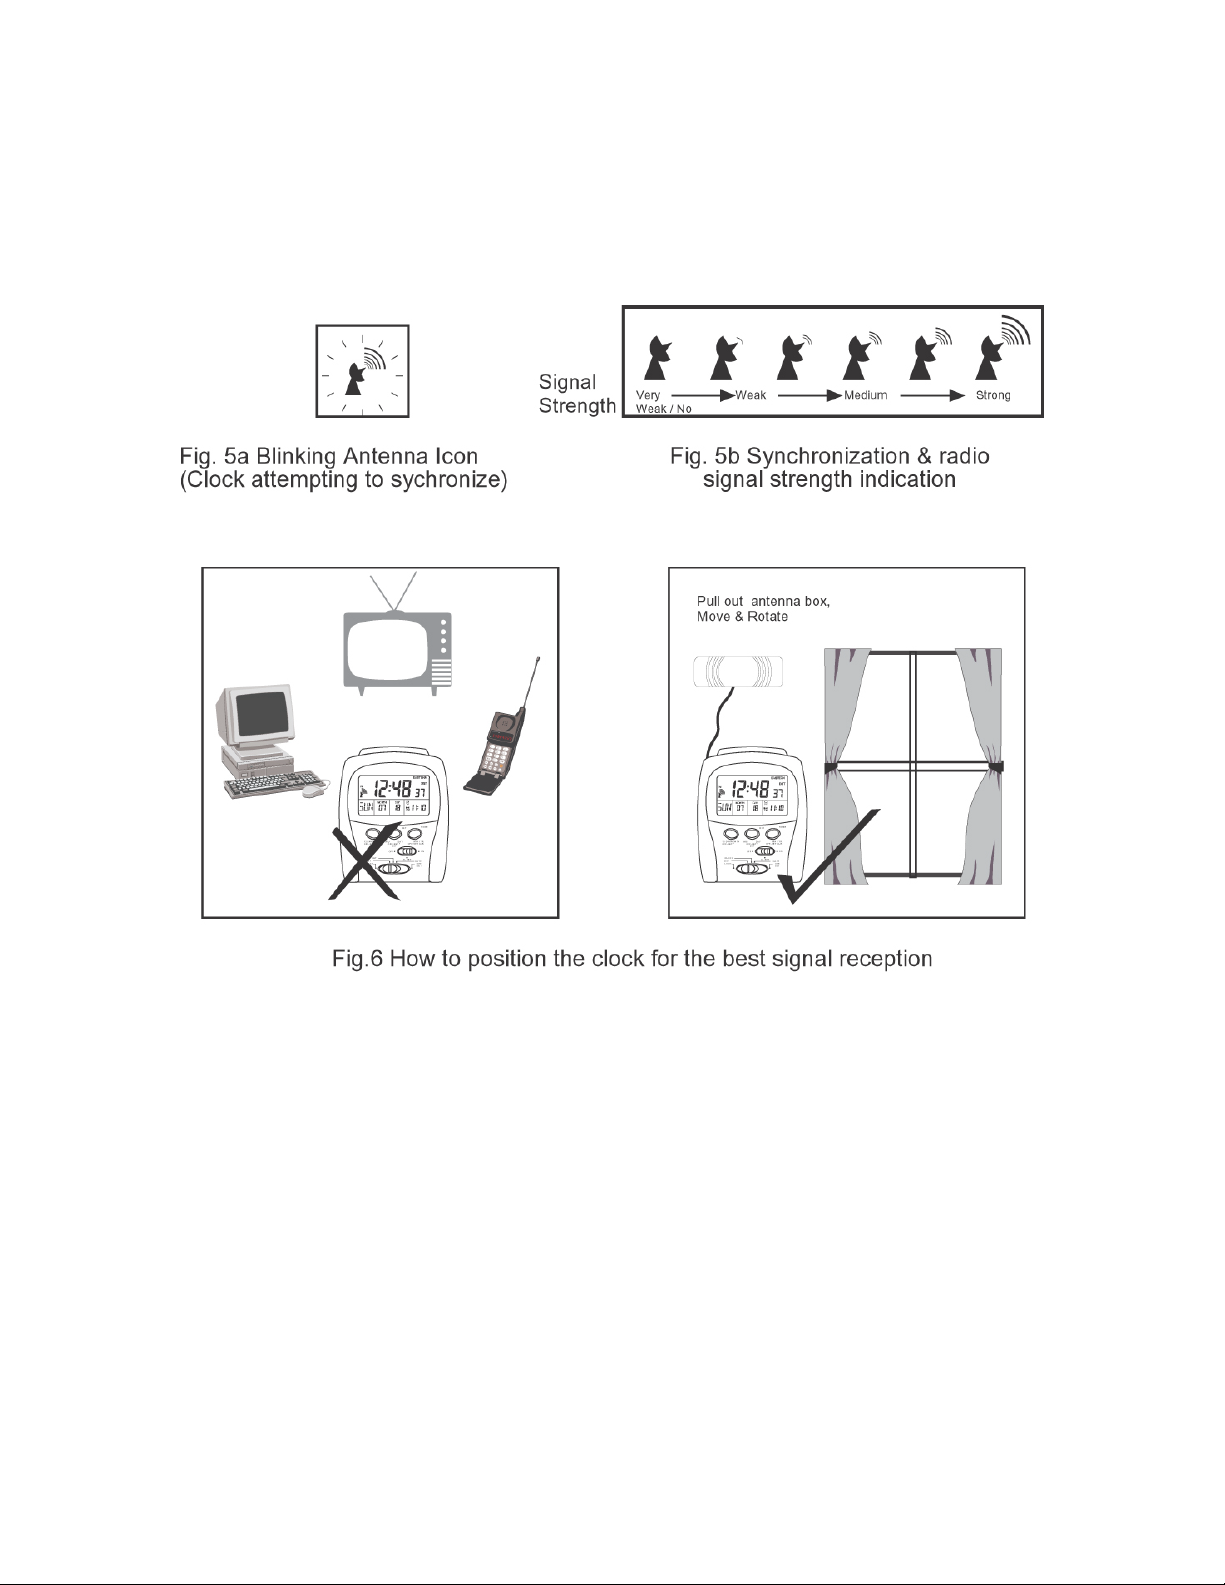
(see Fig. 5b). Use the radio signal strength indicators to find a location that the reception is strong. If the
clock is too close to electrical appliances such as TV, mobile phone and computer they may cause
undesirable signal interference. Strong signal is normally found close to the window. In some areas where
the signal is poor or less, you may need to position and rotate the clock until the best signal strength is
obtained. When the signal strength falls to 2 bars, remove the antenna from the back of clock (Fig. 3) and
move the antenna around if necessary but the antenna needs to be kept horizontal for the best reception.
Once you have found the optimal position leave the clock still so that it can pick up good signals. It
normally takes 3 to 9 minutes to synchronize. Once it is successful, the clock will show extremely accurate
time and the correct date. Successful synchronization is symbolized by the still antenna and the radiating
beacon. (Fig.7)
A properly synchronized clock attempts to adjust itself with the radio time signal every evening and if it
fails for more than 24 hours, the Antenna icon disappears. The clock will still function as a quartz clock
until it gets synchronized again.
Page 4

The clock is a radio device and like the mobile phone or the radio, in certain locations and at certain time of
the day, it may not be able to pick up signal strong enough to synchronize.
The clock will activate auto synchronization at 8:00 p.m. in standard time (9:00pm in DST time) every day.
If the clock fails to synchronize in the first attempt, it will make a new attempt at the beginning of every
hour afterwards for 7 more times. In most cases, the clock synchronizes overnight as the radio signal is the
strongest and cleanest in the early morning. You may leave the clock to synchronize to the right time later
or you may temporarily set the clock manually. If user manually sets the time, the clock will start
synchronization when the time reaches the beginning of next hour and if fails will try every hour for 2 more
times.
5. Manual Setting
If necessary the clock can be set manually. Once it is manually set, the clock will attempt to synchronize
regularly for 3 days. If all attempts fail, the receiver circuit is put to sleep mode to conserve power. The
clock will function as a quartz clock until it is forced to attempt synchronization again. (section 6)
Note: Manual setting cannot be done if the time has been offset. In the manual setting mode if the digits do
not respond to the pushing of the buttons, go to the off-set mode (section 8.1) and clear the offset before
proceeding with manual setting.
5.1 To select Time Zone & Daylight Savings/Standard Time
Page 5

5.2 To select 12/24-hour display and set time
Fig.9 12-24 Hour display select and Time set
After setting is done, put Mode switch back to LOCK position.
5.3 To set calendar
After setting is done, put Mode Switch back to LOCK position.
Page 6

6. Forced Synchronization
If you want the clock to attempt synchronization, you can force the clock to do so by pressing the DST and
HOME buttons simultaneously. To make a forced synchronization mode switch should be at LOCK
position and the alarm switch should be at AL.ON or AL OFF position.
7. To set alarm
(Note that MODE switch must be at LOCK position.)
Fig.11 To set alarm
Alarm will sound at preset time. To stop temporarily push LIGHT/SNOOZE button on the top. Alarm will
repeat for 4 times in every 5 minutes interval until the Alarm Switch is put to OFF position.
8. When Travelling to another place
If you are travelling to another city in the mainland of the USA, you can change the time zone of the
clock to that of the destination city. If you are travelling outside the US mainland, you can offset the hour.
8.1 To offset time
If the mode switch is in OFFSET position you can set any offset value to match the time in any where
in the world. You can adjust from 0 up to +23 offset by pressing OFFSET* (and adjust 0 to -23
offset by pressing OFF SET *.) If you want to reset offset to zero, it can be done by one touch on OFF-SET
CLR button while the mode switch is at the OFFSET mode.
To read home time, push Home button.
Page 7

8.2 To change Home Time from standard to daylight savings and vice versa
Push and hold Home button then push DST, once you are at different offset.
Note if you are travelling to the India Subcontinent where the local time is half an hour from the main time
zones of the world you may reset the clock by taking off the batteries and then manually set the clock to the
local time according to the procedure described above. Hide the US time zone indicator on the LCD by
putting Mode Switch at Zone/DST position and then push Z.CLR.
9. Back Light
Push LIGHT/SNOOZE button on the top to light up the EL for reading the LCD in the dark.
PI-EX698-3
 Loading...