

ChamSys MagicQ MQ100 Pro, MagicQ MQ50, MagicQ MQ200 Pro, MagicQ MQ300 Pro, Magic MQ100 Xpert Quick Start Manual

www.chamsys.co.uk MagicQ Console Quick Start Manual
ChamSys
MagicQ Quick Start Manual
1 of 34

www.chamsys.co.uk MagicQ Console Quick Start Manual
Care of your console
To keep your console in best condition please observe the following recommendations:
q Keep liquids away from the console. Drinks split over a console may cause irreparable damage.
q Keep the console out of direct sunlight – place the console in the shade. Excess heat from the sun may cause
damage to the touch screens and to the plastic bezel.
q Do not use sharp objects on the touch-screen. If you wish to use an object other than your finger, then use a blunt
object that will not damage the surface.
q Do not block the ventilation grills on the rear panel and underneath the console.
q Do not use the console outside its operating temperature range.
q Handle the console with care when moving or transporting it. The console contains components that may be
damaged by shock such as a hard drive. Always use a padded flight case wherever possible.
q Do not use solvents or cleansers to clean the console. Do not rub firmly on the metal or plastic surfaces – this may
cause the paint or lettering to be removed. Gently use a damp cloth to clean the touch-screen and panels.
Safety Information
q Do not open the front, rear or lower panels of the console unless you have electrical expertise. The console
contains components with voltages that may shock.
q Do not use the console if the power cables are damaged in any way.
q Repairs should only be undertaken by authorised service representatives.
q If liquids are spilt over the console then remove power immediately, and seek advice from your authorised service
representative.
q When transporting the console ensure that there are sufficient people to carry the console.
2 of 34

www.chamsys.co.uk MagicQ Console Quick Start Manual
Quick Start Guide to using MagicQ consoles
Introduction
This document is intended to enable you to get up and running with MagicQ consoles. It is designed to introduce the
layout of the console along with the key functions. It then runs through patching a show, recording Cues and Cue
Stacks and show playback.
This guide is not a substitute for the MagicQ manual. The manual provides detailed information on all the standard
and advanced features of the console. The manual is available from ChamSys website at www.chamsys.co.uk. The
manual is also available on the console - simply press the Help button and use hyperlinks to navigate to the topic you
are interested in.
MagicQ software is being continually improved – please use the information in this manual as a guide only – detailed
information on new features and changes are available in the software changes logs on our web site.
MagicQ Consoles
The MagicQ range of consoles includes the MagicQ MQ100 Pro, MagicQ MQ200 Pro, MagicQ MQ300 Pro, Magic
MQ100 Xpert and the MagicQ MQ50. All the consoles run the same operating system and MagicQ software – they
just vary in styling, number of faders and buttons, and choice of internal or external screen.
3 of 34
www.chamsys.co.uk MagicQ Console Quick Start Manual
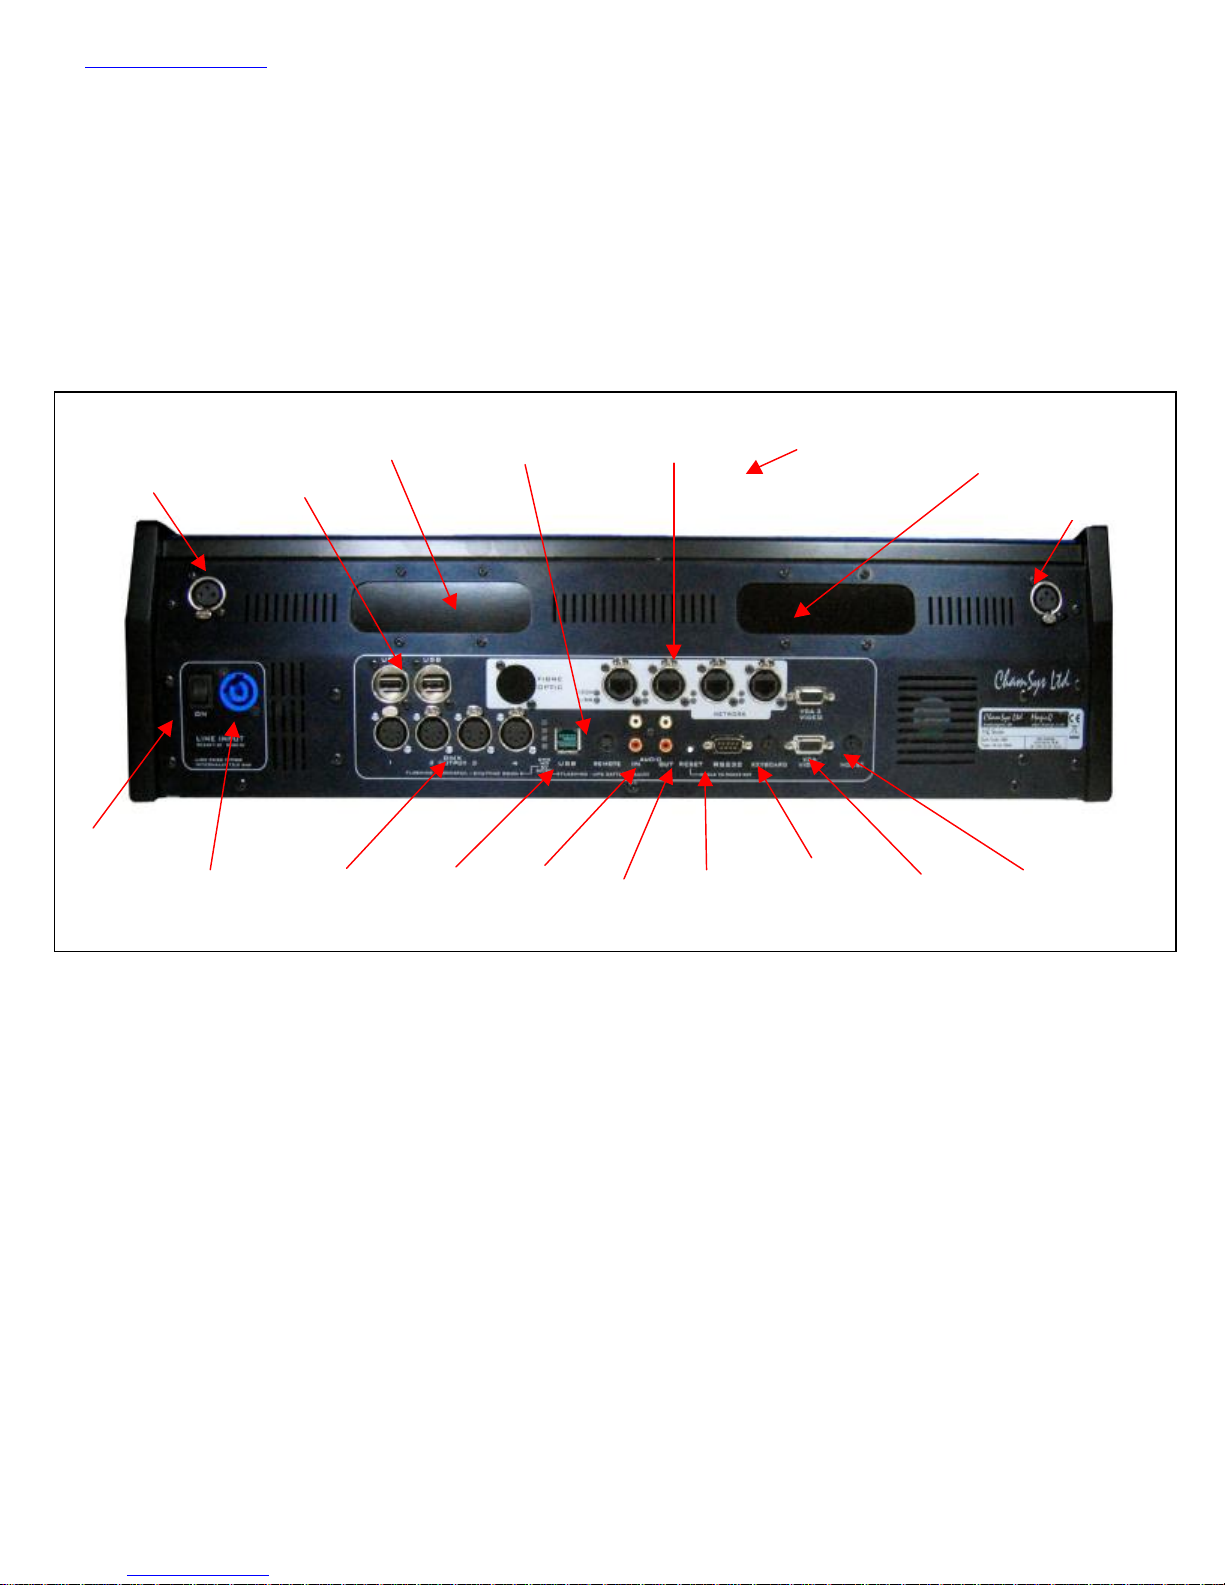
Power socket
Power switch
Audio
ports
Console lamp
USB
Network
ports
Monitor
Mouse
Serial
Reset
Keyboard
port
Remote
trigger
Expansion
module
Expansion
module
USB port
Console lamp
DMX
USB
Connections
The picture below shows the connections on a MQ100 Pro console. The MQ200 Pro and MQ300 Pro have the same
connectors with the addition of extra console lamp sockets.
The expansion module slots can be fitted with MagicQ expansion modules such as the twin DMX512 output module,
and other future expansion modules.
MQ100 Pro
under arm-rest
ports
(110-240Vac)
ports
port
button
port
port
port
4 of 34

www.chamsys.co.uk MagicQ Console Quick Start Manual
Power socket
Power switch
Audio
ports
Console lamp
USB
Network
port
Monitor
Mouse
Serial
Reset
button
Keyboard
port
Remote
trigger
Expansion
module
Expansion
module
USB port
Console lamp
The original MQ100 (MQ100 Xpert) has the following connections.
MQ100
under arm-rest
(110-240Vac)
The rear panel of the MQ50 is similar but with a slightly different layout of the connectors. The MQ50 power
connector is an IEC connector.
port
port
port
port
Plugging up
• Connect the power lead to the power socket labelled LINE INPUT.
• Put the console lamps into the console lamp sockets
• Connect the keyboard to the socket on the back panel marked KEYBOARD
It is not necessary to connect the mouse. The mouse is only required if the touch screen becomes damaged.
DMX connections
The MagicQ Pro series of consoles have 4 direct DMX outputs on the rear of the panel so you can connect your DMX
cables direct to the console.
Alternatively you can use Ethernet and an external Ethernet to DMX converter box such as the ChamSys 3 Universe
Ethernet to DMX converter. Connect the DMX converter to the console Network port via the network cable provided.
When making a direct connection in this way an ”inverted” network cable must be used.
To connect multiple Ethernet to DMX converters to the console, use a network hub or network router using standard
network cables.
5 of 34

www.chamsys.co.uk MagicQ Console Quick Start Manual
Powering up
To power up the console press the power switch on the back panel. On the MQ50 press the red button in the top right
of the front panel. The blue LEDs on the ten S buttons will light up in turn. After a few seconds the screen will come
to life and you will see the operating system quickly performing self tests. Once the self tests are completed the
MagicQ application is started.
Powering down
To power down the console it is necessary to quit the MagicQ application. The console operating system then
performs an automatic shutdown and turns itself off when complete. To quit the MagicQ application, press the SETUP
button and then the QUIT soft button. When asked for confirmation, press the YES.
Note that just removing the power cord to the console will not have the desired effect since the internal UPS continues
to provide power.
If for some reason you are unable to power off the console then you may need to reset it as below.
Resetting the console
Under rare circumstance it may be necessary to reset the console.
To reset the console, press SETUP to go to the Setup Window and press SHIFT and QUIT. This performs an
immediate soft reset of the console - the MagicQ application will be running the show again within about 2-3 seconds.
If for some reason the console does not respond to button presses then try pressing CTRL BREAK on the external
keyboard (hold CTRL whilst pressing BREAK).
If this has no effect then a hard reset may be required. Hard resets should be avoided as they bypass the operating
system shutdown procedures and may cause problems with the file system. To perform a hard reset, press and hold the
reset button on the back panel for 5 seconds.
To force the console to power off completely, press and hold the reset button on the back panel until it powers off
(approximately 10 seconds.)
6 of 34
www.chamsys.co.uk MagicQ Console Quick Start Manual
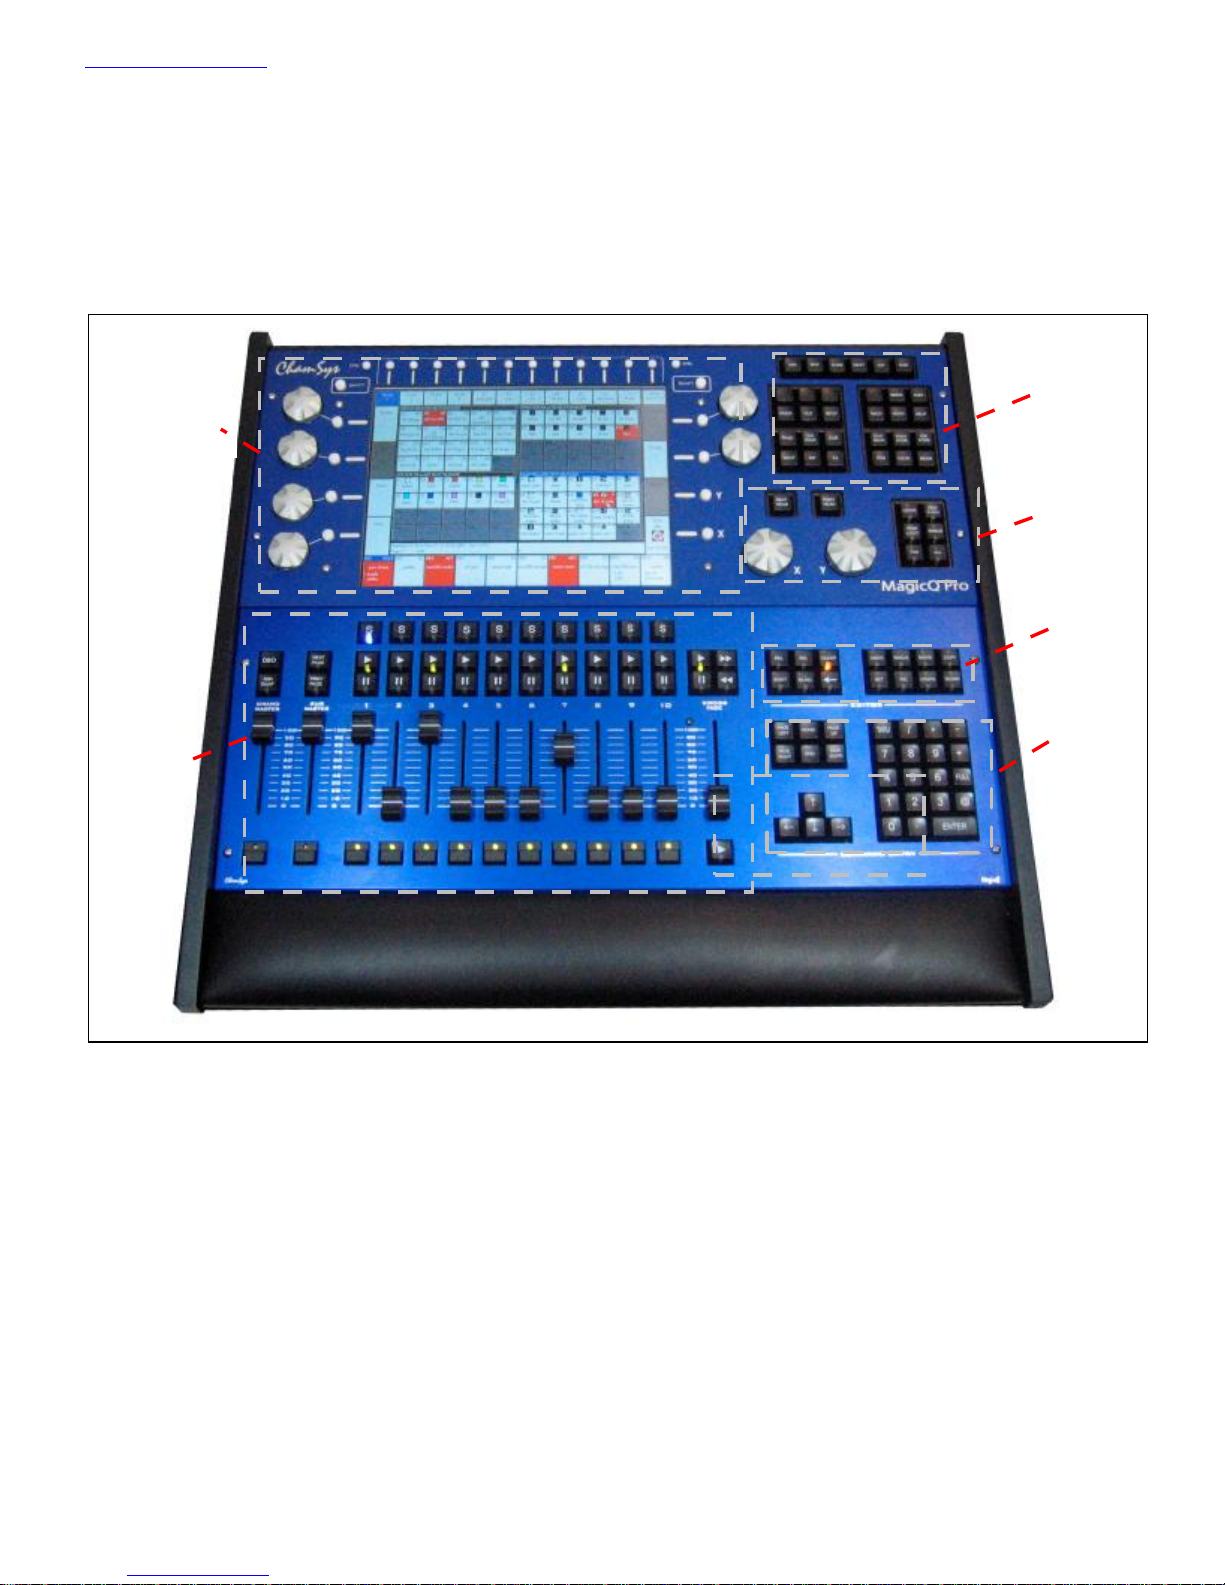
Console Layout
All MagicQ consoles are very similar - they differ only in the number of playback faders. The programming interface
is consistent across the entire range of consoles.
Window select
Touch screen
& encoders
buttons
Head control
section
Editor
buttons
Playback
section
Keypad
section
7 of 34
www.chamsys.co.uk MagicQ Console Quick Start Manual
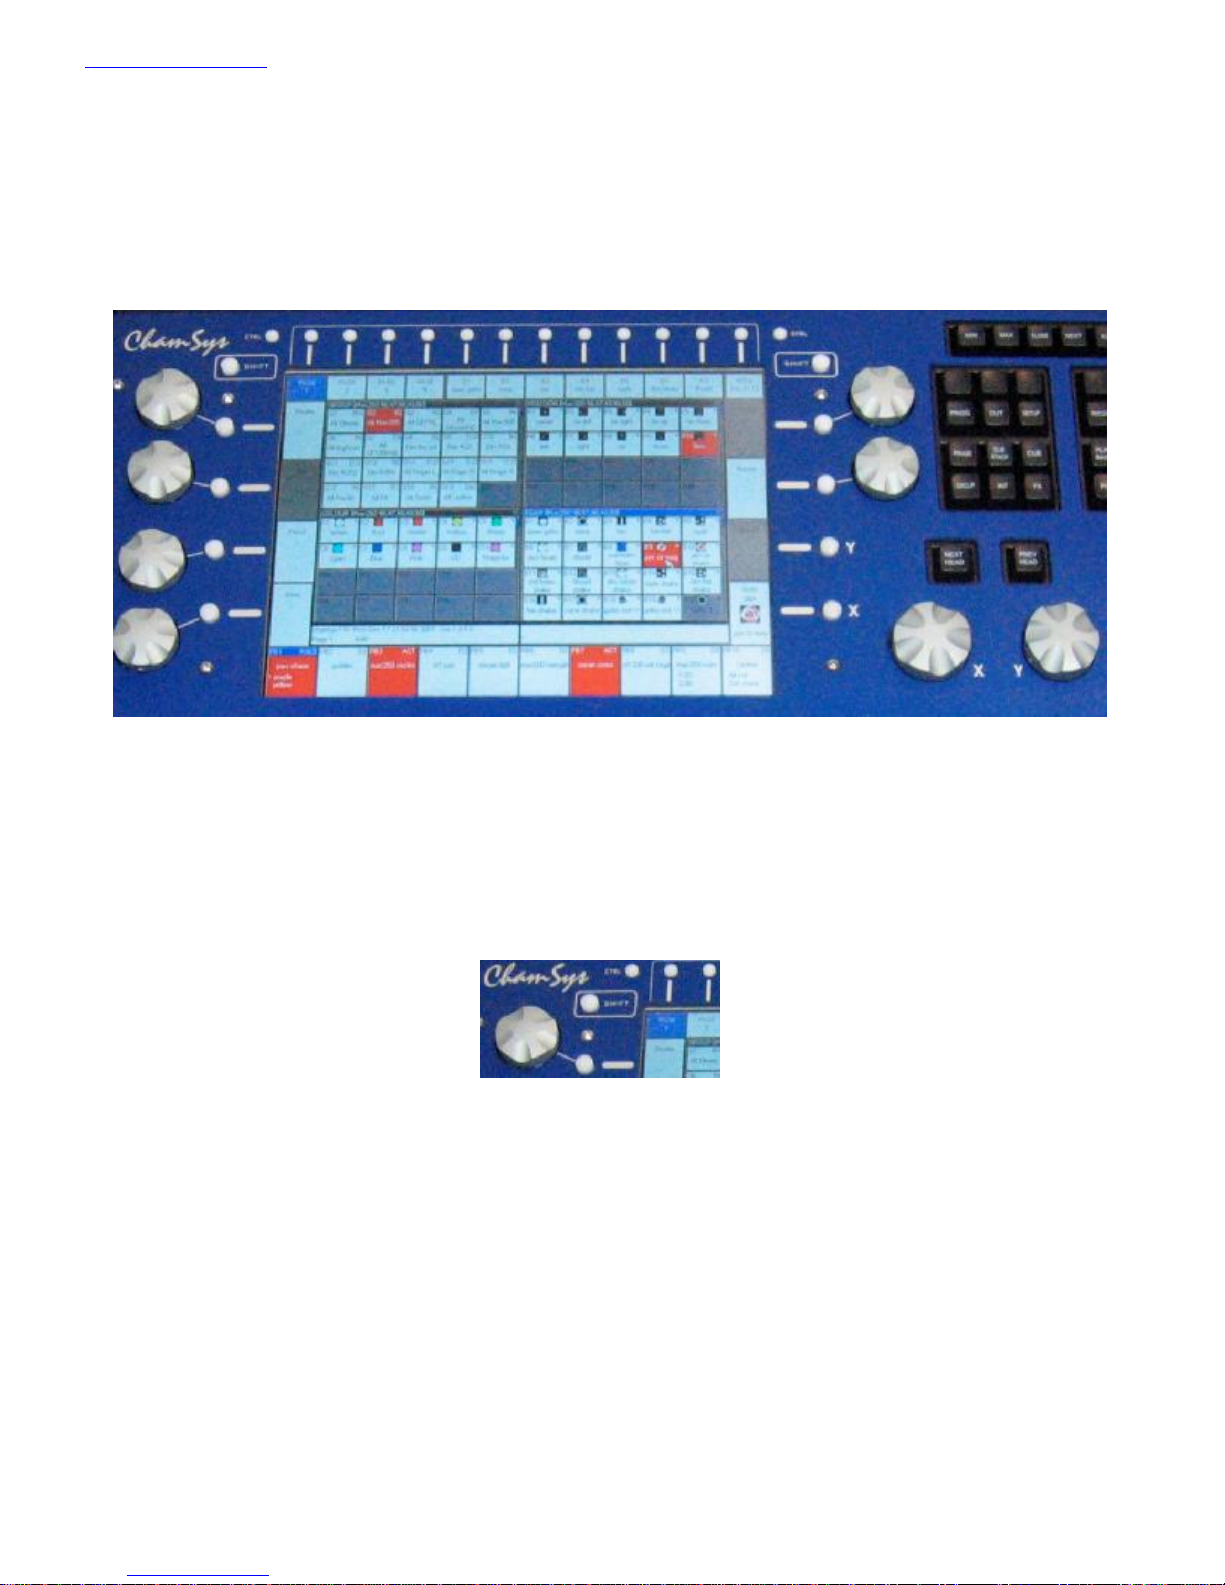
Touch Screen & Encoders
There are 24 buttons and 8 rotary encoders placed around the touch screen.
The buttons are referred to as soft buttons since their function changes according to the active window on the touch
screen. The current function of a soft button is displayed on the touch screen adjacent to the button. To select the
function you can either press the screen or the soft button itself.
The function of the rotary encoders also changes according to the active window with the current function being
displayed adjacent to the encoder.
At the top left and top right of the touch screen there are SHIFT and CTRL buttons. Pressing theses buttons selects
alternate functions for the soft buttons and encoders.
8 of 34

www.chamsys.co.uk MagicQ Console Quick Start Manual
Windows
The area in the centre of the screen is the windows section in which the various control windows are displayed. There
are two main types of windows – boxes style windows which have large boxes such as the Group Window and
spreadsheet style editing windows such as the Patch Window.
A window is displayed by pressing the appropriate window button. Changing window does not affect programming or
playback.
Multiple windows can be displayed at one time by sizing the windows appropriately. In addition a complete
configuration of windows – i.e. a complete view can be selected using CTRL and the top soft buttons. For example, to
select the Palettes view (Groups, Positions, Colours and Beams) press CTRL and the first top soft button.
When a window button is pressed, that window becomes the active window. The active window is on the top of the
screen and is easily identified as the window with the highlighted title bar at the top. It is also the window with the
cursor in it.
An item in a window can be selected either
a) By pressing the touch screen over the appropriate part of the window
b) By moving the cursor to the appropriate position and pressing the ENTER button.
c) By moving the mouse to the position and pressing the left mouse button.
The cursor can be moved around the active window using the cursor keys in the Editor area of the console or via the
cursor keys on the keyboard. PG UP, PG DN, PG LEFT and PG RIGHT can be used to scroll the window in the
appropriate direction. HOME and END can be used to get to the start and end of the window respectively.
9 of 34
www.chamsys.co.uk MagicQ Console Quick Start Manual
Towards the bottom of the touch screen are two small windows, the Status Display and the Input Display. The Status
Display shows the current date and time, the ADD / SWAP status of the console and other relevant status information.
The Input Display shows the data that has been currently entered through the keypad and the keyboard. Note that text
is not entered into the main Windows until ENTER is pressed. This allows the user to choose whether the keyboard
data is SET into fields in the windows or onto Playbacks.
After a command has been entered it also confirms that the command has been accepted and shows any error messages
when a command is not possible.
Head Control
The area around the two large rotary encoders is referred to as the head control area. It is used to alter the parameters
of individual heads and apply effects such as fans over groups of heads.
The NEXT HEAD and PREV HEAD buttons are used to select
an individual head to modify.
The other buttons control the selection mode; LOCATE,
HIGHLIGHT, FAN, SINGLE, ODD/EVEN, and ALL.
10 of 34
www.chamsys.co.uk MagicQ Console Quick Start Manual
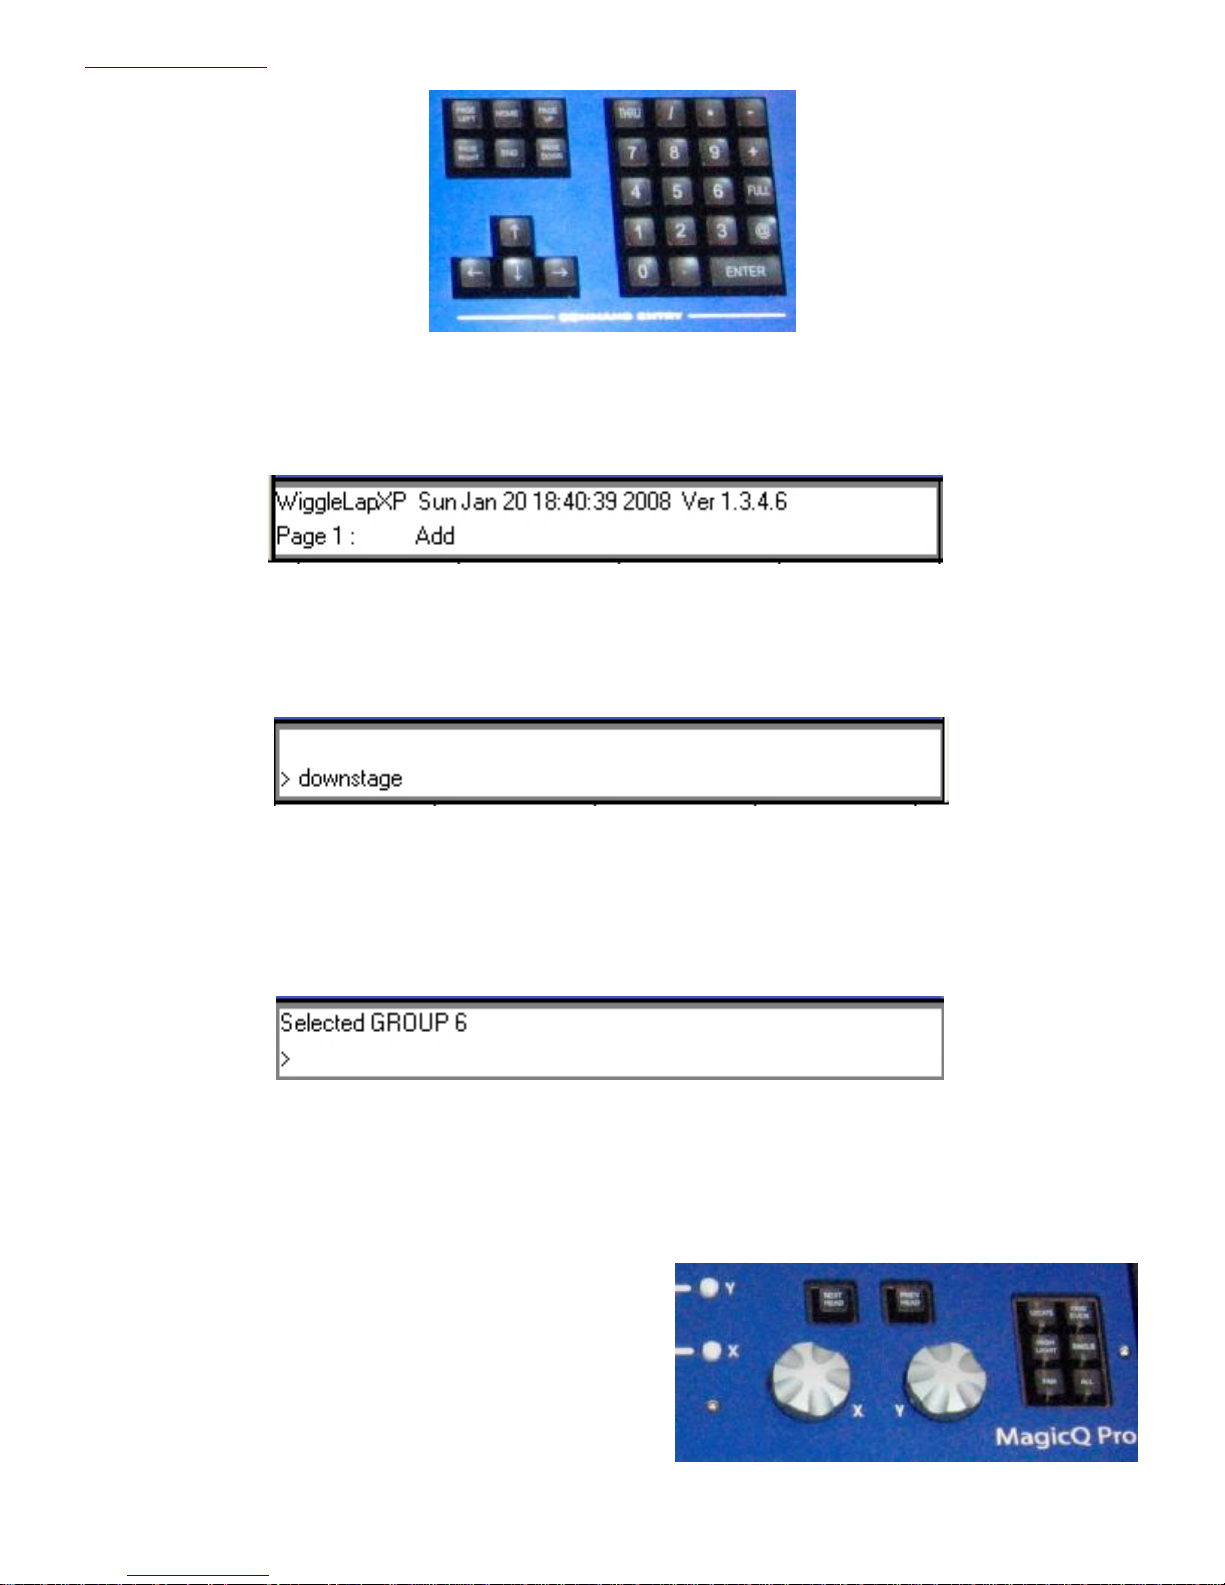
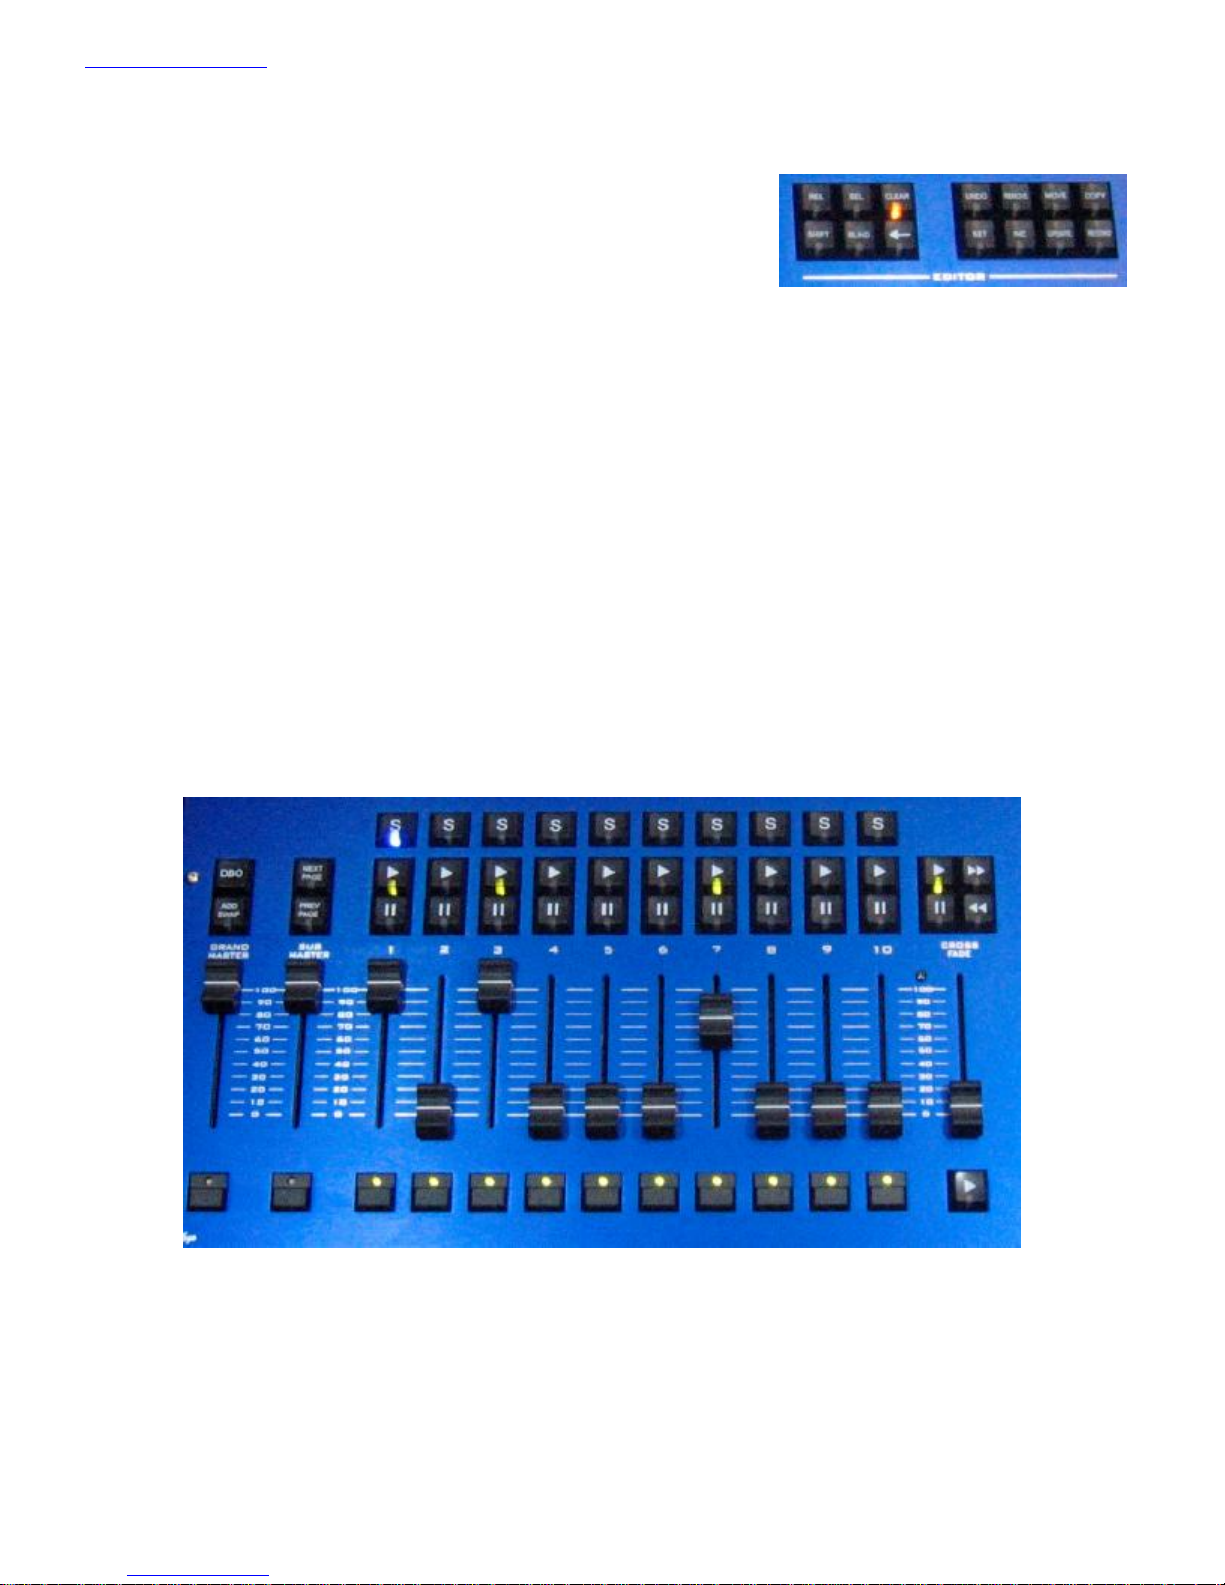
Editor buttons
The Editor buttons are used to modify program data. The 8 buttons on the
right hand side are the action buttons which are used to modify show data.
The action buttons are
UNDO REMOVE MOVE COPY
SET INCLUDE UPDATE RECORD
The buttons on the left:
BLIND and CLEAR affect the programmer
REL and SELECT affect playbacks
SHIFT selects alternate functions
<-- undoes keyboard input and clears actions
Playback
The Playback area is situated directly below the touch screen and consists of 10 playbacks each with a fader and four
buttons (FLASH, GO, STOP, SELECT). The area above each of the playbacks on the touch screen is used to provide
information about the status of the playback.
The playback area also contains a Grand Master, a Sub Master, Page Select buttons and a Manual Playback for taking
control of Cue Stacks.
The cross fade section contains a GO, STOP. FWD, BCK buttons, a cross fader and a master GO button. The cross
fade section controls the current playback selected with the S button.
11 of 34
 Loading...