

Champion Power Equipment C75520 User Manual

Table of Contents
Introduction ..................................... 1
Portable Power Generator........................ 1
Accessories................................................ 1
This Booklet.............................................. 1
Manual Conventions.........................2
Safety Rules......................................3
Controls and Features.......................5
Generator.................................................. 5
Power Panel .............................................. 6
Parts Included .......................................... 7
Assembly ..........................................8
Remove the Generator from the Shipping
Carton .......................................................8
Install the Wheel Kit.................................8
Install the Support Leg.............................8
Install the Handle.....................................8
Optional: Install the Spark Arrester.........8
Add Engine Oil .........................................8
Connect LPG cylinder............................... 9
Grounding................................................. 9
Operation .......................................10
Generator Location................................. 10
Grounding............................................... 10
Starting the Engine................................. 10
Connecting Electrical Loads................... 10
Stopping the Engine ............................... 10
Do Not Overload Generator ................... 10
Capacity............................................... 10
Power Management .............................11
Wattage Reference Chart.........................11
Maintenance................................... 12
Engine Maintenance............................... 12
Oil........................................................ 12
Spark Plugs ......................................... 12
Air Filter.............................................. 12
Spark Arrester..................................... 13
Cleaning .............................................. 13
Adjustments........................................ 13
Maintenance Schedule........................ 13
Generator Maintenance.......................... 13
Storage ........................................... 14
Engine Storage........................................ 14
Generator Storage................................... 14
Specifications ................................. 15
Engine Specifications.............................. 15
Generator Specifications......................... 15
Fuel.......................................................... 15
Oil............................................................ 15
Spark Plugs ............................................. 15
Valve Clearance....................................... 15
Parts Diagram ......................................... 16
Engine.................................................. 16
Power Panel......................................... 17
Generator ............................................18
Parts List .................................................19
Troubleshooting .............................23
Warranty ........................................24
Warranty Qualifications .........................24
Repair/Replacement Warranty ..............24
Do not return the unit to the place of
purchase..................................................24
Warranty Exclusions...............................24
Limits of Implied Warranty and
Consequential Damage ...........................24
Contact Information ...............................24
Address................................................24
Customer Service ................................24
Technical Service.................................24
Notes ..............................................28

Introduction
Introduction
Congratulations on your purchase of a
Champion Power Equipment generator. CPE
designs and builds generators to strict
specifications. With proper use and
maintenance, this generator will bring years
of satisfying service.
Portable Power Generator
This unit is a liquid propane gas (LPG)
engine driven, alternating current (AC)
generator. It is designed to supply electrical
power for lighting, appliances, tools and
similar equipment.
Record the model and serial numbers as well as date and place of purchase for future reference.
Have this information available when ordering parts and when making technical or warranty
inquiries.
Champion Power Equipment Support
Accessories
Champion Power Equipment manufactures
and sells accessories designed to help you
get the most from your purchase. To find out
more about our covers, power cables and
storm kits, please visit our web site at
www.championpowerequipment.com
This Booklet
Every effort has been made to ensure the
accuracy and completeness of the
information in this manual. We reserve the
right to change, alter and/or improve the
product and this document at any time
without prior notice.
(877) 338-0999
Model Number
C75520E
Serial Number
Date of Purchase
Purchase Location
1
Manual Conventions
Manual Conventions
This manual uses the following symbols to
help differentiate between different kinds of
information. The safety symbol is used with
a key word to alert you to potential hazards
in operating and owning power equipment.
Follow all safety messages to avoid or reduce
the risk of serious injury or death.
CAUTION
CAUTION indicates a potentially hazardous
situation which, if not avoided,
minor or moderate injury.
may
result in
CAUTION
DANGER
DANGER indicates an imminently hazardous
situation which, if not avoided,
or serious injury.
will
result in death
WARNING
WARNING indicates a potentially hazardous
situation which, if not avoided,
death or serious injury.
could
result in
CAUTION used without the safety alert symbol
indicates a potentially hazardous situation which,
if not avoided,
may
result in property damage.
NOTE
If you have questions regarding your generator,
we can help. Please call our help line at (877)
338-0999.
2

Safety Rules
DANGER
Safety Rules
Generator produces powerful voltage.
WARNING
Read this manual thoroughly before operating
your generator. Failure to follow instructions
could result in serious injury or death.
WARNING
The engine exhaust from this product contains
chemicals known to the state of California to
cause cancer, birth defects, or other reproductive
harm.
DANGER
Generator exhaust contains carbon monoxide, a
colorless, odorless, poison gas. Breathing carbon
monoxide will cause nausea, dizziness, fainting or
death.
Operate generator outdoors only in a well
ventilated area
DO NOT operate the generator inside any
building, enclosure or compartment, including the
generator compartment of a recreational vehicle.
DO NOT allow exhaust fumes to enter a confined
area through windows, doors, vents or other
openings.
DANGER
Rotating parts can entangle hands, feet, hair,
clothing and/or accessories.
DO NOT touch bare wires or receptacles.
DO NOT use electrical cords that are worn,
damaged or frayed.
DO NOT operator generator in wet weather.
DO NOT allow children or unqualified persons to
operate or service the generator
Use a ground fault circuit interrupter (GFCI) in
damp areas and areas containing conductive
material such as metal decking.
Use approved transfer equipment to isolate
generator from your electric utility and Notify
your utility company before connecting your
generator to your power system.
WARNING
Sparks can result in fire or electrical shock.
When servicing the generator:
Disconnect the spark plug wire and place it
where it cannot contact the plug.
DO NOT check for spark with the plug removed.
Use only approved spark plug testers.
WARNING
Running engines produce heat.
Severe burns can occur on contact.
Combustible material can catch fire on contact.
DO NOT touch hot surfaces.
Avoid contact with hot exhaust gases.
Allow equipment to cool before touching.
Maintain at least three feet of clearance on all
sides to ensure adequate cooling.
Maintain at least five feet of clearance from
combustible materials.
Traumatic amputation or severe laceration can
result.
Keep hands and feet away from rotating parts.
Tie up long hair and remove jewelry.
Operate equipment with guards in place.
DO NOT wear loose-fitting clothing, dangling
drawstrings or items that could become caught.
3
Safety Rules
DANGER
Propane (LPG) is highly flammable and explosive.
Fire or explosion can cause severe burns or death
if the gas is ignited.
Before starting the generator
Turn the generator off.
Inspect your LPG tank for damage or leaks.
Attach only approved tanks that have been
properly filled by an approved station.
DO NOT light or smoke cigarettes.
Replace the hose at the first sign of a leak or if
age-cracking becomes apparent.
When starting the generator
DO NOT attempt to start a damaged generator.
Make certain that the LPG tank, air filter, spark
plug, fuel lines and exhaust system are properly
in place.
Make certain that the generator resting firmly on
level ground.
When operating the generator:
DO NOT move or tip the generator during
operation.
DO NOT tip the generator or allow oil to spill.
When transporting or servicing the
generator:
Make certain that the LPG tank is disconnected
and properly shut off.
Disconnect the spark plug wire.
When storing the generator:
Store away from sparks, open flames, pilot lights,
heat and other sources of ignition.
CAUTION
Exceeding the generator’s running capacity can
damage the generator and/or electrical devices
connected to it
DO NOT overload the generator.
Start the generator and allow the engine to
stabilize before connecting electrical loads.
Connect electrical equipment in the off position,
and then turn them on for operation.
Turn electrical equipment off and disconnect
before stopping the generator.
DO NOT tamper with the governed speed.
DO NOT modify the generator in any way.
WARNING
Rapid retraction of the starter cord will pull hand
and arm towards the engine faster than you can
let go.
Unintentional startup can result in entanglement,
traumatic amputation or laceration.
Broken bones, fractures, bruises or sprains could
result.
When starting engine, pull the starter cord slowly
until resistance is felt and then pull rapidly to
avoid kickback.
DO NOT start or stop the engine with electrical
devices plugged in.
CAUTION
Improper treatment or use of the generator can
damage it, shorten its life and void your
warranty.
Use the generator only for intended uses.
Operate only on level surfaces.
DO NOT expose generator to excessive moisture,
dust, or dirt.
DO NOT allow any material to block the cooling
slots.
If connected devices overheat, turn them off and
disconnect them from the generator.
DO NOT use the generator if:
Electrical output is lost
Equipment sparks, smokes or emits flames
Equipment vibrates excessively
Know how to stop the generator quickly in
case of an emergency.
Understand the use of all generator controls,
receptacles and connections.
Do not allow children to operate the
generator without proper supervision.
4
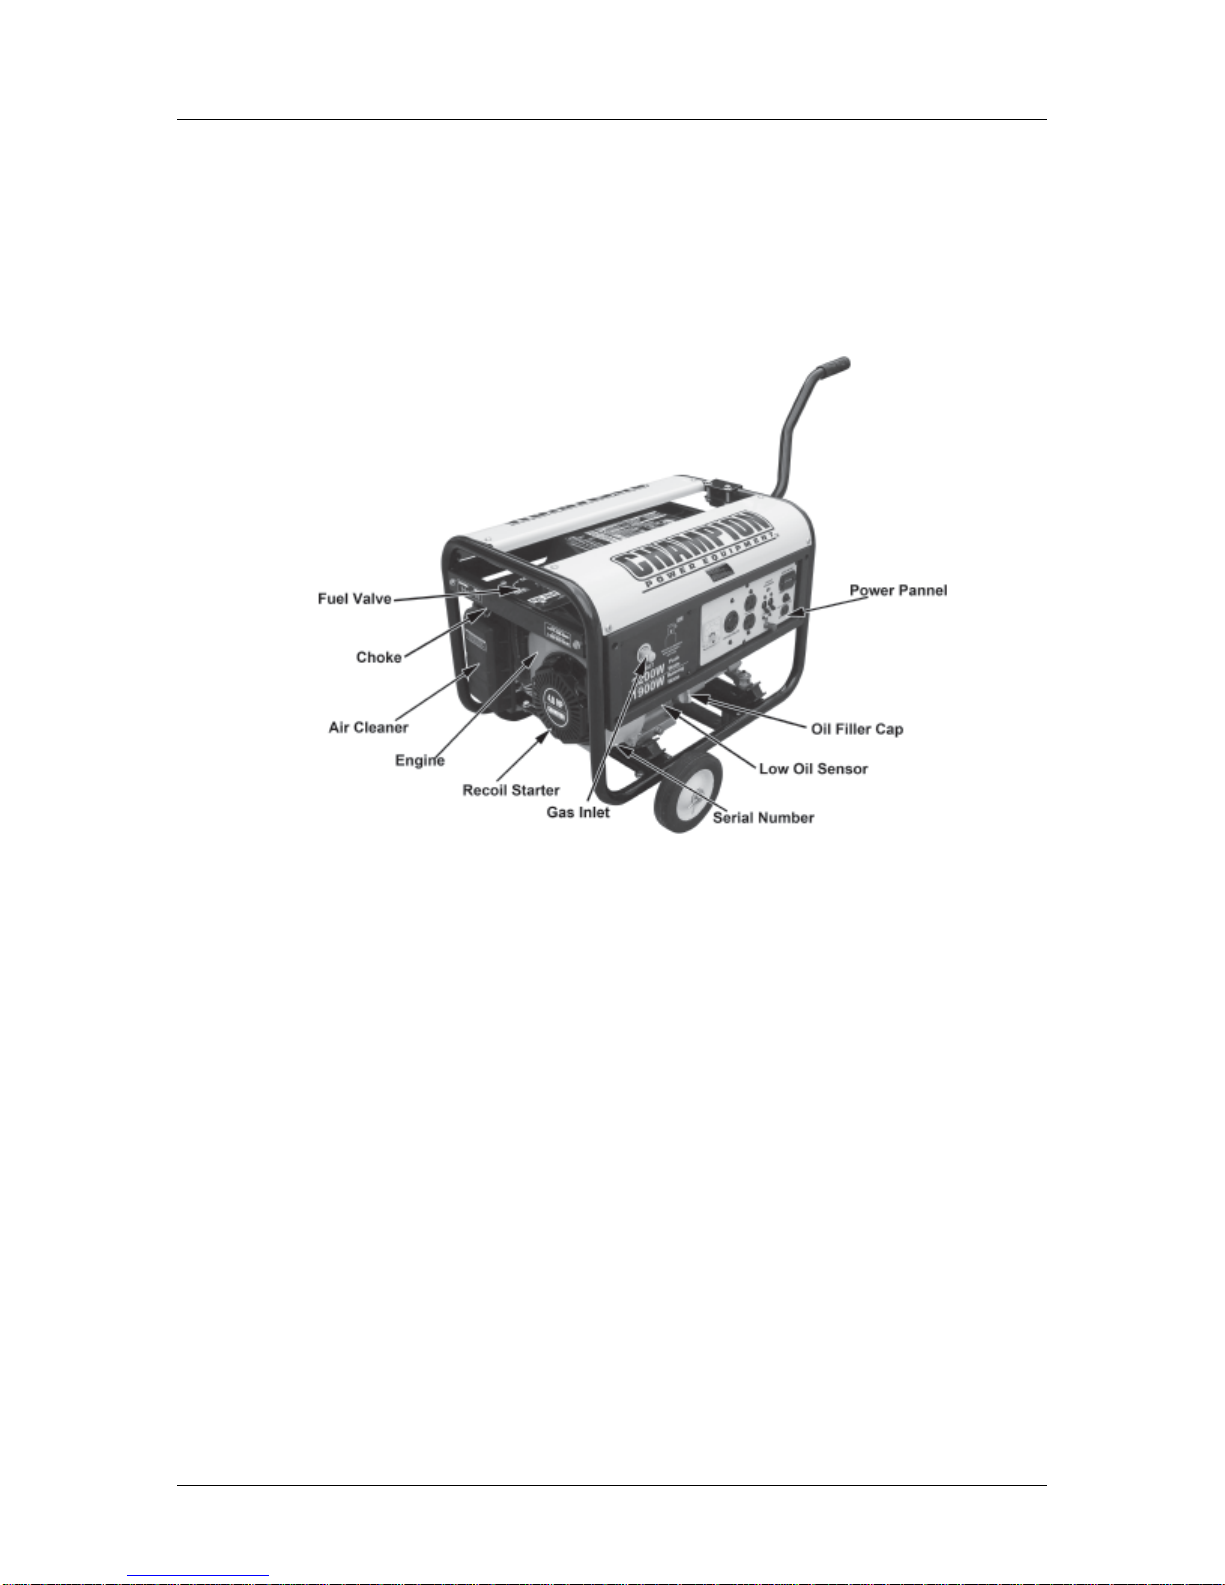
Controls and Features
Controls and Features
Read this owner’s manual before operating your generator. Familiarize yourself with the location
and function of the controls and features. Save this manual for future reference.
Generator
Oil Filler Cap – Check and fill engine oil
level.
Engine – 4.0 HP OHV engine.
Air Cleaner – Protects the engine by
filtering dust and debris from the intake air.
Choke – Used to start the engine
Recoil Starter – Used to start the engine
Fuel Valve – Turn this valve to the “On”
position to supply fuel to the engine.
Gas Inlet– Nipple for LPG connection.
Serial Number – Please have this number
available when calling for assistance.
Low Oil Sensor – Senses the level of oil in
the crankcase and shuts the engine down if
the level falls too low.
Power Panel – See “Power Panel”
5
Controls and Features
Power Panel
Receptacles
120/240 V 30 A Twist9 A circuit breaker on each 120 Volt leg of
the receptacle. This receptacle powers 240
Volt AC, 60 Hz, single phase loads requiring
up to 8 A or 1900 Watts of power. If an L1430P plug is wired for only one 120 Volt leg
(3-wire connection) then this receptacle
powers 120 Volt AC, 60 Hz, single phase
loads requiring up to 9 A or 1100 Watts of
power.
120 V 20 A Duplex
protected by a 9 A circuit breaker. Use each
receptacle to operate 120 Volt AC, single
phase, 60 Hz loads requiring up to 9 A 0r
1100 Watts of power.
12 V 8.3 A DC
recharge a 12 Volt automotive or utility style
storage battery with the battery charge
cables provided. This receptacle cannot
charge 6 Volt batteries and cannot be used
The combined running load of all the receptacles shall not exceed 1900 Watts (16 A at 120 VAC or
8 A at 240 VAC).
– this receptacle allows you to
Lock – protected by a
– each receptacle is
to crank an engine. It is not recommended
for charging deep cycle batteries. Do not
charge batteries for extended periods of time
without checking.
Voltmeter – Displays the output voltage of
the generator.
Circuit Breakers – Protects the generator
against electrical overload.
Ground Terminal – Consult an electrician
for local grounding regulations.
Gas Inlet – Nipple for LPG connection.
Hour Meter – Records the cumulative
number of hours the generator has been in
use.
6
Controls and Features
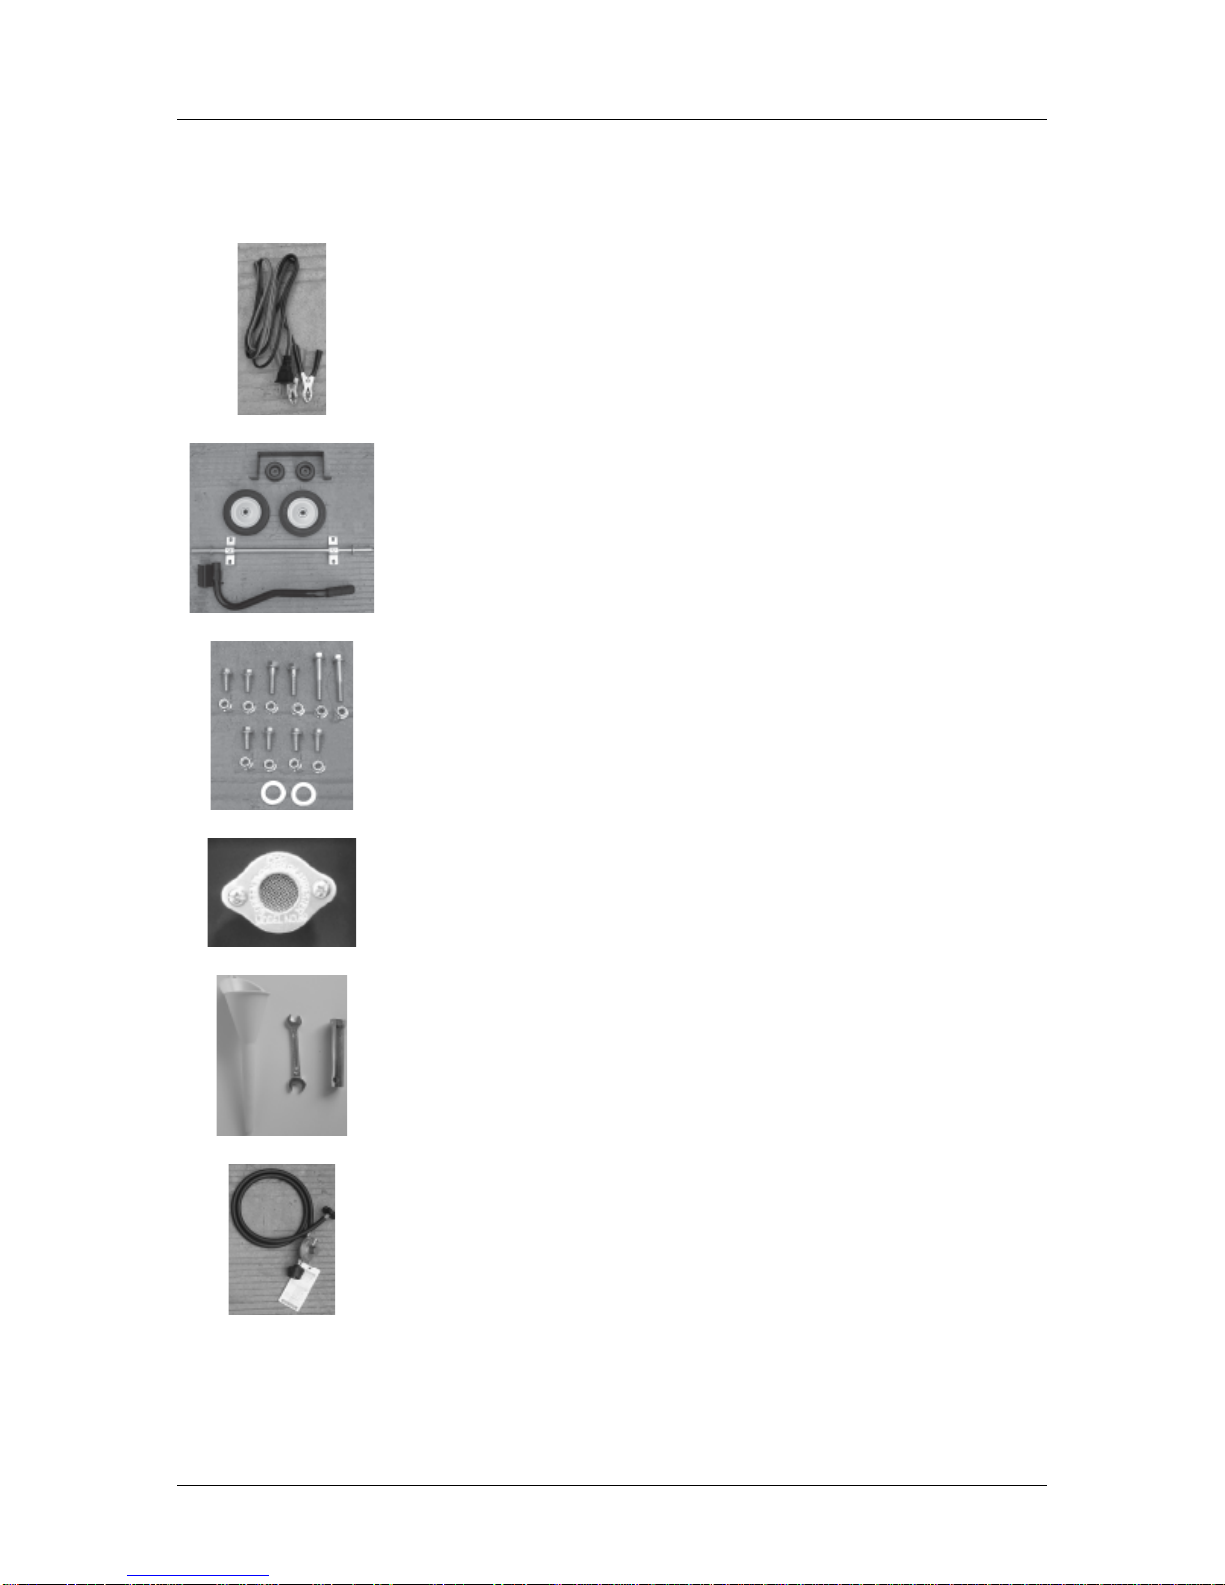
Parts Included
Your C75520E LPG-Powered Generator ships with the following parts:
6 foot Battery Cable
Wheel Kit
Axle 1 piece
10” Solid Wheel 2 pieces
Vibration Mounts 2 pieces
Handle Assembly 1 set
Handle Lock Pins 2 pieces
Bolt Kit
Wheel Retaining Pins 2 pieces
Flat Washers 2 pieces
Cap Screws and Nuts 10 sets
Spark Arrester Kit
Spark Arrester 1 piece
Cover Plate 1 piece
Screws, Lock Washers 2 pieces
Oil Funnel 1 piece
Wrench 1 piece
Spark Plug Socket 1 piece
6.5 foot Gas Hose and Regulator Assembly
7

Assembly
Assembly
Your generator requires some assembly.
This unit ships from our factory without oil.
It must be properly serviced with LP gas and
oil before operation.
If you have any questions regarding the
assembly of your generator, call our help
line at (877) 338-0999. Please have your
serial number and model number available.
Remove the Generator from
the Shipping Carton
1. Set the shipping carton on a solid, flat
surface.
2. Remove everything from the carton
except the generator.
3. Carefully cut each corner of the box
from top to bottom. Fold each side flat
on the ground to provide a surface area
to install the wheel kit and support leg.
Install the Wheel Kit
CAUTION
The wheel kit is not intended for over-the-road
use.
You will need the following tools to install
the wheels:
12 mm wrench
Socket wrench with a 12 mm socket
Pliers
1. Before adding oil to the engine, tip the
generator slowly so that the engine side
is up.
2. Attach the axle assembly to the
generator frame using four cap screws
(M8 x 20) and nuts.
3. Slide a wheel onto the axle. Make certain
that the valve stem is facing outward.
4. Place a washer on the end.
5. Install the cotter pin through the hole on
the end of the axle.
6. Carefully bend the legs of the cotter pin
back around the axle.
7. Repeat steps 3-6 to attach the second
wheel.
Install the Support Leg
1. Attach the rubber vibration mount to
the support leg with a cap screw
(M8x20) and lock nut (M8).
2. Attach the support leg to the generator
frame with cap screws (M8x30) and lock
nuts (M8).
3. Tip the generator slowly so that it rests
on the wheels and support leg.
Install the Handle
1. Line up the holes at the base of the
handle with the receiving holes on the
generator frame.
2. Thread cap screws (M8x50) through the
frame and handle.
3. Place a lock nut (M8) on the end of the
cap screw and fasten securely. DO NOT
over tighten the lock nut.
Optional: Install the Spark
Arrester
Insert the spark arrester screen into the
muffler outlet. Secure the spark arrester by
placing the cover plate over the end of the
screen, with the lettering facing outward.
Secure the cover plate with the two screws
and lock washers provided with the spark
arrester kit.
Add Engine Oil
CAUTION
DO NOT attempt to crank or start the engine
before it has been properly filled with the
recommended type and amount of oil. Damage
to the generator as a result of failure to follow
these instructions will void your warranty.
1. Place the generator on a flat, level
surface.
2. Remove oil fill cap/dipstick to add oil.
3. Add 0.63 qt (0.6 L) of oil and replace oil
fill cap/dipstick.
4. Check engine oil level daily and add as
needed.
8
 Loading...