

Champion Power Equipment C41155 Operator's Manual
Congratulations on your purchase of a Champion Power Equipment generator. CPE designs and builds generators to
strict specifications and with proper use and maintenance this generator should bring you years of satisfying service.
SAFETY PRECAUTIONS
WARNING
Your generator can develop tremendous power forces and if used unsafely or improperly could result in property damage, serious
injury, or death. Throughout this manual you will find the following symbols for caution, warning, and danger. Pay particular attention to
the notes preceded by these symbols as they are written for your safety. Ultimately, safe operation of this device rests with you, the
operator.
DANGER
Read, study, and follow all instructions before operating this device. Failure to heed these instructions may
result in personal injury and/or property damage.
Indicates a hazard which, if not avoided, will result in death or serious injury.
WARNING
CAUTION
Indicates a potentially hazardous situation which, if not avoided could result in death or serious injury.
Indicates a potentially hazardous situation which, if not avoided, may result in minor or moderate injury or
equipment damage. This notation is also used to alert against unsafe practices.
SAFETY AND OPERATION INSTRUCTIONS
WARNING
Failure to follow these instructions and warnings may result in death, personal injury, or property damage.
DANGER
WARNING
WARNING
WARNING
WARNING
WARNING
WARNING
WARNING
Gasoline engines produce toxic carbon monoxide exhaust fumes. Breathing exhaust fumes will cause serious injury
or death.
No modifications, alterations, or deviation to the generator are authorized by the manufacturer and should not be made.
Read, study, and understand the operator's manual prior to operation of this product. Read, study and understand the
engine manual prior to operation. Follow all warnings and instructions.
Know your equipment. Check the applications, limitations, and potential hazards with this unit and its placement or
location.
The engine exhaust from this product contains chemicals known to the State of California to cause cancer, birth defects or
other reproductive harm.
Gasoline is flammable. Check for spilled fuel or fuel leaks. Stop engine and allow to cool at least 2 minutes before
refueling.
Equipment must be used on a hard, level surface, free from grease, fuel and other combustible materials.
Engine must not be run at excessive speeds. Operating an engine at excessive speeds increases the hazard of personal
injury. Do not tamper with the parts which may increase or decrease the speed of the engine.
WARNING
WARNING
WARNING
WARNING
WARNING
WARNING
WARNING
WARNING
Do not operate this generator in the rain or unusually wet conditions.
This generator is designed for outdoor use only; do not use this generator inside any building or enclosure including the
generator compartment of a recreational vehicle (RV), garages, basements, crawl spaces and other locations where CO
gas can collect and cause death or injury. Fire or an explosion may result.
No user-performed modifications, including venting of exhaust and/or cooling ventilation are authorized by the
manufacturer, Also, allow at least two feet of clearance on all sides of the generator even while operating the unit
outdoors.
If this unit is used for backup power in the event of a utility power failure, the following step must be taken: Before
connecting the generator to an electrical system, open the main circuit breaker or main switch serving the system, to
isolate the generator system from the electric utility. Failure to isolate the generator and utility systems may result in
damage to the generator and may also result in injury or death to electric utility workers, due to a back feed of electrical
energy.
This product is equipped with a spark-arresting muffler. If the product will be used around flammable materials, or on land
covered with materials such as agricultural crops, forest, brush, grass, or other similar items, then the approved spark
arrester must be installed. SPARK-ARRESTERS ARE REQUIRED IN THE STATE OF CALIFORNIA. Spark arresters are
also required on some U.S. Forest Service land and may also be legally required under other statutes and ordinances.
Never step over a generator.
Failure to heed these warnings may result in personal injury and/or property damage. No modifications, alterations, or
deviations to the generator are authorized by the manufacturer and should not be made.
Engine speed has been factory set to provide safe operation. Tampering with the engine speed adjustment could result in
overheating of attachments and could cause a fire. Never attempt to “speed up” the engine to obtain more performance.
Both the output voltage and frequency will be thrown out of standard by this practice, endangering attachments and the
user.
1
WARNING
Never refuel a generator while it is in operation. Make sure the generator is not running. (This is a severe risk of
fire.)
WARNING
CAUTION
CAUTION
CAUTION
CAUTION
Engine Exhaust, some of it’s constituents, and certain vehicle components contain or emit chemicals known to the State of
California to cause cancer and birth defects or other reproductive harm.”
This product contains chemicals, including lead, known to the State of California to cause cancer, and birth defects or other
reproductive harm. Wash hands after handling .”
This generator has been shipped from the factory without oil in the crankcase. Operating the unit without oil can ruin the
engine.
You MUST unplug any load from the generator before starting. This will help to prevent permanent damage to any
appliances.
Do not exceed rated capacity of current draw. Current load must be kept within rating on the generator label. Overloading
will damage the unit and/or shorten its life.
For starting, grasp the starter grip and pull slowly until you feel resistance. Then pull firmly. Repeat if necessary with
choke opened slightly. When engine starts, open the choke gradually until the engine is warm.
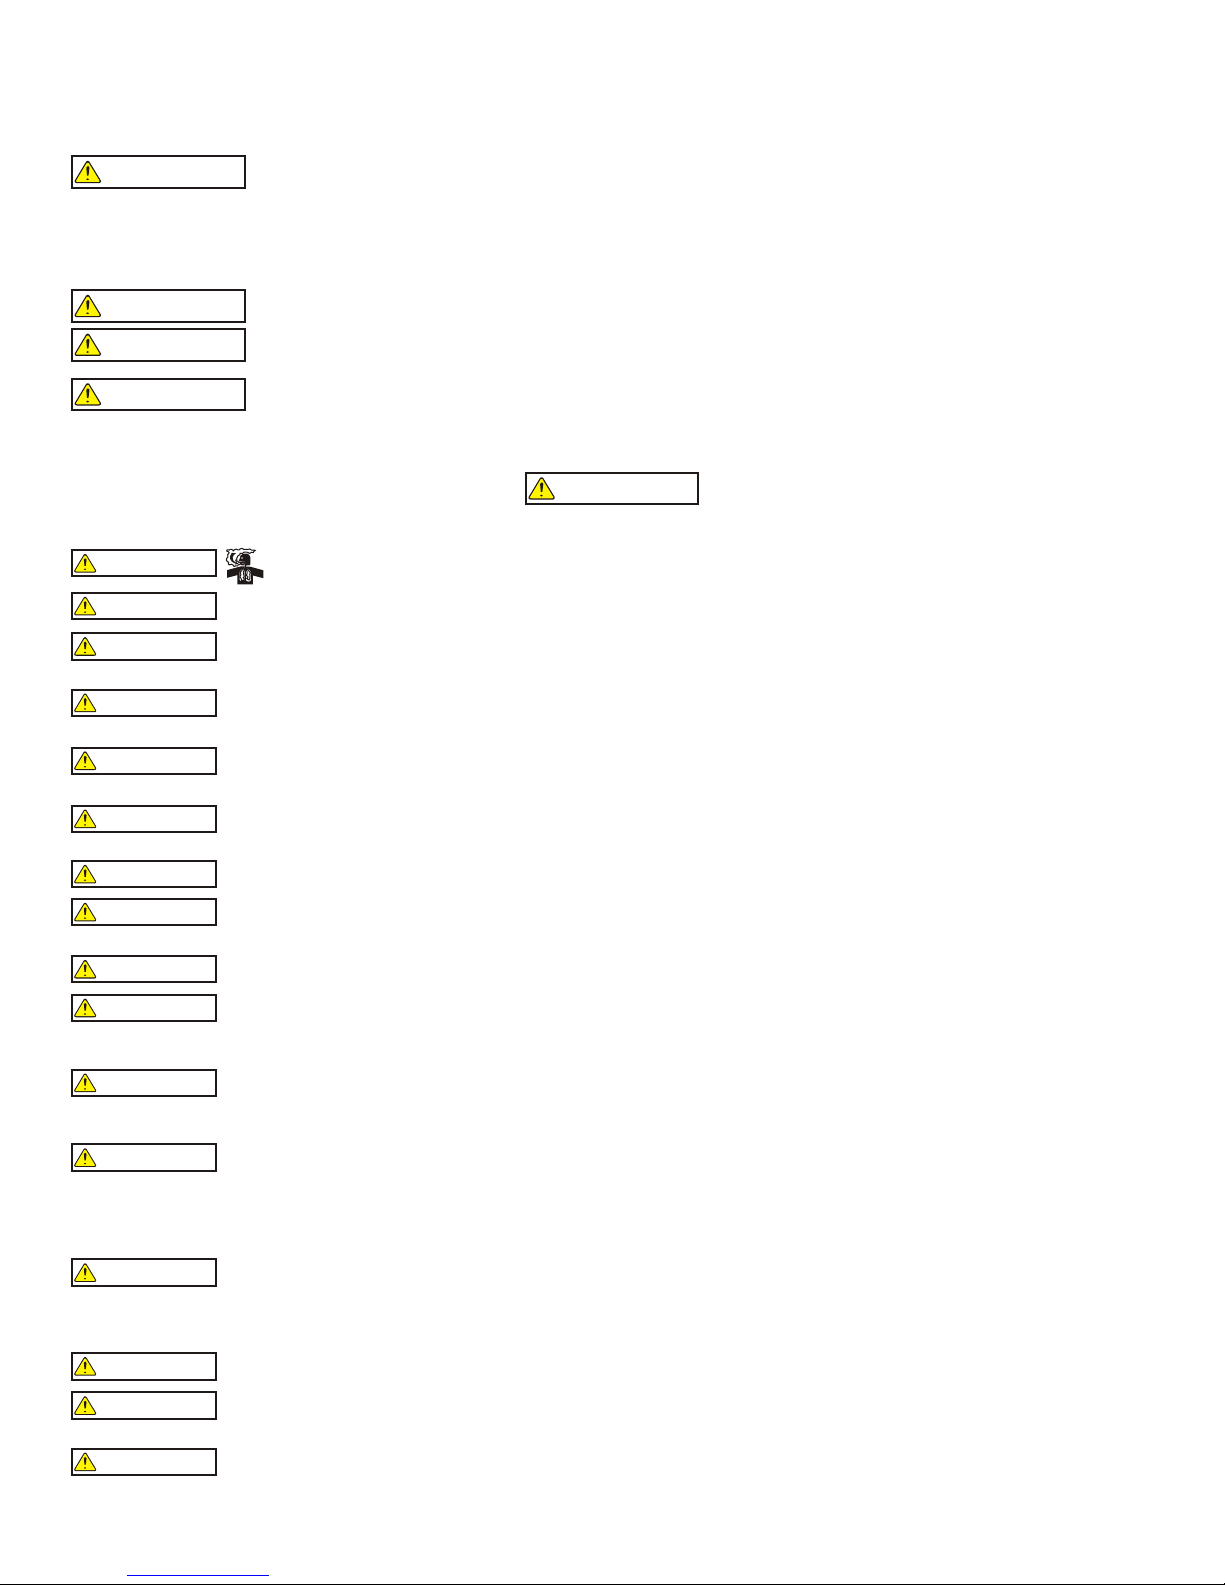
INCLUDED WITH YOUR GENERATOR
1. Generator
2. 6 ft Battery Cable
3. Wheel Kit
(1 Axle, 2 Wheels, 2 Vibration Mounts, 1 Handle Assembly, (1 Support Leg)
4. Bolt Kit
(2 Wheel Retaining Pins, 2 Flat Washers, 10 Cap Screws and Nuts)
5. Spark Arrestor, Cover Plate and 2 Screws w/ Lock Wahsers
1 set
1 set
1 set
1 set
1 set
2 3
NOT INCLUDED WITH YOUR GENERATOR
4
1 2 3
1. NEMA L14-30P
2. NEMA L5-30P
3. Standard 120V 3-Prong Plug
2
5
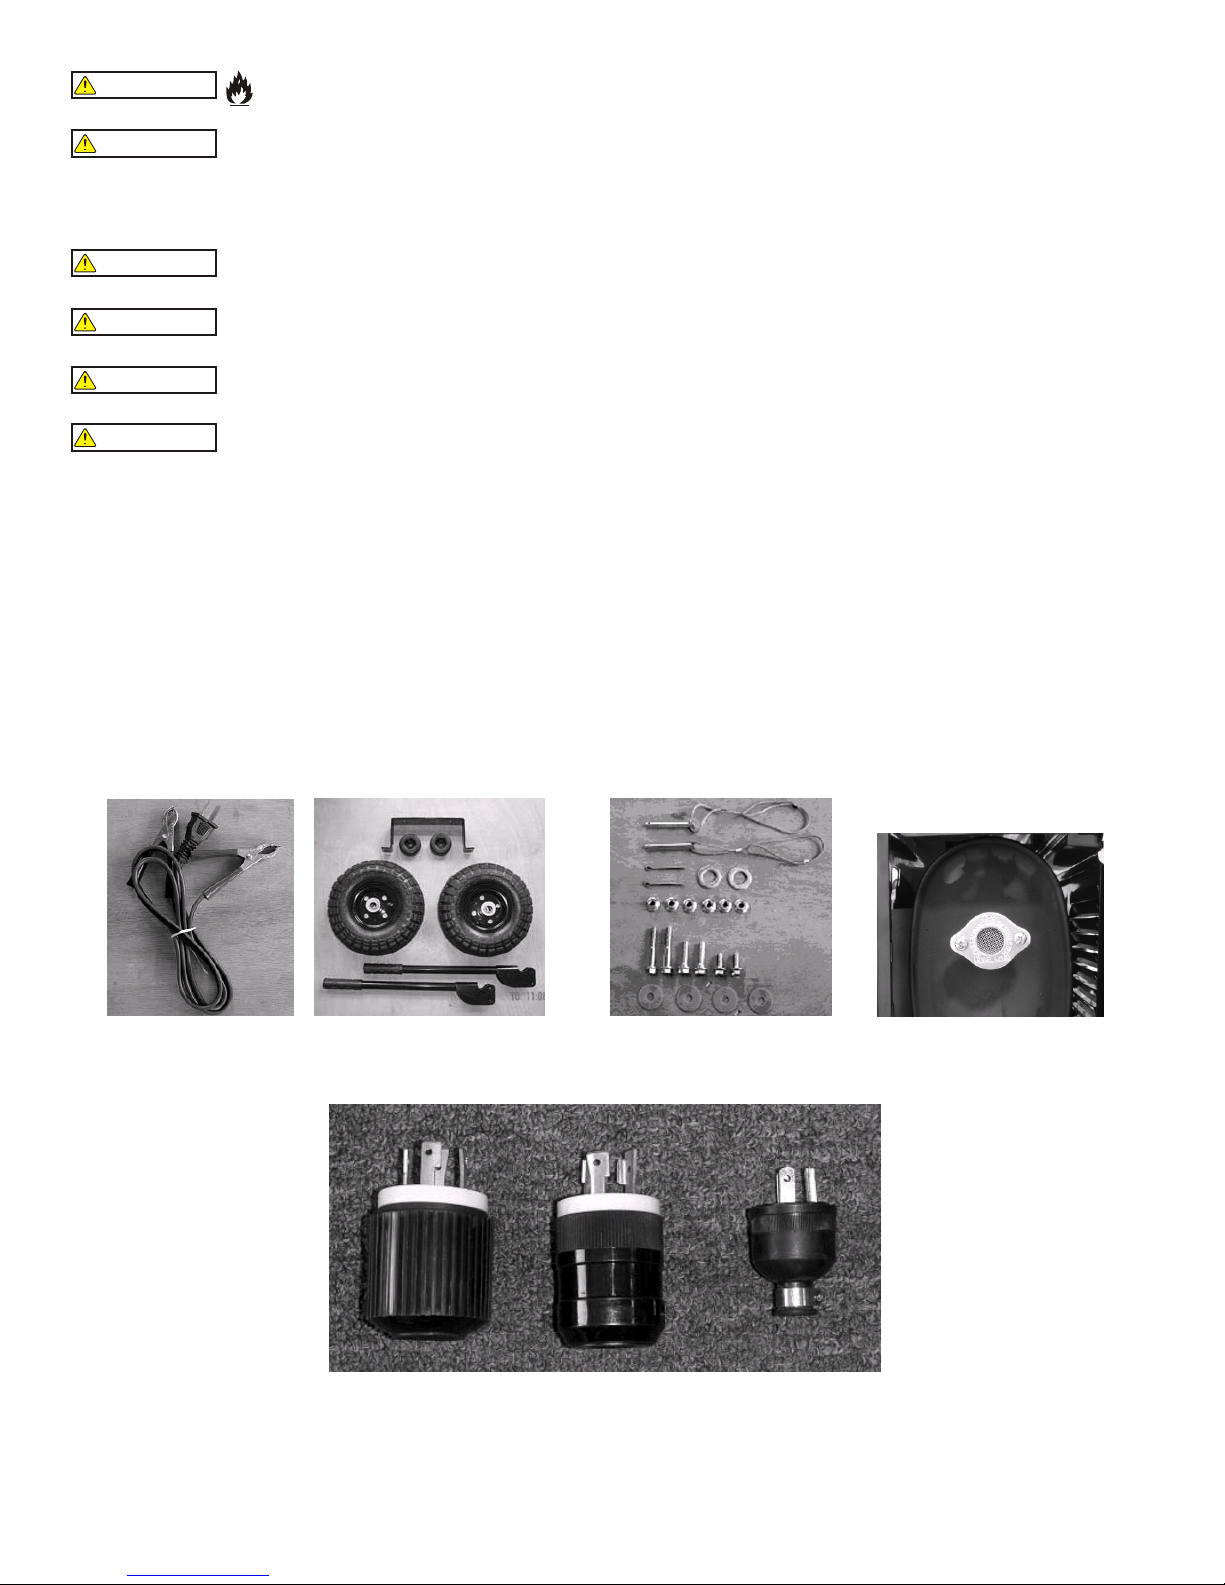
CONTROL PANEL COMPONENTS
1.AC Voltmeter
Use the voltmeter as a visual aid. It indicates the AC voltage. The normal voltage meter reading is 230 to 250 volts resulting in proper
distribution of voltage to the receptacles. Excessive meter voltage could result in damage to appliances.
CAUTION
2.120 Volt AC Outlet, Locking Receptacle
The outlet is protected by a 25 Amp push-to-reset circuit breaker. This receptacle powers 120 Volt AC, 60 Hz, Single Phase loads requiring up
to 25 Amps or 3000 Watts of power.
3.120 / 240 Volt AC Outlet, Locking Receptacle
This outlet is protected by 25 Amp push-to-reset circuit breakers on each 120 Volt leg of the receptacle. This receptacle powers 240 Volt AC, 60
Hz, Single Phase loads requiring up to 23 Amps or 5500 Watts of power. If an L14-30P plug is wired for only one 120 Volt leg (3-wire
connection) then this receptacle powers 120 Volt AC, 60 HZ, Single Phase loads requiring up to 25 Amps or 3000 Watts of power.
4.120 Volt AC, Duplex Receptacle
Each receptacle is protected against overload by a 20 Amp push-to-reset circuit breaker. Use each receptacle to operate 120 Volt AC, singlephase 60 Hz electrical loads requiring up to 20 Amps or 2,400 Watts of power.
5.Note:
Combined amperage of the receptacle is not to exceed circuit breaker limits.
6.12 VOLT, 10 Amp DC Outlet
This receptacle allows you to recharge a 12 Volt automotive or utility style storage battery with the battery charge cables provided. This
receptacle cannot charge 6 Volt batteries and cannot be used to crank an engine. It is also not recommended for charging deep cycle
batteries. Do not charge any batteries for extended periods without checking.
Engine speed has been adjusted at the factory and establishes the proper electrical frequency output (60 Hz). Do not
attempt to increase the speed of the engine for higher output. Serious damage could occur to the generator or engine.
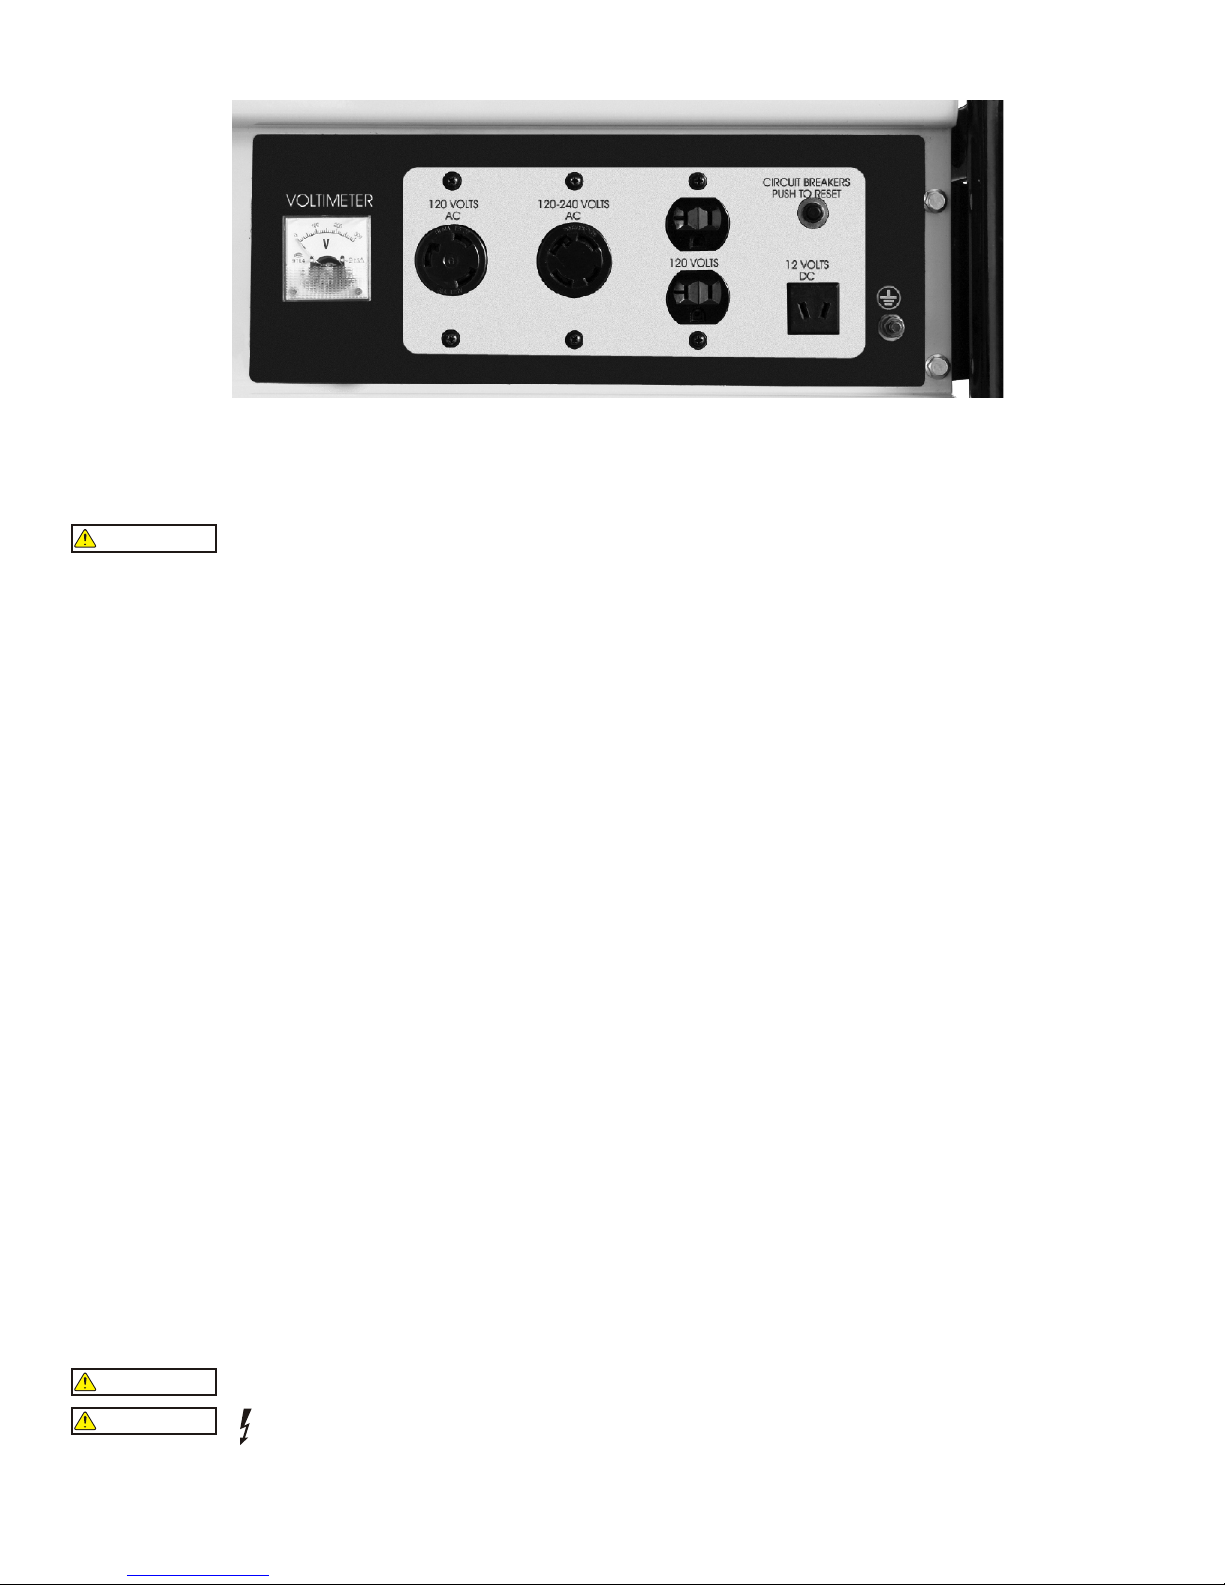
STARTING WATTAGE REQUIREMENTS
1. Some appliances and tools are listed below with starting and running voltage and amperage requirements. Use the following formula to
convert voltage and amperage to wattage:
2. To determine the approximate starting wattage requirement for most appliances and tools with inductive type motors, multiply the wattage
that was calculated by 3 times to assure adequate generator capacity. If the nameplate information is not available, use the values on the
following page as a guide.
3. Remember that the starting and running wattage for resistive loads are the same. (Example: a 100-watt light bulb requires only 100 Watts to
start.) Most resistive loads will be listed in wattage.
4.Use the chart on the next page as a reference guide.
a. FORMULA: VOLTS X AMPS = WATTS
b. EXAMPLE(Voltage and amperage for 1/3 HP furnace fan):
120 Volts X 10 Amps = 1200 Running Watts
CAUTION
CAUTION
Let the engine stabilize and warm up for about five minutes after starting and before using.
DO NOT OVERLOAD THE GENERATOR. Add up the rated watts (or amps) of all loads to be connected at one time.
This total should not be greater than the rated wattage/amperage capacity of the generator.
3
Air Conditioner (12,000 BTU)
Air Conditioner (20,000 BTU)
Battery Charger 20 AMP
Battery Charger 12V DC
Belt Sander 3”
Bench Grinder 6”
Chain Saw
Circular Saw (6-12”)
Clothes Washer
Coffee Maker
Compressor (1HP)
Compressor (½ HP)
Compressor (3/4 HP)
Curling Iron
Demolition Hammer
Disc Sander (9”)
Edge Trimmer
Electric Blanket
Electrical Nail Gun
Electric Range - One Element
Electric Skillet
Freezer
Furnace Fan (1/3 HP)
Hair Dryer
Hand Drill (1”)
Hand Drill (½”)
Hand Drill (1/4”)
Hand Drill (3/8”)
Hedge Trimmer
Home Security
Impact Wrench
Jet Pump
Jigsaw
Lawn Mower
Light Bulb
Microwave
Milk Cooler
Oil Burner on Furnace
Oil Fired Space Heater (140,000 BTU)
Oil Fired Space Heater (30,000 BTU)
Oil Fired Space Heater (85,000 BTU)
Paint Sprayer, Airless (1/3 HP)
Paint Sprayer, Airless (handheld)
Portable Heater (5,000 BTU)
Radio
Refrigerator
Refrigerator/Freezer
Slow Cooker
Small Refrigerator
Submersible Pump (1 HP)
Submersible Pump (½ HP)
Submersible Pump (1-1/2 HP)
Sump Pump
Table Saw
Television
Toaster Oven
Water Heater
Weed Trimmer
RUNNING WATTAGE GUIDE
0 4000500 1000 1500 2000 2500 3000 3500
1700
3300
500
110
1000
700
1200
800
1200
1000
2000
1400
1800
700
1300
1200
500
230
1200
1500
1250
500
1200
1200
1100
750
250
500
450
100
500
800
550
1200
100
700
1100
300
400
150
225
600
150
1550
50
600
1200
200
500
2000
1500
2800
600
1750
400
1500
4000
500
Starting loads may need as much as 3 times the Running Wattage for Electrical Motors. Check your appliance rating before using generator.
4
GENERATOR ASSEMBLY AND MOUNTING
1. If your generator was delivered with two L-shaped metal shipping brackets mounted underneath the engine, these brackets must be
removed. These brackets were installed temporarily on some generators for shipping only and prevent the rubber isolation mounts beneath the
engine and generator from functioning properly.
2. Your Champion Generator is supplied with a wheel kit. If you want to install the wheel kit on your unit, please follow the following
instructions.
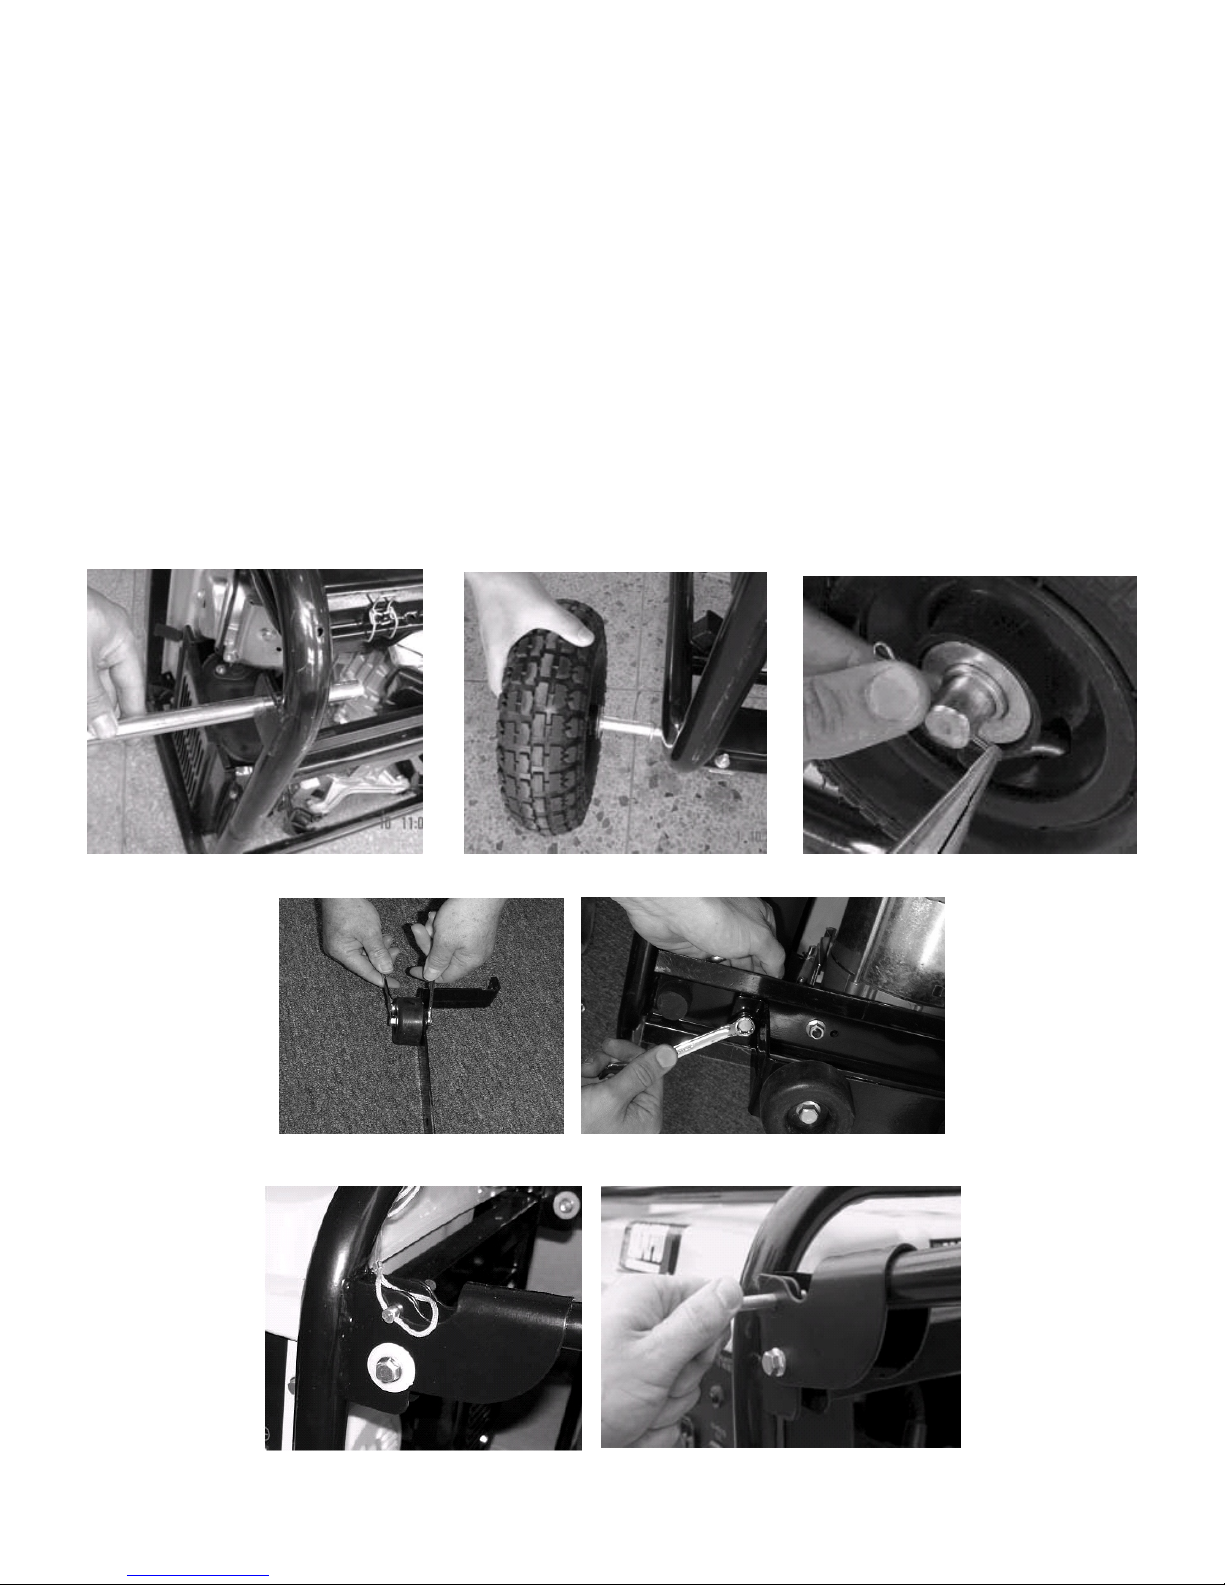
3. Secure each vibration mount to the support leg with a lock nut (M8), and a cap screw (M8 x 30) (Fig 4)
4. Secure the support leg to the cradle with cap screws (M8 x 20) and lock nuts (M8) (Fig 5).
5. Position the handles on the cradle and attach with plastic flat washer, cap screws (M8 x 50) and lock nuts (M8) (Fig 6)
6. Loop handle locking pin lanyards around main frame above handle bracket. Use to lock handle in upright position.(Fig 7)
7. Check that all fasteners are tight.
8. If the included spark arrester insert is to be used, installation should be performed as follows. Insert the spark arrester screen into the muffler
outlet. Secure the spark arrester by placing the cover plate over the end of the screen, with lettering facing outward. Secure the cover plate with
the two screws and lock washers providing with the spark arrester kit.
a. Place the bottom of the generator cradle on a flat, even surface. Temporarily place unit on blocks to ease assembly.
b. Slide axle through both mounting braces on the cradle frame as shown (Fig 1).
c. Slide a wheel and a flat washer over the axle (Fig 2), and then secure the wheel with a retaining pin.(Fig 3)
d. Install the other wheel in the same manner.
FIG. 1 FIG. 2 FIG. 3
FIG. 4 FIG. 5
FIG. 6 FIG. 7
5
 Loading...