

Page 1
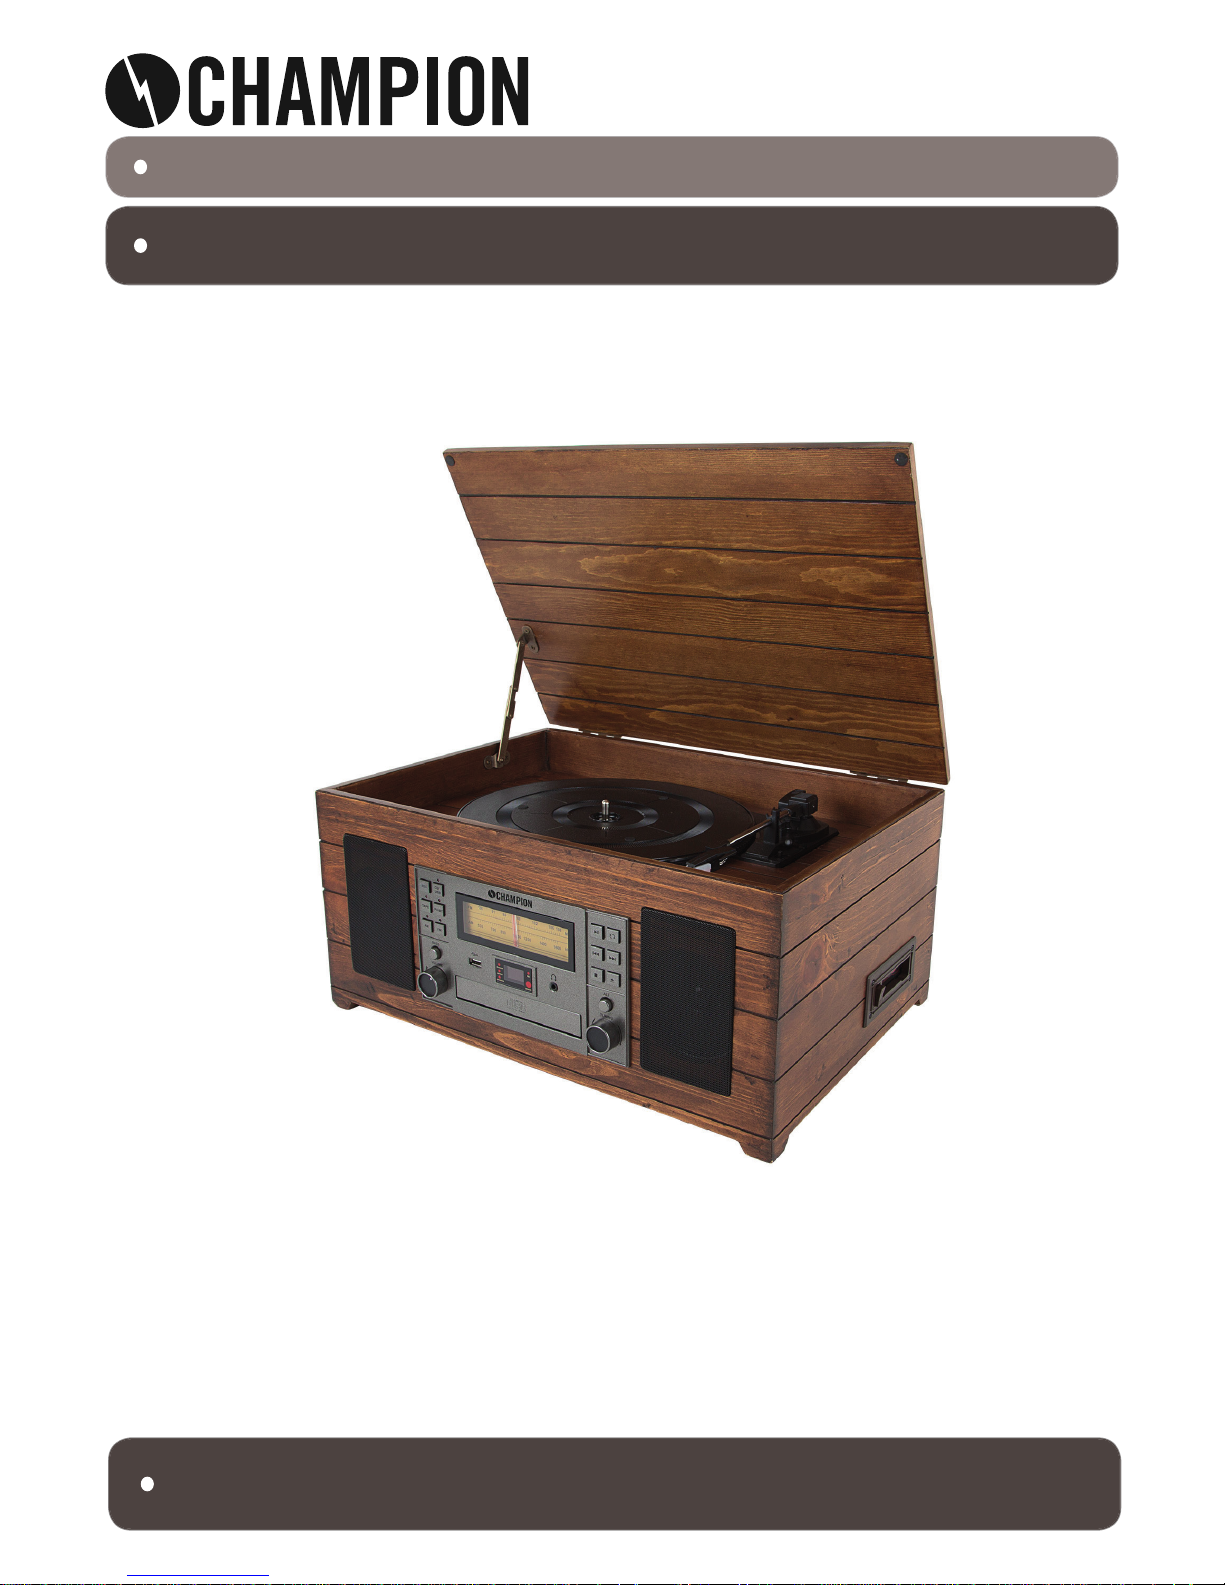
CHVS310
USER MANUAL
EN - English
SE - Svenska
DK - Danske
NO - Norsk
FI - Suomi
Read this Manual carefully before use
Page 2

CAUTION
TO PREVENT FIRE OR SHOCK HAZARD, DO NOT USE THIS PLUG WITH AN EXTENSION CORD,
RECEPTACLE OR OTHER OUTLET UNLESS THE BLADES CAN BE FULLY INSERTED TO PREVENT
BLADE EXPOSURE. TO PREVENT FIRE OR SHOCK HAZARD, DO NOT EXPOSE THIS APPLIANCE TO
RAIN OR MOISTURE.
EN
CAUTION
The lightning fl ash with
arrow-head symbol, within an
equilateral triangle is intended to
alert the user to the presence of
uninsulated dangerous voltage
within the products enclosure that
may be of suffi cient magnitude to
constitute a risk of electric shock
to persons.
WARNING!
TO REDUCE THE RISK OF
ELECTRIC SHOCK DO NOT
REMOVE COVER (OR BACK),
NO USER SERVICEABLE
PARTS INSIDE REFER
SERVICING TO QUALIFIED
SERVICE PERSONNEL.
The exclamation point within an
equilateral triangle is intended
to alert the user to the presence
of important operating and
maintenance (servicing)
instructions in the literature
accompanying the appliance.
IMPORTANT SAFETY INSTRUCTIONS
1. Please read these instructions and keep them for future reference.
2. Pay attention to all warnings.
3. Follow all instructions.
4. Do not use this apparatus near water.
5. Clean only with a dry cloth.
6. Do not block any ventilation openings.
7. Install in accordance with the manufacturer’s instructions. Do not install near any heat sources such
as radiators, heaters, stoves, or other apparatus (including amplifi ers) that produce heat.
8. Protect the power cord from being walked on or kinked, in particular where the plug is fi tted and at
the point where it exits from the apparatus.
9. Only use attachments / accessories specifi ed by the manufacturer.
10. Unplug this apparatus during lightning storms or when unused for long periods of time.
11. Refer all servicing to qualifi ed service personnel. Servicing is required when the apparatus has been
damaged in any way, such as power-supply cord or plug is damaged, liquid has been spilled or
objects have fallen into the apparatus, the apparatus has been exposed to rain or moisture, does not
operate normally, or has been dropped.
12. This appliance should not be exposed to dripping or splashing waterand no object fi lled with liquids,
such as vases, should be placed on the apparatus.
13. Do not overload the wall power outlet. Use only power source as indicated - i.e.230V AC mains.
IMPORTANT NOTES
1. Avoid installing this unit in places exposed to direct sunlight or close to heat radiating appliances
such as electric heaters, on top of other stereo equipment that radiates too much heat, places lacking
ventilation or dusty areas, places subject to constant vibration and/or humid or moist areas.
2. Do not attempt to clean this unit with chemical solvents as this might damage the fi nish. Use a clean
dry cloth. Operate controls and switches as described in the manual.
3. Before turning On the power, make certain the AC power cord is plugged
in. Store your CDs,
Cassettes in a cool area to avoid damage from heat. When moving the set, be sure to fi rst disconnect
the power cord.
1.
Page 3
EN
Preparation for use
Unpacking and set up
1. Carefully remove the unit from the display carton and remove all packing material from the unit.
2. Unwind the AC power cord and extend it to its full length.
3. Unwind the FM Antenna wire and extend it to its full length.
4. Place the unit on a stable, level surface, convenient to an AC outlet, out of direct sunlight, and away
from sources of excess heat, dust, moisture, humidity or strong magnetic fi elds.
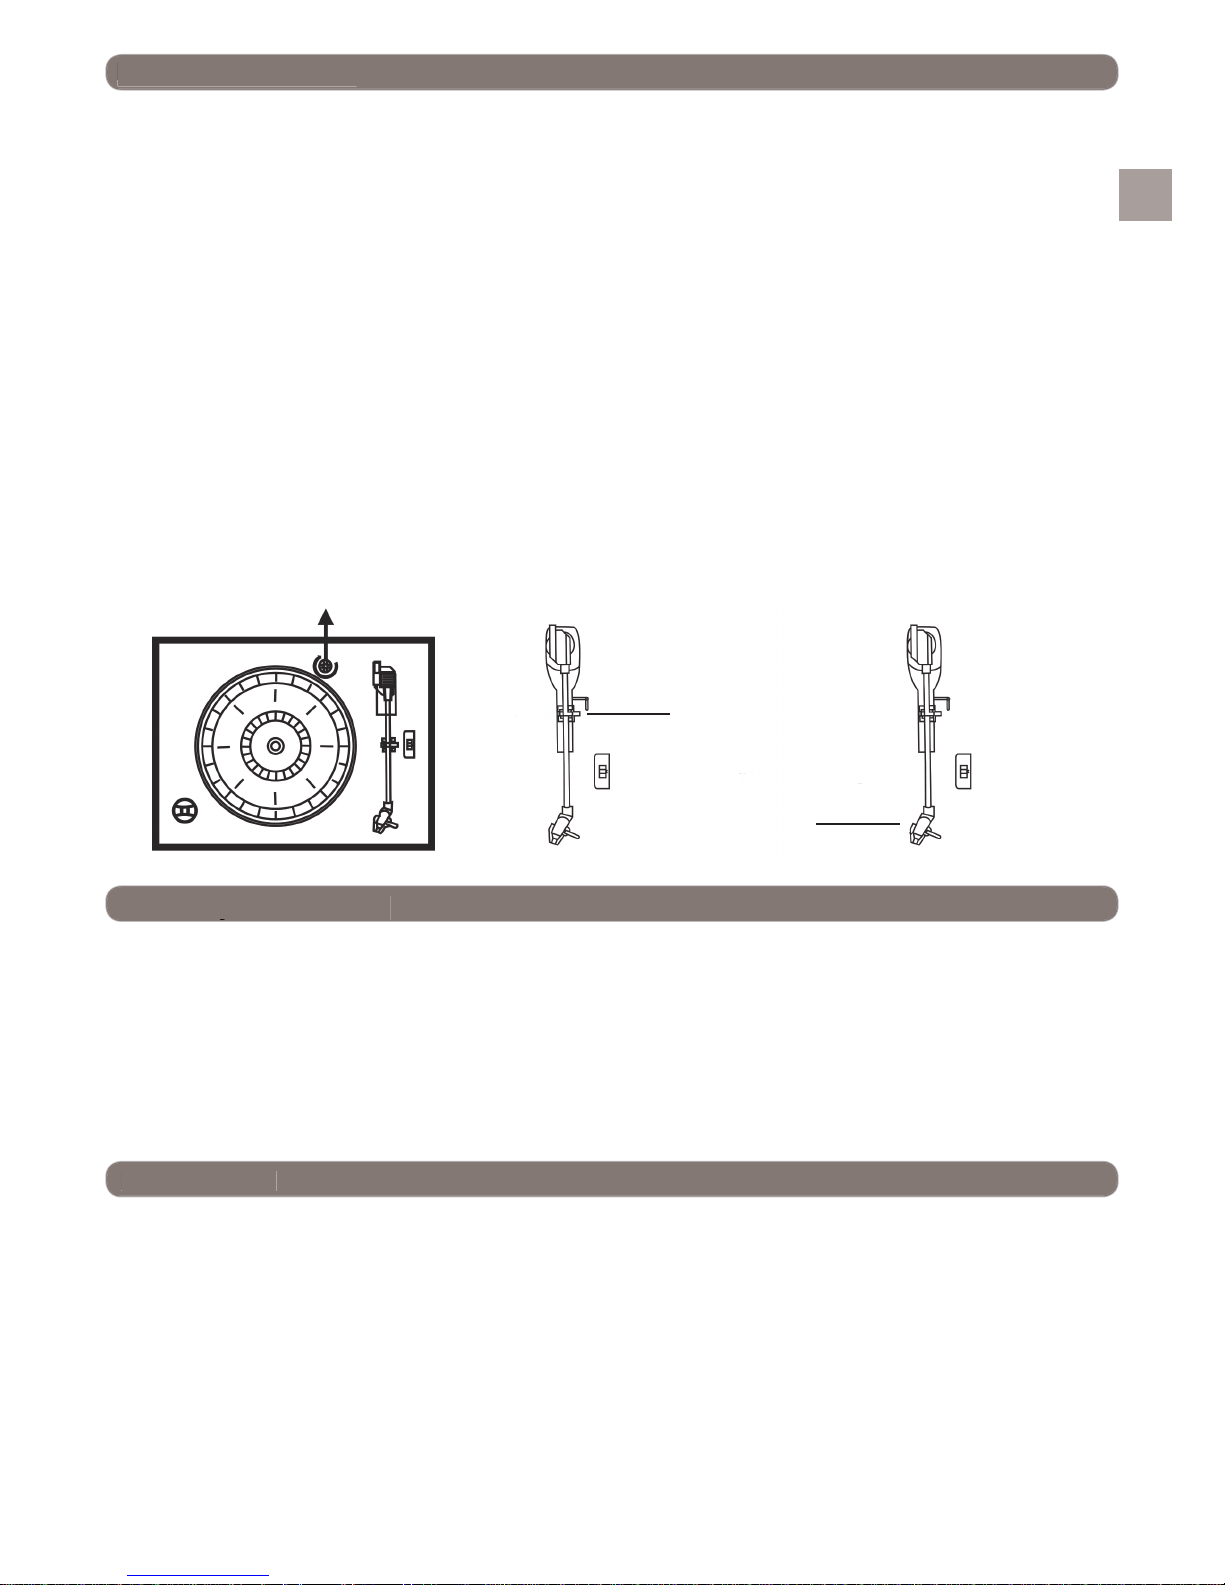
5. Raise the lid to expose the phonograph. The phonograph has been secured for shipment with a
transit screw. Use a coin or screwdriver to tum the transit screw clockwise. This will allow the
turntable to ”fl oat”.
6. Remove the opaque white plastic stylus cover from the phonograph stylus by sliding it forward and
down.
7. Discard the stylus cover.
8. Remove the twist-tie that was used to secure the tone arm during shipment.
9. Release the tone arm lock lever.
10. Connect the plug to your AC outlet.
Transit screw
Tone arm lock lever
Stylus cover
Protect your furniture
This model is equipped with non-skid rubber feet to prevent the product from moving when you operate the
controls. These feet are made from non-migrating rubber material specially formulated to avoid leaving any
marks or stains on your furniture. However certain types of oil based furniture polishes, wood preservatives,
or cleaning sprays may cause the rubber feet to soften, and leave marks or a rubber residue on the furniture.
To prevent any damage to your furniture we strongly recommend that you purchase small self-adhesive felt
pads, available at hardware stores and home improvement centers everywhere, and apply these pads to the
bottom of the rubber feet before you place the product on fi ne wooden furniture.
IMPORTANT
Raising and Lowering the Lid:
• To open the lid, raise it as far as it will go until the lid support bracket locks in the open position. To close
the lid, lift it upward slightly until the lid support bracket unlocks, and then gently lower the lid.
• To avoid damaging the cabinet or the lid, never force the lid closed. always raise the lid to release the
lid support bracket.
To save power consumption:
• To help save power consumption, if there is no audio signal input for 20 minutes while the unit is
powered on, the unit will cut off power automatically. To turn power back on and resume playing, you will
need to tum off the power fi rst and tum it back on to continue.
2.
Page 4
EN
Locations of Controls and Indicators
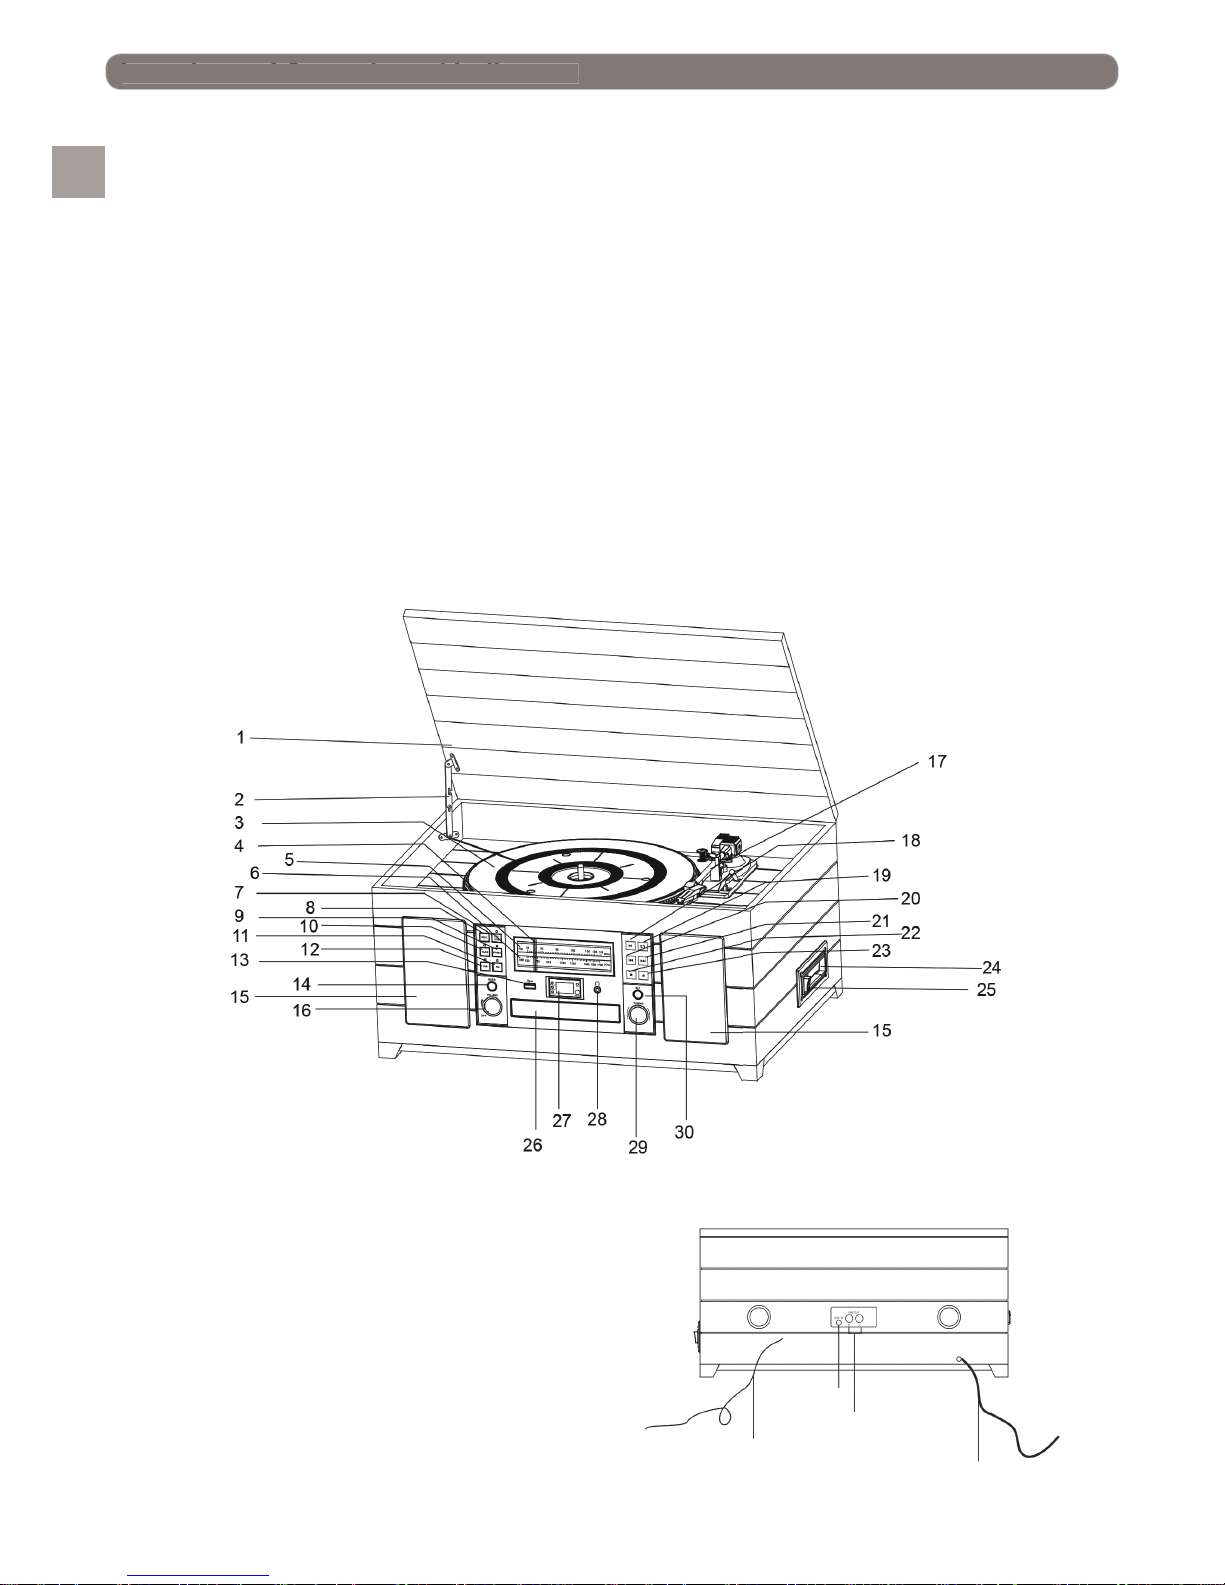
Front Panel:
1. Phonograph Lid
2. Phonograph Lid Support Bracket
3. Turntable
4. Pointer
5. FM Dial Scale
6. AM Dial Scale
7. CD/USB Button
8. REC Button
9. PH/BT Button
10. TAPE Button
11. FM Button
12. AM Button
13. USB Socket
14. BASS Button
15. Speakers
16. OFF/VOLUME Knob
17. Tone Arm
18. Play/Pause Button
19. Repeat Button
20. SKIP REV. Button
21. SKIP FWD. Button
22. Stop Button
23. Open/Close Button
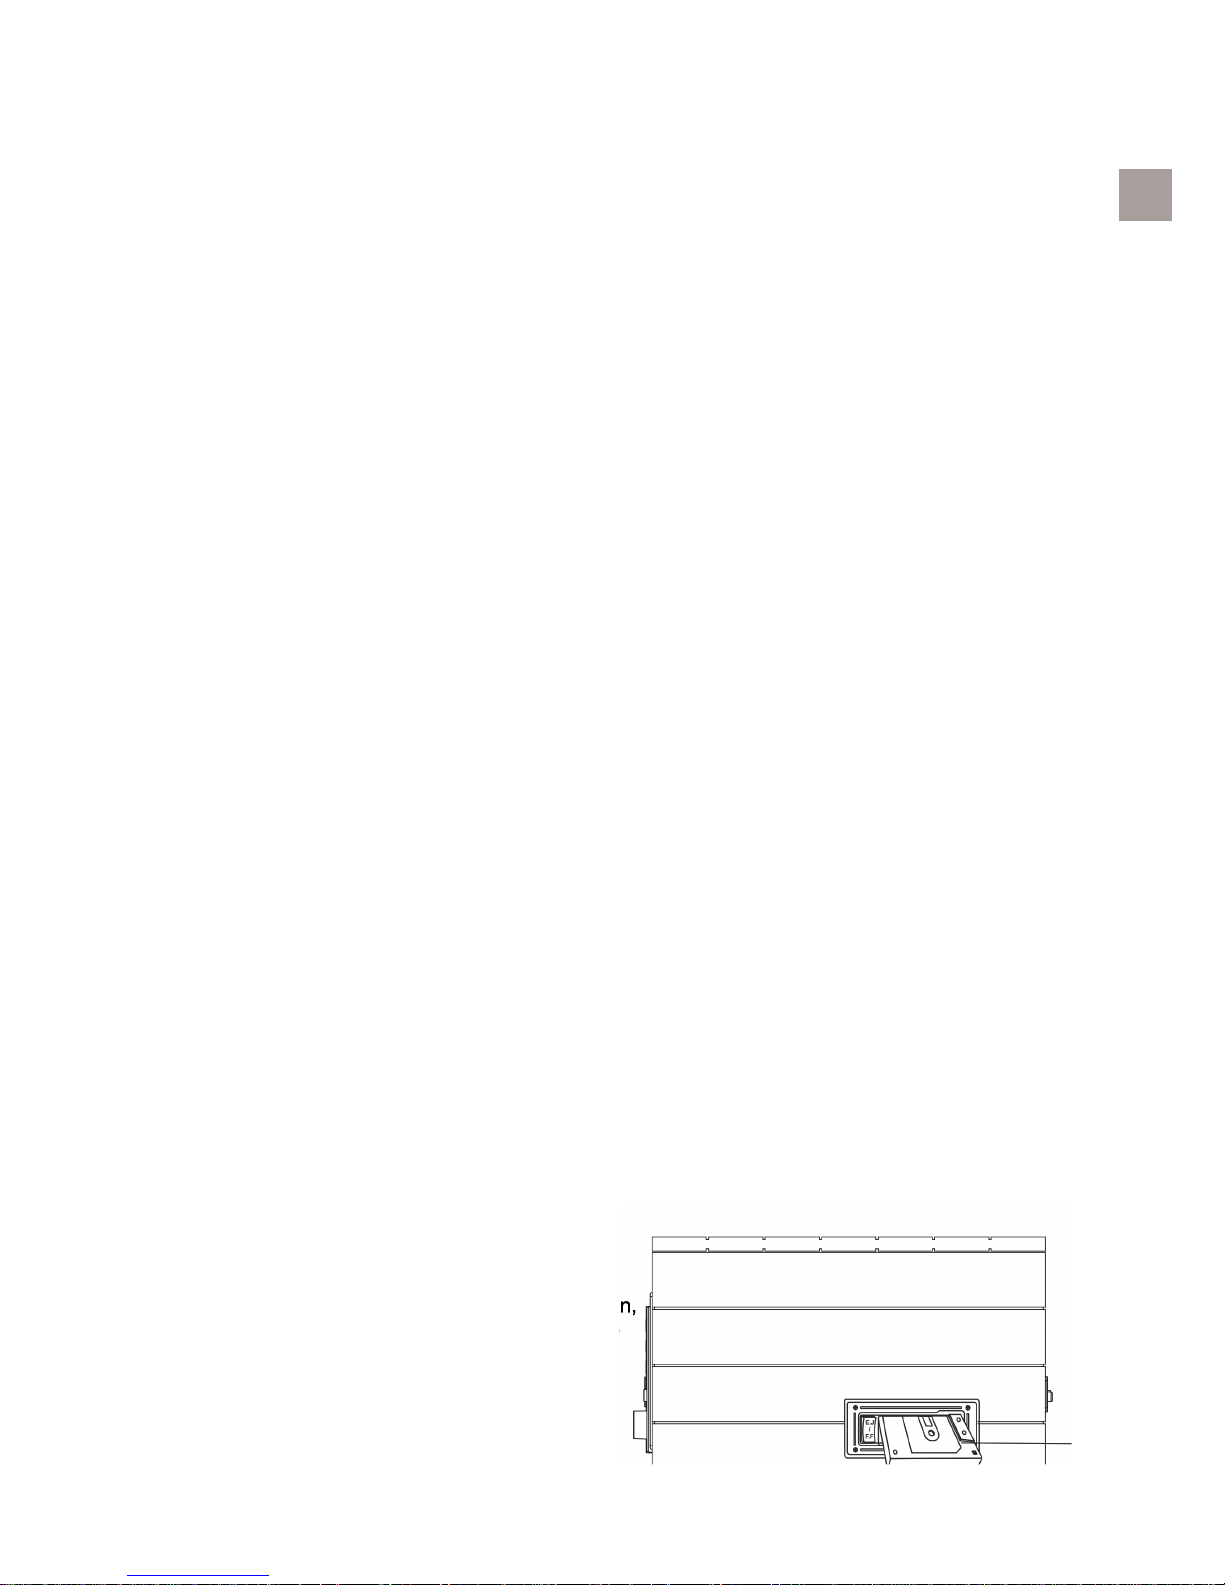
24. Cassette Slot
25. Cassette EJ/FF Button (Eject/Fast Forward)
26. CD Drawer
27. LED Display
28. Headphone Jack
29. Tuning Knob
30. ALT Button
Back Panel:
31. FM Lead Wire Antenna
32. AC Power Cord.
33. AUX IN (UR) Jack
34. LINE OUT Jack(R/L)
3.
31
32
33
34
Page 5
EN
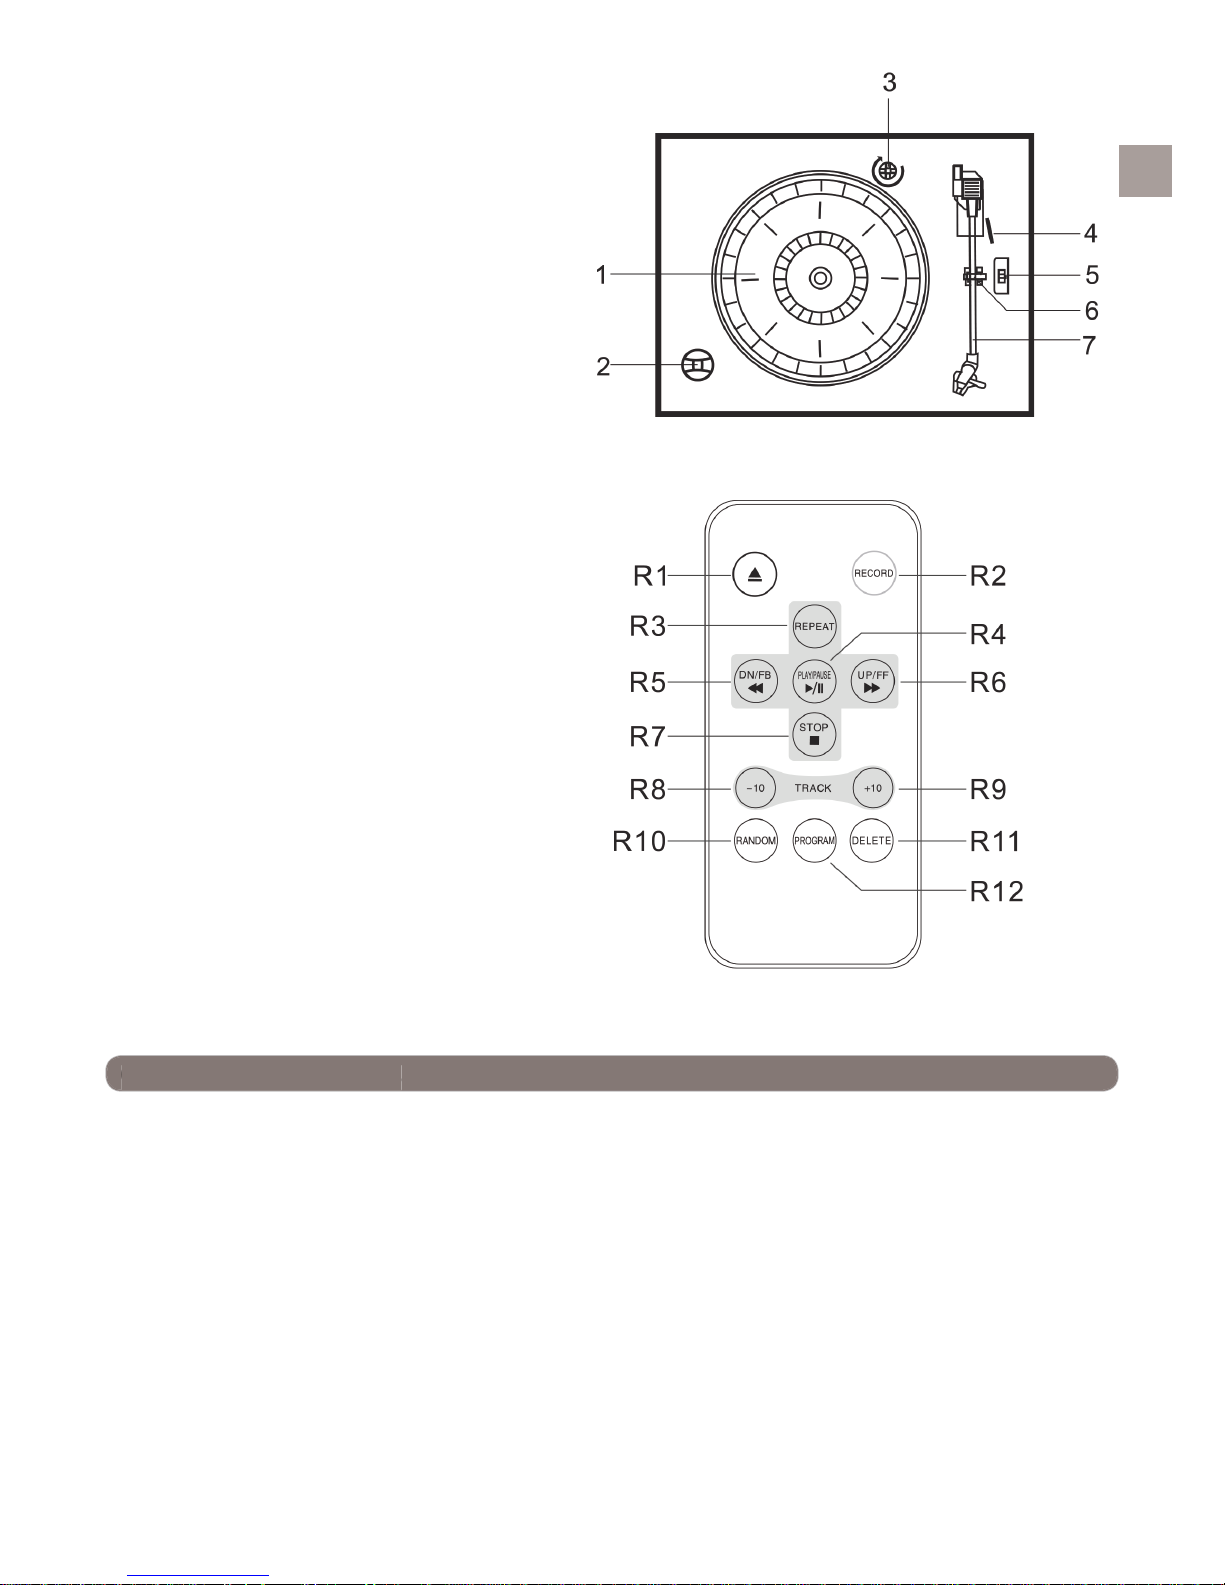
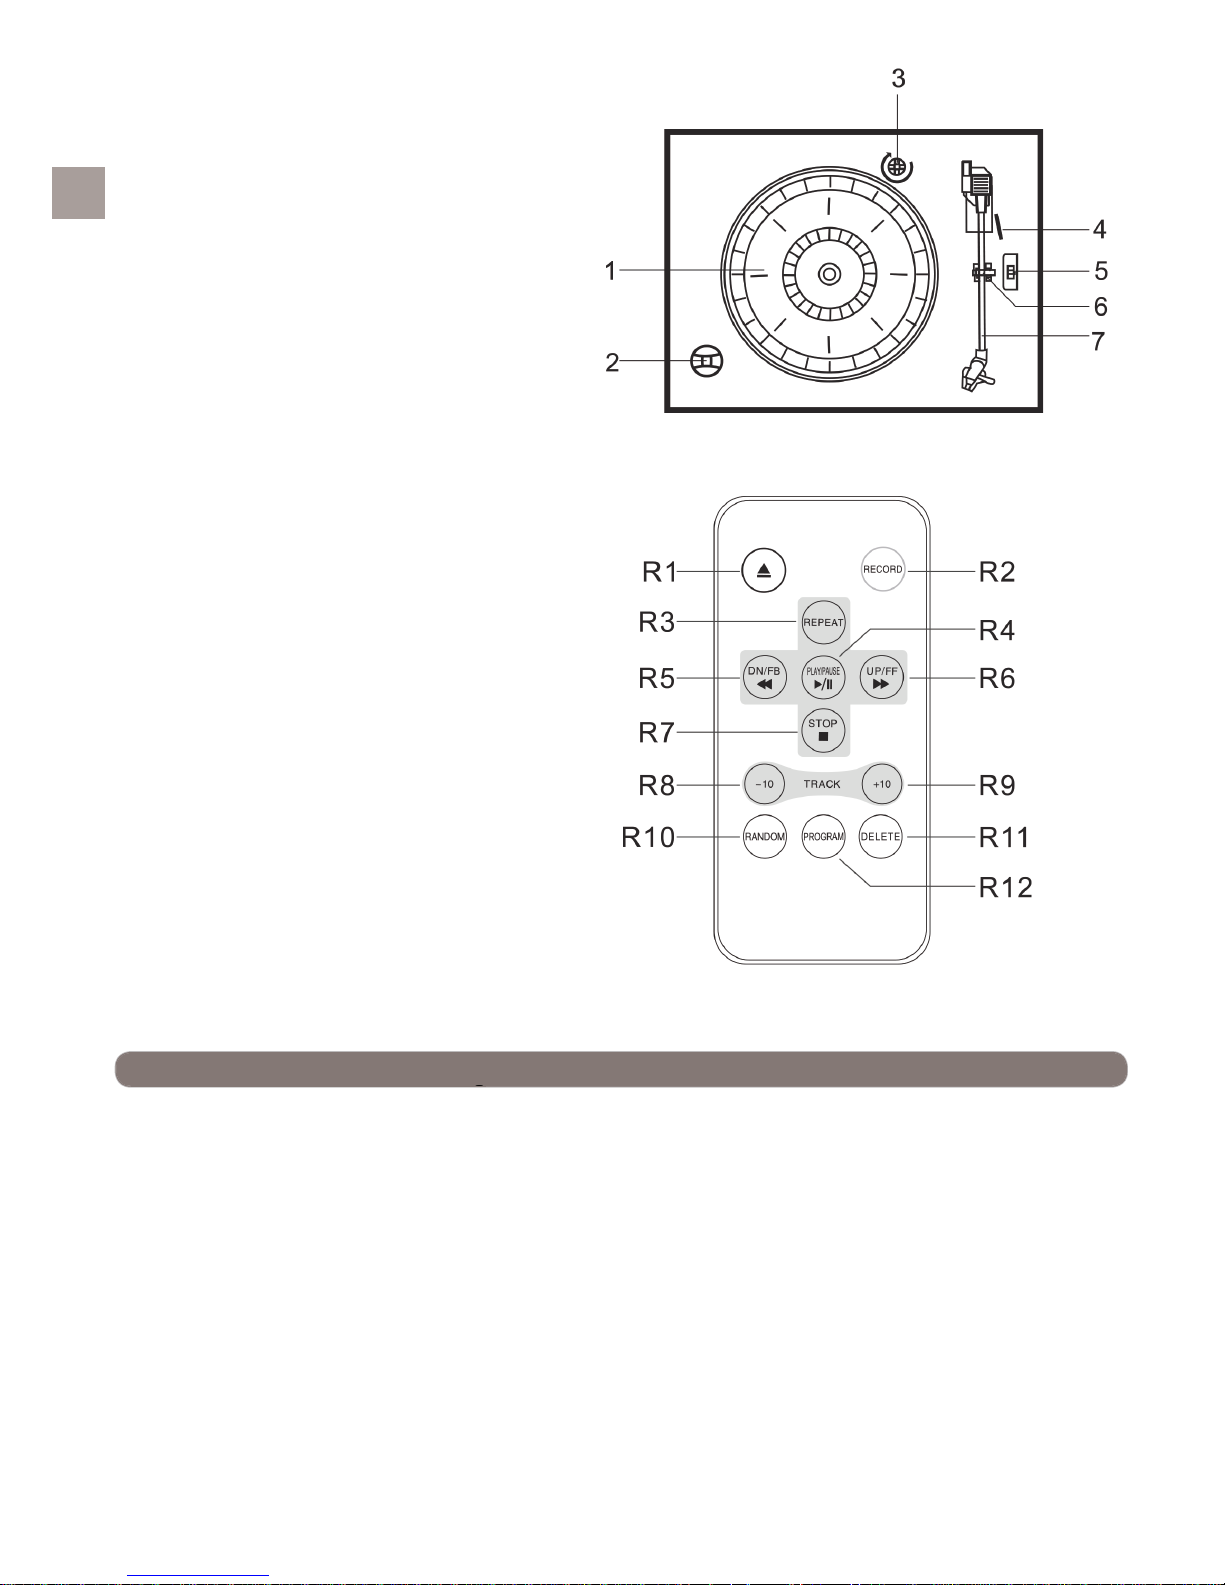
Phonograph:
1. Turntable
2. 45 RPM Adapter
3. Transit Screw
4. Cue Lever
5. Speed Selector (33 & 45 & 78 RPM)
6. Tone Arm Lock
7. Tone Arm with Stylus
Remote control operation:
R1: OPEN / CLOSE
R2: RECORD
R3: REPEAT
R4: PLAY / PAUSE
R5: DN/FB (S KIP REV)
R6: DN/FF (S KIP Forward)
R7: STOP
R8: TRAC K -10
R9: TRACK +10
RI0: RANDOM
R11: DELETE
R12: PROGRAM
NOTE: ALL of the buttons on the remote control
have the same function as these buttons in
the unit. This remote control only used for CD/
MP3, USB mode.
Operating Instructions
Radio Operation
1. Rotate the OFF/VOLUME knob to turn on the unit.
2. Press the AM button or FM button to select the AM or FM function.
3. Select the desired station by rotating the TUNING knob.
4. Adjust the OFFNOLUME knob to the desired sound level.
Antenna Information
• The AM antenna is inside the cabinet. If AM reception is unsatisfactory, try repositioning the cabinet
slightly until the internal antenna is picking up the strongest signal.
• The FM wire antenna is located on the back of the cabinet. If necessary, adjust the position and
direction of this antenna until you fi nd the position that provides the best reception.
4.
Page 6

EN
CD/MP3 operation:
1. Press the CD/USB button to select the CD function.
2. Press the OPEN/CLOSE button to open the CD drawer, and the LED display will show <OP>.
3. Place the CD/CD-R/CR-RW/MP3 disc in the drawer with the printed label side facing up.
4. Press the OPEN/CLOSE button again to close the CD drawer. The LED display will show”-” for a
few seconds, then the total number of tracks on the disc will be displayed. ”nod” will be shown when
there is no disc inside the unit.
5. The PLAY/PAUSE INDICATOR will light up. Playback will start automatically.
6. Adjust the OFFNOLUME knob to the desired sound level.
7. To pause playback, press the PLAY/PAUSE button. The PLAY/PAUSE INDICATOR will dash.
8. To stop playback, press the STOP button. The PLAY/PAUSE INDICATOR will go off.
USB operation:
1. Insert the USB into the USB socket.
2. Press the CD/USB button to select the CD function, and press and hold the PLAY/PAUSE to select
the USB function. The LED display will show”-” for a few seconds, then the total number of tracks
on the USB will be displayed. ”nob” will be shown when there is no USB insert the unit.
3. The PLAY/PAUSE INDICATOR will light up. Playback will start automatically.
4. Adjust the OFFNOLUME knob to the desired sound level.
5. To pause playback, press the PLAY/PAUSE button. The PLAY/PAUSE INDICATOR will dash.
6. To stop playback, press the STOP button. The PLAY/PAUSE INDICATOR will go off.
NOTE: Press and hold PLAY/PAUSE button to enter function change as follows: CD-USB
Play control in CD/MP3/USB :
1. Place your CD or MP3 discs in the drawer or insert USB. It will automatically start playback.
Playback will continue until the end of the DISC or USB, when the disc is fi nished, the display
shows the total number of tracks on the disc or USB again. You may also stop playback at any time
by pressing the STOP button.
2. Adjust the OFF/VOLUME control to the desired level.
3. In play mode. press the SKIP FWD button on the unit front panel or UP/FB button on the remote
control to the next song.
4. Press the SKIP REV button on the unit front panel or DN/FB button on the remote control to the
previous song that has just been played.
5. Press the FOLDER+/+10 or FOLDER-/-10 button to skip forward or recede 10 tracks in CD/MP3/
USB.
Selecting the folder playback for MP3/USB:
1. In stop mode. press FOLDER+/+10 or FOLDER-/-10 button to selected the FOLDER+ or FOLDER-.
2. To confi rm the FOLDER tracks number, press PLAY/PAUSE button to playback. the song number
and folder number of your selected track will be shown consecutively in every 2 seconds. You may
also stop playback at any time by press the STOP button.
Selecting your desired part for CD/MP3/USB:
1. Press and hold SKIP FWD or SKIP REV button on the unit front panel or UP/FF or DN/FB button
on the remote control to select your desired part of the currently playing track and then release the
buttons. The playback will resume normal from that point.
Pause control in CD/MP3/USB:
1. In CD/MP3/USB playing mode, press the PLAY/PAUSE button once. Playback stops but the disc
continues to spin and the LCD indicator of the track number will fl ash.
2. Press the PLAY/PAUSE button once more to cancel pause and the track number will stop dashing.
5.
Page 7
Record CD/MP3/USB/phono/cassette function:
1. In CD/MP3/USB/Phono and CASSETTE playing mode, select to the desired track songs.
2. Insert USB press REC button once, the unit displays <REC>, and the REC indicator lamp will show.
3. Press REC button once more to confi rm record to USB and the REC indicator lamp will dash. The
unit can be recorded songs for your select favorite songs numbers. If want to stop the recording
press STOP button.
NOTE: In PHONO/CASSETTE mode record. to confi rm record mode. The unit display <REC> and red
indicator lamp will dash.
Cancel USB songs operation:
1. The unit plays the song in USB you dislike, pressing and hold the DELETE button on the remote
control for 2 seconds to cancel the song, the unit LCD will display <DEL>.
Repeat playback in CD/MP3/USB:
1. In CD/MP3/USB play mode. Press REPEAT button once, the repeat indicator will dash and the
present track will repeat once it’s fi nished.
2. Press the REPEAT button twice, the repeat indicator will stop dashing, remain on, once the disc is
fi nished, it will start over again from the beginning.
3. To cancel repeat playback, press the REPEAT button again, the repeat indicator will go off. Repeat
playback is also canceled by pressing the STOP button.
Random playback in CD/MP3/USB mode:
1. In CD/MP3/USB play mode, press RANDOM button to start random playingfunction, random
indicator will be on. Press this button again to cancel the random function.
Program function in CD/MP3/USB mode:
1. This feature allows you to program 20 tracks in CD model and 99 tracks in MP3/USB mode for
playback in any desired order.
2. In CD/MP3/USB stop mode, press the PROGRAM button to enter the program mode. The program
number briefl y shows ’001’, and the program indicator will dash. Press the SKIP FWD or SKIP REV
button on the unit front panel or UP/FF or DN/FB button on the remote control to select the fi rst
track number you wish to enter in the program memory, example: track number 008 when
the desired track number appears on the display, press the PROGRAM button again to memorize
the track. The program number briefl y shows ’002’, then the program indicator will dash.
3. Repeat above steps, select a different track number each time until you have entered up to 20 (CD)
tracks and 99 (MP3/USB) tracks in the program memory.
4. Press the PLAY/PAUSE button to begin the programmed playback. The PROGRAM indicator will
stop dashing. Playback will begin with the fi rst track you have programmed and will continue until
the last programmed track has been played. The programmed sequence may be canceled by
pressing the STOP button twice.
Cassette function operation:
1. Select the CASSETTE function. Insert your
cassette into the slot, as shown in the illustration,
with the side you wish to play facing up and the
open end on the right side.
EN
6.
Page 8
EN
2. Cassette playback begins as soon as the tape is inserted.
Adjust the OFF-VOLUME control knob to the desired level.
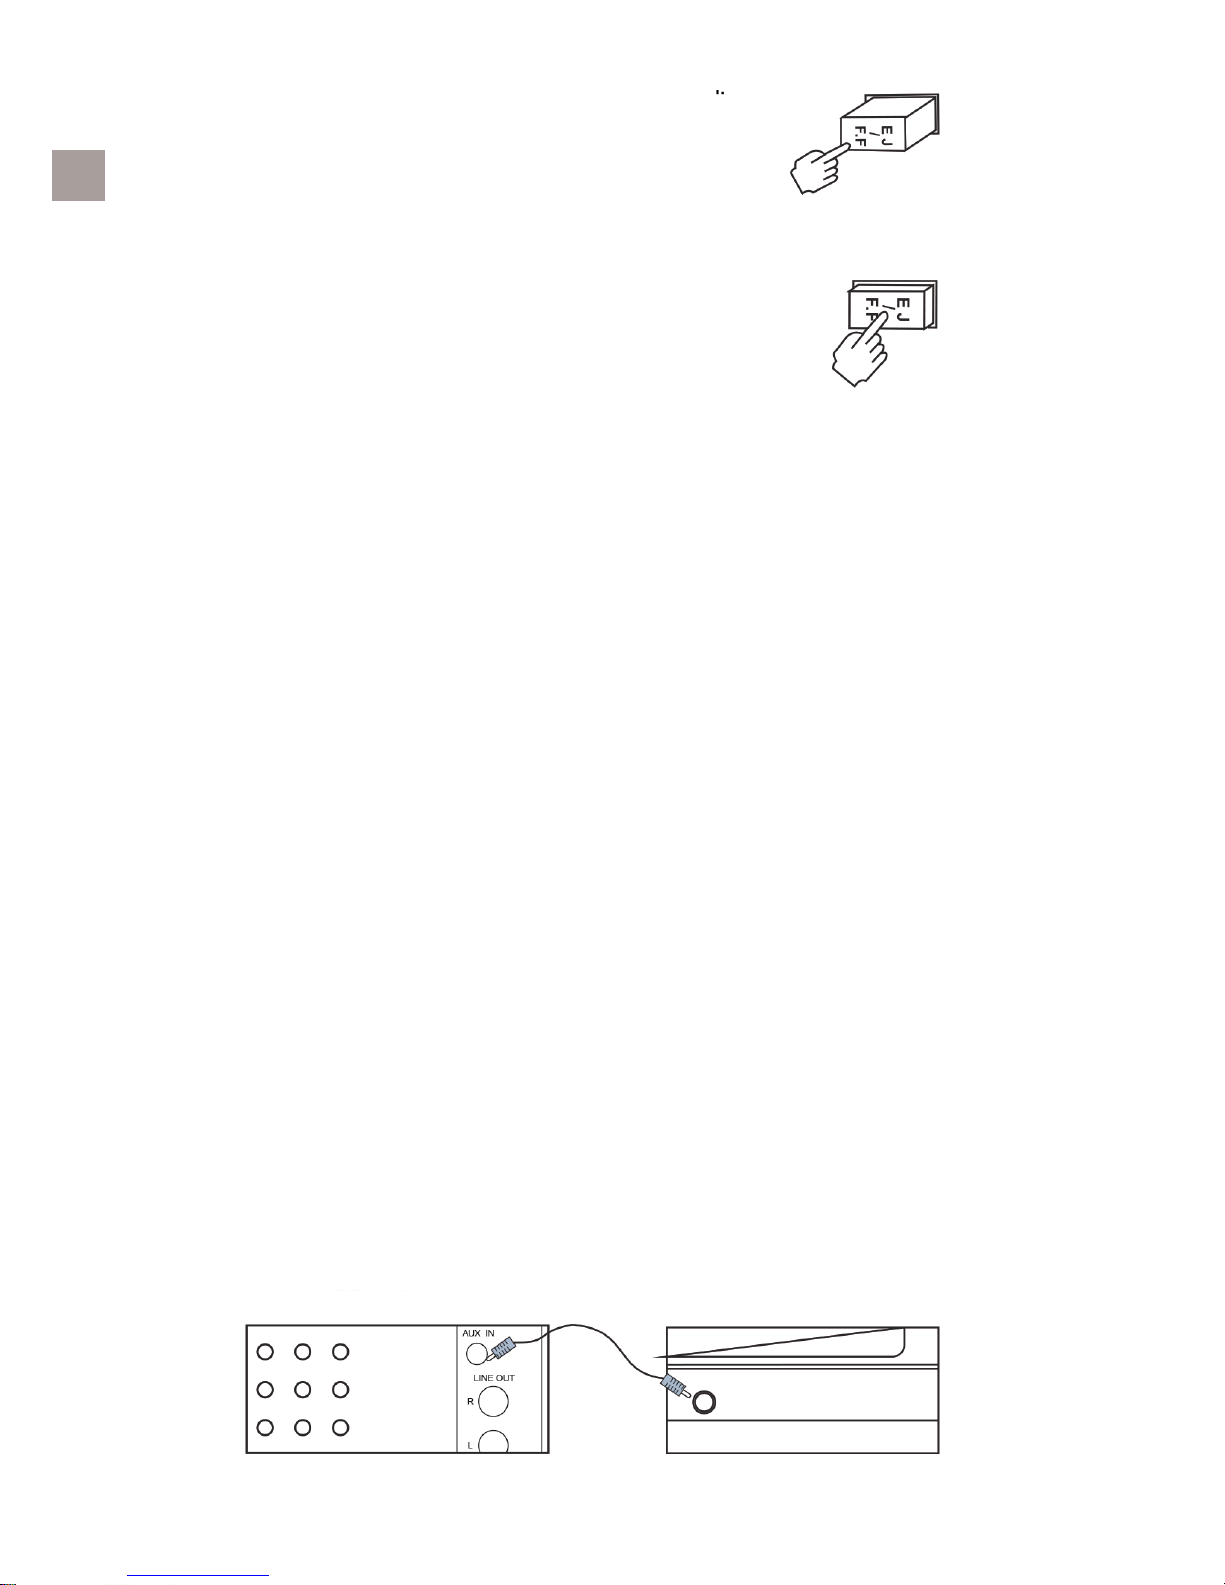
3. To advance the tape rapidly, depress the EJ/FF
(Eject/Fast Forward) button approximately half way.
The tape will move forward rapidly as long as the button
is depressed. Normal playback will resume when the
button is released.
4. When the tape ends the player stops automatically.
Depress the EJ/FF (Eject/Fast Forward) button
completely to remove the cassette from the player.
You may press the EJ/FF (Eject/Fast Forward)
button to stop playing and remove the cassette at
any time.
Phono function operation:
1. Select the PHONO function, make sure that you have removed the stylus cover from the stylus.
2. Place your PHONO DISC on the center spindle.
3. Adjust the OFF/ VOLUME control to the desired level.
NOTE: Do not tum or stop the turntable manually. Moving or jarring the turntable without securing the Tone
Arm clamp could result in damage to the Tone Arm.
4. Set the turntable speed selector to the appropriate speed, 33, 45, or 78 RPM. If you are playing 45
RPM singles , place the 45 RPM adapter on the center spindle.
5. When turntable fi nishes playing, tone arm will return to original position automatically.
Bluetooth function operation:
1. Tum on the unit, rotate the volume control to desert level. Tum the function knob to PH mode, and
make sure the tone-arm is on the resetting state. A short Bluetooth starting tone will be heard, then
the Bluetooth indicator will be fl ashing.
2. Tum on your Bluetooth device and scan. It will be displayed as ”CHVS310” when discovered by
your Bluetooth device.
3. When the unit is paired with your Bluetooth device, you can hear a short tone from the speakers.
4. Play your Bluetooth device as you normally do and the sound will be played from this unit.
NOTE: 1. Make sure your Bluetooth device and this unit is within 10 meters of each other.
2. Check and see if there are other Bluetooth devices nearby interfering the signal and connection.
3. This unit is could be paired by multiple different Bluetooth devices, but could only be connected
and played by one of them at a time. Make sure no other device is actively connected to it already
when you are trying to connect the one you are wording on.
Aux in function operation:
1. Select to the PHONO function. Insert two ends of cord into ”AUX IN” socket of unit and
corresponding socket of your external device respectively. Operate external device as usual and
through the speaker of unit you can hear the songs from the external device.
7.
Page 9
EN
IMPORTANT!
TO PROTECT THE TURNTABLE FROM DAMAGE DURING
TRANSPORTATION, A SILVER TRANSIT SCREW IS LOCATED IN THE UPPER RIGHT CORNER OF THE TURNTABLE
PLATFORM.
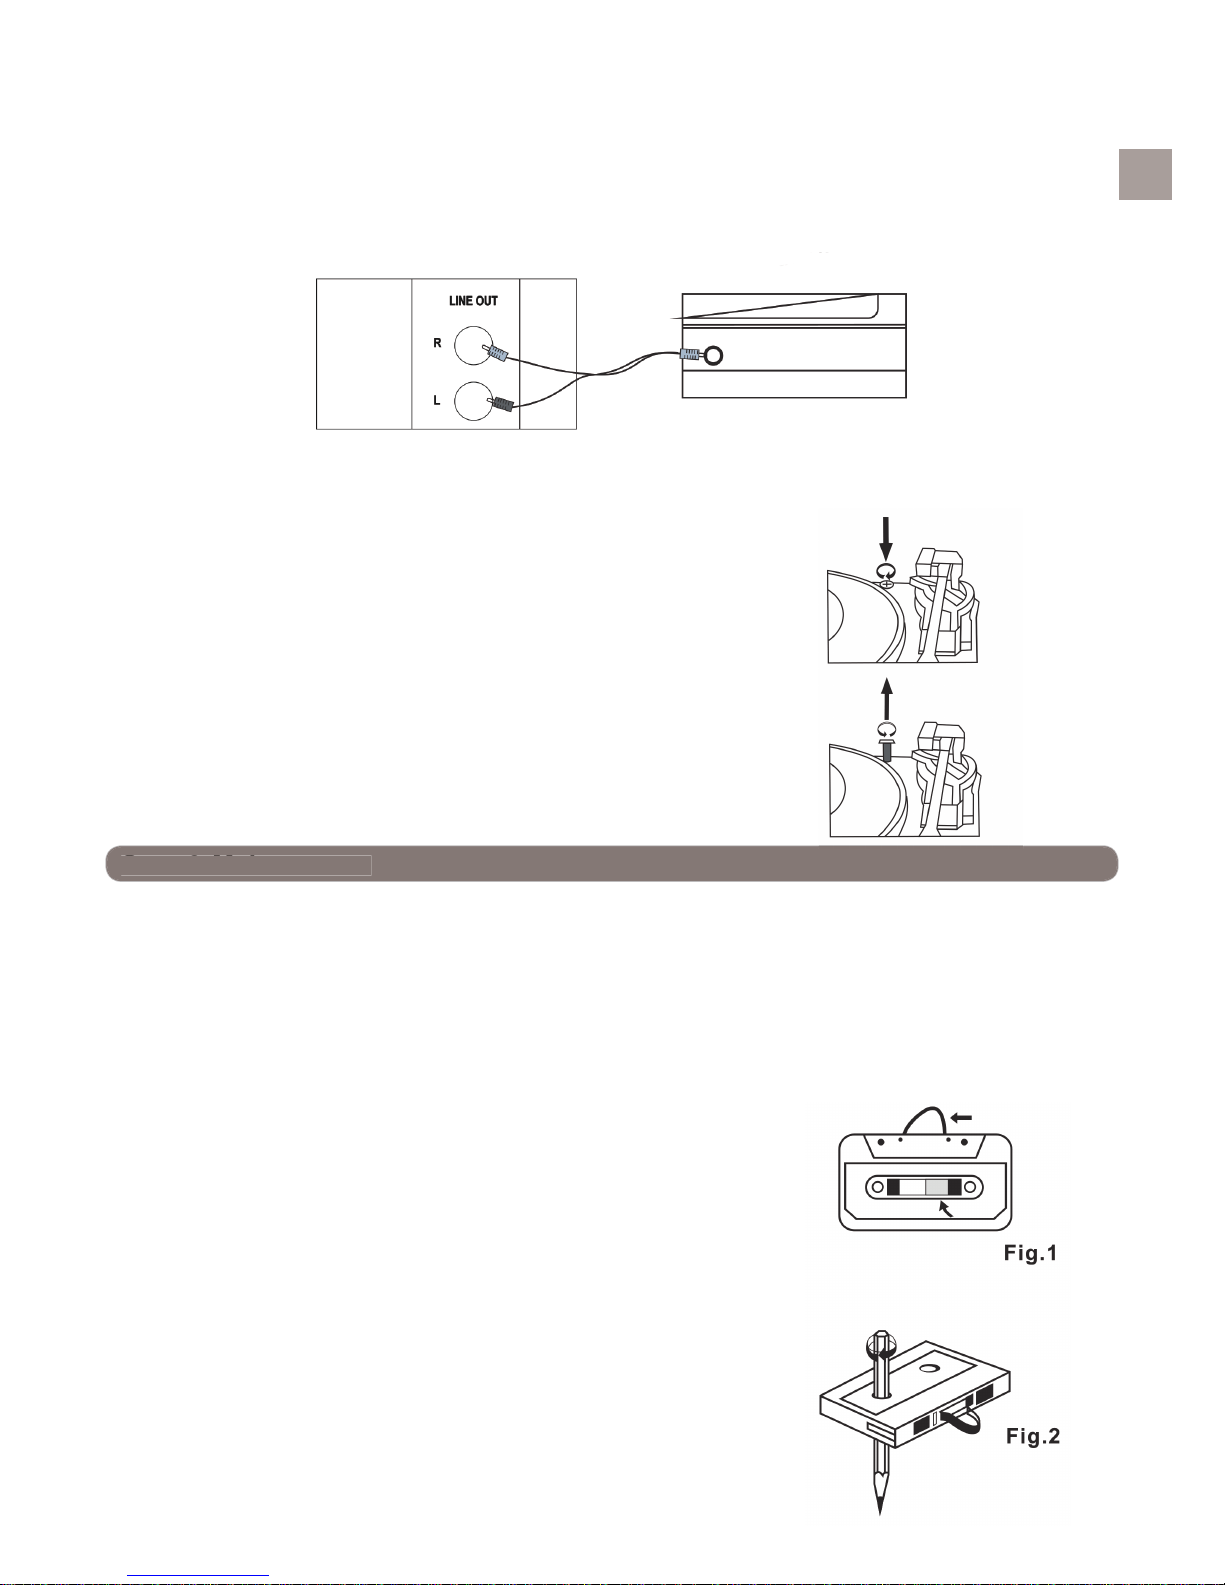
• BEFORE PLAYING A RECORD, PLEASE USE A
SCREWDRIVER OR COIN TO TURN THE TRANSIT
SCREW COMPLETELY DOWN IN CLOCKWISE
DIRECTION TO UNLOCK THE TURNTABLE.
• TO LOCK TH E TURNTABLE AGAIN FOR
TRANSPORTATION, PLEASE TURN THE SCREW IN
COUNTER - CLOCKWISE DIRECTION.
Care & Maintenance
Cassette care:
Two common causes of trouble experienced when using cassettes are:
• Tape jamming - Leading to uneven speed in playback.
• Tape entangling - the tape wraps itself around vital parts of the mechanism.
Line out operation:
1. This system includes a set of LINE OUT sockets (UR) which allow you to record from the Radio or
phonograph of this system to an external recording device such as a cassette recorder, mini-disc,
etc. In any play mode, insert the audio cable (not include) into the matching ”LINE OUT” socket of
the unit, operate as usual, and through the speakers of external device you can hear the sound
exported from.
To reduce the likelihood of these problems occurring, the following
precautions should be observed:
1. Check that there are no loose layers of tape visible through
the cassette center window (see Fig.1). Take up any loose
layers, using a pencil or hexagonally barreled ballpoint pen,
before inserting the cassette into the machine (see Fig. 2).
2. If the cassette feels tight while performing operation shown
(see Fig. 2), the tape may be jamming due to ridges formed
in the winding of the tape (visible through the center
window). These may be removed in most cases, by fast
winding of the cassette from one end to the other and back
again.
3. Use only well-known brands of tape. Avoid use of C-120
Cassettes.
4. Furthermore, do not expose cassettes to direct sunlight,
dust or oil, and do not touch the tape surfaces.
8.
Page 10

EN
Compact disc care:
1. To remove a disc from its storage case, press down on the center of the case and lift the disc out,
holding it carefully by the edges.
2. Fingerprints and dust should be carefully wiped off the disc s recorded surface with a soft cloth.
Unlike conventional vinyl or shellac records, compact discs have no grooves to collect dust and
microscopic debris, so gently wiping with a soft cloth should remove most particles. Wipe in a
straight line from the insideto the outside of the disc. Small dust particles and light stains will have
absolutely no effect on sound reproduction quality.
3. Clean the disc periodically with a soft, lint-free, dry cloth or abrasive cleaners to clean the disc. If
necessary, use a CD cleaning kit.
4. Never affi x labels to the surface of compact discs or write on them, except very gently with
specialist CD-R Pens.
Care of the cabinets:
1. You should care for the cabinet as you would care for any piece of fi ne furniture, when the cabinet
becomes dusty, wipe it with a soft, non-abrasive dusting cloth.
2. If the cabinet becomes smudged with fi nger prints, you may use any good quality commercial
dusting and polishing spray cleaner. However, avoid spraying the plastic or metal parts of
this system. We recommend that you spray the cleaner onto your dusting cloth not directly onto the
cabinet to avoid getting any of the spray on the plastic or metal parts.
Champion ®
Makadamgatan 14 I 254 64 Helsingborg I Sweden
info@championnordic.se
Designed in Sweden I Assembled in China
Correct Disposal of this product
This marking indicates that this product should not be disposed with other
household wastes throughout the EU. To prevent possible harm to the
environment or human health from uncontrolled waste disposal, recycle it
responsibly to promote the sustainable reuse of material resources.
9.
Page 11
SE
10.
VARNING
FÖR ATT FÖRHINDRA BRAND ELLER CHOCKSKADA ANVÄND INTE DENNA KONTAKT MED FÖRLÄNGNINGSSLADD ELLER ANNAT UTTAG SÅVIDA INTE BLADEN KAN SÄTTAS IN HELT FÖR ATT
FÖRHINDRA ATT DE BLOTTAS. FÖR ATT FÖRHINDRA BRAND ELLER CHOCKSKADA, UTSÄTT INTE
DENNA APPARAT FÖR REGN ELLER FUKT.
Det blinkade ljuset med en
pilsymbol, inuti en liksidig triangel
är avsedd för att uppmärk-
samma användaren på att det
fi nns oisolerad farlig spänning
inom produkten som kan vara av
nog styrka för att utgöra en risk
för elektrisk chock för personer.
VARNING!
FÖR ATT MINSKA RISKEN FÖR
ELEKTRISK CHOCK TA INTE
BORT HÖLJE (ELLER
BAKSIDA), INGA DELAR ÄR
SERVICEVÄNLIGA FÖR
ANVÄNDARE, KONSULTERA
KVALIFICERAD SERVICE-
PEROSNAL FÖR SERVICE.
Utropstecknet inuti en liksidig triangel är avsedd för att uppmärk-
samma användaren på att det
fi nns viktig användar- och
underhålls- (service-)instruktioner
i texten som följde med
apparaten.
VIKTIGA SÄKERHETSINSTRUKTIONER
1. Vänliga läs dessa instruktioner och behåll dem för framtida referens.
2. Var uppmärksam på alla varningar.
3. Följ alla instruktioner.
4. Använd inte denna apparat i närheten av vatten.
5. Rengör endast med en torr trasa.
6. Blockera inte några av ventilationsöppningarna.
7. Installera i enlighet med tillverkarens instruktioner. Installera inte nära några värmekällor så som
element, värmare, spis eller andra apparater (inklusive förstärkare) som producerar värme.
8. Skydda strömsladden från att trampas på eller bli böjd, speciellt där kontakten sitter fast och där den
kommer ut från apparaten.
9. Använd endast fästen/tillbehör som är specifi cerade av tillverkaren.
10. Koppla ur apparaten vid åskväder eller när den är oanvänd under längre tid.
11. Lämna all service till kvalifi cerad personal. Service krävs när apparaten på något sätt har skadats, så
som när strömsladden eller kontakten är skadad, om vatten har spillts på den eller om objekt har fallit
på apparaten, om apparaten har utsatts för regn eller fukt, om den inte fungerar normalt eller om den
har tappats.
12. Denna apparat bör inte utsättas för droppande eller stänkande vatten och inga föremål med fyllda
med vatten, så som vaser, bör sättas på apparaten.
13. Överbelasta inte vägguttaget. Använd endast strömkällor som är indikerade – d.v.s. 230V AC uttag.
VIKTIG INFORMATION
1. Undvik att installera denna enhet på platser som är utsatta för direkt solljus eller som är nära
värmeelement så som elektriska värmare, ovanpå stereoutrustning som utger för mycket värme,
platser som saknar ventilation eller med mycket damm, platser som utsätts för konstant vibration och/
eller platser med hög fukthalt.
2. Försökt inte att rengöra denna enhet med kemiska medel som kan skada fi nishen. Använd en ren,
torr trasa. Använd kontroller och knappar så som beskrivs i manualen.
3. Innan du sätter på strömmen, säkerställ att strömsladden är inkopplad. Förvara dina CD-skivor och
kassetter i ett kallt utrymme för att undvika värmeskada. När du fl yttar anläggningen, var säker på att
du först kopplat ur strömsladden.
Page 12

SE
11.
Förberedelse för användning
Uppackning och installation
1. Ta försiktigt enheten ur visningskartongen och ta bort allt förpackningsmaterial från enheten.
2. Linda upp AC-strömsladden och sträck ut den till sin fulla längd.
3. Linda upp FM-antennsladden och sträck ut den till sin fulla längd.
4. Placera enheten på en stabil, jämn yta, i närheten av ett strömuttag, bort från direkt solljus och bort
från starka värmekällor, damm, fukt, luftfuktighet eller starka magnetiska fält.
5. Lyft på locket för att visa fonografen. Fonografen har säkrats vid frakt med en transitskruv. Använd
ett mynt eller en skruvmejsel för att vrida transitskruven medurs. Detta låter skivspelaren ”fl yta”.
6. Ta bort det ogenomskinliga vita nålskyddet i plast från fonografen genom att dra det framåt och
nedåt.
7. Kasta nålskyddet.
8. Ta bort tråden som användes för att säkra tonarmen under frakt.
9. Släpp spaken för låsning av tonarmen.
10. Koppla kontakten i ditt strömuttag.
Transportsäkring
Spak för låsning av
tonarm
Nålskydd
Skydda dina möbler
Denna modell är utrustad med antiglid-fötter i gummi för att förhindra att produkten ska röra sig när du
använder den. Dessa fötter är tillverkade i icke-migrerande gummimaterial specifi kt sammansatt för att
undvika att det ska lämna märken eller fl äckar på dina möbler. Dock kan vissa typer av oljebaserade möbel-
polish, träskyddsmedel eller rengöringssprayer göra att gummifötterna mjukas upp och lämnar märken eller
gummirester på möblerna. För att motverka skada på dina möbler rekommenderar vi starkt att du köper
små, självhäftande fi lttassar, tillgängliga från byggvaruhus och hemrenoveringsbutiker, och sätter dessa
tassar på botten av gummifötterna innan du sätter produkten på fi na trämöbler.
VIKTIGT
Höja och sänka locket:
• För att öppna locket, höj det så högt som det går tills lockhållarna låser i öppen position. För att stänga
locket, öppna det lite tills lockhållarna släpper och sänk sedan försiktigt locket.
• För att undvika skada på utsidan av spelaren eller locket, stäng aldrig locket genom att tvinga det. lyft
alltid upp locket för att få hållarna att släppa.
För att spara strömkonsumtion:
• För att hjälpa till att spara på strömmen stänger enheten av strömförsörjningen automatiskt om ingen
ljudsignal upptäckts inom 20 minuter då enheten är påslagen. För att sätta på strömmen igen och återuppta uppspelning måste du först stänga av strömmen och sätta på den igen för att fortsätta.
Page 13

SE
12.
Placering av kontroller & indikatorer
Front Panel:
1. Fonografl ock
2. Stödfäste för fonografl ock
3. Skivspelare
4. Pekare
5. FM-frekvensinställning
6. AM-frekvensinställning
7. CD/USB-Knapp
8. REC-knapp
9. PH/BT-knapp
10. KASETT-knapp
11. FM-knapp
12. AM-knapp
13. USB-ingång
14. BAS-knapp
15. Högtalare
16. AV/VOLYM-knapp
17. Tonarm
18. Spela/Pausa-knapp
19. Repetera-knapp
20. SKIP BAK-Knapp
21. SKIP FRAM-knapp
22. Stopp-knapp
23. Öppna/Stäng-knapp
24. Kassettöppning
25. Kassett EJ/FF-Knapp
(MATA UT/Snabbspola)
26. CD-Fack
27. LED-display
28. Hörlursuttag
29. Stämningsvred
30. ALT-knapp
Bakpanel:
31. FM-ledsladd antenn
32. AC-strömsladd
33. AUX IN (UR) Uttag
34. LINJE UT Uttag(R/L)
31
32
33
34
Page 14
SE
13.
Fonograf:
1. Skivspelare
2. 45 RPM-Adapter
3. Transitskruv
4. Cue-spak
5. Hastighetsväljare (33 & 45 & 78 RPM)
6. Tonarmslås
7. Tonarm med nål
Användning av fjärrkontroll:
R1: ÖPPNA/STÄNG
R2: SPELA IN
R3: REPETERA
R4: SPELA/PAUSA
R5: DN/FB (HOPPA BAK)
R6: DN/FF (HOPPA FRAM)
R7: STOPP
R8: SPÅR -10
R9: SPÅR +10
RI0: SLUMPVIS
R11: RADERA
R12: PROGRAM
NOTERA: ALLA knapparna på fjärrkontrollen
har samma funktion som motsvarande knappar
på enheten. Denna fjärrkontroll används endast
för CD/MP3 och USB-läge.
Instruktioner för användning
Radioanvändning
1. Vrid på AV/VOLYM-knappen för att sätta på enheten.
2. Tryck på AM-knappen eller FM-knappen för att välja AM- eller FM-funktion.
3. Välj den önskade stationen genom att vrida på STÄMNINGS-vredet.
4. Justera AV/VOLYM-knappen till önskad ljudnivå.
Antenninformation
• AM-antennen är inuti skåpet. Om AM-mottagningen är otillfredsställande, prova att fl ytta på skåpet
lite grann till dess att den interna antennen tar emot den starkaste signalen.
• Sladdantennen för FM fi nns på baksidan av skåpet. Om det är nödvändigt, justera positionen och
riktningen på denna antenn till dess att du hittar positionen som ger bäst mottagning.
Page 15

SE
14.
CD/MP3-användning:
1. Tryck på CD/USB-knappen för att välja CD-funktion.
2. Tryck på ÖPPNA/STÄNG-knappen för att öppna CD-facket och LED-displayen kommer visa <OP>.
3. Placera CD/CD-R/CD-RW/MP3-skivan i facket med den trycka sidan uppåt.
4. Tryck på ÖPPNA/STÄNG-knappen en gång till för att stänga CD-facket. LED-displayen kommer
då att visa ”-” i några sekunder, sedan kommer det totala antalet spår på skivan att visas. ”nod”
kommer att visas när ingen skiva är i enheten.
5. SPELA/PAUSA-INDIKATORN kommer att lysas upp. Uppspelning kommer starta automatiskt.
6. Justera AV/VOLYM-knappen till önskad ljudnivå.
7. För att pausa uppspelning, tryck på SPELA/PAUSA-knappen. SPELA/PAUSA-INDIKATORN
kommer att blinka.
8. För att stoppa uppspelning, tryck på STOPP-knappen. SPELA/PAUSA-INDIKATORN kommer att
stängas.
USB-användning
1. Sätt USB-minnet i USB-uttaget.
2. Tryck på CD/USB-knappen för att välja CD-funktionen och tryck och håll på SPELA/PAUSA-
knappen för att välja USB-funktionen. LED-displayen kommer visa ”-” i ett par sekunder och sedan
kommer det totala antalet spår på USB-minnet att visas. ”nob” kommer att visas när det inte är
någon USB insatt i enheten.
3. SPELA/PAUSA-INDIKATORN kommer att lysa upp. Uppspelning kommer starta automatiskt.
4. Justera AV/VOLYM-knappen till önskad ljudnivå.
5. För att pausa uppspelning, tryck på SPELA/PAUSA-knappen. SPELA/PAUSA-INDIKATORN
kommer att lysa upp.
6. För att stoppa uppspelning, tryck på STOPP-knappen. SPELA/PAUSA-INDIKATORN kommer att
stängas.
NOTERA: Tryck och håll nere SPELA/PAUSA-knappen för att komma åt funktionsskifte som följer: CD-
USB
Spelkontroll i CD/MP3/USB
1. Placera din CD eller MP3-disk i facket eller sätt in en USB. Uppspelning kommer automatiskt att
starta. Uppspelning kommer fortsätta till slutet av SKIVAN eller USB, när skivan är färdig kommer
displayen att visa det totala antalet spår på skivan eller USB igen. Du kan också välja att stoppa
uppspelningen när du vill genom att trycka på STOPP-knappen.
2. Justera AV/VOLYM-knappen till önskad ljudnivå.
3. I uppspelningsläge, tryck på SKIPPA FRAM-knappen på enhetens frampanel eller UPP/FB-
knappen på fjärrkontrollen för att hoppa till nästa låt.
4. Tryck på SKIP BAK-kappen på enhetens frampanel eller DN/FB-knappen på fjärrkontrollen för att
hoppa till den förra sången som precis har spelats.
5. Tryck på knappen MAPP+/+10 eller knappen MAPP-/-10 för att hoppa fram eller hoppa bak 10 spår
i CD/MP3/USB.
Välja uppspelning av mapp i MP3/USB:
1. I stoppläge, tryck på knappen MAPP+/+10 eller knappen MAPP-/-10 för att välja FOLDER+ eller
FOLDER-. För att bekräfta spårnummer i MAPP, tryck på SPELA/PAUSA-knappen för uppspelning.
Låtnumret och mappnumret för ditt valda spår kommer att visas kontinuerligt varannan sekund. Du
kan också stoppa uppspelning när som helst genom att trycka på STOPP-knappen.
Välj din önskade del för CD/MP3/USB:
1. Tryck och håll nere SKIPPA FRAM- eller SKIPPA BAK-knappen på enhetens frampanel eller UPP/
FF- eller DN/FB-knappen på fjärrkontrollen för att välja din önskade del av det spår som spelas för
tillfället och släpp sedan knapparna. Uppspelningen kommer att fortsätta som normalt från den
punkten i spåret.
Paus-kontroll för CD/MP3/USB:
1. I uppspelningsläge för CD/MP3/USB, tryck på SPELA/PAUSA-knappen en gång. Uppspelning
stoppas men skivan fortsätter snurra och LCD-indikatorn för spårnummer kommer att blinka.
2. Tryck på SPELA/PAUSA-knappen en gång till för att avbryta paus och spårnumret kommer att sluta
blinka.
Page 16

SE
15.
Spela in i CD/MP3/USB/fono/kassett-funktion:
1. I uppspelningsläge för CD/MP3/USB/Fono och KASSETT, välj de önskade låtarna och deras spår.
2. Sätt in USB och tryck på REC-knappen en gång, enheten visar <REC>, och indikatorn för
inspelning kommer att lysa.
3. Tryck på REC-knappen en gång till för att bekräfta inspelning till USB och ljuset som indikerar
inspelning kommer att blinka. Enheten kan lagra inspelade sånger för dina valda favoritsång nummer. Om du vill stoppa inspelningen, tryck på STOPP-knappen.
NOTERA: I inspelningsläge för FONO/KASSETT, för att bekräfta inspelning, kommer enhetens display visa
<REC> och den röda indikatorlampan kommer att blinka.
Avbryt USB-uppspelning av sånger:
1. Om enheten spelar en sång från USB som du inte tycker om kan du trycka och hålla nere
RADERA-knappen på fjärrkontrollen i 2 sekunder för att avbryta sången, LCD-displayen på enheten
kommer att visa <DEL>.
Upprepa uppspelning i CD/MP3/USB:
1. I uppspelningsläge för CD/MP3/USB. Tryck på REPETERA-knappen en gång, repeteringsindikatorn
kommer att blinka och det nuvarande spåret kommer att repeteras när det är färdigspelat.
2. Tryck på REPETERA-knappen två gånger så kommer repeteringsindikatorn att sluta blinka,
fortsätta vara på, och sedan kommer skivan att upprepas från start när den är färdigspelad.
3. För att avbryta repeterad uppspelning, tryck på REPETERA-knappen igen, repeteringsindikatorn
kommer att stängas. Repeterad uppspelning stoppas också genom att trycka på STOPP-knappen.
Slumpvis uppspelning i CD/MP3/USB-läge:
1. I uppspelningsläge för CD/MP3/USB, tryck på SLUMPVIS-knappen för slumpvis uppspelnings-
funktion, indikatorn för slumpvis kommer att vara på. Tryck på denna knapp igen för att avbryta
funktionen för slumpvis uppspelning.
Programmeringsfunktion i CD/MP3/USB-läge:
1. Denna funktion låter dig programmera 20 spår i CD-läge och 99 spår i MP3/USB-läge för
uppspelning i vilken ordning du vill.
2. I CD/MP3/USB-läge med uppspelning stoppad, tryck på PROGRAM-knappen för att komma in i
programläge. Programnumret visar kort ’001’ och programindikatorn kommer blinka. Tryck på
SKIP FRAM- eller SKIP BAK-knappen på enhetens frampanel eller UP/FF- eller DN/FB-knappen
på fjärrkontrollen för att välja det första spåret som du önskar föra in i programminnet,
exempelvis: om spår nummer 008 är det önskade spåret, när detta kommer upp på displayen, tryck
på PROGRAM-knappen en gång till för att spara spåret. Programnumret visar kort numret ’002’ och
sedan kommer programindikatorn att blinka.
3. Repetera ovanstående steg, välj ett annat spårnummer varje gång till du har valt upp till 20 (CD)
spår och 99 (MP3/USB) spår i programminnet.
4. Tryck på SPELA/PAUSA-knappen för att börja den programmerade uppspelningen. PROGRAM-
indikatorn kommer att blinka. Uppspelning kommer att börja med det första spåret som du har
programmerat och kommer att fortsätta tills det sista programmerade spåret har spelats. Den
programmerade sekvensen kan avslutas genom att trycka på STOPP-knappen två gånger.
Användning av kassettfunktion:
1. Välj KASSETT-funktionen. Sätt i din kassett i
facket, så som visas på bilden, med den sida
som du önskar spela uppåt och den öppna
änden på höger sida.
Page 17

SE
16.
2. Kassett-uppspelning börjar så fort bandet är insatt.
Justera AV/VOLYM-knappen till önskad ljudnivå.
3. För att snabbspola på bandet, tryck ned knappen EJ/FF
(Ta ut/Spola Fram) cirka halvvägs. Bandet kommer att
spola fram snabbt så länge knappen är nedtryckt. Normal
uppspelning kommer att återupptas när knappen släpps.
4. När bandet är slut stoppar spelaren automatiskt. Tryck
ned knappen EJ/FF (Ta ut/Spola Fram) helt för att ta ut
kassetten från spelaren. Du kan trycka ned knappen
EJ/FF (Ta ut/Spola Fram) för att stoppa uppspelning och
ta ut kassetten när som helst.
Användning av fonofunktion:
1. Välj FONO-funktion och säkerställ att du tagit av nålskyddet från nålen.
2. Placera din VINYLSKIVA på mittaxeln.
3. Justera AV/VOLYM-kontrollen till önskad ljudnivå.
NOTERA: Vrid eller stoppa in skivspelaren manuellt. Att fl ytta eller skaka skivspelaren utan att fästa
tonarmen kan resultera i skador på tonarmen.
4. Ställ in skivspelarens hastighet till önskad nivå, 33, 45 eller 78 RPM. Om du spelar 45 RPM-singlar,
placera adaptern för 45 RPM i mitten.
5. När skivspelaren slutar spelar kommer tonarmen automatiskt att fl ytta sig till sin ursprungsposition.
Användning av Bluetooth-funktionen:
1. Sätt på enheten, ställ in volymkontrollen till önskad nivå. Ställ funktionsknappen till PH-läge och
säkerställ att tonarmen är i omstartsläge. En kort startton för Bluetooth kommer att höras och sedan
kommer Bluetooth-indikatorn att blinka.
2. Sätt på din Bluetooth-enhet och scanna. Den kommer att visas som ”CHVS310” när den hittas av
din Bluetooth-enhet.
3. När enheten paras med din Bluetooth-enhet kan du höra en kort ton från högtalarna.
4. Spela från din Bluetooth-enhet som du vanligtvis gör och ljudet kommer att spelas från denna
enhet.
Notera:
1. Säkerställ att din Bluetooth-enhet och denna enhet är inom 10 meter från varandra.
2. Kolla och se om det fi nns några andra Bluetooth-enheten i närheten som stör signalen och
kopplingen.
3. Denna enhet kan kopplas samman med fl era olika Bluetooth-enheter, men kan endast vara aktivt
kopplad till och spela från en åt gången. Säkerställ att inga andra enheter är aktivt kopplade till den
redan när du försöker koppla till en ny enhet.
Användning av AUX IN-funktionen:
1. Välj FONO-funktionen. Sätt in två sladdändar i ”AUX IN”-uttaget på enheten och motsvarande i din
externa enhet. Använd den externa enheten som vanligt och från högtalarna till enheten kan du
höra sångerna som spelas på den externa enheten.
Page 18

SE
17.
VIKTIGT!
FÖR ATT SKYDDA SKIVSPELAREN FRÅN SKADA UNDER
TRANSPORT ÄR EN TRANSITSKRUV I SILVER PLACERAD
I DET ÖVRE HÖGRA HÖRNET AV SKIVSPELAREN.
• INNAN EN SKIVA SPELAS, VÄNLIGEN ANVÄND EN
SKRUVMEJSEL ELLER ETT MYNT FÖR ATT VRIDA
TRANSPORTSKRUVEN HELT MEDURS FÖR ATT
LÅSA UPP SKIVSPELAREN.
• FÖR ATT LÅSA SKIVSPELAREN IGEN FÖR
TRANSPORT, VÄNLIGEN VRID SKRUVEN MOTURS.
Skötsel & Underhåll
Kassettskötsel:
Två vanliga anledningar till att problem uppstår när kassetter används är:
• Bandstörning – Leder till ojämn uppspelning.
• Bandintrassling – bandet surrar sig runt viktiga delar i mekanismen.
Användning av linje-ut:
1. Detta system inkluderar en uppsättning LINJE UT-uttag (UR) som låter dig spela in från radio eller
skivspelaren i detta system till en extern inspelningsenhet så som en kassettbandspelare, mini-disc
osv. I alla uppspelningsläge, sätt i ljudkabeln (inte inkluderad) i det matchade ”LINJE UT”-uttaget
på enheten, använd som vanligt och genom högtalarna som hör till den externa enheten kan du
höra ljudet som exporteras från denna enhet.
För att minska risken för att dessa problem ska uppstå, bör följande
försiktighetsåtgärder vidtas:
1. Kolla så att det inte är några lösa lager av tejp synliga
genom kassettens centralfönster (se Fig. 1). Ta upp alla
lösa lager genom att använda en penna eller hexagon formad kulspetspenna innan kassetten sätts in i maskinen
(se Fig. 2).
2. Om kassetten känns spänd när åtgärden som visas (se Fig.
2), kan bandet ha uppspelningsproblem på grund av räffl or
som formats i lindningen av bandet (synliga genom central-
fönstret). Dessa kan tas bort i de fl esta fall genom
snabbspolning av bandet från en sida av kassetten till den
andra och tillbaka igen.
3. Använd endast välkända märken på kassettband. Undvik att
använda kassetter av typ C-120.
4. Fortsättningsvis bör kassetter inte utsättas för direkt solljus,
damm eller olja och bandets yta bör inte vidröras.
Page 19

SE
Champion ®
Makadamgatan 14 I 254 64 Helsingborg I Sweden
info@championnordic.se
Designed in Sweden I Assembled in China
Korrekt avfallshantering
Denna symbol på produkten eller i instruktionerna betyder att den ska
slängas separat från annat hushållsavfall när den inte fungerar längre.
Inom EU fi nns separata återvinningssystem för avfall. Kontakta lokala
myndigheter eller din återförsäljare för mer information.
18.
Skötsel av CD-skivor:
1. För att ta ut en skiva från sitt skyddsfodral, tryck ned mittendelen av fodralet och lyft ut skivan
medan du håller den försiktigt i kanterna.
2. Fingeravtryck och damm bör försiktigt torkas bort från skivans inspelningssida med en mjuk trasa.
Till skillnad från traditionella vinyl- eller schellackskivor har CD-skivor inga räffl or som samlar damm
och mikroskopisk smuts, så det bör räcka med att försiktigt torka med en mjuk trasa för att få bort
att partiklar. Torka i en rak linje från insidan till utsidan av skivan. Små dammpartiklar och lätta
fl äckar har absolut ingen påverkan på uppspelningskvaliteten.
3. Rengör skivan periodvis med en mjuk, luddfri, torr trasa eller passande rengöringsmedel för att
hålla den fri från smuts. Om nödvändigt, använd ett kit för CD-rengöring.
4. Sätt aldrig etiketter eller skriv på ytan av CD-skivor, bortsett från väldigt försiktig skrift med speciellt
anpassade pennor för CD-R.
Skötsel av skåp:
1. Du bör ta hand om kabinetten så som du tar hand om alla möbler. När skåpet blir dammigt, torka av
det med en mjuk, len dammtrasa.
2. Om skåpet blir nedsmutsat med fi ngeravtryck kan du använda vilket högkvalitativt, bra damm- och
polishspray som helst. Men undvik att spraya på plast- eller metalldelarna i systemet. Vi
rekommenderar att du sprayar rengöringsmedlet på din dammtrasa och inte direkt på skåpet för att
undvika att det kommer spray på plast- eller metalldelarna.
Page 20

DK
19.
FORSIGTIG
FOR AT UNDGÅ BRAND ELLER STØD, BRUG IKKE DETTE STIK MED EN FORLÆNGERLEDNING,
KOBLINGSSTIK ELLER ANDET STIK, MEDMINDRE KONTAKTELEMENT KAN INDSÆTTES HELT FOR
AT UNDGÅ EKSPONERING AF KONTAKTELEMENT. FOR AT UNDGÅ BRAND ELLER STØD, UDSÆT
IKKE DETTE APPARAT FOR REGN ELLER FUGT.
Lynet med pile-hoved symbolet
inde i en ligesidet trekant har til
formål at advare brugeren om
uisoleret farlig spænding i
produktet, som muligvis er af
tilstrækkelig størrelse til at udgøre
risiko for elektrisk stød over for
personer.
ADVARSEL!
FOR AT MINDSKE RISIKO FOR
ELEKTRISK STØD, FJERN
IKKE BESKYTTELSE (ELLER
BAGSIDE), INGEN BRUGER-
ANVENDELIGE DELE INDENI.
HENVISER TIL AT OVERLADE
VEDLIGEHOLDELSE TIL
KVALIFICERET PERSONALE.
Udråbstegnet i en ligesidet
trekant har til formål at advare
brugeren om tilstedeværelse af
vigtige betjenings- og vedlige-
holdelses- (service) instruktioner
i det informationsmateriale, der
følger med apparatet.
VIGTIGE SIKKERHEDSFORANSTALTNINGER
1. Venligst læs disse instruktioner og behold dem til fremtidigt brug.
2. Vær opmærksom på samtlige afvarsler.
3. Følg alle instruktioner.
4. Brug ikke dette apparat i nærheden af vand.
5. Rengør kun med en ren klud.
6. Bloker ikke ventilationsåbninger.
7. Installer i overensstemmelse med producentens instruktioner. Installer ikke i nærheden af
varmekilder såsom radiatorer, varmeapparater, komfurer eller andre apparater (inklusive
forstærkere), som producerer varme.
8. Beskyt strømledningen fra at blive trådt på eller bøjet, specielt der, hvor stikket er fastgjort og det
sted, hvor den udgår fra apparatet.
9. Brug kun tilbehør specifi ceret af producenten.
10. Fjern apparatet fra strømforsyningen under lyn- og tordenvejr, og når det ikke anvendes i en længere
periode.
11. Overlad al servicearbejde til kvalifi ceret personale. Servicearbejde er påkrævet når apparatet på
nogen måde er blevet skadet, såsom hvis strømforsyningsledningen eller stikket er skadet, væske er
blevet spildt eller genstande er blevet tabt ind i apparatet, hvis apparatet er blevet udsat for regn eller
fugt, ikke fungerer normalt, eller ervblevet tabt.
12. Dette apparat må ikke udsættes for dryp eller stænk waterand intet objekt fyldt med væske, såsom
vaser, må anbringes på apparatet
13. Overbelast ikke stikkontakten i væggen. Brug kun strømforsyningskilder som anvist – dvs. 230V AC
hovedledninger.
VIGTIGE BEMÆRKNINGER
1. Undgå at installere denne enhed på steder udsat for direkte sollys eller tæt på varmegivende
elementer såsom varmeovne, oven på andre stereo-apparater, der afgiver for meget varme, steder
med manglende ventilation eller støvede områder, steder udsat for konstant vibration og/eller fugtige
eller våde områder.
2. Forsøg ikke at rengøre denne enhed med kemiske opløsningsmidler, da dette kan ødelægge
overfl aden. Brug en ren, tør klud. Betjen knapper og kontakter som beskrevet i manualen.
3. Før du tænder for enheden, skal du sikre dig, at AC strømforsyning er koblet til. Opbevar dine CD’er
og plader køligt for at undgå varmeskader. Når du fl ytter på sættet, så sørg for at frakoble strømmen
først.
Page 21

DK
20.
Forberedelse til brug
Udpakning og opsætning
1. Fjern forsigtigt enheden fra kassen og fjern al pakningsmateriale fra enheden.
2. Vikl AC ledningen ud og fold ud til fuld længde.
3. Vikl FM antennen ud og fold ud til fuld længde.
4. Placer enheden på en stabil, jævn overfl ade i praktisk afstand til en AC stikkontakt, væk fra direkte
sollys og væk fra kilder til varme, støv, fugt, vand og stærke magnetiske felter.
5. Løft låget så du kan se grammofonen. Grammofonen er blevet sikret under transporten med en
transportskrue. Brug en mønt eller skruetrækker til at dreje skruen i urets retning. Dette vil tillade
drejeskiven at ”fl yde”.
6. Fjern den hvide, matte plastik fra pickupnålen ved at glide det fremad og ned.
7. Smid pickupnåls-beskyttelsen ud.
8. Fjern den klips, der beskyttede pickuparmen under transporten.
9. Slip pickuparmen fri fra låsearmen.
10. Sæt stikket i din AC stikkontakt.
Transportskrue
Lås til pickuparm
Beskyttelse
pickup-nål
Beskyt dine møbler
Denne model er udstyret med skridsikre gummifødder for at forhindre produktet i at rykke sig, mens du
betjener knapperne. Disse fødder er lavet af skridsikkert gummimateriale specielt designet til at undgå at
efterlade mærker eller pletter på dine møbler. Dog kan visse typer oliebaseret møbelvoks, træbeskyttelsesmiddel eller rengøringsspray blødgøre gummifødderne, hvilket kan efterlade gummirester på møblerne.
For at forhindre skade på dine møbler anbefaler vi på det kraftigste, at du køber nogle små, selvklæbende
fi ltpuder, som kan fås i isenkramforretninger og boligforretninger overalt, og sætter disse fast under gummifødderne, før du placerer produktet på fi ne træmøbler.
VIGTIGT
Løfte og sænke låget:
• For at åbne låget, løft låget opad så langt, det kan komme, indtil støttearmen låser og holder det
åbent. For at lukke låget, løft det lidt opad indtil støttearmen låses op, og sænk derefter forsigtigt
låget.
• For at undgå at ødelægge montren eller låget, tving aldrig låget ned. løft altid låget for at løsne
støttearmen.
Spar på strømforbruget:
• For at spare på strømmen vil enheden automatisk slukkes, hvis der ikke er noget lydsignal I 20 minutter.
For at tænde igen og spille musik skal du først slukke for strømmen og derefter tænde igen for at
fortsætte.
Page 22

DK
21.
Placering af knapper og indikatorer
Forside:
1. Grammofon låg
2. Grammofonlågs-støttearm
3. Drejeskive
4. Pointer
5. FM indstillingsknap
6. AM indstillingsknap
7. CD/USB knap
8. REC knap
9. PH/BT knap
10. TAPE knap
11. FM knap
12. AM knap
13. USB stik
14. BAS knap
15. Højtalere
16. OFF/VOLUME knap
17. Pickuparm
18. Play/Pause knap
19. Gentagelsesknap
20. SKIP REV. Knap
21. SKIP FWD. Knap
22. Stop knap
23. Åben/Luk knap
24. Kassetteåbning
25. Kassette EJ/FF knap (Eject/Fast Forward)
26. CD skuffe
27. LED skærm
28. Hovedtelefon jack
29. Afstemningsknap
30. ALT knap
Bagside:
31. FM hovedantennetråd
32. AC strømforsyning
33. AUX IN (UR) Jack
34. LINE OUT Jack (R/L)
31
32
33
34
Page 23

DK
22.
Grammofon:
1. Drejeskive
2. 45 RPM Adapter
3. Transportskrue
4. Signal håndtag
5. Hastighedsvælger (33 & 45 & 78 RPM)
6. Lås til pickuparm
7. Pickuparm med pickupnål
Fjernbetjening:
R1: ÅBEN / LUK
R2: PLADE
R3: GENTAG
R4: PLAY / PAUSE
R5: DN/FB (SKIP REV)
R6: DN/FF (SKIP FORWARD)
R7: STOP
R8: TRACK -10
R9: TRACK +10
R10: TILFÆLDIG
R11: SLET
R12: PROGRAM
BEMÆRK: ALLE knapper på fjernbetjeningen
har de samme funktioner som disse knapper på
enheden. Denne fjernbetjening bruges kun til
CD/MP3, USB tilstand.
Betjeningsinstruktioner
Radio betjening
1. Drej på OFF/VOLUME knappen for at tænde enheden
2. Tryk på AM eller FM knappen for at vælge AM eller FM funktionen
3. Vælg den ønskede station ved at dreje på afstemningsknappen
4. Juster OFF/VOLUME knappen for at opnå den ønskede lydstyrke.
Antenne Information
• AM antennen sidder inde i montren. Hvis AM forbindelsen er utilfredsstillende, prøv at fl ytte lidt på
montren, indtil antennen fanger det stærkeste signal.
• FM antennen sidder bag på montren. Om nødvendigt, juster position og retning af antennen indtil
du fi nder den stilling, der giver det bedste signal.
Page 24

DK
23.
CD/MP3 betjening:
1. Tryk på CD/USB knappen for at vælge CD funktionen.
2. Tryk på ÅBEN/LUK knappen for at åbne CD skuffen, og LED skærmen vil vise <OP>.
3. Placer CD/CD-R/CR-RW/MP3 skiven i skuffen med tryk-siden opad.
4. Tryk på ÅBEN/LUK knappen igen for at lukke CD skuffen. LED skærmen vil vise ”-” i nogle få sek
under, hvorefter det samlede antal numre på CD’en vil blive vist. ”nod” vises, når der ikke er indsat
en disk i enheden.
5. PLAY/PAUSE indikatoren vil lyse op. Afspilning starter automatisk.
6. Juster OFF/VOLUME knappen til ønsket lydniveau.
7. For at pause afspilning, tryk på PLAY/PAUSE knappen. PLAY/PAUSE knappen vil blinke.
8. For at stoppe afspilning, tryk på STOP knappen. PLAY/PAUSE indikatoren vil slukke.
USB betjening:
1. Indsæt USB i USB stikket
2. Tryk på CD/USB knappen for at vælge CD funktion, og tryk på PLAY/PAUSE knappen og hold den
nede for at vælge USB funktion. LED skærmen vil vise ”-” i nogle få sekunder, hvorefter det
samlede antal numre på USB stikket vil blive vist. ”nob” vil blive vist når der ikke er indsat noget
USB.
3. PLAY/PAUSE indikatoren vil lyse op. Afspilning starter automatisk.
4. Juster OFF/VOLUME knappen til ønsket lydniveau.
5. For at pause afspilning, tryk på PLAY/PAUSE knappen. PLAY/PAUSE knappen vil blinke.
6. For at stoppe afspilning, tryk på STOP knappen. PLAY/PAUSE indikatoren vil slukke.
BEMÆRK: Tryk og hold PLAY/PAUSE knappen nede for at lave følgende funktionsskift: CD-USB.
Afspilningskontrol i CD/MP3/USB:
1. Placer CD eller MP3 disk i skuffen eller indsæt USB. Afspilning starter automatisk. Afspilning vil
fortsætte indtil slutningen af disken eller USB, når disken er færdig, vil displayet vise det samlede
antal sange på disk eller USB igen. Du kan til enhver tid stoppe afspilning ved at trykke på STOP
knappen.
2. Juster OFF/VOLUME knappen til det ønskede niveau.
3. I afspilningstilstand: Tryk på SKIP FWD knappen på forsiden af enheden eller UP/FB knappen på
fjernbetjeningen for at gå til næste sang.
4. Tryk på SKIP REV knappen på forsiden af enheden eller DN/FB knappen på fjernbetjeningen for at
gå tilbage til forgående sang.
5. Tryk på FOLDER+/+10 eller FOLDER-/-10 for at gå ti sange frem eller tilbage på CD/MP3/USB.
Valg af afspilningsfolder for MP3/USB:
1. I stoptilstand: Tryk på FOLDER+/+10 eller FOLDER-/-10 knappen for at vælge FOLDER+ eller
FOLDER-. For at bekræfte FOLDER sangnumrene, tryk på PLAY/PAUSE knappen for at afspille.
Sangnummeret og foldernummeret på den sang, du har valgt, vil blive vist efter hinanden hver
andet sekund. Du kan til enhver tid stoppe afspilningen ved at trykke på STOP knappen.
Valg af ønsket del for CD/MP3/USB:
1. Tryk og hold SKIP FWD eller SKIP REV knappen nede på forsiden af enheden eller UP/FF eller
DN/FB knappen på fjernbetjeningen for at vælge den ønskede del af den sang, der afspilles, og slip
derefter knappen. Afspilningen vil fortsætte normalt fra den valgte del.
Pause kontrol for CD/MP3/USB:
1. I CD/MP3/UDB tilstand, tryk på PLAY/PAUSE knappen én gang. Afspilning stopper, men disken
drejer fortsat, og LCD indikatoren med sangnummeret vil lyse.
2. Tryk på PLAY/PAUSE knappen igen for at stoppe pausen, og sangnummeret vil stoppe med at
blinke.
Page 25

DK
24.
Optage CD/MP3/USB/grammofon/kassette funktion:
1. I CD/MP3/USB/grammofon og KASSETTE afspilningstilstand, vælg den ønskede sang.
2. Indsæt USB og tryk REC knappen én gang, skærmen viser <REC>, og REC indikatorlampen bliver
synlig.
3. Tryk på REC knappen en gang til for at bekræfte optag til USB og REC lampen vil lyse. Du kan
optage dine favoritnumre. Hvis du vil stoppe optagelsen, tryk på STOP knappen.
BEMÆRK: I RADIO/KASSETTE tilstand tryk RECORD for at bekræfte. Skærmen vil vise <REC>
og en rød indikatorlampe lyser.
Fortryd USB sangbetjening:
1. Enheden spiller en sang på USB, du ikke kan lide – tryk og hold DELETE knappen nede på
fjernbetjeningen i to sekunder for at fortryde sangen, enhedens LCD skærm vil vise <DEL>.
Gentag afspilning for CD/MP3/USB:
1. I CD/MP3/USB afspilningstilstand: Tryk på REPEAT knappen én gang, repeat indikatoren vil blinke
og sangen vil blive gentaget, når den er færdig.
2. Tryk på REPEAT knappen to gange, repeat-indikatoren vil stoppe med at blinke og forblive tændt.
Når pladen er færdig med at afspille, vil den starte forfra.
3. For at stoppe repeat-afspilning, tryk på REPEAT knappen igen, repeat-indikatoren vil slukke.
Repeat-afspilning kan også stoppes ved at trykke på STOP knappen.
Tilfældig afspilning i CD/MP3/USB tilstand:
1. I CD/MP3/USB afspilningstilstand, tryk på RANDOM knappen for at starte tilfældig afspilning,
random-indikator vil lyse. Tryk på knappen igen for at stoppe tilfældig afspilning.
Program funktion i CD/MP3/USB tilstand:
1. Denne funktion tillader dig at programmere 20 numre i CD tilstand og 99 numre i MP3/UDB tilstand
for afspilning i en hvilken som helst ønsket rækkefølge.
2. I CD/MP3/USB stop tilstand, tryk på PROGRAM knappen for at starte program-tilstand. Progra-
meringsnummeret viser kort ’001’ og program-indikatoren vil blinke. Tryk på SKIP FWD eller SKIP
REV knappen på forsiden af enheden eller UP/FF eller DN/FB knappen på fjernbetjeningen for
at vælge det første nummer, du ønsker at komme ind i programmeringshukommelsen, eksempel:
Sang nummer 008, når den ønskede sang vises på skærmen, tryk på PROGRAM knappen igen for
at memorisere sangen. Programmeringsnummeret viser kort ’002’, og program-indikatoren blinker.
3. Gentag ovenstående trin, vælg en forskellig sang hver gang indtil du har valgt op til 20 (CD) sange
eller 99 (MP3/USB) sange i programmeringshukommelsen.
4. Tryk på PLAY/PAUSE knappen for at afspille programmeringen. PROGRAM indikatoren vil stoppe
med at blinke. Afspilning vil starte med den første sang, du har programmeret og vil fortsætte indtil
den sidste programmerede sang er blevet afspillet. Den programmerede serie kan stoppes ved at
trykke på STOP knappen to gange.
Kassette funktions-betjening:
1. Vælg KASSETTE funktionen. Indsæt
kassettebåndet i åbningen som vist i
illustrationen, med den side, du ønsker at
afspille, opad og den åbne ende mod højre.
Page 26

DK
25.
2. Kassetteafspilning begynder så snart båndet er sat i.
Juster OFF-VOLUME knappen for at opnå ønsket niveau.
3. For at spole båndet hurtigt, tryk EJ/FF (Eject/Fast Forward)
knappen cirka halvvejs. Båndet vil spole frem, så længe
knappen holdes inde. Normal afspilning vil fortsætte, så
snart knappen slippes.
4. Når båndet er færdigt stopper afspilningen automatisk.
Tryk helt ned på EJ/FF (Eject/Fast Forward) knappen for
at fjerne kassettebåndet fra afspilleren. Du kan trykke på
EJ/FF (Eject/Fast Forward) knappen for at stoppe afspilning
og fjerne båndet når som helst.
Grammofon funktions-betjening:
1. Vælg PHONO funktionen, sørg for at du har fjernet nåle-beskytteren fra pickupnålen.
2. Placer til LP på midter-tappen.
3. Just OFF/VOLUME knappen til ønsket niveau.
BEMÆRK: Drej og stop ikke pladen manuelt. At fl ytte eller støde pickupnålen uden at fastgøre
pickuparmens støtte, kan resultere i skade af pickuparmen.
4. Sæt drejeskivens hastighedsvælger til den passende hastighed, 33, 45 eller 78 RPM. Hvis du
afspiller 45 RPM singles, placer da 45 RPM adapteren på midter-tappen.
5. Når drejeskiven er færdig med at afspille, vil pickuparmen automatisk vende tilbage til original
position.
Bluetooth funktions-betjening:
1. Tænd for enheden, drej volume-knappen til ønsket niveau. Drej funktionsknappen til PH tilstand og
sørg for, at pickuparmen er i reset-position. En kort Bluetooth starttone vil lyde, og Bluetooth
indikatoren vil lyse.
2. Tænd din Bluetooth-enhed og scan. Den vil blive vist som ”CHVS310” når den bliver fundet af din
Bluetooth-enhed.
3. Når enheden er parret med Bluetooth-enheden, vil du høre en kort tone fra højtalerne.
4. Afspil fra din Bluetooth-enhed som du normalt ville gøre, og lyden vil blive spillet fra denne enhed.
Bemærk:
1. Sørg for at din Bluetooth-enhed og denne enhed er højst 10 meter fra hinanden.
2. Tjek om der er andre Bluetooth-enheder i nærheden, som forstyrrer signal og forbindelse.
3. Denne enhed kan parres med fl ere forskellige Bluetooth-enheder, men kan kun forbindes og
spille fra én ad gangen. Sørg for, at ingen andre enheder allerede er aktivt forbundet to den, når
du prøver at forbinde din enhed.
Aux i funktion:
1. Vælg PHONO funktionen. Indsæt de to ender af ledningen i henholdsvis ”AUX IN” stikket på
enheden og tilsvarende stik på din eksterne enhed. Betjen den eksterne enhed som du plejer, og
du kan høre musik fra din eksterne enhed gennem højtalerne.
Page 27

DK
26.
VIGTIGT!
FOR AT BESKYTTE DREJESKIVEN FRA SKADE UNDER
TRANSPORT, SÆTTES EN SØLVFARVET TRANSPORTSKRUE I ØVERSTE HØJRE HJØRNE AF DREJESKIVEN.
• FØR DU SPILLER EN PLADE, BRUG EN
SKRUETRÆKKER ELLER MØNT TIL AT DREJE
TRANSPORTSKRUEN HELT NED I URETS RETNING
FOR AT LÅSE DREJESKIVEN OP.
• FOR AT LÅSE DREJESKIVEN IGEN FOR
TRANSPORT, DREJ TRANSPORTSKRUEN MOD
URET.
Pleje & Vedligeholdelse
Kassettebånd pleje:
To typiske årsager til problemer, der opleves ved brug med kassettebånd, er:
• Båndet presses sammen, hvilket fører til ujævn hastighed i afspilning.
• Båndet fi ltrer sammen – båndet vikles rundt om vigtige dele af maskineriet.
Line out betjening:
1. Dette system indeholder et sæt LINE OUT stik (UR), som tillader dig at optage fra radioen eller
grammofonen i systemet til en ekstern enhed såsom en kassetteoptager, mini-disk etc. I en hvilken
som helst afspilningstilstand, indsæt lydkablet (ikke inkluderet) i det matchende ”LINE OUT” stik i
enheden, betjen som normalt, og du vil gennem højtalerne kunne høre den eksporterede lyd.
For at reducere sandsynligheden for, at disse problemer opstår,
bør du tage følgende sikkerhedsforanstaltninger:
1. Tjek gennem midten af kassettebåndet, at der ikke er løse
lag af bånd indeni (se Figur 1). Saml løse lag bånd op med
en blyant eller sekskantet kuglepen, før du sætter
kassettebåndet ind i maskinen (se Figur 2).
2. Hvis kassettebåndet føles stramt, mens du udfører den
viste handling (se Figur 2), er båndet måske sammen presset grundet riller formet i spolingen (synligt gennem
vinduet midt i båndet). Disse kan fjernes i de fl este tilfælde,
ved hurtigt at spole båndet frem og tilbage.
3. Brug kun velkendte kassettebånds-mærker. Undgå at bruge
C-120 kassetter.
4. Undgå desuden at udsætte kassettebånd for direkte sollys,
støv eller olie, og rør ikke ved båndets overfl ade.
Page 28

DK
27.
Champion ®
Makadamgatan 14 I 254 64 Helsingborg I Sweden
info@championnordic.se
Designed in Sweden I Assembled in China
Korrekt affaldshåndtering
Dette symbol på produktet eller i instruktionerne betyder at det skal smides
ud separat fra andet husaffald, når det ikke fungerer længere. I EU fi ndes
separate genbrugssystemer for affald. Kontakt de lokale myndigheder eller
din sælger for mere information.
Pleje af kompakt disk / CD:
1. For at fjerne en disk fra etuiet, tryk ned på midten af etuiet og løft forsigtigt skiven ud ved at holde
forsigtigt i kanterne.
2. Fingeraftryk og støv bør tørres forsigtigt af diskens indspillede side med en blød klud. I modsætning
til traditionelle vinyler eller shellac plader, har cd’er ingen riller, der kan samle støv og
mikroskopiske stumper, så en forsigtig aftørring med en blød klud burde kunne fjerne snavset. Tør
i en lige linje fra midten og ud mod kanten af disken. Små støvpartikler og lyspletter har ingen effekt
på kvaliteten af lydproduktionen.
3. Gør lejlighedsvis disken ren med en blød, fnullerfri, tør klud eller rengøringsmidler specielt beregnet
til formålet. Om nødvendigt, brug et CD rengøringssæt.
4. Sæt aldrig mærkater på overfl aden af disken eller skriv på den, med mindre det er helt forsigtigt
med en speciel CD-R pen.
Pleje af grammofonmontren:
1. Du bør pleje montren, som du plejer alle andre fi ne møbler, når montren er beskidt bør du tørre den
af med en blød, tør klud uden slibevirkning.
2. Hvis montren bliver fedtet ind i fi ngeraftryk, kan du bruge et hvilken som helst kommercielt støv- og
poleringsspraymiddel af god kvalitet. Undgå dog at sprøjte på systemets plastik- og metaldele. Vi
anbefaler, at du sprøjter rengøringsmidlet direkte på kluden, ikke direkte på montren. På den måde
undgår du at sprøjte på de andre dele.
Page 29

NO
28.
ADVARSEL
FOR Å UNNGÅ BRANN ELLER ELEKTRISKE STØT: IKKE BRUK DETTE STØPSELET MED EN SKJØTELEDNING, STIKKONTAKT ELLER ANDRE UTTAK MED MINDRE PLUGGENE KAN SETTES HELT
INN FOR Å UNNGÅ ÅPENT MELLOMROM MELLOM PLUGGER OG KONTAKT. FOR Å UNNGÅ BRANN
ELLER ELEKTRISKE STØT: IKKE EKSPONER PRODUKTET FOR REGN ELLER FUKT.
Lynet med pilspissymbol i en
likesidet trekant skal varsle
brukeren om at det fi nnes uisolert
spenning i produktets kabinett
som kan være kraftig nok til å
utgjøre fare for elektriske støt.
ADVARSEL!
FOR Å UNNGÅ FARE FOR
ELEKTRISKE STØT: IKKE
FJERN DEKSELET (ELLER
BAKSIDEN). INGEN AV DELENE
INNE I DEKSELET BØR HÅND-
TERES AV BRUKER. OVERLAT
SERVICE TIL KVALIFISERT
SERVICEPERSONELL.
Utropstegnet i en likesidet trekant
er ment å varsle brukeren om at
det fi nnes viktige bruks- og ved-
likeholdsinstruksjoner (servicein-
struksjoner) i bruksanvisningen
som medfølger produktet.
VIKTIGE SIKKERHETSINSTRUKSJONER
1. Vennligst les disse instruksjonene og ta vare på dem for fremtidig bruk.
2. Vær oppmerksom på alle advarsler.
3. Følg alle instruksjoner.
4. Ikke bruk dette produktet i nærheten av vann.
5. Rengjør kun med en tørr klut.
6. Ikke blokker ventilasjonsåpningene.
7. Installer i henhold til produsentens instruksjoner. Må ikke installeres i nærheten av varmekilder som
radiatorer, varmeovner, komfyrer eller andre apparater som produserer varme.
8. Beskytt strømledningen mot å bli tråkket på eller bøyd, spesielt der pluggen sitter, og på det punktet
der ledningen kommer ut fra apparatet.
9. Bruk kun tilbehør spesifi sert av produsenten.
10. Trekk ut støpselet ved lyn og torden og når produktet ikke brukes over lengre tidsrom.
11. Overlat all service til kvalifi sert servicepersonale. Service er nødvending når apparatet er skadet på
noen som helst måte, som når strømledningen eller pluggen blir ødelagt, når væske eller andre ting
har kommet inn i apparatet, om apparatet har blitt utsatt for regn eller fukt, om det ikke virker som det
skal, eller om det har blitt mistet i bakken.
12. Dette produktet må ikke utsettes for dryppende vann eller vannsprut, og andre objekter fylt med
vann, slik som vaser, må ikke plasseres på apparatet.
13. Ikke overbelast stikkontakten. Bruk kun anbefalte strømkilder – 220–240V AC-uttak.
VIKTIGE MERKNADER
1. Unngå plassering av enheten i direkte sollys eller i nærheten av varmestrålende apparater som
elektriske varmeovner, på toppen av stereoutstyr som utstråler for mye varme, på steder som mangl
er ventilasjon, på støvete områder eller på steder med konstant vibrasjon og/eller fuktige områder.
2. Ikke vask enheten med kjemiske løsemidler, da dette kan skade overfl aten. Bruk en tørr klut. Bruk
kontroller og brytere som beskrevet i bruksanvisningen.
3. Før du skrur på strømmen, sørg for at AC-strømledningen er koblet til. Oppbevar CD-er og kassetter
kjølig for å unngå varmeskade. Sørg for å trekke ut strømledningen før fl ytting av utstyret.
Page 30

NO
29.
Forberedelser før bruk
Utpakking og oppsett
1. Ta enheten forsiktig ut av emballasjen og fjern all emballasje fra enheten.
2. Vikle ut AC-strømledningen og trekk den ut til full lengde.
3. Vikle ut FM-antennen og trekk den ut til full lengde.
4. Plasser enheten på en jevn, stabil fl ate i nærheten av et AC-strømuttak, ikke i direkte sollys og vekk
fra varmekilder, støv, fuktighet eller sterke magnetfelter.
5. Løft lokket for å eksponere platespilleren. Platespilleren er sikret for transport med en transportskrue.
Bruk en mynt eller skrutrekker for å skru skruen med klokken. Dette vil la platespilleren snurre.
6. Fjern det gjennomsiktige hvite plastdekselet på platespillerarmen fra platespilleren ved å forsiktig
dytte frem og ned.
7. Fjern dekselet på platespillerarmen.
8. Fjern stripsen som holder tonearmen under transport.
9. Frigjør tonearmens låsespak.
10. Koble støpselet til ditt AC-strømuttak.
Transportskrue
Ødelagt låsespak
Deksel på
platespillerarm
Beskytt møblene dine
Denne modellen er utstyrt med gummiføtter for å forhindre produktet fra å skli og fl ytte på seg når du bruker
kontrollene. Føttene er laget i gummimateriale som ikke fl ytter på seg, og er spesielt designet for å unngå å
etterlate seg merker eller fl ekker på møblene. Ulike typer oljebasert møbelpolish, trebeskyttelsesmidler eller
vaskesprayer kan likevel mykgjøre gummiføttene og etterlate merker eller gummirester på møblene. For å
unngå skade på møblene dine anbefaler vi på det sterkeste å kjøpe små selvklebende fi ltputer som fås kjøpt
i de fl este jernvare- eller møbelbutikker, og feste disse på bunnen av gummiføttene før du plasserer produktet på fi ne tremøbler.
VIKTIG
Heving og senking av lokket:
• For å åpne lokket, hev lokket så høyt det går, til støttestengene låser seg i åpen posisjon. For å lukke
lokket, løft det litt opp til støttestengene går ut av låst stilling, og senk så lokket.
• For å unngå skade på kabinettet eller lokket må du aldri tvinge lokket igjen med makt. sørg alltid for å
heve lokket slik at støttestengene går ut av låst stilling.
For å spare strøm:
• For å spare strømforbruket vil enheten automatisk skru seg av om den står uten inngående lyd i mer enn
20 minutter. For å skru på strømmen igjen og fortsette spillingen må du først skru av enheten og så skru
den på igjen.
Page 31

NO
30.
Plassering av kontroller & indikatorlamper
Frontpanel:
1. Platespillerlokk
2. Støttestang til platespillerlokk
3. Dreieskive
4. Peker
5. FM-indikator
6. AM-indikator
7. CD/USB-knapp
8. REC-knapp
9. PH/BT-knapp
10. TAPE-knapp
11. FM-knapp
12. AM-knapp
13. USB-inngang
14. BASS-knapp
15. Høyttalere
16. AV/VOLUM-knapp
17. Tonearm
18. Spill/pause-knapp
19. Gjenta-knapp
20. NESTE/SPOL BAKVER-knapp
21. NESTE/SPOL FREMOVER
-knapp
22. Stopp-knapp
23. Åpne/lukke-knapp
24. Kassett
25. Kassett EJ/FF-knapp (åpne/
spole fremover)
26. CD-skuff
27. LED-display
28. Jack til hodetelefoner
29. Søkeknott
30. ALT-knapp
Bakpanel:
31. FM-blytrådantenne
32. AC-strømledning
33. AUX IN (UR)-jack
34. LINJE UT-jack (R/L)
31
32
33
34
Page 32

31.
NO
Platespiller:
1. Dreieskive
2. 45 RPM-adapter
3. Transportskrue
4. Spak
5. Fartsvelger (33 & 45 & 78 RPM)
6. Tonearmlås
7. Tonearm med peker
Fjernkontrollvalg:
R1: ÅPNE/LUKKE
R2: SPILL INN
R3: GJENTA
R4: SPILL AV/PAUSE
R5: DN/FB (NESTE/SPOL BAKOVER)
R6: DN/FF (NESTE/SPOL FREMOVER)
R7: STOPP
R8: SPOR -10
R9: SPOR +10
RI0: TILFELDIG AVSPILLING
R11: SLETT
R12: PROGRAM
MERK: ALLE knappene på fjernkontrollen har
samme funksjon som de tilsvarende knappene
på enheten. Fjernkontrollen brukes kun til CD/
MP3 og USB-modus.
Bruksanvisning
Bruk av radio
1. Skru på AV/VOLUM-knotten på enheten.
2. Trykk på AM- eller FM-knotten for å velge AM- eller FM-funksjon.
3. Velg ønsket stasjon ved å skru på søkeknotten.
4. Juster OFF-/VOLUM-knappen for ønsket lydnivå.
Antenneinformasjon
• AM-antennen befi nner seg inne i kabinettet. Hvis AM-mottaket ikke er tilfredsstillende, prøv å
justere plasseringen av kabinettet litt, til den interne antennen tar imot det sterkeste signalet.
• FM-ledningsantennen er plassert bak på kabinettet. Om du ønsker bedre mottak, kan du justere
antennens plassering og retning til du fi nner den posisjonen som tilbyr best signalmottak.
Page 33

NO
32.
Bruk av CD/MP3:
1. Trykk på CD/USB-knappen for å velge CD-funksjon.
2. Trykk på ÅPNE/LUKKE-knappen for å åpne CD-skuffen, LED-displayet vil så vise symbolet <OP>.
3. Plasser CD/CD-R/CR-RW/MP3-disken i skuffen med den trykte siden opp.
4. Trykk på ÅPNE/LUKKE-knappen en gang til for å lukke CD-skuffen. LED-displayet vil vise «-» i
noen sekunder, så vil det vise det totale antall spor på disken. «nod» vises når det ikke er en disk i
enheten.
5. SPILL/PAUSE-indikatoren lyser opp. Avspillingen starter automatisk.
6. Juster AV/VOLUM-knappen til ønsket lydnivå.
7. For å pause avspillingen, trykk på SPILL/PAUSE-knappen. SPILL/PAUSE-indikatoren vil blinke.
Bruk av USB
1. Sett USB-en i USB-inngangen.
2. Trykk på CD/USB-knappen for å velge CD-funksjon, press og hold SPILL/PAUSE for å velge
USB-funksjon. LED-displayet vil vise «-» i noen sekunder før det totale antall spor på USB-enheten
vises. «nob» vil vises dersom det ikke er koblet til en USB-enhet.
3. SPILL/PAUSE-indikatoren vil lyse opp. Avspillingen starter automatisk.
4. Juster AV/VOLUM-knappen for ønsket lydnivå.
5. For å pause avspillingen, trykk SPILL/PAUSE-knappen. SPILL/PAUSE-indikatoren vil blinke.
6. For å stoppe avspillingen, trykk STOPP-knappen. SPILL/PAUSE-indikatoren vil skru seg av.
MERK: Trykk inn og hold SPILL/PAUSE-knappen for å skifte til følgende funksjoner: CD-USB
Avspillingskontroll på CD/MP3/USB
1. Plasser CD-en eller MP3-disken i skuffen eller koble til USB-enheten. Avspillingen starter
automatisk. Avspillingen fortsetter til det er slutt på disken eller USB-enheten. Når disken er ferdig,
vises totalt antall spor på disken eller USB-enheten igjen. Du kan også stoppe avspillingen når som
helst ved å trykke på STOPP-knappen.
2. Juster AV/VOLUM-kontrolleren til ønsket nivå.
3. For å gå til neste sang i avspillingsmodus, trykk på NESTE/SPOL FREMOVER-knappen på
enhetens frontpanel eller UP/FB-knappen på fjernkontrollen.
4. Trykk på NESTE/SPOL BAKOVER-knappen på enhetens frontpanel eller DN/FB-knappen på
fjernkontrollen for å komme til sangen som nettopp ble spilt.
5. Trykk på MAPPE+/+10-knappen eller MAPPE-/-10-knappen for å spole fremover eller hoppe over
10 spor i CD/USB/MP3-modus.
Valg av mappeavspilling for MP3/USB:
1. I stopp-modus, trykk på MAPPE+/+10 eller MAPPE-/-10 knappen for å velge MAPPE+ eller
MAPPE-. For å bekrefte MAPPE-spornummer, trykk SPILL/PAUSE-knappen for å starte
avspillingen. Spornummer og mappenummer for det valgte sporet vil vises fortløpende hvert andre
sekund. Du kan også stoppe avspillingen når som helst ved å trykke på STOPP-knappen.
Valg av ønsket del av CD/MP3/USB-sporet:
1. Trykk og hold SPOL FREMOVER-knappen eller SPOL BAKOVER-knappen på enhetens
frontpanel eller UP/FF-knappen eller DN/FB-knappen på fjernkontrollen for å velge den delen av
sporet som skal avspilles, og slipp deretter knappene. Avspillingen gjenopptas normalt fra dette
punktet.
Pausekontroll i CD/MP3/USB-modus:
1. I CD/MP3/USB-avspillingsmodus, trykk på SPILL/PAUSE-knappen én gang. Avspillingen stopper,
men disken fortsetter å snurre, og LCD-indikatoren med spornummeret vil blinke.
2. Trykk SPILL/PAUSE-knappen mer enn én gang for å avslutte pausen, og spornummeret slutter å
blinke.
Page 34

NO
33.
Ta opp CD-/MP3-/USB-/plate-/kassettfunksjon:
1. I CD-/MP3-/USB-/plate- og KASSETT-avspillingsmodus, velg ønsket spor.
2. Koble til USB, trykk REC-knappen én gang, enhetens display vil da vise <REC>, og REC-
indikatorlampen vil lyse.
3. Trykk REC-knappen én gang til for å bekrefte innspillingen til USB, og REC-indikatorlampen vil
blinke. Enheten kan ta opp sanger av dine favorittspor. Trykk STOPP-knappen når du ønsker å
avslutte innspillingen.
MERK: I PLATE/KASSETT-opptaksmodus: For å bekrefte opptaksmodus vil enhetens display <REC> og
den røde indikatorlampen lyse.
For å avslutte USB-sangavspilling:
1. Om enheten spiller en sang du ikke liker via USB, kan du trykke og holde inn SLETT-knappen i to
sekunder for å avslutte sangen, LCD-displayet vil da vise <DEL>.
For å repetere avspilling i CD/MP3/USB-modus:
1. I CD/MP3/USB-avspillingsmodus. Trykk GJENTA-knappen én gang, gjenta-indikatoren vil da blinke,
og sporet som spilles av, vil spilles av igjen etter at det er ferdig.
2. Trykk på GJENTA-knappen to ganger, gjenta-indikatoren vil da slutte å blinke og forbli på, og når
disken er ferdig, starter den igjen fra begynnelsen.
3. For å avslutte repetisjon av avspilling, trykk GJENTA-knappen én gang til, gjenta-indikatoren vil da
skru seg av. Man kan også avslutte repetisjon av avspilling ved å trykke på STOPP-knappen.
Tilfeldig avspilling I CD/MP3/USB-modus:
1. I CD/MP3/USB-avspillingsmodus, trykk TILFELDIG-knappen for å starte tilfeldig-avspillingsfunksjon,
tilfeldig-indikatoren vil lyse. Trykk denne knappen én gang til for å avslutte tilfeldig-funksjonen.
Programfunksjon i CD/MP3/USB-modus:
1. Denne funksjonen lar deg programmere 20 spor i CD-modus og 99 spor i MP3/USB-modus for
avspilling i ønsket rekkefølge.
2. I CD/MP3/USB-stoppmodus, trykk PROGRAM-knappen for å gå over til program-modus.
Programnummer «001» vises raskt, og programindikatoren vil lyse. Trykk på SPOL FREMOVER-
eller SPOL BAKOVER-knappen på enhetens frontpanel eller UP/FF-eller DN/FB-knappen på
fjernkontrollen for å velge det første sporet du ønsker å ha programmert, for eksempel når
det ønskede spornummeret du ønsker å programmere inn i programminnet dukker opp, trykk
PROGRAM-knappen igjen for å huske sporet. Programnummeret «002» vises raskt, så vil
programindikatoren blinke.
3. Gjenta ovenstående steg, velg forskjellige spor hver gang til du har lagt til opptil 20 spor (CD) eller
99 spor (MP3/USB) i programminnet.
4. Trykk SPILL/PAUSE-knappen for å begynne avspillingen av programmet. PROGRAM-indikatoren
vil slutte å blinke. Avspillingen starter med det første sporet du har programmert, og vil fortsette til
det siste programmerte sporet er ferdig avspilt. Den programmerte sekvensen kan avsluttes ved å
trykke to ganger på STOPP-knappen.
Bruk av kassett-funksjonen:
1. Velg KASSETT-funksjonen. Sett inn kassetten
i kassett-plassen som vist på illustrasjonen,
med den siden du ønsker å spille av, opp, og
den åpne enden på rett side.
Page 35

NO
34.
2. Kassettavspillingen begynner så snart kassetten er på plass.
Juster AV/VOLUM-knappen til ønsket nivå.
3. For å spole kassetten fortere, trykk EJ/FF (Eject/Spol raskt
fremover)-knappen omtrent halvveis ned. Kassetten vil spole
raskt fremover så lenge knappen er trykket ned. Normal
avspilling fortsetter når knappen slippes.
4. Når kassetten er ferdig spilt, stopper spilleren automatisk. Du
kan trykke på EJ/FF (Eject/Spol raskt fremover)-knappen når
som helst for å stoppe avspillingen og ta ut kassetten.
Bruk av platefunksjon:
1. Velg PLATE-funksjonen, sørg for at du har fjernet nåldekselet fra nålen.
2. Plasser ønsket PLATE på spindelen i midten.
3. Juster AV/VOLUM-kontrollen til ønsket nivå.
MERK: Ikke snu eller stopp dreieskiven manuelt. Flytting eller risting på dreieskiven uten å sikre tonearmklemmen kan resultere i skade på tonearmen.
4. Still inn dreieskivens fartsvelger til passende fart, 33, 45 eller 78 RPM. Om du spiller på 45
RPM-singler, plasser 45 RPM-adapteren på spindelen i midten.
5. Når dreieskiven er ferdig spilt, vil tonearmen automatisk returnere til opprinnelig posisjon.
Bruk av Bluetooth-funksjon:
1. Skru på enheten, skru volumkontrollen til ønsket nivå. Skru funksjonsknappen til PH-modus, og
sørg for at tonearmen er nullstilt. Man får høre en kort Bluetooth-oppstartslyd, så vil Bluetooth indikatoren blinke.
2. Skru på Bluetooth-enheten og skann. Den vil vises som «CHVS310» når den oppdages av
Bluetooth-enheten.
3. Når enheten er paret med din Bluetooth-enhet, kan du høre en kort tone fra høyttalerne.
4. Bruk Bluetooth-enheten som vanlig, og lyden vil spilles av fra denne enheten.
Merk:
1. Sørg for at Bluetooth-enheten og denne enheten ikke er lenger enn 10 meter fra hverandre.
2. Sjekk om det er andre Bluetooth-enheter i nærheten som kan forstyrre signaler og tilkobling.
3. Enheten kan pares med fl ere forskjellige Bluetooth-enheter, men kan kun kobles til og spille av
fra én enhet om gangen. Sørg for at ingen andre enheter er aktivt tilkoblet før du prøver å koble til
enheten du vil spille av fra.
Bruk av Aux-funksjon:
1. Velg PLATE-funksjonen. Plugg en ende av ledningen i «AUX IN»-inngangen på enheten og
tilsvarende inngang på din eksterne enhet. Bruk den eksterne enheten som normalt, og du kan
høre sanger fra den eksterne enheten gjennom enhetens høyttalere.
Page 36

NO
35.
VIKTIG!
FOR Å BESKYTTE DREIESKIVEN MOT SKADE UNDER
TRANSPORT ER DET PLASSERT EN SØLVFARGET
TRANSPORTSKRUE ØVERST I HØYRE HJØRNE PÅ
DREIESKIVEPLATTFORMEN.
• BRUK EN SKRUTREKKER ELLER MYNT TIL Å SNU
TRANSPORTSKRUEN HELT NED MED KLOKKEN
FOR Å LÅSE OPP DREIESKIVEN FØR BRUK.
• FOR Å LÅSE DREIESKIVEN IGJEN FOR
TRANSPORT, VRI SKRUEN MOT KLOKKEN.
Stell og vedlikehold
Kassettvedlikehold:
To vanlige grunner til problemer ved bruk av kassetter er:
• Båndet kjører seg fast – fører til ujevn avspillingsfart
• Båndet krøller seg sammen – båndet vikler seg inn i seg selv og rundt viktige deler av mekanismen.
Bruk av linje ut:
1. Dette systemet inkluderer et sett LINJE UT-stikkontakter (UR) som lar deg spille inn fra radioen
eller platespilleren på dette systemet til en ekstern innspillingsenhet som en kassett opptaker, minidisk eller lignende. I hvilken som helst avspillingsmodus, koble audiokabelen (ikke
inkludert) til «LINJE UT»-stikkontakten på enheten, bruk den som vanlig, og du vil kunne høre lyden
som er eksportert fra høyttalerne, på den eksterne enheten.
For å redusere sannsynligheten for å oppleve disse problemene er
det lurt å merke seg følgende:
1. Sjekk at det ikke er løse lag med kassettbånd synlig
gjennom midtvinduet på kassetten (se Fig.1). Stram inn
eventuelle løse bånd ved hjelp av en blyant eller sekskantet
kulepenn før du setter kassetten inn i maskinen (se Fig.2).
2. Om kassetten føles stram mens viste operasjon utføres (se
Fig.2), kan båndet være fastkjørt grunnet kanter som
former seg under stramming av båndet (synlig gjennom
midtvinduet). Disse kan i de fl este tilfeller raskt fjernes ved
å stramme kassetten fra den ene enden til den andre og
tilbake igjen.
3. Bruk kun anerkjente kassettbåndmerker. Unngå bruk av
C-120-kassetter.
4. Videre er det viktig ikke å utsette kassetter for direkte sollys,
støv eller olje, og husk at du ikke må ta på selve båndet.
Page 37

Champion ®
Makadamgatan 14 I 254 64 Helsingborg I Sweden
info@championnordic.se
Designed in Sweden I Assembled in China
Korrekt avfallshåndtering
Dette symbolet på produktet eller i instruksjonene betyr at det skal kastes
separat fra annet husholdningsavfall når det ikke virker lenger. Det fi nnes
leveringspunkter og gjenbruksstasjoner som skal håndtere denne typen
avfall. Kontakt lokale myndigheter eller forhandler for mer informasjon.
NO
36.
Compact disk-vedlikehold:
1. For å fjerne en disk fra oppbevaringen, trykk ned midten av dekselet og løft CD-en ut ved å holde
den forsiktig langs kantene.
2. Fingeravtrykk og støv bør tørkes forsiktig av CD-ens innspilte fl ate med en myk klut. Til forskjell fra
tradisjonelle vinyl- eller shellacplater har ikke CD-er riller som samler opp støv og mikroskopisk
rusk, så å tørke forsiktig over CD-en bør fjerne de fl este partiklene. Små støvpartikler og lysfl ekker
vil ikke ha noen effekt på lydgjengivelseskvaliteten.
3. Rengjør platen jevnlig med en myk, lofri, tørr klut eller med mildt rengjøringsmiddel for å rengjøre
CD-en. Om nødvendig, benytt et rengjøringssett for CD-er.
4. Ikke fest etiketter eller skriv på overfl aten av CD-er, annet enn veldig forsiktig med spesielt egnede
CD-R-penner.
Vedlikehold av kabinett:
1. Du bør vedlikeholde kabinettet slik du ville ha gjort med et hvilket som helst fi nt møbel. Tørk av
kabinettet med en myk støvklut som ikke riper dersom kabinettet blir støvete.
2. Om kabinettet blir tilgriset med fi ngeravtrykk, kan du bruke et hvilket som helst kommersielt
støvfjernende og polerende sprayrengjøringsprodukt. Unngå imidlertid å spraye plast- og
metalldelene på dette systemet. Vi anbefaler at du sprayer rengjøringsproduktet på støvkluten og
ikke direkte på kabinettet for å unngå å få spray på plast- og metalldelene.
Page 38

FI
37.
VAROITUS
VÄLTTÄÄKSESI TULIPALON JA SÄHKÖISKUN RISKIÄ, ÄLÄ KÄYTÄ TÄTÄ PISTOKETTA JATKOJOHDON
TAI PISTORASIOIDEN KANSSA, ELLEIVÄT PISTOKKEEN TERÄT MAHDU KOKONAAN PISTORASIAN
SISÄÄN. ESTÄÄKSESI TULIPALON TAI SÄHKÖISKUN, ÄLÄ ALTISTA TÄTÄ LAITETTA SATEELLE TAI
KOSTEUDELLE.
Nuolipäinen salama tasasivuisen
kolmion sisällä on varoitus eri-
stämättömästä, vaarallisesta jän-
nitteestä laitteen kotelon sisällä.
Jännite saattaa olla tarpeeksi
voimakas aiheuttamaan vakavan
sähköiskun.
VAROITUS!
VÄLTTÄÄKSESI SÄHKÖISKUN
VAARAA, ÄLÄ POISTA SUO-
JUSTA (TAI TAKAOSAA). LAI-
TE EI SISÄLLÄ OSIA, JOTKA
KÄYTTÄJÄ VOI KORJATA ITSE
- KORJAUSTA VARTEN VIE
LAITE VALTUUTETTUUN HUOL-
TOON.
Huutomerkki tasasivuisen kolmion
sisällä on tarkoitettu kiinnittämään
käyttäjän huomio tärkeisiin
käyttö-, huolto- ja korjausohjeisiin
laitteen mukana tulevassa
materiaalissa.
TÄRKEITÄ TURVAOHJEITA
1. Ole hyvä ja lue nämä ohjeet ja säilytä ne tulevaisuuden varalle.
2. Kiinnitä huomiota kaikkiin varoituksiin.
3. Noudata kaikkia ohjeita.
4. Älä käytä tätä laitetta veden läheisyydessä.
5. Puhdista ainoastaan kuivalla liinalla.
6. Älä peitä ilmanvaihtoaukkoja.
7. Asenna valmistajan ohjeiden mukaisesti. Älä asenna lähelle lämmönlähdettä, kuten lämpöpatterin,
lämmittimen, uunin tai muiden laitteiden (kuten vahvistimien) lähelle, jos ne tuottavat lämpöä.
8. Suojaa virtajohtoa, ettei sen päältä kävellä ja ettei se taitu, etenkin kohdassa, jossa se yhdistyy
laitteeseen.
9. Käytä vain lisäosia/tarvikkeita, jotka valmistaja on hyväksynyt.
10. Irrota laite verkkovirrasta ukkosmyrskyjen aikana, tai jos laite on käyttämättömänä pitkän ajan.
11. Hoida kaikki korjaukset valtuutetun huoltajan luona. Huoltoa tarvitaan, jos laite vaurioituu millään
tavalla, esimerkiksi jos virtajohto vahingoittuu, laitteeseen on pudonnut nestettä tai esineitä, laite on
altistunut sateelle tai kosteudelle, laite ei toimi normaalisti, tai jos laite on pudotettu.
12. Laitetta ei saa altistaa vedelle, ja nesteellä täytettyjä esineitä kuten maljakoita ei tule asettaa laitteen
päälle.
13. Älä ylikuormita seinäpistoketta. Käytä vain sallittua virtalähdettä, eli 230V AC –verkkovirtaa.
TÄRKEITÄ HUOMIOITA
1. Vältä tämän laitteen asentamista paikkoihin, jotka ovat suorassa auringonpaisteessa tai lämpöä
säteilevien laitteiden, kuten sähkölämmittimien lähelle, joissa on huono ilmanvaihto, jotka ovat alttiita
jatkuvalle tärinälle ja/tai kosteudelle, tai muiden stereolaitteiden päälle tai pölyisiin paikkoihin.
2. Älä yritä puhdistaa laitetta kemiallisilla liuottimilla, sillä ne saattavat vahingoittaa laitteen pintaa. Käytä
puhdistamiseen kuivaa liinaa. Käytä hallintalaitteita ja kytkimiä kuten käyttöohjeessa on kuvailtu.
3. Ennen kuin kytket laitteeseen virran varmista, että virtajohto on kytketty kunnolla. Säilytä CD:t ja
kasetit viileässä tilassa välttääksesi lämmön aiheuttamaa vahinkoa. Jos siirrät laitetta, irrota ensiksi
virtajohto pistorasiasta.
Page 39

FI
38.
Käytön valmistelut
Pakkauksesta purkaminen ja asennus
1. Irrota laite varovasti pahvista ja poista kaikki pakkausmateriaalit laitteen ympäriltä.
2. Kierrä virtajohto auki ja levitä koko pituudelleen.
3. Kierrä FM-antennijohto auki ja levitä koko pituudelleen.
4. Aseta laite vakaalle, tasaiselle alustalle, josta on kätevä yhteys pistorasiaan, ja joka ei ole suorassa
auringonvalossa tai lämmönlähteiden, pölyn, kosteuden tai voimakkaiden magneettikenttien lähellä.
5. Nosta kantta paljastaaksesi levysoittimen. Levysoitin on lukittu kuljetuksen ajaksi ruuvilla. Käytä kolik
koa tai ruuvimeisseliä ja käännä ruuvia myötäpäivään. Tämä mahdollistaa levylautasen “kellumisen”.
6. Poista läpikuultamaton, valkoinen, muovinen neulansuojus levysoittimen neulan ympäriltä
liu’uttamalla sitä eteen- ja alaspäin.
7. Heitä neulansuojus roskiin.
8. Poista kierreside, joka piti äänivartta paikoillaan kuljetuksen aikana.
9. Vapauta äänivarren lukituksen vipu.
10. Yhdistä pistoke pistorasiaan.
6Äänivarren lukko
Repeytynyt
lukituksen vipu
Neulansuojus
Suojele huonekalujasi
Tässä mallissa on liukumattomat kumijalat, jotka estävät laitetta liikkumasta, kun käytät hallintalaitteita. Jalat
on tehty kumista, joka on erityisesti valmistettu niin, ettei se jätä merkkejä tai tahroja huonekaluihin. Jotkin
kalustekiillokkeet, puunkäsittelyaineet ja puhdistussuihkeet voivat kuitenkin aiheuttaa kumijalkojen pehmentymisen, ja jättää merkkejä tai kumijäämiä huonekaluihin. Estääksesi huonekalujen vahingoittumisen suosittelemme, että ostat pieniä itsekiinnittyviä tyynyjä, joita löydät esimerkiksi rautakaupoista, ja asetat nämä
tyynyt kumijalkojen päähän ennen kuin asetat laitteen hienojen puukalusteiden päälle.
TÄRKEÄÄ
Kannen nostaminen ja laskeminen:
• Avataksesi kannen, nosta se niin pitkälle kuin mahdollista kunnes kannen tukikannatin lukittuu
pitämään kannen auki. Sulkeaksesi kannen, nosta sitä hieman ylöspäin, jotta lukitus vapautuu, ja
laske kansi sitten varoen alas.
• Välttääksesi laitteen vahingoittamista, älä koskaan pakota kantta kiinni. nosta aina kantta ensin
ylöspäin vapauttaaksesi lukituksen.
Virransäästö:
• Jos laitteessa ei ole äänisignaalia 20 minuuttiin laitteen ollessa päällä, laite kytkeytyy automaattisesti pois
päältä virran kulutuksen vähentämiseksi. Kytkeäksesi laitteeseen taas virran, käännä virta ensin pois ja
sitten takaisin päälle.
Page 40

FI
39.
Hallintalaitteiden ja indikaattorien sijainti
Etupaneeli:
1. Levysoittiminen kansi
2. Levysoittimen kannen tukikannatin
3. Levylautanen
4. Osoitin
5. FM-valitsimen asteikko
6. AM-valitsimen asteikko
7. CD/USB-painike
8. REC–painike
9. PH/BT-painike
10. TAPE–painike
11. FM-painike
12. AM-painike
13. USB-vastake
14. BASS-painike
15. Kaiuttimet
16. Virta pois/Äänisäädin
17. Äänivarsi
18. Toista/Tauko-painike
19. Toista uudelleen -painike
20. Taaksepäin-painike
21. Eteenpäin-painike
22. Pysäytyspainike
23. Avaa/Sulje-painike
24. Kasettilokero
25. Kasetti EJ/FF -painike (kasetti ulos/
pikakelaus eteenpäin)
26. CD-laatikko
27. LED-näyttö
28. Kuulokeliitäntä
29. Virityssäädin
30. ALT-painikeeo
Takapaneeli:
31. FM-liitosjohdon antenni
32. Verkkovirran johto
33. AUX-liitäntä
34. Ulostuloliitäntä
31
32
33
34
Page 41

FI
40.
Levysoitin:
1. Levylautanen
2. 45 RPM -adapteri
3. Kuljetusruuvi
4. Merkkivipu
5. Nopeuden valitsin (33 & 45 & 78 RPM)
6. Äänivarren lukko
7. Äänivarsi ja neula
Kauko-ohjaimen toiminnot:
R1: AVAA/SULJE
R2: NAUHOITA
R3: TOISTA UUDELLEEN
R4: TOISTA/TAUKO
R5: DN/FB (edellinen kappale)
R6: DN/FF (seuraava kappale)
R7: PYSÄYTÄ
R8: TRACK -10
R9: TRACK +10
RI0: SATUNNAINEN TOISTO
R11: POISTA
R12: OHJELMA
HUOM: KAIKKI kauko-ohjaimen toiminnot
löytyvät myös laitteistosta. Ohjainta voi
käyttää vain CD-, MP3- ja USB–tiloissa.
Käyttöohjeet
Radion käyttäminen
1. Käännä OFF/VOLUME –säädintä käynnistääksesi laitteen.
2. Paina joko AM- tai FM-nappulaa valitaksesi AM- tai FM –tilan.
3. Valitse haluamasi kanava kääntämällä TUNING-säädintä.
4. Aseta äänenvoimakkuus kääntämällä OFF/VOLUME –säädintä.
Tietoa antennista
• AM-antenni on kaapin sisällä. Jos AM-kuuluvuus on huono, voit yrittää parantaa vastaanottoa
siirtämällä kaappia hieman, kunnes sisällä oleva antenni vastaanottaa vahvemman signaalin.
• FM-kaapeliantenni on kaapin takaosassa. Jos tarpeellista, voit säätää antennin asentoa, kunnes
löydät parhaan kuuluvuuden.
Page 42

41.
FI
CD/MP3–ominaisuuksien käyttäminen:
1. Paina CD/USB–painiketta valitaksesi CD-toiminnon.
2. Paina OPEN/CLOSE-painiketta avataksesi CD-lokeron, jolloin LED-näytössä lukee <OP>.
3. Aseta CD/CD-R/CR-RW/MP3–levy lokeroon etikettipuoli ylöspäin.
4. Paina OPEN/CLOSE–painiketta sulkeaksesi CD-lokeron. LED-näytössä lukee “-” muutaman
sekunnin ajan, sitten näyttö ilmoittaa levyn kappaleiden lukumäärän. Näytössä lukee “nod”, jos
lokerossa ei ole levyä.
5. PLAY/PAUSE–indikaattorivalo syttyy. Levyn toisto aloitetaan automaattisesti.
6. Aseta haluamasi äänenvoimakkuus kääntämällä OFF/VOLUME-säädintä.
7. Pysäyttääksesi levyn toiston, paina PLAY/PAUSE–painiketta. PLAY/PAUSE-indikaattori välähtää.
8. Lopettaaksesi levyn toiston, paina STOP–painiketta. PLAY/PAUSE–indikaattorivalo sammuu.
USB-toiminnon käyttäminen:
1. Aseta USB-laite USB-liitäntään.
2. Paina CD/USB–painiketta valitaksesi CD-toiminnon, ja paina sitten PLAY/PAUSE –painiketta siihen
asti, että USB-tila kytkeytyy päälle. LED-näytössä näkyy “-” muutaman sekunnin ajan, sen jälkeen
näytetään USB-laitteella olevien kappaleiden kokonaismäärä. Näytössä lukee “nob”, jos USB liitäntään ei ole kytketty mitään.
3. PLAY/PAUSE–indikaattorivalo syttyy. Toisto aloitetaan automaattisesti.
4. Aseta äänenvoimakkuus haluamallesi tasolle kääntämällä OFF/VOLUME-säädintä.
5. Pysäyttääksesi toiston, paina PLAY/PAUSE–painiketta. PLAY/PAUSE–indikaattori välähtää.
6. Lopettaaksesi toiston, paina STOP–painiketta. PLAY/PAUSE–indikaattorivalo sammuu.
HUOM: Pidä PLAY/PAUSE–painiketta alas painettuna valitaksesi seuraavista haluamasi toiminnon:
CD-USB
Toiston hallinta CD/MP3/USB-tilassa
1. Aseta CD tai MP3–levysi lokeroon tai aseta USB paikalleen. Toisto aloitetaan automaattisesti.
Toisto jatkuu levyn tai USB:n loppuun, levyn loppuessa näytöllä näytetään taas levyltä tai USB:ltä
löytyvien kappaleiden kokonaismäärä. Voit myös lopettaa toiston missä vaiheessa tahansa
painamalla STOP-painiketta.
2. Aseta äänenvoimakkuus haluamallesi tasolle OFF/VOLUME–säätimellä.
3. Toistotilassa paina SKIP FWD –painiketta laitteiston etupaneelissa tai UP/FB–painiketta
kauko-ohjaimessa siirtyäksesi seuraavaan kappaleeseen.
4. Paina SKIP REV –painiketta etupaneelissa tai DN/FB–painiketta kauko-ohjaimessa siirtyäksesi
edelliseen kappaleeseen.
5. Paina FOLDER+/+10 tai FOLDER-/-10 –painiketta siirtyäksesi 10 kappaletta eteen- tai taaksepäin
CD/MP3/USB–tilassa.
Kansion valinta kappaleiden toistolle MP3/USB-tilassa:
1. Stop-tilassa, paina FOLDER+/+10 tai FOLDER-/-10 –painiketta valitaksesi FOLDER+ tai FOLDER-.
Vahvistaaksesi kansion valinnan, paina PLAY/PAUSE–painiketta aloittaaksesi toiston. Kappaleen
sekä kansion numero näytetään vuorotellen 2 sekunnin välein. Voit lopettaa kappaleen toiston
milloin tahansa painamalla STOP-painiketta.
Haluamasi kohdan valitseminen CD/MP3/USB-tilassa:
1. Pidä SKIP FWD tai SKIP REV –painike laitteiston etupaneelissa tai UP/FF tai DN/FB –painike
kauko-ohjaimessa alas painettuna siirtyäksesi haluamasi kohtaan toistettavassa kappaleessa, ja
päästä sitten painike vapaaksi. Toisto jatkuu normaalisti tästä kohdasta.
Toiston keskeyttäminen CD/MP3/USB-tilassa:
1. CD/MP3/USB-toistotilassa, paina PLAY/PAUSE–painiketta kerran. Toisto keskeytetään, mutta levy
jatkaa pyörimistä ja LCD-indikaattorissa välkkyy kappaleen numero.
2. Paina PLAY/PAUSE–painiketta uudestaan jatkaaksesi kappaleen soittamista, kappalenumero
lopettaa välkkymisen.
Page 43

42.
FI
Tallennus CD/MP3/USB/phono/kasetti-tilassa:
1. CD/MP3/USB/Phono/kasetti–tilassa, valitse haluamasi kappaleet.
2. Aseta USB liitäntään ja paina REC-painiketta kerran, näytössä lukee <REC>, ja REC-
indikaattorivalo syttyy.
3. Paina REC-nappia kerran uudestaan vahvistaaksesi tallentamisen USB:lle. REC-valo alkaa
välkkyä. Halutessasi voit tallentaa pelkästään haluamasi kappaleet. Jos haluat lopettaa
tallentamisen, paina STOP-painiketta.
HUOM: PHONO/CASSETTE–tilassa paina RECORD vahvistaaksesi tallennustilan. Näytössä lukee
<REC> ja punainen indikaattorivalo välkkyy.
Peruuta kappaleen toisto USB-tilassa:
1. Jos laitteisto toistaa kappaleen, josta et pidä, voit peruuttaa kappaleen toistamisen pitämällä
DELETE-painikkeen alas painettuna kauko-ohjaimesta 2 sekunnin ajan. LCD-näyttöön tulee teksti
<DEL>.
Toista uudelleen CD/MP3/USB-tilassa:
1. CD/MP3/USB–toistotilassa: paina REPEAT-painiketta kerran, uudelleentoiston indikaattorivalo
välkkyy ja sen hetkinen kappale toistetaan uudelleen sen loputtua.
2. Paina REPEAT–painiketta kahdesti, uudelleentoiston indikaattorivalo lopettaa välkkymisen mutta
jää päälle, levy toistetaan automaattisesti alusta sen loputtua.
3. Peruaksesi uudelleentoiston, paina REPEAT–painiketta uudelleen ja indikaattorivalo sammuu. Voit
peruuttaa uudelleentoiston myös painamalla STOP-painiketta.
Satunnainen toisto CD/MP3/USB-tilassa:
1. CD/MP3/USB-toistotilassa, paina RANDOM–painiketta aloittaaksesi satunnaisen toiston.
Satunnaistoiston indikaattorivalo syttyy. Paina samaa painiketta uudelleen peruuttaaksesi
satunnaistoiston.
Ohjelmointitoiminto CD/MP3/USB-tilassa:
1. Tämä toiminto mahdollistaa 20 kappaleen (CD –tilassa) tai 99 kappaleen (MP3/USB–tilassa)
soittamisen haluamassasi järjestyksessä.
2. CD/MP3/USB –stop-tilassa, paina PROGRAM –painiketta päästäksesi ohjelmointitilaan. Näytössä
lukee hetken ’001’, sitten ohjelmoinnin indikaattorivalo välkkyy. Paina SKIP FWD tai SKIP REV –
painiketta laitteiston etupaneelissa tai UP/FF tai DN/FB –painiketta kauko-ohjaimessa valitaksesi
ensimmäisen kappaleen, jonka haluat ohjelmoida soittojonoon. Esimerkiksi: jos haluat valita
kappaleen numero 008, tämän numeron näkyessä näytöllä paina uudestaan PROGRAM–painiketta
lisätäksesi kappaleen soittojonoon. Näytöllä lukee hetken ’002’, sitten ohjelmoinnin indikaattorivalo
välkkyy.
3. Toista yllä olevat vaiheet valiten joka kerralla eri kappalenumeron, kunnes olet valinnut
maksimissaan 20 (CD) tai 99 (MP3/USB) –kappaletta ohjelman muistiin.
4. Paina PLAY/PAUSE –painiketta aloittaaksesi ohjelmoidun soittojonon toistamisen. PROGRAM indikaattori lopettaa välkkymisen. Toisto aloitetaan ensiksi valitusta kappaleesta ja jatkuu, kunnes
viimeinen ohjelmoitu kappale on soitettu. Voit peruuttaa ohjelmoidun soittojonon painamalla STOP painiketta kahdesti.
Kasettitoiminnot:
1. Valitse CASSETTE–tila. Aseta kasetti lokeroon,
kuten näytetty kuvassa, se puoli ylöspäin, jonka
haluat soittaa, ja avoin pääty oikealle.
Page 44

FI
43.
2. Kasetin toisto aloitetaan heti kun kasetti on asetettu lokeroon.
Säädä äänenvoimakkuus haluamallesi tasolle OFF-VOLUME–
säätimellä.
3. Kelataksesi kasettia nopeasti eteenpäin, paina EJ/FF
(Eject/Fast Forward) –painike noin puoleen väliin. Nauha
kelautuu nopeasti eteenpäin niin kauan, kun painike on alas
painettuna. Normaali toisto jatkuu, kun painike vapautetaan.
4. Kun nauha loppuu, toisto lopetetaan automaattisesti. Paina
EJ/FF (Eject/Fast Forward) –painike kokonaan pohjaan
vapauttaaksesi kasetin soittimesta. Voit painaa EJ/FF–
painikkeen pohjaan milloin tahansa lopettaaksesi kasetin toiston.
Levysoittimen toiminnot:
1. Valitse PHONO–tila, ja varmista, että olet poistanut neulasuojan neulan ympäriltä.
2. Aseta PHONO-LEVY keskitapin päälle.
3. Aseta haluamasi äänenvoimakkuus OFF/ VOLUME–säätimellä.
HUOMIO: Älä käännä tai pysäytä levylautasta manuaalisesti. Levylautasen siirtäminen tai hidastaminen
ilman, että äänivarren kiinnitin on kiinnitetty, saattaa vaurioittaa äänivartta.
4. Aseta levylautasen nopeus oikealle tasolle, 33, 45, tai 78 RPM. Jos soitat 45 RPM -singlejä, aseta
45 RPM –adapteri keskitapille.
5. Kun levylautanen lopettaa soittamisen, äänivarsi siirtyy automaattisesti alkuperäiseen asentoon.
Bluetooth-toiminnot:
1. Kytke laitteistoon virta ja käännä äänenvoimakkuus halutulle tasolle. Käännä toimintonuppi PH tilaan ja varmista, että äänivarsi on nollausasennossa. Kuulet lyhyen Bluetoothin aloitusäänen, ja
Bluetooth-indikaattorivalo välkkyy.
2. Käynnistä Bluetooth-laitteesi ja skannaa lähellä olevat yhteydet. Laite näkyy listassa nimellä
”CHVS310”, kun Bluetooth-laitteesi löytää sen.
3. Kun Bluetooth-laite on muodostanut laiteparin laitteiston kanssa, kuulet lyhyen äänimerkin
kaiuttimista.
4. Soita musiikkia Bluetooth-laitteeltasi kuten normaalisti, ääni toistetaan nyt laitteiston kaiuttimista.
Huomio:
1. Varmista, että Bluetooth-laitteesi ja tämä laitteisto ovat 10m säteellä toisistaan.
2. Varmista, ettei lähellä ole muita Bluetooth-laitteita, jotka saattavat häiritä signaalia ja yhteyden
muodostamista.
3. Tämä laitteisto voi muodostaa laiteparin monen eri Bluetooth-laitteen kanssa, mutta voi olla
yhdistettynä vain yhteen laitteeseen kerrallaan. Varmista, ettei toinen Bluetooth-laite ole aktiivisesti
yhdistettynä laitteistoon, jos yrität muodostaa yhteyden toisen laitteen kanssa.
AUX-toiminnot:
1. Valitse PHONO–tila. Aseta aux-johdon toinen pää ”AUX IN” –liitäntään ja toinen pää ulkoiseen
laitteeseen. Käytä ulkoista laitetta kuten normaalisti, kappaleet toistetaan laitteiston kaiuttimista.
Page 45

FI
44.
TÄRKEÄÄ!
LEVYLAUTASEN VAHINGOITTUMISEN ESTÄMISEKSI KULJETUKSEN AIKANA, LEVYLAUTANEN ON KIINNITETTY HOPEISELLA RUUVILLA ALUSTAN OIKEASTA YLÄKULMASTA.
• ENNEN KUIN SOITAT ÄÄNILEVYÄ, VAPAUTA
LEVYLAUTANEN KÄÄNTÄMÄLLÄ RUUVIA MY
ÖTÄPÄIVÄÄN RUUVIMEISSELILLÄ TAI KOLIKOLLA.
• LUKITAKSESI LEVYLAUTASEN UUDESTAAN
KULJETUSTA VARTEN, KÄÄNNÄ RUUVIA
VASTAPÄIVÄÄN.
Huolto
Kasettien huolto:
Kaksi yleistä ongelmaa kasettien soittamisessa ovat:
• Nauhan jumittuminen – johtaa epätasaiseen toistonopeuteen.
• Nauhan sotkeutuminen – nauha kietoutuu tärkeiden mekanismien ympärille.
Line out -toiminnot:
1. LINE OUT -liitännät (UR) mahdollistavat radiosta tai levysoittimesta tulevan musiikin tallentamisen
ulkoiselle tallentavalle laitteelle, kuten kasettinauhurille, mini-discille, jne. Missä tahansa toistotilassa, aseta
audiokaapeli (ei tule laitteiston mukana) “LINE OUT” -liitäntään, soita musiikkia kuten tavallisesti, ja kuulet
musiikin ulkoisen laitteen kaiuttimien kautta.
Vähentääksesi näiden ongelmien riskiä, seuraavat varotoimet tulee
ottaa huomioon:
1. Tarkista, että kasetissa ei näy löysällä olevia
nauhakerroksia (katso kuva 1 ). Kiristä mahdolliset löydät
nauhakerrokset esimerkiksi lyijykynän avulla ennen kuin
asetat kasetin laitteeseen (katso kuva 2).
2. Jos kasetti tuntuu tiukalta suorittaessasi kuvailtua toimintoa
(katso kuva 2), nauha saattaa olla jumissa kasetin
kelauksessa muodostuneiden harjanteiden takia (tämä
näkyy kasetin keski-ikkunassa). Nämä voi
useimmiten poistaa kelaamalla kasetin nopeasti toisesta
päädystä toiseen ja takaisin.
3. Käytä vain tunnettuja kasettimerkkejä. Vältä C-120 –
kasettien käyttöä.
4. Älä altista kasettia suoralle auringonvalolle, pölylle tai öljylle,
äläkä koske sen nauhapintaan.
Page 46

Champion ®
Makadamgatan 14 I 254 64 Helsingborg I Sweden
info@championnordic.se
Designed in Sweden I Assembled in China
Oikea hävittäminen
Tämä symboli tuotteessa tai ohjeissa tarkoittaa, että laite täytyy hävittää
erillään muista talousjätteistä, kun se ei enää toimi. EU:n sisällä on jätteille
erillisiä kierrätysjärjestelmiä. Lisätietojen saamiseksi ota yhteyttä
paikallisiin viranomaisiin tai jälleenmyyjääsi.
45.
FI
CD-levyjen huolto:
1. Poistaaksesi levyn kotelosta, paina kotelon keskiosaa alaspäin ja nosta levy varovasti ylös sen
reunoista.
2. Sormenjäljet ja pöly tulee pyyhkiä varovasti levyn pinnalta pehmeällä kankaalla. Toisin kuin
vinyyli- ja shellac-levyissä, CD-levyissä ei ole uria, joihin pöly tarttuu, joten kevyen pyyhkimisen
pitäisi riittää puhdistamiseen. Pyyhi suorassa linjassa levyn sisäosasta ulospäin. Pienillä
pölyhiukkasilla ja kevyillä tahroilla ei ole vaikutusta äänentoiston laatuun.
3. Puhdista levy säännöllisesti pehmeällä, nukkaantumattomalla, kuivalla kankaalla. Älä käytä
hankaavia kemikaaleja levyn puhdistamiseen. Tarvittaessa käytä CD-levyjen puhdistussarjaa.
4. Älä koskaan kiinnitä etikettejä CD-levyn pintaan äläkä kirjoita niihin muulla kuin erityisellä CD-R
kynällä. Käytä myös tällöin erityistä varovaisuutta.
Kaapiston huolto:
1. Sinun tulisi huolehtia kaapistosta yhtä lailla kuin muistakin huonekaluistasi. Kun kaapisto pölyyntyy,
puhdista se pyyhkimällä pehmeällä, hankaamattomalla kankaalla.
2. Jos kaapisto likaantuu esimerkiksi sormenjäljistä, käytä korkealaatuista puhdistus-ja
kiillotussuihketta. Vältä kuitenkin kaapiston muovi- ja metalliosien suihkuttamista. Suosittelemme,
että suihkutat puhdistusainetta suoraan käyttämääsi puhdistusliinaan, jotta voit paremmin suojata
muovi- ja metalliosia.
 Loading...