

Page 1
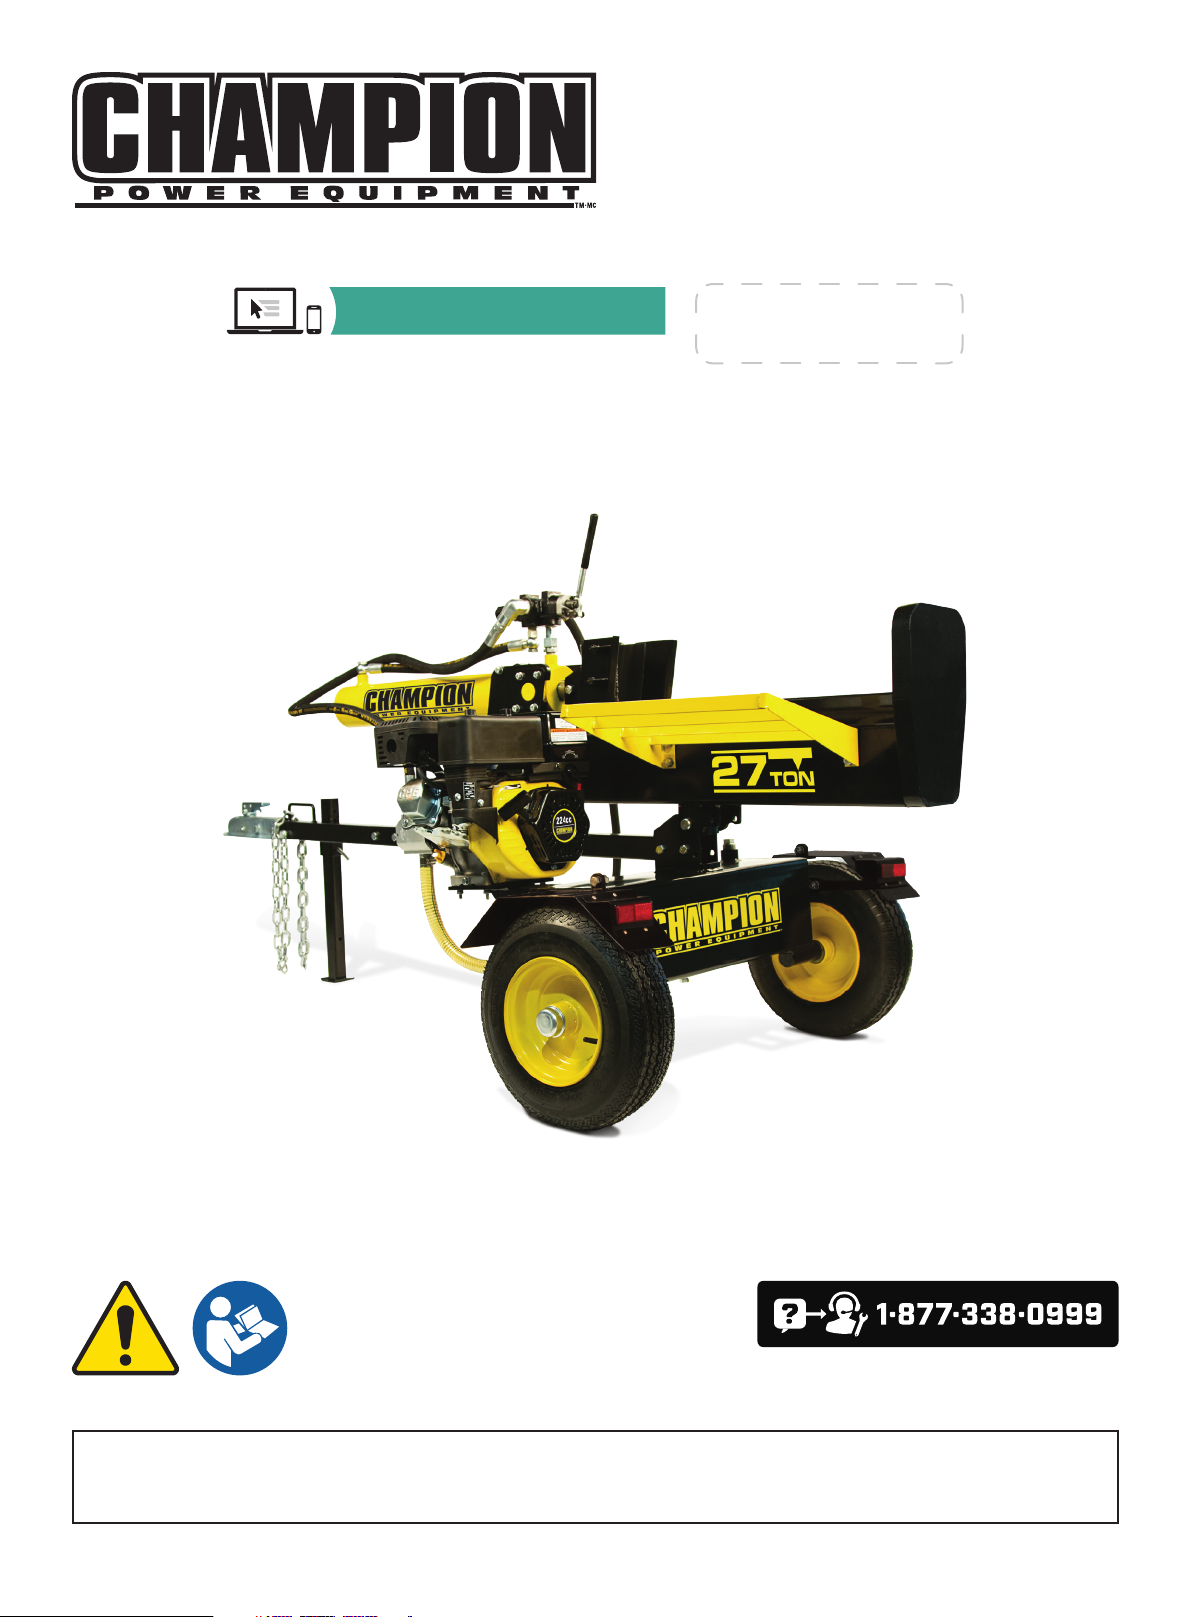
OPERATOR'S MANUAL
MODEL #92750-1
27 TON LOG SPLITTER
REGISTER YOUR PRODUCT ONLINE
at championpowerequipment.com
SERIAL NO. LABEL
or visit championpowerequipment.com
READ AND SAVE THIS MANUAL. This manual contains important safety precautions which should be read and understood before operating the product. Failure to
do so could result in serious injury. This manual should remain with the product.
Specifications, descriptions and illustrations in this manual are as accurate as known at the time of publication, but are subject to change without notice.
Made in China - REV 20191009 Champion Power Equipment, Inc., Santa Fe Springs, CA USA
Page 2

92750-1 - 27 TON LOG SPLITTER
TABLE OF CONTENTS
TABLE OF CONTENTS
Introduction ................................................... 3
Safety Definitions
Important Safety Instructions
Fuel Safety .........................................................5
Training .............................................................6
Preparation .........................................................6
Operation ...........................................................7
Maintenance and Storage .........................................7
Safety and Dataplate Labels ....................................... 8
Safety Symbols .....................................................9
Operation Symbols ............................................... 11
Quickstart Label Symbols........................................ 11
Controls and Features ................................. 12
Log Splitter ....................................................... 12
Parts Included .................................................... 13
Parts Not Included ............................................... 13
Assembly ..................................................... 14
Open Shipping Crate ............................................. 14
1) Install the Tow Bar ............................................ 14
2) Install the Fenders ............................................ 14
3) Install the Wheels ............................................. 14
4) Install the Beam ............................................... 15
5) Install the Cylinder and Wedge ............................... 15
6) Install the Engine and Hoses .................................. 16
7) Install the Log Catchers ....................................... 17
Add Engine Oil .................................................... 17
Add Fuel .......................................................... 18
Add Hydraulic Oil ................................................. 19
Operation ..................................................... 19
Before Each Use Inspect the Log Splitter ....................... 19
Changing Beam from Horizontal to Vertical Orientation ........ 20
Towing Log Splitter Safety ....................................... 20
Log Splitter Location ............................................. 20
Starting the Engine ............................................... 21
Stopping the Engine .............................................. 21
Log Splitter Operation ............................................ 21
Operation at High Altitude ....................................... 22
.......................................... 3
....................... 4
Maintenance ................................................ 22
Cleaning the Log splitter ......................................... 23
Changing the Engine Oil ......................................... 23
Cleaning and Adjusting the Spark Plug(s) ....................... 23
Cleaning the Air Filter ............................................ 23
Changing the Hydraulic Oil ....................................... 24
Maintenance Schedule ........................................... 24
Storage ........................................................ 25
Log Splitter Storage .............................................. 25
Engine Stored for Less than 30 Days ........................... 25
Engines Stored for Over 30 Days ................................ 25
Specifications .............................................. 26
Log Splitter Specifications ....................................... 26
Engine Specifications ............................................ 26
Oil Specifications ................................................. 26
Hydraulic Oil System ............................................. 26
Fuel Specifications ............................................... 27
Spark Plug Specifications ........................................ 27
Valve Specifications .............................................. 27
Important Message About Temperature......................... 27
Parts Diagram .................................................... 28
Parts List ......................................................... 29
Engine Parts Diagram ............................................ 30
Engine Parts List ................................................. 31
Troubleshooting ........................................... 33
Warranty*
Warranty Qualifications .......................................... 34
Repair/Replacement Warranty ................................... 34
Do Not Return The Unit To The Place Of Purchase ............. 34
Warranty Exclusions ............................................. 34
Other Exclusions ................................................. 34
Limits of Implied Warranty and Consequential Damage ........ 34
Contact Information .............................................. 34
.................................................... 34
2
Page 3

92750-1 - 27 TON LOG SPLITTER
INTRODUCTION
INTRODUCTION
Congratulations on your purchase of a Champion Power Equipment
(CPE) product. CPE designs, builds, and supports all of our
products to strict specifications and guidelines. With proper
product knowledge, safe use, and regular maintenance, this
product should bring years of satisfying service.
Every effort has been made to ensure the accuracy and
completeness of the information in this manual at the time of
publication, and we reserve the right to change, alter and/or
improve the product and this document at any time without prior
notice.
Since CPE highly values how our products are designed,
manufactured, operated and are serviced, and also highly value
your safety and the safety of others, we would like you to take the
time to review this product manual and other product materials
thoroughly and be fully aware and knowledgeable of the assembly,
operation, dangers and maintenance of the product before use.
Fully familiarize yourself, and make sure others who plan on
operating the product fully familiarize themselves too, with the
proper safety and operation procedures before each use. Please
always exercise common sense and always err on the side
of caution when operating the product to ensure no accident,
property damage, or injury occurs. We want you to continue to use
and be satisfied with your CPE product for years to come.
SAFETY DEFINITIONS
The purpose of safety symbols is to attract your attention to
possible dangers. The safety symbols, and their explanations,
deserve your careful attention and understanding. The safety
warnings do not by themselves eliminate any danger.
The instructions or warnings they give are not substitutes for
proper accident prevention measures.
DANGER
DANGER indicates a hazardous situation which,if not avoided,
will result in death or serious injury.
WARNING
WARNING indicates a hazardous situation which, if not
avoided, could result in death or serious injury.
CAUTION
CAUTION indicates a hazardous situation which, if not avoided,
could result in minor or moderate injury.
NOTICE
When contacting CPE about parts and/or service, you will need to
supply the complete model and serial numbers of your product.
Transcribe the information found on your product’s nameplate
label to the table below
CPE TECHNICAL SUPPORT TEAM
1-877-338-0999
MODEL NUMBER
92750-1
SERIAL NUMBER
DATE OF PURCHASE
PURCHASE LOCATION
NOTICE indicates information considered important, but not
hazard-related (e.g., messages relating to property damaged).
3
Page 4
92750-1 - 27 TON LOG SPLITTER
IMPORTANT SAFETY INSTRUCTIONS
IMPORTANT SAFETY INSTRUCTIONS
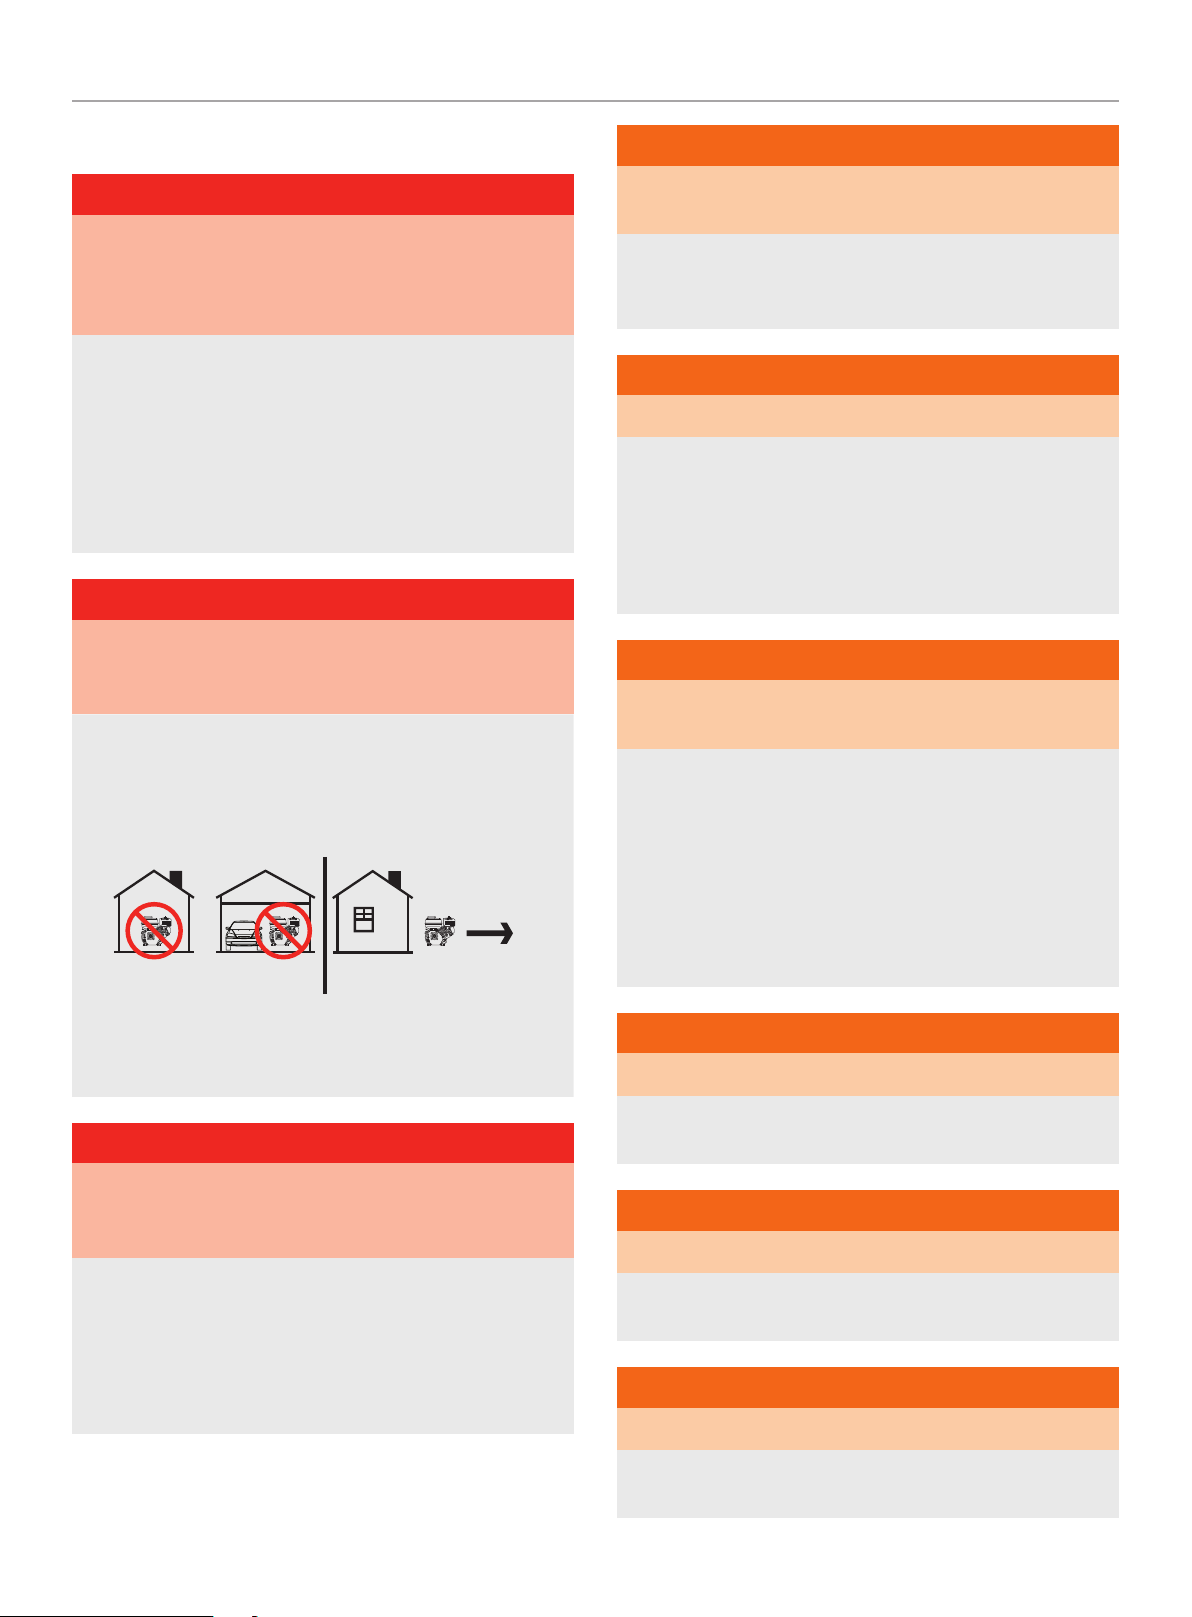
DANGER
Log splitter engine exhaust contains carbon monoxide,
a colorless, odorless, poison gas. Breathing carbon monoxide
will cause nausea, dizziness, fainting or death.
If you start to feel dizzy or weak, get to fresh air immediately.
Operate log splitter outdoors only in a well ventilated
area.
DO NOT operate the log splitter inside any building, including
garages, basements, crawlspaces and sheds, enclosure or
compartment.
DO NOT allow exhaust fumes to enter a confined area through
windows, doors, vents or other openings.
DANGER
Using an engine indoors CAN KILL YOU IN MINUTES. Engine
exhaust contains carbon monoxide. This is a poison you cannot
see or smell.
NEVER use inside a home or garage, EVEN IF doors and
windows are open.
ONLY use OUTSIDE and far away from windows, doors,
and vents.
WARNING
Operation of this equipment may create sparks that can start
fires around dry vegetation.
A spark arrestor may be required. The operator should contact
local fire agencies for laws or regulations relating to fire
prevention requirements.
WARNING
Sparks can result in fire or electrical shock.
When servicing the engine:
Disconnect the spark plug wire and place it where it cannot
contact the plug.
DO NOT check for spark with the plug removed.
Use only approved spark plug testers.
WARNING
Running engines produce heat. Severe burns can occur on
contact. Combustible material can catch fire on contact.
DO NOT touch hot surfaces.
Avoid contact with hot exhaust gases.
Allow equipment to cool before touching.
Install battery-operated carbon monoxide alarms or plug-in
carbon monoxide alarms with battery back-up according to the
manufacturer’s instructions.
DANGER
Rotating parts can entangle hands, feet, hair, clothing and/or
accessories. Traumatic amputation or severe laceration can
result.
Keep hands and feet away from rotating parts.
Tie up long hair and remove jewelry.
Operate equipment with guards in place.
DO NOT wear loose-fitting clothing, dangling drawstrings or
items that could become caught.
Maintain at least 3 ft. (91.4 cm) of clearance on all sides to
ensure adequate cooling.
Maintain at least 5 ft. (1.5 m) of clearance from combustible
materials.
WARNING
Crush Hazard
Wedge can cut through skin and break bones. Keep all limbs
away from wedge and endplate.
WARNING
Projectile Hazard
Pieces of log may be ejected from the splitter while operating.
Wear ANSI approved safety glasses when operating. Be alert.
WARNING
Keep Operator Work Zone Clear
Keep work zone clear of debris while working to ensure safe
footing.
4
Page 5

92750-1 - 27 TON LOG SPLITTER
IMPORTANT SAFETY INSTRUCTIONS
WARNING
Before removing the pin installed into the front support leg
make sure hitch is installed onto vehicle. Releasing the pin
before will cause support leg to slide up and possibly cause
injury.
WARNING
Skin Injection Hazard. High pressure hydraulic oil can inject
under your skin.
Make sure all fittings are tightly secure before applying
pressure. Relieve system of pressure before servicing.
WARNING
Towing Hazard
ALWAYS check all local and state regulations regarding towing,
licensing and lights before towing your log splitter. Review
towing safety warnings in your towing vehicle manual.
Drive safely. Be aware of the added length of the log splitter.
NEVER ride or transport cargo on the log splitter. Choose a
level surface to operate the log splitter.
CAUTION
Improper treatment or use of the log splitter can damage it,
shorten its life and void your warranty.
Use the log splitter only for intended uses.
Operate only on level surfaces.
DO NOT expose log splitter to excessive moisture, dust,
or dirt.
DO NOT allow any material to block the cooling slots.
DO NOT use the engine if:
– Equipment sparks, smokes or emits flames
– Equipment vibrates excessively
Fuel Safety
DANGER
GASOLINE AND GASOLINE VAPORS ARE HIGHLY
FLAMMABLE AND EXPLOSIVE.
Fire or explosion can cause severe burns or death.
NEVER EXCEED MAX. Towing Speed 45 MPH (72 KM/H)
WARNING
Rapid retraction of the starter cord will pull hand and arm
towards the engine faster than you can let go. Unintentional
startup can result in entanglement, traumatic amputation or
laceration. Broken bones, fractures, bruises or sprains could
result.
When starting engine, pull the starter cord slowly until
resistance is felt and then pull rapidly to avoid kickback.
CAUTION
Parts of the hydraulic circuit (cylinder, pump, valve-body,
hoses) can become very hot during operation.
WARNING
In most states towing on public streets is either prohibited or
would require further licensing or modifications. Please check
with your local authorities or DMV regarding regulations,
restrictions and registration.
Gasoline and gasoline vapors:
– Gasoline is highly flammable and explosive.
– Gasoline can cause a fire or explosion if ignited.
– Gasoline is a liquid fuel but its vapors can ignite.
– Gasoline is a skin irritant and needs to be cleaned up
immediately if spilled on skin or clothes.
– Gasoline has a distinctive odor, this will help detect potential
leaks quickly.
– In any petroleum gas fire, flames should not be extinguished
unless by doing so the fuel supply valve can be turned OFF.
This is because if a fire is extinguished and a supply of fuel is
not turned OFF, then an explosion hazard could be created.
– Gasoline expands or contracts with ambient temperatures.
Never fill the gasoline tank to full capacity, as gasoline needs
room to expand if temperatures rise.
When adding or removing gasoline:
Turn the engine off and let it cool for at least two minutes before
removing the gasoline cap. Loosen the cap slowly to relieve
pressure in the tank.
Only fill or drain gasoline outdoors in a well-ventilated area.
DO NOT pump gasoline directly into the engine at the gas station.
Use an approved container to transfer the fuel to the engine.
DO NOT overfill the gasoline tank.
5
Page 6

92750-1 - 27 TON LOG SPLITTER
IMPORTANT SAFETY INSTRUCTIONS
Always keep gasoline away from sparks, open flames, pilot lights,
heat and other sources of ignition.
DO NOT light or smoke cigarettes.
When starting the engine:
DO NOT attempt to start a damaged engine.
Make certain that the gasoline cap, air filter, spark plug, fuel lines
and exhaust system are properly in place.
Allow spilled gasoline to evaporate fully before attempting to start
the engine.
Make certain that the log splitter is resting firmly on level ground.
When operating the log splitter:
DO NOT move or tip the log splitter during operation.
DO NOT tip the log splitter or allow fuel or oil to spill.
When transporting or servicing the log splitter:
Make certain that the fuel valve is in the OFF position, the gasoline
tank is empty.
Disconnect the spark plug wire.
When storing the log splitter:
Store away from sparks, open flames, pilot lights, heat and other
sources of ignition.
Do not store log splitter or gasoline near furnaces, water heaters,
or any other appliances that produce heat or have automatic
ignitions.
WARNING
NEVER use a gasoline container, gasoline tank, or any other
fuel item that is broken, cut, torn or damaged.
7. High fluid pressures are developed in hydraulic log splitters.
Pressurized hydraulic fluid escaping through a pin hole
opening can puncture skin and cause sever blood poisoning.
Therefore, the following instructions should be heeded at all
times.
7a. Do not operate the unit with frayed, kinked, cracked or
damaged hoses, fittings, or tubing.
7b. Stop the engine and relieve hydraulic system pressure
before changing or adjusting fittings, hoses, tubing, or
other system components.
7c. Do not adjust the pressure settings of the pump or valve.
7d. Do not check for leaks with your hand. Leaks can
be detected by passing cardboard or wood over the
suspected area. Look for discoloration. If injured by
escaping fluid, see a doctor at once. Serious infection or
reaction can develop if proper medical treatment is not
administered immediately.
8. Keep the operator zone and adjacent area clear for safe,
secure footing.
9. If your log splitter is equipped with an internal-combustion
engine and intended for use near any unimproved forest,
brush, or grass covered land, the engine exhaust should be
equipped with a spark arrestor. Make sure you comply with
local, state, and federal codes. Take appropriate fire-fighting
equipment with you.
10. Log splitters should be used only for splitting wood. Do not
use for other purposes unless the manufacturer provides
attachments and instructions.
11. Only split wood WITH the grain. NEVER split perpendicular to
the grain
Training
1. Read the Operator’s Manual completely before attempting to
use this log splitter.
2. Do not allow anyone to operate your log splitter who has not
read the Operator’s Manual or has not been instructed on the
safe use of the log splitter.
3. Never allow children or untrained adults to operate this
machine.
4. Many accidents occur when more than one (1) person
operates the log splitter. If a helper is assisting in loading logs
to be split, never actuate controls until helper is clear of the
area.
5. Never allow anyone to ride on the machine.
6. Never transport cargo on the log splitter.
Preparation
1. Be thoroughly familiar with all controls and with proper use of
the equipment.
2. Safety Gear:
2a. Always wear safety shoes or heavy boots when operating
the machine.
2b. Always wear safety glasses or goggles when operating
the machine.
2c. Never wear jewelry or loose-fitting clothing that might
become entangled in moving or rotating parts of the
machine.
3. Make sure the splitter is on a level surface. Block tires and
ensure support leg is secure to prevent unintended movement
of the log splitter during operation.
3a. Always operate the splitter from the manufacturer’s
indicated operator zone.
6
Page 7

92750-1 - 27 TON LOG SPLITTER
IMPORTANT SAFETY INSTRUCTIONS
4. Logs to be split on ram-type units should be cut as squarely
as possible.
5. Fuel:
5a. Use an approved fuel container.
5b. Never add fuel to a running or hot engine.
5c. Fill fuel tank outdoors with extreme care. Never fill fuel
tank indoors.
5d. Replace gasoline cap securely and clean up any spilled
fuel.
Operation
1. Before starting this log splitter, review all safety rules. Failure
to follow these rules may result in serious injury to the
operator or bystanders.
2. Be sure to confirm all hose connections and hose clamps are
tight before each use. It is possible for connections to vibrate
loose over time.
3. Never leave the machine unattended with the power source
operating.
Maintenance and Storage
1. Always shut off the power source while repairing or adjusting
the splitter except as recommended by the manufacturer.
2. Clean debris and chaff from the engine cylinder, cylinder head
fins, recoil starter cover, and muffler areas. If the engine is
equipped with a spark arrestor muffler, clean and inspect
it regularly (follow manufacturer’s service instructions).
Replace, if damaged.
3. Never store the unit indoors with fuel in the tank. Fumes
might reach an open flame spark. Allow the engine to cool
before storing in any enclosure.
4. Clear debris from movable parts, but only when the power
source is shut off.
5. Check to be sure all nuts and bolts are tight to assure the
equipment is in safe working condition.
4. Never operate the machine when under the influence of
alcohol, drugs or medication.
5. The machine owner should instruct all operators in safe log
splitter operation.
6. Always operate the log splitter with all safety equipment in
place and all controls properly adjusted for safe operation.
7. Always operate the log splitter at manufacturer’s
recommended speed.
8. Always keep hands and feet clear of moving parts.
9. When loading a ram-type log splitter, place your hands on
the sides of the log, not the ends. Never place your hands or
any part of your body between a log and any part of the log
splitter.
10. On ram-type log splitters, never attempt to split more than
one (1) log at a time unless the ram has been fully extended
and a second log is needed to complete the separation of the
first log.
11. On ram-type log splitters on which the logs are not cut
square, the longest portion of the log should be rotated down
and the most square end placed against the ram.
12. Only split logs with the grain of the wood.
13. Use only your hand to operate the log splitter controls.
14. Do not refuel the engine until it has cooled for several
minutes.
7
Page 8
92750-1 - 27 TON LOG SPLITTER
1117-L-SF-a
DaNGER PELIGRO DaNGER
UNLEADED FUEL ONLY. Minimum octane rating
of 85. Ma ximum 10% ethanol.
GASOLINA REGULAR SOLAMENTE. 85 octanos
como mínimo . Máximo de etanol d e 10%.
ESSENCE SANS PLOMB SEULEMENT. Indice
d’octane mi nimal de 85. Maxi mum 10 % d'éthanol.
1032-L-OP-a
WaRNING
DO NOT TOUCH!
Exhaust gas es, muffler
and engine compo nents
are extremely H OT and
cause burns.
aDVERTENCIa
¡NO TOCAR! Los gases de
escape, el silenc iador y los
compnonentes d el motor están
extremadamente CALIENTES y
causan quemaduras.
aVERTISSEmENT
NE TOUCHEZ PAS! L es gaz
d’échappement, le silencieux
et les pièces du mot eur sont
extrêmement CHAUDS et
peuvent causer des brûlures.
1052-L-SF-B
CHAMPION POWER EQUIPMENT, INC.
12039 SMITH AVENUE
SANTA FE SPRINGS, CA 90670
USA / É.-U.
1-877-338-0999
WWW.CHAMPIONPOWEREQUIPMENT.COM
MADE IN CHINA / FABRIQUÉ EN CHINE
1266-L-PR-B
MANUFACTURE DATE
DATE DE FABRICATION
SERIAL NO.
N° DE SÉRIE
MODEL
MODÉLE
92750-1
XXXX
XXXXXXXXXXXX
IMPORTANT SAFETY INSTRUCTIONS
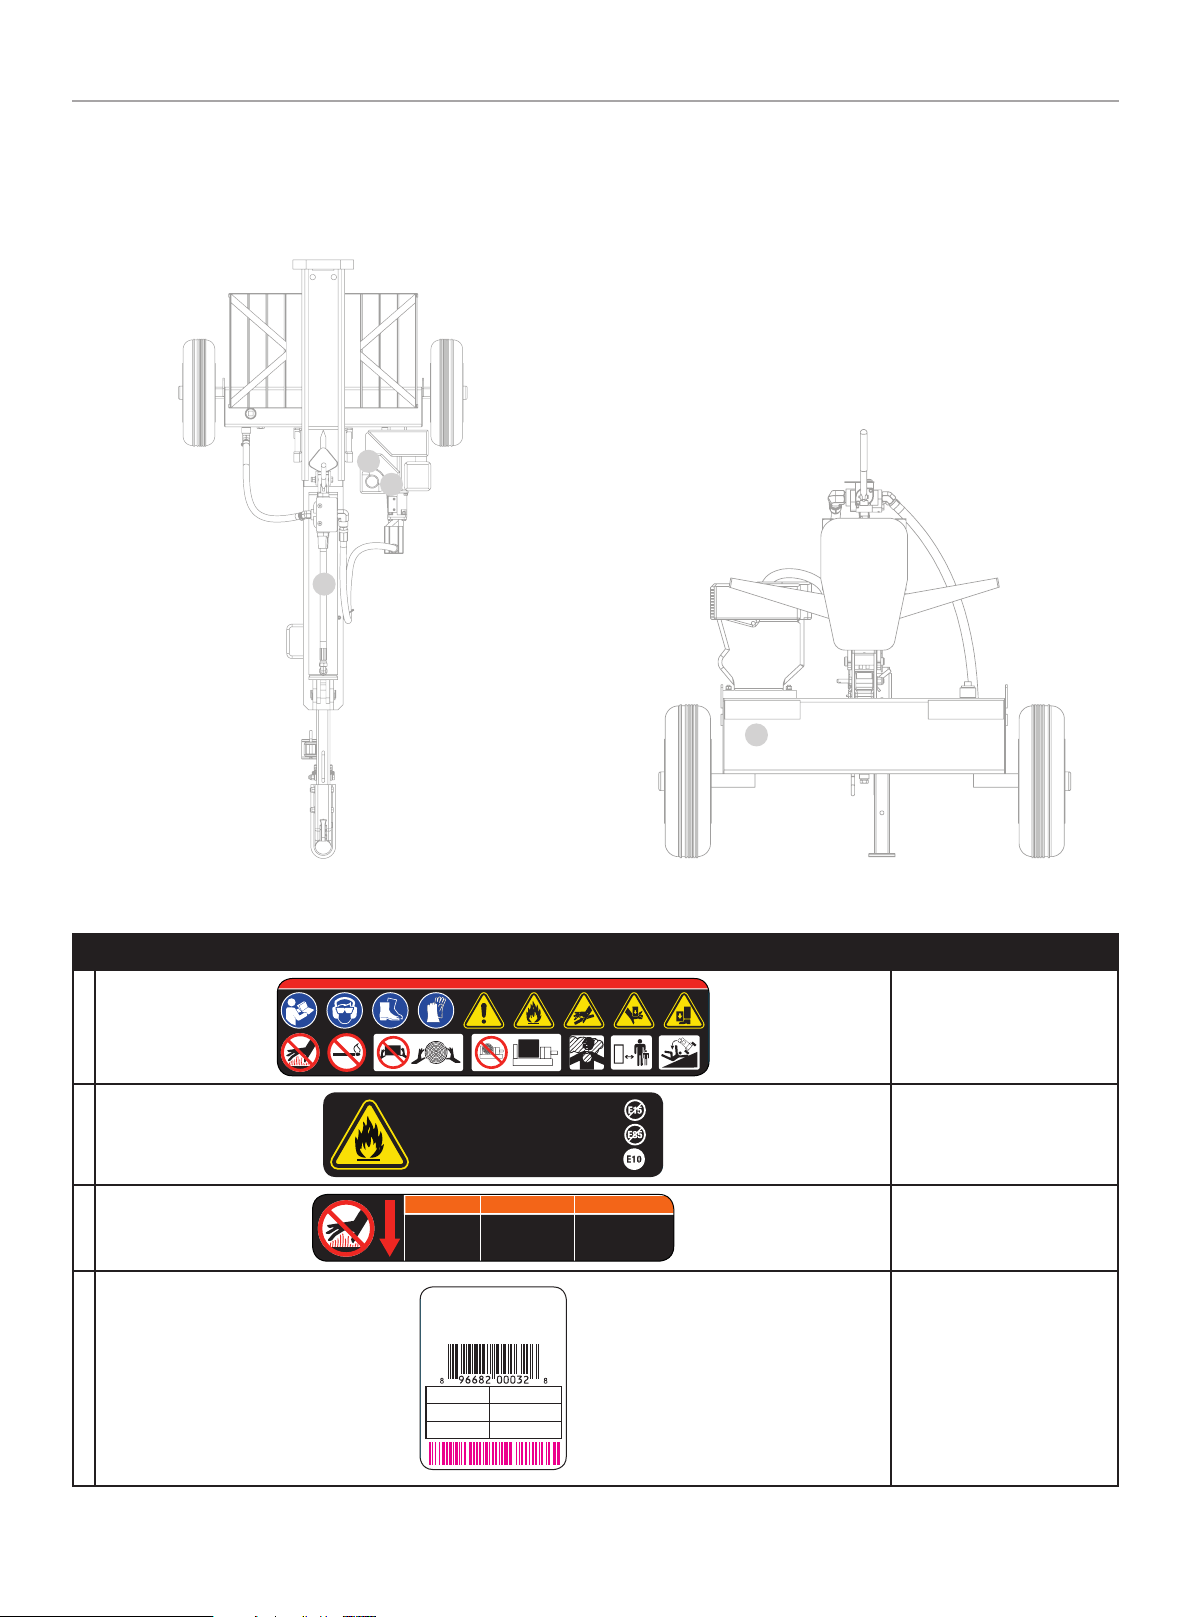
Safety and Dataplate Labels
These labels warn you of potential hazards that can cause serious injury. Read them carefully.
If a label comes off or becomes hard to read, contact Technical Support Team for possible replacement.
B
C
A
D
Top Back
LABEL DESCRIPTION
A
B
C
Safety Symbols/
CO Danger
Fuel
Hot Surface
D
Dataplate
8
Page 9
92750-1 - 27 TON LOG SPLITTER
IMPORTANT SAFETY INSTRUCTIONS
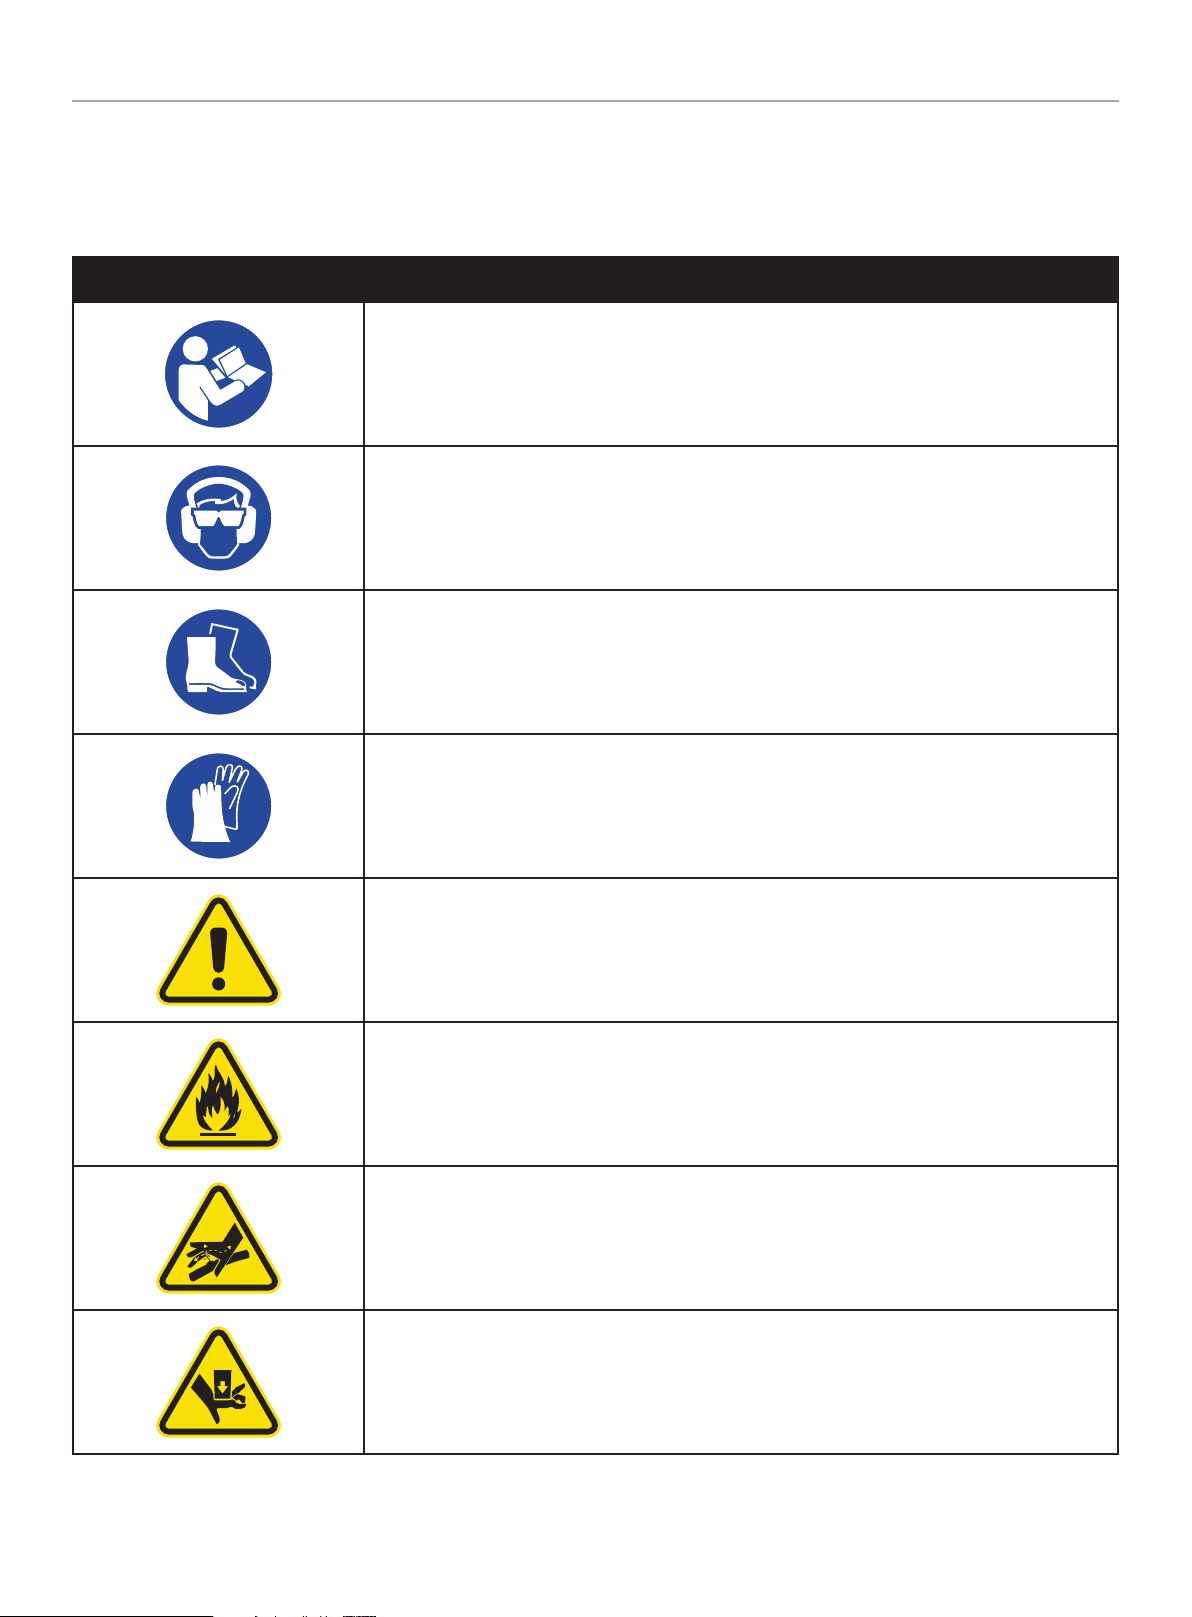
Safety Symbols
Some of the following symbols may be used on this product. Please study them and learn their meaning. Proper interpretation of
these symbols will allow you to more safely operate the product.
SYMBOL MEANING
Read Operator’s Manual. To reduce the risk of injury, user must read and understand operator’s
manual before using this product.
Eye and Ear Protection. Always wear safety goggles or safety glasses with side shields, and as
necessary a full face-shield as well as full ear protection when operating this product.
Footwear. Always wear safety shoes or heavy boots when operating the machine.
Gloves. Always wear nonslip, heavy-duty protective gloves when operating this product.
Safety Alert. Precautions that involve your safety.
Risk of Fire. Fuel and its vapors are extremely flammable and explosive. Fire can cause severe
burns or death. Do not add fuel while the product is operating or still hot.
Skin Injection Hazard. High pressure hydraulic oil can inject under your skin.
Make sure all fittings are tightly secure before applying pressure. Relieve system pressure before
servicing.
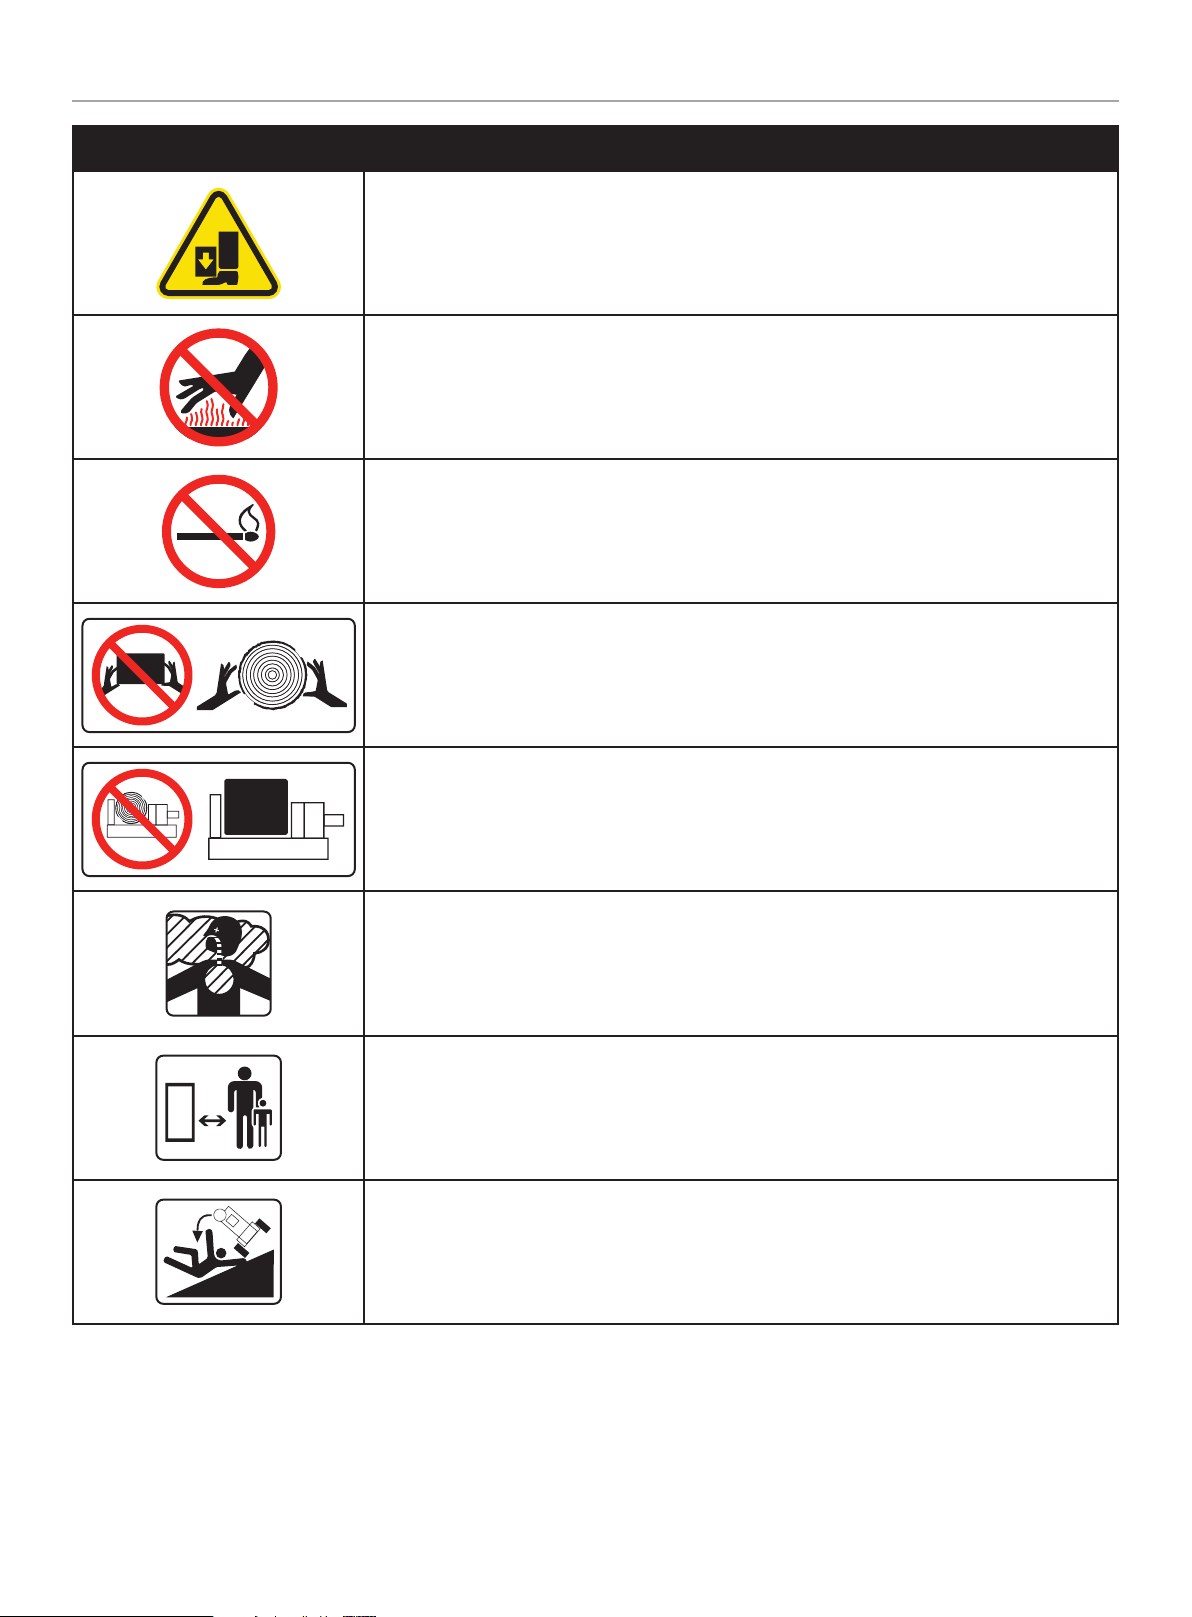
Always keep hands away from the wedge and the ram. Moving parts can crush or cut.
9
Page 10
92750-1 - 27 TON LOG SPLITTER
SYMBOL MEANING
IMPORTANT SAFETY INSTRUCTIONS
Always keep feet away from the wedge and the ram. Moving parts can crush or cut.
Hot Surface. To reduce the risk of injury or damage, avoid contact with any hot surface
Open Flame alert. Fuel and its vapors are extremely flammable and explosive. Keep fuel away
from smoking, open flames, sparks, pilot lights, heat, and other ignition sources.
Hold logs on sides when loading. Keep hands and feet away from cylinder, wedge,
and partially split logs.
Never place hands or any part of the body between a log and any part of the log splitter.
Do not split logs against the grain. Split logs end to end in the direction of the grain only.
Toxic Fumes. The engine exhaust from this product contains chemicals known to cause cancer
and birth defects and other reproductive harm.
Risk of Asphyxiation. This engine emits carbon monoxide, an odorless, colorless poison gas.
Breathing carbon monoxide can cause nausea, fainting or death. Use only in a well-ventilated
area.
Clearance. Keep all objects including others at least 10 feet (3m) from this machine.
Only one person should operate the log splitter and load the logs
Never operate on an incline. Make sure the splitter is on a level surface. Block tires and ensure
support leg is secure to prevent unintended movement of the log splitter during operation.
10
Page 11
92750-1 - 27 TON LOG SPLITTER
1129-L-OP-a
10W-30
5 6 7 8
21 3 4
IMPORTANT SAFETY INSTRUCTIONS
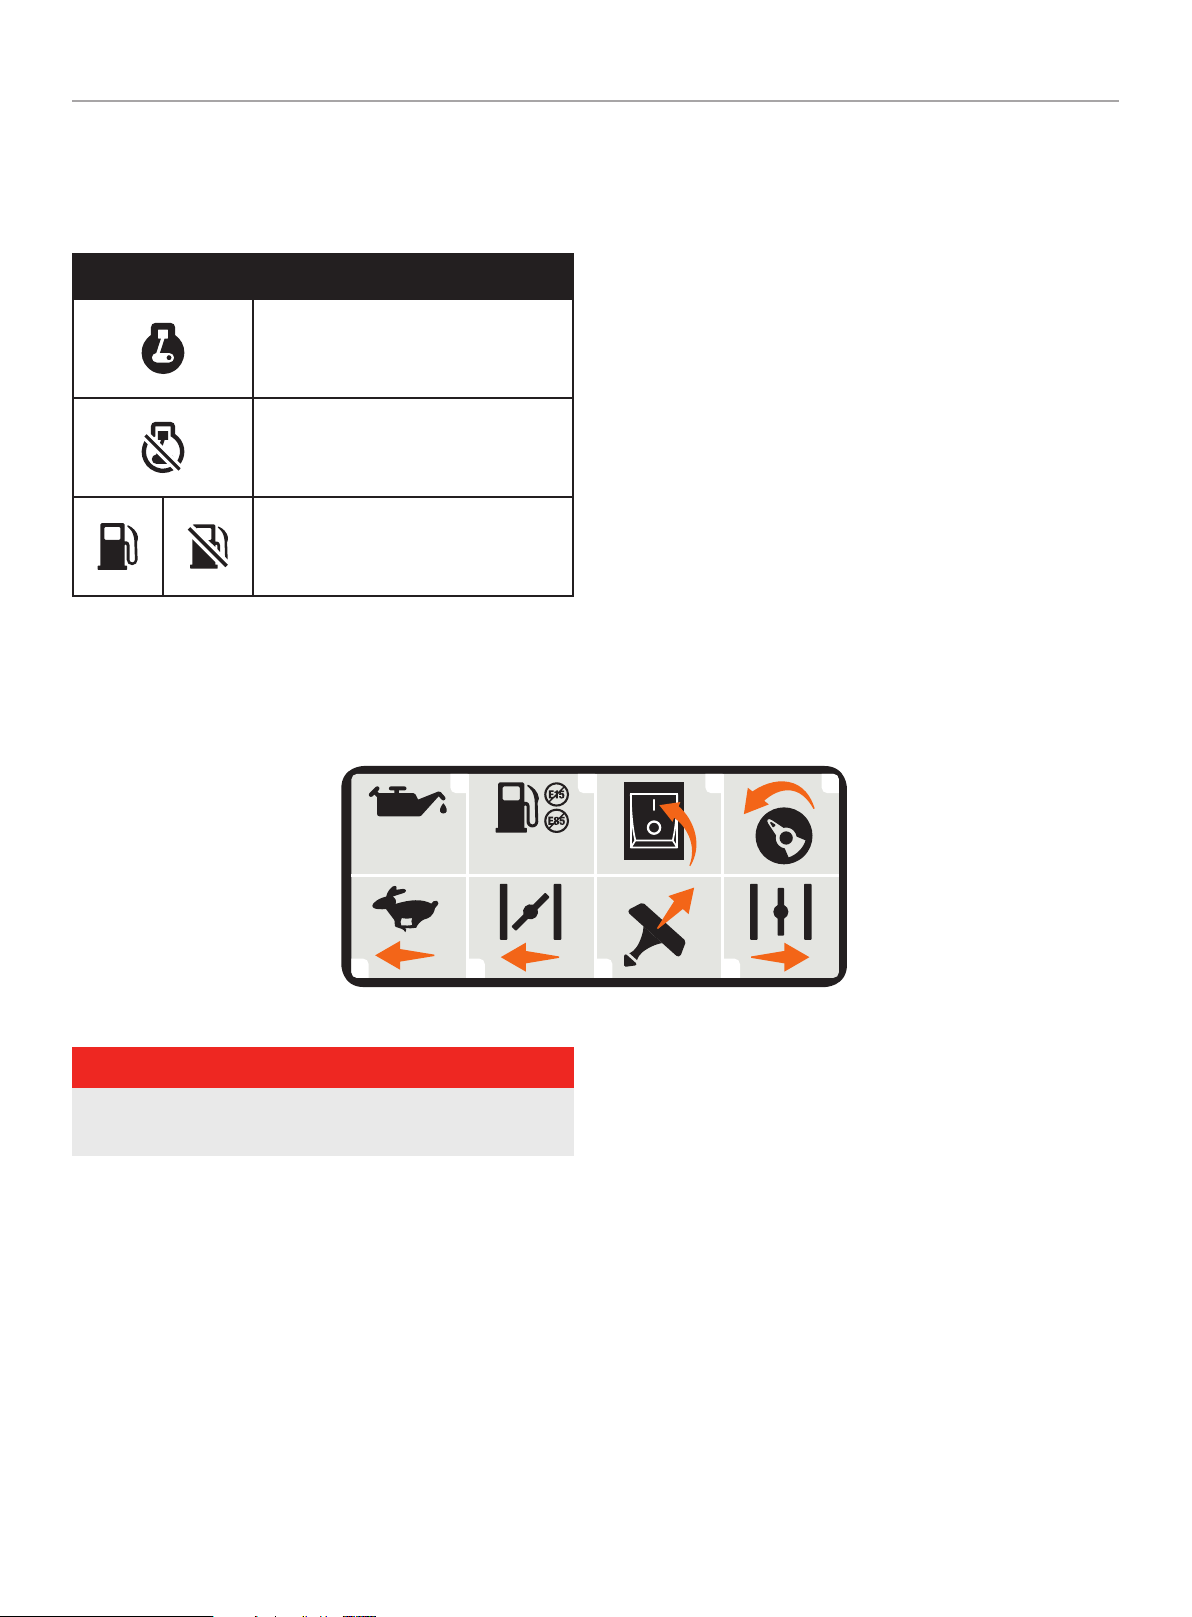
Operation Symbols
Some of the following symbols may be used on this product. Please study them and learn their meaning. Proper interpretation of
these symbols will allow you to more safely operate the product.
SYMBOL MEANING
ON
STOP or OFF
Fuel/Gasoline Valve ON/OFF
Quickstart Label Symbols
Some of the following symbols may be used on this product. Please study them and learn their meaning. Proper interpretation of these
symbols will allow you to more safely operate the product.
Starting the Engine
DANGER
Move log splitter outside and far away from windows,
doors and intake ventilation covers.
1. Check oil level.
Recommended oil is 10W-30.
2. Check gasoline level.
When adding gasoline, use a minimum octane rating of 85
and an ethanol content of 10% or less by volume.
3. Press engine switch to the “ON” position.
4. Turn the fuel valve to “ON” position.
5. Move the throttle lever to the “FAST” position.
6. Move choke lever to “CHOKE” position.
7. Pull the recoil cord.
8. Move the choke lever to “RUN” position.
11
Page 12
92750-1 - 27 TON LOG SPLITTER
CONTROLS AND FEATURES
CONTROLS AND FEATURES
Read this operator’s manual before operating your log splitter. Familiarize yourself with the location and function of the controls and
features. Save this manual for future reference.
Log Splitter
5
6
7
8
10
9
4
3
2
1
11
12
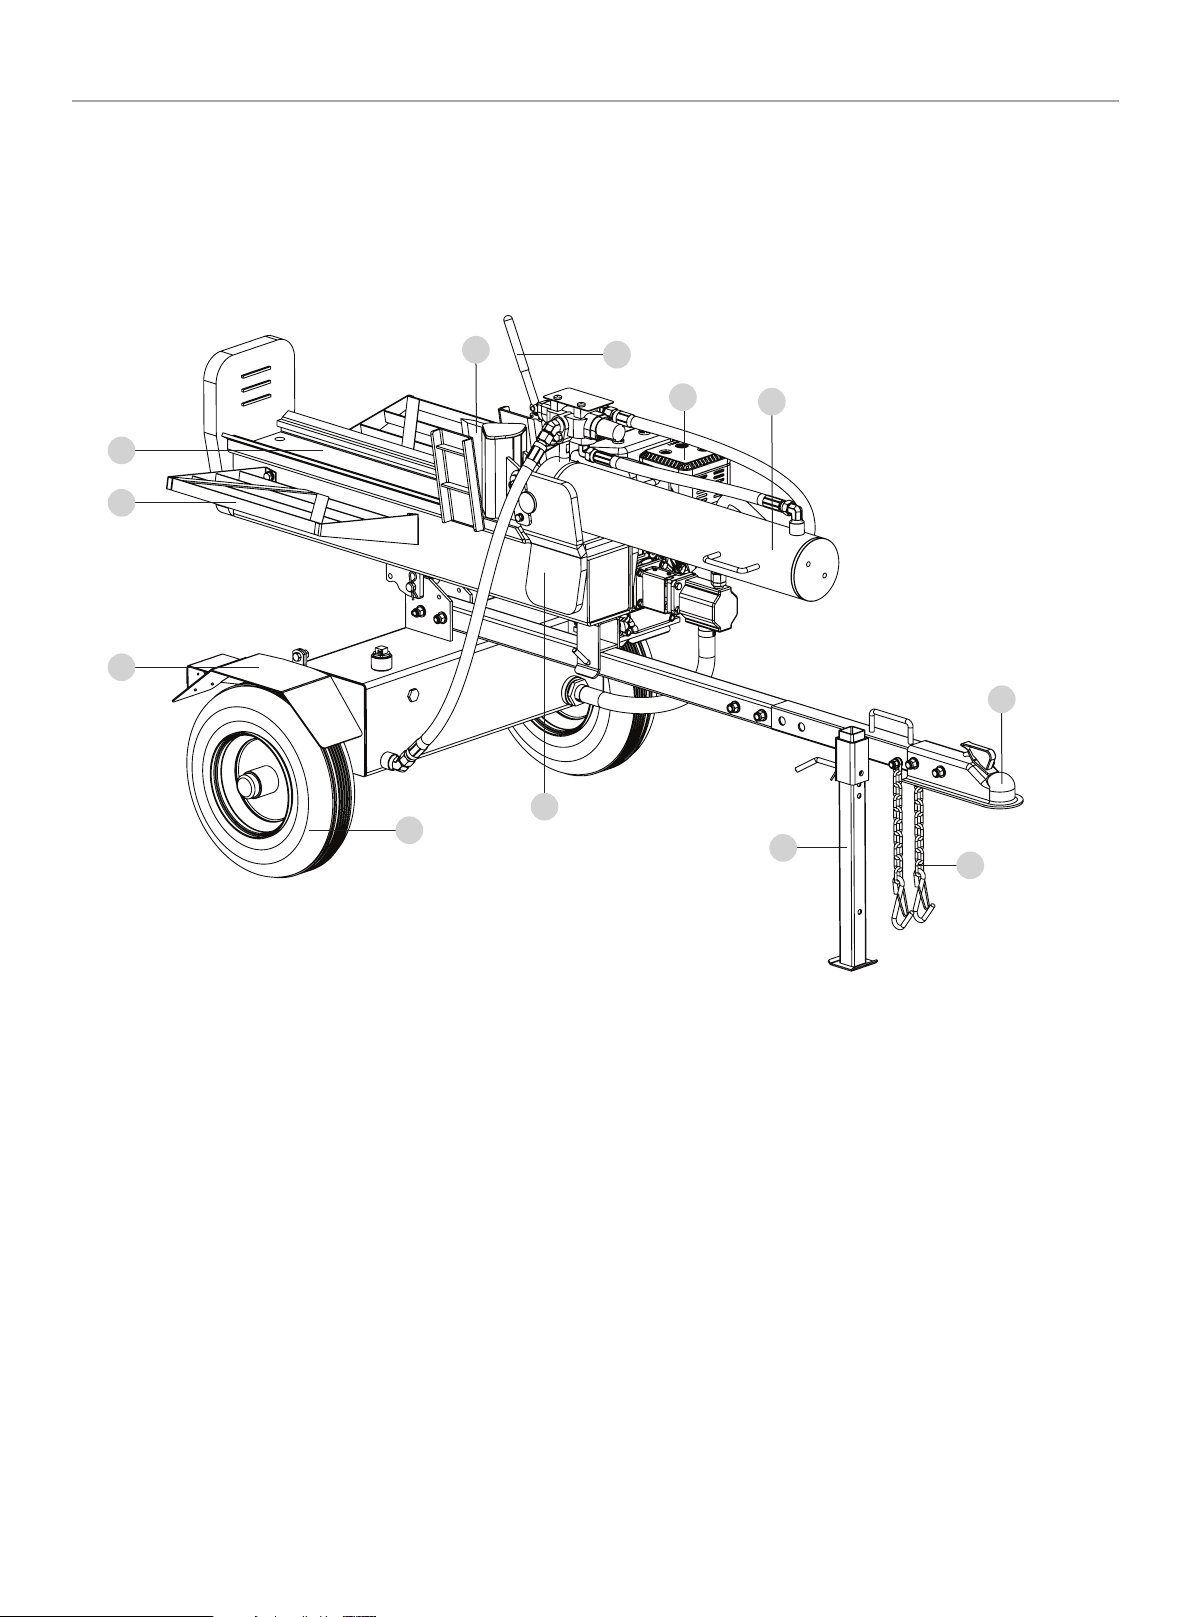
1. 2 in. (5.1 cm) Ball Coupler – For towing the log splitter
behind your vehicle.
2. Hydraulic Cylinder – 4.7 in. (12 cm) bore × 23 in.
(58.4 cm) stroke. Rated to 3600 psi.
3. Engine – 224cc, OHV, 4-stroke, air cooled.
4. Control Valve Handle – Controls the movement of the
cutting wedge.
5. Wedge
6. Splitting Beam
7. Log Catchers
8. Fenders
9. Tires – Maximum travel speed is 45 MPH (72 KM/H).
10. Mounting Plates – Holds hydraulic cylinder in place.
11. Support Leg – Supports log splitter while operating. Raise
leg for towing.
12. Safety Chains – For use while towing.
12
Page 13

92750-1 - 27 TON LOG SPLITTER
Parts Included
CONTROLS AND FEATURES
Part Part Qty. Hardware Needed
Castle Nut 2 1× 30mm open-end wrench
Wheels 2
Tow Bar 1
Support Leg 1
Beam 1
Cylinder 1
Wedge 1
Oil Tank Inlet
Connector
Engine 1
High Pressure Hose 1 1× 27mm open-end wrench
Log Catchers 2
Fenders 2
Cotter Pin Ø4 × 32 2 Needle nose pliers
Axle Cap 2 Mallet
Bolt M12 × 85 2 1× 18mm wrench or socket
Nu t M12 4 1× 19mm wrench or socket
Flat Washer Ø12 4
Bolt M12 × 65 2 1× 18mm wrench or socket
Pin 1
R-Pin 1
Hitch Pin 1
R-Pin 1
Lock Pin 1
R-Pin 1 Use for either Vertical or Horizontal
Cylinder Fixing Plate 2
Bolt M8 × 20 4 1× 13mm wrench or socket
Lock Washer Ø8 4
Washer Ø8 4
Bolt M12 × 75(12.9) 1 1× 18mm wrench or socket
Nu t M12 1 1× 19mm wrench or socket
Flat Washer Ø12 1
1 1× 27mm open-end wrench
Bolt M8 × 45 4 1× 13mm wrench
Nut M8 4 1× 14mm wrench
Lock Washer Ø8 4
Flat Washer Ø8 4
Bolt M10 × 15 1× 16mm wrench or socket
Lock Washer Ø10
Flat Washer Ø10
Bolt M10 × 25 4 1× 16mm wrench or socket
Nut M10 4 1× 17mm wrench
Lock Washer 4
Flat Washer 4
Hardware
Qty.
Tool Needed
Parts Not Included
– Engine Oil (10W-30) 20.3 fl. oz (0.6 L)
– Hydraulic Oil (ISO 32) 832 fl. oz (24.6 L)
13
Page 14
92750-1 - 27 TON LOG SPLITTER
ASSEMBLY
ASSEMBLY
Your log splitter is requires some assembly.
If you have any questions regarding the assembly of your log
splitter, call our help line at 1-877-338-0999. Please have your
serial number and model number available.
Open Shipping Crate
1. Set the shipping crate on a solid, flat surface
2. Carefully cut the shipping bands and remove lid of shipping
crate.
3. Locate all hardware before beginning assembly.
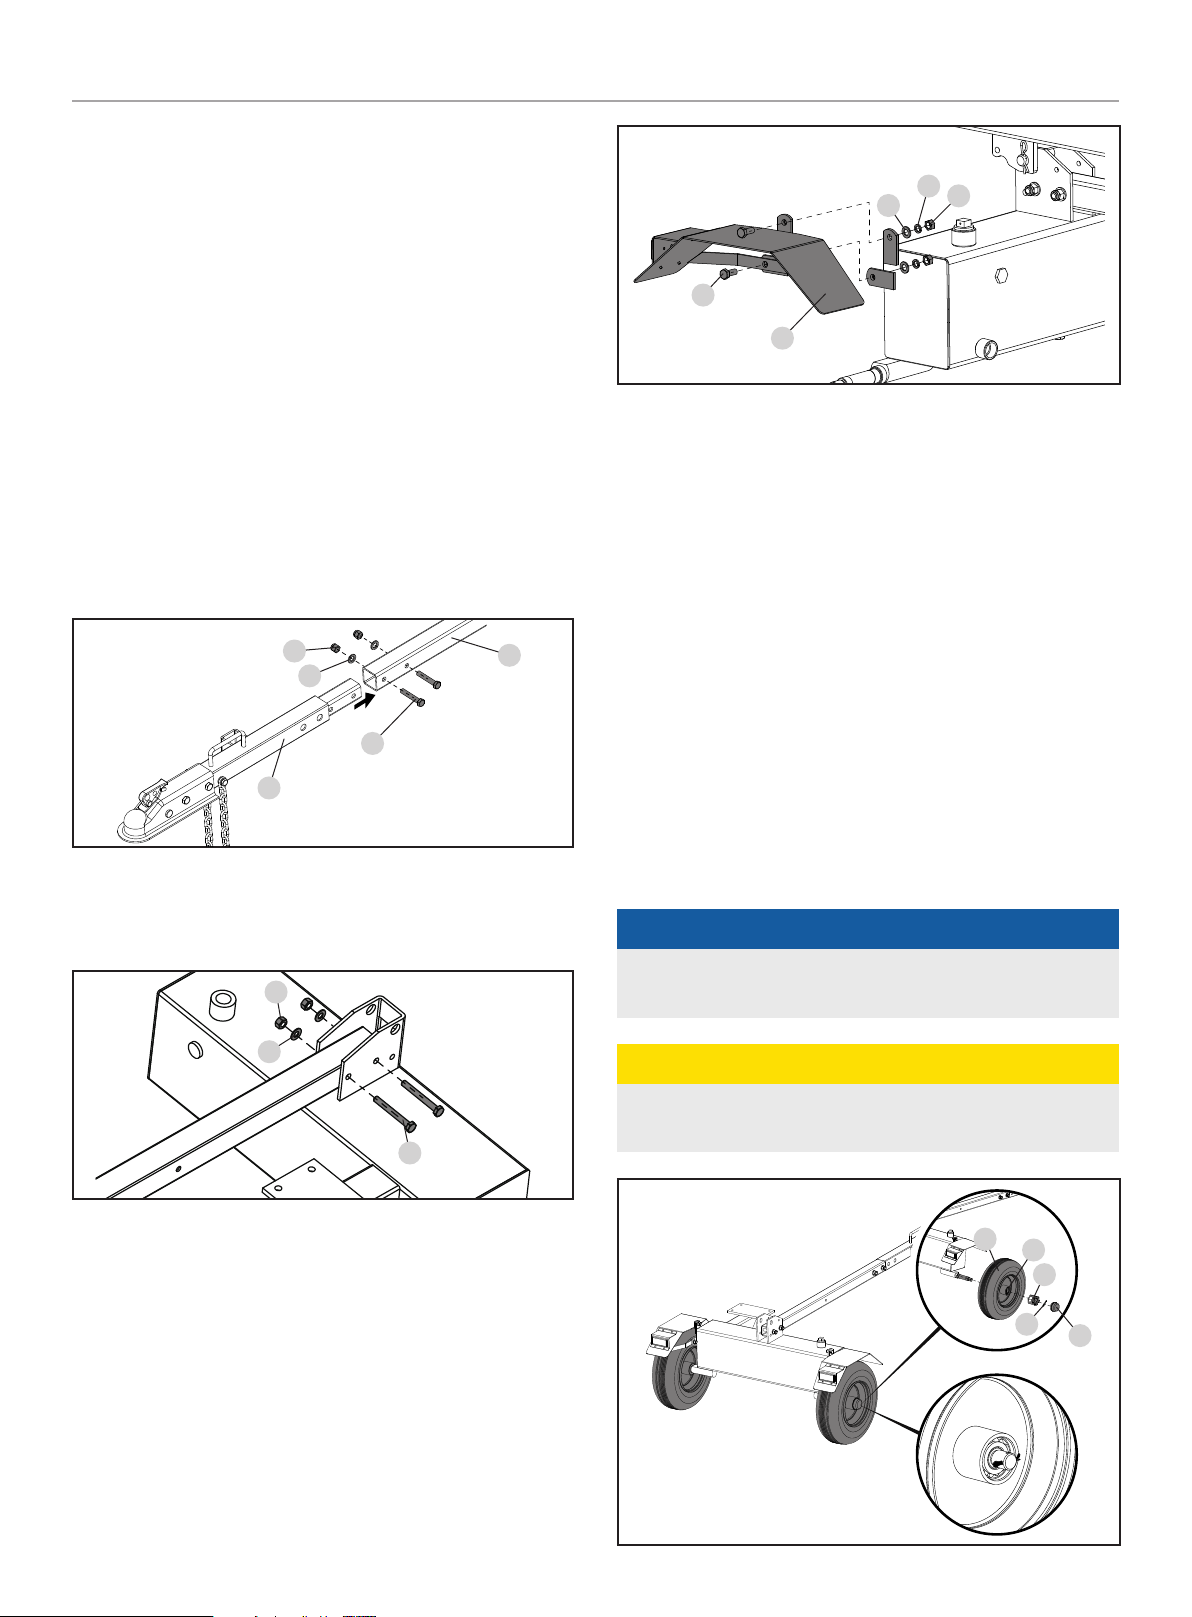
1) Install the Tow Bar
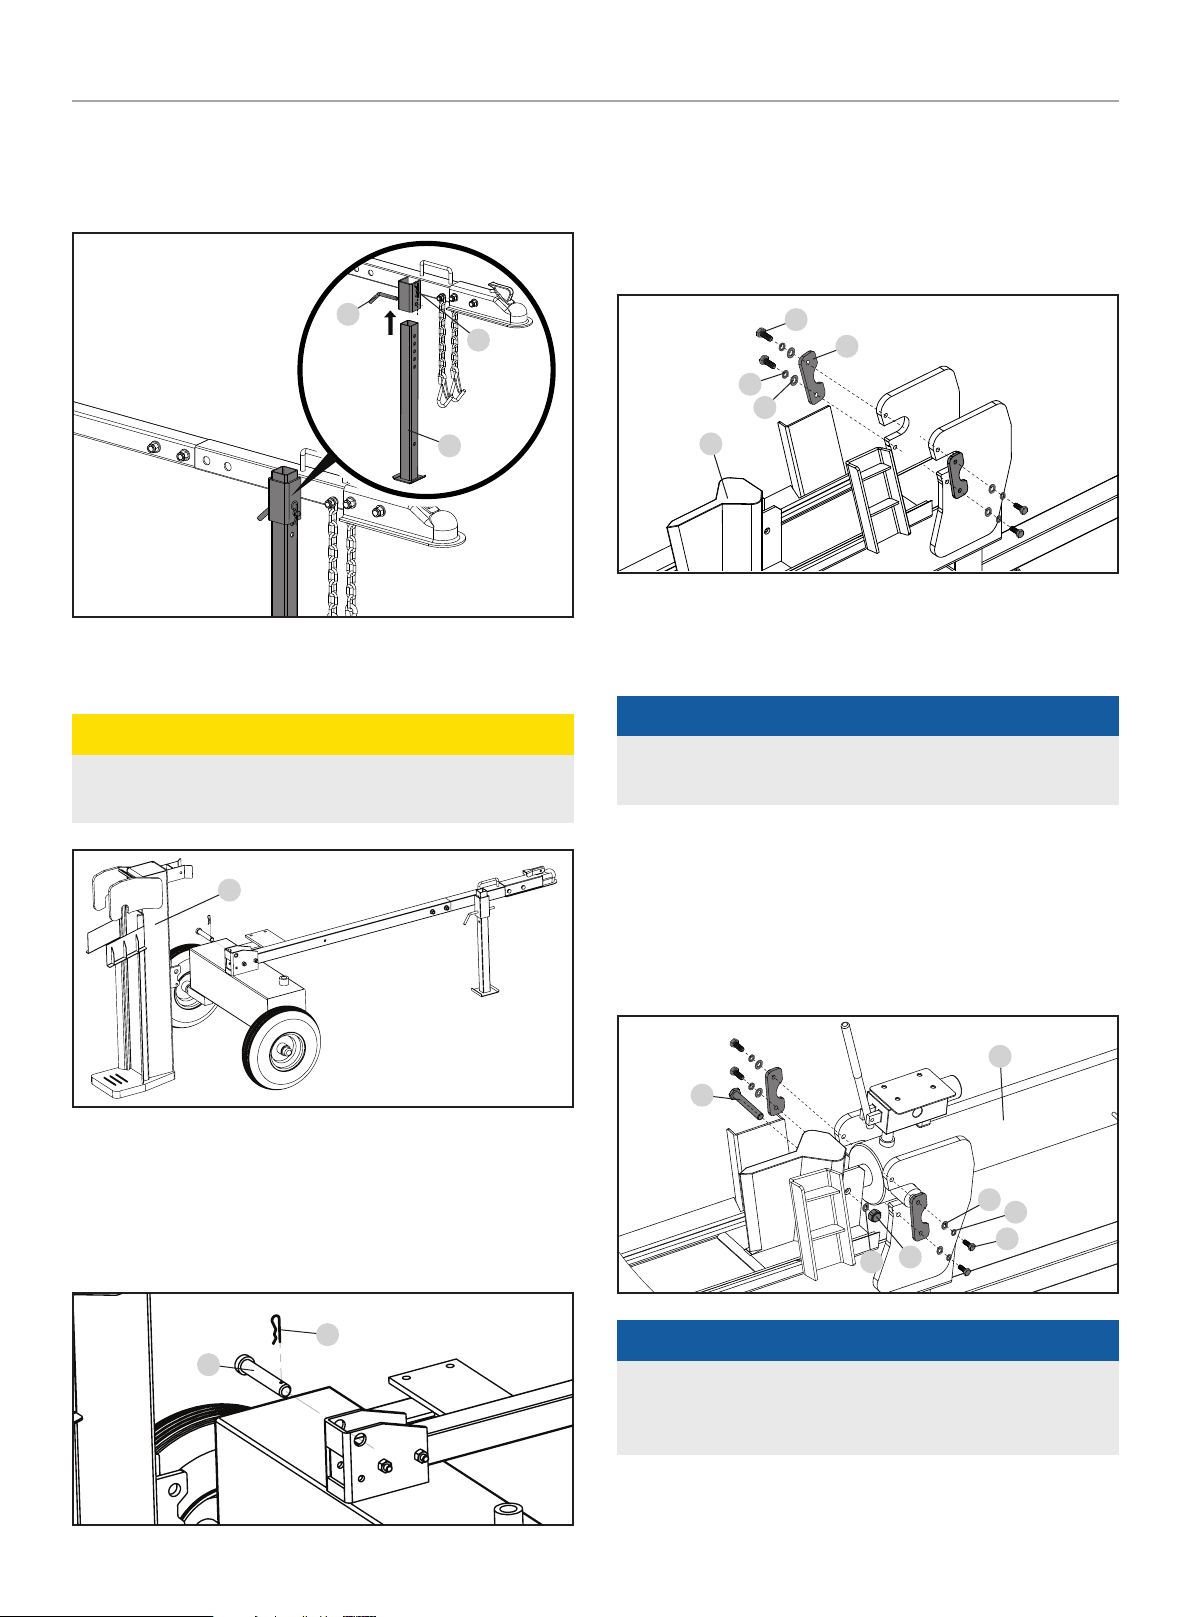
1. Assemble two piece tow bar (18, 19) with two M12 × 65 bolts
(28) and M12 lock nuts (5) and washers (4).
5
4
28
18
75
25
70
69
52
3) Install the Wheels
1. Place bearings (58) in the wheel (59) hub.
2. Press the seal over the bearing on the inside of the wheel.
Use a hammer and wood block to flush the seal with the end
of the hub.
3. Slide the wheel over the axel on the hydraulic oil tank.
4. Install the castle nut (57) and tighten by hand. Tighten
another ¼ turn with a wrench to seat the bearing.
5. Spin the wheel to distribute grease.
6. Loosen the castle nut and re-tighten by hand.
19
2. Attach the tow bar to the bracket on top of the hydraulic oil
tank with two M12 × 85 bolts (64) and M12 lock nuts (5) and
washers (4).
5
4
64
2) Install the Fenders
1. Attach the fender (69) to the side of the hydraulic oil tank with
M10 × 25 bolts (70), M10 washers (25), M10 lock washers
(75) and M10 nuts (52). The safety reflector should be facing
the back of the hydraulic oil tank.
7. Install the cotter pin (61) through the castle nut and axle to
prevent the nut from backing off.
8. Place axle cap (56) over castle nut and axle.
9. Repeat steps 1-8 for the other wheel.
NOTICE
Keep the wheel hub clean and free from debris during
assembly.
CAUTION
Over-tightening the castle nut will cause the bearings to run
hot and fail prematurely.
59
58
57
61
56
2. Repeat with second fender on opposite side.
14
Page 15
92750-1 - 27 TON LOG SPLITTER
ASSEMBLY
4) Install the Beam
1. Install the front support leg (27) and secure with pin (20) and
R-pin (21) (hairpin clip).
20
21
27
2. Stand the beam (1) upright on foot plate behind the hydraulic
fluid tank.
CAUTION
Beam is heavy. Use at least 2 people when lifting or moving
the beam.
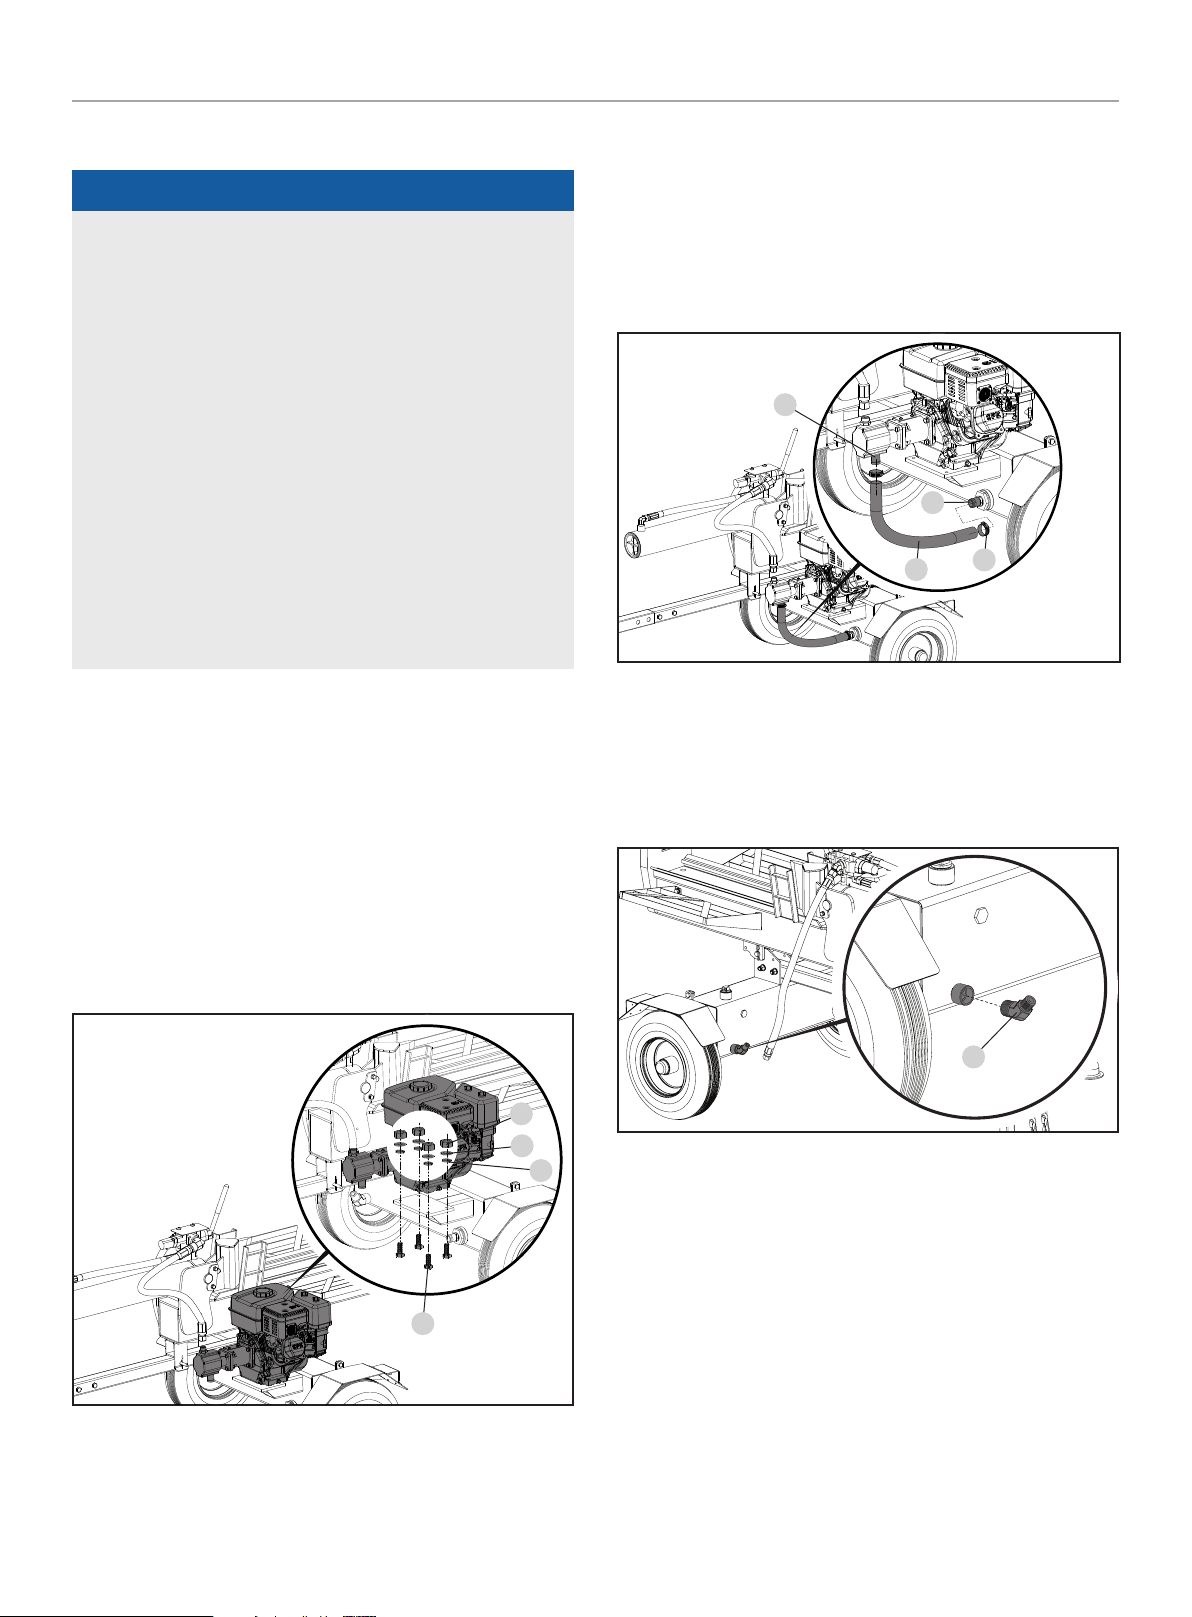
5) Install the Cylinder and Wedge
1. Place the wedge (3) on the beam between the cylinder
mounts and slide it forward into the rails.
2. Remove the cylinder mounting plate (72), washer (36), lock
washer (37), and bolt (71). Repeat on other side.
71
72
37
36
3
3. Install the cylinder (16) by sliding the pegs at the end of the
cylinder into the mounting slots on top of the beam. Be sure
to slide the cylinder all the way back into the mounting slots.
NOTICE
The cylinder will support itself when slid all the way back into
the mounting slots.
1
3. Slowly lift the front of the tow bar to roll the frame toward the
beam and carefully align the pivot holes on the bottom of the
beam and the top of the hydraulic oil tank.
4. Once aligned, secure the beam to the tank with hitch pin (63)
and R-pin (65).
65
63
4. Secure the cylinder mounting plates with hardware removed
in step 2.
5. Slide the wedge back toward the cylinder and align the bolt
hole in the wedge with the bolt hole in the cylinder rod.
Assemble the bolt (2), washer (4) and nut (5). Hand tighten
securely.
16
2
36
37
71
4
NOTICE
5
The cylinder rod may need to be rotated slightly in order to
properly align the wedge. Insert a screwdriver into the bolt
hole in the cylinder rod and slowly rotate as needed.
15
Page 16
92750-1 - 27 TON LOG SPLITTER
ASSEMBLY
6) Install the Engine and Hoses
NOTICE
Some hoses may be preassembled by the factory, check your
hoses per below instructions to ensure proper assembly.
Oil Inlet (High Pressure) and Oil Return Hoses
– These hoses are black and have swivel nuts on both ends.
– The Oil Inlet Hose (29) sends hydraulic oil from the pump to
the control valve/cylinder.
– The Oil Return Hose (17) returns hydraulic oil from the
control valve/cylinder to the tank.
– Hose connections do NOT require thread seal tape. The
O-ring seals against the face of the fittings on the pump
and hose.
Suction Hose
– This is the clear hose that connects the hydraulic tank to
the pump inlet.
– Secure both ends of hose with hose clamps.
Engine
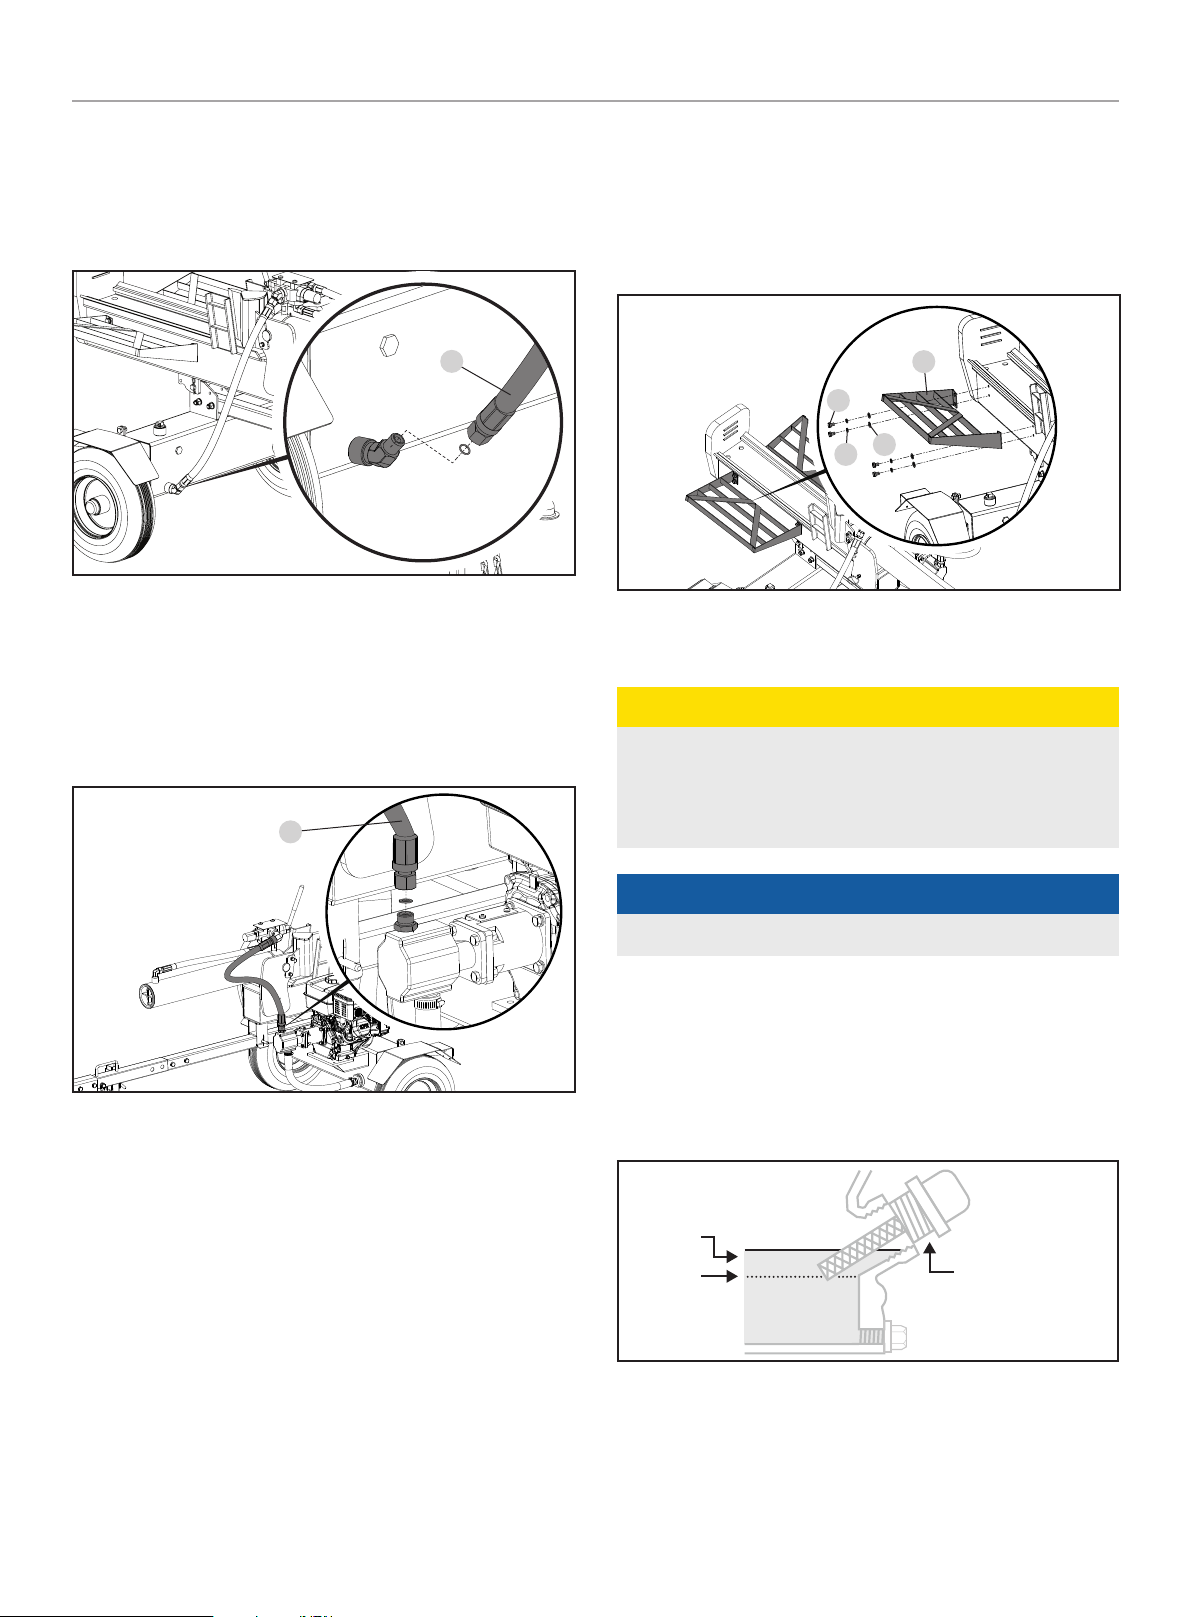
1. Align the 4 holes on the base of the engine with the 4 holes
on the engine mount.
2. Thread an M8×45 bolt (55) through an washer (36) lock
washer (37) and (38) M8 lock nut.
Suction Hose
5. Using the provided d32 hose clamps (33), connect one end of
the clear oil hose (34) to the hydraulic oil tank (A) just beneath
the engine and the other end to the pump inlet on the bottom
of the pump (B). Securely tighten the clamps on both ends of
the clear hydraulic hose with either a flat head screw driver or
8mm socket (Torque to 2.9-4.4 ft lbs.).
B
A
34
33
Oil Return (Low Pressure) Hose
6. Using the provided inlet connector (11), add 2-3 wraps of new
Teflon® tape to prevent oil leaks. Securely tighten the fitting
with 27mm wrench (Torque to 51.7-66.4 ft lbs.). Make sure
the fitting when fully tightening faces upward as shown.
3. Thread bolt and washers through a hole on the bottom of the
engine mount into the engine and add the lock nut.
(Torque to 44 - 52 ft lbs.).
4. Repeat steps 1-3 for the rest of the engine mounting
hardware.
38
37
36
55
11
16
Page 17
92750-1 - 27 TON LOG SPLITTER
ASSEMBLY
7. Place an o-ring into tank inlet connector installed in the
previous step. Make sure the o-ring is properly placed in the
inner groove. Connect the end of hose (17) to the tank inlet
connector. Securely tighten the end with a 27mm wrench
(Torque to 44 - 52 ft lbs.).
17
Oil Inlet (High Pressure) Hose
8. Place an o-ring into pump outlet fitting. Make sure the o-ring
is properly placed in the inner groove. Connect the other end
of the high pressure hose (29) to the pump outlet. Securely
tighten the end of hydraulic hose with a 27mm wrench
(Torque to 44 - 52 ft lbs.).
29
7) Install the Log Catchers
1. Attach log catcher (73) to side of beam with four M10×15
bolts (76), four M10 lock washers (75), and four M10 washers
(25).
2. Repeat step 1 for the other side.
73
76
25
75
Add Engine Oil
CAUTION
DO NOT attempt to crank or start the engine before it has been
properly filled with the recommended type and amount of oil.
Damage to the engine as a result of failure to follow these
instructions will void your warranty.
NOTICE
The recommended oil type is 10W-30 automotive oil.
1. Place the log splitter on a flat, level surface.
2. Remove oil fill cap/dipstick to add oil.
3. Using a funnel, add up to 20.3 fl. oz. (0.6 L) of oil and replace
oil fill cap/dipstick. DO NOT OVERFILL.
4. Check engine oil level daily and add as needed.
MAX
MIN
OIL DIP STICK
17
Page 18

92750-1 - 27 TON LOG SPLITTER
ASSEMBLY
NOTICE
Once oil has been added, a visual check should show oil about
1-2 threads from running out of the fill hole.
If using the dipstick to check oil level, DO NOT screw in the
dipstick while checking.
NOTICE
Check oil often during the break-in period. Refer to the
Maintenance section for recommended service intervals.
CAUTION
The engine is equipped with a low oil shut-off and will stop
when the oil level in the crankcase falls below the threshold
level.
NOTICE
We consider the first 5 hours of run time to be the breakin period for the engine. During the break in period we
recommend using standard automotive non-synthetic blended
oils. After the break in period synthetic lubricant can be used
but is not required. Adjusting throttle setting will increase/
decrease engine speed helping to seat piston rings. Avoid
bogging or lugging the engine down and avoid prolonged
running at constant RPM. After the 5 hour break-in period,
change the oil. Using synthetic lubricants does not increase
the recommended oil change interval.
Add Fuel
1. Use clean, fresh, regular unleaded gasoline with a minimum
octane rating of 85 and an ethanol content of less than 10%
by volume. ybc
2. DO NOT mix oil with gasoline.
3. Remove the gasoline cap.
4. Slowly add gasoline to the tank. DO NOT OVERFILL. Gasoline
can expand after filling. A minimum of ¼ in. (6.4 mm) of
space left in the tank is required for gasoline expansion,
although more than ¼ in. (6.4 mm) is recommended. Gasoline
can be forced out of the tank as a result of expansion if
overfilled, and can affect the stable running condition of the
log splitter.
5. Screw on the gasoline cap and wipe away any spilled fuel.
CAUTION
Use regular unleaded gasoline with a minimum octane rating
of 85 and an ethanol content of less than 10% by volume.
DO NOT mix oil and gasoline.
Fill tank to approximately ¼ in. (6.4 mm) below the top of the
tank to allow for gasoline expansion.
DO NOT pump gasoline directly into the log splitter at the
pump. Use an approved container to transfer the gasoline to
the log splitter.
DO NOT fill tank indoors.
DO NOT fill tank when the engine is running or hot.
NOTICE
Synthetic oil may be used after the 5 hour initial break-in
period. Using synthetic oil does not increase the recommended
oil change interval. Full synthetic 5W-30 oil will aid in starting
in cold ambient < 41º F (5º C).
Recommended Engine Oil Type
10W-30
10W-405W-30
5W-30 Synthetic
-20 0 20 40 60
°F
-28.9
°C -17. 8 -6.7 4.4 15.6 26.7 3 7.8 48.9
Ambient temperature
NOTICE
80 100 120
Weather will affect engine oil and engine performance. Change
the type of engine oil used based on weather conditions to suit
the engine needs.
DO NOT overfill the tank.
DO NOT light cigarettes or smoke when filling the tank.
WARNING
Pouring gasoline too fast through the fuel screen may result in
blow back of gasoline at the operator while filling.
18
Page 19
92750-1 - 27 TON LOG SPLITTER
NOTICE
OPERATION
WARNING
Our engines work well with 10% or less ethanol blend
gasoline. When using ethanol-gasoline blends there are some
issues worth noting:
– Ethanol-gasoline blends can absorb more water than
gasoline alone.
– These blends can eventually separate, leaving water or a
watery goo in the tank, fuel valve and carburetor.
– With gravity-fed supplies, the compromised gasoline can
be drawn into the carburetor and cause damage to the
engine and/or potential hazards.
– There are only a few suppliers of fuel stabilizer that are
formulated to work with ethanol-gasoline blends.
– Any damages or hazards caused by using improper
gasoline, improperly stored gasoline, and/or improperly
formulated stabilizers, are not covered by manufacturer’s
warranty.
It is advisable to always shut off the gasoline supply, run the
engine to starvation and drain the tank when the equipment is
not in use for more than 30 days.
DO NOT remove the hydraulic oil fill cap when the engine
is running or hot. Hot oil can escape causing severe burns.
Always allow the log splitter to cool completely before
removing the hydraulic oil cap.
High fluid pressure and temperatures are created in the
hydraulic log splitters. Hydraulic fluid will escape through a
pin-size hole opening and can puncture skin and cause severe
blood poisoning.
Inspect hydraulic system regularly for possible leaks.
Never check for leaks with your hand while the system is
pressurized. Seek medical attention immediately if injured by
escaping fluid.
5. Replace and tighten the oil plug and orient the vent hole away
from the operator zone.
6. Start Engine. Extend and retract the wedge to purge air from
the hydraulic system. When the wedge motion is smooth, the
system is properly purged.
7. Check the hydraulic oil tank sight glass. Add approximately
1.5 gallons of hydraulic oil to bring the level back up to the
sight glass.
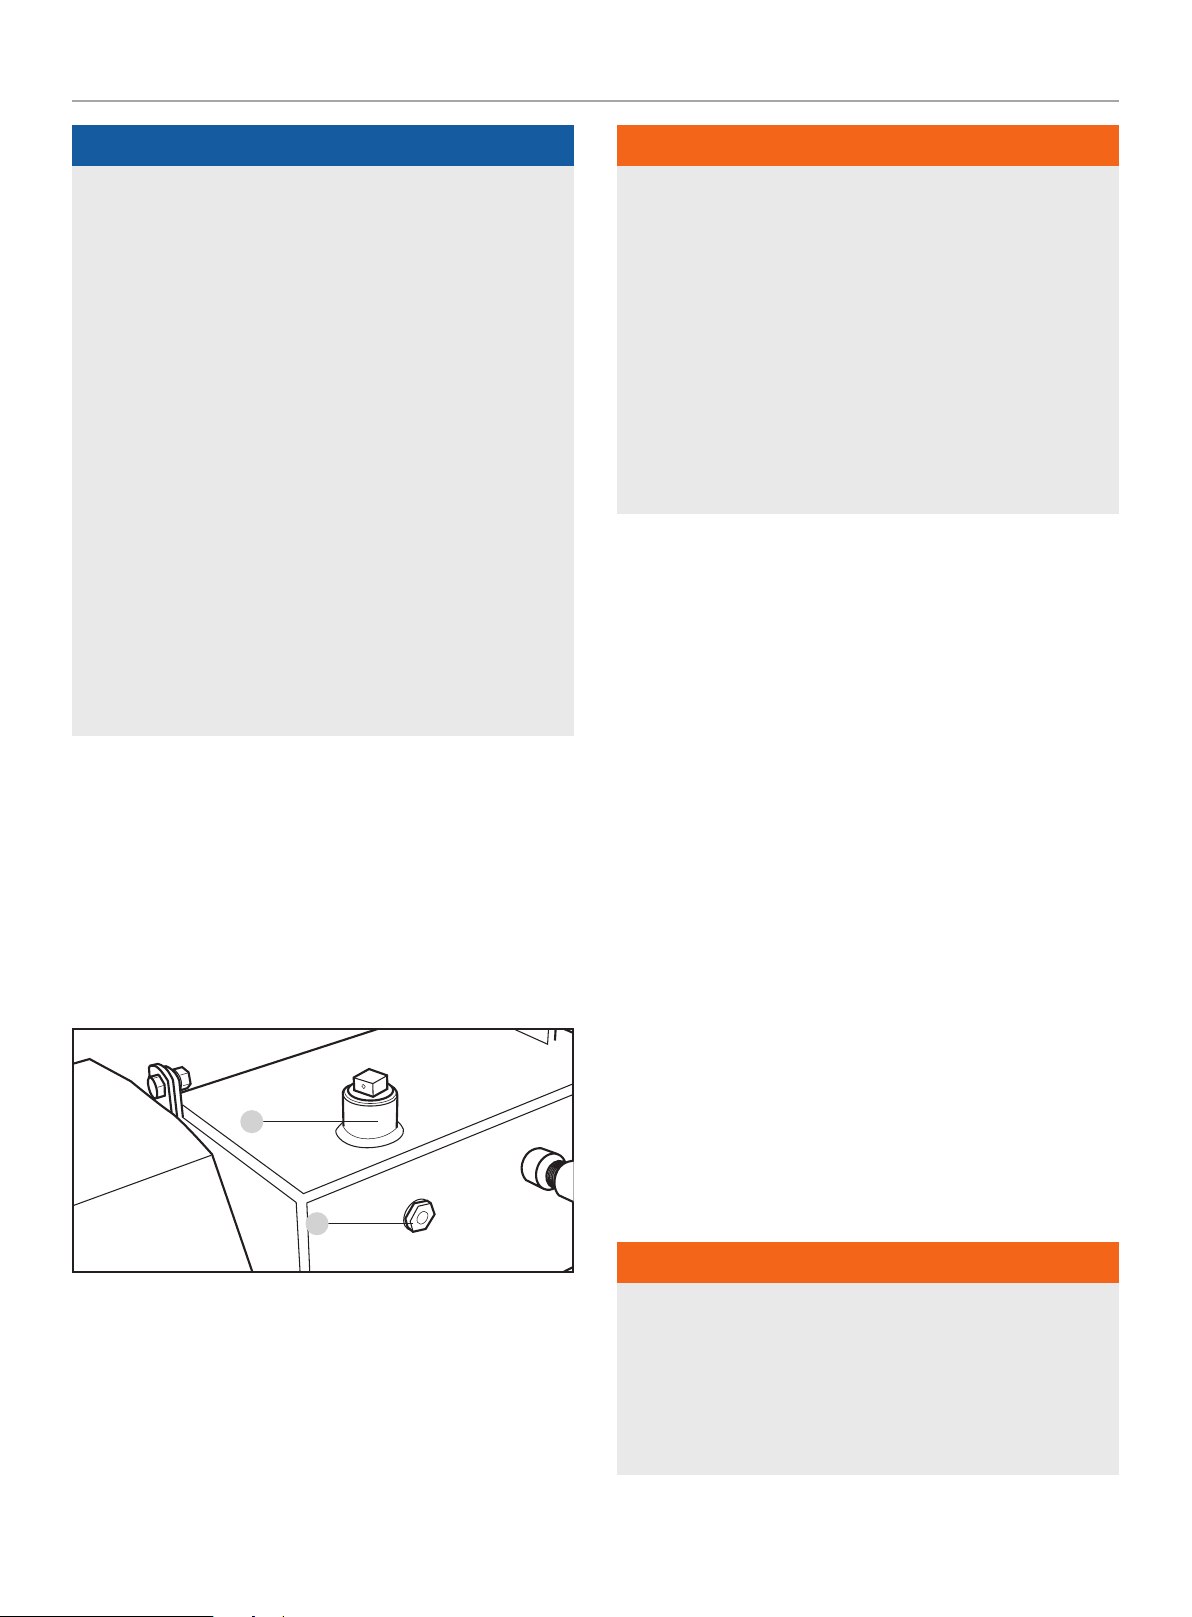
Add Hydraulic Oil
1. Make sure the log splitter is on a flat, level surface.
2. Remove the oil plug from the oil tank. (A)
3. Add 640 fl. oz. (5 gal. [18.9 L]) of hydraulic oil - ISO 32 / SAE
10W / SAE 32 / ISO 46 are all acceptable types of fluid.
4. Check the hydraulic oil level using the oil sight glass. Oil level
should be centered on the glass sight. (B)
A
B
OPERATION
Before Each Use Inspect the Log Splitter
1. Check the hydraulic oil level and visually inspect all hoses,
attachments and cylinder for loose fittings, leaks, cracks,
fraying or other damage.
2. DO NOT operate the log splitter if there is any indication of
damage.
3. Inspect the engine and make sure the oil level is correct
before operating. If the engine is equipped with a spark
arrestor, clean and inspect it regularly (follow spark arrestor
maintenance schedule).
4. The tires need to be fully inflated and in good repair.
Reference the tire sidewall for recommended tire pressure.
WARNING
DO NOT over inflate tires. Serious injury can result if tires
explode.
DO NOT tow the log splitter if the tires are worn or will not hold
air.
DO NOT exceed the maximum 45 MPH (72 KM/H) towing
speed.
19
Page 20
92750-1 - 27 TON LOG SPLITTER
OPERATION
Changing Beam from Horizontal to Vertical
Orientation
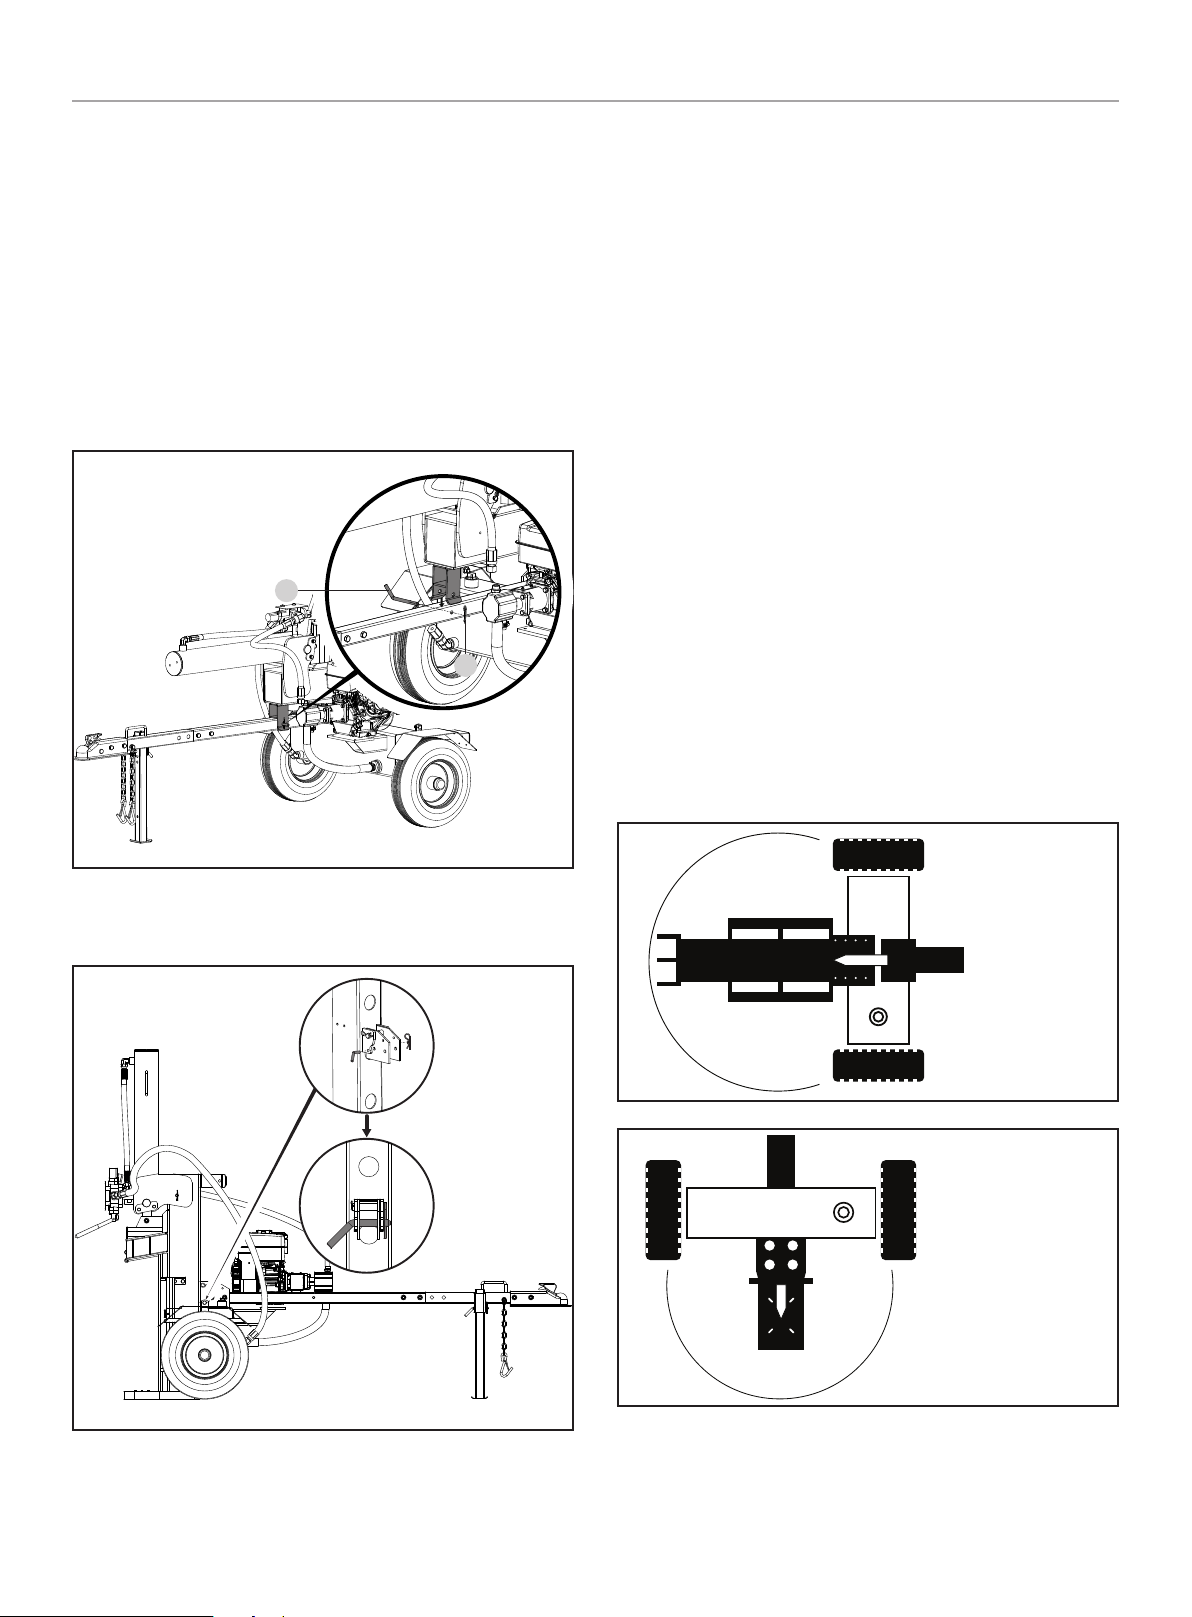
When logs are too heavy to lift, log splitter beam can be moved
from horizontal to vertical orientation.
To change from horizontal to vertical orientation:
1. Remove “R” clip and pin that locks the beam to the tow bar.
2. Standing alongside the hydraulic ram, (opposite side from the
engine) firmly grasp the handle on the beam and lift upward
while pushing the beam back until upright. (Caution, beam is
heavy.)
68
21
Towing Log Splitter Safety
1. Always check local and state regulations regarding the
requirements for towing, licensing and lights.
2. Before towing make sure the log splitter is correctly and
securely attached to the vehicle and the safety chains
attached with enough slack to allow for turning.
3. Never exceed the max. travel speed of 72 km/h (45 MPH).
Towing the log splitter at speeds greater than 72 km/h
(45 MPH) could result in serious injury or death. Always adjust
your towing speed according to the terrain and conditions.
4. Always disconnect the log splitter from the towing vehicle
before operating.
Log Splitter Location
This log splitter must have at least seven feet of clearance from
combustible material. Leave at least three feet of clearance on all
sides of the log splitter to allow for adequate cooling, maintenance
and servicing. DO NOT place the log splitter near vents or intakes
where engine exhaust fumes could be drawn into occupied or
confined spaces. ONLY operate the log splitter outdoors.
3. Insert pin and “R” clip in the rear locking hole (at base of tow
beam).
The log splitter needs to be on a dry level surface with good
footing. DO NOT work on mud, ice, tall grass, brush or snow.
Only operate log splitter from work zone shown below.
W
o
r
k
Z
o
n
e
HORIZONTAL
OPERATING POSITION
VERTICAL
OPERATING POSITION
To change from vertical to horizontal orientation, reverse steps.
W
o
k
n
o
Z
20
r
e
Page 21

92750-1 - 27 TON LOG SPLITTER
WARNING
OPERATION
NOTICE
ALWAYS use the log splitter for its intended use. The log
splitter should only be used to split wood logs, length wise
with the grain.
NEVER modify, alter or change the log splitter in anyway.
Modifications will void the warranty.
NEVER attach a rope, cable or other device to the control lever
on the log splitter.
DO NOT modify or change the engine and operating speeds or
pressure settings. These changes can cause safety issues.
ONLY operate the log splitter in daylight.
NEVER operate, or let anyone else operate, the log splitter
while under the influence of alcohol, drugs, or medication.
NEVER leave the log splitter unattended while the engine is
running.
DO NOT change the splitting position with the engine running.
Contact with the muffler can cause serious burns.
ALWAYS make sure the beam is in the locked position.
DO NOT let the beam drop as it could crush fingers or cause
damage to the log splitter.
If the engine starts but does not run make certain that the log
splitter is on a flat, level surface. The engine is equipped with
a low oil sensor that will prevent the engine from running when
the oil level falls below a critical threshold.
Stopping the Engine
1. Turn the fuel valve to the “OFF” position.
2. Let the engine run until fuel starvation has stopped the
engine. This usually takes a few minutes.
3. Turn the engine switch to the “OFF” position.
Important: Always ensure that the fuel valve and the engine
switch are in the “OFF” position when the engine is not in use.
NOTICE
If the engine will not be used for a period of two (2) weeks or
longer, please see the Storage section for proper engine and
fuel storage.
Log Splitter Operation
Starting the Engine
1. Make certain the log splitter is on a flat, level surface.
2. Flip engine switch to the “ON” position.
3. Rotate the fuel valve to the “ON” position.
4. Move the throttle lever to the “FAST” position.
5. Move the choke lever to the “CHOKE” position.
6. Pull the starter cord slowly until resistance is felt and then
pull rapidly. SEE NOTE.
7. As engine warms up, move the choke lever to the “RUN”
position.
NOTICE
Keep choke lever in “CHOKE” position for 2 pulls of the recoil
starter. After second pull, move choke lever to the “RUN”
position for up to the next 3 pulls of the recoil starter.
Too much choke leads to spark plug fouling/engine flooding
due to the lack of incoming air. This will cause the engine not
to start.
1. ALWAYS wear ear and eye protection, protective clothing and
safety gear.
2. Block tires and ensure support leg is secure to prevent
unintended movement of the log splitter during operation.
3. Set log splitter in either the horizontal or vertical position.
NOTICE
HORIZONTAL position is used for lighter logs that can easily be
loaded onto the beam.
VERTICAL position is used for light logs as well as heavy logs
that are difficult to load onto the beam.
Back injury can result from lifting logs onto the log splitter if
proper lifting techniques are not used.
21
Page 22

92750-1 - 27 TON LOG SPLITTER
MAINTENANCE
4. Load a log onto the beam against the end plate
(MAX LOG LENGTH – 23.8 in. [60.3 cm]).
5. Make sure all limbs are clear of crush zones.
6. Push the control valve handle forward (towards the end plate)
to split the log.
7. Push the auto control valve handle backward to return the
wedge to its original position.
8. Clear the split wood from the work zone.
CAUTION
Do not hold auto control valve in return position. It will damage
the stop block or beam.
NOTICE
It is normal for the hydraulic fluid to appear foamy/frothy
during operation.
Operation at High Altitude
The density of air at high altitude is lower than at sea level. Engine
power is reduced as the air mass and air-fuel ratio decrease.
Engine power and log splitter output will be reduced approximately
3½% for every 1000 ft. of elevation above sea level. This is a
natural trend and cannot be changed by adjusting the engine. At
high altitudes increased exhaust emissions can also result due to
the increased enrichment of the air fuel ratio. Other high altitude
issues can include hard starting, increased fuel consumption and
spark plug fouling.
To alleviate high altitude issues other than the natural power
loss, CPE can provide a high altitude carburetor main jet. The
alternative main jet and installation instructions can be obtained
by contacting our Technical Support Team. Installation instructions
are also available in the Technical Bulletin area of the CPE website.
WARNING
Operation using the alternative main jet at elevations lower
than the recommended minimum altitude can damage the
engine. For operation at lower elevations, the originally
supplied standard main jet must be used. Operating the
engine with the wrong engine configuration at a given altitude
may increase its emissions and decrease fuel efficiency and
performance.
MAINTENANCE
Make certain that the log splitter is kept clean and stored
properly. Only operate the unit on a flat, level surface in a clean,
dry operating environment. DO NOT expose the unit to extreme
conditions, excessive dust, dirt, moisture or corrosive vapors.
Inspect all air vents and cooling slots to ensure that they are clean
and unobstructed.
Clean spark arrester every 100 hours.
Check and tighten all bolts and nuts before operating the log
splitter.
WARNING
Never operate a damaged or defective log splitter.
WARNING
Improper maintenance will void your warranty.
NOTICE
Maintenance, replacement, or repair of emission control
devices and systems may be performed by any non-road
engine repair establishment or individual.
The part number and recommended minimum altitude for the
application of the high altitude carburetor main jet is listed in the
table below.
In order to select the correct high altitude main jet it is necessary
to identify the carburetor model. For this purpose, a code is
stamped on the side of the carburetor. Select the correct high
altitude jet part number corresponding to the carburetor code
found on your particular carburetor.
Carb. Code High Alt. Jet Part Number Min. Altitude
P22-1-Z 27.131017.04.01.Z
P22-1-H 27.131017.04.01.H
P22-1-Y 27.131017.04.01.Y
3500 ft.
(1067 m)
The owner/operator is responsible for all periodic maintenance.
Complete all scheduled maintenance in a timely manner.
Correct any issue before operating the log splitter.
For service or parts assistance, contact our
Technical Support Team at 1-877-338-0999.
22
Page 23
92750-1 - 27 TON LOG SPLITTER
MAINTENANCE
Cleaning the Log splitter
CAUTION
DO NOT spray engine with water.
Water can contaminate the fuel system and can enter the
engine through the cooling slots and damage the engine.
Clear the debris from the beam, wedge and endplate.
Use a damp cloth to clean exterior surfaces of the engine and log
splitter.
Use a soft bristle brush to remove excess dirt and oil.
Use an air compressor (25 PSI) to clear dirt and small debris.
Wipe all metal parts with an oily rag to help prevent rust and
corrosion.
Changing the Engine Oil
Change oil when the engine is warm. Refer to the oil specification
to select the proper grade for your operating environment.
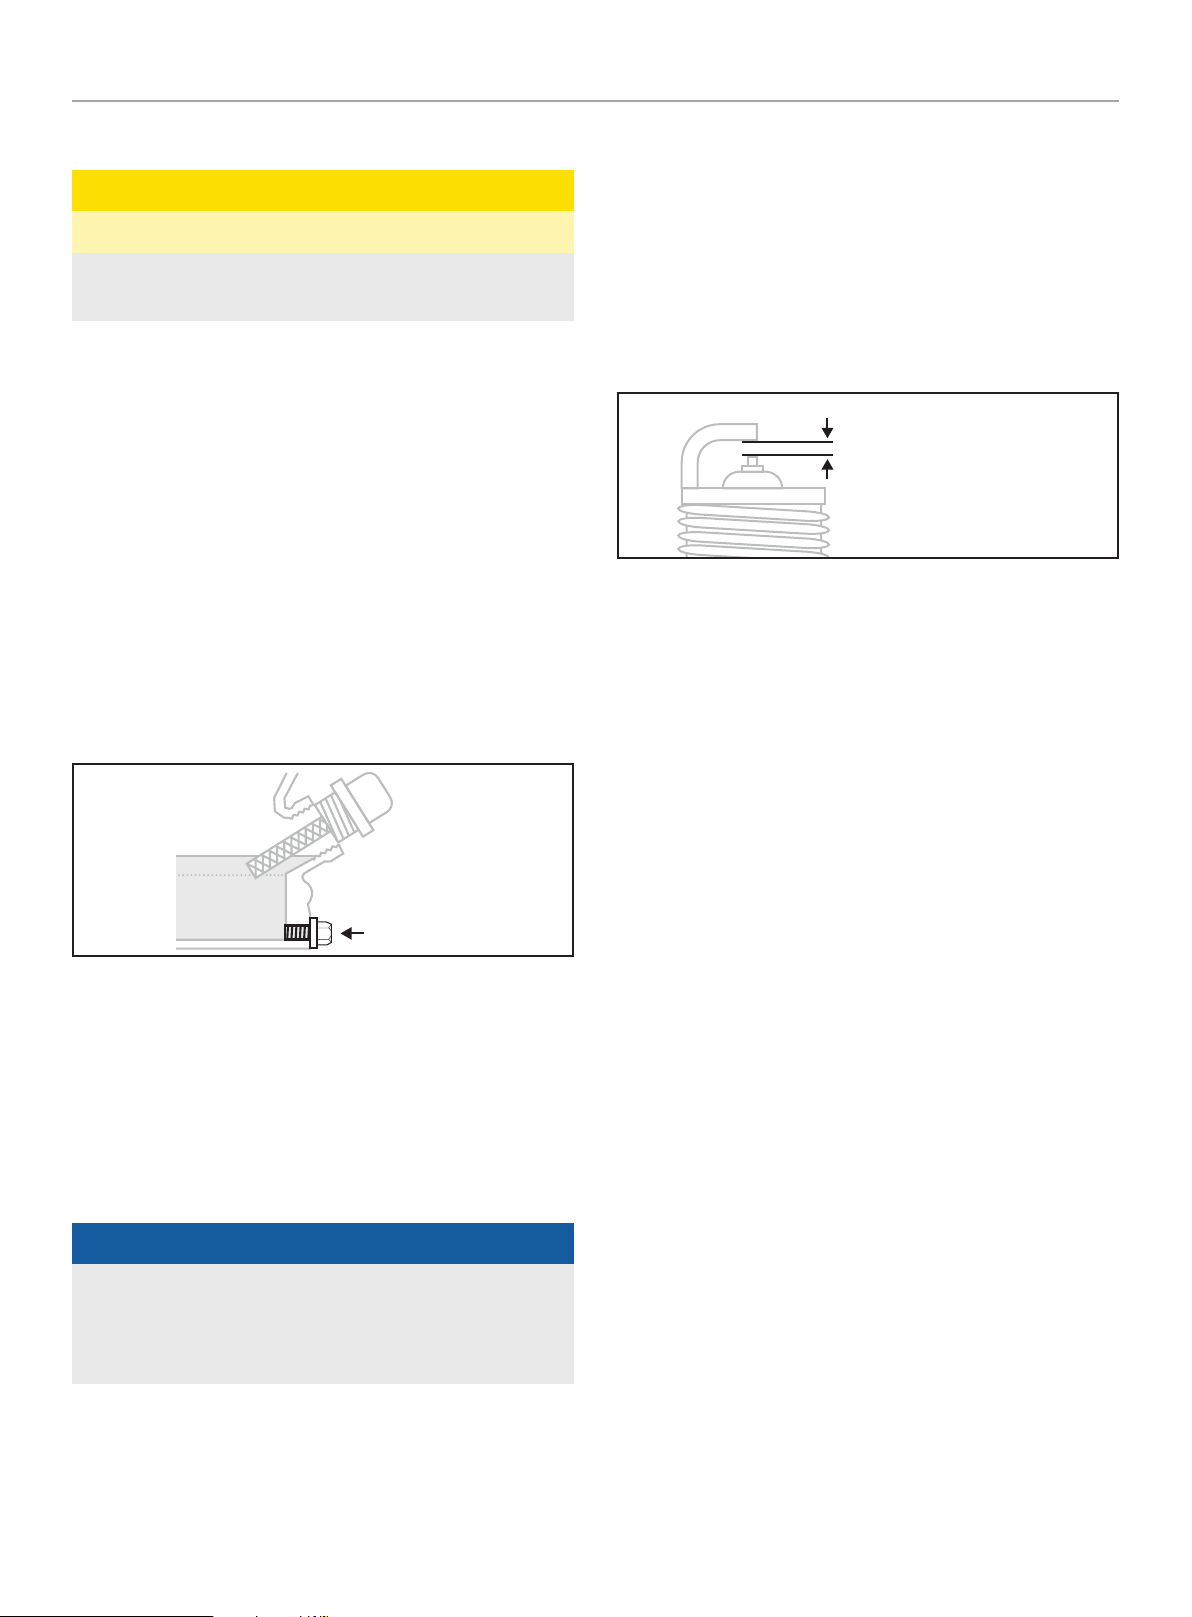
1. Remove the oil drain plug with a 12 mm socket
(not included) and extension.
Cleaning and Adjusting the Spark Plug(s)
1. Remove the spark plug cable from the spark plug.
2. Use a spark plug socket tool (not included), or a
13/16 in. (21 mm) socket (not included) to remove the plug.
3. Inspect the electrode on the plug. It must be clean and not
worn to produce the spark required for ignition.
4. Make certain the spark plug gap is
0.028-0.031 in. (0.7-0.8 mm).
SPARK PLUG GAP
5. Refer to the spark plug types in Specifications when replacing
the plug.
6. Firmly re-install the plug.
7. Attach the spark plug cable to the spark plug.
Cleaning the Air Filter
DRAIN BOLT
2. Allow the oil to drain completely into an appropriate container.
3. Replace the oil drain plug.
4. Remove the oil fill cap/dipstick to add oil.
5. Using a funnel, add up to 20.3 fl. oz. (0.6 L) of oil (not
included) and replace oil fill cap/dipstick. DO NOT OVERFILL.
6. Dispose of used oil at an approved waste management
facility.
NOTICE
Once oil has been added, a visual check should show oil
about 1-2 threads from running out of the fill hole. If using the
dipstick to check oil level, DO NOT screw in the dipstick while
checking.
1. Using your fingers, unscrew the thumb screws of the top
holes of the air filter cover.
2. Remove the plastic outer casing.
3. Remove the foam element.
4. Wash in liquid detergent and water. Squeeze thoroughly dry in
a clean cloth.
5. Saturate in clean engine oil.
6. Squeeze in a clean, absorbent cloth to remove all excess oil.
7. Place the filter in the assembly.
8. Reattach the air filter cover and using your fingers, insert the
thumb screws into the top and bottom holes of the air filter
cover. Screw until tight. Be sure not to over tighten.
23
Page 24
92750-1 - 27 TON LOG SPLITTER
MAINTENANCE
Changing the Hydraulic Oil
NOTICE
Install a new hydraulic oil filter each time the hydraulic oil is
changed.
1. Begin with the cylinder retracted and the engine “OFF.”
2. Turn the fuel valve “OFF.”
3. Release any stored pressure by moving the valve lever
forward and backward several times.
4. Place a container under the hydraulic tank. Make sure it is
large enough to hold the contents of the tank.
5. To drain the oil, unscrew and remove the tank drain plug on
the bottom of the hydraulic tank.
6. Allow oil to completely drain from the tank into the container.
7. Reinsert and screw in the tank drain plug. Tighten, but do not
over tighten.
NOTICE
The drain plug is sealed with Teflon tape. Add 2-3 wraps of
new Teflon tape as needed when replacing the drain plug to
prevent oil leak
WARNING
Always shut off the engine, disconnect the spark plug, and
relieve system pressure before cleaning, adjusting, or repairing
the splitter. Relieve system pressure by moving split control
lever back and forth several times.
NOTICE
Refer to Specifications for a list of compatible replacement
filters or call Champion Power Equipment at 1-877-338-0999
to order a replacement OEM filter.
Maintenance Schedule
Follow the service intervals indicated in the following maintenance
schedule.
Service your log splitter more frequently when operating in
adverse conditions.
Contact our Technical Support Team at 1-877-338-0999 to locate
the nearest CPE certified service dealer for your log splitter or
engine maintenance needs.
EVERY 8 HOURS OR DAILY
Check engine and hydraulic oil levels
Clean around air intake and muffler
A
B
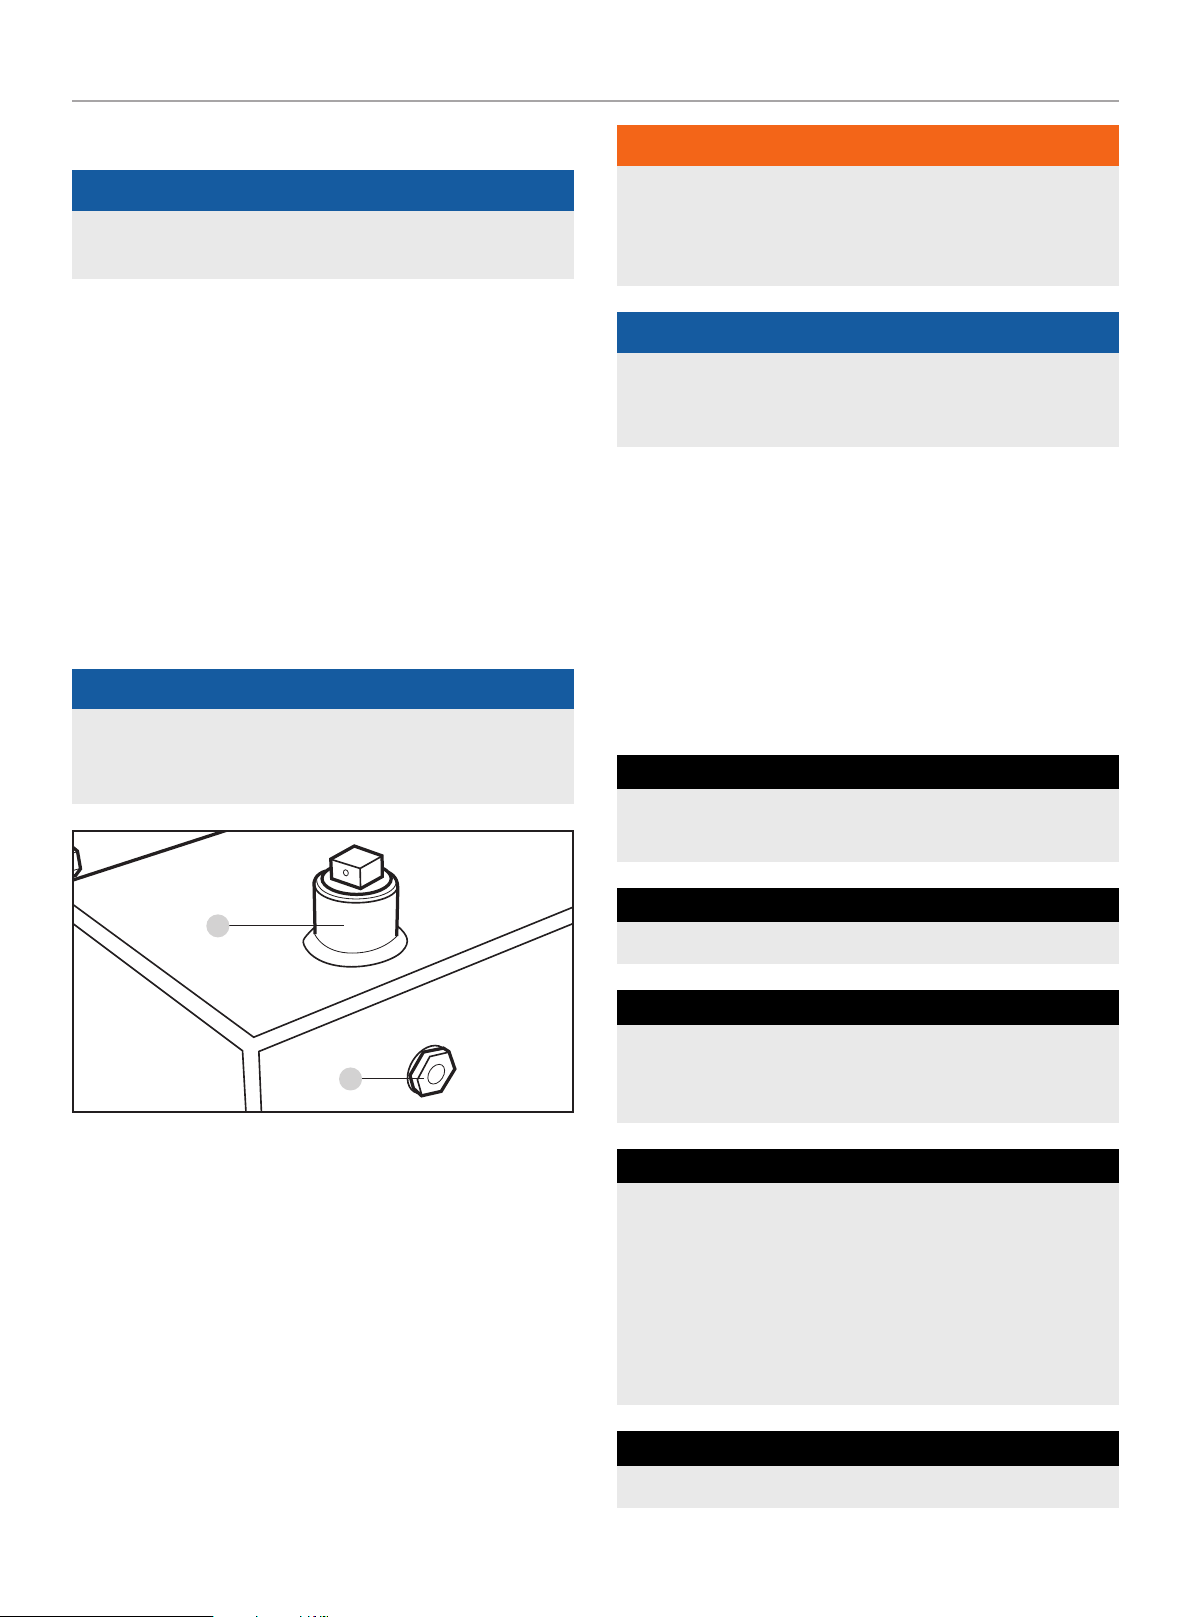
8. Unscrew and remove the tank fill plug, on top of the tank.
Using a funnel add approximately 5 gal. (18.9 L) of hydraulic
oil to the tank. Wipe up any spilled oil. (A)
9. Turn the fuel valve on, and start the engine. Purge the air
from the system by extending and retracting the wedge
several times until the motion is smooth.
10. Check the hydraulic oil level using the sight glass.
Add 1.5 gal. (5.7 L) of hydraulic oil, so the oil level is visible in
the sight glass. (B)
11. Dispose of used oil at approved recycling locations.
FIRST 5 HOURS
Change oil
EVERY 50 HOURS OR EVERY SEASON
Clean air filter
Change oil if operating under heavy load or in hot
environments
EVERY 100 HOURS OR EVERY SEASON
Change oil
Clean/adjust spark plug
Check/adjust valve clearance*
Clean spark arrestor
Clean fuel tank and filter*
Change hydraulic oil
Change hydraulic oil filter
EVERY 250 HOURS
Clean combustion chamber*
24
Page 25

92750-1 - 27 TON LOG SPLITTER
STORAGE
EVERY YEAR
Inspect wheel bearings and repack bearing grease as
needed.
EVERY 3 YEARS
Replace fuel line*
* To be performed by knowledgeable, experienced owners or CPE certified service
centers.
STORAGE
Refer to the Maintenance section for proper cleaning instructions.
Log Splitter Storage
1. The log splitter needs to be cool for at least 5 minutes before
storing.
2. Clean the log splitter before storage according to the
Maintenance section.
3. Retract the wedge to protect the rod from corrosion.
4. Wipe the beam and wedge with an oily rag to prevent rust
and corrosion.
Engine Stored for Less than 30 Days
Engines Stored for Over 30 Days
1. Add a properly formulated fuel stabilizer to the tank.
2. Run the engine for a few minutes so the treated fuel cycles
through the fuel system and carburetor.
3. Turn the fuel valve to the “OFF” position.
4. Let the engine run until fuel starvation has stopped the
engine. This usually takes a few minutes.
5. The engine needs to cool completely before cleaning and
storage.
6. Clean the engine according to the maintenance section.
7. Change the oil.
8. Remove the spark plug and pour about 14.8 mL (1⁄2 ounce) of
oil into the cylinder. Using the Recoil, crank the engine slowly
to distribute the oil and lubricate the cylinder.
9. Reattach the spark plug.
WARNING
Never store the log splitter inside next to appliances where
there is a source of heat or open flame, spark or pilot light
because they can ignite gasoline vapors.
DO NOT store a log splitter near fertilizer or any corrosive
material. Even with an empty gas tank, gasoline vapors could
ignite.
1. Allow the engine to cool completely before storage.
2. Clean engine according to the Maintenance section.
3. To extend the fuel storage life add a properly formulated fuel
stabilizer to the tank.
4. Ensure the fuel valve is in the “OFF” position.
25
Page 26

92750-1 - 27 TON LOG SPLITTER
SPECIFICATIONS
SPECIFICATIONS
Log Splitter Specifications
Ram Force ....................................................27 Ton
Max Cycle Time ........................................ 16 seconds
Max Log Length .................................. 23.8 in.(60.3 cm)
Max Log Weight ..................................... 100 lb. (45 kg)
Coupler Ball Size ......................................2 in. (5.1 cm)
Tire Size ............................................16 in (40.6 cm.)
Max towing speed ...............................72 km/h (45 MPH)
Cylinder size ................... 4.7 in. × 23 in. (12 cm × 58.4 cm)
Cylinder rod size ................................... 1.8 in. (4.5 cm)
Hydraulic Fluid Type ......... ISO 32 / SAE 10W / SAE 32 / ISO 46
Gear Pump ...................................................2-stage
Max pressure .............................................. 3600 psi
Max flow capacity .............................. 11 GPM (41.6 LPM)
Control Valve .................................. Detent (auto-return)
Overall Dimensions
Gross Weight ...................................... 485 lb. (220 kg)
Net Weight ....................................... 440.9 lb. (200 kg)
Height ........................................... 45.9 in. (116.5 cm)
Width ............................................. 40.9 in. (104 cm)
Length ............................................ 86.2 in. (219 cm)
Engine Specifications
Model .................................................. YF172F-000
Displacement ................................................. 224cc
Type ...................................................4-Stroke OHV
Star t Type .................................................... Recoil
Oil Specifications
DO NOT OVERFILL.
Type ................................................ See chart below
Capacity ..........................................20.3 fl. oz. (0.6 L)
Recommended Engine Oil Type
10W-30
10W-405W-30
5W-30 Synthetic
-20 0 20 40 60
°F
-28.9
°C -17.8 -6.7 4.4 15.6 26.7 37.8 48.9
Ambient temperature
NOTICE
80 100 120
Weather will affect engine oil and engine performance. Change
the type of engine oil used based on weather conditions to suit
the engine needs.
Hydraulic Oil System
Type ......................................... See Hydraulic oil chart
Capacity .............................. 832 fl. oz. (6.5 gal. [24.6 L])
NOTICE
Weather will affect hydraulic oil and log splitter performance.
Change the type of hydraulic oil used based on weather
conditions to suit the engine needs.
32˚F / 0˚C
Recommended Hydraulic Oil Type
Recommended Hydraulic Oil Type
ISO 32 / SAE 10W / SAE 32 / ISO 46
Automatic Transmission Fluid
-20 0 20 40 60
°F
-28.9
°C -17.8 -6.7 4.4 15.6 26.7 37.8 48.9
Ambient temperature
80 100 120
26
Page 27

92750-1 - 27 TON LOG SPLITTER
Fuel Specifications
Use regular unleaded gasoline with a minimum octane rating of 85
and an ethanol content of less than 10% by volume. DO NOT USE
E15 or E85. DO NOT OVERFILL.
Gasoline Capacity ................................... 0.9 gal. (3.4 L)
Spark Plug Specifications
OE M Type .............................................. NHSP F6RTC
Replacement Type ......................NGK BPR6ES or equivalent
Gap ..................................0.028-0.031 in. (0.7-0.8 mm)
Valve Specifications
Intake Clearance ................. 0.005-0.007 in. (0.13-0.17 mm)
Exhaust Clearance ............... 0.007-0.009 in. (0.18-0.22 mm)
NOTICE
A technical bulletin regarding valve adjustment procedures is
available at www.championpowerequipment.com.
SPECIFICATIONS
Important Message About Temperature
Your product is designed and rated for continuous operation at
ambient temperatures up to 104°F (40°C). When your product is
needed it may be operated at temperatures ranging from
2°F (-10°C) to 122°F (50°C) for short periods of time. If exposed
to temperatures outside this range during storage, it should be
brought back within this range before operation. In any event, the
product must always be operated outdoors, in a well-ventilated
area and away from doors, windows and vents.
27
Page 28
92750-1 - 27 TON LOG SPLITTER
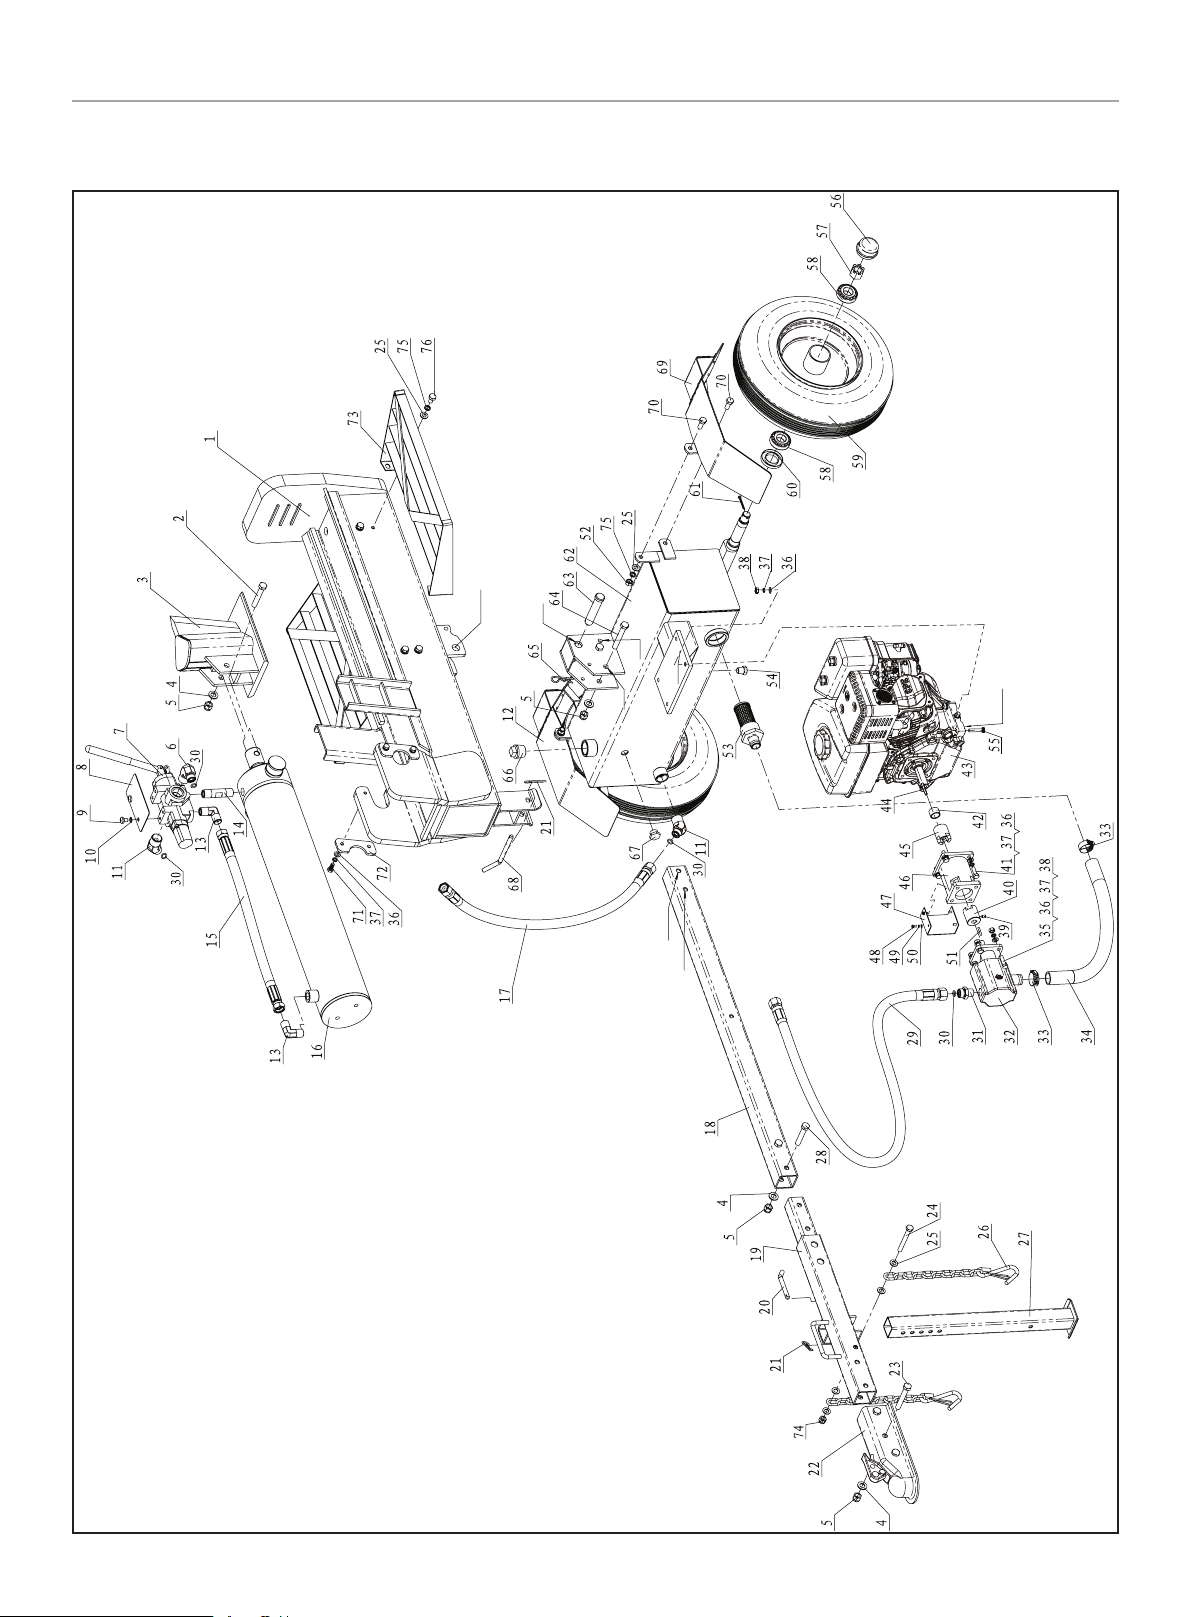
Parts Diagram
SPECIFICATIONS
(A)
(B)
TO(E)
TO(A)
(E)
(C)
(D)
(F)
TO(F)
TO(D)
TO(C)
TO(B)
28
Page 29
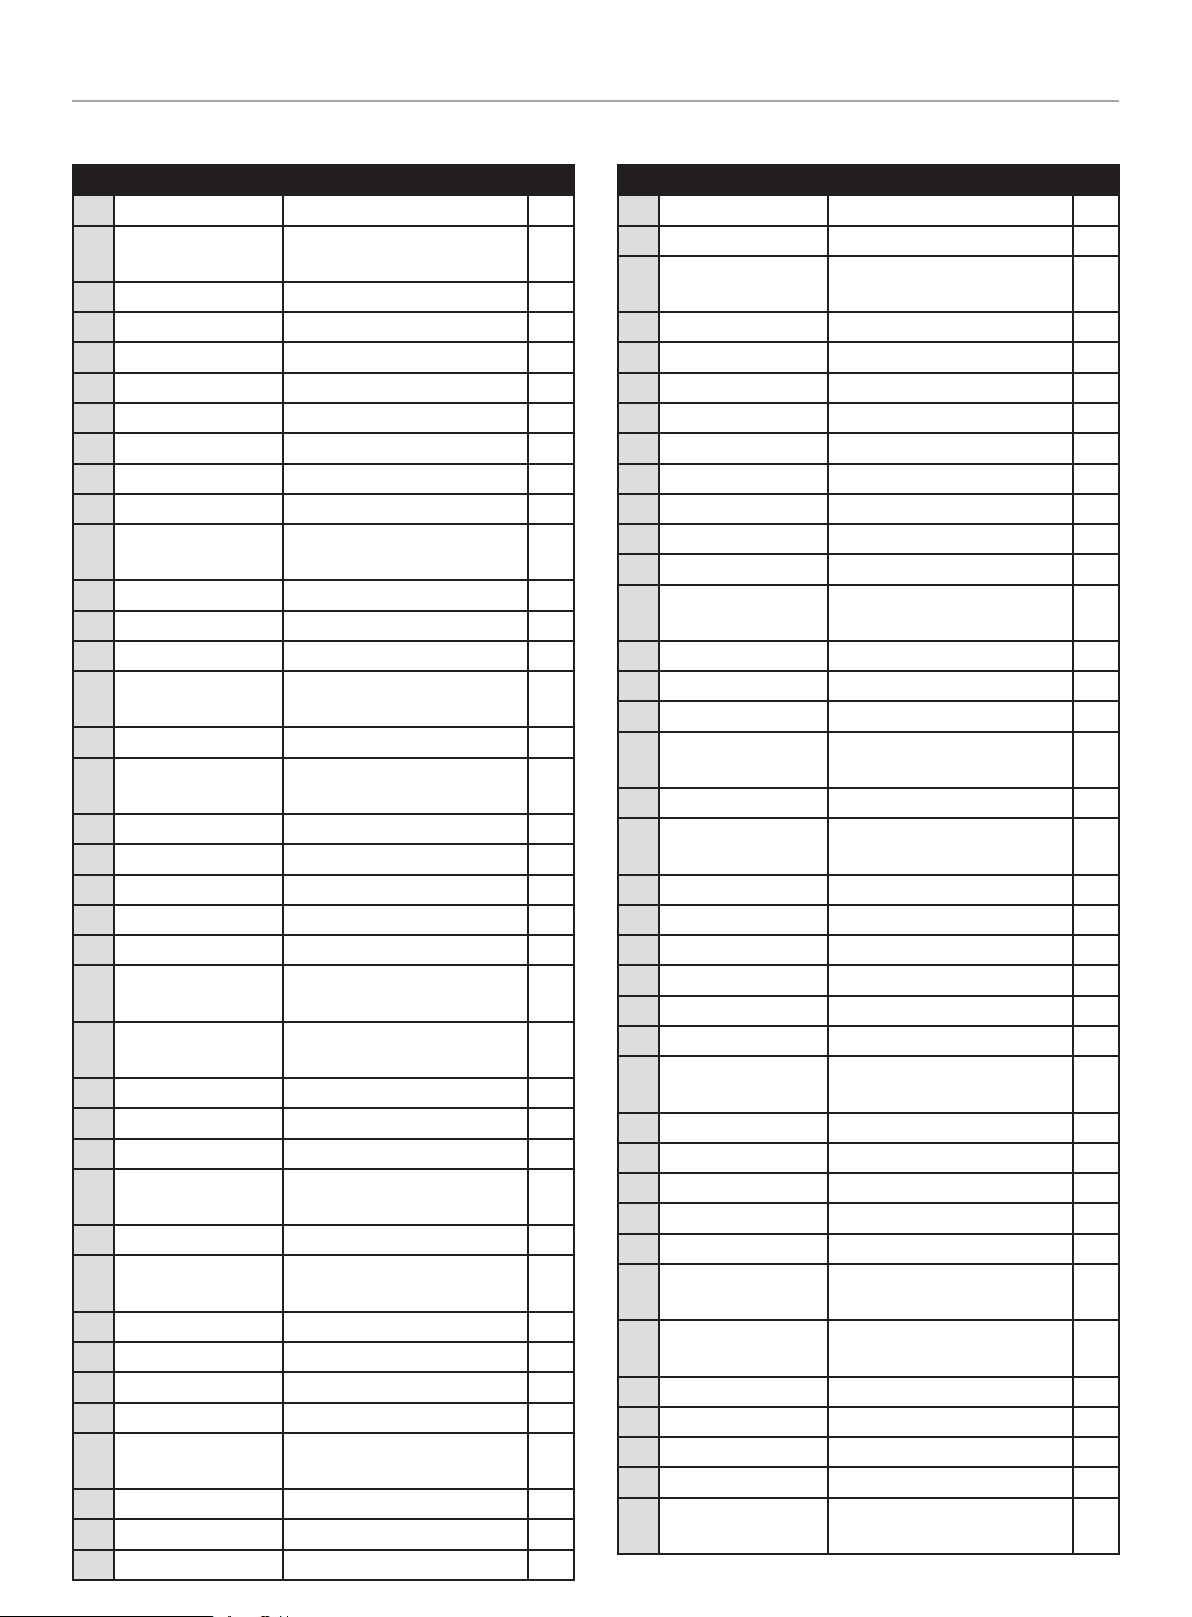
92750-1 - 27 TON LOG SPLITTER
Parts List
SPECIFICATIONS
# Part Number Description Qty
1 PMJ27-02-00 Beam 1
G5782-
2
2000-M12-75
3 PMJ22J-04-00 Wedge Slide 1
4 G95-2000-12 Washer Ø12 7
5 G889.1-2000-M12 Lock Nut M12 7
6 PMJ20J-16 Control Valve "IN" Connector 1
7 PMJ22J-12 Control Valve 1
8 PMJ22J-19 Plate 1
9 G818-2000-M8-12 Bolt M8x12 2
10 G859-19 87-8 Washer Ø8 2
11 PM J20 J -17
12 PMJ22G-34-00 Left Fender 1
13 PMJ7-15 Right Angle Joiner 2
14 PMJ7-22 Through Joiner 1
15 PMJ30-16A
16 PMJ30-08A-00 Cylinder 1
17 PMJ20J-15
18 PMJ22J-06 Bas e Tube 1
19 PMJ23-01-00 Base Connector 1
20 PMJ22J-10 Pin 1
21 PMJ22G-30 R Pin 2
22 PMJ22G-40 2-in. Coupler 1
G5782-
23
2000-M12-80
G5782-
24
2000-M10-85
25 G95-2000-10 Washer Ø10 16
26 PMJ25M-18-00 Safety Chain With Hook 2
27 PMJ22J-07-00 Front Support Leg 1
G5782-
28
2000-M12-65
29 PMJ20J-18 Hydraulic Hose(Valve-Pump) 1
G3452.1-9 2-10 -
30
2.65
31 PMJ22G-21 Outlet Connector Of Pump 1
32 PMJ22J-14 Gear Pump 1
33 J8870-1999 -d32 Clamp d32 2
34 PMJ22G-17 Oil Pipe 1
G5783-
35
2000-M8×30
36 G95-2000-8 Washer Ø8 16
37 G93-1987-8 Lock Washer Ø8 16
38 G6170-2000-M8 Nut M8 8
Bolt M12x75(12.9) 1
Control Valve "OUT"
Connector
Hydraulic Hose( ValveCylinder)
Hydraulic Hose( Valve-Oil
Tank)
Bolt M12x80 2
Bolt M10x85 1
Bolt M12x65 2
"O" Ring Ø10x2.65 4
Bolt M8x30 4
# Part Number Description Qty
39 G77-2000-M6-10 Screw M6x10 1
40 PMJ22G-26 Gear Pump Connector 1
ASME-B18. 2.1-
41
1996-516-24-1
42 PMJ22G-29 Engine Bushing 1
43 27.102 Engine 1
44 G1096-1979-5-36 Flat Key 5x36 1
45 PMJ22G-28 Engine Connector 1
46 PMJ22G-27 Gear Pump Stand 1
47 PMJ22G-32 Connector Cover 1
48 G818-2000-M4-10 Cross Head Screw M4x10 4
2
1
1
49 G848-1985-4 Lock Washer Ø4 4
50 G859-1987-4 Washer Ø4 4
G1096-1979-3.18-
51
25.4
52 G6170-2000-M10 Nut M10 4
53 PMJ22Q-20A Internal Oil Filter 1
54 PMJ22G-19 Oil Plug 1
G5782-
55
2000-M8-45
56 PMJ22J-05-02 Axle Cap 2
G9459-1988 -M20-
57
1.5
58 L44634 LYC DS Tapered Bearing 4
59 PMJ22J-05-03 Wheel 2
60 PMJ22J-05-01 Cased Seal 2
61 G91-2000-4-32 Cotter Pin Ø4x32 2
62 PMJ27-01-00 Oil Tank 1
63 PMJ22G-12 Hinge Pin 1
G5782-
64
2000-M12-85
65 GJY12-3 R Pin 1
66 PMJ22G -18 Screw NPT 1 in. 1
67 G1160.2-89 Oil Scale 1
68 PMJ22J-15 Pin 1
69 PMJ22G-35-00 Right Fender 1
G5781-
70
2000-M10-25
G5783-
71
2000-M8-20
72 PMJ22J-03 Cylinder Fixing Plate 2
73 PMJ30F-01-Y Log Catcher-Yellow 2
74 G889.1-2000-M10 Lock Nut M10 1
75 G93-19 87-10 Lock washer Ø10 12
G5781-
76
2000-M10-15
Bolt 5/16 in.-24x1 in. 4
Flat Key 3.18x25.4 1
Bolt M8x45 4
Slotted Nut M20x1.5 2
Bolt M12x85 2
Bolt M10x25 4
Bolt M8x20 4
Bolt M10x15 8
29
Page 30
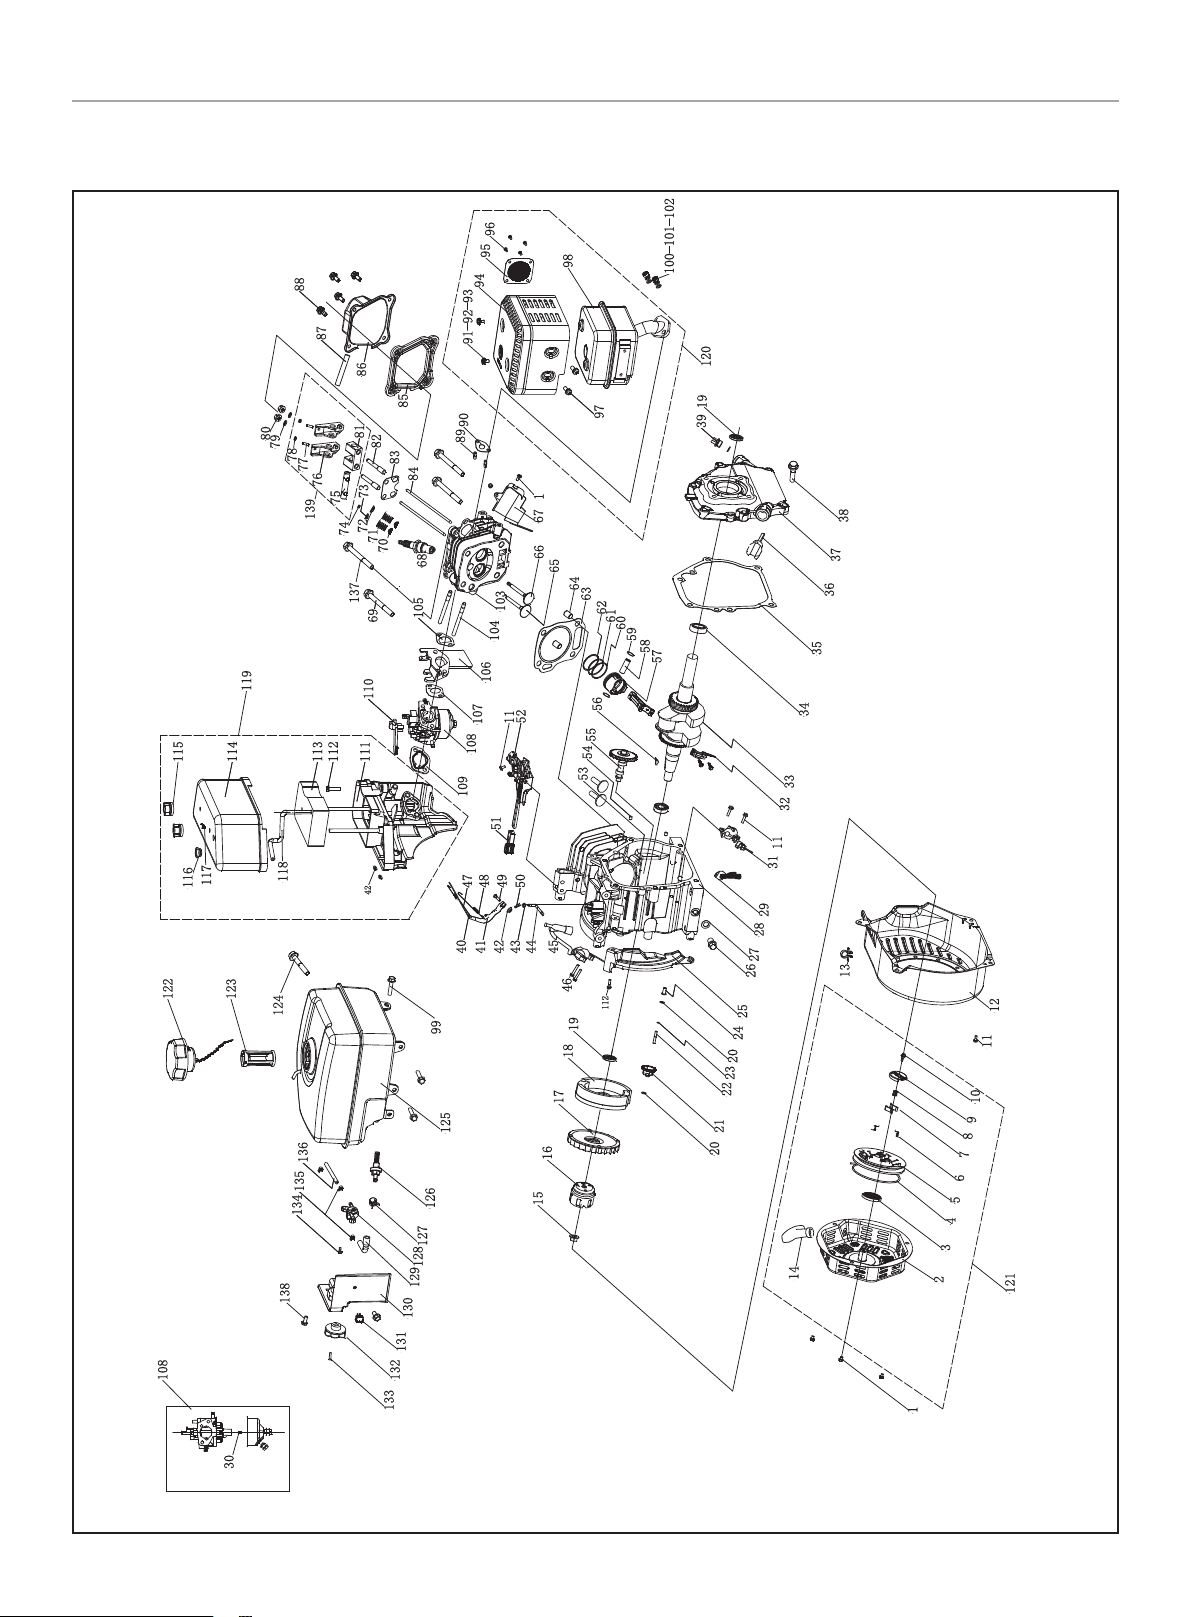
92750-1 - 27 TON LOG SPLITTER
Engine Parts Diagram
88
SPECIFICATIONS
96
95
94
98
100 101 102
87
86
85
80
79
78
119
114
115
117
116
122
108
118
123
124
134
138
81
82
77
76
139
112
113
136
135
83
73
75
72
74
71
70
137
69
110
111
42
131
132
133
84
105
128
129
130
68
99
125
126
127
91 92 93
90
89
103
104
106
52
11
107
108
109
51
474849
50
4041424344
120
97
1
67
66
65
64
63
62
61
60
59
56
55
54
53
45
46
112
19
18
17
16
15
19
39
38
37
36
58
57
27
26
25
24
20
23
22
21
20
35
34
33
32
11
31
29
28
13
12
11
10
9
8
7
6
5
4
3
14
2
1
121
30
30
Page 31

92750-1 - 27 TON LOG SPLITTER
Engine Parts List
SPECIFICATIONS
# Part Number Description Qty
1 1.5789.0608 Flange Bolt M6 × 8 5
2 22.061100.00.1 Recoil Starter Cover, Black 1
3 21.061005.00 Recoil Starter Spring 1
4 2.10. 0 0 3.1 Rope Ø4 × 1550, Black 1
5 21.061001.01 Recoil Starter Reel 1
6 45.060003.00 Spring, Ratchet 2
7 45.060002.00 Starter Ratchet, Steel 2
8 45.060009.00 Spring, Ratchet Guide 1
9 45.060007.00 Ratchet Guide 1
10 45.060008.00 Screw, Ratchet Guide 1
11 1.5789.0612 Flange Bolt M6 × 12 8
12 27.080100.05.48 Fan Cover, Yellow 1
13 2.05.002 Clamp Ø9.5 × 5 1
14 21.061300.00 Handle, Recoil, Soft 1
15 2.02.006 Nut M14 × 1.5 1
16 83.060001.01 Pulley, Starter 1
17 27.080001.00 Cooling Fan 1
18 24.120100.06 Flywheel 1
19 2.11.001 Oil Seal Ø25 × Ø41.3 × 6 2
20 2.03.020.1
21 21.110100.00 Gear, Governor 1
22 21.110013.00 Shaft, Governor Gear 1
23 21.110011.00 Clip, Governor Gear 1
24 21.110012.01 Bushing, Governor Gear 1
25 23.080600.00 Air Guide, Right 1
26 2.08.037
27 2.03.016
28 27.030100.00 Crankcase 1
29 21.120400.01 Diode Assembly 1
27.1310 17.0 4 Standard Main Jet 1
30
27.1310 17.0 4 .0 1 Altitude Main Jet /
31 21.127000.02 Oil Level Sensor 1
32 27.050200.00 Connecting Rod 1
33 27.050100.01 Crankshaft, Q 1
34 1.276.6205 Bearing 6205 2
35 24.030008.00 Gasket, Crankcase Cover 1
36 22.031000.00.48
37 24.030007.00 Cover, Crankcase 1
38 1.5789.0832 Flange Bolt M8 × 32 6
39 22.031000.01.48 Oil Filler Cap, Yellow 1
40 23.110005.01 Spring, Throttle Return 1
41 27.110003.00 Arm, Governor 1
42 1.6177.06 Flange Nut M6 3
43 2.03.021.1
44 21.110001.00 Shaft, Governor Arm 1
45 22.123000.02 Ignition Coil 1
46 1.5789.0625 Flange Bolt M6 × 25 2
Washer Ø6.2 × Ø15 × 0.5,
Black
Drain Bolt M10 × 1.25 ×
25
Washer Ø10 × Ø16 × 1.5,
Drain Bolt
Oil Dipstick Assembly,
Yellow
Washer, Ø6.4 × Ø13 × 1,
Black
# Part Number Description Qty
47 23.110006.00 Rod, Governor 1
48 2 7.1100 0 7.0 1 Spring, Governor 1
49 2.08.040
50 21.110008.00 Pin, Shaft 1
51 24 .1110 08 .01.48
52 24.1110 0 0 .01 Control Assembly 1
53 25.040013.00 Lifter, Valve 2
54 2.04.001 Dowel Pin Ø9 × 14 2
55 27.041000.01 Camshaft 1
56 2 .14. 0 12
57 27.050005.00 Piston 1
58 23.050003.00 Pin, Piston 1
59 2.09.001 Circlip Ø18 × Ø1 2
60 27.050303.00 Ring, Oil 1
61 27.050302.00 Ring, Second Piston 1
62 27.050301.00 Ring, First Piston 1
2
2
2
1
1
63 27.030009.01 Gasket, Cylinder Head 1
64 2.04.003 Dowel Pin Ø10 × 14 2
65 23.040002.02 Valve, Intake 1
66 23.040006.02 Valve, Exhaust 1
67 26.080400.00 Air Guide, Lower 1
68 2.15.002(F6RTC) Spark Plug F6RTC 1
69 1.5789.0865 Flange Bolt M8 × 65 3
70 23.040017.00 Oil Seal, Valve 2
71 21.040003.00 Spring, Valve 2
72 21.040007.00
73 21.040001.00
74 21.040008.00 Rotator, Exhaust Valve 1
75 24.040202.00 Shaft, Rocker Arm 1
76 22.040009.00 Rocker Arm 2
77 22.040012.00 Screw, Valve Adjustment 2
78 21.040021.00 Nut M6 × 0.5, Lock 2
79 1.97.1.06 Washer Ø6 2
80 1.6177.1.0 6 Flange Nut M6 2
81 24.040201.00 Retainer, Rocker Arm 1
82 23.040010.00 Bolt, Rocker Arm 2
83 24.040004.00 Guide Plate, Push Rod 1
84 27.040005.00 Push Rod 2
85 21.020002.01
86 24.021000.00 Cylinder Head Cover 1
87 21.020001.00 Breather Tube 1
88 1.5789.0615 Flange Bolt M6 × 15 4
89 2.01.010 Stud Bolt M8 × 35 2
90 26.100001.00 Gasket, Exhaust Pipe 1
91 1.16 6 74 .0 510 Flange Bolt M5 × 10 2
92 1.848.05 Washer Ø5 2
Bolt M6 × 21, Governor
Arm
Grip Sheath, Speed
Governor, Yellow
Woodruff Key, 4 × 7.5 ×
19
Retainer, Exhaust Valve
Spring
Retainer, Intake Valve
Spring
Gasket, Cylinder Head
Cover
1
1
1
1
1
1
31
Page 32

92750-1 - 27 TON LOG SPLITTER
# Part Number Description Qty
93 1.93.05 Lock Washer Ø5 2
94 24.10 12 0 2.0 0 Muffler Protector 1
95 4 6.101300.05 Spark Arrestor Assembly 1
96 1.818.0406 Screw M4 × 6 4
97 1.9074.4.0510
98 24.101100.00 Muffler 1
99 2 .0 8 .15 4
100 1.6175.08 Nut M8 2
101 1.848.08 Washer Ø8 2
102 1.93.08 Lock Washer Ø8 2
103 26.010100.01 Cylinder Head, 224cc 1
104 2.01.009 Stud Bolt M6 × 110 2
105 24.130002.00 Gasket, Insulator 1
106 23.130001.00 Insulator, Carburetor 1
107 22.130003.00 Gasket, Carburetor 1
27.131000.04
108
27.131000.09
109 21.130004.00 Gasket, Air Cleaner 1
110 21.13010 0.0 0 Choke Handle 1
111 24.091100.01 Base, Air Cleaner 1
112 1.5789.0620 Flange Bolt M6 × 20 2
113 24.091003.02 Element, Air Cleaner 1
114 24.091200.02 Cover, Air Cleaner 1
115 24.091600.01
116 2.12.001 Buffer Ø7.5 × 7.5 1
117 2.06.006 Clamp Ø7 × Ø1 1
118 24.070014.02 Pipe, Reversal Valve 1
119 24.091000.02 Air Cleaner Assembly 1
120 24.101000.00.2 Muffler Assembly 1
121 22.061000.00 Recoil Assembly 1
122 24.070100.02 Cap, Fuel Tank 1
123 81.070301.00 Fuel Filter, Fuel Tank 1
124 2.08.15 6
125 24.071000.01.1 Fuel Tank 1
126 21.070600.03 Fitting, Fuel Tank 1
127 2.06.016 Clamp, Ø8.7 × b8 1
128 24.070400.00 Fuel Valve 1
129 24.070011.01 Pipe, Ø4.5 × (30+30) 1
130 24.070010.00 Veil, Fuel Tank 1
131 5.1010.00 3.3 Ignition Switch, Red 1
132 24.070001.00 Fuel Knob 1
133 1.818.0412 Bolt M4 × 12 1
134 1.16674.0 512 . 2 Flange Bolt M5 × 12 1
135 2.06.007 Clamp Ø8 × b6 3
136 24.070011.00 Pipe, Ø4.5 × Ø9.5 × 230 1
137 2.08.12 1 Flange Bolt M10 × 65 1
138 1.5789.0612.3
139 24.040200.00 Rocker Arm Assembly 1
Screw/Washer Assembly
M5 × 10
Flange Bolt Assembly M6
× 20
Carburetor 1
Screw Cap, Air Clean
Cover
Flange Bolt Assembly M6
× 33
Flange Bolt M6 × 12,
Green
SPECIFICATIONS
2
3
2
1
2
32
Page 33
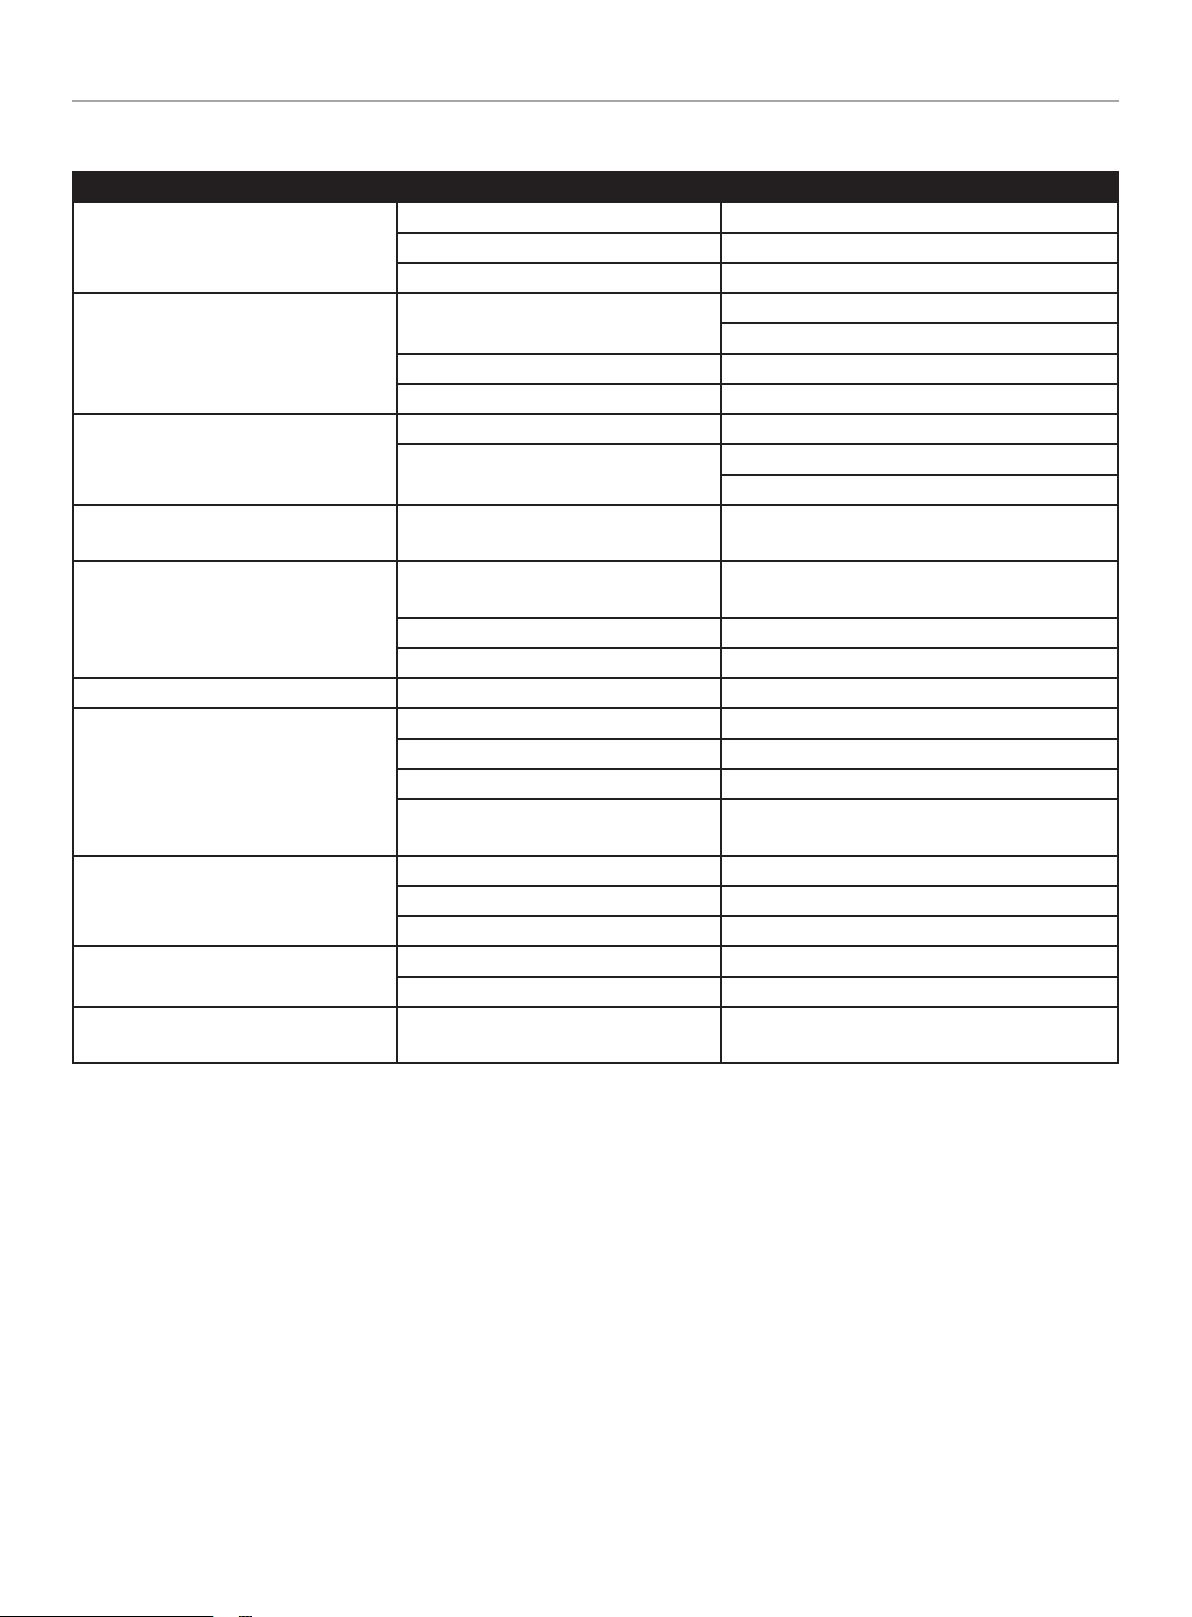
92750-1 - 27 TON LOG SPLITTER
TROUBLESHOOTING
TROUBLESHOOTING
Problem Cause Solution
No fuel Add fuel
Engine will not start
Engine starts but runs roughly
Engine shuts down during operation
Engine cannot supply enough power or
overheating
Wedge movement is slow or erratic
Oil leak from hose connection Loose hose clamp or hydraulic fitting Tighten hose clamp or hydraulic fitting
Oil leak from cylinder
Wedge will not extend or retract
Wedge does not Auto-Return
Excessive bouncing while towing Under-inflated tires
Faulty spark plug Replace spark plug
Unit loaded during startup Remove load from unit
Low oil level
Choke in the wrong position Adjust choke
Spark plug wire loose Attach wire to spark plug
Out of fuel Fill fuel tank
Low oil level
Insufficient ventilation
Air in the hydraulic oil system
Debris lodged in beam guides Clear debris from beam
Low hydraulic oil Check oil level and add as needed
Faulty cylinder rod seal Contact Customer Service
Scored or bent cylinder rod Contact Customer Service
Loose hydraulic fitting Tighten hydraulic fitting
Faulty combination washer seal on
cylinder hydraulic fitting
Faulty control valve Contact Customer Service
Faulty hydraulic pump Contact Customer Service
Low hydraulic oil Check oil level and add as needed
Low hydraulic oil Check oil level and add as needed
Faulty control valve Contact Customer Service
Fill crankcase to the proper level
Place log splitter on a flat, level surface
Fill crankcase to the proper level
Place log splitter on a flat, level surface
Check for air restriction. Move to a well ventilated
area
Purge air by extending and retracting the wedge
several times until motion is smooth
Contact Customer Service
Inflate tires to proper pressure. Refer to tire
sidewall
For further technical support:
Technical Support Team
Mon-Fri 8:30 AM-5:00 PM (PST/PDT)
Toll Free 1-877-338-0999
[email protected]
33
Page 34

92750-1 - 27 TON LOG SPLITTER
WARRANTY*
WARRANTY*
CHAMPION POWER EQUIPMENT
2 YEAR LIMITED WARRANTY
Warranty Qualifications
To register your product for warranty and FREE lifetime call center
technical support please visit:
https://www.championpowerequipment.com/register
To complete registration you will need to include a copy of the
purchase receipt as proof of original purchase. Proof of purchase
is required for warranty service. Please register within ten (10)
days from date of purchase.
Repair/Replacement Warranty
CPE warrants to the original purchaser that the mechanical and
electrical components will be free of defects in material and
workmanship for a period of two years (parts and labor) from
the original date of purchase and 180 days (parts and labor) for
commercial and industrial use. Transportation charges on product
submitted for repair or replacement under this warranty are the
sole responsibility of the purchaser. This warranty only applies to
the original purchaser and is not transferable.
Do Not Return The Unit To The Place Of
Purchase
Contact CPE’s Technical Service and CPE will troubleshoot any
issue via phone or e-mail. If the problem is not corrected by
this method, CPE will, at its option, authorize evaluation, repair
or replacement of the defective part or component at a CPE
Service Center. CPE will provide you with a case number for
warranty service. Please keep it for future reference. Repairs or
replacements without prior authorization, or at an unauthorized
repair facility, will not be covered by this warranty.
Warranty Exclusions
This warranty does not cover the following repairs and equipment:
Normal Wear
Products with mechanical and electrical components need
periodic parts and service to perform well. This warranty does not
cover repair when normal use has exhausted the life of a part or
the equipment.
Installation, Use and Maintenance
This warranty will not apply to parts and/or labor if the product is
deemed to have been misused, neglected, involved in an accident,
abused, loaded beyond the product’s limits, modified, installed
improperly or connected incorrectly to any electrical component.
Normal maintenance is not covered by this warranty and is not
required to be performed at a facility or by a person authorized by
CPE.
Other Exclusions
This warranty excludes:
– Cosmetic defects such as paint, decals, etc.
– Wear items such as filter elements, o-rings, etc.
– Accessory parts such as hoses, storage covers, etc.
– Failures due to acts of God and other force majeure events
beyond the manufacturer’s control.
– Problems caused by parts that are not original Champion
Power Equipment parts.
Limits of Implied Warranty and
Consequential Damage
Champion Power Equipment disclaims any obligation to cover
any loss of time, use of this product, freight, or any incidental
or consequential claim by anyone from using this product.
THIS WARRANTY AND THE ATTACHED U.S. EPA and/or CARB
EMISSION CONTROL SYSTEM WARRANTIES (WHEN APPLICABLE)
ARE IN LIEU OF ALL OTHER WARRANTIES, EXPRESS OR IMPLIED,
INCLUDING WARRANTIES OF MERCHANTABILITY OR FITNESS
FOR A PARTICULAR PURPOSE.
This warranty gives you certain legal rights which may change
from state to state or province to province. Your state or province
may also have other rights you may be entitled to that are not
listed within this warranty.
Contact Information
Address
Champion Power Equipment, Inc.
12039 Smith Ave.
Santa Fe Springs, CA 90670 USA
www.championpowerequipment.com
Customer Service
Mon – Fri 8:30 AM – 5:00 PM (PST/PDT)
Toll Free: 1-877-338-0999
[email protected]
Fax no.: 1-562-236-9429
Technical Service
Mon – Fri 8:30 AM – 5:00 PM (PST/PDT)
Toll Free: 1-877-338-0999
[email protected]
24/7 Tech Support: 1-562-204-1188
*Except as other wise stipulated in any of the following enclosed Emission Control System Warranties (when applicable) for the Emission Control System: U.S. Environment
Protection Agency (EPA) and/or California A ir Resources Board (CAR B).
34
Page 35

CHAMPION POWER EQUIPMENT, INC. (CPE),
THE UNITED STATES ENVIRONMENT PROTECTION AGENCY (U.S. EPA)
EMISSION CONTROL SYSTEM WARRANTY
Your Champion Power Equipment (CPE) engine complies with U.S. EPA emission regulations.
YOUR WARRANTY RIGHTS AND OBLIGATIONS:
The US EPA AND CPE are pleased to explain the Federal Emission Control Systems Warranty on your 2019 small off-road engine (SORE)
and engine powered equipment. New engines and equipment must be designed, built and equipped, at the time of sale, to meet U.S.
EPA regulations for small off-road engines (SORE). CPE warrants the emission control system on your small off-road engine (SORE)
and equipment for the period of time listed below, provided there has been no abuse, neglect, unapproved modification, or improper
maintenance of your equipment.
Your emission control system may include parts such as the carburetor, fuel-injection system, the ignition system, catalytic converter and
fuel lines. Also included may be hoses, belts, connectors and other emission related assemblies. Where a warrantable condition exits, CPE
will repair your small off-road engine (SORE) at no cost to you including diagnosis, parts and labor.
MANUFACTURER’S EMISSION CONTROL SYSTEM WARRANTY COVERAGE:
This emission control system is warranted for two years, subject to provisions set forth below. If, during the warranty period, an emission
related part on your engine is defective in materials or workmanship, the part will be repaired or replaced by CPE.
OWNER WARRANTY RESPONSIBILITIES:
As the small off-road engine (SORE) owner, you are responsible for the performance of the required maintenance listed in your Owner’s
Manual. CPE recommends that you retain all your receipts covering maintenance on your small off-road engine (SORE), but CPE cannot
deny warranty solely for the lack of receipts or for your failure to ensure the performance of all scheduled maintenance.
As the small off-road engine (SORE) owner, you should however be aware that CPE may deny you warranty coverage if your small, off-road
engine (SORE) or a part has failed due to abuse, neglect, improper maintenance or unapproved modifications.
You are responsible for presenting your small off-road engine (SORE) to an Authorized CPE service outlet or alternate service outlet as
described in (3)(f.) below, CPE dealer or CPE, Santa Fe Springs, Ca. as soon as a problem exists. The warranty repairs should be completed
in a reasonable amount of time, not to exceed 30 days.
If you have any questions regarding your warranty rights and responsibilities, you should contact:
Champion Power Equipment, Inc.
Customer Service
12039 Smith Ave.
Santa Fe Springs, CA 90670
1-877-338-0999
Page 36

EMISSION CONTROL SYSTEM WARRANTY
The following are specific provisions relative to your Emission Control System (ECS) Warranty Coverage.
1. APPLICABILITY: This warranty shall apply to 1997 and later model year small off-road engines (SORE). The ECS Warranty Period shall
begin on the date the new engine or equipment is delivered to its original, end-use purchaser, and shall continue for 24 consecutive
months thereafter.
2. GENERAL EMISSIONS WARRANTY COVERAGE
CPE warrants to the original, end-use purchaser of the new engine or equipment and to each subsequent purchaser that each of its
small off-road engines (SORE) is:
2a. Designed, built and equipped so as to conform to U.S. EPA emissions standards for spark-ignited engines at or below 19 kilowatts.
2b. Free from defects in materials and workmanship that cause the failure of a warranted part to be identical in all material respects
to the part as described in the engine manufacturer’s application for certification for a period of two years.
3. THE WARRANTY ON EMISSION-RELATED PARTS WILL BE INTERPRETED AS FOLLOWS:
3a. Any warranted part that is not scheduled for replacement as required maintenance in the Owners Manual shall be warranted for
the ECS Warranty Period. If any such part fails during the ECS Warranty Period, it shall be repaired or replaced by CPE according
to Subsection “d” below. Any such part repaired or replaced under the ECS Warranty shall be warranted for any remainder of the
ECS Warranty Period.
3b. Any warranted, emissions-related part which is scheduled only for regular inspection as specified in the Owners Manual shall be
warranted for the ECS Warranty Period. A statement in such written instructions to the effect of “repair or replace as necessary”,
shall not reduce the ECS Warranty Period. Any such part repaired or replaced under the ECS Warranty shall be warranted for the
remainder of the ECS Warranty Period.
3c. Any warranted, emissions-related part which is scheduled for replacement as required maintenance in the Owner’s Manual shall
be warranted for the period of time prior to the first scheduled replacement point for that part. If the part fails prior to the first
scheduled replacement, the part shall be repaired or replaced by CPE according to Subsection “d” below. Any such emissionsrelated part repaired or replaced under the ECS Warranty, shall be warranted for the remainder of the ECS Warranty Period prior to
the first scheduled replacement point for such emissions-related part.
3d. Repair or replacement of any warranted, emissions-related part under this ECS Warranty shall be performed at no charge to the
owner at a CPE Authorized Service Outlet.
3e. The owner shall not be charged for diagnostic labor which leads to the determination that a part covered by the ECS Warranty is in
fact defective, provided that such diagnostic work is performed at a CPE Authorized Service Outlet.
3f. CPE shall pay for covered emissions warranty repairs at non-authorized service outlets under the following circumstances:
i. The service is required in a population center with a population over 100,000 according to U.S. Census 2000 without a CPE
Authorized Service Outlet AND
ii. The service is required more than 100 miles from a CPE Authorized Service Outlet. The 100 mile limitation does not apply in the
following states: Alaska, Arizona, Colorado, Hawaii, Idaho, Montana, Nebraska, Nevada, New Mexico, Oregon, Texas, Utah and
Wyoming.
3g. CPE shall be liable for damages to other original engine components or approved modifications proximately caused by a failure
under warranty of an emission-related part covered by the ECS Warranty.
3h. Throughout the ECS Warranty Period, CPE shall maintain a supply of warranted emission-related parts sufficient to meet the
expected demand for such emission-related parts.
3i. Any CPE Authorized and approved emission-related replacement part may be used in the performance of any ECS Warranty
maintenance or repair and will be provided without charge to the owner. Such use shall not reduce CPE’s warranty obligation.
3j. Unapproved add-on or modified parts may not be used to modify or repair a CPE engine. Such use voids this ECS Warranty and
shall be sufficient grounds for disallowing an ECS Warranty claim. CPE shall not be liable hereunder for failures of any warranted
parts of a CPE engine caused by the use of such an unapproved add-on or modified part.
Page 37

EMISSION-RELATED PARTS INCLUDE THE FOLLOWING: (using those portions of the list
applicable to the engine)
Systems covered by this
warranty
Fuel Metering System Fuel regulator, Carburetor and internal parts
Air Induction System Air cleaner, Intake manifold
Ignition System Spark plug and parts, Magneto ignition system
Exhaust System Exhaust manifold, catalytic converter
Miscellaneous Parts Tubing, Fittings, Seals, Gaskets, and Clamps associated with these listed systems.
Evaporative Emissions Fuel Tank, Fuel Cap, Fuel Line (for liquid fuel and fuel vapors), Fuel Line Fittings, Clamps, Pressure
Relief Valves, Control Valves, Control Solenoids, Electronic Controls, Vacuum Control Diaphragms,
Control Cables, Control Linkages, Purge Valves, Gaskets, Vapor Hoses, Liquid/Vapor Separator,
Carbon Canister, Canister Mounting Brackets, Carburetor Purge Port Connector
Parts Description
TO OBTAIN WARRANTY SERVICE:
You must take your CPE engine or the product on which it is installed, along with your warranty registration card or other proof of original
purchase date, at your expense, to any Champion Power Equipment dealer who is authorized by Champion Power Equipment, Inc. to
sell and service that CPE product during his normal business hours. Alternate service locations defined in Section (3)(f.) above must be
approved by CPE prior to service. Claims for repair or adjustment found to be caused solely by defects in material or workmanship will not
be denied because the engine was not properly maintained and used.
If you have any questions regarding your warranty rights and responsibilities, or to obtain warranty service, please write or call
Customer Service at Champion Power Equipment, Inc.
Champion Power Equipment, Inc.
12039 Smith Ave.
Santa Fe Springs, CA 90670
1-877-338-0999
Attn.: Customer Service
 Loading...