

Page 1
OWNER’S MANUAL & OPERATING INSTRUCTIONS
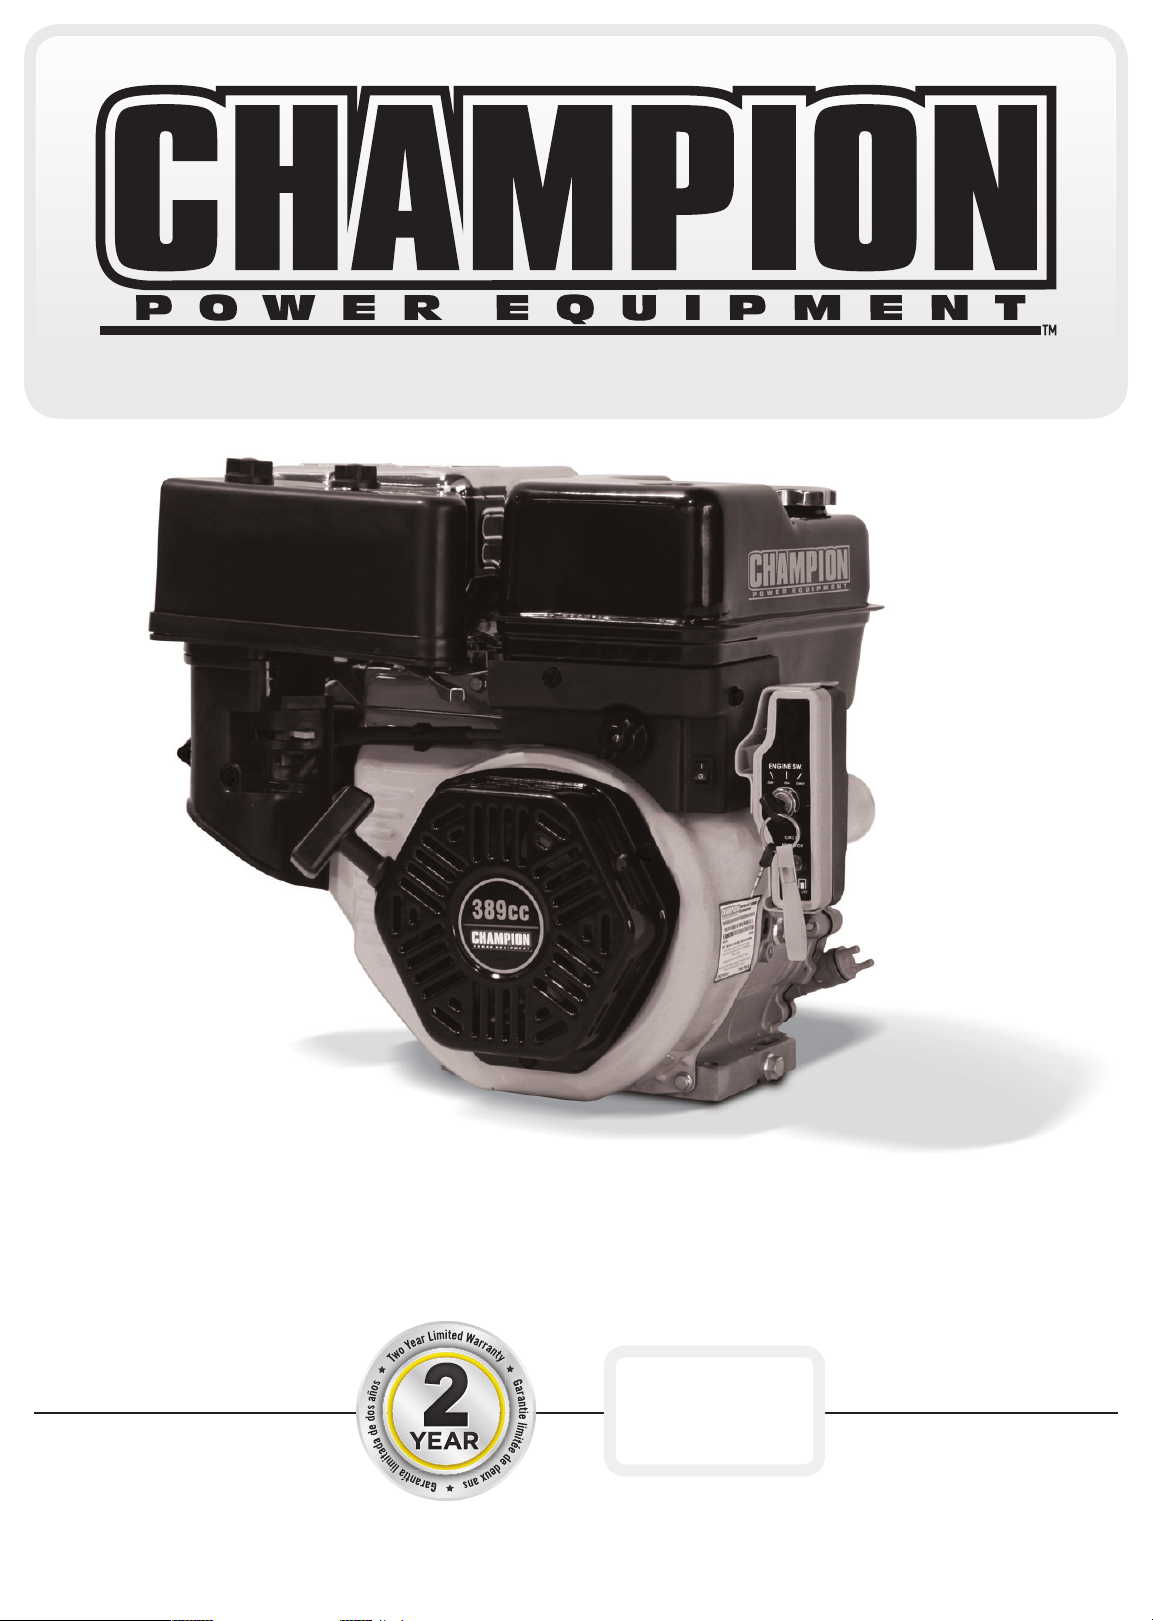
389cc
REPLACEMENT ENGINE
MODEL NUMBER
61301
10006 Santa Fe Springs Road
SAVE THESE INSTRUCTIONS
Important Safety Instructions
are included in this manual.
MADE IN CHINA
REV 61301-20110629
www.championpowerequipment.com
Santa Fe Springs CA 90670
USA / 1-877-338-0999
Page 2

Have questions or need assistance?
Do not return this product to the store!
WE ARE HERE TO HELP!
Visit our website:
www.championpowerequipment.com
for more info:
• Product Info & Updates
• Frequently Asked Questions
– or –
Call our Customer Care Team Toll-Free at:
• Tech Bulletins
• Product Registration
1-877-338-0999
Page 3
TABLE OF CONTENTS
61301
389cc
REPLACEMENT ENGINE
Introduction ............................ 1
Introduction .......................... 1
Replacement Engine .................... 1
Accessories .......................... 1
This Booklet .......................... 1
Manual Conventions ....................... 2
Safety Rules ............................ 3
Controls and Features ..................... 5
Replacement Engine .................... 5
Parts Included ........................ 5
Assembly .............................. 6
Add Engine Oil ........................ 6
Add Engine Fuel ....................... 6
Connect Battery (not included) ............. 6
Operation .............................. 7
Engine Location ....................... 7
Starting the Engine ..................... 7
Stopping the Engine .................... 7
Maintenance and Storage ................... 8
Engine Maintenance .................... 8
Oil .............................. 8
Spark Plugs ........................ 8
Air Filter .......................... 8
Cleaning .......................... 8
Adjustments ........................ 9
Maintenance Schedule ................. 9
Storage ............................. 9
Engine Storage ...................... 9
Troubleshooting ......................... 10
Specifications .......................... 11
Engine Specifications .................. 11
Fuel .............................. 11
Oil ............................... 11
Spark Plugs ......................... 11
Valve Clearance ....................... 11
Keyway Shaft ........................ 11
Dimensions ......................... 12
Parts Diagram ........................ 13
Parts List ........................... 14
Warranty ............................. 15
Warranty Qualifications ................. 15
Repair/Replacement Warranty ............. 15
Do Not Return The Unit To The
Place Of Purchase ..................... 15
Warranty Exclusions. . . . . . . . . . . . . . . . . . . . 15
Normal Wear ...................... 15
Installation, Use and Maintenance ........ 15
Other Exclusions .................... 15
Limits of Implied Warranty and Consequential
Damage .......................... 15
Contact Information .................... 15
Address .......................... 15
Customer Service ................... 15
Technical Service ................... 15
Page 4

INTRODUCTION
ENGLISH 61301
Introduction
Congratulations on your purchase of a Champion Power
Equipment engine. CPE designs and builds engines to
strict specifications. With proper use and maintenance,
this engine will bring years of satisfying service.
Replacement Engine
This unit is a gasoline driven, key-way shaft
replacement engine. It is designed to supply power for
air compressors, pumps, pressure washers, reel-type
lawn mowers, go-carts, agricultural and construction
equipment and other pulley-style applications.
Record the model and serial numbers as well as date and place of purchase for future reference. Have this information
available when ordering parts and when making technical or warranty inquiries.
Accessories
Champion Power Equipment manufactures and sells
accessories designed to help you get the most from your
purchase. To find out more, please visit our web site at:
www.championpowerequipment.com
This Booklet
Every effort has been made to ensure the accuracy and
completeness of the information in this manual. We reserve
the right to change, alter and/or improve the product and
this document at any time without prior notice.
Champion Power Equipment Support
1-877-338-0999
Model Number
61301
Serial Number
Date of Purchase
Purchase Location
For Oil Type see “Add Engine Oil” section. For Fuel Type see “Add Fuel” section.
1 REV 61301-20110629
Page 5
61301 ENGLISH
MANUAL CONVENTIONS
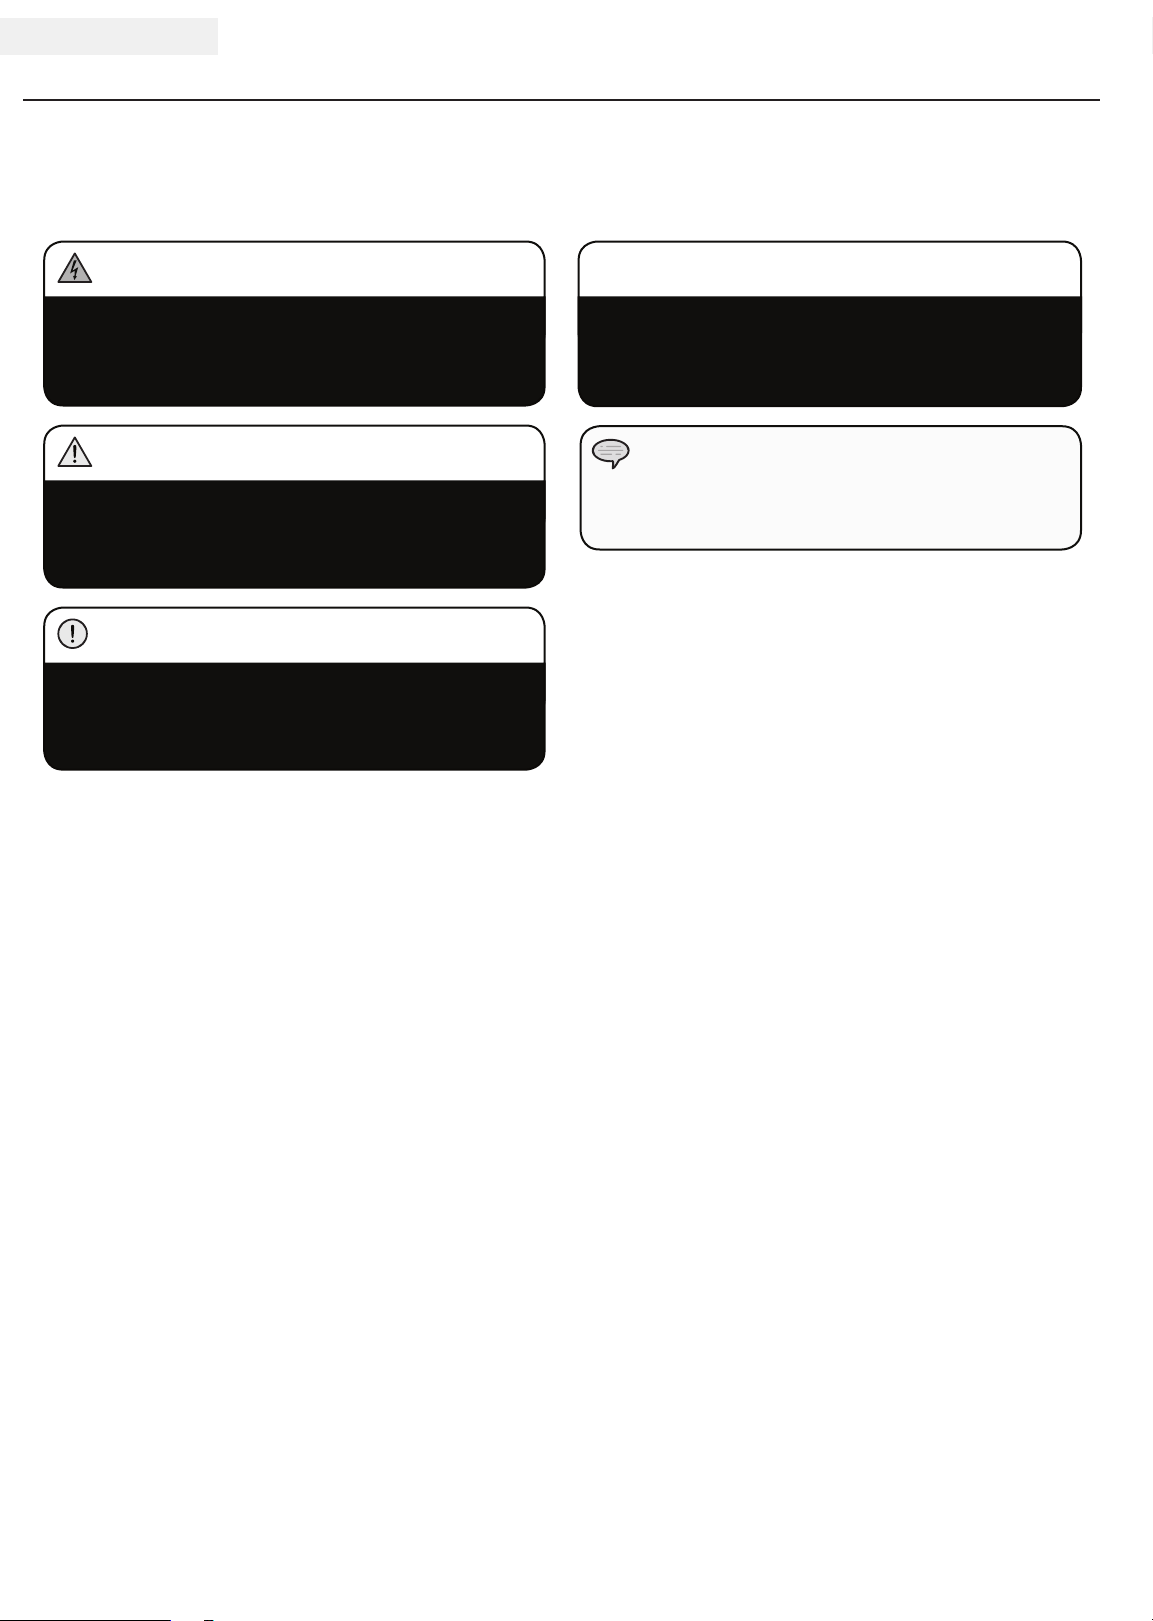
This manual uses the following symbols to help differentiate between different kinds of information. The safety symbol
is used with a key word to alert you to potential hazards in operating and owning power equipment.
Follow all safety messages to avoid or reduce the risk of serious injury or death.
DANGER
DANGER indicates an imminently hazardous
situation which, if not avoided, will result in death
or serious injury.
WARNING
WARNING indicates a potentially hazardous
situation which, if not avoided, could result in
death or serious injury.
CAUTION
CAUTION indicates a potentially hazardous
situation which, if not avoided, may result in minor
or moderate injury.
CAUTION
CAUTION used without the safety alert symbol
indicates a potentially hazardous situation which, if
not avoided, may result in property damage.
NOTE
If you have questions regarding your engine, we can
help. Please call our help line at 1-877-338-0999
REV 61301-20110629 2
Page 6
SAFETY RULES
ENGLISH 61301
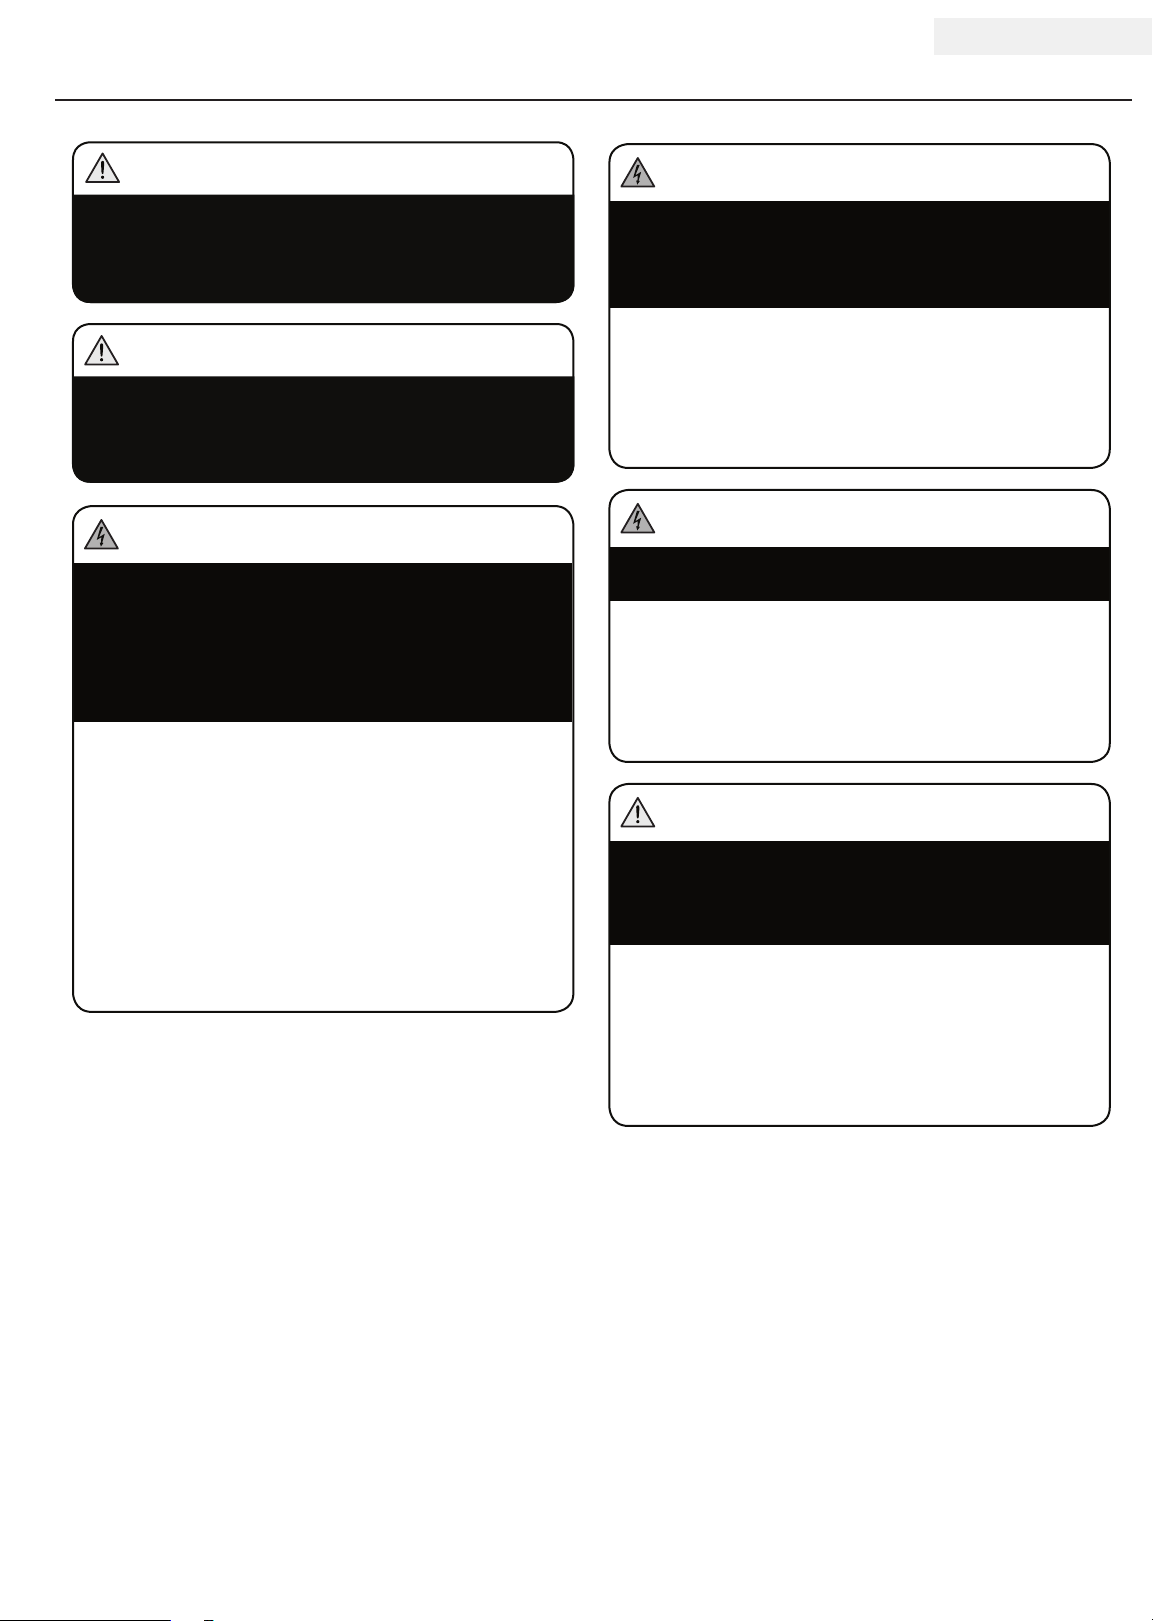
WARNING
Read this manual thoroughly before operating your
engine. Failure to follow instructions could result in
serious injury or death.
WARNING
The engine exhaust from this product contains
chemicals known to the state of California to cause
cancer, birth defects, or other reproductive harm.
DANGER
Engine exhaust contains carbon monoxide, a
colorless, odorless, poison gas. Breathing carbon
monoxide will cause nausea, dizziness, fainting or
death. If you start to feel dizzy or weak, get to fresh
air immediately.
Operate engine outdoors only in a well ventilated
area DO NOT operate the engine inside any
building, including garages, basements,
crawlspaces and sheds, enclosure or compartment,
including the engine compartment of a recreational
vehicle. DO NOT allow exhaust fumes to enter a
confined area through windows, doors, vents or
other openings. DANGER CARBON MONOXIDE,
using an engine indoors CAN KILL YOU IN
MINUTES.
DANGER
Rotating parts can entangle hands, feet, hair,
clothing and/or accessories. Traumatic amputation or
severe laceration can result.
Keep hands and feet away from rotating parts. Tie up
long hair and remove jewelry. Operate equipment with
guards in place. DO NOT wear loose-fitting clothing,
dangling drawstrings or items that could become
caught.
DANGER
Sparks can result in fire or electrical shock.
When servicing the engine:
Disconnect the spark plug wire and place it where
it cannot contact the plug. DO NOT check for spark
with the plug removed. Use only approved spark
plug testers.
WARNING
Running engines produce heat. Severe burns can
occur on contact. Combustible material can catch
fire on contact.
DO NOT touch hot surfaces. Avoid contact with
hot exhaust gases. Allow equipment to cool before
touching. Maintain at least three feet of clearance
on all sides to ensure adequate cooling. Maintain
at least five feet of clearance from combustible
materials.
3 REV 61301-20110629
Page 7
61301 ENGLISH
SAFETY RULES
WARNING
Rapid retraction of the starter cord will pull hand and
arm towards the engine faster than you can let go.
Unintentional startup can result in entanglement,
traumatic amputation or laceration.
Broken bones, fractures, bruises or sprains could
result.
When starting engine, pull the starter cord slowly
until resistance is felt and then pull rapidly to avoid
kickback.
CAUTION
Improper treatment or use of the engine can damage
it, shorten its life and void your warranty.
Use the engine only for intended uses. Operate
only on level surfaces. DO NOT expose engine to
excessive moisture, dust, or dirt.
DO NOT allow any material to block the cooling
slots. DO NOT use the engine if:
– Equipment sparks, smokes or emits flames
– Equipment vibrates excessively
DANGER
Fuel and fuel vapors are highly flammable and
extremely explosive.
Fire or explosion can cause severe burns or death.
Unintentional startup can result in entanglement,
traumatic amputation or laceration.
When adding or removing fuel:
Turn the engine off and let it cool for at least two
minutes before removing the fuel cap. Loosen the
cap slowly to relieve pressure in the tank. Only fill
or drain fuel outdoors in a well-ventilated area.
DO NOT overfill the fuel tank. Always keep fuel
away from sparks, open flames, pilot lights, heat
and other sources of ignition. DO NOT light or
smoke cigarettes.
When starting the engine:
DO NOT attempt to start a damaged engine. Make
certain that the gas cap, air filter, spark plug,
fuel lines and exhaust system are properly in
place. Allow spilled fuel to evaporate fully before
attempting to start the engine.
Make certain that the engine is resting firmly on
level ground.
When transporting or servicing the engine:
Make certain that the fuel shutoff valve is in the off
position and the fuel tank is empty. Disconnect the
spark plug wire.
When storing the engine:
Store away from sparks, open flames, pilot lights,
heat and other sources of ignition.
REV 61301-20110629 4
Page 8
ENGLISH 61301
CONTROLS AND FEATURES
Read this owner’s manual before operating your engine. Familiarize yourself with the location and function of the
controls and features. Save this manual for future reference.
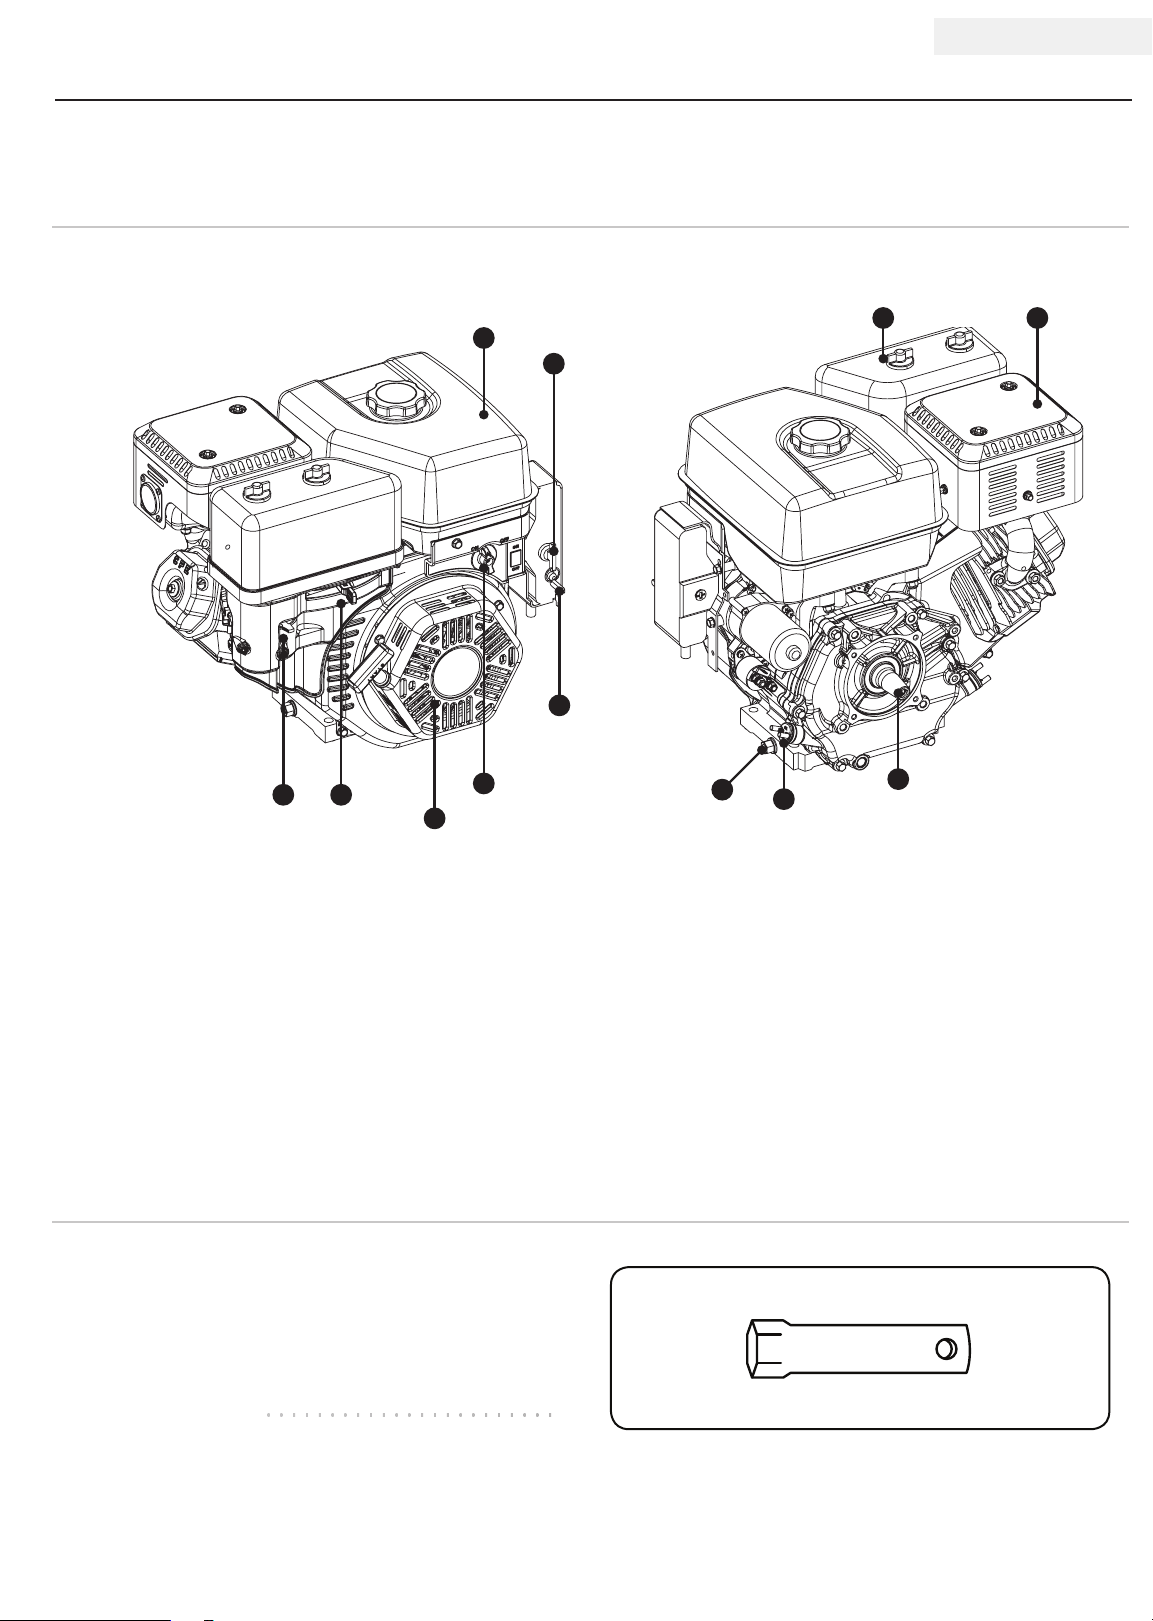
Replacement Engine
8 9
1
2
67
(1) Fuel Tank – 1.8 (6.8 L) gallon capacity fuel tank.
(2) Ignition Switch
(3) Circuit Breaker – Protects the ignition switch from
electrical overload.
(4) Fuel Valve Knob – Turn this valve to the “On”
position to supply fuel to the engine.
(5) Recoil Starter – Used to start the engine.
(6) Throttle – Controls the engine speed.
(7) Choke Lever – Used to start the engine.
4
5
Parts Included
3
12
(8) Air Cleaner – Protects the engine by filtering dust
and debris from the intake air.
(9) Muffler
(10) Crank Shaft
(11) Oil Filler Cap – Check and fill engineoil level.
(12) Oil Drain – Check and fill engine oil level.
11
10
Your 61301 Gasoline Powered Engine ships with the
following parts:
Other
– Spark Plug Socket ....................... 1
5 REV 61301-20110629
Page 9
61301 ENGLISH
ASSEMBLY
This unit ships from our factory without oil. It must be
properly serviced with fuel and oil before operation.
Add Engine Oil
CAUTION
DO NOT attempt to crank or start the engine before
it has been properly filled with the recommended
type and amount of oil. Damage to the engine as a
result of failure to follow these instructions will void
your warranty.
1. Place the engine on a flat, level surface.
2. Remove oil fill cap/dipstick to add oil.
3. Add 1.16 qt (1.1 L) or less of oil (SAE10W-30) and
replace oil fill cap/dipstick.
4. Check engine oil level daily and add as needed.
CAUTION
The engine is equipped with a low-oil-shutoff and
the will stop when the oil level in the crankcase
falls below the threshold level.
Add Engine Fuel
1. Use clean, fresh, regular unleaded fuel with a
minimum octane rating of 85 and an ethanol content
of less than 10% by volume.
2. DO NOT mix oil with fuel.
3. Clean the area around the fuel cap.
4. Remove the fuel cap.
5. Slowly add fuel to the tank. DO NOT overfill. Allow
approximately ¼ inch of space for fuel expansion.
6. Screw on the fuel cap and wipe away any spilled fuel.
CAUTION
Use regular unleaded gasoline with a minimum
octane rating of 85.
Do not mix oil and gasoline.
Fill tank to approximately ¼ inch below the top of
the tank to allow for fuel expansion.
DO NOT fill fuel tank indoors.
DO NOT fill fuel tank when the engine is running or hot.
DO NOT overfill the fuel tank.
DO NOT light cigarettes or smoke when filling the
fuel tank.
NOTE
Check oil often during the break-in period. Refer to
the Maintenance section for recommended service
intervals.
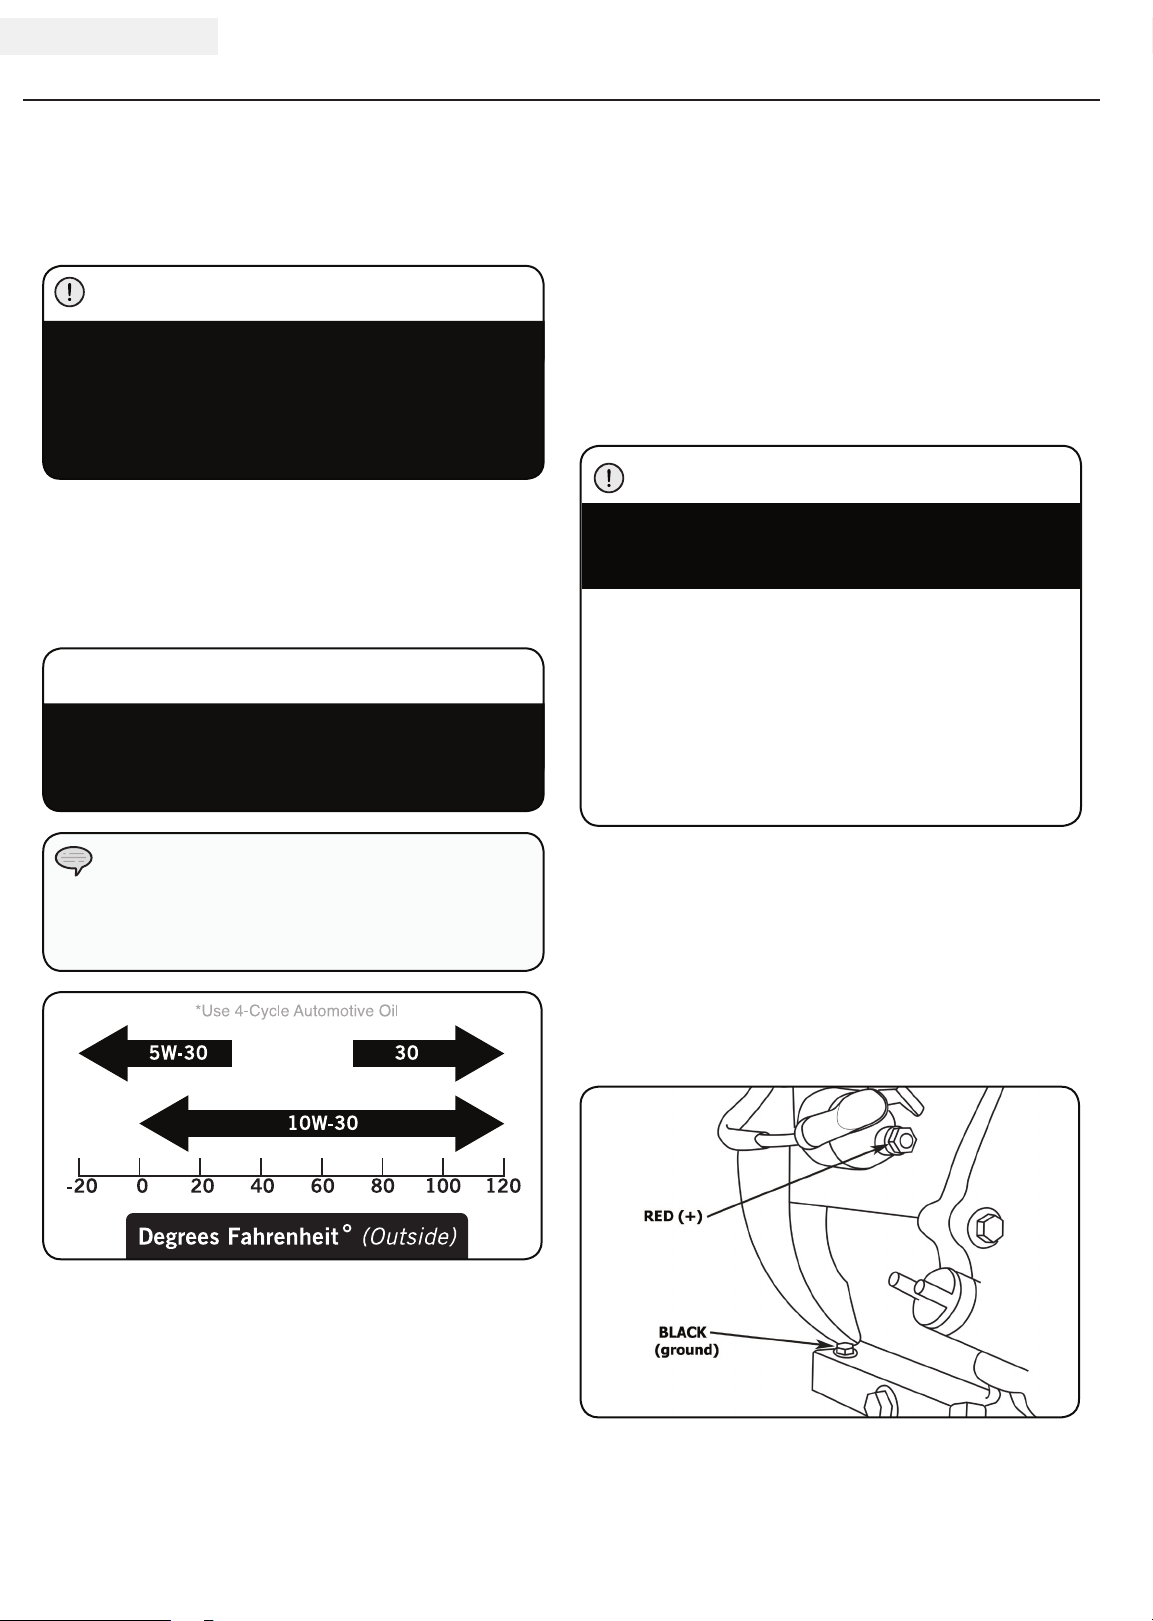
Connect Battery (not included) (Figure A)
1. Connect the red (+) lead to the positive (+) terminal
on the battery. Then connect the lead to the bolt on
the back side of the starter solenoid.
2. Connect the black (–) lead to the negative (–)
terminal on the battery. To ground the lead, connect
to the bolt on the engine base.
(Figure A)
REV 61301-20110629 6
Page 10
OPERATION
ENGLISH 61301
Engine Location
Place the engine in a well-ventilated area. DO NOT
place the engine near vents or intakes where exhaust
fumes could be drawn into occupied or confined
spaces. Carefully consider wind and air currents when
positioning engine.
Starting the Engine
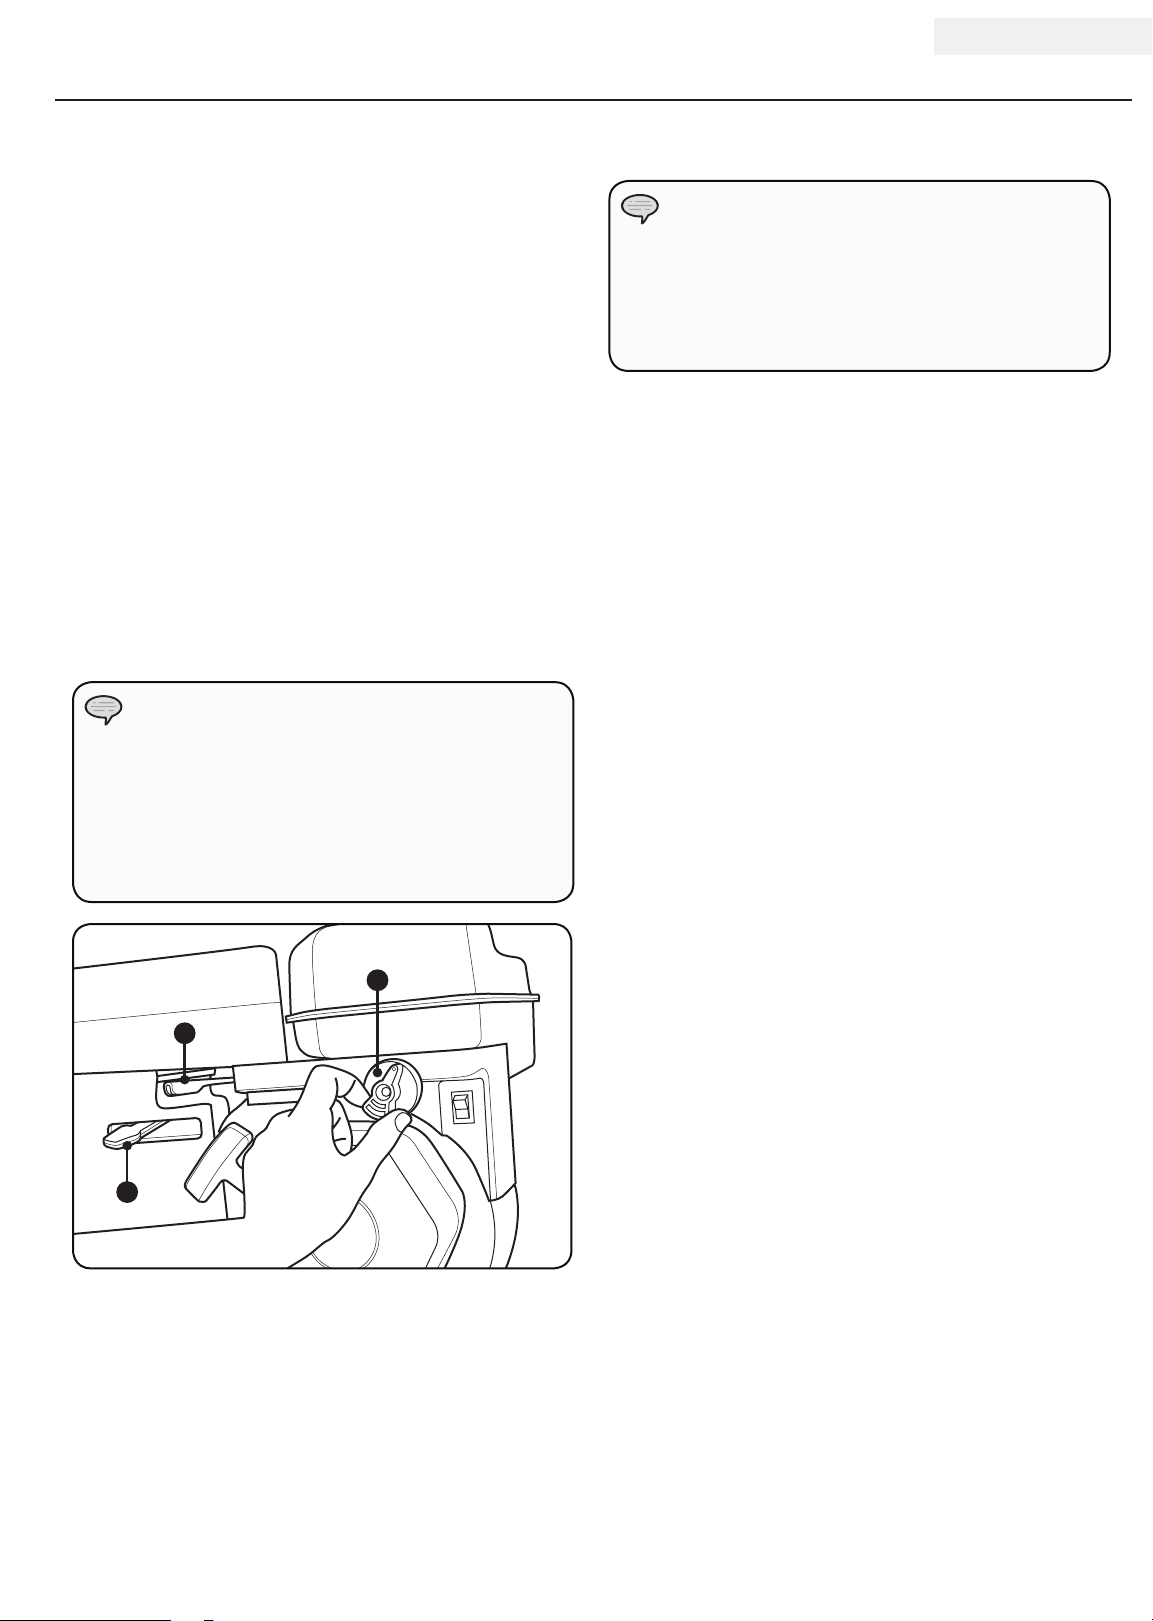
1. Make certain the engine is on a flat, level surface.
2. Turn the engine switch to “ON” position.
3. Rotate the fuel valve to the “ON” position (to the left)
(Item A).
4. Move the choke lever (Item B) to the “Choke”
position (to the left).
5. Turn the engine switch to the “Start” start position
until the engine starts and then release, OR
6. Pull the starter cord slowly until resistance is felt and
then pull rapidly. SEE NOTE BELOW.
NOTE
Keep choke lever in “Choke” position for only 1
pull of the recoil starter. After first pull, move choke
lever to the “Run” position for up to the next 3
pulls of the recoil starter. Too much choke leads to
sparkplug fouling/engine flooding due to the lack of
incoming air. This will cause the engine not to start.
Starting the Engine Cont’d.
NOTE
If the engine starts but does not run make certain
that the engine is on a flat, level surface. The
engine is equipped with a low oil sensor that will
prevent the engine from running when the oil level
falls below a critical threshold.
Stopping the Engine
1. Turn the ignition switch to the “Off” position.
2. Turn the fuel knob to the “Off” position.
A
C
B
7. As engine warms up, move the choke lever (Item B)
to the “Run” position (to the right).
8. Move the throttle lever (Item C) to the “Fast” position.
7 REV 61301-20110629
Page 11
61301 ENGLISH
MAINTENANCE AND STORAGE
The owner/operator is responsible for all periodic
maintenance.
WARNING
Never operate a damaged or defective engine.
WARNING
Improper maintenance will void your warranty.
NOTE
For service or parts assistance, contact our help line
at 1-877-338-0999.
Complete all scheduled maintenance in a timely manner.
Correct any issue before operating the engine.
Engine Maintenance
To prevent accidental starting, remove and ground spark
plug wire before performing any service.
Oil
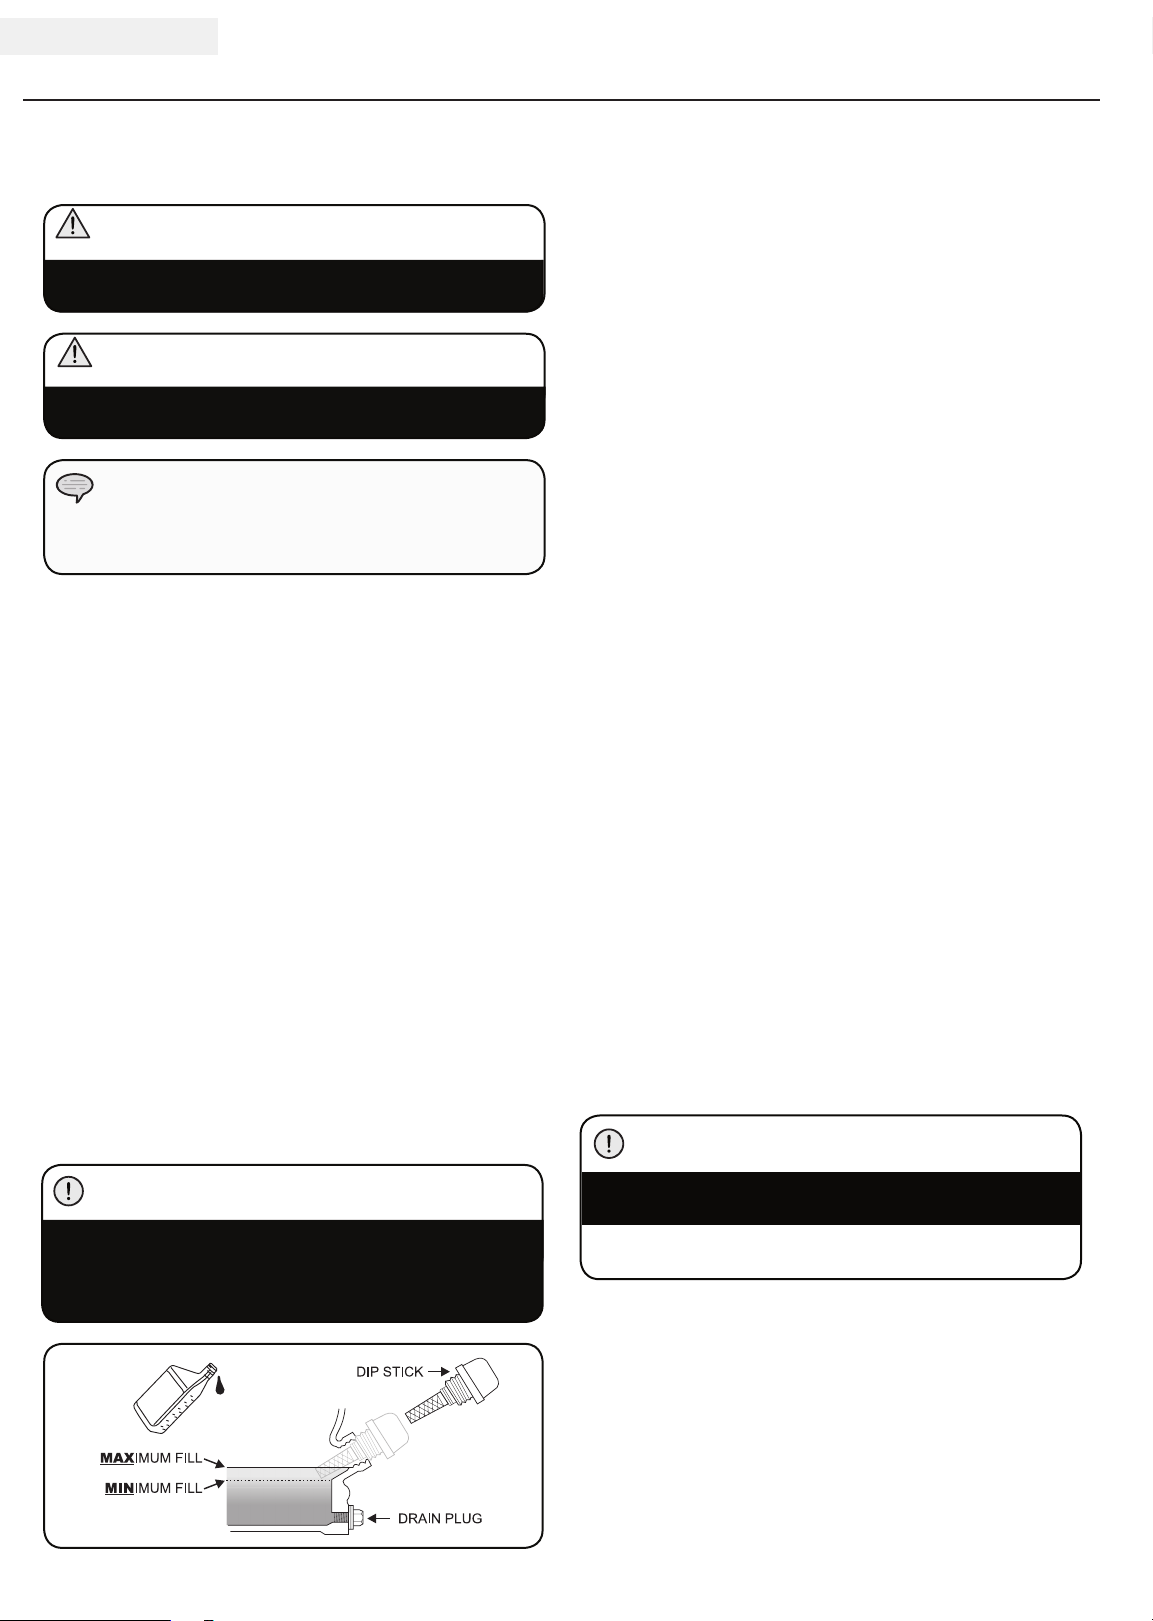
Change oil when the engine is warm. Refer to the oil
specifi cation to select the proper grade of oil for your
operating environment.
1. Remove the oil drain plug with a 15 mm socket and
extension.
2. Allow the oil to drain completely.
3. Replace the drain plug.
4. Remove oil fi ll cap/dipstick to add oil.
5. Add 1.16 qt (1.1 L) of oil and replace oil fi ll cap/
dipstick.
6. Dispose of used oil at an approved waste
management facility.
Spark Plugs
1. Remove the spark plug cable from the spark plug.
2. Use the spark plug tool that shipped with your engine
to remove the plug.
3. Inspect the electrode on the plug. It must be clean
and not worn to produce the spark required for
ignition.
4. Make certain the spark plug gap is 0.7 - 0.8 mm
(0.028 - 0.031 in.).
5. Refer to the spark plug recommendation chart when
replacing the plug.
6. Carefully thread the plug into the engine.
7. Use the spark plug tool to fi rmly install the plug.
8. Attach the spark plug wire to the plug.
Air Filter
1. Unscrew wing nut to remove the air fi lter cover.
2. Unscrew wing nut to remove the air fi lter.
3. Separate the foam element and the paper element.
4. Tap the paper fi lter element to remove dirt and
debris. Use compressed air (25 PSI) to clear debris.
5. For the foam element: Wash in liquid detergent and
water. Squeeze thoroughly dry in a clean cloth.
6. Saturate in clean engine oil.
7. Squeeze in a clean, absorbent cloth to remove all
excess oil.
8. Reassemble the two elements and reattach. Tighten
wing nut.
9. Reattach the air fi lter cover and snap in place.
Cleaning
Use a damp cloth to clean exterior surfaces of the engine.
Use a soft bristle brush to remove dirt and oil.
Use an air compressor (25 PSI) to clear dirt and debris
from the engine.
CAUTION
CAUTION
The engine ships from the factory without oil.
Before pulling the recoil start or starting the engine,
fi ll with oil. Do not overfi ll.
DO NOT spray engine with water.
Water can contaminate the fuel system.
REV 61301-20110629 8
Page 12
MAINTENANCE AND STORAGE
ENGLISH 61301
Adjustments
The air-fuel mixture is not adjustable. CPE recommends
that you contact our service line at 1-877-338-0999 for
all other service and/or adjustment needs.
Maintenance Schedule
Follow the service intervals indicated in the schedule
below. Service your engine more frequently when
operating in adverse conditions.
Contact our help line at 1-877-3 3 8-0999 to locate the
nearest Champion Power Equipment certified service
dealer for your engine maintenance needs.
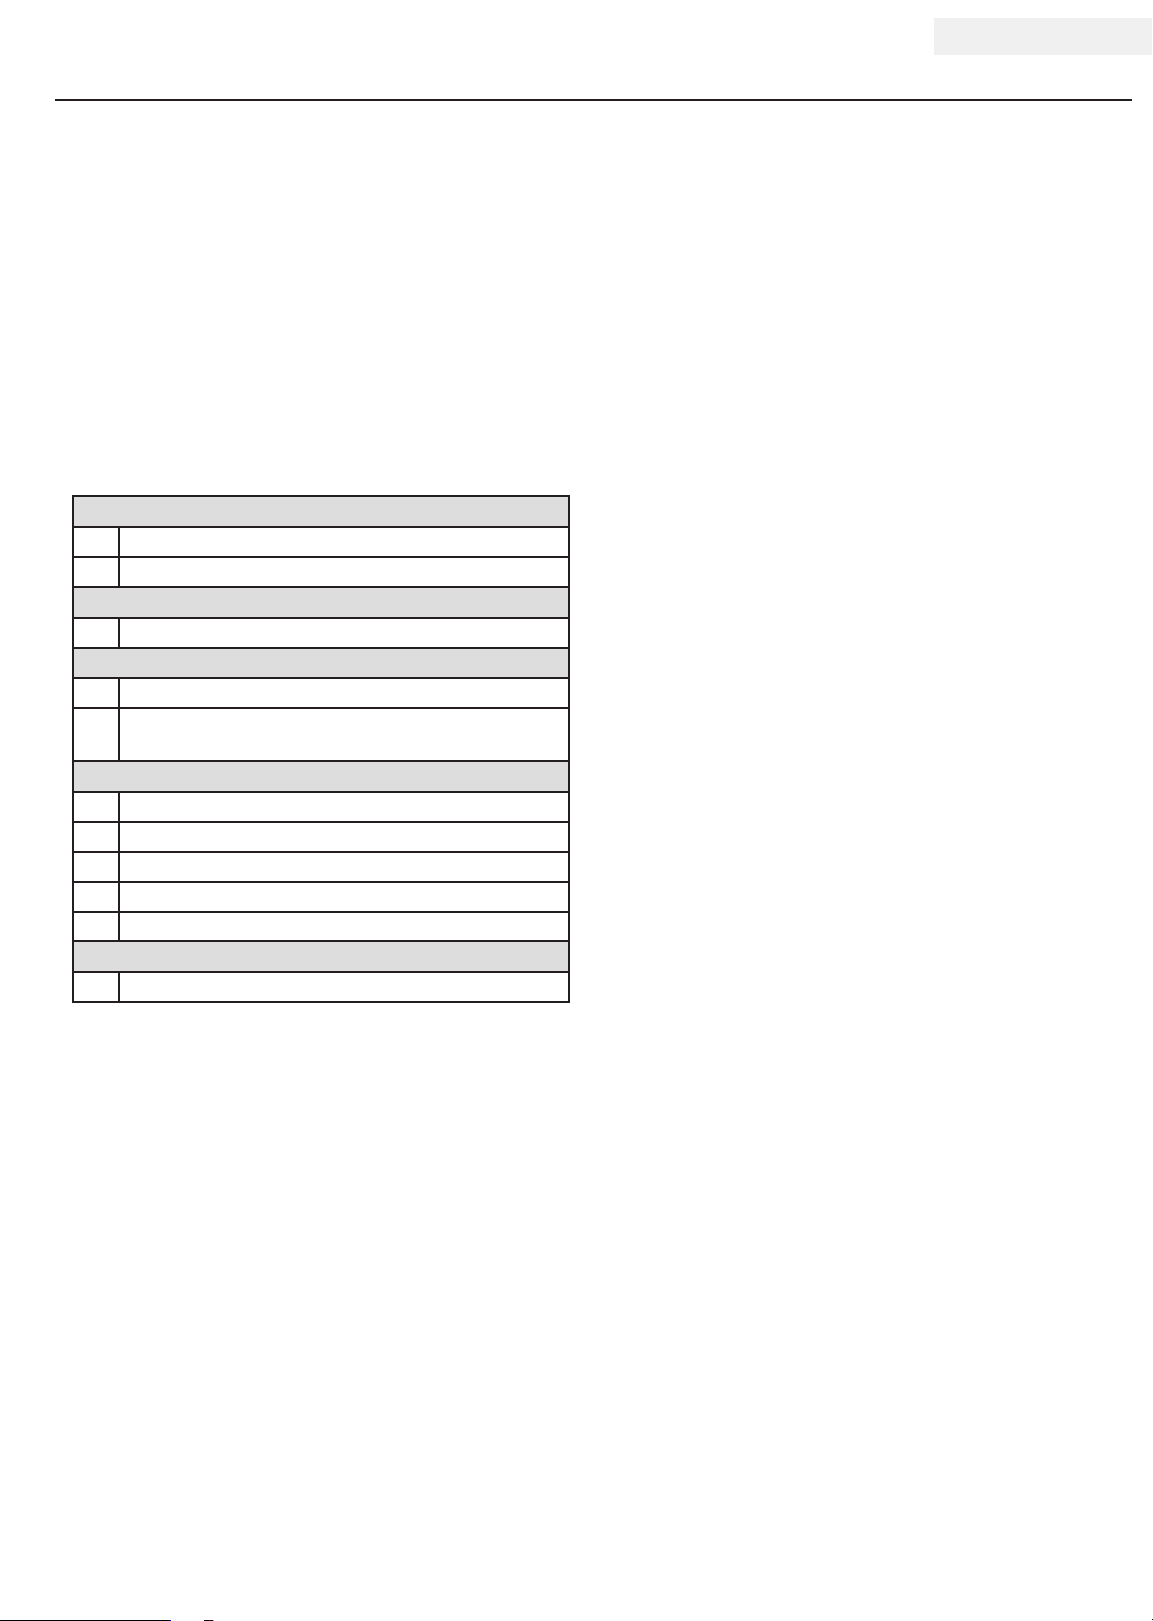
Every 8 hours or daily
Check oil level
Clean around air intake and muffler
First 5 Hours
Change oil
Every 50 hours or every season
Clean air filter
Change oil if operating under heavy load or in hot
environments
Every 100 hours or every season
Change oil
Clean/Adjust spark plug
Check/Adjust valve clearance *
Clean spark arrester
Clean fuel tank and filter *
Every 3 years
Replace fuel line
*To be performed by knowledgeable, experienced owners or
Champion Power Equipment certified dealers.
Storage
Engines stored for over 30 days need to be drained of
fuel to prevent gum from forming in the fuel system,
carburetor components and hoses. For long term
storage, please follow these guidelines.
Engine Storage
1. Allow the engine to cool completely before storage.
2. Clean the engine according to the instructions in the
Maintenance section.
3. Drain all fuel completely from the fuel line and
carburetor to prevent gum from forming.
4. Add a fuel stabilizer into the fuel tank.
5. Change the oil.
6. Remove the spark plug and pour about ½ ounce
of oil into the cylinder. Crank the engine slowly to
distribute the oil and lubricate the cylinder.
7. Reattach the spark plug.
9 REV 61301-20110629
Page 13
61301 ENGLISH
TROUBLESHOOTING
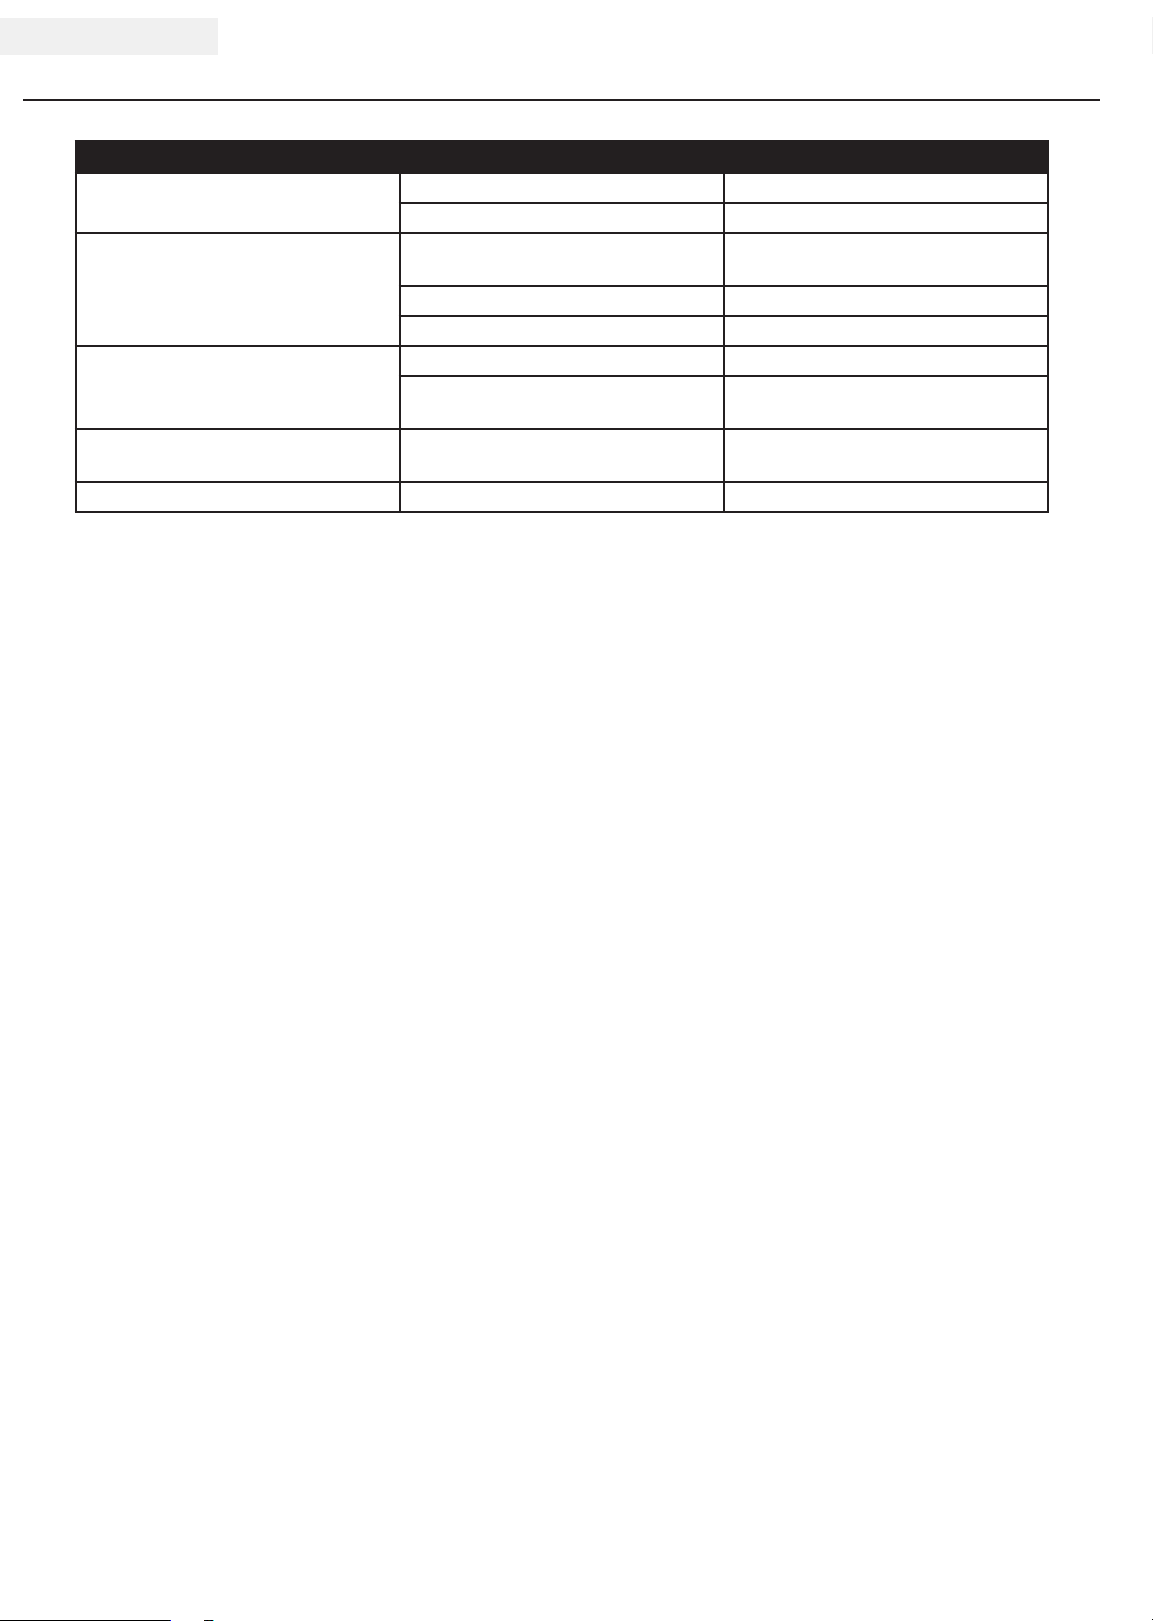
Problem Cause Solution
Engine will not start No fuel Add fuel
Faulty spark plug Replace spark plug
Engine will not start;
Engine starts but runs roughly
Engine shuts down during operation Out of fuel Fill fuel tank
Engine cannot supply enough power or
overheating
Engine gallops Engine governor defective Contact the help line
For further technical support:
Technical Service
Mon – Fri 8:30 AM – 5:00 PM (PST/PDT)
Toll Free: 1-877-338-0999
[email protected]
Low oil level Fill crankcase to the proper level;
place engine on a flat, level surface
Choke in the wrong position Adjust choke
Spark plug wire loose Attach wire to spark plug
Low oil level Fill crankcase to the proper level;
place engine on a flat, level surface
Insufficient ventilation Check for air restriction; move to a
well ventilated area
REV 61301-20110629 10
Page 14
SPECIFICATIONS
ENGLISH 61301
Engine Specifications
– Engine .................... 389 cc OHV CPE
– PTO Rotation ............... Counterclockwise
– Ignition Mode .............. TCI (transistorized)
– Displacement ...................... 389 cc
– Torque (max) .......... 18.5 ft-lb at 3000 RPM
– Compression ....................... 8.5:1
– Crank Shaft .... . 1” x 3 31⁄64” (2.54 cm x 8.85 cm)
– End Hole .............. . Tapped 3/8”z 24 UNF
– Fuel Capacity .............. 1.8 gallons (6.8 L)
– Gross Weight ............ . 84.66 lbs. (38.4 kg)
– Net Weight ............... . 78.5 lbs. (35.6 kg)
– Height ................ .17.9 inches (43.4 cm)
– Width .............. .15.98 inches (40.59 cm)
– Length. . . . . . . . . . . . . . . . . 19.69 inches (50 cm)
Fuel
Fuel capacity is 1.8 gallons (6.8 L). Use regular
unleaded gasoline with a minimum octane rating of 85
and an ethanol content of less than 10% by volume.
Spark Plugs
Recommended replacement spark plug:
– NGK BR6ES or equivalent
Make certain the spark plug gap is 0.7 - 0.8 mm or
(0.028 - 0.031 in.).
Valve Clearance
– Intake: 0.13 – 0.17 mm (0.005 – 0.007 in.)
– Exhaust: 0.18 – 0.22 mm (0.007 – 0.009 in.)
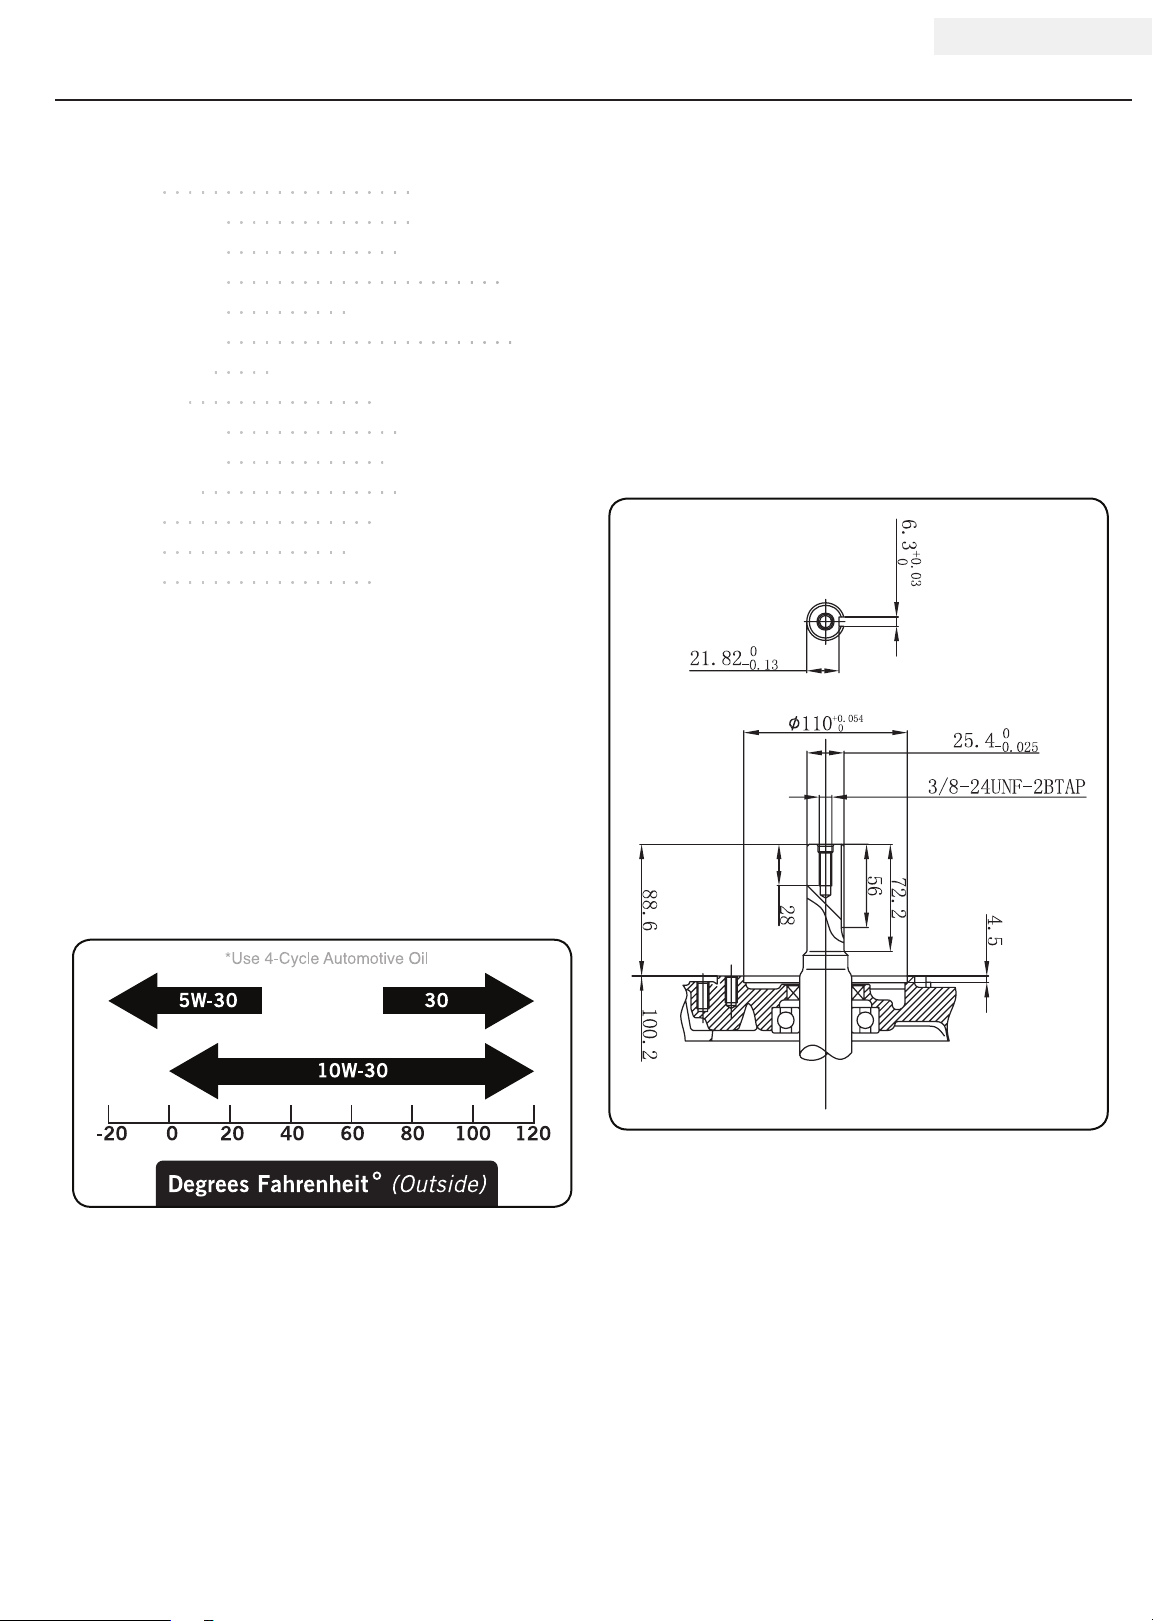
Keyway Shaft
Oil
Use 4-Cycle automotive oil.
Oil capacity is 1.16 qt (1.1 L).
Please reference the following chart for recommended
oil types for use in the engine.
11 REV 61301-20110629
Page 15
61301 ENGLISH
SPECIFICATIONS
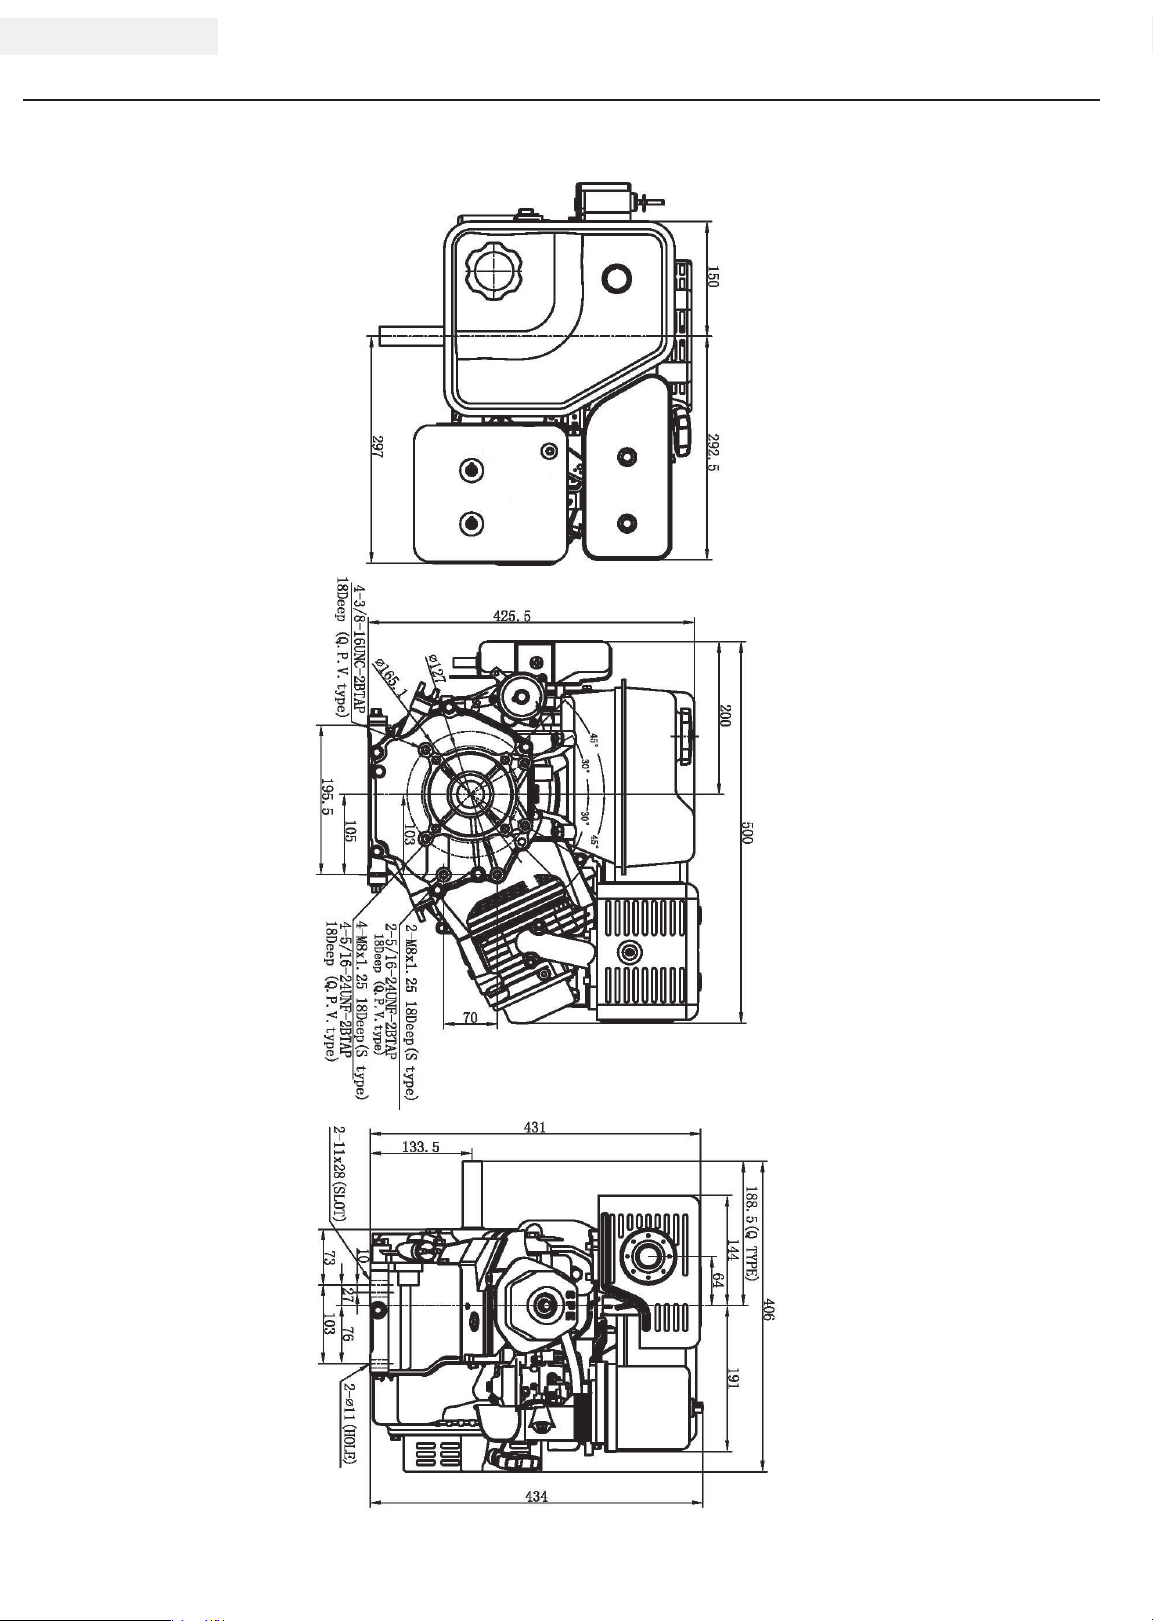
Dimensions
REV 61301-20110629 12
Page 16
SPECIFICATIONS
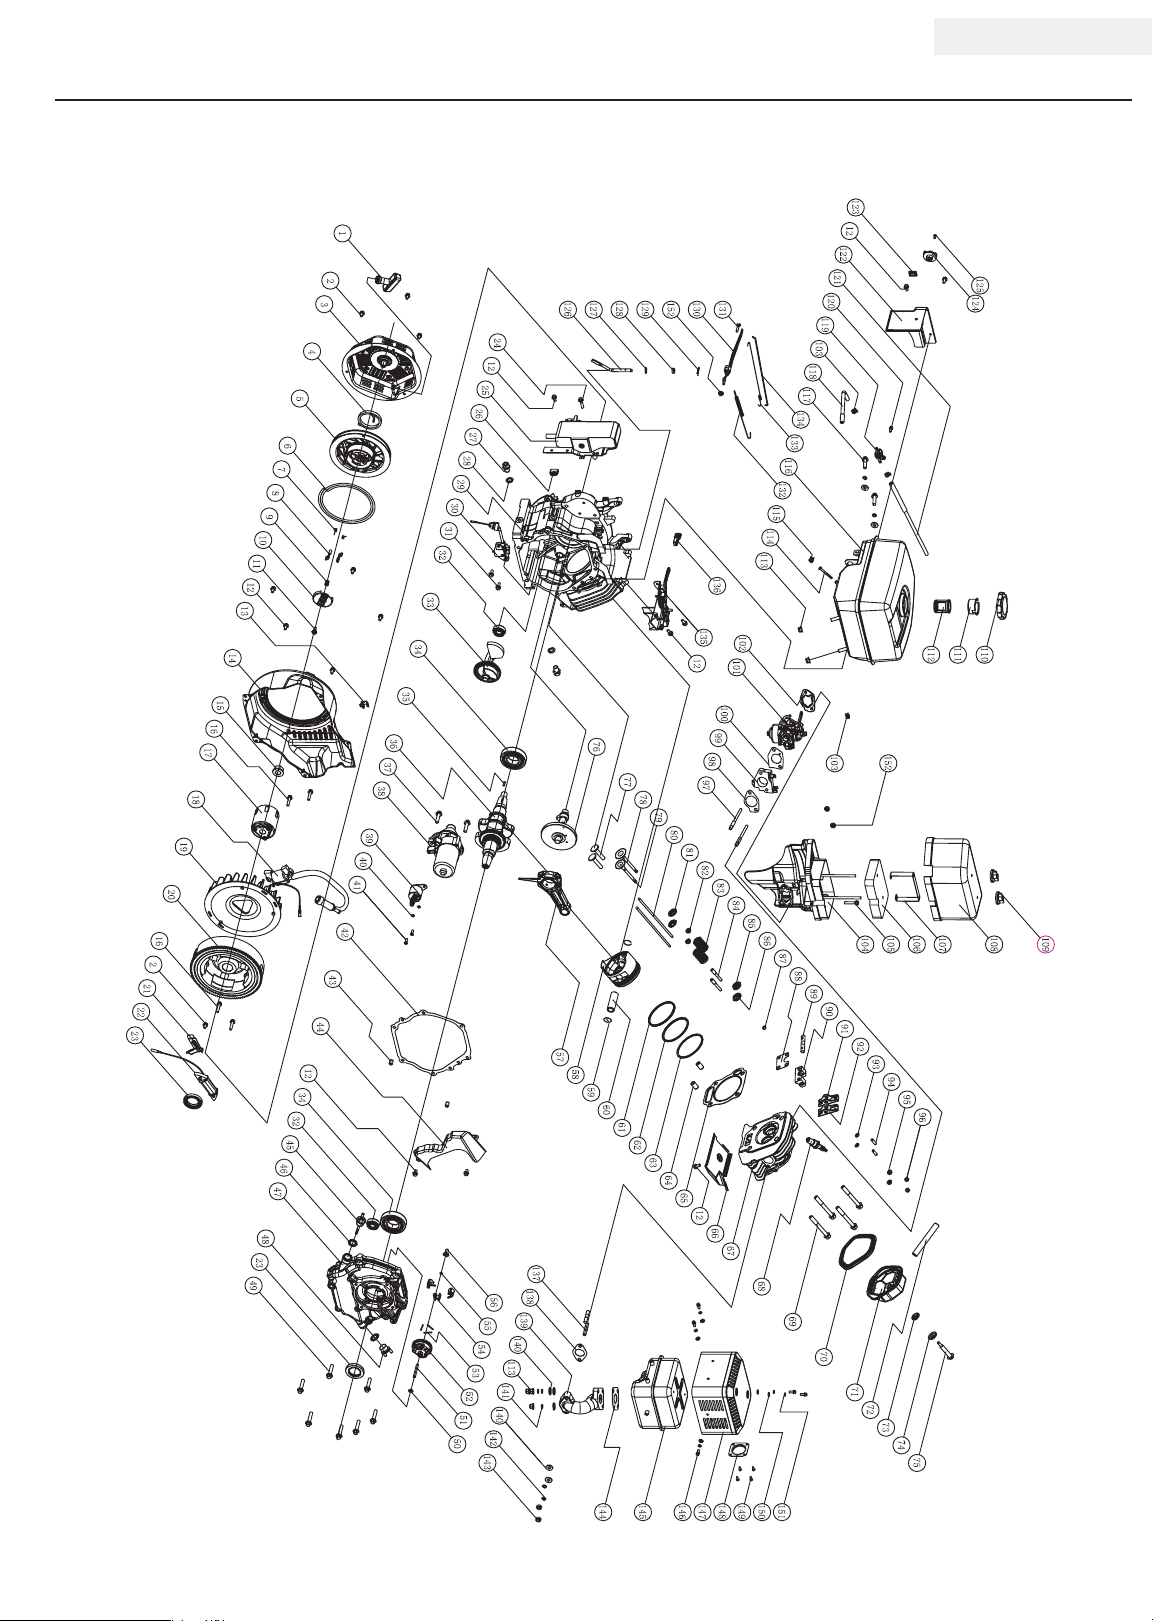
Parts Diagram
ENGLISH 61301
13 REV 61301-20110629
Page 17
61301 ENGLISH
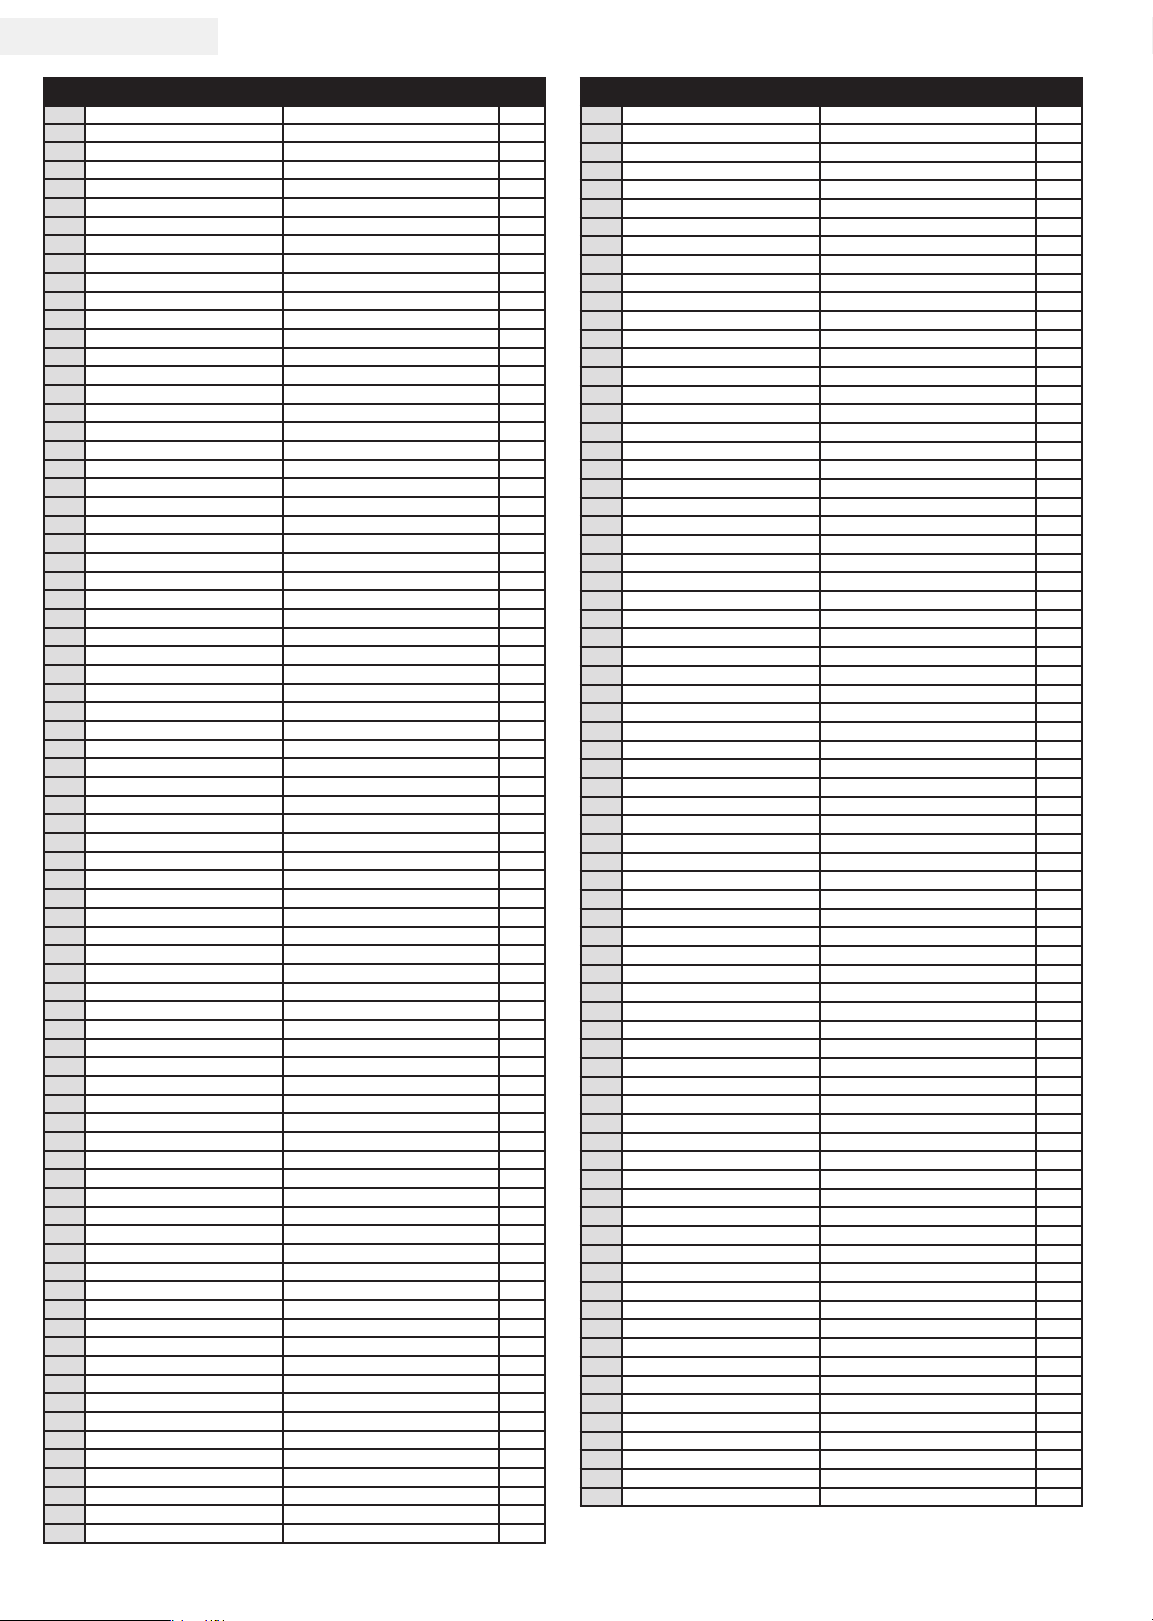
Parts List
# Part Number Description Qty.
1 ST160 F-1061200 Recoil Star ter Knob 1
2 GB578 9-- 86 -FB6 -8 Flange B olt M6 ×8 4
188.061100.31 Recoil St arte r Case
3
ST188F-1060 009 Starte r Return S pring
4
ST188F-1060 008 Recoil Sta rter P ulley
5
ST188F-1060 007 Recoil Sta rter Ro pe
6
ST188F-1060 006 Ratchet Spr ing
7
ST188F-1060 005 Ratchet St arter
8
ST188F-1060 004 Ratchet Guid e Spring
9
ST188F-1060 003 Ratchet Guid e
10
ST188F-1060 002 Ratchet Guid e Bolt
11
GB5789- -8 6-FB 6-12 Flange B olt M6 ×12
12
ST188F-1080 003 Clamp
13
ST188F-1080100 -G Fan Cover
14
ST188F-1050 006 Special Nut
15
GB5789- -8 6-FB 6-29 Flange B olt 6× 29
16
ST188F-1060 001 Starte r Pulley C omp
17
ST188F-112200 0- G Ignition C oil
18
ST188F-1080 002 Cooling Fan
19
ST188FD -1121000 Flywhe el
20
ST188F-1030 002 Plate Coil
21
ST188F-112300 0 Coil Char ger
22
ST188F-10302 00 Oil Seal
23
GB5789- -8 6-FB 6-25 Flange B olt 6× 25
24
ST188F-112800 0- G Star ter Swltc h
25
ST188F-1030 012 Grommet
26
139FMD -1003101 Drain Plu g Bolt
27
139FMD -1003102 Drain Plu g Washe r
28
ST188F-1030 006 -G Crankc ase
29
ST188FD -1127000- A Oil Level Switch
30
GB5789- -8 6-FB 6-15 Flange B olt 6×15
31
GB/ T276-9 4 Radial Ball Bearing 6202
32
ST188F-10503 03 Balance Ge ar
33
GB/ T276-9 4 6207/ C3 Radial Ball Bearing 6207
34
ST188F-10503 04 Key
35
ST188F-10503 00 Cranksha ft Co mp
36
GB5789- -8 6-FB 8-35 Flange B olt 8 ×35
37
ST188F-112500 0 Starte r Engine A ssy
38
ST188F-112600 0 Relay
39
GB93 5 Spring Wash er ø5
40
GB818 M5×16 Screw M5 ×16
41
ST188F-1030 010-G Case Cov er Packin g
42
ST168F-1030015- G Dowel Pin 9 ×14
43
ST188F-1080 002- G Shroud
44
ST188F-1030 003- B Oil Filler C ap
45
ST160F-10300 02 Oil Filler Ca p Packing
46
ST188F-1030 011-G-5/16 Crankc ase Co ver
47
ST160F- -1030005 -B Oil Filler Cap
48
GB5789- -8 6-FB 8- 40 Flange B olt 8 ×40
49
ST160F-1110108 Washer
50
ST188F-1110009 G overno r Shaft
51
ST188F-1110101 Gover nor Weig ht Holde r
52
ST188F-1110102 Gover nor Weig ht Pin
53
ST188F-1110103 Gover nor Weig ht
54
ST160F-1110103 Gover nor Shaf t Clip
55
ST188F-1110008 G overno r Slider
56
ST188F-10502 00 Connectin g Rod A ssemb ly
57
ST188F-1050 001 Piston
58
ST188F-1050 004 Piston Pin C lip
59
ST188F-1050 005 Piston Pin
60
ST188F-1050100 Oil Seal S et
61
ST188F-1050 003 Second Rin g Set
62
ST188F-1050 002 First Ring Set
63
ST188F-1030 013 Dowel Pin
64
ST188F-1030 008 -G Cylinde r Head Gasket
65
ST188F-1080 001-G Shroud
66
ST188F-1011000- G Head Comp
67
NHSP LD F6 RTC Spark P lug
68
ST188F-1030 009 Bolt
69
ST188F-10200 03- CPE Head O ver Pa cking
70
ST188F-1020100 -A Head C over C omp
71
ST188F-10200 02 Tube
72
ST188F-10200 04 Packing He ad Cov er Bolt
73
ST188F-10200 05 Washer He ad Co ver Bolt
74
ST188F-10200 06 Bolt Hea d Cove r
75
ST188F-1041000 C amshaf t
76
ST188F-1040 012 Valve Lifte r
77
13
# Part Number Description Qty.
ST188F-1040 003 Intake Valve
78
ST188F-1040 011 Exhaus t Valve
1
1
1
1
2
2
1
1
1
1
1
1
4
1
1
1
1
1
1
2
1
1
1
2
2
1
1
2
2
1
2
1
1
2
1
1
2
2
1
2
1
1
2
1
1
7
1
1
1
3
3
1
1
1
1
2
1
1
1
1
2
1
1
1
1
4
1
1
1
1
1
1
1
2
79
ST188F-1040 010-Ⅱ Push Rod
80
ST188F-1040 006 Valve Spring Washer
81
ST188F-1040 004 Valve Seal
82
ST188F-1040 007 Valve Spring
83
ST168F- -1040027 Pivot Bo lt
84
ST188F-1040 002 Intake Valve Spring Ret ainer
85
ST188F-1040 008 Exhaus t Valve Sp ring Retain er
86
ST188F-1040 009 Valve Rotat or
87
ST188F-1040 028 Push Rod Gu ide Plate
88
ST188F-1040 021 Rocker A xis
89
ST188F-1040 026 Valve Rocker Arm
90
ST188F-1040 022 Intake Valve Exhau st Rocke r
91
ST188F-1040 023 Exhaus t Valve E xhaust Rocker
92
GB97.1-8 5 Washer ø6
93
ST160F-1040 024 Rocker Ar m Bolt
94
GB6177--86 -N6 Nut M6
95
ST160F-1040 025 Pivot Adjus ting Nut
96
ST188F-1010002 B olt
97
ST188FD -1130003 Carbure tor Insula tor Pac king
98
ST188F-113400 0 Carbure tor Insula tor
99
ST188F-113000 2 Carbure tor Pac king
100
ST188F-113300 0- G Carbu retor
101
ST188F-1130100 Ai r Cleane r Packin g
102
ST188FD -1070006 -A Clip
103
188.091100.32 Air Clea n Elbow
104
GB5789- -8 6-FB 6-3 3 Flange B olt M6 ×33
105
188.09100 3.32 Air Clea ner Elem ent
106
188.091102.32 Air Clea ner Supp ort
107
188.09120 0.32 Air Clea ner Co ver
108
ST188F-1090100 -C Air Clean er Cap
109
ST160F-1070100-H Fuel Tank Cap
110
ST160F-1070006 -B Filter Suppor t
111
ST160F-1070006 -A Fuel Filter
112
GB61787.1-N8 Nut M8
113
ST152FD-1070200 Fuel Filter
114
ST1P68F-10700 06- F C lip
115
188.071000 .33 Fuel Tank Com p
116
GB5789- -8 6-FB 8-32 Flange B olt 8 ×32
117
ST188F-107000 3-G Tube, II
118
ST168F-1070200 -G Fuel Valve
119
GB16674-M5-12 Bolt M5×12
120
ST188F-1070001-G Tube, I
121
188.070010.31 Fuel Tank Shrou d
122
168.07002 3.01 Plug
123
ST168F-1070003 -G Fuel Valve Knob
124
GB818 M4×12 Screw M4 ×12
125
ST188F-1110003 C over A rm Shaf t
126
ST188F-1110005 Wa sher ø 8.2×17×0 .8
127
ST188F-1030100 Oil Seal
128
ST188F-1110007 Pin Clip
129
ST188F-1110006 G overno r Arm
130
ST160F-1110004 G overno r Arm B olt
131
ST188F-1110004 G overno r Spring
132
ST188F-1110001 T hrottle Return Sp ring
133
ST188F-1110002 G overno r Rod
134
188.08 030 0.06 Con trol As sembl y
135
168.11100 8.01 She ath Grip
136
ST188F-1010001 B olt
137
ST188F-1100100- G Exhaust Pip e Gask et
138
188.101001.34 Exhau st Pipe
139
GB84 8 Washer ø8
140
GB859 Lock Wa sher ø 8
141
GB93 8 Lock Wash er ø8
142
GB6175 M8 Nut M8
143
188.101002.34 Muffle r Packin g
144
188.101100.34 Muffle r
145
GB 16174 M5×10 Flange B olt M5×10
146
188.101200.34 Muffle r Prote ctor
147
188.101300.34 Spark A rres ter
148
GB818 M4× 6 Screw M 4×6
149
GB84 8 Washer ø5
150
GB859 Locker Washer ø5
151
GB6177--86 -N6 Nut M6
152
1
1
2
2
2
2
2
1
1
1
1
1
1
1
1
2
2
2
2
2
1
1
1
1
1
3
1
1
1
1
1
2
1
1
1
5
1
1
1
2
1
1
1
1
1
1
1
1
1
1
1
1
1
1
1
1
1
1
1
2
1
1
7
5
2
2
1
1
5
1
1
4
5
5
3
REV 61301-20110629 14
Page 18

WARRANTY
ENGLISH 61301
WARRANTY
CHAMPION POWER EQUIPMENT
2 YEAR LIMITED WARRANTY
Warranty Qualifications
Champion Power Equipment (CPE) will register this
warranty upon receipt of your Warranty Registration Card
and a copy of your sales receipt from one of CPE’s retail
locations as proof of purchase.
Please submit your warranty registration and your proof
of purchase within ten (10) days of the date of purchase.
Repair/Replacement Warranty
CPE warrants to the original purchaser that the
mechanical and electrical components will be free of
defects in material and workmanship for a period of
one year (parts and labor) and two years (parts) from
the original date of purchase (90 days (parts and
labor) and 180 days (parts) for commercial & industrial
use). Transportation charges on product submitted
for repair or replacement under this warranty are the
sole responsibility of the purchaser. This warranty only
applies to the original purchaser and is not transferable.
Do Not Return The Unit To The Place Of Purchase
Contact CPE’s Technical Service and CPE will
troubleshoot any issue via phone or e-mail. If the
problem is not corrected by this method, CPE will, at its
option, authorize evaluation, repair or replacement of the
defective part or component at a CPE Service Center.
CPE will provide you with a case number for warranty
service. Please keep it for future reference. Repairs
or replacements without prior authorization, or at an
unauthorized repair facility, will not be covered by this
warranty.
Other Exclusions
This warranty excludes:
– Cosmetic defects such as paint, decals, etc.
– Wear items such as filter elements, o-rings, etc.
– Accessory parts such as starting batteries, and
storage covers.
– Failures due to acts of God and other force majeure
events beyond the manufacturer’s control.
– Problems caused by parts that are not original
Champion Power Equipment parts.
Limits of Implied Warranty and Consequential Damage
Champion Power Equipment disclaims any obligation to
cover any loss of time, use of this product, freight, or
any incidental or consequential claim by anyone from
using this engine. THIS WARRANTY IS IN LIEU OF
ALL OTHER WARRANTIES, EXPRESS OR IMPLIED,
INCLUDING WARRANTIES OF MERCHANTABILITY OR
FITNESS FOR A PARTICULAR PURPOSE.
A unit provided as an exchange will be subject to the
warranty of the original unit. The length of the warranty
governing the exchanged unit will remain calculated by
reference to the purchase date of the original unit.
This warranty gives you certain legal rights which may
change from state to state. Your state may also have
other rights you may be entitled to that are not listed
within this warranty.
Contact Information
Address
Champion Power Equipment, Inc.
Customer Service
10006 Santa Fe Springs Rd.
Santa Fe Springs, CA 90670
www.championpowerequipment.com
Warranty Exclusions
This warranty does not cover the following repairs and
equipment:
Normal Wear
Engines need periodic parts and service to perform well.
This warranty does not cover repair when normal use has
exhausted the life of a part or the equipment as a whole.
Installation, Use and Maintenance
This warranty will not apply to parts and/or labor if this
engine is deemed to have been misused, neglected,
involved in an accident, abused, loaded beyond the
engine’s limits, modified, installed improperly or
connected incorrectly to any electrical component.
Normal maintenance such as spark plugs, air filters,
adjustments, fuel system cleaning and obstruction due
to buildup is not covered by this warranty.
15 REV 61301-20110629
Customer Service
Mon – Fri 8:30 AM – 5:00 PM (PST/PDT)
Toll Free:1-877-338-0999
Fax no.: 1 (562) 236-9429
Technical Service
Mon – Fri 8:30 AM – 5:00 PM (PST/PDT)
Toll Free: 1-877-338-0999
[email protected]
Page 19

Champion Power Equipment, Inc (CPE),
Emission Control System Warranty
Your Champion Power Equipment (CPE) engine complies with Environment Canada (EC)
emission regulations.
YOUR WARRANTY RIGHTS AND OBLIGATIONS:
CPE is pleased to explain the Emission Control Systems Warranty on your 2011 small off-road
engine. New engines must be designed, built and equipped, at the time of sale, to meet EC
regulations for small non-road engines. CPE must warrant the emission control system on your
small off-road engine for the period of time listed below, provided there has been no abuse,
neglect, unapproved modification, or improper maintenance of your small off-road engine.
Your emission control system may include parts such as the carburetor, fuel-injection system, the
ignition system, catalytic converter and fuel lines. Also included may be hoses, belts, connectors
and other emission related assemblies. Where a warrantable condition exits, CPE will repair your
small off-road engine at no cost to you including diagnosis, parts and labor.
MANUFACTURER’S EMISSION CONTROL SYSTEM WARRANTY COVERAGE:
This emission control system is warranted for two years, subject to provisions set forth below. If,
during the warranty period, emission related part on your engine is defective in materials or
workmanship, the part will be repaired or replaced by CPE.
OWNER WARRANTY RESPONSIBILITIES:
As the small off-road engine owner, you are responsible for the performance of the required
maintenance listed in your Owner’s Manual. CPE recommends that you retain all your receipts
covering maintenance on your small off-road engine, but CPE cannot deny warranty solely for the
lack of receipts or for your failure to ensure the performance of all scheduled maintenance.
As the small off-road engine owner, you should however be aware that CPE may deny you
warranty coverage if your small, off-road engine or a part has failed due to abuse, neglect,
improper maintenance or unapproved modifications.
You are responsible for presenting your small off-road engine to an Authorized CPE service outlet,
CPE dealer or CPE, Santa Fe Springs, CA., USA as soon as a problem exists. The warranty
repairs should be completed in a reasonable amount of time, not to exceed 30 days.
If you have any questions regarding your warranty rights and responsibilities, you should contact:
Champion Power Equipment, Inc.
Customer Service
10006 Santa Fe Springs Road
Santa Fe Springs, CA 90670
USA
Tel: (888) 696-0668
The emission warranty is a defects warranty. Defects are judged on normal engine performance.
The warranty is not related to an in-use emission test.
Page 20

EMISSION CONTROL SYSTEM WARRANTY
The following are specific provisions relative to your Emission Control System Warranty
Coverage.
Emission Control System Warranty (ECS Warranty):
1. APPLICABILITY: The ECS Warranty Period shall begin on the date the new engine or
equipment is delivered to its original, end-use purchaser, and shall continue for 24 consecutive
months thereafter.
2. GENERAL EMISSIONS WARRANTY COVERAGE
CPE warrants to the original, end-use purchaser of the new engine or equipment and to each
subsequent purchaser that each of its small off-road engines is:
a. Designed, built and equipped so as to conform at the time of sale with applicable
regulations under the Canadian Environmental Protection Act, 1999 (CEPA 1999).
b. Free from defects in materials and workmanship that cause the failure of a warranted
part to be identical in all material respects to the part as described in the engine manufacturer’s
application for certification for a period of two years.
3. THE WARRANTY ON EMISSION-RELATED PARTS WILL BE INTERPRETED AS
FOLLOWS:
a. Any warranted part that is not scheduled for replacement as required maintenance in
the Owners Manual shall be warranted for the ECS Warranty Period. If any such part fails during
the ECS Warranty Period, it shall be repaired or replaced by CPE according to Subsection “d”
below. Any such part repaired or replaced under the ECS Warranty shall be warranted for any
remainder of the ECS Warranty Period.
b. Any warranted, emissions-related part which is scheduled only for regular inspection
as specified in the Owners Manual shall be warranted for the ECS Warranty Period. A statement
in such written instructions to the effect of “repair or replace as necessary”, shall not reduce the
ECS Warranty Period. Any such part repaired or replaced under the ECS Warranty shall be
warranted for the remainder of the ECS Warranty Period.
c. Any warranted, emissions-related part which is scheduled for replacement as required
maintenance in the Owner’s Manual shall be warranted for the period of time prior to the first
scheduled replacement point for that part. If the part fails prior to the first scheduled replacement,
the part shall be repaired or replaced by CPE according to Subsection “d” below. Any such
emissions-related part repaired or replaced under the ECS Warranty, shall be warranted for the
remainder of the ECS Warranty Period prior to the first scheduled replacement point for such
emissions-related part.
d. Repair or replacement of any warranted, emissions-related part under this ECS
Warranty shall be performed at no charge to the owner at a CPE Authorized Service Outlet.
e. The owner shall not be charged for diagnostic labor which leads to the determination
that a part covered by the ECS Warranty is in fact defective, provided that such diagnostic work is
performed at a CPE Authorized Service Outlet.
f. CPE shall be liable for damages to other original engine components or approved
modifications proximately caused by a failure under warranty of an emission-related part covered
by the ECS Warranty.
g. Throughout the ECS Warranty Period, CPE shall maintain a supply of warranted
emission-related parts sufficient to meet the expected demand for such emission-related parts.
h. Any CPE Authorized and approved emission-related replacement part may be used in
the performance of any ECS Warranty maintenance or repair and will be provided without charge
to the owner. Such use shall not reduce CPE’s warranty obligation.
Page 21
i. Unapproved add-on or modified parts may not be used to modify or repair a CPE
engine. Such use voids this ECS Warranty and shall be sufficient grounds for disallowing an ECS
Warranty claim. CPE shall not be liable hereunder for failures of any warranted parts of a
CPE engine caused by the use of such an unapproved add-on or modified part.
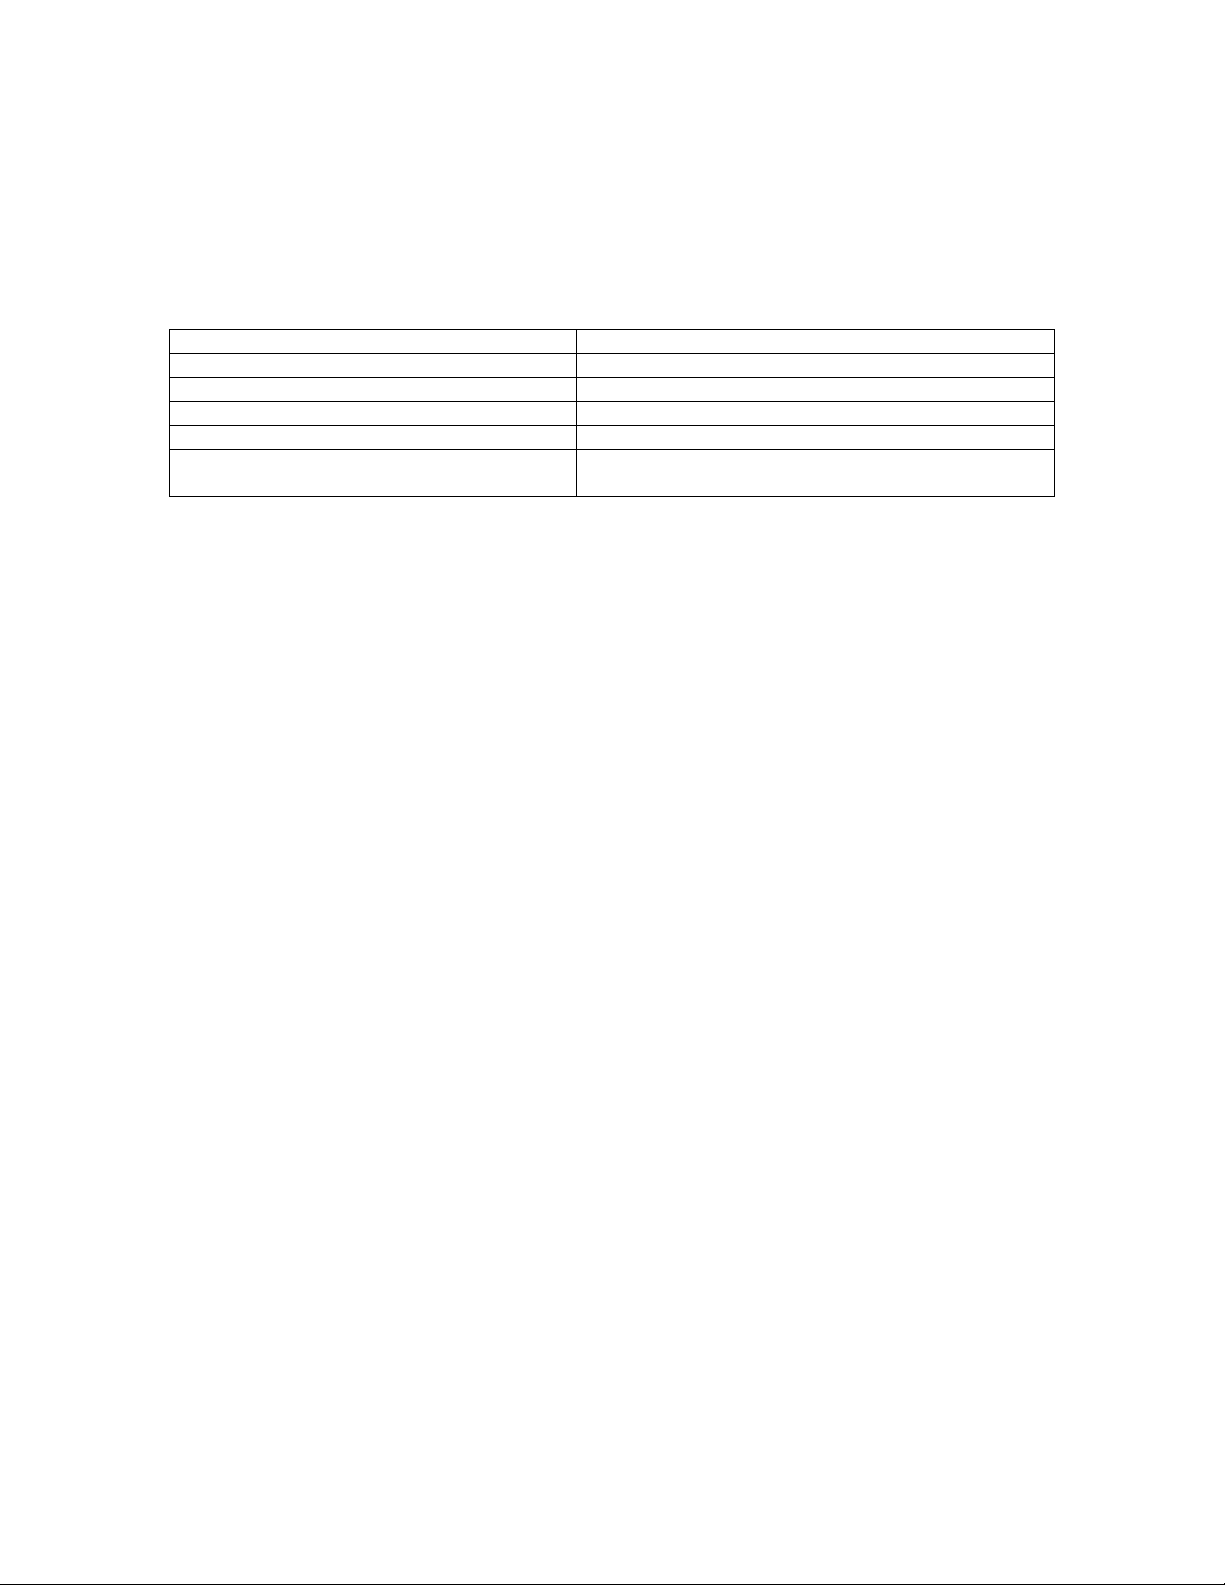
EMISSION-RELATED PARTS INCLUDE THE FOLLOWING: (using those portions of the list
applicable to the engine)
Systems covered by this warranty Parts Description
Fuel Metering System Fuel regulator, Carburetor and internal parts
Air Induction System Air cleaner, Intake manifold
Ignition System Spark plug and parts, Magneto ignition system
Exhaust System Exhaust manifold, catalytic converter
Miscellaneous Parts Tubing, Fittings, Seals, Gaskets, and Clamps
associated with these listed systems.
TO OBTAIN WARRANTY SERVICE:
You must take your CPE engine or the product on which it is installed, along with your warranty
registration card or other proof of original purchase date, at your expense, to any Champion
Power Equipment dealer who is authorized by Champion Power Equipment, Inc. to sell and
service that CPE product during his normal business hours. Claims for repair or adjustment found
to be caused solely by defects in material or workmanship will not be denied because the engine
was not properly maintained and used.
If you have any questions regarding your warranty rights and responsibilities, or to obtain
warranty service, please write or call Customer Service at Champion Power
Equipment, Inc.
Champion Power Equipment, Inc.
10006 Santa Fe Springs Road
Santa Fe Springs, CA 90670
USA
1-877-338-0999
Attn: Customer Service
 Loading...