

Page 1
Model OTIU
Indoor Telephone Interface
Overview
The Indoor Telephone Interface uses a 900 Mhz
secure digital radio link that allows secure
conversations and gate operator control.
The Telephone Interface Unit (OTIU) is compatible
with various Liftmaster Wireless Products.
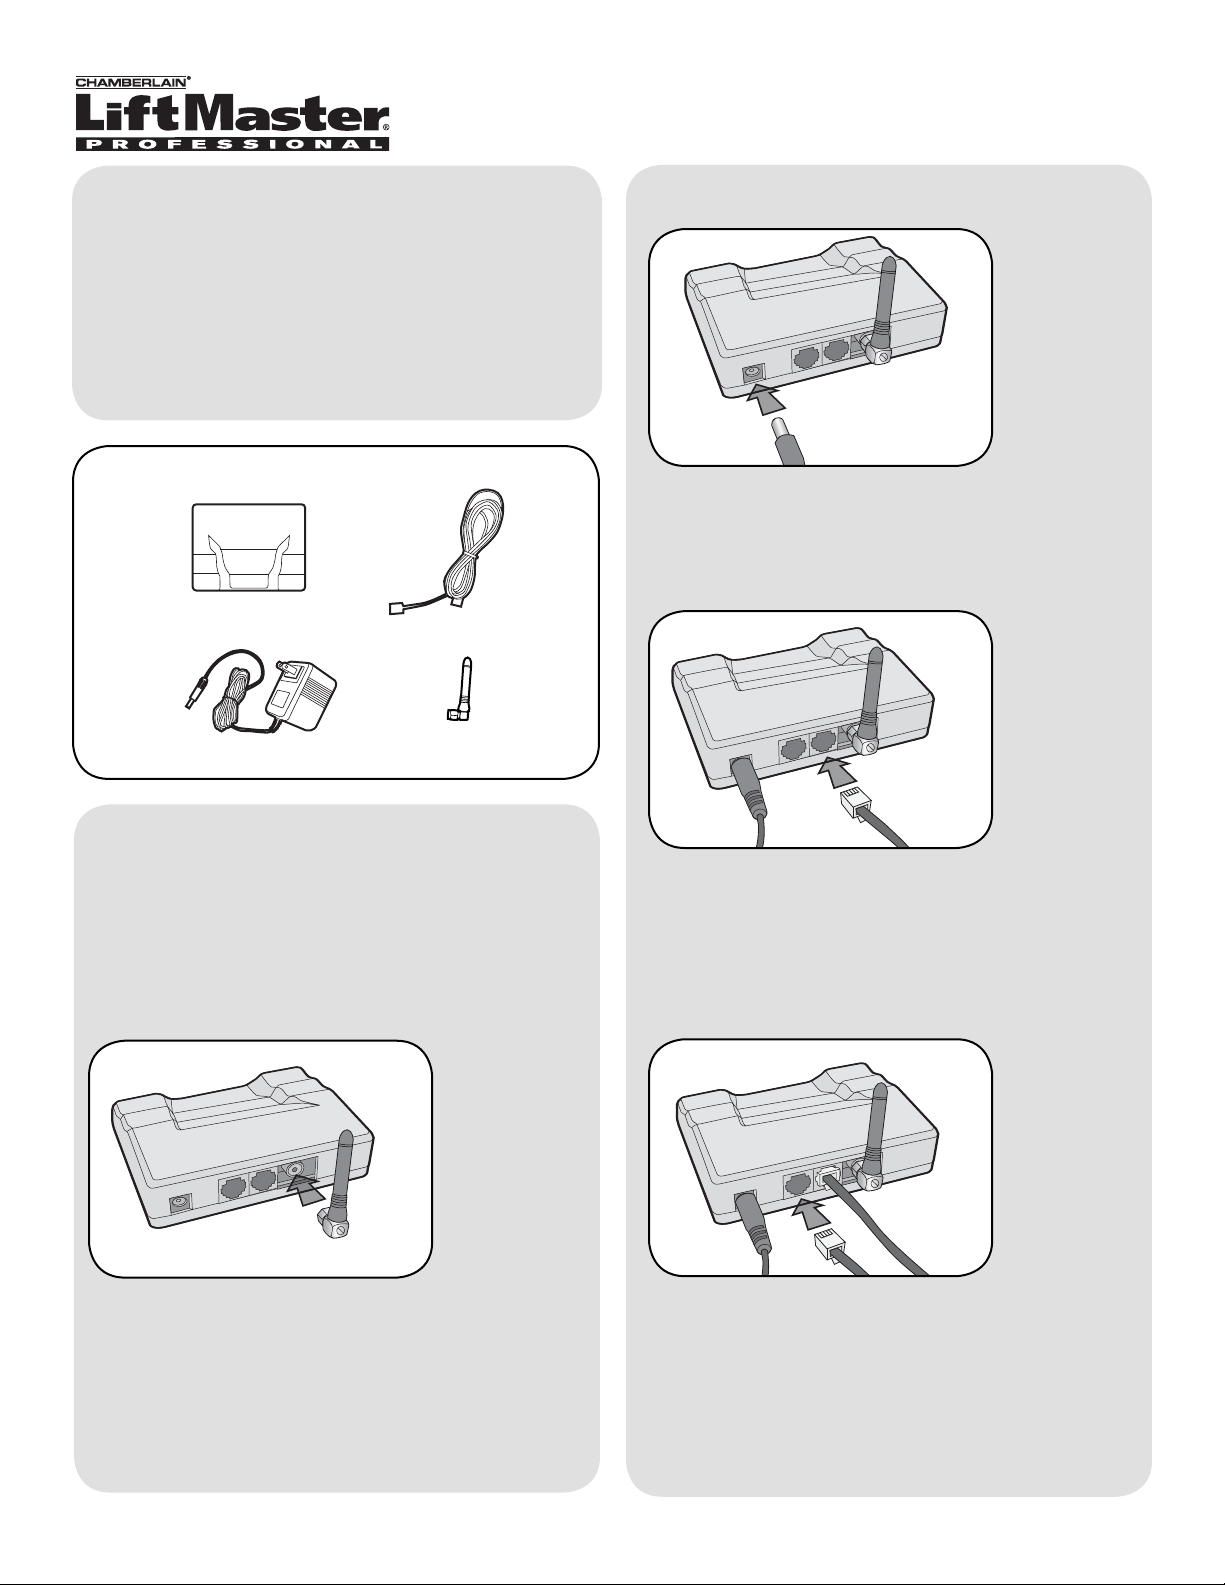
Carton Inventory
Indoor Telephone Interface (OTIU)
AC Adapter
Telephone Cord
Antenna
Step 2
Plug in the AC Adapter. The Power LED will light.
Step 3
Assembly
Choose location near a phone jack and an electrical
outlet. Do not place OTIU near a computer or any
other “radio noise source”. Keep antenna clear of
obstruction.
Step 1
Plug in antenna.
Plug the cord from the phone in the PHONE port.
Step 4
Plug the included phone cord in the LINE port and
connect it to the phone jack in the wall.
1
Page 2
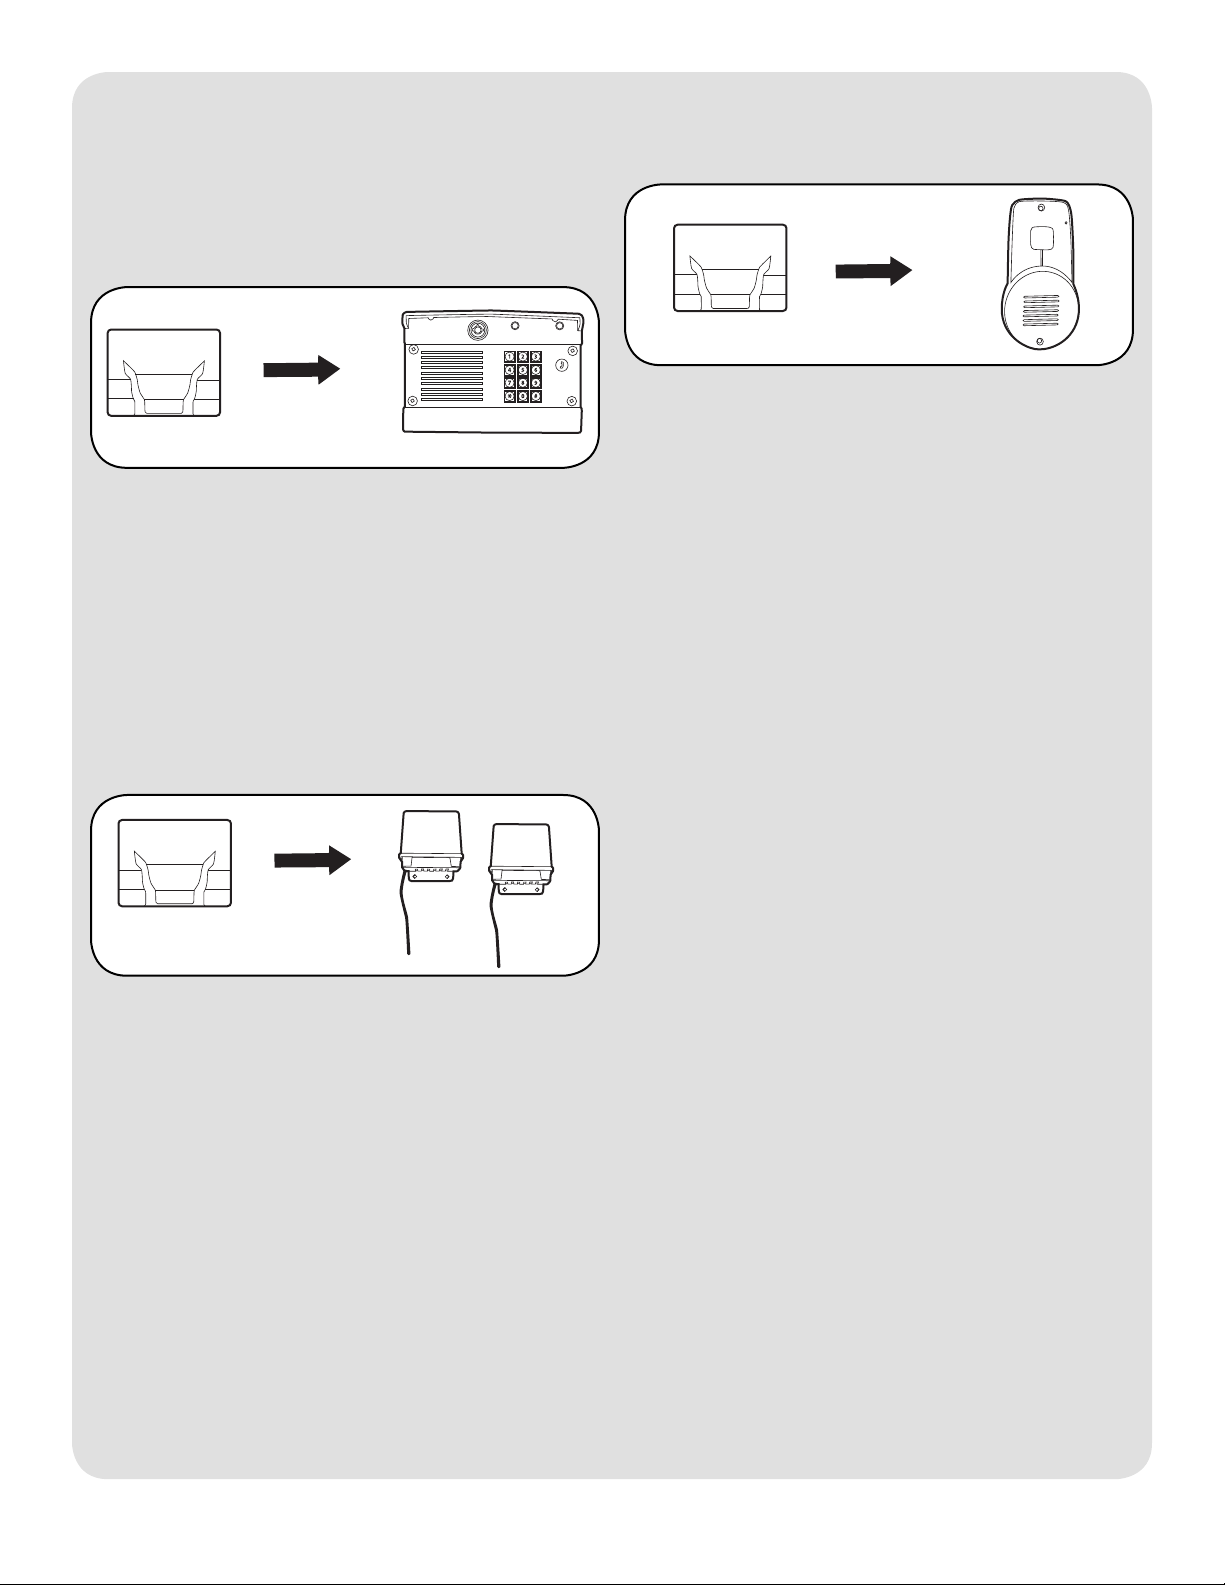
Program Accessories
With Existing Network
NOTE: If programming into an existing network, ensure
the OTIU is programmed to the Active unit.
Gate Access Panel (GAPLM)
Step 1: On the phone connected to the OTIU, press
“**07” after hearing the dial tone. Listen for double beep.
Hang up and Learn LED will flash for 15 seconds. If an
error tone is heard it means that memory will have to be
cleared (see Troubleshooting).
Step 2: Within 15 seconds enter Master PIN Number on
GAPLM.
Step 3: Press “05” and GAPLM will beep. The OTIU will
ring the telephone and Caller ID will display “Unit
Learned”.
DAILM
Step 1: Set Dipswitch #1 on the DAILM to the
UP position to set the DAILM as a primary device.
Step 2: On the phone connected to the OTIU, press
“**07” after hearing the dial tone. Hang up and Learn
LED will flash for 15 seconds. If an error tone is heard it
means that memory will have to be cleared (see
Troubleshooting).
Step 3: Within 15 seconds, press and release the Learn
button on the DAILM.
Step 4: The OTIU will ring the telephone and Caller ID
will display “Unit Learned”.
Repeaters
Step 1: On the phone connected to the OTIU, press
“**07” after hearing the dial tone. Hang up and Learn
LED will flash for 15 seconds. If an error tone is heard it
means that memory will have to be cleared (see
Troubleshooting).
Step 2: Within 15 seconds press the Learn button on
ONE Repeater. The LED will light.
Step 3: The OTIU will ring the telephone and Caller ID
will display “Unit Learned”.
NOTE: If the Repeaters have not been programmed to
anything within an existing network, see Repeater
manual for further instructions.
2
Page 3

Features & Operation
NOTE: Any features of the OTIU do not require extra
service from the Telephone Company.
Power LED
AC Adapter
Learn LED
Line
Antenna
Phone
Answering Calls (Regular Mode)
When visitor presses the Call button on intercom, the
telephone connected to the OTIU will ring distinctively
up to four times. If an expandable OTIU system is used
all phones within the system will ring. When phone is
answered it will connect to the Intercom at gate or door.
After connecting to the Intercom, the gate can be
activated by dialing “*9”.
To activate the primary gate operator dial “*9” on the
phone connected to the OTIU.
Caller ID
When there is a visitor at the gate the OTIU will display
“Gate Visitor” on a Caller ID telephone (or Caller ID box)
that is directly connected to it.
When there is a visitor at the door, the OTIU will display
“Front Door” or “Back Door” depending on how you have
your door Intercom set up (see Intercom manual).
If someone is tampering with the gate, the OTIU will ring
the phone and display “!Gate Tamper!”.
Call Forwarding
If user is away from home the OTIU can be programmed
to call when there is a visitor. When visitor presses Call
button the OTIU will ring home telephone 1 time. If
telephone is not answered, the OTIU will dial callforwarding number that has been programmed. After
ringing that number 3 times the OTIU will hang up. If
visitor presses Call button again the process will repeat.
Answering Calls (Call Forwarding Mode)
When answering call from OTIU, a beep will be heard
for up to 10 seconds. To accept call, dial “0”.
Hang up to disconnect.
To control the gate dial “*9”.
NOTE: OTIU checks if home line is busy prior to dialing
forwarding number. If busy, the OTIU will wait and try
again. Once OTIU dials forwarding number, if forwarding
number is busy, the OTIU will wait and try again.
Programming Call Forwarding Number
On telephone connected to OTIU, dial “*#”. A beep will
be heard.
Enter the forwarding number (up to 14 digits). To accept
new number, press “#”. A beep will be heard.
NOTE: For long distance calls, include proper prefix.
Verifying Call Forwarding Number
On telephone connected to OTIU, dial “**06”. A beep will
be heard. Hang up the telephone.
The telephone will ring and the call forwarding number
that has been programmed will be displayed on Caller
ID screen.
Call Waiting
If talking on the phone connected to OTIU, a distinctive
beep will be heard indicating Call Waiting. Caller ID will
alert that there is a visitor. To place call on hold and
connect to the Intercom, press the FLASH button.
If talking on phone other than the one connected to the
OTIU, the telephone connected to the OTIU will ring as
normal and the call will not be interrupted.
Change Number of Rings
By default the OTIU will ring the telephone 4 times. If an
answering machine is programmed to pick up after 4
rings, OTIU should be changed to ring 3 times. This will
prevent answering machine from picking up if phone is
not answered when a visitor calls. If answering machine
does pick up, visitor will hear answering machine
message through speaker.
Using the telephone connected to OTIU, dial :**102 for
2 rings up through “**105” for 5 rings.
Enable/Disable Call Forwarding
To enable call forwarding dial “**01” on telephone
connected to OTIU. A beep will be heard.
To disable call forwarding dial “**02” on telephone
connected to OTIU. A beep will be heard.
Remote Activation Through Answering
Machine
Gate can be remotely activated through the answering
machine. Call home and when answering machine picks
up, dial “*9”. The OTIU will then activate the gate.
3
Page 4

PIN Number Functions
Number Function
**01 Enable Call Forwarding
**02 Disable Call Forwarding
**07 Activating the OTIU
**06 Verify Call Forwarding Number
**#8 Clear Memory
*9 Activate Gate
**102 - **105 Change number of rings
*#(Phone Number)# Program call forwarding
number
Troubleshooting
Dial tone is not heard after connecting to the OTIU.
Check phone connections. If it is a two-line phone
ensure it is on Line 1.
If a dual-tone error tone is heard when trying to open
gate, ensure OTIU is programmed to the correct
GAPLM, DAILM, or Intercom. Check that gate operator
has been taught to master unit as well.
If OTIU has already been programmed and will need to
have memory cleared (see below).
Memory needs to be cleared.
Clearing OTIU memory will not clear any OTIU settings
or programmed phone numbers. To clear memory, dial
“**#8” on the telephone connected to the OTIU. A beep
will be heard.
To clear DAILM memory, set Dipswitch #1 to the
DOWN position, then press the Learn button until a
beep is heard (about 15 seconds).
OTIU is not getting expected transmission range.
When used in buildings with stucco or cement walls, the
range is greatly reduced. The Repeaters can be used
close to the building to solve this problem.
Keep OTIU away from trees, metal objects, masonry,
computers, and any other “Radio Noise Source”. Radio
devices that run on 900 Mhz also affect range. Turn
them off and see if reception has improved.
Keep antenna vertical.
After dialing “*9” a beep is heard, then an error tone.
Check batteries in GCU.
Will not accept command after dialing “**”.
Check the line and telephone connections.
Telephone does not ring when Call button is
pressed.
If the Active LED on OTIU flashes after Call button is
pressed, check telephone connections.
If the Active LED on OTIU does not flash after the Call
button is pressed, see Programming Accessories to
ensure OTIU is programmed correctly.
There is a buzzing or failed connection when call is
answered.
Move OTIU away from phone and/or computer. Try
changing channel of OTIU and/or the channel on the
GAPLM (see Gate Access Panel manual).
Only first couple of words from caller are heard.
Lower the GAPLM microphone sensitivity (see Gate
Access Panel manual).
When dialing numbers a dial tone is heard.
All numbers and symbols must be dialed within 3
seconds of each other, otherwise the OTIU times out
and returns to dial tone.
FOR TECHNICAL SUPPORT DIAL OUR TOLL FREE NUMBER:
1-800-528-2806
www.liftmaster.com
NOTICE: To comply with FCC and or Industry Canada rules (IC), adjustment or modifications of this receiver and/or transmitter are prohibited,
except for changing the code setting or replacing the battery. THERE ARE NO OTHER USER SERVICEABLE PARTS.
Tested to Comply with FCC Standards FOR HOME OR OFFICE USE. Operation is subject to the following two conditions: (1) this device may not
cause harmful interference, and (2) this device must accept any interference received, including interference that may cause undesired operation.
© 2008, The Chamberlain Group Inc.
114A3530B All Rights Reserved
 Loading...