

Page 1

For more information, please visit www.devancocanada.com or call toll free at 855-931-3334
Page 2

SAFETY INFORMATION
Mechanical
Electrical
IMPORTANT NOTES:
• BEFORE attempting to install, operate or maintain the
commercial door operator, you must read and fully understand
this manual and follow all safety instructions.
• DO NOT attempt repair or service of a commercial door
operator unless you are an Authorized Service Technician.
• A commercial door operator should only be installed on a
properly balanced door only. Ensure door is properly balanced
prior to installation.
When you see these Safety Symbols and Signal Words on the
following pages, they will alert you to the possibility of serious
injury or death if you do not comply with the warnings that
accompany them. The hazard may come from something
mechanical or from electric shock. Read the warnings carefully.
When you see this Signal Word on the following pages, it will
alert you to the possibility of damage to your door and/or the
door operator if you do not comply with the cautionary
statements that accompany it. Read them carefully.
IMPORTANT INSTALLATION INSTRUCTIONS
TO REDUCE THE RISK OF SEVERE INJURY OR DEATH:
1. READ AND FOLLOW ALL INSTALLATION WARNINGS AND
INSTRUCTIONS.
2. Install door operator ONLY on a properly balanced and
lubricated door. An improperly balanced door may NOT
reverse when required and could result in SEVERE INJURY
or DEATH.
3. ALL repairs to cables, spring assemblies and other hardware
MUST be made by a trained door systems technician BEFORE
installing an operator.
4. Disable ALL locks and remove ALL ropes connected to a
door BEFORE installing an operator to avoid entanglement.
5. Install an operator, a minimum of 8 feet (2.44 m) from the
floor.
6. NEVER connect a door operator to a power source until
instructed to do so.
7. NEVER wear watches, rings or loose clothing while installing
or servicing an operator. They could be caught in the door or
operator mechanisms.
ENTRAPMENT PROTECTION DEVICES:
LiftMaster Monitored Entrapment Protection (LMEP)
Monitored photoelectric sensors and/or door edge sensors are
required for any momentary contact to close modes of operation.
Refer to operator manual for additional information. Refer to the
‘Commercial Door Entrapment Protection Systems’, and
accessories page 64, for available options.
8. Install a control station:
• within sight of the door
• out of reach of small children and at a minimum height of
5 feet (1.5 m) above floors, landings, steps, or any other
adjacent walking surface.
• away from ALL moving parts of the door
9. Install the control station far enough from the door to
prevent the user from coming in contact with the door while
operating the controls.
10. Install the entrapment warning placard on the wall next to
the control station in a prominent location, visible from the
door.
11. Place the manual release/safety reverse test label in plain
view on the inside of door.
12. Upon completion of installation, test the entrapment
protection device(s).
13. SAVE THESE INSTRUCTIONS.
Page 3

General Information
This guide is intended to help with Commercial Door Operator maintenance and troubleshooting. The guide offers several
different troubleshooting scenarios and provides answers to frequently asked questions. The comprehensive, yet user-friendly
guide will hopefully be used as a tool to solve all of the Commercial Door Operator maintenance problems you may encounter.
SECTION A
Basic Troubleshooting 4-6
SECTION B
Logic Operators
Industrial Duty Logic Operators 8-26
Medium Duty Logic Operators 27-31
SECTION C
Mechanical Operators 34-36
SECTION D
Basic Electrical Information 38-45
SECTION E
General Information 46-52
SECTION F
Wiring Diagrams 54-62
Commercial Door Entrapment Protection Systems 64
Page 4

Table of Contents
SECTION A
Page
Basic Troubleshooting 5
4
Page 5

Basic Troubleshooting
Always Follow Local Electrical Codes
WARNING! If you are not trained in electrical safety, contact a professional electrical safety trainer. It is in your best
interest to have electrical safety training. Do not attempt to work on a powered (turned on) operator if you have
not received electrical safety training. Remember, it is dangerous to deal with high-voltage electricity. Many people
incurred serious injuries, including fatalities, as a result of electrical accidents. You must be very careful when
checking line voltages.
The high-voltage wiring to the operator, low-voltage wiring to the control station(s), and safety devices may require a
licensed electrician for installation.
Make Sure The Door Is Working Properly
Close the door and disconnect the door from the operator. Manually operate the door. The lifting force needed by most
doors should be manageable by one person and the door should move smoothly. Check all hardware for wear, binding
and tightness. Replace any marginal parts. The door should be in good working order. An unbalanced or jerking door
will put excess wear on the operator and cause premature failure. When checking a door with a hoist operator, be sure
the door is disconnected from the operator and lifted by hand and not by the hoist/hand chain. It is very diffi cult to
determine if the door is balanced when using the operator chain hoist. Repair any door problems before reattaching
the operator.
A
Remove All Accessories And Control Devices
In many cases an operator may be malfunctioning due to accessories or control devices attached to the operator’s
control circuit. The fi rst step in troubleshooting is to use a process of elimination. Disconnect all wired accessories
and control devices. Many times in complicated installations, there will be extra devices installed by an electrician
or other subcontractor that may not be functioning properly with the operator. If the door functions properly after
disconnecting additional devices, start reconnecting each device one at a time. Determine if any of the control
device(s) are causing the problem. Advise the customer of your fi ndings and their options for repairs/replacements.
NOTE: When monitored entrapment protection devices are removed from operators that require a monitored
entrapment protection device such as photo eyes; they will no longer function unless they are under constant
pressure.
5
Page 6

Basic Troubleshooting
Check Incoming Voltage
Check the incoming power voltage to ensure readings are within 10% of the rated voltage. For example, a 115VACrated power line should read between 103.5 to 126.5VAC. Continue to monitor voltage as the operator is activated
through one cycle. Voltage drops occur, but should not drop more than 5% under load from the non-functioning
position, +/- 10% at startup and +/- 5% while the operator is running. Low voltages can cause damage to components
and cause functionality issues.
NOTE: The installation of a dedicated circuit is required for achieving optimal voltage.
Check The Overload
Look at the overload button (when present) on the outside or inside of the electrical box. To confi rm if the overload has
been tripped, press the overload button. If the overload has been tripped, look for a short or bad wire in the operator.
Resetting the overload will only fi x the problem temporarily. LiftMaster recommends the cause of the overload be
identifi ed and resolved. Logic operators are equipped with a thermal overload and will automatically reset themselves.
After the operator cools it must be run a full cycle.
Check Any Interlock Switches
Check any interlock and/or disconnect switches for full activation. Manually activate any interlock switches to verify
proper motion of the switch and use a multimeter across the switch leads to verify proper electrical output. The output
should show a closed circuit (low resistance) when the door is ready to be activated.
A
All of the above testing is generic for Logic 3.0, Logic 4.0, Logic 5.0, Medium Duty Logic and Mechanical operators.
Mechanical operators are also known as Contactor or Electro-Mechanical operators. Effi ciency in troubleshooting
operators differs from this point. Logic operators have many LEDs and special controls to speed up diagnosis. For a
Mechanical operator, refer to Section C. For Logic 3.0, 4.0, 5.0 operators, continue on to Section B.
6
Page 7

Page 8

Table of Contents
SECTION B
Logic Operators
Industrial Duty Logic Operators
Page
Logic Board Overview 9
Troubleshooting 13
Selected Features 21
Diagnostic Chart 22
Symptoms And Solutions 23
Error Codes 25
Remote Controls 27
Medium Duty Logic Operators
Page
Troubleshooting 28
Symptoms And Solutions 29
Error Codes 30
Programming 31
Page 9
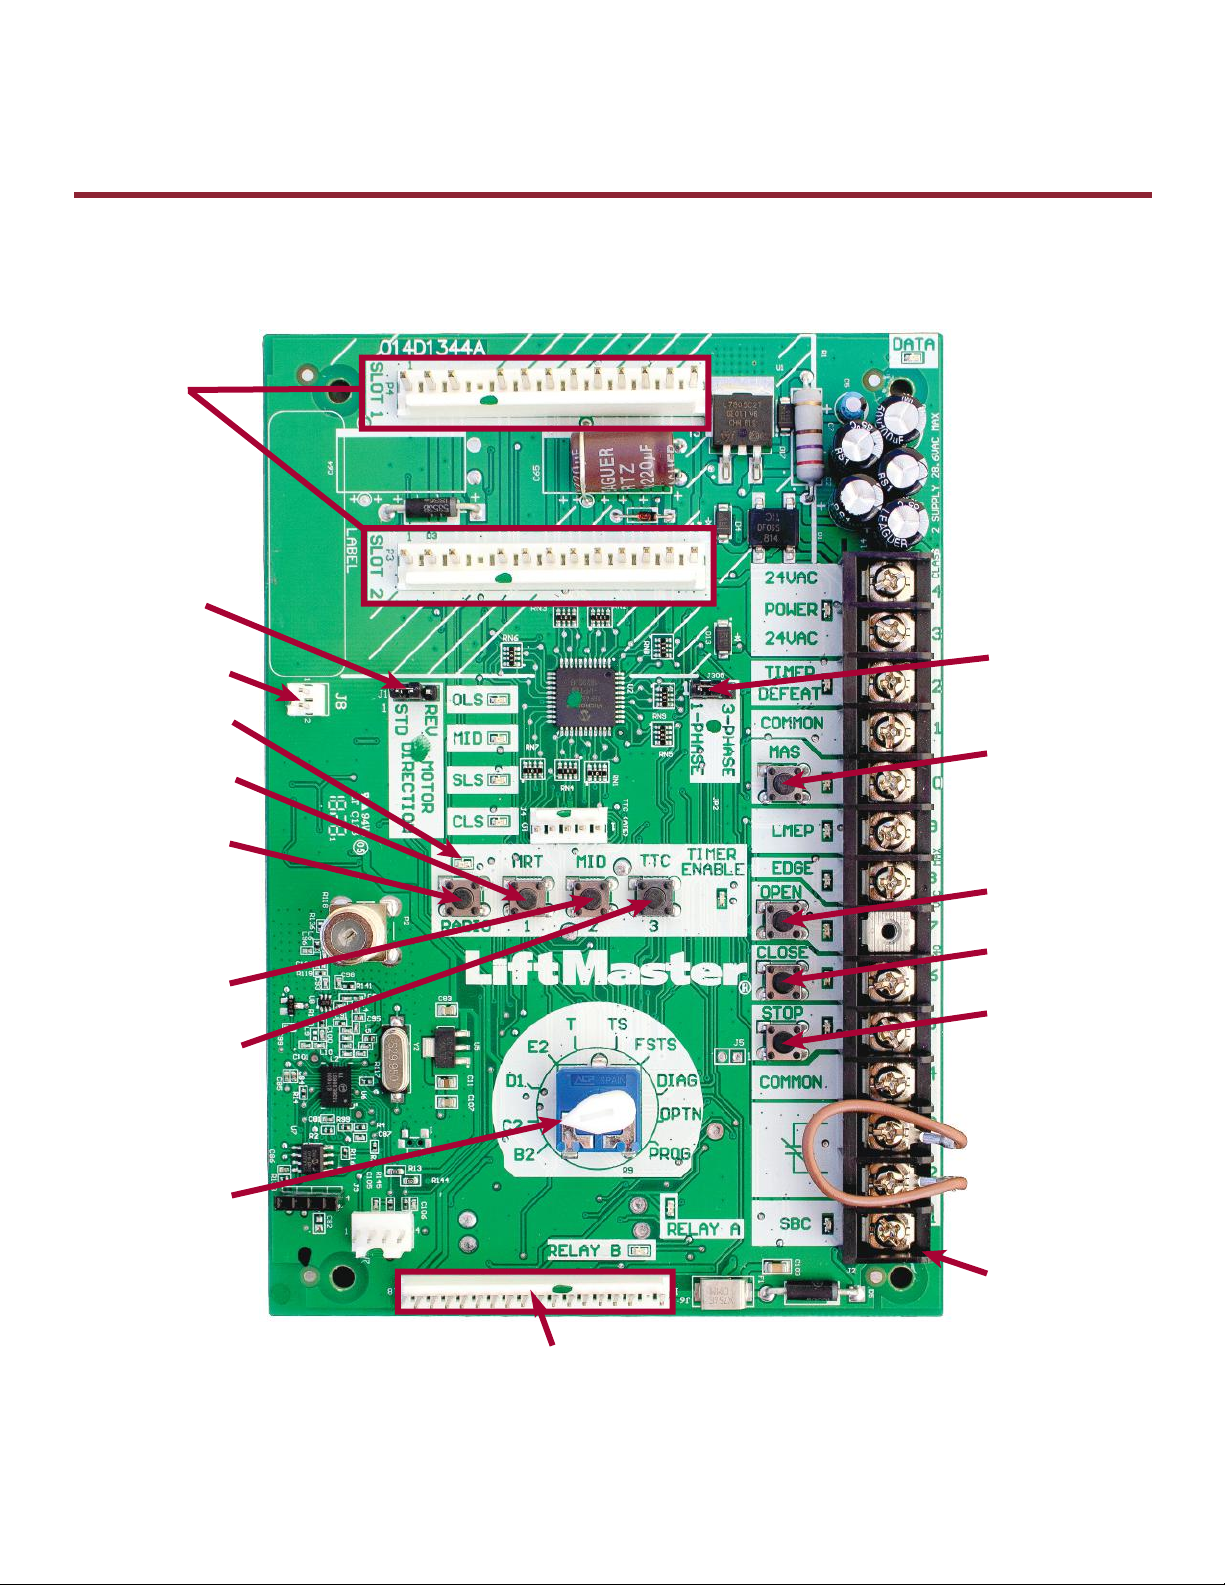
Logic Board Overview
LOGIC 5.0 - SERVICE KIT# K001D8395
Optional Auxiliary
Card Receptacles
Motor
Direction
Jumper
Current Sense
B
Industrial Duty Logic Operators
Single Phase
& Three Phase
Jumper
Receiver LED
Maximum Run
Timer Button
Radio
Learn Button
Mid Stop
Learn Button
Timer-To-Close
Learn Button
Selector Dial
(used for
programming
and selecting
wiring type)
Maintenance
Alert System
Button for
Programming
Open Button
Close Button
Stop Button
Control Wiring
Terminal Block
Main Motor Control Harness Connection
9
Page 10
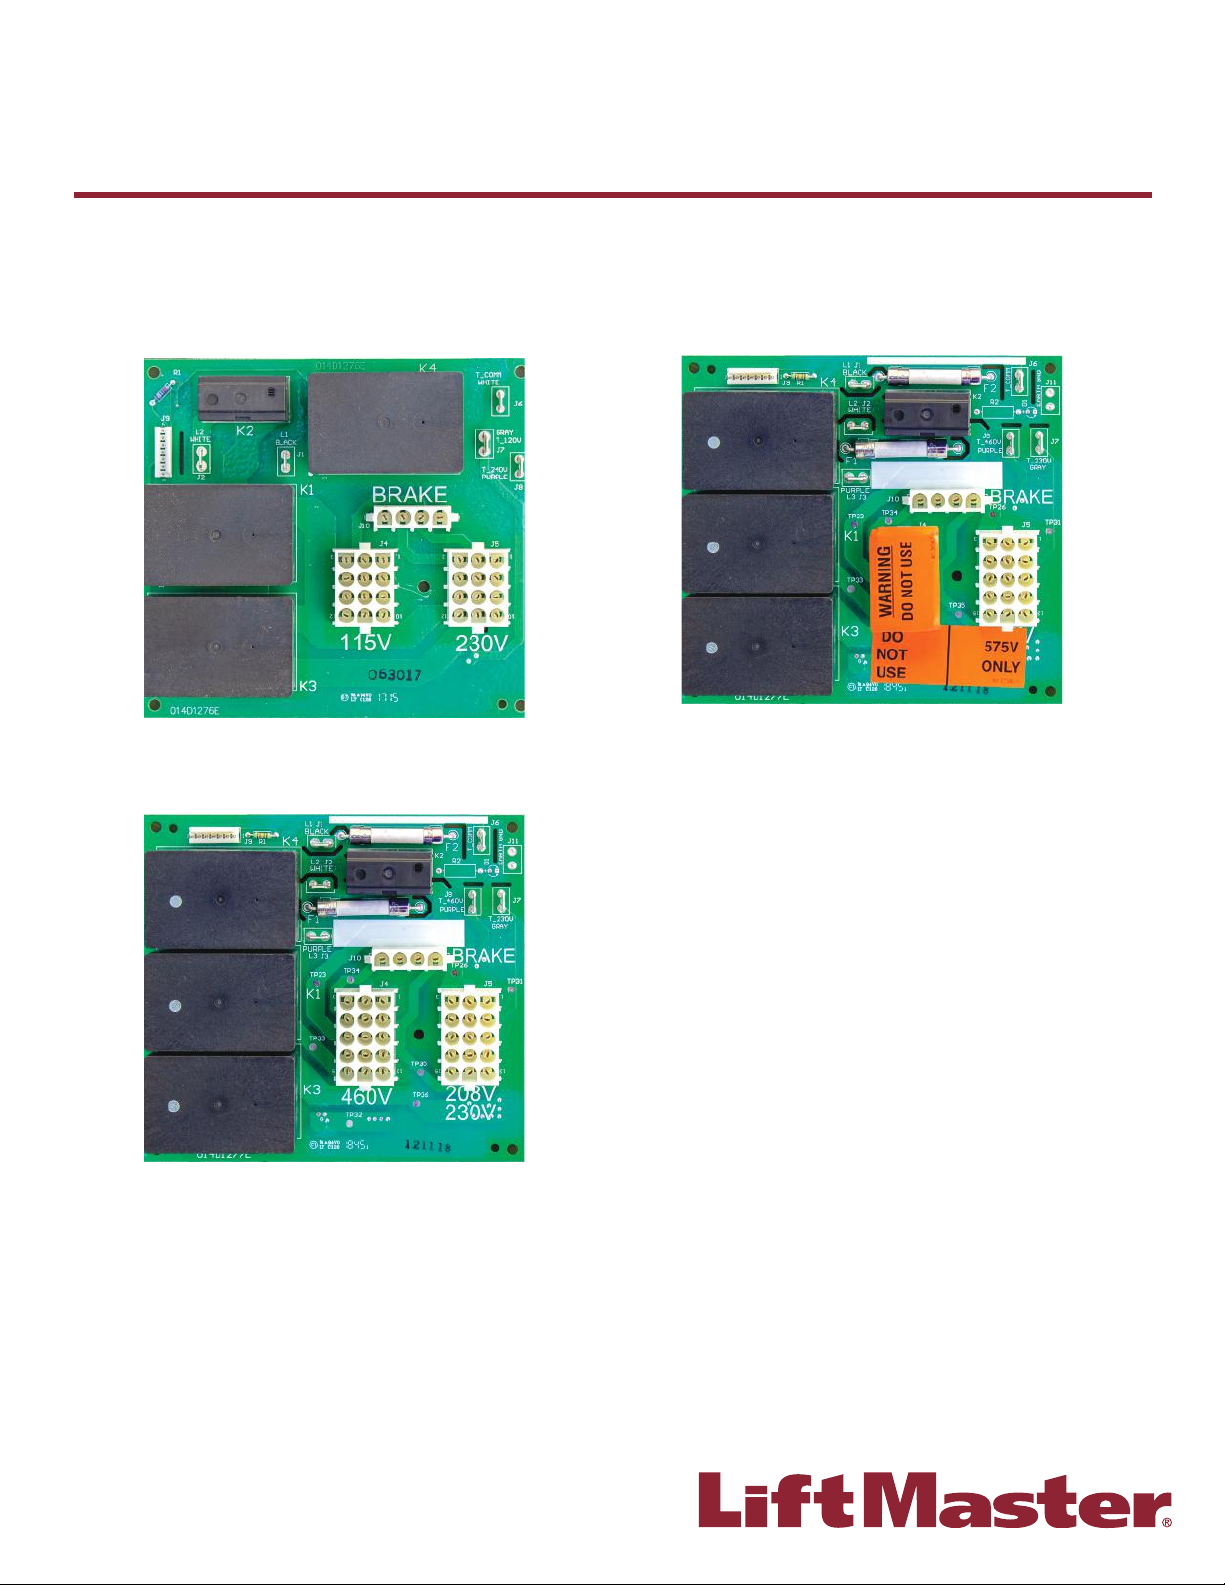
Logic Board Overview
Logic 5.0 Power Board - Dual Voltage Connections
• Reduces stocking a wide variety of operators due to range of potentially required voltages.
• Minimizes lost time if operator does not meet predetermined job site voltage requirements.
B
Industrial Duty Logic Operators
1 Phase Power Board 115/230V
Service Kit# ...................................... K001D8396-1
3 Phase 208/230/460V
Service Kit# ..........................................K001D8397
N4 & N4X Electrical Box Board Requirements
The N4 & N4X Electrical Boxes require specifi c power boards.
When installing power boards for the N4 or N4X Electrical boxes, choose one of the compatible power boards outlined
below that fi t your specifi c voltage requirements.
3 Phase Power Board 575V
Service Kit# ...................................... K001D8397-1
1 Phase Power board - 115/230V, N4/N4X
Service Kit#
3 Phase Power board - 230/460/575V, N4/N4X
Service Kit#
.............................................................................................................................................................................K001D8398
.........................................................................................................................................................................K001D8116-1
10
Page 11

Logic Board Overview
LOGIC 4.0 K001A6837
Optional Auxiliary
Optional Auxiliary
Card Receptacles
Card Receptacles
Motor
Motor
Direction
Direction
Jumper
Jumper
Receiver LED
Receiver LED
Maximum Run
Maximum Run
Timer Button
Timer Button
Radio
Radio
Learn Button
Learn Button
B
Industrial Duty Logic Operators
Single Phase
Single Phase
& Three Phase
& Three Phase
Jumper
Jumper
Maintenance
Maintenance
Alert System
Alert System
Button for
Button for
Programming
Programming
Mid Stop
Mid Stop
Learn Button
Learn Button
Timer-To-Close
Timer-To-Close
Learn Button
Learn Button
Selector Dial
Selector Dial
(used for
(used for
programming
programming
and selecting
and selecting
wiring type)
wiring type)
Main Motor Control Harness Connection
Main Motor Control Harness Connection
5
Open Button
Close Button
Stop Button
5
Control Wiring
Terminal Block
Open Button
Close Button
Stop Button
Control Wiring
Terminal Block
11
Page 12

Logic Board Overview
LOGIC 3.0 K001A5729
Optional Auxiliary
Card Receptacles
B
Industrial Duty Logic Operators
Single Phase and
Three Phase
Jumper
Motor
Direction
Jumper
Open Limit
Switch LED
Mid-Stop LED
Safety Limit
Switch LED
Close Limit
Switch LED
Receiver LED
Radio Learn
Button
Maximum
Run Timer
Learn Button
Mid-Stop
Learn Button
Timer to
Close Learn
Button
Power LED
Timer Defeat
LED
MAS
Learn Button
and LED
Entrapment
Protection LED
Edge LED
Open Button
LED
Close Button
LED
Stop Button
LED
Relay LEDs
Selector Dial
Failsafe/Non-Failsafe
Selector Switch
Control Wiring
Terminal Block
Timer
Enable LED
On-Board
3-Button
Control Station
Single Button
Control LED
12
Page 13

Troubleshooting
Look For Green “POWER” LED
The Industrial Duty Logic Operator has many features reducing time required to identify and make repairs, as well
as time spent training service technicians. Please note when working on an operator, always follow proper electrical
safety guidelines and local codes.
The transformer should produce 24VAC (±10 %) on the secondary side. If the green power LED, which is located near
terminal 13, is illuminated then 24VAC is present on the logic board. Verifying with a multimeter is still recommended.
To check the secondary side of the transformer, set the meter to volts AC and check across the yellow and blue wires
on the transformer or terminals 13 and 14 on the logic board. If working properly, they should each show 24VAC +/10%.
The logic board and all the controls are run on 5VDC. The 5VDC control signal allows 1000 ft. control runs with
18AWG wire. Be sure any incoming signal to the board is from a dry contact and not a voltage source. A dry contact,
such as a standard switch, is a device connecting two wire leads to make a closed circuit. Some examples are the open
or close buttons on LiftMaster’s standard 3-button control station, limit switches and standard relay outputs.
If the green “POWER” LED does not turn on, the transformer may not be working correctly. Verify primary voltage
feeding the transformer by checking: Logic 3.0 and Logic 4.0 - White and Brown wires. Logic 5.0 - Common and
appropriate wire. See the chart for high voltage wires.
B
Industrial Duty Logic Operators
Transformer - High Voltage Color Code
LOGIC 3.0 AND LOGIC 4.0 LOGIC 5.0
115V Brown and White White and Gray
208/230V Single Phase Brown and White White and Purple
208/230V Three Phase Brown and White White and Gray
460V Brown and White White and Purple
575V Brown and White White and Gray
Check Control Station
Verify the control stations are wired to the terminal strip correctly. This is easily checked by using the “OPEN,”
“CLOSE”, and “STOP” LED diagnostic LEDs. The operator should have the “OPEN” and “CLOSE” LEDs off and the
green “STOP” LED on.
Turn the selector dial to DIAG to put the operator in diagnostic mode. Confi rm the wiring is correct on the
board by pressing the “OPEN” and “CLOSE” button on the board separately. When each button is pressed, the
corresponding LED should turn on. When working properly, the STOP LED should be illuminated. Pressing the STOP
button should make this LED turn off. If the LED’s respond accordingly to the on-board OPEN/CLOSE/STOP buttons,
test the 3-button control station or the wiring to the 3-button control station.
To test the 3-button control station, open the control station and use a multimeter to verify continuity. When working
properly, an idle 3-button control station with no depressed buttons should read infi nite resistance (open circuit)
across the “OPEN” and “CLOSE” buttons and 0 Ohms (closed circuit) across the “STOP” button. The meter should
read 0 Ohms (closed circuit) when the “OPEN” and “CLOSE” buttons are pressed, and infi nite resistance (open circuit)
when the “STOP” button is pressed. If the continuity test on the 3-button control station yields different results than
listed, the control station will have to be replaced.
NOTE: Don’t run control wiring and power wiring in the same conduit, these wirings should be separated by 18”.
13
Page 14

Troubleshooting
Check Control Station (Continued)
Terminals 2 and 3 are also a normally closed circuit used when an external interlock is present. If the external interlock
is activated the “STOP” LED will not be lit.
If the LEDs do not respond, disconnect the wall control station(s), put a jumper between the “STOP” and “COMMON”
terminals, and try activating the LEDs by pressing the on-board 3-button control station next to the terminal strip. If
the LEDs do not respond, there is a problem with the logic board and will require replacement.
If the lights do respond, but the operator still does not run, reset the operator to factory defaults.
B
Industrial Duty Logic Operators
Resetting Factory Defaults - Clearing Memory
To reset most of the user installed settings back to factory defaults:
1) Turn the selector dial to DIAGNOSTIC.
2) Press and hold the STOP button for 5 seconds. The MAS LED will fl ash
momentarily when the factory defaults have been restored.
3) Return the selector dial to the desired wiring type.
Factory Defaults:
a) Timer-To-Close is set to 0 seconds.
b) The Mid Stop is deactivated.
c) The Maintenance Alert System is deactivated.
d) The Maximum Run Timer is set to 90 seconds.
e) Car Dealer Mode is deactivated.
f ) The remote controls and myQ® devices will still be learned.
g) Remote control programming via the 3-button control station.
h) The LiftMaster Monitored Entrapment Protection (LMEP) device(s) will
be unprogrammed.
NOTE: Life of Operator feature (Odometer/Cycle Counter) and programmed
remote controls and myQ devices are not cleared.
SELECTOR DIAL
Operation will
vary depending
on wiring type
14
Page 15
Troubleshooting
Advanced Troubleshooting: Testing Single Phase Logic 3.0 And 4.0 Relays
The following tests should be performed by a qualifi ed technician. A multimeter is required.
B
Industrial Duty Logic Operators
(YE)
(WH)
(WH)
(WH)
(WH)
(WH)
(WH)
(YE)
(YE)
(OR)
(GY)
(PU)
(OR)
01
A
4
2
(PU)
(BL) (GY)
See Motor
Connections
8
6
SLOT 1
hot
neutral
ground
(YE)
SLOT 2
MOV
MOV
L3 L2 L1
(WH)
COM
+24 VAC -24 VAC
(BK)
120
VAC
OLS
REV
STD
120 / 240
VAC
MID
SLS
MOTOR
DIRECTION
(BR)
(WH)
CLS
See Motor
Connections
NO
COM
COIL
RADIO
(WH)
C
(GY)
(WH)
01
B
4
8
6
2
Testing C Relay
Check Coil Wires. 0VDC at idle, 24VDC when given a command either direction. Check NO Contact. Metering L1 to
either white wire on C relay should read line voltage when given a command.
Testing B Relay
Check Coil Wires. 0VDC at idle, 24VDC when given an OPEN command. *Special applications might show voltage in
the opposite direction.
Check NO Contact. Metering L2 to 6 on B relay should read line voltage when given an OPEN command. *Special
applications might show voltage in the opposite direction.
Testing A Relay
Check Coil Wires. 0VDC at idle, 24VDC when given a CLOSE command. *Special applications might show voltage in
the opposite direction.
Check NO Contact. Metering L2 to 2 on A relay should read line voltage when given a CLOSE command. *Special
applications might show voltage in the opposite direction.
Testing K3 Relay (Start Winding Relay On Board With White And Yellow Wires)
K3 is a NO relay that closes for 1.25 seconds during start up. To test, remove White and Yellow wires and test for
continuity across the contacts on the relay. Reading should be OPEN when operator is idle and should close for 1.25
seconds when operator is given a command.
NOTE: 1) This test will put the operator into a restricted close mode. Simply cycle power to reset.
2) If the K3 relay is stuck CLOSED, the motor will 'GROWL' loudly and trip the circuit breaker.
3) If the K3 relay is stuck OPEN, motor will only hum.
15
Page 16

Troubleshooting
R
R
Advanced Troubleshooting: Testing Three Phase Logic 3.0 And 4.0 Relays
The following tests should be performed by a qualifi ed technician. A multimeter will be required.
B
Industrial Duty Logic Operators
SLOT 1
208/230/460
VOLT 3PH.
POWER IN
(YE)
SLOT 2
L3 L2 L1
(WH)
COM 120
+24 VAC
MOV
MOV
(WH)
(BK)
VAC
240 / 460 /
575 VAC
-24 VAC
OLS
REV
STD
MID
SLS
MOTOR
DIRECTION
CLS
MRT
NO
COM
COIL
(WH)
D
1
RADIO
(WH)
(WH)
(PU)
(BR)
(BR)
E2
D1
See Motor
Connections
(WH)
NO
COM
C
COIL
C2
B2
01
B
(WH)
(GY)
(GY)
(YE)
(RD)
(WH)
(PU)
(YE)
(OR)
(GY)
(PU)
(OR)
(WH)
(WH)
(WH)
84
(WH)
62
(WH)
01
A
8
4
62
(YE)
(GY)
See Motor
Connections
Testing C And D Relays
Check Coil Wires. Both are 0VDC at idle. Metering across either coil should read 12VDC when given a command.
Check NO Contact. Metering L1 to either white wire on C or D relay should read line voltage when given a command.
Testing B Relay
Check Coil Wires. 0VDC at idle, 24VDC when given an OPEN command. *Special applications might show voltage in
the opposite direction.
Check NO Contact. Metering L2 to 6 on B relay should read line voltage when given an OPEN command. *Special
applications might show voltage in the opposite direction.
Testing A Relay
Check Coil Wires. 0VDC at idle, 24VDC when given a CLOSE command. *Special applications might show voltage in
the opposite direction.
Check NO Contact. Metering L2 to 2 on A relay should read line voltage when given a CLOSE command. *Special
applications might show voltage in the opposite direction.
16
Page 17

Troubleshooting
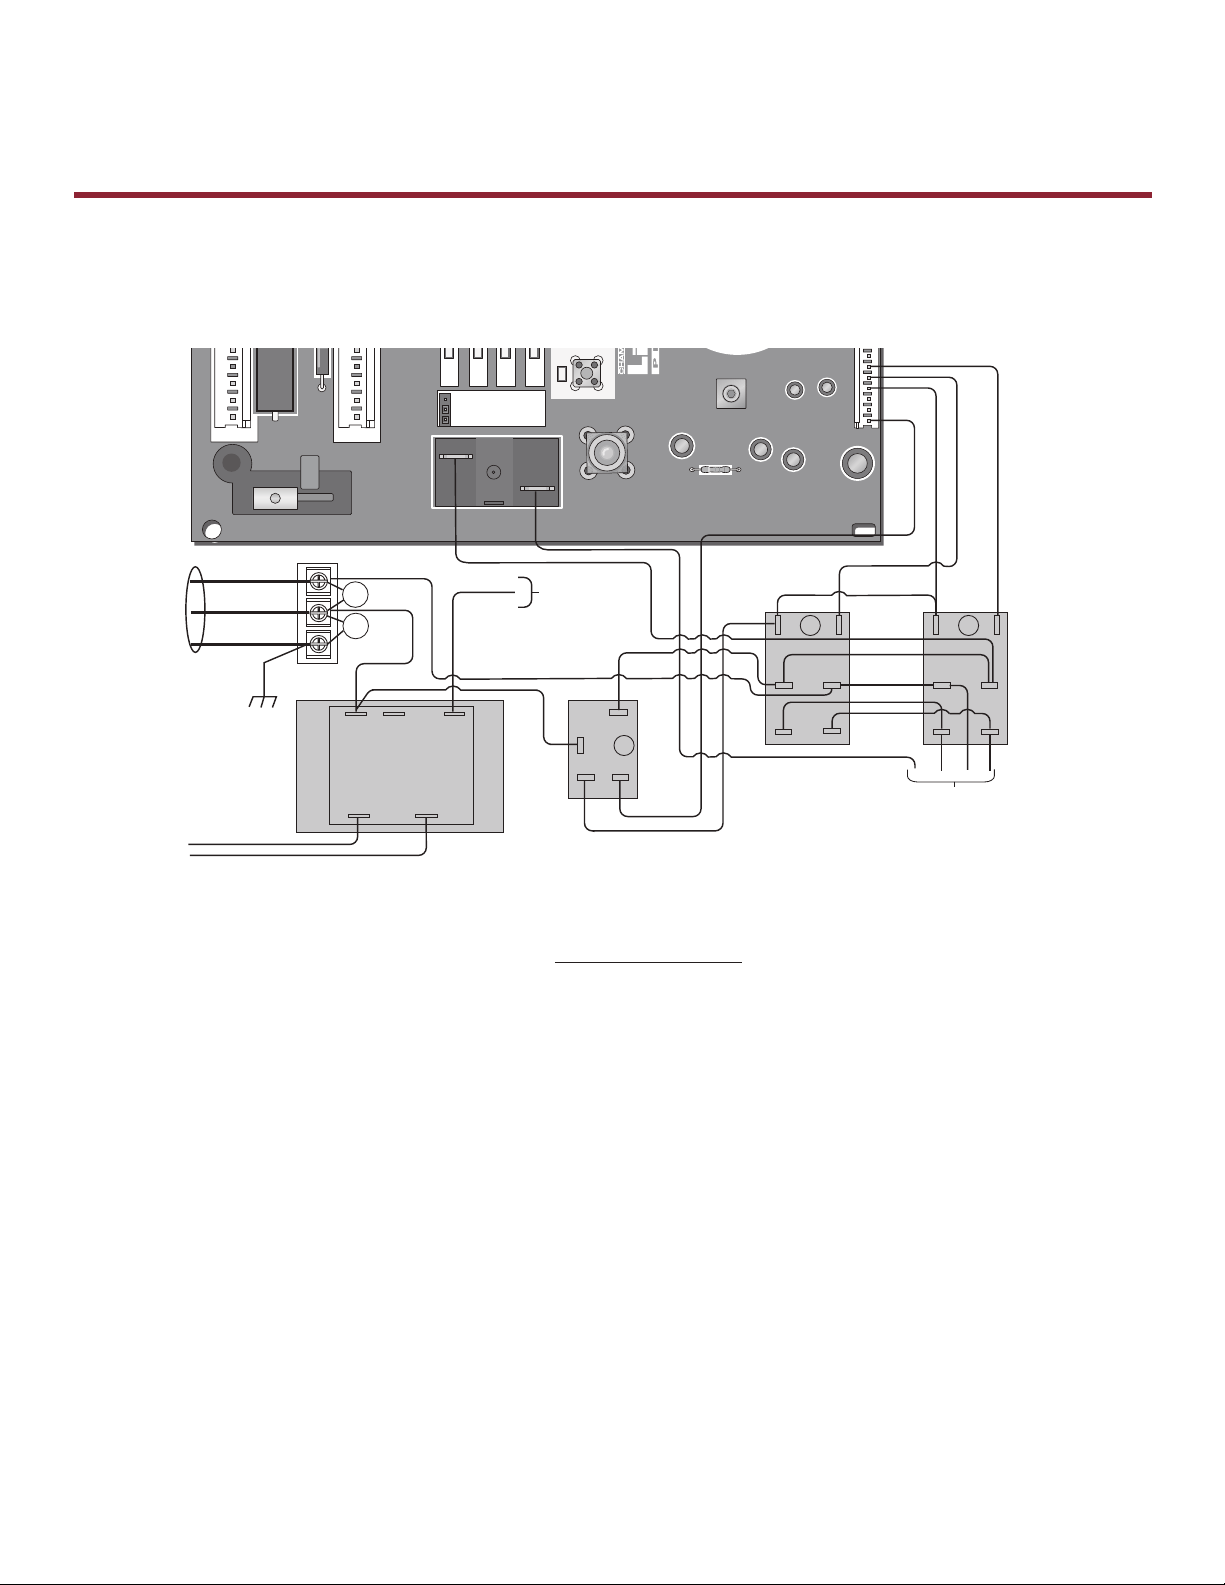
Advanced Troubleshooting: Checking Logic 5.0 Single Phase Motor
The following tests should be performed by a qualifi ed technician. A multimeter will be required.
B
Industrial Duty Logic Operators
123
456
789
10 11 12
1) Turn power off to the operator.
2) Locate the motor plug on the POWER BOARD and unplug.
3) Set the multimeter to continuity/ohms. Ω *Certain meters have a setting that beeps when a closed circuit is
detected. This setting is preferred for the test.
4) Using the guide below, check for continuity across the following pins on the motor harness:
a. Place probe between Thermal Protector, Pins 4 and 10. Continuity should be present.
b. Place probe between Run Winding 1, Pins 12 and 8. Continuity should be present.
c. Place probe between Run Winding 2, Pins 11 and 9. Continuity should be present.
d. Place probe between Start Winding, Pins 1 and 7. Continuity should NOT be present.
5) If the readings are different than the results expected above, the motor will have to be replaced.
17
Page 18
Troubleshooting
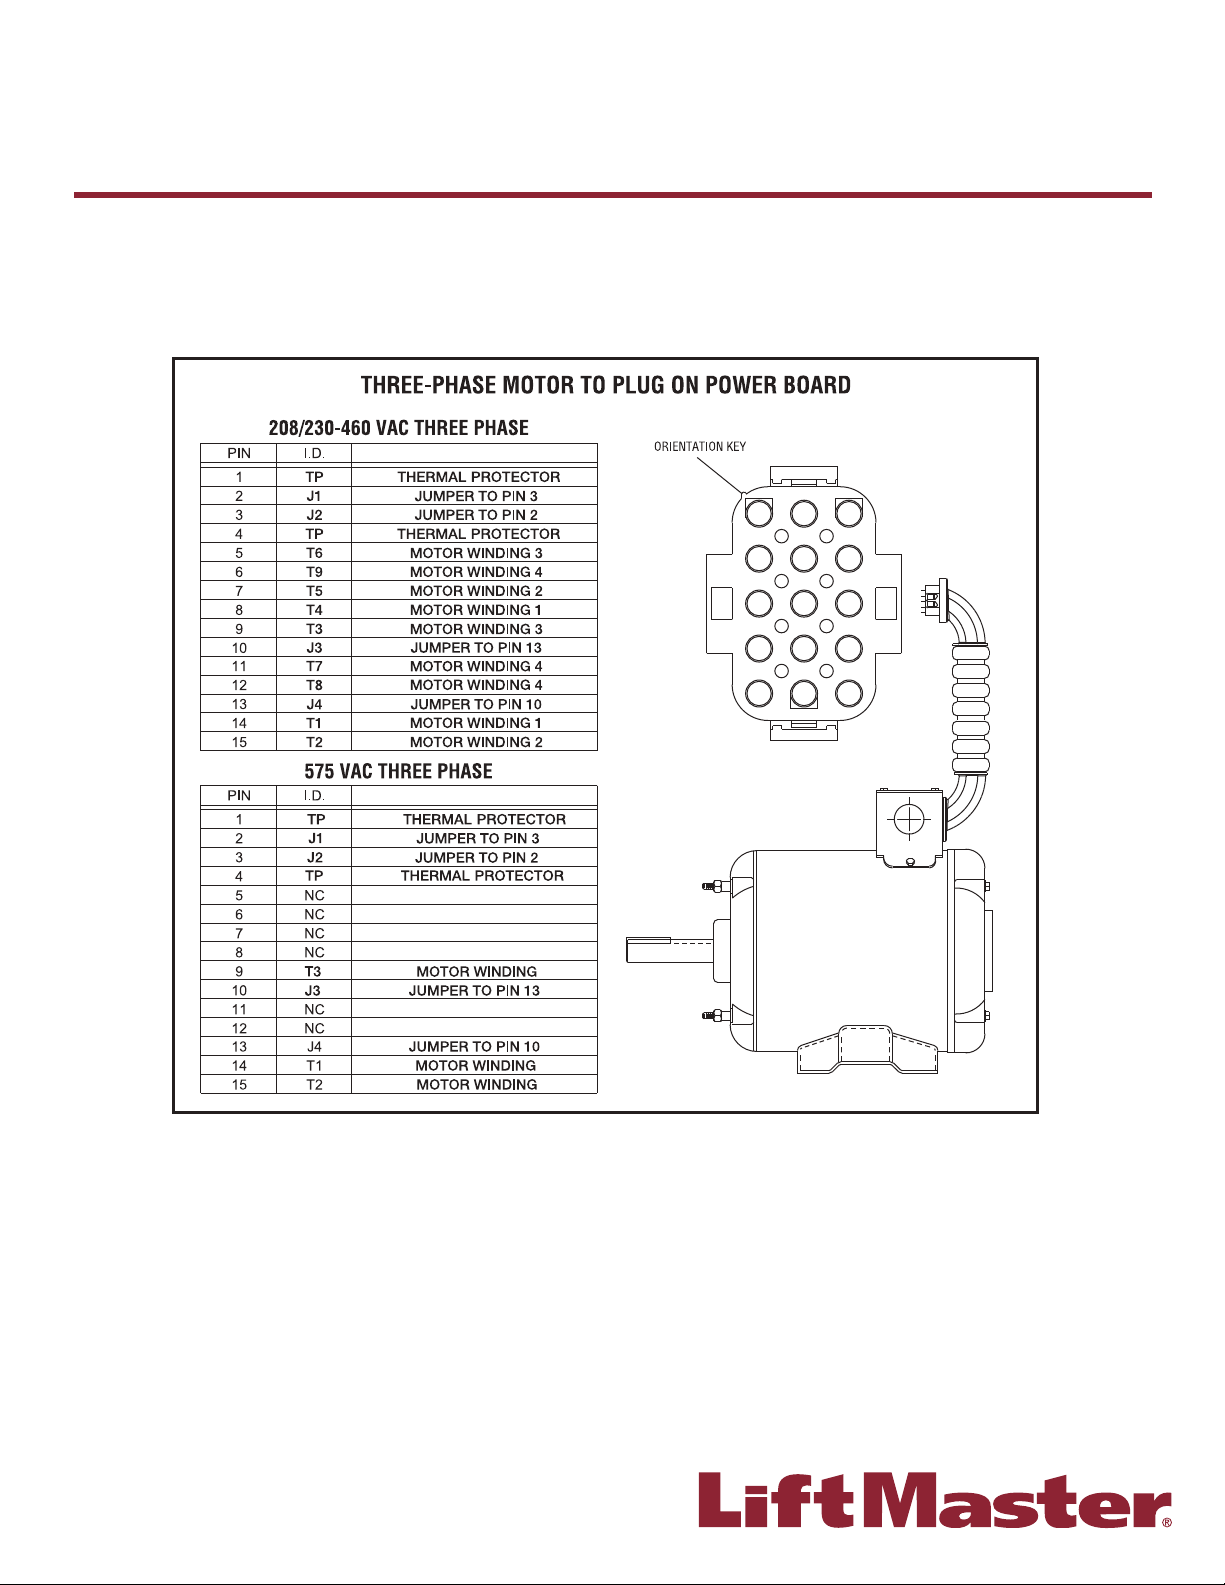
Advanced Troubleshooting: Checking Logic 5.0 Three Phase Motor
The following tests should be performed by a qualifi ed technician. A multimeter will be required.
B
Industrial Duty Logic Operators
123
456
789
10 11 12
13 14 15
1) Turn power off to the operator.
2) Locate the motor plug on the POWER BOARD and unplug.
3) Set the multimeter to continuity/ohms. Ω *Certain meters have a setting that beeps when a closed circuit is
detected. This setting is preferred for the test.
4) Using the guide below, check for continuity across the following pins on the motor harness:
a. Place probe between Thermal Protector, Pins 1 and 4. Continuity should be present.
b. Place probe between Motor Winding 1, Pins 14 and 8. Continuity should be present.
c. Place probe between Motor Winding 2, Pins 15 and 7. Continuity should be present.
d. Place probe between Motor Winding 3, Pins 9 and 5. Continuity should be present.
e. Place probe between Motor Winding 4, Pins 6, 11 and 12. Continuity should be present. *Any combination
between Pins 6, 11 and 12, continuity should be present.
5) If the readings are different than the results expected above, the motor will have to be replaced.
18
Page 19
Troubleshooting
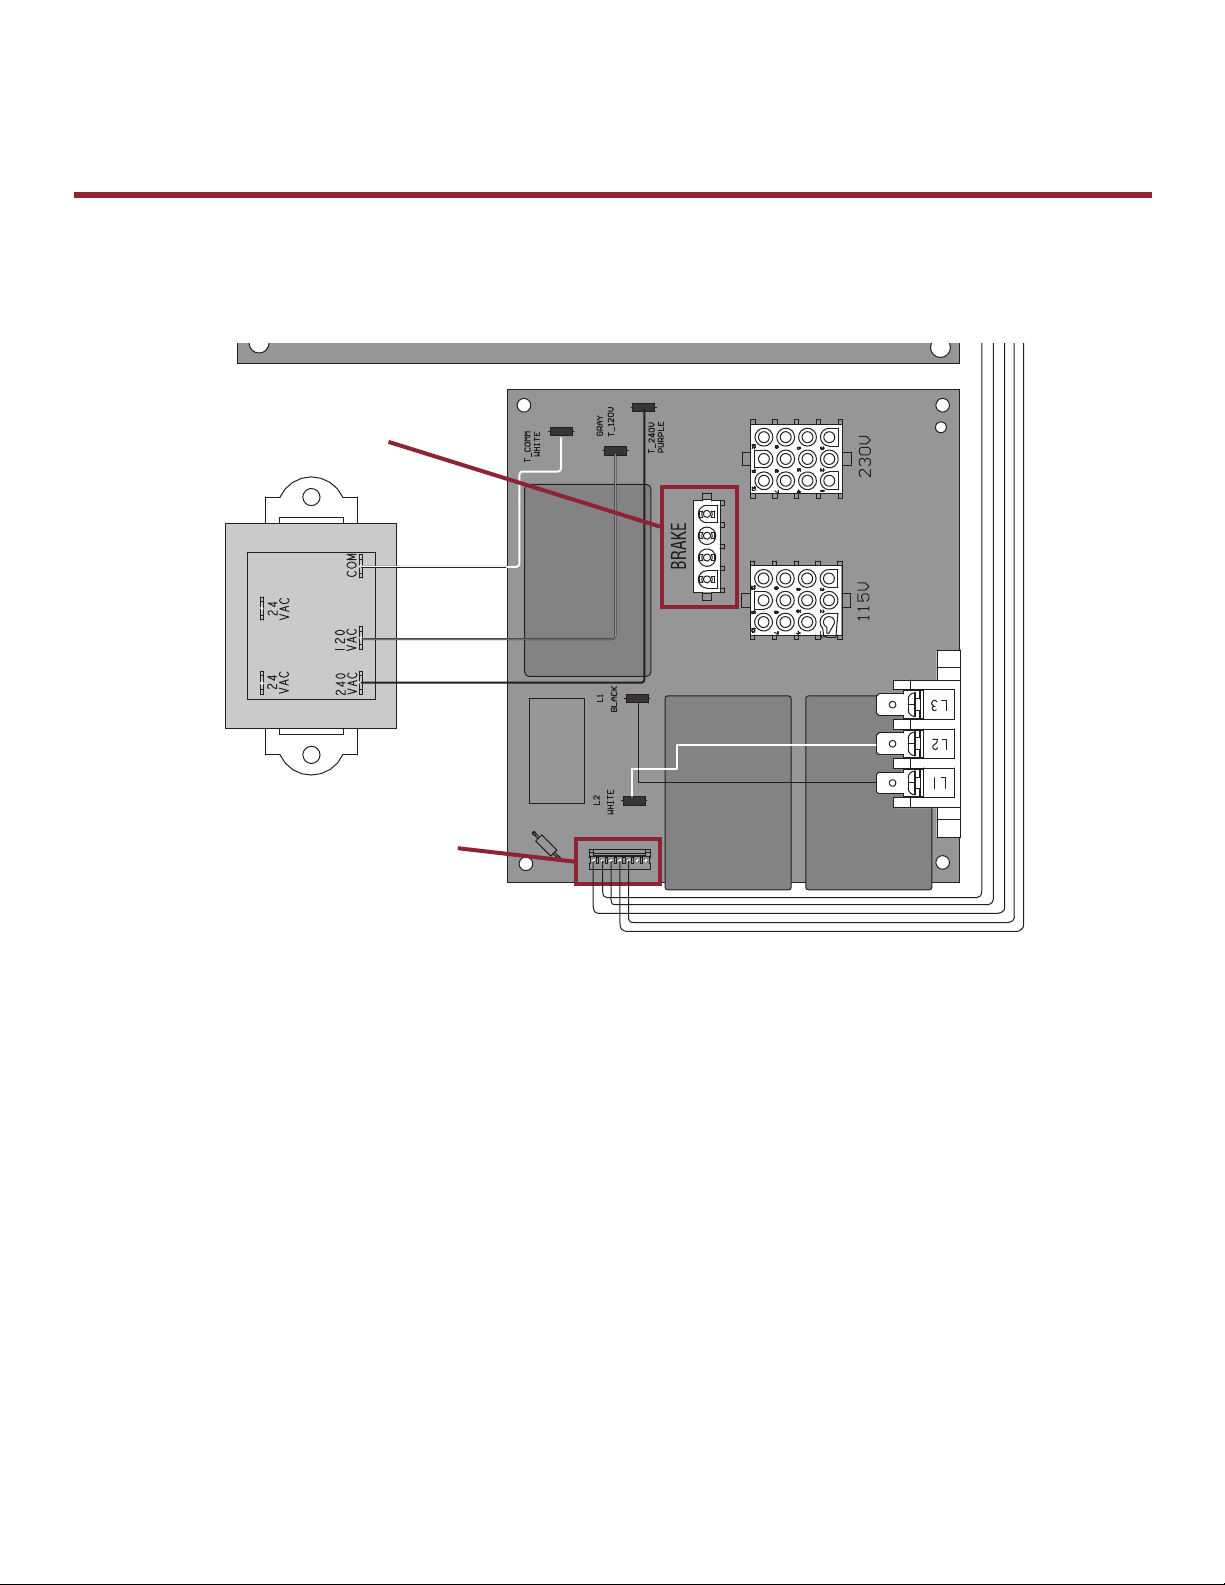
Advanced Troubleshooting: Checking Logic 5.0 Single Phase Brake And Power Board
The following tests should be performed by a qualifi ed technician. A multimeter is required.
To Check Brake
(when present)
B
Industrial Duty Logic Operators
To Check Power Board
To Check Brake (When Present)
1) Turn power off to the operator.
2) Locate the brake plug on the POWER BOARD and unplug.
3) Set the multimeter to continuity/ohms. Ω *Certain meters have a setting that beeps when a closed circuit is
detected. This setting is preferred for the test.
4) Using the guide below, check for continuity across the following pins on the brake harness:
a. On 115v operators, place probe between the White and Yellow wires on the brake
harness. Continuity should be present.
b. On 208/230v operators, place probe between the Blue and Black on the brake
harness. Continuity should be present.
5) If the readings are different than the results expected above, the brake solenoid will have to be replaced.
To Check Power Board
This measurement is done with power removed from the operator and the low voltage harness plugged in to the
Power Board. Set meter to ohms(Ω) and check :
Orange to Gray should read 335 ohms
Orange to Purple should read 648 ohms
Orange to Black should read 335 ohms
Orange to Yellow should read 648 ohms
* Readings are to allow +/- 10% deviation If the readings are different than the results expected above, the Power
Board will have to be replaced.
19
Page 20
Troubleshooting
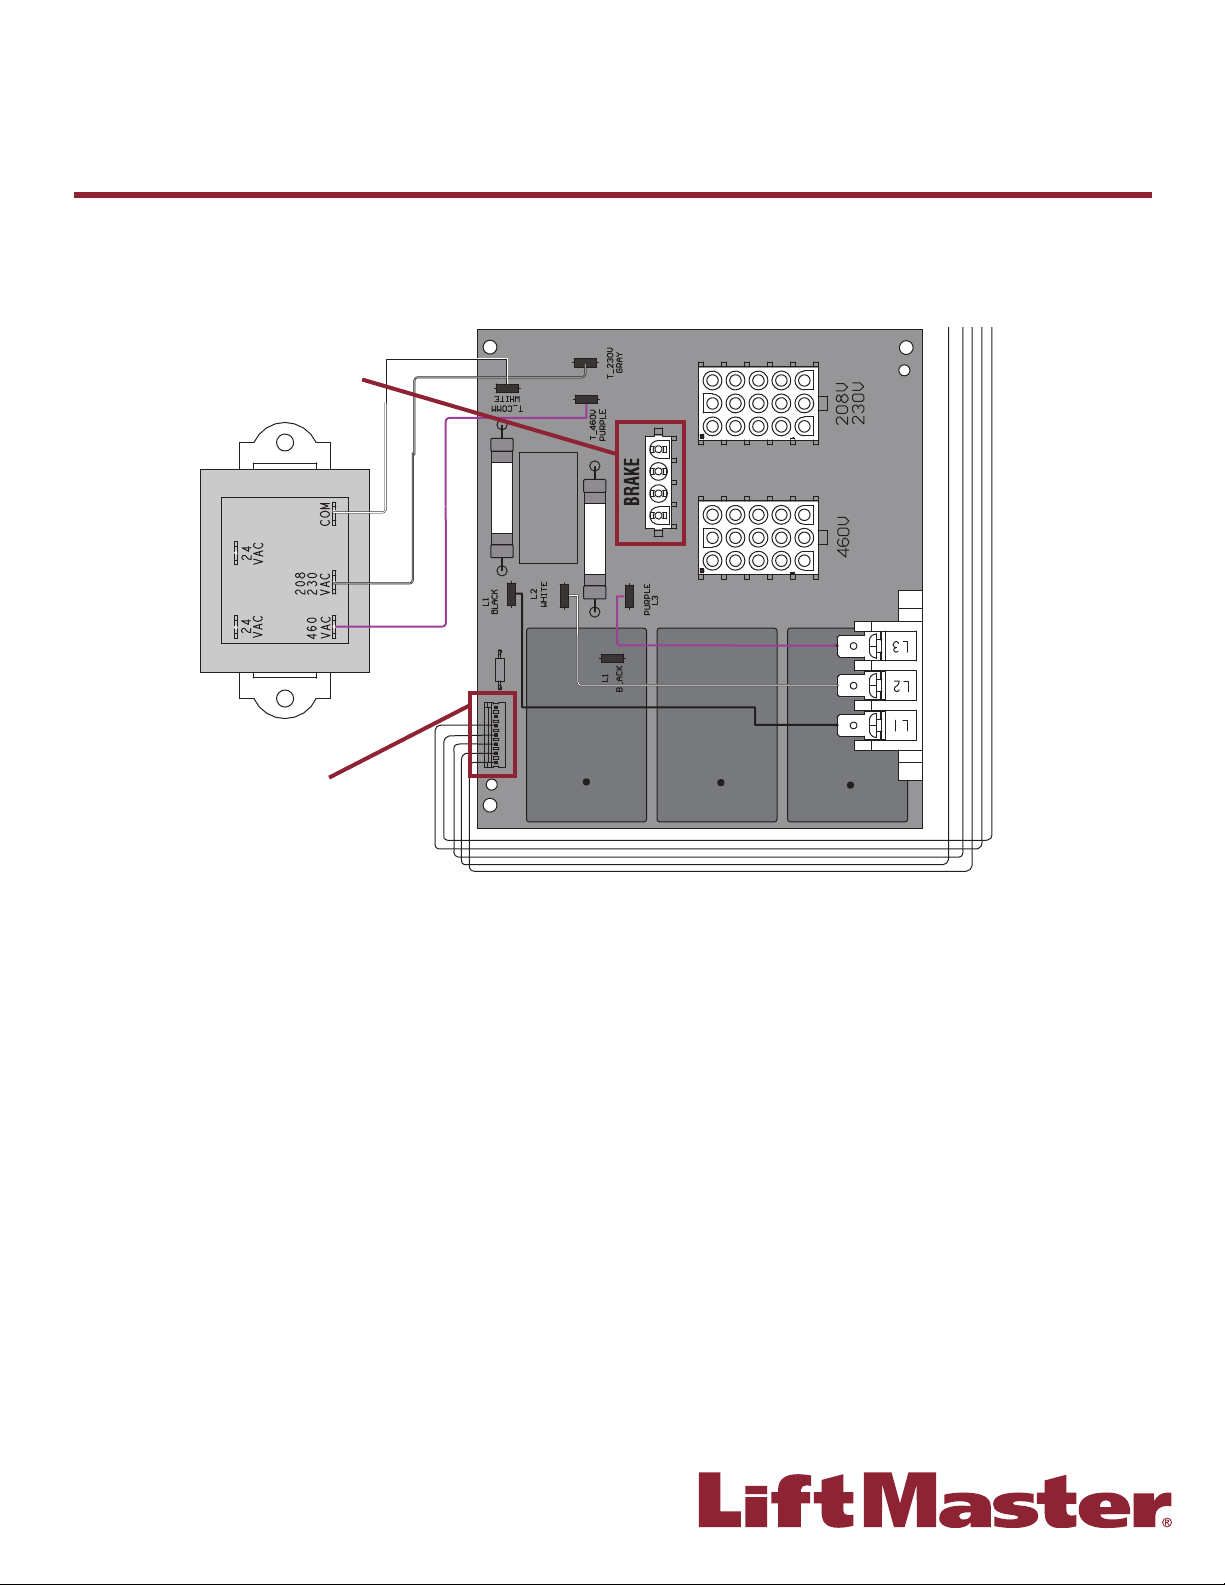
Advanced Troubleshooting: Checking Logic 5.0 Three Phase Brake And Power Board
The following tests should be performed by a qualifi ed technician. A multimeter will be required.
To Check Brake
(when present)
B
Industrial Duty Logic Operators
To Check Power Board
To Check Brake (When Present)
1) Turn power off to the operator.
2) Locate the brake plug on the POWER BOARD and unplug.
3) Set the multimeter to continuity/ohms. Ω *Certain meters have a setting that beeps when a closed circuit is
detected. This setting is preferred for the test.
4) Using the guide below, check for continuity across the following pins on the brake harness:
a. Place probe between Pins 1 and 4 on the brake harness. Continuity should be present.
5) If the readings are different than the results expected above, the brake solenoid will have to be replaced.
To Check Power Board
This measurement is done with power removed from the operator and the low voltage harness plugged in to the
Power Board. Set meter to ohms(Ω) and check :
Orange to Gray should read 350 ohms
Orange to Purple should read 640 ohms
Orange to Black should read 350 ohms
Orange to Yellow should read 350 ohms
*Readings are to allow +/- 10% deviation If the readings are different than the results expected above, the Power
Board will have to be replaced.
NOTE: Fusing on the 3-Phase Power Board is not fi eld-replaceable. An Open Fuse indicates that the 3-Phase Power Board
is damaged and must be replaced. Failure to replace the complete 3-Phase Power Board may result in additional damage
to the Operator.
20
Page 21

Selected Features
Car Dealer Mode
Feature: The car dealer mode uses the SBC (Single Button Control input)
to bring the door from a closed position to the programmed Open Mid-Stop
position and keep it at that location even with multiple inputs.
Benefi t: Provides energy cost savings by limiting the door opening height.
Requirements: This feature works in conjunction with the programmable
Timer-To-Close feature. To enable this feature you must fi rst connect a treadle,
photoelectric sensor or loop detector accessory to the SBC input and must
have at least one LiftMaster Monitored Entrapment Protection (LMEP)
device installed (refer to the installation manual). Wiring type must be
set to TS or T.
TO PROGRAM:
1) Start with the door in the closed position.
2) Turn the SELECTOR DIAL to PROG.
3) Push the TTC button and release (Green Timer LED will
be lit).
4) Push the MID button and release. This turns on the Car Dealer Mode.
(The Green Timer LED will fl ash 6 times indicating the Car Dealer Mode
is turned on.)
5) Push the TTC button and release.
6) Turn the SELECTOR DIAL to the desired wiring type (TS or T).
NOTE: To disable the Dealer Mode follow steps 2 and 3, then press the MRT button and release. (The Green Timer LED
will fl ash 3 times indicating that the Car Dealer Mode is off.)
B
Industrial Duty Logic Operators
SELECTOR DIAL
Operation will
vary depending
on wiring type
Life Of Operator (Odometer/Cycle Counter)
The operator is equipped with an odometer to show how many months and cycles the operator has performed from
the time it was installed. This feature can help determine how long the operator has been in service.
1) Start with the door in the closed position.
2) Turn the SELECTOR DIAL to DIAG (diagnostic mode).
3) Press and release the MAS button on the logic board.
4) Press and release the MRT button on the logic board.
5) The open and close lights will fl ash. OPEN for every 5,000 cycles and CLOSE for every 3 months.
6) Return the SELECTOR DIAL to the desired wiring type.
NOTE: If operator has not reached 5,000 cycles or 3 months, there will be no indications.
Thermal Overload
The Logic operators have been equipped with a thermal motor overload. The thermal overload has replaced the need
for a manual overload on the operator electrical box. The thermal overload works by shutting down the operator until
the operator can cool off and reset automatically. After the overload resets, the operator must be cycled with constant
pressure. The operator must be opened and closed fully to reset the operator to normal operation. This feature saves
the installer from having to physically reset the operator manually.
Motor Direction Jumper
This feature is designed to save the installer from having to rewire the limit switches and motor when unique
applications require reversing the open and close limits. This would typically be seen on an auxiliary trolley
modifi cation, through-wall application, or when mounting the operator upside down. By removing the jumper from the
motor direction pins, the door can be set to either a standard or reversed direction. The factory default is the standard
direction. The logic board automatically changes the motor direction and reverses the Open Limit Switch (OLS) and
the Close Limit Switch (CLS). The only limit switch requiring movement is the Sensing Limit Switch (SLS) to the close
side of the operator. This feature is provided for ease of install.
NOTE: Not for use when a 3PH operator is reverse phased, for 3PH two of the incoming legs of power should be reversed.
21
Page 22

Diagnostic Chart
The industrial duty logic boards (5.0, 4.0, 3.0) have several LEDs to assist in the installation and troubleshooting of the
operator. The following chart should assist in verifying the operator is functioning properly. Turn the selector dial to
DIAGNOSTIC to keep the door from moving while troubleshooting.
LED COLOR DEFINITION
Power Green Indicates power is being generated for the logic board.
Stop Green Indicates a closed circuit between Common terminal 4 and Stop terminal 5.
Open Yellow Indicates a closed circuit between Common terminal 4 and Open terminal 7.
Close Yellow Indicates a closed circuit between Common terminal 4 and Close terminal 6.
LMEP
(Photoelectric
sensors) (CPS-U,
CPS-UN4)
Timer Defeat Yellow Solid on indicates a closed circuit between common and terminal 12.
OLS Yellow Pressing the Open Limit Switch should turn ON this LED.
CLS Yellow Pressing the Close Limit Switch should turn ON this LED.
SLS Yellow Pressing the Sensing Limit Switch should turn ON this LED.
Edge Yellow Indicates a closed circuit between common and terminal 8. Pressing the edge
Mid-Stop Yellow Solid on indicates door is stopped on mid-stop.
Timer Enabled Green Solid on indicates TIMER is programmed and will activate from open or mid
SBC Yellow Indicates a closed circuit between common and terminal 1. Pressing the
MAS Yellow Indicates the Maintenance Alert System has been activated or an error code
Green Solid on indicates LMEP learned. Flashing indicates sensors need to be
B
Industrial Duty Logic Operators
Pressing stop should turn off this LED.
Pressing the open button should turn ON this LED.
Pressing the close button should turn ON this LED.
re-connected or activated, or unlearned if removed**. Solid off indicates no
sensors learned.
Timer-To-Close will not close.
should turn ON this LED.
stop position. Flashing indicates TIMER is counting down and door will close
after preset time. Each fl ash represents 1 second of programmed time.
single button control station should turn ON this LED.
has been triggered. See inside cover of the operator.
NOTE: After a power cycle, the board will fl ash a series of lights, and then
fl ash the fi rmware Rev. on the MAS light. The fi rmware revision will always
be fl ashed as X.Y.; e.g. current version is 8.12 which would fl ash as; 8 blinks,
pause, one blink, pause, 12 blinks. The fi rmware version is printed on the
label of each L5 board. These blinks should not be confused with an error code
which would continue to fl ash repeatedly.
Relay A Yellow Indicates open or close command has been given to the motor. LED turns on
when OPEN/CLOSE button is pressed.
Relay B Yellow Indicates open or close command has been given to the motor. LED turns on
when OPEN/CLOSE button is pressed.
DATA* Green Indicates communication between the Logic 5.0 board and optional
TLS1CARD.
* Logic 5.0 ONLY
** To unlearn, turn the selector dial to DIAG. Press and hold the STOP button until the MAS LED fl ashes (5 fl ashes).
Return the selector dial to the desired wiring type.
22
Page 23

Symptoms and Solutions
SYMPTOM: The Operator Will Not Respond To Any Commands
POSSIBLE CAUSE: SOLUTION:
No power supply Verify primary line voltage from power source. Green
Operator 3-button control station is miswired Use the OPEN, CLOSE and STOP LEDs to help check
Interlock switch is activated Check interlock(s). If more than one external interlock is
Dial still in programming or diagnostic mode Set dial to desired wiring type.
Motor is malfunctioning Verify proper voltage getting to the motor.
Motor thermal overload tripped Check for obstructions and verify the door moves freely.
Failsafe switch is activated requiring photoelectric
sensors (Logic 3.0 only)
B
Industrial Duty Logic Operators
POWER LED must be on.
correct wiring. Verify the logic board is accepting
commands by using the on-board 3-button control
station. Green light next to the STOP button must be on.
present they must be wired in series.
Cycle operator in constant pressure one full cycle open
and close to reset fault. Check to see if motor is hot.
Allow motor to cool before attempting to move door.
Move switch to non-failsafe or connect a failsafe sensing
device.
LiftMaster Monitored Entrapment Protection (LMEP) not
installed (Logic 4.0 and 5.0)
A relay or the power board (Logic 5.0 ONLY) may need
to be replaced
Possible accessory malfunction Disconnect all devices; reattach them one at a time
Possible logic board failure Replace logic board.
SYMPTOM: Power LED Is Not On
POSSIBLE CAUSE: SOLUTION:
Loose secondary wiring connections or a faulty control
transformer
Logic board failure Replace logic board.
Interlock switch Check interlock(s).
SYMPTOM: Stop Button LED Is Not On
POSSIBLE CAUSE: SOLUTION:
Control station miswired or not connected Check wiring to control station.
Interlock switch Check interlock switch(es) for continuity.
Move selector dial to C2 for constant pressure to close
or add a LiftMaster Monitored Entrapment Protection
(LMEP).
When the OPEN or CLOSE button is pressed, Relay A or
B LED should turn on and the door should move in the
corresponding direction. If Relay A or B lights and the
door does not move, the relay or Power Board (Logic 5.0
ONLY) may need to be replaced.
testing for a failure after each one is replaced.
Repair or replace connections or control transformer.
23
Page 24

Symptoms and Solutions
SYMPTOM: The Door Will Move About A Foot, Then Stop. After Stopping, Only Constant Pressure
Commands Will Move The Door
POSSIBLE CAUSE: SOLUTION:
RPM sensor is not connected properly or may need to
be replaced
SYMPTOM: The Door Will Move Most Of The Way Towards A Limit, Then Stop. An Extra Open Or Close
Command Is Able To Get Door To Complete Cycle
POSSIBLE CAUSE: SOLUTION:
The Maximum Run Timer is not set correctly Manually reprogram the Maximum Run Timer OR reset
SYMPTOM: The Door Will Open Partway And Stop. A Second Open Command Is Needed To Open The
Door Completely.
POSSIBLE CAUSE: SOLUTION:
There may be a Mid-Stop set Check to see if the Mid-Stop LED is on. Clear the Mid-
SYMPTOM: The Door Will Open But Will Only Close After A Five Second Delay With Constant Pressure
On The Close Button
POSSIBLE CAUSE: SOLUTION:
The photoelectric sensor, sensing edge or other
entrapment protection device is obstructed or activated
The logic board thinks the photoelectric sensors are
attached and blocked
Failsafe switch set (L3 only) Slide switch to Non-Failsafe mode.
SYMPTOM: The Operator Will Not Respond To Any Commands
POSSIBLE CAUSE: SOLUTION:
Possible accessory malfunction Disconnect all devices; reattach one at a time testing for a
Possible logic board failure Replace logic board.
B
Industrial Duty Logic Operators
a) Check the RPM assembly for loose connections. Check
the Interrupter Cup to ensure it turning when the
operator is running. Check for foreign matter blocking
the optical lens.
b) Replace RPM sensor.
to factory defaults.
Stop by turning the selector dial to program. Press and
hold the Mid-Stop button for 5 seconds. Return dial to
desired wiring type.
If the on-board EYES LED is fl ashing, the photo-eyes are
misaligned or not connected. Remove any obstructions;
check the safety device wires for continuity or a short.
Erase the LMEP device; turn the selector dial to DIAG,
push and hold the stop button until the MAS LED fl ashes.
If a LiftMaster entrapment protection device is not
connected the only modes of operation are C2, D1 or E2.
failure after each one is replaced.
24
Page 25

Error Codes
LiftMaster Logic 3.0, 4.0, and 5.0 Operators incorporate a self-diagnostic feature built into the MAS LED. In
addition to indicating when routine maintenance is due, the MAS LED can be used to troubleshoot problems with
the operator.
If the MAS LED on the logic board or 3-button control station is fl ashing on and off rapidly, the Maintenance Alert
System has been triggered and service is due on the operator. If the MAS LED fl ashes 2 or more times in a row
followed by a pause, an operator error has occurred. To view the errors, turn the selector dial to DIAGNOSTIC
and press the OPEN button. To view the individual error codes (if more than one exists) press CLOSE. It is
possible to have more than one error at a time. Use the chart below to determine the error.
B
Industrial Duty Logic Operators
ERROR
CODE
1 blink MAS triggered (cycles or
2 blinks No RPM input during opening
3 blinks (MRT) Maximum Run Time
4 blinks Obstruction sensed on closing Operator will reverse to
5 blinks A button is stuck (longer than
6 blinks Invalid option card plugged
7 blinks LiftMaster Monitored
8 blinks Brownout detected Operator will run as
9 blinks Motor movement at invalid
10 blinks Operator was not in programming
12 blinks
(3 Phase
Only)
DESCRIPTION SYMPTOM SOLUTION
Normal operation Reset MAS.
months)
The door only responds
or closing
has timed out
2 minutes)
into option card receptacles
Entrapment Protection (LMEP)
device faulted or removed for
greater than 2 minutes
time
mode when the motor phase
jumper was changed.
Current sense fault. Motor moves for limited
to constant pressure
commands.
OR
No operator movement for
3-Phase Operator.
The door stops before
reaching the desired time
OPEN position
The control station will not
respond
Option card will not
function properly
Normal operation (5
second constant pressure
override required to close)
long as enough power is
present
Operator will continue
to function normally for
5 operations and then
default to a constant
pressure mode
The phase will not change Enter programming mode and move phase jumper to
cycles, then motor no
longer moves.
Clutch is slipping; adjust clutch, or verify RPM sensor
connection or replace RPM sensor.
NOTE: To relearn the RPM sensor, move the door with
a constant pressure command. The door will stop
once relearned and normal operation will resume.
OR
Replace 3-Phase Power Board.
Check the operator for any faults (e.g., bad limit switch),
program the Max Run Timer OR reset to factory defaults.
Remove obstructions or realign photoelectric sensor.
The control station must be fi xed or replaced before
it will be recognized as an input.
Refer to accessories (page 63) for list of supported
option card(s).
Cleared when entrapment protection device is
cleared or connected.
1. Check AC line for voltage.
2. Check transformer secondary for low voltage. Too many
accessories may be connected to the transformer.
Check relays and the drive circuitry to insure that
they are turning off. Operator must run correctly for
two starts for the error to be cleared.
change phase.
1. Check current sense wiring connection.
2. Cycle operator power after wiring has been corrected.
OR
Replace 3-Power Power Board
NOTE: 12 flash for current sense 3ph only. Error codes take priority over normal MAS LED operation. Error codes will repeat on the MAS every
1.5 seconds until cleared. There may be more than one error present, but only the highest priority will flash. If the highest error is cleared, the
next highest will flash. All errors self-correct when corrective action is taken and a reset is not needed.
NOTE: After a power cycle, the board will flash a series of lights, and then flash the firmware Rev. on the MAS light. The firmware revision will
always be flashed as X.Y.; e.g. current version is 8.12 which would flash as; 8 blinks, pause, one blink, pause, 12 blinks. The firmware version is
printed on the label of each L5 board. These blinks should not be confused with an error code which would continue to flash repeatedly.
25
Page 26

Remote Controls
Error Codes
Error codes will be displayed by the radio receiver LED on the logic board.
NOTE: The logic 3.0 and Logic 4.0 radio receivers are compatible with Security+
switch remote controls. The Logic 5.0 radio receiver is compatible with Security+ 2.0™ remotes and keyless entry
devices.
B
Industrial Duty Logic Operators
®
315MHz remote controls and DIP
ERROR
CODE
R1 No response from
R2 No response from
R3 The remote cannot
R4 The remote cannot
R5 The remote cannot
R6 Cannot close via
SYMPTOM DISPLAY POSSIBLE CAUSE SOLUTION
the remote
the remote
be programmed
be programmed
be programmed
constant pressure
in C2, D1 or E2
modes
Quick Flash Unlearned remote – A user tries
to use a remote, but the RADIO
LED only fl ashes briefl y and
there is no response from the
operator.
No LED activity Cannot recognize remote –
A weak signal caused by a
discharged battery or outside
interference with the radio
OR is not compatible with the
operator.
Radio LED
turns off after
30 seconds
2 blinks Receiver memory full – A user
3 blinks Duplicate remote – A user
LMEP LED
fl ashes
Cannot recognize remote –
A weak signal caused by a
discharged battery or outside
interference with the radio
OR is not compatible with the
operator.
enters RADIO programming
mode but there is no space
available to add another
remote.
enters RADIO programming
mode and selects the function
to be programmed. When
the remote button is pressed
for programming, a search
reveals that remote is already
programmed.
No entrapment protection
device present – An entrapment
protection device is required to
close via remote.
Try relearning the remote.
Replace battery OR eliminate
interference OR obtain a
compatible remote.
Replace battery OR eliminate
interference OR obtain a
compatible remote.
Erase all learned remotes
and relearn the desired
remote(s).
This remote already has a
function associated with it.
To change the function, erase
all programmed remotes and
reprogram the desired
remote(s).
Must connect a LiftMaster
Monitored Entrapment
Protection (LMEP) device.
26
Page 27

Remote Controls
Compatibility Chart - 315 & 390MHz And Security+ 2.0™
MODEL DESCRIPTION
Remote Controls
893MAX 3-Button Remote Control
w/ Security+ 2.0 and MAX Technology
895MAX* *No Longer available. USE 893MAX as
replacement.
811LM 1-Button Remote Control w/ DIP and
Security+ 2.0 Technology
813LM 3-Button Remote Control w/ DIP and
Security+ 2.0 Technology
891LM 1-Button Remote Control
w/ Security+ 2.0 Technology
893LM 3-Button Remote Control
w/ Security+ 2.0 Technology
371LM 1-Button Remote Control 315MHz
w/ Security+ Technology
372LM 2-Button Remote Control 315MHz
w/ Security+ Technology
373LM 3-Button Remote Control 315MHz
w/ Security+ Technology
374LM 4-Button Remote Control 315MHz
w/ Security+ Technology
333LM 3-Button Remote Control 315MHz Red/
Yellow/Green w/ Security+ Technology
971LM 1-Button Remote Control 390MHz
w/ Security+ Technology
973LM No longer available. Use 893MAX as its
replacement
Wireless Keypads
877MAX Wireless Keypad with Security+ 2.0 and
MAX Technology
877LM Wireless Keypad with Security+ 2.0
Technology
377LM Wireless Keypad 315MHz w/ Security+
Technology
387LM Wireless Keypad - Universal X X X X X
Industrial Duty Logic Operators
Compatible with these CDO Models that have
On-Board Radio Receivers
ATS
LOGIC
5.0
LOGIC 4.0
315MHZ
XX X X X
XX X X X
X
X
X
X
XXX
XXX
XXX
XXX
XXX
XX X X X
X
XXX
LOGIC 4.0
390MHZ
X
X
(PURPLE
LEARN
BUTTON)
MEDIUM-
DUTY
LOGIC
B
27
Page 28

Troubleshooting
MEDIUM DUTY LOGIC BOARD
B
Medium Duty Logic Operators
4 3 2
5
6
7
ITEM DESCRIPTION FUNCTION
1 Open Button Open Door
2 Close Button Close Door
3 Stop Button Stop Door
4 Learn Button Programs the remote controls and
5 Timer-to-Close Button Programs the Timer-to-Close.
6 Purple Wire Antenna Primary Antenna.
7 Auxiliary Antenna
Connection
8 LED Used during programming and
9 Field Wiring Terminal Field wiring connections.
10 Factory Wiring Connector Factory wiring harness connection.
1
1098
performs additional programming.
For use with external antenna kit -EXTANT. Not provided.
diagnosing error codes.
NOTE: SBC feature available with the 71MLSBC kit.
28
Page 29

Symptoms and Solutions
SYMPTOM: Operator Will Not Respond To Any Commands
POSSIBLE CAUSE: SOLUTION:
No power Verify primary line voltage (120 Vac, 60 Hz) is present at terminals L1 & L2. The LED will
Stop circuit not complete Verify Stop Button input (terminals 3 & 5) is properly wired and stop button is not stuck.
Stuck button on 3-button control
station
Interlock input activated a) Verify jumper is located at terminals 3 & 4 if interlock is not present.
Motor overload tripped Overload is internal within motor. Allow to cool and retry.
Accessory failure a) Attempt to close by holding the CLOSE button for more than 5 seconds. If door closes,
Possible component failure Call Technical Support for assistance.
SYMPTOM: Operator Makes Noise But Door Does Not Move
POSSIBLE CAUSE: SOLUTION:
Clutch slipping Adjust clutch, see owner’s manual.
Brake not releasing (if present) Verify brake assembly operation and wiring.
Door operation problem Check door for proper operation.
SYMPTOM: Operator Moves In The Wrong Direction
POSSIBLE CAUSE: SOLUTION:
OPEN and CLOSE button wiring
connection reversed
SYMPTOM: Door Drifts After Operator Stops
POSSIBLE CAUSE: SOLUTION:
Door not balanced properly Check door for proper operation.
Clutch slipping Adjust clutch, see owner’s manual.
Brake not functioning properly (if
present)
SYMPTOM: Door Opens/Closes Too Far
POSSIBLE CAUSE: SOLUTION:
Limits not adjusted properly Adjust limits. See owner’s manual.
SYMPTOM: Door Reverses Unexpectedly
POSSIBLE CAUSE: SOLUTION:
Intermittent Entrapment Protection
Device activation
SYMPTOM: TTC Not Functioning
POSSIBLE CAUSE: SOLUTION:
LiftMaster Monitored Entrapment
Protection Devices
TTC temporarily disabled Close and Open the door. TTC will be re-enabled.
TTC not programmed properly Reprogram TTC. See see owner’s manual.
Radio Functionality NOTE: Built in radio receiver compatible with all LiftMaster 315 MHz remote control devices.
SYMPTOM: No Response
POSSIBLE CAUSE: SOLUTION:
Remote control is not programmed See owner’s manual for programming instructions.
Remote control not compatible Obtain compatible LiftMaster remote control.
Low battery Replace battery.
SYMPTOM: Remote Cannot Be Learned
POSSIBLE CAUSE: SOLUTION:
Low battery Replace battery.
Remote control not compatible Obtain compatible LiftMaster remote control.
SYMPTOM: Poor Radio Range
POSSIBLE CAUSE: SOLUTION:
Low battery in remote Replace battery.
Antenna not confi gured See owner’s manual.
Ambient radio interference or
building structural issue
fl ash when power is present.
Verify that all buttons are actuating freely and releasing properly.
b) Verify interlock is properly wired and not activated when present.
check LiftMaster Monitored Entrapment Protection (LMEP) for proper wiring, polarity,
connections or damage.
b) Remove obstructions or realign photoelectric sensor.
Check 3-button control wiring.
Check brake mechanism to ensure brake lever is free and brake pads are engaging the
brake disc.
Check all connections. Remove obstructions or realign photoelectric sensor.
Check all connections. Verify photoelectric sensors are not blocked and the sensing edge
(if installed) is not activated.
Use EXTERNAL ANTENNA kit, (part: EXT-ANT, see owner’s manual).
B
Medium Duty Logic Operators
29
Page 30

Error Codes
The status of a Medium Duty Logic Operator can be determined by counting the number of fl ashes of the LED on the
logic board.
DIAGNOSTIC LED TABLE
# OF LED FLASHES STATUS SOLUTION
1 System OK. Operating in
2 System OK. Operating in
3 Stuck CLOSE button Check for stuck close button or shorted close wire
4 LiftMaster Monitored
5 Incorrect motor direction Reverse the yellow and red motor wires on the capacitor.
6 Maximum run timer has
7 Logic board Failure REPLACE logic board. NOTE: It is normal for the logic board LED
C2 mode
B2 mode
Entrapment Protection
Device failure
timed out (Maximum run
time = 90 seconds)
B
Medium Duty Logic Operators
None
None
Check for: 1) Misaligned or blocked Photoelectric Sensors.
2) Issue with Monitored Sensing Edge and/or wiring.
Check clutch adjustment. Door height or speed may exceed
the range the operator can travel. Call Technical Support for
assistance.
to fl ash 4 times when power is applied or cycled to the operator.
(Not a logic board failure.)
RESTRICTED CLOSE
This method will allow the door to be closed when LMEP device(s) are no longer working. Press and hold the CLOSE
button until the door reaches the closed limit. If the CLOSE button is released before the door reaches the closed limit
the operator will stop and the procedure will need to be repeated to fully close the door.
30
Page 31

Programming
Requires LiftMaster Monitored Entrapment Protection (LMEP) device. See installation manual for selection and
installation of LiftMaster Monitored Entrapment Protection (LMEP) devices.
REMOTE CONTROLS
Built in 315 MHz radio receiver permits as many as 20 Security+® remote controls or dip switch remote controls in any
combination.
Single Button Remote Control
1) Press and release the LEARN button (LED will light).
2) Press and hold the button on the remote control until the LED fl ashes rapidly, then release to complete
programming (LED will go out).
Repeat steps 1 and 2 for additional remote controls.
3-Button Remote Control To Operate As A Wireless 3-Button Control Station
NOTE: The feature will use 3 of the 20 memory channels in the operator.
1) Press and release the LEARN button (LED will light).
2) Press and release the desired button on the logic board (OPEN, CLOSE or STOP).
3) Press and hold the desired button of the remote control until the LED fl ashes rapidly, then release to complete
programming (LED will go out).
B
Medium Duty Logic Operators
Repeat steps 1 through 3 to program additional buttons.
To Erase All Remote Controls
1) Press and hold the LEARN button (over 5 seconds) until the LED goes out. All programmed remote controls will be
erased.
STOP Button
LEARN Button
R27
LEARN
TTC
1
LMEP1 LMEP2
STOP CLOSE OPEN
D14
LED
234567
COM INTRLK STOP
^^^^
AUX ANT
AUXANT
AUXANT
LEARN
STOPCLOSE OPEN
TTC
D14
LED
1
234567
LMEP1LMEP2
COMINTRLKSTOP
OPENCLOSE
Press and hold button to program Press and hold button to program
CLOSE Button
OPEN Button
OPENCLOSE
Single Button Remote Control 3-Button Remote Control
31
Page 32

Programming
TIMER-TO-CLOSE
Timer-to-Close feature enables the Medium Duty Logic Operator to close from the open limit after a preset time,
adjustable from 5 to 60 seconds in 5 second increments.
To Program
Begin with the door in a fully closed position.
1) Press and release the LEARN button to enter program mode (LED will light).
2) Press and release the TTC button.
3) Every press and release of the STOP button will add 5 seconds to the Timer-to-Close.
Example: 30 second TTC = 6 presses of the STOP button.
4) Press and release the TTC button to exit the programming mode. The LED will fl ash once per 5 seconds of timer
setting.
The TTC will become active after completion of the next open cycle.
NOTE: The LED does not indicate the timer is running.
To Verify The Timer-To-Close (TCC) Setting
1) Press and hold the LEARN button (LED will light).
2) Press and release the TCC button.
3) Press and release the TTC button a second time. The LED will fl ash once per 5 seconds of timer setting.
B
Medium Duty Logic Operators
Clear The Timer-To-Close (TCC)
1) Press and release the LEARN button (LED will light).
2) Press and hold the TCC button for 6 seconds.
3) Release the TTC button (LED will go out). The TTC will no longer be active.
Timer Defeat
The TTC can be temporarily disabled by pressing a STOP button. TTC will become enabled after the next open
command.
LEARN Button
TTC Button
STOP Button
R27
TTC
D14
LED
1
234567
COM INTRLK STOP
LMEP1 LMEP2
^^^^
AUX ANT
AUXANT
AUXANT
TTC
1
LMEP1LMEP2
LEARN
STOP CLOSE OPEN
LEARN
STOPCLOSE OPEN
D14
LED
234567
COMINTRLKSTOP
OPENCLOSE
CLOSE Button
OPEN Button
OPENCLOSE
32
Page 33

33
Page 34

Table of Contents
SECTION C
Mechanical Operators
Page
Symptoms And Solutions 35
Page 35

Symptoms And Solutions
SYMPTOM: The Motor Hums And The Motor Output Shaft Will Not Rotate
POSSIBLE CAUSE: SOLUTION:
Brake did not release (if present) Check the solenoid and check brake adjustment settings.
Door locked or jammed Check door.
Dead phase Check the power supply.
Brake may not be disengaging when starting
relays energize (if present)
SYMPTOM: Door Will Not Move In Either Direction
POSSIBLE CAUSE: SOLUTION:
Clutch is loose Adjust the clutch.
The pulley V-belt is loose Adjust belt by adjusting motor position.
The drive chain has broken Replace drive chain.
Manual disconnect may be engaged Disengage the disconnect.
SYMPTOM: Door Travels In One Direction Only
POSSIBLE CAUSE: SOLUTION:
Bad or miswired limit switch Test continuity of switches and replace as needed. Verify wiring with
Bad or miswired 3-button control station Rewire or replace control station.
Open or close relay miswired or defective Rewire or replace relay.
SYMPTOM: Motor Hums And Starts When It Is Spun
POSSIBLE CAUSE: SOLUTION:
Faulty centrifugal start switch (no start switch
on 1/3 and 1/2 HP motors using Logic 2.0)
Faulty capacitor Replace capacitor.
SYMPTOM: Motor Does Not Hum Or Run In Either Direction
POSSIBLE CAUSE: SOLUTION:
Motor thermal overload tripped Let the motor cool down so internal overload can reset itself, or press
Power is not connected properly Check terminals, circuit breaker, fuses and electrical service panel.
Open and close limit switches are activated Check limit switches.
Control station wired wrong, or has a stuck
button, or auxiliary device is not functioning
properly
Bad start switch in motor (single phase only) Check across black wires on coil of IR relay. Should read same as line
SYMPTOM: Jackshaft Or Hoist Operator Makes Clicking Noise
POSSIBLE CAUSE: SOLUTION:
External interlocks Interlocks must be “normally closed”. Check switch and wiring.
Miswired motor Verify the motor is wired correctly
The operator is mounted wrong; the drive
sprockets are not in line with the driven
sprockets and the chain is clicking
Manually disengage and test again. Repair if needed.
schematic provided.
Tap the motor; if it runs now, the centrifugal switch may be faulty –
replace the motor.
the reset depending on model.
Check continuity from common to NC prongs. Readjust or replace
switches. Remove control stations and auxiliary devices. Test the
operator by jumping T4 and T3, then cross T3 and T1 to open T3 and
T2 to close. Reattach items one at a time and test operation between
each component installation using the component of lowvoltage control wires. Replace, repair, or rewire non-working devices.
voltage.
Reposition the operator.
C
Mechanical Operators
35
Page 36

Symptoms And Solutions
SYMPTOM: Door Drifts After The Operator Is Shut Off
POSSIBLE CAUSE: SOLUTION:
Brake needs adjusting (if present) Check and adjust brake.
Door poorly balanced Check and adjust door/springs.
SYMPTOM: Door Travels Down And Then Stops And Reverses
POSSIBLE CAUSE: SOLUTION:
A sensing device is being activated Check wiring of the sensing device.
Radio receiver may be sending a long signal
to the operator; this can cause the operator
to travel down off the open limit, then reverse
again
SYMPTOM: Door Opens And Then Stops Short Of The Full Open Position
POSSIBLE CAUSE: SOLUTION:
Limit nut not set correctly Adjust limit nut.
An obstruction may be preventing the proper
operation of the door
The clutch may need adjustment Check the sensitivity of the clutch.
Defective limit switch activating prematurely Check limit switch; replace if necessary.
SYMPTOM: Operator Does Not Open Or Close In Response To Command From 3-Button Control Station
POSSIBLE CAUSE: SOLUTION:
Bad wire to 3-button control station Recheck wiring.
Circuit breaker has tripped Reset circuit breaker.
Damaged transformer Check transformer and circuit for 24V.
If equipped with electric interlock, there may
be a poor contact to the interlock switch
Blown fuse Replace fuse.
SYMPTOM: The Door Will Not Close Completely
POSSIBLE CAUSE: SOLUTION:
The limit assembly depression plate is not
properly engaged with nylon limit nut
The door is binding or meeting an obstruction Look for obstruction.
Loose drive or limit chain can cause the chain
to “jump” the sprocket teeth
SYMPTOM: Motor Runs In Wrong Direction
POSSIBLE CAUSE: SOLUTION:
Operator is upside down For MJ, install operator with motor toward the ceiling. For MT,
Motor is wired incorrectly Check and correct wiring.
Three-phase wires are in the wrong order Rearrange any two incoming three-phase power legs on the
Try disconnecting the receiver. If the problem disappears, use a
LiftMaster Brand Receiver
Check door for obstruction.
Verify all interlock switches are working correctly and wiring is
making good contact.
Check and adjust if necessary.
Check the chain as necessary. The limit chain can be adjusted/
tensioned at the electrical box assembly via two mounting screws.
the electrical box and motor should be toward the floor. Correct if
necessary.
terminal strip.
C
Mechanical Operators
36
Page 37

Symptoms And Solutions
SYMPTOM: Motor Is Running But The Door Will Not Move
POSSIBLE CAUSE: SOLUTION:
The door is obstructed or locked Check the door
The clutch may need adjustment Adjust the clutch.
SYMPTOM: Operator Continues To Run At End Of Door Travel
POSSIBLE CAUSE: SOLUTION:
Limits are not set correctly Adjust limits.
Limit switch is faulty Test the switch and check the switch wiring.
SYMPTOM: Motor Operates In Only One Direction When Operated From Radio
POSSIBLE CAUSE: SOLUTION:
Auxiliary device limit switch is not being
activated properly
SYMPTOM: Timer To Close Function Is Inoperable
POSSIBLE CAUSE: SOLUTION:
Timer to close control station is defective Test continuity through wire, then repair or replace.
Timer impulse or timer latch relays are
defective
Timer defeat switch may be activated or
miswired
Defective timer If timer latch and timer impulse relays activate and timer does not
SYMPTOM: Auxiliary Device(s) Will Not Cause Operator To Function Properly
(Radio Control, Sensing Edge, Interlocks, Etc.)
POSSIBLE CAUSE: SOLUTION:
Incorrect control function settings Check positions of control wiring for desired wiring type and reset
Incorrect electrical wiring connections Check wiring with diagram; rewire if necessary.
Auxiliary device uses too many watts If the device is suspect of using too much power, add an additional
Auxiliary device limit switch or sensing limit
switch is not responding or may be overrunning sensing limit switch
Verify the Auxiliary and Sensing Limit Switches (SLS) are activated
in full open and close positions (respectively). Reposition, rewire or
replace.
Repair or replace.
Verify it is “normally closed” and wired correctly; replace if needed.
time out, replace timer.
if necessary.
transformer to power this device.
Test switches and the timing of the switches.
C
Mechanical Operators
37
Page 38

Table of Contents
SECTION D
Basic Electrical Information
Page
Basic Electrical Circuit 39
Limit Switches 40
Multimeter 41
Relays 42
Transformers 44
38
Page 39

Basic Electrical Circuit
A basic electrical circuit is made up of one continuous electrically conductive loop. As an example, see the wiring
diagram of a typical fl ashlight to the right.
Electricity fl ows from positive (+) to negative (-). The
switch stops the electricity from fl owing.
When the switch is closed, electricity will fl ow in a
continuous loop and make the bulb light up. The
electricity will fl ow from the positive side of the battery
past the closed switch through the light bulb (providing
the electricity to light the bulb) and return to the negative
side of the battery.
When the switch is open, the electricity cannot pass
through and electrical fl ow is stopped.
There are many types of switches and components
available within an electrical circuit. Examples include:
motors, contactors, relays, interlocks, capacitors and
limit switches of various types. For commercial operators
to function, each component must be working correctly
for the electrical fl ow to pass through and form a
continuous electrical circuit or loop.
D
Basic Electrical Information
Light Bulb
Switch
Battery
39
Page 40

Limit Switches
D
Basic Electrical Information
Activation Arm
Press this lever down
to activate the switch
Three prongs are present on a limit switch. They are labeled Common or “Com”; Normally Open, abbreviated NO; and
Normally Closed, abbreviated NC. Below is a wire diagram of a limit switch.
When no pressure is applied to the limit switch activation arm, electricity will fl ow from the Common prong to the
Normally Closed prong.
Normally Open
Common
Normally Closed
Activation arm IS NOT being pushed
Normally Closed
Normally Open
Common
When the activation arm is pressed, electricity will fl ow from the Common Prong to the Normally Open Prong.
Electricity will never travel from the NO prong to the NC prong.
Normally Open
Common
Normally Closed
Activation arm IS being pushed
The word “NORMALLY” generally refers to the action of the switch when nothing is activating it. “Normally Closed”
is a continuous fl ow of electricity when the switch is not activated, establishing a closed circuit. “Normally Open” is a
non-continuous fl ow (no fl ow) of electricity when the switch is not activated, establishing an open circuit.
40
Page 41

Multimeter
When shopping for a meter, look for a meter able to fi t in a shirt pocket or clip on a belt. A meter with an audio signal
(buzzer) for continuity checks is recommended.
Checking Ohms/Continuity
When checking the operation of a switch, select the ohm mode on multimeter. (The ohm symbol is Ω). Make sure the
test leads are plugged into the correct sockets for reading ohms. If there is more than one setting in the ohm section
of the meter, select the one with the audio signal.
D
Basic Electrical Information
To test a limit switch, connect one test lead to the Common prong and the other to the Normally Closed prong. The
meter should read 0 resistance or very low resistance. The electricity is fl owing from the Common prong to the
Normally Closed prong. This demonstrates continuity. Activate the switch, the meter will read infi nite resistance or no
continuity. The wires inside the switch are no longer touching between the Common prong and the Normally Closed
prong.
Move the test lead from Normally Closed to Normally Open. While the activation arm is not pressed, the meter should
read open circuit, demonstrating no continuity. Activating the arm should read 0 resistance, demonstrating continuity.
The procedure is called a “Continuity Check” and is used to check for a continuous fl ow of electricity.
Checking Voltage
A multimeter may have several settings for checking voltages. The number associated with each setting is the
maximum voltage able to be read. A meter may be damaged if connected to a higher voltage than selected. Either AC
or DC must be selected prior to testing any circuit. AC stands for alternating current and DC stands for direct current.
AC is usually the incoming line voltage, i.e. 115VAC, 460VAC and so on. 24VAC is also found in the control circuit of a
commercial operator. DC is usually a power source from a battery or the control voltage in a logic board.
AC
Set the meter to VOLTS AC at the lowest setting which is still higher than the expected voltage. If 115VAC is expected
and the meter has 10VAC, 50VAC, 250VAC and 1000VAC, turn the dial to 250VAC. Some meters have only one VAC
choice and the meter can automatically adjust for the voltage received (auto scaling).
DC
41
Page 42

Relays
Relays
In commercial operators, relays are often used to either control
certain operator functions or activate/deactivate ancillary devices
such as heaters or lights.
When electricity is applied to a relay coil, it energizes a magnet and
will close a Normally Open switch or open a Normally Closed switch.
A relay typically has prongs labeled Comm, NO, NC, and two prongs
to power the relay coil. See the light circuit example below containing
a relay.
The diagram below shows two different batteries supplying different voltages. The relay separates the electricity so the
different components are able to work together. Commercial door operators work in a similar fashion. Relays make it
possible for high voltage to work with low voltage.
D
Basic Electrical Information
An “Ice Cube” relay
Light Bulb
NO Switch
Relay
Battery
12V 24V
When the NO switch is pressed closed, electricity will travel through the relay coil and activate the relay. The relay
switch will allow electricity to fl ow through the circuit and turn on the light.
Comm NO NC
42
Page 43

Relays
Relays are available with different coil voltages and contact options. LiftMaster’s line of commercial operators primarily
use Double Pole/Double Throw Relays. A pole is another name for a switch. Double Pole is two separate switches
being turned on or off by the same activation coil (two separate Comms, NCs and NOs). Double Throw means there are
two positions for the output (NO and NC). When shopping for relays, Triple Pole/Single Throw and Single Pole/Double
Throw and many other options are available. Relays are rated with specifi c amp and voltage ratings. Always replace a
relay with the same ratings.
When looking at a wiring schematic, relays will be drawn with several components and the name of the relay will be
noted.
D
Basic Electrical Information
The Coil The NC ContactsThe NO Contacts
R1
Here is the same relay light switch shown as a wiring schematic.
NO
Switch
R1
Battery
R1
R1
Light Bulb
R1
AC Power Source
43
Page 44

Transformers
Transformers
Transformers are used to change incoming voltage to a different outgoing voltage. A transformer has a primary side
(incoming voltage) and a secondary side (outgoing voltage). The primary side connects to wires from the main power
source and the secondary side outputs the new voltage created. In commercial door operators, the secondary side is
generally 24VAC. Read the markings on the transformer to determine the primary and secondary voltages.
Transformers are rated in VOLT Amps (VA). A transformer can only pass the rated amount of electricity from the main
power to the secondary side. Be careful not to overload the transformer. Verify the amperage rating on all devices
connected to the 24VAC side of the transformer including devices attached to the logic board. Multiply the Amperage
rating for each device by the voltage needed to run the device.
▲
COMM 120V▲ 240V
D
Basic Electrical Information
▲
44
Page 45

Transformers
Example for calculating amperage draw:
Below is an example of text for a label that could be placed on accessory devices:
Output Rating…5 AMPS 28VAC or DC Max
Power…24VAC @ 30ma
The “Power” rating is required. The transformer’s secondary side is 24VAC and the transformer is rated for 20VA. The
example accessory above uses 30 milli-amps, which is .03 Amps. Multiply the volts being used (24V) and the amps
(.03A) to get the VOLT Amps (VA) used by the accessory (24Vx0.03A=0.72VA). That leaves (20-0.72=) 19.28VA left
for other accessories (photo-eyes, loop detectors, etc). Once the total VA exceeds 20VA, the operator may experience
failures. For operator setups requiring multiple accessories, calculate total VA draw and upgrade the transformer if
necessary. (40VA transformers or greater are available).
The output rating is how much electricity the accessory is able to have pass through it. This number is useful when
determining if an accessory will properly function long term with the commercial operator. The output rating has
nothing to do with the required amount of electricity to make the accessory function.
LiftMaster does offer technical training courses. See the back of this guide or visit liftmastertraining.com for more
information.
D
Basic Electrical Information
45
Page 46

Table of Contents
SECTION E
General Information
Page
Frequently Asked Questions 47
Suggested Service Truck Supplies 50
Recommended Wire Gauge Chart 51
Amperage 52
Page 47

Frequently Asked Questions
1. What Are The Minimum Features Required To Be Programmed On A Logic Operator?
2. How Is The Maximum Run Timer Feature Set Up?
3. What Are The LiftMaster Approved Entrapment Protection Devices?
4. How Is The Maintenance Alert System Feature Set Up?
5. How Is The Timer To Close Feature Set Up?
6. How Is The Mid-Stop Feature Set Up?
7. Can The Delay To Reverse Be Changed?
8. How Can The Operator Be Set To The Original Factory Default Settings?
9. How Can A Second Set Of Photo Eyes Be Installed And What Is Required?
10. How To Wire Multiple 3-Button Control Stations.
11. What Are The Major Differences Between Logic 4.0 And Logic 5.0?
1. What Are The Minimum Features Required To Be Programmed On A Logic Operator?
The minimum features required to be programmed include; setting the limits and selector dial for the correct wiring
type (C2, B2, etc).
NOTE: For UL operators monitored entrapment protection must be installed to operate in B2.
2. How Is The Maximum Run Timer Feature Set Up?
The Maximum Run Timer is a safety feature which allows the operator motor to run in one direction for a limited
amount of time. In the event of a door system failure, the operator will not continue to run. The factory default time is
ninety seconds. The timer can be set to a user’s preference.
E
General Information
To set the Maximum Run Timer:
NOTE: The default setting for the Maximum Run Timer (MRT) is 90 seconds.
• Start with the door in the closed position.
• Set the selector dial to PROGRAM.
• Press the MRT button on the logic board.
• Press the OPEN button and wait for the door to reach the full open limit.
• Once the door has reached the open position, programming is complete.
• Turn the selector dial back to desired wiring type.
• Close the door.
NOTE: To reset the MRT only, turn the selector dial to program and press and hold the MRT button until the MAS LED fl ashes rapidly.
3. What Are The LiftMaster Approved Monitored Entrapment Protection Devices?
LiftMaster offers a variety of Monitored Entrapment Protection Devices. See page 64.
NOTE: All plug-in cards, including the CPS3CARD are not compatible with Medium Duty Logic Operators.
4. How Is The Maintenance Alert System Feature Set Up?
The Maintenance Alert System fl ashes a light on the control station after a preset number of cycles have occurred
to provide an alert for required routine preventative maintenance. The purpose of the system is to promote proper
operation of the door through proper maintenance provided by a certifi ed LiftMaster dealer.
To set the MAS:
• Close the door.
• Turn the selector dial to PROGRAM.
• Press and release the MAS button.
• Press the STOP button once to clear the MAS counter.
• Press the OPEN button once for every 5,000 cycle increment. Press the CLOSE button once for every 3-month
increment. Press the STOP button once to clear the MAS memory.
• Press the MAS button to complete the programming. The on-board LED will fl ash back the programmed settings.
The OPEN LED will fl ash once for every 5,000 cycles. The CLOSE LED will fl ash once for every 3 months.
• Turn the selector dial back to the desired wiring type.
47
Page 48

Frequently Asked Questions
5. How Is The Timer To Close Feature Set Up?
Timer to Close is used to close a door automatically after a preset amount of time has passed.
Logic 3.0
To set the Timer to Close:
• Close the door.
• Turn the selector dial to PROGRAM.
• P ress the TIMER button on the logic board.
• Press the STOP button to clear the timer.
• Press the OPEN button for every 5 seconds the operator should wait before attempting to close the door. Press the
CLOSE button for every 60 seconds the operator should wait before closing the door.
• Press the TIMER button to complete the programming. The LEDs on the OPEN and CLOSE buttons will fl ash to
confi rm the timer setting. The OPEN LED will fl ash once for every 5 seconds programmed and the CLOSE LED will
fl ash once for every 60 seconds programmed.
• Turn the selector dial to the desired timer wiring type (TS, T or FSTS).
Logic 4.0 / 5.0
• Close the door.
• Turn the selector dial to PROGRAM.
• Press and release the TIMER button on the logic board.
• Press and release the STOP button to clear the timer.
• Press and release the OPEN button for every second the operator should wait before attempting to close the door.
Press and release the CLOSE button for every 15 seconds the operator should wait before closing the door.
• Press and release the TIMER button to complete the programming. The LEDs on the OPEN and CLOSE buttons will
fl ash to confi rm the timer setting. The OPEN LED will fl ash once for every second programmed and the CLOSE LED
will fl ash once for every 15 seconds programmed.
• Turn the selector dial to the desired timer wiring type (TS ,T or FSTS).
E
General Information
6. How Is The Mid-Stop Feature Set Up?
Mid-Stop is used when the door is not required to open fully on every cycle. Mid-Stop will stop the door at a preset
height during the open cycle.
To set the Mid-Stop:
• Close the door.
• Turn selector dial to PROGRAM.
• Press and release the MID button on the logic board.
• Press the OPEN button. When the door reaches the desired mid-stop height, press and release the STOP button.
• Press and release the MID button to complete the programming.
• Turn the selector dial to the desired wiring type.
7. Can The Delay To Reverse Be Changed?
On a Logic Operator, the delay to reverse is preset at 1.5 seconds and is not able to be changed. This length of time
has been determined as appropriate to allow the door to reverse without jerking on the operator and door parts, which
may cause premature failure of the operator and/or door.
48
Page 49

Frequently Asked Questions
8. How Can The Operator Be Set To The Original Factory Default Settings?
To reset most of the user-installed settings back to factory defaults:
• Turn the selector dial to DIAGNOSTIC.
• Press and hold the STOP button for 5 seconds. The MAS LED will fl ash momentarily when the factory defaults have
been restored.
• Return the selector dial to the desired wiring type.
Factory Defaults:
• Timer to Close = 0 seconds
• Monitored Entrapment Protection Device (CPS-U Photo Eye or OES Edge) = unlearned
• Mid-Stop = deactivated
• Maintenance Alert System = deactivated
• Maximum Run Timer = 90 seconds
9. How Can A Second Set Of Photo Eyes Be Installed And What
Is Required?
Installing a second set of photo eyes on a Logic 3.0, 4.0 or 5.0
operator requires the use of a CPS3CARD. The fi rst set of photo
eyes will wire to LMEP and COMMON on the logic board. The
second set will wire to the CPS3CARD. The card is plugged into
the logic board.
E
General Information
10. How To Wire Multiple 3-Button Control Stations.
WIRING TWO 3-BUTTON CONTROL STATIONS
Operator Screw Terminals
OPEN
1
OPEN
CLOSE
STOP
The STOP Circuit must be wired in series.
The OPEN and CLOSE wiring should be in parallel.
11. What Are The Major Differences Between Logic 4.0 And Logic 5.0?
Exclusive Logic 5.0 Features:
• myQ Technology - Internet connectivity for monitoring and controlling a commercial door operator from a smart
phone, tablet or computer.
• Security + 2.0™ On Board Receiver - Improves range and reduces radio interference.
• Dual Voltage - Within phases, voltage is selectable at the time of installation with the placement of a connector.
Single-phase is compatible with 115v and 230v. 3-phase is compatible with 208v, 230v and 460v. 3-phase, 575v is a
model without fi eld selectable voltage.
COMMONCLOSE
STOP
2
OPEN
CLOSE
STOP
49
Page 50

Suggested Service Truck Supplies
The items listed below are intended for repair of a LiftMaster operator and not necessarily for repair of a door.
MULTIMETER - Look for a meter that has an audio signal for continuity. To make working on a ladder safer and easier,
look for test leads able to grip onto the wire being tested. A high quality (expensive) multimeter is not required. A less
expensive meter will work very well for diagnosing electrical issues within an operator.
SCREWDRIVERS - Standard size Phillips and Flathead and a small size Flathead for setting DIP switches and working
with Logic “Daughter Boards” i.e. CPS3CARD, TLS1CARD, etc. Screwdrivers should be insulated.
SOCKETS AND CRESCENT WRENCHES - A 1/4” nut driver will be extremely handy. Crescent Wrenches and Socket
Sets are mainly for removing an operator from the door, wall or ceiling.
Additional Items:
Wire Stripper w/Crimping Tool
Wire Cutters
Needle Nose Pliers
Standard Pliers
Manual Winch - Used for lifting or lowering the operator safely
Jumper Wires w/Alligator Clips
E
General Information
NOTE: Use fall protection or harness and tether as necessary.
Spare Parts To Keep On The Truck:
16AWG Stranded
Insulated Wire
(at least 5 colors)
Limit Switches
(including at least one
aux. limit switch kit)
CPS-U Entrapment Device
Edge Kit and Replacement
Components
Sprocket Keys and
Setscrews
Logic Operators:
Replacement boards:
Logic 4.0
Logic 5.0
RPM Sensor
Logic 5.0 Power Boards
(single-phase and 3-phase)
Medium Duty Logic Board
Belt
Chain
Stripper w/Crimping Tool
40VA Transformers
Relays
Master Link
3-Button Control Station
893MAX Remote Control
Mechanical Operators:
Contactor
Belt
Transformers
Relays
Master Link
50
Page 51

Recommended Wire Gauge Chart
Recommended Control Wire Gauge Based On Wire Run Length For Mechanical Operators
Logic Operators are rated for up to 1000 feet with 18-gauge wire.
E
General Information
Wire Gauge
(AWG)
Feet Feet
22 N/A 600
20 50 700
18 75 1000
16 115
14 180
12 290
10 500
NOTES:
1) These distances are for accessory wires such as 3-button control stations, photo-eyes, loop detectors and treadle
hoses.
2) The control distance is the distance between the power connection and the accessory in question.
e.g. a 3-button control station 25 feet from the operator
a loop detector 30 feet from the operator
photo-eyes 10 feet from the operator
MECHANICAL LOGIC
Control Wire Distance
Main Power Wire Gauge And Length Recommendations
A power drop between idle (off) and running voltage should not exceed 2 volts.
Understand the amperage rating for each operator’s voltage and horsepower using Table 1. The information in the
table may change without notice; review the instruction manual provided with each operator for the most current
information.
Determine the gauge of wire needed to safely accommodate the distance between the operator and the electrical box
using either Table 2A for SINGLE PHASE or 2B for THREE PHASE (page 51).
NOTES:
1) The amount of electricity carried by a wire is restricted to the release of heat through the electrical insulation
material (the cable insulation can melt if the improper gauge is used).
2) Don’t run control wiring and power wiring in the same conduit, these wirings should be separated by 18”.
51
Page 52

Amperage
TABLE 1 Amperage By Model/Horsepower And Voltage (All Voltages Are 60Hz)
Model HP 115V 230V 1ph 230V 3ph 460V 575V
LGJ (OBSOLETE) 1/2 5
ATS2113X 1/4 5
ATSW * 6A
MGJ ** 1/2 6 2.1 1.1
MT, MJ & MH ** 1/2 6
APT 1/2 11.2
T, J & H 1/3 8.5 4.2 3
T, J, H, HJ, DJ, DHJ, & SD *** 1/2 11.2 5.6 3.1 1.75 1.4
T, J, H, HJ, DJ, DHJ, & SD 3/4 13.6 6.8 4 2 1.6
T, J, H & SD 1 16 8 6 3 1.8
GT*** 1/2 11.2 5.6 3.1 1.75 1.4
GT 3/4 13.6 6.8 4 2 1.6
GT 1 16 8 6 3 1.8
GT 1-1/2 20 10 7 3.5 2.75
GH & GSD*** 1/2 11.2 5.6 3.1 1.75 1.4
GH & GSD 3/4 13.6 6.8 4 2 1.6
GH & GSD 1 16 8 6 3 1.8
GH & GSD 1-1/2 20 10 7 3.5 2.75
GH 2 843
GH 3 10.6 4.8
E
General Information
TABLE 2A
Amps 50 FT 100 FT 200 FT 350 FT 500 FT 750 FT
12 1286420
11 121064210
10 121064210
9 121064220
8 141086421
7 141286422
6 141286422
5 1612108642
4 1614108644
3 18141210 8 6 4
2 2016141210 8 6
1 22201614121010
TABLE 2B
Amps 50 FT 100 FT 200 FT 350 FT 500 FT 750 FT
12 8621
11 106410
10 106420
9 106420
8 108421
7 1286220
6 1286420
5 121064210
4 141086421
3 141286422
2 1614108644
1 2016141210 8 6
SINGLE-PHASE OPERATORS/Wire Needed For Distance Between Operator And Electrical Box
1000 FT
THREE-PHASE OPERATORS/Wire Needed For Distance Between Operator And Electrical Box
1000 FT
NOTES:
*Rated Load: 600 in-lb/sec (50 ft-lb/sec)
**Rated Load: 125 ft-lbs/sec
***Rated Load: 140 ft-lbs/sec
52
Page 53

53
Page 54

Table of Contents
SECTION F
Wiring Diagrams
Page
Logic 5.0 - Single Phase 55
Logic 5.0 - Three Phase 56
Logic 4.0 - Single Phase 57
Logic 4.0 - Three Phase 58
Logic 3.0 - Single Phase 59
Logic 3.0 - Three Phase 60
Medium Duty Logic Operator 61
Mechanical Operator - Single Phase 62
Mechanical Operator - Three Phase 63
54
Page 55

Logic 5.0 - Single Phase
Refer to the installation
manual for LiftMaster
Monitored Entrapment
Protection (LMEP)
device connections
Ancillary
Sensing
Edge
F
Wiring Diagrams
3-Button Control Station
Hoist Interlock
When Present
TMR DEF
SWITCH
Open/Close
Single Button
Remove Jumper
To Install External
Door Interlock
*NOTE: Black and gray positions vary by model.
NOTE: Lock Sensor is provided on
Models DJ and DH only, red wire from
main harness connects to NC on Bypass
L/S and to NO on LOCK SENSOR Switch.
White wires connect the COM on BYPASS
L/S and LOCK SENSOR Switch to NC on
Open L/S.
NOTE: The Lock Sensor Switch is
located in the chassis.
55
WH- To Externnal Radio Receiver COM (R1)
OR- To Externnal Radio Receiver NO (R2)
YE- To Externnal Radio Receiver 24V (R3)
External
Radio Receiver
NOTE: 32 Vdc power supplied
from White and Yellow wires
located within the electrical box.
Page 56

Logic 5.0 - Three Phase
Refer to the installation
manual for LiftMaster
Monitored Entrapment
Protection (LMEP)
device connections
Ancillary
Sensing
Edge
F
Wiring Diagrams
3-Button Control Station
NOTE: Logic 5.0 three-phase
operators built before February
2016 do not have these
connectors
Hoist Interlock
When Present
TMR DEF
SWITCH
Open/Close
Single Button
Remove Jumper
To Install External
Door Interlock
NOTE: Lock Sensor is provided on
Models DJ and DH only, red wire from
main harness connects to NC on Bypass
L/S and to NO on LOCK SENSOR Switch.
White wires connect the COM on BYPASS
L/S and LOCK SENSOR Switch to NC on
Open L/S.
NOTE: The Lock Sensor Switch is
located in the chassis.
56
*NOTE: Black and gray positions vary by model.
External Radio
Receiver
NOTE: 32 Vdc power supplied
from White and Yellow wires
located within the electrical box.
Page 57

Logic 4.0 - Single Phase
F
Wiring Diagrams
OPEN
115V MOTOR CONNECTION 230V MOTOR CONNECTION
NOTE: Gray (GY) and purple (PU) motor wires are reversed
for H and HJ right hand models and all GH and J models.
Refer to the installation manual
for LiftMaster Monitored
Entrapment Protection (LMEP)
device connections
Hoist Interlock
When Present
C1
DATA
SLOT 1
C8
C61
(YE)
(BL)
SLOT 2
TMR DEF
SWITCH
14
24VAC
13
POWER
TIMER
24VAC
Sensing
Edge
121110
MAS
COMMON
DEFEAT
3-PHASE
1-PHASE
MID
OLS
REV
MOTOR
DIRECTION
STD
Maintenance
Alert LED
(RD) (WH)
CLOSE
STOP
Open
3-Button Control Station
Close
Stop
Open/Close
Single Button
Remove Jumper
To Install External
9
LMEP:
EDGE:
OPEN
TIMER
ENABLE
MRT MID TTC
SLS
CLS
123
RADIO
CLOSE
STOP
5
TTS
FSTS
E2
4
COMMON
DIAG
D1
3
OPTN
C2
2
SBC
PROG
B2
6
7
8
Door Interlock
1
(YE)
(OR)
(WH)
(YE)
(PU)
(WH)
(RD)
RELAY A
RELAY B
(GY)
(YE)
(RD)
(WH)
(PU)
(YE)
(OR)
(GY)
neutral
ground
115 / 230
VOLT 1PH.
POWER IN
NOTE: Lock Sensor is provided on Models
DJ and DH only, red wire from main harness
connects to NC on Bypass L/S and to NO on
LOCK SENSOR Switch. White wires connect
the COM on BYPASS L/S and LOCK SENSOR
Switch to NC on Open L/S.
NOTE: The Lock Sensor Switch is
located in the chassis.
hot
(BK)
MOV
MOV
L3 L2 L1
(WH)
(WH)
NO
NC
VAC
(WH)
(RD)
120 / 240
VAC
(PU)
(WH)
COM 120
+24 VAC -24 VAC
(YE)
COM
OPEN L/S CLOSE L/S
(YE)
(BR)
(WH)
57
Connections
(WH)
NO
NC
NC
SAFETY L/S
NO
See Motor
NO
COM
COIL
COM
COM
(WH)
C
(GY)
(WH)
01
B
4
8
6
2
RPM Board
1 2 3 4
(WH)
(RD)
(YE)
(GY)
(YE)
(WH)
(WH)
(WH)
(WH)
(WH)
(WH)
(YE)
(PU)
(OR)
01
A
4
2
(BL) (GY)
(PU)
See Motor
Connections
(WH) (OR) (YE)
R1 R2 R3
8
6
External Radio Receiver
Page 58

Logic 4.0 - Three Phase
F
Wiring Diagrams
T4
J
T5
J
230V BRAKE
(WHEN PRESENT)
T6
T7 T1
T8
T9 T3
T4
(GY)
(BR)
T2
(PU)
(BR)
(YE)
230V BRAKE
J
T5
J
(WHEN PRESENT)
T6
T7 T1
T8
T9 T3
(GY)
(BR)
T2
(PU)
(BR)
(YE)
(BL/BK)
575V BRAKE
(WHEN PRESENT)
(BL/BK)
1
2
3
208/230V MOTOR CONNECTION 460V MOTOR CONNECTION 575V MOTOR CONNECTION
NOTE: Gray (GY) and purple (PU) motor
wires are reversed for H and HJ right hand
models and all GH and J models.
Sensing
Edge
Refer to the installation manual
for LiftMaster Monitored
Entrapment Protection (LMEP)
device connections
Hoist Interlock
When Present
(YE)
(BL)
TMR DEF
SWITCH
1413121110
DATA
TIMER
MAS
DEFEAT
24VAC
24VAC
COMMON
POWER
3-PHASE
1-PHASE
MID
SLS
MOTOR
DIRECTION
CLS
SLOT 1
SLOT 2
OLS
REV
STD
9
LMEP:
(GY)
(BR)
(PU)
(BR)
(YE)
TIMER
MRT MID TTC
8
EDGE:
ENABLE
7
OPEN
123
RADIO
Maintenance
Alert LED
(RD) (WH)
Close
6
5
STOP
CLOSE
FSTS
TTS
E2
Open
Stop
Open/Close
Single Button
4
COMMON
DIAG
D1
3
OPTN
C2
OPEN
CLOSE
STOP
3-Button Control Station
Remove Jumper
To Install External
Door Interlock
2
1
SBC
RELAY A
RELAY B
(OR)
(WH)
(PU)
(WH)
(RD)
(GY)
(RD)
(WH)
(PU)
(OR)
(GY)
(YE)
(YE)
(YE)
(YE)
PROG
B2
208/230/460
VOLT 3PH.
POWER IN
NOTE: Lock Sensor is provided on Models
DJ and DH only, red wire from main harness
connects to NC on Bypass L/S and to NO on
LOCK SENSOR Switch. White wires connect
the COM on BYPASS L/S and LOCK SENSOR
Switch to NC on Open L/S.
NOTE: The Lock Sensor Switch is
located in the chassis.
(YE)
(WH)
L3 L2 L1
(WH)
+24 VAC -24 VAC
OPEN L/S
LOCK
SENSOR
(see note at left)
(BK)
MOV
MOV
(WH)
COM 120
VAC
(WH)
COM
NO
NC
NO
NC
(WH)
(RD)
240 / 460 /
575 VAC
(RD)
(PU)
(RD)
(WH)
(YE)
58
(WH)
(WH)
NO
COM
COIL
COM
NO
CLOSE L/S
NC
NC
SAFETY L/S
NO
COM
COM
NO
BYPASS
NC
L/S
(WH)
(PU)
(BR)
See Motor
Connections
(BR)
01
B
(WH)
(WH)
(WH)
(WH)
(GY)
RPM Board
1 2 3 4
84
62
(WH)
(RD)
(YE)
(GY)
(WH)
(WH)
R1 R2 R3
(WH)
(WH)
NO
(WH)
COM
C
COIL
D
(OR)
01
A
4
(GY) (YE)
See Motor
Connections
(WH) (OR) (YE)
(PU)
8
62
External Radio Receiver
NOTE: 32 Vdc power supplied
from White and Yellow wires located
within the electrical box.
Page 59

Logic 3.0 - Single Phase
NOTE: Gray (GY) and purple (PU) motor wires are reversed
for H and HJ right hand models and all GH and J models.
F
Wiring Diagrams
OPEN
115V MOTOR CONNECTION 230V MOTOR CONNECTION
CPS-L & CPS-LN4
Hoist Interlock
When Present
Ø
C3
R31
D8
657–A
Ø
14GP
Ø
657–A
Ø
14LG
Ø
P4
D31
U7
C18
R29
E1
D7D6D5
C11
TMR DEF
SWITCH
(YE) (BL)
24VAC24V
D4C25
C17
Ø
P1
X1
U1
2
Ø
D3
14
POWER
K3
Maintenance
CLOSE
Alert LED
(RD) (WH)
STOP
Open
3-Button
Sensing
Edge
Close
Control Station
Stop
Open/Close
Single Button
Remove Jumper
To Install External
SBC
B2 PROG
L5
1
F1
SBC
P1
D34
D14
)
B2 C2 D1 E2
NON FAILSAFE
(
S8
FAILSAFE
P6
Door Interlock
(YE)
(OR)
(WH)
(YE)
(PU)
(WH)
(RD)
(GY)
(YE)
(RD)
(WH)
(PU)
(YE)
(OR)
(GY)
9
8
7
6
5
4
3
CMN
C73
2
FSTSE2
D1 DIAG
C2
C54
L1
C71
C78
®
11
13
TIMER
AC
D19
TIMER
ØØ
J3
J1
10
12
MAS
CMN
EYES
EDGE
OPEN
STOP
D22
OPEN
Ø
D2
TIMER
ENABLE
3
2
D36
1RADIO
D21
CLOSE
RELAY A
CLOSE
D13
STOP
C77
TTS
RELAY B
D35
DEFEAT
D23
D15
D28
D17
EYES
4
MOTOR
DIRECTION
D26
SLS
EDGE
D1
TIMER
D27
MID
CLS
MRT
D16
P7
R8
MAS
DEFEAT
D25
D24
MID
OLS
115 / 230
VOLT 1PH.
NOTE: Lock Sensor is provided on Models
DJ and DH only, red wire from main harness
connects to NC on Bypass L/S and to NO on
LOCK SENSOR Switch. White wires connect
the COM on BYPASS L/S and LOCK SENSOR
Switch to NC on Open L/S.
hot
neutral
earth
POWER IN
(YE)
L3 L2 L1
(WH)
MOV
MOV
(WH)
COM 120
+24 VAC -24 VAC
(WH)
COM
OPEN L/S
COM
BYPASS
L/S
LOCK
SENSOR
(BK)
(BR)
See Motor
Connections
(WH)
(WH)
01
4
(WH)
COM
NO
CLOSE L/S
NC
NC
SAFETY L/S
NO
COM
NO
COM
COIL
C
(GY)
120 / 240
VAC
VAC
(RD)
(PU)
(WH)
NO
NC
(WH)
NO
NC
NO
NC
(RD)
(RD)
(YE)
(WH)
2
(RD)
(YE)
(WH)
1 2 3 4
RPM Board
(YE)
(WH)
B
(WH)
(WH)
8
(WH)
(WH)
6
(WH)
(YE)
(GY)
(OR)
01
A
4
2
(PU)
(BL) (GY)
See Motor
Connections
(YE)
(WH)
(OR)
R1 R2 R3
(PU)
8
6
Radio
59
Page 60

Logic 3.0 - Three Phase
NOTE: Gray (GY) and purple (PU) motor wires are reversed
for H and HJ right hand models and all GH and J models.
T4
T4
J
T5
J
230V BRAKE
(WHEN PRESENT)
T6
T7 T1
T8
T9 T3
(GY)
(BR)
T2
(PU)
(BR)
(YE)
230V BRAKE
J
T5
J
(WHEN PRESENT)
T6
T7 T1
T8
T9 T3
(GY)
(BR)
T2
(PU)
(BR)
(YE)
208/230V MOTOR CONNECTION 460V MOTOR CONNECTION 575V MOTOR CONNECTION
CPS-L & CPS-LN4
Hoist Interlock
When Present
Ø
C3
R31
657–A
Ø
14GP
Ø
657–A
Ø
14LG
Ø
D31
D7D6D5
U7
D8
C18
R29
E1
P4
C11
L3 L2 L1
(WH)
208/ 230 / 380 / 460
VOLT 3PH.
POWER IN
(YE)
OPEN L/S
NOTE: Lock Sensor is provided on Models
DJ and DH only, red wire from main harness
connects to NC on Bypass L/S and to NO on
BYPASS
LOCK SENSOR Switch. White wires connect
the COM on BYPASS L/S and LOCK SENSOR
Switch to NC on Open L/S.
(WH)
LOCK
SENSOR
(see note at left)
(BL/BK)
575V BRAKE
(BL/BK)
TMR DEF
SWITCH
(YE) (BL)
14
24VAC24V
D4C25
C17
Ø
POWER
P1
X1
U1
2
K3
Ø
D3
(BK)
MOV
MOV
(WH)
COM 120
VAC
+24 VAC -24 VAC
(RD)
(WH)
COM
NO
NC
(WH)
(RD)
COM
NO
NC
L/S
(RD)
NO
NC
(WHEN PRESENT)
13
AC
D19
240 / 460 /
575 VAC
12
TIMER
DEFEAT
TIMER
DEFEAT
ØØ
J3
J1
(PU)
F
Wiring Diagrams
1
(GY)
(BR)
(PU)
2
(BR)
(YE)
3
Maintenance
Alert LED
(RD) (WH)
Open
Sensing
Edge
Close
Stop
Open/Close
Single Button
9
8
7
6
5
4
3
11
10
MAS
CMN
EYES
EDGE
OPEN
STOP
CLOSE
D23
D2ØD21
OPEN
D22
TIMER
(WH)
(WH)
ENABLE
3
2
1RADIO
(PU)
(BR)
(BR)
CLOSE
RELAY A
D36
D13
STOP
TTS
RELAY B
D35
C77
See Motor
Connections
(WH)
NO
COM
C
COIL
D28
D17
R8
D25
OLS
(WH)
(YE)
(WH)
MAS
D24
MID
MOTOR
DIRECTION
NO
NC
NC
NO
D15
EYES
4
D1
TIMER
D26
D27
MID
SLS
CLS
MRT
D16
P7
(WH)
NO
COM
D
COIL
COM
CLOSE L/S
SAFETY L/S
COM
EDGE
2
CMN
FSTSE2
D1 DIAG
C2
C54
L1
C73
C78
®
01
B
(WH)
(GY)
(RD)
(YE)
(WH)
1 2 3 4
RPM Board
SBC
B2 PROG
L5
C71
84
62
(GY)
OPEN
CLOSE
STOP
3-Button
Control Station
Remove Jumper
To Install External
Door Interlock
1
F1
SBC
P1
D34
D14
)
(YE)
B2 C2 D1 E2
NON FAILSAFE
(
(OR)
(WH)
(YE)
S8
(PU)
(WH)
(RD)
(GY)
(YE)
(RD)
FAILSAFE
(WH)
(PU)
(YE)
(OR)
(GY)
P6
(WH)
(WH)
(WH)
(WH)
(WH)
Connections
(WH)
R1 R2 R3
Radio
(PU)
(OR)
01
A
4
(GY)
See Motor
(YE)
(OR)
8
62
(YE)
60
Page 61

Medium Duty Logic Operator
F
Wiring Diagrams
Green
Motor
If Interlock is not
**
used, wires are
capped together.
Brake (BMT only)
Capacitor
White*
Brown**
Brown**
Blue*
Orange
Purple
Yellow
* seriw ,deilppus ton si ekarB fI
are capped separately
Yellow
Red
Yellow
Safety Limit
Switch
Red
Grey
AUX ANT
ANT
STOP CLOSE OPEN
LEARN
TTC
J2
LED
2345 67
1
OPENCLOSE
COM INTRLK STOP
LMEP1 LMEP2
Black
Black
L2
L1
OPEN
CLOSE
STOP
Remove Jumper to Install
External Door Interlock.
Open Limit
Switch
Grey
Close Limit
Switch
26
61
Page 62

Mechanical Operator - Single Phase
WARNING
F
Wiring Diagrams
62
Page 63

Mechanical Operator - Three Phase
F
Wiring Diagrams
TO REVERSE MOTOR
DIRECTION INTERCHANGE
PURPLE & GRAY WIRES
AT CONTACTOR 1 & 3
RELAY
YELLOW
GREY
PURPLE
BRAKE
( WHEN REQ'D )
( 3/4 HP & BELOW )
( 1 HP & ABOVE )
BROWN
BROWN
BL-BK
BL-BK
( 3/4 HP & BELOW )
TO MOTOR
(WHEN PRESENT)
575V BRAKE
575V MOTOR CONNECTION
*
SEE NOTE:
ORANGE
BROWN
EXT.
INTLK.
TO OPEN
AND CLOSE
SAFETY
TO TERMINAL #2
TO TERMINAL #3
ORANGE
BROWN
YELLOW
5710
EDGE
PURPLE
PURPLE
GREY
GREY
LIMIT SWITCHES
BROWN
BROWN
GREY
YELLOW
L1
L1
**
TIMER
( OPTIONAL )
NC
CLOSE
PURPLE
PURPLE
BROWN
YELLOW
BLACK
( 3/4 HP & BELOW)
T1
T2
T3
96
95
OVERLOAD
( 1 HP & ABOVE ONLY )
BLACK
BLACK
L2
L3
3 PHASE
POWER IN
C
SAFETY
L/S
CLOSE
NC
L/S
C
BLACK
LOAD
24VAC
XFMR
L1
L2
L3
BLACK
L3L2
GROUND
- Shipped from Factory
*
CLOSE CONTROL
WIRING OPTIONS
C2 WIRING:
*
Constant Pressure to Close
RED WIRE ON TERMINAL
#2 (Shipped from Factory)
B2 WIRING:
Momentary Contact to Close
MOVE RED WIRE FROM
TERMINAL #2 TO TERMINAL #3
- Transformer Primary Voltage
**
same as Line Voltage.
WARNING
ALWAYS DISCONNECT
POWER WHENEVER
INSTALLING OR SERVICING
THE DOOR OPERATOR.
LINE
**
WIRE NUT
ORANGE
C
L/S
L/S
C
CLOSE
A1
13
5
3
1
A1
13
5
3
1
OPEN
BROWN
RED
PURPLE
PURPLE
ORANGE
ORANGE
RED
R1
R2
R3
AUX.TERMINAL
BLOCK FOR RADIO
NO
NC
OPEN
LIMIT SWITCHES
ORANGE
NC
ORANGE
PURPLE
A2
PURPLE
14
PURPLE
6
BLACK
4
2
BLACK
ORANGE
A2
YELLOW
14
6
BLACK
BLACK
4
BLACK
2
YELLOW
RED
RED
YELLOW
PURPLE
ORANGE
RADIO
RECEIVER
AUX.OPEN
OPEN
PURPLE
PURPLE
RED
YELLOW
GREY
PURPLE
WHITE
ORANGE
ORANGE
R1
CNONC
INTERLOCK
( OPTIONAL )
230V
(WHEN PRESENT)
ORANGE
RED
1
ORANGE
GREY
PURPLE
PURPLE
RED
ORANGE
32 4
YELLOW
BRAKE
OPEN
230V MOTOR CONNECTION
(WHEN PRESENT)
230V BRAKE
CLOSE
STOP
460V MOTOR CONNECTION
63
Page 64

Page 65

HOW TO ORDER
REPAIR PARTS
DEVANCO CANADA
19192 HAY ROAD, UNIT Q
SUMMERSTOWN, ON K0C 2E0
TOLL FREE: 855-931-3334
www.devancocanada.com
WHEN ORDERING REPAIR PARTS
PLEASE SUPPLY THE
FOLLOWING INFORMATION:
3 PART NUMBER
3 DESCRIPTION
3 MODEL NUMBER
 Loading...