

Page 1
1
1
2
1
2
1
5
2
3
4
5
Disabled
This Quick Start is intended to highlight a typical single family home with one phone line. These
instructions are not intended to be comprehensive. Each application is unique, it is the
responsibility of the purchasers, designer, installer and end user to ensure that the total control
access system is safe for its intended use. Please refer to the manuals and/or qualified technician
for further information.
NOTE: The default password is “Manager.”
®
EL MODEL
Quick Start Guide
For Single Family Residence No Phone Line (Without Directory Codes) Installation using Versa XS
3. Select the DEVICES Tab
1
1
Click on the
“Device Configuration
Wizard” button
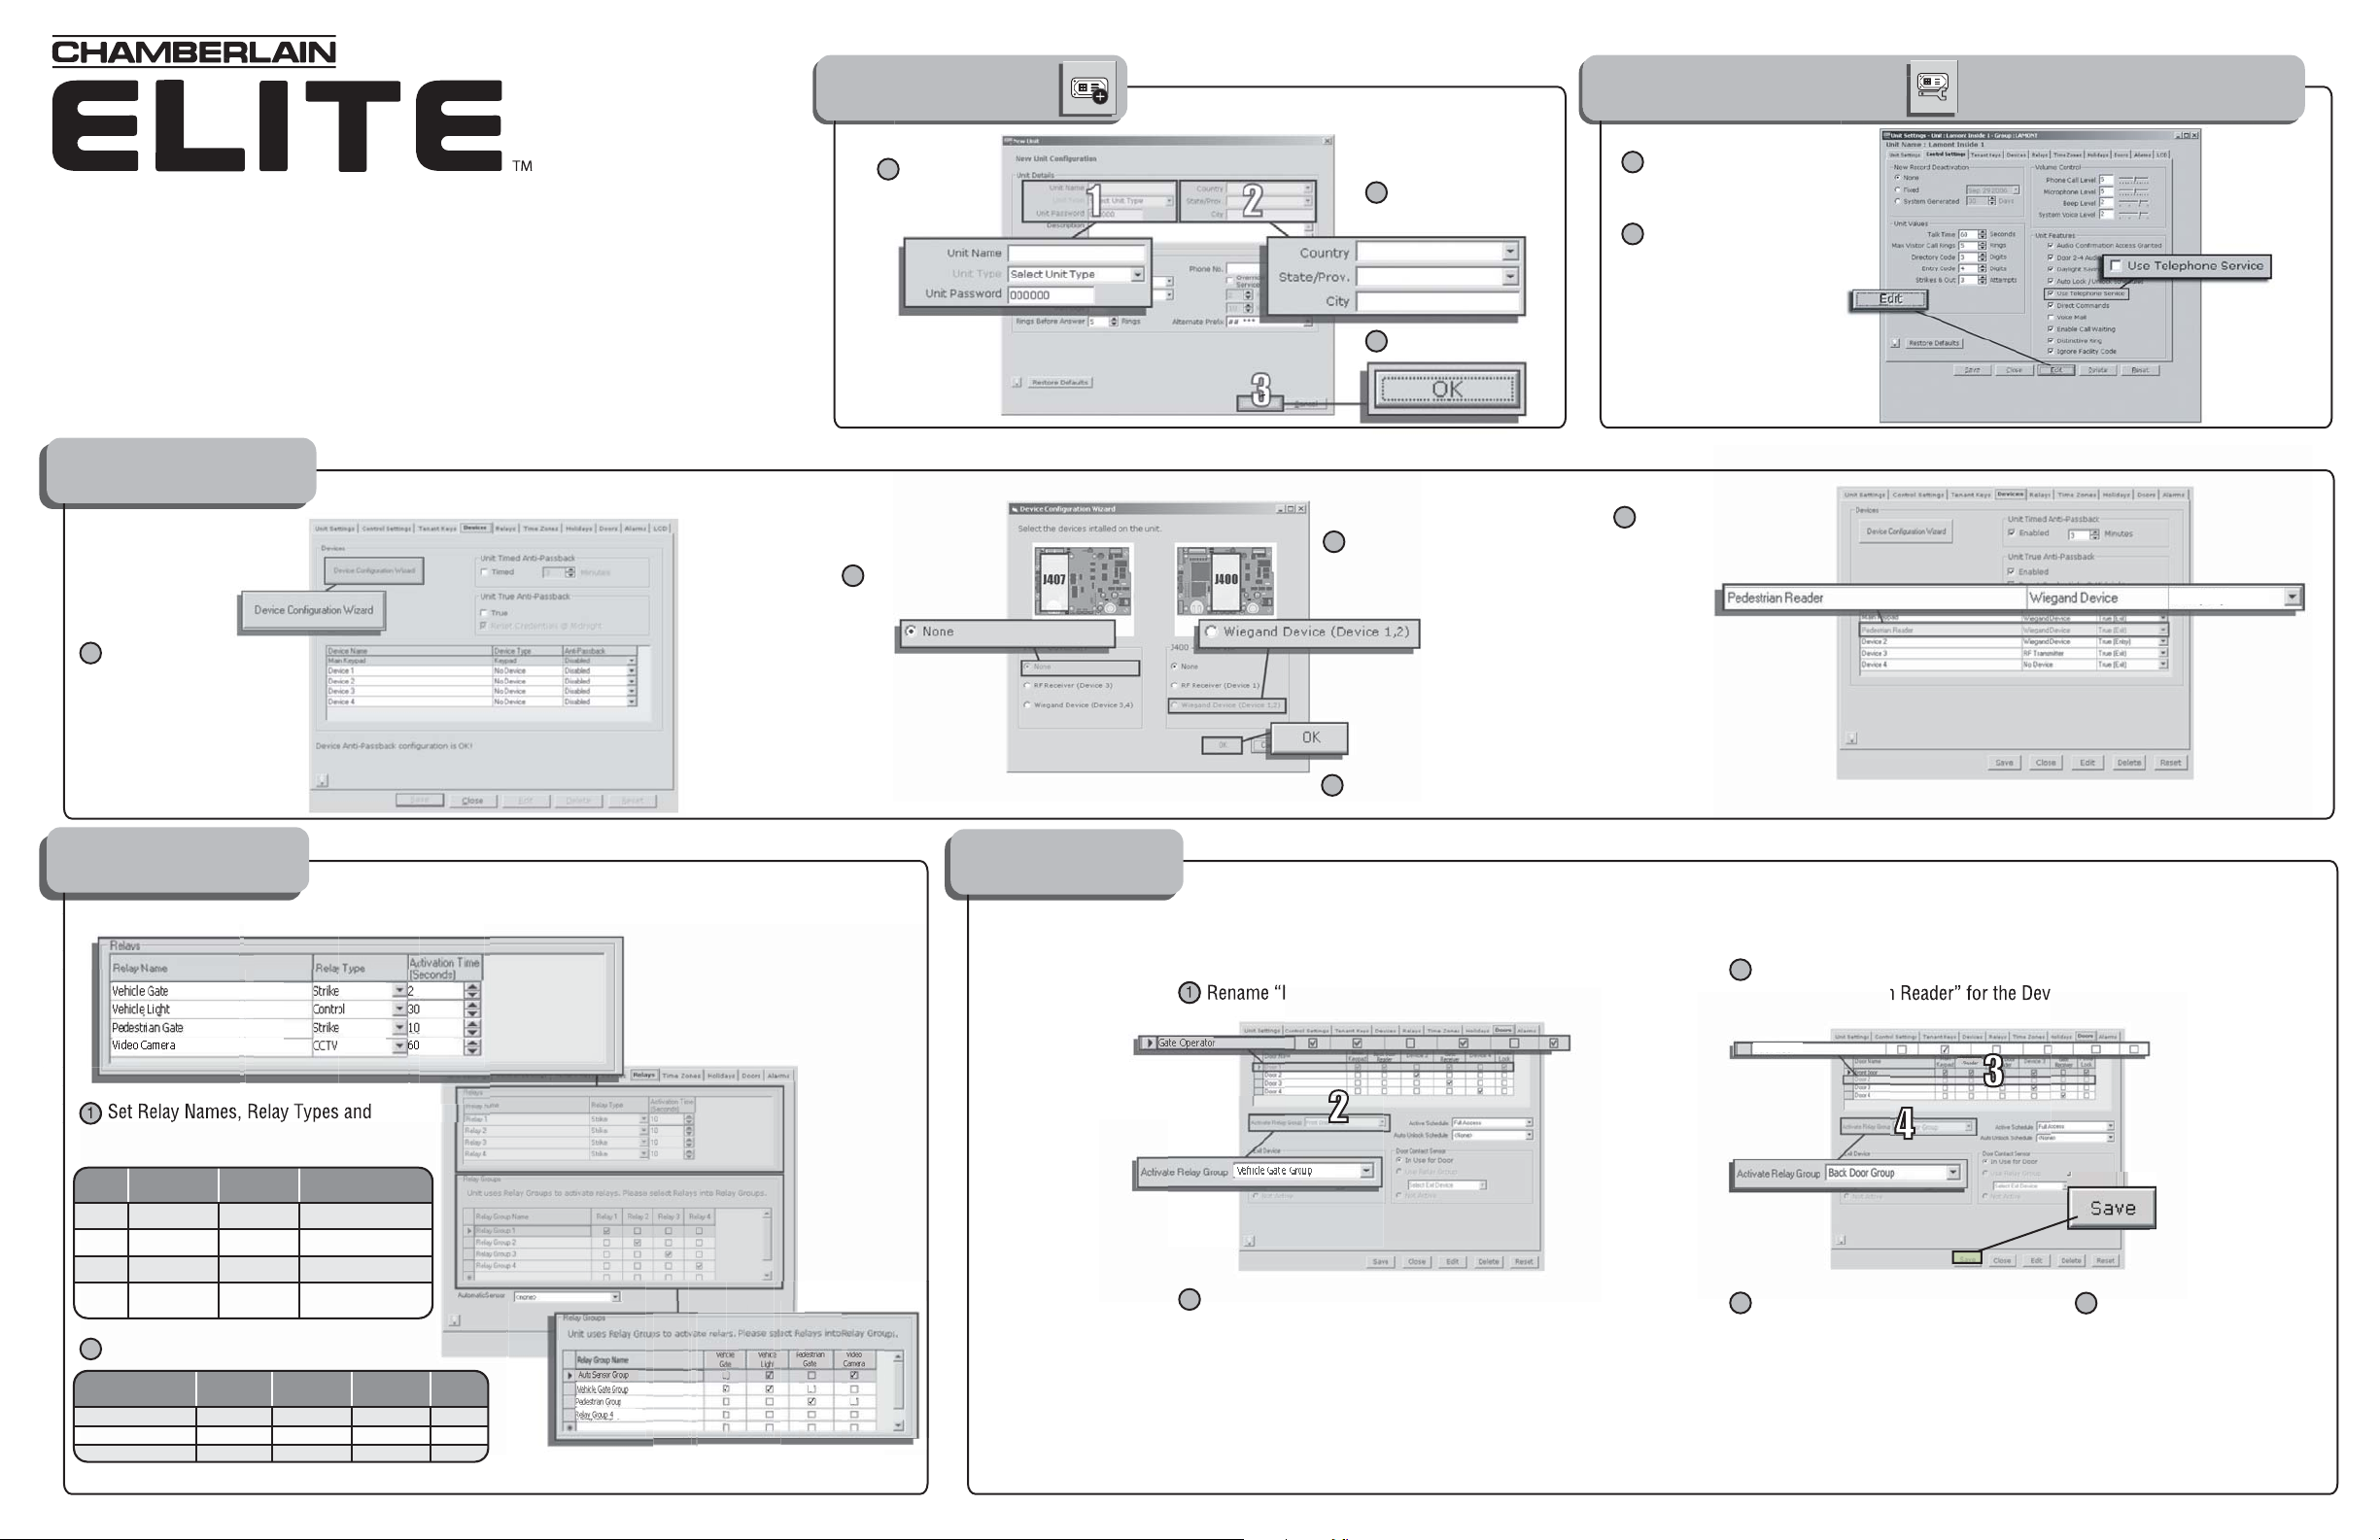
1. Click the NEW UNIT ICON
1
Enter Unit
Name and
Unit Type
2
Choose “None”
for J407
2
Enter Country,
State/Prov. and City
3
Click OK
3
Choose “Wiegand Device”
for J400
2. Click the Unit Configuration ICON and Select the CONTROL SETTINGS Tab
1
Click on the
“Edit” button
2
Uncheck the
“Use Telephone Service”
check box
5
Rename “Device 1” to
“Pedestrian Reader”
Disabled
4. Select the RELAYS Tab 5. Click the DOORS Tab
1
Set Relay Names, Relay Types and
Activation Times:
Relay # Relay Name Relay Type Relay Activation Time
1 Vehicle Gate Strike 2 Seconds
2 Vehicle Light Control 30 Seconds
3 Pedestrian Gate Strike 10 Seconds
4 Video Camera CCTV 60 Seconds
2
Set Relay Groups:
Relay Group Name
Auto Sensor Group
Vehicle Gate Group
Pedestrian Group
Vehicle
Gate
XX
Vehicle
Light
Pedestrian
Gate
XX
X
Video
Camera
4
1
Rename “Door 1” to “Gate Operator”
2
Select “Vehicle Gate Group”
from the drop-down menu
Click OK
2
3
Rename “Door 2” to “Pedestrian Gate” and
select “Pedestrian Reader” for the Device
Pedestrian Gate
3
4
4
Select “Pedestrian Group”
from the drop-down menu
5
Click SAVE
Page 2

Enter Last Name
1
Enter Display Info
2
NOTE: The unit uses Display
Info for transactions when
the Entry Code or Credential
Code is used.
7. Click the ACCESS DETAILS Tab6. Click the NEW TENANT ICON
Enter an Entry Code (optional)
1
Click on Select and create a new
Credential (optional)
2
NOTE: A credential is a generic term when
referring to a transmitter or swipe card.
11
1
2
2
8. Click the AUTO CONFIGURATION ICON
OK
The Custom Configuration screen will open
A pop-up window will inform you that the Connect Set was
sucessfully tested.
NOTE: If “Test It” button fails, try one of the following:
If the problem persists, please call technical support.
If a window appears informing you to close all applications,
make sure to close other applications and click
Wait for Versa XS to
identify modems
1
4
5
Check the “Use This Connect Set for Unit”
check box
4
1. Be sure your modem is turned on.
2. Check the appropriate Connection Mode (Direct or Modem) type
confirms with the selected COM port (see you computer’s COM
settings).
3. Close any other application using the COM port.
4. Close any other applications.
9. Click the TRANSFER DATA ICON
Check Configuration and Tenant Info in the Send Data to Unit frame
1
1
2
1
2
3
Select a Connect
Set from the
“Connect Set” list
2
Click OK
3
Click “Test It”
then
5
click
Click START
2
NOTE: If a mismatch message/warning appears click OK.
Page 3

1. Click the NEW UNIT ICON
1
2
5
3
6
4
1
2
1
2
3
4
5
6
7
2
3
4
Disabled
Disabled
This Quick Start is intended to highlight a typical Multi-Tenant Complex. These instructions are
not intended to be comprehensive. Each application is unique, it is the responsibility of the
purchasers, designer, installer and end user to ensure that the total control access system is safe
for its intended use. Please refer to the manuals and/or qualified technician for further
information.
NOTE: The default password is “Manager.”
®
EL MODEL
Quick Start Guide
For Multi-Family or single-Family (With Directory Codes) Versa XS
2. Click the Unit Configuration ICON Select the DEVICES Tab
2
Choose “RF Receiver”
for “J407”
1
Click on the
“Device Configuration
Wizard” button
1
1
Enter Unit Name and select
the correct Unit Type
Choose “Wiegand Device”
3
for “J400”
4
Click OK
2
Enter Country, State/Prov., City
and Phone Number
3
Enter Phone Number
to dial into unit
4
Click OK
5
Rename “Device 1” to
“Back Door Reader”
6
Rename “Device 3” to
“Gate Receiver”
Disabled
Disabled
3. Select the RELAYS Tab 4. Click the DOORS Tab
1
Rename “Door 1” to “Front Door”
1
Set Relay Names, Relay Types and
Activation Times:
Relay # Relay Name Relay Type Relay Activation Time
1 Front Strike Strike 10 Seconds
2 Security Light Control 60 Seconds
3 Back Strike Strike 10 Seconds
4 Gate Strike 2 Seconds
2
Set Relay Groups:
Relay Group Name
Front Door Group
Back Door Group
Gate Group
Front Strike
Security Light Back Strike Gate
XX
X
X
2
Select “Front Door Group”
from the drop-down menu
3
Rename “Door 2” to “Back Door” and
select “Back Door Reader” for the Device
4
Select “Back Door Group”
from the drop-down menu
5
Rename “Door 3” to “Gate” and
select “Back Door Reader” for the Device
6
Select “Gate Group”
from the drop-down menu
7
Click SAVE
Page 4

11
2
Enter Last Name
1
Enter Display Info
2
NOTE: The unit uses Display
Info for transactions when
the Entry Code or Credential
Code is used.
6. Click the ACCESS DETAILS Tab6. Click the NEW TENANT ICON
Enter an Entry Code (optional)
1
Click on Select and create a new
Credential (optional)
2
NOTE: A credential is a generic term when
referring to a transmitter or swipe card.
1
2
Select <Add New>
from the Directory
Code drop-down
menu to create a
new Directory Code
(optional)
1
1
Choose a Directroy Code (0000-9999)
the system will use to dial (optional)
2
Enter Phone No.
associated with
the Directory Code
(optional)
3
Enter Display Name
4
3
2
4
8. Click the AUTO CONFIGURATION ICON
OK
The Custom Configuration screen will open
A pop-up window will inform you that the Connect Set was
sucessfully tested.
NOTE: If “Test It” button fails, try one of the following:
If the problem persists, please call technical support.
If a window appears informing you to close all applications,
make sure to close other applications and click
Wait for Versa XS to
identify modems
1
4
5
Check the “Use This Connect Set for Unit”
check box
4
1. Be sure your modem is turned on.
2. Check the appropriate Connection Mode (Direct or Modem) type
confirms with the selected COM port (see you computer’s COM
settings).
3. Close any other application using the COM port.
4. Close any other applications.
9. Click the TRANSFER DATA ICON
Check Configuration and Tenant Info in the Send Data to Unit frame
1
5
Click OK
5
1
2
1
2
3
Select a Connect
Set from the
“Connect Set” list
2
Click OK
3
Click “Test It”
then
5
click
Click START
2
NOTE: If a mismatch message/warning appears click OK.
Select the Directory Code from the “Directory Code”
drop-down menu
6
Click OK
7
6
7
7. Click the TELEPHONE ENTRY DETAILS tab
114A3000D
©2007 Chamberlain Elite
All Rights Reserved
 Loading...