

Page 1
BEDIENUNGSANLEITUNG
INDUSTRIETORANTRIEBE
Seriennummer:
(siehe Abdeckung Steuerungsgehäuse)
Installiert am:
Schaltstandart:
DK - SERIE
2 JAHRE GARANTIE
Page 2

INHALTSVERZEICHNIS
INHALTSVERZEICHNIS Seite 2
WICHTIGE SICHERHEITSHINWEISE 3 - 4
ALLGEMEINE INFORMATIONEN 4
VORBEREITUNGSMASSNAHMEN 5
AUFSTELLUNGSHINWEIS
MONTAGEANORDNUNG 6
HINWEISE ZUR INSTALLATION
ELEKTRISCHER ANSCHLUSS 7
ENDSCHALTEREINSTELLUNG 8 - 9
ENDSCHALTERANSCHLUSS 10
STEUERUNG AS2-eco 11 - 15
STEUERUNG AS210 16 - 20
ZUSATZMODUL ZM-SKS 21 - 22
TECHNISCHE DATEN 23
GARANTIE 24
MASSZEICHNUNGEN 25-27
KONFORMITÄTSERKLÄRUNG 28
ANSCHLUSSPLÄNE TST-2/TST-3 29-30
2 Revision_11_2007
Page 3
Tor sollte ausbalanciert sein. Ist dieses nicht
der Fall müssen zusätzliche Maßnahmen
ergriffen werden, wie z.B. Abrollsicherung, um
einen ordnungsgemäßen Betrieb zu
Gewährleisten. Nicht bewegliche oder
festsitzende Tore müssen repariert werden.
Tore, Torfedern, Kabel, Scheiben,
Halterungen und Schienen stehen dann unter
extremer Spannung, was zu schweren
Verletzungen führen kann.
Machen Sie keine Versuche, das Tor zu
lockern, zu bewegen oder auszurichten.
Wenden Sie sich an Ihren Wartungsdienst.
Bei der Wartung bzw. Installation des
Toröffners ist geeignete Schutzkleidung zu
tragen, dazu gehören u.a. Schutzbrille,
Rückenstützgürtel und Schutzhandschuhe.
Bei der Installation bzw. Wartung eines
Toröffners dürfen kein Schmuck, keine Uhren
oder lockere Kleidung getragen werden. Bei
Arbeiten auf Leitern oder erhöhten Plattformen sind die entsprechenden Sicherheitsverfahren einzuhalten.
Zur Vermeidung schwerer Verletzungen
aufgrund von Verwicklungen sind alle an das
Tor angeschlossenen Seile und Ketten vor
der Installation des Toröffners abzumontieren.
Bei Installation und elektrischem Anschluss
sind die vor Ort geltenden Bau- und
Elektrovorschriften einzuhalten. Stromkabel
dürfen nur an ein ordnungsgemäß geerdetes
Netz angeschlossen werden.
Diese Anlage darf nicht in feuchten oder
nassen Räumen installiert werden.
Die Arbeiten am Toröffner sollten immer nur
von einer (1) Person gleichzeitig ausgeführt
werden.
Bei Arbeiten am Toröffner sind alle lokalen
Sicherheitsvorschriften einzuhalten.
Die Installation dieses Geräts muss gemäß
EN12453 erfolgen.
Die am schließenden Torrand ansetzende
Kraft darf 150 N (15kg) nicht überschreiten.
Wird die Schließkraft auf über 150 N
eingestellt, muss entsprechendes
zusätzliches Sicherheitszubehör installiert
werden (siehe Einsatz von Sicherheitsanwendungen). Die Kraft darf auf keinen
Fall zum Bewegen eines fest sitzenden
Tors verstellt werden.
Eine zu hohe Kraft führt zu Störungen des
ordnungsgemäßen Betriebs des Reversierungssystems oder zu Beschädigungen
am Tor.
Um alle Bediener an die Sicherheitsverfahren
zu erinnern, ist neben der Bedientasteneinheit
das entsprechende Warnschild anzubringen.
Zur Vermeidung einer Beschädigung des
Tors sind alle vorhandenen Sperren zu
deaktivieren. Wenn die Sperren dennoch in
Betrieb bleiben müssen, kann ein Entriegelungsschalter eingebaut werden.
Dreitastenblock, Haupttrennschalter und
alle sonstigen Steuereinrichtungen sind in
Sichtweite des Tores und außer
Reichweite von Kindern zu installieren.
Kindern darf die Bedienung von Tasten
oder Fernsteuerungen nicht erlaubt
werden. Ein Missbrauch des Toröffners
kann zu schweren Verletzungen führen.
Der Toröffner darf nur bedient
werden, wenn die Bedienperson den
gesamten Torbereich einsehen kann,
dieser frei von Hindernissen ist und der
Toröffner ordnungsgemäß eingestellt ist.
Niemand darf durch das Tor hindurchgehen, solange es in Bewegung ist.
Kindern darf das Spielen in der Nähe des
Tors nicht erlaubt werden.
Vor der Durchführung von Reparaturen
oder dem Entfernen von Abdeckungen am
Toröffner, ist durch Schaltsperren bzw.
Abklemmen sicherzustellen, dass
niemand den Antrieb versehentlich in
Gang setzen kann.
Dieses Symbol bedeutet ‚Vorsicht’ und steht vor einem Sicherheitshinweis zur
Vermeidung von Personen - oder Sachschäden. Lesen Sie diese Hinweise bitte
sorgfältig. Der Torantrieb ist selbstverständlich auf eine sichere Bedienbarkeit hin
ausgelegt und geprüft worden; diese kann jedoch nur gewährleistet werden, wenn bei
der Installation und Bedienung die nachstehend aufgeführten Sicherheitsvorschriften
genau eingehalten werden.
Dieses Symbol steht vor Hinweisen, deren Nichteinhaltung zu schweren Personenbzw. Sachschäden führen kann.
WICHTIGE SICHERHEITSHINWEISE
Vor Installation, Bedienung oder Wartung des Torantriebs ist diese
Bedienungsanleitung sorgfältig durchzulesen und es sind alle Sicherheitshinweise
zu beachten.
3 Revision_11_2007
Page 4
Dabei beachten Sie folgende Punkte:
diese Anleitung
alle anderen zum Antrieb gehörenden Projektierungsunterlagen,
Inbetriebnahmeanleitungen und Schaltbilder
die aktuell gültigen nationalen Vorschriften (Sicherheits- / Unfall - verhütung)
Gewährleistung, Lagerung
Die Einhaltung dieser Anleitungen und Hinweise ist Grundlage für störungsfreien Betrieb und Erfüllung eventueller
Gewährleistungsansprüche. Untersuchen Sie die Lieferung sofort nach Erhalt auf etwaigeTransportschäden. Teilen Sie
diese sofort dem Transportunternehmen und auch dem Lieferanten mit. Wenn Sie den Getriebemotor nicht gleich
einbauen, lagern Sie ihn in einem trocknen, staubfreien und schwingungsarmen Raum bei 0°C bis +40°C.
Zustand bei Auslieferung
Jeder Getriebemotor wird nach den bei Chamberlain gültigen technischen Unterlagen hergestellt und einem Probelauf
unterzogen. Änderungen der technischen Daten und Konstruktion, die dem technischen Fortschritt dienen, bleiben
vorbehalten. Der Versand erfolgt in ordnungsgemäßen Verpackungen.
WICHTIGE SICHERHEITSHINWEISE
Die technischen Daten des Getriebemotors entnehmen Sie bitte dem
Typenschild, oder der beigefügten Unterlagen.
Wir bedanken uns für den Kauf unserer Produkte
Falls Sie noch Fragen zur Installation haben, so wenden Sie sich bitte an:
Chamberlain GmbH, Alfred-Nobel-Str. 4,
66793 Saarwellingen
Tel: (49) 6838-907222, Fax: (49) 6838-907179
e-mail: info@.garog-service.de
Internet:: www.garog-service.de
ALLGEMEINE INFORMATIONEN
Spannungsführende und bewegte
Teile elektrischer Maschinen, können
schwere oder tödliche Verletzungen
verursachen. Montage, Anschluss,
Inbetriebnahme sowie Wartungs- und
Reparaturarbeiten dürfen nur durch
qualifiziertes Fachpersonal erfolgen.
Zur Vermeidung einer Beschädigung
des Tores bzw. des Antriebes sind alle
Verschlussvorrichtungen ausser
Betrieb zu nehmen. Verschlussvorrichtung(en) in der Stellung
“Offen” feststellen. Wenn ein Verschluss in Betrieb bleiben muss,
sollte ein Entriegelungschalter installiert werden.
4 Revision_11_2007
Page 5
VORBEREITUNGSMAßNAHMEN
Bevor Sie mit der Installation beginnen stellen Sie sicher,dass alle notwendigen
Sicherheitsmaßnahmen eingeleitet worden sind.
1.Aufstellung
Maschine auf glatter Montageplatte bzw. ausgerichteten Spannschienen aufsetzen
und Befestigungschgrauben gleichmäßig anziehen
Vergewissern Sie sich vorher, dass:
der Antrieb unbeschädigt und nicht blockiert ist
der Antrieb nach längerer Lagerzeit neu vorbereitet wurde
die Zuleitung abgeschaltet und gegen wiedereinschalten gesichert ist (VDE)
alle Anschlüsse ordnungsgemäß ausgeführt wurden
die Drehrichtung des Getriebemotors richtig ist
alle Motorschutzeinrichtungen aktiv sind
keine anderen Gefahrenquellen vorhanden sind
AUFSTELLUNGSHINWEIS
Der Antrieb darf nur montiert werden, wenn:
- die Angaben auf dem Leistungsschild des Antriebs mit dem Spannungsnetz übereinstimmen
- der Antrieb unbeschädigt ist
- die Umgebungstemperatur -20°C bis +60°C beträgt.
- die Aufstellhöhe 1000 m über NN nicht übersteigt
- die Schutzart entsprechend ausgewählt worden ist
Abtriebswellen und Aufstellflächen sind ggf. gründlich von Korrosionsschutzmittel zu befreien (handelsübliches
Lösungsmittel verwenden). Wegen Materialschäden darf das Lösungsmittel nicht an die Dichtlippen der Wellendichtringe
gelangen. Schleifmittel dürfen nicht angewendet werden.
Um Wellenbrüche und damit schwere und tödliche Verletzungen zu vermeiden, ist bei der
Aufstellung folgendes zu beachten:
Voraussetzung für eine ausreichende Bemessung der Welle hinsichtlich der Dauerfestigkeit ist ein spannungsfreier Einbau
und eine unverschiebliche Lagerung der Auflager im Getriebe sowie der bei Bedarf vom Anwender zusätzlich beigestellten
und erforderlichen Stützlager in jede Richtung.
Der Maschinenrahmen und die Krafteinleitungspunkte sind für die auftretenden Auflagerkräfte konstruktiv und
festigkeitsmäßig entsprechend auszulegen. Das Getriebegehäuse mit 2 Lagern und alle weiteren Lagerstellen befinden
sich auf einem gemeinsamen, stabilen und an den Auflageflächen in einem Arbeitsgang bearbeiteten Rahmen. Dabei muß
der Aufsteller gewährleisten, daß die Verformung des Rahmens bei der Belastung keine negativen Einflüsse auf die
Wellenbelastung ausübt. Das feste Anziehen der Schrauben ist erst dann vorzunehmen, wenn das Getriebe genau
ausgerichtet ist.Das Aufstellen in Feuchträumen oder im Freien ist nur nach Absprache mit dem Hersteller zulässig!
Werden die Antriebe längere Zeit gelagert, ist ebenfalls Rücksprache mit dem Hersteller zu führen!
5 Revision_11_2007
Page 6
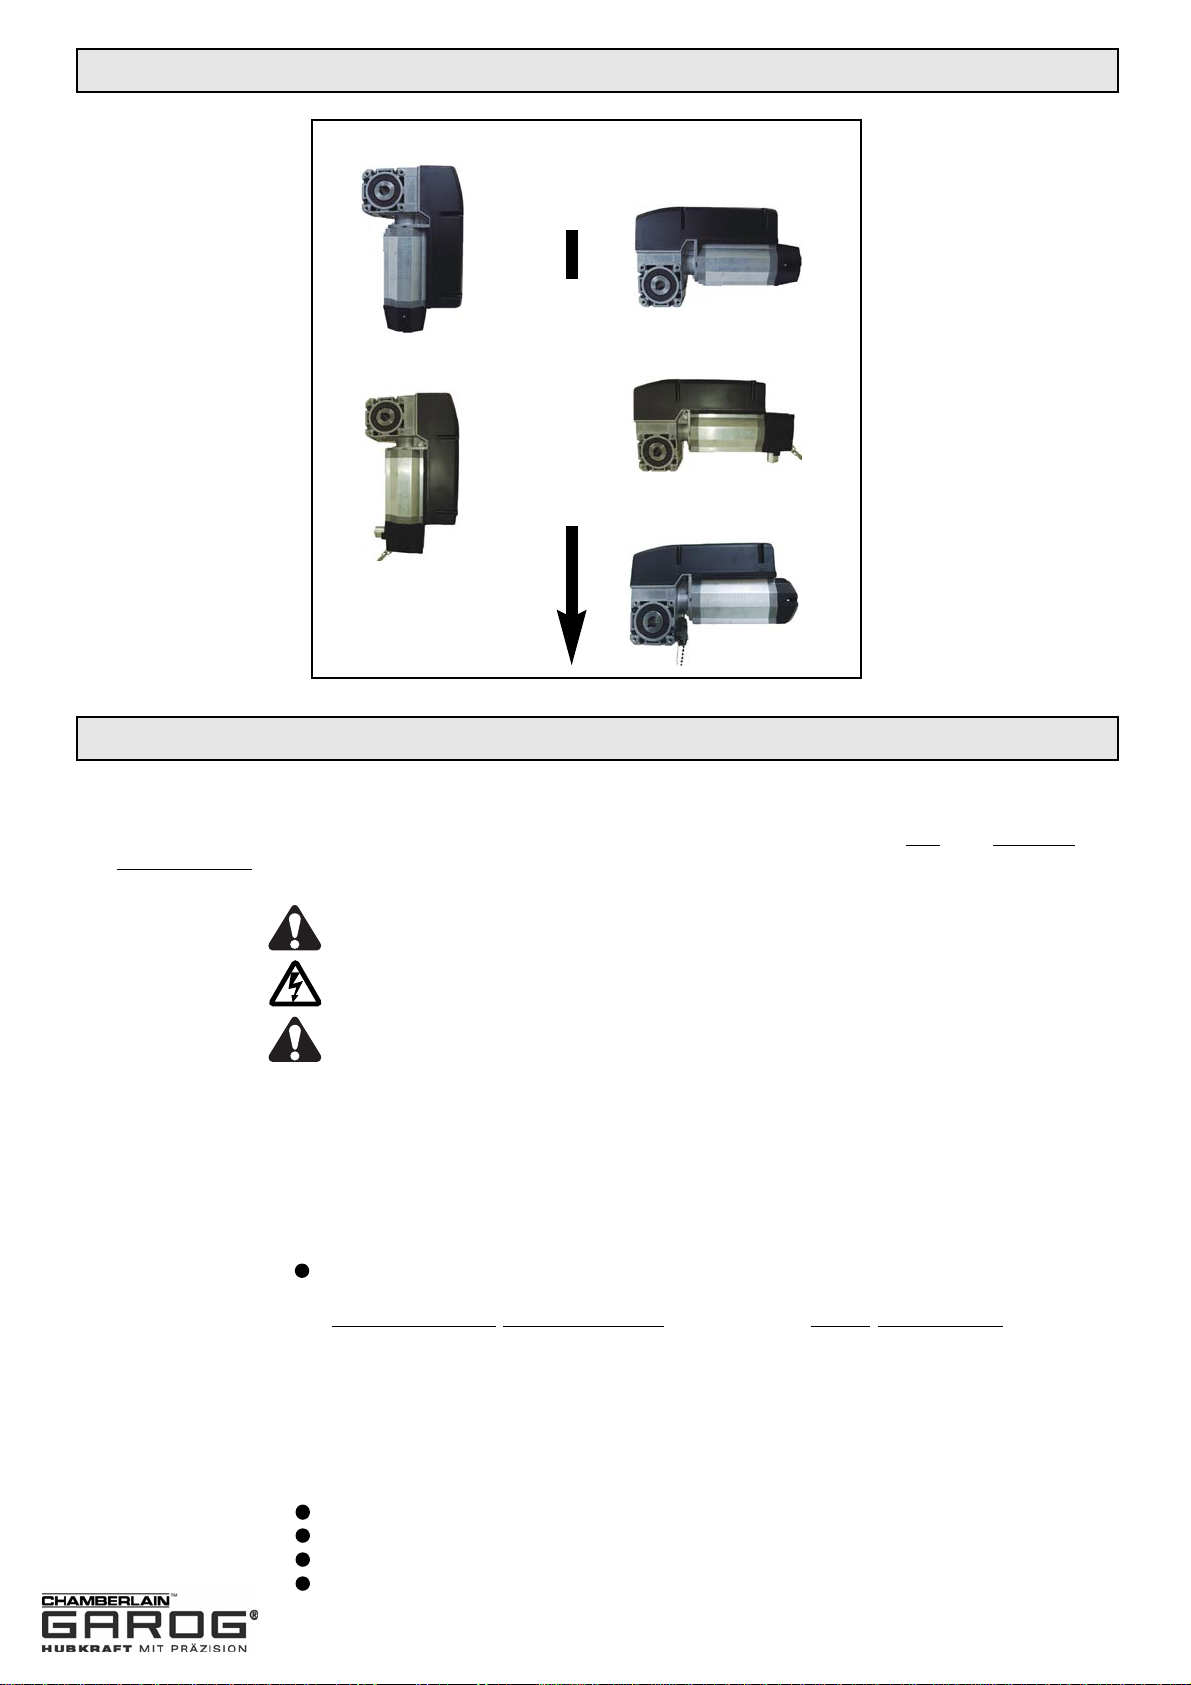
MONTAGEANORDNUNG
Montageanordnung
DKK
DKN
DKK
DKN
DKS
Schließrichtung
HINWEISE ZUR INSTALLATION
Elektrischer Anschluss
Der Anschluss nach Schaltbild und die Wartung eines Elektroantriebes dürfen nur von Elektro-
Fachpersonal durchgeführt werden.
Die entsprechenden Unfallverhütungsvorschriften sind zu berücksichtigen! Zum Schalten des Motors und der Bremsanschlüsse müssen
Schaltkontakte der Gebrauchskategorie AC-3 nach IEC 158 verwendet werden.
Die Leitungsarten und ihre Querschnitte sind nach den geltenden Vorschriften zu
wählen.Die Nennströme und die Schaltungsart sind auf dem Motortypenschild
angegeben.Die Antriebsangaben müssen mit den Anschlusswerten übereinstimmen.
Bei Betrieb mit elektronischen Regelgeräten sind unbedingt die entsprechenden InbetriebnahmeAnleitungen und Schaltbilder zu berücksichtigen!
Inbetriebnahme:
Prüfen Sie während der Inbetriebnahme, ob:
der Antrieb keine große Geräuschentwicklung hat
Bei ungewöhnlichen Laufgeräuschen ist der Antrieb sofort stillzusetzen und der
Kundendienst zu benachrichtigen. Bei Ölverlust ist der Kundendienst anzurufen, der Ölstand
am Peilstab der Entlüftungsschraube zu prüfen und bei Unterschreitung der Mindesteinfüllmenge der
Antrieb ebenfalls stillzusetzen.
Um eine effeziente Unterstützung im Fehlerfall zu gewährleisten, werden folgende
Informationen benötigt:
geben Sie die Daten vom Typenschild des Antriebs an
nennen Sie Art und Ausmaß der Störung
nennen Sie wann und unter welchen Begleitumständen, die Störung aufgetreten ist
Antrieb keiner Drehzahlschwankung oder anderen Auffälligkeiten unterliegt
6 Revision_11_2007
Page 7
Vor der Installation von Stromkabeln und Steuerungsvorrichtungen müssen unbedingt alle
nachstehenden Spezifikationen und Warnungen beachtet werden. Bei Nichteinhaltung
derselben kann es zu schweren Verletzungen bzw. zur Beschädigung des Antriebs kommen.
Das Steuerungsgehäuse des Torantriebs darf nur von geschultem "Chamberlain
"-Fachpersonal
geöffnet werden. Im Bedarfsfall wenden Sie sich bitte an den vor Ort zuständigen Chamberlain -
Händler.
Vor der Elektroinstallation oder der Inbetriebnahme des Antriebs bitte erst den Schaltplan
sorgfältig durchlesen. Für die gesamte elektrische Verkabelung sind die vor Ort geltenden
Vorschriften einzuhalten.
Vor der Durchführung von Wartungsarbeiten am Torantrieb muss zuerst über den
Haupttrennschalter die Stromversorgung / Die Kraftübertragung unterbrochen werden.
Nach Abschluss der Wartungsarbeiten muss der Bereich zum Zeitpunkt der erneuten
Inbetriebnahmen wieder leer und gesichert sein
ELEKTRISCHER ANSCHLUSS
Wenn Sie weiteres Zubehör oder Ersatzteile benötigen, wenden Sie sich bitte an Ihren
lokalen Chamberlain - Händler.
CHAMBERLAIN - GmbH
Alfred-Nobel-Str. 4
66793 Saarwellingen
BESTELLFAX: +(49) 6838-907179
TECHNISCHE HOTLINE: +(49) 6838-907222
l A: Drucktaster zur Steuerung mittels kontinuierlichem Niederhalten.
l B: Schlüsselschalter o.ä. zur Steuerung mittels kontinuierlichem Betätigung.
l C: Begrenzung der Antriebskraft durch Kraftbegrenzungs- (Kupplung) und Schutzvorrichtungen
(Sicherheitsrandpolster)
l D: Vorrichtung zum Erkennen von Personen oder Hindernissen, die am Boden auf einer Seite
(Innenseite) des Tores stehen (Infrarot-Lichtschranke).
l E: Vorrichtung zum Erkennen von Personen oder Hindernissen, die am Boden beiderseits
(Innen- und Außenseite) des Torblattes stehen (Infrarot-Lichtschranke).
HINWEIS: Ausführliche Informationen finden Sie in der EN12453.
MATRIX FÜR DEN EINSATZ VON SICHERHEITSEINRICHTUNGEN
Steuerung über kontinuierliche
Schalterbetätigung
Impulsaktivierung in Sichtweite
des Tores
Automatische Steuerung
Unterwiesene Person
(unzugänglich für
Öffentlichkeit)
Gruppe 1
A
C
C und D
(Allgem. öffentlicher
Bereich)
Gruppe 3
k. A.
C und E
C und E
Öffentlicher Bereich
Gruppe 2
B
C und D
C und E
STEUERUNGSART TOR WIRD GENUTZT VON
7 Revision_11_2007
Page 8
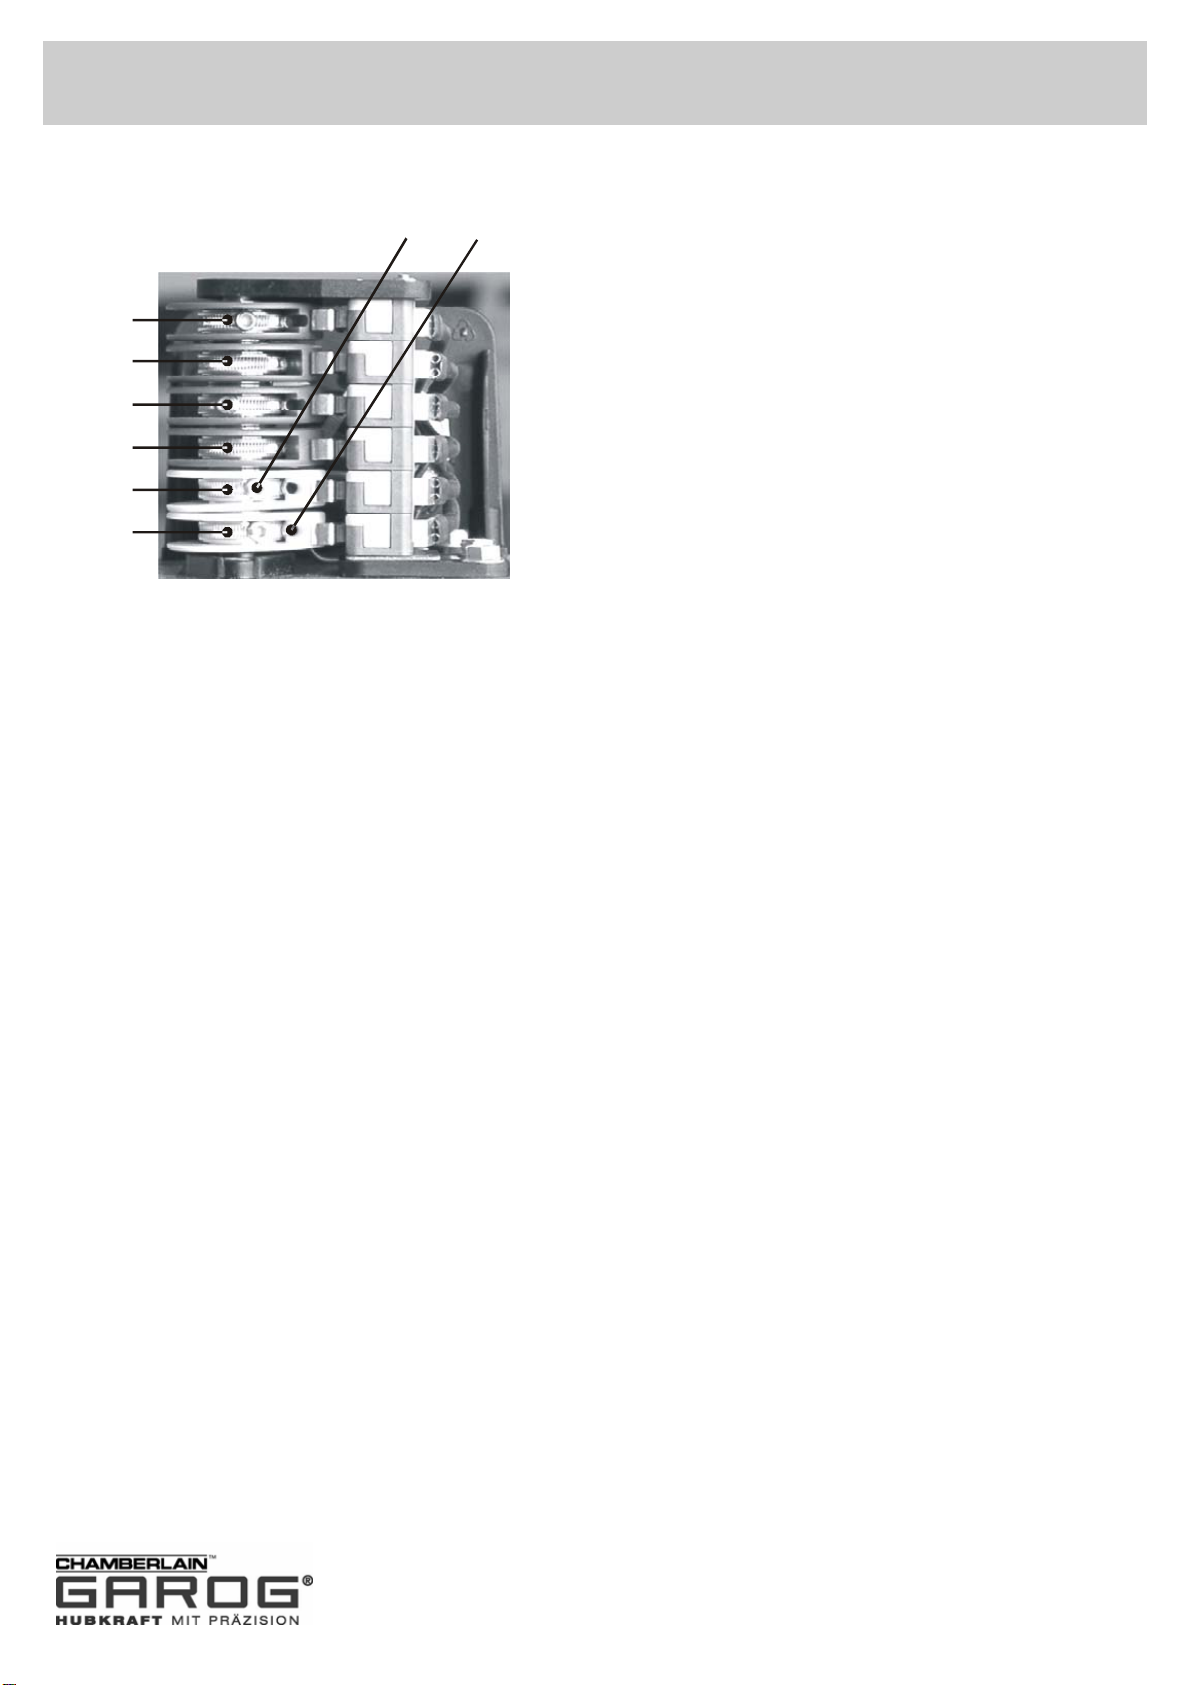
Endschaltereinstellung Sektionaltor Endschalter Standard 6 Nocken-LSS6
Antriebe mit integrierter Steuerung AS2-eco verfügen über den Endschalterblock LSS-4
(mit Endschalter für ÖFFNEN & SCHLIESSEN und Sicherheitsendschalter für ÖFFNEN & SCHLIESSEN,
jedoch ohne Zusatzendschalter)
A B
1. Zusatzendschalter AUF grün
1
2
3
4
5
6
1. Tor in gewünschte ZU- Stellung fahren.
2. Den Schaltnocken 5 (weiss) so einstellen, daß der Endschalter betätigt wird.
3. Befestigungsschraube A anziehen.
4. Die Feineinstellung wird mit der Schraube B vorgenommen.
2. Endschalter AUF grün
3. Sicherheitsendschalter AUF rot
4. Sicherheitsendschalter ZU rot
5. Endschalter ZU weiss
6. Zusatzendschalter ZU weiss
5. Tor in gewünschte AUF- Stellung fahren.
6. Den Schaltnocken 2 (grün) so einstelle n, daß der Endschalter betätigt wird.
7. Befestigungsschraube A anziehen.
8. Die Feineinstellung wird mit der Schraube B vorgenommen.
9. Die Sicherheitsendschalter 3 und 4(rot)müssen so eingestell t werden, daß sie sofort
nach überfahren der Steuerendschalter ansprechen.
10. Nach dem Probelauf, Sitz der Befestigungsschraube überprüfen.
11. Die Zusatzendschalter 1 und 6 haben potentialfreie Wechselkontakte.
8 Revision_11_2007
Page 9
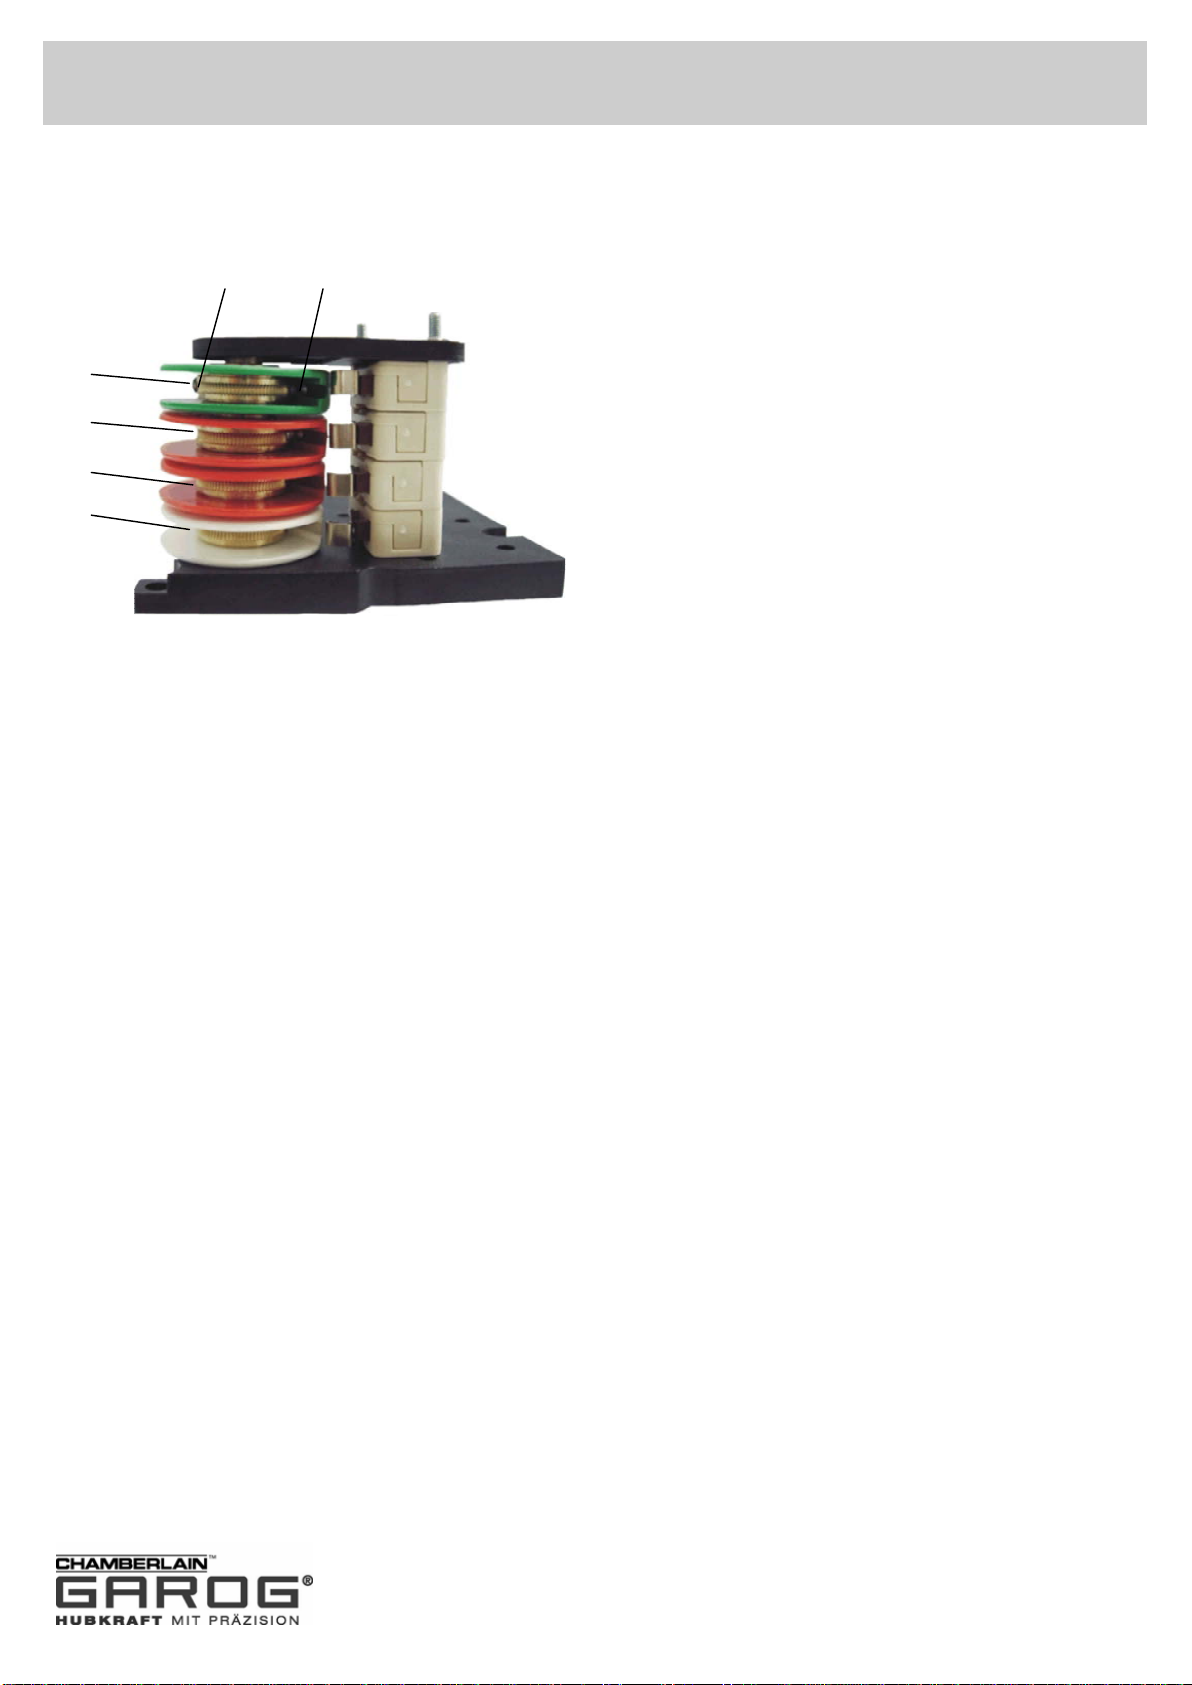
Endschaltereinstellung Sektionaltor Endschalter 4 Nocken
A B
2
2. Endschalter AUF grün
3
4
5
1. Tor in gewünschte ZU- Stellung fahren.
2. Den Schaltnocken 5 (weiß) so einstellen, dass der Endschalter betätigt wird.
3. Befestigungsschraube A anziehen.
3. Sicherheitsendschalter AUF rot
4. Sicherheitsendschalter ZU rot
5. Endschalter ZU weiß
4. Die Feineinstellung wird mit der Schraube B vorgenommen.
5. Tor in gewünschte AUF- Stellung fahren.
6. Den Schaltnocken 2 (grün) so einstellen, dass der Endschalter betätigt wird.
7. Befestigungsschraube A anziehen.
8. Die Feineinstellung wird mit der Schraube B vorgenommen.
9. Die Sicherheitsendschalter 3 und 4 (rot) müssen so eingestellt werden, dass sie sofort
nach dem Überfahren der Steuerendschalter ansprechen.
10. Nach dem Probelauf den Sitz der Befestigungsschraube überprüfen.
9 Revision_11_2007
Page 10

EINSTELLUNG DER ENDSCHALTER (LSS-6) SEKTIONAL TORE
ANSCHLUSSDIAGRAM für Endschalter LSS6
(Standard nur bei Antrieben mit Endschalter LSS-6)
(Standard nur bei Antrieben mit Endschalter LSS-6)
10 Revision_11_2007
Page 11

BEDIENUNGSANLEITUNG AS2-eco
Geprüft nach:
EN 12453
11 Revision_11_2007
Page 12
BEDIENUNGSANLEITUNG AS2-eco
Die Steuerung AS2-eco ist für den Betrieb von Toranlagen mit 3 Phasen Motoren im
Totmann- Betrieb konzipiert.
Zum Öffnen oder Schließen eines Tores wird beispielsweise ein Dreifachtaster
angeschlossen.
Beachten Sie die in Ihrem Land nationalen und lokalen gültigen Richtlinien und
Vorschriften zur Inbetriebnahme von kraftbetätigten Toren. Der Anlagenersteller ist
für die Gesamtanlage verantwortlich. Er muss für die Einhaltung der einschlägigen
Normen und Richtlinien (z.B. DIN EN 12453, DIN EN 13241-1) sorgen, und für die
Gesamtanlage eine technische Dokumentation erstellen. Die Dokumentation muss der
Toranlage beigefügt sein.
Installation und Wartung an der Steuerung AS2-eco dürfen nur von entsprechend
geschulten Elektrofachkräften durchgeführt werden.
Bei elektrischen Arbeiten ist die Anlage spannungsfrei zu schalten. Alle
Schutzbestimmungen müssen beachtet werden.
Der Totmann-Betrieb ist nur zulässig wenn die Anlage von den Befehlsgeräten aus
eingesehen werden kann und die Benutzer entsprechend unterwiesen wurden.
Der Betrieb der Steuerung in Selbsthaltung ist nur bei Benutzung von dem in EN
13241-1 und EN 12453 geforderten Schutzeinrichtungen erlaubt.
Wenn Sie die Sicherheitshinweise nicht beachten, sind Sie für die daraus
resultierenden Personen- und Sachschäden selbst verantwortlich.
12 Revision_11_2007
Page 13

Ansc
uss de
sgebe
U
BEDIENUNGSANLEITUNG AS2-eco
An den Klemmen X1, L1, L2, L3 der Grundplatine ist die mit Schmelz- Sicherung
abgesichert Netzzuleitung anzuschließen. Der Schmelzsicherungswert darf maximal
4A betragen.
Der Netzstecker muss frei zugänglich und in der Nähe der Steuerung angebracht
sein.
Der Wert der Netzspannung (230V AC oder 400V AC) muss an Klemme X6 über die
Brücke eingestellt werden.
Ein falsches Einlegen der Brücke kann zur Zerstörung der Steuerung
führen.
-
Der 3 Phasen Antrieb wird an den Klemmen X2, U, V, W angeschlossen.
Drehrichtungsänderung: nach dem Anschluss des Antriebs muss mit den
Tasten AUF und ZU, die Drehrichtung überprüft werden. Entspricht die Laufrichtung
nicht der Pfeilrichtung der gedrückten Tasten, müssen die Klemmen an den
Anschlüssen U und V getauscht werden.
hl
r Externen Befehl
r AUF, STOP, Z
Für die Bedienung von Außen kann ein Dreifach- Taster (z.B. KDT 3) an die Klemmen
X3, 4, 5, 6, 7 angeschlossen werden. Optional kann ein Dreifachtaster über die
Klemme X4 angeschlossen werden. Ist dieser Klemmblock nicht belegt, so muss ein
Jumper den Stoppkontakt brücken.
Die Leitungen der externen Befehlsgräte müssen erdschutzsicher (doppelte Isolierung)
verlegt werden.
Die beiden Taster für AUF und ZU sind hierbei als Schließer auszuführen. Da der
Stopptaster im Sicherheitskreis verschaltet ist, muss er als Öffner angeschlossen
werden.
Der Gefahrenbereich muss einsehbar sein da der Totmann- Betrieb mit
Tasten durchgeführt wird.
13 Revision_11_2007
Page 14

BEDIENUNGSANLEITUNG AS2-eco
Anschluss der Endschalter
Die Endschalter und Sicherheitsendschalter AUF und ZU werden an die Klemmen 8, 9,
10 angeschlossen.
Anschluss von direkten Sicherheitsschaltern
Sicherheitselemente die direkt in den Steuerablauf eingreifen werden in Reihe zu dem
Stoppkontakt angeschlossen.
Hierzu zählen NOT- AUS bzw. Fangvorrichtung, Einzugssicherung und
Schlupftürsicherung.
Technische Daten AS2-eco
Versorgungsspannung: 230V – 240V AC / 50 – 60 Hz
400V – 415V AC / 50 – 60 Hz
Stromaufnahme Max.: 120 mA
Sicherung Sekundärseitig: 250 mA
Relaiskontaktdaten
Schaltleistung
Mechanische Lebensdauer: 10 x 10
Elektronische Lebensdauer: 10 x 10
Umgebungstemperatur: 5°….55° C
Luftfeuchtigkeit: 45 bis 85% RH
Einbaulage: Beliebig
6
6
14 Revision_11_2007
Page 15
BEDIENUNGSANLEITUNG AS2-eco
S2 Endschalter AUF
OPEN Limit
Interreupteur fin de course OUVERT
S3 Sicherheitsendschalter AUF
OPEN safety limit
Interreupteur de mise au point OUVERT
S4 Sicherheitsendschalter ZU
CLOSE safety limit
Interreupteur de mise au point FERME
S5 Endschalter ZU
CLOSE limit
Interreupteur fin de course FERME
S7 Notbedienung
Emergency operation
Manouvre de secoure
S8 Thermoelement Motor
Thermical motor protection
Thermoprotection du moteur
AUF
OPEN
OUVERT
Jumper Position AUF/OPEN/OUVERT
Selbsthaltung
Self Locking
Automaintien
Jumper Position ZU/CLOSE/FERME
Totmann
Hold to run
Homme-mort
ZU
CLOSE
FERME
U V W
L1 / L2 / L3
400V/50Hz
15 Revision_11_2007
Page 16

Betriebsanleitung – AS 210
geprüft nach:
EN60335-1 / EN60204-1
in Zusammenhang mit EN12453
(Nutzungssicherheit kraftbetätigter Tore)
DEUTSCH
16 Revision_11_2007
Page 17

Betriebsanleitung – AS 210
DEUTSCH
Die Steuerung AS 210 ist für den Betrieb von Toranlagen konzipiert.
In der Grundversion ist sie für den Totmann-Betrieb ausgelegt.
Durch Aufstecken von Steckmodulen kann sie individuell erweitert werden.
SICHERHEITSHINWEISE
 Beachten Sie die in Ihrem Land gültigen Richtlinien und Vorschriften zur Inbetriebnahme
von kraftbetätigten Toranlagen.
 Installations- und Wartungsarbeiten an der Steuerung AS 210 dürfen nur von
Elektrofachkräften durchgeführt werden.
 Schutzbestimmungen beachten!
 Bei elektrischen Arbeiten ist die Anlage spannungsfrei zu schalten.
 Totmann-Betrieb ist nur zulässig, wenn die Anlage von den Befehlsgeräten aus
eingesehen werden kann.
Wenn Sie die Sicherheitshinweise nicht beachten, sind Sie für die daraus
resultierenden Personen- und Sachschäden selbst verantwortlich.
NETZANSCHLUSS
 Bei Festanschluss muss ein allpoliger Hauptschalter vorgesehen werden.
 Bei Drehstromanschluss nur 3’er Blocksicherungsautomaten (10A) verwenden.
ass die Netzspannung mit der Angabe auf dem Typenschild  Beachten Sie, d
übereinstimmt.
 Beachten Sie, dass an der Steckdose ein rechtsdrehendes Drehfeld vorliegt.
 Antrieb und Steuerung dürfen nur in Räumen montiert werden.
TECHNISCHE DATEN
Modell AS 210
Frequenz
Schutza IP 54
A max.
Betriebstemperatur
der 400V Spannung 230V o
50 Hz
rt
10 A
-10°C bis +55°C
17 Revision_11_2007
Page 18

Betriebsanleitung – AS 210
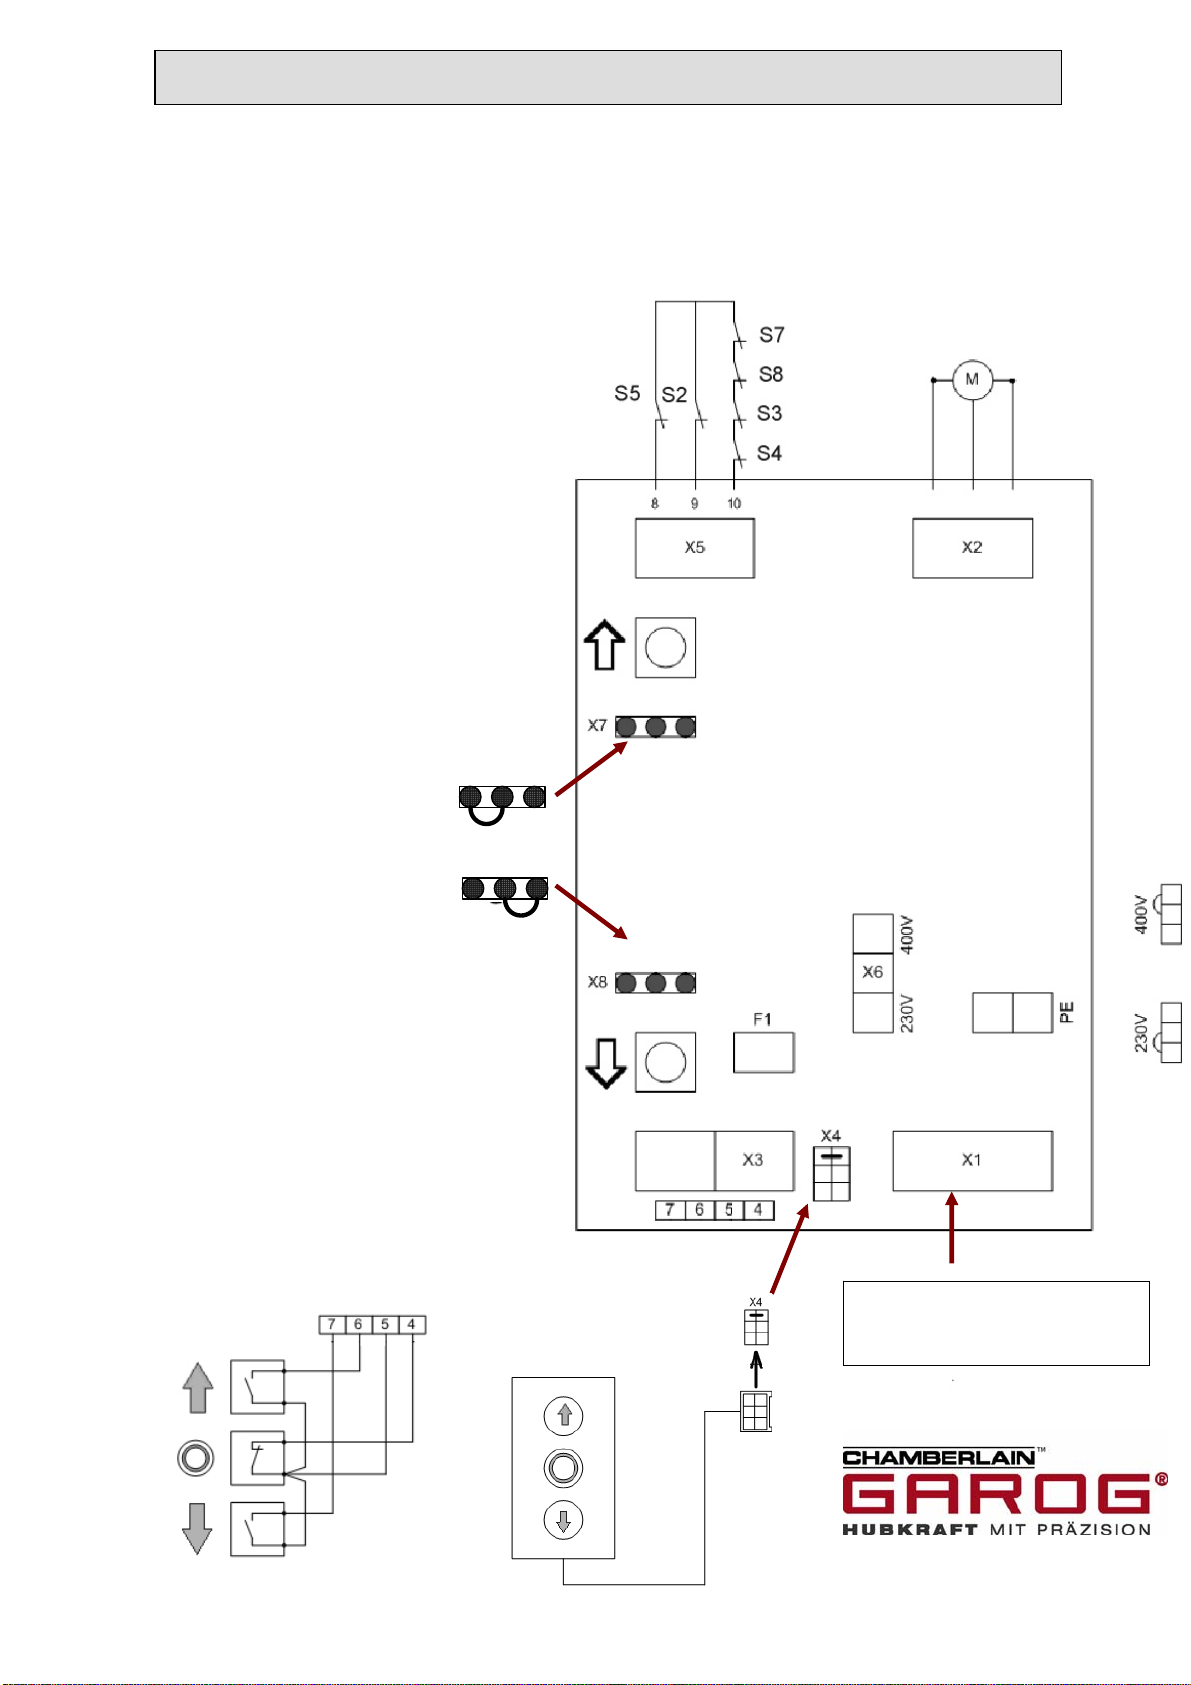
GRUNDPLATINE AS 210
DEUTSCH
J15
18 Revision_11_2007
Page 19
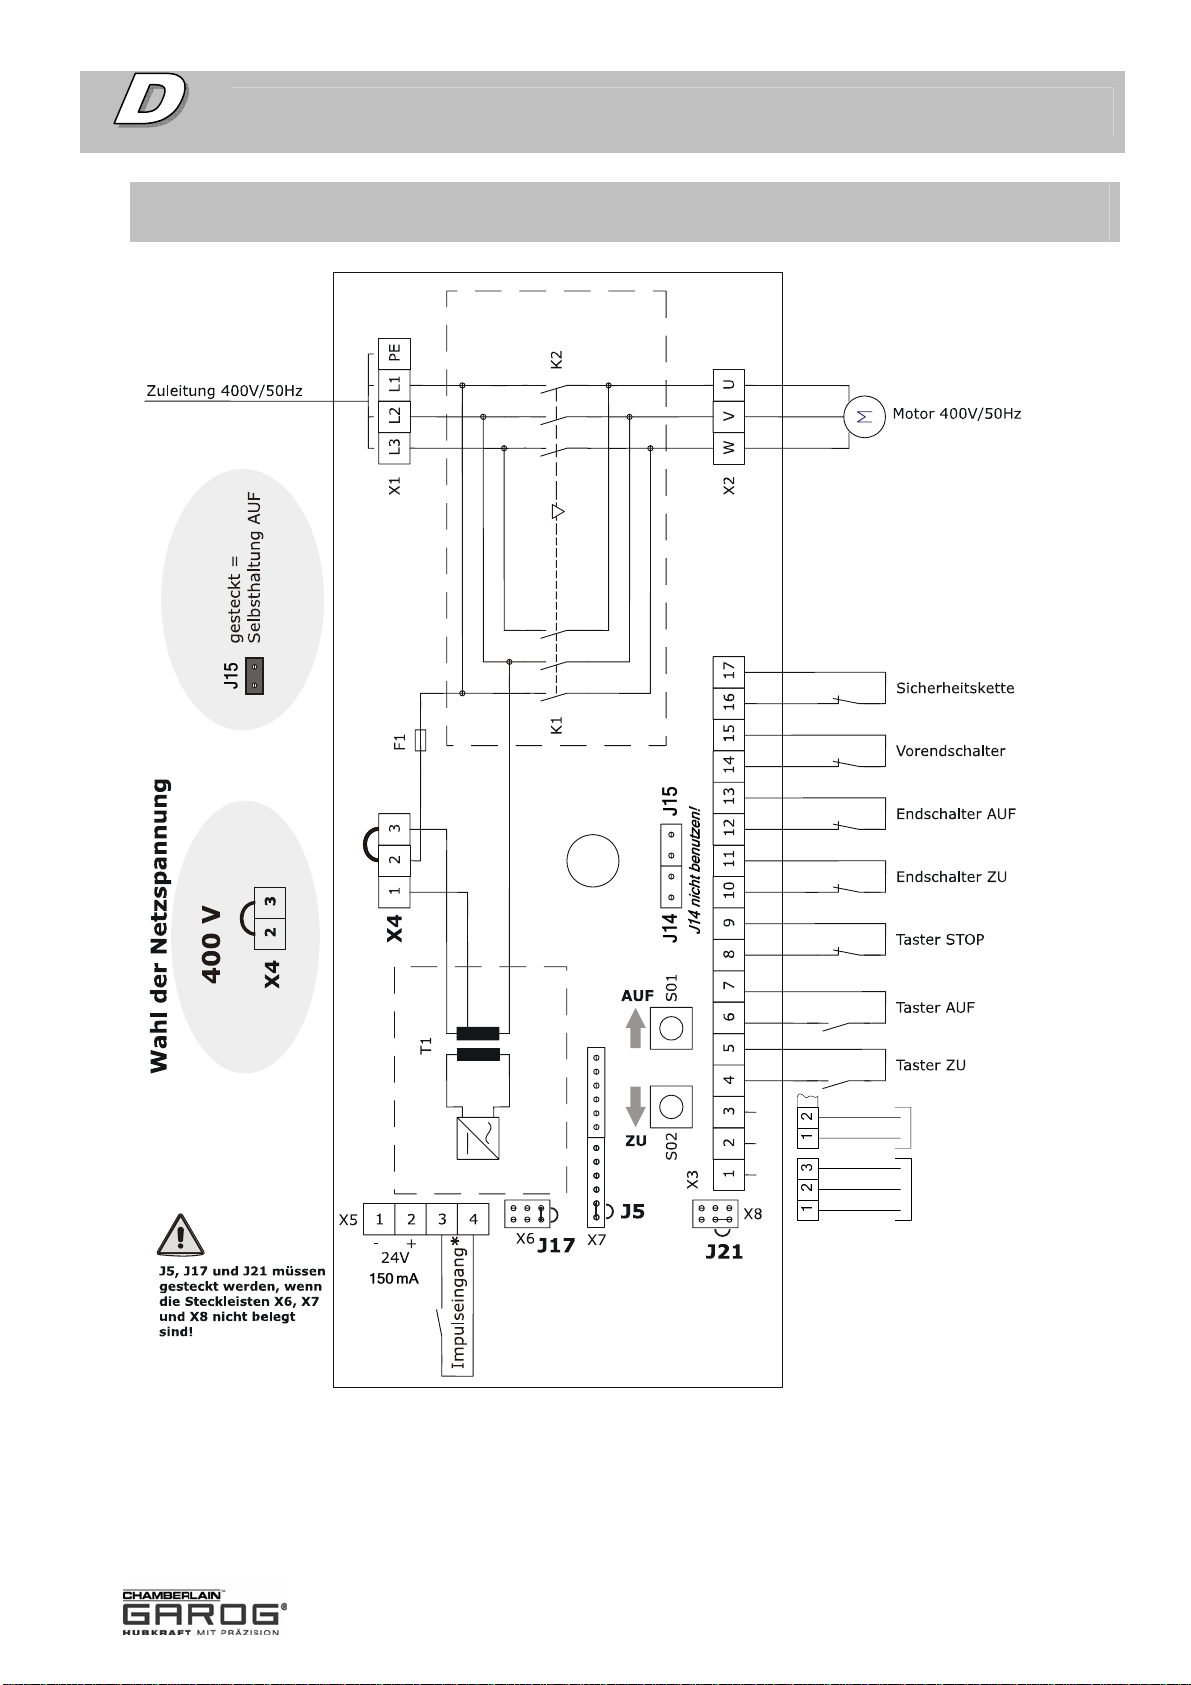
Betriebsanleitung – AS 210
DEUTSCH
SCHALTPLAN AS 210 400V FÜR OPTOELEKTRONISCHE SCHALTLEISTE UND
FÜR 8,2 kOhm WIEDERSTANDSAUSWERTUNG
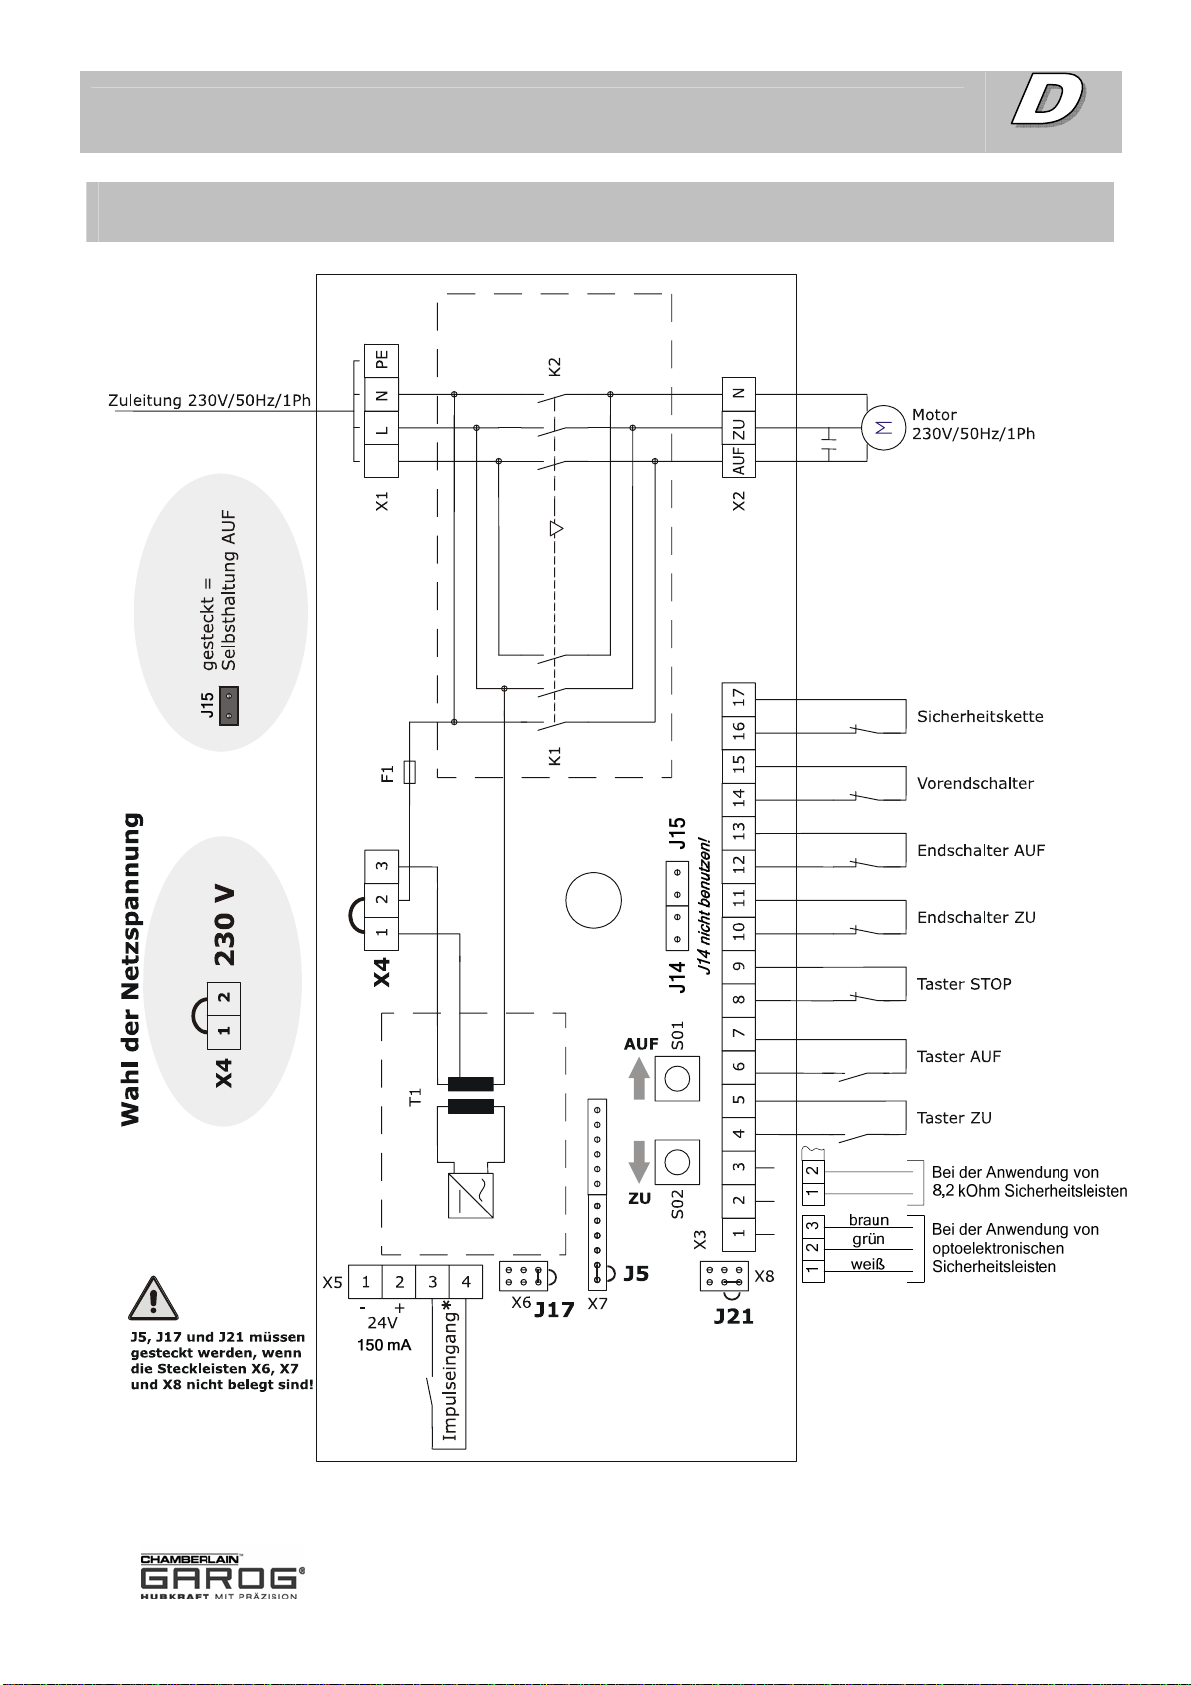
Bei der Anwendung von
braun
grün
weiß
8,2 kOhm Sicherheitsleisten
Bei der Anwendung von
optoelektronischen
Sicherheitsleisten
*
*
*Nur in Verbindung mit Zusatzmodul
ZM-SKS
19 Revision_11_2007
Page 20
Betriebsanleitung – AS 210
DEUTSCH
SCHALTPLAN AS 210 230V FÜR OPTOELEKTRONISCHE SCHALTLEISTE UND
FÜR 8,2 kOhm WIEDERSTANDSAUSWERTUNG
*
*
20 Revision_11_2007
*Nur in Verbindung mit Zusatzmodul
ZM-SKS
Page 21

Betriebsanleitung – ZM-SKS
ZM-SKS
ZM-SKS
21 Revision_11_2007
Page 22

Betriebsanleitung – ZM-SKS
Modul zum Anschluss einer Sicherheits-Kontakt-Leiste
Montage auf der Hauptplatine AS 210:
 Platine ZM-SKS in Steckleiste X7 stecken. Bestückte Seite muss in Traforichtung
zeigen.
J3 - Jumper
SKS Wahl
J2 - Jumper
Automatische Wiederabfahrt
Jumper J2 – Automatische Wiederabfahrt
gesteckt = Automatische Wiederabfahrt
offen = keine Automatische Wiederabfahrt
Jumper J3 – SKS Wahl
gesteckt = Optoelektronische Schaltleiste (OSE)
offen = Widerstandsleiste 8,2 kOhm
LED H1 – SKS
Dauerleuchten = SKS o.k.
Blinken = SKS Störung
H1 - LED
SKS
22 Revision_11_2007
Page 23

TECHNISCHE DATEN DK - ANTRIEBE
Die Chamberlain-Garog Basis-Antriebe beinhalten den Torantrieb fertig verdrahtet und eine
Drehmomentstütze.
Zwei Antriebsvarianten stehen zur Verfügung:
1. Antrieb mit einem potentialfreien Nockenendschalter LSS-6 zum Anschluss an externe
Automatiksteuerungen oder mit integrierter Steuerung AS210 mit Zusatzmodul ZM-SKS*
2. Antrieb mit einer Totmann-Steuerung AS2-eco mit Nockenendschalter LSS-4 und
vorverdrahtetem Dreifach-Drucktaster.
Als Notbetätigungsmöglichkeiten stehen zur Wahl:
Die Nothandkurbel (DKK), die automatische Nothandkette (DKN) sowie die Schnellkupplung (DKS).
*Antriebe mit Steuerung AS210 und Modul ZM-SKS sind Sondermodelle (CN-Variante) auf Anfrage
Modell Typ Steuerung Endschalter Nm UpM Notbetätigung
DKK100240000 DKK --------- LSS-6 100 24 Nothandkurbel
DKK100240110 DKK AS2-eco LSS-4 100 24 Nothandkurbel
DKN100240000 DKN --------- LSS-6 100 24 Nothandkette
DKN100240110 DKN AS2-eco LSS-4 100 24 Nothandkette
DKN100240440-CN DKN AS210 LSS-6 100 24 Nothandkette
DKS100240000 DKS --------- LSS-6 100 24 Schnellkupplung
DKS100240110 DKS AS2-eco LSS-4 100 24 Schnellkupplung
DKS100240110-CN DKS AS210 LSS-6 100 24 Schnellkupplung
Technische Daten Motorleistung 0,37 kW
Drehmoment 100 Nm
Abtriebsdrehzahl 24 UpM
Einschaltdauer S3 60%
Betriebsspannung 400V/3~
Frequenz 50 Hz
Nennstrom 2,1 A
Schutzart IP 54
Bauseitige Zuleitung 5x1,5 mm
Bauseitige Absicherung 10 A
Temperaturbereich -20° - +60°
Hohlwelle 25,4 mm
Gewicht DKK/DKS 13kg, DKN 15kg
23 Revision_11_2007
Page 24

GEWÄHRLEISTUNG UND LAGERUNG
Definition qualifiziertes Personal
Im Sinne der Betriebsanleitung bzw. der Warnhinweise auf dem Produkt selbst sind es Personen, die mit Aufstellung
Montage, Inbetriebsetzung und Betrieb des Produktes vertraut sind und über die ihrer Tätigkeit entsprechende
Qualifikationen verfügen wie z. B. :
a. Ausbildung oder Unterweisung bzw. Berechtigung, Stromkreise und Geräte gemäß den Standards der
Sicherheitstechnik anzuschließen, ein- und auszuschalten, zu erden und zu kennzeichnen.
b. Ausbildung oder Unterweisung gemäß den Standards der Sicherheitstechnik in Pflege und Gebrauch
angemessener Sicherheitsausrüstung
c. Schulung in Erster Hilfe
Aufsetzen von Antriebselementen
Das Aufziehen von Antriebselementen, wie z.B. Seilscheiben, Rädern u.s.w., erfolgt nach vorhergegangenem Anwärmen.
Die Anwärmtemperatur sollte 100°C betragen.
Vorheriges einstreichen mit Gleitmittel erleichtert die Montage.
Um Schäden an Lagern, Gehäuse und Wellen zu vermeiden, dürfen die Antriebselemente auf keinem Fall durch
Hammerschlag auf das Wellenende aufgezogen werden!
Das Aufsetzen von Antriebselementen mittels Druck durch Pressen bedarf einer Krafteinleitungsfläche
(Anlage der Abtriebswelle).
Aufgesetzte Übertragungselemente sollten gewuchtet sein und dürfen keine unzulässigen Radial- oder Axialkräfte
hervorrufen. Bei den Montagearbeiten sind die entsprechenden Toleranzen zu beachten
(siehe Maßblatt).
24 Revision_11_2007
Page 25
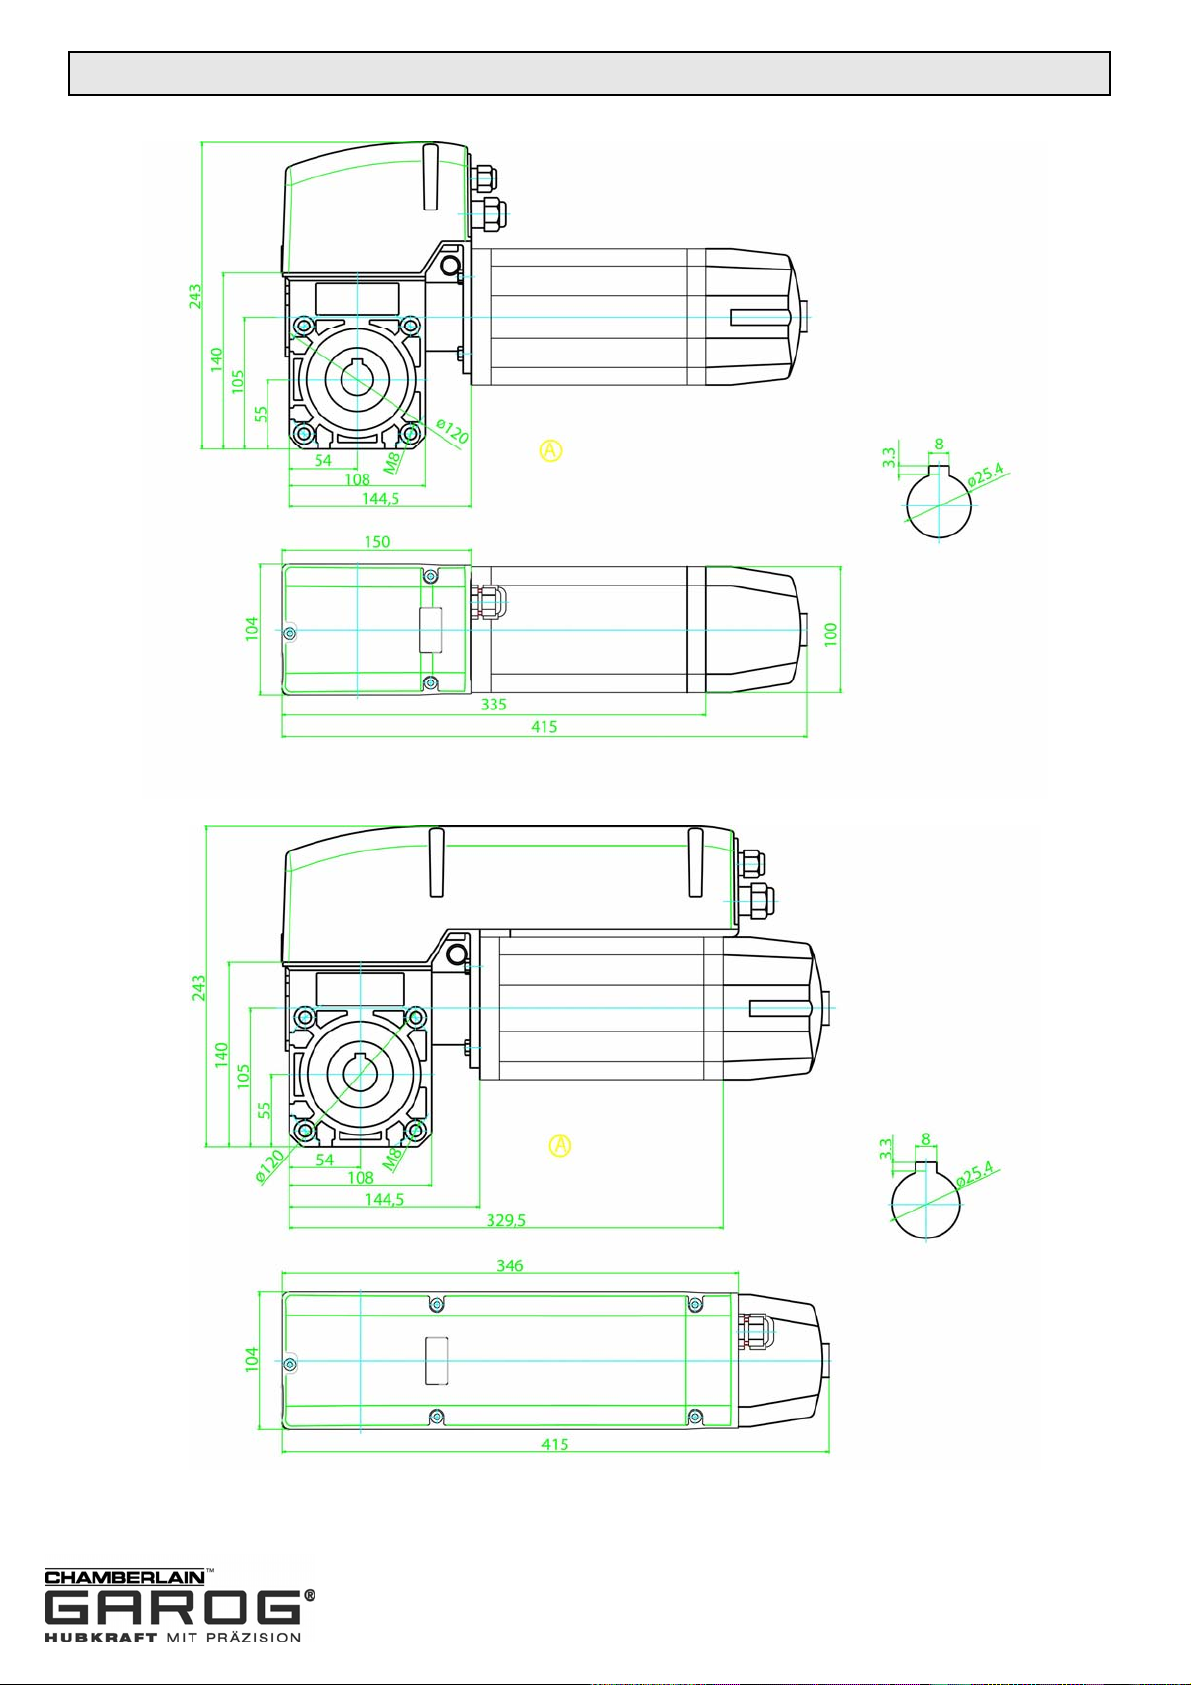
MASSZEICHNUNGEN DKK 100
25 Revision_11_2007
Page 26
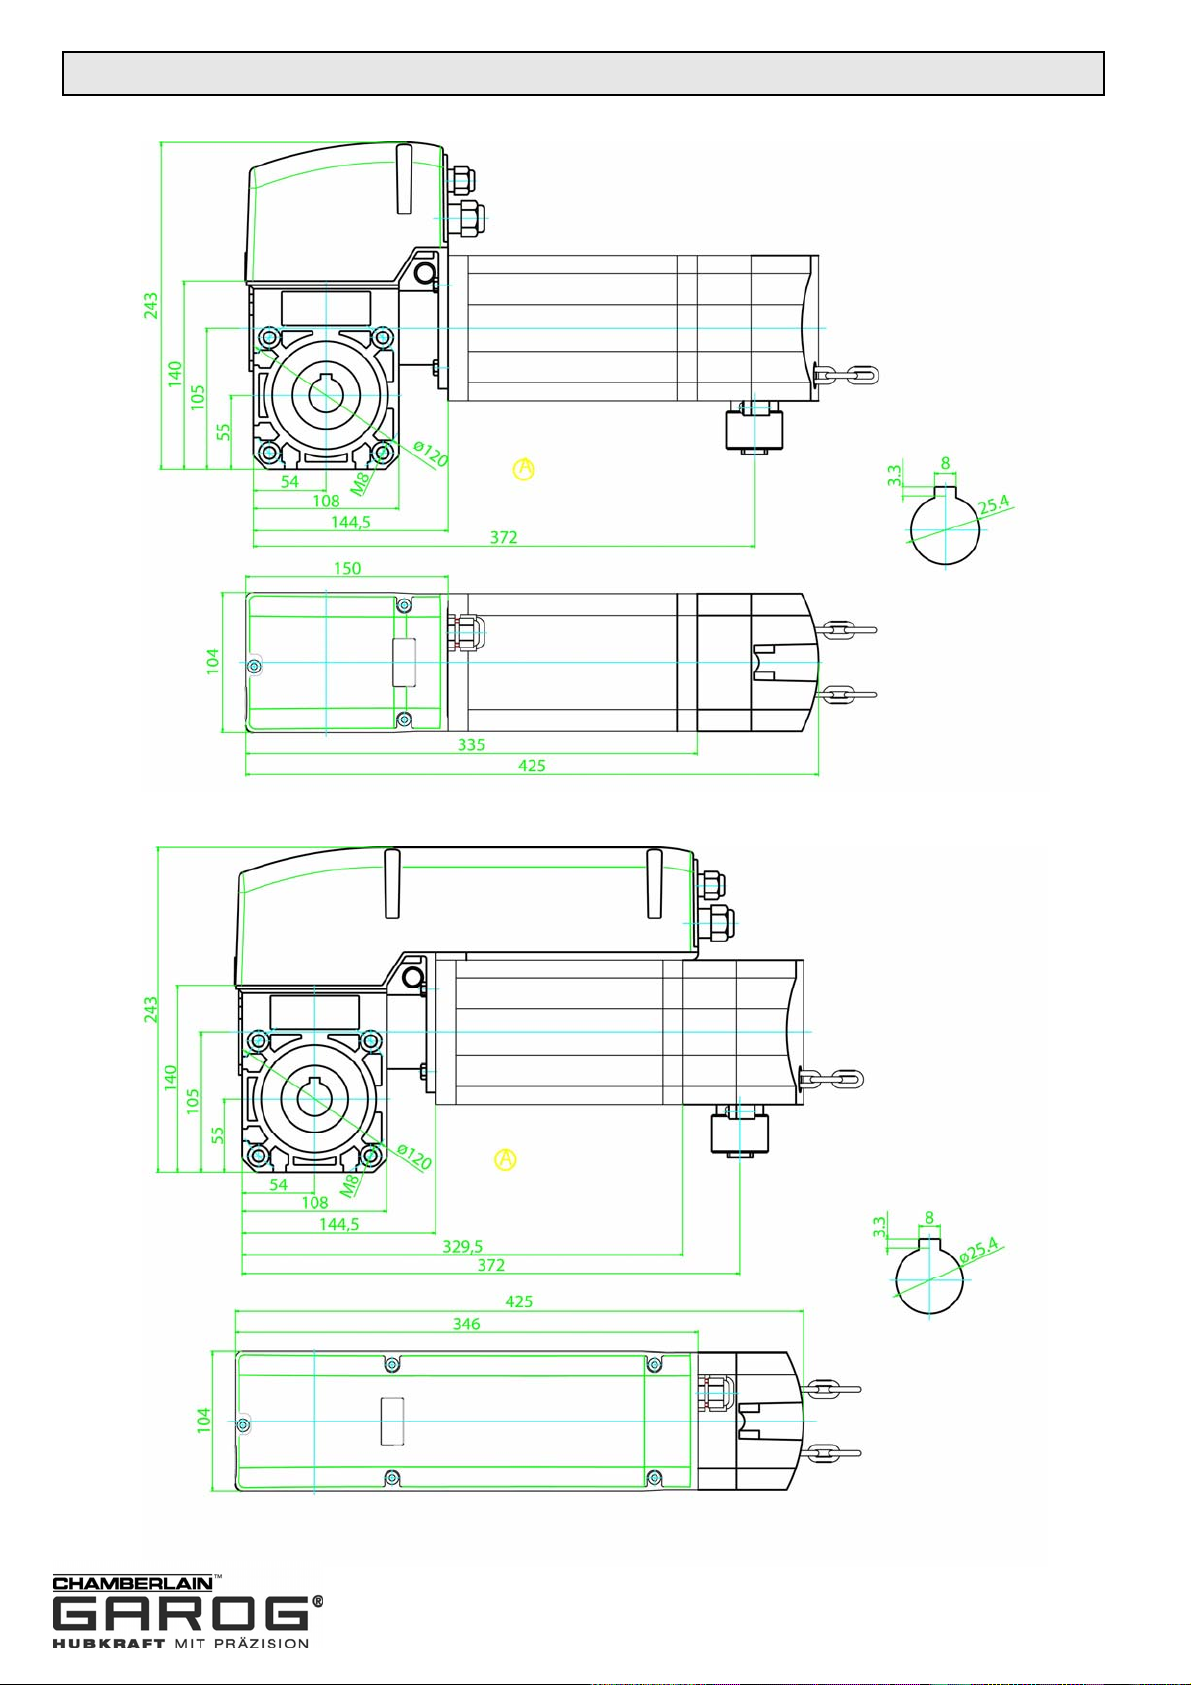
MASSZEICHNUNGEN DKN 100
26 Revision_11_2007
Page 27
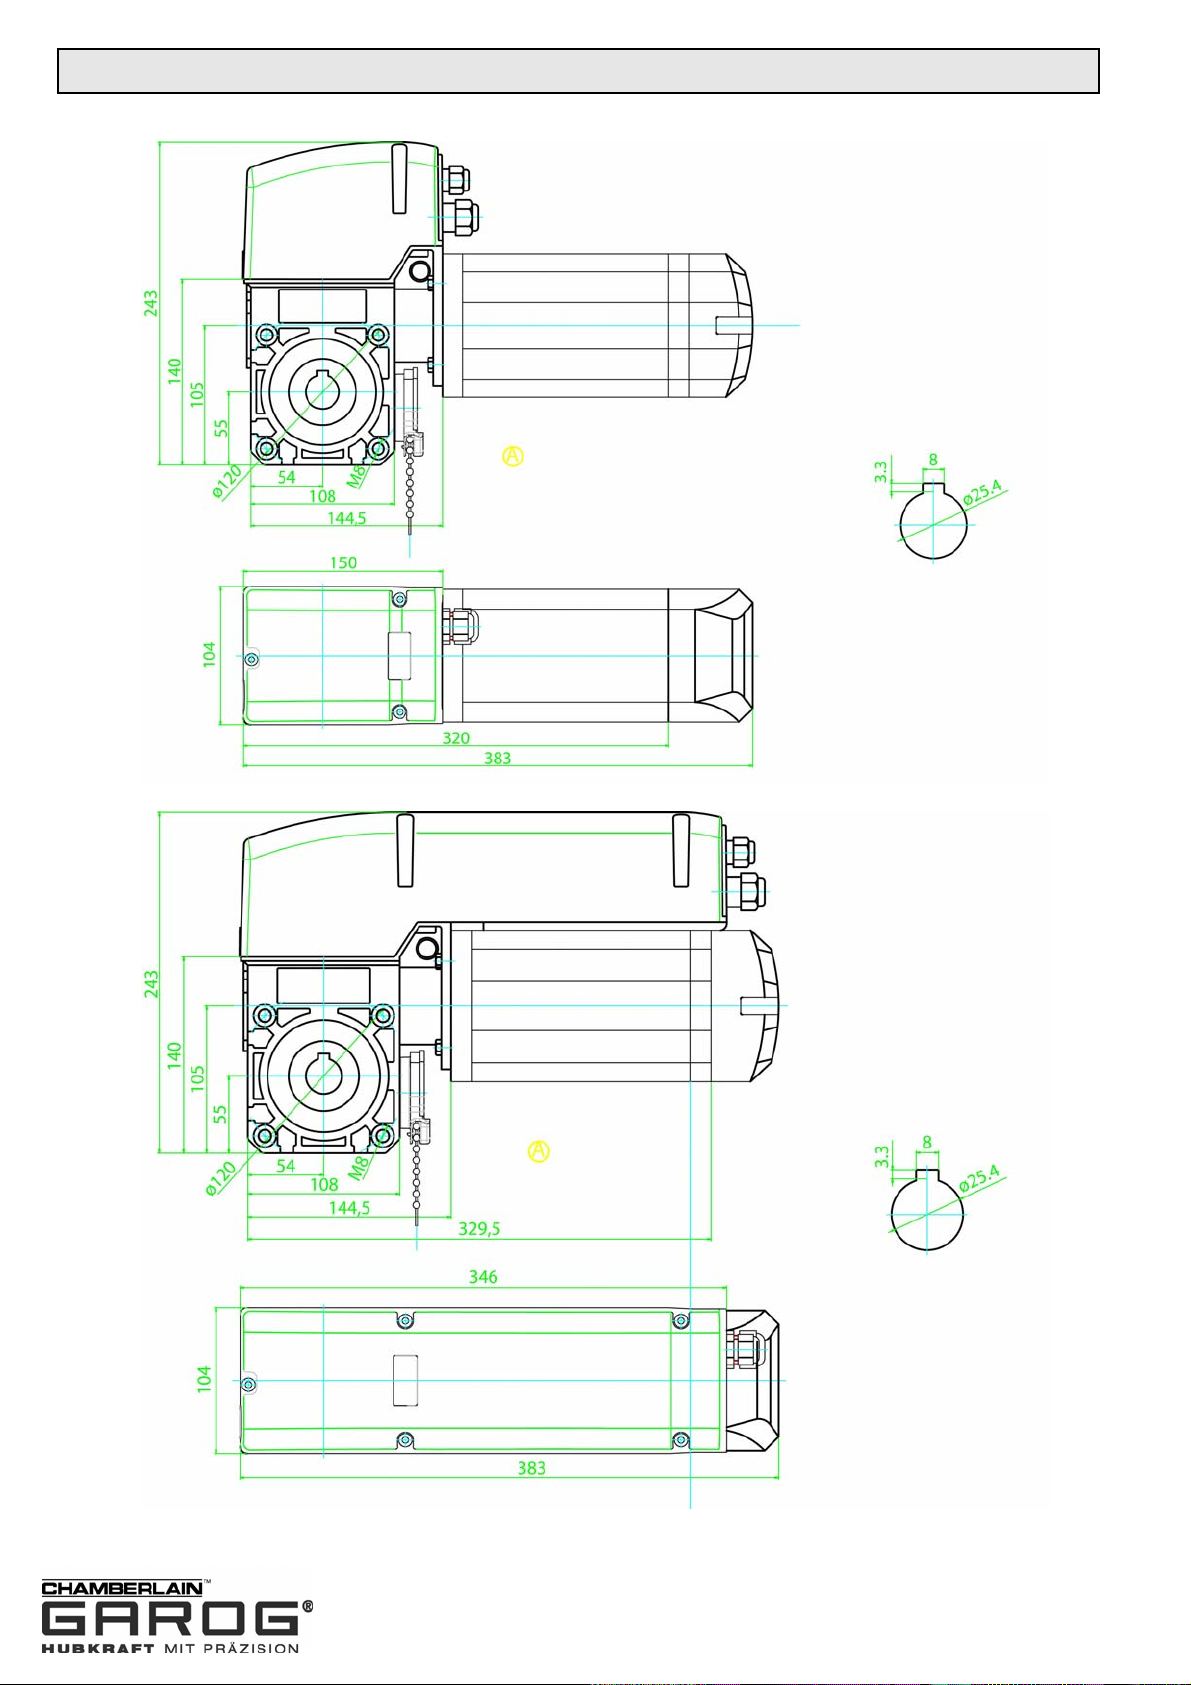
MASSZEICHNUNGEN DKS 100
27 Revision_11_2007
Page 28

EG-Konformitätserklärung
(gemäß EG-Richtlinie Maschine 98/37/EG, Anhang II, Teil B)
Die Firma
Chamberlain GmbH
Alfred-Nobel-Straße 4
66793 Saarwellingen
erklärt, dass die nachfolgend bezeichneten Produkte der Typen:
DKK100, DKN100, DKS100
den Bestimmungen der nachfolgenden CE-Richtlinien entsprechen:
• EG-Richtlinie Maschine 98/37/EG
• EG-Richtlinie Niederspannung 73/23/EWG
• EG-Richtlinie Elektromagnetische Verträglichkeit 89/336/EWG
Die folgenden Normen wurden angewandt:
ZH 1/494 – 04/1998 Richtlinie für kraftbetätigte Fenster, Türen, Tore
EN 12604 – 08/2000 Tore - Mechanische A spekte, Anforderungen
EN 12453 – 02/2001 Nutzungssicherheit kraftbetätigter Tore,
Anforderungen
VDE 0700 Teil 238 – 10/1983 Sicherhei t elektrischer Geräte
VDE 0801 – 01/90 Funktionale Sicherheit
EN 61000 – 4-2 bis 4-6/4-11 Elektromagnetische Verträglichkeit
EN 300220 – 03/2001 Elektromagnetische Verträglichkeit
DIN EN 500811 – 11/1997 Elektromagnetische Verträglichkeit
DIN EN 500811 – 11/1997 Elektromagnetische Verträglichkeit
Saarwellingen, den 05. Mai 2006 _______________________
Dipl.-Ing. Harry Naumann
Manager, Regulatory Affairs
Page 29

Page 30

Page 31

OPERATING MANUAL
INDUSTRIAL DOOR DRIVES
Serial nummer:
(see motor gearbox)
Installed on:
Switchgear standart:
DK-SERIES
2 YEAR WARRANTY
Page 32

TABLE OF CONTENTS
TABLE OF CONTENTS PAGE 2
IMPORTANT SAFETY ADVICE 3 - 4
GENERAL INFORMATION 4
PREPARATORY TASKS 5
INSTALLATION ADVICE
MOUNTING ARRANGEMENT 6
INSTALLATION ADVICE
ELECTRICAL CONNECTION 7
LIMIT SWITCH ADJUSTMENT 8-9
SCHEMATIC DIAGRAM LIMIT SWITCH 10
AS2-eco CONTROL OPERATING 11-15
AS210 CONTROL OPERATING 16 - 19
OPERATING INSTRUCTIONS ZM-SKS 20 - 21
Technical Data 22
Warranty 23
Technical Drawings 24-26
Circuit Diagram TST-2/TST-3 27-28
CE Declaration of Conformity 29
Revision_11_2007
2
Page 33

The door should be counterbalanced.
If this is not done then additional
measures must be taken, such as
unwinding protection, to guarantee
proper operation. In the case of DKA
drives unwinding protection is
standard! Non-movable or stuck
doors must be repaired. Doors, door
springs, cables, pulleys, retainers and
rails are under extreme tension in
such situations and this can lead to
serious injuries.
Do not attempt to loosen, move or
realign the door yourself.
Contact your maintenance service.
Suitable protective clothing should be
worn during maintenance or installation
of the door opener. This includes safety
glasses, back supporting belt, and
protective gloves. When installing or
maintaining a door opener no jewellery,
watches or loose clothing may be worn.
When working from ladders or on
extended platforms the corresponding
safety procedures must be followed.
To avoid serious injuries resulting from
getting tangled or caught in the
mechanisms, all ropes and chains,
which are connected to the door,
must be removed before installing the
door opener.
During installation and connection of the
electrical supply the local building and
electrical regulations must be followed.
Power cables may only be connected to
a properly earthed network.
This system must not be installed in
damp or wet rooms.
Work on the door opener may only be carried
out by one (1) person working on his own.
When working on the door opener all
the local safety regulations must be
observed. Installation of this device
must be done according to EN12453.
The force on the closing door edge
must not exceed 150 N(15kg). If the
closing force is set to more than 150N
then the corresponding additional
safety accessories must be installed
(see "Installation of safety applications"). The force must never be
set to move a stuck door.
Too high a force leads to faults in the
proper operation of the reversing system
or to damage to the door.
To remind all operators of the safety
procedures the corresponding warning
sign should be attached beside the
operating control unit.
To avoid damage to the door all the
blocking devices should be deactivated.
If however the blocking devices must
remain in operation an unlatching switch
can be installed.
The three-switch block, main disconnecting switch and all other
control devices must be installed
within view of the door and out of
reach of children. Children should not
be allowed to operate switches or the
remote controller. Misuse of the door
opener can lead to serious injuries.
The door opener may only be
operated if the operator can see the
whole door area, if it is free from
obstacles and the door opener is
properly adjusted. No one may pass
through the door while it is moving
and children must not be allowed to
play in the vicinity of the door.
Before carrying out repairs or removing the covers on the door
opener, it is essential to ensure that
no one can inadvertently start the
drive by installing a lockout device or
disconnecting the cables.
This symbol means "Caution" and stands in front of safety advice intended to avoid
personal injury or material damage. Please read such advice carefully. The door drive is of
course designed and tested for safe operation. It is however only possible to guarantee this
if the following safety instructions are accurately followed during installation and operation.
This symbol is intended to advise that if the respective instruction is not followed serious
personal injury or material damage can occur.
IMPORTANT SAFETY INFORMATION
Before installation, operation or maintenance of this door drive,
this operating manual must be read through carefully
and all the safety advice must be followed.
3 Revision_11_2007
Page 34

IMPORTANT SAFETY INFORMATION
Live and moving parts of electrical
machines can cause serious or fatal
injuries. The installation, connection
and starting up, as well as maintenance and repair work may only be
carried out by qualified specialist
personnel.
To avoid damage to the door or the
drive, all the locking devices must be
put out of operation. Set locking
device(s) to the "Open" position. If a
lock is to remain in operation an
unlatching switch must be installed.
Please find the technical data for the geared motor
from the type plate or from the attached documents.
In doing so you should also follow:
· The instructions in this manual
· All other project planning documents for the drive
· The start-up instructions and circuit diagrams
· The currently-valid national regulations (safety and accident prevention)
Guarantee, storage
It is essential to follow these instructions and advice since they are the basis for trouble-free operation as well as for any
guarantee claims. Check the delivery immediately after receipt for any transport damage. Report any damage immediately
to the transport company as well as to the supplier. If you do not install the geared motor straight away you should store it in
a dry, dust-free, low-vibration room at temperatures between 0 and +40°C.
Delivered condition
Every geared motor is manufactured according to the valid technical documentation and subjected to a test run at
Chamberlain. We retain the right to make changes to technical data and design, which are in the interests of progress.
Dispatch takes place in the appropriate packaging.
GENERAL INFORMATION
We thank you for purchasing our product
still have questions on the installation then please contact:
Chamberlain Gmbh, Alfred-Nobel-Str. 4,
66793 Saarwellingen Germany
Tel: (0049)(0)6838-907222
Fax: (0049)(0)6838-907179
e-mail: info@garog-service.de
internet: www.garog-service.de
Revision_11_2007
4
Page 35

PREPARATORY MEASURES
The drive may only be installed:
If the details on the rating plate on the drive correspond with the mains voltage.
If the drive is undamaged
If the ambient temperature is between -20°C and +60°C
If the installation height is not more than 1000m above sea level
If the type of protection has been appropriately selected.
Output shafts and mounting surfaces are to be thoroughly cleaned to remove the corrosion protection agent (use standard
commercial solvent). To avoid material damage the solvent must not get onto the sealing edges of the rotary shaft seals.
Abrasive agents must not be used.
To avoid shaft breakages and hence serious or fatal injuries it is essential to note the following during mounting:
The precondition for suitable dimensioning of the shaft with respect to its fatigue strength is stress-free installation and an
immovable bearing device for the gearbox support as well as any additional or essential supporting bearings in each
direction as supplied by the user.
The machine frame and force introduction points are to be designed with respect to construction and strength according to
the bearing forces which arise. The gearbox housing with two bearings and all the other bearing points are located on a
common, stable framework on which the bearing surfaces have been machined in one operation. Thereby the installer
must ensure that any deformation of the frame under load will not have any negative influences on the shaft load. The
screws may only be fully tightened once the gearbox has been accurately aligned. Installation in damp rooms or in the open
air is only permitted following agreement with the manufacturer. If the drives are stored for a lengthy period of time it is also
necessary to discuss this with the manufacturer.
INSTALLATION ADVICE
Before starting the installation work make sure that all the
necessary safety measures have been implemented.
1. Installation
Place machine down on smooth mounting plate or aligned slide rails and tighten fixing
screws uniformly.
Make sure beforehand that:
The drive is not damaged or sticking
The drive has been reprepared after a lengthy storage period
The supply line is switched off and safeguarded against being switched on again
(VDE regs.) (VDE = German assoc. of electronic engineers)
The connections have been made properly
The turning direction of the geared motor is correct
All motor protection devices are active
No other danger sources exist
Revision_11_2007
5
Page 36

MOUNTING ARRANGEMENT
Mounting arrangement 1
DKK
DKN
DKN
DKS
INSTALLATION ADVICE
Mounting
DKK
arrangement 2
Closing direction
Electrical connection
The connections according to the circuit diagram and the maintenance of the electrical drive may only be
carried out by electrical specialist personnel.
The corresponding accident prevention regulations must be followed.
For switching the motor and the brake connections, switching contacts of
utilization category AC-3 acc. to IEC 158 must be used.
The types of line and their cross-sections must be selected according to the
relevant regulations. The nominal flows and the type of connection are given
on the motor type plate. The drive details must agree with the connected
values.
If operated with electronic control devices it is essential to take account of
the corresponding start-up instructions and circuit diagrams.
Commissioning:
During commissioning check whether:
The drive does not get excessively hot
In the event of unusual running noises the drive must be stopped immediately and Customer Services should be
informed. If oil is lost Customer Services should be called, the oil level should be checked by means of the dipstick on the
vent screw and the drive must also be switched off if the level falls below the minimum filling quantity.
T o ensure efficient support in the event of a fault we require the following information:
The data from the type plate on your drive unit
The type and extent of the fault
When and under what accompanying conditions the fault occurred.
Whether the drive was subject to speed variations or other distinctive happenings
6 Revision_11_2007
Page 37

ELECTRICAL CONNECTION
Before the installation of power cables and control devices it is essential to take note of all the
following specifications and warnings. If they are not heeded serious injuries or damage to the
drive can occur.
The control housing of the door drive may only be opened by trained"Chamberlain" specialist
personnel. If necessary please contact your local Chamberlain dealer.
Before electrical installation or the starting up of the drive please study the circuit diagram
carefully. The valid local regulations must be followed for all the electrical wiring work.
Before carrying out any maintenance work on the door drive it is first necessary to disconnect
the power supply / power transmission at the main switch.
After completion of the maintenance work the danger zone must be cleared and secured again
before restarting.
If you require additional accessories or spare parts
please contact your local Chamberlain dealer.
CHAMBERLAIN - GmbH
Alfred-Nobel-Str. 4
66793 Saarwellingen
ORDERING FAX NO: (0049)(0)6838-907179
TECHNICAL HOTLINE: (0049)(0)6838-907222
l A: Pushbutton for control by holding down continuously
l B: Keyswitch, or suchlike for controlling by means of continuous actuation
l C: Limitation of driving force by force limiting (clutch) and protection devices
(safety edge padding).
l D: Device to detect people or obstacles which are on the ground on one side (inside) of the door
leaf (infrared light barrier)
l E: Device to detect people or obstacles which are on the ground on both sides
(inside and outside) of the door leaf (infrared light barrier).
ADVICE: For more detailed information see EN12453.
MATRIX FOR THE USE OF SAFETY EQUIPMENT
Control by continuous switch
operation
Pulse actuation within visual
range of door
Automatic control
Trained
people(inaccessible
to the public)
Group 1
A
C
C and D
(General public area)
Group 3
No info.
C and E
C and E
Public area
Group 2
B
C and D
C and E
TYPE OF CONTROL DOOR WILL BE USED BY
7
Revision_11_2007
Page 38

LIMIT SWITCH ADJUSTMENT Limit Switch - LSS6
Operator equipped with AS2-eco come with the limit switch LSS-4.
(Limits for OPEN & CLOSE and SAFETY-Limit-Switch Open and Closed,
without additional limits)
A B
1. Additional Limit Switch OPEN green
1
2. Limit Switch OPEN green
2
3
4
3. Safety Limit Switch OPEN red
4. Safety Limit Switch CLOSED red
5
5. Limit Switch CLOSED white
6
6. Additional Limit Switch CLOSED white
1. Drive the door to wished CLOSED position.
2. Set the control cam 5 (white) the way that the limit switch is operated.
3. Tighten the fixing screw A.
4. Drive the door to wished OPEN position.
5. Set the control cam 2 (green) the way that the limit switch is operated.
6. Tighten the fixing screw A.
7. Fine adjustment is done with the screw B.
8. The safety limit switches 3 and 4 (red) must be set the way that they react directly after
passing the control limit switch.
9. After the operation test, control the fixing screw.
10. The additional limit switches 1 and 6 have change-over contact free of potential.
8 Revision_11_2007
Page 39

LIMIT SWITCH ADJUSTMENT Limit Switch - LSS4
A B
2
2. Limit Switch OPEN green
3
4
5
1. Drive the door to wished CLOSED position.
2. Set the control cam 5 (white) the way that the limit switch is operated.
3. Tighten the fixing screw A.
3. Safety Limit Switch OPEN red
4. Safety Limit Switch CLOSED red
5. Limit Switch CLOSED green
4. Drive the door to wished OPEN position.
5. Set the control cam 2 (green) the way that the limit switch is operated.
6. Tighten the fixing screw A.
7. Fine adjustment is done with the screw B.
8. The safety limit switches 3 and 4 (red) must be set the way that they react
directly after passing the control limit switch.
9. After the operation test, control the fixing screw.
9 Revision_11_2007
Page 40

LIMIT SWITCH ADJUSTMENT (LSS-6) SECTIONAL DOORS
SCHEMATIC DIAGRAM
(Standard only with limit switch LSS-6)
(Standard only with limit switch LSS-6)
10 Revision_11_2007
Page 41

OPERATING INSTRUCTIONS AS2-eco
Tested according to:
EN 12453
11 Revision_11_2007
Page 42

OPERATING INSTRUCTIONS AS2-eco
The door control AS2-eco is conceived to operate door units with three-phase
motors in dead-man operation mode.
For example, a triple switch is connected with to open or close a gate.
SAFETY INSTRUCTIONS
Â
Please consider valid national and local directives and regulations related
to the start-up of motorised doors in your country. The person and/or the
company installing the unit is responsible of the complete unit. The
installator has to respect the important norms and directives ( such as
DIN EN 12453, DIN EN 13241-1) and establish the technical documents
related to the whole unit. The technical documents have to be enclosed to
the door’s unit.
 Installation and maintenance works at the control AS2-eco have only to be
done by specialised technicians in electrics.
 During works on electrical devices, the unit must be switched off supply.
All regulations related to protection must be considered.
 Dead-man operation mode is only allowed if the unit is visible from the
instruction switches and the operators were instructed correspondingly.
 The operation of the gate control in self-locking mode is only allowed if
the protecting equipment required in EN 13241-1 und EN 12453 are used.
If you do not respect the safety instructions, you are personally liable f
the resulting damages on persons and materials.
or
12 Revision_11_2007
Page 43

OPERATING INSTRUCTIONS AS2-eco
Connection of mains cable
Â
The circuit distribution protected by fuse has to be connected to the screw
terminals X1, L1, L2, L3 of the mother board. The value of safety fuse
should not exceed 4A.
 The mains plug must be accessible and installed near by the control.
 The value of the supply voltage (230V AC or 400V AC) must be set at the
screw terminal X6 through the bridge.
A wrong connection of the bridge may destroy the control.
on nection of three -phase drive C
 The three-phase drive has to be connected to the screw terminals X2, U,
V, W.
 Change of sense of rotation: after connecting the drive, the sense of
rotation must be checked with the key buttons OPEN and CLOSED. If the
moving direction does not correspond to the direction of the arrow
indicated on the pressed button, so the screw terminals of the
connections U and V must be exchanged.
Connection of the external instructions switches OPEN, STOP, CLOSED
Â
To operate from outside, a triple switch (such as KDT 3) can be connected
to the screw terminals X3, 4, 5, 6, 7. Optionally, a triple switch can be
connected to through the screw terminal X4. If the block of bi
is not configured, so a jumper must bridge the stop contact.
Â
The line of external instruction devices must be installed safe according to
protective earthing (double insulation).
Â
Here both key buttons related to OPEN and CLOSED should be executed
as closer. As the key button related to stop in
the safety circuit is already
onfigured, it must be connected as opener. c
The area of danger must
runs with key buttons.
be visible since the dead-man operation mode
nding posts
13 Revision_11_2007
Page 44

OPERATING INSTRUCTIONS AS2-eco
Connection of limit switch
Â
The limit switch and safety limit switch OPEN and CLOSED should be
connected to the screw terminals 8, 9, 10.
Connection of direct safety switches
 Safety elements that directly intervene in the control process are to be
connected in range to the stop contact.
 There are, among others: emergency shut-down respectively safety-
catch, feed protection and protection of integrated door.
Technical data AS2-eco
istribution voltage
D 230V – 240V AC / 50 – 60 Hz
400V – 415V A
Current cons max. 120 mA
umption
C / 50 – 60 Hz
econdary 250 mA Safety fuse s
Data of relay contac
t
Rupturing capacity
Mechanical useful life 10 x 10
Electronic useful life 10 x 10
6
6
Ambient te 5°….55° C
Humidity 45 to 85%
mperature
RH
Position of installation as wished
Revision_11_2007
14
Page 45

OPERATING INSTRUCTIONS AS2-eco
S2 Endschalter AUF
OPEN Limit
Interreupteur fin de course OUVERT
S3 Sicherheitsendschalter AUF
OPEN safety limit
Interreupteur de mise au point OUVERT
S4 Sicherheitsendschalter ZU
CLOSE safety limit
Interreupteur de mise au point FERME
S5 Endschalter ZU
CLOSE limit
Interreupteur fin de course FERME
S7 Notbedienung
Emergency operation
Manouvre de secoure
S8 Thermoelement Motor
Thermical motor protection
Thermoprotection du moteur
AUF
OPEN
OUVERT
Jumper Position AUF/OPEN/OUVERT
Selbsthaltung
Self Locking
Automaintien
Jumper Position ZU/CLOSE/FERME
Totmann
Hold to run
Homme-mort
ZU
CLOSE
FERME
U V W
L1 / L2 / L3
400V/50Hz
15 Revision_11_2007
Page 46

OPERATING INSTRUCTIONS – AS 210
Tested according to:
EN60335-1 / EN60204-1
connected with EN12453
(safety use of power operated doors)
ENGLISH
16 Revision_11_2007
Page 47

OPERATING INSTRUCTIONS – AS 210
ENGLISH
The control AS 210 is conceived to operate doors.
In the basic model, it is made for the dead man operation.
By means of plug-in modules, it can be extended individually.
SAFETY NOTICES
 Please note valid directions and regulations of start-up of power operated doors in your
country.
 Installation and maintenance works at control AS 210 should only be done by skilled
Electricians.
 Note protecting prescriptions!
 The installation has to be switched on free of tension during electrical works
 Dead-man operation is only allowed if the installation can be seen from the control
devices.
If you do not respect the safety notices, you are responsible of resulting
personal and material damages.
CURRENT SUPPLY
 In case of fixed connection, an all-polo main switch has to be foreseen.
 In case of rotary current, only use triple block safety cut-out (10 A).
 Please note that supply voltage corresponds with the data on type plate.
 lease note that a clockwise rotatory field should be at the power outlet P
 Command and control should only be assembled inside buildings.
TECHNICAL DATA
Model AS 210
r 400V Tension 230V o
Frequency
Type of IP 54
A max.
Operating temperature
protection
50 Hz
10 A
-10°C to +55°C
17 Revision_11_2007
Page 48

OPERATING INSTRUCTIONS – AS 210
MOTHERBOARD AS 210
Terminal strip for external radio transmission
Plug-in strip for external triple switch
ENGLISH
Choice of supply voltage
400V/230V
Terminal rail
supply
Setting button
CLOSE
Setting button
Terminal rail
limit switch and
control switch
Jumper J15
self-locking OPEN
OPEN
Terminal rail
motor
18 Revision_11_2007
Page 49

OPERATING INSTRUCTIONS – AS 210
ENGLISH
CIRCUIT DIAGRAM AS 210 400V FOR OPTOELECTRONIC RUPTURING
STRIP AND FOR 8,2 kOhm EVALUATION OF RESISTANCE
*
*
*
19 Revision_11_2007
*only in connection
with ZM-SKS
Page 50

OPERATING INSTRUCTIONS
ZM-SKS
ZM-SKS
20 Revision_11_2007
Page 51

Operating Instructions – ZM-SKS
ENGLISH
Module for the connection of a SKS rail
Assembling Instructions in Board Plate AS 210:
 Insert board plate ZM-SKS in plug-in rail X7. Equipped side must show to the direction of
the transformer.
J3 - Jumper
SKS ch o ice
J2 - Jumper
Automatic remove downwards
Jumper J2 – Automatic remove downwards
plugged in = Automatic remove downwards
open = no automatic remove downwards
Jumper J3 – SKS choice
plugged in = optoelectronic rupturing strip
open = 8,2 kOhm
LED H1 – SKS
Permanent illumination = SKS OK
Flashing = SKS Disturbance
H1 - LED
SKS
21 Revision_11_2007
Page 52

TECHNICAL DATA DK - DRIVES
Chamberlain-Garog base set drives include the ready-wired door drive and a torque bracket.
Two base types of drives are available:
1. Drive with a potential-free cam limit switch LSS-6 for using external automatic
control units or with controller AS210 and ZM-SKS*
2. Drive with a controller AS2-eco with a cam limit switch LSS-4 and pre-wired 3-push-button-station.
Various types of emergency actuators are available:
The emergency hand-crank (DKK), the automatic emergency chain (DKN) as well as
the quick-action clutch (DKS).
*Operator with integrated Controller AS210 and ZM-SKS are special versions on request
Model Typ Controller Limit-Swich Nm Rpm Emergency Actuation
DKK100240000 DKK --------- LSS-6 100 24 Hand crank
DKK100240110 DKK AS2-eco LSS-4 100 24 Hand crank
DKN100240000 DKN --------- LSS-6 100 24 Chain
DKN100240110 DKN AS2-eco LSS-4 100 24 Chain
DKN100240440-CN DKN AS210 LSS-6 100 24 Chain
DKS100240000 DKS --------- LSS-6 100 24 Quick Release Clutch
DKS100240110 DKS AS2-eco LSS-4 100 24 Quick Release Clutch
DKS100240440-CN DKS AS210 LSS-6 100 24 Quick Release Clutch
Technial Data Motor power 0,37 kW
Torque 100 Nm
Speed 24 UpM
Duty factor S3 60%
Operating voltage 400V/3~
Frequency 50 Hz
Nominal current 2,1 A
Type of motor protection IP 54
Supply cable, on site 5x1,5 mm
Fuse protection, on site 10 A
Temperature range -20° - +60°
Hollow shaft 25,4 mm
Weight DKK/DKS 13kg, DKN 15kg
22 Revision_11_2007
Page 53

GUARANTEE AND STORAGE
Definition of qualified personnel
Within the meaning of the operating manual and the warning information concerning the product itself, these are people
who are familiar with the setting out, installation, commissioning and operation of the product and have suitable
qualifications for their work, such as:
a. Training or instruction in, and authorization to connect up, switch on and off, earth and mark power circuits and
devices according to the engineering safety standards.
b. Training or instruction according to engineering safety standards in the care and use of the appropriate safety
equipment.
c. Training in first aid.
The fitting of drive elements
The fitting of drive elements such as rope pulleys, wheels etc is best done after previous warming of the respective part.
The preheating temperature should be 100°C.
A precoating of a copper paste eases mounting and provides long-term protection from frictional corrosion.
To avoid damage to bearings, housings and shafts the drive elements must never be mounted on the end of the
shaft by hammer blows.
The fitting of drive elements by means of pressure requires a force introduction surface (seating on output shaft).
Fitted transmission elements must be counterbalanced and must not cause any non-permitted radial or axial forces.
The corresponding tolerances must be observed during the fittining work (see dimension drawing).
23 Revision_11_2007
Page 54

TECHNICAL DRAWINGS DKK 100
24 Revision_11_2007
Page 55

TECHNICAL DRAWINGS DKN 100
25 Revision_11_2007
Page 56

TECHNICAL DRAWINGS DKS 100
26 Revision_11_2007
Page 57

Page 58

Page 59

EU Conformity Declaration
(pursuant to EU Machine Guideline 98/37/EG, Annexe II , Part B)
Messrs
Chamberlain GmbH
Alfred-Nobel-Straße 4
66793 Saarwellingen
herewith declares that the products designated below of types:
DKK100, DKN100, DKS100
meet the requirements set out in the following CE guidelines:
• EU Machine Guideline 98/37/EG
• EU Low Voltage Guideline 73/23/EWG
• EU Electromagnetic Compatibility Guideline 89/336/EWG.
The following standards were applied:
ZH 1/494 – 04/1998 Guideline for Power-Driven Windows, Doors, Gates
EN 12604 – 08/2000 Doors/Gates - Mechanical Aspects , Requirements
EN 12453 – 02/2001 Usage Safety of Power-Driven Doors/Gates,
Requirements
VDE 0700 Teil 238 – 10/1983 Safety of Electric Devices
VDE 0801 – 01/90 Functional Safety
EN 61000 – 4-2 bis 4-6/4-11 Electromagnetic Compatibility
EN 300220 – 03/2001 Electromag netic Compatibility
DIN EN 500811 – 11/1997 Electromagnetic Co m patibility
DIN EN 500811 – 11/1997 Electromagnetic Co m patibility
Saarwellingen,
Germany, 5th May 2006 _______________________
Dipl.-Ing. Harry Naumann
Manager, Regulatory Affairs
Page 60

Manuel d'instructions
Motorisation pour portes industrielles
Numéro de série
(voir bloc moteur)
Installé le:
Schéma de montage:
SÉRIE DK
2 ans de garantie
Page 61

SOMMAIRE
SOMMAIRE PAGE 2
MESURES DE SÉCURITÉ IMPORTANTES 3
INFORMATIONS GÉNÉRALES 4
MESURES PRÉPARATOIRES 5
CONSEILS D’INSTALLATION
SENS DE POSE 6
CONSEILS DE POSE
BRANCHEMENTS ÉLECTRIQUES 7
RÉGLAGE DES FINS DE COURSE 8-9
SCHÉMA
PLAN DE CÂBLAGE 10
NOTICE EXPLICATIVE 11-15
COMMANDE HOMME-MORT AS2ECO
NOTICE EXPLICATIVE 16-19
COMMANDE HOMME-MORT AS210
NOTICE EXPLICATIVE ZM-SKS 20-21
DONNÉES TECHNIQUES ENTRAÎNEMENTS 22
GARANTIE 23
SCHÉMAS TECHNIQUES 24-26
DÉCLARATION DE CONFORMITÉ CE 27
PLAN DE CÂBLAGE - TST-2/TST-3 28-29
(Annexe 1 + 2)
Page 2 Révision_11_2007
Page 62

VEUILLEZ TOUT D'ABORD LIRE CES REGLES DE SECURITE IMPORTANTES
Avant toute installation, mise en service et maintenance
d'un automatisme de porte industrielle, veuillez lire attentivement cette notice d'installation et
respecter toutes les consignes de sécurité.
Ces pictogrammes appellent à la prudence et ont valeur d'avertissement, car leur non-respect peut
entraîner un risque des blessures corporelles ou de dommages matériels.Veuillez lire attentivement ces
avertissements. Cet entraînement est conçu et testé de manière à offrir un fonctionnement
sûr sous réserve d'être installé et utilisé conformément aux règles de sécurité suivantes.
Le non-respect des règles de sécurité suivantes peut provoquer de sérieux dommages corporels ou
matériels.
La porte ou le rideau doit toujours être
bien équilibrée. Ne laissez pas la force du
moteur compenser une porte ou un rideau
industriel qui bloque ou qui coince. Les portes,
ressorts de porte, câbles, poulies, crochets et
tout le matériel sont soumis à des tensions
extrêmes et peuvent provoquer de graves
blessures corporelles.
Il est important que la porte ou le rideau
reste toujours parfaitement opérationnel.
Toute porte ou rideau qui bloque ou reste
coincé doit être immédiatement réparé. Ne
pas essayer de le réparer soi-même, mais
faire appel à un spécialiste.
Une prudence particulière s'impose lors
de l'utilisation d'outils et de petites pièces.
Ne pas porter de bagues, de montres ou
de vêtements amples lors des travaux de
montage ou de réparation.
Lors du montage un confinement entre la
pièce entraînée et les pièces environnantes
du bâtiment (par exemple une paroi) doit être
pris en compte en raison du mouvement
d'ouverture de la pièce entraînée.
Les câbles électriques doivent être posés
conformément aux prescriptions locales
relatives aux systèmes et installations
électriques. Le câble électrique doit
uniquement être raccordé à un réseau
électrique correctement relié à la terre.
Cet appareil ne doit pas être installé dans
un endroit humide.
Déposer toutes les serrures montées afin
d'éviter d'endommager la porte ou le
rideau.
Pour toute intervention sur la motorisation, les réglementations locales
doivent être impérativement respecter.
L'installation de cette motorisation doit
être effectuée en conformite à la norme
EN12453.
La force mesurée au niveau bas de
la porte ou du rideau lors de la fermeture
de la porte ne doit pas dépasser
150N (15kg). Si la force de fermeture est
réglée à plus de 150N, il faut installer un
système de protection.
Toute force excessive provoque des dysfonctionnements du système d'inversion de
sécurité ou des déformations irréparables de
la porte ou du rideau.
Afin de rappeler en permanence les
procédures de sécurité aux usagers, un
panneau d'avertissement doit être placé en
permanence près du bouton mural de
commande de la porte.
Déverrouiller tous les verrous
afin d'éviter d'endommager la porte ou le
rideau.
Tenir tous les accessoires
hors de portée des enfants.
Ne pas laisser les enfants utiliser les
boutons ou les télécommandes.
La fermeture d'une porte ou d'un
rideau peut provoquer de sérieuses
blessures.
Actionner la commande d'ouverture
UNIQUEMENT quand la porte est
complètement visible et non obstruée et
que l'entraînement est correctement réglé.
Personne ne doit entrer ou sortir lorsque
la porte est en mouvement.
Interdire aux enfants de jouer près de la
porte.
Débrancher le courant de
l'entraînement avant de commencer
toute réparation et d’ôter le
couvercle.
Page 3 Révision_11_2007
Page 63

Respecter les points suivants :
la notice
le cahier des charges
la mise en service et le schéma de branchement
la réglementation nationale en vigueur
Garantie - Stockage
L'application de la garantie-produit est subordonnée au respect des instructions et recommandations mentionnées dans ce
manuel.
Vérifier le parfait état du produit à la livraison.
En cas de détérioration de la marchandise, prévenir le plus rapidement possible le fournisseur ou le transporteur.
Dans le cas d'un montage à date ultérieure de la motorisation, veuiller la stocker dans un endroit sec (température
ambiante comprise entre 0 et 40°C) et à l'abri de la poussière.
Livraison
Toutes les motorisations élaborées d'après les spécifications techniques de la société Chamberlain ont subi des tests sur
banc d'essai. Sous réserve de modifications techniques. Matériel livré dans emballages réglementaires.
VEUILLEZ TOUT D'ABORD LIRE CES REGLES DE SECURITE IMPORTANTES
Les caractéristiques techniques de la motorisation de porte industrielle peuvent être
relevées sur l'étiquette située sur le bloc moteur ou sur le manuel d'instructions.
Nous vous remercions d'avoir choisi nos produits.
Pour plus de renseignements concernant l'installation, n'hésitez pas à nous contacter:
Chamberlain GmbH, Alfred-Nobel-Str. 4,
66793 Saarwellingen
Tel: (49) 6838-907222, Fax: (49) 6838-907179
e-mail: info@.garog-service.de
Internet:: www.garog-service.de
INFORMATIONS GÉNÉRALES
Page 4 Révision_11_2007
Page 64

MESURES PRÉPARATOIRES
La motorisation ne doit être montée que si :
le voltage indiqué sur la plaque du bloc-moteur correspond à celui du secteur
le moteur est en parfait état
la température ambiante est comprise entre -20°C et +60°C
le lieu d'installation de la motorisation est situé en dessous de 1000m d'altitude
vous avez choisi une indice de protection répondant aux conditions de votre installation
L'arbre de commande et la surface de fixation doivent être exempts de toute trace de produit anti-corrosion. Le cas
échéant, utilisez un solvant vendu dans le commerce en prenant garde à ce que le solvant n'entre pas en contact avec le
joint d'étanchéité de l'arbre moteur au risque d'endommager le matériel. Ne pas utiliser de produits abrasifs.
Afin d'éviter toutes ruptures de l'arbre de commande et toutes blessures ou accidents mortels
lors de la pose, veuillez respecter absolument les instructions suivantes
La condition requise pour un dimensionnement suffisant de l'arbre si on considère la résistance à long terme est un
montage sans contraintes et sans possibilité de coulissement transversal des paliers d'appui dans le réducteur ainsi que
des paliers de butée dans les deux sens qui sont éventuellement nécessaires et fournis en supplément par l'utilisateur.
Le bâti de la machine et les points d'application de la force doivent être conçus et dimensionnés de sorte à présenter une
résistance adéquate. Le carter de réducteur avec 2 paliers et tous les autres paliers se trouvent sur un cadre commun,
stable et usiné d'un seul tenant au niveau des surfaces d'appui. L'installateur doit garantir que la déformation du cadre en
charge n'aura pas d'effets négatifs sur la sollicitation de l'arbre. Le serrage à fond des vis ne devra intervenir qu'une fois que
le réducteur est correctement aligné. L'installation dans des locaux humides ou à l'extérieur n'est autorisée qu'après
concertation avec le fabricant !
En cas de stockage prolongé des entraînements, il convient également de se consulter avec le fabricant !
MESURES DE POSE
Avant de commencer l'installation, vérifiez que toutes les mesures de sécurité
aient été respectées.
Fixation
Le moteur doit être monté sur une surface plane
(plaque de montage ou console de fixation).
Les vis de fixation doivent toutes être serrées à force égale.
Avant la pose, assurez-vous que :
le moteur ne soit ni bloqué, ni abîmé
l'alimentation électrique soit coupée
tous les branchements aient été correctement effectués
le sens de rotation du moteur soit correct
tous les systèmes de sécurité du moteur soient actifs
toutes sources de danger extérieures aient été écartées
Page 5 Révision_11_2007
Page 65

Branchement électrique
Le branchement électrique conformément au schéma du circuit ainsi que la maintenance électrique de la
motorisation doivent impérativement être effectués par des professionnels.
Respecter les prescriptions correspondantes de prévention des accidents !
Pour la commutation du moteur et des raccordements des freins, il est
nécessaire d'utiliser des contacts de commutation de catégorie d'utilisation
AC-3 selon CEI 158. Les types de câbles et leurs sections seront sélectionnés
conformément aux prescriptions en vigueur. Les courants nominaux et le
type de commutation sont indiqués sur la plaquette signalétique du moteur.
Les indications relatives à l'entraînement doivent correspondre aux valeurs
de raccordement.
En cas de fonctionnement avec des appareils de régulation électronique, il est impératif de tenir
compte des instructions correspondantes de mise en service et des schémas électriques !
SENS DE MONTAGE
CONSEILS D'INSTALLATION
Schéma 1
DKK
DKN
DKN
DKS
Schéma
DKK
Sens de Fermeture
2
Mise en service:
Vérifiez au cours de la mise en service que :
le moteur fonctionne sans bruit excessif
En cas de bruits de course étranges, stoppez immédiatement le moteur et contactez le service
après-vente. En cas de fuite d'huile, contactez le service clientèle, vérifiez le niveau d'huile et coupez
aussitôt le moteur si la jauge présente un niveau d'huile en dessous du minimum.
En cas de panne, les informations suivantes sont nécessaires pour assurer un soutien
technique le plus efficace possible :
les références figurant sur la plaque du bloc-moteur
le type et l'importance du problème technique
le moment et les circonstances de la panne survenue
toute rotation irrégulière du Moteur
Page 6 Révision_11_2007
Page 66

BRANCHEMENTS ELECTRIQUES
Avant d'installer le câblage électrique ou les postes de commande, veillez respecter toutes
les spécifications et mises en garde ci-dessous. Dans le cas contraire, l'utilisation de ce
mécanisme de commande peut entraîner de graves blessures et/ou endommager le
mécanisme lui-même.
Le boîtier électrique du mécanisme doit uniquement être accessible aux techniciens
"Chamberlain" qualifiés. Lorsqu'une réparation ou maintenance doit être effectuée,
s'adresser au revendeur local Chamberlain.
Avant de procéder à l'installation électrique ou à la mise en service de l'entraînement, veuillez
lire attentivement le schéma électrique. Pour l'ensemble du câblage électrique, respecter les
prescriptions locales en vigueur.
Avant de réaliser des travaux de maintenance sur l'entraînement, il faut d'abord couper
l'alimentation électrique / la transmission de la force par le biais de l'interrupteur-sectionneur
principal.
Au terme des travaux de maintenance, il faut à nouveau évacuer et sécuriser la zone de danger
au moment de la remise en service.
Pour tout autre accessoire ou pièce détachée,
contactez votre revendeur local Chamberlain.
CHAMBERLAIN - GmbH
Alfred-Nobel-Str. 4
66793 Saarwellingen
COMMANDE PAR FAX: +(49) 6838-907179
LIGNE D’ASSISTANCE TECHNIQUE: +(49) 6838-907222
lA:Maintenir le bouton-poussoir enfoncé pour actionner la commande.
lB:Maintenir l'interrupteur à clé ou similaire enfoncé pour actionner la commande.
lC:Limitation des forces de commande à l'aide de dispositifs de limitation de force
(embrayage) et de sécurité (tranche de sécurité)
lD:Dispositif servant à détecter la présence d'une personne ou d'un obstacle se trouvant
au sol d'un côté (intérieur) de la porte. (cellules infrarouges).
lE:Dispositif servant à détecter la présence d'une personne ou d'un obstacle se trouvant
au sol des deux côtés (intérieur & extérieur) du battant. (cellules infrarouges).
REMARQUE: Pour toute information complémentaire, c.f. norme EN12453.
TABLEAU RELATIF AUX PROTECTIONS ANTI-ECRASEMENT
Commande par contact
maintenu (homme-mort)
Commande par contact
impulsionnel
à proximité de porte
Commande automatique
Utilisateurs formés
(zone non publique)
Groupe 1
A
C
C et D
Zone publique
Groupe 3
k. A.
C et E
C et E
Zone publique
Groupe 2
B
C et D
C et E
TYPE DE COMMANDES UTILISATEURS DE LA PORTE
Page 7 Révision_11_2007
Page 67

RÉGLAGE DES FINS DE COURSE (LSS6) PORTES SECTIONNELLES
B
A
1.
OUVERTURE
1
Interrupteur de fin de course OUVERTURE2.
2
3
3.
OUVERTURE
4
4.
5
FERMETURE
6
6.
FERMETURE
1. Manoeuvrer la porte sectionnelle dans la position FERMETURE souhaitée.
vertInterrupteur de fin de course additionnel
vert
rougeInterrupteur de fin de course de sécurité
rougeInterrupteur de fin de course de sécurité
blancInterrupteur de fin de course FERMETURE5.
blancInterrupteur de fin de course additionnel
2. Ajuster la came (blanche) de contacteur 5 de sorte que l'interrupteur de fin de course soit activé.
3. Serrer le boulon de fixation A.
4. Le réglage fin du fin de course se fait à l’aide du boulon B.
5. Manoeuvrer la porte sectionnelle dans la position OUVERTURE souhaitée.
6. Ajuster la came (verte) de contacteur 2 de sorte que l'interrupteur de fin de course soit activé.
7. Serrer le boulon de fixation A.
8. Le réglage fin du fin de course se fait à l’aide du boulon B.
9.
Les interrupteurs (rouges) de fin de course de sécurité 3 et 4 doivent être ajustés de sorte qu'ils
réagissent aussitôt que les contacteurs de fin de course sont activés.
10. Après un cycle d’essai, contrôler l'ajustement du boulon de fixation.
11. Les interrupteurs de fin de course additionnels 1 et 6 ont des contacteurs inverseurs libres de
potentiel.
Les entraînements équipés d’une électronique de commande intégrée AS2-eco disposent d’un ensemble
de fins de course LSS-4 comprenant 4 interrupteurs de fins de course : OUVERTURE, FERMETURE et fins
de course de sécurité OUVERTURE et FERMETURE
Page 8 Révision_11_2007
Page 68

RÉGLAGE DES FINS DE COURSE (LSS4) PORTES SECTIONNELLES
A B
2
3
4
5
1. Manoeuvrer la porte sectionnelle dans la position FERMETURE souhaitée.
2. Ajuster la came (blanche) de contacteur 5 de sorte que l'interrupteur de fin de course soit activé.
3. Serrer le boulon de fixation A.
4. Le réglage fin du fin de course se fait à l’aide du boulon B.
Interrupteur de fin de course OUVERTURE2.
3.
OUVERTURE
4.
FERMETURE
vert
rougeInterrupteur de fin de course de sécurité
rougeInterrupteur de fin de course de sécurité
blancInterrupteur de fin de course FERMETURE5.
5. Manoeuvrer la porte sectionnelle dans la position OUVERTURE souhaitée.
6. Ajuster la came (verte) de contacteur 2 de sorte que l'interrupteur de fin de course soit activé.
7. Serrer le boulon de fixation A.
8. Le réglage fin du fin de course se fait à l’aide du boulon B.
9.
Les interrupteurs (rouges) de fin de course de sécurité 3 et 4 doivent être ajustés de sorte qu'ils
réagissent aussitôt que les contacteurs de fin de course sont activés.
10. Après un cycle d’essai, contrôler l'ajustement du boulon de fixation.
Page 9 Révision_11_2007
Page 69

REGLAGE DES FINS DE COURSE (LSS-6) PORTES SECTIONNELLES
Plan de câblage
S1= Fin de course OUVERTURE additionnel (Standard sur les fins de course LSS-6)
S2= Fin de course OUVERTURE
S3= Fin de course de sécurité OUVERTURE
S4= Fin de course de sécurité FERMETURE
S5= Fin de course FERMETURE
S6= Fin de course FERMETURE additionnel (
Standard sur les fins de course LSS-6)
Page 10 Révision_11_2007
Page 70

BETRIEBSANLEITUNG / OPERATING INSTRUCTION / MANUEL D’INSTRUCTIONS
DK Antriebe / DK Drives
Contrôlé selon:
EN 12453
Page 11 Révision_11_2007
Page 71

Notice explicative – AS2 eco
FRANÇAIS
La commande AS2 eco est conçue pour piloter en logique homme-mort des
portes sectionnelles, rideaux roulants et grilles métalliques équipés de moteurs
triphasés.
L’ouverture et la fermeture de la porte, du rideau ou de la grille s’effectue à vue
à l’aide d’une boîte à boutons 3 fonctions.
INSTRUCTIONS DE SECURITE
Veuillez respecter les directives et les règlements nationaux et locaux en
vigueur dans votre pays pour la mise en service de portes motorisées.
L’installateur du moteur est responsable de toute l’installation. Il est
responsable du respect des normes et des directives importantes (telles
DIN EN 12453, DIN EN 13241-1) et se doit d’établir une documentation
technique pour toute l’installation. La documentation doit être jointe à
l’ensemble porte-entraînement.
L’installation et la maintenance de la commande AS2 eco ne doivent être
effectuées que par des électriciens qualifiés.
Pour tous travaux électriques, l’installation doit impérativement être mise
hors tension. Tous les règlements de sécurité doivent être respectés.
La manoeuvre en logique homme-mort est uniquement autorisée par un
personnel ayant été préalablement avisé et uniquement si l’installation
complète est parfaitement visible du lieu de l’ordre de manoeuvre.
L’utilisation de la commande en logique automatique n’est autorisée que
si la porte est équipée des dispositifs de sécurité prévus conformément
aux directives relatives aux normes EN 13241-1 et EN 12453.
En cas de non-respect des instructions de sécurité, vous serez tenu pour
seul responsable en cas de dommage aux personnes et aux biens.
Page 12 Révision_11_2007
Page 72

Notice explicative – AS2 eco
Branchement du câble d’alimenta tion
Le câble du réseau d’alimentation protégé par un coupe-circuit à fusible
est à brancher aux bornes L1, L2 et L3 du bornier X1 de la platine. La
valeur de fusible du coupe-circuit ne doit pas dépasser 4A.
La fiche d’alimentation doit être facilement accessible et installée à
proximité de l’électronique de commande.
La valeur de la tension du réseau électrique (230V AC ou 400V AC) doit
être définie par la position du shunt sur le bornier X6.
Une erreur dans la position du shunt peut provoquer la destruction de
l’électronique de commande.
ranchement du moteur triphasé B
Les 3 phases du moteur doivent être raccordées sur les bornes U, V et W
du bornier X2.
Changement de sens de rotation: après avoir branché le moteur, le sens
de rotation doit être vérifié à l’aide des touches OUVERTURE et
FERMETURE. Si le sens de marche ne correspond pas à la direction
indiquée par la flèche correspondant à la touche activée, il est nécessaire
d’intervertir les phases aux bornes U et V.
Branchement d’actionneurs externes OUVERTURE, STOP, FERMETURE
Pour toute manoeuvre externe,une boîte à boutons 3 fonctions peut être
branchée aux bornes 4, 5, 6 et 7 du bornier X3. Par option, une boîte
boutons peut être branchée sur la broche X4. Si
utilisée, un jumper doit shunter le contact STOP.
s protégés par
Les câblages des actionneurs externes doivent être posé
une mise à la terre (double isolation).
s de
Les deux boutons OUVERTURE et FERMETURE exécutent des contact
fermeture (NO). Comme le bouton STOP est connecté au circuit d
écurité, il doit être raccordée comme contact d’ouverture (NF).
s
La zone de danger de l’installation doit être visible, car la
logique homme-mort s’effectue à l’aide de ces boutons.
cette broche n’est pas
manoeuvre en
FRANÇAIS
à
e
Page 13 Révision_11_2007
Page 73

Notice explicative – AS2 eco
FRANÇAIS
Branchement des interrupteurs de fin de course
Les interrupteurs de fin de course et les interrupteurs de fin de course de
sécurité OUVERTURE et FERMETURE sont à brancher aux bornes 8, 9, 10.
Branchement d’interrupteurs de sécurité directs
Les dispositifs de sécurité qui interviennent directement dans le processus
de commande seront branchés en série au contact STOP.
Parmi ces dispositifs de sécurité on compte entre autres: interrupteur
coup-de-poing, pare-chute, barrière photoélectrique supérieure et
contacteur de portillon.
Données techniques AS2 eco
ension d’alimentation
T 230V – 240V AC / 50 – 60 Hz
Absorption de max. 120 mA
oupe-circuit econdaire 250 mA
C s
Données contacts de
Capacité de coupure
Durée de vie mécanique 10 x 10
Durée de vie électronique 10 x 10
Température amb 5°….55° C
Humidité de l’air 45 à 85%
Position d’installation au choix
courant
relais
iante
400V – 415V A
6
6
humidité ambiante
C / 50 – 60 Hz
Page 14 Révision_11_2007
Page 74

Notice explicative – AS2 eco
S2 Endschalter AUF
OPEN Limit
Interreupteur fin de course OUVERT
S3 Sicherheitsendschalter AUF
OPEN safety limit
Interreupteur de mise au point OUVERT
S4 Sicherheitsendschalter ZU
CLOSE safety limit
Interreupteur de mise au point FERME
S5 Endschalter ZU
CLOSE limit
Interreupteur fin de course FERME
S7 Notbedienung
Emergency operation
Manouvre de secoure
S8 Thermoelement Motor
Thermical motor protection
Thermoprotection du moteur
AUF
OPEN
OUVERT
Jumper Position AUF/OPEN/OUVERT
Selbsthaltung
Self Locking
Automaintien
Jumper Position ZU/CLOSE/FERME
Totmann
Hold to run
Homme-mort
ZU
CLOSE
FERME
U V W
Page
L1 / L2 / L3
400V/50Hz
15 Révision_11_2007
Page 75

Instructions de Service – AS 210
Contrôlés selon:
EN60335-1 / EN60204-1
en relation avec EN12453
(Sécurité d'opération de portails motorisés)
FRANÇAIS
Page 16 Révision_11_2007
Page 76

Instructions de Service – AS 210
FRANÇAIS
Le contrôle AS 210 est conçu pour opérer des portails.
La version de base est construit pour l'opération d'homme mort.
En insérant des modules enfichables, elle peut être étendue individuellement.
INSTRUCTIONS DE SÉCURITÉ
 Veuillez considérer les directives et les règlements en vigueurs pour la mise en route de
portails motorisés dans votre pays.
 Les travaux d'installation et de maintenance à la contrôle AS 210 ne doivent être
accomplis que par des électriciens qualifiés.
 Considérez les dispositifs de protection!
 L'appareil doit être sans courant durant des travaux électriques.
 L'opération d'homme mort n'est justifié que si la machine est visible des appareils de
commande.
Si vous ne considérez pas les instructions de sécurité, vous êtes responsable
des dommages personnels et matériels résultants vous-même.
CONNEXION DU RESEAU
 Dans le cas de branchements fixes, un interrupteur principal sur tous les pôles doit être
prévu.
 Dans le cas de connections triphasées n'employez qu'un triple coupe-circuit
automatique de bloc (10A).
 Veuillez faire attention à ce que la tension du réseau correspond au données de la
plaque signalétique.
 euillez considérer que la prise a un champ tournant à droite. V
Les commandes et les contrôles ne doivent être montées que dans un bâtiment. Â
DONNEES TECHNIQUES
Modèle AS 210
u 400V Tension 230V o
50 Hz
e protection
A max.
Température de
service
10 A
-10°C á +55°C
Fréquence
Indice d IP 54
Page 17 Révision_11_2007
Page 77

Instructions de Service – AS 210
210
PLATINE AS
Rail à bornes pour transmission par radio externe
Rail à insérer pour l'interrupteur triple extern
FRANÇAIS
Rail
ZM-SKS
Ligne d’alimentation
400V/230V
Rail à bornes
réseau
Touche de réglage
FERME
Touche de réglage
OUVERT
Rail à bornes
interrupteur
fin de course
et appareils
d’instruction
Jumper J15
Automaintien OUVERT
Page 18 Révision_11_2007
Rail à bornes
Moteur
Page 78

Instructions de Service – AS 210
FRANÇAIS
PLAN DE CABLAGE AS 210 400V - RAIL DE COMMUTIATION
OPTOÉLECTRONOQUE, EVALUATION DE LA RÉSISTANCE 8,2 kOhm
Ligne d’alimentation
400V/50Hz
auto maintien OUVERT
inséré =
L2
L3 PEL1
X1
2
1 3
F1
K2
K1
U
VW
X2
17
16
15
14
13
12
11
10
9
87
Moteur 400V/50Hz
Chaîne de sécurité
Interrupteur fin de
course préliminaire
Interrupteur
fin de course
OUVERT
Interrupteur
fin de course
FERME
Interrupteur
STOP
Interrupteur
OUVERT
Interrupteur
FERME
Rail de commutation
optoélectonique *
Evaluation 8,2 kOhm
*
X5
1
- +
24V
2
T1
34
Ent rée
6543
brun
32121
vert
blanc
X6
S02 S01
21
X3
X8
X7
d'i mpulsions
Page 19 Révision_11_2007
*Seulement dans le cadre de ZM - SKS
Page 79

INS T R U C T I O N S DE SERVICE
ZM-SKS
ZM-SKS
Page 20 Révision_11_2007
Page 80

INS T R U C T I O N S DE SERVICE - ZM - S K S
FF
FRANÇAIS
MODULE POUR BRANCHER UN RAIL SKS
+ INSTRUCTIONS DE MONTAGE DANS UNE PLATINE AS 2.1:
Introduire la platine ZM-SKS dans un rail à insérer X7. Le côté équipé doit
Ü
montrer vers la direction du transformator.
J3 - Jumper
Choix SKS
Jumper J2 - Nouvelle descente automatique
Ü
inséré = Nouvelle descente automatique
ouvert = pas de nouvelle descente automatique
J2 - Jumper
Nouvelle descente automatique
H1 - LED
SKS
Jumper J3 - Choix SKS
inséré = rail de commutation optoélectronique
ouvert = 8,2 kOhm
LED H1 - SKS
Illumination permanente = SKS OK
Clignoter = SKS perturbation
Page 21 Révision_11_2007
Page 81

DONNÉES TECHNIQUES ENTRAÎNEMENTS SÉRIE DK
Les entraînements standard Chamberlain Garog comprennent l’entraînement de porte sectionnelle
précâblé et une console de couple.
Deux variantes d’entraînement sont disponibles:
1- Entraînement équipé d’un ensemble de fins de course à cames libre de potentiel LSS-6 pour le
branchement d’une électronique de commande externe
2- Entraînement équipé d’une électronique de commande interne pour logique homme-mort
AS2eco avec ensemble de fins de course à cames LSS-4 et d’une boîte à boutons 3 fonctions
précâblée.
Dispositifs de débrayage et manoeuvre de secours au choix :
- Dispositif à manivelle de secours (DKK)
- Dispositif à chaîne de secours automatique (DKN)
- Dispositif à désaccouplement rapide (DKS)
*Des unités de contrôle AS210 et module ZM - SKS sont des modèles spéciaux (CN - Variante) sur demande
Modèle Type Commande Fins de Nm T/min Dispositif de secours
course
DKK100240000 DKK --------- LSS-6 100 24 Manivelle de secours
DKK100240110 DKK AS2-eco LSS-4 100 24 Manivelle de secours
DKN100240000 DKN --------- LSS-6 100 24 Chaîne de secours
DKN100240110 DKN AS2-eco LSS-4 100 24 Chaîne de secours
DKN100240440-CN DKN AS210 LSS-6 100 24 Chaîne de secours
DKS100240000 DKS --------- LSS-6 100 24 Désaccouplement rapide
DKS100240110 DKS AS2-eco LSS-4 100 24 Désaccouplement rapide
DKS100240440-CN DKS AS210 LSS-6 100 24 Désaccouplement rapide
Caractéristiques techniques
Puissance moteur 0,37 kW
Couple 100 Nm
Vitesse de rotation 24 t/min
Facteur de marche du moteur S3 60%
Tension secteur 400V/3~
Fréquence 50Hz
Courant nominal 2,1 A
Degré de protection IP 54
Câble d’alimentation requis 5x1,5 mm
Fusible requis pour l’installation 10 A
Plage de température -20° à +60°
Diamètre arbre creux 25,4 mm
Poids DKK/DKS: 13kg, DKN: 15kg
ou avec contrôle AS210 et ZM - SKS*.
Page 22 Révision_11_2007
Page 82

GARANTIE ET STOCKAGE
Définition du personnel qualifié
Au sens de la notice d'utilisation et des avertissements relatifs au produit lui-même, nous comprenons par personnel
qualifié toute personne familiarisée avec la mise en place, le montage, la mise en service et le fonctionnement du produit et
qui disposent, de par leur activité, de qualifications correspondantes, par. ex. :
a. Formation, instruction ou autorisation en matière de raccordement, de mise en marche et d'arrêt, de mise à la
terre et de marquage de circuits électriques et d'appareils selon les standards de technique de sécurité.
b. Formation ou instruction en matière d'entretien et d'utilisation d'équipements de sécurité adéquats
conformément aux standards de la technique de sécurité.
c. Formation en matière de premiers secours.
Pose d'éléments d'entraînement
L'emmanchement d'éléments d'entraînement tels que des poulies de câble, des pignons, etc. s'effectue après chauffage
préalable. La température de chauffe doit être de l'ordre de 100 °C.
Le fait d'enduire préalablement les pièces avec de la pâte de cuivre facilite le montage et évite à terme la formation de
rouille d'ajustage.
Afin d'éviter des dommages au niveau des paliers, boîtiers ou arbres, les éléments d'entraînement ne doivent en
aucun cas être emmanchés à coups de marteau sur l'extrémité de l'arbre !
L'emmanchement d'éléments d'entraînement à la presse requiert une surface d'application de la force (support de l'arbre
de sortie).
Les éléments de transmission emmanchés doivent être équilibrés et ne doivent pas induire de forces radiales ou axiales
hors tolérance. Lors des travaux de montage, respectez les tolérances correspondantes (voir cotes).
Page 23 Révision_11_2007
Page 83

SCHÉMAS TECHNIQUES DKK 100
24 Révision_11_2007
Page 84

SCHÉMAS TECHNIQUES DKN 100
25 Révision_11_2007
Page 85

SCHÉMAS TECHNIQUES DKS 100
26 Révision_11_2007
Page 86

Déclaration de conformité CE
(conformité à la directive européenne Machines 98/37/CE, annexe II, partie B)
La société
Chamberlain GmbH
Alfred-Nobel-Straße 4
D - 66793 Saarwellingen
déclare que les types de produits désignés ci-après :
DKK100, DKN100, DKS100
satisfont aux dispositions des directives européennes suivantes :
• Directive européenne Machines 98/37/CE
• Directive européenne Basse tension 73/23/CEE
• Directive européenne Compatibilité électromagnétique 89/336/CEE
Die folgenden Normen wurden angewandt:
ZH 1/494 – 04/1998 Directive pour fenêtres, portes, portails motorisés
EN 12604 – 08/2000 Portails – Aspects mécaniques, ex igences
EN 12453 – 02/2001 Sécurité d’utilisation des portails motorisés, exigences
VDE 0700 Teil 238 – 10/1983 Sécurité des appareils électriques
VDE 0801 – 01/90 Sécurité fonctio nnelle
EN 61000 – 4-2 bis 4-6/4-11 Compatibilité électromagnétique
EN 300220 – 03/2001 Compatibi l it é électromagnétique
DIN EN 500811 – 11/1997 Compatibilité électromagnétique
DIN EN 500811 – 11/1997 Compatibilité électromagnétique
Saarwellingen, le 5 mai 2006 _______________________
Dipl.-Ing. Harry Naumann
Manager, Regulatory Affairs
Page 87

Page 88

 Loading...