

Page 1
MODEL 1703EML - THE CHAMBERLAIN ARM™
B
E
™
™
INSTALLATION INSTRUCTIONS
To be used in conjunction with the
Chamberlain Garage Door Operator Owner’s Manual
Models: ML700, ML750, ML850
Before you begin, please read this entire instruction manual.
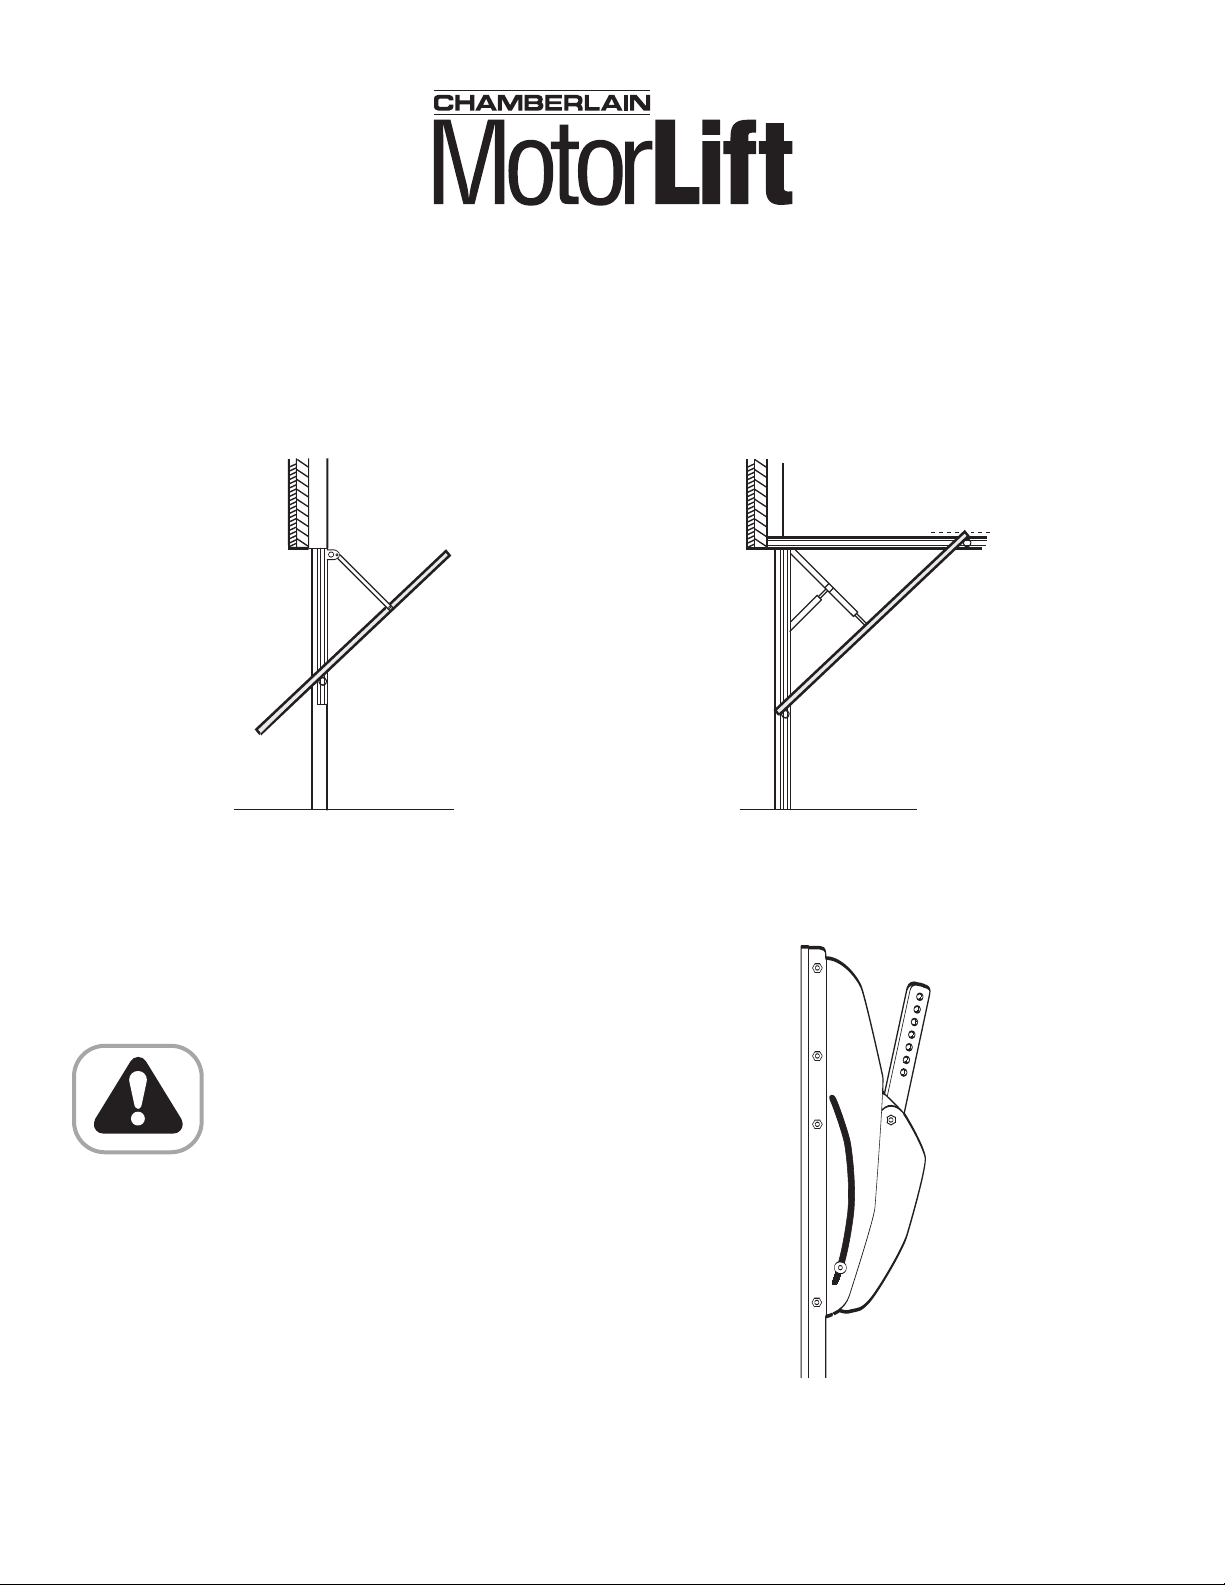
One-Piece Canopy Door
(vertically tracked)
For use only with one-piece canopy and dual track
doors as illustrated above. Do not use this door arm
with sectional doors, fully retractable doors or canopy
doors with jamb hardware.
Review all safety warnings on Page
one of your garage door operator
s manual.
’
owner
and all its operating gear is in good
condition and works easily when it is
manually operated.
Lubricate all garage door working parts before installing
the door arm. Ensure that the timber or metal garage door
frame on both sides and above the door is in good and
sound condition and is securely fixed to the main
structure of the garage. If there is any doubt, consult a
professional garage door installer. (See the Yellow Pages
under Garage Doors)
Do not run the operator until installation is complete.
Ensure that the door
One-Piece Door with Dual Track
(vertical and horizontal)
The Chamberlain Arm™
HOTLINE:
Germany 06838 / 907100 • France 03.87.95.39.28 • UK 0800 317847 • NL 20 684 7978
14A3167A-GB
1
Page 2
Planning
6
8
3
12
2
9
13
1
1
7
14
15
4
5
10
1
16
6
8
3
12
2
9
13
1
1
7
14
15
5
10
1
17
4
15
16
6
8
3
2
1
1
7
4
5
10
1
4
12
13
113.5 mm
17 mm
1
2
3
4
5
5
3
7
If the door has a lip,
measure from
the top of the door,
not the top of the lip.
17 mm
41 mm
1
2
6
3
4
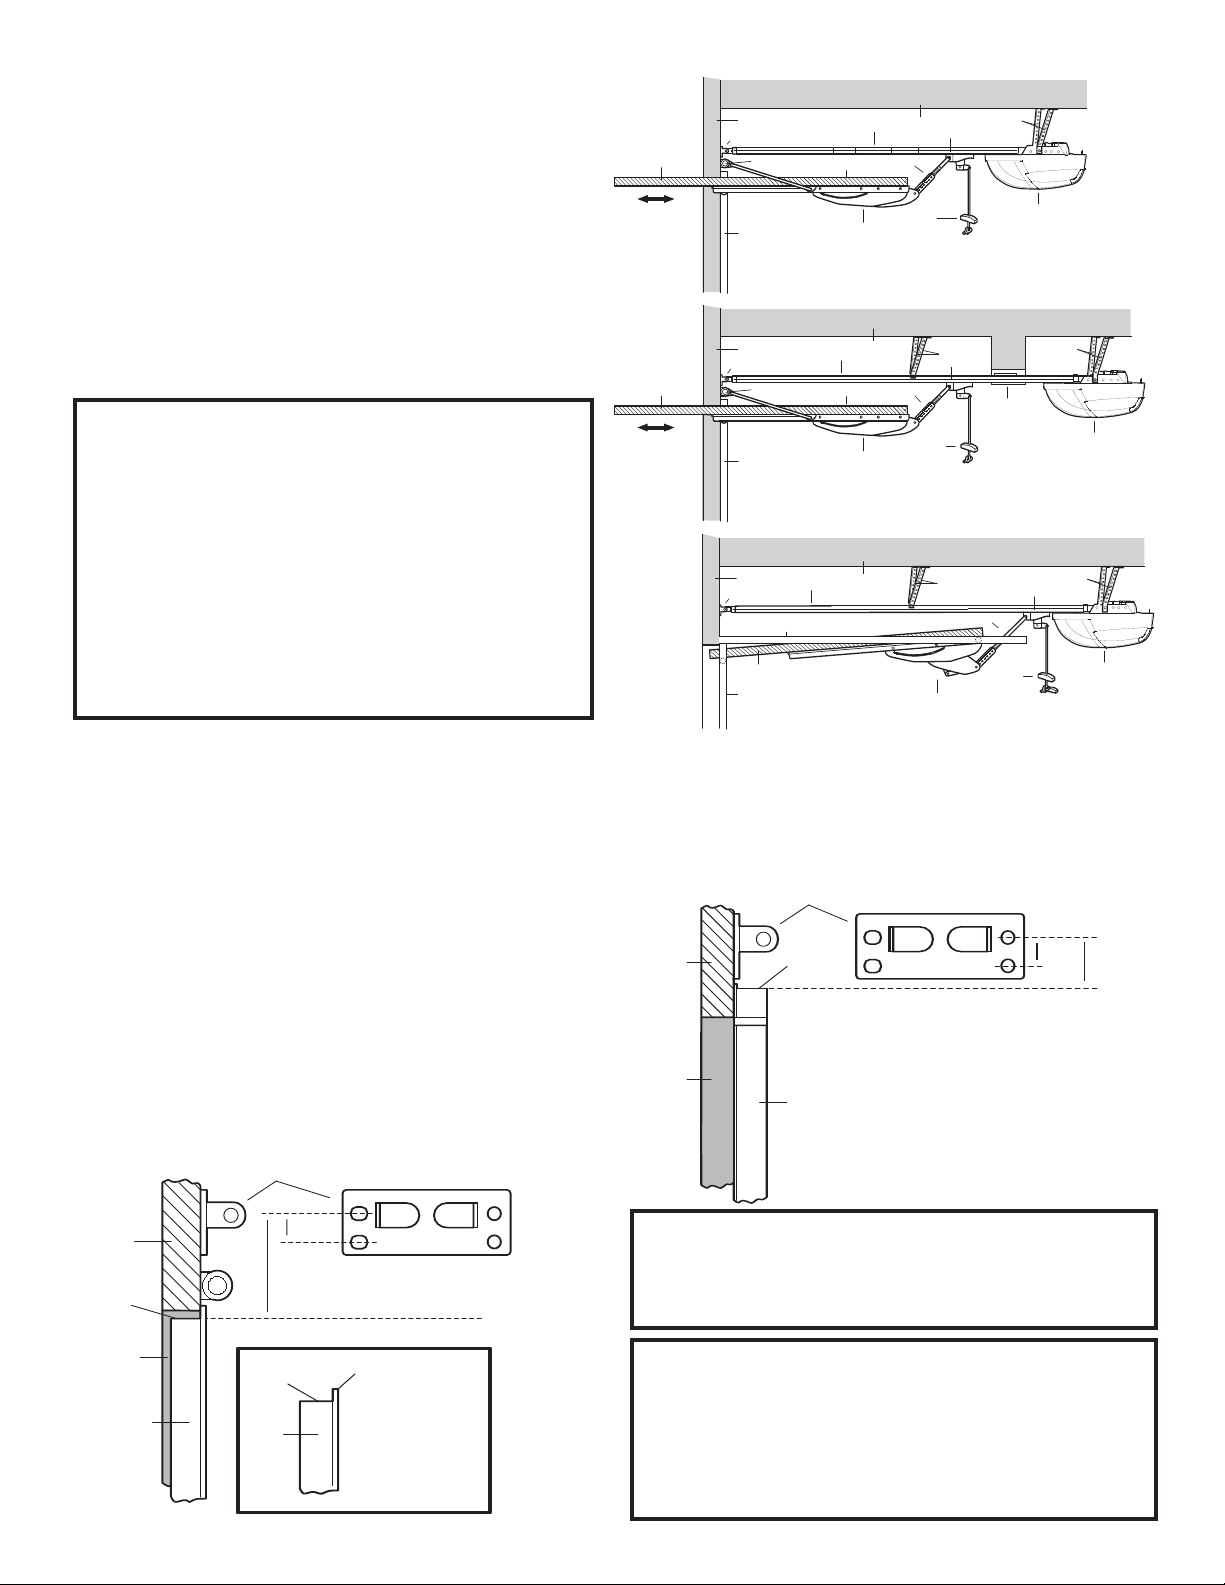
You may find it helpful to refer to the applicable
illustration as you proceed with the installation of your
garage door operator and The Chamberlain Arm™. The
garage door opener must be installed parallel to the floor.
Follow rail assembly instructions as shown in the Owner's
manual. Note: For the best operating result of canopy doors,
use only 3-sections of the 4-piece rail or add a rail support
bracket as shown (16). Make sure rail support bracket does
not interfere with the trolley movement (Purchase part no.
600121). If 3 rails sections are used, the chain (belt) must be
cut by the same amount. For belts, a new belt clip is
recommended (Purchase part no. 041B5669).
FIGURE 1
Canopy Garage Door – with 3 rail sections
1. Header wall
2. Header bracket
3. Garage door opener rail
4. Ceiling
5. Garage door opener
hanging brackets
6. Trolley
7. Extension arm
8. Garage door
9. Garage door spring
10. Operator
11. Garage door opener
manual release
12. Chamberlain Arm™
13. Garage door track
14. Garage door, should be
horizontal in fully open
position
15. Use limit adjustment of
garage door opener to
level the garage door
16. Rail support bracket
(not supplied)
Header Bracket Installation
For a canopy door, the instructions (Figures 2A & 2B)
replace Step 13 in the Owner’s manual which refer to
positioning the header bracket. If you have an inward
facing lintel, which does not allow the header bracket to
be fitted directly above the garage door, you should see
Figure 16 & text with this instruction.
doors, install the header bracket 50mm (2”) above the
high point of door travel as shown in the Owner’s
manual.
Standard canopy garage doors
Canopy doors are normally provided without a frame, for
fixing to a timber frame. In this case, ensure header
bracket is located as shown below:
For dual track
Canopy Door with Structural Obstruction
and 4 rail sections
Garage Door with Dual Tracks – with 4 rail sections
(vertical and horizontal)
For pre-hung canopy garage doors
For doors either pre-hung in a metal frame or supplied
with a metal frame for self-assembly, ensure header
bracket is located as shown below:
FIGURE 2B
FIGURE 2A
1. Header bracket
2. Header frame
3. Top of Garage Door
5. Garage Door
6. Pre-hung door with frame
7. Lip
4. Door jamb
Proceed with Steps 14 in your Owner
’s Manual. Replace Step
15 in the Owner’s Manual with the following instructions. Raise
the operator until the rail is horizontal. The rail should be parallel
114A3167A-GB
to the floor. Temporarily support the operator using a step ladder.
Continue with Steps 16 through 18 in the Owner’s Manual. In
Step 15, the removal of 25mm (1”) board does not apply to
canopy doors. After Step 18 is completed, proceed to page 4 in
this manual to begin the installation of the Chamberlain
2
Arm
™
.
Page 3
5
6
1
3
2
4
1
2
Representative Locking Mechanism
5
6
WWARNARNINGING
CAUTIONCAUTION
WWARNARNINGING
WWARNARNINGING
1
1
3
4
5
6
To prevent damage to garage door and operator: Ensure that
turning the outside handle will not actuate ANY of the locking
mechanisms supplied with the door.
• Remove all door latching mechanisms (Figure 3), and
secure any locking bars in the open position.
FIGURE 3
FIGURE 6
• Disengage the outer trolley from the inner trolley by
pulling down the manual release rope and handle
(Figure 6).
• Connect and secure the extension arm to outer trolley
with the clevis pin and ring fastener provided with the
garage door operator.
FIGURE 4
1. Spring
2. Latch
3. Door Plate
4. Canopy Door
5. Inside of Canopy Door
6. Remove inside Door
Handle
• Remove inside door handle but leave the barrel in
place in door (Figure 4).
Ensure that turning the outside handle will not actuate
•
ANY of locking mechanism supplied with the door.
Failure to do so will result in serious damage to your
door and operator. This is not covered by the
Manufacturer’s Warranty.
FIGURE 5
1. Trolley
2. Clevis ring
3. Bolt
4. Extension Arm
5. Trolley disengage lever
6. Manual release
Unbolt the extension arm from the door arm (Figure 5).
•.
1. Connection
114A3167A-GB
Arm
Canopy Door
2.
Arm
3
Page 4

Template
Te m
plate
1
2
1
3
Figure 11
Figure 12
12
3
4
5
6
1
2
3
4
5
6
Figure 11
1
2
3
4
5
6
1
2
3
4
5
Figure 10
1
3
6
5
7
8
The template is provided for use with two different types
of doors. Position and mark holes as directed below,
based on your requirements.
• Position the template horizontally to match up the
centerlines of the header bracket and the template.
Refer to Figure 8 or Figure 9, depending on your door
style.
• To check, place the extension arm on the trolley into
the slot on the template. The extension arm should be
straight and in line with the garage door operator rail.
FIGURE 7
1. Tab
Centerline of Template
2.
3. Slot for Extension Arm
Alignment Test
Door without a Lip
FIGURE 8
• Bend back tabs on the template (Figure 7).
• Rest the bottom of the tabs on the top of the door as
shown in Figure 8 (door without a lip). This provides
proper vertical replacement of holes.
Note: The door arm should extend about 13mm (1/2”)
over the top of the door (Figure 10 or Figure 11). If
not, check template and hole positions.
• Select and mark the (2) template holes which will allow
the mounting screws the best possible support in the
door, (preferable hole locations into the door’s main
bracing) as shown in Figures 10/11.
If possible, use
additional screws.
The garage door may require additional bracing to
provide suitable support.
FIGURE 10
FIGURE 11
Door with a Lip
FIGURE 9
• For a door with a lip, as shown in Figure 9, do not
bend back the tabs on the template. Instead, position
the horizontal dotted line at the top of the lip.
provides proper vertical placement of the holes.
2.
3.
4. Canopy Door without
Bracket
Ta b
emplate
T
Lip
Centerline of Header
1.
5. Extension
6. Canopy Door with Lip
op of
T
7.
Door with Lip
8. Top of Door with Lip
Arm
emplate for
T
This
op of Canopy Door
T
1.
without Lip
2. 13mm (1/2”)
op of Door
T
3.
Arm
4. Screws
5. Use additional screws if
possible
6. Door
Arm
114A3167A-GB
4
Page 5

Door Arm Installation
WWARNARNINGING
CAUTIONCAUTION
WWARNARNINGING
WWARNARNINGING
1
2
3
1
A
B
C
1
Figure 12
A
BC
3
2
4
5
1
5
1
6
5
1
8
7
7
Figure 13
5
8
3
9
7
11
10
4
1
2
6
To prevent damage to garage door, do NOT drill through the
entire door.
• With a 4.5mm (3/16") bit, drill two holes, 25mm (1")
deep.
FIGURE 12
• Attach the door arm with proper hardware provided
(Figure 12).
Note: Whenever possible, use the nuts and bolts
supplied (A).
For metal or metal-braced doors, use self-tapping
screws supplied (B). For timber or timber-braced doors,
use wood screws supplied (C).
• Before tightening the screws, align the door arm so it
is vertical. Use a level to assist. The tighten the screws.
1. Exterior of Door
2. Nut
3. Lock Washer
4. Bolt
5. Door Arm
6. Self-trapping screw
7. Timber support
8. Lag screw
A
1. Bolt
2. Lock Washer
3. Nut
B
1. Metal or Metal-Braced
C
1. Timber or TimberBraced
FIGURE 13
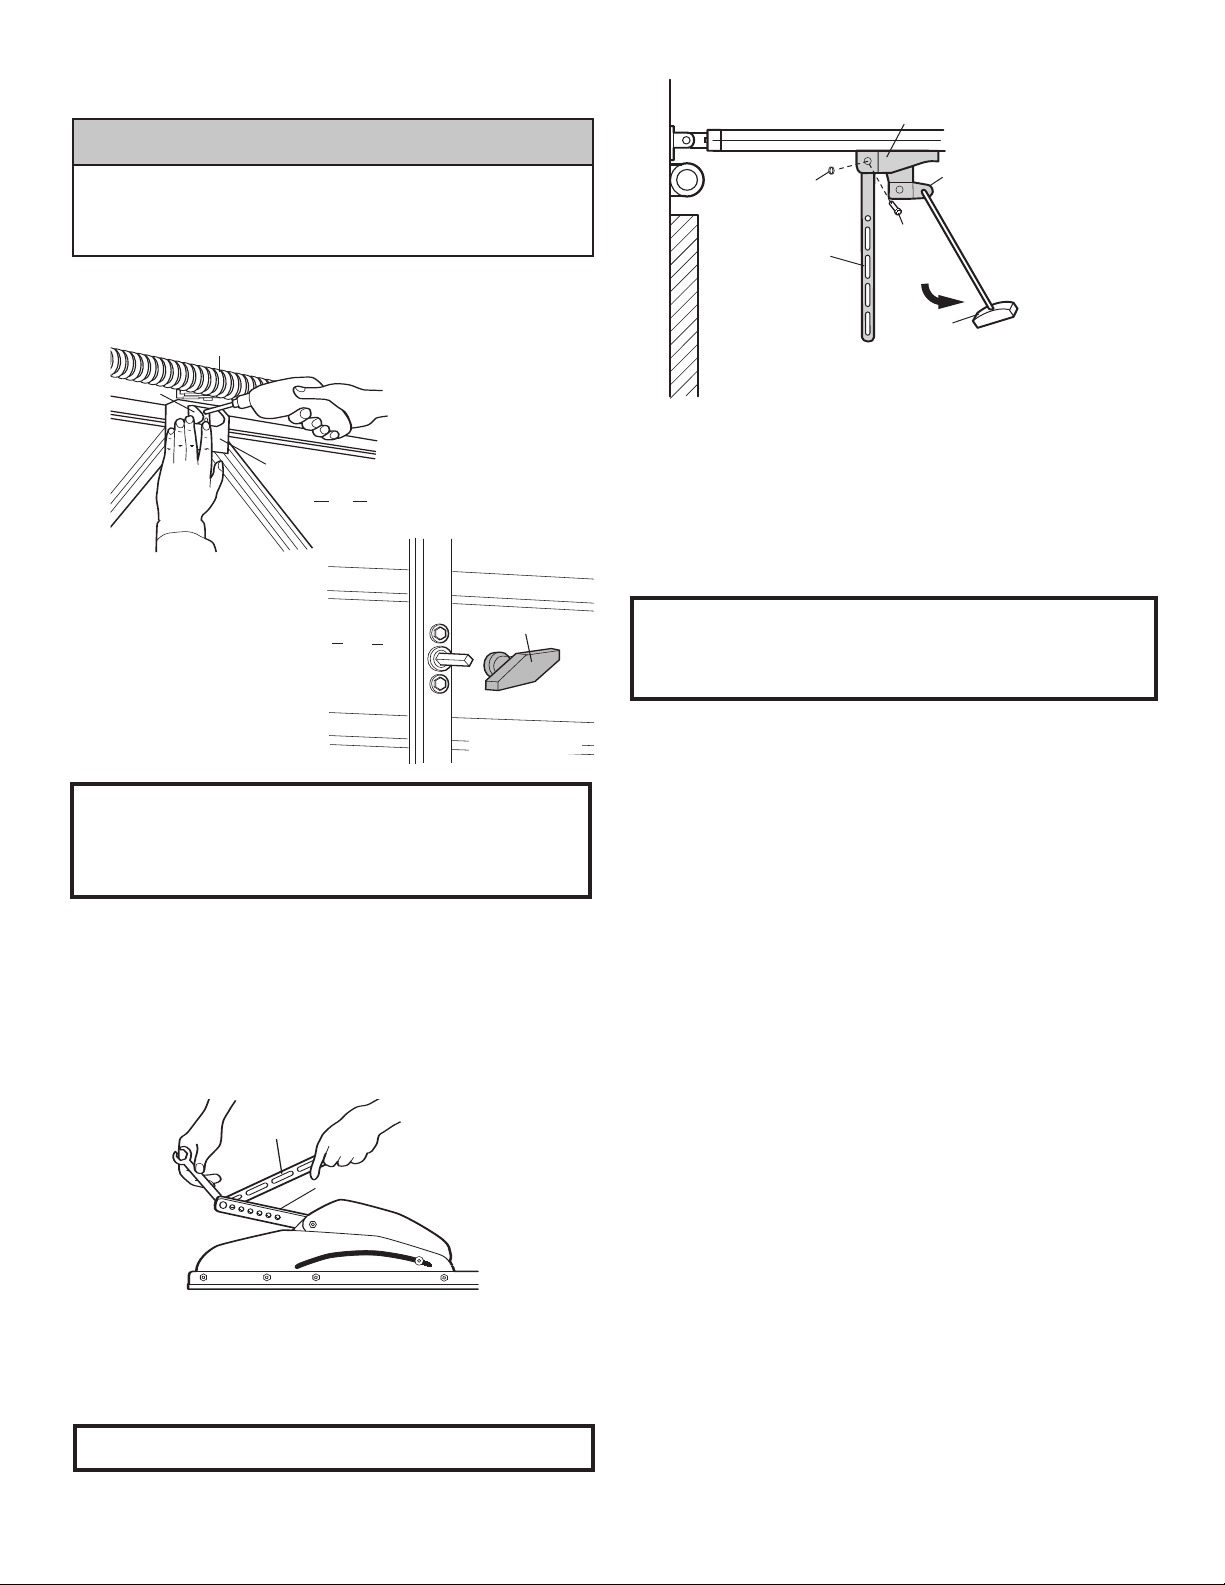
Connecting the Extension Arm
1. Select the two bottom holes in the door arm that will
allow the screws to go into a cross bracing support of
the door (Figure 13). Door may REQUIRE
ADDITIONAL bracing to provide suitable support.
2. Mark and drill two 4.5mm (3/16") holes. Use the proper
screws provided.
The centerline of the garage door opener and the
centerline of the door arm should match to prevent
binding of the arm in operation.
3. Recheck and if not aligned, correct.
4. With the door fully closed, slide outer trolley (with
Note: Do not move the door arm to meet the extension
arm—move the extension arm to meet the angle of the
door arm.
5. Insert the two mounting bolts provided into holes as far
6. Cut off the shipping cable tie to release the
114A3167A-GB
extension arm connected), against door arm. Line up
the extension arm and insert into slot in door arm
(Figure 14).
apart as possible and tighten (Figure 15).
mechanism (Figure 14 and Figure 15).
Header Wall
1.
Assembly
2. Rail
3. Door Spring
4. Header Bracket
5. Centerline of Header
Bracket
6. Canopy Door
5
7. Door
8. Centerline of Door
9. Cross Bracing
10. Mounting Screw
11. Door Arm must be
vertical (use level)
Arm
Arm
Page 6

Garage door with lintel in line with the
1
2
3
6
3
2
3
5
3
2
4
max.225
275
2
75
275
max.225
275
275
garage door
FIGURE 14
1. Trolley
2. Connection Arm
Release the trolley and slide the connection arm into the slot
of the door arm.
Do not move the door arm. Leave in upright position.
FIGURE 15
3. Canopy Door Arm
Garage door with inward protruding
lintel
1. To install the Chamberlain Door
Arm at inward protruding lintel
situations the door arm must be
mounted in a different way.
Cut down the door arm
2.
supplied with your garage door
operner (275mm).
3. Mount the cut down door arm
to the trolley as shown. Do not
use the slotted arm supplied
with the Chamberlain Door
Arm.
4. Take the curved door arm
supplied with the Garage Door
Opener and fit all as shown
together. If you disconnect the
trolley you can move it easily
in any position for the
installation. Use M8 screws
with lock nuts (not supplied).
1. Trolley
2. Connection Arm
3. Canopy Door Arm
4. Shipping cable tie
114A3167A-GB
5. Tighten the screws fully and
back them off again 1/2 turn.
5. Screw 5/16” - 18 x 7/8”
6. Nut
Open the garage door slowly and carefully by hand.
Watch the movement of the door arm. If the Chamberlain
Door Arm hits the rail before the garage door is fully
open, the angle of the arms must change. Close the
garage door and use another hole to change the angle of
the system. Try again until the Chamberlain Door Arm
does not hit the rail anymore. In some cases raising the
operator head is quicker.
6
Page 7

Initial Operation:
6
8
3
12
2
9
13
1
1
7
1
4
15
4
5
1
0
1
WWARNARNINGING
The Chamberlain Arm™ has been designed so that, when used
with a Chamberlain manufactured operator, the door will open to
a fully horizontal position (Figure 16).
Note: The door may be designed in such a way that it does not
open to the full horizontal. Adjust the UP limit so that the door
stops at a slightly downward angle when open.
Note: If safety reversing sensors (Protector System) must be
installed, please refer to your owner´s manual before
proceeding to Setting the limits and learning the force:
Setting the limits and learning the force:
When returning to your Owner’s Manual, adjust the trolley travel
limits as follows:
1. With the inner and outer trolley sections still disconnected,
manually open your door to the horizontal position. Make a
mark on the rail where the end of trolley nearest to the
operator stops.
2. Manually close the door and mark the rail where the end of
the trolley nearest the door stops.
3. With the inner and outer trolley sections still disconnected,
activate the operator and adjust the limits following the
owners manual of the garage door opener, until the inner
trolley stops on the marks you made. For models ML700,
ML750, ML850 please read section #15, setting limits
manually as found in the HAVING A PROBLEM section in
your owner’s manual. While setting the door limits manually,
leave door and operator disconnected at all times.
4. Reconnect the inner and outer trolley sections so the door is
connected to the operator.
5. Force must be learned after completion of the limit settings.
For models ML700, ML750, ML850 please read section #26.
6. Run the operator again to ensure the door is opening and
closing correctly.
Continue with the instructions in your Owner’s Manual.
Having a problem?
1. Pull the manual release handle to disengage the trolley.
2. Lift the door about halfway. Release the door. It should stay in
place, supported entirely by its springs.
3. Raise and lower the door to see if there is any binding or
sticking. If your garage door binds, sticks or is out of balance,
call a professional garage door service engineer
Note: Lubricate the inside and outside of the rail.
Note: In some cases you may find the door will not open fully
until the force has been set.
Note: In rare installations, the canopy door may touch the
operator rail when closing. This is NOT the fault of the operator
or arm. If this occurs:
Manually check the operation of the canopy door to ensure
1.
that it is closing easily. The door must have a slight drop at
the start of closing.
2. If the door is not running easily, check that the side wires are
not catching or binding on the wire guides. Move the guides
until the wires run free.
3. Raise the operator head by about 50mm (2”) vertically so
there is a slight downward angle on the rail.
4. The door spring may be over tensioned.
114A3167A-GB All rights reserved
.
© 2005 Chamberlain GmbH
FIGURE 16
Header wall
1.
Header bracket
2.
Garage door opener rail
3.
4. Ceiling
5. Garage door opener
hanging brackets
6. Trolley
7. Extension arm
8. Garage door
9. Garage door spring
Operator
10.
1. Garage door opener
1
manual release
12. Chamberlain Arm™
13. Garage door track
14. Garage door, should be
horizontal in fully open
position
15. Use limit adjustment of
garage door opener to
level the garage door
Do not attempt to adjust the spring. Call a local
garage door installing professional.
The Protector System™ (a safety reversing sensor
accessory) must be installed, if the Chamberlain
Arm is used (model 770E).
 Loading...