

Page 1

ChallengerOptics.com
Wavelength Specic Optical Testing and Measurement Equipment
CO-OPM-MPO24
/ Interactive
Operating Manual
Best viewed with Adobe Acrobat Reader
2.1 Operating Keys 4
2.3.1 Polarity 111.1 Special Features 2
2.2.4 dB / dBm 7
2.3.6 Data Format 15
2.2 Key Function 5
1.2 Specications 2
2.2.5 Graph 9
2.3.7 System Info 15
2.2.1 Power ON / OFF 5
2.3.2 Oset 12
2.2.6 Recall 10
2.3.9 Scan Display 16
2.3.8 Scan Type 16
2.2.2 Power Meter 6
2.3.3 Auto Power O 121.3 Package Contents 3
2.2.7 Save 10
2.3.4 Time Set 131.4 Charge Method 3
2.2.3 Scan 7
2.3.5 Data Delete 141.5 Meter Care 3
2.310 Threshold 17
2. Getting Started 4
2.3 Menu 111. Introduction 2
051818
Page 2

ChallengerOptics.com
Wavelength Specic Optical Testing and Measurement Equipment
back to Contents
CO-OPM-MPO24 p 2
1. Introduction
1.1 Special Features
- 24 Fiber
- Quick power measurement on all bers
- Compact size, one button operation
- Color LCD for graph display
- Light weight for easy eld use
- Quick start: No warm-up and 2 second measurement
- Software provided for data management
1.2 Specications
Channels 24 Fiber
Wavelength 850, 1310, 1550 nm
Measurement Speed 3 sec. (approx.)
Measurement Range +10 dBm to -40 dBm
Measurement Accuracy ±0.5 @ -20 dBm
Display Resolution 0.01 dB
Optical Connector MPO Angled, unpinned
Display Units dB, dBm
Display 2.8” TFT-LCD, 16 bit Color
Battery / Power Rechargeable Lithium-Polymer – 7 hr.
Operating Temperature -20° ~ +55° C
Weight 13 oz*
Dimensions h / w / d 7 x 3.25 x 1.5 (inches)* *w/boot
Page 3

ChallengerOptics.com
Wavelength Specic Optical Testing and Measurement Equipment
back to Contents
CO-OPM-MPO24 p 3
1.3 Package Contents
Description Quantity
Body 1 ea
Body Rubber Case 1 ea
USB Data cable 1 ea
Charger 1 ea
User’s Manual - USB stick 1 ea
1.4 Charge Method
The CO-OPM-MPO24 has a rechargeable battery. A USB power adapter and
micro USB cable are provided for charging. Typical charge time is six hours.
Charging conditions:
LED Color Action of LED Conditions for battery charge
Red ON Charging
Green ON Fully charged
1.5 Meter Care
- Do not subject the CO-OPM-MPO24 to strong impact.
- The CO-OPM-MPO24 is not water resistant or waterproof
- Do not disassemble.
Always properly clean the ber interfaces before taking a measurement.
Always replace the Dust Cap for dust protection.
Page 4

ChallengerOptics.com
Wavelength Specic Optical Testing and Measurement Equipment
back to Contents
CO-OPM-MPO24 p 4
2. Getting Started
2.1 Explanation of Operating Keys
Key Function
Backlight Power On/O, Backlight On/O
PM Single Fiber, Fiber number and Power Display
λ Changing inspection wavelength
SCAN
Fiber are scanned and power levels are displayed
dB/dBm Toggle between dB and dBm UOM
▲ Move UP in a menu/page up in result screen
Graph Power levels of all wavelengths are displayed as a graph
Recall Recall saved measurements
▼ Move down in a menu/page down in result screen
SAVE Save measurement to meter memory
ESC Cancel or move back to previous menu
MENU Access System Menu and settings
ENTER Enter
Page 5

ChallengerOptics.com
Wavelength Specic Optical Testing and Measurement Equipment
back to Contents
CO-OPM-MPO24 p 5
2.2 Key Function
2.2.1 Power ON / OFF
To turn on and o.
Press the button for
more than 2 seconds, the logo
shown appears. The meter
then displays the channel with
the highest power level.
Press the button for
more than 2 seconds to turn
the power o.
Backlight
Backlight
Page 6

ChallengerOptics.com
Wavelength Specic Optical Testing and Measurement Equipment
back to Contents
CO-OPM-MPO24 p 6
2.2.2 Power Meter
Power Measurement has 2
options ‘Auto’ and ‘Manual’. If
you select ‘Auto’, the instrument
automatically scans the
optical input and displays the
wavelength which has been
detected with the highest level
of power.
If you select ‘Manual’, the power of the wavelength selected by the user
is displayed in real time.
Press the button, mode will change “Auto” to “Manual” and
vice versa.
You can select the dierent wavelengths using
Press the button to change the inspection wavelength.
▲
5 jkl
▼
8 tuv
PM
1 .qz
λ
2 abc
Page 7

ChallengerOptics.com
Wavelength Specic Optical Testing and Measurement Equipment
back to Contents
CO-OPM-MPO24 p 7
2.2.3 Scan
Press the button, scan-
ning starts for all 24 Fibers.
Press the button to
change the inspection
wavelength.
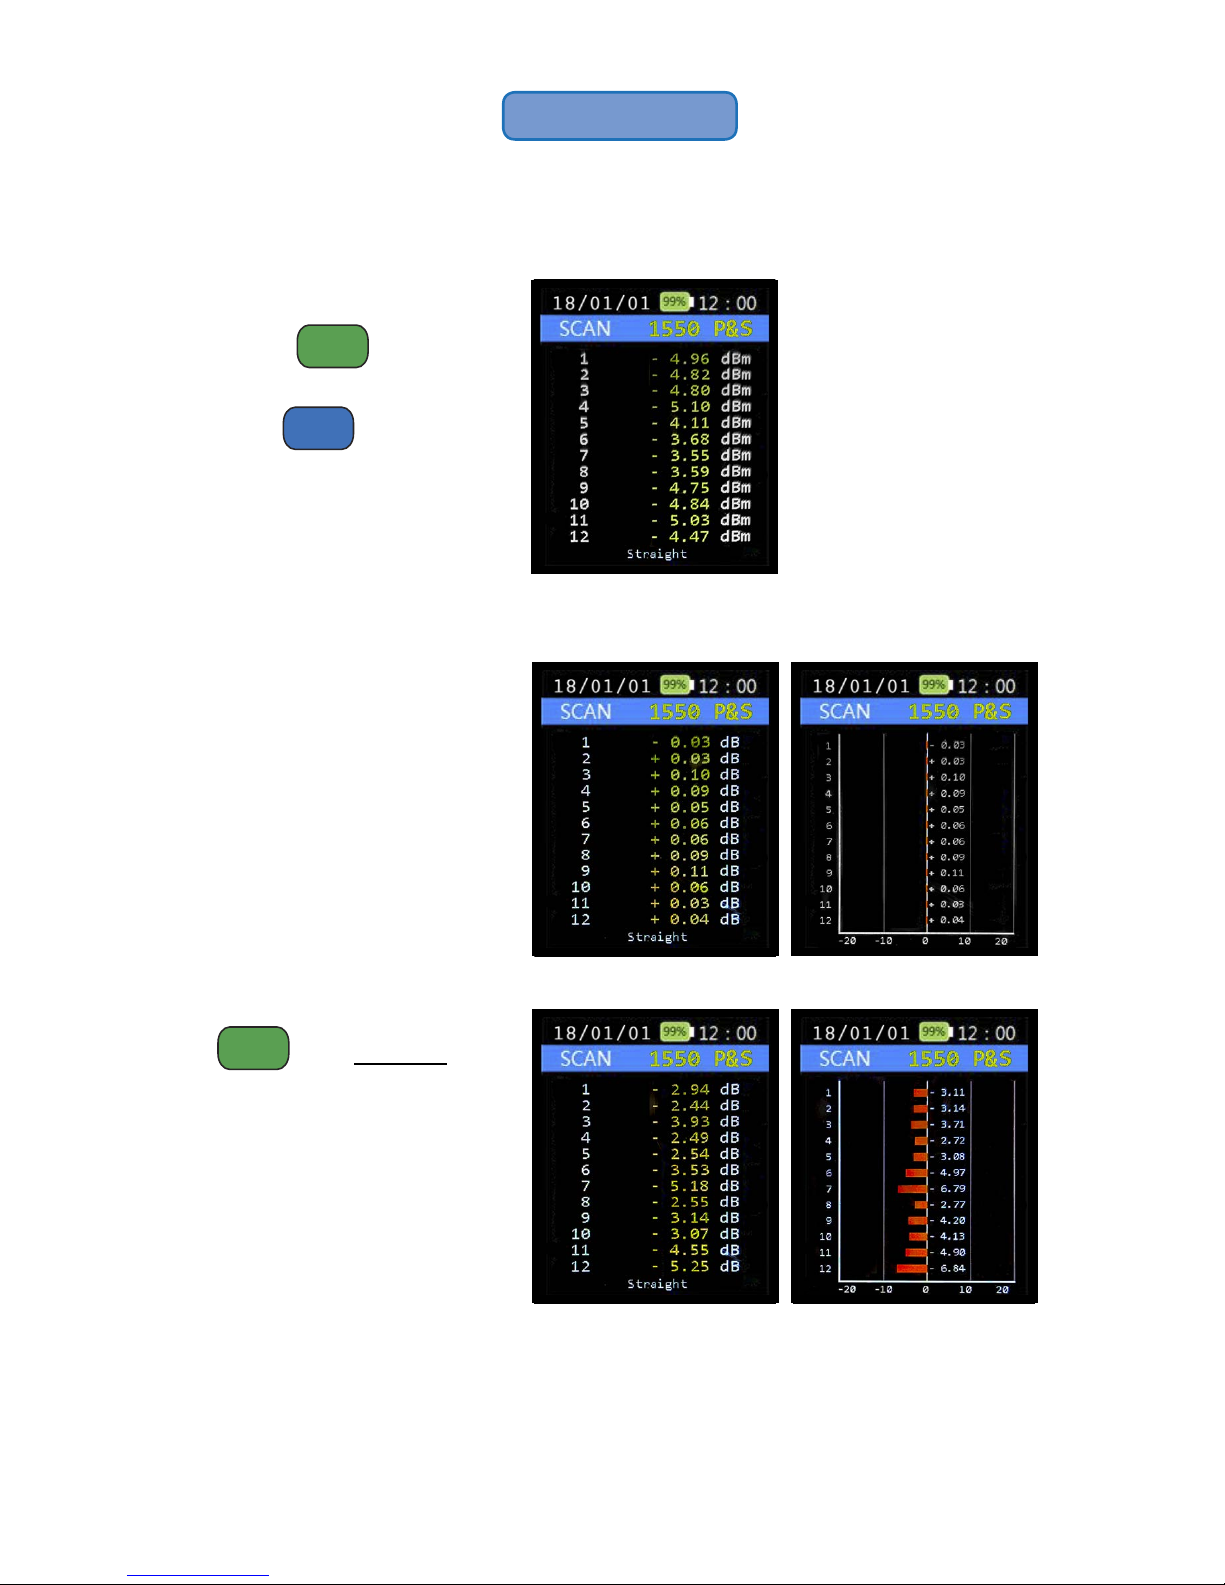
2.2.4 dB / dBm: Relative/Absolute Measurements
This button toggles between
dB (relative) & dBm (absolute)
power measurements
To measure the relative loss of
an MPO circuit, connect the
CO-OPM-MPO24 to a known
light source with a short (test)
jumper.
(continued)
SCAN
3 def
dB/dBm
4 ghi
λ
2 abc
Page 8
ChallengerOptics.com
Wavelength Specic Optical Testing and Measurement Equipment
back to Contents
CO-OPM-MPO24 p 8
2.2.4 dB / dBm: Relative/Absolute Measurements
With dBm selected as the
UOM, press scan.
Press the dB/dBm button
to choose dB as UOM (the
meter will pause a few
seconds while it stores the
power measurements).
A scan will appear with
dB values close to 0.00 dB.
A graph is also available.
Remove test jumper and
replace with jumper to be
measured
Press scan: The relative
loss of the jumper will be
displayed on both the table
and graph.
SCAN
3 def
SCAN
3 def
dB/dBm
4 ghi
Page 9

ChallengerOptics.com
Wavelength Specic Optical Testing and Measurement Equipment
back to Contents
CO-OPM-MPO24 p 9
2.2.5 Graph
The button is used
after scanning to show power
levels in graphical format.
Scroll to view bers 13-24
Press the button again
it returns to text mode.
Graph
6 mno
Graph
6 mno
Page 10

ChallengerOptics.com
Wavelength Specic Optical Testing and Measurement Equipment
back to Contents
CO-OPM-MPO24 p 10
2.2.6 Recall
The button will recall
saved measurements.
Press to select the data
you want to display.
Recall
7 prs
ENTER
–
2.2.7 Save
The button allows the
user to save a measurement.
The following message shows,
and the measurement is saved
using the current date and
time as the lename.
Then, press the button
to save.
To abort saving, press .
ESC
•
ENTER
–
SAVE
9 wxy
Page 11

ChallengerOptics.com
Wavelength Specic Optical Testing and Measurement Equipment
back to Contents
CO-OPM-MPO24 p 11
2.3 MENU
The button, allows
you to congure the operating
environment of the
CO-OPM-MPO24
The menu consists of:
Polarity
Oset
Auto Power O
Time Set
Data Delete
Data Format
System Info
Scan Display
and Threshold
2.3.1 Polarity
Use this option to change the
polarity of the measurement.
Straight (Type A)
Rollover (Type B)
Flipped (Type C)
MENU
0 BS
Page 12

ChallengerOptics.com
Wavelength Specic Optical Testing and Measurement Equipment
back to Contents
CO-OPM-MPO24 p 12
2.3.2 Oset
If you press the button
after selecting ‘O Set’, you
can setup dBm value and the
optical power value on the
screen.
Input the value pressing the
number buttons.
You can set the oset between ±25.99dBm.
‘+’ and ‘-’ sign can be changed to the and buttons.
▲
5 jkl
▼
8 tuv
ENTER
–
2.3.3 Auto Power O
The meter will automatically
power down if the user does
not input any key in the
determined time.
You can set the time
between 5 to 600 Min. by
pressing the number key
and button.
ENTER
–
Page 13

ChallengerOptics.com
Wavelength Specic Optical Testing and Measurement Equipment
back to Contents
CO-OPM-MPO24 p 13
2.3.4 Time Set
Press the button after
selecting ‘Time Set’, to set the
date and current time.
Enter date in
YY/MM/DD format
Enter time in
HH/MM/SS format
You can save the time by pressing button.
ENTER
–
ENTER
–
Page 14

ChallengerOptics.com
Wavelength Specic Optical Testing and Measurement Equipment
back to Contents
CO-OPM-MPO24 p 14
2.3.5 Data Delete
Press the button after
selecting ‘Delete Data’, you can
delete saved measurements.
Use▲ and ▼ to select data
set to be deleted.
Press the key after
choosing the data you want to
delete, the message appears
on the screen to conrm to
delete or not.
Press the button, to
delete measurement from the
memory.
ENTER
–
ENTER
–
ENTER
–
Page 15

ChallengerOptics.com
Wavelength Specic Optical Testing and Measurement Equipment
back to Contents
CO-OPM-MPO24 p 15
2.3.6 Data Format
You can delete all saved les
by formatting the memory.
Press the key after
‘Data Format’, message
appears on the screen to
conrm.
Press the button, all
les are deleted from the memory.
CAUTION: This option deletes ALL DATA saved on the meter.
2.3.7 System Info
General information about the
equipment.
PN - Product Name
SN - Serial Number
HW - Hardware version
FW - Firmware version
ENTER
–
ENTER
–
Page 16

ChallengerOptics.com
Wavelength Specic Optical Testing and Measurement Equipment
back to Contents
CO-OPM-MPO24 p 16
2.3.9 Scan Display
‘Scan Display’ consists of ‘All’
and ‘Measured’.
This can be selected using
, .
‘All’ will display power level on
all 24 bers.
If you choose the ‘Measured’, the value of the selected channel is output.
▲
5 jkl
▼
8 tuv
2.3.8 Scan type
This option allows the user
to choose the scan type:
Press & Scan (Single) or
Real Time using
the and keys,
user can toggle between a
single scan or continuous
(real time) scan when you
press the button.
▲
5 jkl
▼
8 tuv
SCAN
3 def
Page 17

ChallengerOptics.com
Wavelength Specic Optical Testing and Measurement Equipment
back to Contents
CO-OPM-MPO24 p 17
2.3.10 Threshold
This will change the baseline
of the meter.
‘-30.00 dBm’ is the default
setting.
Press the button after
selecting ‘Threshold’, you can
set the baseline.
Baseline changes can be
found at the graph screen.
ENTER
–
 Loading...