

Page 1

ChallengerOptics.com
Wavelength Specic Optical Testing and Measurement Equipment
10 Channel,
CorWave Power Meter
ChallengerOptics
CO-OPM-10
OPERATING MANUAL
1.0 Introduction . . . . . . . . . . . . . . . . 3
1.1 Special Features . . . . . . . . . . . . . 3
1.2 Specications . . . . . . . . . . . . . . 3
1.3 Accessories . . . . . . . . . . . . . . . 4
1.4 Optical Standards . . . . . . . . . . . . 4
1.5 Charge Method . . . . . . . . . . . . . 5
1.6 Meter Care . . . . . . . . . . . . . . . 5
2.0 Getting Started . . . . . . . . . . . . . . 6
2.1 Explanation of Operating Keys . . . . . . . . 6
2.2 Key Function . . . . . . . . . . . . . . . 7
2.2.1 Power ON / OFF . . . . . . . . . . . 7
2.2.2 Power Meter . . . . . . . . . . . . 8
2.2.3 CWDM . . . . . . . . . . . . . . 9
2.2.4 Scan . . . . . . . . . . . . . . . 9
2.2.5 dB / dBm . . . . . . . . . . . . . 10
2.2.6 Graph . . . . . . . . . . . . . . . 10
2.2.7 Recall . . . . . . . . . . . . . . . 11
2.2.8 Save . . . . . . . . . . . . . . . 11
2.3 Menu . . . . . . . . . . . . . . . . . 12
2.3.1 Scan Set . . . . . . . . . . . . . . 13
2.3.2 Oset . . . . . . . . . . . . . . . 14
2.3.3 Auto Power O . . . . . . . . . . . 15
2.3.4 Time Set . . . . . . . . . . . . . . 16
2.3.5 Data Delete . . . . . . . . . . . . 17
2.3.6 Data Format . . . . . . . . . . . . 18
2.3.7 System Info . . . . . . . . . . . . 18
2.3.8 Scan Display . . . . . . . . . . . . 19
2.3.9 PM Mode . . . . . . . . . . . . . 19
2.3.10 Scan Mode . . . . . . . . . . . . 20
2.3.11 Threshold . . . . . . . . . . . . . 21
2.3.12 Graph Color . . . . . . . . . . . . 22
2.3.13 Below Threshold . . . . . . . . . . 23
3.0 Wavelength Chart . . . . . . . . . . . . . . 24
CONTENTS
092217
Page 2

ChallengerOptics.com
Wavelength Specic Optical Testing and Measurement Equipment
ChallengerOptics.com
Wavelength Specic Optical Testing and Measurement Equipment
Chapter 1.0 - Introduction / 04Chapter 1.0 - Introduction / 03
1. Introduction
1.1 Special Features
- Automatic Wavelength specic power measurement
- Compact and lightweight for eld use
- Easy One Hand Operating
- Measurement Save and Recall Function
- Auto shut o function
- Fast power up and test
- High-quality graphics
1.2 Specications
Channels 10 - CorWave
Wavelength
1290, 1291, 1293, 1295, 1471, 1491, 1591, 1611,
1310, 1550 nm
Channel Spacing Custom
Measurement Speed 0.5 sec (all channels)
Measurement Range +10 dBm ~ -40 dBm
Measurement Accuracy ±1.0 @ -40 dBm
Power Resolution 0.01 dB
Optical Connector SC / APC
Display Unit dB, dBm
Display 2.8” TFT-LCD, 16 bit Color
Battery / Power Rechargeable Lithium-Polymer – 7 hr
Operating Temperature -4° ~ +130° F (-20° ~ +55° C )
Weight 14 oz*
Dimensions h / w / d 7 x 3.25 x 1.5 (inches)* *w/boot
1.4 Optical Standards
Wavelength
Parameter Unit Specication
Number of Channels 10
Measuring Wavelengths nm
1290, 1291, 1293, 1295, 1471,
1491, 1591, 1611, 1310, 1550
Optical Power
Parameter Unit Specication
Range of display dBm +10 ~ -40
Accuracy dB ±1.0 @ -40
Resolution dBm 0.01
UOM dB / dBm
Optical Connection:
SC/APC Optical connector, bottom of unit
1.3 Accessories
Description Quantity
Body 1 ea
Body Rubber Case 1 ea
USB Data cable 1 ea
Charger 1 ea
User’s Manual 1 ea
Page 3

ChallengerOptics.com
Wavelength Specic Optical Testing and Measurement Equipment
ChallengerOptics.com
Wavelength Specic Optical Testing and Measurement Equipment
Chapter 2.1 - Explanation of Operating Keys / 06Chapter 1.0 - Introduction / 05
1.5 Charge Method
The CO-OPM-10 has a rechargeable battery. A USB power adapter and
micro USB cable are provided for charging. Typical charge time is six hours.
Charging conditions:
LED Color Action of LED Conditions for battery charge
Red ON Charging
Green ON Fully charged
1.6 Meter Care
Do not subject the CO-OPM-10 to strong impact.
The CO-OPM-10 is not water resistant or waterproof
Do not disassemble.
Always properly clean the ber interfaces before taking a measurement.
Always replace the Dust Cap for dust protection.
2. Getting Started
2.1 Explanation of Operating Keys
Key Function
Backlight Power On/O, Backlight On/O
PM Single Channel, Channel number and Power Display
CWDM Power levels of all wavelengths are displayed as a table
SCAN
All Wavelengths are scanned and power levels are displayed
dB/dBm Toggle between dB and dBm UOM
▲ Move UP in a menu/page up in result screen
Graph Power levels of all wavelengths are displayed as a graph
Recall Recall saved measurements
▼ Move down in a menu/page down in result screen
SAVE Save measurement to meter memory
ESC Cancel or move back to previous menu
MENU Access System Menu and settings
ENTER Enter
Page 4

ChallengerOptics.com
Wavelength Specic Optical Testing and Measurement Equipment
ChallengerOptics.com
Wavelength Specic Optical Testing and Measurement Equipment
Chapter 2.2 - Key Function / 08Chapter 2.2 - Key Function / 07
2.2 Key Function
2.2.1 Power ON / OFF
To turn on and o.
Press the button for
more than 2 seconds, the logo
shown appears. The meter then
displays the channel with the
highest power level.
Press the button for
more than 2 seconds to turn
the power o.
Backlight
Backlight
2.2.2 Power Meter
Power Measurement has 2
options ‘Auto’ and ‘Manual’. If
you select ‘Auto’, the instrument
automatically scans the
optical input and displays the
wavelength which has been
detected with the highest level
of power.
If you select ‘Manual’, the power
of the wavelength selected by the user is displayed in real time.
You can select the dierent wavelengths using
Selection of Manual and Auto can be done in the “System Menu” button
‘PM Scan Mode’ or Click button.
▲
5 jkl
▼
8 tuv
MENU
0
PM
1 .qz
Page 5

ChallengerOptics.com
Wavelength Specic Optical Testing and Measurement Equipment
ChallengerOptics.com
Wavelength Specic Optical Testing and Measurement Equipment
2.2.3 CWDM
Press the and the light
source is scanned only once.
You can select dierent
wavelengths using
, .
2.2.4 Scan
Press the button, the light
source is scanned and the dBm
value is displayed.
You can select the page using
, the arrow keys.
Chapter 2.2 - Key Function / 10Chapter 2.2 - Key Function / 09
2.2.5 dB / dBm
This button toggles between
dB & dBm Units of Measure
(UOM)
2.2.6 Graph
The button is used after
scanning to show power levels
in graphical format.
Press the button again it
returns to text mode.
SCAN
3 def
▲
5 jkl
dB/dBm
4 ghi
▼
8 tuv
Graph
6 mno
Graph
6 mno
CWDM
2 abc
▲
5 jkl
▼
8 tuv
Page 6

ChallengerOptics.com
Wavelength Specic Optical Testing and Measurement Equipment
ChallengerOptics.com
Wavelength Specic Optical Testing and Measurement Equipment
Chapter 2.2 - Key Function / 12Chapter 2.2 - Key Function / 11
2.2.7 Recall
The button will recall
saved measurements.
Press to select the data
you want to display.
Recall
7 prs
ENTER
–
2.2.8 Save
The button allows the
user to save a measurement. The
following message shows, and
the measurement is saved using
the current date and time as the
lename.
Then, press the button
to save.
To abort saving, press .
ESC
•
ENTER
–
SAVE
9 wxy
2.3 MENU
The button, allows you
to congure the operating
environment of the CO-OPM-10.
The menu consists of:
‘SCAN SET’, ‘O Set’,
‘Auto Power O ’, ‘Time Set’,
‘Data Delete’, ‘Data Format’,
‘System Info’, ‘Scan Display’,
‘PM Mode’, ‘Scan Mode‘,
‘Threshold’, ‘Graph Color’ and ‘Below Threshold’.
MENU
0
Page 7

ChallengerOptics.com
Wavelength Specic Optical Testing and Measurement Equipment
ChallengerOptics.com
Wavelength Specic Optical Testing and Measurement Equipment
Chapter 2.3 - Menu / 14Chapter 2.3 - Menu / 13
2.3.1 Scan Set
When you choose the Scan Set, ‘All Scan’, ‘Selected’ are displayed.
‘All Scan’ will measure all 10
wavelengths
‘Selected’ is used to choose
which wavelengths are
measured.
If you press the ‘Selected’, you
can see the screen to the right.
Press the button
to toggle ON or OFF the
highlighted wavelength.
Use the ,
buttons to highlight the
channels.
ENTER
–
▲
5 jkl
▼
8 tuv
2.3.2 Oset
If you are measuring at a test
point you can set the ‘Oset’ by
pressing the key.
Press the button after
selecting ‘All Channel’, you can
set up all channel’s oset value
between –25.99 to +25.99 dB.
‘+’ and ‘-’ sign can be changed to
number 5 and 8 key.
Press the button
after selecting ‘Each Channel’;
you can set up each channel’s
oset value between
–25.99 to +25.99 dB
ENTER
–
ENTER
–
ENTER
–
Page 8

ChallengerOptics.com
Wavelength Specic Optical Testing and Measurement Equipment
ChallengerOptics.com
Wavelength Specic Optical Testing and Measurement Equipment
Chapter 2.3 - Menu / 16Chapter 2.3 - Menu / 15
2.3.3 Auto Power O
The meter will automatically
power down if the user does not
input any key in the determined
time.
Press the button after
selecting ‘Auto Power O’, you
can set the Auto power o time
in minutes.
You can set the time between
5 to 600 Min. by pressing the
number key and button.
ENTER
–
ENTER
–
2.3.4 Time Set
Press the button after
selecting ‘Time Set’, to set the
date and current time.
Enter date in YY/MM/DD format
Enter time in HH/MM/SS format
You can save the time by
pressing button.
ENTER
–
ENTER
–
Page 9
ChallengerOptics.com
Wavelength Specic Optical Testing and Measurement Equipment
ChallengerOptics.com
Wavelength Specic Optical Testing and Measurement Equipment
Chapter 2.3 - Menu / 18Chapter 2.3 - Menu / 17
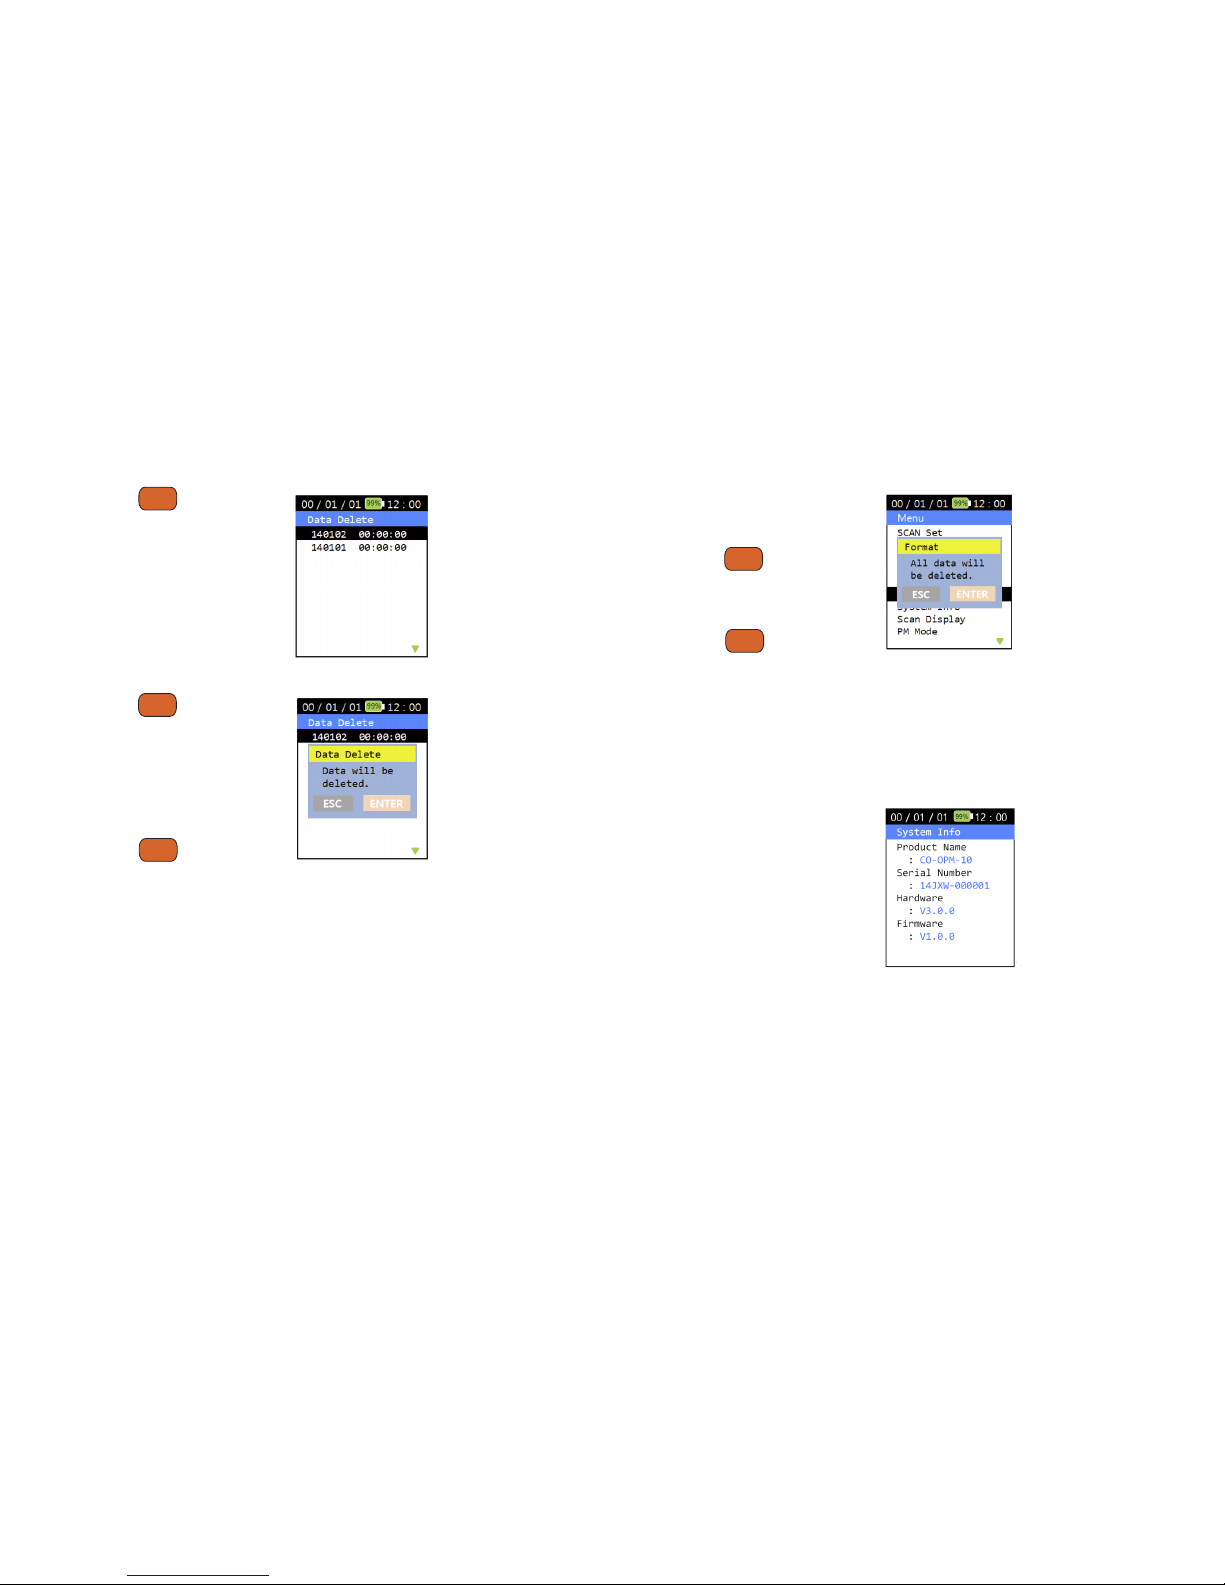
2.3.5 Data Delete
Press the button after
selecting ‘Delete Data’, you can
delete saved measurements.
Use▲ and ▼ to select data set
to be deleted.
Press the key after
choosing the data you want to
delete, the message appears on
the screen to conrm to delete
or not.
Press the button, to
delete measurement from the
memory.
ENTER
–
ENTER
–
ENTER
–
2.3.6 Data Format
You can delete all saved les by
formatting the memory.
Press the key after ‘Data
Format’, message appears on
the screen to conrm.
Press the button, all les
are deleted from the memory.
CAUTION: This option deletes ALL DATA saved on the meter.
2.3.7 System Info
General information about the
equipment.
Product Name
Serial Number
Hardware version
Firmware version
ENTER
–
ENTER
–
Page 10

ChallengerOptics.com
Wavelength Specic Optical Testing and Measurement Equipment
ChallengerOptics.com
Wavelength Specic Optical Testing and Measurement Equipment
Chapter 2.3 - Menu / 20Chapter 2.3 - Menu / 19
2.3.8 Scan Display
‘Scan Display’ consists of ‘All’
and ‘Measured’.
This can be selected using
, .
‘All ’will display power levels
of All wavelengths measured
by the meter REGARDLESS of
power level.
If you choose the ‘Measured’, only wavelengths with a power level higher
than -40 dBm are displayed.
2.3.9 PM Mode
The ‘PM Mode’ consists of the
‘Auto’ and ‘Manual’.
This can be selected using
, .
If you choose the ‘Auto’, when
selecting ‘CWDM’, shows the real
time changing values.
If Manual is selected the meter will display power level of the last channel
measured. User can display adjacent channels using the ▲ and ▼ buttons.
▲
5 jkl
▲
5 jkl
▼
8 tuv
▼
8 tuv
2.3.10 Scan Mode
The ‘SCAN Mode’ consists of the
‘Single’ and ‘Repeat’.
This can be selected using
, .
If you choose the ‘Repeat’, when
selecting ‘SCAN’, shows the real
time changing power values.
There are approximately 3 measurements per second.
If you choose the ‘Single’, when selecting ‘SCAN’, shows the power values scanned
only once. To refresh the measurement, press the SCAN button again.
▲
5 jkl
▼
8 tuv
Page 11

ChallengerOptics.com
Wavelength Specic Optical Testing and Measurement Equipment
ChallengerOptics.com
Wavelength Specic Optical Testing and Measurement Equipment
Chapter 2.3 - Menu / 22Chapter 2.3 - Menu / 21
2.3.11 Threshold
This will change the baseline of
the meter.
‘-30.00 dBm’ is the default
setting.
Press the button after
selecting ‘Threshold’, you can set
the baseline.
Baseline changes can be found
at the graph screen.
ENTER
–
2.3.12 Graph Color
You can change the graph color.
Page 12

ChallengerOptics.com
Wavelength Specic Optical Testing and Measurement Equipment
ChallengerOptics.com
Wavelength Specic Optical Testing and Measurement Equipment
Chapter 2.3 - Menu / 23
2.3.13 Below Threshold
The ‘Below Threshold’ consists of
the ‘Display’ and ‘Hide’.
This can be selected using
, .
If you choose the ‘Display’,
any power level BELOW the
threshold will be displayed as it
is measured.
If you choose the ‘Hide’ Any
power level BELOW the
threshold will not be displayed
on the graph and displayed as
“Low” on the table listing.
▲
5 jkl
▼
8 tuv
notes
 Loading...