

Page 1

名称/料号
说明书8458-4334094-001
2016-10-26
A5(148.5x210mm)
PDF
CH171
70g双胶纸
张妹珍
页 数
20 张A4纸
黑白印刷
说明书排版上下不要留太多白,
Page 2

C
O
W
hpr
HAL
W
W
G
n
t
G
h
a
n
n
s
e
o
e
e
w
s
o
c
e
Afte
t
a
b
o
.
a
e
0(M
e
v
T
4
V
o
g
1
800
1
riginal
ARNIN
ese instru
T
oduct, e
m
issing par
LEN
C
Manu
Importa
ctions co
suring it i
s, call th
E
ain
l
t-Please
tain imp
assembl
Custom
Sa
read the
rtant inf
d corre
r Helplin
e instruct
rmation
tly and s
on 0333
r Service S
ions fully
hat will h
fely. If y
300 1614
6
upport
elp you g
u need h
efore st
88617
odel: Y
rting ass
et the be
lp or ha
334-01)
mbly.
st from y
e dama
ur
ed or
0 Oct 20
6
Page 3

2
CONTENTS
GENERAL POWER TOOLS SAFETY WARNINGS……………………………………………....….3
SPECIAL SAFETY INSTRUCTIONS FOR CHAIN SAW…………………………………………..…5
SYMBOLS…………………………………………………………………………………………...…..8
DIAGRAM……………………………………………………………………………………….....….10
PARTS LIST……………………………………………………………………………………………..10
INTENDED USE………………………………………………………………………………….….…11
ASSEMBLY……………………………………………………………………………………………..12
OPERATION……………………………………………………………………………....….……….16
CLEANING AND MANTENIANCE ……………………………………………………….….….…26
TECHNICAL DATA……………………………………………………………………………………34
TROUBLESHOOTING ……….……………………………………………………………................35
GUARANTEE …………………………………...……………………………..…………………….. 36
RECYCLING AND DISPOSAL……………………………………………………………….….…..36
PLUG REPLACEMENT………………………………………………………………………………..37
Page 4
G
E
W
o
a)
b)
liq
u
c)
to
El
e
a)
pl
u
ris
k
b)
ref
r
c)
th
e
d)
Ke
e
in
c
e)
ou
t
f) I
pr
o
P
e
a)
us
e
m
o
b)
du
c
o
c)
so
u
on
d)
at
t
NERAL
P
WARNI
N
instru
c
Save
a
warni
n
(cordl
e
rk Area
Keep work
Do not op
ids, gase
s
Keep chil
d
lose contr
ctrical
S
Power tool
gs with ea
of electri
Avoid bod
r
igerators.
T
Do not ex
p
risk of el
e
Do not ab
u
p cord a
w
rease the
When ope
r
door use.
U
f operatin
g
tected su
p
rsonal S
a
Stay alert,
w
a power
ment of i
n
Use perso
n
st mask,
n
nditions
w
Prevent un
rce and/o
r
the switc
h
Remove a
n
ached to
OWER
G! Read
a
tions may
ll warning
gs refers
ss) powe
r
Safety
area clea
n
erate pow
e
or dust. P
o
ren and b
y
ol.
afety
plugs mus
t
rthed (gro
u
c shock.
y contact
w
T
here is a
n
ose power
ctric sho
c
u
se the co
r
ay from
h
risk of ele
c
ating a po
w
se of a c
o
a power t
o
ply. Use o
f
fet
y
atch wha
t
tool while
attention
al protecti
v
on-skid s
a
ill reduce
intentional
battery p
a
or energ
y adjustin
g
a rotatin
g
TOOLS
S
ll safety w
a
result in e
l
s and ins
t
to your
m
tool.
and well
l
r tools in
wer tools
standers a
match the
nded) po
w
ith earth
e
increase
d
tools to rai
k.
d. Never
u
eat, oil, s
h
tric shoc
k
er tool ou
t
rd suitabl
ol in a da
an RCD r
e
you are d
o
you are ti
r
while op
e
e equipm
e
fety sho
e
personal i
n
starting. E
n
ck, pickin
g
izing pow
e
key or w
r
part of t
h
AFETY
W
rnings an
d
ectric sh
o
ructions f
o
ains-ope
r
it. Clutter
e
explosive
a
create sp
a
way while
o
outlet. Ne
v
er tools. U
n
d or grou
n
risk of el
e
n or wet c
o
se the cor
d
arp edge
s
.
t
doors, use
e for outd
mp locatio
e
duces th
ing and u
s
ed or und
rating po
w
nt. Always
s, hard
h
juries.
sure the s
w
up or car
r
r tools th
a
ench befo
r
e power t
o
3
ARNIN
G
all instru
c
ck, fire an
r future r
e
ated (co
r
d or dark
tmospher
e
a
rks whic
h
o
perating
a
er modify t
h
modified
ded surfa
c
ctric sho
c
nditions.
W
d
for carry
or movin
an extensi
oor use re
n is unavoi
d
e risk of el
e
e common
er the infl
u
er tools
m
wear eye
p
at, or he
itch is in t
h
ying the t
o
t have th
e
e turning t
ol may r
e
S
tions. Fail
u
d/or serio
u
ference.
T
ded) po
w
areas invi
t
s, such a
s
may igni
t
power to
o
e plug in
a
plugs an
d
es, such
a
k if your
b
ater ente
r
ing, pullin
g
g parts. D
a
on cord su
i
duces the
d
able, use
e
ctric sho
c
sense whe
ence of d
ay result
rotection.
aring pro
t
h
e off-posi
t
ol. Carryin
switch o
n
he power t
sult in pe
r
re to follo
w
s injury.
he term
"
er tool
o
e accide
n
in the pr
e
e the dus
t
l. Distrac
t
ny way. D
o
matchin
g
s pipes, r
a
ody is ea
r
ing a po
w
or unplu
g
a
maged
o
table for
risk of ele
c
a residual
k.
n operatin
g
rugs, alco
h
in serious
p
Protectiv
e
ection us
e
ion before
g power t
o
invites a
c
ool on. A
w
sonal inju
r
w
the war
n
power to
o
r battery-
ts.
sence of
f
or fumes.
ions can
c
not use a
n
outlets
w
diators, r
a
thed or g
r
er tool wil
ging the
p
r entang
c
tric shoc
k
current de
v
a power t
o
ol or me
d
ersonal i
n
equipme
n
d for a
p
connectin
g
ols with
y
c
cidents.
rench or
y.
ings and
l" in the
operated
lammable
ause you
y adapter
ill reduce
nges and
ounded.
l increase
ower tool.
led cords
.
v
ice (RCD)
ol. Do not
ication. A
jury.
t such as
propriate
to power
our finger
a key left
Page 5

G
E
P
e
e)
th
e
f)
D
fro
m
g)
th
e
ha
P
o
a)
to
o
b)
b
e
c)
m
a
m
e
d)
un
f
Po
e)
an
yrep
f)
K
e
d
g)
int
o
o
p
S
e
a)
pa
NERAL
P
rsonal S
a
Do not ov
e
power t
o
ress prop
e
m
moving
p
If devices
se are c
o
zards.
wer Tool
Do not for
c
l will do t
h
Do not us
e
controlle
d
Disconnec
t
king any
a
asures re
d
Store idle
p
amiliar wit
wer tools
a
Maintain p
other co
n
aired bef
o
eep cutti
n
ges are le
Use the p
o
account
erations
d
rvice
Have your
rts. This wil
WARNI
N
may u
reduc
e
to co
n
machi
OWER
fety (co
rreach. Ke
e
ol in unex
rly. Do not
arts. Loos
e
are provi
d
nnected
a
Use an
d
e the pow
e
e job be
t
the power
with the
t
the plug
f
djustment
s
uce the r
ower tool
s
h the pow
e
re dang
e
ower tools.
dition tha
t
re use. M
a
g tools s
h
ss likely to
wer tool,
a
the workin
ifferent fr
o
power to
o
l ensure t
h
G! This m
a
nder som
e
the risk
o
sult their
p
ne.
TOOLS
S
ntinued)
p proper
f
pected si
t
wear loos
e
clothes,
ed for the
nd prope
r
Care
r tool. Use
ter and s
a
tool if the
s
switch is
d
rom the p
o
, changin
g
isk of start
i
out of the
r tool or th
e
rous in th
e
Check for
may affe
c
ny accid
e
arp and
c
bind and
ccessorie
s
g conditio
n
m those i
n
l serviced
at the saf
e
chine pr
o
circums
t
f serious
o
hysician
a
AFETY
W
ooting an
d
uations.
clothing
o
jewellery
o
connectio
ly used.
U
the corre
c
fer at the
s
witch doe
s
angerous
wer sourc
e
accesso
r
ng the p
o
reach of c
h
se instruc
t
hands of
misalignm
e
t the pow
e
nts are c
a
lean. Pro
p
are easie
r
and tool
b
s and th
e
tended
c
by a qual
i
ty of the
duces an
ances int
e
r fatal inju
nd the m
e
4
ARNIN
G
balance
a
r jewellery
r long ha
n of dust
e
se of du
s
t power to
o
rate for w
h
s
not turn i
t
and must
and/or th
ies, or sto
r
wer tool
a
ildren an
d
ions to op
e
untraine
d
nt or bind
i
r tool’s o
p
used by
p
erly main
t
to contr
o
its etc. in
a
work to
b
ould resul
t
fied repai
r
power to
o
electrom
a
rfere wit
h
ry, we rec
o
dical imp
l
S
t all times.
. Keep you
r
ir can be
c
xtraction
a
t collecti
o
l for your
a
ich it wa
s
on and of
f
be repair
e
e battery
p
ing power
ccidental
do not all
o
rate the p
o
users.
ng of movi
eration. If
oorly mai
n
ained cu
t
l.
ccordan
c
e perform
e
in a haz
a
person u
s
l is maint
a
gnetic fi
e
active o
r
mmend
p
ant manu
This enab
hair, clot
h
aught in
m
nd collec
t
o
n can r
e
pplication
designe
d
. Any po
w
d.
ack from t
tools. Suc
h
ly.
w persons
wer tool.
ng parts, b
damaged,
tained p
o
ting tools
e with the
s
d. Use of
rdous situ
a
ing only i
d
ined.
ld during
passive
m
ersons wi
t
facturer b
les better
ing and gl
o
oving p
a
ion faciliti
e
duce du
. The corr
e
.
er tool th
a
he power t
prevent
i
reakage o
f
have the
p
wer tools
.
with sha
r
e instructi
o
the pow
e
tion.
entical re
p
operation
edicalim
p
h medic
a
efore ope
control of
ves away
rts.
s, ensure
st-related
ct power
t cannot
ool before
ve safety
parts and
ower tool
p cutting
ns, taking
r tool for
lacement
. This field
lants. To
l implants
rating this
Page 6

5
SPECIAL SAFETY INSTRUCTIONS FOR CHAIN SAW
zKeep all parts of the body away from the saw chain when the chain saw is operating. Before you
start the chain saw, make sure the saw chain is not contacting anything. A moment of
inattention while operating chain saws may cause entanglement of your clothing or
body with the saw chain.
zAlways hold the chain saw with your right hand on the rear handle and your left hand on the front
handle. Holding the chain saw with a reversed hand configuration increases the risk of
personal injury and should never be done.
zWear safety glasses and hearing protection. Further protective equipment for head, hands, legs
and feet is recommended. Adequate protective clothing will reduce personal injury by
flying debris or accidental contact with the saw chain.
zDo not operate a chain saw in a tree. Operation of a chain saw while up in a tree may result
in personal injury.
zAlways keep proper footing and operate the chain saw only when standing on fixed, secure and
level surface. Slippery or unstable surfaces such as ladders may cause a loss of balance or
control of the chain saw.
zWhen cutting a limb that is under tension be alert for spring back. When the tension in the
wood fibres is released the spring loaded limb may strike the operator and/or throw the
chain saw out of control.
zUse extreme caution when cutting brush and saplings. The slender material may catch the
saw chain and be whipped toward you or pull you off balance.
Carry the chain saw by the front handle with the chain saw switched off and away from your body.
When transporting or storing the chain saw please always fit the guide bar cover. Proper handling
of the chain saw will reduce the likelihood of accidental contact with the moving saw chain
.
zFollow instructions for lubricating, chain tensioning and changing accessories. Improperly
tensioned or lubricated chain may either break or increase the chance for kickback.
zKeep handles dry, clean, and free from oil and grease. Greasy, oily handles are slippery
causing loss of control.
zCut wood only. Do not use chain saw for purposes not intended. For example: do not use chain
saw for cutting plastic, masonry or non-wood building materials. Use of the chain saw for
operations different than intended could result in a hazardous situation.
Causes and Operator Prevention of Kickback
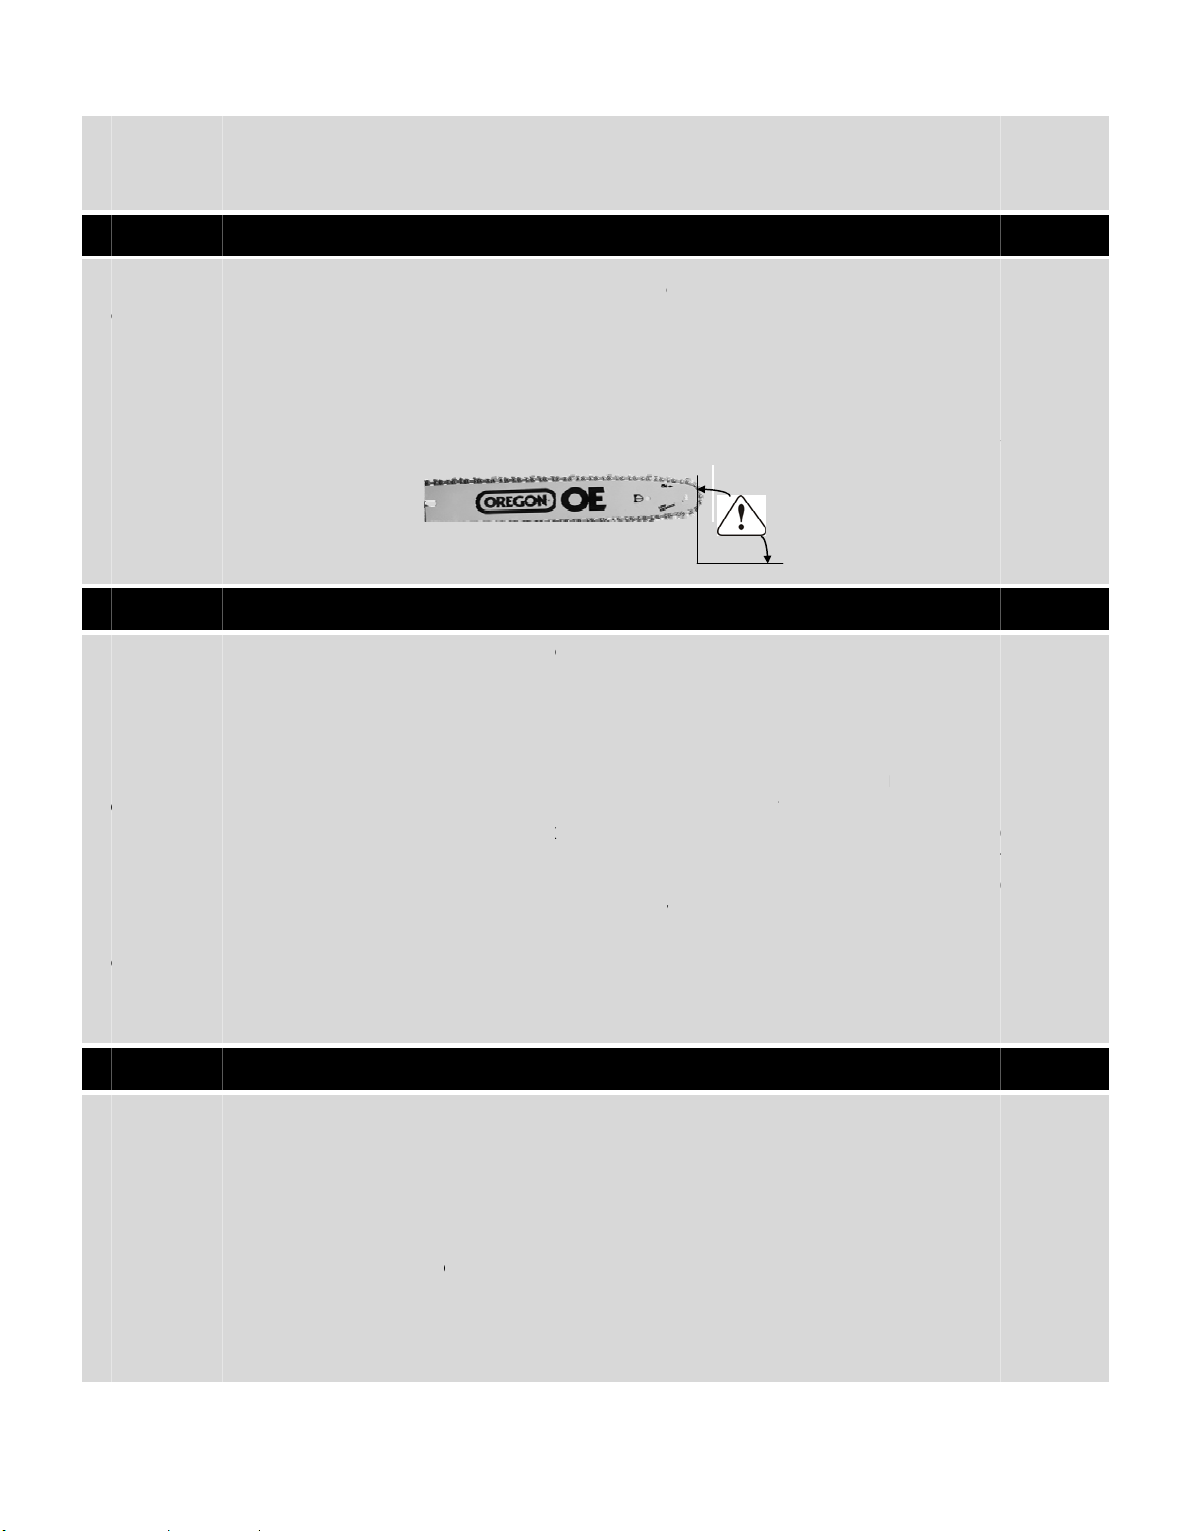
Kickback may occur when the nose or tip of the guide bar touches an object, or when the
wood closes in and pinches the saw chain in the cut.
Tip contact in some cases may cause a sudden reverse reaction, kicking the guide bar up
and back towards the operator.
Pinching the saw chain along the top of the guide bar may push the guide bar rapidly back
towards the operator.
Either of these reactions may cause you to lose control of the saw which could result in
serious personal injury. Do not rely exclusively upon the safety devices built into your saw. As
a chain saw user, you should take several steps to keep your cutting jobs free from accident
Page 7

S
P
C
a
or
Ki
cca
z
z
z
Fol
th
e
Re
c
x
x
x
Lu
x
x
x
x
If t
cl
e
c
e
ECIAL
S
uses an
d
injury.
kback is t
h
n be avoi
d
Maintain
a
on the sa
w
forces c
a
of the c
h
Do not ov
e
contact
a
Only use
r
bars and
low the m
a
depth g
a
ommend
e
Use a resi
During th
e
cord fro
m
The first-ti
bricatio
n
The chai
n
Use only
n
WARNI
N
pump
;
Check oil
he lubrica
an and fr
e
ntre.
AFETY I
N
d
Opera
t
e result o
f
ed by ta
k
firm grip,
and posi
t
n be con
t
ain saw.
rreach an
nd enab
l
eplaceme
n
chains m
a
nufacturer
’
uge heig
h
d:
dual curr
e
cutting
o
snagged
me user s
h
System
is autom
a
ew chain
G! Never
the bar a
level bef
o
tion syste
m
e from o
b
STRUC
T
or Prev
e
f
tool misu
s
ing prop
e
with thum
b
ion your b
o
rolled by
t
d do not c
u
es better
c
t bars an
d
y cause
c
s sharpeni
n
t can le
a
nt device
peration,
on branc
h
ould, as
a
tically lu
b
oil specifi
use waste
d
nd the ch
a
re each
w
does no
t
struction
s
IONS F
O
ntion of
K
s
e and/or
r precaut
i
s and fing
e
dy and ar
m
he opera
t
t above s
h
ontrol of
chains sp
e
hain bre
a
g and ma
d to incre
a
with a tri
p
the suppl
y
es and t
h
minimum
ricated.
cally form
u
oil, low
q
in may r
e
ork sessi
o
work pro
. If it is still
6
R CHA
I
ickbac
k
incorrect
o
ons as gi
v
rs encircli
to allow
y
or, if pro
p
oulder hei
g
the chain
cified by
t
kage an
d
intenance
sed kick
b
ping curr
e
cord mu
s
e like.
practice,
lated for
uality oil,
o
sult in seri
n, refill if l
e
perly, che
not worki
n
N SA
W
(contin
u
perating
en below:
ng the cha
ou to resi
s
er preca
u
ht. This h
e
saw in un
e
he manuf
a
/or kickb
a
instruction
s
ack.
nt of 30m
t be secu
cutting lo
chainsaw
s
r insuffici
e
ous perso
n
ss than ¼
f
ck if the o
g, conta
c
ed)
procedur
e
in saw han
d
t kickback
tions are
t
lps preve
n
xpected
cturer. Inc
o
ck.
for the sa
w
A or less
rely positi
o
gs on a s
a
.
nt oil. Thi
s
al injury
ull.
il filter an
d
t an auth
s or cond
d
les, with
b
forces. Ki
c
aken. Do
n
t uninten
d
situations.
rrect rep
l
chain. D
e
ned to pr
e
w-horse o
could da
m
all oil-wa
orised ser
v
itions and
oth hands
kback
ot let go
ed tip
acement
creasing
e
vent the
r cradle.
age the
ys are
ice
Page 8
S
P
S
a
Ki
c
u
p
cu
Th
e
In
t
Thi
di
a
It i
s
Fu
r
D
u
a
c
int
e
us
e
m
u
m
awe
Th
e
c
o
m
a
Th
e
R
e
Ev
e
Ac
c
-
C
-
A
- U
- F
l
- F
l
- I
n
- S
k
- L
o
ECIAL
S
fety Ch
a
kback is
wards to
w
tting with
t
risk of ki
c
x
Ensuri
n
x
Not al
l
x
Not c
u
ended
U
s chain sa
meter ac
only allo
w
thermore
ring the u
s
cording t
o
e
nded us
e
/ mainte
st be fam
nufactur
e
ll as the a
user an
d
mbinatio
n
chine.
chain sa
sidual R
i
n with the
i
ording to
t
ontact wi
t
ccess to t
nforeseen
ung out o
ung out o
halation
o
in conta
c
ss of hea
AFETY I
N
in Brake
a pheno
m
ards the
o
t
he blade
kback ca
g the wo
r
owing th
e
tting with
se/Not i
n
w is only
d
cording t
h
ed to cu
t
a professi
o
e of the
c
the man
u
are also
t
nance. P
e
iliar with t
h
rs original
llowed co
not the
m
of not int
e
w is only i
n
sks
ntended u
s
he type an
t
h expose
d
he rotatin
g
, abrupt
m
f parts fro
m
f parts of
t
f work pe
t with the
ring, if no
r
STRUC
T
enon wh
perator.
I
tip, if the
s
n never b
e
k area is f
r
chain to
g
the dang
e
tended
U
esigned f
o
e guide b
wood. E
v
nal use f
o
hain saw
t
al and al
s
he details
ople/User
e manua
l
or appro
v
mbinatio
n
anufactu
r
nded us
e
tended t
o
e of the a
p
d
construc
t
saw tee
t
saw cha
ovement
the saw
he work
p
ace parti
c
oil,
equired
e
IONS F
O
ereby th
e
t happen
s
aw gets
p
complet
ee of de
b
et pinch
e
r area at
se
r cutting
o
ar length.
ery other
r tree ser
v
he user h
a
o to the
n
in the ma
n
who wor
k
. It is only
ed spare
s of guide
er is liabl
e
or a not
a
use outd
pliance th
e
ion of the
a
h of the s
a
in (cuttin
g
of the gui
d
chain (C
u
iece
les,
ar protec
t
7
R CHA
I
tip of th
e
with littl
e
inched in
ely elimin
a
ris.
d.
the tip of
o
f brushes
use of the
ices is stri
c
s to arra
n
amed pi
c
ual rega
r
with the
c
allowed t
o
parts (gui
d
bar / sa
w
for every
llowed c
h
oor.
re is alwa
y
ppliance t
h
w chain
(
hazards)
e bar (c
u
tting / inj
e
ion used
d
N SA
W
e
saw fli
e
or no w
a
it’s cut, o
r
ted but it
the saw .s
, trunks or
machine
tly forbid
d
ge for pe
r
tograms
o
ding safe
t
hain saw
assembl
e
e bar; sa
w
chain as
n
accident
ange of
t
s a residu
a
e followin
g
cutting h
a
tting haz
a
ction haz
a
uring wo
r
s quickly
rning and
if the sa
w
can be r
e
ee illustra
t
timber be
is a not in
t
en.
sonal pro
t
n the ch
a
y warning
s
or make
m
on the c
h
chain, s
p
amed in
which res
u
he constr
u
l risk, whi
c
potential
zards)
rds)
rds)
k.
and unc
o
can be
c
contact
s
duced b
y
ion belo
w
ams up to
ended us
e
ective eq
in saw. P
a
and refe
r
aintenan
c
ain saw
t
ark plug
e
the manu
a
lts from a
ction on
t
h can not
p
hazards m
i
ntrollably
aused by
debris.
:
.
a
.
uipment
rts of the
ences for
c
es on it
he
e
.g.) as
l.
he
revented.
ght apply:
Page 9
S
Y
IM
P
an
m
a
In
d
W
A
W
e
W
e
Pr
o
S
W
S
W
M
a
MBOLS
ORTANT:
d learn th
e
chine m
o
icates da
RNING –
T
ar ear pr
o
ar gloves
tect the
m
ITCH OFF:
ITCH OFF:
ke sure t
h
Some of t
h
ir meani
n
re effecti
v
nger, war
n
o reduce
tection,
e
and safe
t
achine f
r
Remove
p
Remove
p
e “chain
b
e followi
n
g. Proper
ely and r
e
ing or ca
u
the risk of
ye prote
c
y boots to
om the d
a
lug from
m
lug from
t
rake” is
d
g symbol
s
interpreta
duce the
tion.
injury, us
e
tion and
h
protect a
mp and
n
ains bef
o
he mains
i
isengage
d
8
may be
u
tion of th
e
risk of ac
c
r must re
a
elmet wh
e
gainst ele
c
ever exp
o
re cleani
n
mmediat
e
.
sed on y
o
se symbo
l
ident.
d instructi
o
n using t
h
tric shoc
k
se it to ra
i
g or mai
n
ly if the c
a
ur tool. B
e
s will allo
w
o
n manu
a
e produc
n.
tenance
a
ble is da
m
sure to st
u
you to u
s
l.
t.
aged or
dy them
e the
cut.
Page 10

S
Y
Ke
C
o
Thi
W
E
bu
lo
c
G
u
20
0
MBOLS
ep childr
e
nforms to
s product
EE symbo
l
t in an en
v
al counci
aranteed
5/88/EC)
n at a dis
t
relevant
s
is double
i
. Tools tha
ironment
a
l authority
sound p
o
ance of n
afety stan
nsulated
e
t are no lo
lly friendl
y
for recycl
wer level
(
ot less tha
dards.
lectricall
y
nger usab
l
way. Ple
ing advic
e
(
tested a
c
9
n 10m fro
m
e should
n
ase recyc
l
.
cording t
o
the wor
k
ot be dis
p
e where f
a
Directiv
e
area
osed of w
i
cilities e
x
2000/14/
th househ
ist. Check
EC as am
e
old waste
with your
nded by
Page 11
10
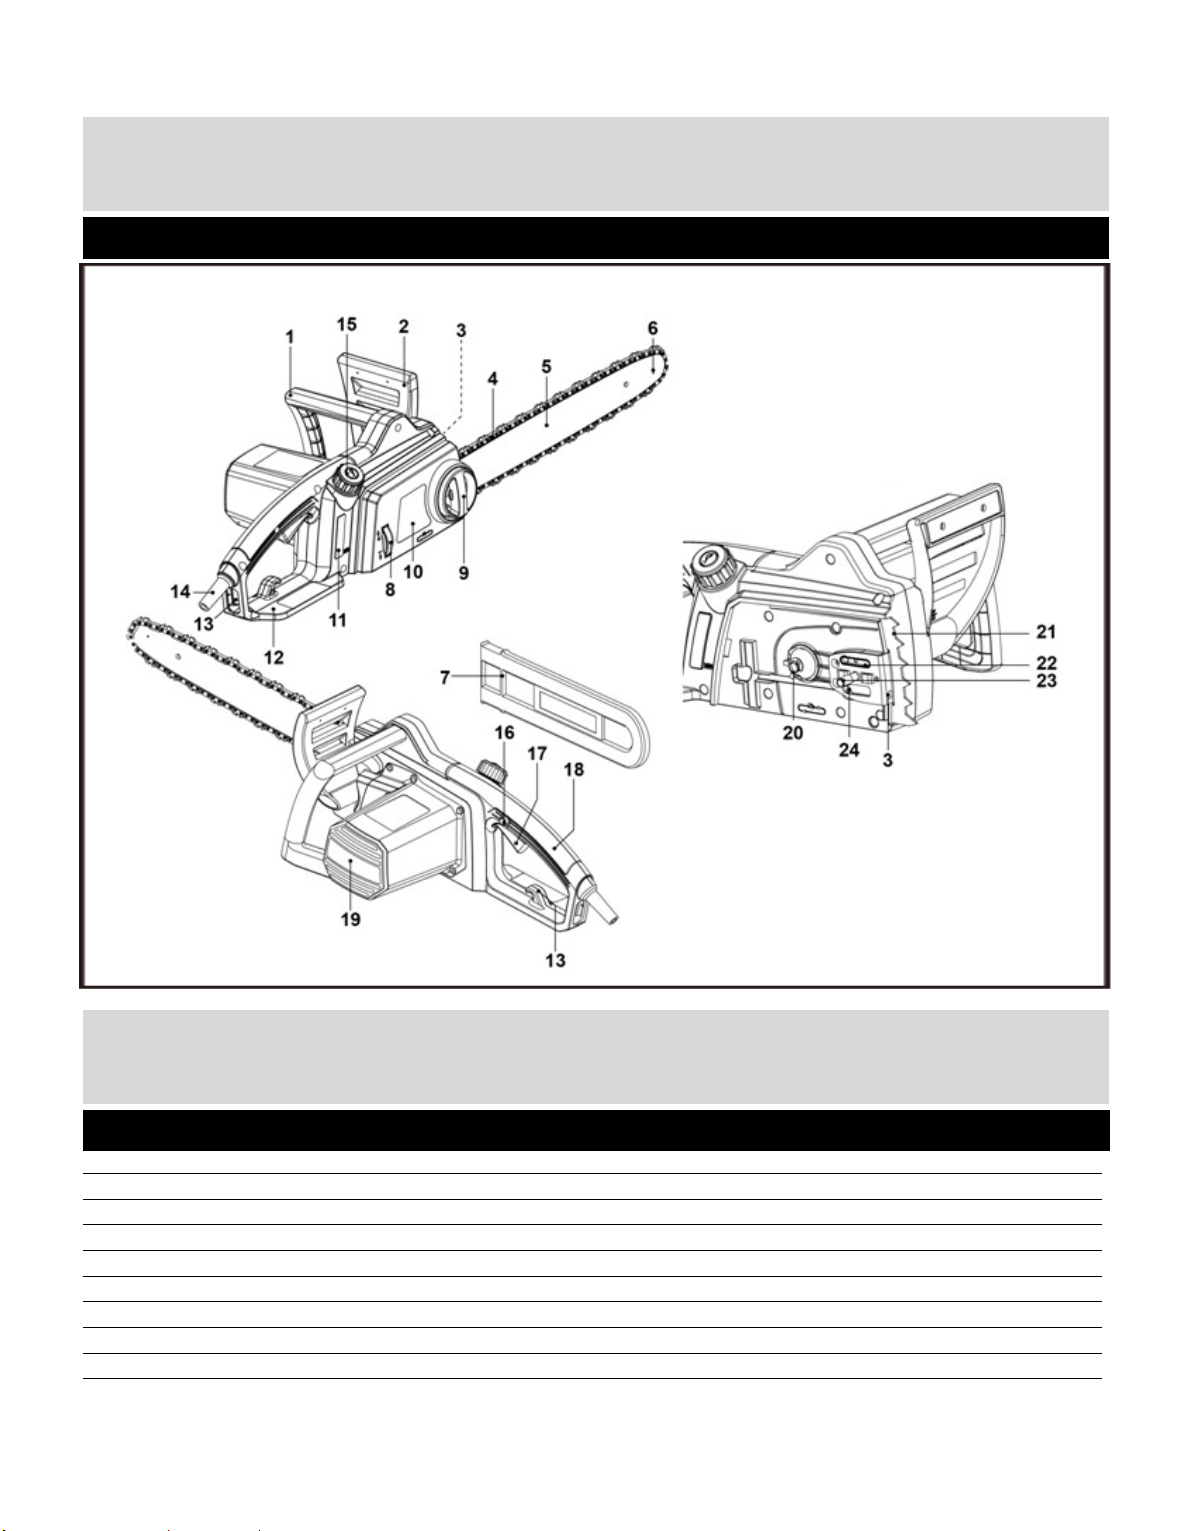
DIAGRAM
PARTS LIST
(See Fig. A)
1. Front Handle
2. Front Guard/Chain Brake
3. Anti-skid teeth
4. Saw Chain
5. Guide Bar
6. Sprocket Nose
7. Guide Bar Cover
8. Adjustable knob for Chain Tension
Fig.A
Page 12

11
PARTS LIST
(See Fig. A, continued)
9. Press Knob for Guide Bar Tension
10. End Cover
11. Oil Level Window
12. Rear Guard
13. Cable Strain Relief
14. Power Cord with Plug
15. Oil Tank Cap
16. Lock-off Button
17. On/Off Switch
18. Rear Handle
19. Air Vents
20. Drive Sprocket
21. Spike Bumper
22. Oiling Port
23. Bolt
24. Tension Pin
Remark: Above are all assembled in the standard delivery.
INTENDED USE
This chain saw is designated with a rated input of 1800 Watts. The product is intended for cutting
logs with a thickness of max. 326mm. It must not be used for cutting other materials, such as
plastics, stone, metal or wood that contains foreign objects.
The product may only be used with the guide bar/saw chain combination stated in these
instructions. It is not permitted to use other types or sizes.
Vertical and horizontal cuts can be performed with this product. Longitudinal sections can only
be cut by professionals.
This product should not be used outside of domestic premises e.g. for cutting firewood in forested
areas. The product should not be used on masonry and material that are harmful to health.
This product is intended for private domestic use only, not for any commercial trade use. It must
not be used for any purposes other than those described.
Page 13
AS
U
n
1.
U
2.
R
3.
M
p
a
in
c4.Eals
C
h
N
O
di
sdet
Al
w
ch
ch
Te
n
te
n
cu
su
f
C
h
pr
o
a
p
SEMBL
Y
packing
npack al
emove a
ake sure
rts are mi
s
omplete
o
nsure tha
t
o include
s
ain Ten
s
WARNI
N
tensio
n
when
h
TE: The ch
a
assemble
d
ails.
ays main
ain may j
u
ain! A loo
s
sioning t
h
sion can
tting cha
r
ficient lu
b
eck the
c
duct. Th
e
proximat
e
l parts an
d
ll packing
the deliv
e
sing or sh
o
r damag
e
t
you hav
e
suitable
p
ioning
C
G! Unplu
g
! The cut
t
andling t
in and bar
chain an
d
tain prop
e
mp out o
f
e chain
w
e chain t
o
cause ch
a
acteristic
s
rication a
n
hain tensi
o
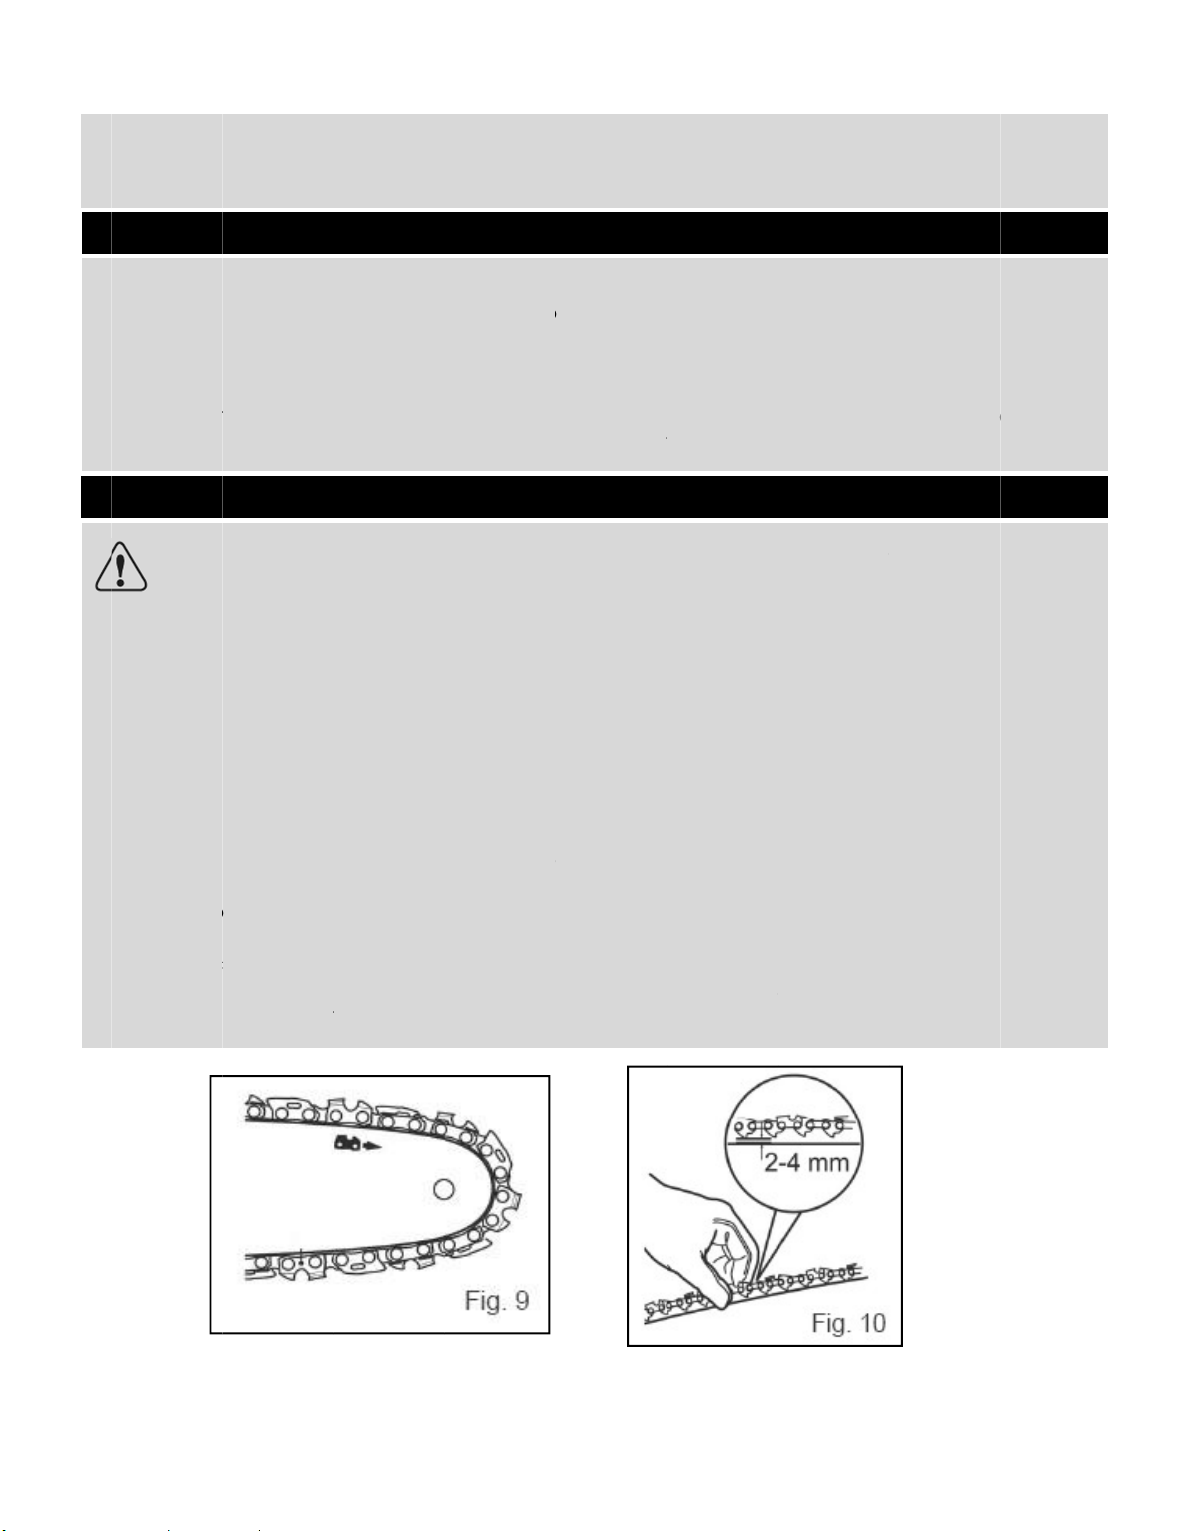
correct
ly 2-4mm
f
lay them
materials
ry conte
n
w dama
g
d produ
c
all the a
c
ersonal p
hec
k
the pro
d
ing edge
s
he chain!
have bee
n
bar for re
p
r chain t
e
the guid
e
ill cause r
a
o tightly
w
in deraili
n
and pro
l
d correc
t
n using
o
chain te
n
f
rom the
g
on a flat,
and ship
p
ts are co
m
e do not
u
t represe
n
cessories
a
rotective
e
uct from
t
of the sa
w
already a
s
lacement
,
nsion! A l
o
bar groo
pid wear
ill overlo
a
g, where
a
onged w
o
tensionin
g
ne hand
t
sion is a
c
uide bar
(
12
stable sur
f
ing devic
e
plete an
d
se the pr
o
ts a haza
r
nd tools
n
quipmen
t
he power
chain a
r
sembled
o
please re
a
ose chai
n
ve! This m
a
to the ch
a
d the mo
t
a
s a corr
e
rking life
!
o lift the
s
hieved
w
5) in the
c
ace.
s if appli
c
free of a
duct but
d to peo
p
eeded fo
r
t
.
source b
e
e sharp.
A
n the mac
h
d the mai
n
increase
s
y injure t
h
in, guide
or and c
a
ctly tight
e
! The cha
aw chain
hen the
s
entre (Fig
s
able.
ny dama
g
contact y
le and pr
o
assembl
y
fore adju
s
lways we
a
inewhen
y
tenance
p
s
the risk
o
e operat
o
bar and s
use dam
a
ned chai
n
in life ma
(4) again
s
s
aw chai
n
s
. 9, 10).
e. If you f
i
our store.
perty.
and oper
a
s
ting the
s
r protecti
ou get it o
u
art in this
m
f kickbac
k
r and da
m
procket!
ge, and i
n
provide
s
inly depe
n
t the wei
g
can be
nd that
Using an
a
tion. This
aw chain
ve gloves
t of box. If
anual for
! A loose
age the
sufficient
the best
ds upon
ht of the
lifted by
Page 14

13
ASSEMBLY
Chain Tensioning Check (continued)
If loose chain is found before use, please follow up the instruction below.
(If tight chain is found before use, please do the opposite to the below instruction.)
Firstly slightly tighten the Knob (9) clockwise. (Fig.7)
Do not tighten the locking nut completely and saw chain tensioning is required first.
NOTE: The saw chain (4) has not yet been tensioned. Tension the chain as described under
“Saw chain tensioning”. After operating the product for approximately 1 hour, adjust the
chain tension again.
Saw Chain Tensioning
Always check the saw chain tension before use, after first cuts and regularly during use
approximately every five cuts. After initial operation, new chains can lengthen considerably.
This is normal during the break-in period and the interval between future adjustments will
lengthen quickly.
Set the product on a suitable flat surface.
Turn the tension knob (8)clockwise until the chain “tie straps” are adjust touching the bottom
edge of the guide bar(5) Fig.(8).
Page 15

AS
C
h
Tu
r
Lu
N
e
O
p
pr
o
oil
cu
e
q
pr
oSet
Un
fu
n
le
a
(Fi
gCh
th
e
Wi
p
N
O
a
c
SEMBL
Y
ain Ten
s
n the kno
b
bricatio
n
WARNIN
G
using it!
result in
ver opera
erating t
h
duct life
s
is eviden
t
tting ope
r
uipment
w
per amo
u
the prod
u
screw an
d
nel with
a
ve appro
.12).
eck the oi
oil level i
e up spill
TE: Alwa
y
cordanc
e
ioning
C
(9) cloc
k
! The pro
d
Never op
e
extensive
te the ba
r
e produc
t
pan and
by smok
e
ations is
ith an a
u
nt of oil t
o
ct on an
y
remove
t
filter to
p
ximately
5
l level win
d
s lower th
a
ed lubric
a
s dispose
with loca
heck (c
o
wise to ti
g
uct is no
t
rate the
p
damage
t
and chai
n
s dry or
w
cause ra
p
or bar d
i
essential
tomatic
o
the bar
a
suitable
s
he tank
c
revent d
e
mm of sp
ow (11)
p
n “MIN”
m
nt with a
s
of lubri
c
l regulatio
ntinued)
hten the
c
filled wit
h
roduct wi
t
t
o the pro
d
without
l
ith too litt
l
id wear t
o
scoloratio
to minimi
z
iling syst
e
nd chain
!
urface wi
t
ap(15), t
h
bris enteri
ace to th
e
rior to sta
r
arking (F
i
oft cloth
a
ant, use
d
ns.
14
over (10)
oil. It is e
s
t
hout cha
i
d
uct!
ubricatio
n
e oil will
d
the chai
n
n! Adequ
a
e friction
m! The
o
t
h the tan
k
en add t
h
ng the ta
n
lower e
d
t-up and r
e
g. 13).
nd refit t
h
oil and
complet
e
sential to
n oil or wit
oil!
ecrease
c
and bar
te lubric
a
with the
iling syste
cap(15)
e lubrica
n
k and to
a
ge to all
o
gularly d
u
e tank c
a
objects
c
ly (Fig.11)
.
fill the pro
h an emp
t
utting eff
i
from over
h
tion of th
guide b
a
m autom
a
facing up
w
t into the
void spill
i
w the lu
b
ring oper
p (15).
c
ontamin
a
duct with
y oil tank,
ciency, s
h
eating! I
n
e saw ch
a
r. Your
p
tically d
e
ards.
tank. Use
ng and o
v
rication t
o
ation. Refi
ted with
oil before
as this will
orten the
sufficient
in during
roduct is
livers the
a proper
erfill and
expand
ll oil when
them in
Page 16

AS
Lu
C
o
Th
ewit
pr
o
M
a
D
o
str
a
(Fi
g
C
o
Yo
SEMBL
Y
bricatio
n
nnectio
n
WARNIN
G
conne
c
with so
c
proper
s
extensio
n
hout an
tected s
u
ke sure t
h
uble the
e
in relief
(
.14,15).
nnect th
e
ur produc
t
WARNI
N
rating
(contin
u
to the
P
! For you
r
ted to an
kets prot
e
ize and t
y
cable m
extension
pply!
e on/off s
w
xtension
c
13). Gent
l
extensio
n
is now re
G! Chec
k
label
ʽ
ed)
ower Su
p
safety, it
extension
cted ag
a
pe for yo
u
ust alway
s
cable c
itch (17)
able, ab
o
y pull on
t
cable to
ady to be
the volt
a
pl
y
is require
d
cable! Th
e
inst wat
e
r product
be used
w
onnected
is in its off
ut a foot
t
he cord
t
a suitable
used.
ge! The
v
15
that the
extensio
n
r splashin
g
(>/= 1.5
m
ith the c
a
. Always
position.
from the
o ensure
t
socket.
oltage m
u
plug atta
c
cable m
u
! Ensure
t
m2)!
ble strain
use a re
s
end and
h
t
hat it is f
i
st compl
y
hed to th
st be suit
a
he exten
s
relief! Do
n
s
idual cu
r
ook the l
o
rmly atta
c
with the
is produc
t
ble for o
u
ion cabl
e
ot use th
e
rent sup
p
op over
t
hed at t
h
informati
o
is always
tdoor use
is of the
product
ly (RCD)
he cable
e handle
n on the
Page 17

O
P
C
h
¾
¾
¾
¾
¾
¾
¾
¾
¾
C
h
Th
e
o
c
Th
e
16
)
Th
ebra
Ch
Th
e
ch
M
a
ERATI
O
eck that
y
Before st
a
Working
w
fit to co
m
Ensure th
Make su
r
Ensure th
enter th
e
Ensure th
Make su
r
Double
c
Underta
k
about its
WARNI
N
safety
– Safe
t
ain Bra
k
chain b
r
curs the c
chain br
a
.
chain br
a
ke is acti
v
ain Brake
T
followin
g
ain brake
ke sure t
h
N
ou have
n
rting you
ith this p
r
plete the
at you ha
v
e that yo
u
at no una
working
a
at the pr
o
e that saf
e
heck that
e periodi
c
suitability
G! For yo
u
instructio
n
y Warnin
g
e
ake is a
s
hain stop
s
ke (2) in
t
a
ke (2) in
ated (Fig
est
function
a
test is to r
e
e chain b
oted all t
h
must hav
e
oduct is d
e
job safet
y
e all the
a
wear suit
uthorized
p
rea.
duct is fre
ty devic
e
all assem
b
structura
l
for its inte
r own an
s in follow
s.”
afety me
c
immedia
t
he engag
the enga
g
. 17).
l check
s
duce th
e
rake (2) is
e followi
n
fully rea
d
manding
.
ccessori
e
able pers
o
eople, e
s
e from da
m
s and ac
c
ly tools h
a
checks o
f
nded pur
p
d the saf
e
ing sectio
n
hanism
a
ely.
ed diseng
ed positi
o
hould be
possibilit
y
disengag
e
16
g instruct
i
and und
’ therefor
e
s and too
nal prote
c
pecially
c
age an
d
essories a
ve been
this prod
u
ose.
ty of oth
e
“In more
ctivated
b
aged posi
n, the sa
w
carried o
u
of injury
d
d. Disen
g
ons:
erstood t
h
ensure y
o
ls needed
tive equi
p
hildren, a
n
that it is
n
re correct
removed
f
cts; do n
o
r people
y
detail – T
e
y the fro
tion, the
p
chain is
s
t before
e
ue to kic
k
age the
c
e entire i
n
u are phy
s
for assem
ment.
d pets ar
e
ot worn.
ly fixed.
f
rom the
p
t use it if y
o
ou must
r
chnical a
n
nt guard
(
roduct c
a
topped
a
ach use.
back.
hain brak
e
struction
m
s
ically an
d
bly and o
p
nearby
o
roduct b
e
u have a
n
ead and
f
d legal in
f
2). When
n be oper
s soon as
t
The purp
o
(2) by p
u
anual.
mentally
eration.
r could
fore use.
y doubts
ollow the
ormation
kickback
ated (Fig.
t
he chain
se of the
lling it
Page 18

O
P
C
h
b
a
Pl
a
th
e
Gr
a
ha
Pr
e
sw
W
hag
no
O
n
M
a
Gr
i
ch
Pr
e
Sq
u
Re
ERATI
O
ain Bra
k
ck towar
d
ce the pr
o
surface
o
sp the fr
o
ndle (18)
w
ss the lo
itch (17)
w
ile the m
o
ainst the
c
NOTE: T
WARNI
N
take t
h
produ
c
The c
h
rmal oper
a
/Off Swi
t
ke sure t
h
p the pro
d
ain brake
)
ss the loc
eeze in t
h
lease the
o
N
e (conti
n
s the fron
t
duct on
a
r other o
b
nt handl
e
ith your ri
ck-off bu
t
ith your i
n
tor is run
n
hain bra
k
he motor
w
G! If the
s
e produ
c
t if the c
h
ain brak
e
tion!
ch
e safety
c
uct with
b
and your
k-off butt
o
e on/off
s
n/off swi
t
ued)
handle(1
ny suita
b
jects and
(1) with
y
ght hand.
ton (16)
dex finge
r
ing, acti
v
e(2). The
s
ill not st
a
aw chai
n
t to the n
ain brake
should n
hain brak
e
oth hand
right han
d
n (16) an
d
witch (17
)
ch (17) to
) (Fig.16).
le flat sur
f
connect
i
our left
h
Your thu
m
with your
and hold
ate the c
aw chain
rt if the c
h
and mot
o
earest au
t
is not wo
r
ot be us
e
(2) is dis
e
s, your lef
t
holding
t
hold it in
to switch
switch th
e
17
ace, mak
e
t to the p
o
and. Your
b and fin
g
right thu
it in positi
o
hain brak
e
(4) and
m
ain brake
r fail to s
t
horized d
e
king prop
e
d for sta
r
ngaged
(
hand hol
d
he rear h
a
position.
the prod
u
product
sure the
wer supp
thumb a
n
ers shoul
d
mb, then
o
n.
(2) by
m
otor shoul
d
is in the e
t
op when
aler or s
e
rly!
ting and
s
see abov
e
ing the fr
o
ndle(18).
ct on (Fig
off.
saw chai
n
ly as desc
r
d fingers
encircle
t
fully squ
e
oving yo
u
d
stop im
m
ngaged
p
the chai
n
rvice ce
n
s
topping
t
Fig. 16).
nt handl
e
.19).
(4) is not
ibed.
should en
he handl
e
eze in t
h
r left han
d
ediately.
osition.
brake is
e
tre! Do n
o
he produ
(1) do no
t
touching
circle the
(Fig. 18).
e on/off
forward
ngaged,
t use the
ct during
t
hold the
Page 19

18
OPERATION
General Operation
Check the product, its power cord and plug as well as accessories for damage before each
use. Do not use the product if it is damaged or shows wear.
Double check that accessories and the guide bar/saw chain are properly fixed.
Always hold the product by its handle. Keep the handle dry to ensure safe support.
Ensure that the air vents are always unobstructed and clear. Clean them if necessary with a
soft brush. Blocked air vents may lead to overhearing and damage the product.
Switch the product off immediately if you are disturbed while working by other people
entering the working area. Always let the product come to complete stop before putting it
down.
Do not overwork yourself. Take regular breaks to ensure you can concentrate on the work
and have full control over the product.
Basic Operating/Cutting Procedure
To become proficient attend a recognized chain saw training course to learn how to
operate chain saws safely and effectively. Familiarize yourself with all the controls and
switches. Practice all movements with the product switched off.
Always hold the products firmly with both hands. Hold the front grip with your left hand and
the rear grip with your right hand. Fully grip both handles at all times during operation. Never
operate the product using only one hand.
Ensure the power cord is located to the rear, away from the chain and the wood and is
positioned so that it cannot be caught on branches or similar objects during cutting.
Only use the product with a secure stance. Hold the product to the right-hand side of your
body (Fig. 20).
The Saw chain (4) must be running at full speed before it makes contact with the wood. Use
the spike bumper (21) to secure the product onto the wood before starting to cut and use it
as a leverage point while cutting (Fig. 21).
Reset the spike bumper at a low point when cutting thicker logs by pulling the product slightly
backwards until the gripping teeth release, and then reposition at lower level to continue
Page 20

19
OPERATION
Basic Operating/Cutting Procedure (continued)
sawing. Do not remove the product completely from the wood.
Do not force the saw chain while cutting. Let the chain do the work using the gripping teeth
to apply minimal leverage pressure.
Do not operate the product with your arms fully extended or attempt to saw areas which are
difficult to reach, or while on a ladder. Never use the product above shoulder height (Fig.
22).
Optimum sawing is achieved if the chain speed remains constant during cutting.
Be careful when reaching the end of the cut. The weight of the product may change
unexpectedly as it cuts free from the wood. This can cause accidents to the legs and feet.
Always remove the product from a wood cut while the product is running.
Kickback
WARNING! Beware of kickback! Kickback can lead to dangerous loss of control of the
product and result in serious or fatal injury to the operator or anyone standing close by!
Always be alert because rotational kickback and pinch kickback are major product
operational dangerous and the leading cause of most accidents!
Kickback may occur if the nose or the tip of the guide bar touches an object, or if wood
pinches the saw chain in the cut.
In some cases, contact with the tip of the guide bar(5) may cause a lightning-fast reverse
reaction, kicking the guide bar up and back toward the operator (Figs. 23, 24, 25).
Page 21

20
OPERATION
Kickback (continued)
Pinching of the saw chain (4) along the bottom of the guide bar (5) may pull the product
forward away from the operator (Fig. 26)
Pinching of the saw chain (4) along the top of the guide bar (5) may push the guide bar
rapidly back toward the operator (Fig.27).
Any of these reactions may cause a loss of control over the product, which could result in
serious personal injury or even death.
With a basic understanding of “kickback”, the element of surprise can be reduced or
eliminated. Sudden surprise contributes to the majority of accidents.
Keep a good firm grip on the product with both hands, your right hand on the rear handle (18)
and your left hand on the front handle (1), when the motor is running. Maintain a firm grip
with your thumbs and fingers encircling the handles. A firm grip will help you reduce
“kickback” and maintain control of the product.
You should read all the safety warnings and user instructions carefully before attempting to
operate this product.
To Avoid Kickback:
Saw with the guide bar at a flat angle.
Never work with a loose, widely stretched or heavily worn chain.
Page 22

21
OPERATION
Kickback (continued)
Ensure the chain is sharpened correctly.
Never saw above shoulder height.
Never work with the tip of the guide bar.
Always hold the product firmly with both hands.
Always use a low kickback chain.
Apply the metal gripping teeth for leverage.
Ensure correct chain tension.
Felling a Tree
When bucking and felling operations are being performed by two or more persons at the
same time, the felling operations should be separated from the bucking operation by a
distance of at least twice the height of the tree being felled. Trees should not be felled in a
manner that would endanger any person, strike any utility line or cause any property
damage. If the tree does make contact with any utility line, the company should be notified
immediately.
The product operator should keep on the uphill side of the terrain as the tree is likely to roll or
slide downhill after it is felled.
An escape path should be planned and cleared as necessary before cuts are started. The
escape path should extend back and diagonally to the rear of the expected line of fall (Fig.
28).
Before felling is started, consider the natural lean of the tree, the location of larger branches
and the wind direction to judge which way the tree will fall.
Remove dirt, stones, loose bark, nails, staples and wire from the tree.
Page 23

22
OPERATION
Felling a Tree (continued)
Notching Undercut
Make the notch (Fig. 19 B) 1/3 the diameter of the tree, perpendicular to the direction of falls
(Fig. 29). Make the lower horizontal notching cut first. This will help to avoid pinching either
the saw chain or the guide bar when the second notch is being made.
Felling Back Cut
Make the felling back cut(Fig. 29 A) at least 50mm higher than the horizontal notching cut.
Keep the felling back cut parallel to the horizontal notching cut. Make the felling back cut so
enough wood is left to act as a hinge. The hinge (Fig. 29 C) wood keeps the tree from twisting
and falling in the wrong direction. Do not cut through the hinge.
As the felling gets close to the hinge, the tree should begin to fall. If there is any chance that
the tree may not fall in desired direction or it may rock back and bind the saw chain, stop
cutting before the felling back cut is complete and use wedges of wood, plastic or
aluminium to open the cut and drop the tree along the desired line of fall.
Limbing and Pruning
When the tree begins to fall remove the product from the cut, stop the motor, put the
product down, then use the retreat path planned. Be alert for overhead limbs falling and
watch your footing.
Limbing is removing the branches from a fallen tree. When limbing leave larger lower limbs to
support the log off the ground. Remove the small limbs in one cut (Fig. 30). Branches under
tension should be cut from the bottom up to avoid binding the product.
Page 24

O
P
Li
m
C
u
A
s
ot
h
O
n
du
W
a
B
u
Bu
c
w
e
su
p
Fo
l
(Fi
gWh
(u
n
ERATI
O
bing a
n
WARNI
N
logs,
o
When
until y
o
the b
a
WARNI
N
perfor
m
tting Sp
r
pring pol
e
er wood
s
a fallen t
r
ring the b
u
tch out f
o
cking a
L
king is c
u
ight is e
v
ported b
y
low the si
m
. 31), it is
en the lo
derbuck)
N
d Prunin
G! Never
r in any p
o
pruning tr
e
u have c
u
rk from th
e
G! If the
the pru
n
ing Pol
e
is any l
o
o that it s
p
ee, a root
cking cu
t
r spring p
o
og
tting a lo
n
enly distri
b
the use
o
ple direc
cut from
t
g is supp
o
. Then ma
k
g (conti
n
climb into
sition whi
c
es, it is i
m
t off the l
main m
e
limbs to
b
ing!
s
g, branc
h
rings ba
c
ed stump
h
to separ
a
les, they
g into len
g
uted on
f limbs, lo
tions for e
a
he top (o
v
rted on t
h
e the fini
s
ued)
a tree to
l
h may c
a
portant n
o
imb furth
e
mber!
e prune
d
, rooted
s
k if the w
o
as a high
te the lo
g
are dang
e
ths. It is i
m
both fee
t
gs and ch
sy cuttin
g
erbuck).
e end (F
i
hed cut
b
23
imb or pr
u
use you t
o
t to mak
e
r out to re
are abo
v
tump, or
s
od holdi
n
potential
from the
rous.
portant t
o
. When
p
ocks.
. When th
g. 32), c
u
y overbu
c
ne! Do n
o
lose the
b
the flush
duce the
w
e chest
h
s
apling w
h
g it is cut
o
of springi
n
stump.
make su
r
ossible, t
h
e log is su
p
t 1/3 the
king to m
e
t stand o
n
alance o
r
cut next t
o
eight! Th
eight, hir
ich is be
n
r remov
e
g back to
e your fo
o
e log sh
o
ported al
diameter
et the fir
s
ladders,
p
control o
main lim
is prevent
s
e a profe
t under t
e
d.
the uprig
h
ting is fir
m
uld be r
a
ong its en
t
from the
u
t cut.
latforms,
f the saw!
p or trunk
stripping
ssional to
nsion by
t position
and your
ised and
ire length
nderside
Page 25

24
OPERATION
Bucking a Log (continued)
When the log is supported on both ends (Fig. 33), cut 1/3 the diameter from the top
(overbuck). Then make the finished cut by underbucking the lower 2/3 to meet the first out.
When bucking on a slope always stand on the uphill side of the log (Fig. 34). When “cutting
through”, to maintain complete control release the cutting pressure near the end of the cut
without relaxing your grip on the product handles. Don’t let the chain contact the ground.
After completing the cut, wait for the saw chain to stop before you move the product.
Always stop the motor before moving from the tree to tree.
Support small logs on a sawing stand or another log while bucking (Fig. 35).
If the diameter is large enough for you to insert a soft bucking wedge without touching the
chain, you should use the wedge to hold the cut open to prevent pinching (Fig. 36).
Page 26

25
OPERATION
Bucking a Log (continued)
After Use
Switch the product off, disconnect it from the power supply and let it cool down.
Check, clean and store the product as described below.
Page 27

C
L
Th
Ke
Re
Ins
fin
d
G
e
Cl
e
In
p
Re
N
O
to
C
h
au
Sp
r
N
O
Lu
bCle
Usi
an
M
a
th
e
EANIN
G
e Golde
n
WARNI
N
produ
c
ep the pr
o
gular and
pect the
p
broken
a
WARNI
N
All furt
neral C
l
an the p
r
articular
move stu
b
TE: Do no
t
clean this
eck for
w
thorized s
e
ocket Nos
e
TE: It is n
o
rication
c
an the s
p
ng a disp
o
d inject g
r
ke sure t
h
lubricati
o
AND
M
Rules f
o
G! Alway
s
t cool d
o
duct cle
a
proper cl
e
roduct b
e
nd worn
p
G! Only p
her works
eaning
oduct wit
h
clear the
a
born dirt
w
use che
m
product
a
orn or
d
rvice ce
n
o
t necess
a
an be do
rocket no
s
sable lub
e
ease until
at the ch
a
n proced
AINTEN
A
r Care
switch t
h
wn befor
e
n. Remov
e
aning wil
l
fore eac
h
arts.
erform re
p
must be p
a dry cl
o
ir vents(1
ith high
p
ical, alka
l
s they mi
g
amaged
tre for re
p
ry to re
m
ne on the
e(6).
gun, ins
e
it appear
s
in brake(
2
ure until t
h
NCE
e produc
t
performi
n
debris fr
o
help ens
u
use for
w
airs and
m
erformed
b
th. Use a
b
9) after e
v
ressure ai
ine, abras
ht be har
m
parts. Re
p
air befor
e
ove the
s
job.
rt the nos
e
on the o
u
) is deac
t
e sprock
e
26
off, disc
o
g inspect
m it afte
r
re safe us
orn and
d
aintenan
c
y a quali
f
rush for
a
ery use w
r (max. 3
b
ive or oth
e
ful to its
lace wo
using the
aw chai
n
of the n
e
tside ed
g
ivated. R
o
t(6) has b
nnect it f
r
ion, maint
e
each use
e and pro
amaged
p
e work a
c
f
ied speci
a
reas that
a
ith a cloth
ar).
r aggressi
surfaces.
rn parts
a
product
a
(4) to lu
b
edle into
t
e of the s
p
tate the s
een grea
s
om powe
r
nance a
n
and befo
long the li
f
arts. Do
n
cording t
list!
re hard t
o
and brus
h
ve deterg
e
s necess
a
gain.
ricate th
e
he lubric
a
rocket(6
)
aw chain
(
ed.
supply a
n
d cleani
n
re storag
e
e of the
p
ot opera
t
o these in
s
reach.
.
nts or disi
ry or c
o
sprocke
t
tion hole
(
(Fig. 37).
4) by han
d
d let the
g work!
.
roduct.
e it if you
tructions!
nfectants
ntact an
nose(6).
Fig. 37 A)
. Repeat
Page 28

27
CLEANING AND MAINTENANCE
Guide Bar and Saw Chain Maintenance
Most guide bar problems can be prevented merely by keeping the product well maintained.
Incorrect filling and non-standard cutter and depth gauges settings are the causes of most
guide bar problems, primarily resulting in uneven bar wear. As the bar wears unevenly, the
rails widen, which may cause the chain to clatter and make it difficult to complete straight
cuts. If the guide bar is insufficiently lubricated and the product is operated with a saw chain
which is too tight, this will contribute to rapid bar wear. To help minimize bar wear,
maintenance of the guide bar as well as the saw chain is recommended.
Disassemble the guide bar and saw chain in reversed order from assembly.
Check the oiling port (22) for clogging and clean if necessary to ensure proper lubrication of
the guide bar and saw chain during operation. Use a soft wire small enough to insert into the
oil discharge hole.
NOTE: The condition of the oil passages can be easily checked. If the passages are clear, the
chain will automatically give off a spray of oil within seconds of the product starting. Your
product is equipped with an automatic oiling system.
Check the drive sprocket (20). If it is worm or damaged due to strain, have it replaced by an
authorized service agent.
Clear residue from the rails on the guide bar (5) using a screwdriver, putty knife, wire brush or
other similar tool. This will keep the oil passages open to provide proper lubrication to the bar
(5) and chain(4) (Fig. 38).
Check the guide bar “rail” for wear: Hold a ruler (straight edge” against the side of the guide
bar and “cutter side plates”. If there is a gap between the ruler and guide bar the guide bar
“rail” is normal. If there is no gap (ruler flush against the side of the guide bar) the guide bar
“rail) is worn and needs to be replaced with a new one of the same type (Fig. 39).
Turn the guide bar 180eto allow even wear, thereby extending the life span of the guide
bar(5).
Check the saw chain for possible wear and damages. Replace it with a new one if required.
Experienced users can sharpen a dull saw chain (see section “Saw chain sharpening”
below).
Refit the saw chain (4) and the guide bar (5) as described under “Assembly”.
Page 29

C
L
S
a
N
O
int
oHa
ch
su
pThe
th
e
¾
¾
¾
¾
¾
To
¾
¾
¾
Us
e
fil
e
A
f
th
e
EANIN
G
w Chain
TE: Never
o
the tree
ve your c
ain yours
e
plied wit
h
WARNI
N
Use pr
o
height
d
saw cha
i
File angl
e
Cutting
a
File posit
i
Diamete
r
File dept
h
sharpen t
h
Use prot
e
Ensure th
Engage
t
a round
diamete
r
ile guide
i
file at th
e
AND
M
Sharpe
n
saw with
and the
c
hain (4) s
h
lf using
a
the shar
p
G! Only s
h
per tools
ifference
n (4) you
h
ngle
on
of round
e chain,
p
ctive glo
v
e chain is
he chain
b
file, whos
e
is above
t
s availabl
e
correct
p
AINTEN
A
ing
a blunt c
h
hips are v
arpened
proper
ening kit.
arpen th
e
to sharpe
between
t
ave to c
o
file
roceed
a
es.
correctly
t
rake to l
o
diamete
he cutter
’
from m
o
osition.
NCE
ain. The s
a
ery small.
professio
n
sharpeni
n
saw chai
n the saw
he tooth
a
nsider th
e
s follows:
ensioned
.
ck the ch
r is 1.1 tim
s top plat
st reputa
b
28
w chain
i
ally at a
u
g kit. Als
o
n yourself
i
chain!
nd ridge
followin
g
ain on th
e
es the cu
t
e.
le tool m
e
s blunt if
y
thorized s
observ
e
f you are
t
is the cut
t
points (Fi
g
bar.
ting tooth
rchants
a
ou have
t
ervice ce
n
the sha
r
rained an
t
ing dept
h
. 40).
depth. M
a
nd is the
e
o push th
e
tre or sh
a
pening i
n
d have ex
p
. When s
h
ke sure
2
e
asiest w
a
product
rpen the
structions
erience!
arpening
0% of the
y to hold
Page 30

29
CLEANING AND MAINTENANCE
Saw Chain Sharpening (continued)
File at an angle perpendicular to the bar, and at an angle of 25eto the direction of
travel(Fig.41).
File the each tooth from the inside towards outside only. File one side of the chain first than
turn the saw around and repeat the process.
Sharpen each tooth equally by using the same number of strokes.
Keep all cutter lengths equal. Check the safety depth gauge height every 5 sharpenings. If
the depth gauges are also trimmed it is essential that the original profile is restored.
Use a dept gauge measuring instrument to check the height of the depth gauge. Depth
gauge measuring jigs are available from most reputable tool merchants (Fig. 42).
Chain and Bar Replacement
Assemble the guide bar and saw chain before operation. Follow the operating instructions
step-by-step and use the pictures provided as a visual guide to easily assemble the product.
Warning! Read all the instructions carefully! Do not connect the product to the power supply
until it is completely assembled! Always wear gloves during assembly!
Use only the guide bar (5) and saw chain (4) according to the technical data of the product.
Place the product on a suitable flat surface with the cover (10) facing upwards.
Remove the cap (9), loosen the retaining nut (9) anticlockwise with Knob (8) and remove the
cover (10) (Fig.1)
Spread the saw chain (4) out with the cutting edges of the chain pointing in the rotational
direction and side the chain into the groove around the guide bar. (Fig.2)
Page 31

C
L
C
h
Ali
gLay
b
o
EANIN
G
ain and
WAR
N
mee
t
have
prof
e
elimi
n
com
p
conj
u
n the gui
the saw
c
lt. (Fig. 5,
6
AND
M
Bar Rep
l
ING! Alwa
y
s the low-
k
the kick
b
ssional o
p
ated kic
k
lete prot
e
nction wi
t
de bar (5)
hain aro
u
)
AINTEN
A
acemen
y
s use a s
a
ickback r
e
ack redu
c
erator! N
e
back! A l
o
ction ag
a
h other ki
c
and saw
c
nd the dr
i
F
NCE
t (contin
u
w chain
d
quireme
n
ing guar
d
vertheles
s
w-kickba
c
inst injury!
kback pr
o
hain (4)
a
ve sprock
e
ig.1
30
ed)
esigned
a
ts! A stan
d
links) sh
o
, a low-ki
c
k or “saf
e
Therefore
tection d
e
ssembly
w
t and wh
e
s “low-ki
c
ard saw
c
o
uld only
kback sa
w
ty” chain
always us
e
e
vices su
c
ith the dri
v
n lower t
h
kback” o
r
hain (a c
h
be used
b
chain d
should ne
a low-ki
c
h as front
e sprock
e
e guide
b
a saw ch
a
ain whic
h
y an ex
p
oes not c
o
ver be re
g
kback sa
w
guard/ch
a
t (20) and
ar to inst
a
in which
does not
erienced
mpletely
arded as
chain in
in brake!
bolt (23).
ll it to the
Page 32

C
L
C
h
Re
lo
c
N
O
“S
a
ch
Sa
wAlw
a
p
Thi
le
n
Al
w
ch
ch
Te
nten
cu
su
f
EANIN
G
ain and
place the
king nut
c
TE: The sa
w
w chain
ain tensio
n
Chain T
e
ays che
c
proximat
e
s is norm
a
gthen qu
i
WARNI
N
tensio
n
when
h
ays main
ain may j
u
ain! A loo
s
sioning t
h
sion can
tting cha
r
ficient lu
b
AND
M
Bar Rep
l
cover (10
)
ompletel
y
chain (
4
tensionin
g
again.
nsioning
k the sa
w
ly every fi
v
l during t
h
ckly.
G! Unplu
g
! The cut
t
andling t
tain prop
e
mp out o
f
e chain
w
e chain t
o
cause ch
a
acteristic
s
rication a
n
AINTEN
A
acemen
and sligh
, saw ch
a
) has not
”. After o
p
chain t
e
e cuts. A
f
e break-i
the pro
d
ing edge
s
he chain!
r chain t
e
the guid
e
ill cause r
a
o tightly
w
in deraili
n
and pro
l
d correc
t
NCE
t (contin
u
tly tighten
in tension
i
yet been
erating
t
nsion bef
o
ter initial
o
n period
a
uct from
t
of the sa
w
nsion! A l
o
bar groo
pid wear
ill overlo
a
g, where
a
onged w
o
tensionin
g
31
ed)
the Knob
ng is requ
i
tensioned
he produ
c
re use,
a
peration,
nd the i
n
he power
chain a
r
ose chai
n
ve! This m
a
to the ch
a
d the mo
t
a
s a corr
e
rking life
!
(9) clock
w
red first.
. Tension
t
t for ap
p
fter first
c
new chai
n
terval be
t
source b
e
e sharp.
A
increase
s
y injure t
h
in, guide
or and c
a
ctly tight
e
! The cha
ise. (Fig.7
)
he chain
roximatel
y
uts and r
e
s can len
g
ween fut
u
fore adju
s
lways we
a
s
the risk
o
e operat
o
bar and s
use dam
a
ned chai
n
in life ma
)
Do not ti
g
as descri
b
1 hour,
a
gularly
d
then con
s
re adjust
m
s
ting the
s
r protecti
f kickbac
k
r and da
m
procket!
ge, and i
n
provide
s
inly depe
n
hten the
ed under
djust the
uring use
s
iderably.
ents will
aw chain
ve gloves
! A loose
age the
sufficient
the best
ds upon
Page 33

32
CLEANING AND MAINTENANCE
Chain and Bar Replacement (continued)
Set the product on a suitable flat surface.
Turn the tension knob (8)clockwise until the chain “tie straps” are adjust touching the bottom
edge of the guide bar(5) Fig.(8).
Check the chain tension using one hand to lift the saw chain(4) against the weight of the
product. The correct chain tension is achieved when the saw chain can be lifted by
approximately 2-4mm from the guide bar (5) in the centre (Figs. 9, 10).
Turn the knob (9) clockwise to tighten the cover (10) completely (Fig.11).
Power Cord
If the power cord is damaged, it must be replaced by the manufacturer, its service agent or
similarly qualified persons in order to avoid a safety hazard.
Repair
This product does not contain any part that can be repaired by the consumer. Contact a
qualified specialist to have it checked and repaired.
Page 34

33
CLEANING AND MAINTENANCE
Storage
Clean the product as described above.
Store the product and its accessories in a dry, frost-free place.
Always store the product in a place that is inaccessible to children. The ideal storage
temperature is between 10 to 30eC.
We recommend using the original package for storage or covering the product with a
suitable cloth to protect it against dust.
Transportation
Switch the product off and disconnect it from power supply before transporting it anywhere.
Attach transportation guards, if applicable.
Always carry the product by its handle.
Protect the product from any heavy impact or strong vibrations which may occur during
transportation in vehicles.
Secure the product to prevent it from slipping or falling over.
Page 35

TE
V
Th
e
an
Th
e
in
a
CHNIC
A
Rated Vol
t
Power inp
Rated no l
o
Guide bar
Guide bar
Saw chain
V
olume of
Front han
d
Rear hand
Sound pr
e
S
ound po
w
Guarante
e
Protectio
n
Degree o
f
Machine
w
declare
d
d may be
u
declare
d
dvance.
L DATA
t
age
ut power
ad spee
d
length
type
type
oil tank
le a
h
le a
h
ssure leve
er level
L
d sound
p
class
protectio
eight
vibration
sed for c
o
vibration
m
l L
PA
WA
ower lev
e
n
value has
mparing
o
ay also
b
l L
WA
been me
a
ne produ
c
e used ev
a
34
sured in
a
t with an
o
luate the
ccordanc
e
ther.
exposure f
o
ORE
G
O
5.94
4.64
91.70
d
102.70
d
with a st
o
r the user
220-240
V
85
8
3
ON 140S
D
REGON 91
4m/s2, K=
1
4m/s2, K=
1
B(A) K=2
.
B(A) K=2
.
1
0
andard te
s
caused b
y
~ 50Hz
1800W
0 min
-1
60mm
EA041
PJ052X
100ml
.5m/s
2
.5m/s
2
5dB(A)
5dB(A)
8dB(A)
II
IPX0
5.6kg
t method
vibration
Page 36

T
R
Su
s
ch
OUBLE
S
pected
m
eck the p
r
WARNI
N
inspe
c
centr
e
Fault
Motor
d
Chain
d
Poor c
u
perfor
m
Chain
j
guide
b
Chain
w
difficul
Chain
HOOTI
N
alfunctio
n
oduct usi
n
G! Only
tion, main
or a simil
a
oes not r
oes not
m
tting
ance
j
umps off
ar
w
orks wit
h
ty
becomes
G
s are ofte
g this sec
perform
t
tenance
a
rly qualifi
e
Ca
u
un
No
Wo
r
oveCh
a
Blu
n
Ch
aSaw
inc
o
Ch
a
Ch
a
hotCh
a
n due to
c
tion. In m
o
he steps
nd repair
d specia
se
electricity
n carbon
in brake
t saw ch
a
in tensio
n
chain fit
t
rrectly
in tensio
n
in tensio
n
in lubrica
35
auses tha
t
st cases t
h
describe
d
work mus
t
list if you
c
brushes
in
ed
nt
t
the users
e proble
m
within
t
be perfor
annot sol
v
Remedy
Check so
c
Damage
d
by a servi
c
cables wi
t
Damage
d
by a servi
c
See secti
o
Carbon b
r
Check th
e
release if
n
Sharpen
o
chain.
Check ch
a
Check sa
w
Check ch
a
Check ch
a
Check oil
lubricatio
n
can fix th
e
can be
s
hese inst
r
med by a
n
e the pro
ket, cabl
e
cable: H
a
e agent.
h insulati
o
switch: H
a
e agent.
n on chai
ushes ne
e
chain br
a
ecessary
r replace
a
in tensio
n
chain
a
in tensio
n
a
in tensio
n
level. Ch
e
.
mselves.
s
olved qu
i
uctions!
A
authoris
e
blem your
s
s and pl
u
ve repair
e
Do not p
a
n tape.
ve repai
r
n brake.
d replaci
n
ke and
.
the saw
.
.
.
ck chain
Therefore
ckly.
ll further
d service
s
elf!
gs.
d
tch
ed
g.
Page 37

U
T• M• T• R
I
T
E
e
a
o
d
e
E
u
t
d
a
m
u
f
k
G
t
c
s
u
e
e
d
u
v
g
y
S
a
p
u
v
a
a
n
s
d
t
r
y
o
p
t
e
a
a
y
.
o
a
w
s
a
c
n
o
t
t
a
s
n
a
n
u
a
y
e
o
o
t
a
d
d
d
i
e
a
p
a
o
t
a
g
,
d
(
l
g
o
e
e
e
3
i
u
g
e
e
G
RANTE
1.
This prod
faulty ma
till receip
If the pro
2.
replace
same ite
3.
his guara
isuse, ab
rade, pro
epairs att
4.
n the unli
5.
his guara
ct has b
terials an
as proof
uct is fo
ll defecti
or items
ntee does
se or ne
essional o
empted b
ely event
ntee does
en manuf
workma
of purcha
nd to be
e parts or
of a grea
not cove
lect,
r hire use,
anyone
that this
not affec
ctured t
ship for w
e.
efective
, at our di
er value
defects
ther tha
roduct d
your stat
a high q
rranted
ithin the
cretion, r
nd/or spe
aused by
our auth
es devel
utory righ
ality stan
ears from
relevant t
place th
cification.
or resultin
rized rep
p a fault
s.
ard. It is
purchase
me perio
unit free
g from:
ir centre
lease cal
uarante
please r
, we will
of charge
call 0333
the helpl
d against
tain your
ither
with the
00 1614);
ne.
CYCLIN
R
Th
product
p
ckage un
pr
perly. Re
Ol
product
ho
usehold r
an
d protecti
ntre (if th
c
AND DI
comes in
il you are
ycle the
are pote
bbish. Yo
ng the en
re is one
POSAL
packag
sure that
ackage
ntially rec
are requ
ironment
vailable)
that pro
ll parts h
fterward
clable u
ested to
by handi
ects it ag
ve been
.
der WEEE
ssist us an
g in this a
inst dam
elivered
and do n
our con
ppliance
ge durin
and the p
t, therefo
ribution t
t an equi
shipping.
roduct is f
re, belon
saving r
pped coll
Keep the
nction
in your
sources
ction
36
Page 38

P
L
(U
K
If
y
IM
P
Th
e
Bl
u
Br
o
As
c
o
c
o
c
o
N
O
pl
u
UG REP
& IRELAN
D
ou need
t
ORTANT
wires in
t
e = Neutr
a
wn = Live
the colors
lored mar
k
lored blu
e
lored bro
w
WARNI
N
an ap
p
.
TE: If a m
o
g and se
v
LACEME
ONLY)
o replace
he mains
l
l
of the wir
e
ings iden
t
must be
c
n must b
e
G! Never
c
roved 13
A
lded plug
ered cab
l
N
T
the fitted
ead are
c
s in the e
l
ifying the
onnecte
d
connect
onnect li
v
mp BS13
6
is fitted a
n
e, it must
plug then
olored in
a
ectrical c
o
terminals
to the te
ed to the
t
e or neut
r
3/A plug
a
d has to
b
be destro
y
37
follow th
e
ccordan
c
rd of this
in your pl
u
rminal wh
i
erminal
w
al wires t
o
nd the c
o
e remov
e
ed to pre
instructi
o
e with th
e
applianc
e
g, proce
e
ch is mar
k
hich is m
a
the eart
h
rrect rat
e
d take gr
vent eng
a
ns below.
followin
g
may not
c
d as follo
w
ed with N
.
rked with
terminal
o
d fuse
eat care i
n
ging into
a
code:
orrespon
d
s. The wir
e
The wire
w
L.
f the plu
g
disposin
g
a
socket.
with the
which is
hich is
. Only fit
of the
Page 39

Page 40

Page 41

 Loading...