

Page 1
12 LITRE DEHUMIDIFIER
INSTRUCTION MANUAL
Page 2

2
Thank you for selecting super quality dehumidifier. Please be sure to read this manual
carefully before using it. Keep the manual for future reference.
SAFETY INSTRUCTIONS
Please read the operating instructions carefully before using your dehumidifier for the first
time.
1. Install the appliance on flat and hard place to avoid occurrence of vibration and
noise.
2. Never immerse the appliance in water or other liquids.
3. Never operate the appliance if the cable or connector is damaged, or there is
something abnormal may happen.
4. Disconnect the appliance from power supply when it is not in use, or before relocating
or cleaning it.
5. Operate the appliance only at the voltage specified.
6. The appliance is for indoor use only, do not use it for other purpose.
7. Do not put heavy objects on the appliance.
8. Do not cover the unit.
9. To prevent spilling, empty the water tank before restarting the appliance.
10. Do not put the unit close to heat-generat ing devices or near flammable and dangerous
materials, don’t tip the appliance to any side as spilt water could damage the appliance.
11. Never insert any slim rod and hard object into the unit body to avoid occurrence of
hazard or unit failure.
12. Always store the unit upright in order to maintain the compressor in a proper working
condition. Leave the unit upright for at least 24 hours before operating.
13. This appliance is not intended for use by persons (including children) with reduced
physical, sensory or mental capabilities, or lack of experience and knowledge, unless they
have been given supervision or instruction concerning use of the appliance by a person
responsible for their safety. Children should be supervised to ensure that they do not play
with the appliance.
Page 3

3
Don’t try to repair, dismantle or remold such appliance, or it may make some damage.
Even if the supply cord is damaged, it must be replaced by the manufacturer or its service
agent or a similarly qualified person in order to avoid a hazard.
PLACEMENT
When positioning the dehumidifier, ensure that it is placed on a level surface and that there
is a minimum of 10cm of space on either side of the unit to allow for efficient airflow.
We do not recommend the use of an extension lead, so please try to ensure that the unit is
sufficiently close to a fixed main socket. If it is necessary to use an extension lead, please
ensure the diameter of the wires of the cable is at least 1 mm2.
When the dehumidifier is in operation, outside doors and windows should be closed when
necessary for most efficient use.
Make sure that there is no obstruction around the air inlet and the air outlet. The position of
the air inlet and outlet is as below:
Air inlet
Air outlet
Page 4
4
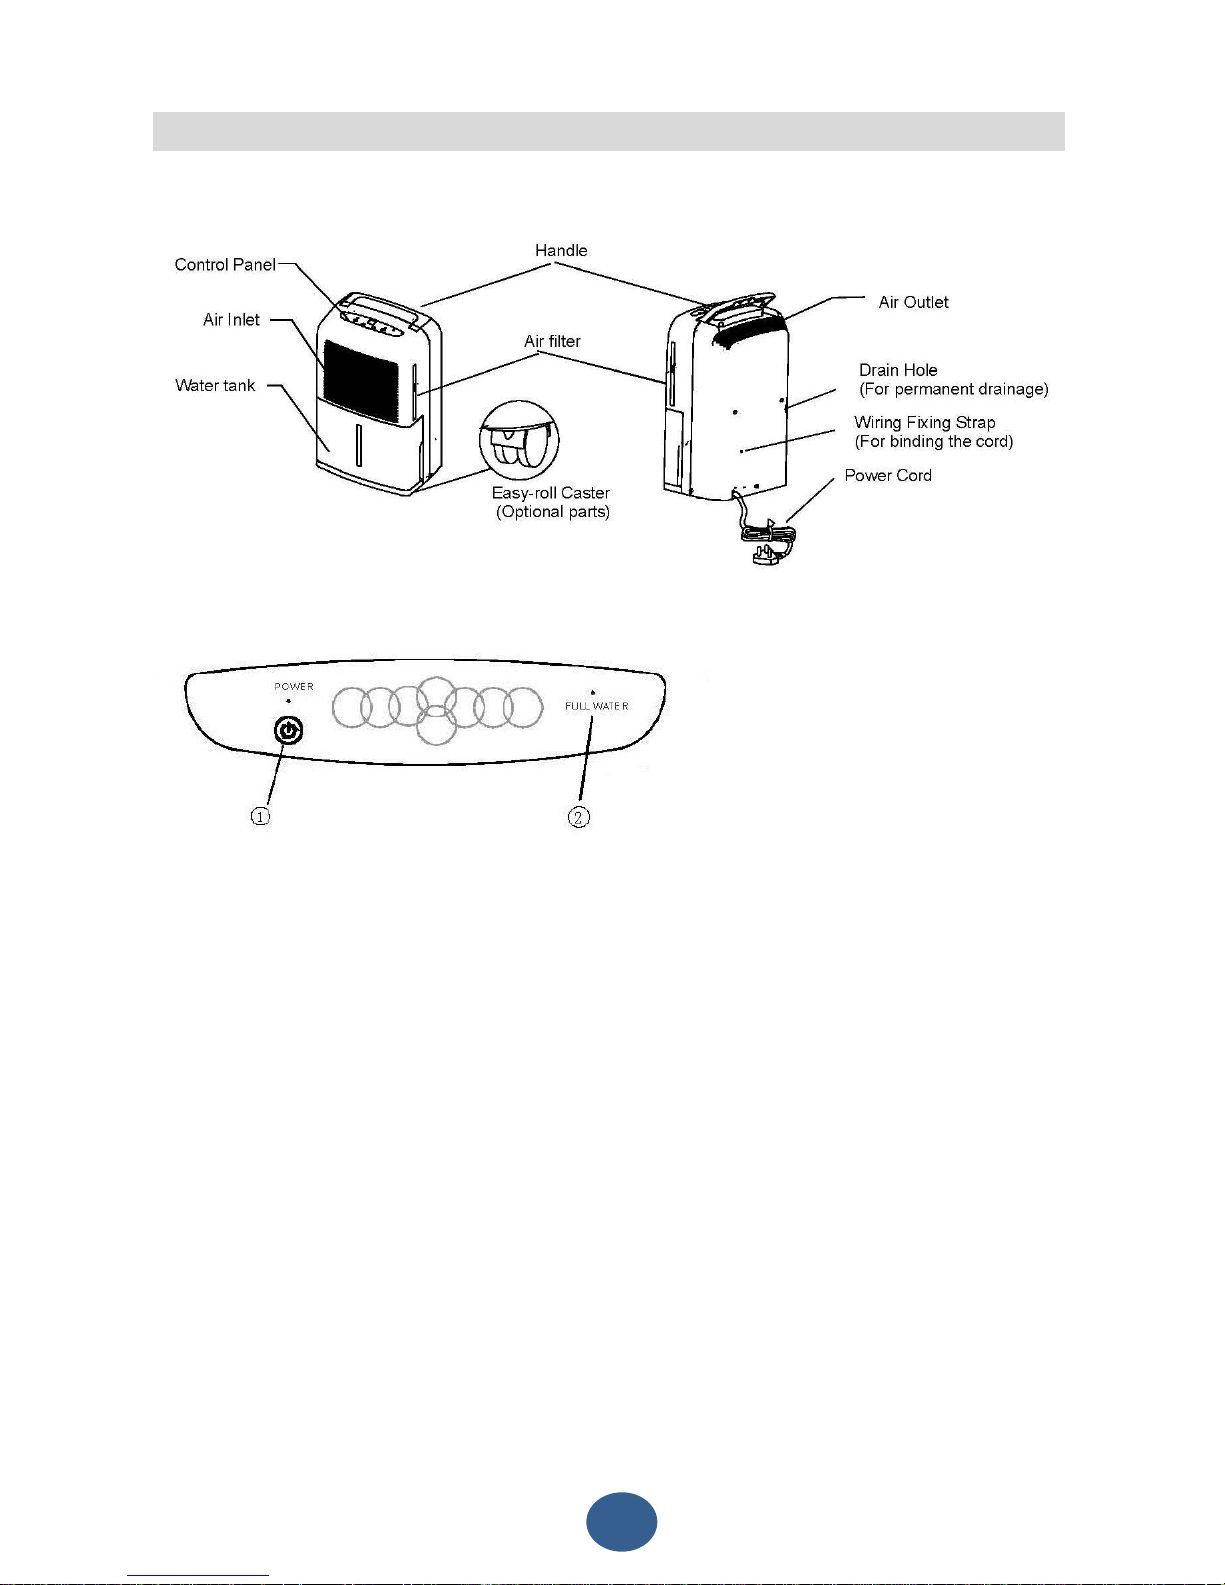
KNOW YOUR APPLIANCE
MAIN UNIT
CONTROL PANEL
(1) ON/OFF button
(2) Full water indicator
Operation
- Plug the unit into a correct mains socket.
- Press the “ON/OFF” button once. The unit will start to work and the power indicator
light will illuminate.
- Press the “ON/OFF” button again. The unit will stop and the power indicator light will
go off.
Note:
1. Do not use the machine when the temperature is over 35℃ or below 5℃.
2. When the unit has been turned off, please wait for at least 5 minutes before turn it on
again. Fails to do this will damage the compressor.
3. This unit is fitted with an auto defrosting function. It will start when the evaporator
generates frost. This function will start to running when the temperature goes down to 5
℃.
Page 5

5
DRAINAGE
While the water tank is full, the compressor will stop and the water full indicator light will
illuminate.
To remove the water tank, pull it out carefully from the unit.
After empting the water tank, place the tank back to the unit. Make sure it is properly
positioned, in order for the water full indicator light to go out and your dehumidifier is
operating.
Please note, in case, the water tank has not been positioned well, the water full indicator
light will still illuminate.
CONTINUOUS DRAINAGE
When the dehumidifier is operated at very high humidity levels, the water tank will require
more frequent drainage. In this situation, it may be more convenient to set the unit up for
continuous drainage with the following procedures:
1. Remove the water tank from the unit.
2. Remove the rubber water stopper in the continuous drainage port. Keep the rubber
water stopper in a safety place for future use.
3. Remove the plastic cover carefully at the back of the unit.
4. Prepare the water tube (not included) with 13.5mm internal diameter and 1.5mm
thickness.
5. Insert the tube through the hole at the back to the front.
6. Connect the tube to the continuous drainage port.
7. Put the water tank back to the unit.
8. Ensure the water will always drain away freely and the tube will remain in right place &
the water tank is in correct position.
NOTE : In very cold weather conditions, precaution should be taken to prevent the water
tube from freezing.
If it is no longer to use the continuous drainage, please follow the below procedures :
1. Remove the water tank from the unit.
2. Remove the water tube from the continuous drainage port. Then pull it out from the
hole at the back of the unit.
Page 6

6
3. Insert the rubber water stopper to the continuous drainage port.
4. Put the water tank back to the unit.
Continuous drainage hole
Water tube
Rubber water stopper
Remove the plastic cover and insert
the water tube through the hole.
Page 7

7
CLEANING
Always unplug the unit from the power supply before beginning cleaning to avoid
electric shocks.
Housing
- Use a soft, damp cloth to wipe the cabinet clean. Never use strong chemicals, oil-based
products, detergents, chemically treated cloths or other cleaning solution. These could
damage the cabinet.
Filter
- It is recommended to clean the air filter once every two weeks.
-Remove the water tank and extract the filter holder.
-Use a vacuum cleaner or tap the filter lightly to remove loose dust and dirt from the filter.
Rinse the filter frame thoroughly under running water.(Do not warmer than 40℃).
- Dry thoroughly before replacing.
- Do not expose the filter to sunlight.
WARNING: Never operate the dehumidifier without the filters.
Put back the filter carefully
after cleaning.
Remove the filter on
the side carefully.
Page 8

8
STORAGE
If not use the unit for an extended period of time. Please:
- Turn the unit off and unplug it from the mains.
- Completely empty the water tank and wipe it clean.
- Cover the unit and store where it will not receive direct sunlight.
TROUBLE SHOOTING
Never try to repair or dismantle the dehumidifier yourself. Incompetent repairs result in loss
of warranty and can endanger the user and the property.
Problem Possible Cause Solution
Has the power cord
been
disconnected?
Plug the power cord into
the outlet.
Is the tank full
indication blinking?
(the tank is full or in
a wrong position)
Empty the water in the
drainage tank and then
reposition the tank.
The unit doesn't operate
Is the temperature
of the room above
5℃ or below 35℃?
The protection device is
activated and the unit
cannot be started.
Is the air filter
clogged?
Clean the air filter as
instructions.
The dehumidifying
function doesn't work
Is the intake duct or
discharge duct
obstructed?
Remove the obstruction
from the discharge duct
or intake duct.
No air is discharged
Is the air filter
clogged?
Clean the air filter as
instructions.
Is the unit tilted or
unsteady?
Move the unit to a
stable, sturdy location.
Operation is noisy
Is the air filter
clogged?
Clean the air filter as
instructions.
Page 9

9
TECHNICAL DATA
Model MDF-12DMN3
Mains 220V-240V ~50Hz
Power W 260W
Ampere consumption A 1.4 A
Dehumidification capacity
(30℃ RH 80%)
L/24h 10 L/24h
Dehumidification capacity
(32℃ RH 90%)
L/24h 13 L/24h
Air volume(max) m³/h 120 m³/h
Refrigerant load g R134a/130 g
Compressor TATUNG FE140Y-E
Recommended room size m2 Up to 20 m2
Water tank L 3 L
Dimensions(W*H*D) mm 315*505*235mm
Weight Kg 15.5Kg
WASTE ELECTRICAL PRODUCTS SHOULD NOT BE DISPOSED OF WITH
HOUSEHOLD WASTE.PLEASE RECYCLE WHERE FACILITIES EXIST CHECK
WITH YOUR LOCAL AUTHORITY FOR RECYCLING ADVICE.
Page 10

10
Page 11

11
 Loading...