

Page 1
10 LITRE DEHUMIDIFIER
INSTRUCTION MANUAL
MODEL NO. : MDDN-10DEN7-QA3
Page 2
2
Thank you for selecting super quality dehumidifier. Please be sure to read this manual
carefully before using it. Keep the manual for future reference.
SAFETY INSTRUCTIONS
Page 3
3
Page 4
SERVICE OPERATIONS
4
Page 5
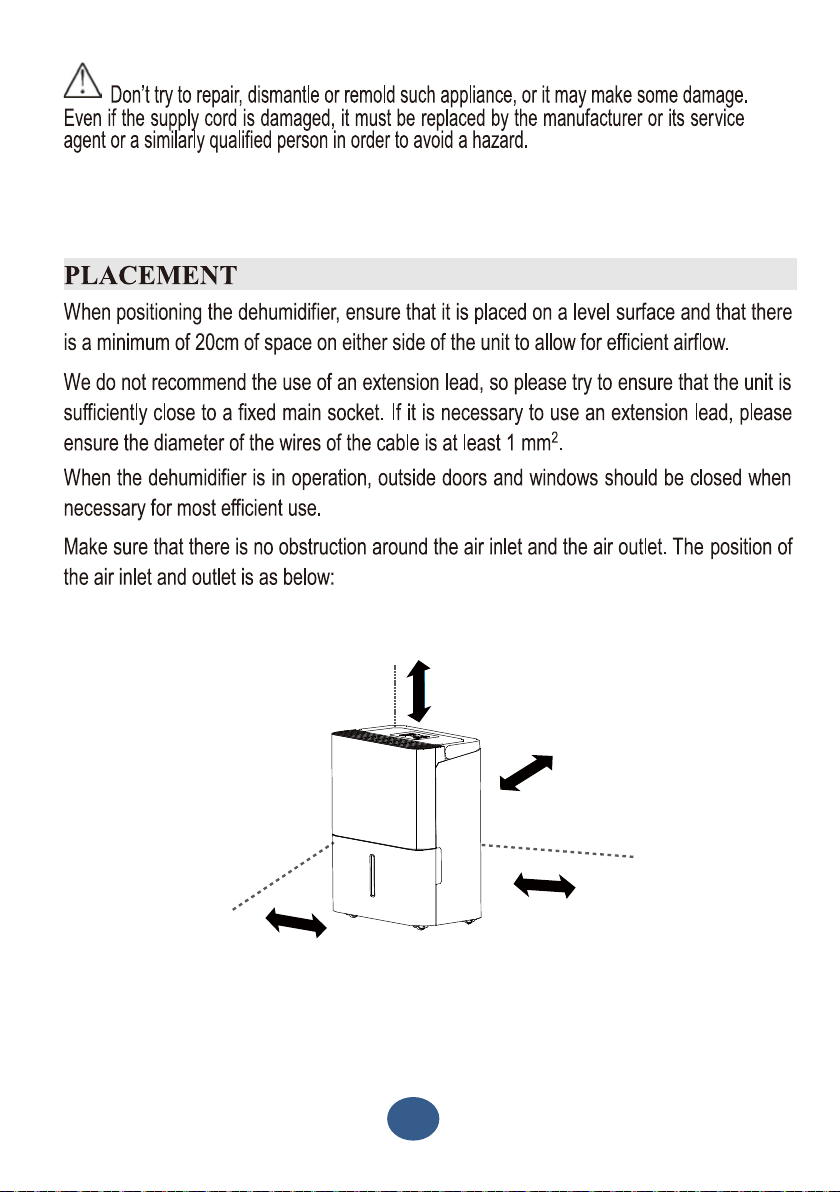
more than 20cm
more than 40cm
more than 20cm
more than 20cm
5
Page 6
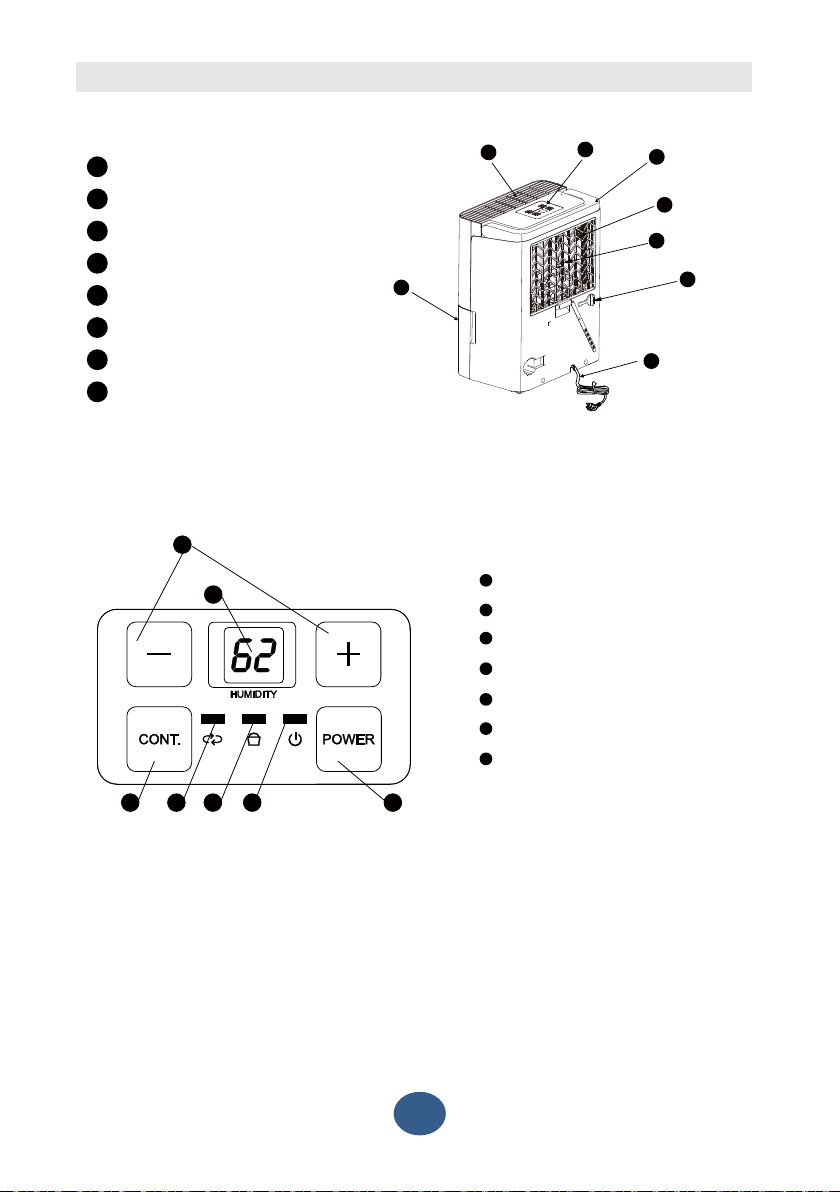
KNOW YOUR APPLIANCE
MAIN UNIT
Control panel
1
Air outlet grille
2
Water tank
3
Handle
4
Air inlet
5
Air filter
6
Drain hose outlet
7
Power cord and plug
8
CONTROL PANEL
6
7
3
2
1
Power on indicator light
2
Water full indicator light
3
Continuous operation on indicator light
4
5
Continue operation button
6
Humidity set control buttons
7
Display
1
4
5
6
8
snottub F FFFO / NO rewoP
7
3
5
2 1
4
6
Page 7

Operation
Power on indicator light
1
This indicator light remains on when the unit is switched on and turns dark
when the unit is switched off.
Water full indicator light
2
Glows when the bucket is ready to be emptied, or when the bucket is removed or
not replaced in the proper position.
Continuous operation on indicator light
3
This indicator light illuminates when the continuous operation is on.
Power ON / OFF buttons
4
Press to turn the dehumidifier on and off. It illuminates when the unit is
switched on and turns dark when the unit is switched off.
When Humidity/Temperature sensor malfunction occurs, it blinks at 5 times per
seconds.
Continue operation button
5
Press the button once to active the continuous operation mode. The relevant indicator
will illuminate. The unit will continue to running. Humidity set control function cannot be
used. Press the button again to cancel the function.
Humidity set control buttons
6
The humidity level can be set within a range of 35%RH(Relative Humidity) to
8 %RH(Relative Humidity) in 5% increments.
5
The unit will continue to operate until the desire humidity level has reached.
Display
7
It will display the room humidity level. While any humidity control button has
been pressed, it will display the desire set humidity level. Then It will revert to
back to the room humidity level.
7
Page 8

DRAINAGE
While the water tank is full, the compressor will stop and the unit will display "P2" , the
water full indicator light will illuminate.
To remove the water tank, pull it out carefully from the unit.
After empting the water tank, place the tank back to the unit. Make sure it is properly
positioned, in order for the water full indicator light to go out and your dehumidifier
is ope
Please note, in case, the water tank has not been positioned well, the water full indicator
light
1. Pull out the bucket from the unit. 2. Pour the water out.
rating.
will still illuminate.
water outlet
CONTINUOUS DRAINAGE
When the dehumidifier is operated at very high humidity levels, the
water tank will
require more frequent drainage. In this situation, it may be more convenient to set the
unit up for continuous drainage with the following procedures:
1 . Cut off the plastic cover located at drain hose outlet by a scissor. Remove the rubber water
stopper in the drain hose outlet. Keep the rubber water stopper in a safety place for future use.
2. Prepare the water tube (not included) with 13.5 mm internal diameter and 1.5 mm thickness.
3. Connect the tube to the drain hose outlet at the back.
4. Ensure the water will always drain away freely and the tube will remain in right place & the
water tank is in correct position.
NOTE:
In very cold weather conditions, precaution should be taken to prevent the water tube
from freezing.
If it is no longer to use the continuous drainage, please follow the below procedures :
1. Remove the water hose from the drain hose outlet of the unit.
2. Insert the rubber water stopper to the drain hose outlet.
Cut off the plastic
cover, then attach
the water hose to
the drain hose outlet.
Do not block water flow by a rise.
Do not block water flow by a retortion.
8
Page 9

CLEANING
Always unplug the unit from the power supply before beginning cleaning to avoid
electric shocks.
Housing
- Use a soft, damp cloth to wipe the cabinet clean. Never use strong chemicals, oil-based
products, detergents, chemically treated cloths or other cleaning solution. These could
damage the cabinet.
Filter
- It is recommended to clean the air filter once every two weeks.
- Grip the tab on the filter and pull it upward, then pull it out.
- Clean the filter with warm, soapy water. Rinse and let the filter dry before replacing it.
Do not clean the filter in a dishwasher.
- Do not expose the filter to sunlight.
STORAGE
If not use the unit for an extended period of time. Please:
- Turn the unit off and unplug it from the mains.
- Completely empty the water tank and wipe it clean.
- Cover the unit and store where it will not receive direct sunlight.
9
Page 10

TROUBLE SHOOTING
Problem
Possible Cause
Solution
5℃ or below 35℃?
er
.
?
.
Never try to repair or dismantle the dehumidifier yourself. Incompetent repairs result in loss
of warranty and can endanger the user and the property.
The unit doesn't operate
The dehumidifying
function doesn't work
No air is discharged
Has the power cord
been disconnected?
Is the tank full
indication blinking?
(the tank is full or in
a wrong position)
Is the temperature
of the room above
Is the air filt
clogged?
Is the intake duct or
discharge duct
obstructed?
Is the air filter
clogged
Plug the power cord into
the outlet.
Empty the water in the
drainage tank and then
reposition the tank.
The tank is not
positioned correctly, pull
it out and push it in
again until the tank full
indicator goes off.
The protection device is
activated and the unit
cannot be started.
Clean the air filter as
instructions
Remove the obstruction
from the discharge duct
or intake duct.
Clean the air filter as
instructions
10
Page 11

TECHNICAL DATA
Model MDDN-10DEN7-QA3
Mains
Power W 340W
Ampere consumption A 1.9A
Dehumidification capacity
(30℃ RH 80%)
Air volume(max) m³/h 107 m³/h
Refrigerant load g R290/45g
Compressor TATUNG FX170M-E
Recommended room size m2 Up to 31 m2
Water tank L 2.1 L
Dimensions(W*H*D) mm 320*420*215 mm
Weight Kg 11.3Kg
2012/19/EU for
L/24h 10 L/24h
220-240V~ 50Hz, 1Ph
11
Page 12

lf a 13 Amp (BS 1363) fused plug is used it must
be fitted with a 13 Amp fuse. lf in doubt consult a
qualified electrician.
Wiring for a 13 Amp Plug (BS1363)
lf a 13 Amp (BS 1363) plug is used , it must be fitted with a 13 Amp Fuse
conforming to BS1363 and be ASTA approved. lf in doubt consult a qualified
electrician who will be pleased to do this for you.
12
13Amp
Page 13

13
Page 14

14
Page 15

15
Page 16

16
Page 17

17
Page 18

18
Page 19

PRODUCT GUARANTEE
This product is guaranteed against manufacturing defects for a period of
Year
This product is guaranteed for twelve months from the date of original purchase.
Any defect that arises due to faulty materials or workmanship will either be replaced,
refunded or repaired free of charge where possible during this period by the dealer from
whom you purchased the unit.
The guarantee is subject to the following provisions:
The guarantee does not cover accidental damage, misuse, cabinet parts, knobs or
consumable items.
The product must be correctly installed and operated in accordance with the instructions
contained in this manual. A replacement copy of this instruction manual can be obtained
from www.argos-support.co.uk
It must be used solely for domestic purpose.
The guarantee will be rendered invalided if the product is re-sold or has been damaged by
inexpert repair.
Specifications are subject to change without notice.
The manufacturer disclaims any liability for the incidental or consequential damages.
The guarantee is in addition to, and does not diminish your statutory or legal rights.
Guarantor: Argos Ltd
489 - 499 Avebury Boulevard
Central Milton Keynes
MK9 2NW
www.argos-support.co.uk
19
Page 20

 Loading...