

Page 1
MODEL NO. HTJ-2027
3.2L ULTRASONIC HUMIDIFIER
INSTRUCTION MANUAL
Important - Please read these instructions carefully before first
using this product and retain for future reference.
Page 2

SAFETY INSTRUCTIONS
1. Install the appliance on a flat and firm surface to avoid vibration and
noise.
2. Never immerse the appliance in water or other liquids.
3. Never operate this appliance if the cable or connector is damaged or
if there is any abnormal operation.
4. Disconnect the appliance from the mains when it is not in use, or
before relocating or cleaning it.
5. Operate the appliance only at a mains supply of 220-240V~50/60Hz
6. This appliance is for indoor use only.
7. Do not put heavy objects on the appliance.
8. Do not disassemble, so as to avoid electric shock. No user
serviceable parts inside
9. Do not damage the mains cord by excessive bending or knotting, and
do not put pressure on the cable grips, as this can cause short circuit
and fire.
10. Do not put the unit close to heat-generating devices or near
flammable and dangerous materials. Do not tilt the appliance, as split
water could damage the appliance.
11. Do not use around flammable or corrosive, gases and conductive
dust.
12. This appliance can be used by children aged 8 years
and above and persons with reduced physical, sensory
or mental capabilities or lack of experience and
knowledge if they have been given supervision or
instruction concerning use of the appliance in safe way,
and understand the hazards involved. Children shall not
play with the appliance. Cleaning and user maintenance
shall not be made by children without supervision.
Do not try to repair, dismantle or modify the appliance
as this may damage the unit. If the supply cord is
damaged, it must be replaced by the manufacturer, or
its service agent or a similarly qualified person in order
to avoid a hazard.
Page 3
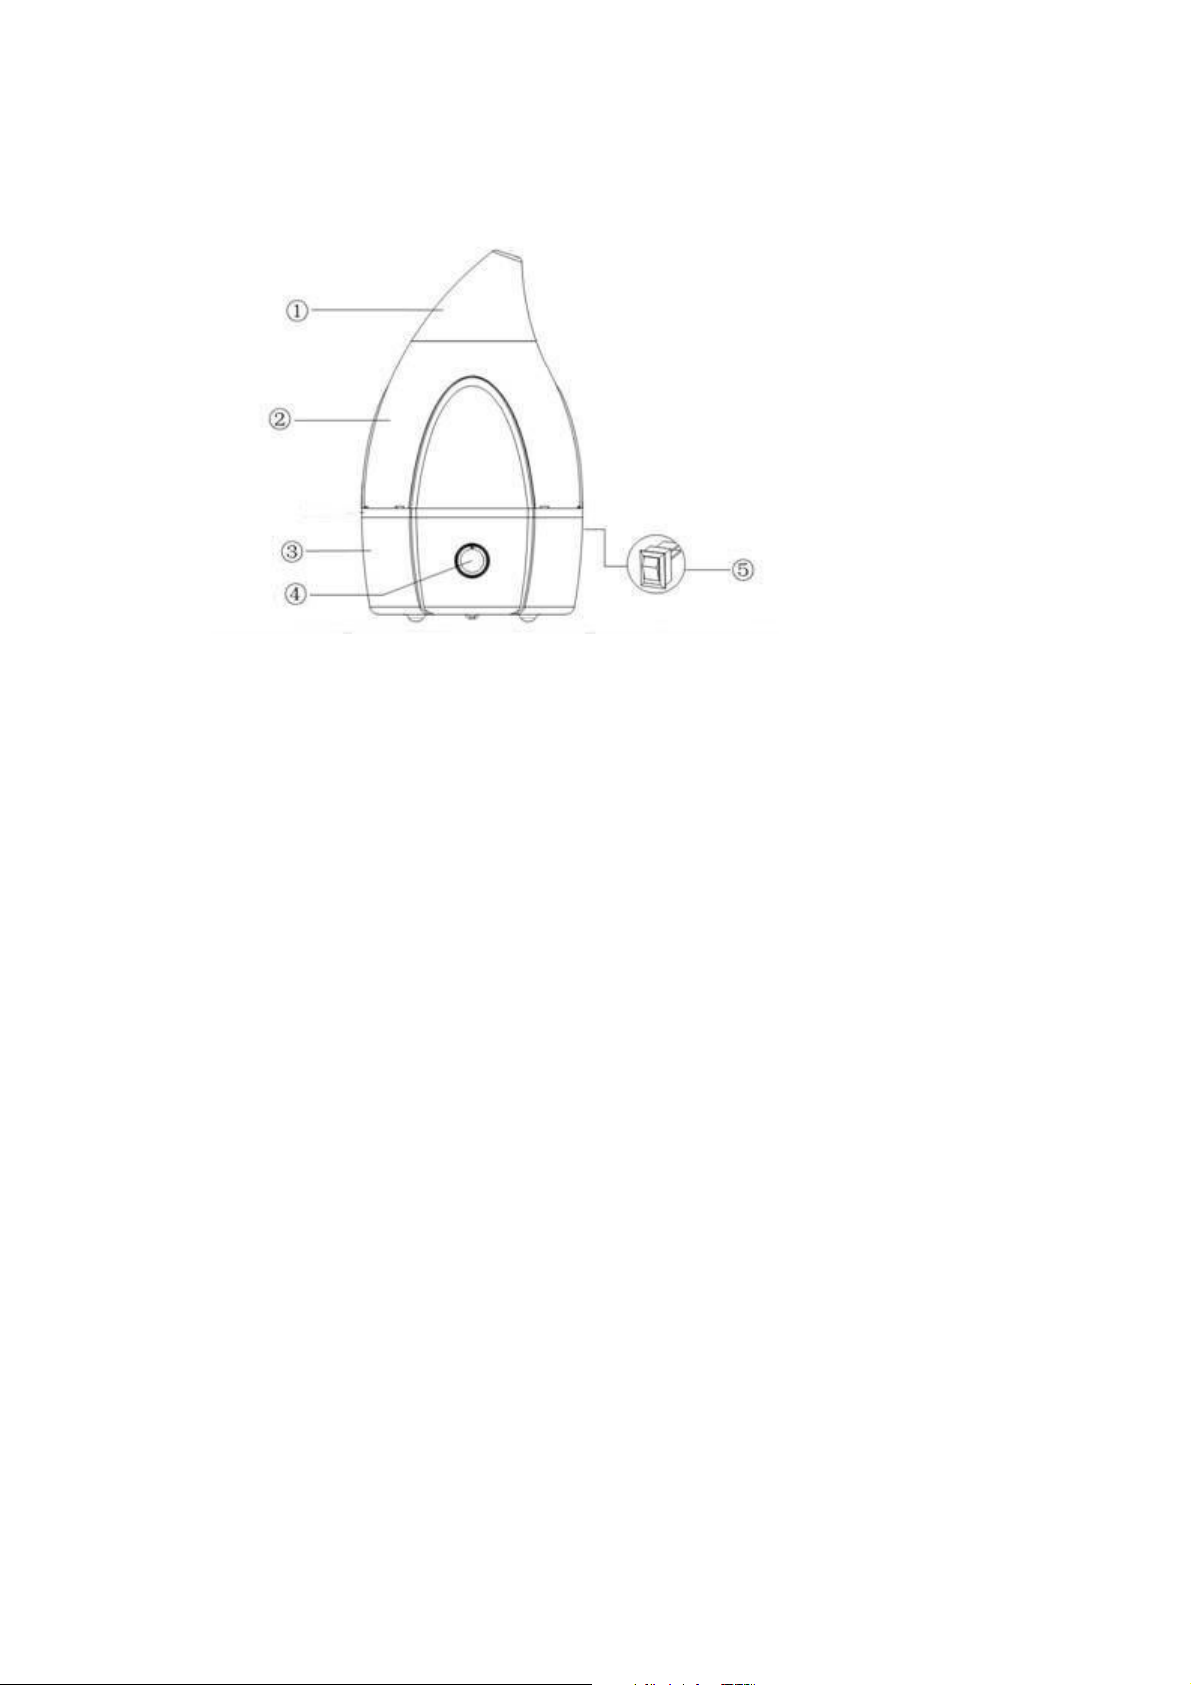
KNOW YOUR APPLIANCE
1. Fog nozzle
2. Water tank
3. Base
4. Control Knob
5. Main Power switch
First time use
Filling the water tank:
We recommend using distilled water to avoid limescale build-up but if
using tapwater in a hardwater area we recommend regular cleaning to
avoid limescale build-up. Make sure water temperature does not exceed
40°C.
(Put the appliance down on a suitable flat horizontal surface, and where it is to
be used.)
Note: Do not use on any surface that may be damaged by water, (during refill
some water drops may be spilt)
Page 4
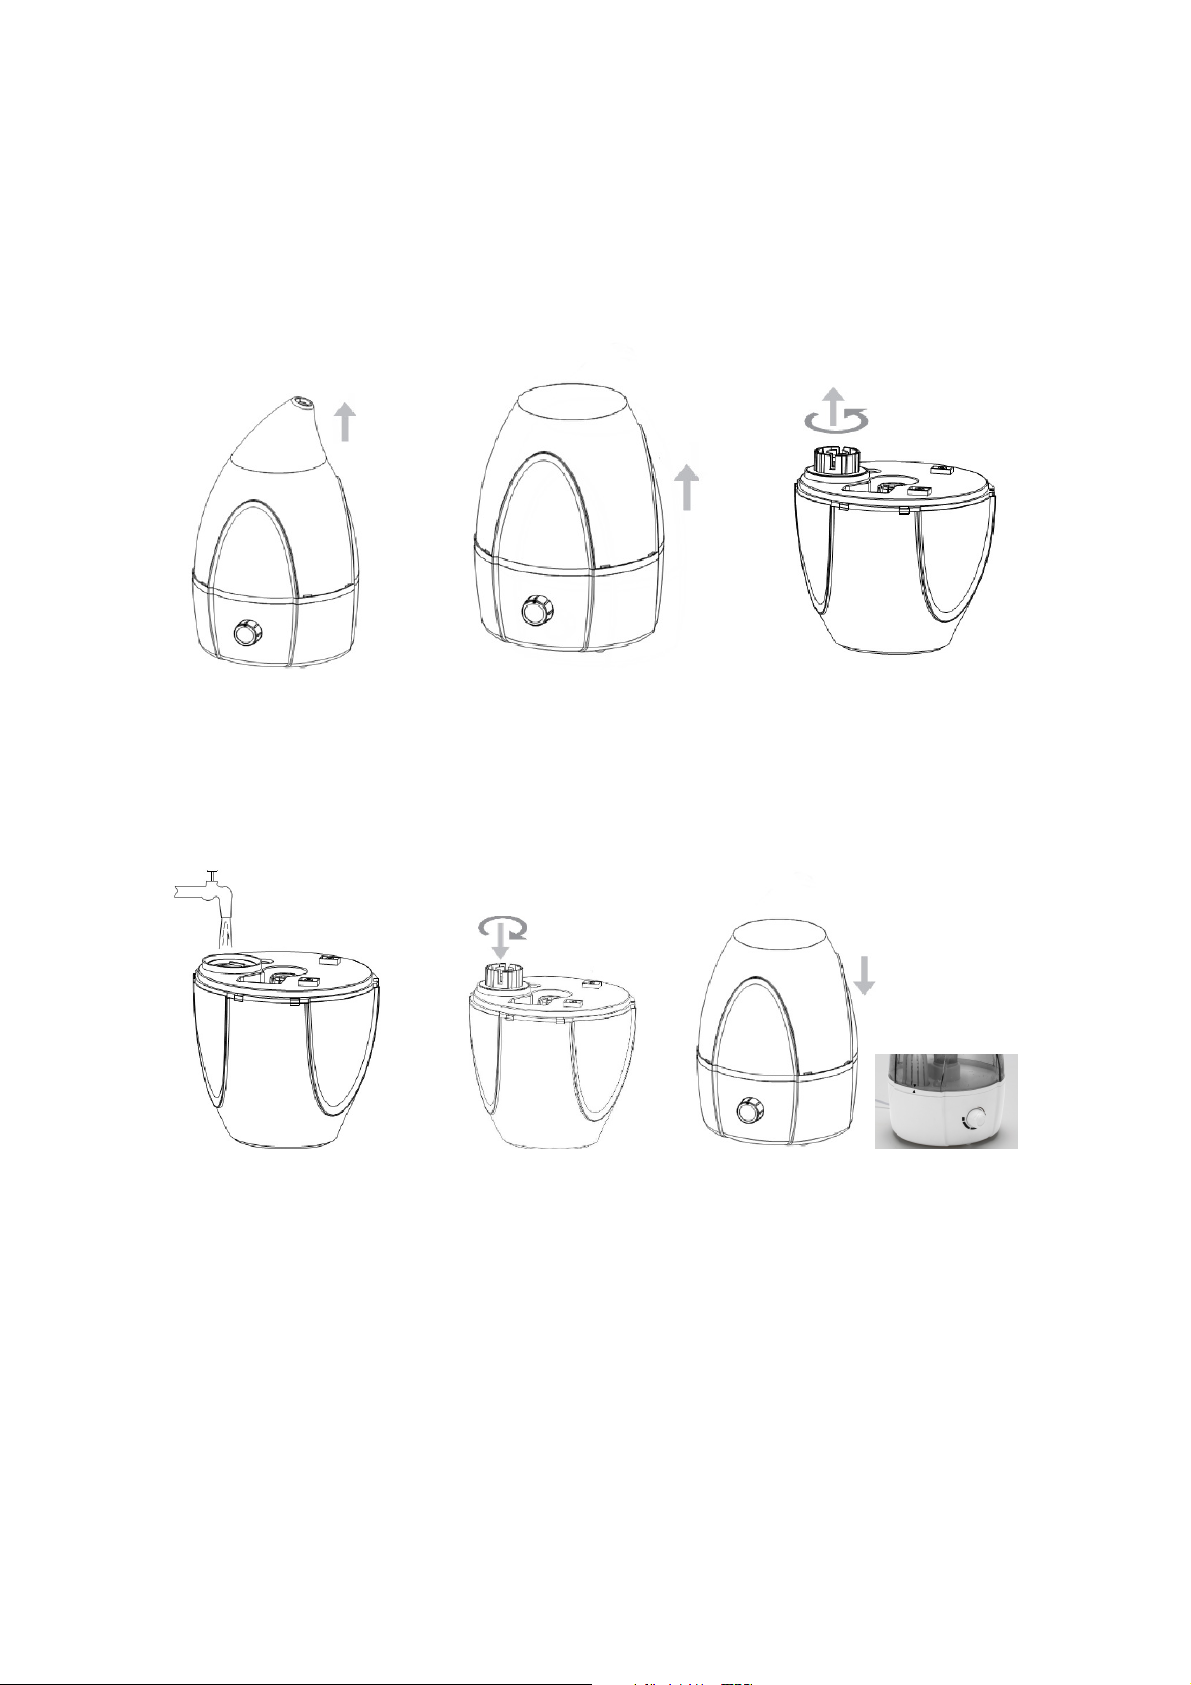
1. Remove the white fog nozzle (1) from the top of the blue water tank. Never
remove or fill the water tank with the fog nozzle attached.
2. Remove the blue water tank from its base, and turn the tank upside-down.
3. Unscrew the filler cap with filter in the direction shown, and remove.
Take off the nozzle Lift off water tank Turn over, unscrew the cap
4. Fill from the tap or distilled water container to the top of upturned tank or as
much as required
5. Replace filler cap/filter assembly.
Fill (tap or Jug) Fasten the cap Fit tank to base as align marks
Align marks
6. Turn the tank over and wipe away any spilt water, carefully fit the tank onto the
base, taking care to align correctly noting the alignment marks on the base unit
and tank.
7. Refit fog nozzle (1)
8. Plug in to a 220-240V~50/60Hz, wall socket, and switch on with units main
power switch (5)
Note: If the indicator light is Red, water is still filling the flume (in the base
unit), wait until it turns Blue, the unit will start working.
Page 5

In use:
Turn control knob (4) to set the vapor release rate depending on requirement,
including dryness or size of room.
When the tank is short of water, the indicator will turn Red once again, and vapor
release will stop. Turn off and un-plug the unit from the wall socket.
How to re-fill with water:
1. Remove the white fog nozzle from the top of the blue water tank. Never
remove or fill the water tank with the fog nozzle attached.
2. Carefully remove the blue water tank from its base, and turn the tank
upside-down.
Note: During this process the flume (in the base unit) will be full of water, lift off
the tank into a towel to catch drips if necessary.
3. Continue as step 3 (See “First time use”)
CLEANING
Always unplug the unit from the mains before commencing any cleaning in order
to avoid the risk of electric shock.
Tank cleaning
Remove the water tank (2) from the unit and unscrew the water cap. Wipe away
any limescale present with a clean soft cloth then wash it with clean water. We
recommend cleaning the water tank every 2 to 3 weeks.
Page 6
Flume cleaning
If there is any limescale in the flume, wipe it with a soft cloth and wash it with
clean water.
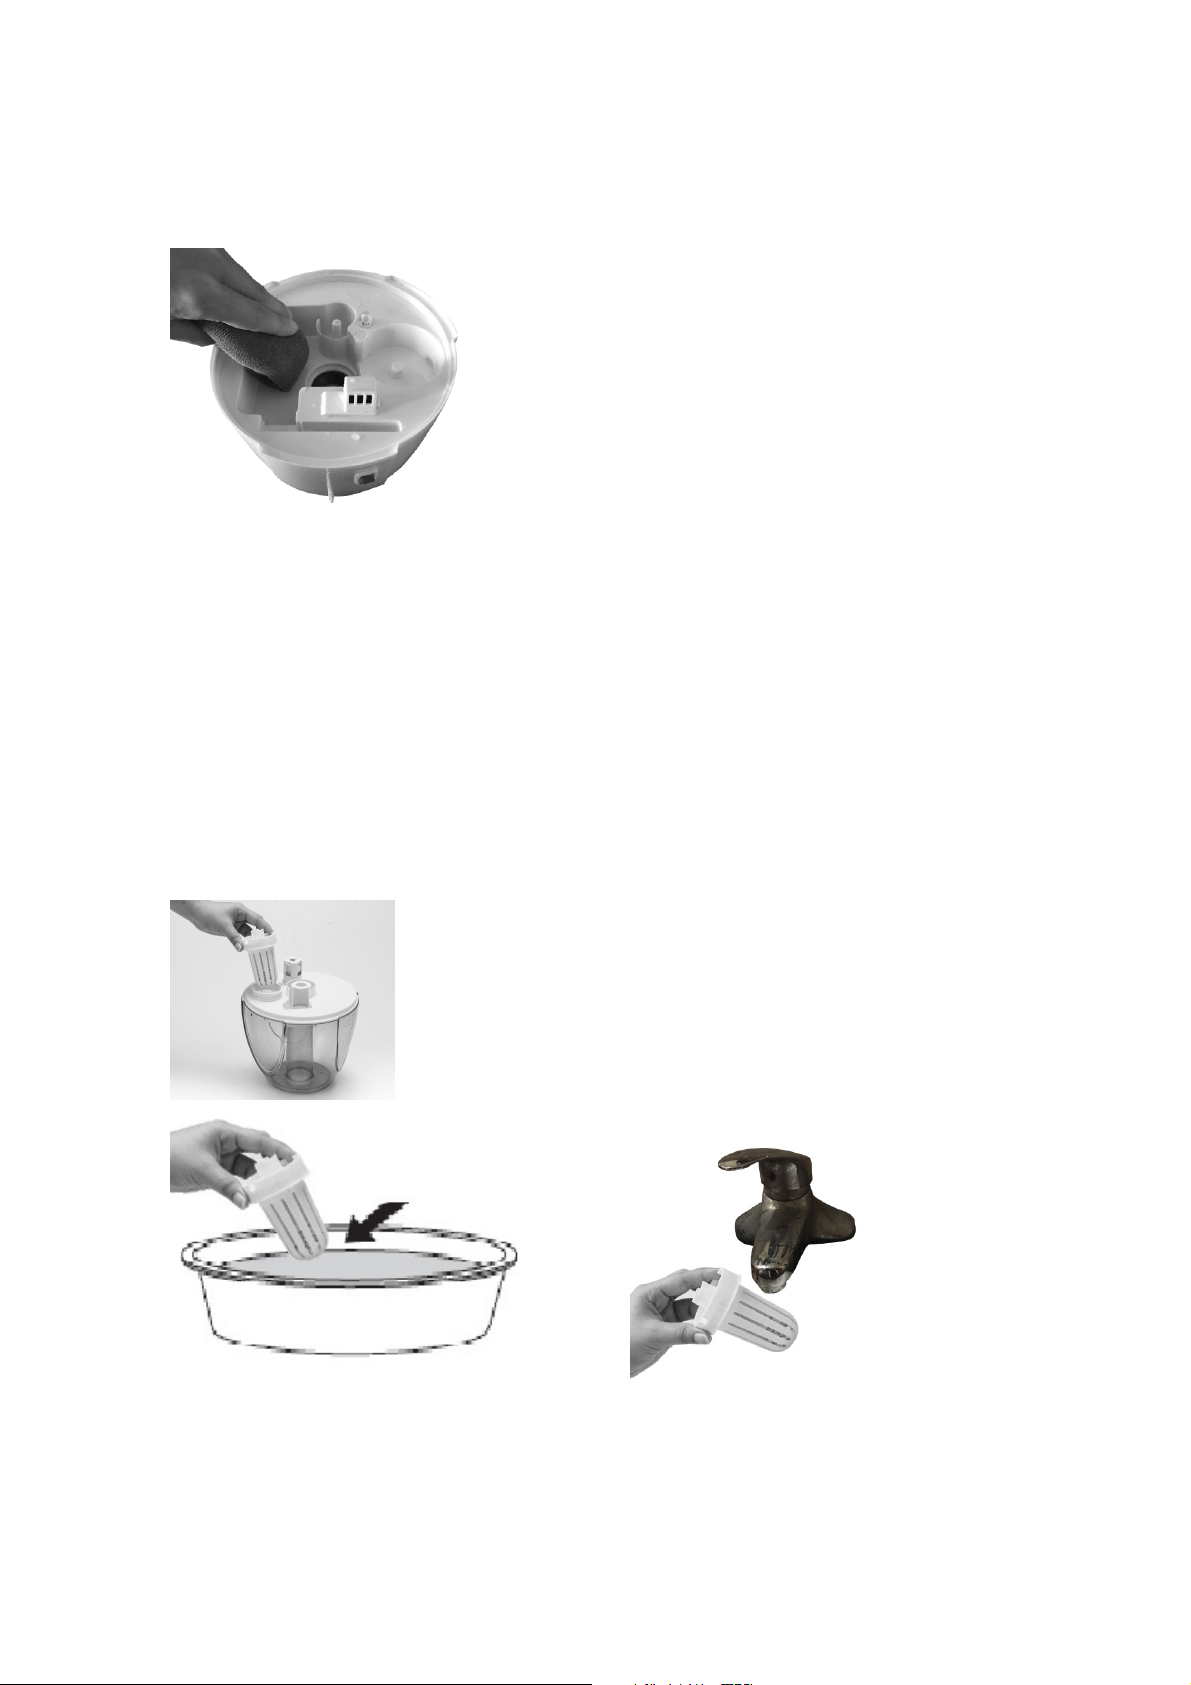
Atomiser chip cleaning
Apply detergent to the surface of the atomiser chip and then pour in warm water
and wait for 5 minutes. Gently brush around the opening and rinse again with
clean water. Take special care not to submerge the main unit in water or splash
the controls.
Note: Only use a small amount of water to clean the atomiser chip and base unit,
do not rinse under a tap as this will damage the unit.
Maintenance of Water Filter
Remove the water filter from the unit by unscrewing. Wash the filter in warm
soapy water and rinse thoroughly. Refit the water filter.
Page 7
STORAGE
If not using the unit for an extended period of time, please:
o Turn the unit off and unplug it from the mains.
o Completely empty the water tank and wipe it clean.
o Completely drain the base unit and wipe dry
o Cover the unit and store away from direct sunlight.
TROUBLE SHOOTING
Never try to repair or dismantle the humidifier yourself. Incompetent repairs
result in loss of warranty and can endanger the user and property.
PROBLEM CAUSE
No operation and no lights Check mains plug is fully inserted and
socket switched on
Make sure the power switch (5) is turned on
Blue light, no vapour Check whether there is water in tank
Turn up adjustment knob
Lift off and refit the tank
Vapour has bad odour Unit needs cleaning and drying for 12 hours.
Small amount of vapour Atomiser chip dirty or lime scale buildup
Water being stored for too long causing lime
scale build-up.
PURCHASING REPLACEMENT FILTER
Replacement filter is available for purchase. If you would like to purchase a filter,
please phone 0843 289 9160 between the hours of 8:30am – 4:30pm, Mon-Fri.
Waste electrical products should not be disposed of with
general household waste, please recycle in accordance with local regulations.
Page 8

CAUTIONS
When using this humidifier, please comply with the following safety measures:
Carefully read all the instructions, even if you are very familiar with this
product.
This humidifier is designed for use in the UK; if used in any other country
please check your supply voltage is compliant with product specifications.
Please do not use the humidifier in drafty areas and radiation areas.
Keep as far away from machinery, furniture, and electrical products.
When not in use turn off, unplug, empty the water, and dry completely.
Water must not be allowed to enter the lower section of the base unit.
Do not touch the water in the flume or parts in water when the unit is on.
Do not wash, adjust or move the humidifier without first unplugging it from
mains.
Prevent water from getting into the inside of the unit when washing.
Do not put chemicals, detergents into the atomiser as dangerous vapors can
be emitted.
While the unit is operating, do not move it otherwise water spillage and
contamination of the lower base unit may cause serious damage.
If the temperature is likely to fall below 0°C the unit must be fully emptied.
Never turn whole unit upside down while on or off, water contamination or
atomizer chip damage could occur.
Do not pull at the power cord or damage may occur, power cord can only be
replaced by the manufacturer, or its service agent or a similarly qualified
person
This product is intended for use as an indoor air humidifier, and should not
be used for any other purpose.
After use, the humidifier should be switched off by pressing the “On/Off”
button to the “Off” position.
Never operate unit without water in the tank.
Always keep the unit upright to avoid water leakage.
SPECIFICATIONS
Product Name Ultrasonic Humidifier
Model HTJ-2027
Rated voltage 220-240V~50/60Hz
Rated power 18-25W
Water tank capacity 3.2L
Rating Humidity 250ml/hr
Page 9

CONNECTION TO POWER
• Before connecting, check that the voltage indicated on the appliance
corresponds with the mains voltage in your home. If this is not the case,
consult your dealer and do not use.
• This appliance may be fitted with a non-rewirable plug. If you need to change
the fuse in a non–rewirable plug, the fuse cover must be refitted. If the fuse
cover is lost or damaged, the plug must not be used until a replacement is
obtained.
• If the plug has to be changed because it is not suitable for your socket, or
becomes damaged, the appliance should be disconnected from the mains
power supply. The plug should be cut off and an appropriate plug fitted
following the wiring instructions. The removed plug must be disposed of
safely as insertion into a mains socket is likely to cause an electrical hazard.
• This equipment must be disconnected from the mains when not in use. Do
not allow this unit to be exposed to rain or moisture.
For your own safety read the following instructions carefully before
attempting to connect this unit to the mains.
You should only plug the appliance into a 220-240V AC, 50/60Hz supply.
Connecting it to other power sources may damage the appliance.
The wires in the mains lead are coloured in
accordance with the following code:
BLUE = NEUTRAL
BROWN = LIVE
IMPORTANT
The colours of the wires in the mains lead of this appliance may not correspond
with the coloured markings identifying the terminals in your plug, proceed as
follows:
Caution
To prevent electric shock disconnect from the
mains before removing the cover
• The blue wire must be connected to the terminal marked with the letter N or
coloured black
• The brown wire must be connected to the terminal marked with the letter L or
coloured red.
If a 13 Amp (BS 1363) fused plug is used it must be fitted with a 3A fuse
conforming to BS 1362 and be ASTA approved.
If in doubt contact a qualified electrician.
Page 10

 Loading...