

Page 1

-12-
Environment & Guarantee
Environmental protection
Recycle unwanted materials instead of disposing of them as waste. All tools and
packaging should be sorted, taken to the local recycling centre and disposed of
in an environmentally safe way.
If faults cannot be remedied, contact the Helpline on
GUARANTEE
This product is selected for DOMESTIC USE ONLY and not for business use.
This product is guaranteed against manufacturing defects for a period of 12months.
This does not cover the product where the fault is due to misuse, abuse, use in
contravention of the instructions, or where the product has been the subject of unauthorised
modifications or alterations, or has been the subject of commercial use.
In the event of a problem with the product within the guarantee period please return it to
your nearest Argos store.
If the item is shown to have an inherent defect present at the time of sale, the store will
provide you with a replacement. Your statutory rights remain unaffected.
08707252949
Issue 1 D.S. 10/2006
ARG, Retail Group
MK9 2NW.
CGT180
18V CORDLESS GRASS TRIMMER
Page 2

13.Do not run with the grass trimmer.
14.Only use your trimmer for cutting grass
and seed, never for other purpose.
15.Only use the grass trimmer in daylight
or good artificial light.
16.Before use, check the grass trimmer is
in good condition and that it is
operating properly. Pay special
attention switch and cutting head.
17.Switch on the grass trimmer according
to these instructions and keep you
hands and feet well away from the
cutting line
18.Always hold your grass trimmer firmly
make sure you always maintain a good
balance and secure footing.
19.Make sure the open side of the
protection guard is pointing away from
yourself before you switch on the
trimmer.
20.Do not operate the grass trimmer on
wet grass, or under damp condition.
21.Take special care in slippery conditions
on slops and uneven ground.
22.Watch for hidden obstacles such as
tree stumps and roots to avoid
stumbling
23.Check the cutting head at regular
intervals. If the behavior of the cutting
head changes (noise, vibration), check
immediately as follows: switch off the
trimmer, hold it firmly and bring the
cutting head to a standstill by pressing
it against the ground. Then remove the
battery pack. Check condition of the
cutting head, look for crack.
24.Have the damaged cutting head
replaced immediately even if it only
has superficial cracks. Never attempt
to repair a damaged cutting head
25.Only use original cutting heads and
replacement spools. Never use metal
cutting device
26.Warning! Danger of injury by the line
cutting device. After replacing a spool,
Safety Instructions
-2-
WARNING! Read all instructions. Failure
to follow all instructions listed below may
result in electric shock, fire and/or serious
physical injury. Make sure you fully
understand and observe the safety
precautions and warning before starting
and using the trimmer for the first time.
SAVE THESE INSTRUCTIONS
1. Always take ear protection, if the noise
pressure level at the place of work
exceed 85dB
2. Wear protective glasses or goggles.
3. Your grass trimmer is a high-speed,
fast cutting power tool. Therefore,
special safety precautions must be
observed to reduce the risk of personal
injury.
4. Never allow children or people
unfamiliar with these instructions use
the grass trimmer
5. The operator or user of this grass
trimmer is responsible for accidents or
hazards occurring to other people or
their property.
6. Keep children and bystanders away.
7. Always wear substantial footwear and
long trousers. Always care your foot
while trimming.
8. Do not operate this grass trimmer
when barefoot or wearing open
sandals.
9. Never use the grass trimmer with
damaged guard or without guard in
place.
10.Never work with a trimmer while under
the influence of alcohol or drugs.
11.Never attempt to modify your trimmer
in any way since it may increase the
risk of personal injury.
12.Do not use wire or metal reinforced line.
This excludes all liability for personal
injury or damaged to property caused
by use or impermissible modification.
Safety Instructions
be sure to bring the unit into normal
working position before turning it on
again.
27.Warning! The nylon line continue to
rotate after the motor is switch off.
28.Warning! Do not put your hands or feet
near or under the rotating parts when
the machine rotating
29.Warning! Never pick up or carry the
trimmer while the motor is running.
30.Warning! Switch off the trimmer and
remove the battery pack, if :
l Whenever you leave the machine
l Before checking, cleaning and working
on the appliance.
l After striking a foreign object. Inspect
the appliance for damage and make
repair.
l The grass trimmer starts to vibrate
abnormally.
31.Keep air ventilation clear. Clean the
plastic parts with damp cloth.
32.Never leave you grass trimmer
outdoors in rain. Store your tool in a dry,
high place, keep out of reach of
children.
IMPORTANT NOTE
ALWAYS REMOVE BATTERY
BEFORE CLEANNING, REPAIR
AND STORAGE.
Intended use
This product is selected for DOMESTIC
USE ONLY and not for business use.
-2-
-3-
Page 3
Charging the battery pack
Your grass trimmer need 3-5 hours charge
before use. To charge battery, first remove
battery pack from trimmer. Press the
release button on the battery pack, pull the
battery out.
Power connection
Check the voltage given on the charger
matches the supply voltage.
Charging the Battery
The charger and grass trimmer battery
pack in this pack are specifically designed
to work together. Do not attempt to use the
grass trimmer battery pack with any other
charger.
Important notes for chargering the
battery
The battery is supplied UNCHARGED
from the factory. It will be necessary to
charger the battery for approximately 3-5
hours before use.
Do not charge a battery when it or the air
O
temperature is below 4 C.
Between charge cycles rest the charger for at
least 15 minutes.
In a warm environment or after heavy use,
the battery pack may become too hot to
permit charging. Allow time for the battery
to cool down before recharging.
When the battery is charged for the first
time and after prolonged storage, the
battery will only accept approximately 60%
charge. However, after several charge and
discharge cycles the battery will accept a
100% charge.
To Charge the battery
Challenge Grass Trimmer
:
:
:
:
Charger voltage
Battery voltage
Battery
No-load Speed:
Cutting width
TECHNICAL SPECIFICATIONS
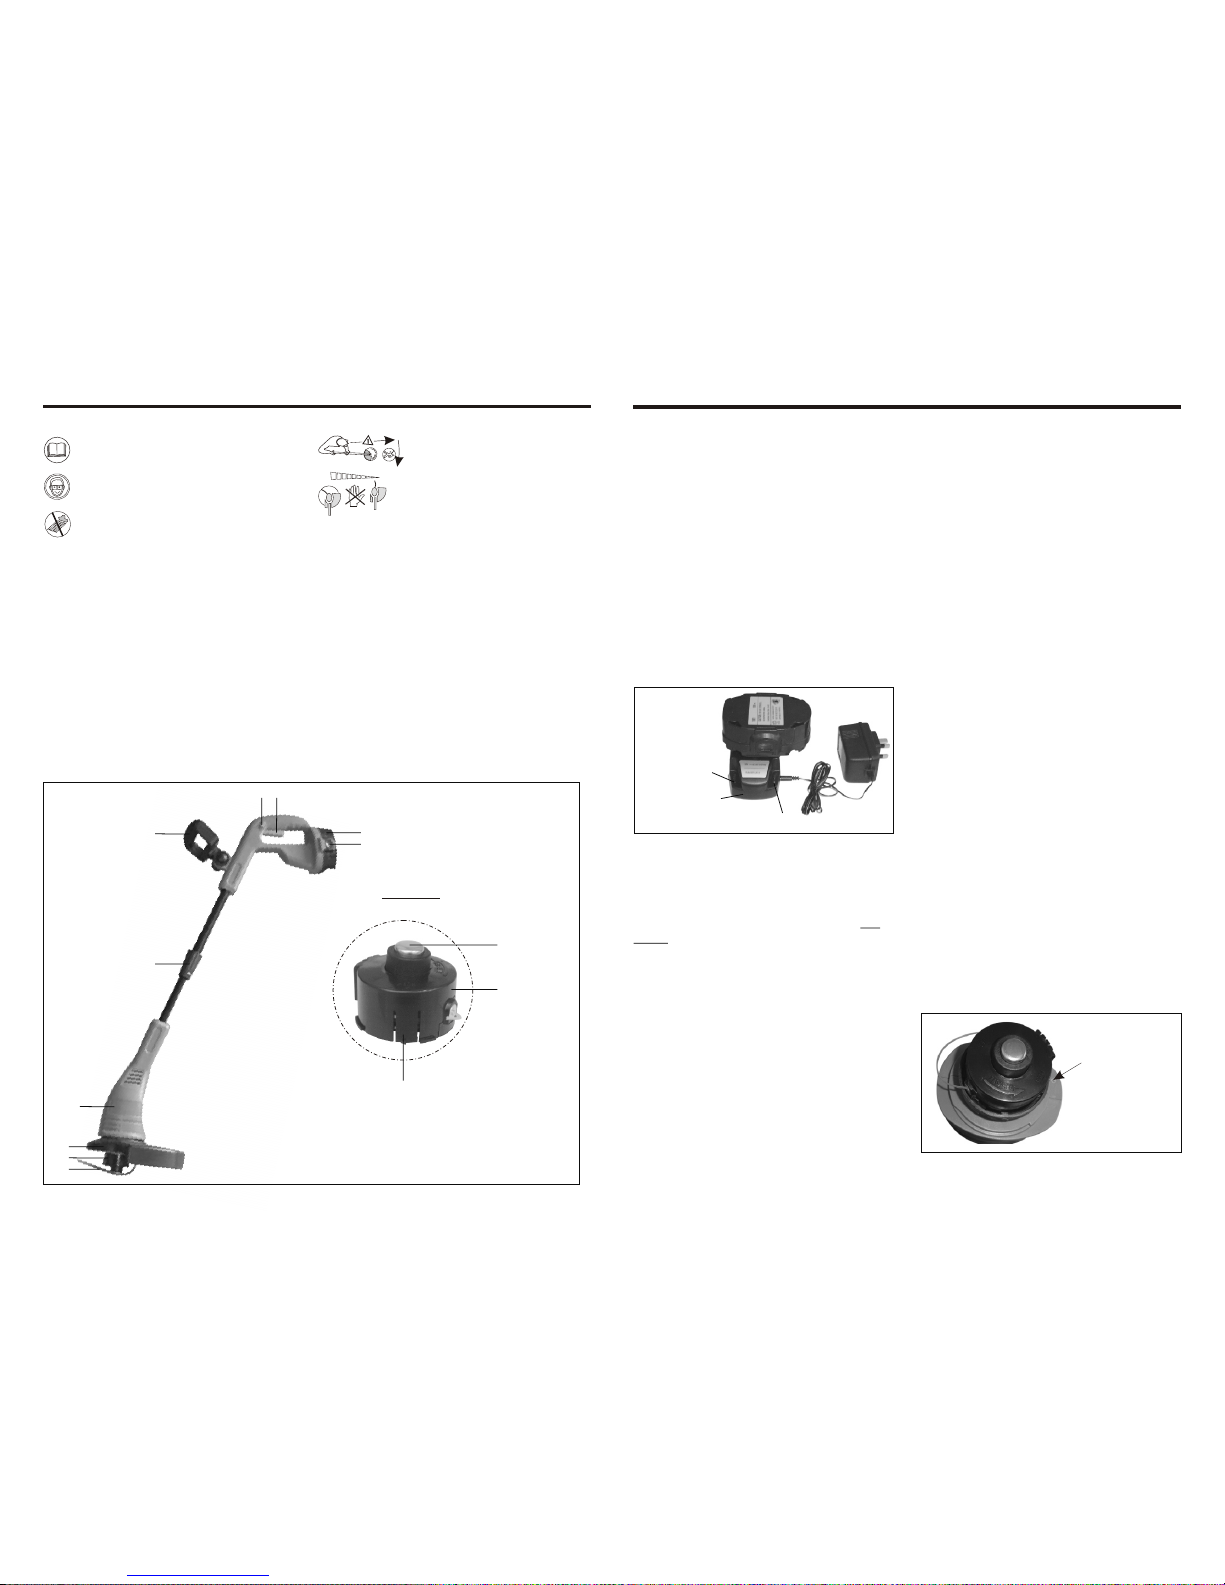
COMPONENT LIST
1
2
3
4
On/off switch
Safety switch
Additional handle
Height adjustment locking mechanism
5 Motor housing
SYMBOL EXPLANATION
Read the instruction manual
prior to operation.
Wear eye protection
Do not expose to moisture
o
3
6
0
Keep bystanders away
Do not touch the nylon line
until it stops completely
when replacing new line
Grass Trimmer - Assembly
Locking mechanism on both sides
Spool cover
Spool
8 DETAI
SCALE 3:1
L
1
9
3
-4-
-5-
Input: 230V~ 50Hz
Output: 20Vdc 400mA
18Vdc
15 x 1.2V dc Ni-Cd battery
8100rpm
230mm
6
7
8
9
10
Guard
Cutting head
Strimmer line
Battery pack
Battery release button
:
:
:
:
:
Charger time
Weight
A-weighted sound pressure level
A-weighted sound power level
Vibration
3
2
m/S
-5hours
3.2kg
77dB(A)
87dB(A)
7.45
l Connect the charger to the charging
base, and plug the charger plug into a
suitable 230 volt mains socket, then
insert the battery pack into the charging
base, the indicator (red) will illuminate to
show that charging is taking place.
l A fully-discharged battery will take
approximately 3-5 hours to reach full
charge. When charging is complete,
unplug the charging plug from the wall
socket.
Note: The charger will not automatically
switch off when the battery is full charge,
and the red indicator will remain on. Do not
leave your battery on charge continuously.
This may damage the battery cells.
Warning! Do not charge the battery
exceeds 10 hours.
Using Battery Pack
After charging, you need replace the
battery pack on the grass trimmer body,
before inserting the battery pack into grass
trimmer:
Ensure that any fitting has been fitted
securely and that any adjustment device
has been removed. The relevant fasteners
have been secured tightly in place and the
work piece is adequately secured.
Note: Always ensure the battery is
disconnected before making any
adjustments.
2. Position guard with inner side, ie.
moulding facing you as shown in Dia. 2.
ASSEMBLY INSTRUCTION
Guard fitting
1. Position motor head/axle as shown in
dia 1, with screw fixing hole at the top
centre (remove pre-fitted screw)
Dia. 1
2
10
4
5
6
7
8
Charging
indicator (Red)
Power indicator (Green)
Charging base
Remove pre-fitted
screw prior to
fitting guard.
Page 4

Grass Trimmer - Operation
Grass Trimmer - Operation
-7-
-6-
3. Lower the guard over the motor
head/axle (see Dia.3 ) and align slots as
shown in Dia. 4 (note position of the tab).
4. Align marks on head of the unit and the
guard, turn the guard in a clockwise
direction, see Dia 4.
WARNING! Take great care when doing
this as the guard has a very sharp
cutting edge
Charging the battery pack
5. Keep turning the guard until it locks into
position (the tab will lock into place),
insert screw into screw hole at top
centre and tighten. The guard is now
installed, see Dia5
Fitting the additional handle
Note: This may be fully assembled when
you get the machine, however this
instruction gives you full assembly details.
1. Fit the additional handle over the mow
shape support on the trimmer.
2. Insert the locking wheel into the support
with its two pins aligning with the holes
in the support.
3. Pass the bolt through the hole in the
additional handle support from the other
side.
4. Locate and secure the big knob on the
bolt.
Adjusting additional handle
Dia. 2
Dia. 3
Dia. 4
Dia. 5
You can now adjust and locate the handle
in the most suitable position. Release the
knob, then adjust handle angle and tight
the knob again. See Dia 6.
Preparing the trimmer for use
1. Adjust the main shaft to the correct
working length for your physical size. To
do this, turn the height adjustment
locking mechanism clockwise to unlock
and pull/push the lower shaft to the
desired length. Turn the locking
mechanism anti-clockwise till the shaft
is firmly locked. See Dia 7
2. Check the length of the nylon cutting
line, pull line to inner edge of outer
guard, if the line is very short, i.e. more
than 50mm away from edge of guard,
push down on centre of cutting head
and at the same time pull the line a few
centimeters beyond the guard (see Dia
8 ), when the trimmer starts the line will
automatically be cut to the correct
length.
3. When you need to increase the line
length during use you can simply 'bump
feed' the trimmer to restore line to
correct length. To bump feed, turn on
the trimmer and gently bump the top of
the cutting head on a firm surface, the
line will be automatically extended and
cut, see Dia 9
OPERATING THE TRIMMER
1. To switch on the trimmer, press the
safety switch, then close upon the
On/Off switch. Release the On/Off
switch to stop, see dia 10.
2. If you find that the nylon line is too short
follow the instruction as in 'Preparing the
trimmer for use' section 4 (dia 8)
l Let the trimmer run for a few seconds
without touching the working area, and
allow the trimmer to cut the line.
l Use the trimmer at an angle of
approximately 20 degree to the working
area, see Dia 11.
l Swing the trimmer from side to side, see
Dia 12.
Dia. 10
Dia. 8
Dia. 9Dia. 9
tab
Lower into position
align slotsand
Caution:
Sharp cutting edge!
Align marks
on head and
guard
Insert and
tighten screw
Tab in locked position
Note position of
slots and tab
Dia. 6
Additional handle
Securing bolt
Knob
Locking wheel
under the knob
Dia. 7
U
n
lo
c
k
L
o
c
k
1
2
Dia 11
Page 5

Grass Trimmer - Operation
-9-
3. Do not overload your trimmer, take
small 'bits' this will keep machine
operating at high speed and will greatly
improve cutting efficiency, see dia13
and dia14.
4. Use the edge of the guard as a guide
when using near fences walls etc, and
move in a backwards direction, this will
save damage, see Dia 15 and Dia 16.
REPLACING THE CUTTING LINE
Warning! Always remove the battery
pack before carrying out any
maintenance
Note: Use the same diameter nylon line
for replacement, DO NOT use metal or
other material line.
1. To replace the nylon line, first remove
the spool cover from the spool holder by
pressing the spool cover locking
mechanism from the both sides and at
the same time hold the bottom of the
cutting head firmly. Rotate the spool
cover as Dia 17 and 18 direction, the
spool cover will spring up.
2. Insert the line into the small hole in the
end spool and wind the line around the
spool in direction as shown in Dia 19
Note: the line must be wound uniformly
around the spool, or you may
Dia. 17
Dia 12
Dia. 18
experience some line breakage or
vibration.
3. Insert the line through the hole in the
spool cover, pull the line out( to save it
snagging in cutting head body and
lower the spool at an angle) see Dia 20.
4. Push spool with spool cover against the
spring firmly downwards till it lowers into
position. Depressed the locking
mechanism inwards, then turn in arrow
direction till it locks in place, release the
locking mechanism, now the spool
cover is replaced. See dia 21.
Follow the instruction on cutting the line in
"preparing the trimmer for use" section 2
and 3. Before use.
Note: New line can be purchased from
any good garden or DIY center.
Warning! Always let the machine run
for 1-2 mins to check if the cutting head
is in good condition. If noise or
vibration found, switch off and remove
the battery, refit the spool cover.
MAINTENANCE AND STOREAGE
Important note:
Always remove battery
before cleanning, repair and
storage.
1. Always remove the battery pack
whenever you carrying out any cleaning
or repair.
2. Your tool requires no additional
lubrication or maintenance. There are
no user serviceable parts in your tool.
3. Never use water or chemical cleaners to
clean your power tool. Wipe clean with a
dry cloth.
4. Always check the cutting head and
guard before each use.
5. Always store your power tool in a dry
place.
6. Keep the motor ventilation slots clean.
7. Have the unit professionally repaired
should any damage occurs.
TROUBLE SHOOTING
Although your new cordless grass trimmer
is really easy to operate. If you do
experience problems, check the following:
If grass trimmer will not operate
l Check battery pack assembly
l Charge the battery: running of the grass
trimmer is dependent upon sufficient
charge in the battery pack. The battery
charge will deplete if not used for a long
period of time. Try recharging the
battery pack. Ensure that the battery
pack is fully contacted charger base.
Note: The battery pack will only fit into the
charger with + to + and - to -. The charger
will not operate at extremes of temperature.
The charger will get warm during charging
but this is normal.
If the battery will not charge
Check to see if the battery is properly
inserted the charger base, and make sure
the indicator light is on, if not check the
mains supply.
If the trimmer is not cutting properly
Check the condition of the cutting head, if
the cutting line is too short or cutting head
damaged. Note: do not use damaged
cutting head.
Dia. 20
Spool cover
Locking
mechanism
on both sides
Dia. 19
Hole in the
end speel
Dia. 21
2
1
Grass Trimmer - Operation, Maintenance and Troubleshooting
Dia. 15
Dia. 16
Page 6

If battery pack leaks
A small amount of leakage may occur at
extremes of temperature or after heavy
use. Wash off any leakage from hands,
skin or clothes immediately with soap and
water.
If a fault is suspected return the
trimmer to an authorized dealer for
repair.
Note: There are no user serviceable parts
in the trimmer.
FREQUENTLY ASKED QUESTIONS
The grass trimmer body grows hot
following extensive uses
Under normal load condition the body
trigger and battery pack will heat up as the
energy absorbed in the drilling operation
produced heat. Gears, motor and electrical
energy are responsible. This is quite
normal. Simply allow the grass trimmer to
cool down for 5mins.
The battery pack gets warm during use
The power-draw from the battery
generates heat. this is increased as the
energy draw increases. you will not
damage the battery pack and the
generated heat is normal. Should you
desire, simply allow the grass trimmer to
cool off to prior to continuing work.
The battery pack gets warm when
charging
This is normal. It is a result of the chemical
reaction inside the batteries during the
charging process. The charging process is
a energy translation process, the electric
power will partly transform into chemical
power, meanwhile, partly transform into
heat. But this will not damage the battery
pack.
-11-
l A 3 hours charging enables the grass trimmer to operate at
full power.
l Further charging to a maximum of 5 hours increases the use
time.
YOUR BATTERY REQUIRES CHARGING
PRIOR TO USE
l Continuous charging can damage the battery cells.
l Your grass trimmer should only be re-charged when it begins
to run slowly
DO NOT LEAVE YOUR TRIMMER ON
CHARGE CONTINUALLY
RECHARGEABLE BATTERIES AND THE ENVIRONMENT
l Batteries contained within this unit must be disposed of
properly and not discarded in everyday household waste,
which may be disposed of in an incinerator or landfill site.
l Batteries can be harmful to the environment and can explode
when exposed to fire.
ALWAYS READ THE OPERATING
INSTRUCTIONS PRIOR TO USE
We recommend the following:
l Discard batteries completely.
l Take battery pack to your local dealer or local recycling
station. If necessary contact your local council for advice on
disposal.
DO NOT INCINERATE
Troubleshooting and Frequently Asked Questions
-10-
Page 7

Declaration of Conformity
We, Importer
Argos Limited
Avebury,
489-499 Avebury Boulevard
Saxon Gate West,
Central Milton Keynes
MK9 2 NW
declare that the product
CGT180
Challenge Grass trimmer
Complies with the essential health and safety requirements of the following directives:
89/336 EEC. - EMC Directive.
93/68 EEC. - CE Marking Directive
98/37 EC - Machinery Directive
2000/14/EC - Noise emission in the environment by equipment for use outdoors Directive.
- Conformity assessment procedure as per AnnexVI.
- Measured Sound Power Level ( 87dB(A) )
- Declared Guaranteed Sound Power Level ( 96dB(A) )
Standards and technical specifications referred to:
EN60745-1:2003 +A1:2003
EN786:1996+A1:2001
EN 55014-1: 2000
EN 55014-2: 1997
EN61000-3-3:1995
EN61000-3-2:2000
ISO11094: 1991
EN ISO 3744: 1995
Authorised Signatory
Date: Sep 18, 2005
Signature:
Name: Roger Panton-Kent
Head of Quality Assurance
(EC conformity mark)
 Loading...