

Page 1
3 in 1 Detector
BD7223
If faults cannot be remedied, contact the Helpline on 020 83916767.
Helpline@hilka.co.uk
GUARANTEE
This product is guaranteed for domestic use for a period of 12 months against faulty manufacture or materials. This
guarantee does not affect the statutory rights of the consumer. If in the event of any problem occurring please
contact our Helpline at the number above for advice. This product is not guaranteed for HIRE purpose.
CHALLENGE TOOLS (UK) LTD.
1 ROEBUCK PLACE, ROEBUCK ROAD, CHESSINGTON, SURREY KT9 1EU
Issue1 J.W. 10/04
USING THE DETECTOR
HINTS:
Stud detection can be carried out on wallpapers but some sensitivity will be lost
depending on the thickness of the paper and in some case these can be foil backed
thus giving false reading, please confirm wallpaper types when detecting!
It is advisable to take several readings along the vertical baton or stud as a nail may
change the apparent center position.
THIS IS VERY IMPORTANT. Because the unit will show baton or stud findings when
it is moving from thin layers to thick layers, on the contrary, the unit would not show
any signal when it is moving from thick layers to thin layers.
When the battery is low below 7V, the LowBat LED will light. Change the battery, note
the correct type, as soon as possible.
When the Detector nears the Metal, the Metal light comes on and the buzzer
sounds, scan in two different directions and make two marks. The metal is in the
middle of the two marks.(Refer Dia 6).
3. Scanning for wood in Stud Mode
Push the Mode switch in Stud mode position.
Put the Detector on the wall and press the Power button to turn on power.
Power LED then comes on. Stud LED lights for about 30 seconds and turns off.
Move the unit horizontally across the wall when the Detector nears the wood on
the back of the wall, the Stud light comes on and the buzzer sounds.
Scan in two different directions, then make two marks. The wood is in the middle
of the two marks
Note: Always keep detector flat to the surface being detected for best detection
sensitivity.
-3-
Page 2
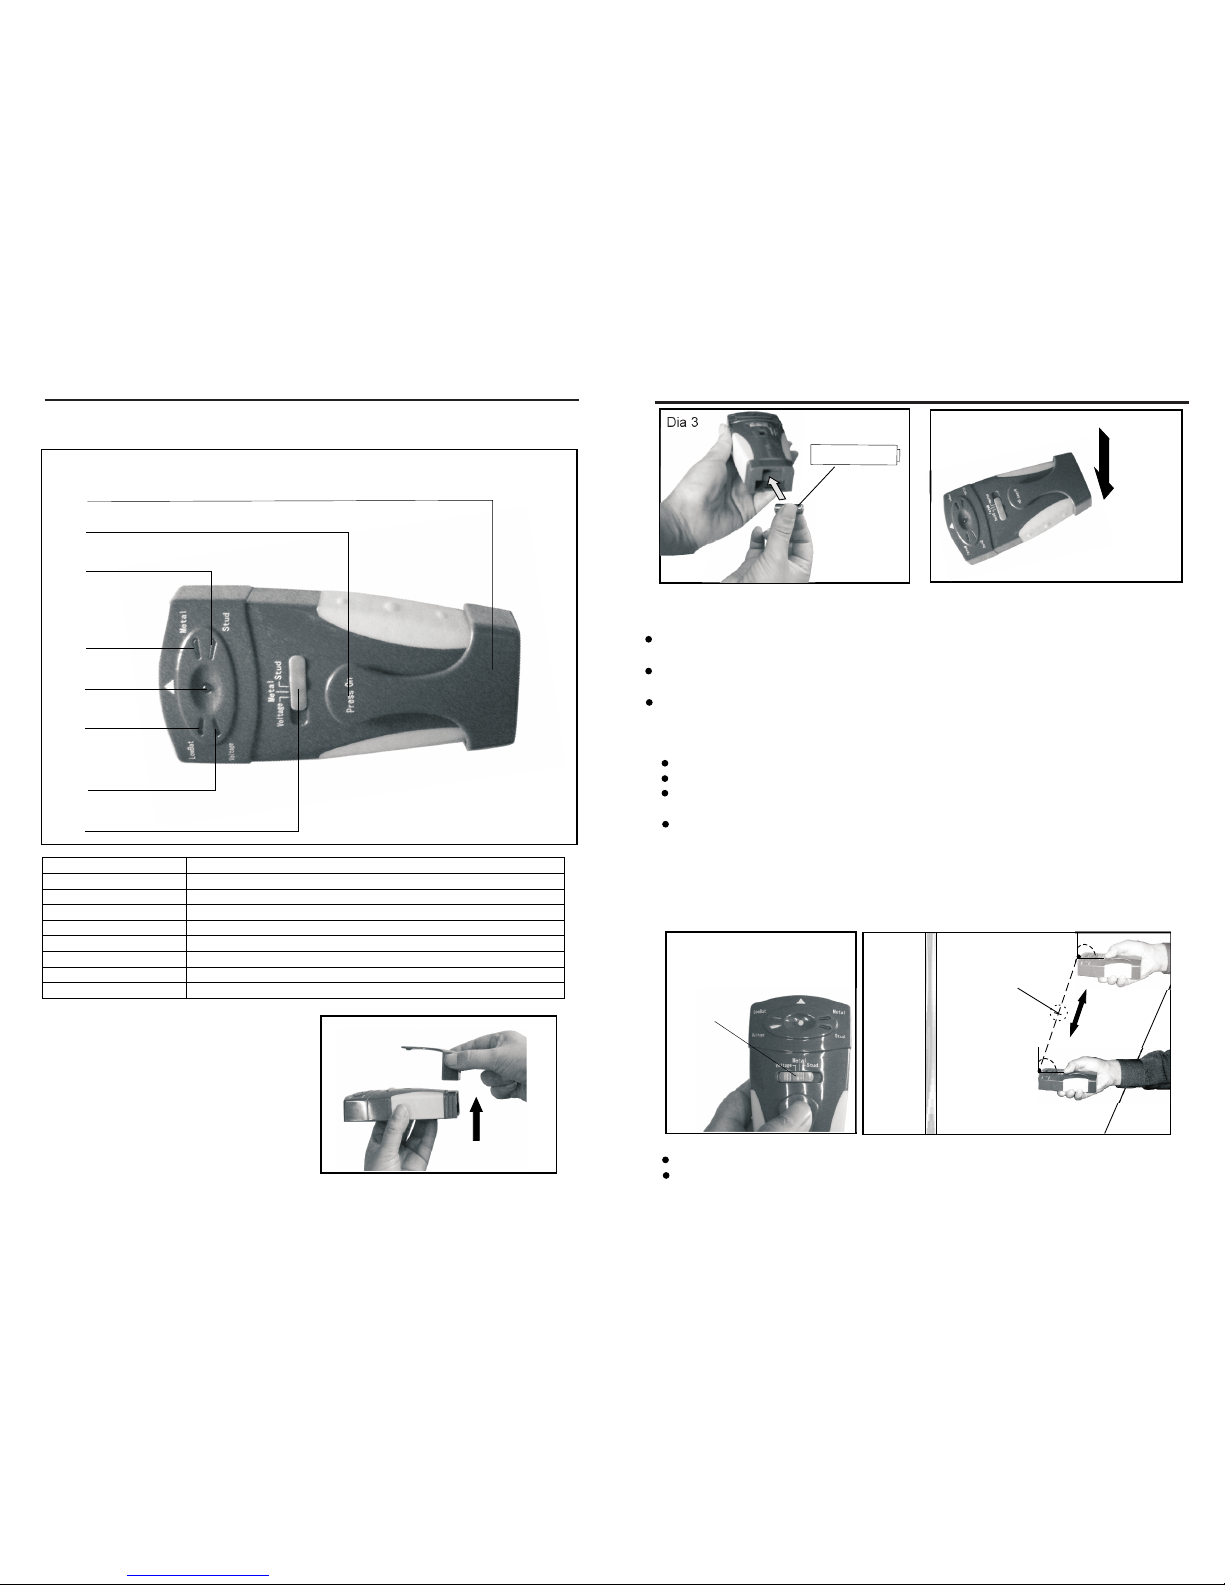
Component List
1
2
3
4
5
6
7
8
USING THE DETECTOR
Dia 3
PREPARING THE DETECTOR FOR USE
1. Slide off the battery cover on the back of
unit and connect a fresh 12V battery,
see Dia 2 & 3. Ensure battery is fitted in
the correct manner, note positive (+) and
negative (-) connections.
2. Restore the cover and securely snap in
place, now the detector is ready for use.
See Dia 4.
NOTE:
Be sure to use a DURACELL MN21/23 12Volt Battery or its equivalent (available
in most hardware stores) with this detector.
-1-
PLEASE READ THE INSTRUCTION MANUAL PRIOR TO OPERATING THIS
PRODUCT AND KEEP FOR FUTURE USE.
Component
1. Battery cover
2. Power button
3. Stud LED
4. Metal LED
5. Power LED
6. LowBat LED
7. Voltage LED
8. Mode switch
USE
Power can be turned on when the button is pressed
It lights when the Detector detects wood
It lights when the Detector detects metal
It lights when powered on
It lights when the capacity of the battery is over
It lights when the Detector detects AC voltage
Slide left or right for the intended detection purpose
To shield the battery from external environment
USING THE DETECTOR
NOTE:
The unit will not detect items that are shielded in some way or are in excess of 30mm
from the surface.
Because the unit is sensitive at detection you should repeat the process to confirm
position of wire, metal or wood.
For best detection sensitivity, always scan with the unit vertical to the surface when
detecting AC voltage and metal. Lie the unit flat on the surface when detecting wood.
1. Scanning for AC voltage (50Hz 230V or 60Hz 110V) in Voltage Mode.
Push the Mode switch in Voltage mode position, see Dia 5.
Press the Power button to turn on Power.
Voltage LED keeps on lighting if AC voltage is around the detector, otherwise the
Voltage LED turns off automatically after flickering for about 30 seconds.
To scan for AC voltage, move the detector in one direction. The Voltage LED will
flicker and buzzers will be heard when it detects AC voltage. Keep scanning in this
case until the Voltage LED goes off. Then move the detector in reverse direction.
Repeat the scanning for several times to ascertain the wire position. When the
detector moves closer to the wire, the Voltage LED flashes (emitting green light)
faster and buzzer sounds faster until the Voltage LED emits red light. Make a mark
from different directions. The wire is in the middle of the two marks, see Dia 6.
2. Scanning for metal in Metal Mode
Push the Mode switch in Metal mode position.(Refer to Dia 5)
Put the Detector far away from metals, then press the Power button to turn on power.
The Power LED comes on and Metal LED lights for about 30 seconds then turns off
automatically.
- 23A/12V +
Dia 1
-2-
Dia 2
Slide off cover
Dia 4
Restore cover
Fit battery
Dia 5
Push to
Voltage/
Metal
Mode
Dia 6
Keep unit vertical to the surface
o
90
o
90
Position
 Loading...