

Page 1
Instruction Manual
Model No.: AC100-R
Air Cooler
READ AND SAVE THESE INSTRUCTIONS
Page 2

CONTENTS
3
7
8
9
10
11
12
13
14
15
1.SAFETY INSTRUCTION …………………………………………
2.PARTS LIST ………………………………………………………
3.PLACEMENT ……………………….………………………………
4.CONTROL PANEL AND SETTINGS …..………………….……
5.USER TIPS FOR AIR COOLER …………………………………
6.MAINTENANCE ………………………………….….………………
7.CLEANING THE HONEYCOMB …………………………………
8.STORAGE …………………………………………………………
9.TROUBLE SHOOTING ……………………………………………
10.CONNECTION TO POWER ………………………………………
Page 3

- Non-specialized personnel or unauthorized repair personnel shall not
to repair or modify the machine.
- It is forbidden to operate with wet hands to avoid electric shock.
- Any power cord, which suffers from aging and knotting and whose plug
is damaged, should be stopped its use immediately, and must be
repaired by a professional manufacturer or equally qualified personnel.
- No cleaning, maintenance or movement of the unit is allowed if it does
not switch off.
- If the unit is not in use for a long time, unplug the power cord.
- To prevent accidental injury or damage to the unit, please do not insert
any foreign matter into the air inlet and outlet, because the unit
incorporates a high-speed wind rotor,
- It is prohibited to use this unit in environments with flammable and
explosive gases and direct sunlight for a long period shall be avoided.
- Do not place this unit in an inclined or other uneven place to prevent
the unit from falling and causing damage to the unit or internal parts.
- This machine is suitable for indoor use instead of outdoor use.
- This machine has a safety switch. If the honeycomb filter support has
not been installed well, the unit will not work as usual; when the
machine is working, do not remove the honeycomb filter frame.
- At any time the water level in the tank shall not exceed "MAX"
(maximum) scale, and during humidification, the total water level in the
tank shall be controlled, and shall not be below "MIN" (minimum) scale.
- After the water tank is filled with water, do not tilt or collide with the unit
when placing or moving it. To move the unit body, please drive it
slowly from the side to prevent water overflow.
- In using the unit, prohibit overturning to avoid any accident. If the unit
topples over accidentally, and it contains water, unplug the power cord
immediately and take it to repair store.
Safety Instruction
Page 4

- Do not place items on the unit, and covering the outlet is strictly
prohibited.
- When wash the unit appearance, apply a damp cloth (or add a little
cleaning agent) to wipe, and never use corrosive cleaning agent or
solvent for cleaning. Never rinse the unit with water.
- Do not have the air inlet and outlet of the unit close to walls, curtains
and other objects, or they may block the airflow and affect air supply.
- When the unit is running, do not knock at or shock the unit body
forcibly or it may lead to automatic shutdown, in which case simply
restart the unit.
- In summer, the water in the tank may easily deteriorate and generate
odor, please pay attention to regular change of water; if the indoor
temperature is below zero in winter humidification, it is best to use
warm water for humidification.
- Do not place the unit directly below the power outlet.
- Do not use the unit around the tub, sprinkler or swimming pool.
- Product repair must be carried out in a designated agency.
- If the supply cord is damaged, it must be replaced by manufacturer or
its service agent or a similarly qualified person in order to avoid a
hazard.
- Indoor use only.
- To protect against the risk of electrical shock, do not immerse the unit,
cord or plug in water or other liquid.
- This appliance can be used by children aged from 8 years and above
and persons with reduced physical, sensory or mental capabilities or
lack of experience and knowledge if they have been given supervision
or instruction concerning use of the appliance in a safe way and
understand the hazards involved. Children shall not play with the
appliance. Cleaning and user maintenance shall not be made by
children without supervision.
Page 5

- When the appliance is not in use and before cleaning, unplug the
appliance from the outlet.
- Keep electrical appliances out of reach from Children or infirm persons.
Do not let them use the appliances without supervision.
- Unplug the appliance during filling and cleaning.
- Prior to cleaning or other maintenance, the appliance must be
disconnected from the supply mains.
- Use a soft cloth moisten with mild soap, and then use a dry cloth to
wipe it again.
- Carefully read the instructions before operating the unit.
- Rating: This unit must be only connected to a 220-240 V / 50 Hz
earthed outlet.
- Installation must be in accordance with regulations of the country
where the unit is used.
- If you are in any doubt about the suitability of your electrical supply
have it checked and, if necessary, modified by a qualified electrician.
- Disconnect the power plug from socket before changing filters,
dismantling, assembling or cleaning.
- Avoid touching any moving parts of the appliance.
- Never insert fingers, pencils or any other objects though the guard.
- Never connect the unit to an electrical outlet using an extension cord. If
an outlet is not available, one should be installed by a qualified
electrician.
- A damaged supply cord should be replaced by the manufacturer or a
qualified electrician in order to avoid a hazard.
- Any service other than regular cleaning or filter replacement should be
performed by an authorized service representative. Failure to comply
could result in a voided warranty.
- Do not use the appliance for any other purposes than its intended use.
- Never use the mains plug as a switch to start and turn off the air unit.
Page 6

Use the provided Off switch located on the control panel.
- Always place the unit on a dry and stable surface. Do not move or tilt
the unit while water tanks is full.
- The appliance should not be installed in laundry or wet rooms.
- Avoid keeping the unit in direct sunlight for a long period of time.
Page 7
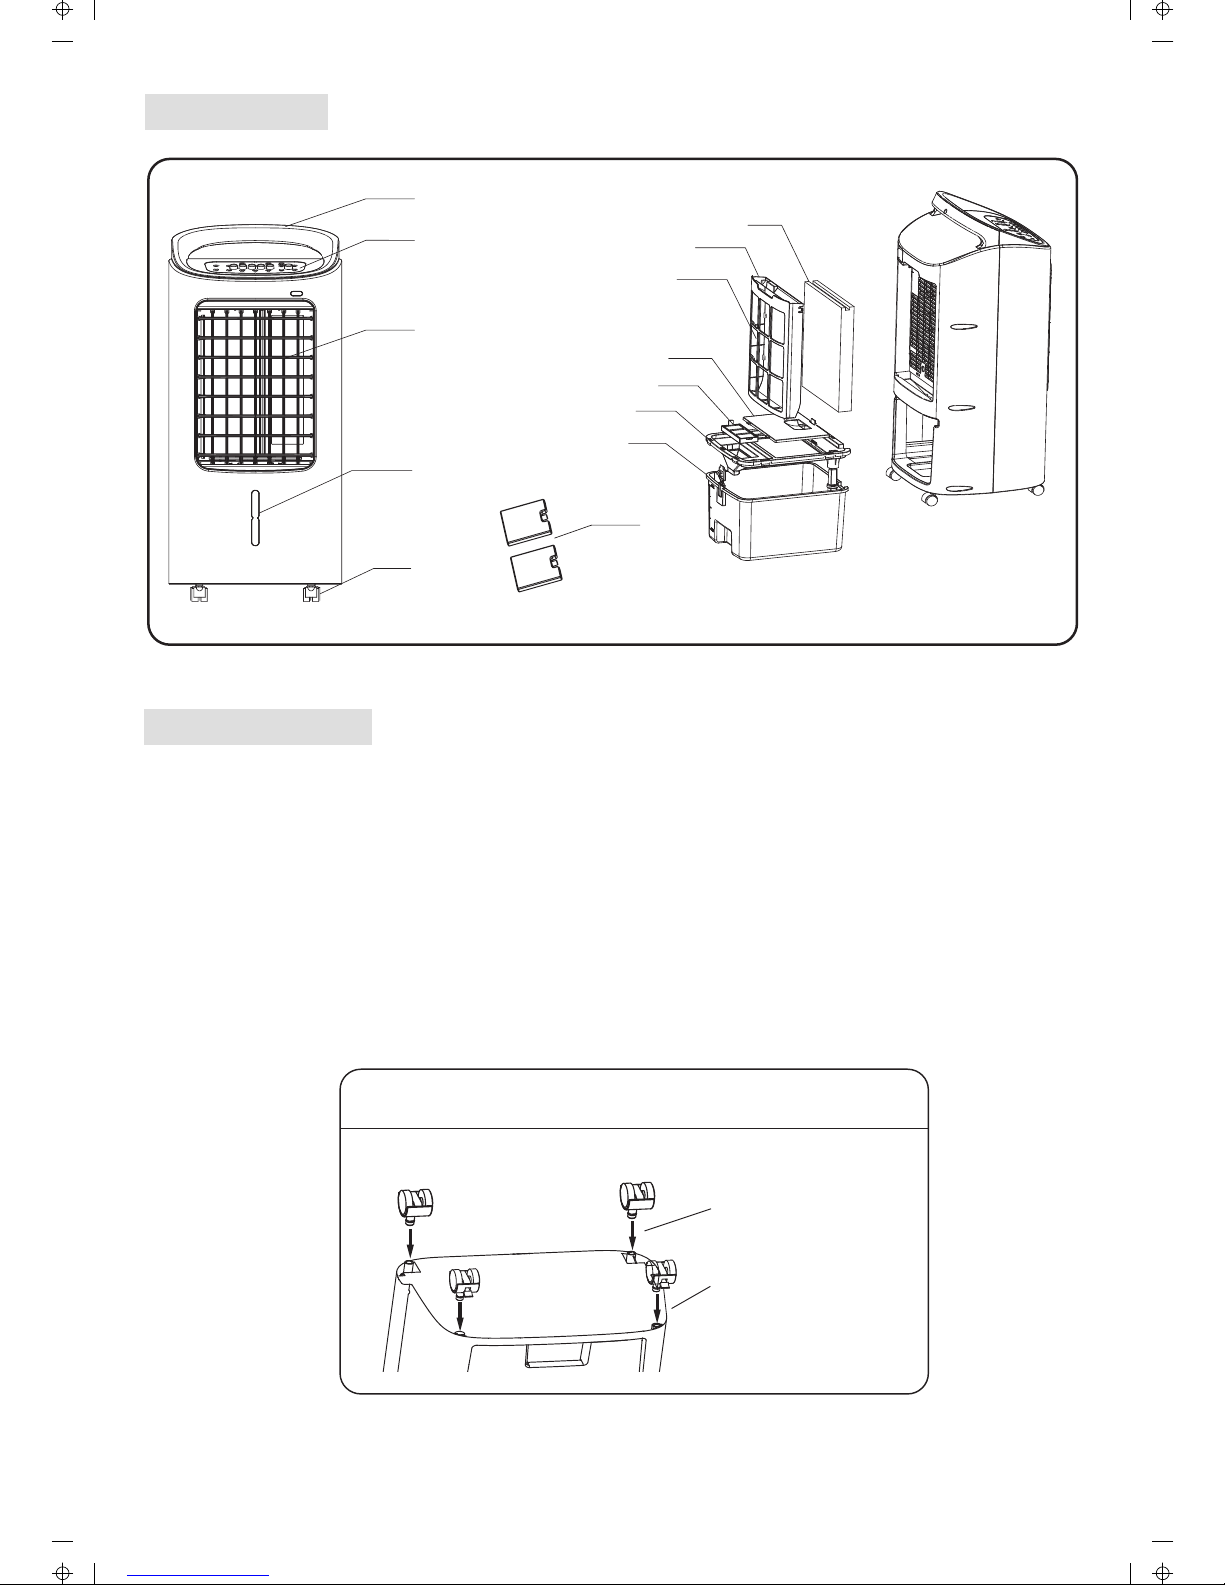
PARTS LIST
INSTALLATION
This unit can easily be moved from one room to another. While moving
the unit please note that it must always be kept upright and then
placed on an even surface.
Remove any packaging - keeping the air cooler in a vertical position.
Make sure all parts are present and unit is assembled correctly including the castor wheels (these need to be pushed into place on the
base of the unit)
Front Foot-wheel
Rear Foot-wheel
Foot-Wheel Installation
Fig.2
Ice box
Pre-filter
Honeycomb filter
Honeycomb filter frame
Water tank
Control panel
Handle
Air flow outlet
Water tank cover
Water tank top cover
Filter net
Wheel
Water window
Fig.1
Page 8
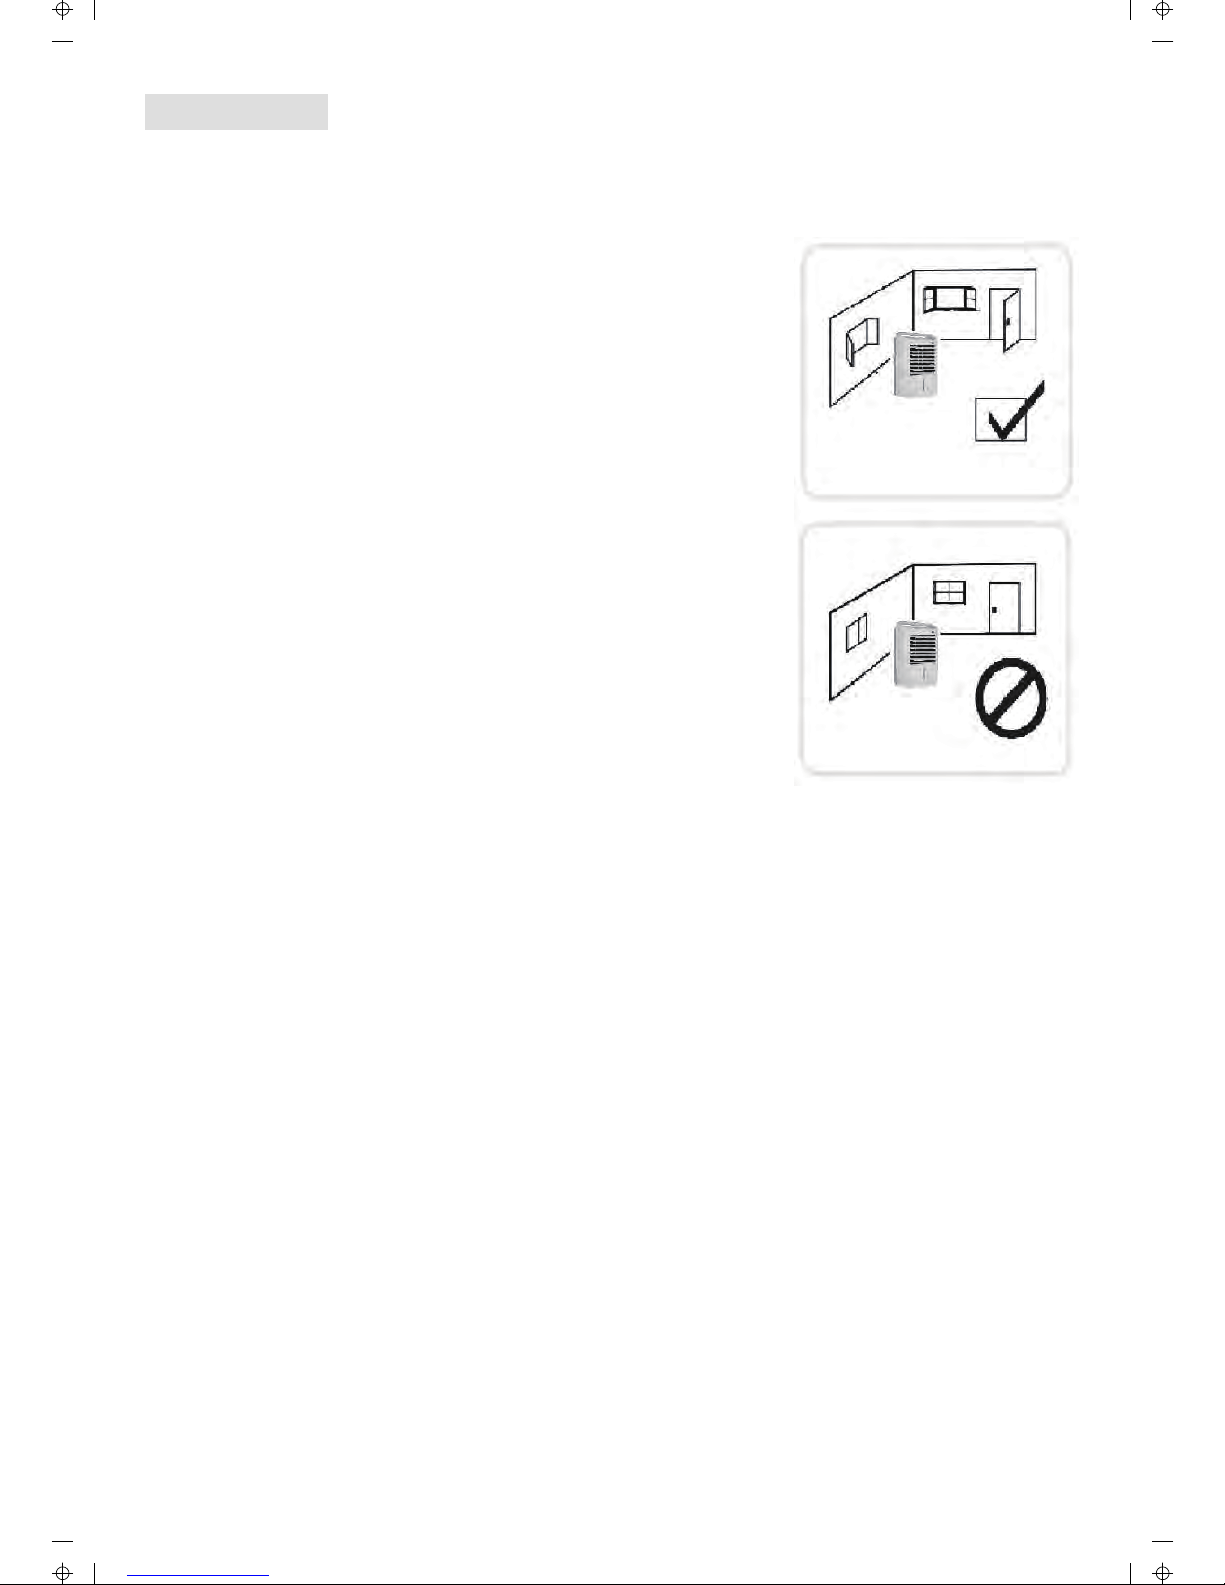
To maximize efficiency, position the Air Cooler
according to the following
guidelines:
Place the cooler in front of an open door or
window. Ensure that there is adequate
cross-ventilation in the room by leaving a door
or window open opposite the cooler.
The air cooler should not be used in enclosed
spaces. It must be kept level and there must
be opened to allow free air flow. The air cooler
works best when placed near to an open wind,
so that outside air is drawn into the air cooler,
circulates in the room, then exits via the flow of
air coming out of the air cooler. The maximum
cooling effect is felt when a person is near the
flow of air coming out of the air cooler. The air
cooler produces moisture and can be used to
humidify dry air. To be used for humidification
the windows and doors should be closed.
PLACEMENT
Fig.3
Fig.4
Page 9

CONTROL PANEL AND SETTINGS
Off Low Medium High OSC. Humidify
1.
2.
3.
4.
5.
6.
Off: To turn off the unit, press the off button once.
Low / Medium / High: Press one of the fan speed button to
turn on the air cooler. To change the fan speed, press desired fan
speed button.
OSC: Press this button to start the oscillation function. Press it
again to turn off oscillation.
Humidify: Press this button to turn on the humidifying function.
Press it again to switch it off.
Cool mode : To put the frozen ice pack into the water in the
water tank. Turn the humidification function on. The product will blow
out the cool humid air to produce the cooling effect.
Fan mode : Turn on the unit and select the desired fan speed. No
water has been added to the water tank.
Ice Pack: The ice pack can absorb any heat in the water, lowering
the temperature and improving the overall cooling effect.
You can use either use the ice pack that has been chilled in the
freezer for 8 hours or simply use ice cubes.
Using the Ice Box
Water + Ice
Water Level
Before turn on the appliance:
Water tank: Pull the water tank out from
the body of the unit and pour water into
the water tank; ensuring not to fill above
the MAX level (5L).
Fig.5
Page 10

USER TIPS FOR AIR COOLER
What is Evaporative Cooling?
Air Coolers are built to maximize energy efficiency and keep energy
costs low. Warm air is drawn into the cooler and enters the
Honeycomb filter. Water pumped from the water tank pours over the
Honeycomb filter frame. As the warm air passes through the
Honeycomb filter frame, the water absorbs the heat, naturally cooling
and humidifying the air. A fan propels the cooled air out into the room.
This no-compressor system cools naturally, efficiently and
inexpensively.
During the operation:
When humidifying, the water level must not be lower than the MIN
water line. If you want to increase the cooling effect, you can put ice
or the charged ice packs into the water tank, but be sure that by
adding ice or icepacks the water level does not go over the MAX
limit. Empty some water if necessary.
Make sure filter frame is properly inserted at the back of the unit
-
-
-
Warm and
dry air
Cool and
humid air
Pump
Water
Honeycomb filter
Evaporative Air Cooling Mechanism
Fig.6 Fig.7
Note: If you want to remove the water tank, please turn off the unit
and wait for 2 minutes. It is to let the water inside the honeycomb to
go down to the tank before remove the tank from the unit.
Otherwise, the water in the honeycomb will drop down to the slot for
putting the tank.
Once the water level goes below the minimum level, the device
inside the tank will be triggered and the unit will beep three times.
Stop the unit and pull out the water tank. Add the water to max.
level and replace the tank to the unit. Then restart the unit under
cool mode.
Page 11

MAINTENANCE
Cleaning
ATTENTION: Please shut off the unit and unplug from
the mains before cleaning or performing any
maintenance.
Cleaning the surface
Clean the plastic housing with a duster or a soft wet cloth.
Do not use chemical solvents (such as benzene, alcohol or gasoline)
as they may cause irreversible damage. Make sure no water enters
the control panel.
Cleaning the water tank
Unplug the power cord, remove the honeycomb filter bracket, and then
remove the water tank.
With a cloth (dipped in a mild detergent), wipe the water tank, rinse it
with water, and then carefully place it back in the unit.
Draining the water reservoir and refilling with fresh water at least once
a week will help reduce any mineral deposits and keep the filters
clean.
Do not run the unit in Humidify mode with stale water in the tank.
We recommend emptying the tank and refilling it with fresh water if
water has been standing in the tank for an extended period of time.
The recommended maximum relative humidity level is 60% or less,
which allows a noticeable temperature decrease. The temperature will
be lower in drier climates because higher evaporation occurs when the
humidity is low.
NOTE : When the product is used for the first time the filter frame may
have an odor which will dissipate in a few hours or so of initial use.
Page 12

CLEANING THE HONEYCOMB FILTER
• The appliance is supplied with a Honeycomb filter.
• The Honeycomb filter are located inside the Rear grille. See Fig 9 for
instructions on how to remove them from the unit for cleaning and
maintenance.
• Do not run the unit in COOL mode with stale water in the tank. You
must empty the water tank and refill with fresh water, especially if the
tank has not been cleaned in a long time.
• The cleaning frequency for the Honeycomb filter depends on local air
and water conditions. In areas where the mineral content of water is
high, mineral deposits may build up on the Honeycomb filter and
restrict air flow. Draining the water tank and refilling with fresh water at
least once a week will help reduce mineral deposits. If mineral deposits
remain on the Honeycomb filter, the Honeycomb filter should be
removed and washed under fresh water. The Honeycomb filter should
be cleaned every two months or sooner, depending on your needs.
• For best results allow the Honeycomb filter to dry after each use by
turning off the cool mode 15 minutes before turning the unit off.
Fig.8 Fig.9
Honeycomb filter
Page 13

STORAGE
- Make sure all parts are dry by running the Fan mode for about 30
minutes before storing (time depends on ambient humidity conditions).
- Switch OFF the Air Cooler and unplug from the power supply.
- Empty all the water from the tank.
- Clean the water tank with a damp cloth to wipe away any dust or
mineral deposits.
- Remove the Honeycomb filter frame from the Air Cooler and rinse
under fresh water to remove dust and dirt.
- Replace the Honeycomb filter frame after they are clean and dry.
- To protect the unit from dust and scratches, cover with a clean cloth or
plastic bag before storing.
- Coil the power cord and store it away from the floor to protect it.
Removing the Honeycomb filter:
Carefully pull out the rear grille from the cooler.
Slide out the Honeycomb filter and clean with water.
Replace or clean Honeycomb filter with water and a damp cloth as
needed.
WARNING: DO NOT operate the Air Cooler when the Rear grille is
removed from the Air Cooler, or if there is a loose-fitting Rear grille.
Doing so can cause serious injury or dangerous electrical shock.
1.
2.
3.
If the Air Cooler will not be used for a long time:
Page 14

TROUBLE SHOOTING
Do not repair or disassemble the unit by yourself, unauthorized repair attempts will
invalidate the warranty and may cause bodily harm.
If the above solutions do not resolve the problem please contact the service centre.
Issue
No power
1. Power cord is unconnected
2. The fan speed button is not
pressed.
1. Connect the power cord
2. Press the one of the fan speed
button.
No dust
elimination
1. The honeycomb filter is blocked.
2. The air inlet is blocked.
1. Remove the honeycomb filter and
clean it.
2. Remove the obstruction.
Odour emission
from unit
1. New unit. When the unit is used for
the first time, the Honeycomb
filter
will have an odour,
which will dissipate within a week
of use
2. Honeycomb filter may have
developed mold or bacterial growth.
1. No action required
2. Clean the filter pads with mild
antibacterial solution.
Dry before use.
Possible Reason Solution
Technical specification
Model no.
Operating voltage
Rated input
Class protection
Water tank (max. mark level)
Air flow
Noise
Net weight
Dimension
Recommended Room Size
AC100-R
220-240V~ 50Hz
50W
Class II
5L
5m³/min
55-62dB
6.73kg
300mmx302mmx704mm
25-35m
2
Page 15
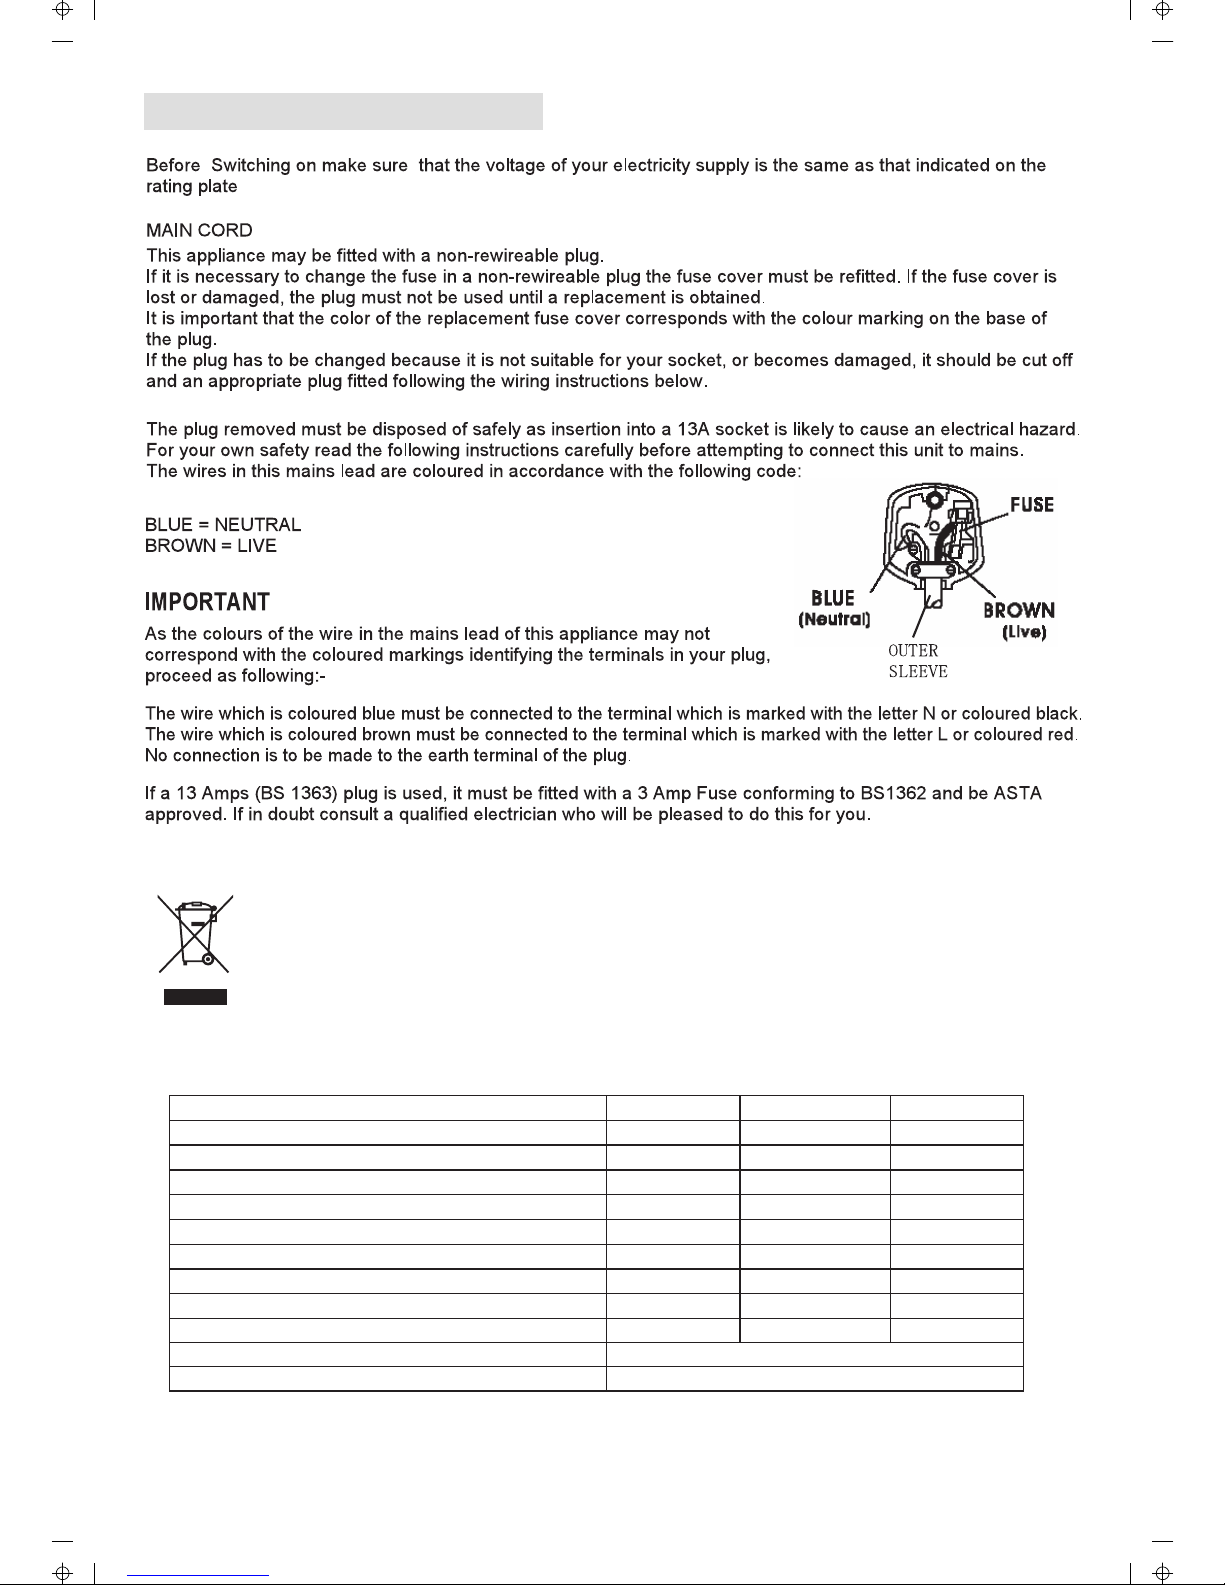
CONNECTION TO POWER
This marking indicates that this product should not be disposed with other household wastes throughout the EU.
To prevent possible harm to the environment or human health from uncontrolled waste disposal, recycle it
responsibly to promote the sustainable reuse of material resources. To return your used device, please use the
return and collection systems or contact the retailer where the product was purchased. They can take this
product for environmental safe recycling.
CORRECT DISPOSAL OF THIS PRODUCT
tinU eulaV lobmyS noitpircseD
--
AC100-R
-- .on ledoM
Technical Specifications(ERP)
m³ F etar wolf naf mumixaM /min
W P tupni rewop naF
m³( VS eulav ecivreS /min)/W
P noitpmusnoc rewop ybdnatS
SB
W
POff power consumption
OFF
W
L level rewop dnuos naF
WA
dB(A)
ces/sretem c
Q
yticolev ria mumixaM
IEC 60879: 1986 (corr.1992) eulav ecivres rof dradnats tnemerusaeM
Contact details for obtaining more information Customer helpline 0345 640 0800
seasonal electricity consumption
kWh/a
57,87
24,52
49,30
0,50
0,15
-
4,02
15,94
Page 16
PRODUCT GUARANTEE
This product is guaranteed against manufacturing defects for a period of
Year
This product is guaranteed for twelve months from the date of original purchase.
Any defect that arises due to faulty materials or workmanship will either be replaced,
refunded or repaired free of charge where possible during this period by the dealer from
whom you purchased the unit.
The guarantee is subject to the following provisions:
The guarantee does not cover accidental damage, misuse, cabinet parts, knobs or
consumable items.
The product must be correctly installed and operated in accordance with the instructions
contained in this manual. A replacement copy of this instruction manual can be obtained
from www.argos-support.co.uk
It must be used solely for domestic purpose.
The guarantee will be rendered invalided if the product is re-sold or has been damaged by
inexpert repair.
Specifications are subject to change without notice.
The manufacturer disclaims any liability for the incidental or consequential damages.
The guarantee is in addition to, and does not diminish your statutory or legal rights.
Guarantor: Argos Ltd
489 - 499 Avebury Boulevard
Central Milton Keynes
MK9 2NW
www.argos-support.co.uk
 Loading...